

Page 1
C
onco
D
escription
T
he Concord TouchScr
wi
th a graphical user interface designed to control the ba
functions of the Concord 6 or Concord 4 (re
c
ontrol panels. Use the touch
example, open doors, movement detected, etc.) and to control
the security
Usi
ng the touch
Ea
sily
(
AAG) sensor status.
Arm (ARM STAY or ARM AWAY) and disarm the
Activate a panic alarm to call the central monitoring station
i
n a non-medical emergency.
rd 5" T
ouch
Sc
reen
een is a 5-inch color LCD
visi
scr
een to obtain home status (for
system
.
scr
een:
obtain home/building status using At-A-Glance
scr
een
on 4.82 or later)
system
sic
Qu
Main
T
he Main
normal operation. All operations begin at (and inact
to) this
ick
Operation Guide
Screen
scr
een is the display shown most of the time in
scr
een.
ivity reverts
This
document provides ba
touch
scr
een and security
system programmi
documentation. For configuration and option deta
your security provider
Safety I
IMPORTANT SAFET
WARNIN
T
he product accessory bag contains items that could be
choki
ATTENTION:
nformation
GS
WARNING: CHOKING HAZARD
ng hazards. Please keep away from small children.
ng and operation, refer to the panel
AND SAFET
Le sachet d'accessoires produit contient des
sic
operation information for the
system. For compl
.
Y INFO
RMATION. READ ENCL
Y INFO
RMATION
.
ete Concord 4
ils, c
.
ontact
OSED
Access the Main
Via the Close icon
display to the previous
display the touch
mov
e through multiple levels of
scr
een.
After a period of inact
blank
W
hen the panel enters an alarm. The touch
automatica
Emergency
Touc
h the button and an Emergency
appears. Depending on the
Panic and Po
buttons) may appear. Select the appropriate button.
An emergency alarm initiated by
touching the button and entering your user
access code within 30 seconds.
Not
es
scr
een:
scr
scr
een is in, it may be necessary to
ivity
scr
een as your default
lly r
eturns to the Main
Button
lic
e buttons or the Panic, Po
system
een. Depending on which
scr
eens to reach the Main
on any
scr
een (unless you set a
scr
een saver).
scr
een
scr
een.
scr
, two or three buttons (the
lic
e, and
Fir
e
mistake c
an be canceled by
een
2018
UTC Fire & Security Ame
ricas Corporati
If your
The fire panic cannot be canceled.
on, Inc. 1 / 6 P/N 466
system is c
servic
e, the authorities
for deta
ils
onnected to a security monitoring
will
.
be notified. Contact your dealer
-
Page 2

T
ime
Curr
ent time is located at the top center of the Main
Time is
automatica
lly
updated by the security
scr
system tim
een.
Partition
T
he partition the touch
the Main
c
onfigurations).
C
ontact your security provider for more information regarding
partition deta
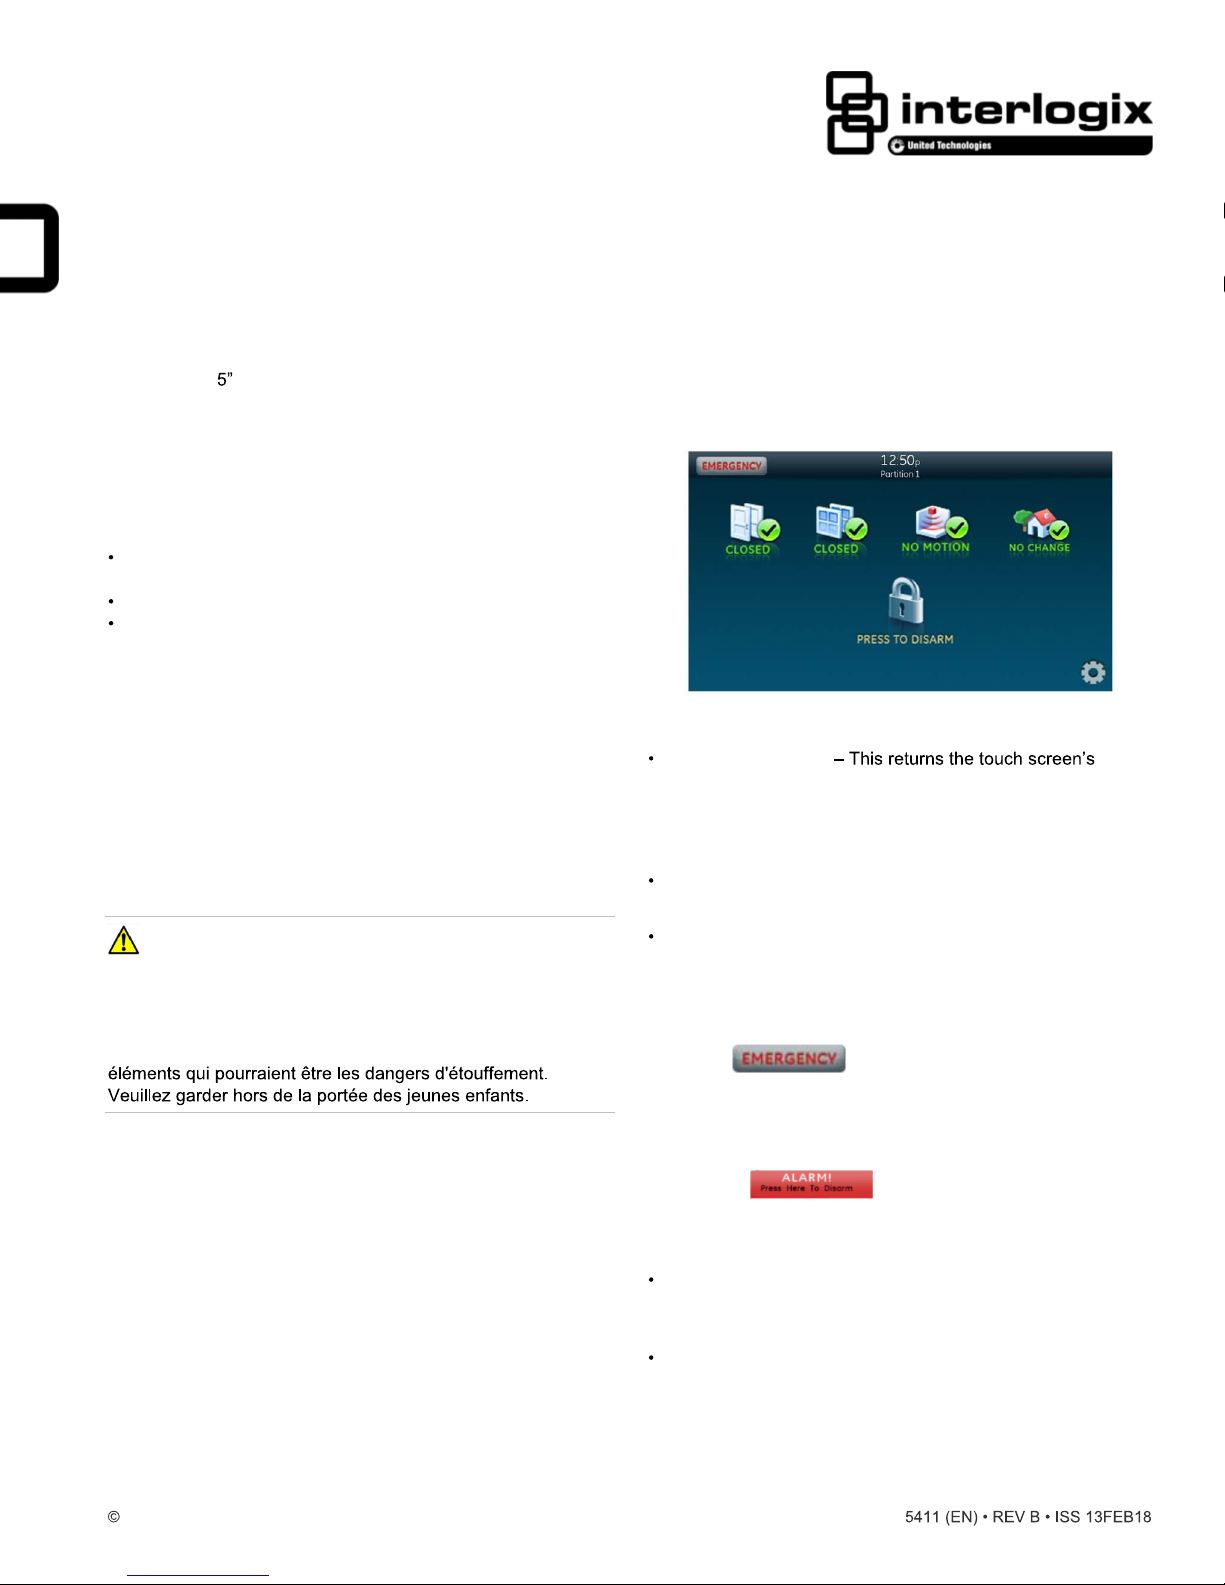
At-A-
T
he four icons across the middle of the
s
tatus of your home. Press the status icons and a new
scr
een under the time (Partition 1 in typical
ils
Glance / Home Status Icons
provides status deta
Doors - Depicts monitored door status (usua
doo
are closed. A red e
mor
Windo
check indic
r
ed e
wi
ndows are open.
Motion - Depicts moti
in your
detected. A red e
was
this feature would be a touch
detects movement in the home before you enter.
Property - Depicts other changes to protected property
in your system. For exampl
freeze sensor or movement of protected items. A green
check indic
(for movem
or freeze) are closed. A red e
that either a sensor is tripped or there is unacknowledged
act
ivity
Note: These icons may c
your system is
i
nformation, consult your security provider.
A
rming Icons
not configured to support this feature. For more
scr
een is associated with is displayed on
.
scr
een represent the
scr
ils
.
rs)
. A green check indicates that all monitored doors
xclamati
e doors are open.
ws - Depicts monitored window status. A green
ates that all monitored windows are closed. A
xclamati
on point indicates that one or more
home. A green check indicates no recent motion
detected within the last 10 minutes. A typical use for
.
xclamati
ates no change since the last time you
ent of a protected item) and all sensors (water
on point indicates that one or
on detected by the motion sensors
on point indicates that motion
scr
een in the garage that
e, activation of a water or
xclamati
lly external
on point indicates
ontain the text N/A, indicating that
e.
visi
een
ted
or
A
W
the Arm
rming Screen
hen you touch the PRESS TO ARM icon on the Main
scr
ARM STAY - The typical selection when you are staying
home. The doors and windows
c
ARM AWAY - The typical selection when you are leaving
the home. The doors, windows, and motion sensors
armed. The a
the
Optional Arming
Silent exit - Press to
This will
No d
the current a
w
closi
w
ic
A
double your exit time.
elay - Press to disable the entry timer and exit timer for
hen you
ng any entrance door while the
ant instant ala
on (a clock with a slash through it)
rming Errors
PRESS TO DIS
level
, one of these icons
your system
that appears. If you enter an incorrect code, press the
Clear
button and enter the correct code.
een appears with the following a
ountdown
will
will
scr
een.
rmi
ng
cycl
not be leaving the pre
rms. W
ARM - D
. Enter your code in the keypad
appear at the middle of the
rmi
ng countdown
Button
silence your exi
epending on your a
will
appear. Press to disarm
will
be armed. The a
will
appear at the middle of
s
t beeps during a
e. The No Delay feature may be used
mises
system is arm
hen you select the No Delay option, an
will
appear over the lock.
If there is a problem when you select an a
Arm
scr
een, a
scr
een indicates what the problem is (for
example, that a door or window is opened). Correct the
problem or press the Bypass button.
Pre
ssi
ng Bypass
the current a
After correcting the problem or pre
the a
rmi
ng countdown message in the middle of the
s
top the a
your c
ode.
will caus
rmi
ng se
rmi
ng process, touch the Cancel button and enter
e the sensor to be disabled during
ssi
on.
ssi
ng Bypass, you
rmi
ng choices:
scr
een.
not opening or
ed and you
rmi
ng option on the
will s
scr
rmi
ng
scr
een
scr
rmi
will
rmi
ng.
ee
een. To
een,
ng
be
T
he a
rmi
ng icons are located below the home status icons.
T
he icons indicate the armed status of the security
PRESS TO
ARM, touch to access the Arm
2 / 6 P/N 466
ARM - W
hen the icon shows PRESS TO
scr
een.
system
.
A
larms
If an alarm occurs in your security
at the bottom of the Main
scr
een indicates the time the alarm
system
, an alarm message
occurred and the sensor that sent the alarm. The message
mi
, indicating that the front
door sensor sent an alarm at 10:30 AM.
-
Page 3

Settings Screen
Touc
h the Settings icon on the Main
Settings
scr
een appears.
scr
een and the
loc
ated in a less secure area, such as a garage. If this de
is loc
ated in areas that are less secure, be sure your se
provider has Qu
ick Arm
and Qu
ick Exi
t programmed to off.
rvic
vic
e
e
features.
Typical s
Gold - A button is selected.
Blue - Buttons not selected.
Us
Event History - Touch the Related Show button to view
system ev
D
Panel Status - Touch the Related Show button to display the
s
tatus of your security
Smo
have activated and require resetting. Touch to reset smokes
w
Chang
partitions.
Ch
chim
scr
provider which doors are programmed to chime when opened.
R
this feature.
Keyp
tatus indicators (e
e the
scroll
buttons to see all of the options (below):
ents.
irect Bypass - Touch the Related button to bypass a sensor.
ke Reset Is display
hen displayed.
e Partition - Touch the Related button to change
ime - Touch the On or Off button to toggle the touch
e feature on or off. This feature
een to beep when a certain door opens. Ask your security
efer to the security panel documentation for information on
ress Volume - Touch the arrow buttons to adjust this
xcludi
system
.
ed only after
ng light
scr
wir
ed smoke detectors
will
enable this touch
een):
scr
een
Programming
Touc
h the Settings icon
Settings
Touc
Touc
You
the System Progra
and Partition Master Code only. User access codes
allow entry into System Progra
scr
een appears.
h the down
h the enter button next to Progra
will
then be prompted enter your access code, after which
on the Main
scroll
button down until you see this
mmi
mmi
ng
scr
een
will
appear ( System Master
mming)
.
scr
een and the
ng.
will
scr
een:
not
not controlled by this setting.
Beep Volume - Touch the arrow buttons to adjust this touch
beep volume level. The
c
ontrolled by this setting.
Brightn
Default
scr
go dark after a period of inact
be the Main
T
60 minutes.
C
calibr
res
Calibrati
icons i
Help - Touc
displays a
i
Code A
i
any access. Enable this setting when the touch
ess - Touch the arrow buttons to adjust the brightness
screen -
een saver mode. Select Blank to have the
scr
een and the
he touch
alibration - The touch
nformation on a given topic.
nformation displayed is
scr
een
will
automatica
scr
ated. However, if the touch
pond correctly, touch the Show button to access the
on
scr
een. To calibrate the touch
n the corners of the
h the Help button to access the Help menu, which
lis
t of help topic buttons. Touch the buttons for
ccess Required
(CAR) When this option is enabled,
limi
sir
en sounds are not
scr
een and LED
ivity
. Othe
rwis
e, the default
scr
een
will always
lly blank
een typica
scr
een using a soft, fine point.
ted and a pa
lly
scr
een buttons do not
be lit.
da
ily
at 2:00 AM for
does not need to be
scr
een, touch the
ssc
ode is required for
scr
will
een is
U
ser
Cod
es
Uses
this
scr
een to change or delete codes or modify attributes
and pe
rmissi
by a user number must have a unique code).
+
on associated with a code. Each user (identified
P/N 466
-
3 / 6
Page 4

To selec
followed by touching the SAVE button.
Nex
and change that user attributes. You may also enter or change
a user code.
been a
t a user number,
t touch the number next to User Code. Here you can see
Note:
ssi
gned.
simply
touch number and enter their
???? indicates that no user code has
If your
system is
phone interface/voice module, you
selecti
on and volume controls.
equipped with either a voice only module or
will s
ee the Voice Chime
Set Up Schedules
On the System Progra
Schedules button. Here you can change
Time sc
time, and the day of the week these times are effective.
Schedules can be used to control the
Attach To
hedules are durations defined by a start time, a stop
Events
mmi
ng
scr
een, touch the Set Up
Tim
system
e Schedules.
automatica
lly
.
System Master Codes and Partition Master Codes can also be
c
hanged. The default Master Code is 1234. It is highly
recomm
multipl
selecti
for items in the partition they have p
your security pr
and codes or to find out how your
those options.
ended to change this code. If
e partitions, a Partition Master code is also available for
on and change. The Partition Master only has authority
ofe
ssi
onal for more information on Partitions
system is c
rivil
ege to access. Contact
system is c
onfigured for
onfigured for
Options
On the System Progra
T
he options presented are those available to change for the
user selected upon entering Progra
below can edit Downloading and Chime on Close.
mmi
ng
scr
een, press the Options button.
mmi
ng. The user shown
On the System Progra
Events button. Here you can select a schedule and specify
whic
h events occur on that schedule.
T
he right column is displayed if you have outputs a
your
partitions.
mmi
ng
scr
een, press the Attach To
ssi
gned to
System Version
On the System Progra
Ve
rsi
on button. Here you can see deta
mmi
ng
scr
een, touch the System
ils
of your
system
.
4 / 6 P/N 466
-
Page 5

Set Date/Time
On the System Progra
button. Here you can set the Date and
W
hen you press on a white text box, it
allow you to change that setting.
mmi
ng
scr
een, touch the Set Date/
Time s
will bri
Tim
ettings.
ng up a keypad to
Installer Programming Screen
T
he
system
has a
scr
een for the Installer or qualified
techn
ici
an. If you inadvertently see the following
the press and hold the top white bar for seven
sec
onds to exit.
scr
een, touch
Status LED (Blue li
e
T
he touch
m
ode status at a glance. The table below explains LED
scr
een has an LED that indicates power and sleep
ght)
behavior.
Tab
le 1: Status LED
LED
System status
Solid blue (while ba
Fadi
ng blue P
Off Screen saver active
C
leaning
ckli
ghts are on) P
rimary
power present
rimary
power failure
If necessary, use a soft cloth to clear smudges on the touch
scr
een. Do not use glass cleaner.
Maintenan
A qualified techn
Dispo
Dispos
e of the touch
r
egulations.
sal
ce and s
ici
an should check this
scr
een in accordance with local
upport
system every
3 years.
Troub
Proble
Low battery
ic
System
trouble
le
m
on
Condition
Action
Indicates that the Concord 4 security panel backup
battery is low.
A yellow triangle over the settings on the Main
m
eans a trouble condition e
touch de
system c
mi
nute) may be heard.
To check s
s
tatus icon.
Note: By pre
heard they
hours.
If there is no trouble detailed after the status button is
pressed, refer to the event buffer in the touch
and/or view full status on an alphanume
c
onnected elsewhere in the
s
s/Solutions
xists
on the Concord 4 or
vices. D
epending on volume settings and
onfiguration, four audible beeps (once a
tatus, press the icon. Then press the
ssi
ng the icon, if audible beeps are
will
be suppressed for a minimum of four
ric key
system
.
scr
scr
pad
een
een
W
arranty I
MANUFACTURER HER
nfo
rmation
EBY DISCLAIMS ALL WARRANTIES
AND REPRESENTATIONS, WHETHER EXPRESS, IMPLIED,
STA
TUTOR
LIMITED TO) ANY WARRANTIES OF ME
Y OR OTHERWISE INCLUDING (BUT NOT
RCHANT
ABILITY
OR FITNESS FOR A PARTICULAR PURPOSE WITH
R
ESPECT TO ITS CONCORD 4 PRO
SO
FTWAR
E. MA
NUFACTURER FURTHER DISC
OTHER IMPLIED WARRANTY
COMPUTER INFORMATION TRANSACTION
DUCT
S AND RELATED
LAIMS ANY
UNDER THE UNIFORM
S ACT OR
SIMILAR LAW AS ENACTED BY ANY STATE.
(U
SA on
ly)
SOME STATES DO NOT ALLOW THE
EXCLUSION OF IMPLIED WARRANTIES, SO THE ABOVE
EXCLUSION MAY NOT APPLY TO YOU. THIS WARRANTY
GIVES YOU SPECIFIC LEGAL RIGHTS AND YOU MAY
ALSO HAVE OTHER LEGAL RIGHTS THAT VARY FROM
STATE TO STATE.
MANUFACTURER M
WARRANT
SE
CURIT
W
ILL NOT BE HACKED, COMPROMISED AND/OR
Y, COVENANT OR PROMISE THAT ITS
Y PRO
CIRCUMVENTED; (II) W
ADEQUATE WARNING OR PROTECTION FROM, BREAK
AKES NO REPRESENTATION,
DUCT
S AND/OR RELATED SO
ILL PREVENT, OR PROVIDE
FTWARE (I)
INS, BURGLARY, ROBBERY, FIRE; OR (III) WILL WORK
PROPERLY IN ALL ENVIRONMENTS AND APPLICATIONS.
P/N 466
-
5 / 6
Page 6

Warning
Thes
experienced security profe
s and Disclaimers
e products are intended for sale to, and installation by, an
ssi
onal.
UTC Fir
e & Security cannot
provide any assurance that any person or entity buying its
is pr
ope
rly trai
or experienced to correctly install security related products.
For more i
firesecurityproducts.com/po
c
ode.
Contact info
For
customer
s
upport or call +1 855 286 8889.
nformation on product warnings, refer to
licy/pr
oduct-warning/ or scan the
rmation
general information, see
/technical support, see
www.i
www.i
nterlogix.com. For
nterlogix.com/custome
7 United Technologies Corporation. Interlogix is part of
UTC
Building and Industrial Systems, a unit of United
Tec
hnologies Corporation. All rights reserved.
ned
r-
6 / 6 P/N 466
-
 Loading...