

Page 1

Technical Document
RAD-Series AAA Server
Getting Started Guide
Version 7.1 for Linux
Page 2

© 2004-2005 Interlink Networks, Inc. All Rights Reserved.
This document is copyrighted by Interlink Networks Incorporated (Interlink Networks). The information
contained within this document is subject to change without notice. Interlink Networks does not guarantee
the accuracy of the information.
Trademark Information
Brand or product names may be registered trademarks of their respective owners.
Revision History
Date Ver si on Type
9/2005 7.1.0 New Product Release
Interlink Networks, Inc.
650 Avis Drive, Suite 300
Ann Arbor, MI 48108
Main - (734) 821-1200
Sales - (734) 821-1228
Fax - (734) 821-1235
Website - www.interlinknetworks.com
Page 3

RAD-Series 7.1 Getting Started Guide
Table of Contents
About this Document . . . . . . . . . . . . . . . . . . . . . . . . . . . . . . . . . . . . . . . . . . . . . . . . . . 1
Audience . . . . . . . . . . . . . . . . . . . . . . . . . . . . . . . . . . . . . . . . . . . . . . . . . . . . . . . . . . . . . . . . 1
Notational Conventions . . . . . . . . . . . . . . . . . . . . . . . . . . . . . . . . . . . . . . . . . . . . . . . . . . . . . 1
Preparation . . . . . . . . . . . . . . . . . . . . . . . . . . . . . . . . . . . . . . . . . . . . . . . . . . . . . . . . . .2
System Requirements . . . . . . . . . . . . . . . . . . . . . . . . . . . . . . . . . . . . . . . . . . . . . . . . . . . . . . 2
Compatibility . . . . . . . . . . . . . . . . . . . . . . . . . . . . . . . . . . . . . . . . . . . . . . . . . . . . . . . . . . . . . 2
Java Run-Time Environment . . . . . . . . . . . . . . . . . . . . . . . . . . . . . . . . . . . . . . . . . . . . . . . . . 3
Java SDK . . . . . . . . . . . . . . . . . . . . . . . . . . . . . . . . . . . . . . . . . . . . . . . . . . . . . . . . . . . . . . . 3
GNU Tar . . . . . . . . . . . . . . . . . . . . . . . . . . . . . . . . . . . . . . . . . . . . . . . . . . . . . . . . . . . . . . . . 3
Upgrading . . . . . . . . . . . . . . . . . . . . . . . . . . . . . . . . . . . . . . . . . . . . . . . . . . . . . . . . . . . . . . . 3
Customizations . . . . . . . . . . . . . . . . . . . . . . . . . . . . . . . . . . . . . . . . . . . . . . . . . . . . . . . . 3
Before Installing . . . . . . . . . . . . . . . . . . . . . . . . . . . . . . . . . . . . . . . . . . . . . . . . . . . . . . . 4
After Installing . . . . . . . . . . . . . . . . . . . . . . . . . . . . . . . . . . . . . . . . . . . . . . . . . . . . . . . . . 4
Certificates . . . . . . . . . . . . . . . . . . . . . . . . . . . . . . . . . . . . . . . . . . . . . . . . . . . . . . . . . . . . . . 4
Installation . . . . . . . . . . . . . . . . . . . . . . . . . . . . . . . . . . . . . . . . . . . . . . . . . . . . . . . . . . . 5
Installation Process . . . . . . . . . . . . . . . . . . . . . . . . . . . . . . . . . . . . . . . . . . . . . . . . . . . . . . . . 5
Installing RAD-Series Software . . . . . . . . . . . . . . . . . . . . . . . . . . . . . . . . . . . . . . . . . . . . . . . 6
Installation Directories . . . . . . . . . . . . . . . . . . . . . . . . . . . . . . . . . . . . . . . . . . . . . . . . . . . . . . 8
Uninstalling RAD-Series Software . . . . . . . . . . . . . . . . . . . . . . . . . . . . . . . . . . . . . . . . . . . . 9
Starting Server Manager . . . . . . . . . . . . . . . . . . . . . . . . . . . . . . . . . . . . . . . . . . . . . . . . . . . . 9
Changing the Server Manager Port . . . . . . . . . . . . . . . . . . . . . . . . . . . . . . . . . . . . . . . 10
Stopping Server Manager . . . . . . . . . . . . . . . . . . . . . . . . . . . . . . . . . . . . . . . . . . . . . . . 10
Starting Remote Control . . . . . . . . . . . . . . . . . . . . . . . . . . . . . . . . . . . . . . . . . . . . . . . . . . . 10
Accessing Server Manager . . . . . . . . . . . . . . . . . . . . . . . . . . . . . . . . . . . . . . . . . . . . . . . . . 10
Adding Servers to Server Manager . . . . . . . . . . . . . . . . . . . . . . . . . . . . . . . . . . . . . . . . . . . .11
Starting the Server . . . . . . . . . . . . . . . . . . . . . . . . . . . . . . . . . . . . . . . . . . . . . . . . . . . . . . . .11
Testing Server Installation . . . . . . . . . . . . . . . . . . . . . . . . . . . . . . . . . . . . . . . . . . . . . . . . . . 12
Configuration . . . . . . . . . . . . . . . . . . . . . . . . . . . . . . . . . . . . . . . . . . . . . . . . . . . . . . . 13
Configuration Process . . . . . . . . . . . . . . . . . . . . . . . . . . . . . . . . . . . . . . . . . . . . . . . . . . . . . 13
Using Server Manager . . . . . . . . . . . . . . . . . . . . . . . . . . . . . . . . . . . . . . . . . . . . . . . . . . . . 13
Basic Server Configuration . . . . . . . . . . . . . . . . . . . . . . . . . . . . . . . . . . . . . . . . . . . . . . . . . 15
Interlink Networks, Inc. i
Page 4

RAD-Series 7.1 Getting Started Guide
Load Configurations . . . . . . . . . . . . . . . . . . . . . . . . . . . . . . . . . . . . . . . . . . . . . . . . . . . 15
Define Access Devices . . . . . . . . . . . . . . . . . . . . . . . . . . . . . . . . . . . . . . . . . . . . . . . . . 15
Define Local Realms . . . . . . . . . . . . . . . . . . . . . . . . . . . . . . . . . . . . . . . . . . . . . . . . . . . 16
Save Configurations . . . . . . . . . . . . . . . . . . . . . . . . . . . . . . . . . . . . . . . . . . . . . . . . . . . 17
Reloading the Server . . . . . . . . . . . . . . . . . . . . . . . . . . . . . . . . . . . . . . . . . . . . . . . . . . . . . 17
Securing the Server . . . . . . . . . . . . . . . . . . . . . . . . . . . . . . . . . . . . . . . . . . . . . . . . . . . . . . 17
Basic Server Administration . . . . . . . . . . . . . . . . . . . . . . . . . . . . . . . . . . . . . . . . . . . 19
Licensing . . . . . . . . . . . . . . . . . . . . . . . . . . . . . . . . . . . . . . . . . . . . . . . . . . . . . . . . . . . 20
Ordering a License . . . . . . . . . . . . . . . . . . . . . . . . . . . . . . . . . . . . . . . . . . . . . . . . . . . . . . . 20
Installing the License . . . . . . . . . . . . . . . . . . . . . . . . . . . . . . . . . . . . . . . . . . . . . . . . . . . . . 20
Technical Support . . . . . . . . . . . . . . . . . . . . . . . . . . . . . . . . . . . . . . . . . . . . . . . . . . . . 21
Web Site . . . . . . . . . . . . . . . . . . . . . . . . . . . . . . . . . . . . . . . . . . . . . . . . . . . . . . . . . . . . . . . 21
Help Desk . . . . . . . . . . . . . . . . . . . . . . . . . . . . . . . . . . . . . . . . . . . . . . . . . . . . . . . . . . . . . . 21
Interlink Networks, Inc. ii
Page 5
RAD-Series 7.1 Getting Started Guide
About this Document
Welcome to RAD-Series AAA Server software. This guide will help you get started with:
• Installing the software
• Basic server configuration for a wired or wireless network
• Basic server administration
Consult the RAD-Series Administrator’s Guide for advanced configuration and administration
instructions.
Audience
This Getting Started Guide is for Network and Systems Administrators who must install and
configure the AAA Server. It’s assumed that you:
• Are familiar with basic Unix commands
• Have full installation privileges on the machines where you will install the software
• Know the hardware and software profiles of the server machines and other devices used
throughout the network
• Know how you will store user profiles for those accessing the network
• For wireless, know the EAP methods and user name formats used
Notational Conventions
Text in this guide is marked in different styles to denote various things.
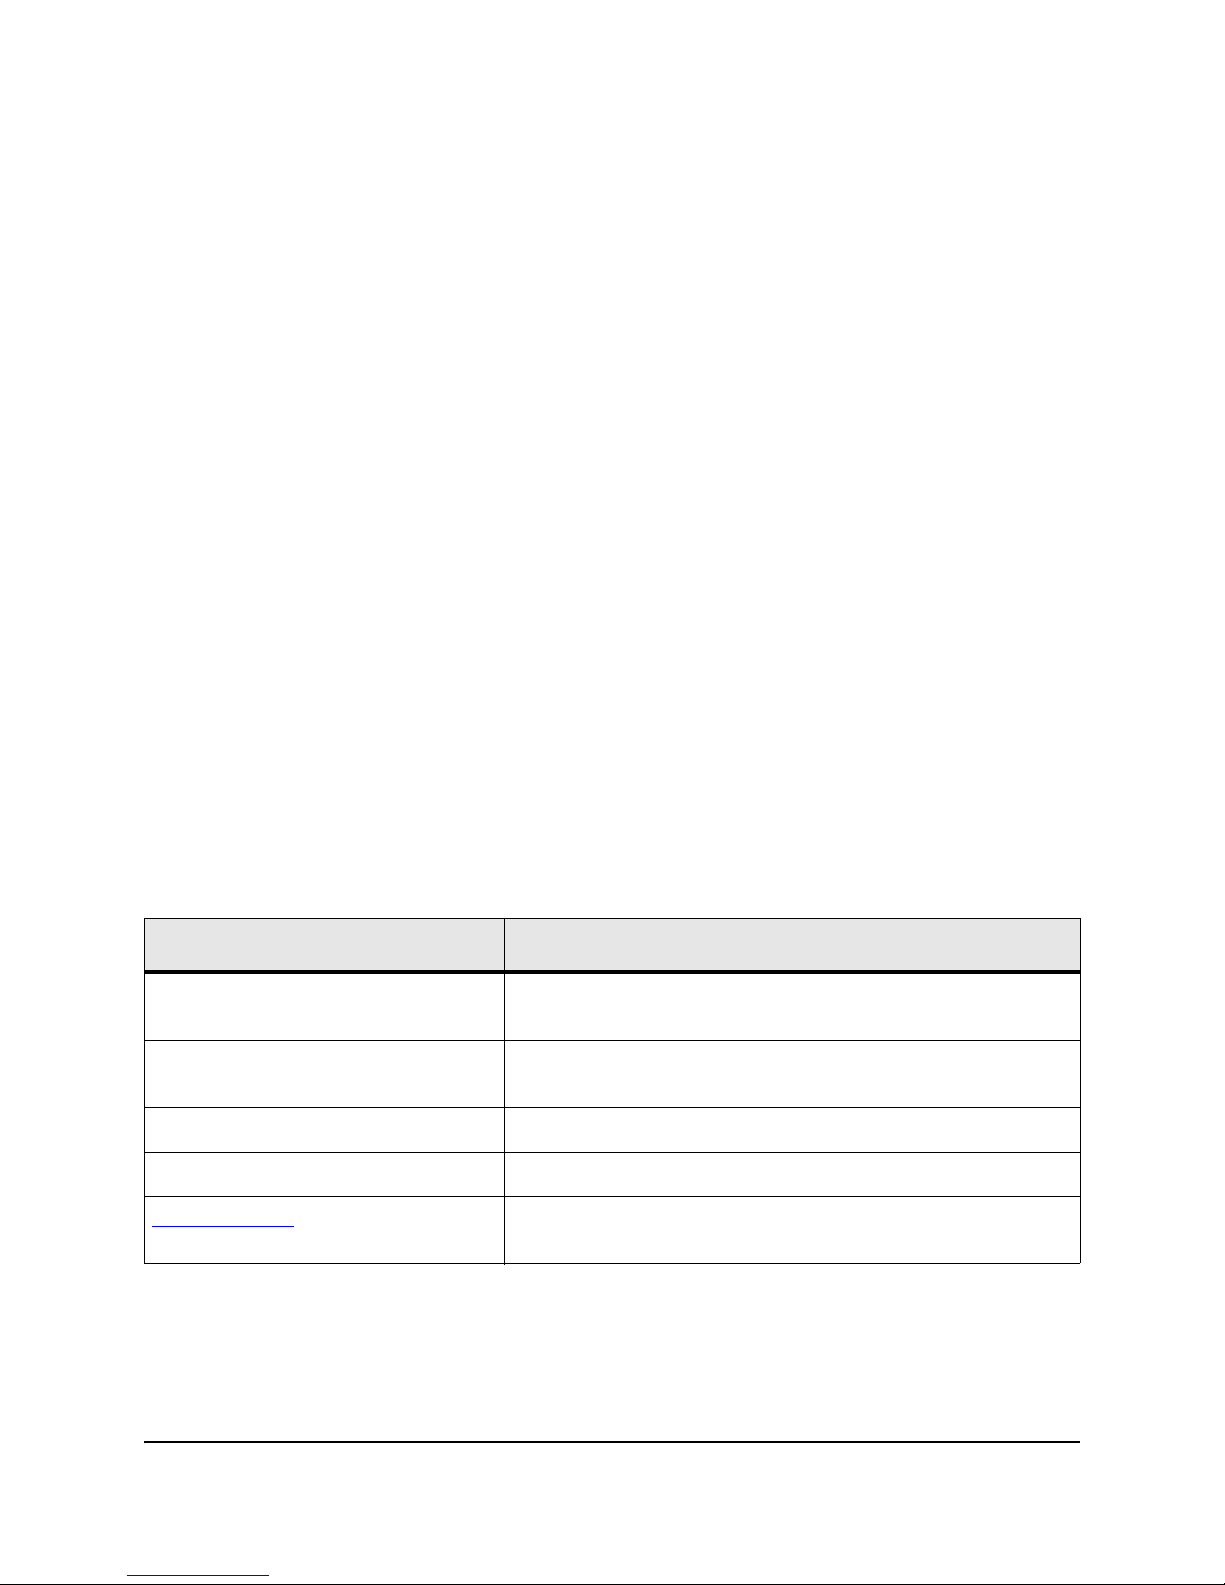
Text Marked... Indicates...
Fixed-width font
Fixed-width italic
Normal italic This is the title of a book or other publication.
Bold This is something noteworthy, so we emphasize it.
Blue underline
This is code, a command, a file name, or a file parameter. Enter
exactly what is shown.
This is a variable. Enter what is correct for your installation, not
what is shown.
This is a hypertext link. Click the link to send e-mail to the
account, or to open the document in your browser.
Interlink Networks, Inc. Page 1
Page 6
RAD-Series 7.1 Getting Started Guide
Preparation
Before installing the software:
• Be sure the host machine meets minimum system requirements
• Bring all software up to required patch levels
• If upgrading, read the section on Upgrading below and decide how you will handle previously
installed components
System Requirements
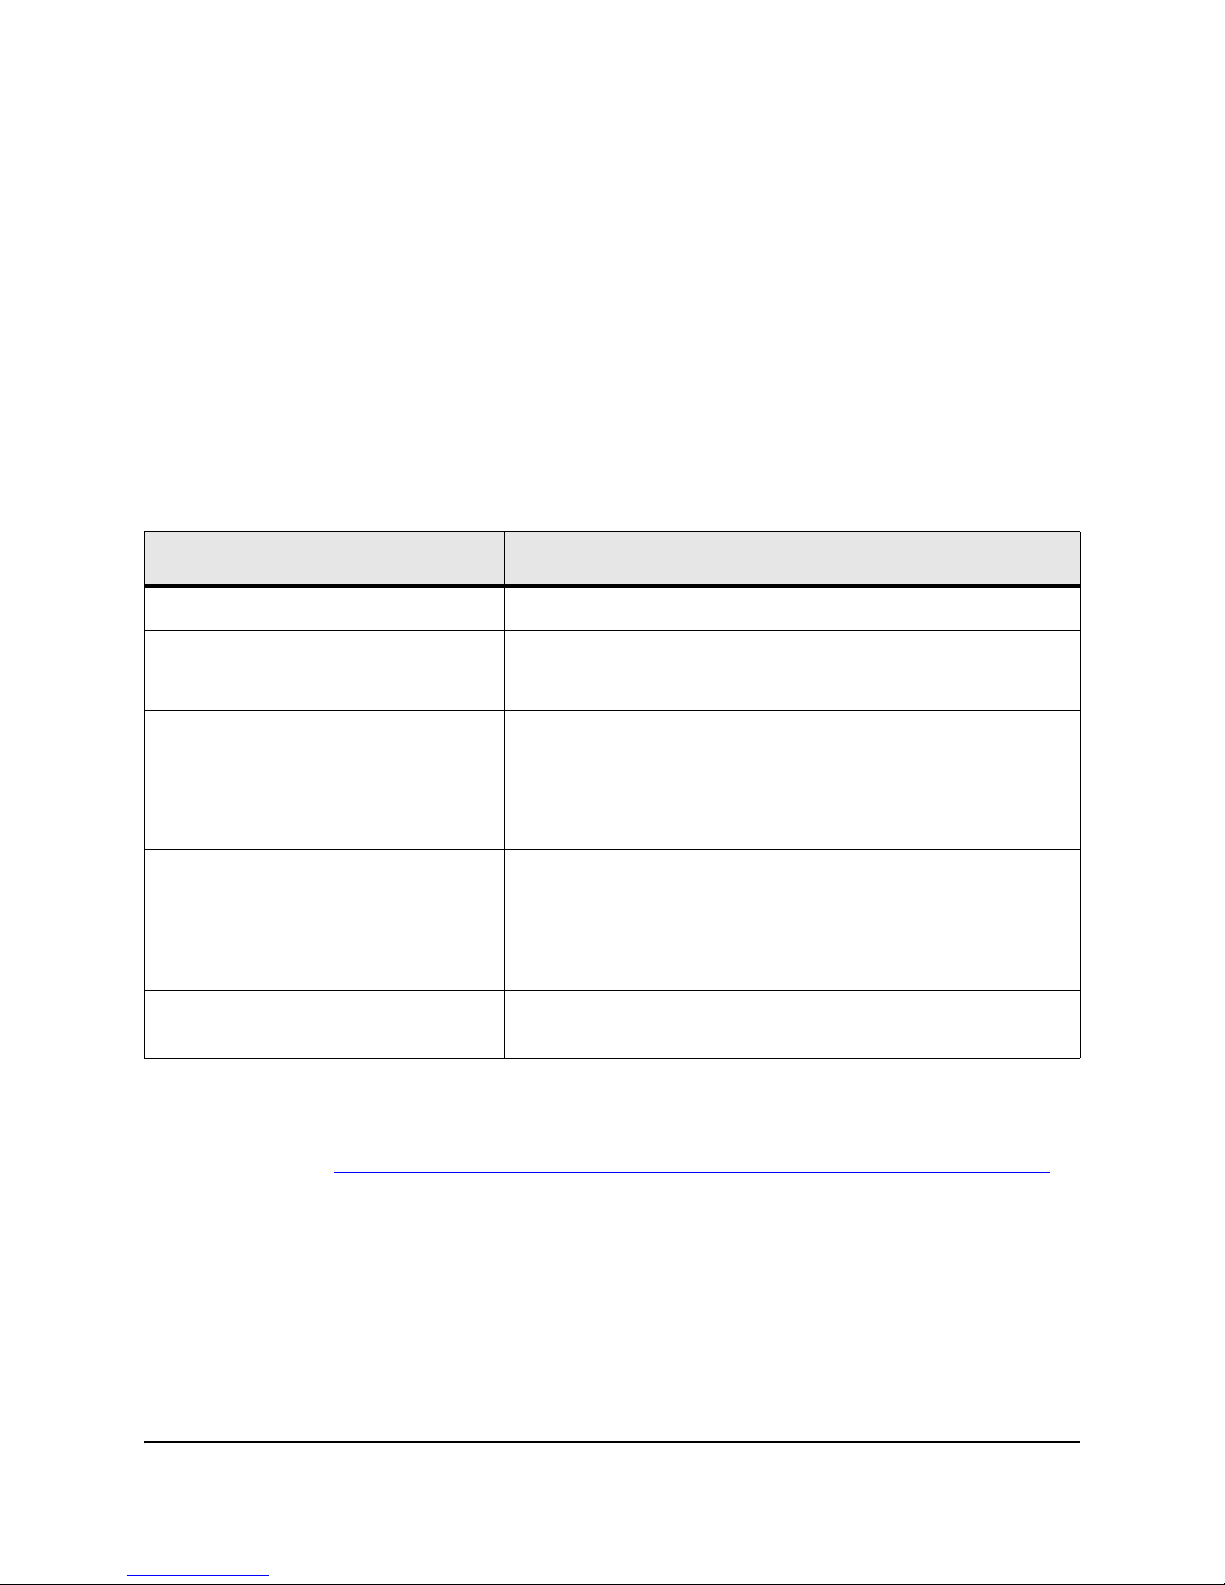
Each licensed copy of the AAA Server can be installed on one machine. The machine where the
server is installed must have:
Specification Requirement
Operating System/Platform Red Hat Enterprise Server 2.0 on Intel hardware
Memory 64 MB RAM minimum
128 MB RAM or higher recommended
Disk Space 82 MB for server and Server Manager
100 MB temporary space for installer
Additional disk space will be required depending on the amount
of local logging.
Browser Mozilla 1.6
Microsoft Internet Explorer 5.5 or higher
The browser preferences / Internet options should be set to
always compare loaded pages to cached pages.
Other Java Run-time Environment (JRE) version 1.3.x or 1.4.x on
each administrator workstation accessing Server Manager.
Compatibility
See the publication Supported and Interoperable Devices and Software Tables for RAD-Series Server
for a list of compatible hardware and software.
Interlink Networks, Inc. Page 2
Page 7

RAD-Series 7.1 Getting Started Guide
Java Run-Time Environment
The Server Manager can be accessed from any workstation with a browser and the Java RunTime Environment (JRE) installed. The JRE is required to run applets that are part of the Server
Manager graphical user interface. Download and install the JRE on each machine you will use as
an administrator workstation. You can download the JRE from:
/http://www.java.com/downloads/
Upgrading
Version 7.1.0 of the AAA Server software converts most previously installed binary and
configuration files to version 7.1.0 formats during the installation process. You no longer need to
uninstall the software prior to upgrading. To take advantage of this feature, you must install all
files into the same directories as your previous installation.
Note: When converting, you don’t have to perform a preliminary backup of configurations. The AAA Server
installer automatically backs up your current configuration files to the subdirectory
backup_raddb.timestamp in the configuration file directory.
If you’re converting from a version earlier than 6.0.x, check the conversion of your vendors,
dictionary, and .fsm files. In some cases, these may need to be manually updated to include
7.1.0 content.
Finite State Machine (.fsm) files that have been modified from the installation default are not
converted with the 7.1.0 installation. These files must be manually recreated in the 7.1.0 file
format after installing the server.
Customizations
If you created custom plug-ins for your AAA Server, you’ll have to recompile them in version
7.1.0 of the Authentication-API (formerly SDK) to make them compatible with version 7.1.0 of
the server.
Before Installing
1 Stop the server, Remote Control, and Server Manager programs.
2 If you choose to uninstall rather than convert files:
• Back up accounting and log files.
• Back up configuration files.
• Run raduninstall (in /opt/aaa/uninstall by default) to remove the original files.
• Manually delete the remaining files.
After Installing
1 If you have modified your state table (.fsm) files you will need to re-make your changes you
made since your previous installation.
Interlink Networks, Inc. Page 3
Page 8

RAD-Series 7.1 Getting Started Guide
2 Restart the server, Remote Control, and Server Manager programs.
Certificates
The AAA Serversoftware is delivered with a certificate, key file, and self-signed certificate
authority list that can be used for preliminary testing. However, if your application requires
certificates, you should replace these with your own files before the server goes into production.
The following authentication methods require a server-side certificate:
•PEAP-MSCHAP
•PEAP-MD5
•PEAP-GTC
• TLS
• TTLS
• TTLS-MD5
• TTLS-PAP
• TTLS-CHAP
• TTLS-MSCHAP
Interlink Networks, Inc. Page 4
Page 9

RAD-Series 7.1 Getting Started Guide
Installation
Installation Process
The AAA Server installation process is:
1 Install software components on server machine(s).
2 Start the Server Manager program.
3 Start the Remote Control program on any machines where it is installed.
4 Access the Server Manager.
5 Add remote servers (if any) to Server Manager.
6 Start the server(s) from Server Manager.
7 Test installation using the preset configuration.
Note: This test can only be performed on the machine hosting the Server Manager program.
At the conclusion of this process, you’ll:
• Know that the server software is installed and working properly
• Be ready to go on to basic server configuration
Interlink Networks, Inc. Page 5
Page 10
RAD-Series 7.1 Getting Started Guide
Installing RAD-Series Software
To install the software:
1 Log on as root.
2 Run the installer:
# sh /download directory path/RAD-Series.7.1.0.linux.i686.bin
Note: The installer will prompt you for each step of the process. To return to a previous step, enter back
until you reach the form you need. To exit the installer, enter quit.
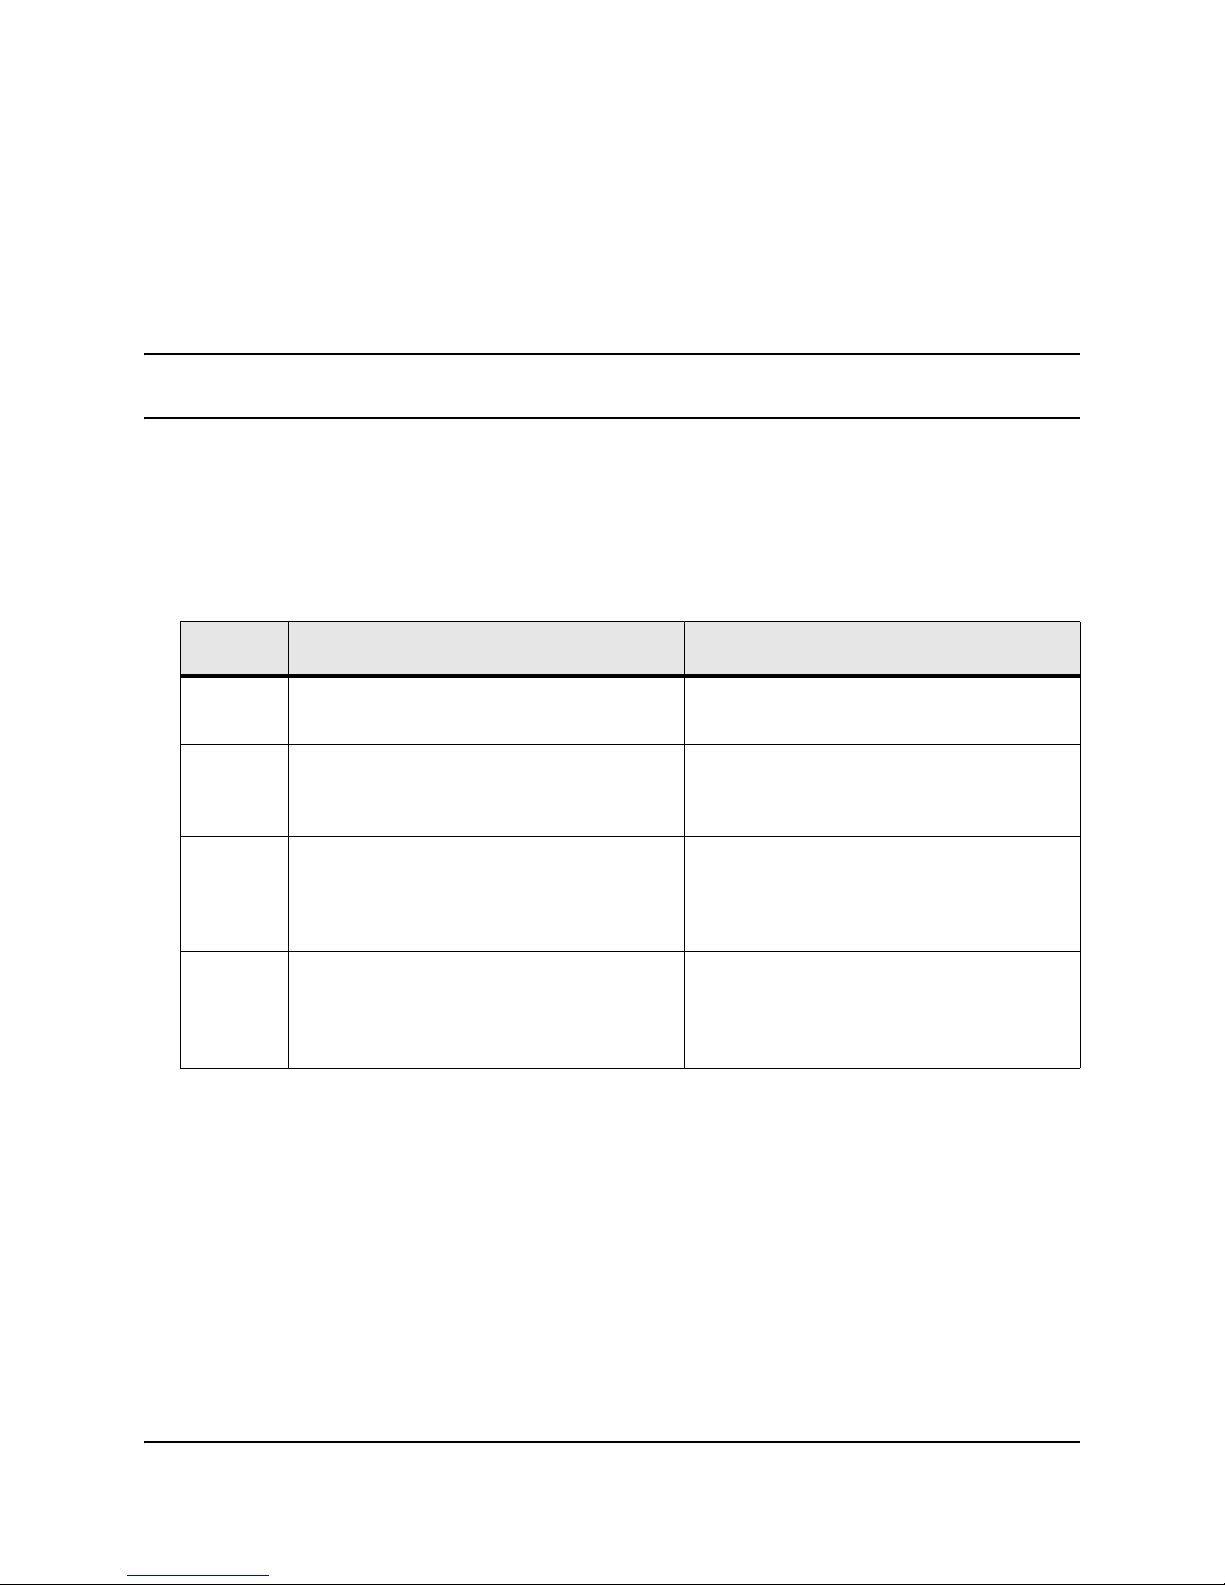
3 Enter the option number for each component to install on this machine, separated by commas
(no spaces). For example:
ENTER A COMMA-SEPARATED LIST OF NUMBERS REPRESENTING THE COMPONENTS
TO BE INSTALLED:
Your options are:
Option Component Required
1,2
1 Server—the AAA Server programs,
configuration files, libraries, plug-ins
2 Server Manager—the browser-based
interface for configuring and administering
the server(s)
3 Remote Control—the RMI objects that
facilitate communication between the
Server Manager program and remote
servers that host the AAA Server software
4 Oracle server—the db_srv daemon that
provides the interface between the Oracle
database and AAA Server.
On each host machine.
On a local server host machine. Only one
installation is needed.
On each machine you will administer
remotely. You do not need Server Manager
on these machines.
On the machine that hosts the Oracle
database. If not the same as the AAA
Server host, install this component later on
the Oracle host.
4 Enter the installation directory for each file type. To accept the default directories, just press
Enter at each prompt.
If this is a fresh installation, then also:
5 Enter a shared secret. This is a code used to establish a trust relationship between the AAA
Server and its test utility. It cannot be more than 255 characters or contain spaces. The default
secret.
is
6 Enter a test user password. This password is used to test installation. The user password
cannot have spaces or the backslash character. The default is password.
Interlink Networks, Inc. Page 6
Page 11

RAD-Series 7.1 Getting Started Guide
7 Enter a Server Manager user name. This is the name you’ll use to log on to Server Manager.
The default is adminaaa.
8Enter a Server Manager password. This is the password you’ll use to log on to Server
Manager. The default is adminaaa.
Interlink Networks, Inc. Page 7
Page 12
RAD-Series 7.1 Getting Started Guide
Installation Directories
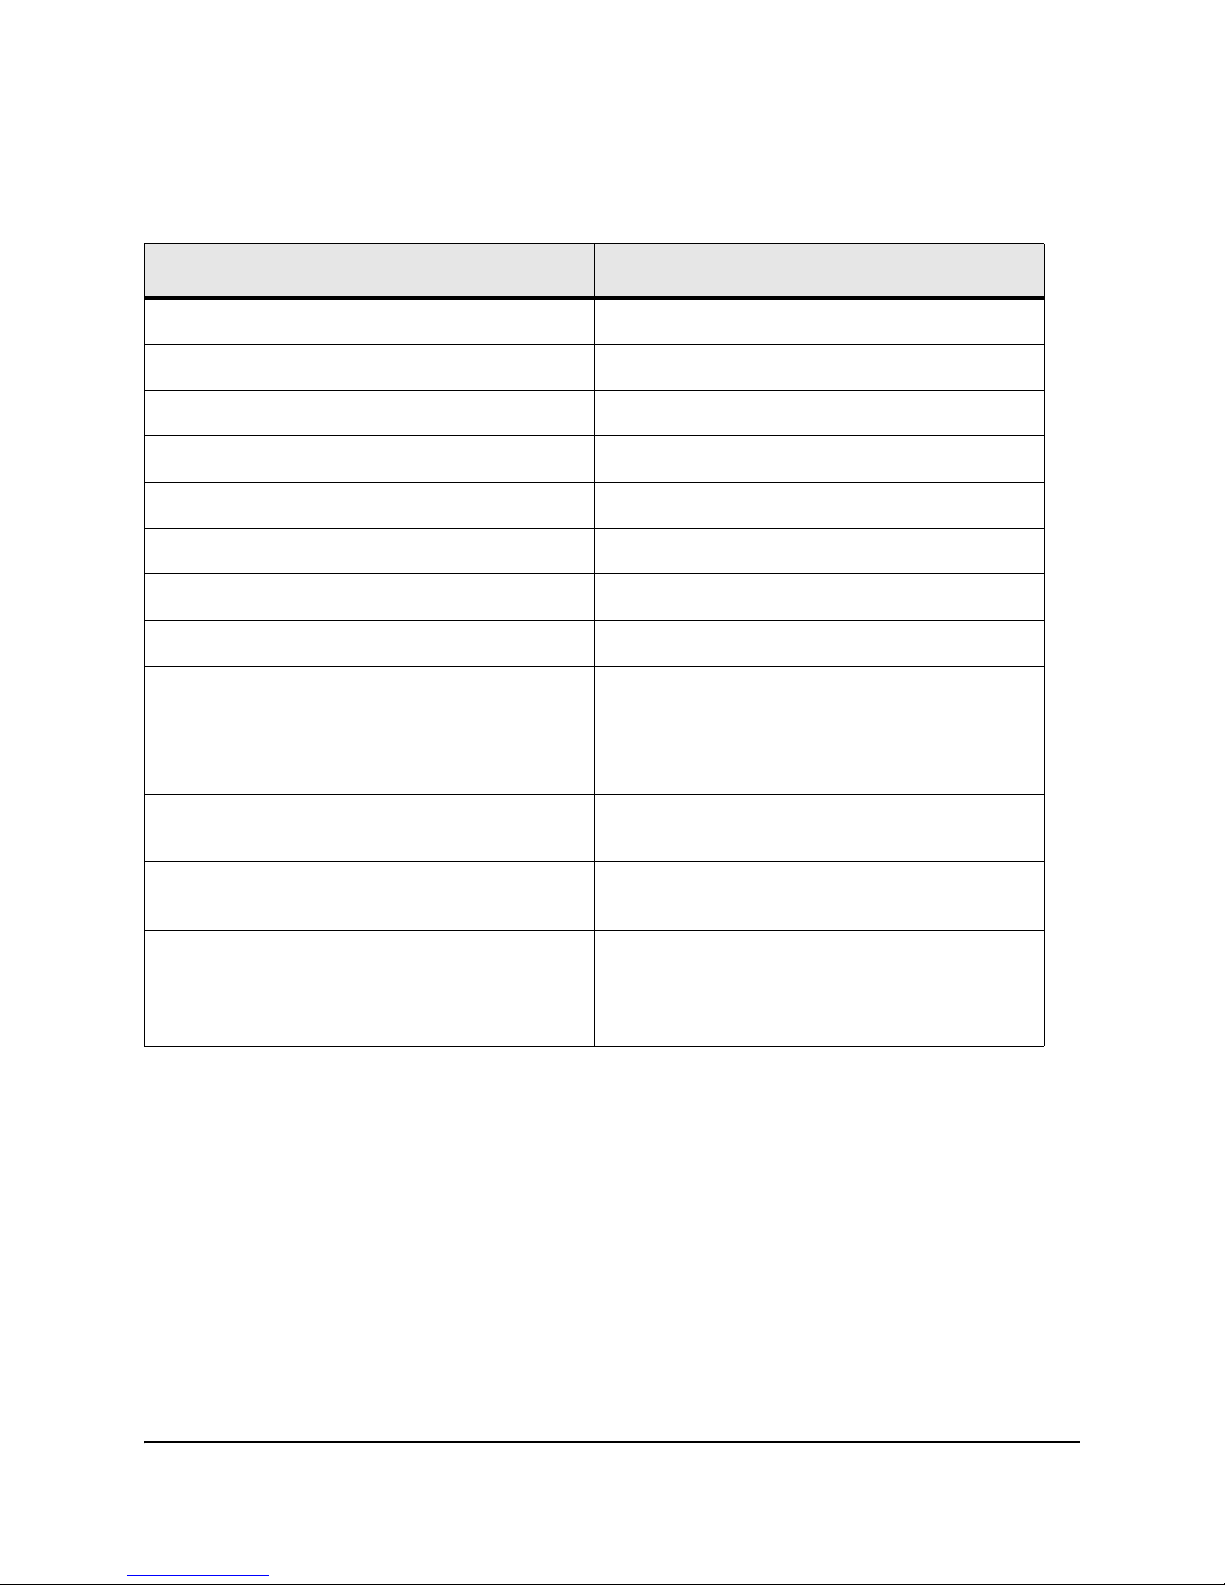
As supplied, the RAD-Series software is installed into the following directories:
Directory Contains
/opt/tomcat
/opt/aaa/remotecontrol
/opt/aaa/lib
/opt/aaa/bin
/opt/aaa/uninstall
/opt/aaa/aatv
/opt/share/aaa/man
/opt/share/aaa/doc
/etc/opt/aaa
/etc/opt/aaa/proldap
/etc/opt/aaa/security
Server Manager program
RMI objects and startup script
Libraries
Server programs and utilities
Uninstaller
Plug-ins
MAN pages
PDF documentation
Configuration files (including dictionary and
vendors files)
*.fsm files: sample finite state machine (FSM)
tables
Schema files and sample LDIF files for LDAP
authentication
Certificates and keys for TLS, TTLS, and PEAP
authentication
/etc/opt/aaa/fsm7.1
Interlink Networks, Inc. Page 8
FSM, group, vendor and dictionay files for 7.1.
They are copied to the configuration directory if
this is a new install or the old files were not
modified by you.
Page 13

RAD-Series 7.1 Getting Started Guide
Uninstalling RAD-Series Software
The RAD-Series software is delivered with an uninstall script, raduninstall, found in the
uninstall subdirectory of the server directory (default /opt/aaa/uninstall).
1 Login and change directory to /server directory/uninstall.
2 Run raduninstall.
3 When prompted, press Enter.
4 Manually delete any files modified since installation.
Note: Modified files include files utilized and changed by the server in the course of normal operation, and
their directories.
Starting Server Manager
Server Manager is the browser-based application for configuring and managing all your AAA
Servers. Once started, you can access Server Manager from any networked workstation that has a
browser and a Java Run-Time Environment installed.
Server Manager can be set up to make a Secure Socket Layer (https) connection to administrator
workstations. See “Configuring Server Manager for SSL” in the RAD-Series Administrator’s
Guide. The steps below show how to start Server Manager using a non-secure (http) connection.
We recommend doing this to complete the initial server set up.
On the machine where you’ve installed Server Manager:
1 Change directory to /Server Manager directory/bin (/opt/tomcat/bin by
default).
2 Run startup.sh.
If the process fails to start:
3 Check the log file catalina.out (in /opt/tomcat/logs by default).
If you see the message “Root cause - Address already in use,” the default port 8080 is already
being used by another process.
4 At your shell prompt, enter lsof -i :8080 to identify the process currently using port
8080.
5 Either change the Server Manager port, or kill the process using the port.
Interlink Networks, Inc. Page 9
Page 14

RAD-Series 7.1 Getting Started Guide
Changing the Server Manager Port
If you can’t use the default port of 8080 for Server Manager:
1 In a text editor, open the file server.xml (in /opt/tomcat/conf by default).
2 Locate the following lines:
<Connector className="org.apache.coyote.tomcat4.CoyoteConnector"
port="8080" minProcessors="5" maxProcessors="75"
enableLookups="true" redirectPort="8443"
acceptCount="100" debug="0" connectionTimeout="20000"
useURIValidationHack="false" disableUploadTimeout="true" />
3 Change “8080” to the port you wish to use.
4 Save and close server.xml.
5 Stop and restart Server Manager.
Stopping Server Manager
To stop the Server Manager program:
1 Change directory to /Server Manager directory/bin.
2 Run shutdown.sh.
Starting Remote Control
On each machine where you’ve installed Remote Control:
1 Change directory to /Remote Control directory.
2 Run
rmistart.sh.
Accessing Server Manager
Once the Server Manager program is started, to access the graphical user interface:
1 Open your browser and enter the URL http://IP-address:Port/aaa where:
• IP-address is the IP for the machine that hosts the Server Manager program.
Port is the port number assigned to Server Manager. Default is 8080.
•
2 Enter the Server Manager administrator user name and password you choose at installation.
Interlink Networks, Inc. Page 10
Page 15
RAD-Series 7.1 Getting Started Guide
3 If this is the first time you’re accessing Server Manager, enter the user name and password
again to authenticate to the Java Run-Time Environment.
You’ll see the Server Manager Administration page, with localhost listed in the Status frame.
Bookmark this page in your browser for ease of access later on.
Note: If you see a Java run-time error in the Status frame, the workstation may not have the Java RunTime Environment installed, or the second Java logon box may be hiding behind other windows awaiting
your entry. See “Java Run-Time Environment” on page 3 for more information.
Adding Servers to Server Manager
If you’ve installed AAA Servers and Remote Control objects on remote machines, add them to
the list of servers managed by Server Manager.
1 Access the Server Manager.
2 In the Navigation tree on the left, click Managed Servers.
3 In the main area on the right, click the Connect to Server link.
4 Enter a Name for the server to appear in Server Manager. This doesn’t have to be the actual
server name, just an identifier.
5 Enter the server’s IP address or fully-qualified domain name.
6 Click Create.
The server now appears in the Server Status area at the lower left of the screen.
Starting the Server
1 Access the Server Manager.
2 In the Server Status area at the lower left of the screen, select the server by checking the box.
3 In the main area to the right, click Start.
If you see a green icon next to the server name in the Status area, the server started.
If you see a red icon, the server failed to start. See the Troubleshooting section of the
Interlink Networks’ Frequently Asked Questions page at www.interlinknetworks.com/support/
faq7-1.htm for possible solutions.
Interlink Networks, Inc. Page 11
Page 16

RAD-Series 7.1 Getting Started Guide
Testing Server Installation
The AAA Server is delivered with a very simple wired network configuration designed to help
you test that the server is installed and authenticating correctly (using password authentication).
We recommend running this test before proceeding with server configuration.
1 Follow the procedure above to start the server in Server Manager.
2 With the server still selected, click the Status button in the main area.
If the server is operational, you’ll see the message:
RADServer-name (RAD-port) is responding
3 Toggle to your shell account.
4 Set the library path (/opt/aaa/lib by default):
# export LD_LIBRARY_PATH=/server library path
5 Change directory to /server binary path (/opt/aaa/bin by default).
6 Run radpwtst -s localhost test_user.
7 When prompted, enter the test user password you specified during installation.
A message appears summarizing authentication. If the server is authenticating properly, the
final line in the message is:
“test_user” authentication OK
8 To terminate the test process:
# kill pid
Where pid is the radius process ID. You can determine this by:
# ps -ef | grep radiusd
Note: Remove the test_user from the localhost configuration when you’re done using the test tool. See the
RAD-Series Administrator’s Guide for instructions.
If you encounter problems while running the test, see the Troubleshooting section of the Interlink
Networks’ Frequently Asked Questions page at www.interlinknetworks.com/support/faq7-1.htm
.
Interlink Networks, Inc. Page 12
Page 17

RAD-Series 7.1 Getting Started Guide
Configuration
The topics in this section will help you begin to set up the server for your network. After
completing them, see the RAD-Series Administrator’s Guide to finish your server configuration.
Configuration Process
The basic configuration process is:
1 Load existing configurations into Server Manager.
2 Define network access devices.
3 Define local realms, including:
• Realm name
• Authentication method
•Users
4 Save configuration to server.
5 Restart the server to enable the new configuration.
By the end of this process, you’ll have:
• At least one realm defined
• At least one user set up for authentication using your method
Using Server Manager
We recommend using Server Manager, rather than command-line functions, to perform basic
AAA Server configuration and administration.
Server Manager works by loading a duplicate of the current server configuration into a temporary
workspace. After you’ve made your changes in the workspace, you save the new configuration to
the server itself, then restart the server to enable the changes.
When you leave Server Manager between sessions, it automatically holds your configuration
changes in the temporary workspace files. You do not need to save until you are ready to push the
configuration to one or more servers.
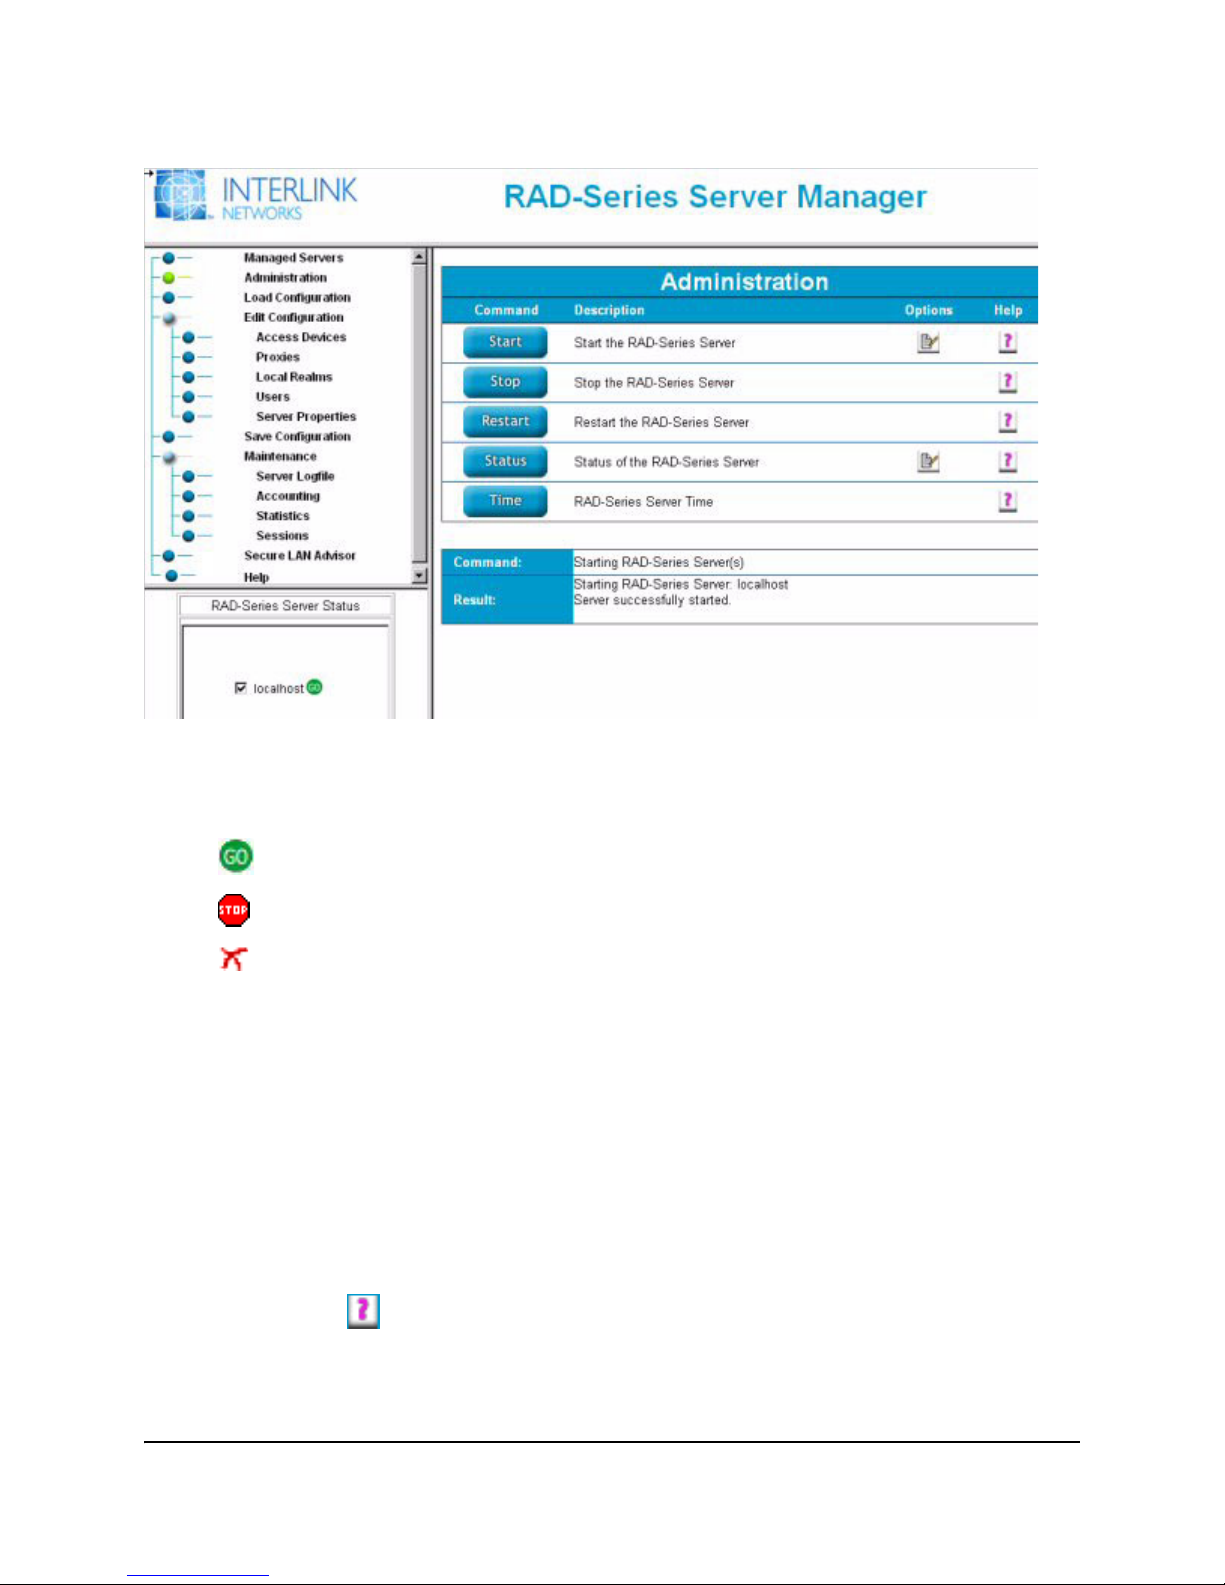
The Server Manager interface contains four primary work areas:
Interlink Networks, Inc. Page 13
Page 18
1
RAD-Series 7.1 Getting Started Guide
3
4
2
1 Navigation frame—In this area, you choose the tasks you want to perform on the selected
servers. The Workspace frame changes according to your selection.
2 Status frame—This area shows the servers in your installation and their current on/off status.
• means the server is running
• means the server is stopped
• means there’s been a server error or communication error
Any server commands you execute from the Administration page affect whatever servers are
selected here.
3 Workspace frame—This area contains the controls for configuring and administering
servers. It changes based on the task you’ve selected.
4 Message frame—This area shows the results of log file searches and server commands.
Each Workspace page contains both buttons and links you can use to drill-down to other forms.
Hover over any button to see what it does. Required fields are marked with an asterisk (*). To go
back to the previous page in your work sequence, click the Cancel button at the bottom of the
page or your browser’s Back button.
Click the Field Help buttons for definitions and acceptable values. For more detailed
configuration instructions, use the Server Manager online Help, found in the Navigation frame.
Interlink Networks, Inc. Page 14
Page 19

RAD-Series 7.1 Getting Started Guide
Basic Server Configuration
Before beginning server configuration, set up all your network devices, and list all shared secrets
and device vendors. You’ll need this information to complete the server configuration.
To start configuring the AAA Server, access Server Manager.
To quit configuration at any time, just close your browser.
Load Configurations
Load the current server configurations into the Server Manager workspace. The initial download
will contain the default wired configuration used to test the server installation.
1 In the Navigation frame, click Load Configurations.
2 In the Workspace frame, select the server to pull configurations from:
3 Click Load.
You’ll be notified when the transfer is complete.
Define Access Devices
Enter the IP address and a shared secret for each access point in your network.
You can enter any valid IP address (e.g.: 192.44.3.11) or fully-qualified DNS name (e.g.:
nas.yourcompany.com).
The shared secret is the code that will be used to establish a trust relationship between the access
device and the server. The shared secret can’t exceed 255 characters or contain spaces.
1 In the Navigation frame, click Define Access Devices.
2 In the Workspace frame, click the New Access Device link or the Add button.
3 In Name, enter the IP address or fully-qualified domain name.
4 Enter and confirm the Shared Secret.
5 The Vendor field specifies which set of vendor-specific attributes to return in RADIUS
message sent to this device. Use CTRL + Click to select to select all that apply from the dropdown list. Choose Generic for none.
6 Click Create.
Interlink Networks, Inc. Page 15
Page 20

RAD-Series 7.1 Getting Started Guide
Define Local Realms
If any of your users are required to enter a realm name to log in to the network
(e.g.: @yourcompany.com), enter the:
• Realm name—any realm you’ve defined, or a fully-qualified DNS name, provided it’s what
appears in the login string
• Authentication methods used by the realm
• User storage type
• User profiles, if using local storage
Enter as many realms as are needed.
If users do not have to enter a realm name to log in, modify the NULL realm and add users to it.
For each realm you’re defining:
1 In the Navigation frame, click the Local Realms link.
You’ll see the NULL realm, set up Deny.
2 If users do not have to enter a realm name, click the NULL link.
If users do have to enter a realm name, click the Add New Realm link and enter it in Name.
3 Choose the User Profile Storage type from the drop-down.
New realms default to LDAP storage.
4 If this is a wireless network and additional parameters appear under Security Method:
• Click EAP Authentication.
• Choose all the EAP methods used by this realm. Use CTRL + Click to select more than
one.
If this is a wired network, leave Password Authentication selected.
5 Add at least one user.
For an LDAP server:
• Under User Storage Parameters, choose New LDAP Directory from the drop-down.
• Enter the directory information and click Save.
• Click Create to save the realm definition.
For local storage:
• Click Create to save the realm definition.
• Click the View User List button next to Local Storage for that realm.
• Click the New User link.
• Enter the required user information and click Create.
Interlink Networks, Inc. Page 16
Page 21

RAD-Series 7.1 Getting Started Guide
Save Configurations
After you’ve completed the basic server configuration in Server Manager, save the configuration
to the server.
If you’re running several AAA Servers with the same configuration, you can select all the servers
and push the new configuration to them at once.
1 In the Navigation frame, click Save Configuration.
2 In the Workspace frame, select the server(s).
3 Click Save.
Restarting the Server
Server Manager includes a special restart function that enables you to apply most configurations
without having to first stop the server. Some server properties and server startup options require
you to stop the server. See the Administrator’s Guide.
1 In the Navigation frame, click Administration.
2 In the Status frame, select the server.
3 In the Workspace frame, click Restart.
Securing the Server
We recommend doing the following to make the server more secure, before putting it into
production. Instructions for each of these procedures are in the RAD-Series Administrator’s
Guide.
1 Remove the test_user from the default users file if you plan to keep this file in your
configuration.
2 Change the Server Manager user name and password from the installation default
3 Change the Server Manager shared secret (the secret Server Manager shares with each server
it manages).
4 Configure the Server Manager to use SSL when communicating with workstations.
5 Change the Server Manager port number.
Following these guidelines will also improve server security:
• Don’t install the AAA Server on user machines.
adminaaa.
• Don’t install the AAA Server on the same machine as other servers, like your web, FTP, and
mail servers.
• Change the Current Directory of a server connection to a secure location to prevent public
access to a core dump.
Interlink Networks, Inc. Page 17
Page 22

• Where possible, store hashed passwords in user profiles.
RAD-Series 7.1 Getting Started Guide
Interlink Networks, Inc. Page 18
Page 23

RAD-Series 7.1 Getting Started Guide
Basic Server Administration
Basic administration for AAA Servers can be done using the Server Manager Administration
page.
You can run any of these commands on several servers at once. Just select all the servers to be
included from the Status frame.
1 Access the Server Manager.
2 Choose Administration from the Navigation frame.
3 In the Status frame, select the server(s) by checking the box.
Be sure to clear the box for any selected servers where you don’t want to run the command.
4 In the Workspace frame, click the command to perform:
• Start—starts server operation after it’s been stopped. You’ll see a green GO icon next to
the server name in the Status frame to indicate it’s online.
• Stop—stops server operation. You’ll see a red STOP icon next to the server name in the
Status frame to indicate it’s offline.
• Restart—let’s you apply new configurations without having to first stop the server. First
save the new configurations to push them to the server.
• Status—checks whether the server is responding. If it is, you’ll see the message
“Server-name(Port-number) is responding.”
• Time—shows the date/time on remote servers.
Interlink Networks, Inc. Page 19
Page 24

RAD-Series 7.1 Getting Started Guide
Licensing
The RAD-Series license enables a base set of features and limits the number of concurrent user
sessions that the software maintains. The license may also enable and disable optional modules
that extend the base feature set.
Initially, the software operates under an evaluation license with the full RAD-Series feature set.
The evaluation license lasts 30 days, during which you can review the user documentation and
other advanced features of the server.
After this time, you must purchase a license to retain the functionality. Be sure to purchase the
appropriate license for your needs. If you’ve configured functions or users during evaluation that
are not supported by the license you purchase, they will be disabled during production use.
Contact [email protected] for more information about the different licensing options.
Ordering a License
When you’re ready to purchase a licensed version of the RAD-Series software, contact your sales
representative at:
Phone: 734-821-1228
Fax: 734-821-1235
E-mail: [email protected]
Installing the License
To install a license purchased for production use or to upgrade a feature set:
1 Backup any existing production licenses.
2 Copy the file aaa.config.license to your configuration directory (/etc/opt/aaa by
default).
3 Access the Server Manager interface.
4 Restart the server in Server Manager.
Interlink Networks, Inc. Page 20
Page 25

RAD-Series 7.1 Getting Started Guide
Technical Support
Web Site
In addition to our printed product documentation, we offer free and unlimited support information
on our web site. Visit the Frequently Asked Questions page at:
http://www.interlinknetworks.com/support/faq7-1.htm
You’ll find a continuously updated list of solutions to common problems, instructions for
advanced configuration tasks, and inter operability information.
Help Desk
RAD-Series software is covered for a 30-day warranty period. During this time, you may contact
our Help Desk for technical support at no additional charge.
To extend technical support beyond the 30-day warranty period, you can purchase a Software
Maintenance Plan. Send an e-mail to:
If you can’t find the solution to your problem in our documentation or on the web site, and you’re
covered by a maintenance plan or the 30-day warranty, you can:
•E-mail [email protected]
• Phone 734-821-1222, Monday through Friday, 8:30 a.m. to 5:30 p.m. EST
(except US holidays)
Be ready to provide the following information when you contact us:
• Version number of the AAA Server that you are using
• Operating system and its version
• Company name of licensee
Please don’t e-mail any unsolicited log file or configuration file snippets longer than one hundred
lines. We’ll let you know if we need more information.
Interlink Networks, Inc. Page 21
 Loading...