


RemotePoint Presenter is protected by US patents 5,296,837; 5,302,936; 5,659,334; plus other
US and foreign patents and patents pending.
© 2003 Interlink Electronics, Inc. All rights reserved.
RemotePoint Presenter, the logo, ClickTrigger, the six dot logo and Interlink
Electronics are registered trademarks of Interlink Electronics, Inc. All other
trademarks are the property of their respective owners.
RemotePoint Presenter User’s Guide
Rev. B

Table of Contents
1. Introduction . . . . . . . . . . . . . . . . . . . . . . . . . . . . . . 5
About RemotePoint Presenter . . . . . . . . . . . . . . . . .5
About the RemotePoint Presenter Software . . . . . . 5
Included in the Box . . . . . . . . . . . . . . . . . . . . . . . . . 5
2. Installation . . . . . . . . . . . . . . . . . . . . . . . . . . . . . . . 6
System Requirements . . . . . . . . . . . . . . . . . . . . . . . 6
Installing the RemotePoint Presenter Software . . . . 6
Installing Batteries in the
RemotePoint Presenter Remote . . . . . . . . . . . . . . . .6
Connecting the USB Receiver . . . . . . . . . . . . . . . . . 7
Programming the Receiver . . . . . . . . . . . . . . . . . . . 8
3. Using RemotePoint Presenter . . . . . . . . . . . . . . . 9
Using RemotePoint Presenter for a
PowerPoint Presentation . . . . . . . . . . . . . . . . . . . . . 9
Starting the RemotePoint Presenter Software . . . . 10
Using RemotePoint Presenter as a
Presentation Remote Control . . . . . . . . . . . . . . . . . 11
Clearing a Presentation Tool from the Screen . . . . 12
Operating Distances . . . . . . . . . . . . . . . . . . . . . . . . 12
Transporting RemotePoint Presenter . . . . . . . . . . . 13
4. Customizing RemotePoint Presenter . . . . . . . . . 14
Changing All Buttons to a Preset Profile . . . . . . . 14
Changing Individual Button Functions . . . . . . . . . 15
Description of Tools . . . . . . . . . . . . . . . . . . . . . . . . 16
Changing Button Properties . . . . . . . . . . . . . . . . . . 29
Working with Toolbars . . . . . . . . . . . . . . . . . . . . . . 30
Changing Preferences . . . . . . . . . . . . . . . . . . . . . . 30
Using Hotspots . . . . . . . . . . . . . . . . . . . . . . . . . . . .31
Using Other Events . . . . . . . . . . . . . . . . . . . . . . . . 32
Saving a Custom Profile . . . . . . . . . . . . . . . . . . . . 32

Table of Contents
continued
5. Using the 32-MB USB Drive . . . . . . . . . . . . . . .34
6. Troubleshooting . . . . . . . . . . . . . . . . . . . . . . . . . . 35
No Mouse Cursor Motion in Windows . . . . . . . . 35
Operating Distance Is Reduced . . . . . . . . . . . . . . . 36
A. Specifications . . . . . . . . . . . . . . . . . . . . . . . . . . . . 37
B. Technical Support . . . . . . . . . . . . . . . . . . . . . . . . 38
FCC Certification . . . . . . . . . . . . . . . . . . . . . . . . . . . . 39
Warranty . . . . . . . . . . . . . . . . . . . . . . . . . . . . . . . . . . . . 40
RemotePoint Presenter Software
License Agreement . . . . . . . . . . . . . . . . . . . . . . . . . . . . 42

USER’S GUIDE
1
About
RemotePoint
Presenter
About the
RemotePoint
Presenter
Software
Introduction
RemotePoint Presenter is a complete wireless
presentation system.
The wireless presentation remote features a laser pointer,
a thumb maneuvered mouse, programmable slide
controls, and the patented ClickTrigger. RemotePoint
Presenter includes a 32-MB storage drive and receiver for
presentation storage and 100 foot RF wireless range. A
complete software package with programmable slide
effects is also included.
This wireless presentation system is the ideal solution for
presentations, training, and interactive multimedia.
The RemotePoint Presenter software lets you control and
customize the functions of RemotePoint Presenter. It
includes 95 different tools with hundreds of
configurations for enhancing PowerPoint presentations.
Included in the
Box
The RemotePoint Presenter box contains:
• RemotePoint® Presenter
• 32MB USB Drive/Receiver
• Presentation Software CD
• Carrying Case
• Two AAA Batteries
• Quick Start Guide
TM
Remote
5
REMOTEPOINT PRESENTER
2
System
Requirements
Installing the
RemotePoint
Presenter
Software
Installing
Batteries in the
RemotePoint
Presenter Remote
Installation
• Windows 98, Me, 2000 or XP
• Available USB port
• 6 MB of available hard disk space
Note: Win98 systems must have software loaded to
ensure trouble free operation
1. Insert the RemotePoint Presenter CD into the CDROM drive.
2. Follow the on-screen instructions.
Note: If the setup wizard does not appear, double-click
My Computer, double-click the icon for your CDROM drive, and then double-click Setup.exe.
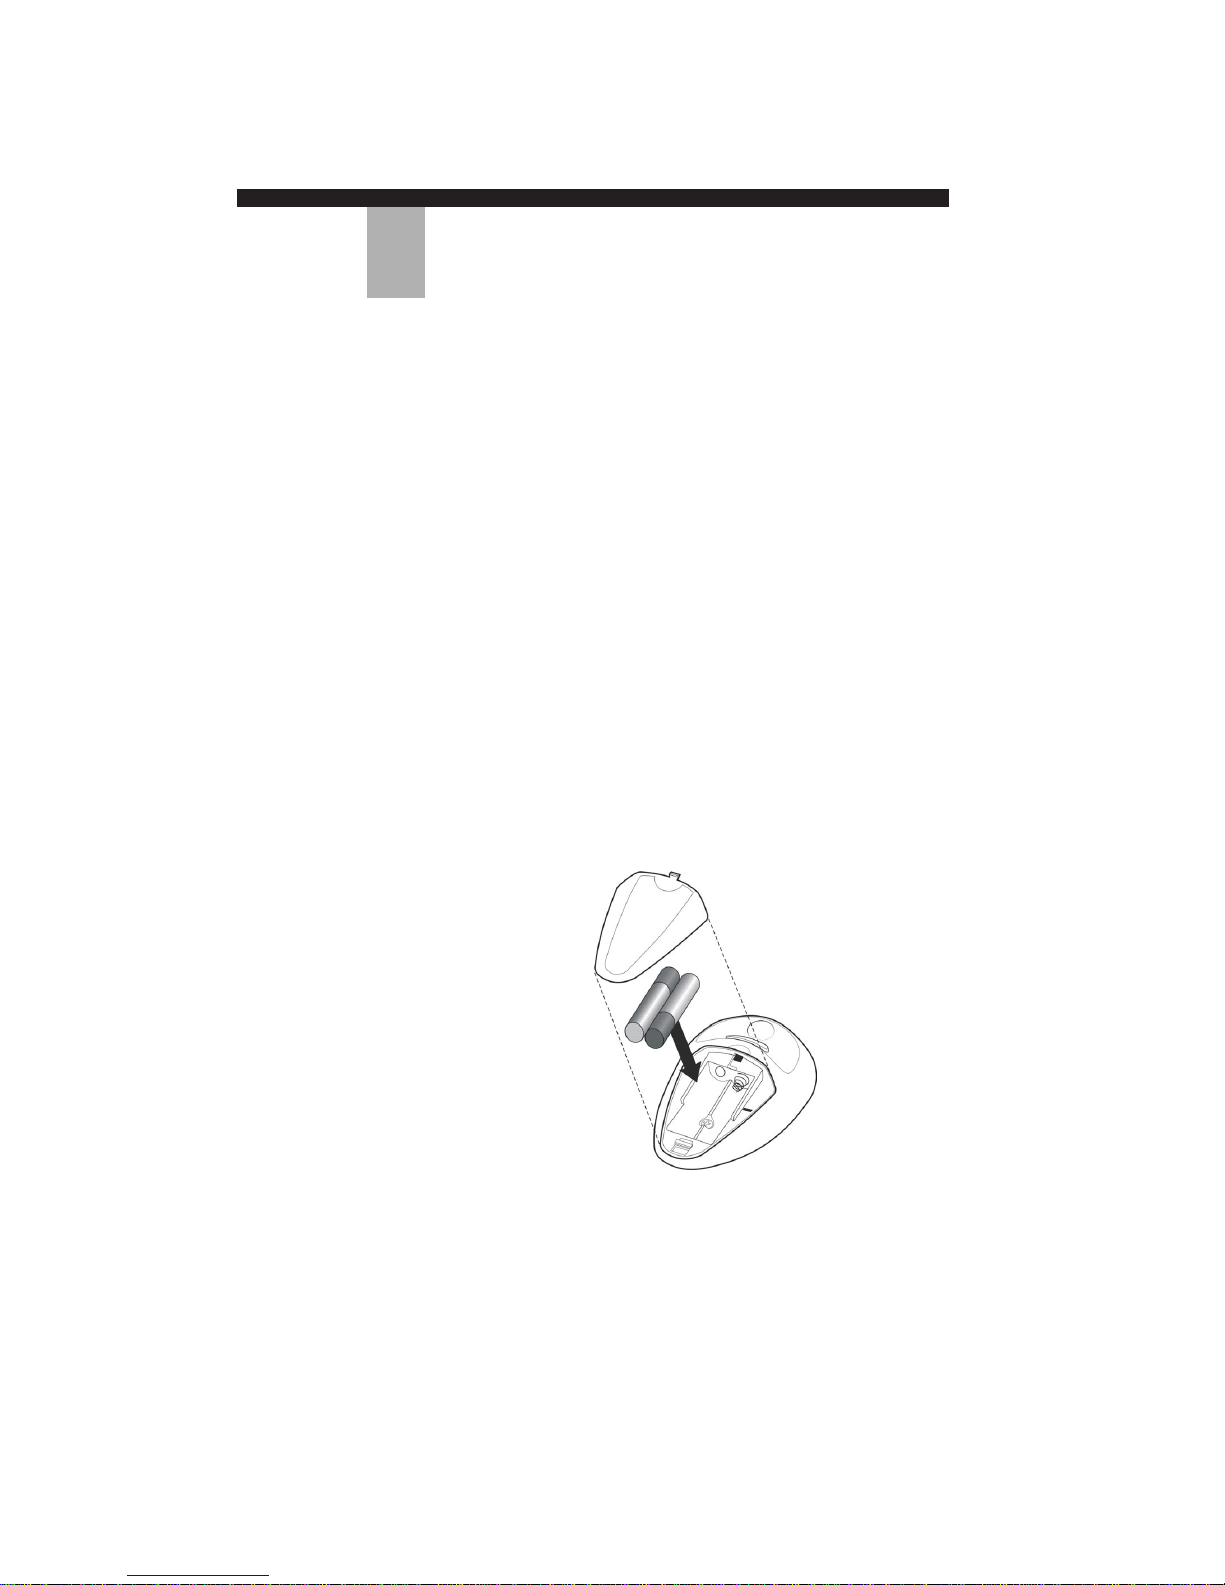
1. Remove the battery cover on the underside of the
RemotePoint Presenter Remote.
6
2. Insert the two AAA batteries in the compartment.
Ensure that the batteries are in the correct
orientation as indicated by the positive (+) and
negative (–) markings.
3. Replace the battery cover.

USER’S GUIDE
Connecting the
USB Receiver
1. Remove the protective cap from the USB Receiver.
2. Flip up the antenna.
3. Insert the receiver into an available USB port on
your computer.
4. The slowly flashing green light indicates that the
receiver is working.
A standard USB extension cable can be used if your
computer has USB ports that are located close together.
These may be obtained at retail computer stores, or are
complimentary with purchase through
support@interlinkelec.com.
Because RemotePoint Presenter uses radio waves, the
receiver can be placed anywhere. You do not need to
place it where you have a line-of-sight connection with
the RemotePoint Presenter Remote.
Note: Shortly after you connect the receiver, Windows
might display the Add New Hardware wizard. If
required, click Next a few times to get through the
wizard. Some Windows 98 computers require that
you insert your Windows 98 installation disk. If
you do not have this available, an alternative
solution is provided on your RemotePoint
Presenter CD in a file titled Win98.pdf.
7

REMOTEPOINT PRESENTER
Programming the
Receiver
The RemotePoint Presenter Remote shares a unique
address with the receiver. This address is automatically
programmed into your receiver the first time you use it.
You should not have to reprogram it unless you have
trouble with the communication between the
RemotePoint Presenter Remote and the receiver.
To program the receiver:
1. Plug the receiver into a USB port and wait for the
green light on the receiver to blink slowly.
2. On the RemotePoint Presenter Remote, press the
laser button and shine the laser beam on the
receiver’s starburst icon for about five seconds.
3. When the green light glows steadily the receiver is
programmed to the unique address of the
RemotePoint Presenter Remote. After address is
established, the LED will return to blinking green.
8

USER’S GUIDE
3
Using RemotePoint
Presenter for a
PowerPoint
Presentation
Using RemotePoint Presenter
programmable buttons in addition to the laser pointer
button and the ClickTrigger on the back.
ClickTrigger (on bottom)
Mouse pointer
With no software loaded, RemotePoint Presenter is ready
to help you present a PowerPoint slideshow.
To use the RemotePoint Presenter as a mouse:
1. Using your thumb, apply side pressure to the mouse
pointer in the direction you want the mouse cursor to
move.
2. Using your index finger, click the mouse by pressing
the ClickTrigger on the back of the RemotePoint
Presenter Remote.
9
REMOTEPOINT PRESENTER
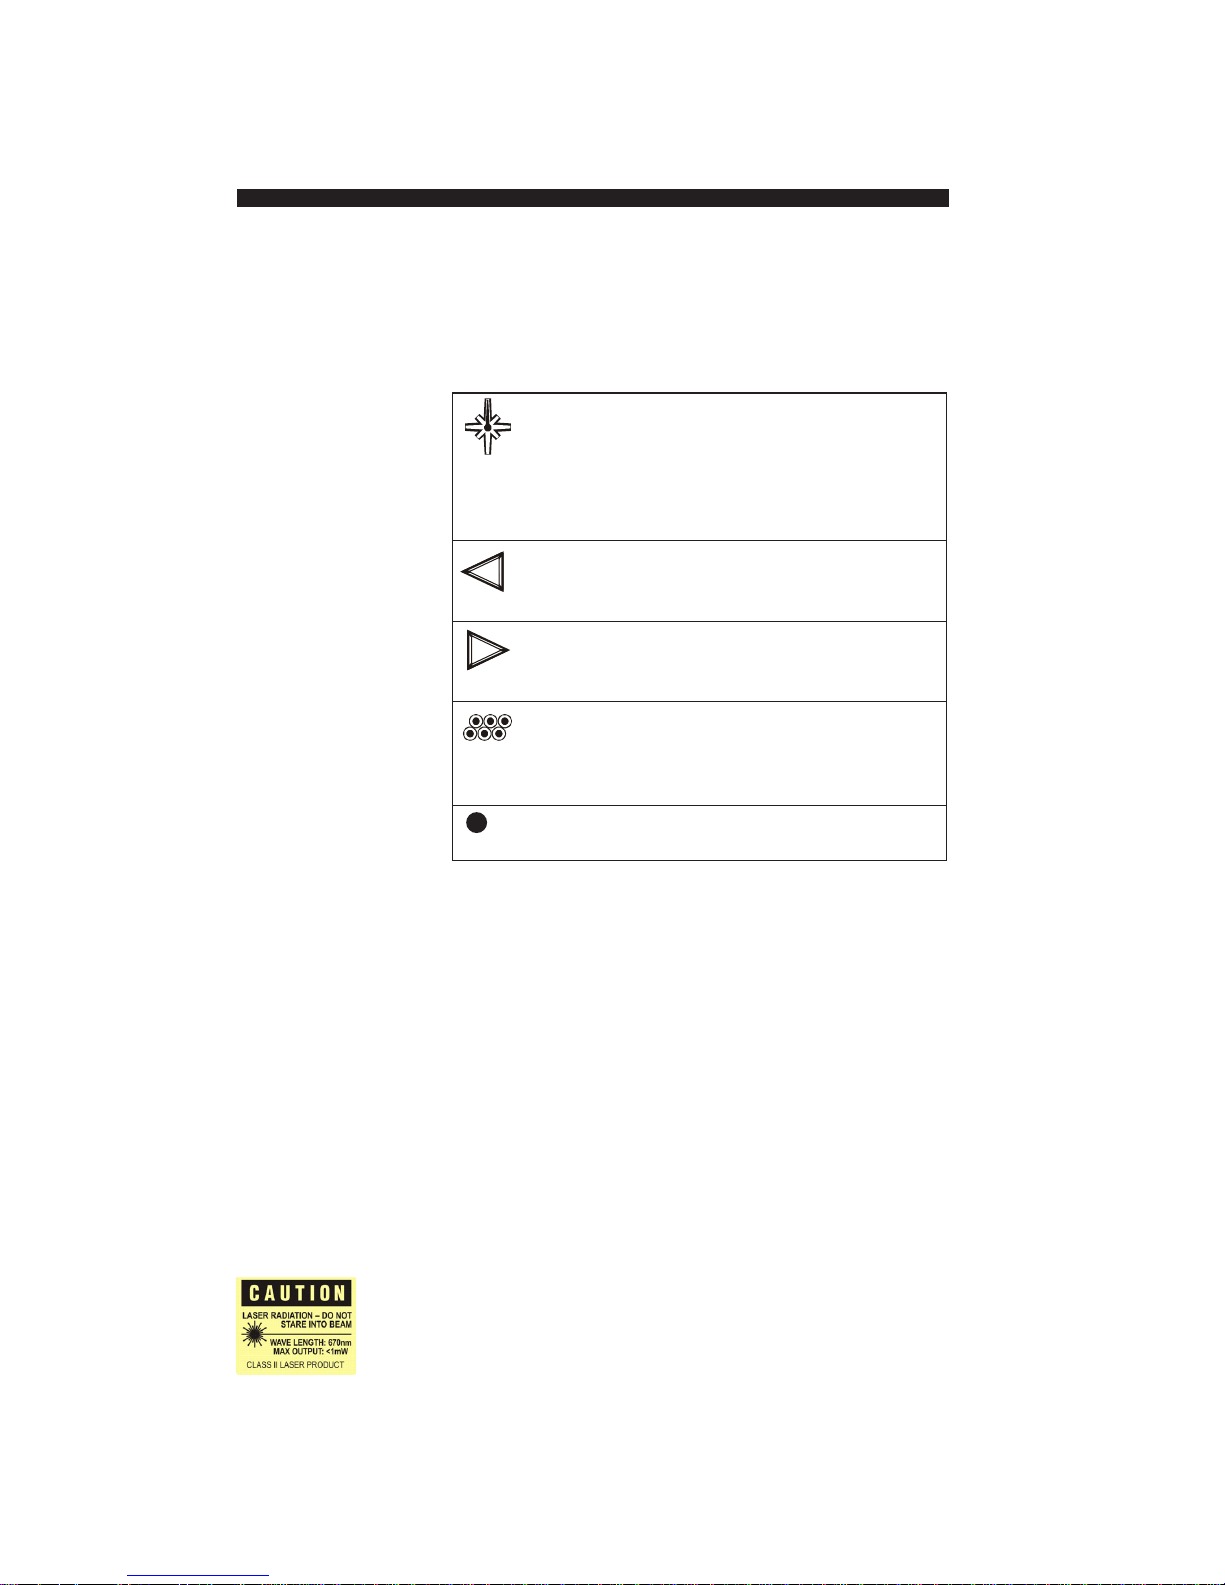
The other RemotePoint Presenter Remote buttons work
as follows:
Illuminates the red laser pointer on the front of the
RemotePoint Presenter Remote. It is typically used
as a pointer during presentations. The laser beam
emits for the duration that you press the button, up to a
maximum of 60 seconds. The range of the beam is in
excess of 100 feet.
Moves to the previous slide in a PowerPoint
slide show, or moves to the previous page in
other applications.
Moves to the next slide in a PowerPoint slide
show, or moves to the next page in other
applications.
Alternately blanks the screen or restores the
current slide in a PowerPoint slide show.
Use this when you want to direct the audience’s attention
away from the screen or to begin or end a slide show.
Launches a PowerPoint slideshow when
PowerPoint is active. F5 keystroke in other programs.
RemotePoint
10
Starting the
Presenter
Software
The RemotePoint Presenter software allows you to
customize the buttons on RemotePoint Presenter. Built-in
profiles for several common applications are provided,
and you can create your own profiles if the built-in
profiles don’t fit your needs. For information about
customizing the button functions, see Customizing
RemotePoint Presenter on page 14.
To start the RemotePoint Presenter software:
• Double-click the RemotePoint Presenter icon in the
notification area (also known as the system tray) at
the lower right corner of the screen.
Note: If the RemotePoint Presenter icon does not appear in
the notification area, start the program by clicking
Start, pointing to Programs, Interlink

USER’S GUIDE
Profiles: Lists preset
and personal profiles;
the current profile is
shown in bold.
Using
RemotePoint
Presenter as a
Presentation
Remote Control
These icons show the
current button
assignments.
Tool palette: These
tools can be assigned
to any button; simply
drag to a button.
Electronics, RemotePoint Presenter, and clicking
Presenter.
With the RemotePoint Presenter software running, the
RemotePoint Presenter becomes a full-featured
presentation remote control. With a single click, you can
change to a different profile, which is a collection of
button assignments.
To use RemotePoint Presenter as a presentation
remote control:
1. Start the RemotePoint Presenter software as
described in Starting the RemotePoint Presenter
11

REMOTEPOINT PRESENTER
2. You can choose a different profile by clicking it in
3. Press any of the buttons on the top of the
Clearing a
Presentation Tool
from the Screen
Several of the RemotePoint Presenter tools display things
on the screen. For example, the analog clock, digital
clock and countdown timer all display clocks in one form
or another. You can clear these from the screen by
pressing a second time the button you pressed to display
the item, or by pressing Escape on your keyboard.
Software, on page 10. The RemotePoint Presenter
software displays the current button assignments.
the list of profiles. The button assignments for the
selected profile are loaded into the RemotePoint
Presenter Remote.
RemotePoint Presenter Remote. As soon as you
press one of these buttons, the RemotePoint
Presenter software minimizes to an icon in the
notification area. The RemotePoint Presenter
Remote is ready to use.
12
Operating
Distances
Toolbars are cleared from the screen by clicking the close
button on the toolbar, or by selecting another tool button
on the Remote unit. If the Keep Cursor On Toolbar option
isn’t checked, then simply moving the mouse off the
toolbar will make it disappear.
The RemotePoint Presenter Remote is designed to
operate at distances up to 100 feet from the receiver.
However, the maximum distance can vary depending on
the environment where the device is operated. Radio
frequency (RF) interference from another source can
reduce the capabilities of RemotePoint Presenter.

USER’S GUIDE
Transporting
RemotePoint
Presenter
Low batteries in the RemotePoint Presenter Remote may
also reduce the operating distance. Always ensure that
you have replacement batteries available.
When transporting the RemotePoint Presenter Remote,
always remove the batteries from the unit. Although the
transmitter automatically goes into a low power “sleep”
mode after a period of non-operational use, we
recommend that you remove the batteries to avoid battery
drain caused by accidental button activation during
transportation.
The carrying case provides protection for the
RemotePoint Presenter during transportation and storage.
13

REMOTEPOINT PRESENTER
Customizing
4
Changing All
Buttons to a
Preset Profile
RemotePoint Presenter
With the RemotePoint Presenter software, you can
customize RemotePoint Presenter for your own needs.
You can:
• Assign tools and toolbars to buttons on the
RemotePoint Presenter Remote
• Change the properties of the tool assigned to a button
(that is, change the effects produced by the tool)
• Choose tools from preset profiles
• Create and save your own profiles
• Customize how RemotePoint Presenter operates
To perform any of these functions, start the RemotePoint
Presenter software, as described in Starting the
RemotePoint Presenter Software on page 10.
A profile is a collection of button assignments. The four
programmable buttons on the RemotePoint Presenter
Remote can be set to any of the preset profiles, or to any
custom profile you have created and saved.
14
When you choose a profile, the button assignments in that
profile are applied to the programmable buttons on the
RemotePoint Presenter Remote.
USER’S GUIDE
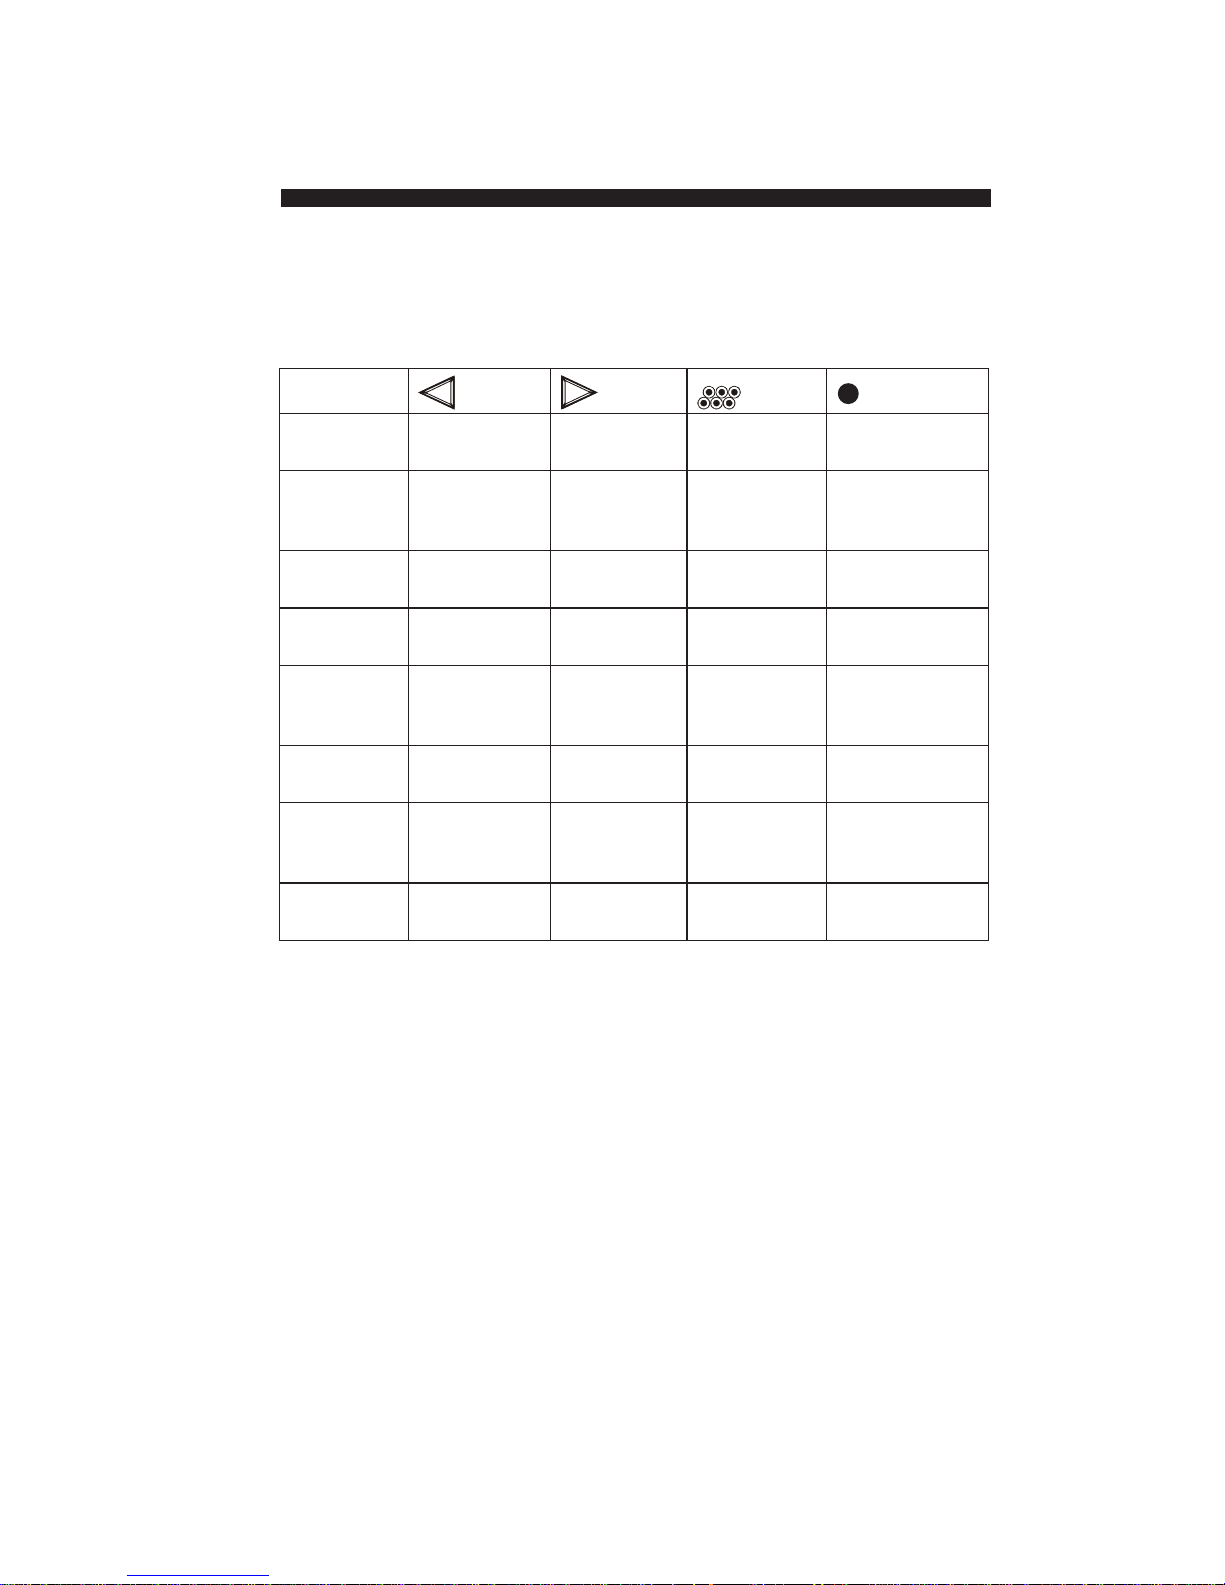
The preset profiles and their button assignments are:
Profile
Business Page Up Page Down Black Screen F5 Keystroke
Presentation
Educational Page Up Geometric Black Screen Countdown
Presentation Pointer – Timer
Right Arrow
Internet Browser – Back Right Click Browser – Activate
Browsing Page Down Browser
Keynote Page Up Page Down Black Screen F5 Keystroke
Speech
Lecture Page Up Geometric Black Screen Ticker Tape
Pointer –
Right Arrow
Standard Left Click Right Click Display Wheel –
Mouse Configurations Autofocus
Training Page Up Geometric Highlighter Zoom
Session Pointer –
Right Arrow
Factory Page Up Page Down Black Screen Start Slideshow
Default
Changing
Individual Button
Functions
To change to a different profile:
1. Open the RemotePoint Presenter software.
2. Click the profile in the list on the left side of the
window.
You can change the tool assigned to any button (for
example, from a Zoom tool to a Clock).
To assign a tool to a button using drag-and-drop:
1. Open the RemotePoint Presenter software.
15

REMOTEPOINT PRESENTER
2. Find the tool you want to use in the tool palette at
3. Drag the tool to the button to which you want to
Note: You can drag a tool from another button as well as
To assign a tool to a button using menus:
1. Open the RemotePoint Presenter software.
2. Click the button you want to change.
3. From the context menu select Replace Tool.
4. From the pop-out menus, select a tool.
the bottom of the window.
assign it.
from the tool palette.
Description of
Presentation
16
Tools
Tools
These are the functions of the various tools that you can
assign to buttons on the RemotePoint Presenter Remote.
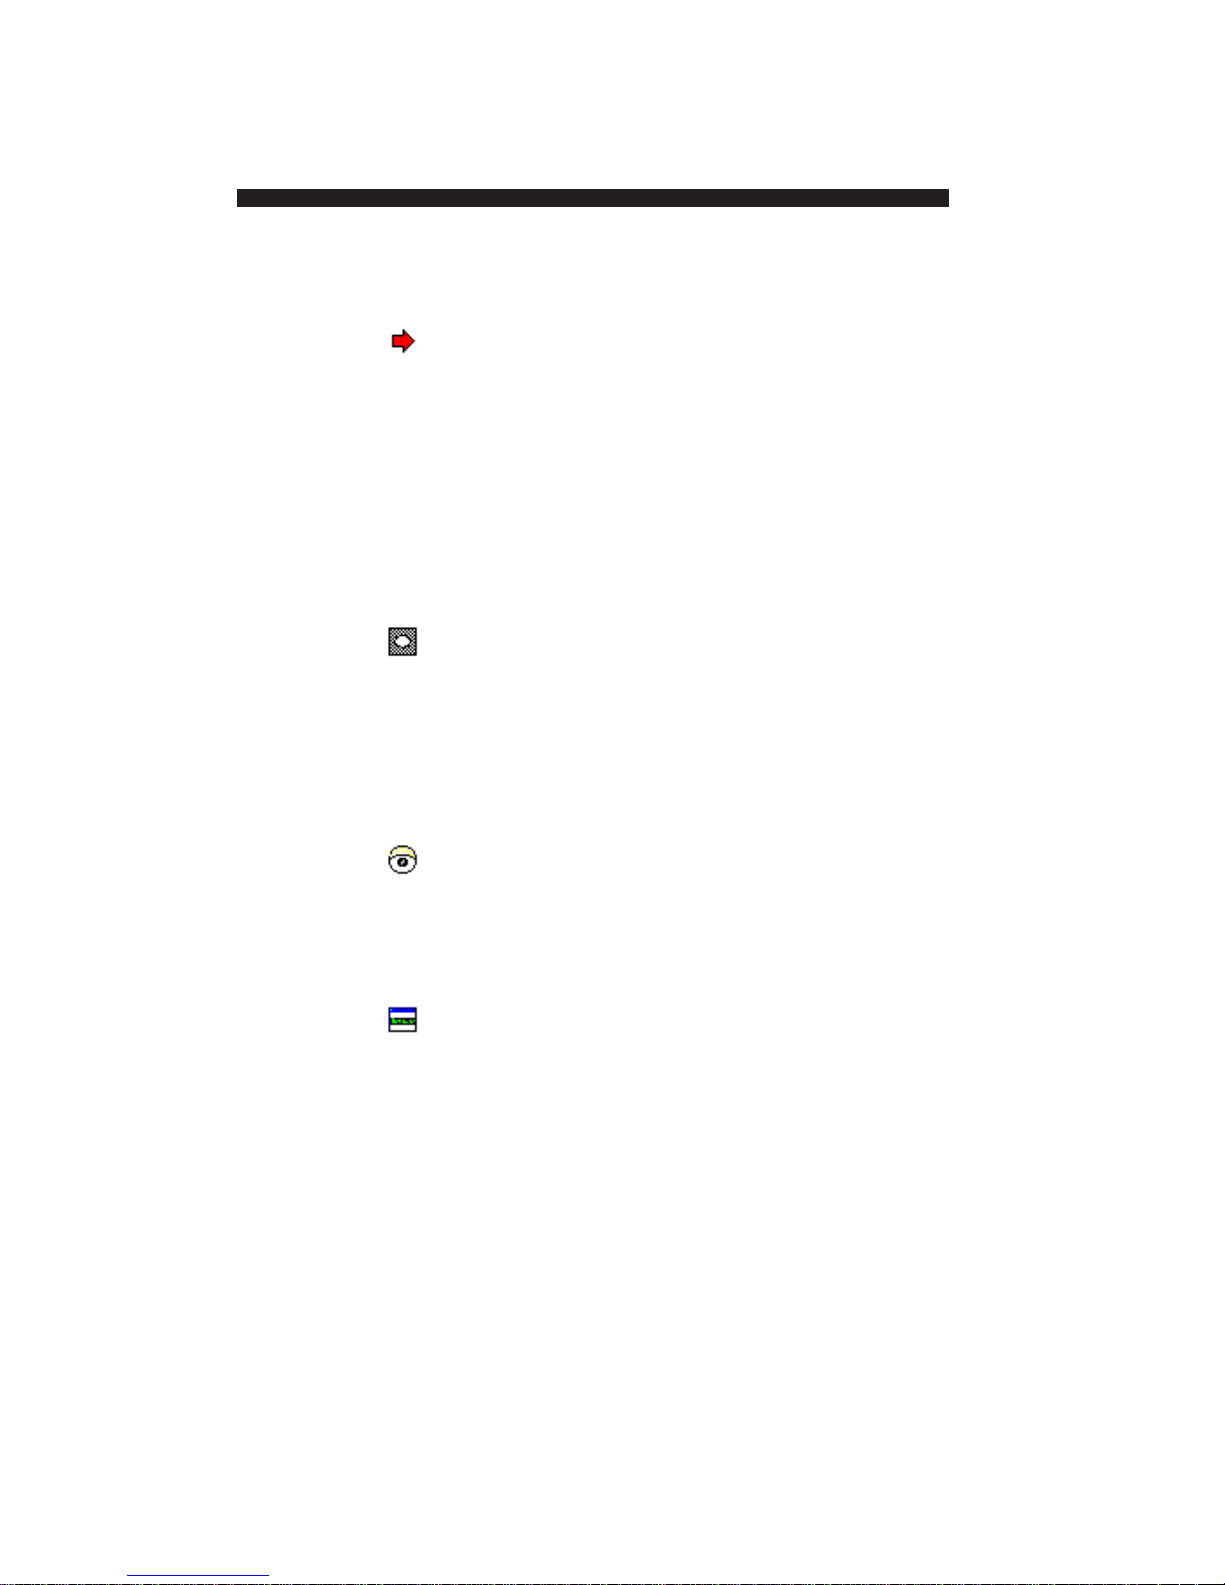
Clear Removes any marks or “ink” on the
Screen screen which you previously stamped,
using the pens, highlighter, or clip art
image
Digital Displays a digital clock on the
Clock screen.
You can change the appearance and
location of the clock.

USER’S GUIDE
Countdown Displays a countdown timer on
Timer the screen.
You can enter the number of seconds to
count down, from 1 to 999. This number
automatically translates into
Hours:Minutes:Seconds.
Analog Displays an analog clock on the
Clock screen.
You can change the appearance of the
clock face.
Display Displays a preselected graphic image
Image from your computer disk.
You can select the image file and choose
how it appears.
Hide and The Reveal tool covers the screen with
Reveal a solid color. Reveal the screen by moving
the mouse across it in the direction of the
reveal.
You can change the reveal style and
direction.
Clipart Toggles the mouse cursor between a
Pointer clip art image you select and a normal
mouse cursor.
Click the mouse to leave a copy of the
image on the screen.
You can change the size and shape of the
image by dragging it. Hold the shift key to
maintain its aspect ratio.
The clip art can be selected from a palette
of different shapes.
17
REMOTEPOINT PRESENTER
Geometric Toggles the mouse cursor between a
Pointer pointer you select and a normal mouse
Spotlight Dims the screen except the part that is “in
cursor.
Click the mouse to leave a copy of the
pointer on the screen.
You can change the size and shape of the
pointer by dragging it. Hold the shift key to
maintain its aspect ratio.
You can change the shape, color, and
style of the pointer.
the spotlight.”
You can vary the size and shape of the
spotlight by dragging it. Hold the shift key
to maintain its aspect ratio.
You can change the type and shape of the
spotlight.
18
Subliminal Displays a message for a short period of
Message time.
You can change the text and the font as
well as the position, background, and the
length of time it is displayed.
Ticker Tape Displays a horizontally scrolling message
on the screen.
The message, appearance and location
can be changed.

USER’S GUIDE
Zoom Magnifies a portion of the screen.
When Zoom Window is selected, press
the Zoom tool button, and then drag to
define the area you want to enlarge.
When one of the Auto Zoom options are
selected, click to enlarge the area around
the mouse cursor.
When Activate AutoZoom immediately is
selected, the area around the mouse
cursor is enlarged when you press the
Zoom tool button.
With Pan Enabled, you can drag to move
the enlarged area around the screen.
Proportional to Screen constrains your
selection to the height/width ratio of your
display.
Laser Toggles the mouse cursor between a
virtual laser pointer and a normal mouse
cursor.
You can change the size of the virtual
laser pointer by dragging.
Remember that the virtual laser is
activated by the button to which you
assign this tool, and not by the laser
pointer button on the Remote unit.
Note: The virtual laser pointer is useful
when giving presentations with rear
projection systems.
19

REMOTEPOINT PRESENTER
Text Stamp Toggles the mouse cursor between a
PowerPoint Tools
Powerpen Toggles the mouse cursor between a pen
large letter “T” and a normal mouse
cursor.
Click to leave a copy of the text you enter
in the Properties dialog on the screen, or
type to enter different text.
You can change the text and the font.
and a normal mouse cursor.
Drag the pen to mark.
The marks you make become annotations
in the PowerPoint presentation.
You can change the color, width, and
appearance of the pen.
Powerpointer Toggles the mouse cursor between a
pointer you select and a normal mouse
cursor.
Click to leave a copy of the pointer on the
screen.
The pointer becomes an annotation in the
PowerPoint presentation.
You can change the size and shape of the
image by dragging it. Hold the shift key to
maintain its aspect ratio.
You can change the shape, color, and
style of the pointer.
20

USER’S GUIDE
Powershape Toggles the mouse cursor between a
shape you select and a normal mouse
cursor.
Click to leave a copy of the shape on the
screen.
The shape becomes an annotation in the
PowerPoint presentation.
You can change the size and shape of the
image by dragging it. Hold the shift key to
maintain its aspect ratio.
You can change the shape, color, and
style of the shape.
PowerText Toggles the mouse cursor between a
large letter “T” and a normal mouse
cursor.
Click to leave a copy of the text you enter
in the Properties dialog on the screen.
The text becomes an annotation in the
PowerPoint presentation.
You can change the text and the font.
Black Toggles a black screen on and off in a
Screen PowerPoint slide show.
White Toggles a white screen on and off in a
Screen PowerPoint slide show.
Start – Stop Starts or ends the PowerPoint slide
Slideshow show.
21

REMOTEPOINT PRESENTER
Jump to Jumps to a selected slide in a
Slide PowerPoint slide show.
Next Slide Moves to the next slide in a PowerPoint
Previous Moves to the previous slide in a
Slide PowerPoint slide show.
First Slide Jumps to the first slide in a PowerPoint
Last Slide Jumps to the last slide in a PowerPoint
You can set the slide number to jump to,
and whether to reset the animation.
slide show.
slide show.
slide show.
Internet Tools
Exit Slide Exits from the slide show in a
Show PowerPoint slide show.
Activate Activates your browser.
Browser
Go to URL Goes to the selected Web page.
Forward Clicks your browser’s Forward button.
Back Clicks your browser’s Back button.
Refresh Refreshes the current page in your
browser
Home Clicks your browser’s Home button.
Search Clicks your browser’s Search button.
22

Mouse Tools
USER’S GUIDE
Favorites Opens your browser’s Favorites menu.
Add to Opens your browser’s Add Favorite
favorites dialog.
New Opens a new browser window.
Window
Print Opens your browser’s Print dialog.
Stop Clicks your browser’s Stop button.
Page Down Clicks your browser’s page down button.
Page Up Clicks your browser’s page up button.
Center Moves the cursor to the center of the
Cursor active monitor.
Wheel Uses the mouse to scroll the active
window.
Left Click Clicks the left mouse button.
Middle Clicks the middle mouse button.
Click
Right Click Clicks the right mouse button.
Left Double Double-clicks the left mouse button.
Click
Middle Double-clicks the middle mouse button.
Double Click
Right Double-clicks the right mouse button.
Double Click
23

REMOTEPOINT PRESENTER
Keyboard Tools
Keyboard Displays a keyboard on the screen. Use
Keypad Displays a numeric keypad on the screen.
Keystroke Sends a selected keystroke to the active
this tool to enter text in a Windows
application (such as Microsoft Excel, or
PowerPoint).
Click on keyboard buttons to enter
characters into the underlying application.
Use this tool to enter numbers in a
Windows application (such as Microsoft
Excel, or PowerPoint).
Click on keyboard buttons to enter
characters into the underlying application.
application.You can select the keystroke
that is sent.
24
Page Up Presses the Page Up key.
Page Down Presses the Page Down key.
Enter Presses the Enter key.
Escape Presses the Esc key.
Delete Presses the Delete key.
Right Presses the right arrow key.
Left Presses the left arrow key.
Up Presses the up arrow key.
Down Presses the down arrow key.
Launch Launches your email client.
Mail

Windows Tools
USER’S GUIDE
Cut Cuts the selection to the Windows
clipboard.
Copy Copies the selection to the Windows
clipboard.
Paste Pastes the contents of the Windows
clipboard.
Close Closes the active application.
Application
Close Closes the active document. The same
Document as pressing Ctrl-F4.
Top of Doc Moves to the top of the active document.
The same as pressing Ctrl-Home.
Bottom of Moves to the bottom of the active
Doc document.
Minimize/ Minimizes all windows on the desktop.
Restore All Restores all windows if they were just
minimized. The same as pressing
Windows-D.
Next Moves to the next window on the
Window desktop. The same as pressing Alt-Esc.
Previous Moves to the previous window on the
Window desktop. The same as pressing Alt-Shift-
Esc.
Next Moves to the next document in the
Document active application. The same as pressing
Ctrl-F6.
25

REMOTEPOINT PRESENTER
Previous Moves to the previous document in the
Document active application. The same as pressing
Help Opens help in the active applications. The
Start Menu Opens the Start menu. The same as
Media Tools
Movie Starts a multimedia movie.
Play Sound Plays a selected sound file once.
Once
Ctrl-Shift-F6.
same as pressing Windows-F1.
pressing the Windows key.
You can select a movie file and change
the background.
You can select a sound file and choose to
play it once, play it continuously, or stop
playing.
26
Play Sound Plays a selected sound file
Continuously continuously.
You can select a sound file and choose to
play it once, play it continuously, or stop
playing.
Stop Sound Stops a sound file that is playing.
You can select a sound file and choose to
play it once, play it continuously, or stop
playing.
Volume Up Increases the sound volume.
You can select the device, and choose to
make the sound volume go up, down, or
mute.

USER’S GUIDE
Volume Decreases the sound volume.
Down
You can select the device, and choose to
make the sound volume go up, down, or
mute.
Mute Mutes the sound.
You can select the device, and choose to
make the sound volume go up, down, or
mute.
Play Plays a CD
Next Plays the next track on a CD.
Previous Plays the previous track on a CD.
Last Plays the last track.
Pause Pauses the CD player
Stop Stops the CD player.
General Tools
Launch Starts a selected application.
Program
Display Toggles the display of the RemotePoint
Configuration Presenter Control Panel.
Change Changes to a selected RemotePoint
Profile Presenter profile.
27

REMOTEPOINT PRESENTER
Screen Starts the screen saver, overriding the
Saver normal Windows screen saver delay
Capture Saves any markings that you have made
Image on the screen using pens or highlighters.
setting.
You can select a screen saver (.scr) file
and configure it.
The image is saved in your My Pictures
folder, or if that doesn’t exist, in
C:\Program Files\RemotePoint
Presenter\Slides, and the filename is the
current date and time.
You can choose how much of the screen
is saved and what type of file is created.
Note: The location to which the screen is
saved might be different if you did not
install RemotePoint Presenter software in
the default location.
28
Clipboard Places the text you enter in the properties
dialog on the Windows clipboard.
Pen Toggles the mouse cursor between a pen
and a normal pointer.
Drag the pen to mark.
You can change the color, width, and
appearance of the pen.
Highlighter Toggles the mouse cursor between a
highlighter and a normal pointer.
Drag the highlighter to mark.
You can change the color, width, and
appearance of the highlighter.

USER’S GUIDE
Changing Button
Properties
You can adjust the properties of the tool assigned to a
button. Properties determines how the tool functions. For
example, the format of the clock that the Analog Clock
tool displays can be changed. Most tools have several
options that you can change to suit your needs.
To change a tool property:
1. Open the RemotePoint Presenter software.
2. Click the button you want to change.
3. Click Properties.
4. Make changes to the properties of the tool.
5. After making your changes to the tool properties,
click OK to apply the changes.
Each properties dialog box has a different set of options
that you can use to change the effect produced by the
tool. Below is an example of the Digital Clock Properties
dialog box, in which you can:
• Specify the location of the clock
• Switch between 12-hour and 24-hour format
• Change the font
• Specify several options for the background
29

REMOTEPOINT PRESENTER
Working with
Toolbars
A toolbar is a collection of tools. You can group several
tool buttons into a toolbar and assign the toolbar to a
button on the RemotePoint Presenter Remote. This
multiplies the functions you have available with
RemotePoint Presenter. When you press a button on the
RemotePoint Presenter Remote with a toolbar assigned to
it, the toolbar appears on the screen in the location you
specify. Use the mouse pointer and the ClickTrigger to
select tools on the toolbar.
To create a toolbar:
1. Click a tool button and click Create Toolbar.
2. Use the top row of buttons to adjust the number of
buttons and tabs to support the tools you want on the
toolbar.
3. Click a button position to add a tool to it. Click
Insert Tool and choose the tool you want to assign.
4. When you have assigned all the tools you want to the
toolbar, set the options for location and size.
30
Changing
Preferences
To use a toolbar:
1. Using the RemotePoint Presenter Remote, press the
button to which the toolbar is assigned.
2. On the toolbar that appears, click the tool you want
to use. If the Autoselect option is checked, then you
don’t have to click the tool; you only have to hold
the mouse cursor over the desired tool for a moment.
RemotePoint Presenter lets you choose several options
for how the software works.

USER’S GUIDE
To change preferences:
1. On the File menu, click Preferences.
2. In the Preferences dialog box, choose the options
you want.
3. Click OK.
You can choose from the following options.
General Start Minimized The RemotePoint Presenter software
displays only a notification area icon when
started
Automatically Edit Properties of tools are displayed when
Properties of New tools are assigned to buttons
Tools
Show Tool Tips Tool tips are displayed when the mouse
cursor hovers over an object
Enabled Hotspots Displays the Hotspots tab in the main
Events window
Other Events Displays the Other Events tab in the main
window
Display Specifies where the presentation tools,
Tools On such as the clocks and spotlight, are
displayed on a multimonitor system
Using Hotspots
Hotspots are areas of the screen that react when the
mouse cursor is moved over them. You can assign tools to
eight different hotspots: the four screen edges and the
four screen corners.
On the Hotspots tab, you assign tools to hotspots in the
same way you assign tools to buttons.
Note: If the Hotspots tab isn’t shown, you must select the
Hotspots check box in the Options dialog box, as
described in Changing Preferences, above.
31

REMOTEPOINT PRESENTER
You can also set the size of the hotspots and the delay
time before the hotspot is recognized.
Using Other
Events
Other Events comprise special combinations of mouse
clicks, keystrokes, scheduled events, or events in
PowerPoint. You can assign a tool to each of these events.
For example, you can display the Digital Clock tool by
pressing Alt-0.
On the Other Events tab, you select events and then
assign tools to them.
Note: If the Other Events tab isn’t shown, you must select
the Other Events check box in the Options dialog
box, as described in Changing Preferences, on
page 30.
To assign a tool to an event:
1. Click the Other Event tab.
2. Right-click in the Event column.
3. On the context menu, click New Event.
4. On the pop-out menus, choose the event you want.
Saving a Custom
Profile
32
5. From the tool palette, drag a tool to the Tool column
adjacent to the new event.
Once you have made changes to a profile by changing
tools or adding a hotspot or other event, you can save
your changes as a custom profile. Custom profiles appear
below the preset profiles in the list on the left side of the
window.

USER’S GUIDE
To save a new custom profile:
1. On the File menu, click Save As.
2. In the File Name box enter the name you want for
the profile.
3. Click Save.
Once you have created a custom profile, you might make
changes. To save the changes, follow this procedure.
To save an existing custom profile:
• On the File menu, click Save.
33

REMOTEPOINT PRESENTER
5
Using the 32-MB USB Drive
The RemotePoint Presenter receiver has a built-in 32megabyte flash memory mass storage device that acts just
like a removable hard drive. The 32-MB USB drive
interface follows the USB mass storage standard so you
can use it by simply inserting it into an available USB
port. Recent versions of Windows already have the
appropriate drivers.
When you insert the RemotePoint Presenter receiver into
a USB port, an additional drive appears in Windows. This
drive acts like the other drives on your system. You can
read, write, and delete files on it. It provides an easy way
to transport your PowerPoint presentations from one
machine to another.
The drive can be locked to write protect your data. Use a
paper clip to slide the data lock to the locked or unlocked
position. When the drive is locked, you cannot write or
delete files.
34
Unlocked
Locked
For more advanced use of the USB Drive, see
USBFlash.pdf on your RemotePoint Presenter CD.

USER’S GUIDE
6
No Mouse Cursor
Motion in
Windows
Troubleshooting
If you experience any difficulties after you have
connected your RemotePoint Presenter and installed the
software, please consult these troubleshooting guidelines:
• Check your connections. Make sure that the
RemotePoint Presenter receiver is securely plugged
into your computer’s USB port.
• Reprogram the receiver. Simply point the
RemotePoint Presenter Remote’s laser at the
starburst on the receiver until the green light glows
steadily.
• Make sure that the RemotePoint Presenter software
program is running. If not, start the program and try
the RemotePoint Presenter Remote again.
• Check the RemotePoint Presenter Remote batteries.
Low batteries can prevent the RemotePoint Presenter
from operating.
• Restart Windows. Sometimes restarting or powering
the computer off and back on will restore cursor
motion when the RemotePoint Presenter program is
restarted.
• Try installing the RemotePoint Presenter receiver
and software on another computer.
Note: The RemotePoint Presenter is a Microsoft
compatible mouse. It is not necessary to load the
RemotePoint Presenter software to use it as a
mouse. However, not all computers are the same.
Some computers (especially notebooks) have USB
ports configured so you can simply plug the
receiver in, power up the computer and
RemotePoint Presenter works. Other computers
might require you to change one or more settings.
Please consult your computer’s user guide to
determine if your computer is capable of working
with multiple pointing devices or automatic
detection of an external mouse.
Usually, this can be changed in
the system BIOS.
35

REMOTEPOINT PRESENTER
Operating
Distance Is
Reduced
• Low batteries in the RemotePoint Presenter Remote
can reduce the operating distance. Always ensure
that you have replacement batteries available.
• The RemotePoint Presenter Remote (the transmitter)
is designed to operate at distances up to 100 feet
from the Receiver. The operating distance may vary,
depending on the structural environment where the
device is operated.
• Changing the orientation of the receiver’s antenna
may increase the operating distance.
36

USER’S GUIDE
A
Specifications
Model VP4300
RemotePoint Presenter Remote Specifications:
• Range: Up to 100 feet (30 meters)
• Radio: Unique Personalized Address
• Frequency: 900 MHz
• Dimensions: 2.4" x 4.3" x 1.5"
(62mm x 110mm x 37mm)
• Weight: 5 ounces (140g)
• Power: 2 AAA Batteries
• Battery Life: 6 months typical
• Laser: Class II Laser
Receiver Specifications:
• Interface: USB
• Presentation Storage: 32 MB
• Dimensions: 1" x 3.9" x .58" (27mm x 98mm x
14mm)
• Weight: 1 ounce (28g)
• Programmable: Via Laser from transmitter
• LED: Address setting indicator
37

REMOTEPOINT PRESENTER
B
Technical Support
If you have any difficulties installing or using your
RemotePoint Presenter, please re-check the section of this
User’s Guide that relates to your problem. If you are still
unable to solve the problem, please call our Product
Support team for assistance.
Product Support
Hours: 8 am to 5 pm, PST
Tel: (888) 696-3500
Fax: (805) 484-5997
Email: support@interlinkelec.com
Please be ready to provide the following information:
• Date and place of purchase
• Brand and model of computer
• Software you use with this product
38

USER’S GUIDE
FCC Certification
This device complies with Part 15 of the FCC Rules.
Operation is subject to the following two conditions: (1)
This device may not cause harmful interference, and (2)
This device must accept any interference received,
including interference that may cause undesired operation.
This equipment has been tested and found to comply with
the limits for a CLASS B digital device, pursuant to Part
15 of FCC Rules. These limits are designed to provide
reasonable protection against harmful interference when
the equipment is operated in a residential installation.
This equipment generates, uses, and can radiate radio
frequency energy and if not installed and used in
accordance with the instruction guide, may cause harmful
interference to radio communications. However, there is
no guarantee that this radio interference will not occur in
a particular installation. If this equipment does cause
harmful interference to radio or television reception,
which can be determined by turning the equipment on
and off, the user is encouraged to try to correct the
interference by one or more of the following measures:
• Re-orient or relocate the receiving antenna.
• Increase the separation between the equipment and
receiver.
• Connect the equipment into an outlet on a circuit
different from that to which the receiver is connected.
• Consult the dealer or an experienced radio-TV
technician for help.
Notice: Any changes or modifications not expressly
approved by the party responsible for
compliance could void the user’s authority to
operate the equipment. This product is
equipped with shielded cable. Extension cables,
if used, must be shielded in order to comply
with the emission limits.
39

REMOTEPOINT PRESENTER
Warranty
What product is covered by this warranty?
The following product (“the Product”) is covered by this warranty: RemotePoint Presenter.
What does this warranty cover?
Interlink Electronics, Inc. (“Interlink”) warrants to the original end-user purchaser of the
Product (“you”) that the Product will be free from defects in materials or workmanship under
normal use and service during the warranty period described in paragraphs 3 and 4.
When does your warranty begin?
The warranty will begin on the day you purchase the Product. Dated proof of purchase is
necessary to accompany the Product returned for warranty service consideration. Valid proof
of purchase must identify the point of purchase, date of purchase, and product model or trade
name. Ordinarily, your sales receipt or invoice will suffice.
How long does the coverage last?
The warranty for the Product, excluding batteries as follows: ONE YEAR PARTS AND LABOR
What will Interlink do if the product becomes defective in materials or workmanship
during the warranty period?
If the Product covered under this warranty becomes defective in materials or workmanship
during the applicable warranty period, INTERLINK will, at its option, either repair the
defective Product without charge for parts and labor, or provide a replacement in exchange
for the defective Product. INTERLINK reserves the right to provide, at no additional cost, a
more current or upgraded model for replacement, if available.
What is not covered by this warranty?
(a) This warranty does not extend to: (i) Products which have been subjected to misuse, accident,
physical damage, improper installation, abnormal operation or handling, neglect, inundation or
fire, or; (ii) Products which have been damaged due to repair, alteration or modification by
anyone other than an authorized representative of INTERLINK, or; (iii) Defects caused by
components, parts, or accessories not compatible with the warranted Product, or; (iv) Products
whose warranty/quality stickers, product serial number plates or electronic serial numbers have
been removed, altered or rendered illegible, or; (v) Accessory items.
(b) ANY OTHER WARRANTIES, INCLUDING BUT NOT LIMITED TO THE IMPLIED
WARRANTIES OF MERCHANTABILITY AND FITNESS FOR PARTICULAR PURPOSE,
SHALL BE LIMITED IN DURATION TO THE DURATION OF THIS WARRANTY. SOME
STATES DO NOT ALLOW LIMITATIONS ON HOW LONG AN IMPLIED WARRANTY
LASTS, SO THE ABOVE LIMITATION MAY NOT APPLY TO YOU.
(c) INTERLINK’S TOTAL LIABILITY FOR DAMAGES FOR ANY CAUSE RELATED TO,
OR ARISING OUT OF, THE USE OR INABILITY TO USE THE PRODUCT, WHETHER
IN CONTRACT, NEGLIGENCE, STRICT TORT OR BASED ON ANY OTHER LEGAL
THEORY, SHALL NOT EXCEED THE ORIGINAL PRICE PAID FOR THE PRODUCT.
(d) IN NO CASE SHALL INTERLINK BE LIABLE FOR ANY INDIRECT SPECIAL,
INCIDENTAL, OR CONSEQUENTIAL DAMAGES BASED UPON BREACH OF
WARRANTY, BREACH OF CONTRACT, NEGLIGENCE, STRICT TORT OR ANY OTHER
40

USER’S GUIDE
LEGAL THEORY. SUCH DAMAGES INCLUDE, BUT ARE NOT LIMITED TO, LOSS OF
PROFITS, LOSS OF SAVINGS OR REVENUES, INABILITY TO USE THE PRODUCT OR
ANY ASSOCIATED EQUIPMENT, COST OF CAPITAL, COST OF ANY SUBSTITUTE
EQUIPMENT, FACILITIES OR SERVICES, CLAIMS BY THIRD PARTIES OTHER THAN
YOU, AND INJURY TO PROPERTY. SOME STATES DO NOT ALLOW THE EXCLUSION
OR LIMITATION OF INCIDENTAL OR CONSEQUENTIAL DAMAGES, SO THE ABOVE
LIMITATION OR EXCLUSION MAY NOT APPLY TO YOU.
How do you get warranty service?
If your Product requires warranty service, you must first contact Product Support to receive
an RMA Number. The telephone number for Product Support is (888) 696-3500. Once you
obtain an RMA Number, you must return the Product to INTERLINK, postage prepaid, along
with a description of the Product malfunction or difficulty and your RMA Number. You must
also substantiate warranty status with a dated proof of purchase (as explained in paragraph
3), inclusive of Product’s serial number. The address where you should send the Product to
receive warranty service is:
Product Support
INTERLINK ELECTRONICS, INC.
546 Flynn Road, Camarillo, CA 93012
RMA Number
INTERLINK assumes no risk for damage or loss in shipment. If, in INTERLINK’S sole
opinion, the Product failure is not covered under this warranty you will be notified and an
authorization will be requested for any further repair activity. Products repaired under
warranty will be returned to you, transportation prepaid. You must pay return shipping costs
for the Products repaired which are not covered by warranty or the Products for which you
do not wish to authorize repairs.
How does state law apply to this warranty?
This warranty gives you specific legal rights, and you may also have other rights which vary
from state to state.
Attorney fees:
If any legal actions arises relating to this warranty, the prevailing party shall be entitled to
recover, in addition to other damages, all court costs, expenses and reasonable attorney fees.
This warranty is the entire agreement.
Unless modified in writing, signed by both you and INTERLINK, this warranty is understood
to be the complete and exclusive agreement between the parties, superseding all prior
agreements, oral or written, and all other communications between the parties relating to the
subject matter of this warranty. No agent or employee of INTERLINK may make
modifications to this warranty and any such representations should not be relied upon.
For more information, please contact PRODUCT SUPPORT at (888) 696-3500.
41

REMOTEPOINT PRESENTER
RemotePoint Presenter Software License Agreement
This legal document is an agreement between you as the end-user (hereinafter, the
“Licensee”) and Interlink Electronics, Inc. (“Licensor”). BY USING THE RemotePoint
Presenter SOFTWARE (the “Software”), YOU ARE AGREEING TO BECOME BOUND
BY THE TERMS OF THIS AGREEMENT. THIS AGREEMENT CONSTITUTES THE
COMPLETE AGREEMENT BETWEEN LICENSEE AND LICENSOR. Grant of License:
In consideration of payment made, Licensor grants to Licensee, a non-exclusive right to
use and display this copy of the Software on a single computer (i.e., with a single central
processing unit) at a single location. If the single computer on which Licensee uses the
Software is used by more than one person, the License covers all users on that single
computer, but does not cover multi-user or networked systems that may be used by more
than one person at a time. Licensor reserves all rights not expressly granted to Licensee.
Ownership of Software: As the Licensee, you own the magnetic or other physical media
on which the Software is originally or subsequently recorded or fixed, but Licensor retains
the ownership of the Software recorded on the original disk copy and all subsequent
copies of the Software, regardless of the form or media in or on which the original and
other copies may exist. Copy Restrictions: The Software and the accompanying written
materials are copyrighted. Unauthorized copying of the Software is expressly forbidden.
Subject to these restrictions, Licensee may make one copy of the Software, solely for
back-up or archival purposes. Use Restrictions: As the Licensee, you may physically uninstall the Software from one computer and install it on another, provided that the Software
is used only on one computer by one person at a time. Licensee may not distribute copies
of the Software or the accompanying written materials to others. Licensee may not modify,
adapt, translate or create derivative works based on the written materials without prior
written consent of the Licensor. Transfer: Any transferee of the Software shall be bound
by the terms and conditions of this agreement. Termination: This License will terminate
automatically without notice from the Licensor if Licensee fails to comply with any
provisions of this License. Upon termination, Licensee must destroy the written materials
and destroy and/or delete from Licensee’s computer all copies of the Software, including
modified copies, if any. Warranty: The disk licensee received containing the Software
was not prepared by Licensor, and Licensor assumes no liability whatsoever regarding its
condition. Licensor does warrant that the Software contained on the disk is free from
material errors. If any error is discovered in the Programming Code contained on the
disk, Licensor may, at it’s discretion, correct the Code and may, upon notice, provide
Licensee with a disk containing the corrected Program, free of charge. EXCEPT FOR
THE ABOVE, LICENSOR GRANTS NO WARRANTIES, EXPRESS OR IMPLIED,
BY STATUTE OR OTHERWISE, REGARDING THE SOFTWARE, THE DISK OR
RELATED MATERIALS, THEIR FITNESS FOR ANY OTHER PURPOSE, THEIR
QUALITY, THEIR MERCHANTABILITY OR OTHERWISE. IN NO EVENT SHALL
LICENSOR BE LIABLE FOR ANY SPECIAL, CONSEQUENTIAL OR OTHER
DAMAGES. In the event of a dispute concerning this agreement, the prevailing party
shall be entitled to recover, in addition to all other damages, reasonable attorney fees,
costs and expenses. Governing Law: This Agreement is governed by the internal laws of
the State of California.
42
 Loading...