

Page 1

Interlink Electronics
®
FSR
USB MicroModule
Integration Guide
Document P/N: EIG-10005 Rev. A
Interlink Electronics and the six dot logo are registered trademarks of Interlink Electronics, Inc.
Force Sensing Resistors®
USB MicroModule
Integration Guide
www.interlinkelectronics.com
Page 2

USB MicroModule
Integration Guide
Table of Contents
Introduction.................................................................................................................... 1
1.0
2.0 Scope ................................................................................................................................ 1
3.0 Theory of Operation .................................................................................................... 2
4.0 Features and Operation ............................................................................................. 4
4.1 Using the Pressure-Sensing Actuator ................................................................... 4
4.2 Clicking and Dragging ........................................................................................... 4
5.0 Mounting .......................................................................................................................... 5
5.1 Suggested Panel Cut-out ...................................................................................... 5
5.2 Mounting MicroModule .......................................................................................... 6
5.3 Supporting MicroModule’s PCB ............................................................................ 7
5.4 Sealing MicroModule with Silicone Sealant........................................................... 7
6.0 Connection ..................................................................................................................... 8
6.1 Molex Header/Mating Connector Specifications ................................................... 8
6.2 USB Interface Connections ................................................................................... 9
6.3 Cable Options ...................................................................................................... 10
7.0 USB Information ......................................................................................................... 11
7.1 Device PID and VID ............................................................................................. 11
7.2 Data Packet ......................................................................................................... 11
7.3 USB Suspend Mode ............................................................................................ 11
7.4 Operating Voltage and Current ........................................................................... 11
8.0 Drawings and Dimensions ....................................................................................... 12
9.0 Orderable Part Numbers .......................................................................................... 14
10.0 Intellectual Property & Other Legal Matters .................................................... 14
11.0 Contact Interlink Electronics ................................................................................ 15
www.interlinkelectronics.com
Page 3

USB MicroModule
Integration Guide
1.0 Introduction
Designed for OEM integration, MicroModule pointing solutions are ideal for computer cursor
control in rugged mobile comp uters, hardened keyboards, navigation s ys t ems, machine control
panels, and many other computer pointing applications. MicroModule, with its USB interface,
can also be easily interfaced to other control applications such as pan and tilt controllers,
motion controllers, CNC controllers and medical control equipment.
MicroModule incorporates Interlink Electronics’ Ve rsaPoint
Directional control is achieved by applying pressure in the direction of desired movement.
Speed is controlled by altering the amount of applied pressure. The result is smooth cursor
movement in any direction , from a precise crawl to a screen-crossing zip. VersaPoint
technology has no moving parts to break or wear out, th us deliver ing reliab le, tro uble- fr ee
cursor control.
The purpose of this document is to guide users through the successful integration of the
Interlink Electronics USB MicroModule.
®
Pressure-Pointing technology.
2.0 Scope
This Integration Guide provides the OEM integrator with all of th e necessary technical
information to succ ess fu l ly i nte gra te the In ter l ink Elec tr onic s USB M icr oMo dul e into pro duc ts
such as:
NEMA-rated industrial pointing devices
Industrial keyboards
Military computers
Motion control applications
Part numbers are detailed in section 9.
www.interlinkelectronics.com
1
Page 4

USB MicroModule
Integration Guide
3.0 Theory of Operation
The most basic FSR consis ts of two membranes separa ted by a thin air gap. The air gap is
maintained by a spacer around the edges and by the r ig idity of the two me mbr anes . One of th e
membranes has two sets of fingers which are interdigitated and electrically distinct; each set
connects to one trace on the tail. Th e other membrane is coa ted wi th FSR ink. Wh en th e two
layers are pressed together, the FSR ink s horts th e two tr aces tog ethe r with a res ist ance tha t
depends on applied force.
Figure 1: Exploded view of a standard single-zone FSR
www.interlinkelectronics.com
2
Page 5

USB MicroModule
Integration Guide
The 4-zone FSR used in MicroModule is simply a combination of four basic FSRs arranged in a
North, South, East, West pattern. Each zone interpenetrates into the two zones on either side
of it. This overlapping of the zones allows us to deter mine how much forc e is in each z one
relative to the others. Once the relative force in each zone is known , the dir ec tion and speed of
the mouse pointer can be de ter mined.
Figure 2: Exploded view of 4-zone FSR
www.interlinkelectronics.com
3
Page 6

USB MicroModule
Integration Guide
4.0 Features and Operation
4.1 Using the Pressure-Sensing Actuator
MicroModule is available with a choice of two actuator styles, either a Finger Disk or a Mini
Joystick (See Figure 3). The Finger Disk actuator is roun d with a fingertip-shaped divot.
The Mini Joystick is a comp act control stick. Both actuator styles deliver simultaneous 360degree control of direction and speed with the touch of a finger. All MicroModule pointing
solutions are maintenance free a nd d elive r “mouse” lifetimes in excess of five million
actuations.
Either actuator will convert the touch of a finger into smooth cursor movement. To use
MicroModule, place your fingertip on the center of the actuator and rock it in the direction
you want to move. You can move in any direction — MicroModule has full 360-degree
directional control. Use a light touch for precision movement, or increase your pressure to
increase the speed of the cursor.
4.2 Clicking and Dragging
The click buttons are located on either side o f the actua tor and opera te like th ose on a
conventional mouse. The left button on the MicroModule is equivalent to the left mouse
button and is used as the default primary button. The right button is equivalent to the right
mouse button and is used as the default secondary button. You can interchange the
operation of the buttons in the Windows Control Panel, if desired (e.g., for le ft-hand ed
users).
To drag an item, simply press and hold the primary button while moving the cursor with the
actuator. Release the primary button to complete the drag operation. Some users find it
easier to swap click buttons and use the right click as the primary button, allowing forefinger cursor control with middle- f in ger clicking.
Figure 3: Exploded MicroModule Actuator Types (Left: Finger Disk, Right: MiniJoystick)
www.interlinkelectronics.com
4
Page 7

USB MicroModule
Integration Guide
5.0 Mounting
MicroModule requires less than 1 0 mm of mounting depth (much less than trackballs or
joysticks), allowing it to be easily integrated into tight, cramped spaces. MicroModule’s slim
mounting profile and small front-panel mounting area frees valuable space for o t her system
components. MicroModule is unaffected by mounting orientation: it can be mounted
horizontally, as in a desktop keyboard; vertically, as on a machine control panel; or any angle in
between. This gives system designers maximum flexibility with produc t design and ergonomics.
MicroModule is designed to be blind-mounted into a variet y of panel types. Additionally, custom
bezels can be fabricated or molded to allow integration into devices such as machine control
panels or notebook computers . A detailed 3D CAD model of Interlink’s suggested moun ting
method and geometry can be found on our webs ite a t www .int erlinkelec tr onics .com /Suppor t
5.1 Suggested Panel Cut-out
When mounting MicroModule, the suggested clearance for the cu t-out around the actuator
(Finger Disk or Mini Joystick) is 0.5 millimeters and 1.0 millimeter for the click buttons. See
Figure 4 for details on the suggested cut-ou t.
.
Figure 4: Suggested panel cut-out dimensions. All dimensions are in mm and Reference.
www.interlinkelectronics.com
5
Page 8
USB MicroModule
Integration Guide
5.2 Mounting MicroModule
To panel mount the module without sealing, fabricate a panel designed with the necessary
cut-outs for the actuator an d click buttons , and four or mo re fast eners (e.g., PEM studs ,
edge clips, hole clips, heat stakes, etc.). When installing, MicroModule should be seated
evenly and the fasteners tightened evenly to avoid stressing the printed circuit board. Over
torque on the bolts should be avoided; this could crack the PCB and cause the module to
fail. It is recommended to use a PCB support bracket to apply even clamping p ressure to
the MicroModule unit. With proper seating and tightening, a liquid and particula te res is tant
interface can be created.
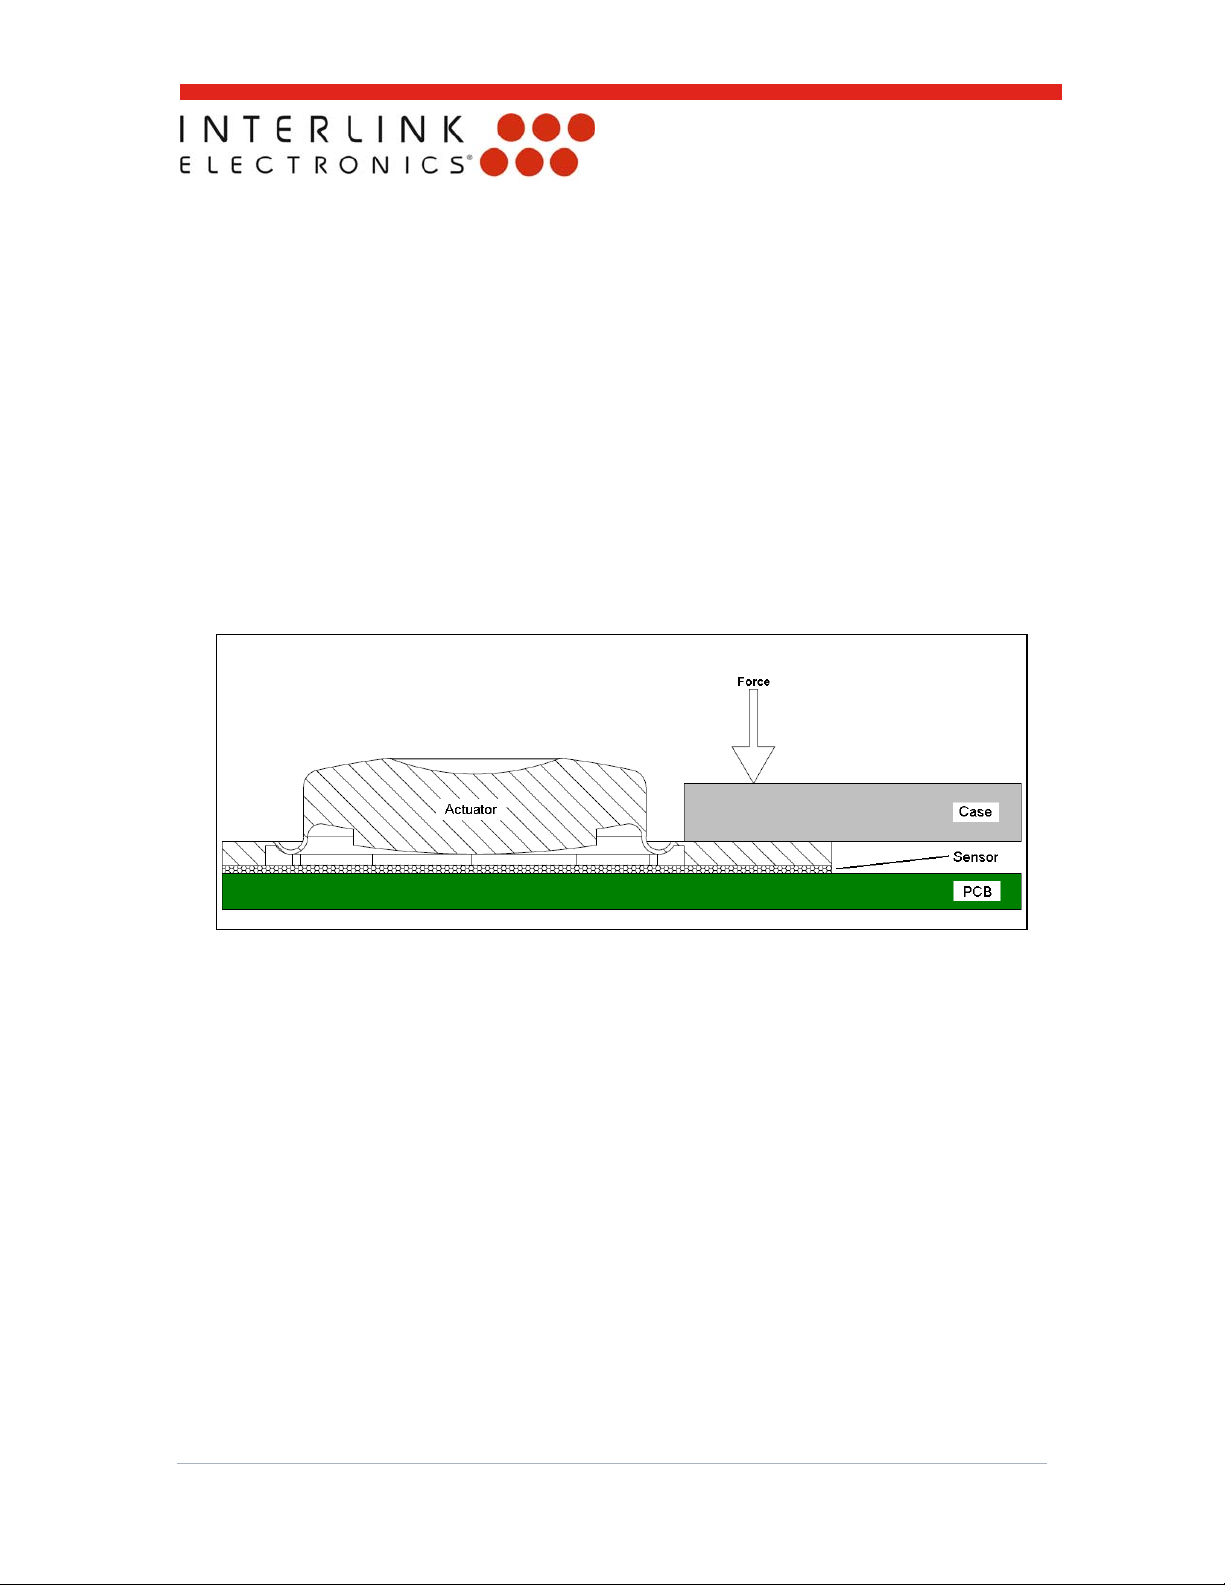
Note: The FSR is connected to the PCBA with Z-axis adhes ive. Th is is an electrica l, no t
mechanical bond. A mechanical means of applying a compressive forc e to th e join t should
be incorporated in the mounting of the MicroModule. This will prevent the delamination of
the adhesive, which can lead to an open circuit. If you follow the Interlink recommended
cut-out and PCB support br acke t technique, the rubber keypad and the panel edge will be
used to apply pressure to the joint (See Fi gure 5) .
Figure 5: Cross section view showing constant pressure being applied to the sensor contacts by
the module's case (panel) through an extension of the rubber keypad actuator
www.interlinkelectronics.com
6
Page 9

USB MicroModule
Integration Guide
5.3 Supporting MicroModule’s PCB
A mounting bracket/clip should be add ed during installation of MicroModule to support its
PCB. The mounting bracket/clip should be designed to mount around the edge of the PCB
and should help prevent excessive flex in the PCB. The below figure illustrates the concept
of the supporting bracket design.
Figure 6: MicroModule Mounting with PCB support bracket. Rear side view of panel/case.
5.4 Sealing MicroModule with Silicone Sealant
MicroModule’s silicone-rubber actuators are designed with an integrated sealing rib that
allows MicroModule to be sealed into a s ystem during installation. Common silicone se alan t
or mounting brackets can a lso be used to create a watertight seal. Once sealed into a
system, spills, rain, or humidity will not affect MicroModule’s performance--making it ideal
for field service, outdoor, or hose-down enviro nmen ts.
RTV silicone sealant can be used as a sealing material. Before starting installation, be sure
to clean the panel and rubber keypad thoroughly with isopropyl alcohol. Integrators may
also find that some panel/bezel materials will need to be primed with a silicone primer to
obtain proper adhesion. To seal MicroModule with silicone sealant, apply a thin bead of
sealant to the top of the rubber keypad on the outer edge of the keypad’s sealing rib.
Minimize the amount of sealan t ap plied to prevent lumping near the active buttons, which
could adversely affect the MicroModule’s performance. Alternately, sealant can be applied
around the perimeter of the module and the bolt holes after it has been mounted into the
bezel or panel. For the best possible seal, apply the sealant to both the top of the keyp ad
before installation, and around the perimeter of the module after installation.
www.interlinkelectronics.com
7
Page 10

USB MicroModule
Integration Guide
6.0 Connection
Connection to MicroModule is accomplished via header J2 (Molex series #53261-0871), where
J2 provides the connection to the unit’s USB interface (See Table 1 for header pin-out). The
integrator will need a cable with one female end (Mo lex series #51021) to mate to J2 and a
second end to mate to their desired interface (e.g., a USB port, PCBA, etc.). Information on the
mating connector to MicroModule’s PCB header is given be low for sys tem in tegr ators to
fabricate cables.
6.1 Molex Header/Mating Connector Specifications
The J2 header is a Mole x series #53261-0871. Molex connector series #51021 is designed
to mate with this head er. The metallic contacts that slip into the #51021 housing can be
either 50079-8 or 5005 8-8. The 50079 contacts acc ep t wires AWG 26-28, and the 50058
contacts accept wires AWG 28-32.
Figure 7: MicroModule Connector (Molex Series 53261).
www.interlinkelectronics.com
8
Page 11

USB MicroModule
Integration Guide
6.2 USB Interface Connections
The following table shows the pin-out for USB connection to the J2 header . J2 is the 8-p in,
1.25 millimeter-center header on the back of the USB MicroModule’s circuit board.
J2 Pin Signal
1 VCC +5V
2 D+ D+
3 D- D4 GND Ground
5 -- -6 -- -7 -- --
Signal
Description
8 -- --
Table 1: USB connector pin-out
www.interlinkelectronics.com
9
Page 12

6.3 Cable Options
The following illustrations show the stan dar d In ter link cable options .
USB MicroModule
Integration Guide
Figure 8: MicroModule Standard Cable Options
www.interlinkelectronics.com
10
Page 13

7.0 USB Information
Communication from the host to the microprocessor is done via USB and:
Uses the low speed USB standard
Is compatible with any USB 1.1 or 2.0 host
Enumerates as a HID device
Uses the standard Windows mouse driver
The microprocessor reports data to the host at a rate of 50 reports/sec.
7.1 Device PID and VID
This IC’s Product ID (PID): 0x0002
Interlink’s Vendor ID (VID): 0x214A
7.2 Data Packet
The data packet from the chip is organize d as:
USB MicroModule
Integration Guide
Byte 0
o Bit 0 is the Left Button status
o Bit 1 is the Right Button status
o Bit 2 is the Middle button status
Byte 1 reports the X direction. The values range from -127 to +127 counts.
Byte 2 reports the Y direction. The values range from -127 to +127 counts.
7.3 USB Suspend Mode
The chip will respond to a “suspend” command from the host by going into a low-power
sleep mode. In sleep mode, the chip consumes approximately 300µA. MicroModule will not
wake the host from suspend mode.
7.4 Operating Voltage and Current
The USB VersaPad is bus power ed ; therefore, it operates at 5V. Un der normal operation,
the device draws between 10mA to 12mA. This current draw is typical of a full assembly
(chip, sensor, etc).
www.interlinkelectronics.com
11
Page 14
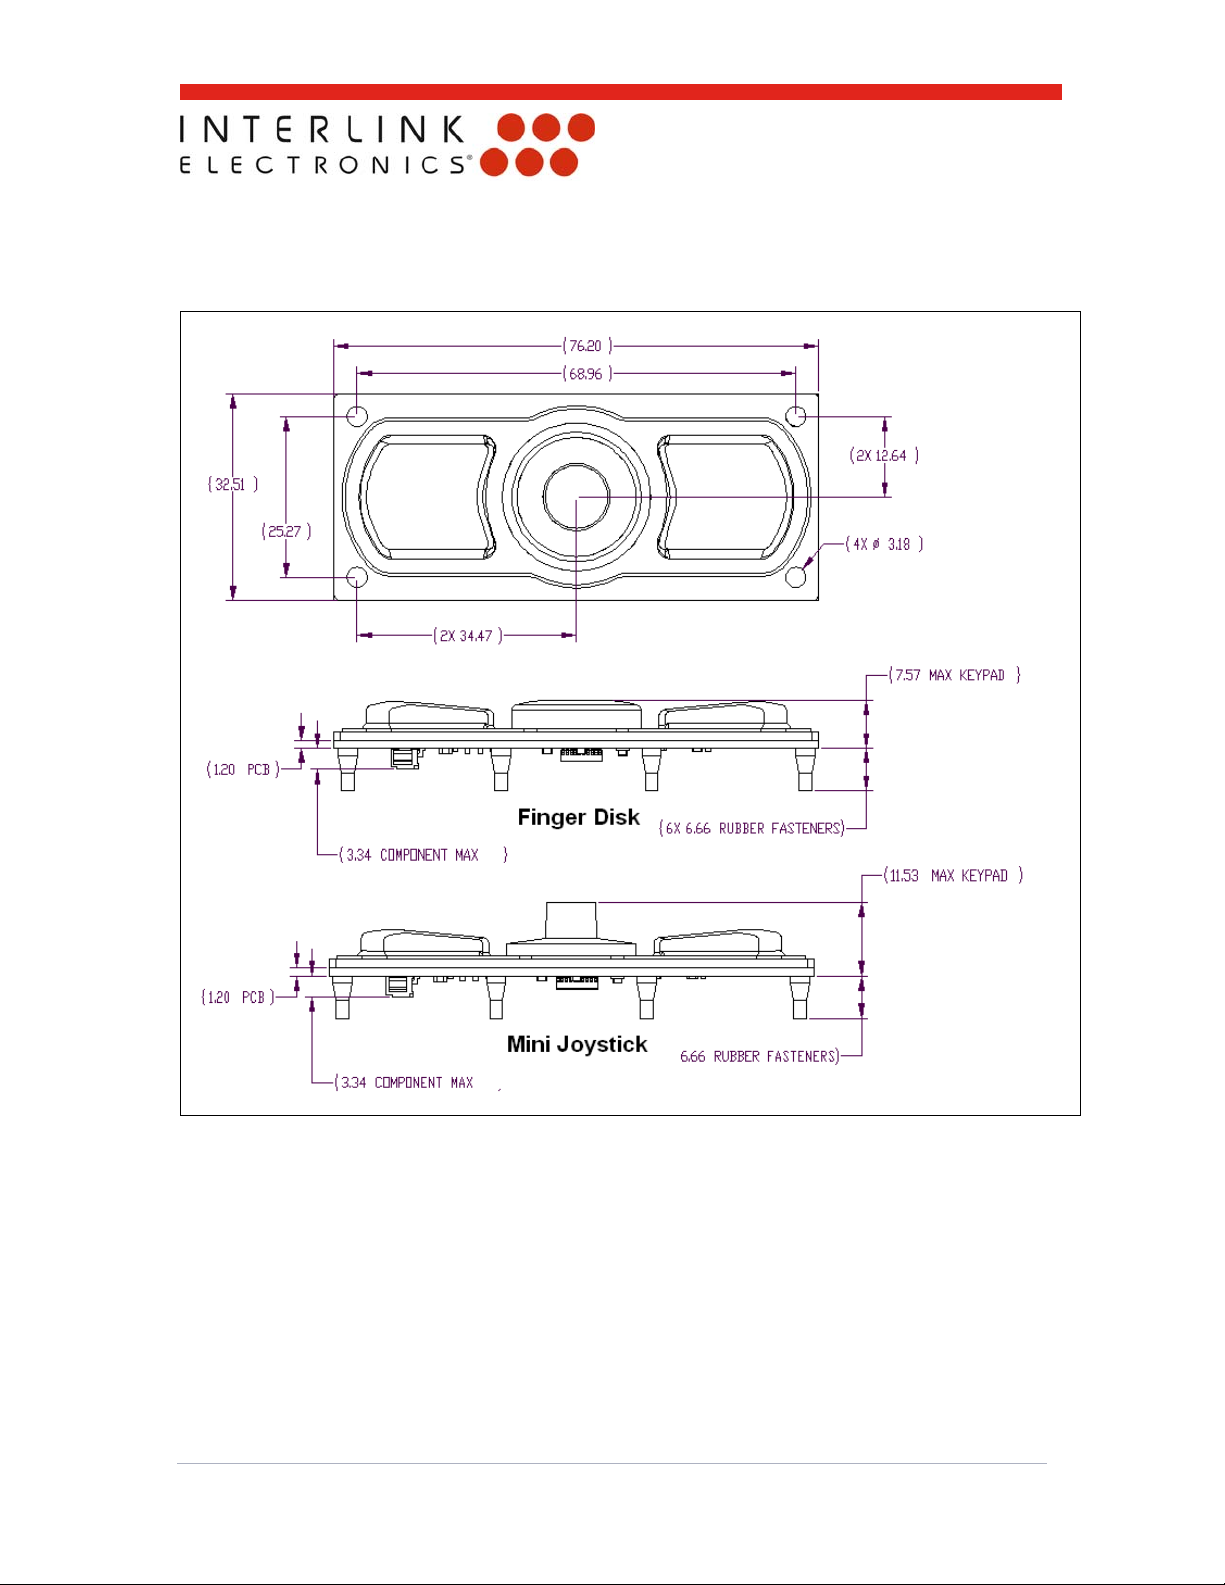
8.0 Drawings and Dimensions
USB MicroModule
Integration Guide
Figure 9: MicroModule Dimension (Reference)
www.interlinkelectronics.com
12
Page 15

USB MicroModule
Integration Guide
Figure 10: MicroModule Rear View (PCB)
Note: A detailed 3D CAD model of Interlink’s MicroModule geometry can be found on our
website at www.interlinkelectronics.com/Support
.
www.interlinkelectronics.com
13
Page 16

9.0 Orderable Part Numbers
Hardware Development Kit MicroModule USB (54-00028)
o QTY 1 MicroModule Demo (Black Button) with USB Cable
o QTY 1 MicroModule USB, w/MiniJoystick
o QTY 1 Gray Button Keypad
o QTY 1 Cable, Harness, 12 inch
o QTY 1 USB Cable Assembly
o QTY 1 USB Flash Drive with Product Literature
MicroModule USB Datasheet
MicroModule USB Integration Guide
MicroModule USB, w/Black Button (54-00002)
MicroModule USB, w/Gray Button (54-00023)
USB MicroModule
Integration Guide
MicroModule USB, w/MiniJoystick (54-00011)
MicroModule USB, w/ Black Button FL-SI Keypad (54-00046)
Cable, Harness, 12 inch (14-16576)
USB Cable Assembly (14-00054)
USB Cable Assembly with Strain Relief, Demo (14-00108)
10.0 Intellectual Property & Other Legal Matters
Interlink Electronics holds several domestic and international patents for its Force Sensing
Resistor technology. FSR and Force Sensing Resistor are company trademarks. All other
trademarks are the property of their respective owners.
The product information contained in this document provides general information and
guidelines only and must not be used as an implied contract with Interlink Electronics.
Acknowledging our policy of c on t inu al product development, we reserve the right to change,
without notice, any detail in this publication. Since Interlink Electronics has no control over the
conditions and method of use o f o ur products, we suggest that any potential user confirm their
suitability for their own application.
www.interlinkelectronics.com
14
Page 17

11.0 Contact Interlink Electronics
United States
Corporate Office
Interlink Electronics, Inc.
546 Flynn Road
Camarillo, CA 93012, USA
Phone: +1-805-484-8855
Fax: +1-805-484-9457
Web: www.interlinkelectronics.com
Sales and support: sales@interlinkelectronics.com
Japan
Japan Sales Office
Kannai-Keihin Bldg. 10F/1004
2-4-2 Ougi-cyo, Naka-ku
Yokohama-shi, Kanagawa-ken 231-0027
Japan
Phone: +81-45-263-6500
Fax: +81-45-263-6501
Web: www.interlinkelec.co.jp
USB MicroModule
Integration Guide
www.interlinkelectronics.com
15
 Loading...