

Page 1
CONSUMER’S MANUAL
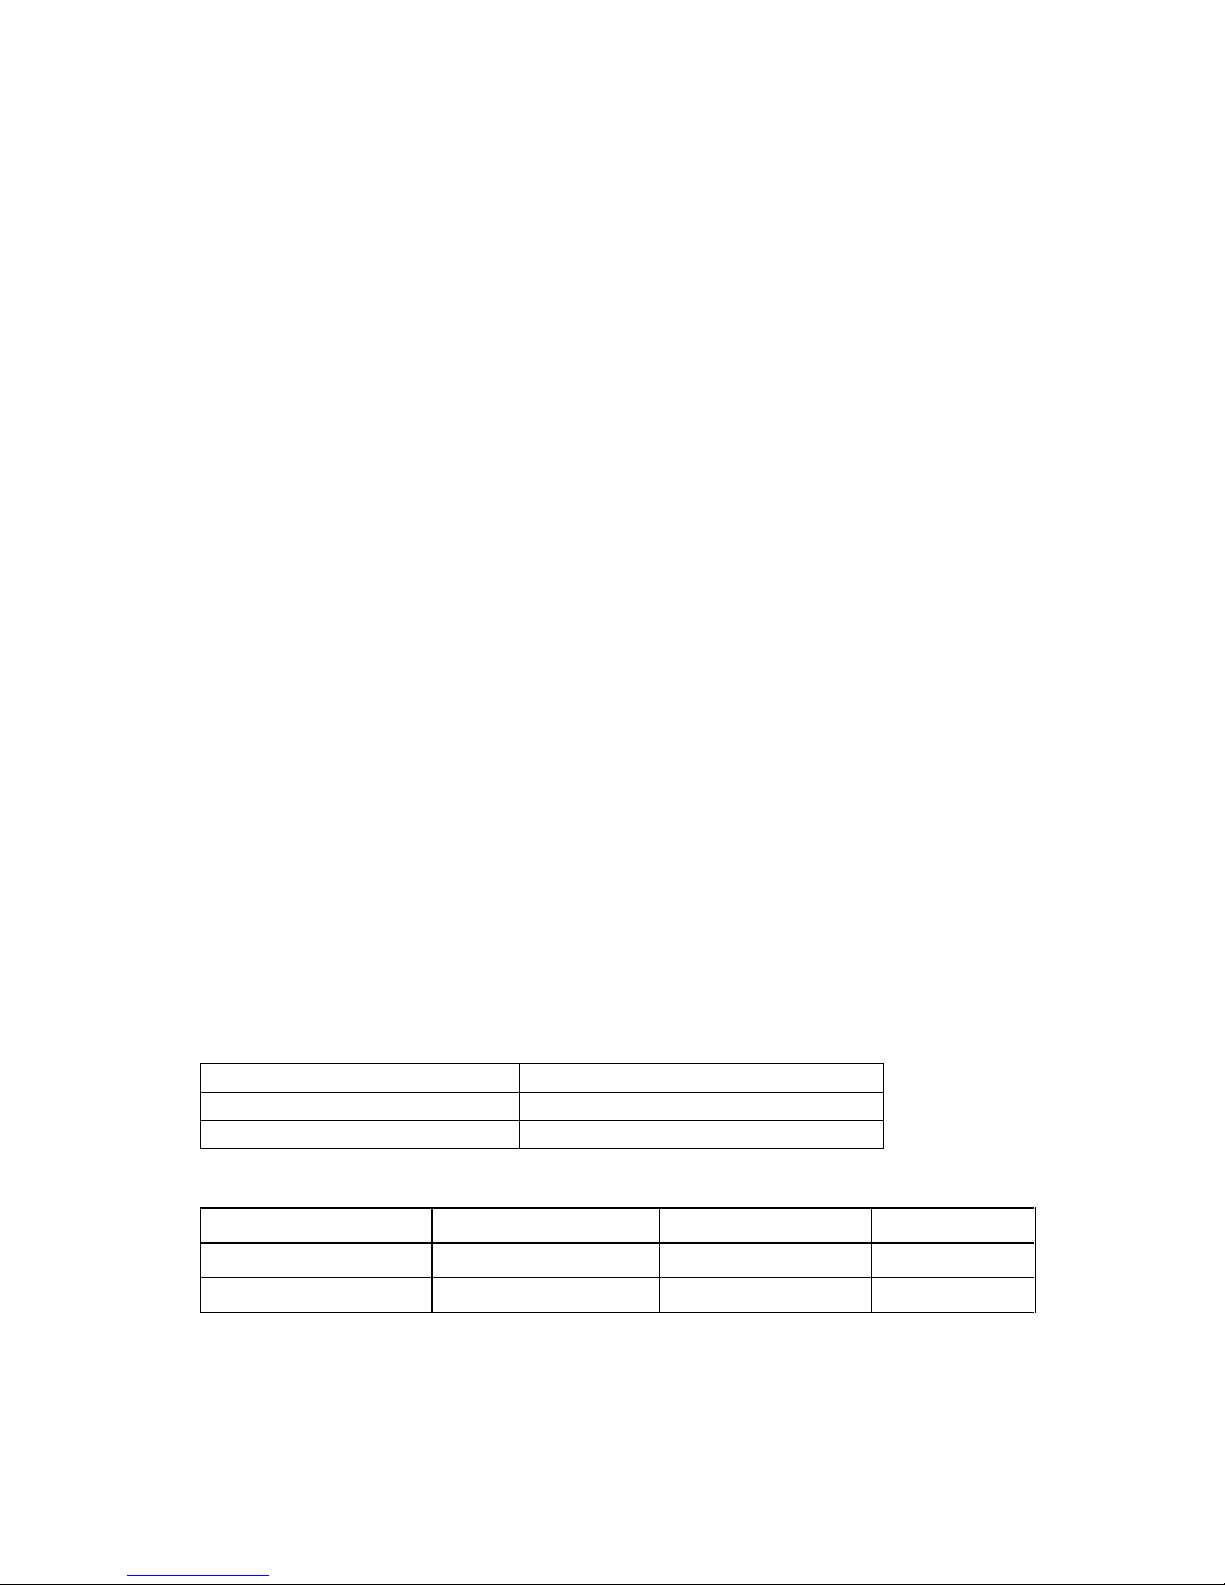
INTERLINE PREMIUM
INFRARED CABINS
Page 2

-2-
Dear customer ,
Thank you for purchasing our product, the new generation sauna in the world .
Before using,
please read this consumer’s manual carefully
!
This consumer’s manual is suitable for saunas with ceramic heaters.
CATALOG Page
A. Preview 2
B. General safety rule 5
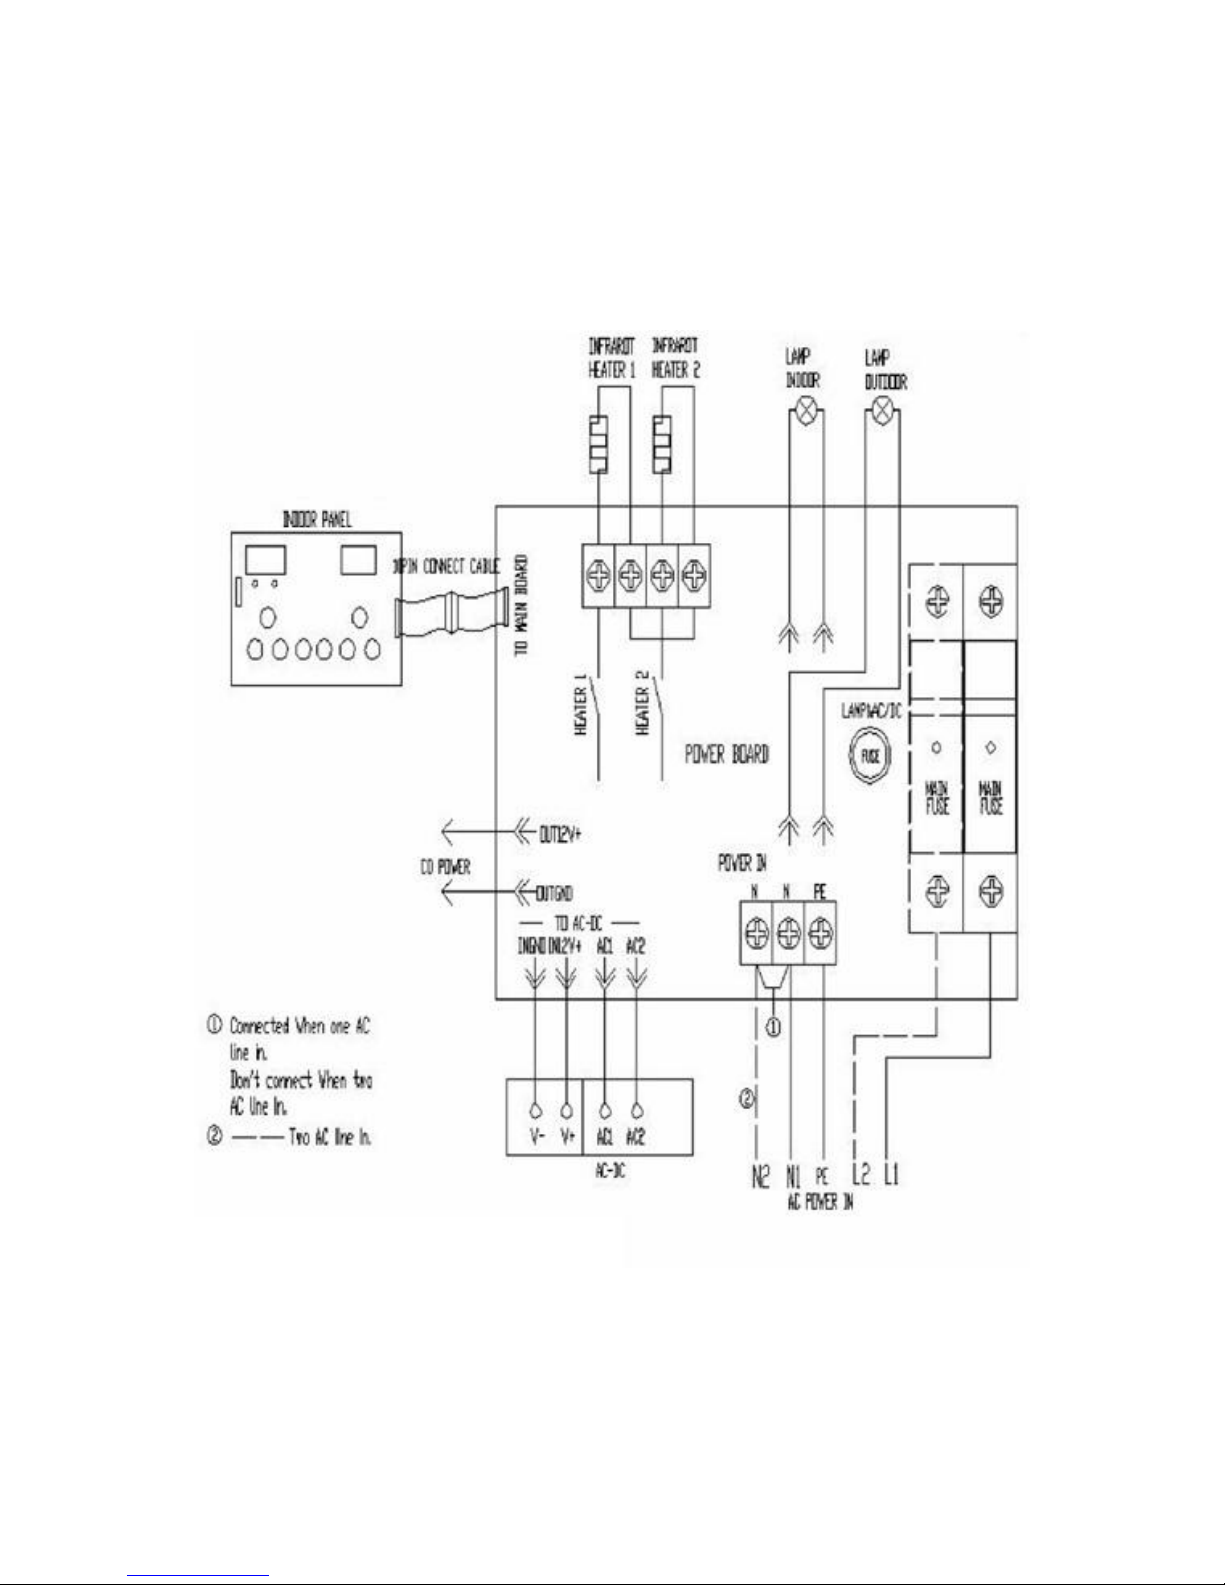
C. Circuit diagram 7
D. Installation 8
E. Operation 14
F. Tips for use 16
G. Frequently Asked Questions 17
H. Maintenance 18
I. Transportation 18
J. Limited Warranty 18
K. Appendix (CD player & Oxygen Ionize Installation) 19
INSTALLATION (2 person sauna room is taken for example)
A. Preview
A1 Brief
All growth depends on sunlight. But 40% of the ultraviolet and the high energy rays of the
sun are harmful to the human body; the remaining 60% of the sun’s energy is beneficial,
comprising infrared rays. Our infrared sauna uses these invisible (5.6-15 µm) infrared rays
to increase cell tissue resonance, accelerate blood circulation and improve organic functions.
Infrared sauna therapy is becoming increasingly popular and accepted by the medical
fraternity, with more studies now supporting the science behind this exciting new
development.
Page 3
-3-
An infrared sauna can help relieve pain and improve wound healing and recovery by
increasing blood circulation. The increased metabolic rate experienced in an infrared sauna
actually burns calories as the body works to sweat. This aids fat burning, improves cardiac
fitness, strengthens the heart, helps eliminate toxins and improves cellulite and general skin
tone. A 30-minute session in an infrared sauna burns the same calories as a 10-kilometer run.
The quality stereo system fitted in our saunas aids relaxation with sound therapy and helps
relieve stress.
A2 Operating Conditions:
A2.1 Temperature: 5℃-40℃
A2.2 Humidity: ≦85%
A2.3 Pressure: 700-1060 hpa
A2.4 Power supply: AC 120V △220V -240V
Frequency △50HZ±1 60HZ±1
: USA or Canada standard.
△
: EU standard.
A2.5 Do not install closer than 12.7 mm to wall.
A3 Features:
A3.1 Wooden construction
A3.2 Digital microprocessor controlled
A3.3 Temperature adjustable from 20℃-60℃
A3.4 Adjustable dwell time from 0 to 60 minutes
A3.5 Digital temperature sensor
A3.6 Soft touch keypad
A3.7 Long-life ceramic infrared heater
Model
Specification
L1TP
900 x 900 x 1900 mm
L2TP
1200 x 1000 x 1900 mm
A3.8 Specification
(ceramic heater):
Model
Rated Voltage
Rated Frequency
Input Power
L1TP
120V/220-240V
60Hz/50Hz
1400W
L2TP
120V/220-240V
60Hz/50Hz
1750W
- 3 -
.
Page 4
-4-
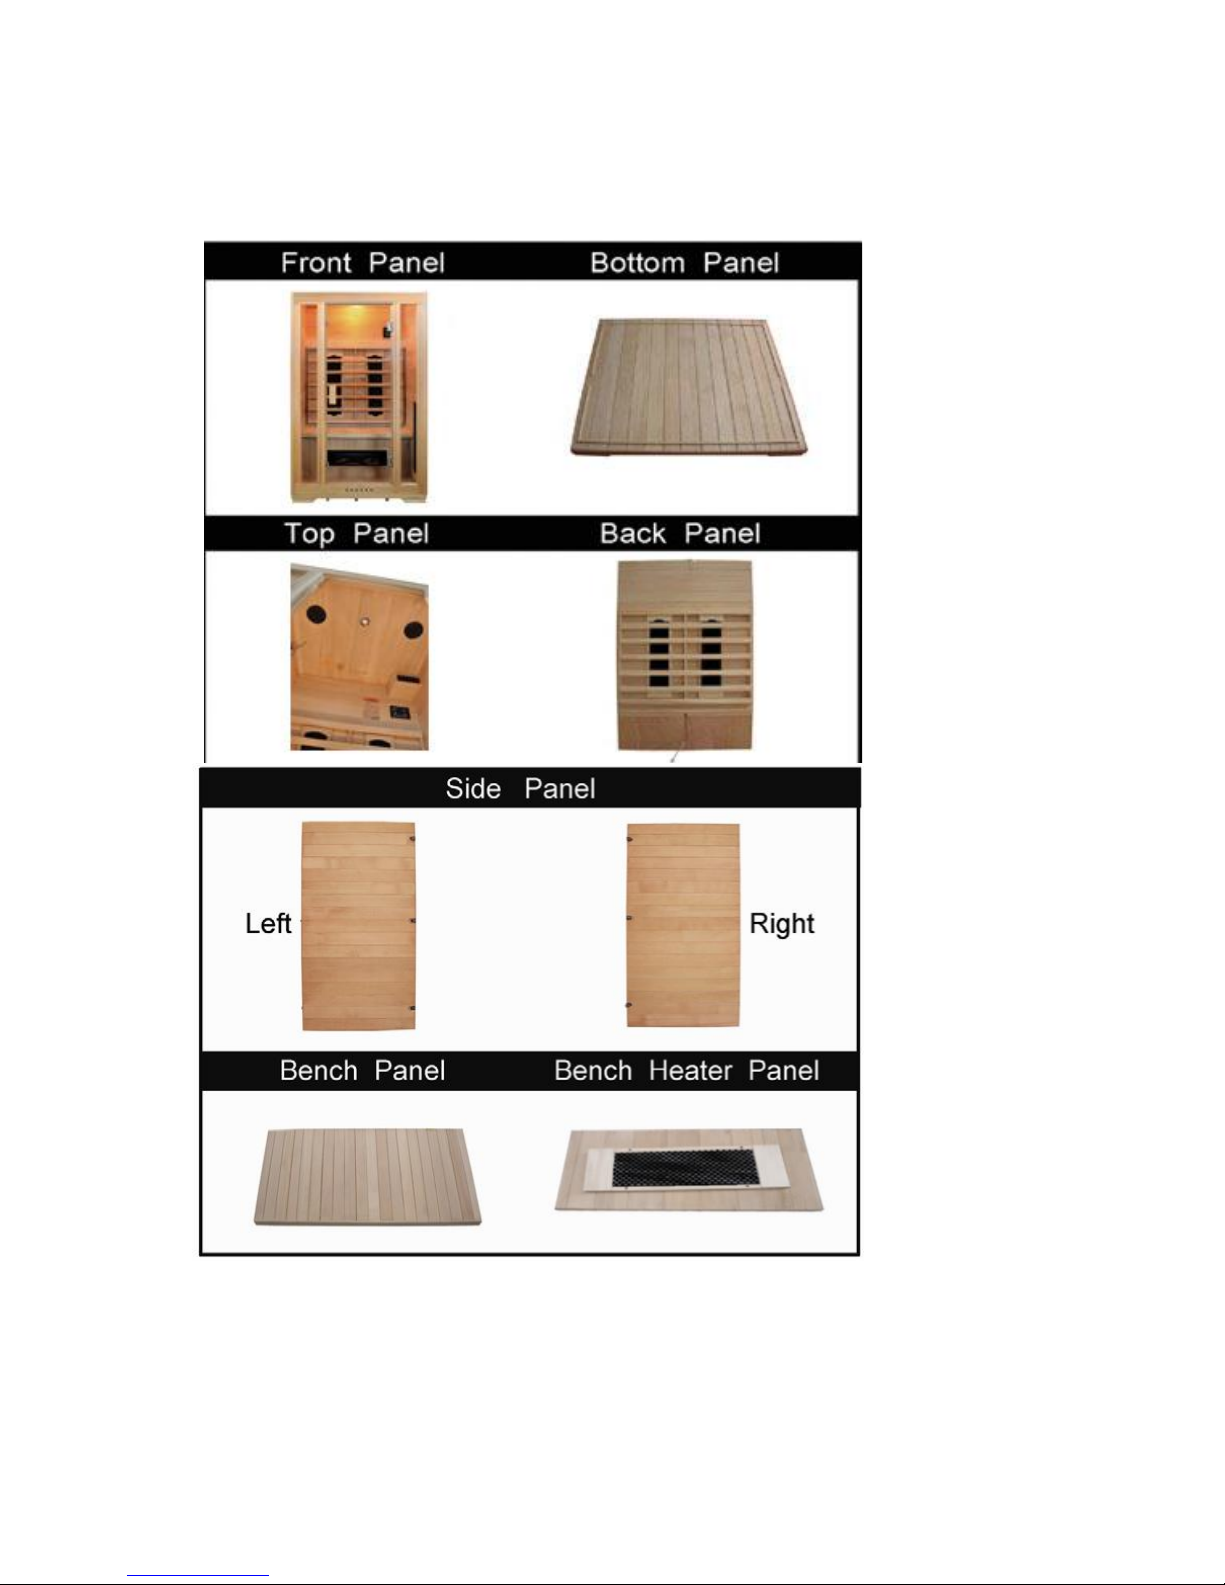
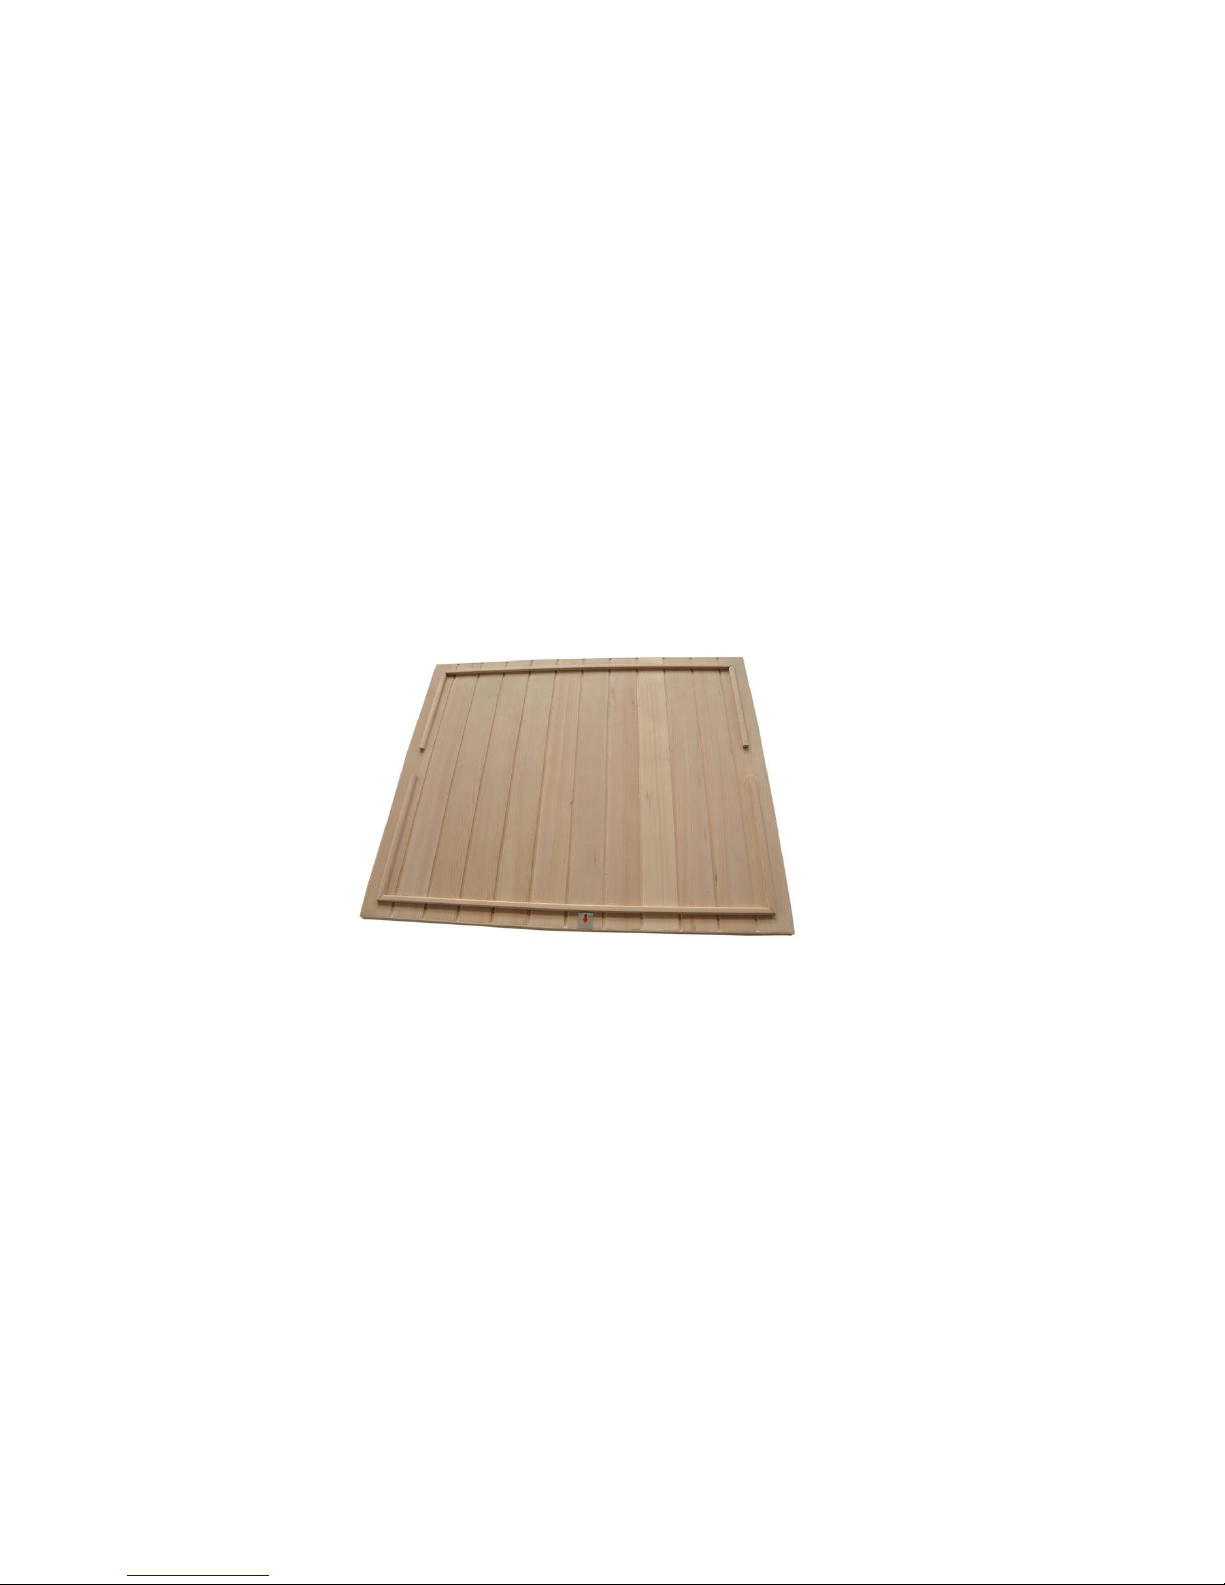
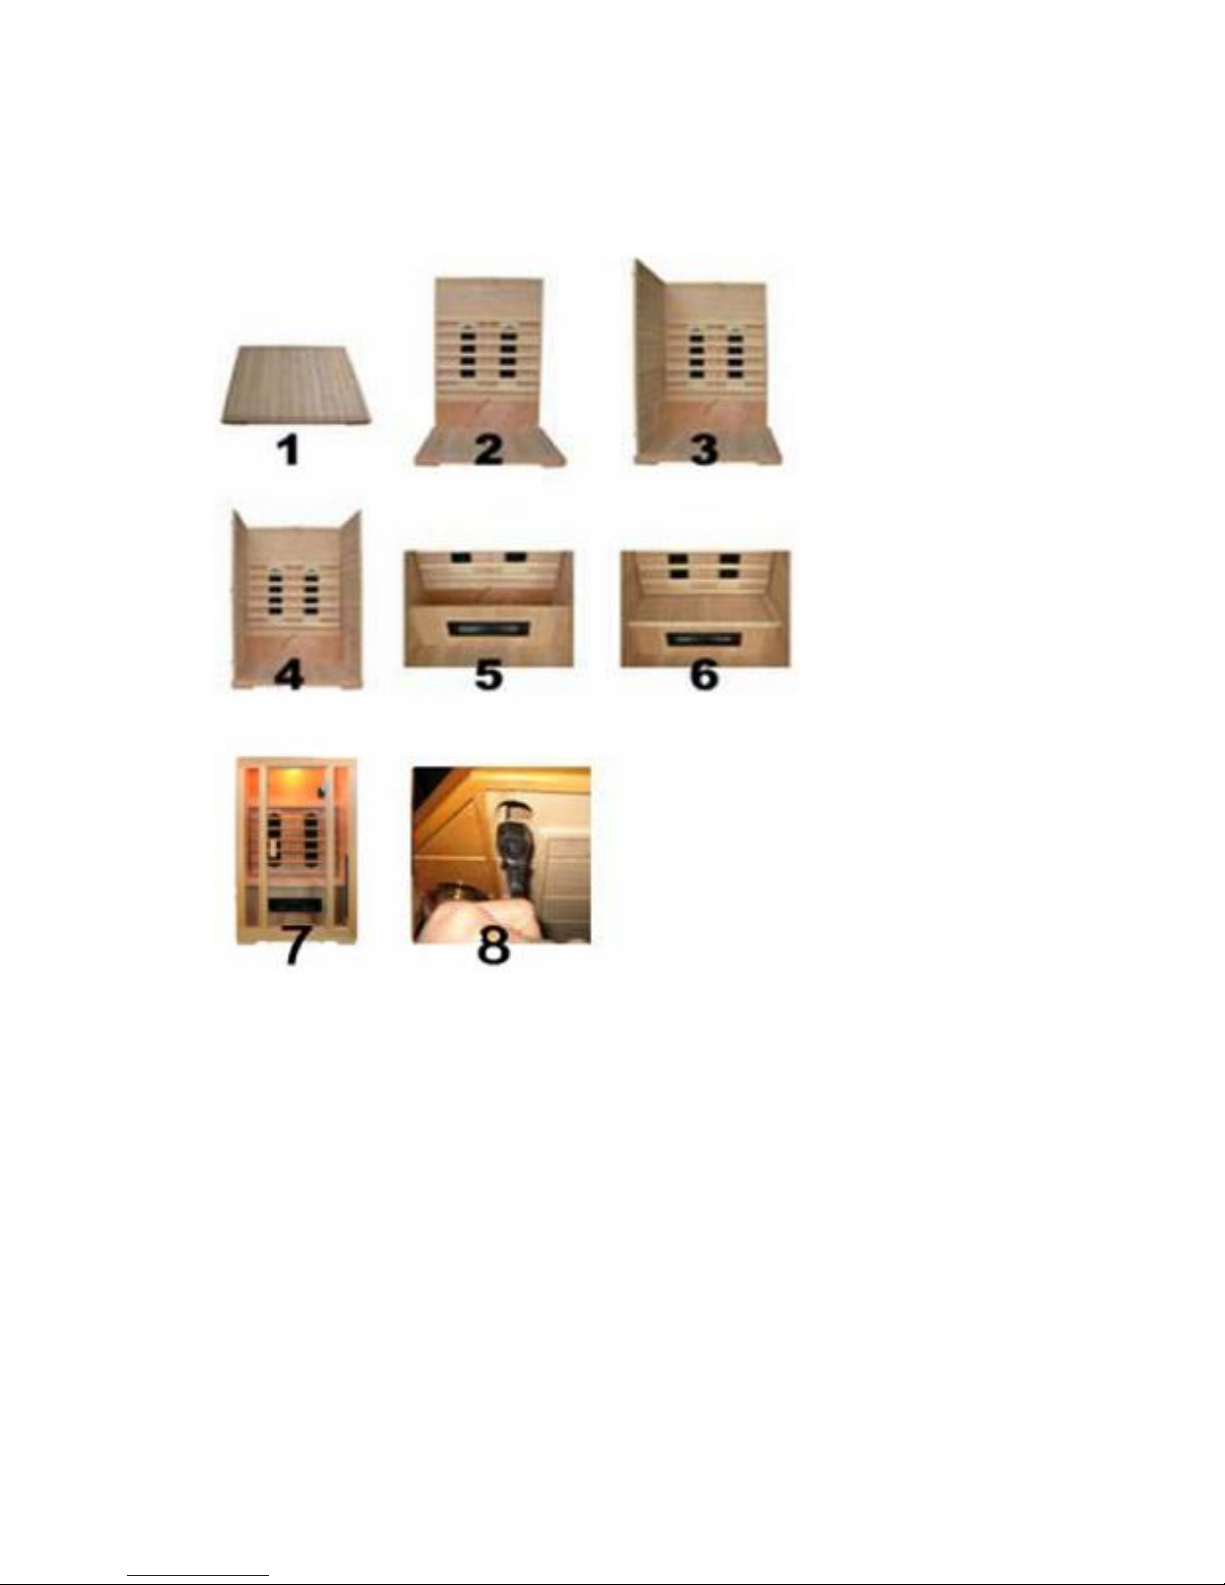
Below are pictures of individual panels for the 2-person models. Other models vary.
Page 5
- 5 -
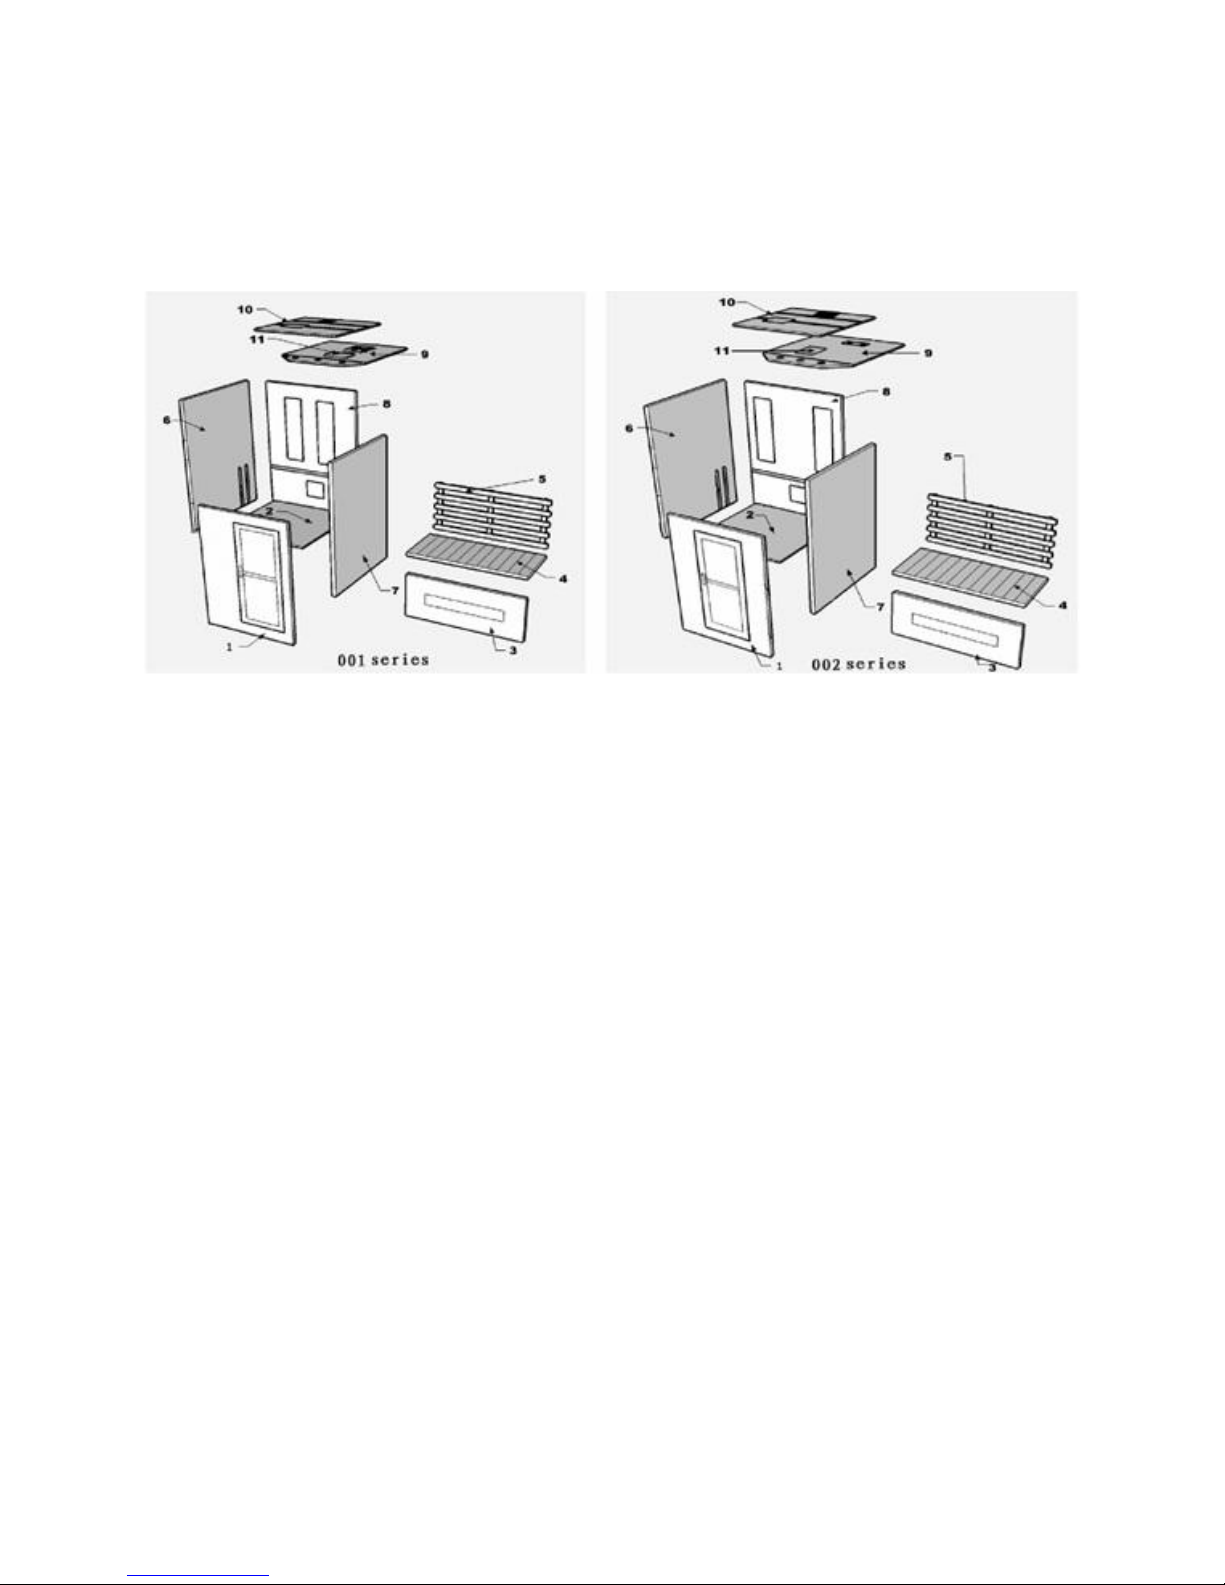
A4 Detail Drawing
Instrument required in installation:
Screwdriver provided in the screw bag.
B. General safety rule
B1.1. Warning: all wiring to the sauna heater and accessories shall be routed away from any
direct radiation from the sauna heater.
B1.2. Warning: any receptacle shall not be installed inside the heated room.
B1.3. Warning: the sauna heater shall not be subjected to water spray and that shower heads
shall not be installed above the sauna heaters.
B1.4. Warning: No plumbing fixtures(taps, etc.) are to be installed in the sauna room.
B1.5. Warning: the door of the heated room should not include any locking or latching system,
malfunction of which could cause entrapment inside the heated room.
B1.6. Warning: the dry-bath room shall be provided with intended ventilation.
1. Front panel. 2. Bottom. 3. Heater Bench. 4. Bench. 5. Bench back. 6. Left panel.
7. Right panel. 8. Back panel. 9. Ceiling panel. 10. Roof panel. 11. Circuit box.
Page 6

- 6 -
B2 Hypothermia
Hypothermia occurs when the internal temperature of the body reaches a level
several degrees above the normal body temperature of 37°C. The symptoms of
hypothermia include an increase in the internal temperature of the body, dizziness,
lethargy, drowsiness, and fainting. The effects of hypothermia include:
B2.1. Failure to perceive heat;
B2.2. Failure to recognize the need to exit the room;
B2.3. Unawareness of impending hazard;
B2.4. Foetal damage in pregnant women;
B2.5. Physical inability to exit the room;
B2.6. Unconsciousness
Warning:
The use of alcohol, drugs, or medication is capable of greatly increasing
the risk of fatal hypothermia.
B3 Safety precautions
B3.1. Do NOT dry clothes or leave towels in the sauna.
B3.2. Do NOT touch the heater tube with your finger or metal tools.
B3.3. Do NOT touch the light when it is on.
B3.4. Do NOT splash water or other liquid to the heating tube
B3.5. Do NOT use the sauna if you have any of the following conditions:
1. Open wounds, eye diseases or serious burns.
2. Elderly and weak people, especially those suffering from a disease. Pregnant women
and infants are prohibited. Children over the age of 6 years may use the sauna under
the supervision of adults.
3. Those with heat sensitivity, obesity, heart disease, blood pressure, circulatory
system problems or diabetes should consult their doctor before using the sauna.
B3.6. Do not place pets into the sauna.
B3.7. Do not use after drinking excessive alcohol.
B3.8. This appliance is not intended for use by persons (including children) with reduced
physical, sensory or mental capabilities, or lack of experience and knowledge,
unless they have been given supervision or instruction concerning use of the
appliance by a person responsible for their safety.
B3.9. Children should be supervised to ensure that they do not play with the appliance.
B3.10. Be careful when using the appliance in places where there are combustible materials.
B3.11. Do not use in presence of an explosive atmosphere.
B3.12. Be aware that heat may be conducted to combustible materials that are out of sight.
B3.13. Place the appliance on its stand after use and allow it to cool down before storage.
B3.14. Do not leave the appliance unattended when it is switched on.
Attention:
If the supply cord is damaged , it must be replaced to prevent hazardous situations.
Page 7
- 7 -
C.
Circuit diagram
Page 8
- 8 -
D. Installation
D1. Pay attention to the following before installation!
D1.1. Do not share the same plug with other appliances.
D1.2. Position it on a flat level surface.
D1.3. Do not splash the exterior with water. If the floor is damp, install a floor
separator to keep the sauna dry and high.
D1.4. Do not store the flammable objects or chemical substances near the sauna.
D1.5. Place the Bottom Panel on the ground and make sure the “FRONT” sticker is
facing up.
Page 9
- 9 -
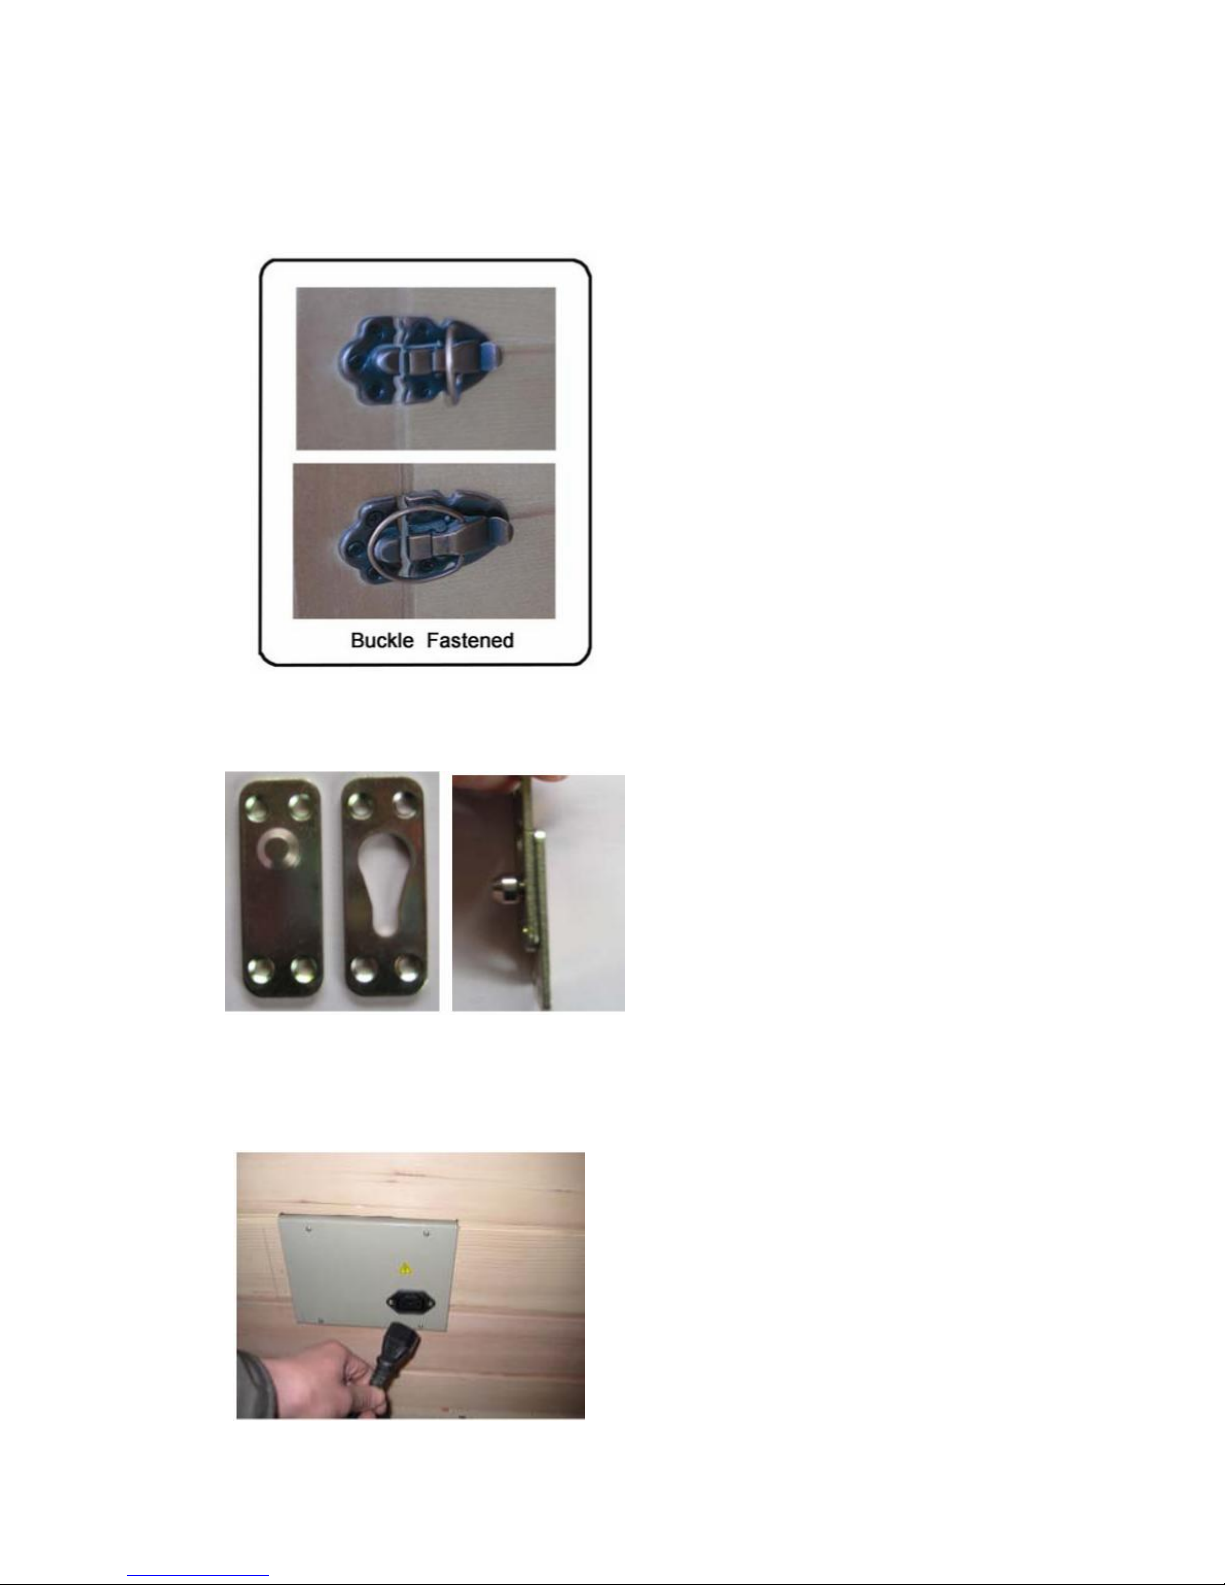
INSTALLATION DIAGRAM (buckle)
Page 10
- 10 -
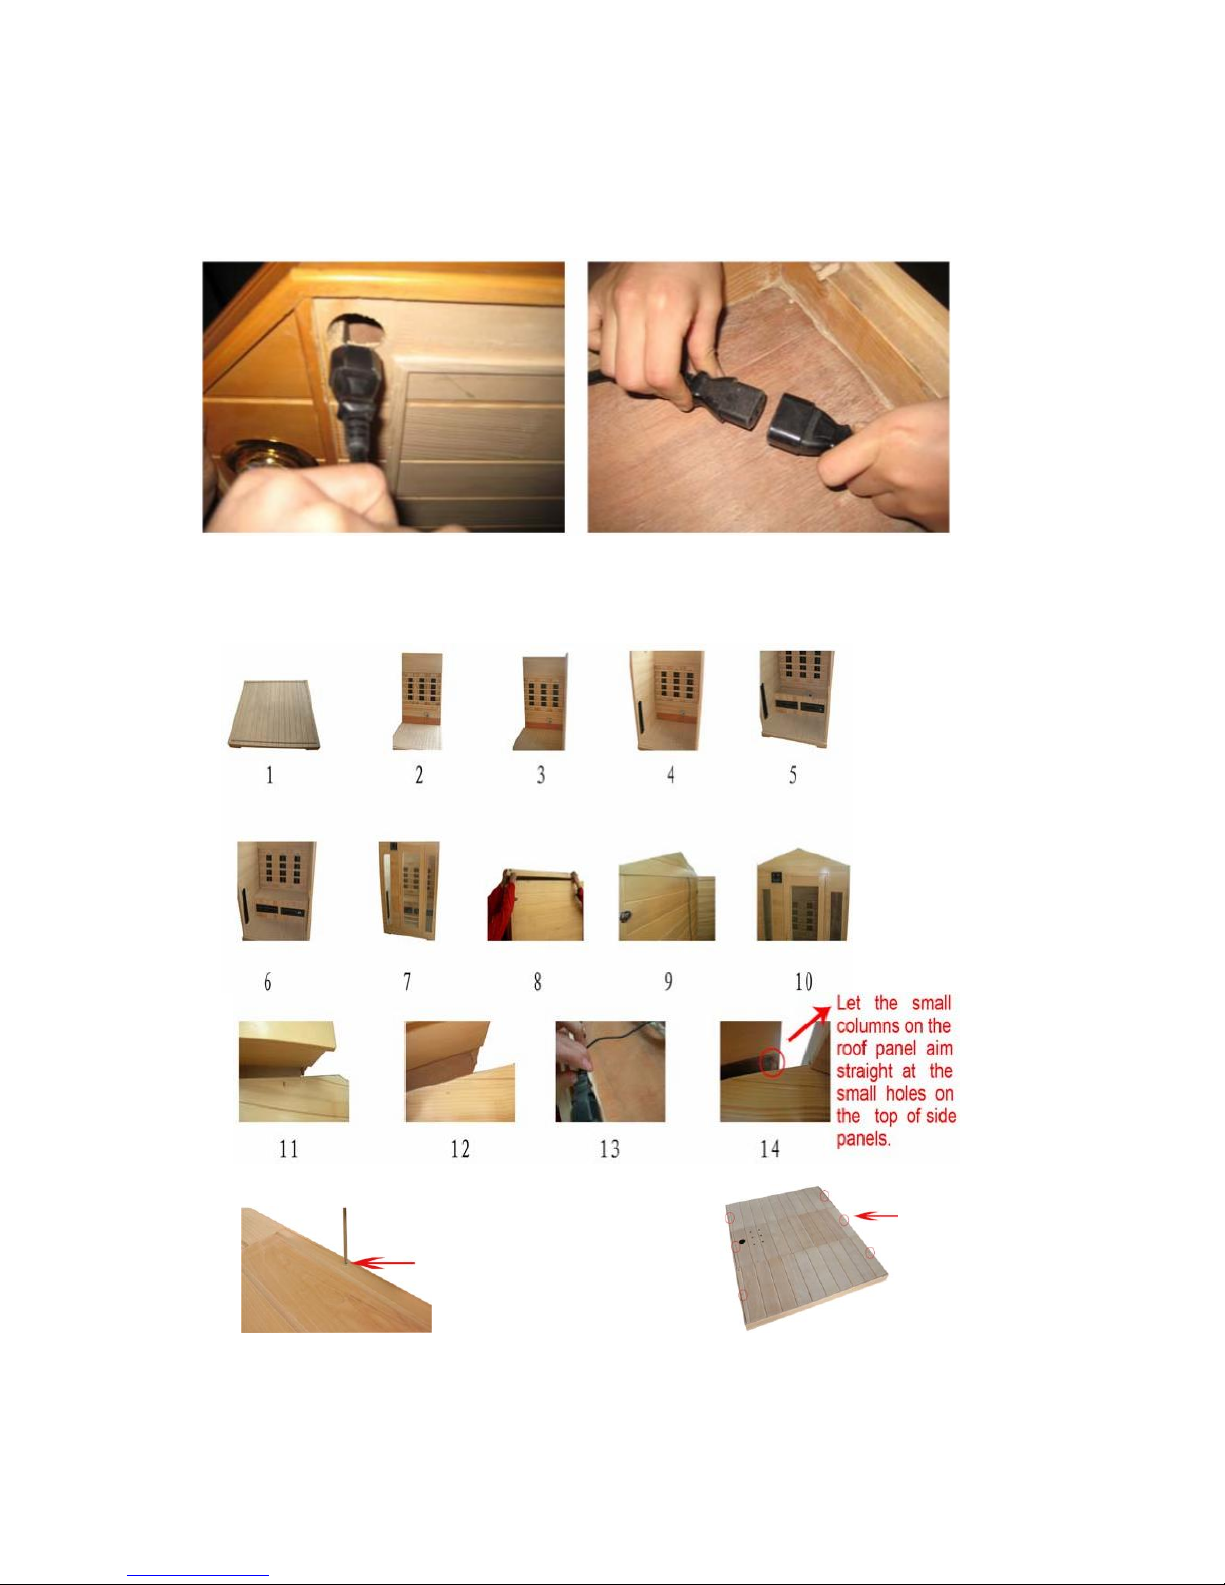
D2.1. Buckle Fastened
Inside Buckle Fastened(Selected Use)
D2.2. Plug in the Bench Heater Cable to the outlet located on the Back Panel.
Make sure connection is secure.
Page 11
- 11 -
D2.3. The Top Panel must be positioned in the right corner. Connect the plugs for heater
through the holes around the Top Panel.
D3 Outdoor Sauna Room
Put the covers on the
roof, then fix them
by screw, each cover
two screws.
6 screws
15
16
Page 12
- 12 -
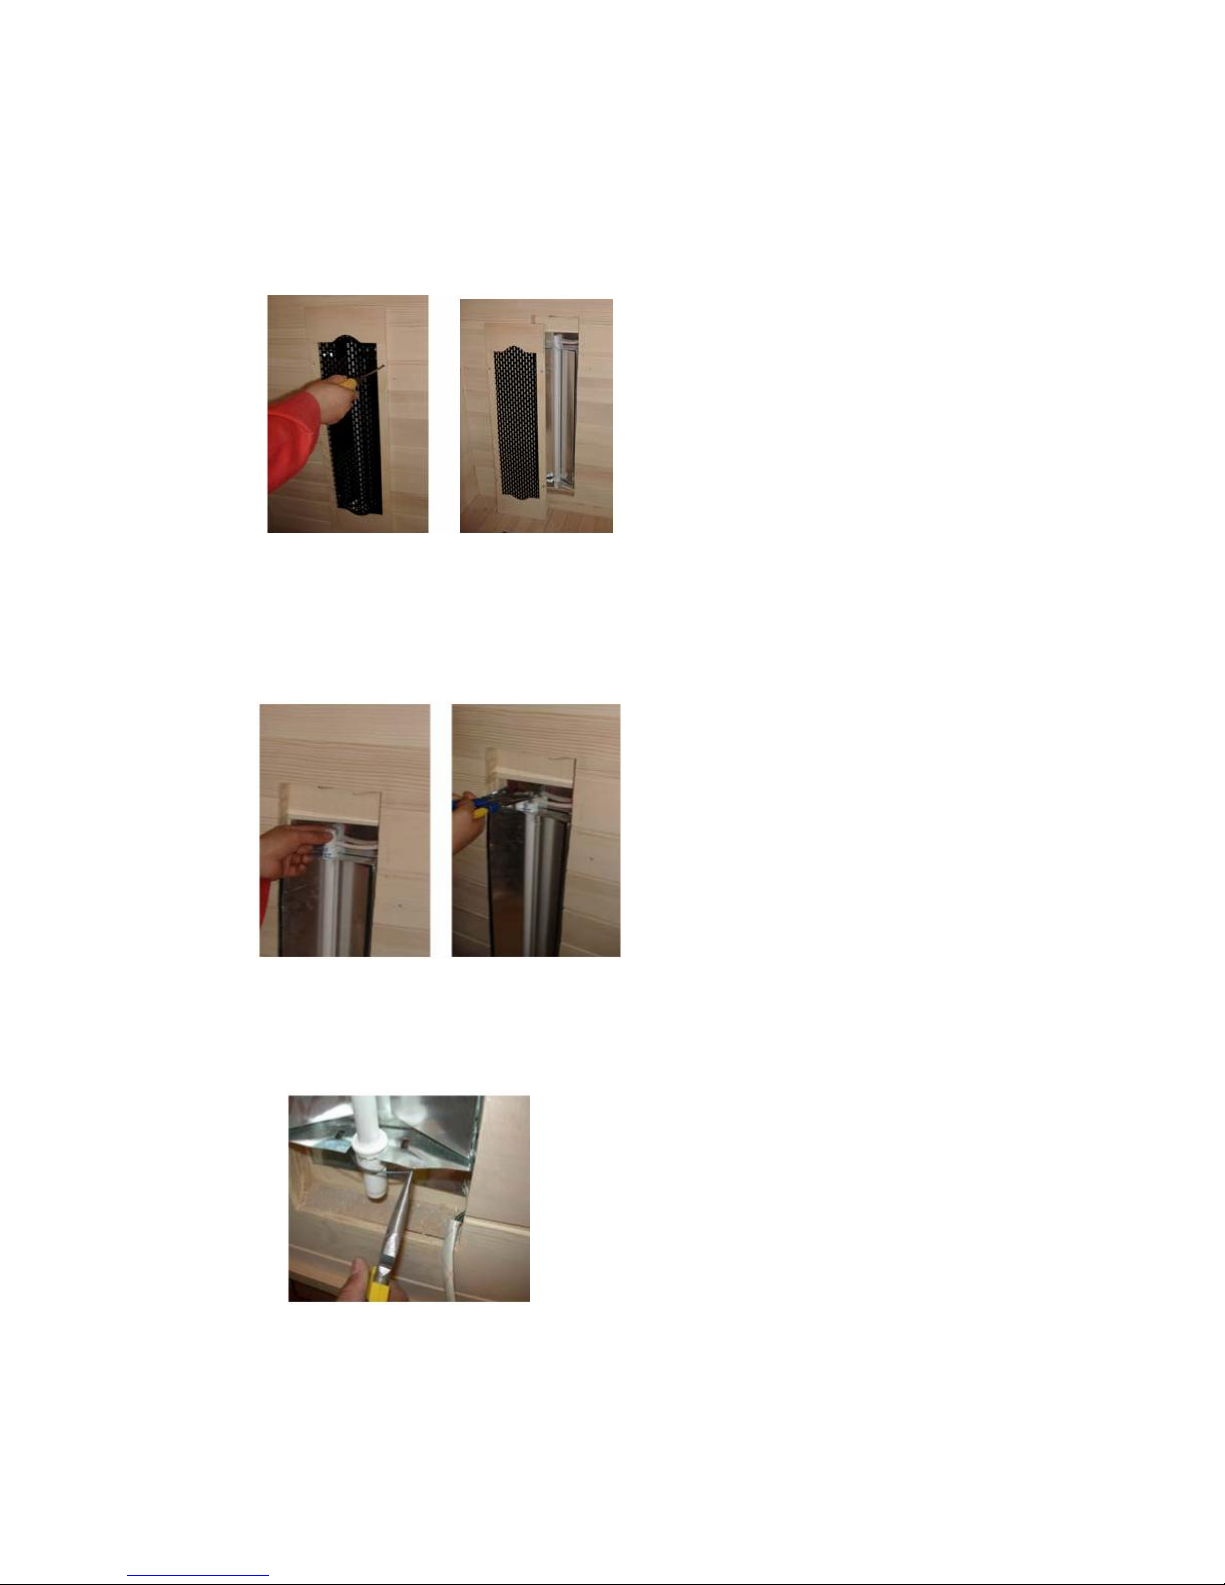
D4. How to replace the ceramic heater.
D4.1. Take off the cover of heater.
D4.2 Take off the ceramic covers of tube and remove the connecters from two ends of the
tube.
D4.3 Take off the clip on the bottom part of heater
Page 13
- 13 -
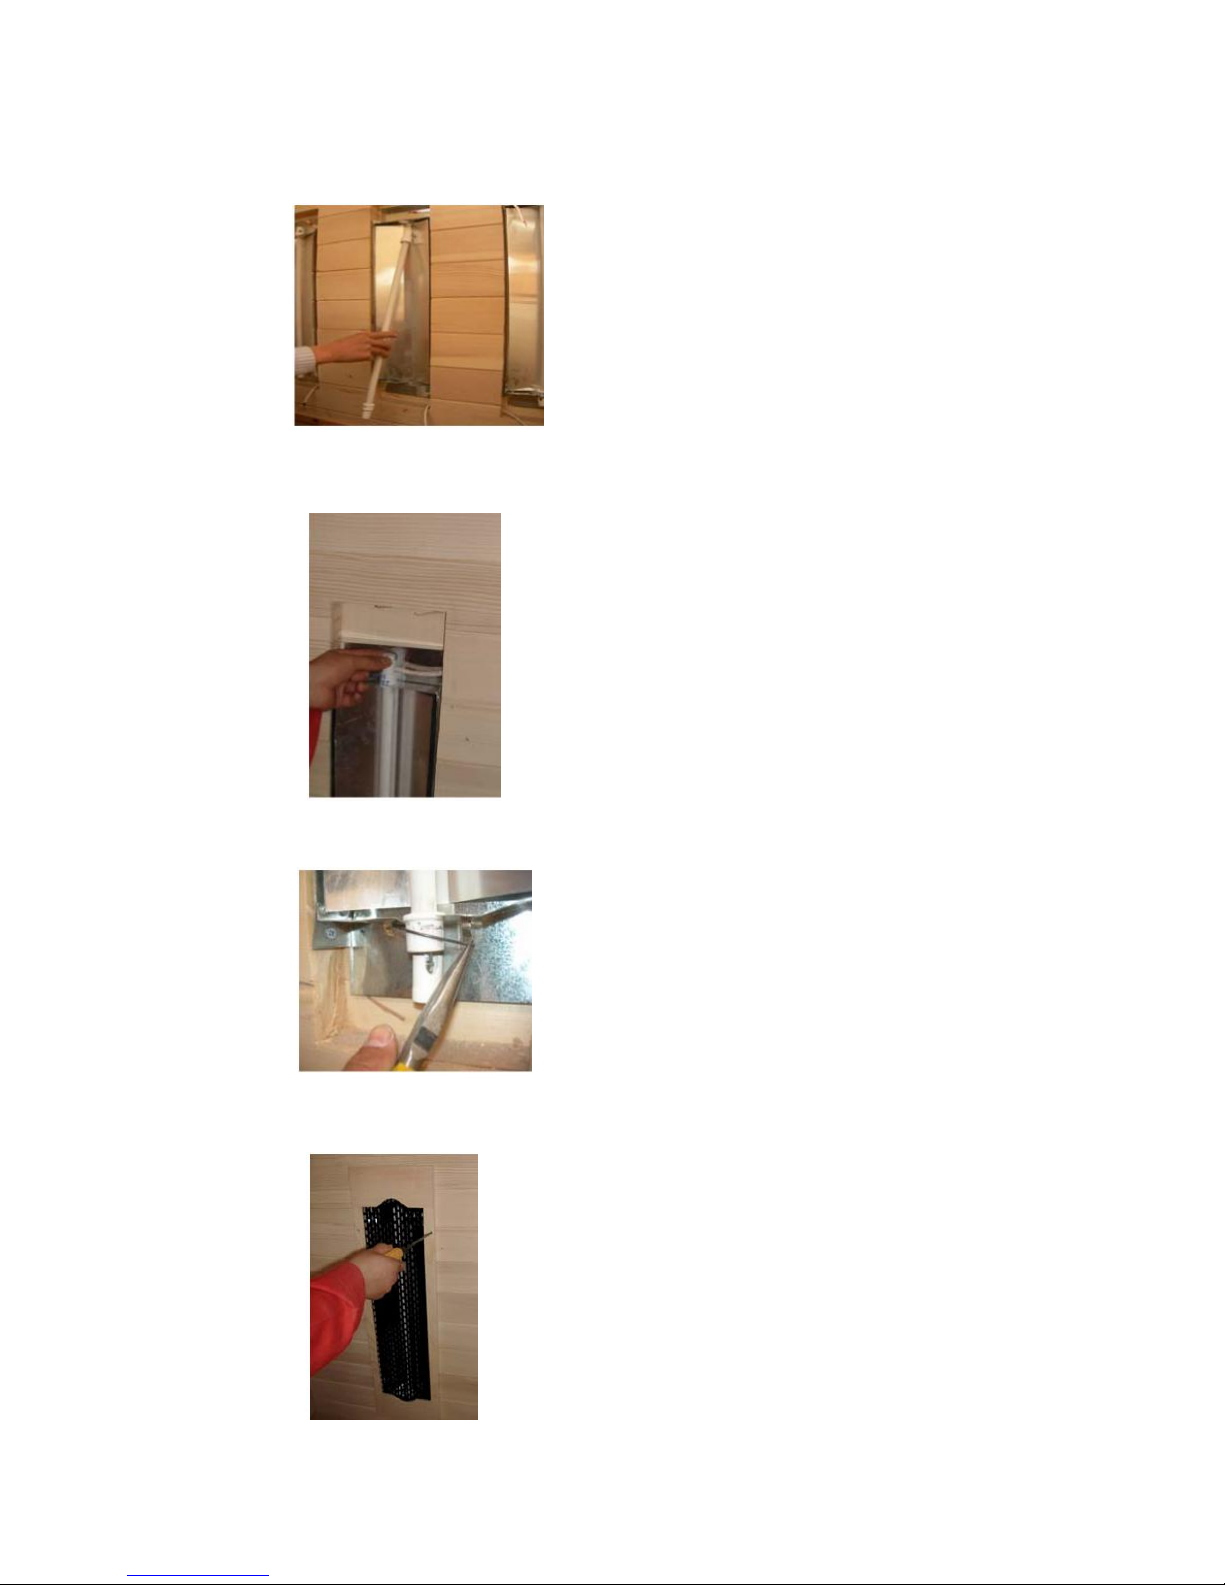
D4.4 Replace the heater.
D4.5 Connect the two connecters to two ends of tube and fasten the ceramic covers of two
ends
D4.6 Install the clip on the bottom part of heater cover.
D4.7 Install the heater cover
Page 14
- 14 -
E. Operation
E1
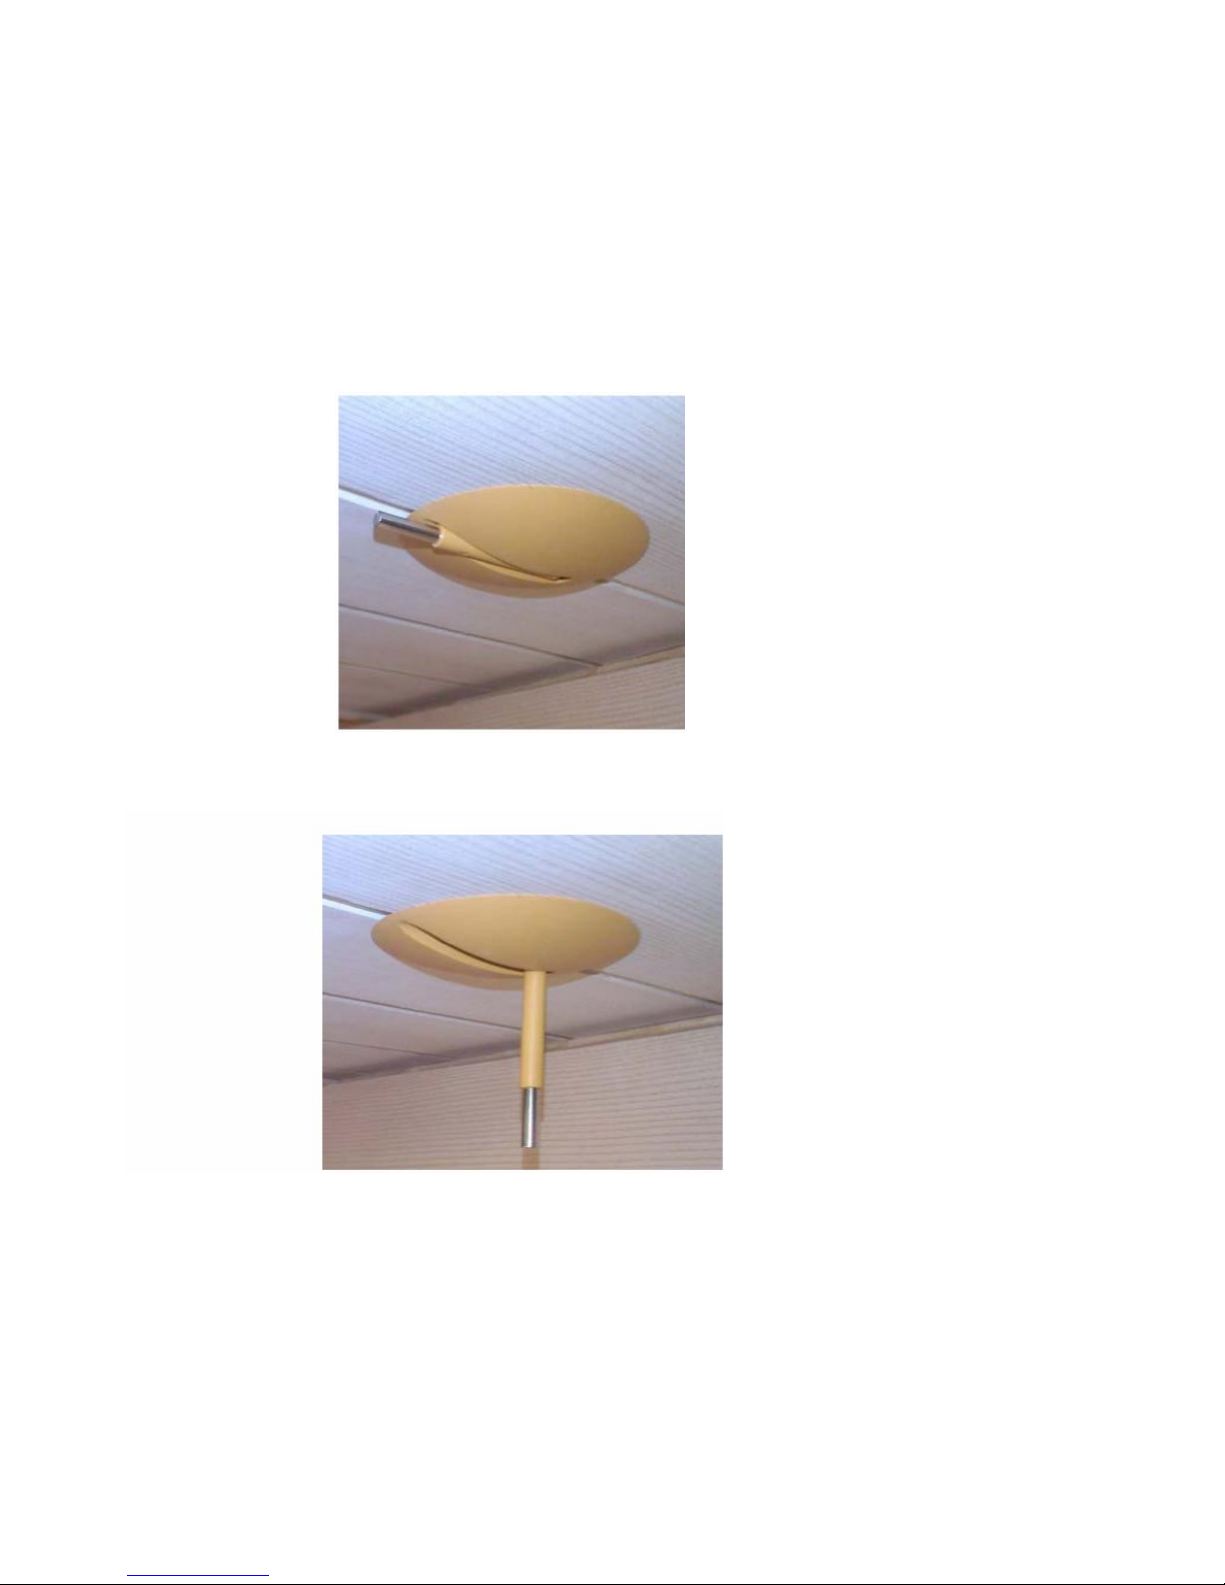
In use of sauna room, please point the temperature sensor vertical downward,
as shown in the figure below to ensure the accuracy of the temperature display on
control panel.
1. Original shape
2. Vertical downward shape
E2
Plug the power cord into the wall outlet.
Page 15
- 15 -
E3
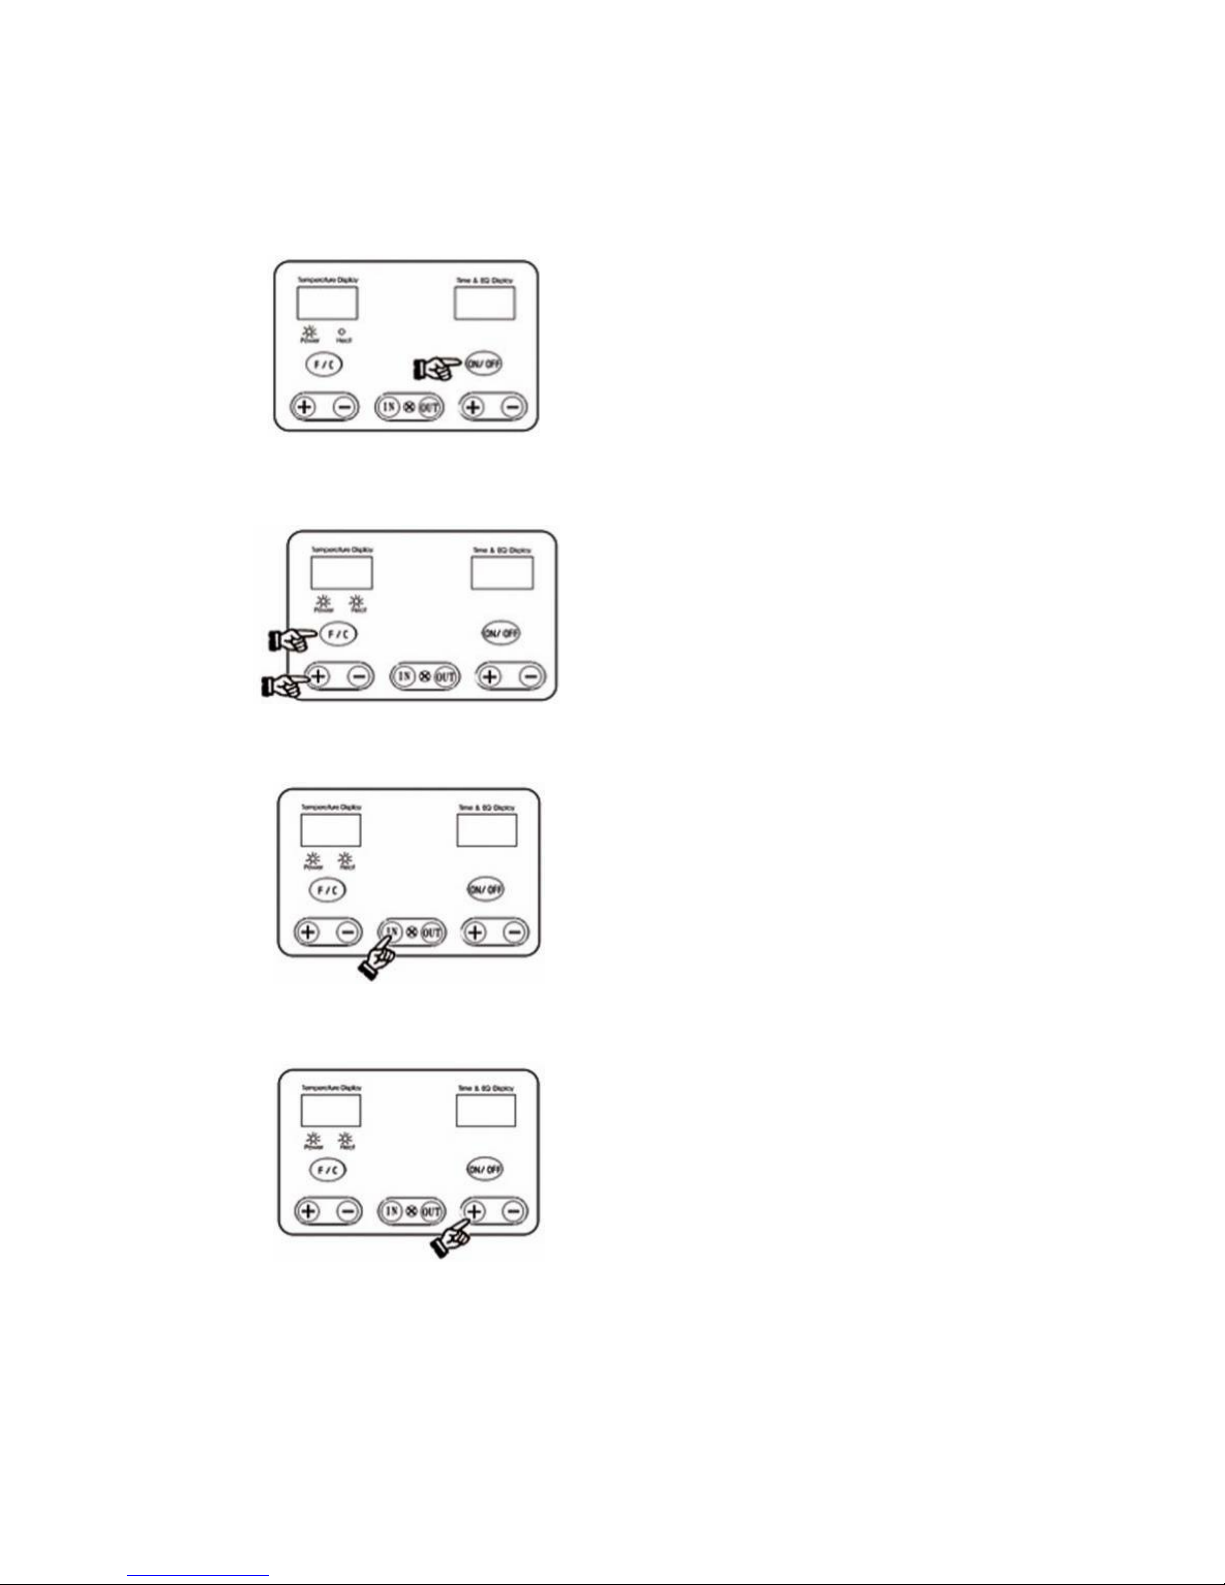
Press the key ON/OFF. The POWER indicator turns on. TEMPERATURE
DISPLAY indicates the temperature in the room. Press the key ON/OFF again.
The POWER indicator turns off.
E4
Press the key F/C , the heat indicator turns on. The sauna will automatically start
by pressing the key + or
-
on the left to adjust the temperature.
E5
Press the key IN to turn on the light in or out of the room. Press it again and the
lights will turn off.
E6
Press the key + or – on the right to adjust the time . If the time indicates 00, the room
stops heating.
E7
Open the ceiling vent to allow a flow of fresh if required.
Page 16

- 16 -
F. Tips for use
F1.
Set the temperature to a comfortable level, normally 40 to 50℃.
F2.
Allow approximately 8-15 minutes for the sauna to warm up.
F3.
Perspiration will begin within 6 to 15 minutes after stepping into the unit. We
recommend a sauna session does not exceed 30 minutes.
F4.
When the temperature reaches the level set on the thermostat, the heaters will turn off and
on periodically to maintain the desired temperature level inside the sauna.
F5.
The front door/ceiling vent can be opened at any time to allow fresh air into the
room.
F6.
Drink plenty of water before, during and after a session to replenish lost fluids from
the body.
F7.
Taking a hot shower or bath before the sauna session will further accelerate
perspiration. However, do dry off thoroughly before entering, for excessive water
will stain or warp the wood. A shower latter is refreshing.
F8.
To absorb perspiration and keep the sauna tidy, place a towel on the bench and floor of
the sauna. Keep one towel handy to wipe out sweat from the body.
F9.
Utilizing the sauna’s heat therapy, put oil into your hair and wrap it with towel. Latter,
rinse your hair thoroughly.
F10. Massage the affected areas to relieve sore and tense muscles.
F11. Shaving your face or legs with a razor while profusely sweating in a sauna yields an
incredibly smooth without the use of gels or foams.
F12. Do not eat at least an hour before your sauna session. It is better to go in a sauna with
An empty stomach. Do not use the sauna immediately after the strenuous exercise.
F13. At the first sign of cold or flu, increasing your sauna sessions may beneficial in
boosting your immune system and decreasing the reproductive rate of viruses.
F14. Any area you want to achieve a deep heating should be moved close to the heaters.
F15. After the session is over, do not immediately getting out. Let the body sweat a little
more. Then, take a warm shower and finish it off with a cold shower to cool off
completely.
F16. Consult your physician for the proper treatment or in any other conditions.
Page 17
- 17 -
G. Frequently Asked Questions
MAKE SURE TO SHUT OFF ELECTRICITY BEFORE DOING IT.
If the supply cord is damaged, it must be replaced to avoid a hazard.
G1
The control panel does not work
Problem
Explanation
Solutio
1.
The power indicator
isn’t on
The fuse is broken or the
sauna is not plugged in
Change the fuse or the
plug in the sauna
2.
The soft keys do not
work
Unplug sauna, wait a minute or plug back into power
source.
G2
The light doesn’t work
Problem
Solution
1
The bulb filament is burned out
Change the bulb (≦15 watt)
G3
The heater tube does not heat.
Problem
Explanation
Solution
1
Part of the heater does
warm up
The heater is defective
Replace with a new
heater
Part of the heater is not
connected well or burned out
Connect them tightly
2
The entire room does
not heat
The relay is damaged
Replace the relay
The control panel is damaged
Replace the control panel
The plug is not plugged in
correctly
Re-plug it
3
Bench heater does not
heat
It is not connected tightly into
the outlet on the back panel
Connect tightly
No such construction
used.
Page 18

- 18 -
H. Maintenance
H1
Clean the sauna room with a soft wet cloth. NEVER use petrol, alcohol, benzene or
any other such chemical to clean the unit.
H2
In hospital or public use areas the sauna can be detoxified with ultrasonic equipment.
I. Transportation and storage
I1
Avoid exposure to rain, snow or strong collisions during transport.
I2
Do not store in damp environments.
J. Limited warranty
We warrant the sauna to be free of defects in material and workmanship.
1) Heaters 12 months
2) Workmanship 12 months
3) Electrical Components 12 months
4) Radio/CD player 12 months
This warranty extends only to the original retail purchaser of the sauna and terminates
upon transfer of ownership. Freight charges to and from the customer are the
responsibility of the customer. This includes freight charges for parts shipped to enable
the services of your sauna. This warranty is void if the sauna has been altered, misused,
or abused. Such instances shall include operation or maintenance of the sauna in
deviation to the published instructions. The warranty extends only to the
manufacturing defects and does not cover any damages resulting from
mishandling of the product by the owner. We shall not be liable for the loss of use of
the sauna or other incidental or consequential damages. Under no circumstances shall
we or any of its representatives be held liable for injury to any persons or damages to
any properties. Some states do not allow exclusion or limitation of incidental or
consequential damages, so the above limitations or exclusions may not apply to you.
This warranty gives you specific legal rights, and you may also have other rights that
vary from state to state. Specifications are subject to change without notice.
Page 19
- 19 -
K. Appendix:
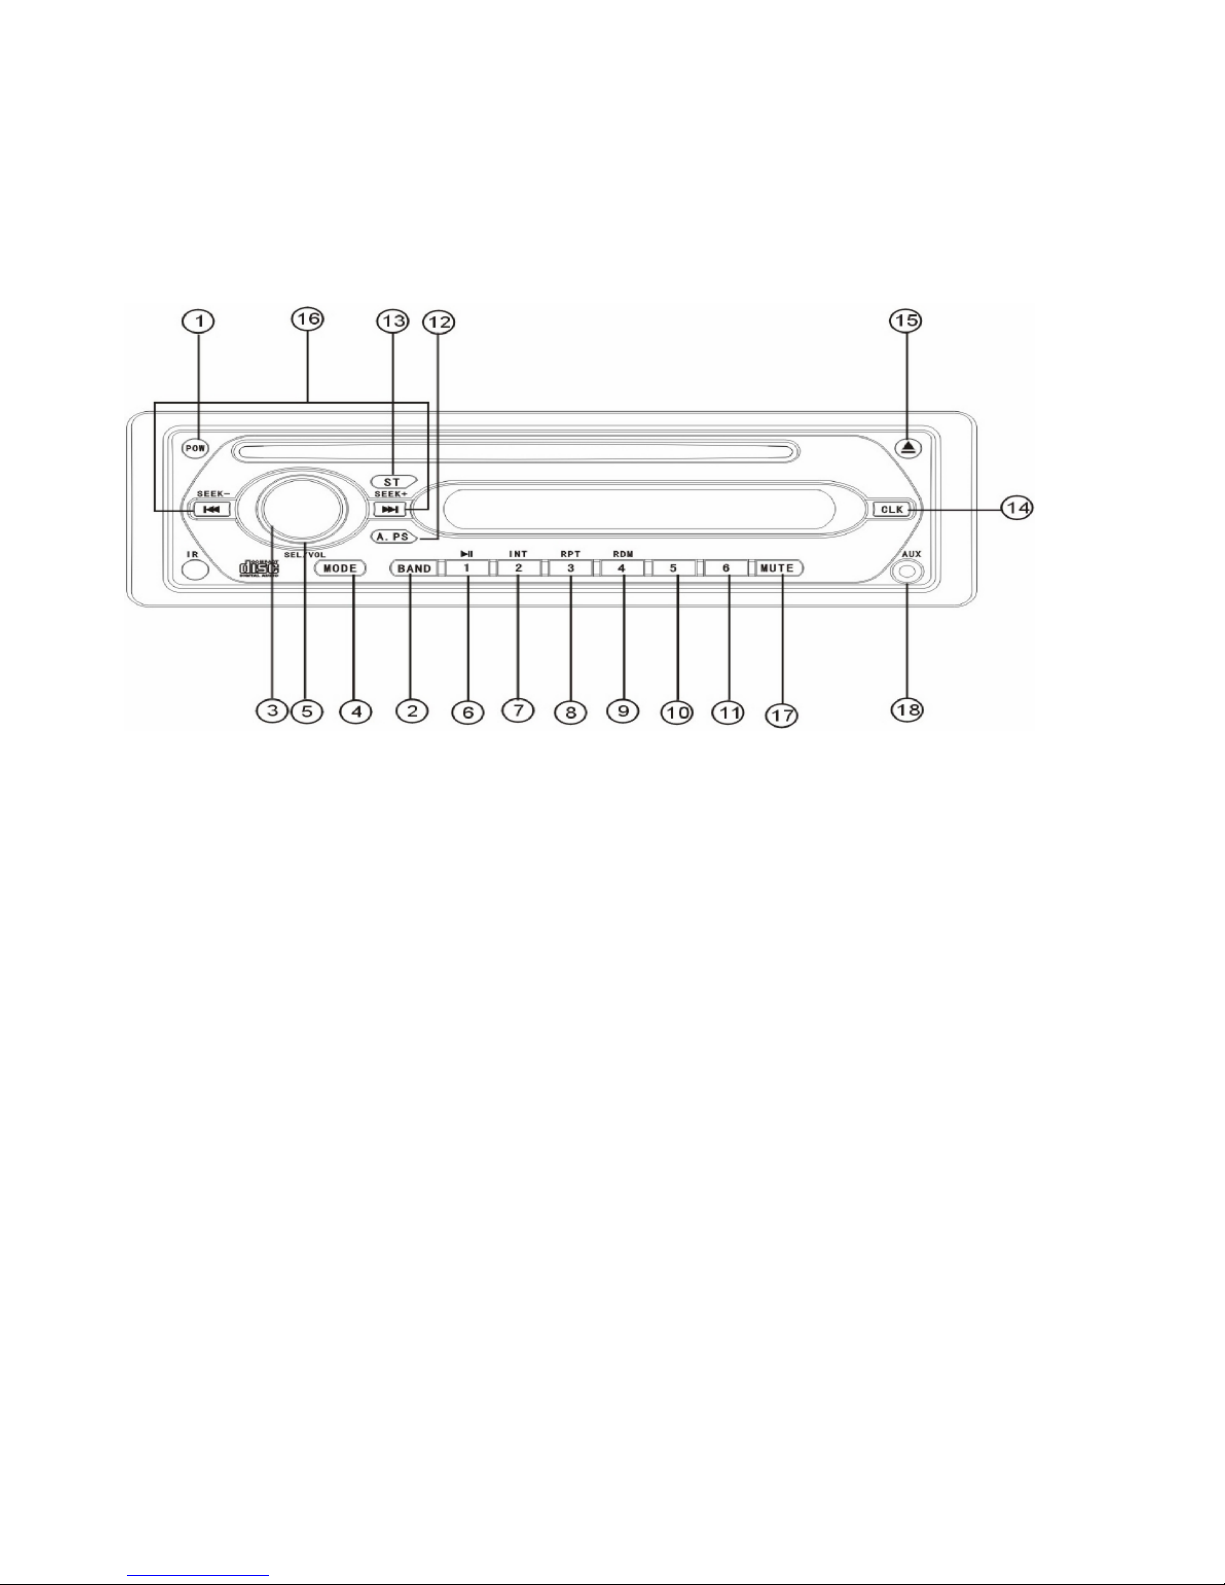
K1 CD Player Installation
1. POWER BUTTON: Press it to start the power and hold it to turn it off.
2. BAND BUTTON: Press it for FM band (FM1,FM2,FM3) and
AM band (AM1 &AM2).
3. “VOL+AND VOL-” For volume adjustment.
4. MODE BUTTON: CD/RADIO/AUX INTERCHANGE
5. SEL BUTTON: MULTI-FUNCTIONAL BUTTON, Press it once for bas, twice
for tre, three times for balance (volume balance for the left and right
speakers). Hold the sel button to select the mode of music with “DSP OFF”
displayed on the LCD, then press “VOL+,VOL-” to select pop, rock, classic.
6. BUTTON: Radio(FM/AM) memory/ pause.
7. 2/INT BUTTON: Radio(FM/AM) memory/browse.
8. 3/RPT BUTTON: Radio(FM/AM) memory/repeat play.
9. 4/RDM BUTTON: Radio(FM/AM) memory/random play.
10. 5 BUTTON: Radio(FM/AM) memory.
11. 6 BUTTON: Radio(FM/AM) memory.
12. A/.PS BUTTON: Auto radio preset channel.
13. ST BUTTON: Radio stereo/mono.
14. CLK BUTTON: Press it once to display time hold it three seconds to flash out
the time, then turn seek+ to adjust minute, seek- to adjust hour.
15. BUTTON: PLAY/OPEN.
Page 20
- 20 -
16. On radio mode, press it for manual station search, hold it for auto station
search on play mode, press it for track selection, hold it for fast-forward
and fast-backward.
17. MUTE BUTTON: MUTE ON/OFF.
18. AUX: AUX INPUT.
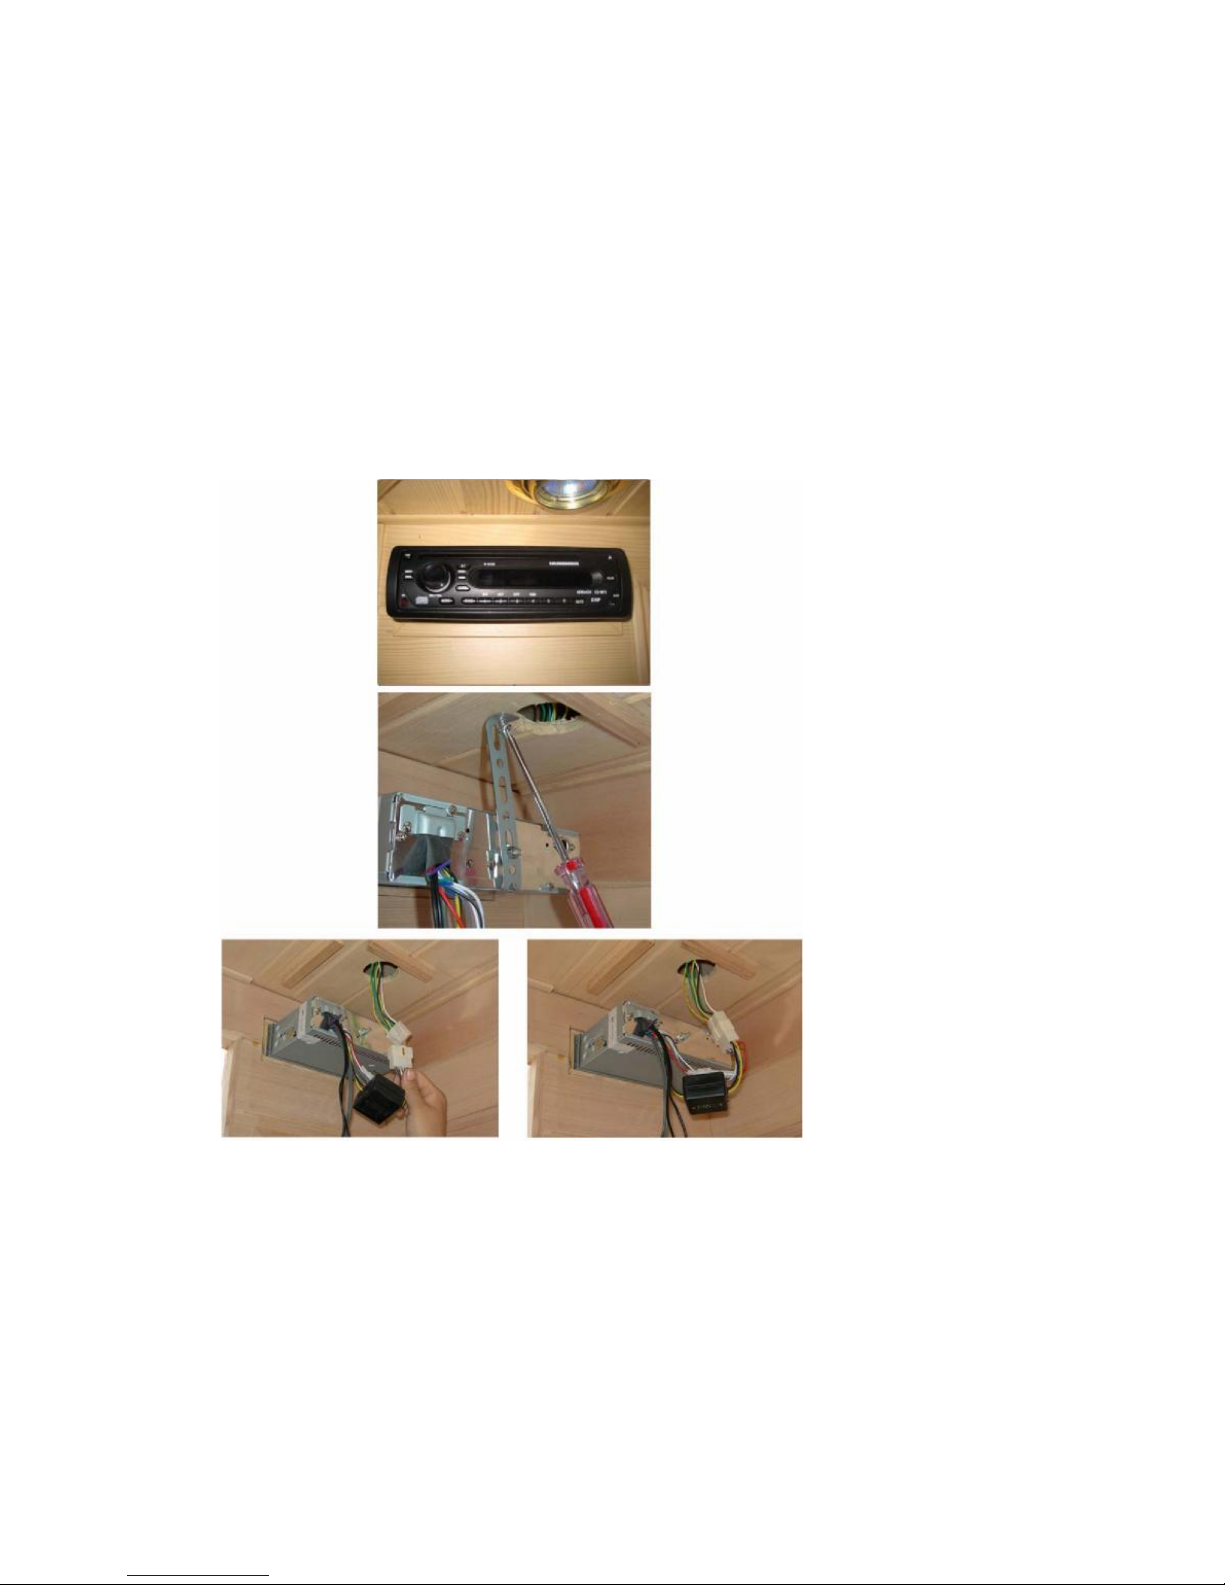
Slide the CD-player into the slot provided on front panel.
Page 21
- 21 -
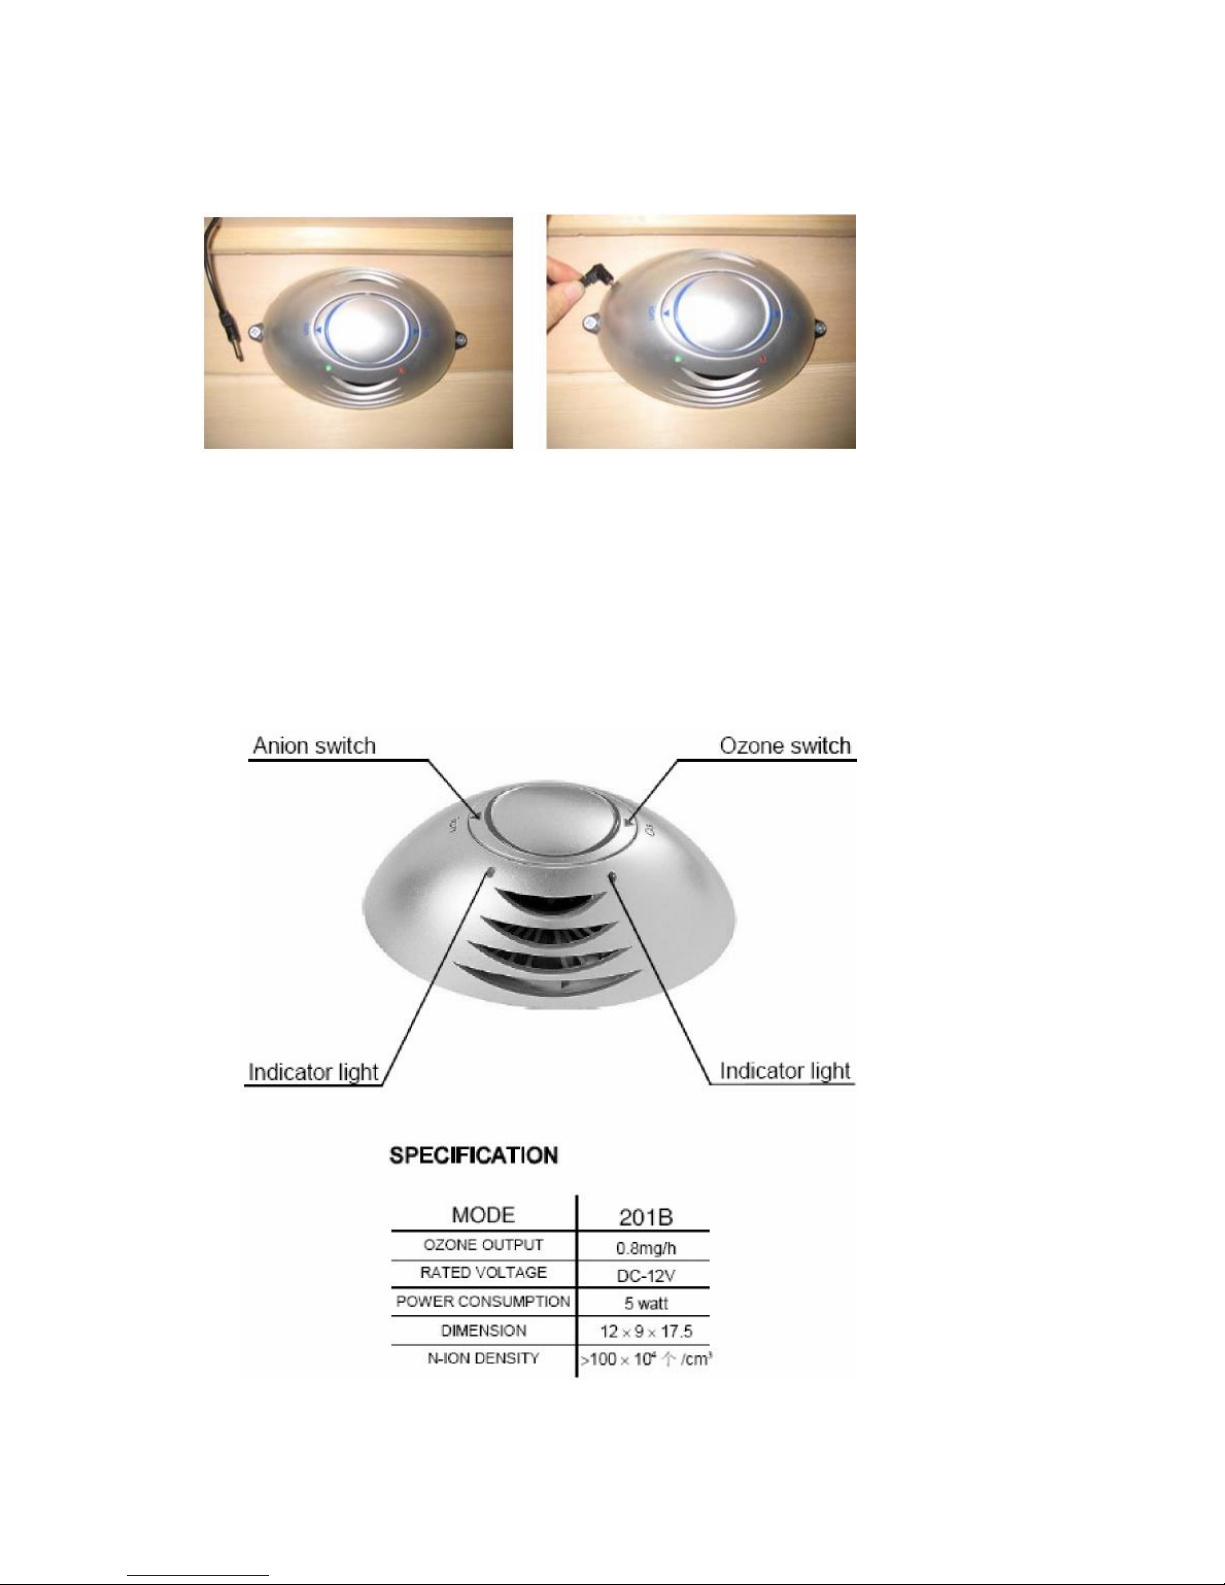
K2 Oxygen Ionizer Installation
installation plug the power
K2.1 Press the ion button: it extremely purifies the air and removes toxic substances including the
dust and odours mould.
K2.2 Press the ozone button: ozone may kill virus, and will be deoxidized into oxygen in
the end without secondary pollution, which the chemical agents cannot achieve.
Page 22

- 22 -
Operating instruction
Anion and ozone can only work separately; when the ozone starts to work the anion will
stop; after about 15 minutes working the ozone will stop and turn the anion function
automatically
BRIEF INTROUCTION
Produce Active Oxygen
The negative ion generated by ionization of high voltage in the air is also called Active
Oxygen.
Clear air
Anions of negative charge can neutralize with the soot and dust of positive charge floating in
air resulting in their natural subsidence.
Eliminate Peculiar Smells
The anion can be absorbed easily by various organisms which will charge their structures or
transfer their energy so as to eliminate the peculiar smells and germs.
Reduce radiation
Anions of negative charge can neutralize with the monitor of positive charge so as to reduce
radiation and protect sight.
Improve pulmonary function
With the anions being absorbed, lungs' absorption of oxygen will increase by 20% and the
exhaustion of carbon dioxide by 15%, improving the blood circulation and pulmonary
function.
Prevent air conditioner disease
Improve body reaction capacity and mobilize the reticular inner skin function as well as
promote body immunity.
Ozone disinfection
We use the sterilization and disinfection of ozone without any second pollution or side effect
as well as a timer installed in the item.
Aroma therapy function
We equip with an aromatherapy which is available for kinds of in the market to release the
scent slowly and last for a long time.
Page 23

- 23 -
K3 FAQ for CD player
Problems
Possible causes
Remedies
The light doesn’t
work
The fuse is broken
Change the fuse on back of CD
Disc can’t be put in
or taken out
CD disc is in the CD
Take out the CD and put in
Turn over the CD to another
side
CD with print design side face
up
Magnetic head is dirty or the
CD has some flaws
Clean the magnetic head or put
in a new CD
Temperature is too high
Renew the temperature to
normal level
Condensation
Stop the sauna for one hour and
try again
No sound
Volume of sound in the
lowest point
Adjust the volume as required
The cord is not joined well
Join it well
CD can be put in or
taken out, but no
voice
The rear plug is not joined
tightly
Plug it tightly
Sound only comes
from one speaker
Check to see if the sound
balance is set to one side
Move the balance
The control pushbutton is not
available
Too noisy, the
microprocessors
can’t work normally
The control panel is not fixed
well
The sound is
jumping
The angle of installation
beyond 30 degrees
Fix again till the suitable
position
Magnetic head is dirty or the
CD has some flaws
Clean the magnetic head or put
in a new CD
The radio doesn’t
work and can’t auto
select wave band
The wire is not connected
well
Connect the wire well
The signal is too weak
Select the wave band by
yourself
 Loading...