


G95 Display Adapter for InterPro-27
Installation and Use
August 1997
DHA021900

Warranties and Liabilities
The information and the software discussed in this document are subject to change without notice and should not be
considered commitments by Intergraph Corporation. Intergraph Corporation assumes no responsibility for any errors
in this document.
The software discussed in this document is furnished under a license and may be used or copied only in accordance
with the terms of the license. No responsibility is assumed by Intergraph for the use or reliability of software on
equipment that is not supplied by Intergraph or its affiliated companies.
All warranties given by Intergraph Corporation about equipment or software are set forth in your purchase contract,
and nothing stated in, or implied by, this document or its contents shall be considered or deemed a modification or
amendment of such warranties.
Copyright
1997, Intergraph Corporation including this documentation, and any software and its file formats and audio-visual
displays described herein; all rights reserved; may only be used pursuant to the applicable software license
agreement; contains confidential and proprietary information of Intergraph and/or other third parties which is
protected by copyright, trade secret and trademark law and may not be provided or otherwise made available without
prior written authorization.
Restricted Rights Legend
Use, duplication, or disclosure by the United States Government is subject to restrictions as set forth in subdivision
(c)(1)(ii) of the rights in technical data and computer software clause at DFARS 252.227-7013.
Unpublished rights reserved under the copyright laws of the United States.
Intergraph Corporation, Huntsville AL 35894-0001
Trademarks
Intergraph, the Intergraph logo, and InterPro are registered trademarks of Intergraph Corporation.
Other brands and product names are trademarks of their respective owners.
G95 Display Adapter for InterPro-27
The G95 video display adapter (Intergraph part number MSMT417) is for use with the following
systems running the Microsoft Windows NT Workstation 4.0 operating system:
u
TD-310, TD-410, TD-610
u
TD-320, TD-325, TD-420, TD-425
u
TD-225
This adapter is modified for use only with the InterPro-27 monitor (Intergraph part number
MDSP09804), and ships with its own video cable (Intergraph part number MCBL186A8).
This document provides instructions for installing the hardware and installing and configuring the
driver software. Important operating notes are also provided.
WARNING Do not connect the adapter or its cable to other Intergraph monitors or to a multisync monitor!
Equipment damage or failure can result.
1
Installing the G95 Display Adapter
Installation of the adapter consists of installing a 2 MB or 6 MB memory module (if not already
installed) on the G95 board and installing the board itself. You can also install two boards for dualscreen capability.
See the on-line System Reference document delivered with the system for details on opening and
closing the computer, identifying PCI expansion slots, and adding expansion boards.
WARNING Follow all warnings and cautions in servicing instructions. If you fail to follow documented,
approved procedures, personal injury or damage to equipment can result.
CAUTION Use an anti-static wrist strap for all servicing procedures to avoid the possibility of electrostatic
discharge.
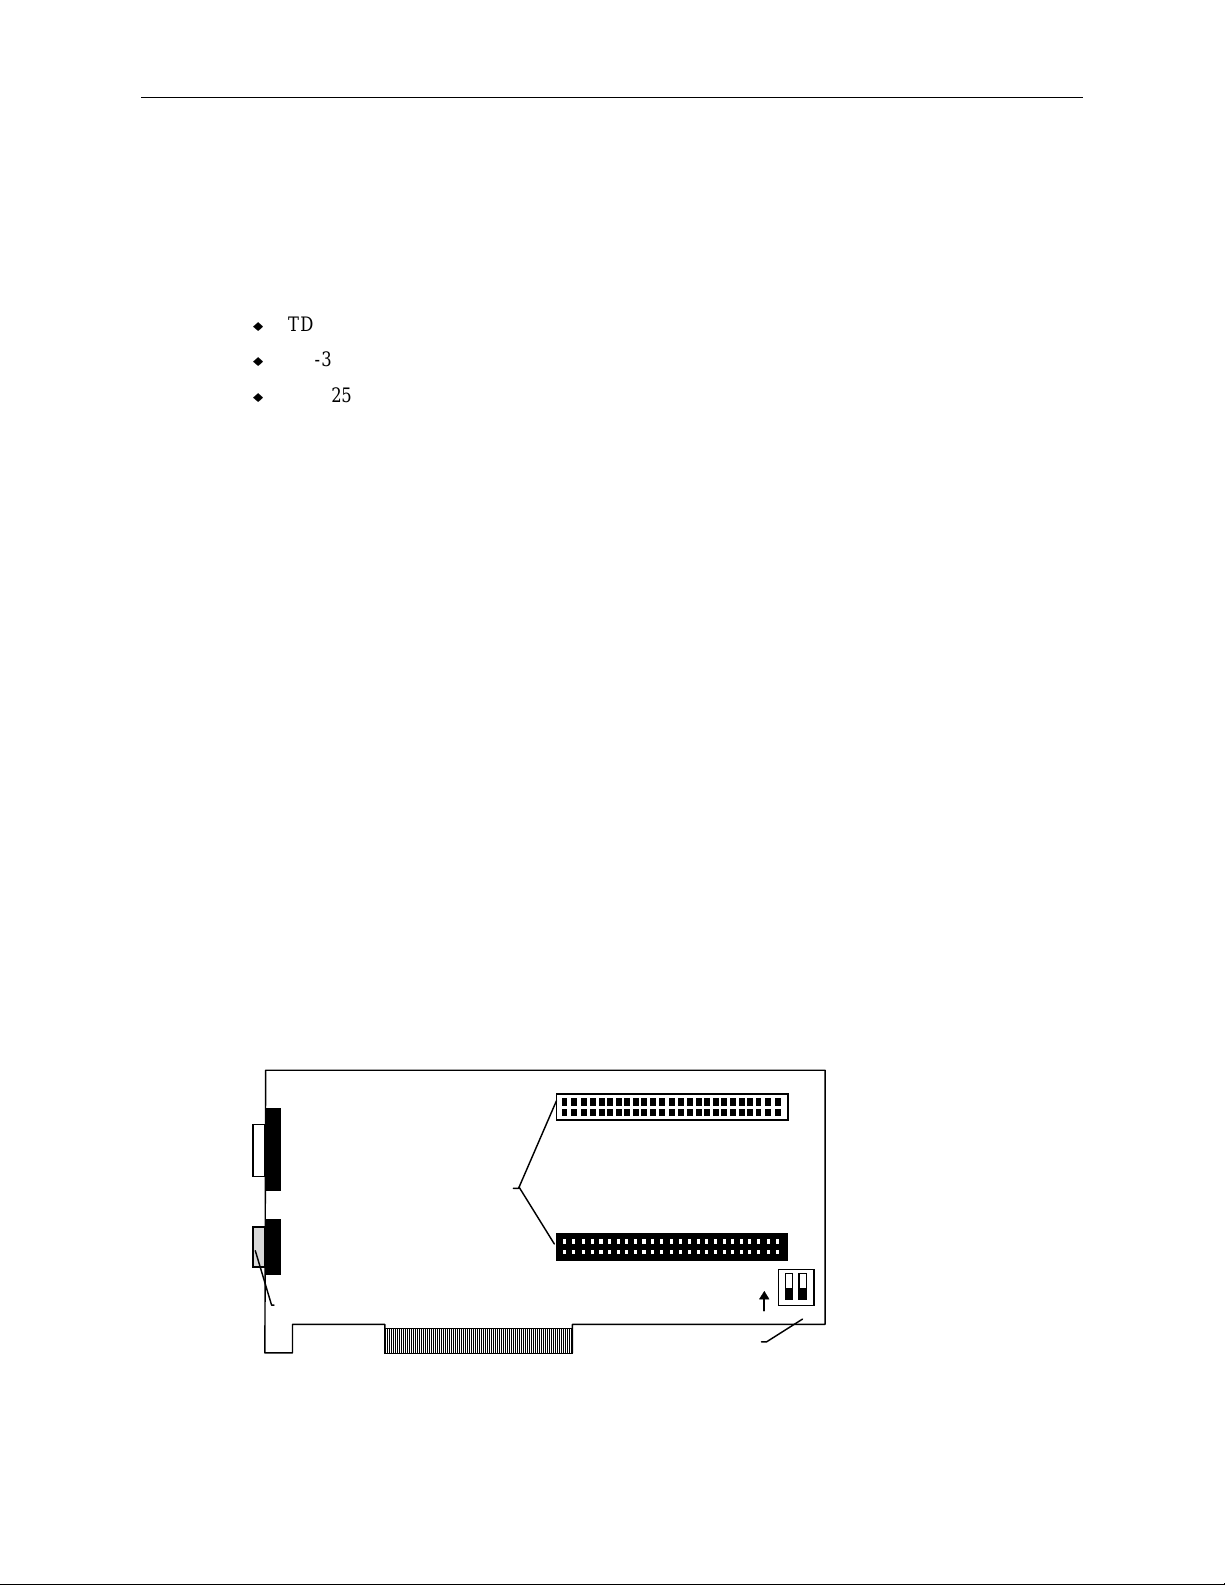
See the following for location of basic board components.
Memory card connectors
Monitor connector (blue)
ON
1 2
VGA Enable/disable

2
Install the Memory Upgrade
If the G95 board does not already have the required 2 MB or 6 MB memory upgrade, perform the
following procedure. If the memory upgrade is already installed, skip this procedure and see the
“Install the Boards” section below.
To install the memory upgrade:
1. Place the G95 board component-side up on an anti-static surface.
2. Remove the memory upgrade card from its package, and orient it so that the two keyed connectors
match the corresponding connectors on the G95 board. See diagram above for details.
3. Press the memory upgrade card firmly into the connectors until seated.
4. Go to the “Install the Board(s)” section below.
Install the Board(s)
To start the installation:
1. Turn off power to the computer and to the monitor.
2. Open the computer to access the PCI expansion slots.
3. Select the PCI expansion slot(s) into which you will install the board(s), as follows:
−
For a TD-x10 or TD-x12 deskside system, install the board in PCI slot 4 for a single-screen
system; install the boards in PCI slots 3 and 4 for a dual-screen system.
−
For a TD-x10 desktop system, install the board in PCI slot 3 for a single-screen system; install
the boards in PCI slots 2 and 3 for a dual-screen system.
−
For a TD-x20 or TD-x25 deskside system, install the board in PCI slot 3 for a single-screen
system; install the boards in PCI slots 2 and 3 for a dual-screen system.
−
For a TD-x20 or TD-x25 desktop system, install the board in PCI slot 5 for a single-screen
system; install the boards in PCI slots 4 and 5 for a dual-screen system.
−
For a TD-225 system, install the board in PCI slot 3 for a single-screen system; install the
boards in PCI slots 2 and 3 for a dual-screen system.
4. Remove the slot covers from the selected PCI slots. Retain the screws from the slot covers; you
will use them to secure the boards to the computer’s chassis.
To disable VGA for dual-screen operation:
1. Ensure that both G95 boards are identical.
2. Select the board on which you want to disable VGA.
3. Move the DIP switch labeled “2” to the ON position to disable VGA. See the diagram above for
details.
NOTE The VGA-enabled board drives the top left monitor in a dual-screen configuration.
To install the G95 Display Adapter:
1. Align the board with the PCI expansion slot, making sure the gold-fingered connectors on the
board’s edge are aligned properly with the slot connector.
2. Push the board into the slot firmly and evenly until it is fully seated in the slot connector.
3. Inspect the connection. If it does not appear to be correct, remove and re-install the board.

4. Use the screws you removed previously to secure the board to the computer’s chassis.
To finish the installation:
1. Close the computer.
2. Make sure that the InterPro-27 monitor is turned off.
3. Connect the supplied video cable (MCBL186A8) to the blue video output port on the G95 display
adapter.
4. Connect the other end of the video cable to the video input port on the InterPro-27 monitor.
Installing the G95IP27 Video Display Driver
The G95 adapter uses the G95IP27 video display driver. If you do not have a diskette containing the
display driver or if the diskette is damaged, you can obtain a copy of the driver from Intergraph Online
at http://www.intergraph.com/drive_update.stm or the Intergraph Bulletin Board Service (IBBS) at
205-730-8786 or 205-730-6504. You can also create a backup diskette containing the driver using the
systems’ InterSite Version Manager utility.
See the README.TXT file that accompanies the driver for additional information.
3
You will need to start up the computer in Windows NT 4.0 Workstation VGA mode.
To install the G95IP27 Video Display Driver:
1. Turn on power to the InterPro-27 monitor and the computer.
2. When prompted, select the Windows NT 4.0 Workstation VGA mode.
3. From the Windows NT Start menu, click Windows NT Explorer.
4. Navigate to the drive and directory containing the driver installation files.
5. Double-click
6. Follow the prompts to install the driver and MGA PowerDesk.
7. Restart the computer and log on in the non-VGA mode of Windows NT 4.0 Workstation.
SETUP.EXE.

4
Configure the G95IP27 Video Display Driver
NOTE The following procedure addresses only the MGA Settings tab on the Display Properties dialog box.
To configure the G95IP27 Video Display Driver:
1. Right-click the desktop, then click Properties.
2. Click the MGA Settings tab on the Display Properties dialog box.
3. Do the following:
−
Click the question mark button (Help) and click a control in the dialog box for details on its
function.
−
From the Color Palette list, click a color depth greater than 256.
−
Click and drag the Display Area slider to select a display resolution. See the “Operating
Notes” below for details on available resolutions.
−
Change the other MGA Settings options as needed.
CAUTION Do not change the Default Monitor setting on the MGA Monitor tab. If you select another monitor, the
monitor will fail to sync and you must then re-install the driver.
5. Do one of the following:
−
Click OK to make the changes and to close the dialog box.
−
Click Apply to make the changes without closing the dialog box.
−
Click Cancel to cancel any changes and to close the dialog box.
6. Read the information in the following section, “Operating Notes.”

Operating Notes
Read the following for important information.
The G95 adapter supports the specified monitor at the following resolutions:
u
640 x 480 at 116 Hz
u
800 x 600 at 124 Hz
u
1600 x 1200 at 60 Hz
The adapter supports three VGA modes (which do not occupy the entire screen) on the specified
monitor:
u
640 x 350 alphanumeric
u
720 x 400 alphanumeric
u
640 x 480 graphics (used when booting Windows NT Workstation 4.0 in VGA mode)
Please note the following:
u
Ensure that a 2 MB or 6 MB memory upgrade module is installed.
5
u
Use two identical adapters for dual-screen display. You must disable VGA on one of the adapters.
u
Use only the MGA Settings tab in the Display Properties dialog box to change display resolutions.
Not all resolutions listed in the standard Settings tab are supported.
u
Do not use the MGA Monitor tab in the Display Properties dialog box to select a monitor type.
The adapter and driver are configured to work with the MDSP098 monitor only.
u
Select a color depth greater than 256 colors. Some programs may not display properly at this
depth.
u
Remember that the DOS command prompt window functions normally. However, a full-screen
DOS command prompt window is not supported.
u
Remember that some distortion may occur in the last blue screen displayed before entering
Windows NT Workstation 4.0, when the driver switches memory clock speed to 50 MHz.
CAUTION Do not update the G95IP27 driver with a Matrox Millennium driver from another source (such as the
operating system CD-ROM). The G95IP27 driver has been modified for use with the specified 27-inch
monitor.
CAUTION Do not update the adapter’s video basic input/output system (BIOS) with a Matrox Millennium video
BIOS from another source. The adapter’s video BIOS has been modified for use with the specified 27inch monitor.
Check the Intergraph Online or the Intergraph Bulletin Board Service (IBBS) for any future updates to
the driver and to the video BIOS.

6
 Loading...