

Page 1

ErgoAct OEM Monitor
Installation Guide
February 1997
DHAF00720
Page 2

Warranties and Liabilities
The information and the software discussed in this document are subject to change without notice and should not
be considered commitments by Intergraph Corporation. Intergraph Corporation assumes no responsibility for any
errors in this document.
The software discussed in this document is furnished under a license and may be used or copied only in accordance
with the terms of the license. No responsibility is assumed by Intergraph for the use or reliability of software on
equipment that is not supplied by Intergraph or its affiliated companies.
All warranties given by Intergraph Corporation about equipment or software are set forth in your purchase
contract, and nothing stated in, or implied by, this document or its contents shall be considered or deemed a
modification or amendment of such warranties.
Copyright
1997, Intergraph Corporation including this documentation, and any software and its file formats and audiovisual displays described herein; all rights reserved; may only be used pursuant to the applicable software license
agreement; contains confidential and proprietary information of Intergraph and/or other third parties which is
protected by copyright, trade secret and trademark law and may not be provided or otherwise made available
without prior written authorization.
Restricted Rights Legend
Use, duplication, or disclosure by the United States Government is subject to restrictions as set forth in subdivision
(c)(1)(ii) of the rights in technical data and computer software clause at DFARS 252.227-7013.
Unpublished rights reserved under the copyright laws of the United States.
Intergraph Corporation
Huntsville AL 35894-0001
Trademarks
Intergraph and the Intergraph logo are registered trademarks of Intergraph Corporation. ErgoAct is a trademark
of Intergraph Corporation. Other brands and product names are trademarks of their respective owners.
Page 3

Contents
Installing an OEM Monitor.........................................................................................1
Remove the Existing Monitor and Separator Plate.........................................................1
Set Up the Panasonic OEM Monitor..............................................................................1
Preparing the Monitor for Installation..............................................................2
Attaching the Separator Plate...........................................................................5
Set Up the Hitachi OEM Monitor ..................................................................................9
Removing the Swivel Base...............................................................................9
Attaching the Adapter Bracket.........................................................................9
Attaching the Separator Plate.........................................................................10
Install the OEM Monitor.............................................................................................13
Page 4

Page 5

Installing an OEM Monitor
This document explains how to remove existing monitors from the ErgoAct workstation stand, and to
install a Panasonic or Hitachi OEM monitor onto the workstation stand. Read the instructions in this
document before proceeding with the installation. To perform the installation, you will need the
following tools:
u No. 1 Phillips screwdriver
u No. 2 Phillips screwdriver
u No. 2 single slot screwdriver
u 3/16-inch Allen wrench
Remove the Existing Monitor and Separator Plate
The existing monitor on the workstation stand uses a separator plate to secure the monitor to the
stand. The separator plate (CFAB532E) must be removed from the existing monitor and installed
onto the new OEM monitor.
1
1. Turn off the power and disconnect the power cord from the existing monitor.
2. Remove and retain the screws that secure the monitor to the workstation stand. The screws are
located underneath the monitor at the back of the stand.
3. Slide the monitor off the stand and set it on its side.
WARNING Do not set the monitor on its display screen. Damage may result.
4. Remove and retain the shoulder screws that secure the separator plate to the monitor.
5. To install the new OEM monitor, refer to “Install the Panasonic OEM Monitor” or “Install the
Hitachi OEM Monitor.”
Set Up the Panasonic OEM Monitor
The hardware kit used to install the Panasonic monitor onto an ErgoAct stand contains the following
items:
u One monitor adapter bracket (MMSA408)
u Four shoulder screws (CFAB507)
u Two M6x12mm Phillips screws (CPHM044) (optional)
Before the monitor can be installed, it must be prepared for installation by removing the monitor
cover and swivel base, and attaching the adapter bracket included with the kit. Finally, the separator
plate from the previous monitor must be attached to the adapter bracket.
Page 6
2
Preparing the Monitor for Installation
WARNING The monitor is heavy and could cause serious personal injury if dropped. Two persons are
required to lift and carry the monitor.
1. Unpack the monitor from its shipping carton.
2. Verify that the monitor power cord is supplied.
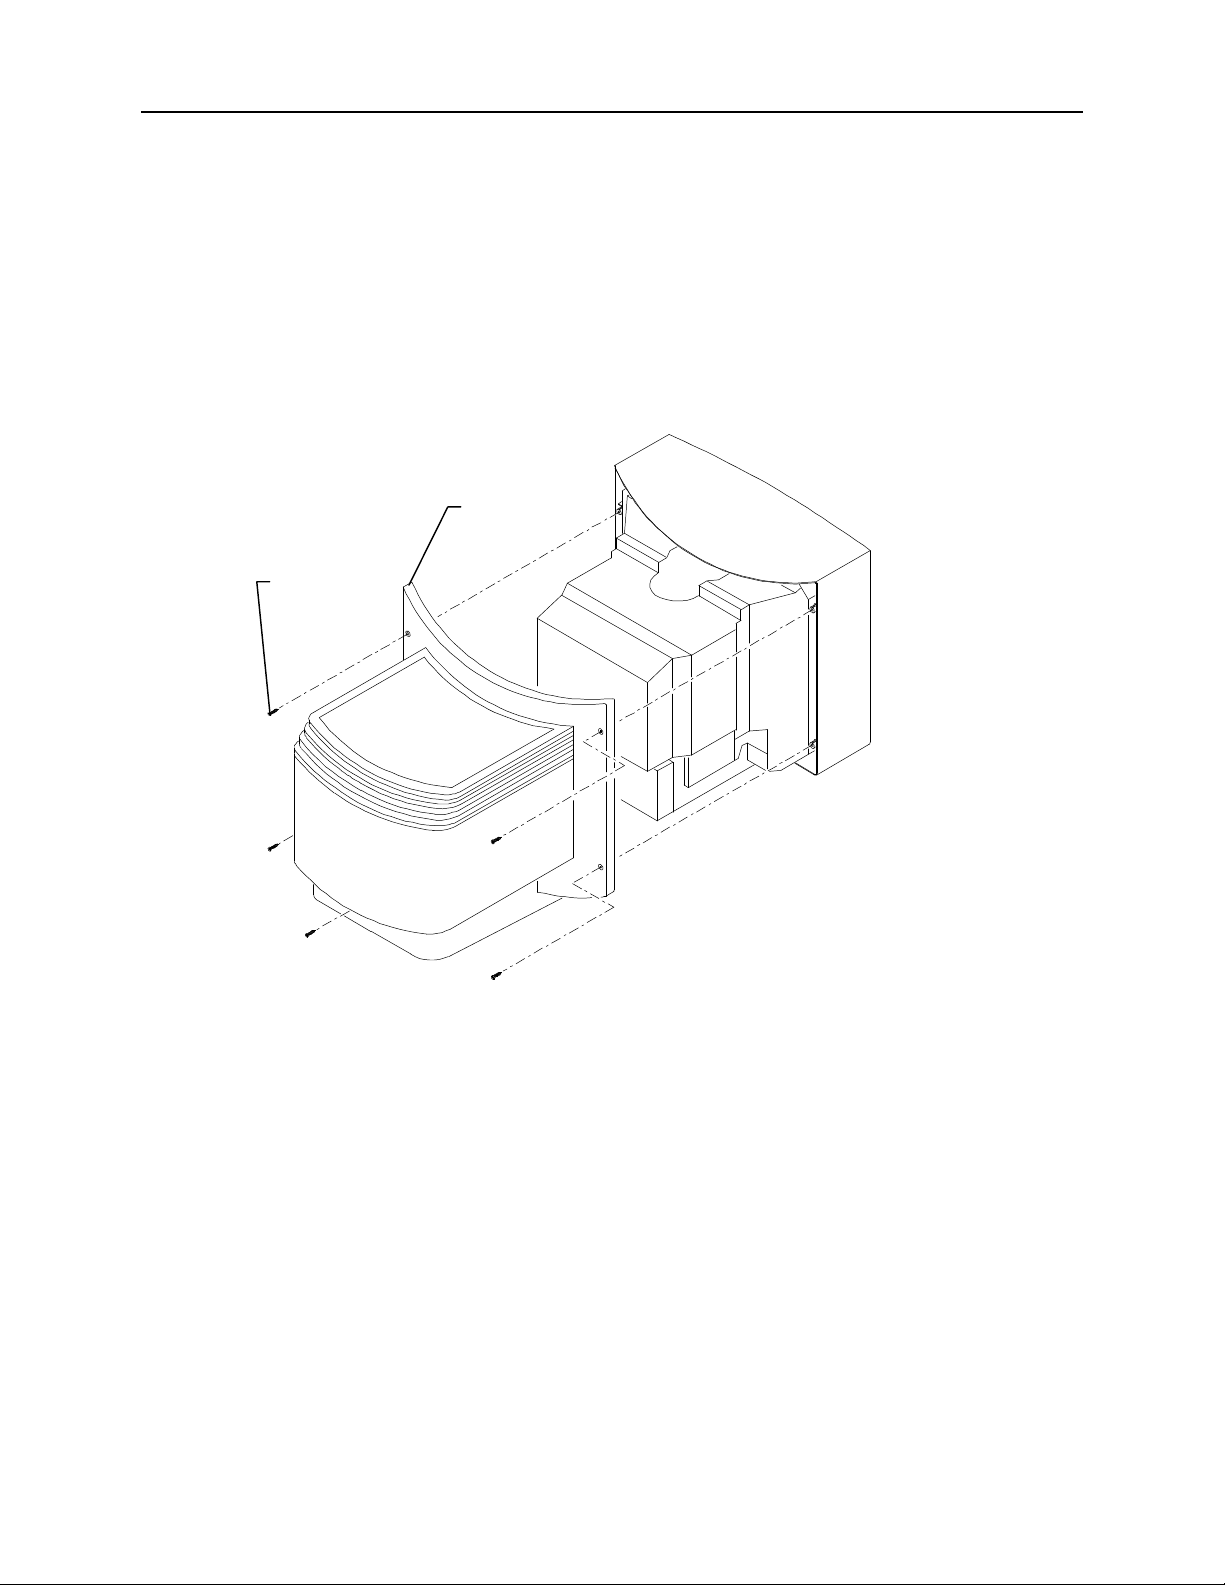
3. Remove the five screws from the back of the monitor cover as shown in the following figure.
Then, remove the monitor cover.
Monitor
Cover
Screws (5)
4. To access the swivel base, turn the monitor onto its side.
WARNING Do not set the monitor on its display screen. Damage may result.
Page 7

5. Firmly press down and pull out the press tabs on the swivel base as shown in the following
figure.
3
Press Tabs
Swivel Base
6. Remove the swivel base from the monitor by sliding it to the back of the monitor.
Page 8

4
7. Place the adapter bracket onto the bottom of monitor. Ensure the holding latches are secured
inside the slots in the monitor frame. Refer to the following figure.
Adapter
Bracket
Slot
8. Slide the bracket toward the front of the monitor to secure it in place. The bracket snaps in
without using screws.
9. Re-attach the monitor cover to the monitor and secure it with the screws removed in step 3.
Repeat these steps for the second monitor, if applicable.
Page 9

Attaching the Separator Plate
The adapter plate is designed with mounting holes so that it can be used in single-monitor and dualmonitor configurations. These holes are used to properly align the separator plate (CFAB532E) to
the adapter bracket. After the separator plate is installed, the monitor is set onto the workstation
stand. If the separator plate is not properly installed, the monitor cannot be secured to the stand.
Shoulder screws (included with the OEM monitor kit) attach the separator plate to the adapter
bracket. The separator plate is included with the workstation stand.
The following figure shows the mounting hole pattern for the adapter bracket, viewed as looking at
the bottom of the monitor.
L L
R R
5
L designates holes for the
monitor on the left side of
the stand, when facing the
front of the stand.
Single Monitor
L L
R R
R designates holes for the
monitor on the right side
of the stand, when facing
the front of the stand.
See the following instructions for single-monitor and dual-monitor configurations.
Page 10
6
Single-Monitor Configuration
1. Install the four shoulder screws through the separator plate into the adapter bracket according to
the locations shown in the following figure.
Separator
Plate
Adapter
Bracket
2. Go to “Install the OEM Monitor” to complete the monitor installation. Use the screws removed
in “Remove the Existing Monitor and Separator Plate” when attaching the monitor to the
workstation stand.
Page 11

Dual-Monitor Configuration
The left-right orientation used in the following directions assume you are facing the front of the
workstation stand.
1. For the monitor to be installed on the right side of the workstation stand, install the four shoulder
screws through the separator plate into the adapter bracket according to the locations shown.
7
R
R
R
R
Separator
Plate
R = Holes for
Right Monitor
Adapter
Bracket
Page 12
8
2. For the monitor to be installed on the left side of the workstation stand, install the four shoulder
screws through the separator plate into the adapter bracket according to the locations shown.
L
L = Holes for
L
L
L
Left Monitor
Separator
Plate
Adapter
Bracket
3. Go to “Install the OEM Monitor” to complete the monitor installation. Use the screws removed
in “Remove the Existing Monitor and Separator Plate” when attaching the monitors to the
workstation stand.
Page 13

Set Up the Hitachi OEM Monitor
The hardware kit used to install the Hitachi monitor onto an ErgoAct stand contains the following
items (not including packaging and documentation):
u One monitor adapter bracket (CFAB334)
u Four shoulder screws (CFAB507)
u Two M6x12mm Phillips screws (CPHM044)
u Three M4x8mm Phillips screws (CPMH022)
Removing the Swivel Base
WARNING The monitor is heavy and could cause serious personal injury if dropped. Two persons are
required to lift and carry the monitor.
1. Unpack the monitor from its shipping carton.
2. Verify that the monitor power cord is supplied.
3. Turn the monitor onto its side.
9
WARNING Do not set the monitor on its display screen. Damage may result.
4. Two screws are located just inside the circular area of the bottom of the base. Remove and retain
these two screws.
5. Slide the base to the back of the monitor and set the base aside.
Repeat these steps for the second monitor, if applicable.
Attaching the Adapter Bracket
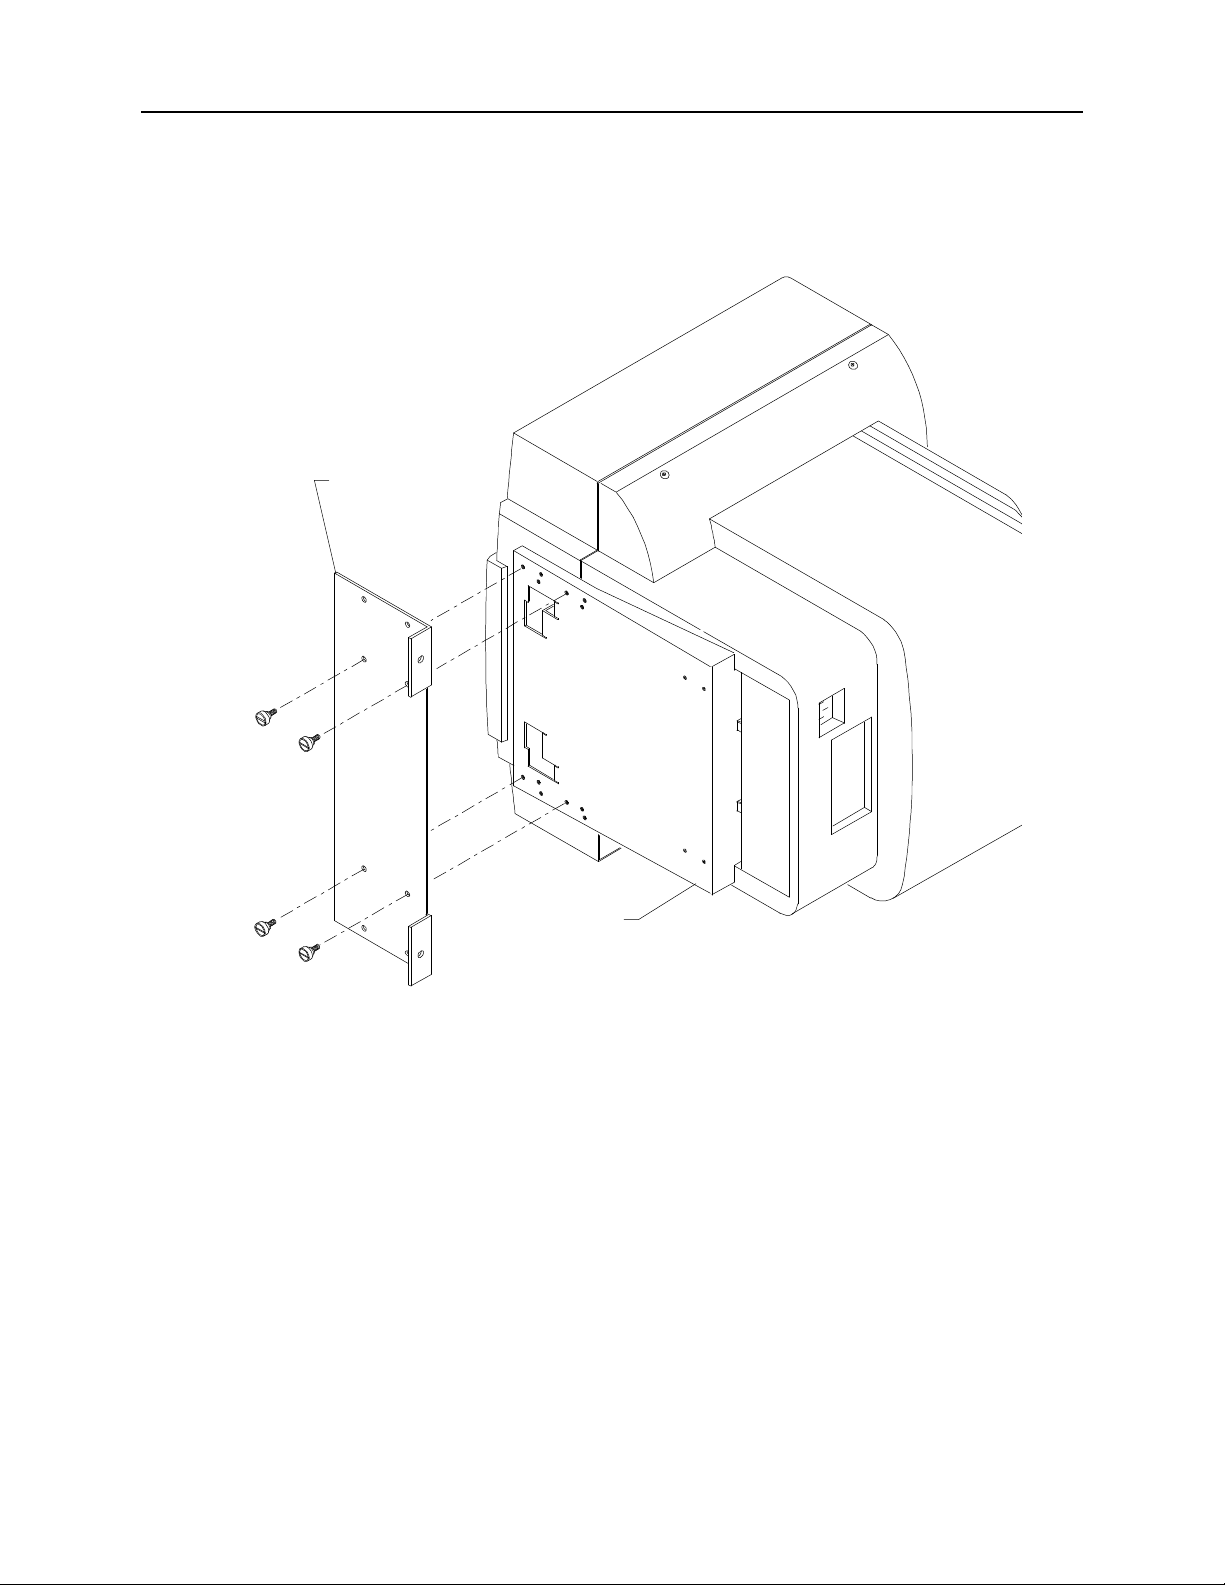
1. While monitor is still on its side, place the adapter bracket onto the bottom of monitor. Ensure
the holding latches are secured inside the slots in the monitor frame. Refer to the following
figure.
2. Using a No. 2 Phillips screwdriver, secure the adapter bracket to the monitor using the two
M4x8mm screws.
Page 14

10
Screws (2)
Adapter
Bracket
Holding Latch
Repeat these steps for the second monitor, if applicable.
Attaching the Separator Plate
The following figure shows the mounting hole pattern for the adapter bracket. These holes are used
to properly align the separator plate to the adapter bracket. Shoulder screws (included with the OEM
monitor kit) attach the separator plate to the bottom of the monitor.
L L
R R
Single Monitor
L L
R R
1. Remove and retain the two screws holding the separator plate to the ErgoAct stand.
Page 15

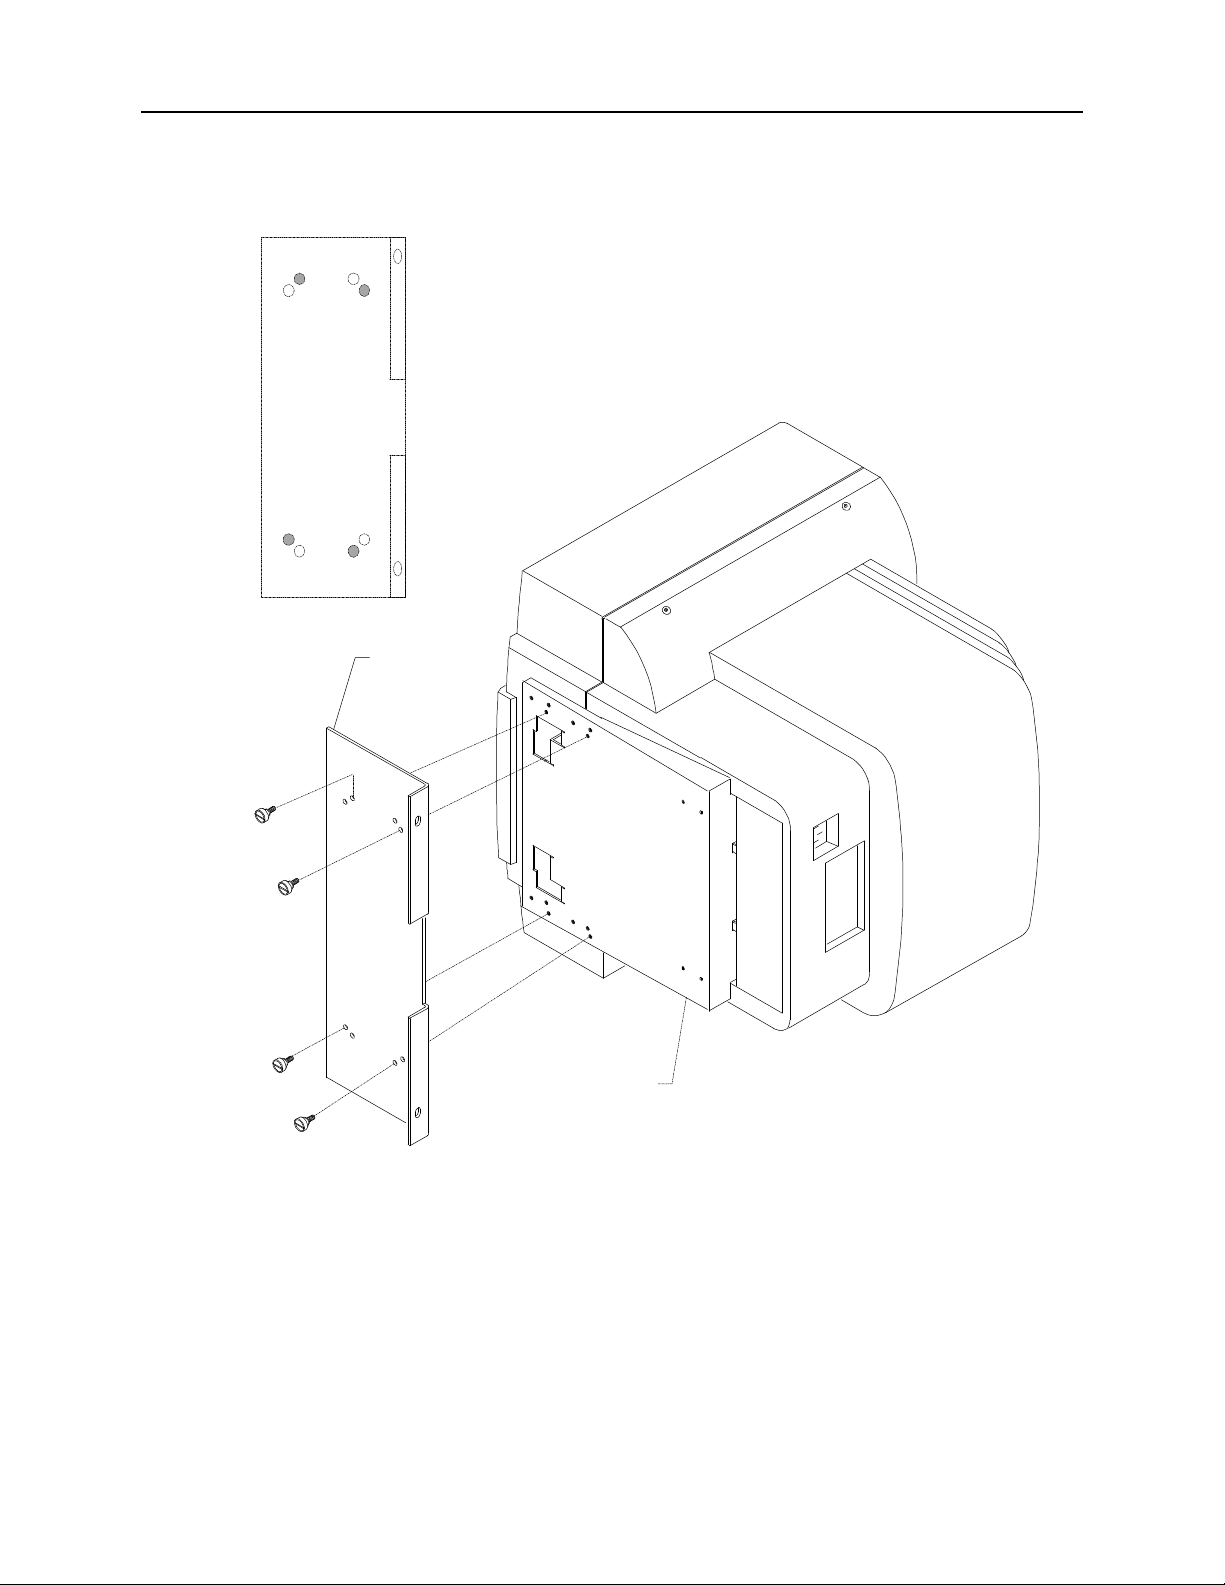
2. For a single-monitor configuration, secure the separator plate to the adapter bracket. Install the
four shoulder screws into locations shown in the following figure.
Separator Plate
Shoulder
Screws (4)
11
3. For the left monitor of a dual-monitor configuration, secure the separator plate to the adapter
bracket. Install the four shoulder screws into locations shown in the following figure.
Separator Plate
Shoulder
Screws (4)
Page 16
12
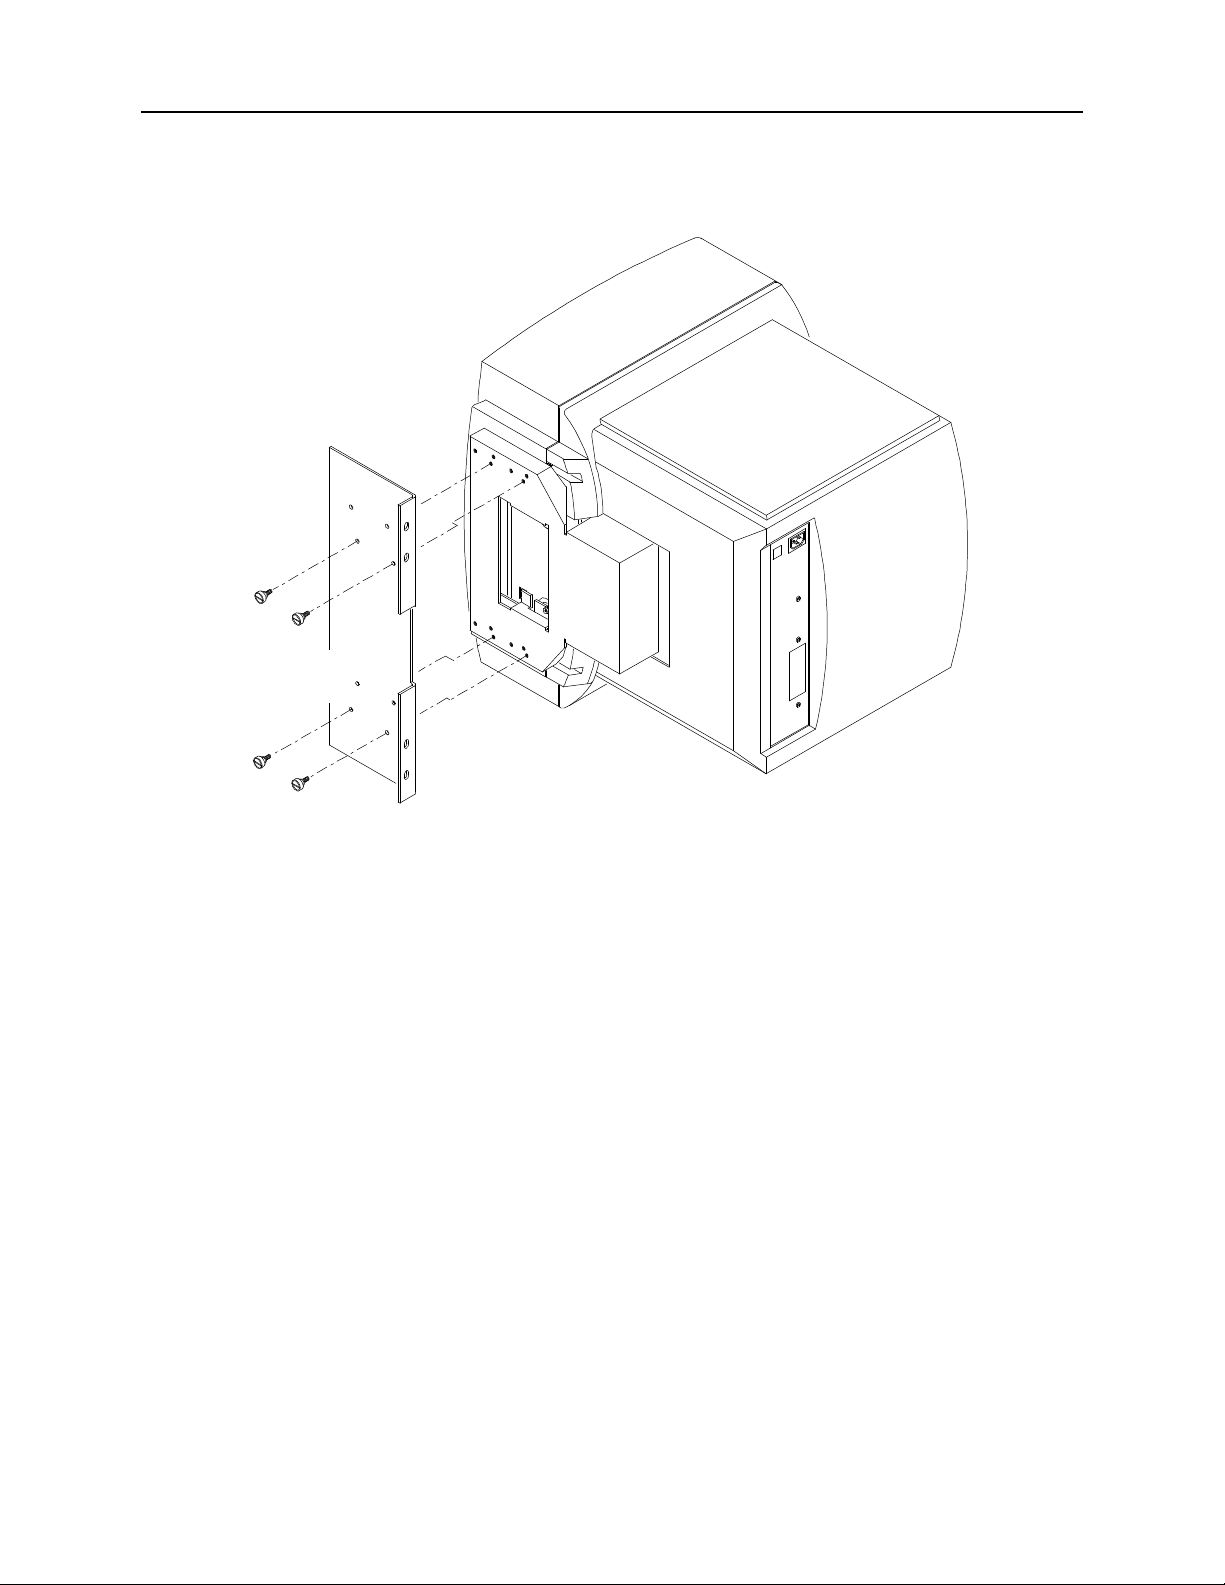
4. For the right monitor of a dual-monitor configuration, secure the separator plate to the adapter
bracket. Install the four shoulder screws into locations shown in the following figure.
Separator Plate
Shoulder
Screws (4)
Refer to “Install the OEM Monitor” to install the monitor.
Page 17

Install the OEM Monitor
Keyholes
1. Place the monitor onto the platform of the ErgoAct stand, setting the shoulder screws inside the
keyholes on the platform. Slide the monitor so the shoulder screws lock in the keyholes.
13
Screws (2)
2. Thread the screws through the separator plate into the mounting holes. Alternately turn each
screw about two turns until the monitor is securely fastened to the stand.
3. Repeat these steps for the second monitor, if applicable.
4. Connect the power cord to the new monitors.
Page 18

14
 Loading...