

Page 1

VIPER V770
Diamond Multimedia Systems, Inc.
USER’S GUIDE
Page 2

Page 3

Table of Contents
ABOUT VIPER V770................................................................................................1
Viper V770 Key Features ............................................................................................... 1
INSTALLING YOUR VIPER V770 BOARD ......................................................................3
Hardware Installation....................................................................................................3
Software Installation...................................................................................................... 8
DIAMOND SOFTWARE TOOLS....................................................................................12
InControl Tools 99 Utility................................................................................................. 12
Updating Your Drivers.................................................................................................... 13
REMOVING YOUR DIAMOND PRODUCT .....................................................................14
Removing Viper V770 Under Windows 98/95.............................................................14
Removing Viper V770 Under Windows NT 4.0............................................................. 14
Removing Diamond Software Tools ............................................................................ 15
TROUBLESHOOTING .................................................................................................16
Windows 98 Q & A......................................................................................................... 17
VIPER V770 DISPLAY MODES...................................................................................19
VIPER V770 SPECIFICATIONS....................................................................................21
WINDOWS 98 MULTIPLE MONITOR SUPPORT...............................................................23
Multimonitor System Requirements.............................................................................. 23
Setting Up Multiple Monitor Support............................................................................ 23
Tips and Troubleshooting .............................................................................................. 24
TRADEMARK AND COPYRIGHT INFORMATION..............................................................26
Trademarks..................................................................................................................... 26
Copyright Notices.......................................................................................................... 26
CE AND FCC INFORMATION ...................................................................................27
FCC Notice..................................................................................................................... 27
Declaration of Conformity............................................................................................ 27
Page 4

Page 5

ABOUT VIPER V770
The Viper V770 graphics accelerator is made for the high-performance
computer enthusiast who is looking for a compelling graphics experience
while using the PC for either entertainment or productivity. The V770 delivers
an unparalleled combination of high performance 2D and 3D graphics,
providing rich multimedia output under the Windows platform.
The Viper V770’s 32MB of high-speed memory delivers powerful gaming at
high resolutions, and handles the most robust 3D textures featured in the
latest games.
This chapter summarizes some important features of the V770 board.
VIPER V770 KEY FEATURES
The Viper V770 graphics accelerators features include:
♦ Advanced 128-bit Processing Power
⇒ Delivers unprecedented speed and quality for 2D, 3D and video
acceleration
⇒ Utilizes nVIDIA’s RIVA TNT2™ controller which is fully optimized for
DirectX 6 and OpenGL
⇒ TwiN Texel 3D engine, including two rendering pipelines for true
single-pass multitexturing, for exquisite rendering of the most intricate
environments
♦ Stunning 3D Quality and Performance
⇒ Increased triangle and fill rates for exceptional graphics rendering
⇒ Multitexturing and a dual 32-bit color rendering pipeline for
heightened visual quality and faster frame rates
⇒ Advanced 3D feature set and 32-bit Z/stencil buffer ensure dazzling
image quality
⇒ 3D resolutions up to 2048 x 1536
⇒ Accelerates popular games and software with support for Direct3D
and OpenGL
®
®
1
Page 6

♦ State-of-the-art 2D graphics
⇒ Next-generation 128-bit acceleration for graphics display at scorching
speeds
⇒ 32MB RAM and 300MHz RAMDAC for high resolutions at the highest
quality
⇒ Ultra-high resolutions up to 2048 x 1536
⇒ Fully optimized for Windows 98/95 and Windows NT 4.0
⇒ Supports multimonitor display, and the OnNow power management
feature of Windows 98
⇒ Accelerates Windows 98/95 and Windows NT 4.0, WHQL certified for
compatibility
♦ Advanced multimedia capabilities:
⇒ Advanced video features include multi-tap X and Y filtering, color
space conversion and scaling
⇒ MPEG-1, MPEG-2, Indeo and Cinepak playback
⇒ DVD playback
♦ AGP configuration with full sideband and pipelining
♦ AGP 2X or 4X, depending upon your motherboard
2
Page 7

INSTALLING YOUR VIPER V770
BOARD
To use your Viper V770 board, you need to first install the hardware, software
drivers, and utilities provided on the installation CD.
Note— Some systems have an integrated graphics solution on the
motherboard. Contact your motherboard manufacturer to determine how to
disable your on-board graphics.
HARDWARE INSTALLATION
Your Viper V770 card is an AGP bus type. Follow the instructions below for
proper installation. Before you install your card, verify if your motherboard is
an AGP 2X, or 4X type, and refer to the instructions in the following section.
Consult the documentation that accompanied your motherboard or system if
you are not sure whether your system supports AGP 2X or 4X.
Warning! To avoid accidental electric shock, shut your computer down and
unplug the power cord before starting the following procedures. Remember
which cables go to which connectors. You may want to label your computer’s
cables before disconnecting them. To protect your Viper V770 board from
damage due to static electrical discharge, ground yourself by touching the
power supply box inside your computer before starting the procedures below.
Important— To receive the full benefits of the AGP version of your Viper
board, you must be running either Windows 98, or Windows 95 OSR2
(version 4.00.950 B, or newer) on a system that has been updated with the
USB OSR2.1 supplement. Check the software disks that were included with
your computer equipment to verify that you have the USB supplement, or
contact your computer manufacturer for additional details. If you are running
Windows NT 4.0, you must be updated with the latest Service Pack. Service
Pack 4 is the current version available from Microsoft.
Setting the Jumpers for Your Card
Your card may be equipped with jumper switches and may require certain
jumper settings to operate properly on either AGP 2X or 4X motherboards.
You must first determine whether your AGP motherboard supports an AGP
3
Page 8
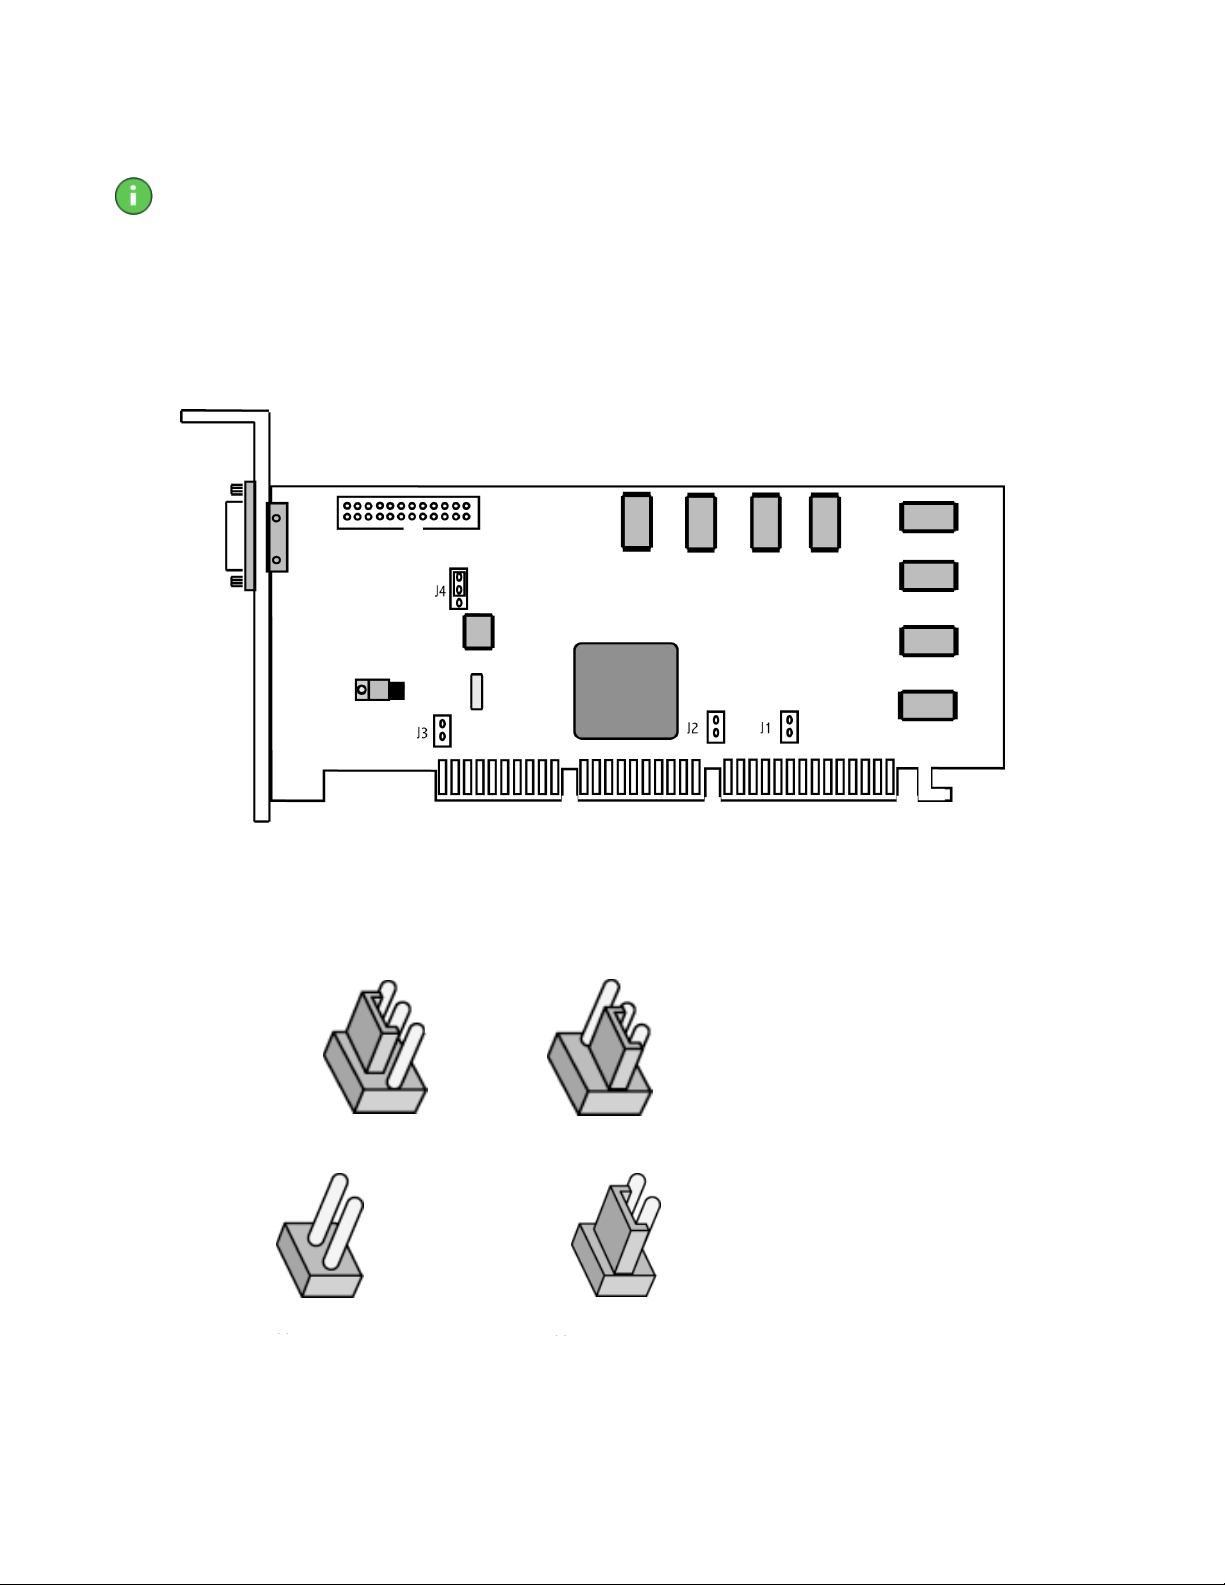
2X or 4X configuration. Consult your computer or motherboard
Jumper J4, A-B
Jumper J4, B-C
manufacturer’s user guide to verify what it supports.
Note: The factory default jumper settings are set to AGP 2X. If you have a 2X
motherboard, do not make any changes to the jumpers on the card—you can
skip this section and continue with the next. If you have an AGP 4X
motherboard, use the following instructions to set the jumpers.
The Viper V770 has 4 jumpers located on the card. They are visible on the
illustration below as J1, J2, J3, J4. The J4 pins are marked A B C for
reference.
A
B
C
To change the jumpers to the AGP 4X configuration:
1. Move jumper J4 from the (factory default) A-B position to the B-C
position:
2. Move jumpers J1, J2, J3 to the closed position:
Jumper J1-3, open
Jumper J1-3, closed
Your card is now set to the AGP 4X configuration.
4
Page 9

Before You Install Your Card…
Before you install your Viper card, it is recommended that you set your
display driver to Standard VGA before you shut down your computer and
remove your legacy (AGP, PCI, or ISA) VGA card.
Setting the Standard VGA Under Windows 95
To set your display to Standard VGA under Windows 95:
1. From the Start menu, go to Start > Settings> Control Panel, then
double-click on Display. The Display Properties sheet appears.
2. Click on the Settings tab, then press the Advanced Properties button.
3. Click on the Adapter tab, the press the Change button. The Select
Device window appears.
4. Click on the Show All Devices bullet. Under Manufacturers select
(Standard Display Types). Under Models, select Standard Display
Adapter (VGA).
5. Click on Apply, then click on OK in all windows to close and accept the
changes.
6. Shut down your computer. You are now ready to remove your old
graphics card and install your new Viper V770 board.
Setting the Standard VGA Under Windows 98
To set your display to Standard VGA under Windows 98:
1. Select Start > Settings > Control Panel > Display. The Display
Properties dialog appears.
2. Choose the Settings tab and click on the Advanced button.
3. Click on the Adapter tab and click on the Change button. The Update
Device Wizard appears.
4. Click Next and select Display a list…
5. Click Next and select Show All Hardware. Click on Standard Display
Adapter Types and select Standard Display Adapter (VGA).
6. Click Next.
7. If a warning dialog appears, asking whether you want to use this driver,
click Yes. Then click Next.
8. Windows asks you if you want to restart your computer. Click No.
9. Shut down your computer. You are now ready to remove your old
graphics card and install your new Viper V770 board.
5
Page 10

Setting the Standard VGA Under Windows NT 4.0
To set your display to Standard VGA under Windows NT 4.0:
1. From the Start menu, go to Start > Settings > Control Panel, then
double click on Display. The Display Properties sheet appears.
2. Click on the Settings tab, then click the Display Type button.
3. Under Adapter Type, click on the Change button. The Change Display
window appears.
4. Under Manufacturers, select Standard Display Types. Under Display,
choose VGA Compatible Display Adapter.
5. Click on OK. You may need to insert your Windows NT 4.0 CD-ROM.
6. Click on Close and OK to accept the changes.
7. Shut down your computer. You are now ready to remove your old
graphics card and install your new Viper V770 board.
Note— You should have the latest Service Pack for NT 4.0 (Service Pack 4)
loaded for the Viper V770 to operate properly. Service Pack 4 is available
from Microsoft’s web page, www.microsoft.com.
After you have completed the steps above and removed your old graphics
card, you can continue with the procedures below to install your Viper V770
board.
Installing Your Viper V770 AGP Board
Installing your card should take just a few minutes. Please note that the
illustrations provided in this section are for instructional use only; the card
shown may look different than the one you purchased. To install your AGP
card, follow these steps:
1. With the power off, remove your computer cover and locate the AGP slot.
6
Page 11

2. Remove the screw attached to the bracket cover and remove the bracket
plate.
3. Before handling the card, ground yourself by touching the power supply
box inside your computer.
4. Position your card directly above the AGP slot as illustrated below.
Note— AGP cards are designed to fit one way only. Be sure your card is
properly aligned.
7
Page 12

5. Insert your card firmly into the AGP slot. Care should be taken to press it
evenly and snugly into its slot. Do not force.
6. Once you are certain that the card is installed properly in its slot, secure it
to the computer frame with the screw you removed in step 2. Make sure
the card does not lift out of the AGP slot while tightening the bracket
screw.
7. Connect your VGA monitor cable to the 15-pin connector on your card.
8. Secure your computer cover and reboot your computer.
9. Continue with the software installation for your operating system in the
following sections.
SOFTWARE INSTALLATION
Now that you have installed your new Diamond graphics card and rebooted
your computer, complete your installation using the following directions.
Windows 98/95 and Windows NT 4.0
There are two ways to install the software for your Diamond graphics card:
8
Page 13

♦ Take advantage of Diamond’s installation utility and make installing your
drivers and Diamond software quick and easy. See Quick Installation of
Diamond Drivers and Utilities.
♦ Install the drivers for your card manually from the Windows Display
Properties dialog. See Manual Installation of Diamond Drivers.
Quick Installation of Diamond Drivers and Utilities
This section covers the installation of your Diamond drivers and Diamond
utilities under Windows 98/95 and NT 4.0.
After Windows 98/95 reboots, the plug-n-play feature detects your new card
and gives the message that new hardware was found. Windows 98/95 may
then compile a driver database. The Add New Hardware Wizard appears
under Windows 98, and the Update Device Driver Wizard appears under
Windows 95. When you see the Wizard, under Windows 98/95, begin with
step 1 below. Windows NT 4.0 users should go to step 2 below:
1. Click Cancel. Your computer will finish booting up.
2. After your computer boots, insert the Diamond installation CD disk into
your CD- or DVD-ROM drive. If your computer is set to “auto play,” the
Diamond installation program starts; go to step 5. If not, go to step 3.
3. Double click on My Computer, then double-click on the letter of your
CD- or DVD-ROM drive. The Diamond installation CD opens.
4. After the Diamond installation CD opens, double-click on Start.exe. The
Diamond installation program is launched.
5. You should now see the Diamond installation screen for your Diamond
product. Click Installation.
6. Select the Drivers option for your Diamond product. The Diamond
Install screen appears. Please review the Release Notes that appear
onscreen—they contain important last-minute information.
7. Click Next.
8. You are given a choice of installation options. Select one of the following
(the Standard option is recommended):
Minimal:
Standard:
Custom:
Installs only the Diamond Display Driver for your card.
Installs the Diamond Display Driver for your card and other
Diamond utilities.
Allows you to choose installation Diamond Drivers, or any
of the Diamond utilities that may ship with your product. At
the minimum, the Diamond Viper Display Driver must be
installed during a first-time installation.
9
Page 14

Note— Diamond Drivers must be installed the first-time you install a
Diamond product.
9. Click the button of the installation option you want. We recommend that
you use the default installation directories.
10. Click Next to continue installation.
Note— If you are prompted to keep or replace existing files, keep the newer
files.
11. After the installation is complete, click Next to restart your computer.
Congratulations, you have successfully installed your new Diamond graphics
accelerator!
Manual Installation of Diamond Drivers
If, for some reason, you need to install the drivers for your Diamond product
“manually,” follow the procedures below for your operating system. If you
need to update your drivers, please see the chapter on Diamond Software
Tools later in this user guide.
Windows 98/95 Manual Driver Installation
To install the driver for your Diamond graphics accelerator, go to Start >
Settings > Control Panel > Display. The Display Properties page
appears. Continue with the following procedure:
1. Click the Settings tab, then click the Advanced button.
2. Click the Adapter tab, and then click the Change button. The Update
Device Wizard appears.
3. Click Next and choose Display a list of all the drivers …
4. Click Next and then click Have Disk…
5. Insert the installation CD. If your system is set to “auto-play,” the
Diamond installation program opens. Click Quit to exit the program.
6. From the Install From Disk dialog, type X:\Win9x\English\Drivers
(where “X” is the letter of your CD- or DVD-ROM drive). Click OK. The
.inf file for your Diamond product should appear in the Select Device
window.
7. Choose the driver that applies to your operating system and click OK.
8. Click OK again, and then click Next. The driver file(s) should be copied
to your system.
Note— If you are prompted to keep or replace existing files, keep the newer
files.
10
Page 15

9. Click Finish, then click Close.
10. Click Close to exit the Display Properties dialog.
11. Reboot your computer.
Windows NT 4.0 Manual Driver Installation
To install the NT 4.0 driver for your Diamond graphics accelerator, go to
Start > Settings > Control Panel > Display. The Display Properties
page appears. Continue with the following procedure:
1. Click the Settings tab, then click the Display Type… button.
2. Click the Change button. The Change Display dialog appears.
3. Click Have Disk… The Install From Disk dialog appears.
4. Insert the installation CD. If your system is set to “auto-play,” the
Diamond installation program opens. Click Quit to exit the program.
5. Type X:\NT4\English\Drivers (where “X” is the letter of your CD- or
DVD-ROM drive). Click OK. The Change Display dialog appears.
6. Select the driver for your Diamond product and click OK.
7. If the Third-party Drivers window appears, click Yes to proceed. The
driver files will now be copied to your system.
8. After you receive a message that the drivers were successfully installed,
click OK.
9. Click Close in the Display Type dialog. You are now placed back into
the Display Properties page.
10. Click the Test button to check your settings, or, click the close
window box in the upper-right corner of the Display Properties page to
exit.
11. Reboot your computer.
After you reboot, you may be requested by the system to check the display
driver. Make any changes you want to your display settings at this time.
11
Page 16

DIAMOND SOFTWARE TOOLS
Diamond Multimedia is committed to keeping your new product running at
peak performance and providing tools to fully optimize your system for your
personal applications.
INCONTROL TOOLS 99 UTILITY
Diamond’s InControl Tools 99 allows you to take charge of your Windows
desktop and make Windows easier to use and control. InControl Tools 99
brings more functionality to the Windows desktop by delivering the most
comprehensive set of easy-to-use 3D desktop features, enabling you to make
on-the-fly display adjustments, setup keyboard shortcuts, select between
Direct3D and OpenGL hardware settings and more.
InControl Tools 99 includes a unique import and export feature, which allows
you to determine your own settings for your favorite PC titles and share them
with other InControl Tools 99 users. A full-screen desktop preview enables
you to view graphics quality and check performance from within a 3D
application as you make setting adjustments. A frame counter measures the
performance and displays the frames per second. In addition, the Shortcut to
URL Favorites feature provides instant access to your favorite Internet sites.
More than a set of desktop configuration features, InControl Tools 99 allows
your Diamond video card to be the complete graphics solution for your PC.
Key Features
♦ Keyboard Shortcuts
♦ Custom Desktop Menu with…
⇒ Resolution Switching on-the-Fly
⇒ Color Depth Switching on-the-Fly
♦ Diamond 3D Settings
♦ Custom Game Setting Profiles
♦ Shortcuts to URL Favorites
♦ Support for Windows 98/95
12
Page 17

NoteYour ICT99 3D desktop features may be different depending your
graphics card.
How is InControl Tools 99 Installed?
When you installed the drivers for your Diamond card and selected
“Standard” installation, ICT99 was automatically installed. If you selected
“Custom” installation and did not install ICT99 or desire to reinstall, run the
“Custom” installation from the product installation CD, and choose ICT99
from the list of available options. See the Software Installation section of this
user guide for information on using the product installation CD for your
operating system.
For the latest updated information, please visit Diamond Multimedia’s web
site at www.diamondmm.com.
Using InControl Tools 99
ICT99 can be launched the following ways:
1. From the Start menu, go to Programs > Diamond > InControl Tools
99.
2. Click the right mouse button on the Windows 98/95 desktop.
⇒ You can click anywhere on the desktop to open the Diamond control
panel
3. Click the Taskbar icon in the lower right corner on the Windows 98/95
desktop.
4. Click the left mouse button on the Diamond icon to open the control panel
There are two configuration managers for ICT99 that will help you to easily
configure your display and desktop features:
♦ InControl Desktop Properties
♦ InControl Desktop Manager
For more information while using ICT99, online Help is available. From any
ICT window, use the right mouse button to click the feature or button you
want Help on, and then click the What’s This? command.
UPDATING YOUR DRIVERS
Check with your system vendor for the latest drivers for your Diamond
product.
13
Page 18

REMOVING YOUR DIAMOND
PRODUCT
This section describes how to properly remove your Viper software and
hardware from your system should you need to do so.
REMOVING VIPER V770 UNDER WINDOWS 98/95
1. From the Start menu, go to Start > Settings> Control Panel, then
double-click on Display. The Display Properties sheet appears.
2. Click on the Settings tab, then press the Advanced Properties button.
3. Click on the Adapter tab, the press the Change button. The Select
Device window appears.
4. Click on the Show All Devices bullet. Under Manufacturers select
Standard Display Types. Under Models, select Standard Display
Adapter (VGA).
5. Click on Apply, then click on OK in all windows to close and accept the
changes.
To remove the hardware:
1. Shut down your computer.
2. Remove the computer case as outlined in the hardware installation
instructions in Chapter 2.
3. Ground yourself by touching the power supply box.
To remove the hardware, simply reverse the hardware installation procedures
from Chapter 3.
REMOVING VIPER V770 UNDER WINDOWS NT 4.0
1. Select Start > Settings > Control Panel > Add/Remove Programs.
2. Click on the Remove the Product button.
3. Click Next.
4. When the uninstall is complete, Windows NT will automatically reboot.
14
Page 19

To remove the hardware:
1. Shut down your computer.
2. Remove the computer case as outlined in the hardware installation
instructions in Chapter 2.
3. Ground yourself by touching the power supply box.
4. To remove the hardware, simply reverse the hardware installation
procedures from Chapter 3.
REMOVING DIAMOND SOFTWARE TOOLS
To remove InControl Tools 99 or the Diamond Update Wizard software, follow
the instructions for your operating system below.
Windows 98/95
1. From the Start menu, click Start > Programs > Diamond > InControl
Tools 99 > Uninstall InControl Tools 99. The Diamond Install window
appears. Click Next.
2. Click the Remove the product button. A list is displayed with the
software components that will be removed. Click Next to remove all
software in the list.
Note— If you only want to remove one product from the list, click Back
and click the Add/Remove components button. Select the item(s) you
want to remove from the checklist. Click Next to continue.
3. After the software has been removed, restart your computer.
Windows NT 4.0
1. From the Start menu, click Start > Programs > Diamond > DIAMOND
Display Component Uninstall. The Diamond Install window appears. Click
Next.
2. Click the Remove the product button. A list is displayed with the
software components that will be removed. Click Next to remove all
software in the list.
Note— If you only want to remove one product from the list, click Back
and click the Add/Remove components button. Select the item(s) you
want to remove from the checklist. Click Next to continue.
3. After the software has been removed, restart your computer.
15
Page 20

TROUBLESHOOTING
If you experience a problem using a Viper V770 board under Windows 98,
there are three possible causes of your problem:
♦ Your application is incompatible with the Viper V770 or is not compatible
with Direct3D or OpenGL.
♦ The Viper card not properly installed (seated incorrectly).
♦ Viper drivers are not correctly installed.
Try the following:
⇒ Check your game manufacturer’s specifications to verify its compatibility
with Direct3D, OpenGL and Viper V770.
⇒ Shut down your computer and double-check the cable connections. Make
sure that the Viper card is properly seated in its AGP slot.
⇒ Re-install the Viper drivers using the Viper Installation CD.
Viper V770 Requires An IRQ
The nVIDIA TNT2 chip requires an IRQ to function correctly. If no IRQ has
been assigned to the card by the motherboard BIOS you may experience
symptoms such as Windows not booting, or extremely poor performance.
The symptoms mostly involve error messages such as While initializing
device, VDD. Windows Protection Error. You must restart your
computer, and, While initializing device, NVRM. Windows Protection
Error. You must restart your computer. Some motherboard BIOS's
allow for an option to "Assign IRQ for VGA." Often, the latest BIOS will also
resolve this problem. Check with your motherboard manufacturer for
information on updating your BIOS.
Your 3D Game or Business Application is
Incompatible with Viper V770
The Viper V770 supports the following API’s on the platforms indicated:
16
Page 21

Windows 98/95
• Direct3D
• OpenGL (ICD)
Windows NT 4.0
• OpenGL (ICD)
If the software application you are running does not support one of these 3D
APIs, it will not be able to recognize your Viper card, and will not take
advantage of it. Check with the application or game publisher in question
about obtaining a version that will support these 3D APIs.
Viper V770 is not Properly Installed
Check to make sure that Viper V770 is properly seated in the AGP slot and
that the VGA monitor cable is firmly and correctly connected to your graphics
card. For more information, please see Chapter 3, Installing Your Viper
V770 Board.
Viper V770 Drivers are not Correctly Installed
Check your Windows Device Manager (Start > Settings > Control Panel >
System > Device Manager) to determine if all the drivers are installed
properly. The properties dialog for the Display Adapter will show if the driver
is functioning properly. If not, a yellow icon with an exclamation point
appears next to the device driver in question.
Recheck the AGP Jumper Settings
Your card has jumpers used to configure AGP 2X or 4X motherboards. The
factory preset is 2X AGP. Moving any one jumper without properly setting all
the jumpers may result in poor performance with AGP 4X motherboards. See
Chapter 3, Hardware Installation, for details.
WINDOWS 98 Q & A
Q: What 3D API’s are supported by the Viper V770?
The Viper V770 supports and accelerates OpenGL and Microsoft’s DirectX,
which includes Direct3D. The Viper V770 also accelerates OpenGL in
Windows NT 4.0.
17
Page 22

Q: User receives a Windows Protection Error in "IFSMGR" when
starting Windows 98.
Check to see if the user has a compressed hard drive, this seems to be the
common factor with this problem. Currently, it is recommended to use
uncompressed hard drives. Contact technical support to report any problems.
FAQs
The most up-to-date Frequently Asked Questions and their answers may be
found at the Diamond Multimedia Web site (www.diamondmm.com).
18
Page 23

VIPER V770 DISPLAY MODES
2D Windows 98/95 and NT Display Modes
Resolution Depth60Hz 72Hz 75Hz 85Hz 100Hz120Hz170Hz200
◆◆◆◆ ◆ ◆ ◆ ◆
◆◆◆◆ ◆ ◆ ◆ ◆
◆◆◆◆ ◆ ◆ ◆ ◆
◆◆◆◆ ◆ ◆
◆◆◆◆ ◆ ◆
◆◆◆◆ ◆ ◆
◆◆◆◆ ◆ ◆
◆◆◆◆ ◆ ◆
◆◆◆◆ ◆ ◆
◆◆◆◆ ◆ ◆
◆◆◆◆ ◆ ◆
◆◆◆◆ ◆ ◆
◆◆◆◆ ◆ ◆
◆◆◆◆ ◆ ◆
◆◆◆◆ ◆
◆◆◆◆
◆◆◆◆
◆◆◆
◆◆◆◆
◆◆◆◆
◆◆
◆◆◆
◆◆◆
◆
◆
◆
◆
◆
◆
640x480
800x600
1024x768
1152x864
1280x1024
1600x1200
1920x1080
1920x1200
1920x1440
2048x1536
256
65K
16M
256
65K
16M
256
65K
16M
256
65K
16M
256
65K
16M
256
65K
16M
256
65K
16M
256
65K
16M
256
65K
16M
256
65K
Hz
19
Page 24

3D Windows 98/95 and NT Display Modes
Resolution Dept
h
640x480
800x600
1024x768
1152x864
1280x1024
1600x1200
1920x1080
1920x1200
1920x1440
2048x1536
16
32
16
32
16
32
16
32
16
32
16
32
16
32
16
32
16
32
16
32
Double - Buffer Double - Buffer + Z-
Buffer
◆◆
◆◆
◆◆
◆◆
◆◆
◆◆
◆◆
◆◆
◆◆
◆◆
◆◆
◆◆
◆◆
◆◆
◆◆
◆◆
◆◆
◆
◆◆
◆
Note— 2D and 3Dmodes listed may vary based upon operating system.
Modes are subject to change without notice.
20
Page 25

Controller:
♦ nVIDIA RIVA TNT2
♦ True 128-bit
Bus Type:
♦ AGP 1.0/2.0 compliant
Memory:
♦ 32MB
Horizontal Sync Signals:
VIPER V770 SPECIFICATIONS
♦ 31.5KHz-108.5KHz
Vertical Refresh:
♦ 60Hz-200Hz
Maximum Dot (Pixel) Rate:
♦ 300MHz RAMDAC
Complete 3D Feature Set:
♦ Anisotropic Filtering
♦ Anti-Aliasing
♦ Alpha-Blending
♦ Bi- and Tri-linear filtering
♦ Bump Mapping
♦ Environment mapping
♦ Fogging
♦ Gouraud Shading
21
Page 26

♦ Hardware Triangle Setup
♦ Mip Mapping
♦ Perspective Correction
♦ Specular highlights
♦ Subpixel precision
♦ Texture Mapping
♦ Transparency (color key and alpha),
♦ Twin Texture Engine, Z-Buffering.
Video Playback:
♦ MPEG-1, MPEG-2, Indeo and Cinepak
♦ Multi-tap X and Y scaling and filtering
♦ Color space conversion
Connectors:
♦ DB-15 analog connector (VESA DDC2B)
♦ Video port connector
Power Requirements:
♦ 14.26 W at +3.3 VDC
Minimum AGP System Configuration:
♦ Intel Pentium® II 233MHz or compatible CPU
♦ Windows 98/95 with OSR 2.1
♦ Windows NT 4.0 with Service Pack 4
♦ AGP 1.0/2.0 compliant motherboard
♦ CD-ROM Drive
22
Page 27

WINDOWS 98 MULTIPLE
MONITOR SUPPORT
Windows 98 lets a single machine connect to multiple display adapters and
monitors. You can significantly expand the total viewing area of your
desktop—increasing the amount of applications or windows you can view
simultaneously.
The multiple monitor feature of Windows 98 requires a display driver that
supports the multimonitor environment. It can be used for the following
purposes:
♦ Desktop publishing
♦ Presentations: Multimonitor display can be used to prepare and deliver
presentations
♦ Games: Navigator and status can be displayed on separate monitors
♦ Business: Several applications can be displayed by tasks on different
monitors.
♦ Monitor matrix display: Up to nine monitors (3x3) can be used to create a
mammoth display.
MULTIMONITOR SYSTEM REQUIREMENTS
Following are requirements for the multimonitor feature:
♦ The main requirement for multiple monitor support are drivers that support
it. Some video drivers included in the operating system will have this
support. The secondary card requires theses drivers. The primary driver
can use any driver that is compatible with the chipset of the card.
♦ You must have enough slots free in the system
SETTING UP MULTIPLE MONITOR SUPPORT
Follow the steps below to set up the multimonitor feature.
1. Set up the first display adapter in slot 1 and install the display adapter
drivers. Your primary card must have the highest priority. (which ever
23
Page 28

card displays POST [Power On Self test] and DOS is the primary display
adapter.)
2. Once the first card is set up, shut down the system, install the second card
and boot up. The system will find the second display adapter and install
the drivers.
3. Reboot the system. On bootup, while the Splash screen is showing, the
second monitor will initialize. It will show you the information about the
card BIOS and tell you…Windows has successfully initialized this
display adapter. To extend the desktop to this monitor, go to your
Display Properties and then to the Settings tab…
4. Once booted up to Windows, go to the Display Properties and then the
Settings tab. You will see a picture of two monitors (the primary is
labeled 1 and the secondary is labeled 2).
5. Click the second monitor and check the box at the bottom that says…
“Extend my Windows desktop onto this monitor.”
6. Click Apply.
7. You should now have both monitors working. You can now set the
resolution, colorpallette, refresh rate, and acceleration of each card
independently. Please refer to the Tips and Troubleshooting for
Multimonitor Support below.
TIPS AND TROUBLESHOOTING
Q: Why did my second monitor fail to come up
after I configured and rebooted my computer?
The likely cause of this is a conflict with the emm386.exe program.
Comment out emm386.exe from config.sys and reboot your computer.
Q: Why won’t the second display adapter
initialize as described in step 3 of setup?
Check the Device Manager. Make sure that both adapters are listed and
conflict free. If you see a problem with the secondary display adapter, check
its properties. On the general tab, under Device Status, it will most likely tell
you that the display drivers do not support multiple display adapters. If it
does, try getting updated drivers for the device that are multimonitor
compliant. If you are using Windows 98 drivers for the device, then it may be
a limitation of the hardware and the card may require that it be the primary
display adapter.
24
Page 29

Q: Why won’t my screen saver display between
both monitors?
The screen saver you are using does not support multiple monitors. Try using
built-in screen savers, such as the Flying Windows or any of the 3D screen
savers.
Q: Why won’t the task bar extend over both
screens?
The task bar is only displayed on one monitor. This is the correct operation.
Q: Why is D3D not accelerated on the second
display adapter?
This is a known issue and is a limitation of either Windows 98 or the
motherboard.
Q: AGP is not the primary adapter. Why not?
That is a limitation of the motherboard. Your primary adapter is whatever
card has the highest bus priority, if you get POST out of the PCI card and not
the AGP card. Contact the motherboard manufacturer for possible solutions.
Q: How many adapters can you have in one
system?
Diamond has tested up to four adapters. According to Microsoft, you can
have as many adapters installed as you want if you adhere to the following:
use Windows 98 drivers, verify that all the hardware is compatible, and have
the resources and slots needed.
Q: How can I get OpenGL to work?
All secondary display adapters must be disabled in order for hardware
OpenGL acceleration to be enabled.
25
Page 30

TRADEMARK AND COPYRIGHT
INFORMATION
TRADEMARKS
Viper is a registered trademark of Directed Electronics, Inc., used under
license. All other products named in this manual are either trademarks or
copyrights of their respective owners.
COPYRIGHT NOTICES
This manual is copyrighted. All rights reserved. This document may not, in
whole or part, be copied, reproduced, reduced or translated by any means,
either mechanical or electronic, without prior consent in writing from
Diamond Multimedia Systems, Incorporated. The information in this manual
has been carefully checked and is believed to be accurate.
However, Diamond Multimedia Systems assumes no responsibility for any
inaccuracies that may be contained in this manual. In no event will Diamond
Multimedia Systems be liable for direct, indirect, special, incidental, or
consequential damages resulting from any defect or omission in this manual,
even if advised of the possibility of such damages.
In the interest of continued product development, Diamond Multimedia
Systems reserves the right to make improvements in this manual and the
products it describes at any time, without notice or obligation.
Copyright © 1999
Diamond Multimedia Systems, Incorporated
Diamond Multimedia Systems Service Company Ltd.
Diamond Multimedia Systems Vertriebs GmbH
This product incorporates copyright protection technology that is protected
by method claims of certain U.S. patents and other intellectual property rights
owned by Macrovision Corporation and other rights and owners. Use of this
copyright protection technology must be authorized by Macrovision
Corporation, and is intended for home and other limited viewing uses only,
unless otherwise authorized by Macrovision Corporation. Reverse engineering
or disassembly is prohibited.
26
Page 31

CE AND FCC INFORMATION
This device complies with CE Certification pursuant to EN55022:199408/A1:1995 class B This device also complies with Part 15 of the FCC Rules.
These limits are designed to provide reasonable protection against harmful
interference in residential installation. This device generates, uses and can
radiate radio frequency energy and, if not installed and used in accordance
with the instructions, may cause harmful interference to radio
communications. However, there is no guarantee that interference will not
occur in a particular installation.
FCC NOTICE
This device complies with Part 15 of the FCC Rules.
Operation is subject to the following two conditions:
1. This device may not cause harmful interference, and
2. This device must accept any interference received, including interference
that may cause undesired operation.
DECLARATION OF CONFORMITY
We, the Responsible Party
Diamond Multimedia Systems, Inc.
2880 Junction Avenue
San Jose, CA 95134
declare that the product
Viper V770
is in conformity with Part 15 of the FCC Rules. Operation is subject to
the following two conditions: (1) this device may not cause harmful
interference, and (2) this device must accept any interference received,
including interference that may cause undesired operation.
27
Page 32

28
 Loading...