

Page 1
lighting your creativity
HONEY BADGER
320Ws Digital Flash
Instruction Manual
www.intertphotographic.com
Page 2

Honey Badger 320 Digital Flash
What’s cool about the Honey Badger?
The Honey Badger is the perfect tool for any shoot, and at 320Ws and only 3lbs, it’s a real force
to be reckoned with. The aggressive ash recycle time ensures you are ready to strike at the right
moment, while the expanded 7-stop power range gives you the versatility and precision you
need to attack any shoot. Remote control of the Honey Badger streamlines setup and operation,
allowing you to remain focused on your work. The ultra bright modeling lamp is softened with the
frosted glass outer dome and will conveniently light your photos and videos. The included 24-inch
Pop-Up softbox ts perfectly around the versatile modier ring on the ash unit so you are ready to
shoot right out of the box.
With all of these features in addition to a Bowens® modier mount, sync port for additional
remotes, a wide range of channels and groups and a lightweight compact form, the Honey Badger
is ready to go to any of your shoots with power and control.
How do I keep my Honey Badger and myself safe?
1. Always keep this product away from rain or dampness to avoid re or electric shock.
2. This product contains high-voltage electronic parts. Touching the high-voltage circuit inside it
may result in electric shock and/or product failure. Do not disassemble. Tampering with your
ash unit will void the warranty. Should repairs become necessary, this product must be sent to
a certied Intert repair facility - contact support for more details.
3. Stop using this product immediately if it breaks open due to explosion, falling, or impact.
Continued use may result in electric shock and/or further product damage.
4. Do not re the ash directly into the eyes (especially those of babies) within short distances.
Otherwise visual impairment may occur.
5. Do not use this ash unit in the presence of ammable gases, chemicals and/or other
ammable materials. In certain circumstances, these materials may be sensitive to the strong
light emitting from this ash unit and re or electromagnetic interference may result.
6. Do not leave unattended or store this ash unit if the ambient temperature is over 120°F/50°C
(e.g. in a vehicle). Prolonged exposure to excessive heat may damage electrical components.
How does Intert Protect my Honey Badger?
Your Honey Badger is protected by a one-year warranty against manufacturer defects.
Warranty does not cover consumables, such as the ash tube or glass dome.
You can reach Intert Photographic Ltd. for customer service at:
Intert Photographic USA
1 (866) 947-9796
support@intertphotographic.com
Intert Photographic UK
+44 (0) 121-522-4800
sales@intertphotographic.com
Page 3

Table of Contents
Honey Badger Overview...................................................................
Accessorizing the Honey Badger.....................................................
Protective Cap............................................................................
Bowens® Mount Modiers.......................................................
Softboxes....................................................................................
Umbrellas...................................................................................
Sync Cable..................................................................................
Remote........................................................................................
Using the Honey Badger.................................................................
Powering Up the Honey Badger............................................
Adjusting the Power...................................................................
Turning off the Flash Function..................................................
Using the Modeling Lamp........................................................
Setting Channels........................................................................
3
4
4
4
4
5
5
5
6
6
6
6
6
6
Setting Groups...........................................................................
Beep Button................................................................................
Optical Slave Cell.......................................................................
Mount to Light Stand.................................................................
Intert 24” (60cm) Pop-Up Softbox..........................................
Replacing the Flash Tube and Frosted Glass Dome..............
Honey Badger Specications............................................................
7
7
7
7
7
7
8
Page 4
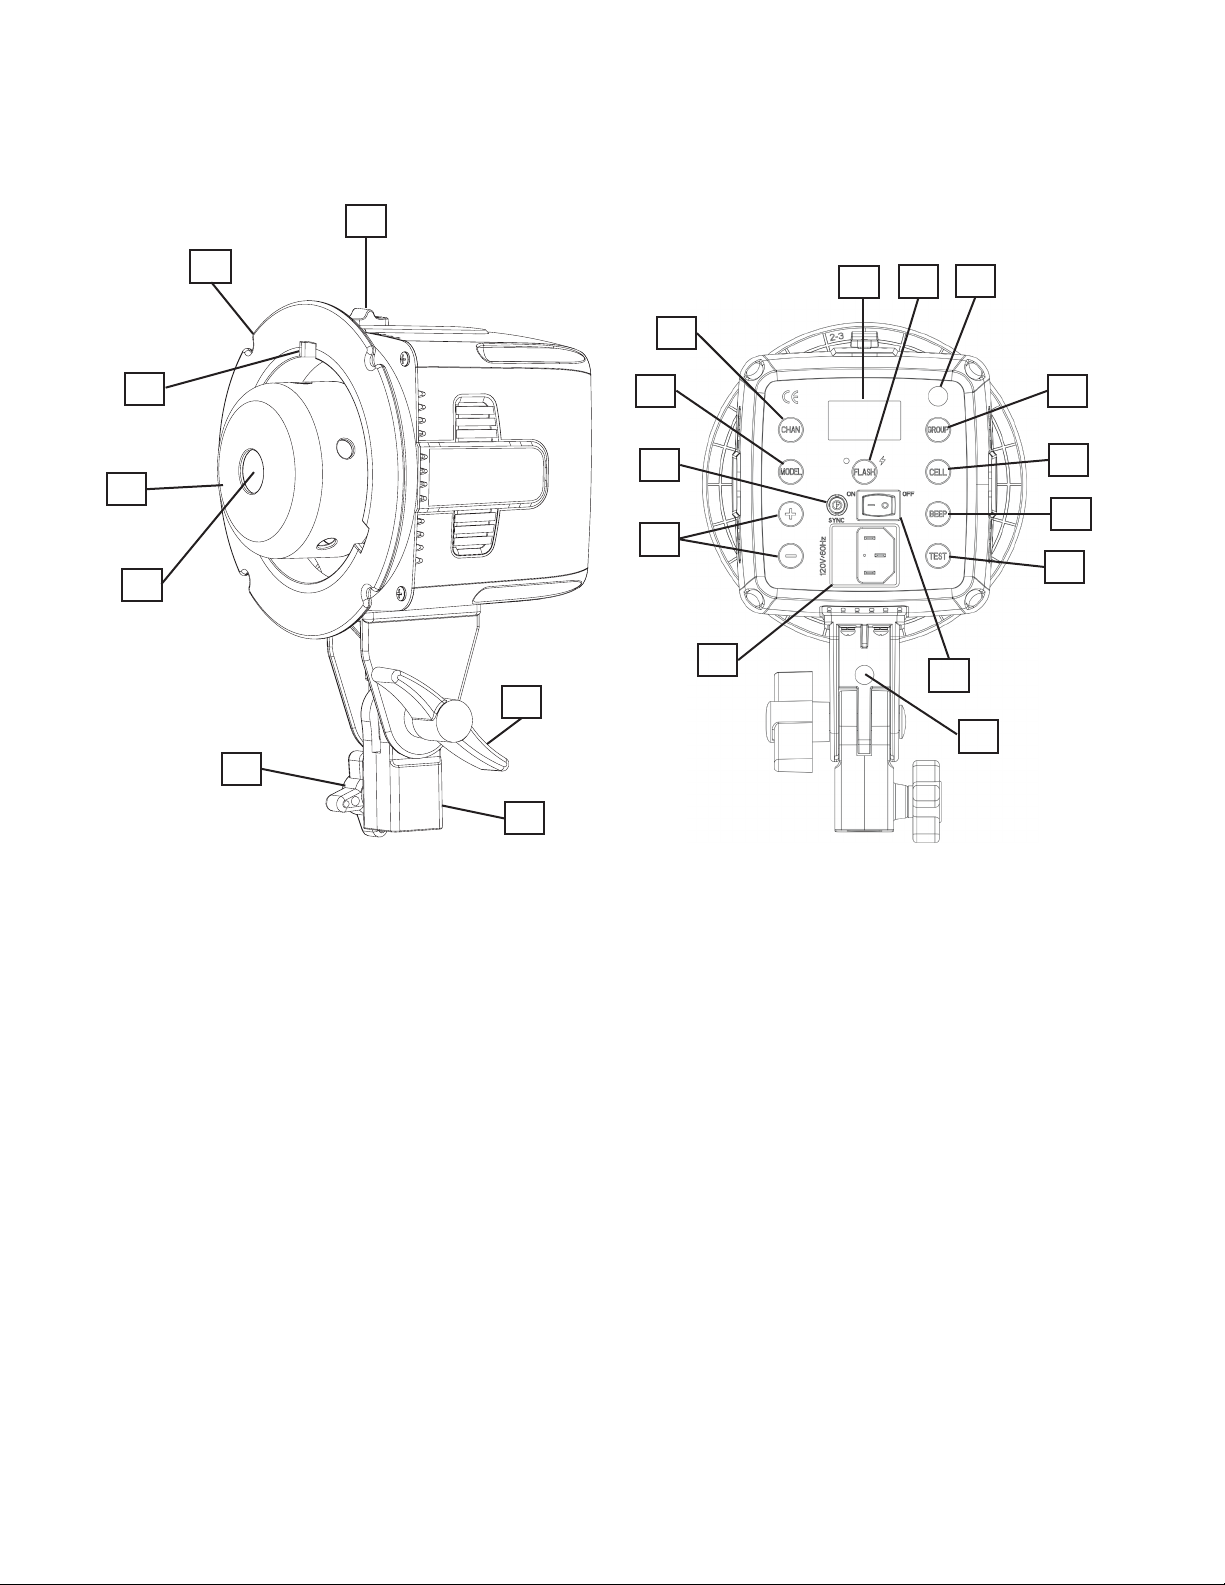
Honey Badger Overview
1
2
10
3
4
5
7
6
8
11
12
13
14
9
15
16
17
18
19
20
21
22
1. Modier Quick-Release
2. Pop-Up Softbox Ring
3. Bowens® S-Type Mount
4. Frosted Glass Dome
5. Flash Tube and LED Lamp
6. Stand Mount Lock
7. Ratcheting Tilt Lock
8. Light Stand Mount
9. LCD Display Screen
10. Channel Selection
11. Modeling Light Button
12. Sync Port
13. Flash Power Up/Down
14. AC Power Port
15. Flash Toggle Button
16. Optical Slave Cell
17. Group Selection
18. Cell Button
19. Beep Button
20. Flash Test Button
21. On/Off Switch
22. Umbrella Mount
www.intertphotographic.com 3
Page 5
Accessorizing the Honey Badger
Protective Cap
Every Honey Badger ash head includes a protective cap. This cover offers protection to the glass dome,
ash tube, and LED modeling lamp during transportation and storage.
To remove the protective cap, pull back on the modier quick release on the top of the ash unit to release
the mount lock. While holding back the release button, twist the protective cap counter-clockwise.
To replace the protective cap back on the ash unit, insert the three prongs of the cap into the mount and
rotate clockwise until you hear a click.
Bowens® Mount Modiers
Modifying the light from your Honey Badger is key to creating dynamic images.
The Honey Badger can be used with any light modier with a Bowens® mount.
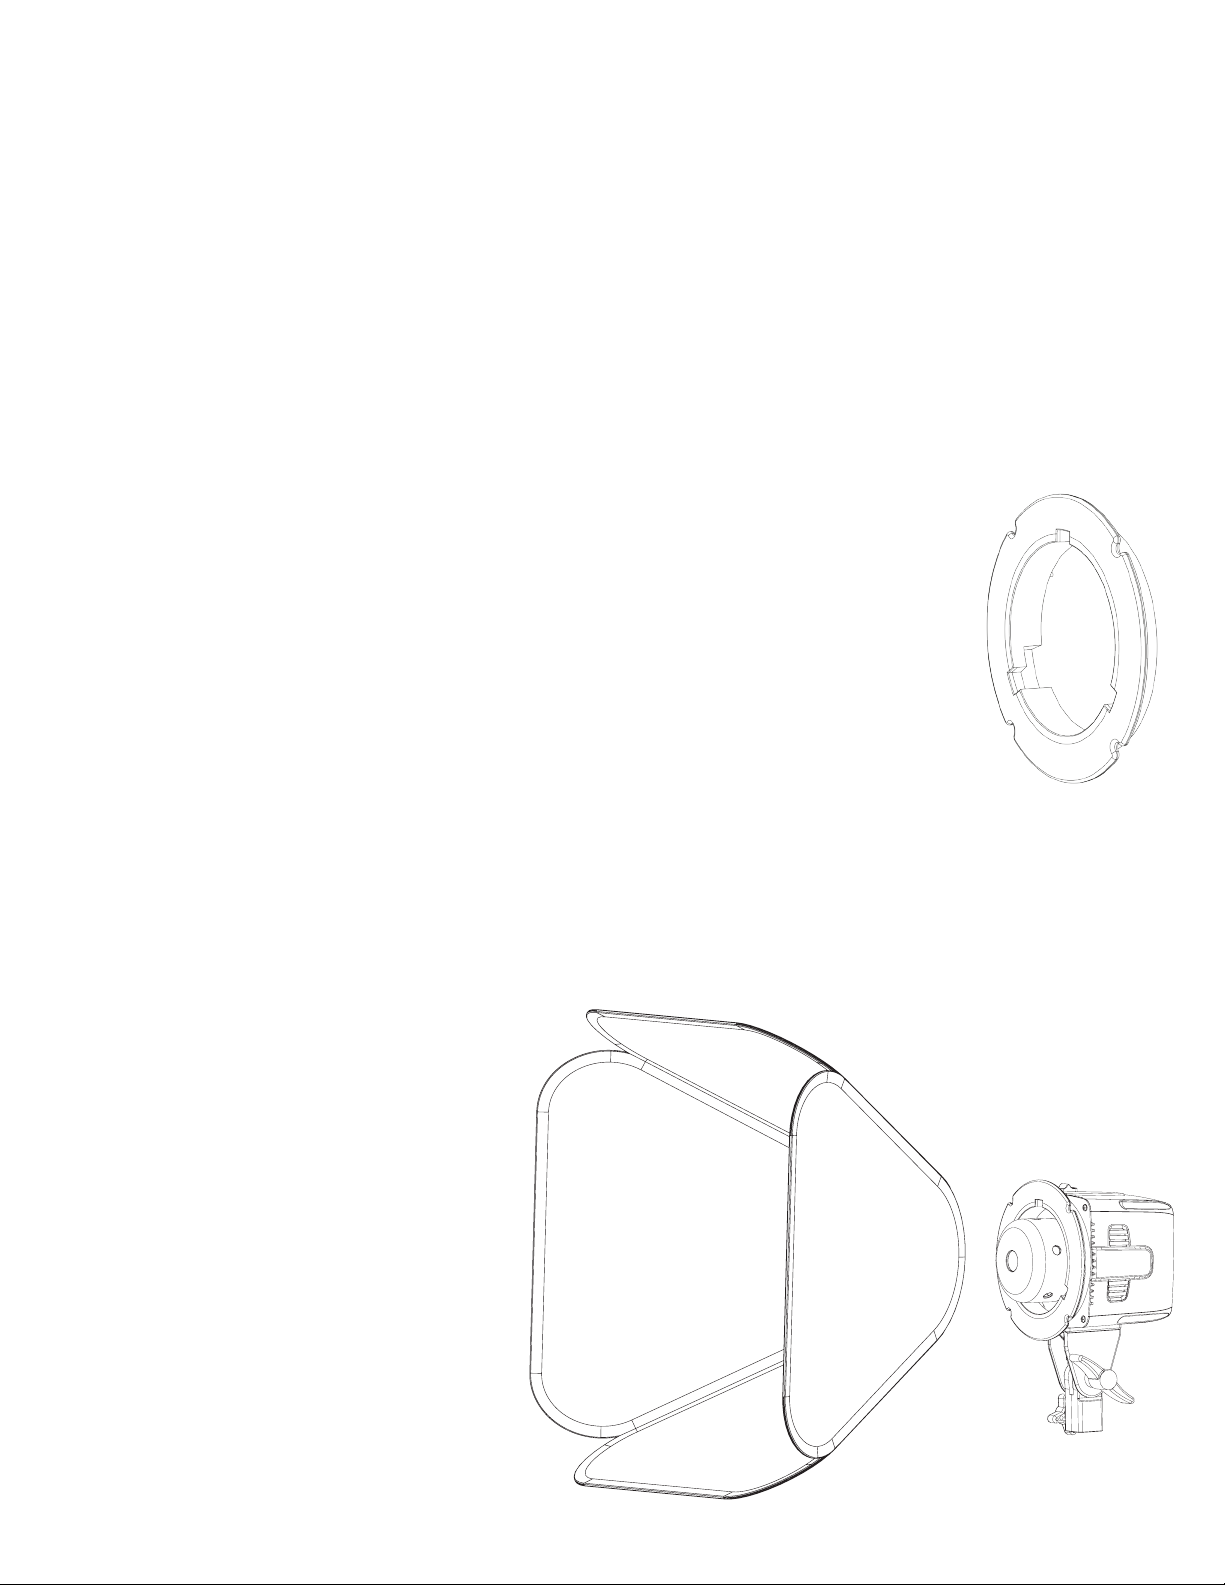
To attach a Bowens® mount modier to the Honey Badger, simply insert the three prongs
of the modier ring into the mount and rotate clockwise until you hear a click. To remove
the modier, pull back on the modier quick release on the top of the ash unit to release
the mount lock and rotate the modier counter-clockwise.
Softboxes
The variety of softbox shapes and sizes allow for endless lighting possibilities. The Honey Badger utilizes a
unique mounting system that ts softboxes with Bowens® mount speedrings as well as pop-up softboxes.
Pop-up softboxes (such as the one included in this kit) hold to the outside of the ring mount. Simply pull the
four sides of the light opening of your softbox around the outside of the mount ring and tension will hold it.
To attach a softbox with a Bowens® mount
speedring, simply insert the three prongs
of the speedring into the mount and rotate
clockwise until you hear a click. To remove
the softbox, pull back on the modier quickrelease on the top of the ash unit to release
the mount lock and rotate the softbox
counter-clockwise.
Intert offers a variety of light modiers as
well as Bowens® speedrings to make your
favorite modiers compatible.
www.intertphotographic.com 4
Page 6

Accessorizing the Honey Badger
Umbrellas
Umbrellas are the most widely-used modiers in photography. Their ease-of-use and versatility makes them
quick to master; a go-to modier in many situations.
Umbrellas can be mounted to the Honey Badger using the umbrella shaft mount on the bottom of the ash
unit. The shaft mount can accommodate the wide variety of Intert brand umbrellas and parabolic umbrellas
as well as most umbrellas up to a 3/8” (8mm) diameter pole.
Sync Cable
Sync cables allow the ash to be triggered by the camera via physical tethered connection. While sync
cables are the most economical way to trigger a ash, they will not allow you to make any adjustments to
the ash from the camera.
A sync cable is included with your Honey Badger and can be plugged into the sync port on the back of
the ash unit and the corresponding sync port on your camera. To connect the cable to the light, insert the
3.5mm (headphone jack) plug into the sync port on the back of the light, just to the left of the power switch.
Take the other end of the cable and connect it to the PC terminal on your camera (*consult your camera user
manual to locate the PC terminal on your camera. Some camera models do not have a PC terminal and may
require a separate adapter).
Remote
The Honey Badger is compatible with all Intert Remotes. Using these remotes
allows you to control all functions of the light wirelessly. This remote mounts to
your camera’s hot shoe and communicates to the Honey Badger unit without an
additional receiver. Intert Remotes are sold separately.
*Compatible remotes include:
-IntertTTLRemotesforCanon,Nikon,&Sony(manualonly)
-IntertManualRemote
www.intertphotographic.com 5
Page 7

Using the Honey Badger
Powering Up the Honey Badger
Insert the included 13’ power cable into the back of the unit and place the plug into a 110V/ 60Hz (220V/50Hz)
grounded power outlet. Activate power with the ON/OFF switch on the back control panel of the ash head.
WARNING: If the light displays a “P1” error code on the screen, the light is overheating and must be turned off
for at least 15 minutes to allow the internal components to cool down.
TEST
Using the Test Function
The “TEST” button will illuminate blue when the ash is charged and ready for use. The blue indicator light will
turn off immediately after the ash has red, and turn on again once the light has fully recycled. Recycle is also
indicated by an audible beep when the “BEEP” function is enabled.
Adjusting the Power
+
Your Honey Badger is packed with 320Ws of power. This power is adjustable over a 7-stop range and can be
adjusted in 1/10th of a stop intervals. Use the + and - buttons on the back of your Honey Badger to adjust the
power from 10.0 (full power) to 4.0 (lowest power). Power is displayed on the LCD screen.
FLASH
Turn off the Flash Function
To take advantage of your modeling lamp function without triggering the ash, press the “FLASH” button. This
will turn on and off the ash function of the light, but keep the modeling lamp function available. This function is
ideal when using the LED modeling lamp of one Honey Badger to light your subject, and mixing it with the ash
of another Honey Badger.
MODEL
Using the Modeling Lamp
To use the 60W LED modeling lamp, press the “MODEL” button on the back interface of the Honey Badger to
toggle through two different modeling lamp modes or turn it off.
• Proportional Mode - Toggle the modeling lamp mode to “PROP”. When used in proportional mode, the
intensity of the modeling lamp will increase and decrease according to the ash power. This is useful when
creating lighting ratios with multiple lights. Use the + and - buttons to adjust the modeling lamp brightness
even when ash is turned off.
_
• Full Mode - Toggle the modeling lamp mode to “FULL”. This will turn the modeling lamp on to full power.
Setting Channels
CHAN
Having 15 unique radio control channels allows you to use your lights in close proximity with another
photographer without interfering with one another. Press the “CHANNEL” button to toggle through the 15
available isolated control channels. Make sure the channel selected on your Honey Badger matches the selected
channel on your Intert remote.
NOTE: Setting the control channel is only necessary when using Intert remotes. If you are using a third-party
radio or optical slave, you can skip this. When using an Intert TTL remote, only channels 1-8 are available.
www.intertphotographic.com 6
Page 8

GROUP
Setting Groups
Setting the control group allows you to independently control the power of each light in your studio without
affecting your other lights. Your Honey Badger can be set to eight different control groups (A-H). Press the
“GROUP” button to assign your light to it’s own group.
NOTE: Setting the control group is only necessary when using Intert remotes. If you are using a third-party
radio or optical slave, you can skip this section. When using an Intert TTL remote, only groups A-C are available.
BEEP
Beep Button
Press the “BEEP” button to turn off the audible sound for buttons, power adjustments and refresh notications.
NOTE: When using an Intert remote, the beep will sound if you attempt to lower the power below 4.0,
regardless of whether the beep function has been turned off.
CELL
Optical Slave Cell
When using a multiple-light setup with your Honey Badger and a sync cord or a third-party remote, turn on the
“CELL” button to activate the optical slave function. This will allow the light to be triggered by the light of your
other ashes.
NOTE: The optical slave cell requires direct line of sight between lights.
Mounting to a Light Stand
Your Honey Badger 320 will mount to most standard light stands with a 5/8” stud. Unscrew the Stand Mount
Tightening Knob until the mount ts onto the light stand. Make sure to turn the Mount Knob until tight.
Use the Ratcheting Adjustment handle to adjust the angle of the light on the stand. The resistance of the
Ratcheting Adjustment handle provides extra security when using large, heavy modiers.
Intert 24” (60cm) Pop-Up Softbox
Take your softbox out of it’s zipper pouch and carefully let it spring open. Attach the hooks of the inner diffuser
to the elastic loops on the inside of the softbox. Attach the outer diffuser to the Velcro around the outside of the
softbox.
Mounting: Opening of softbox will t tight around the outside of the mount ring. Take turns atretching each side
over the mount ring and the softbox will stay attached by tension.
Replacing the Flash Tube and Frosted Glass Dome
Both the ash tube and frosted glass dome are userreplaceable. Replacement parts can be purchased direct
from Intert Photographic or a certied Intert dealer.
*The oil from your ngers will damage ash tubes.
Be sure to handle new ash tubes with gloves or clean
cloth. Always use caution when handling broken glass.
www.intertphotographic.com 7
Page 9

Specications of the Honey Badger
Max Watt Seconds 320Ws
Power Range 7 Stops
Guide Number 148 (100 ISO, 1/125, 1 meter, 7” reector)
Variability 1/10th stop increments
Recycle Time 1 second at full power
Flash Duration 1/900@ full power
Color Temperature 5500K +/- 200K
Modeling Lamp 60w LED (Proportional)
Wireless Control Yes
Shooting Mode Manual
Max Sync Speed 1/250
Fan Cooled Yes
Auto Dump Yes
Temperature Regulation Yes
Umbrella Mount Fits umbrella shafts up to 5/8”(8mm)
Dimensions 5.1x5x4” (13x12.5x10cm) (Pop-up softbox ring 6” in diameter)
Weight 3 lbs
Softbox 60 cm (24”) Pop-Up
Softbox Material Nylon
Heat Resistant No
Inner Diffuser Yes
Outer Diffuser Yes
www.intertphotographic.com 8
 Loading...