

Page 1
Quick Start Guide
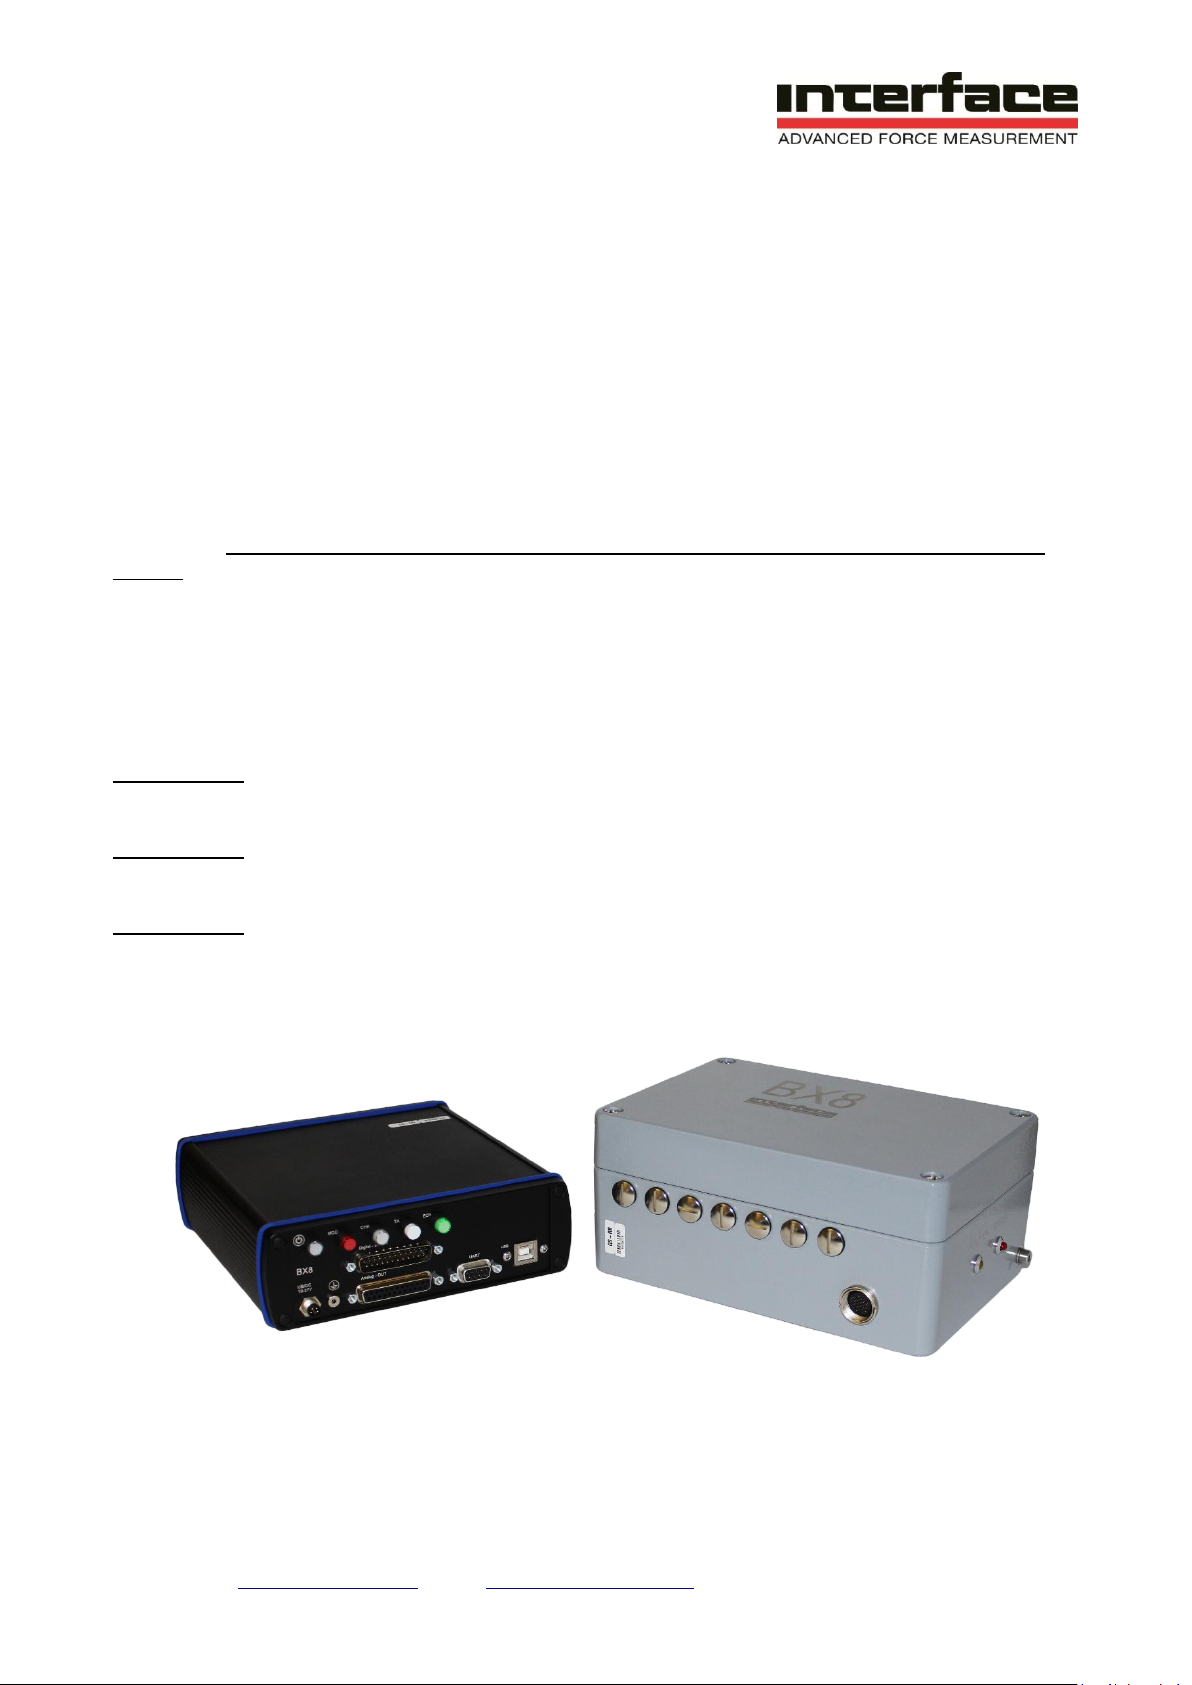
BX8 + 6-Axis Sensor and BlueDAQ Software
CAUTION: Please read this entire guide before making any connections or first powering on the
system.
INTRODUCTION
The model BX8 amplifier and 6-Axis sensor comprise a stand-alone measurement system with
analog outputs of +/-10V on each of the 6 axis. When purchased as a system the BX8 is fully
configured and no further setup is required by the customer. The 6-Axis coefficient matrix is factory
installed in the BX8.
USE CASE 1: The BX8 analog outputs will be connected to the customer’s data acquisition
system. Interface BlueDAQ software will not be used. SEE PAGE 3
USE CASE 2: BX8 will be used with Interface BlueDAQ software for viewing, graphing and logging
data. SEE PAGE 5
USE CASE 3: BX8 will be simultaneously connected to customer’s data acquisition system and to
the Interface BlueDAQ software. SEE BOTTOM OF PAGE 14
15-233 Rev D 11/17/2016
Interface Inc. ● 7401 East Butherus Drive, Scottsdale, Arizona 85260 USA ● Phone 480.948.5555 ● Fax 480.948.1924
Page 1 of 14
Page 2
USE CASE 1: The BX8 analog outputs will be connected directly to the customer’s data
acquisition system. Interface BlueDAQ software will NOT be used.
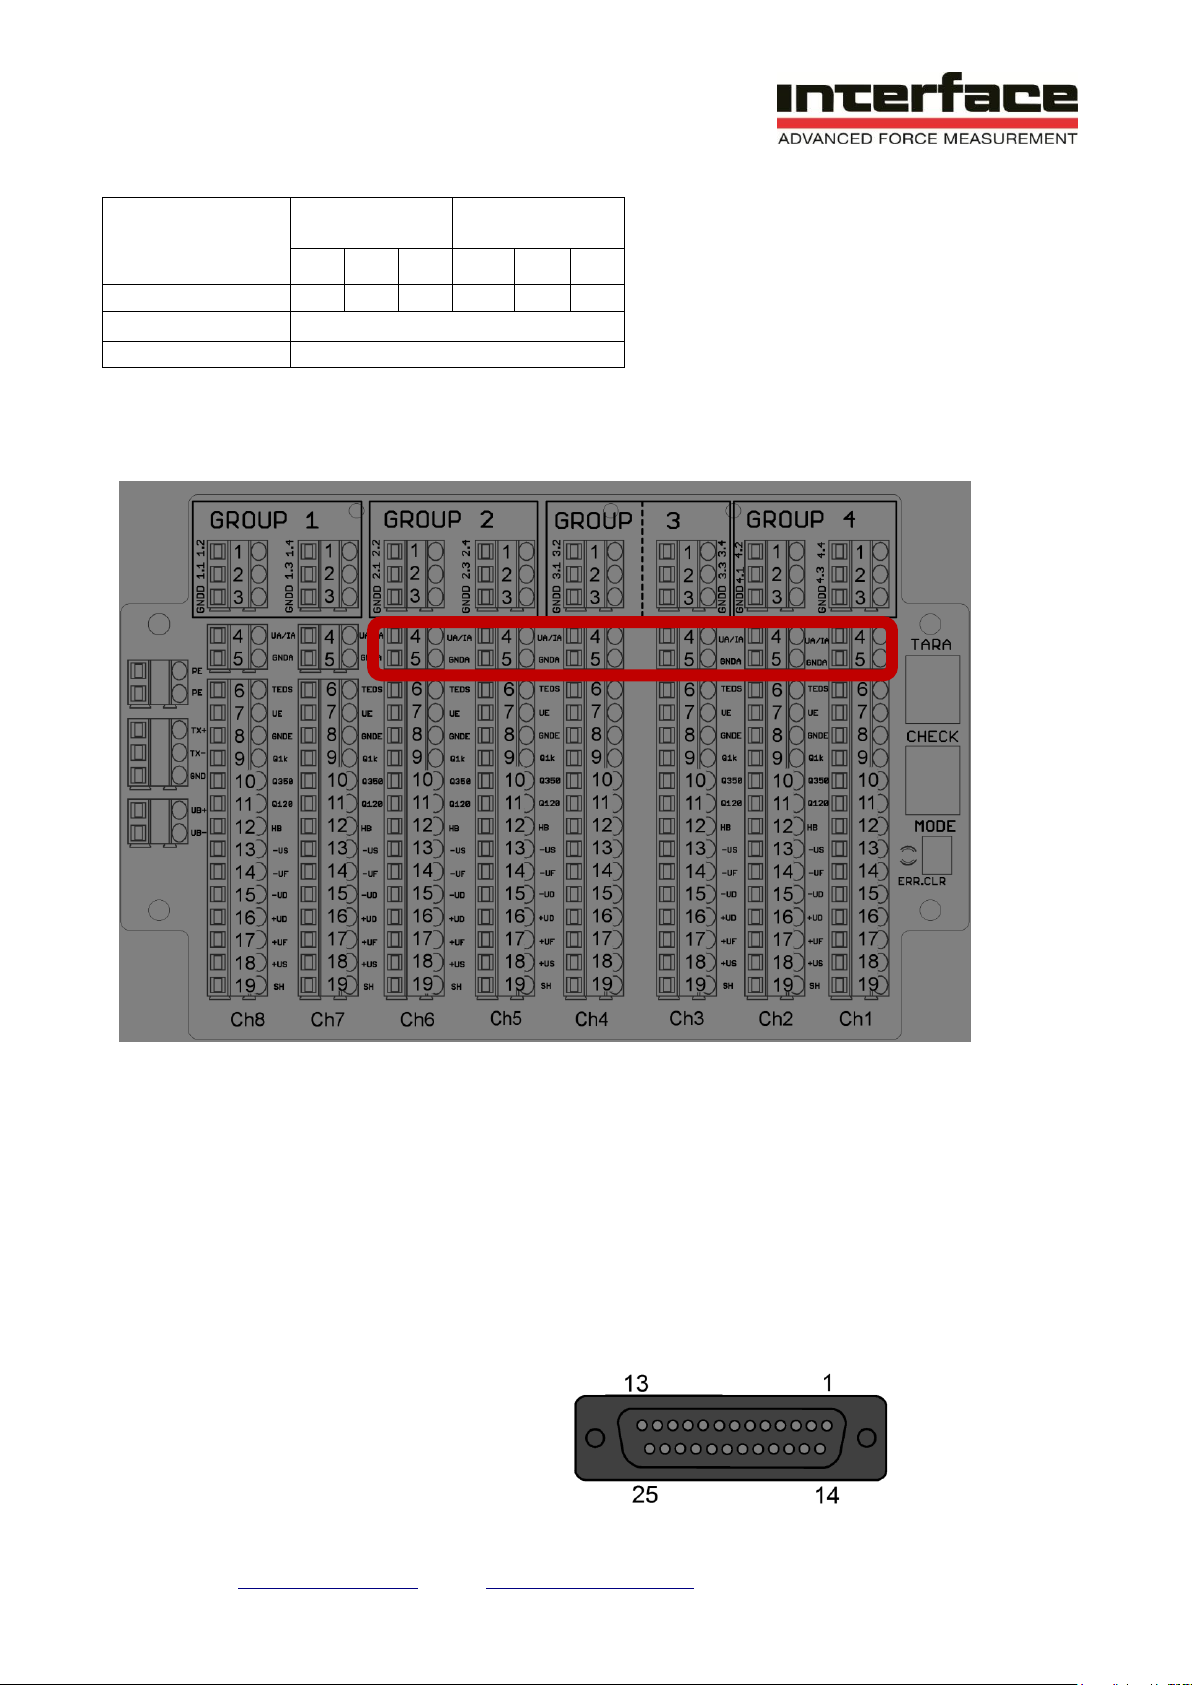
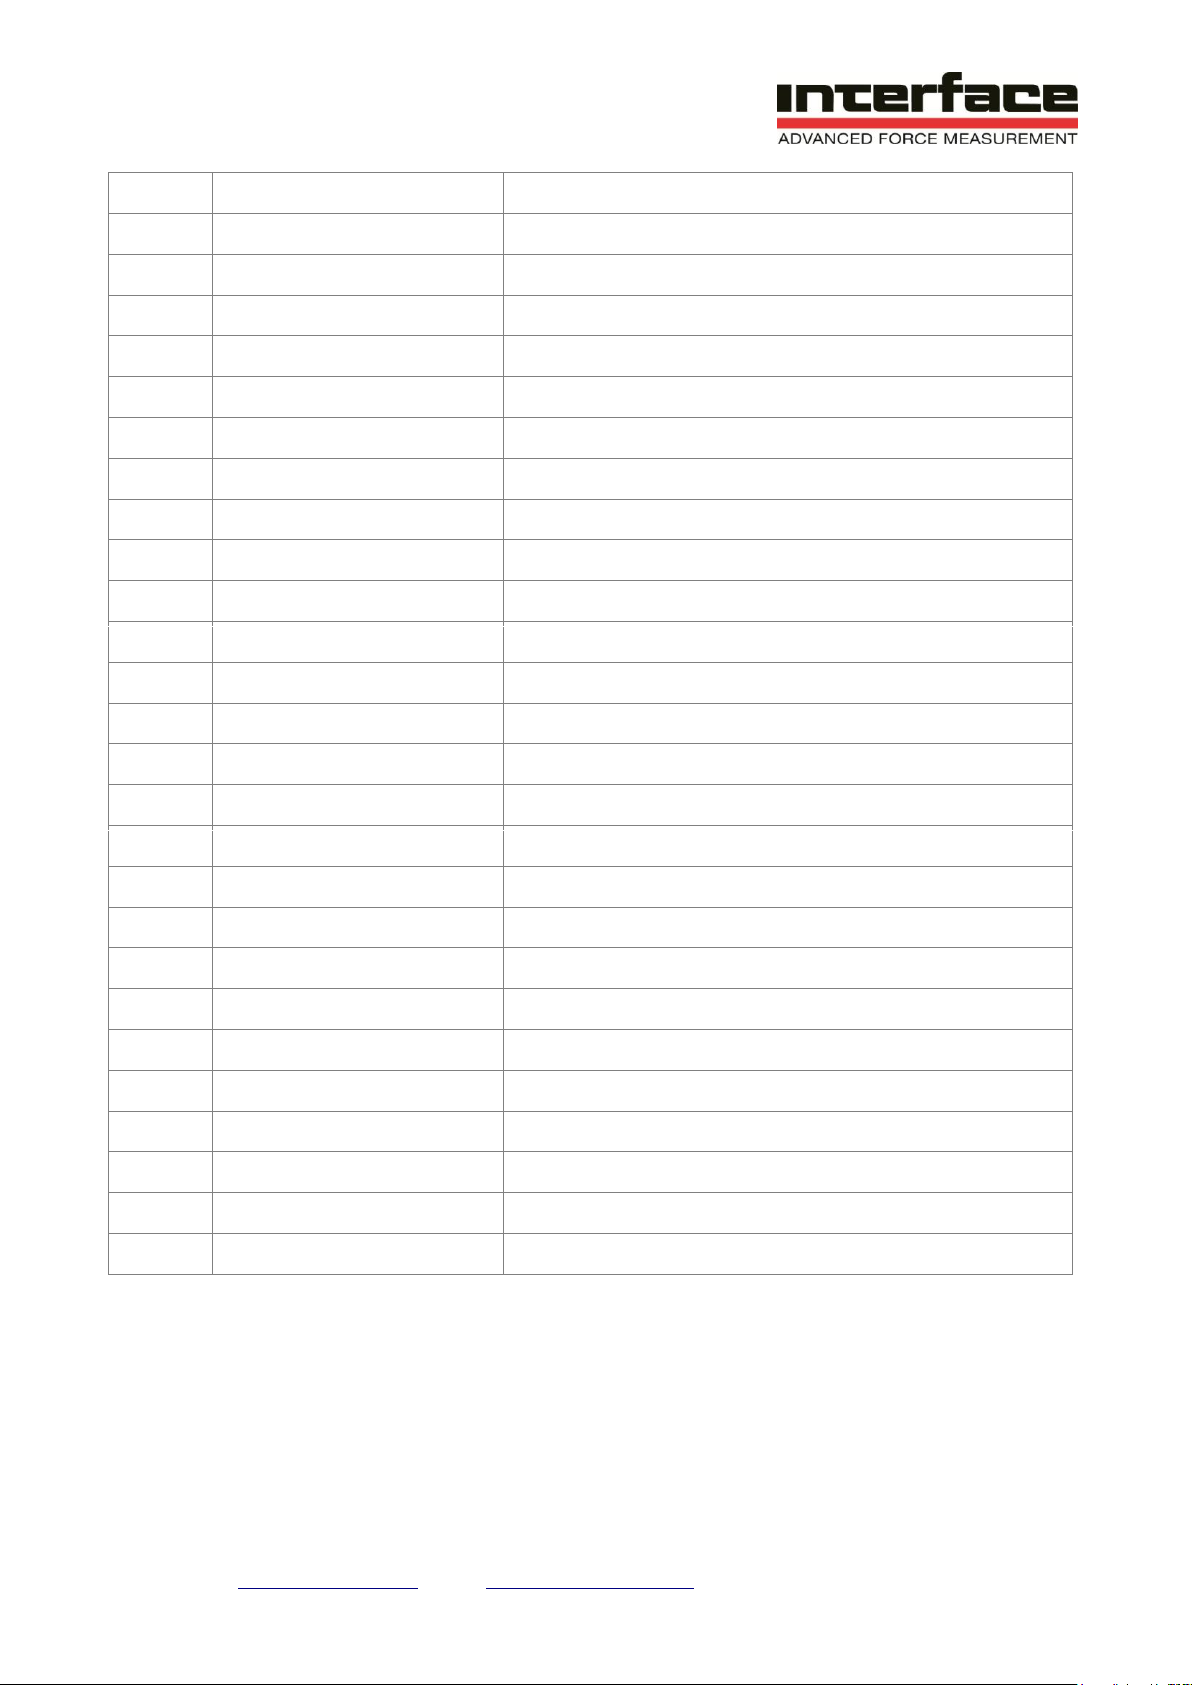
1. Connect analog output signals from BX8 to the user’s system. The analog outputs are
accessible underneath the BX8 lid and are assigned and labeled as described in table 1
and figure 1 below.
BX8-AS
a. There are two capped feedthroughs on the side of the BX8-AS enclosure labeled Output 1
and 2. Either or both of these holes can be used to feed the signal cable out of the BX8
enclosure. Remove either one or both caps and replace with a supplied large cable gland.
b. Either two 6-conductor or one 12-conductor cable can be used and the user will need to
source the signal cable locally. Cable diameter should be between 5 and 10 mm (0.2 to 0.4
inch).
BX8-HD44
c. Create a 25-Pin Mating Connector Cable per supplied manual and connect this to your
system.
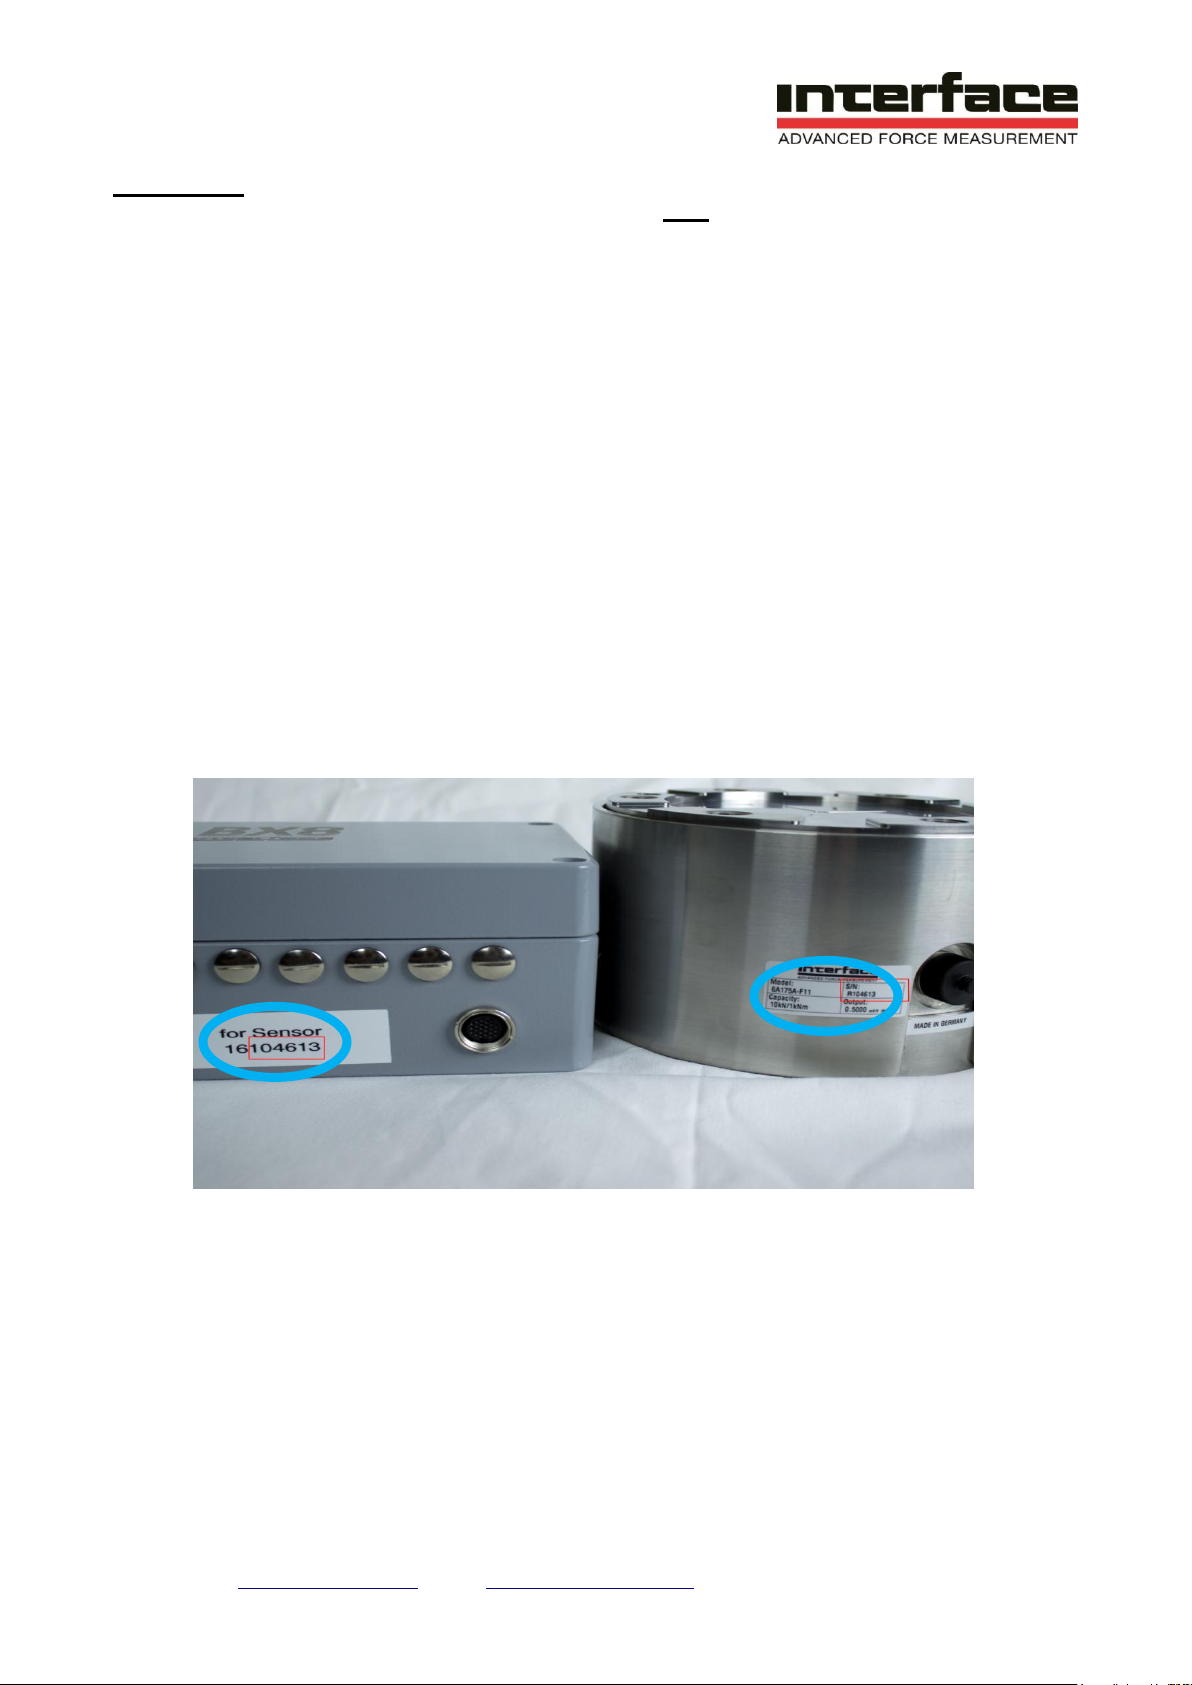
2. Connect the 6-Axis sensor to the BX8-AS using the M16 24-pin connector or to the BX8HD44 using the High Density 44 Pin Connector. The BX8 will be labeled with the 6-Axis
sensor serial number and if multiple systems are purchased care must be taken to connect
the correct sensor.
3. Connect the supplied power cable to the BX8-AS or BX8-HD44 amplifier 4-pin DC power
jack.
4. Simultaneous TARE of all 6 channels can be accomplished using the TARE (TARA) button.
This is locate underneath the cover for Model BX8-AS or on the front panel for Model BX8HD44.
Interface Inc. ● 7401 East Butherus Drive, Scottsdale, Arizona 85260 USA ● Phone 480.948.5555 ● Fax 480.948.1924
Page 2 of 14
Page 3
AXIS
FORCE
MOMENT
(TORQUE)
Fx
Fy
Fz
Mx
My
Mz
CHANNEL
1 2 3 4 5
6
ANALOG OUT
4
ANALOG GND
5
Mz My Mx Fz Fy Fx
Mz My Mx Fz Fy Fx
BX8-AS ANALOG OUTPUT ASSIGNMENTS
Table 1: Analog Output Axis Assignments
BX8-AS ANALOG OUTPUT CONNECTIONS
Figure 1: BX8-AS Analog output connections
BX8-HD44 ANALOG OUTPUT
Connection of the active sensors:
The voltage signal of active sensors is applied to Ue and GNDE.
Potentiometric sensors can be supplied via +Us. The power supply for active sensors can be via
galvanic isolated voltage VCCIO and GNDIO.
Analog Output SUB-D25 Socket
Interface Inc. ● 7401 East Butherus Drive, Scottsdale, Arizona 85260 USA ● Phone 480.948.5555 ● Fax 480.948.1924
Page 3 of 14
Page 4
Pin
Signal
Meaning
1
Ua1/ Ia1
Analog Out Channel 1
2
GNDA
Analog GND
3
Ua2/ Ia2
Analog Out Channel 2
4
GNDA
Analog GND
5
Ua3/ Ia3
Analog Out Channel 3
6
GNDA
Analog GND
7
Ua4/ Ia4
Analog Out Channel 4
8
GNDA
Analog GND
9
Ua5/ Ia5
Analog Out Channel 5
10
GNDA
Analog GND
11
Ua6/ Ia6
Analog Out Channel 6
12
GNDA
Analog GND
13
Ua7/ Ia7
Analog Out Channel 7
14
GNDA
Analog GND
15
Ua8/ Ia8
Analog Out Channel 8
16
GNDA
Analog GND
17 / Internal usage
18 / Internal sage
19 / Internal usage
20 / Internal usage
21
GNDINT
GNDINT
22
GNDINT
GNDINT
23
OutB-
60kHz frequency -6V Out
24
OutB+
60kHz frequency +6V Out
25
GNDINT
GNDINT
Shield
PE
Earth (housing)
Interface Inc. ● 7401 East Butherus Drive, Scottsdale, Arizona 85260 USA ● Phone 480.948.5555 ● Fax 480.948.1924
Page 4 of 14
Page 5
Analog Outputs
+/- 10VDC on each channel
Analog Output Scaling
+10V = +Full Scale on each axis
Data Frequency
10 Hz
Analog Filter
28 Hz -3dB
FIR Digital Filter
OFF
IIR Digital Filter
OFF
Digital I/O
General Purpose
Excitation Voltage
5 VDC
Input Range
3.5 mV/V
DEFAULT SETTINGS
Table 2: Default BX8 settings
USE CASE 2
BX8 will be used with Interface BlueDAQ software for viewing, graphing and logging data.
The Analog Outputs will NOT be used.
Before connecting the BX8 to the PC you must first install the BX8 drivers by running
setupBX8driver.exe and then install the Interface BlueDAQ software. These are supplied on a USB
Flash Drive along with user manuals and copies of the sensor calibration files and certificates. The
setup files can also be downloaded from the BX8 product page at www.interfaceforce.com. The PC
should be connected to the Internet during installation and/or all Windows updates should be
complete.
Driver and BlueDAQ software Installation
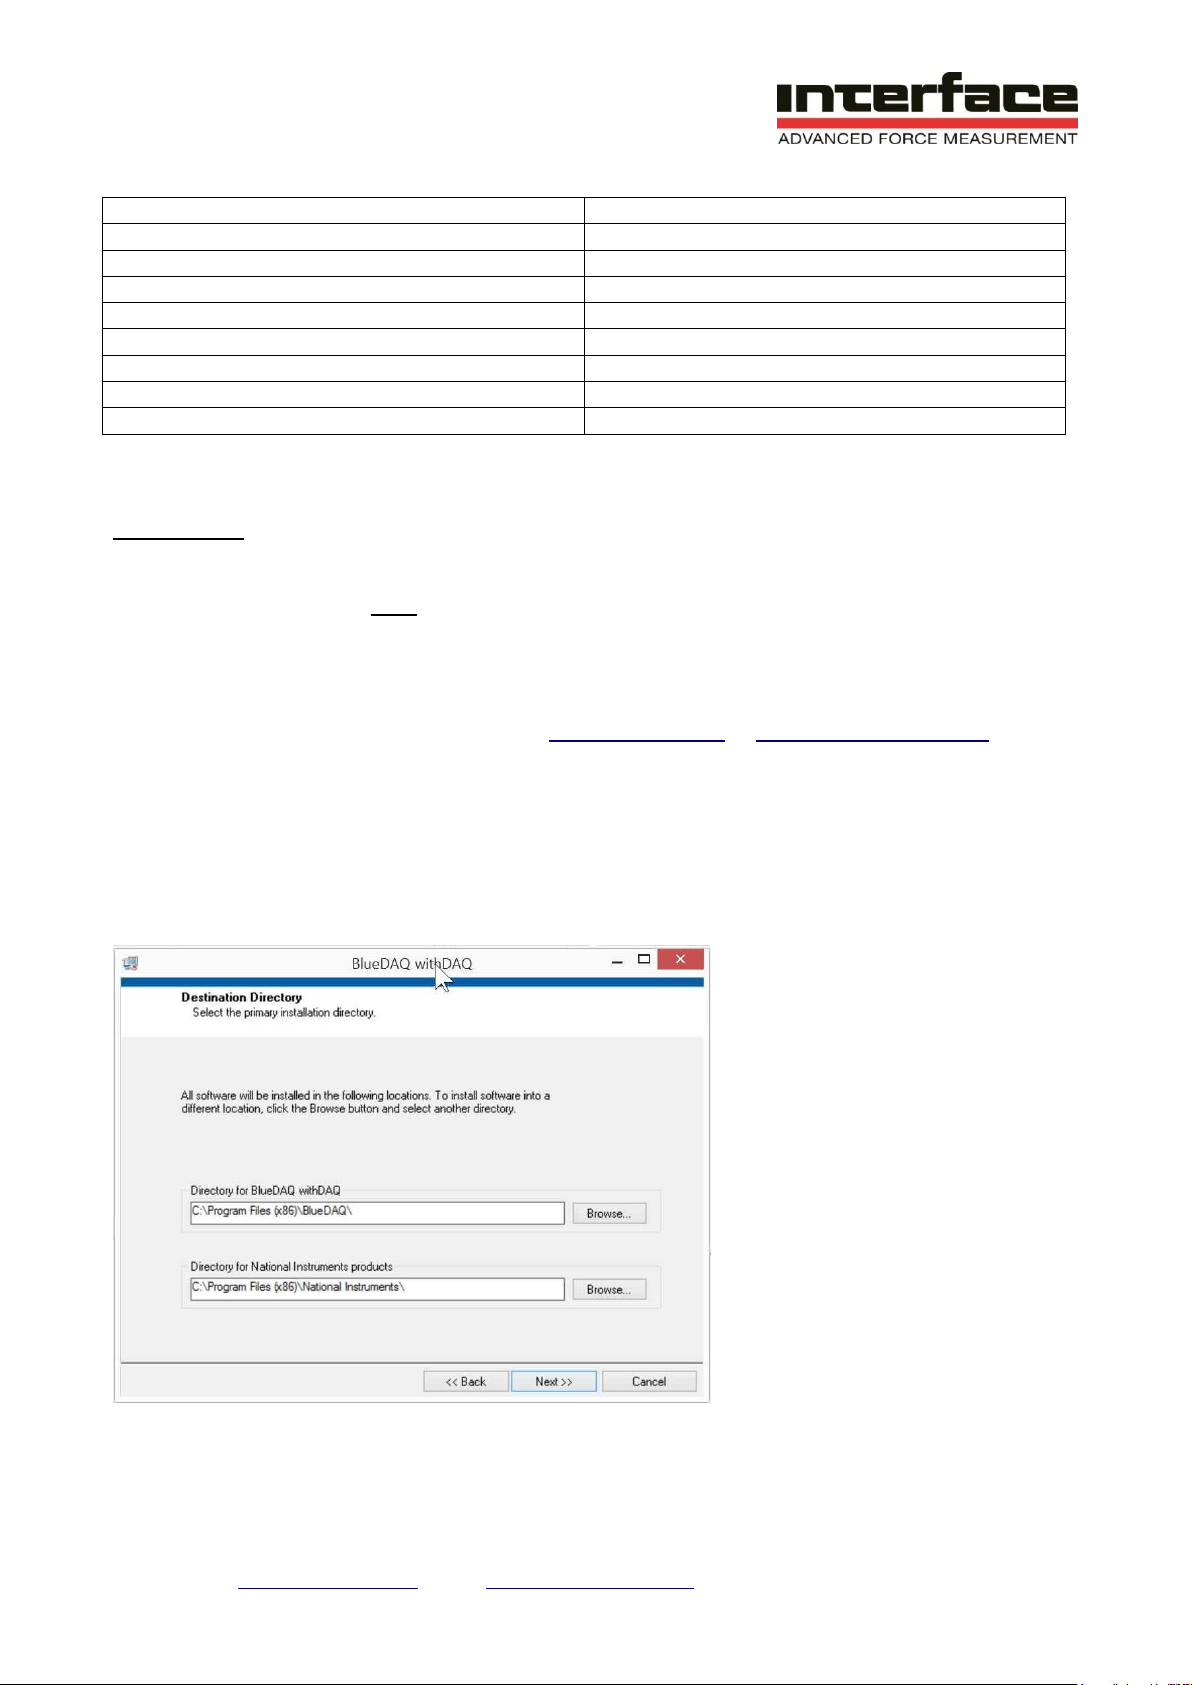
1. Run setupBX8driver.exe and follow the on-screen prompts.
2. Open the bluedaq_v1_34 folder and double-click setup.exe
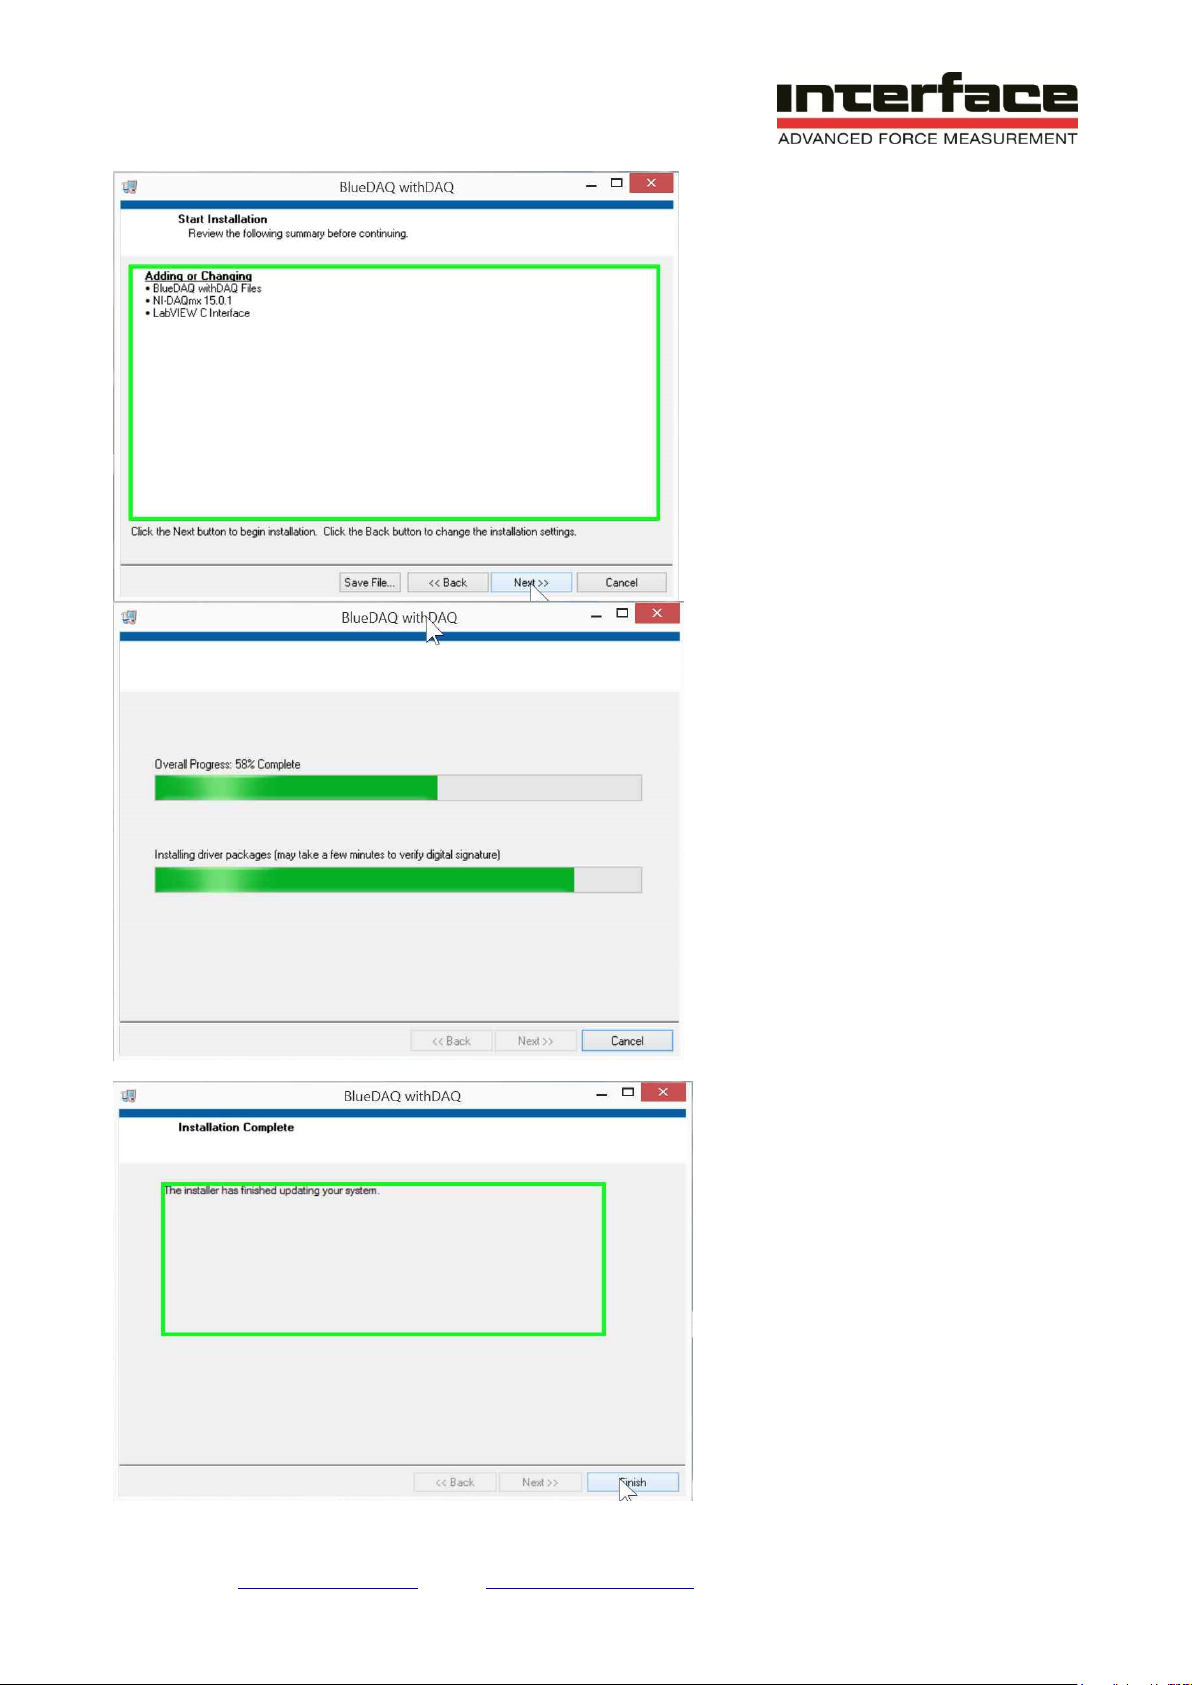
3. Run the setup program and click through the on-screen menus as shown below.
Interface Inc. ● 7401 East Butherus Drive, Scottsdale, Arizona 85260 USA ● Phone 480.948.5555 ● Fax 480.948.1924
Page 5 of 14
Page 6
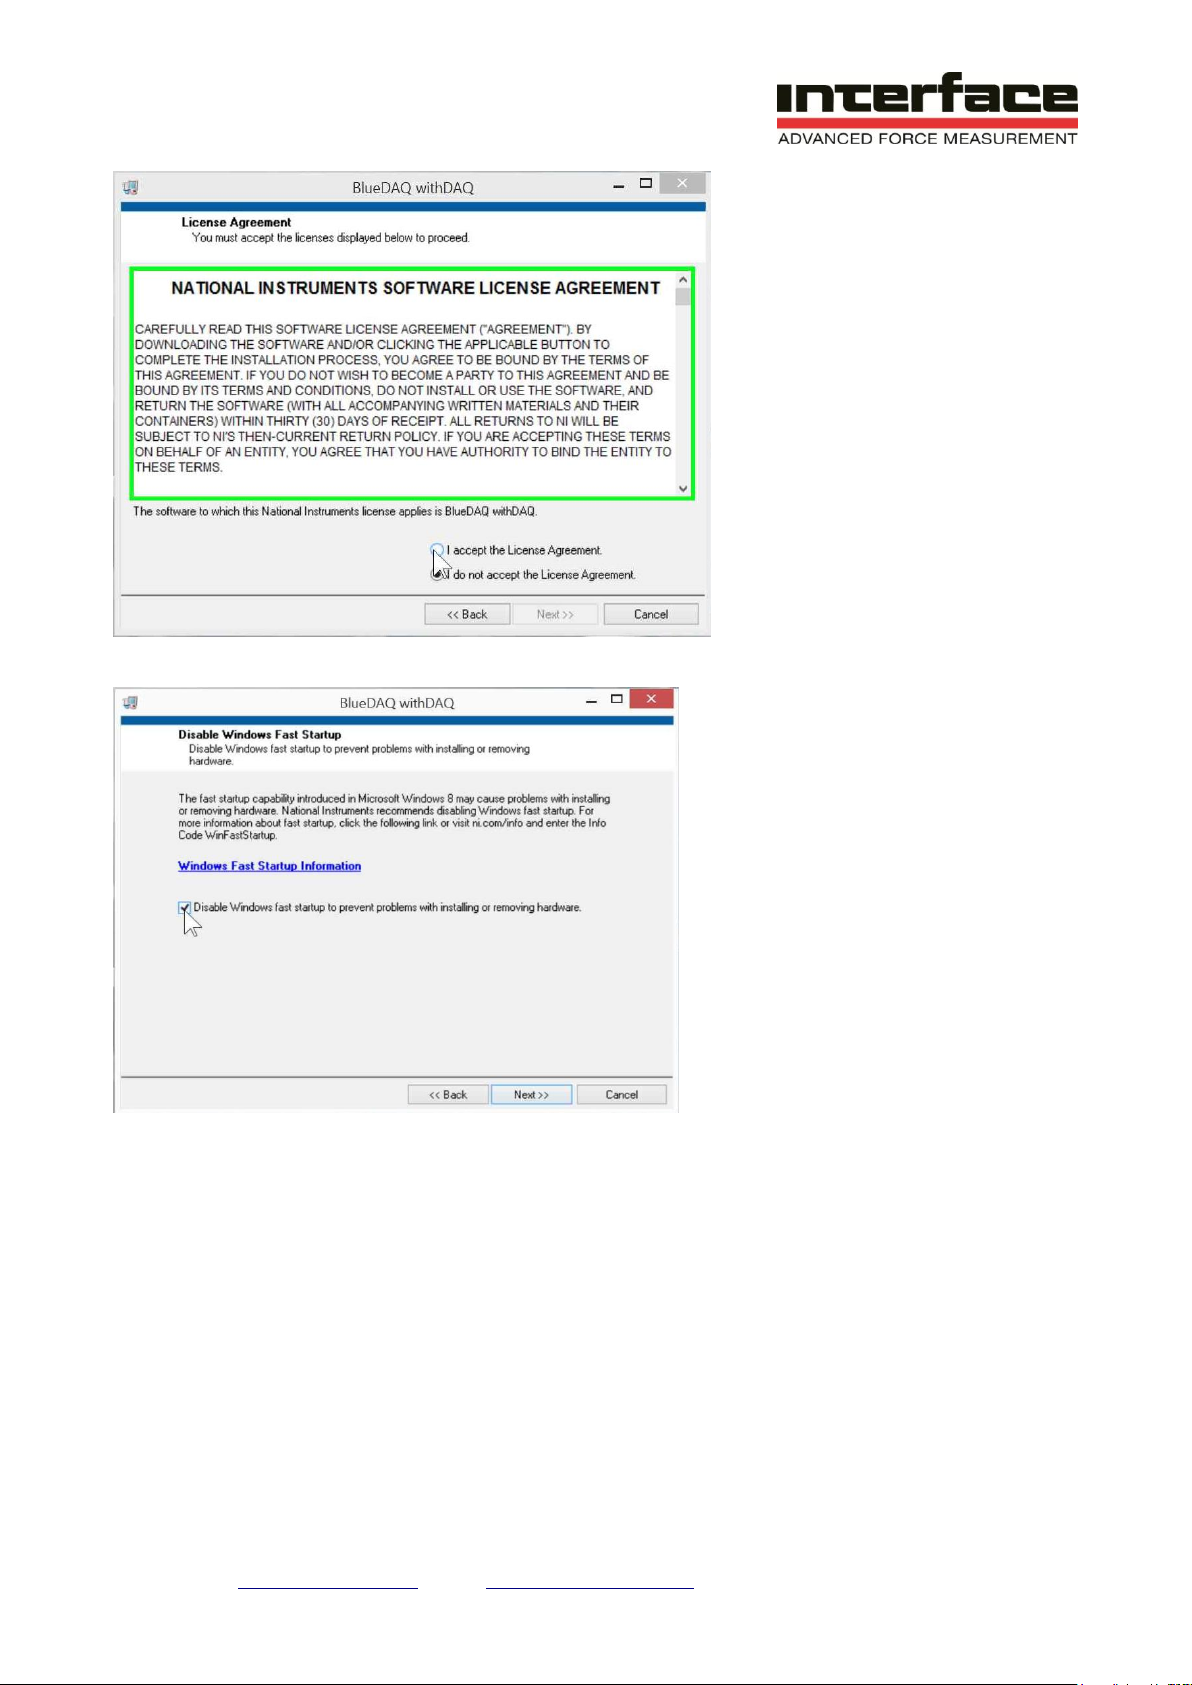
UN-CHECK “Disable Windows Fast Startup…” There are currently no known issues with the BX8
hardware and Windows Fast Startup.
Interface Inc. ● 7401 East Butherus Drive, Scottsdale, Arizona 85260 USA ● Phone 480.948.5555 ● Fax 480.948.1924
Page 6 of 14
Page 7
Interface Inc. ● 7401 East Butherus Drive, Scottsdale, Arizona 85260 USA ● Phone 480.948.5555 ● Fax 480.948.1924
Page 7 of 14
Page 8
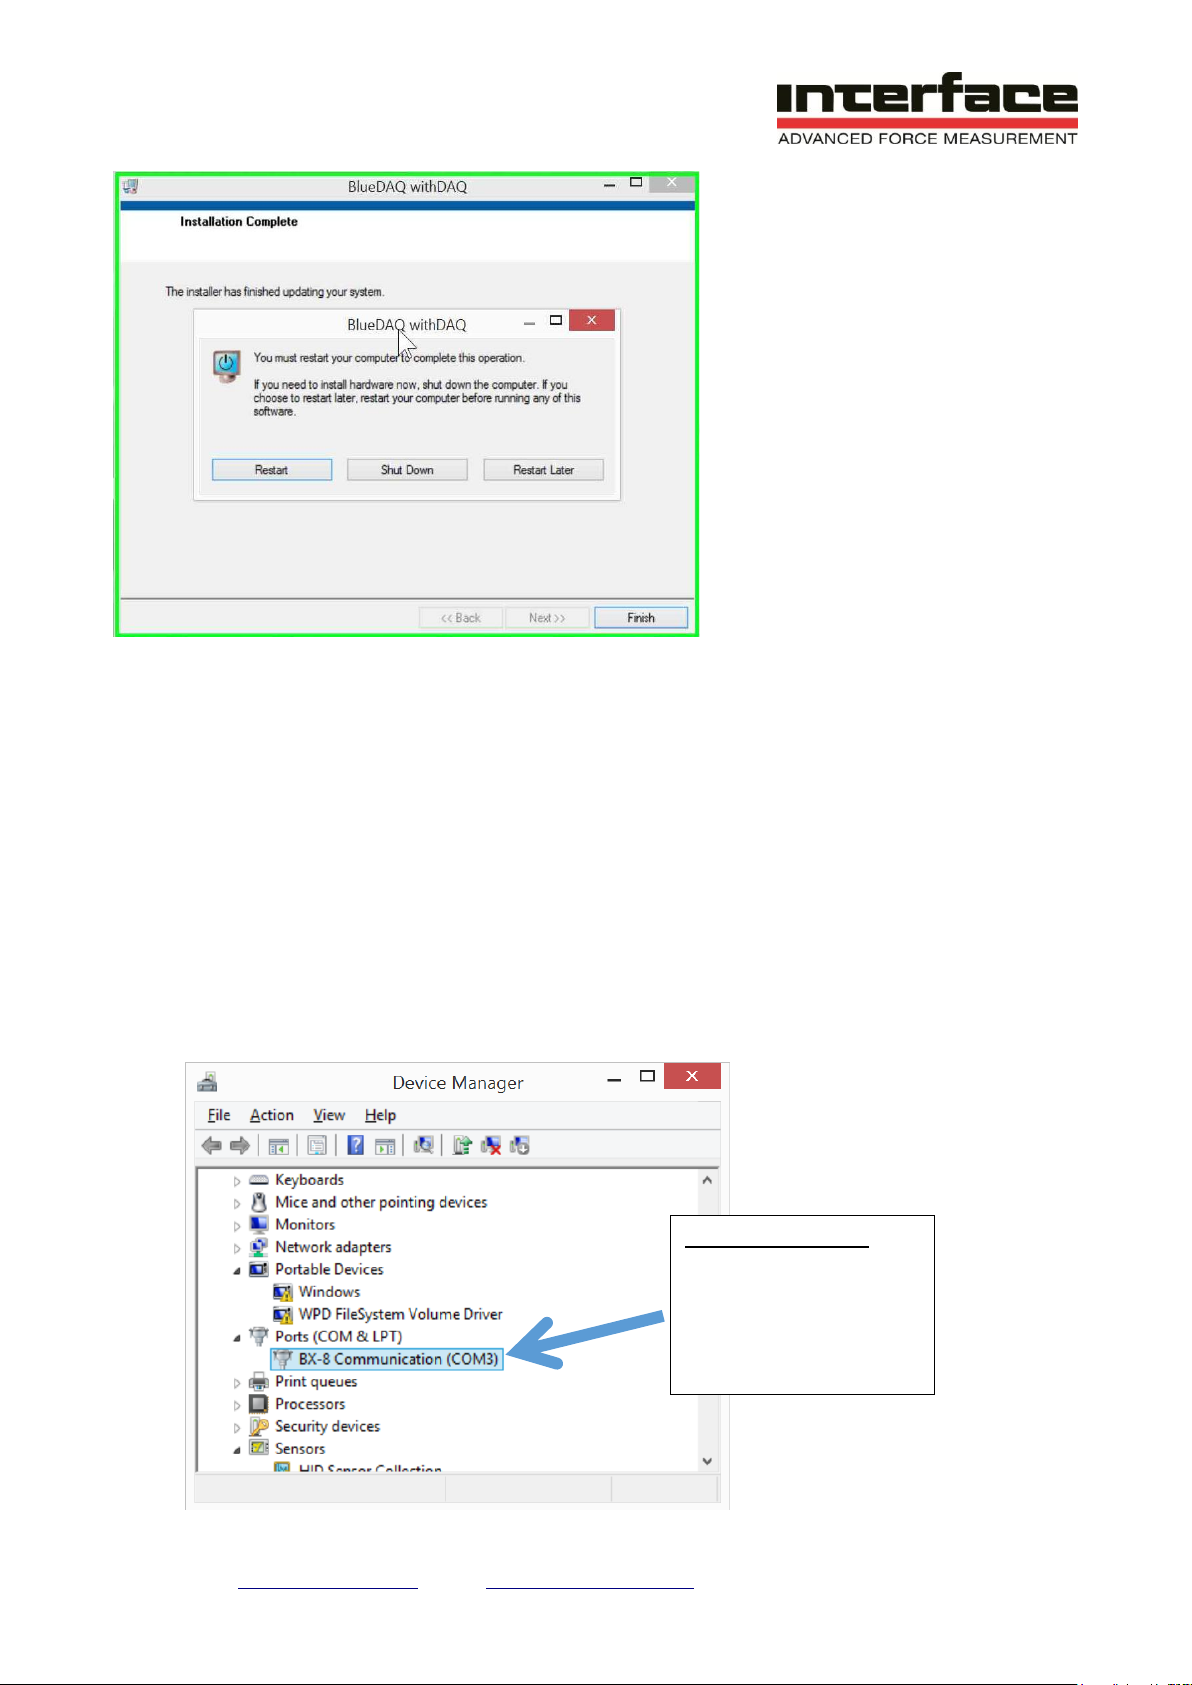
Correct Installation.
Note COM7. Your
system will likely use a
different COM port and
you should note the
number.
After restarting your computer the BlueDAQ software is ready to use.
4. Connect the 6-Axis sensor to the BX8-AS using the M16 24-pin connector or the BX8-HD44
using the 44-Pin High Density Connector. The BX8 will be labeled with the 6-Axis sensor
serial number and if multiple systems are purchased care must be taken to connect the
correct sensor.
5. Connect the supplied power cable to the BX8 amplifier 4-pin DC power jack.
6. Connect the supplied USB cable to the BX8 and the PC. The PC will recognize and install
the BX8 as a COM Port. You should check in windows device manager to make sure the
BX8 was installed correctly. Examples of correct and incorrect installations are below.
Correct Installation. Note COM3
Interface Inc. ● 7401 East Butherus Drive, Scottsdale, Arizona 85260 USA ● Phone 480.948.5555 ● Fax 480.948.1924
Page 8 of 14
Page 9
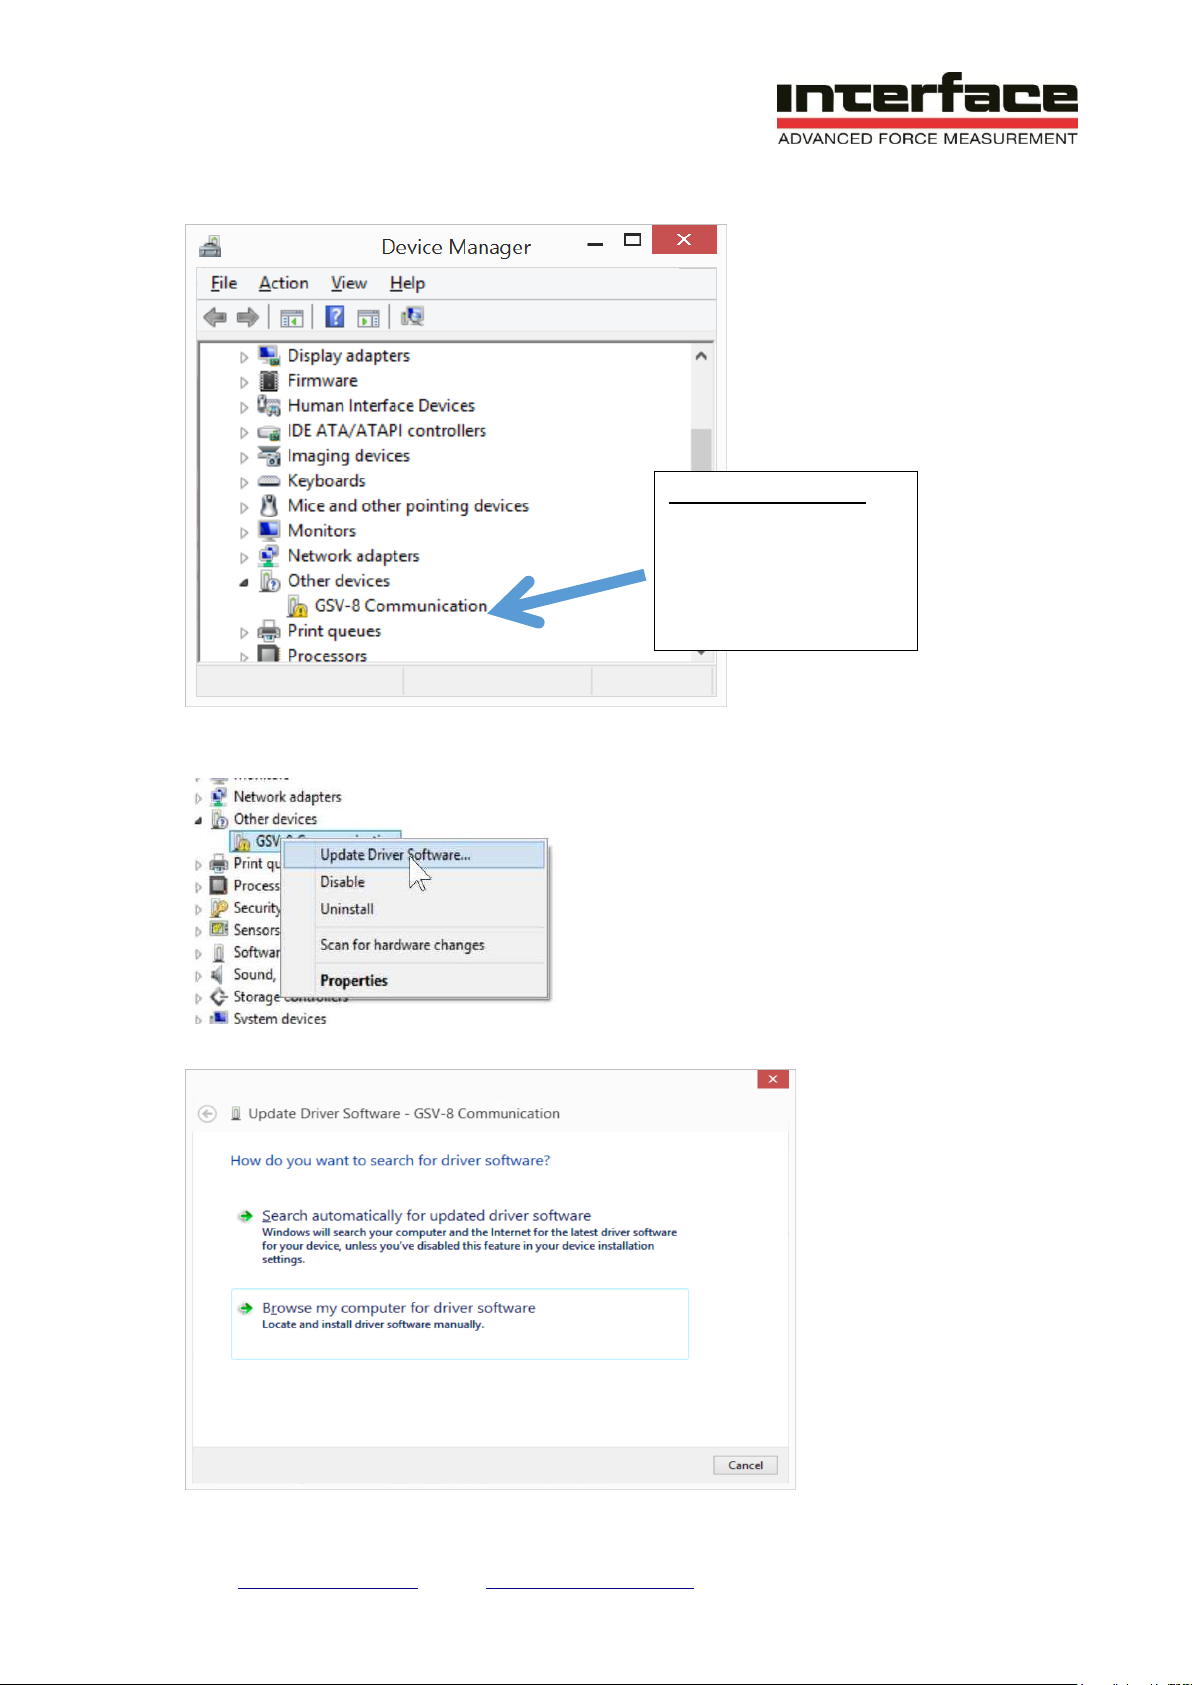
Incorrect Installation.
Driver must be installed
manually per the steps
below
Incorrect Installation
To fix an incorrectly installed BX8 COM driver, Right click on the “GSV-8 Communication”
and select Update Driver Software
Select Browse my computer for driver software, browse to C:\BX8driver\inf and click Next
Interface Inc. ● 7401 East Butherus Drive, Scottsdale, Arizona 85260 USA ● Phone 480.948.5555 ● Fax 480.948.1924
Page 9 of 14
Page 10
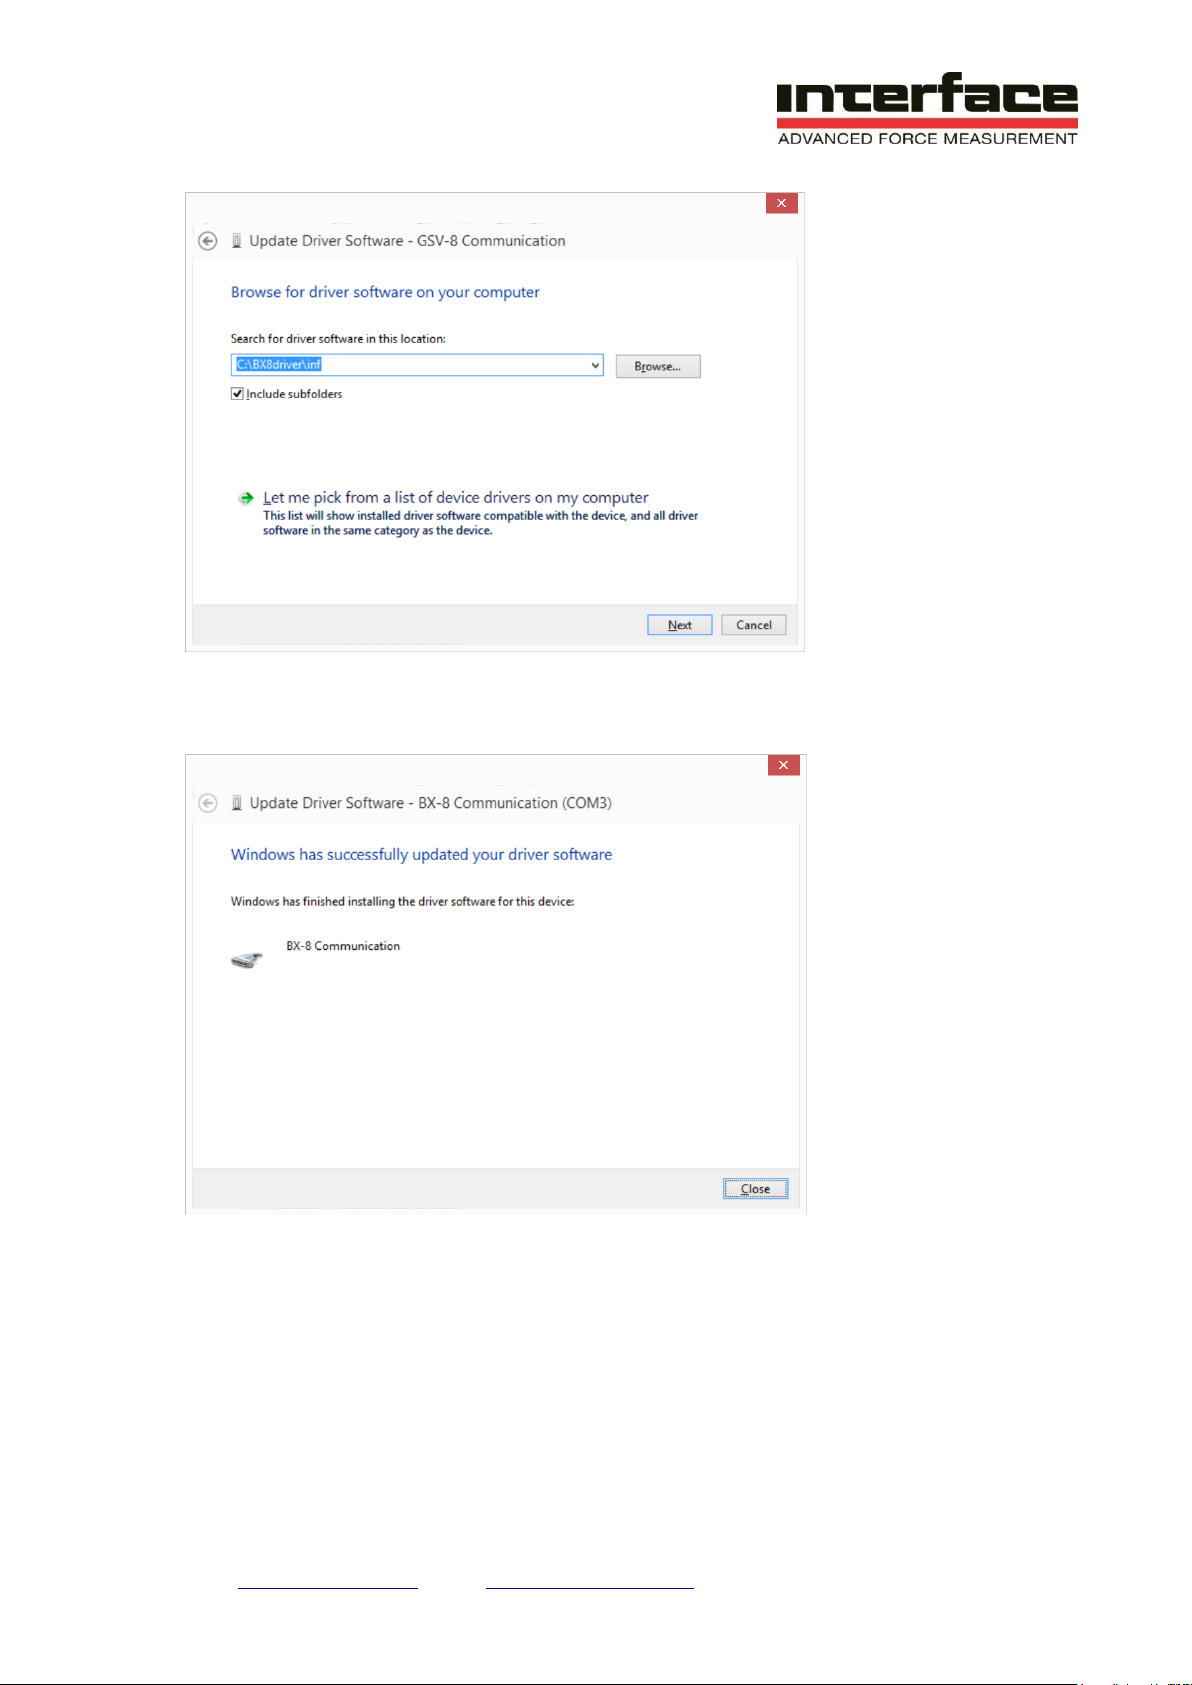
7. Now run BlueDAQ from the Start/Programs Menu
Interface Inc. ● 7401 East Butherus Drive, Scottsdale, Arizona 85260 USA ● Phone 480.948.5555 ● Fax 480.948.1924
Page 10 of 14
Page 11
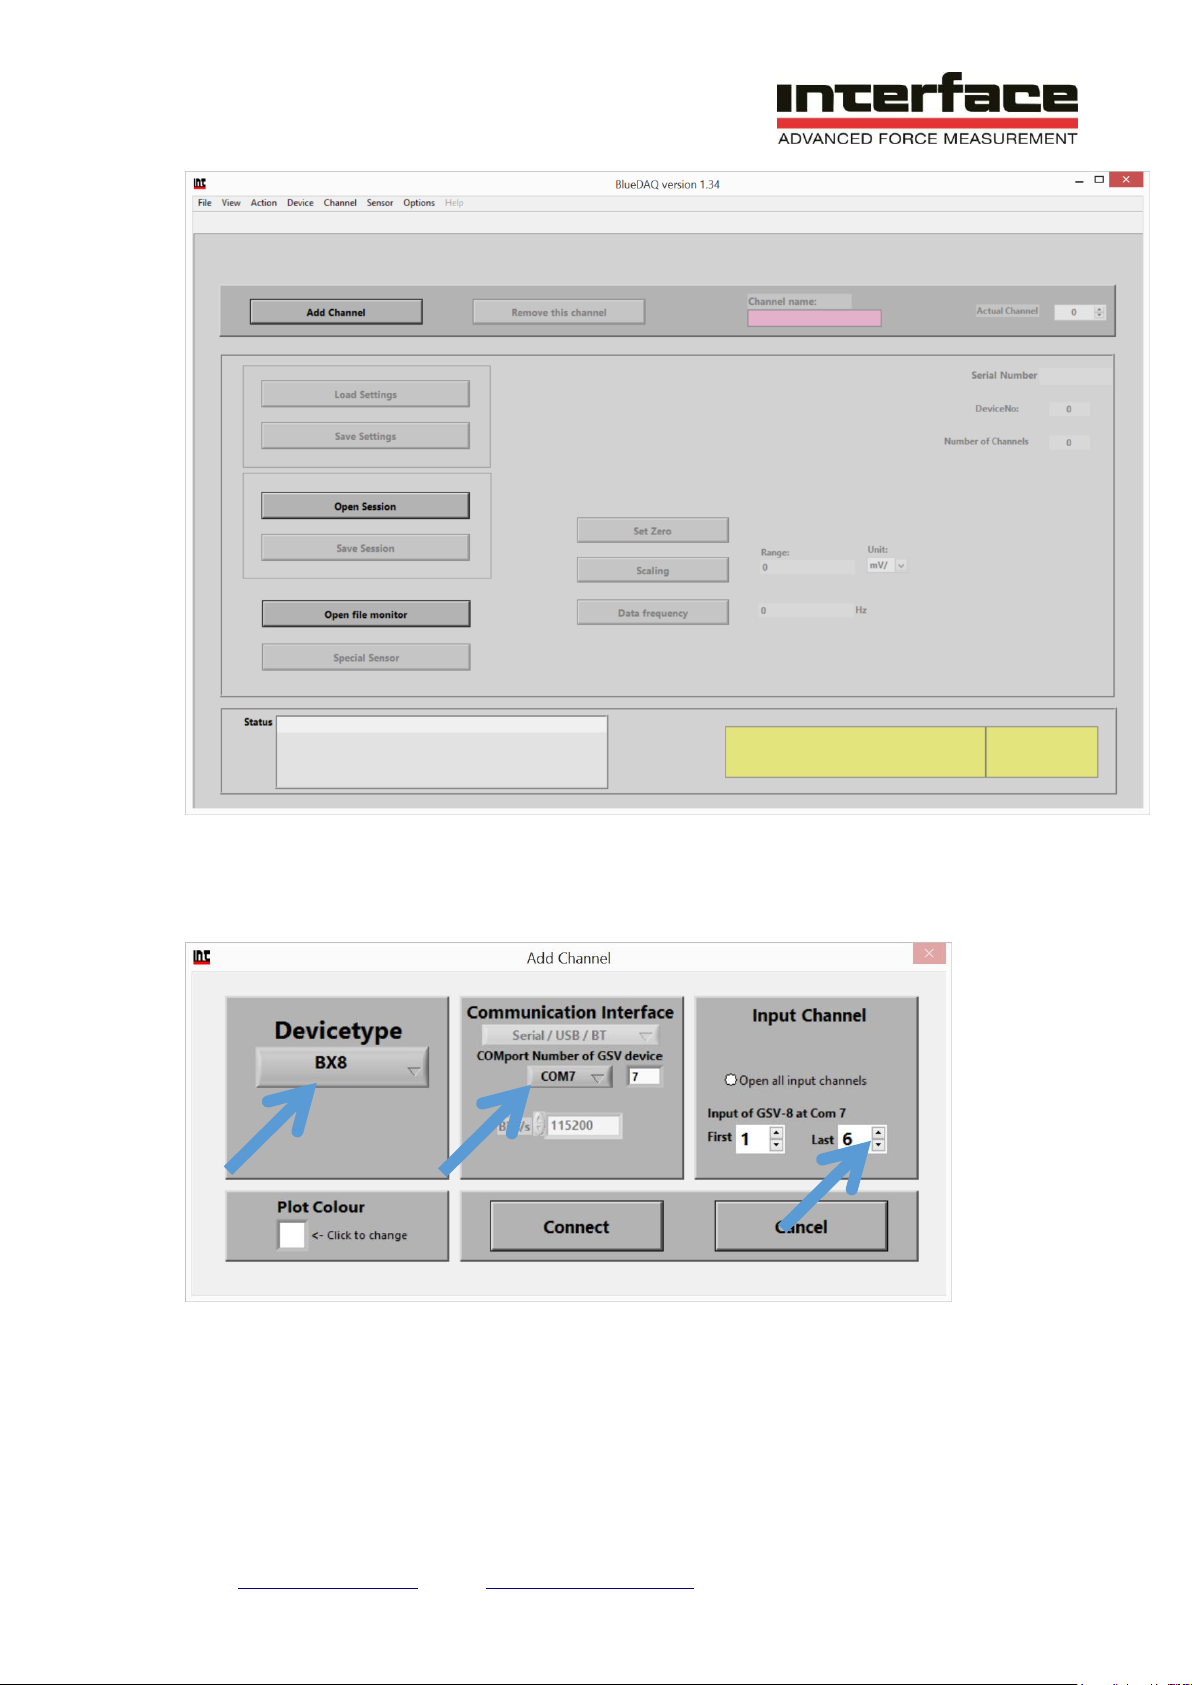
8. Click the Add Channel button and complete the selections as shown below. The COM
number should fill in automatically when you select the COMport drop-down and will be the
same COM as noted during the BX8 driver installation. When finished click Connect and all
6 channels will be added.
Interface Inc. ● 7401 East Butherus Drive, Scottsdale, Arizona 85260 USA ● Phone 480.948.5555 ● Fax 480.948.1924
Page 11 of 14
Page 12
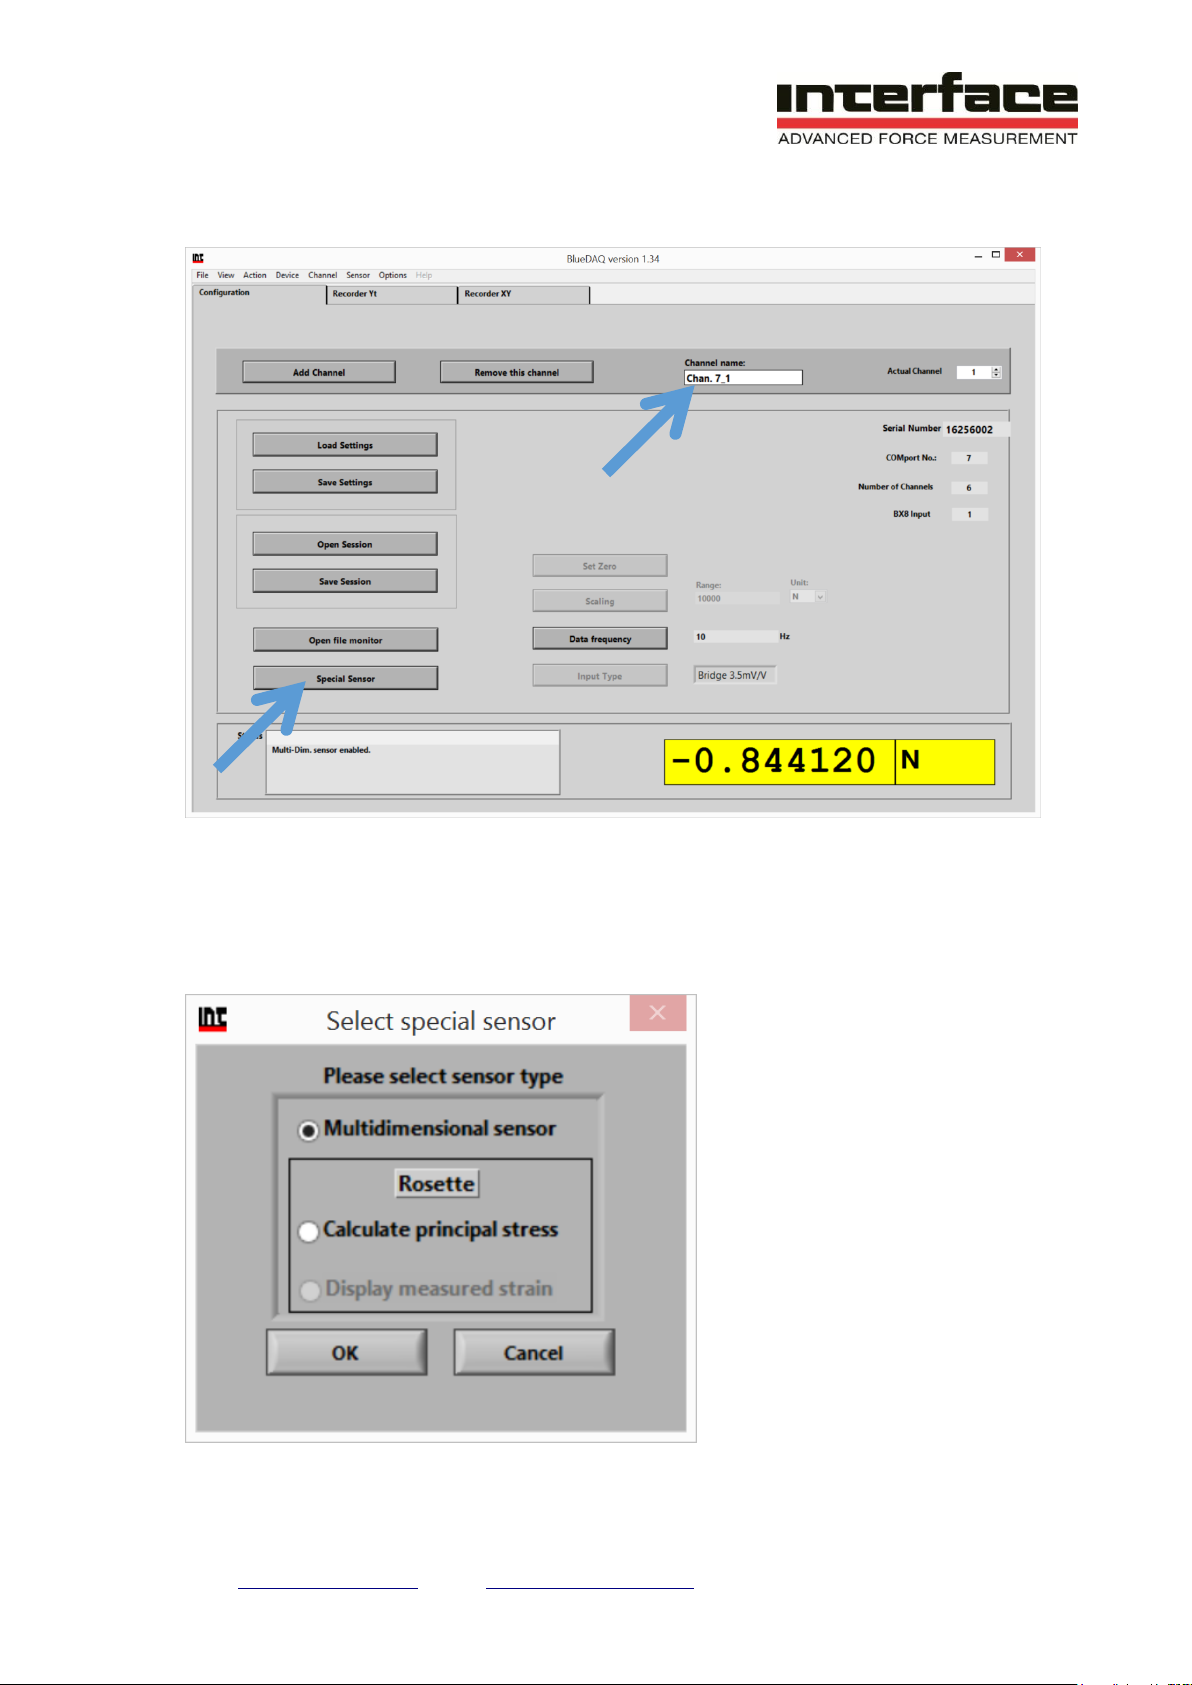
9. Next, click the Special Sensor button to load the pre-assigned channel names. For
example, Chan 7_1 will be renamed to ForceX.
10. Select Multidimensional Sensor and click OK
Interface Inc. ● 7401 East Butherus Drive, Scottsdale, Arizona 85260 USA ● Phone 480.948.5555 ● Fax 480.948.1924
Page 12 of 14
Page 13
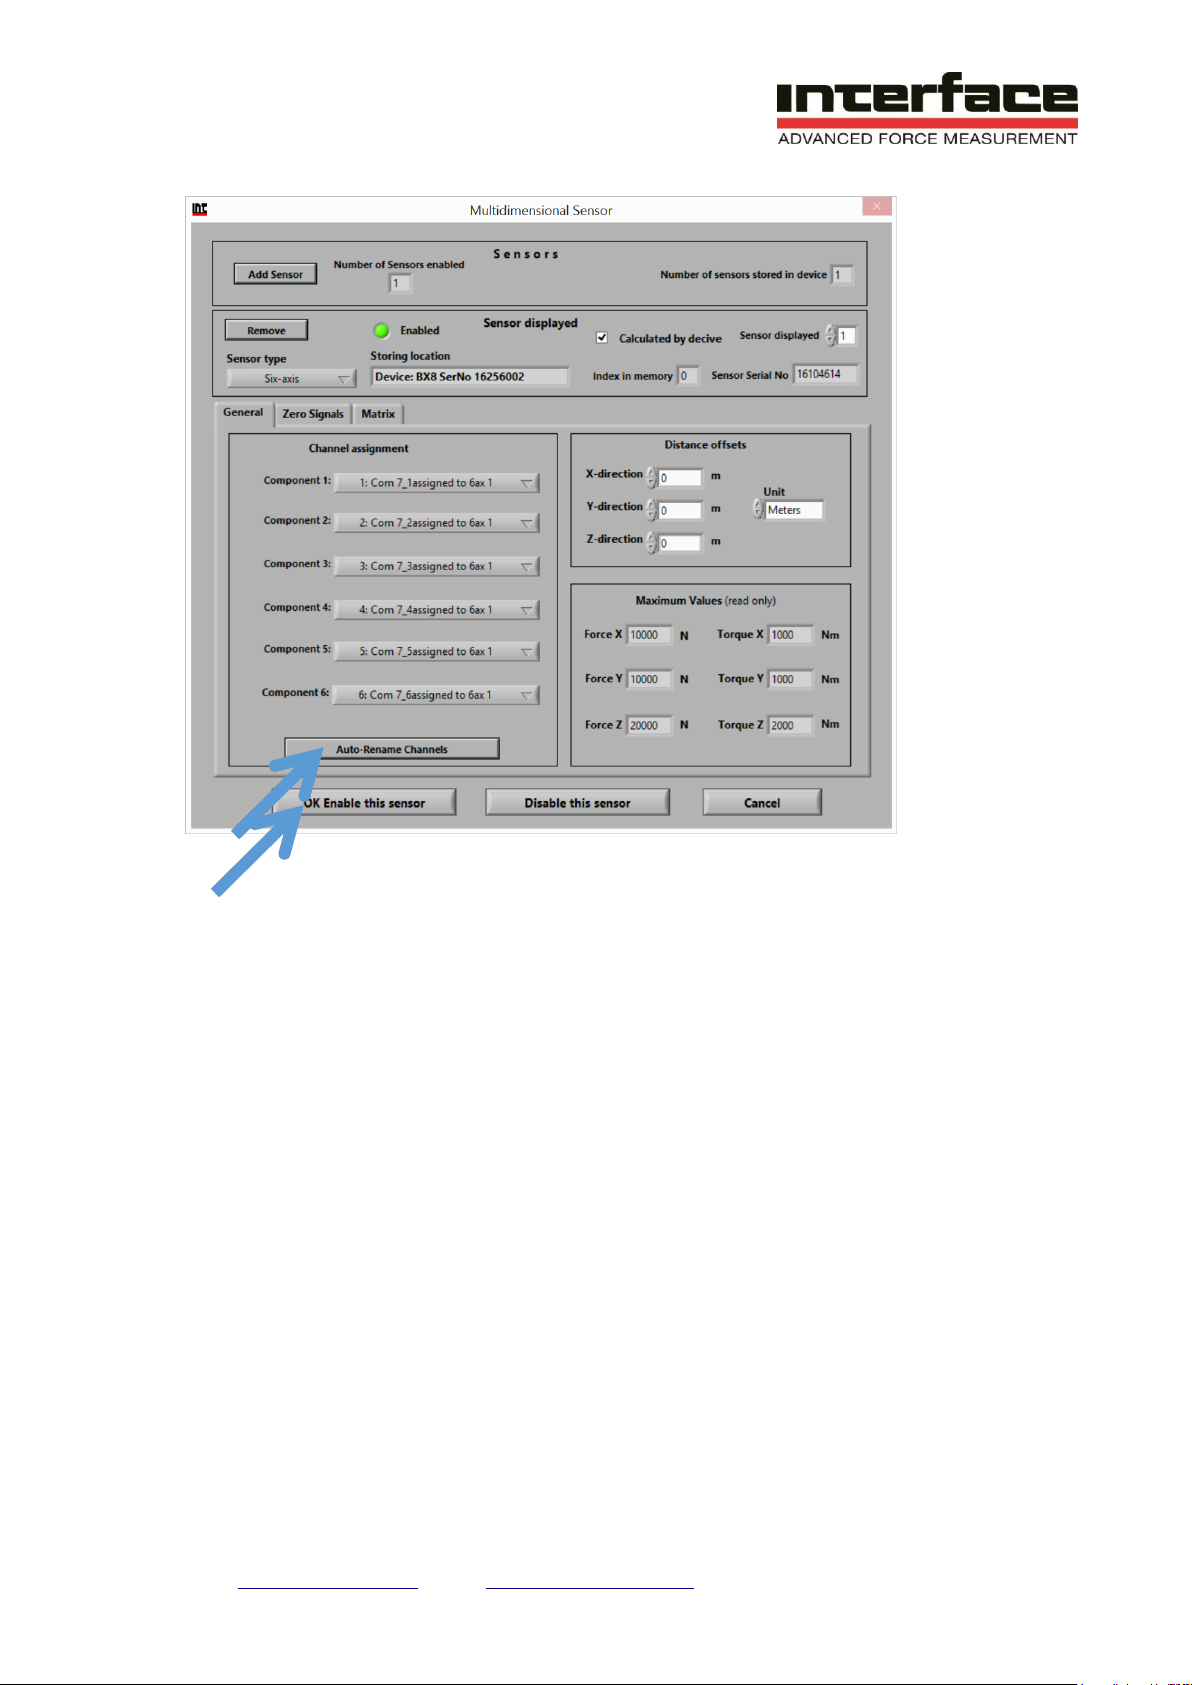
11. Click Auto-Rename Channels and then OK Enable this sensor
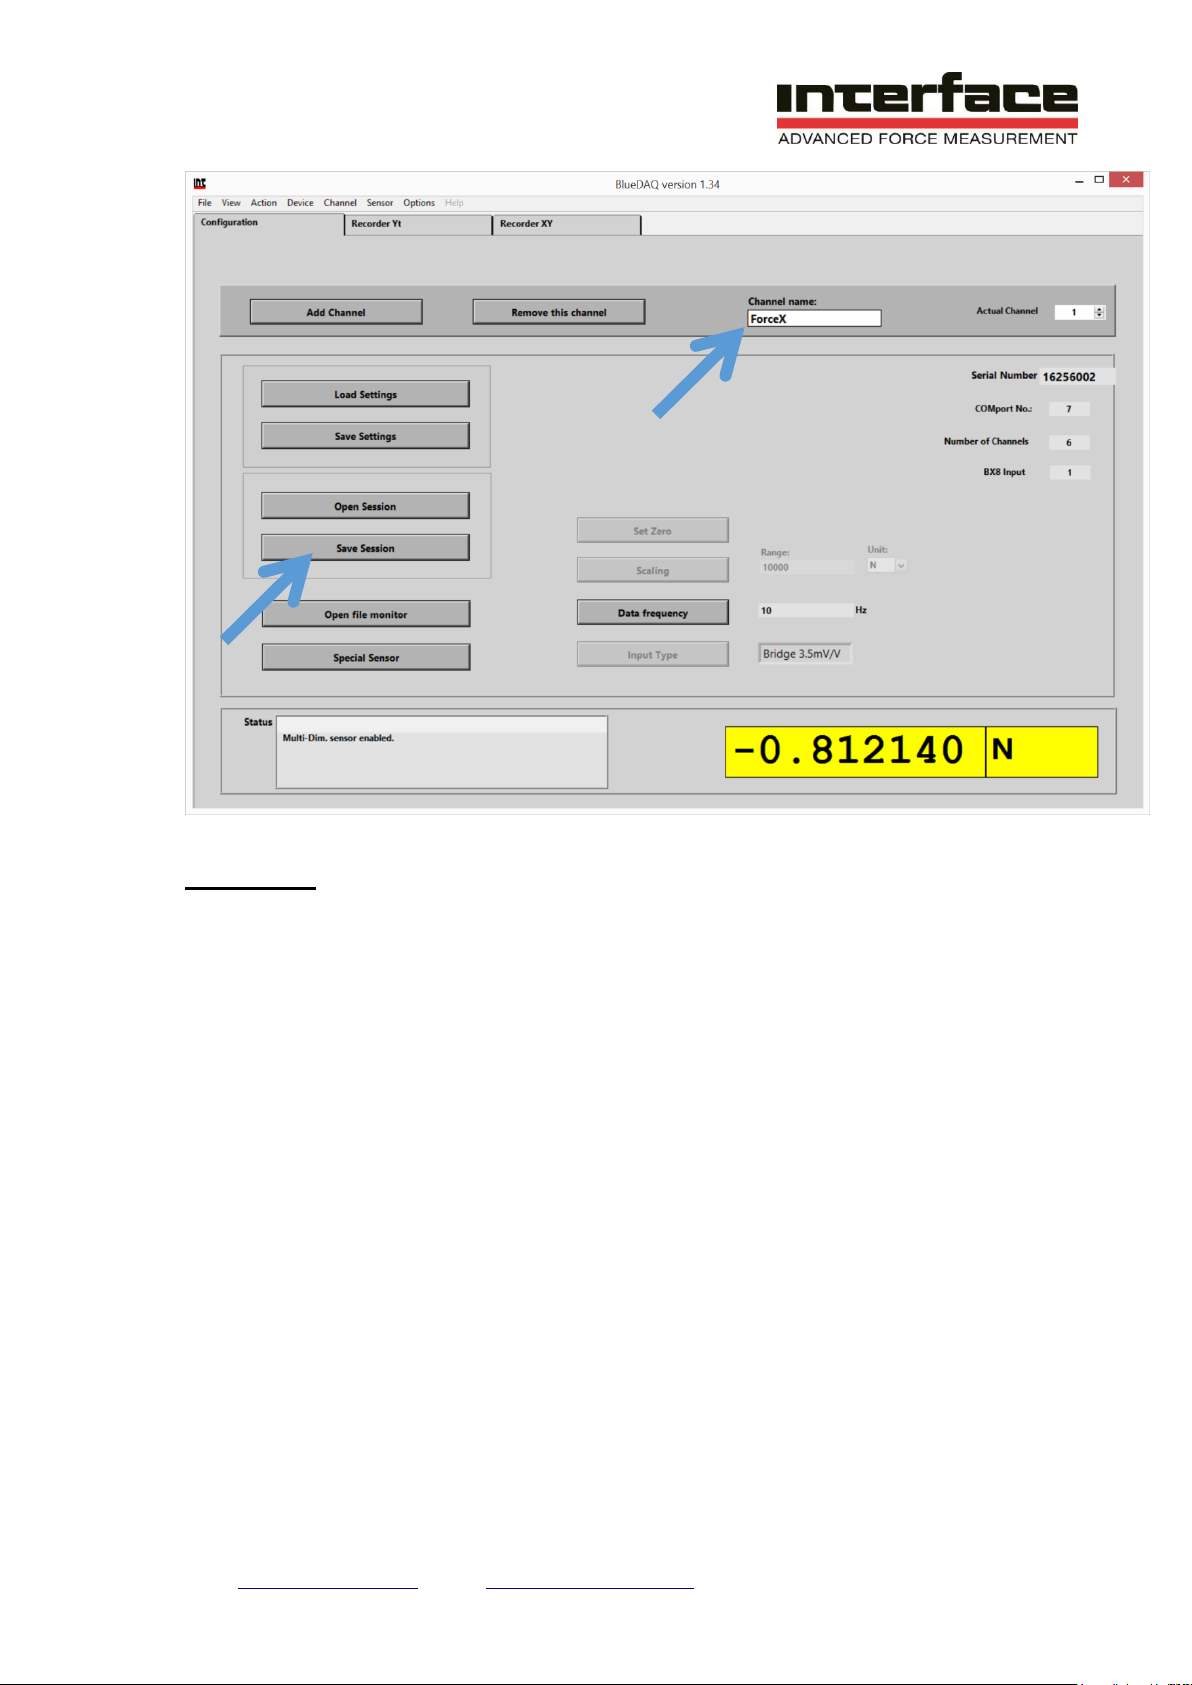
12. The software is now ready to use. You should Click Save Session and save the software
session to your PC. Next time you open the software just select Open Session, select the
file and all of the channels and channel names will be added automatically.
Interface Inc. ● 7401 East Butherus Drive, Scottsdale, Arizona 85260 USA ● Phone 480.948.5555 ● Fax 480.948.1924
Page 13 of 14
Page 14
USE CASE 3: BX8 will be simultaneously connected to customer’s data acquisition system
and to the Interface BlueDAQ software.
1. Follow steps in USE CASE 1 and then USE CASE 2. The BlueDAQ software can be
connected to the BX8 while the analog output signals are actively connected to an external
data acquisition system. Data can be viewed, logged and recorded simultaneously
Interface Inc. ● 7401 East Butherus Drive, Scottsdale, Arizona 85260 USA ● Phone 480.948.5555 ● Fax 480.948.1924
Page 14 of 14
 Loading...