

Interex MACh Speed G3 User Manual

Table of Contents
Preface . . . . . . . . . . . . . . . . . . . . . . . . . . . . . . . . . . . . . . . . . . . . . .1
Chapter 1 - QuickStart . . . . . . . . . . . . . . . . . . . . . . . . . . . . . . . . . . 3
Installing the card . . . . . . . . . . . . . . . . . . . . . . . . . . . . . . . . . . . . . .3
Installing the software . . . . . . . . . . . . . . . . . . . . . . . . . . . . . . . . . . . .6
Chapter 2 - Installing the MACh Speed G3 Upgrade Card . . . . . . .9
General Installation Instructions . . . . . . . . . . . . . . . . . . . . . . . . . . . . .9
Installation in Power Mac 7300, 7500 or 7600 Computers . . . . . . . . 11
Installation in Power Mac 8500 or 9500 Computers . . . . . . . . . . . . . 21
Installation in Power Mac 8600 or 9600 Computers . . . . . . . . . . . . . 32
Installation in Non-Apple Systems . . . . . . . . . . . . . . . . . . . . . . . . . . 40
Chapter 3 - Installing the software . . . . . . . . . . . . . . . . . . . . . . . . .47
The Processor Info Utility . . . . . . . . . . . . . . . . . . . . . . . . . . . . . . . 48
The MACh Speed G3 Control . . . . . . . . . . . . . . . . . . . . . . . . . . . . .50
Chapter 4 - Advanced Performance Tuning . . . . . . . . . . . . . . . . . .53
Multiple Variable Processing (MVP) . . . . . . . . . . . . . . . . . . . . . . . . 54
Adjusting for Maximum CPU Operating speed . . . . . . . . . . . . . . . . . . 54
Frequency Chart . . . . . . . . . . . . . . . . . . . . . . . . . . . . . . . . . . . . . . 56
Adjusting the Maximum Backside Cache Ratios . . . . . . . . . . . . . . . . . 57
Performance Notes . . . . . . . . . . . . . . . . . . . . . . . . . . . . . . . . . . . . 59
Chapter 5 - Technical Support . . . . . . . . . . . . . . . . . . . . . . . . . . . 61
Troubleshooting . . . . . . . . . . . . . . . . . . . . . . . . . . . . . . . . . . . . . . . 61
Warranty Information . . . . . . . . . . . . . . . . . . . . . . . . . . . . . . . . . . 63
Decleration of Conformity . . . . . . . . . . . . . . . . . . . . . . . . . . . . . . . . 64

Thank you for choosing the MACh Speed G3 upgrade. You have
purchased an award wining product which will provide leading
edge performance gains, and is backed by a leader in the computing industry.
The MACh Speed G3 is fully compatible with PowerPC 7300,
7500, 7600, 8500, 8600, 9500 and 9600 Power Computing’s
PowerTower™, PowerCenter™, and PowerWave™ and Umax
S900 and J700.
This manual provides installation instructions for your new MACh
Speed G3 processor upgrade. We have divided this manual into 4
easy sections designed to get your system back in service as soon as
possible.
®
The QuickStart - Provides the information to get your
card installed and running immediately. The quickstart is designed
for persons familiar with installing add-in cards inside computers.
It will provide immediate CPU performance as rated by the manufacture.
Installing the Card - Provides information and
detailed instruction on installing the MACh Speed G3 Upgrade
Card in various computer systems.
Installing the Software - Provides detailed informa-
tion on the use of XLR8 exclusive software additions to the
MACh Speed G3 package.
Advanced Performance Tuning - Provides
information on implementing XLR8’s exclusive MVP performance technology, for tuning your system to run up to 20% faster
than the standard base upgrade settings.
Technical Support - This section includes support
information and a handy troubleshooting section, should you have
problems.
Preface
Page 1

Important:
Before installing your MACh Speed G3 CPU card, read the
instructions covering your machine model.
• Static electricity can cause damage to the CPU card and
other computer components including the motherboard.
• Please use the grounding wrist strap while installing or
removing the MACh Speed G3 card.
About Performance Tuning:
Your MACh Speed G3 CPU card was preset from the factory to
base BUS speed and BUS ratio settings. Depending upon the
hardware and software configuration of your particular computer,
you may choose to change the BUS speed and BUS ratio settings
to optimize performance. Refer to the Advance Performance
Tuning section of this manual to select your preferred settings
prior to installation.
Included with your package
The MACh Speed upgrade includes everything you need to install
your card with the exception of a couple of basic tools which are
usually available to any computer user, a phillips head screwdriver
and a ball point ink pen.
Your package includes:
• The MACh Speed G3 Processor Upgrade Card
• High-quality adjustable anti-static wrist strap
• Software on diskette
• Warranty card
• Manual
The Quickstart
Welcome to the QuickStart Section of this manual. This section
will provide the information that you need to quickly install your
G3 upgrade in the PCI based Mac OS system.
Installing the Card
1. Attach the anti-static wrist strap. The anti-static wrist strap will
ensure that you are well grounded and avoid any unexpected
static discharges.
• The elastic end of the wrist strap is put over your wrist.
The plug end of the wrist strap is attached to the power
cable.
• The opposite end of the power cable plugged into a “live”
wall socket or power strip.
power cord
plugged to
live socket
Attaching the anti-static wrist strap
2. Open the Mac OS system chassis.
• Getting into the chassis varies from system to system. This
chapter assumes that you are familiar with the opening of
your system chassis.Please refer to later chapters if you
need assistance with this operation.
connection to
grounding strap
wrist strap
Preface
Page 2
Chapter 1 - QuickStart
Page 3
3. Remove the existing CPU card.
• Identify the location of the CPU card. You can refer to
the later chapters, or to your Systems user manual.
Removing the CPU card from a PowerMacintosh 7300
4. Remove the MACh Speed G3 from its protective package.
• Be sure that you are grounded, and remove the
MACh Speed from its protective package.
• Inspect the card for any irregularities or possible damage
in shipment.
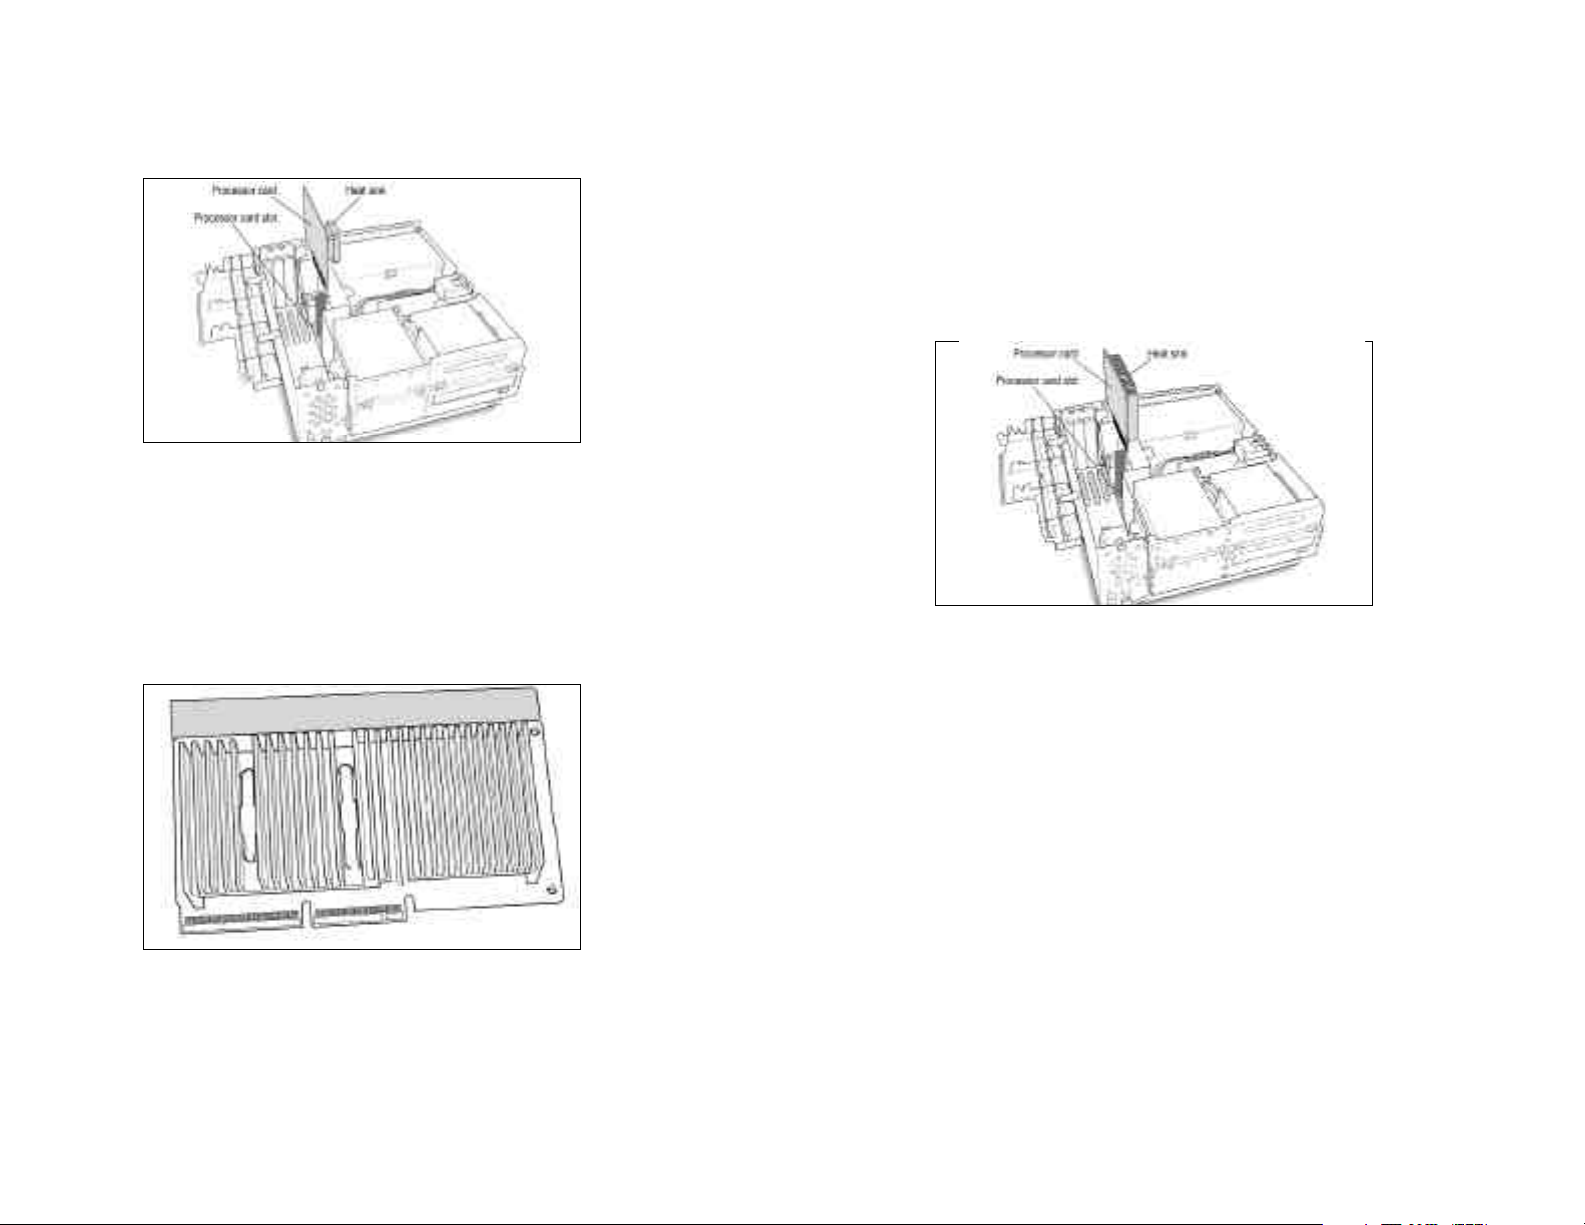
5. Install the MACh Speed G3 into your system.
• The MACh Speed G3 Upgrade will face the same direction as the older card that you just removed. In most cases
this is with the heat sink towards the Power Supply. The
connector is designed to fit only one way.
•Holding the card by the edges (do not depress the heat
sink), insert into the connector without twisting. You may
feel two distinct “clicks” as the card seats itself firmly into
the connector.
Installing the MACh Speed G3
Inspecting the MACh Speed G3
Chapter 1 - QuickStart
Page 4
6. Boot your Mac to test the Card/installation.
• At this point, it is a good idea to check that you get a successful boot up “chime”, ensuring that the card is well
seated and working.
• Simply plug the power cord into the Mac, and start up
the Mac. Once you have verified the “chime, you can disconnect power, and complete the card installation. If you
do not hear a “chime”, refer to Chapter 5 - Tech Support.
•Note: On some machines it may be mandatory to reassemble the Mac before booting. It is suggested that you test for
a successful start-up “chime” at the earliest period possible
to streamline any troubleshooting that may later be
required.
Chapter 1 - QuickStart
Page 5
7. Close up the System.
• With a “chiming” G3 enabled Mac, complete the
installation by reversing the steps you followed for the
installation.
• Reconnect all power cables/video/ADB
• Reboot the system.
Installing the Software
1. Copy the Software.
• After booting your Macintosh, insert the floppy disk.
• Review the readme file on the disk for any last minute
changes or updates.
• Copy the MACh Speed G3 Control file to the Control
Panels folder in the System of your start-up System drive.
• Copy the Prodcessor Info file into any Non-Systm folder.
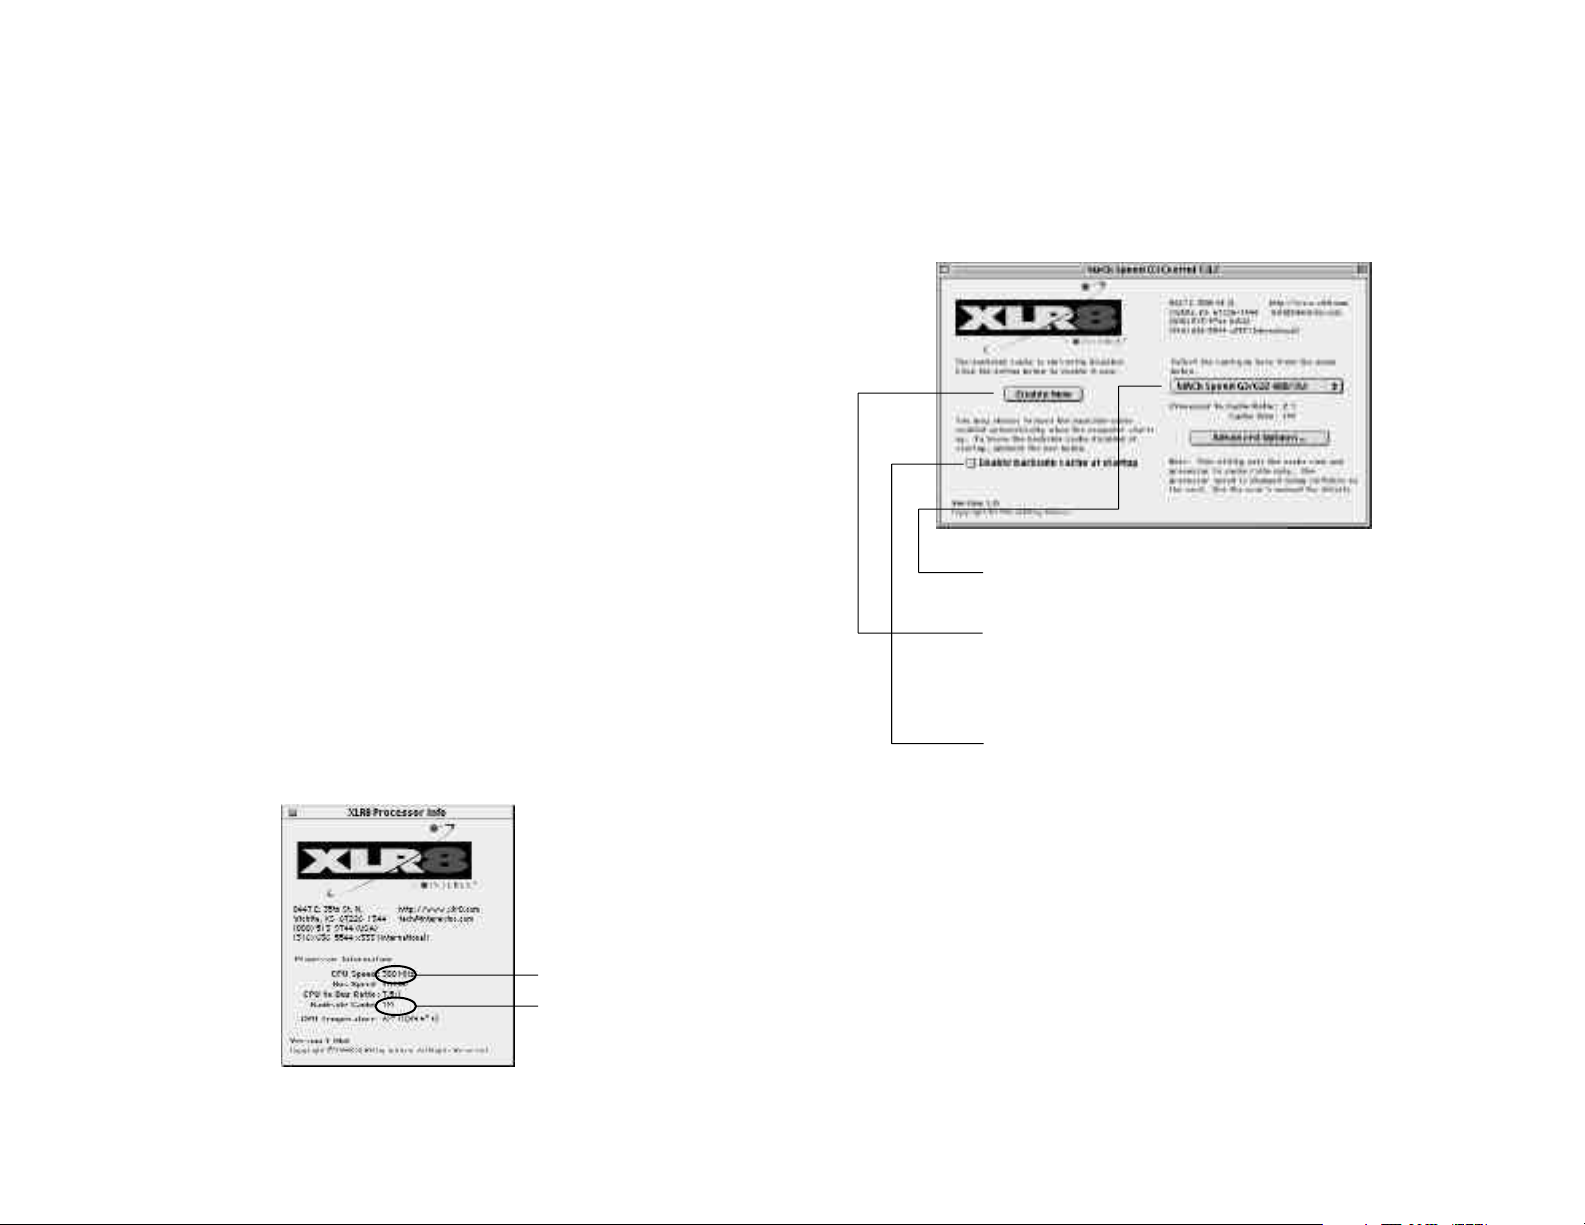
2. Open the Processor Info file (more detail in Chapter 3).
• Double-click on the XLR8 Processor Info. Review the
dialog for correct information.
• If the CPU speed or cache size are reading incorrectly,
you may have a problem with your system. Consult
Chapter 5 - Tech Support for more information.
3. Enable the MACh Speed G3 Backside Cache.
• In the Control Panels folder of your start-up drive, double-click on the MACh Speed G3 Control.
• This software controls the activation of the backside cache
and controls the ratio at which it operates. You are now
ready to turn the backside cache on.
Step A. Select your MACh Speed G3 model from the
pull-down menu.
Step B. Select “Enable Now” to enable the backside
cache. If your system freezes at this point,
you most likely selected the wrong card.
Reboot and select again.
Step C. Now that your cache is enabled, you should
select “Enable Backside Cache at Startup” to
automatically enable the cache every time
you boot your system.
Step D. Advanced options. This area if for enabling
XLR8’s exclusive MVP technology. Refer to
Chapter 4 - Advanced Performance Tuning
for more information.
Chapter 1 - QuickStart
Page 6
Check CPU Speed
Check Cache Size
Chapter 1 - QuickStart
Page 7

4.
Close the MACh Speed G3 Control, restart your system, and
enjoy working at new speeds!
NOTE: If your system hangs on boot, or displays any
error messages, refer to Chapter 5 - Tech Support for
more information.
Installing the
MACh Speed G3
Upgrade Card
This chapter provides information for installing the Mach speed
Card into individual systems. This information can also be found
in the user guides provided by each system manufacturer.
General Installation Instructions
Before installing your MACh Speed Card, you should review this
short section. It provides information specific to the Mach speed
G3 Upgrade Card.
Chapter 1 - QuickStart
Page 8
NOTE: Some of the system pictures may differ slightly from the
exact chassis. When in doubt always refer to your Manufacturer's
User Guide.
Chapter 2 - Installing the MACh Speed G3 Upg rade Car d
Page 9

1. Attach the anti-static wrist strap. The anti-static wrist strap will
ensure that you are well grounded and avoid any unexpected
static discharges.
• The elastic end of the wrist strap is put over your wrist.
The plug end of the wrist strap is attached to the power
cable from the computer system.
• The opposite end of the power cable plugged into a “live”
wall socket or power strip.
power cord
plugged to
live socket
connection to
grounding strap
wrist strap
Installation in a PowerMac
7300, 7500, or 7600
The MACh Speed G3 Upgrade Card gives your Macintosh 7300,
7500 or 7600 computer additional processing power. You install
the upgrade card in the CPU card slot in your computer.
This section will instruct yo on how to:
• Remove the cover from you computer
• Remove expansion card retainer
• Remove current CPU card
• Install the MACh Speed G3 Upgrade Card
• Replace the expansion card retainer
• Replace the computer cover
Attaching the anti-static wrist strap
This chapter explains how to remove the CPU card currently
inside your computer and replace it with the MACh Speed G3
Upgrade Card.
Installing the CPU card is technically challenging. If you prefer,
you can ask an Apple-authorized dealer or service provider to
install it for a fee.
If you attempt to install the card yourself but experience difficulties, it is recommended that you have an Apple-authorized service
provider complete the process. Apple does not warranty damage
caused by improper removal or installation of CPU cards.
1. Prepare the system and work area.
•Prepare your work area by ensuring that you have a well
lighted space, preferably not on carpet (less static), and
away from all magnetic devices.
• Put on the anti-static wrist strap, as instructed earlier.
• Turn off the computer and disconnect all cables.
Chapter 2 - Installing the MACh Speed G3 Upg rade Car d
Page 10
Chapter 2 - Installing the MACh Speed G3 Upg rade Car d
Page 11
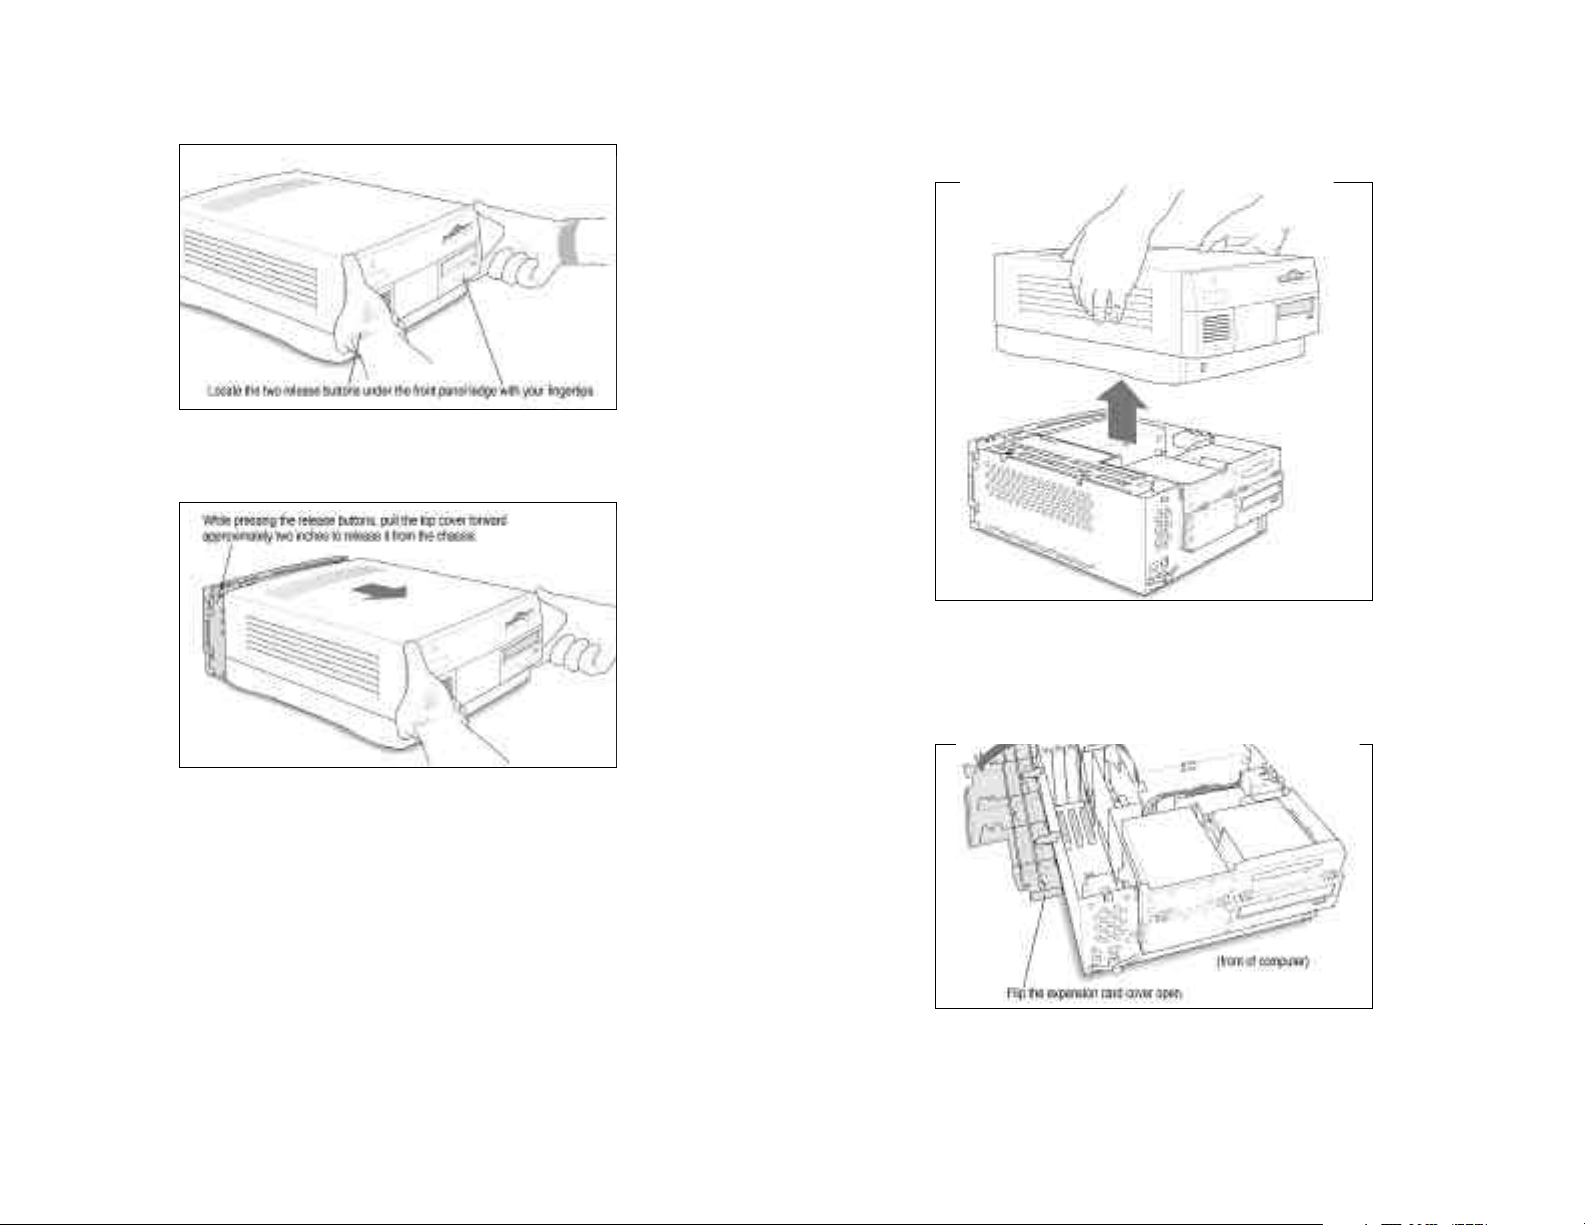
2. Press the two release buttons under the front panel and slide the
cover toward you approximately two inches.
Pressing the release buttons
3. Remove the cover from the computer.
• After you’ve slid the cover forward about two inches, lift it
straight up and off the computer.
Lifting the cover off.
Sliding the cover towards you
Chapter 2 - Installing the MACh Speed G3 Upg rade Car d
Page 12
4. Flip the expansion card cover open
Flopping the cover open
Chapter 2 - Installing the MACh Speed G3 Upg rade Car d
Page 13
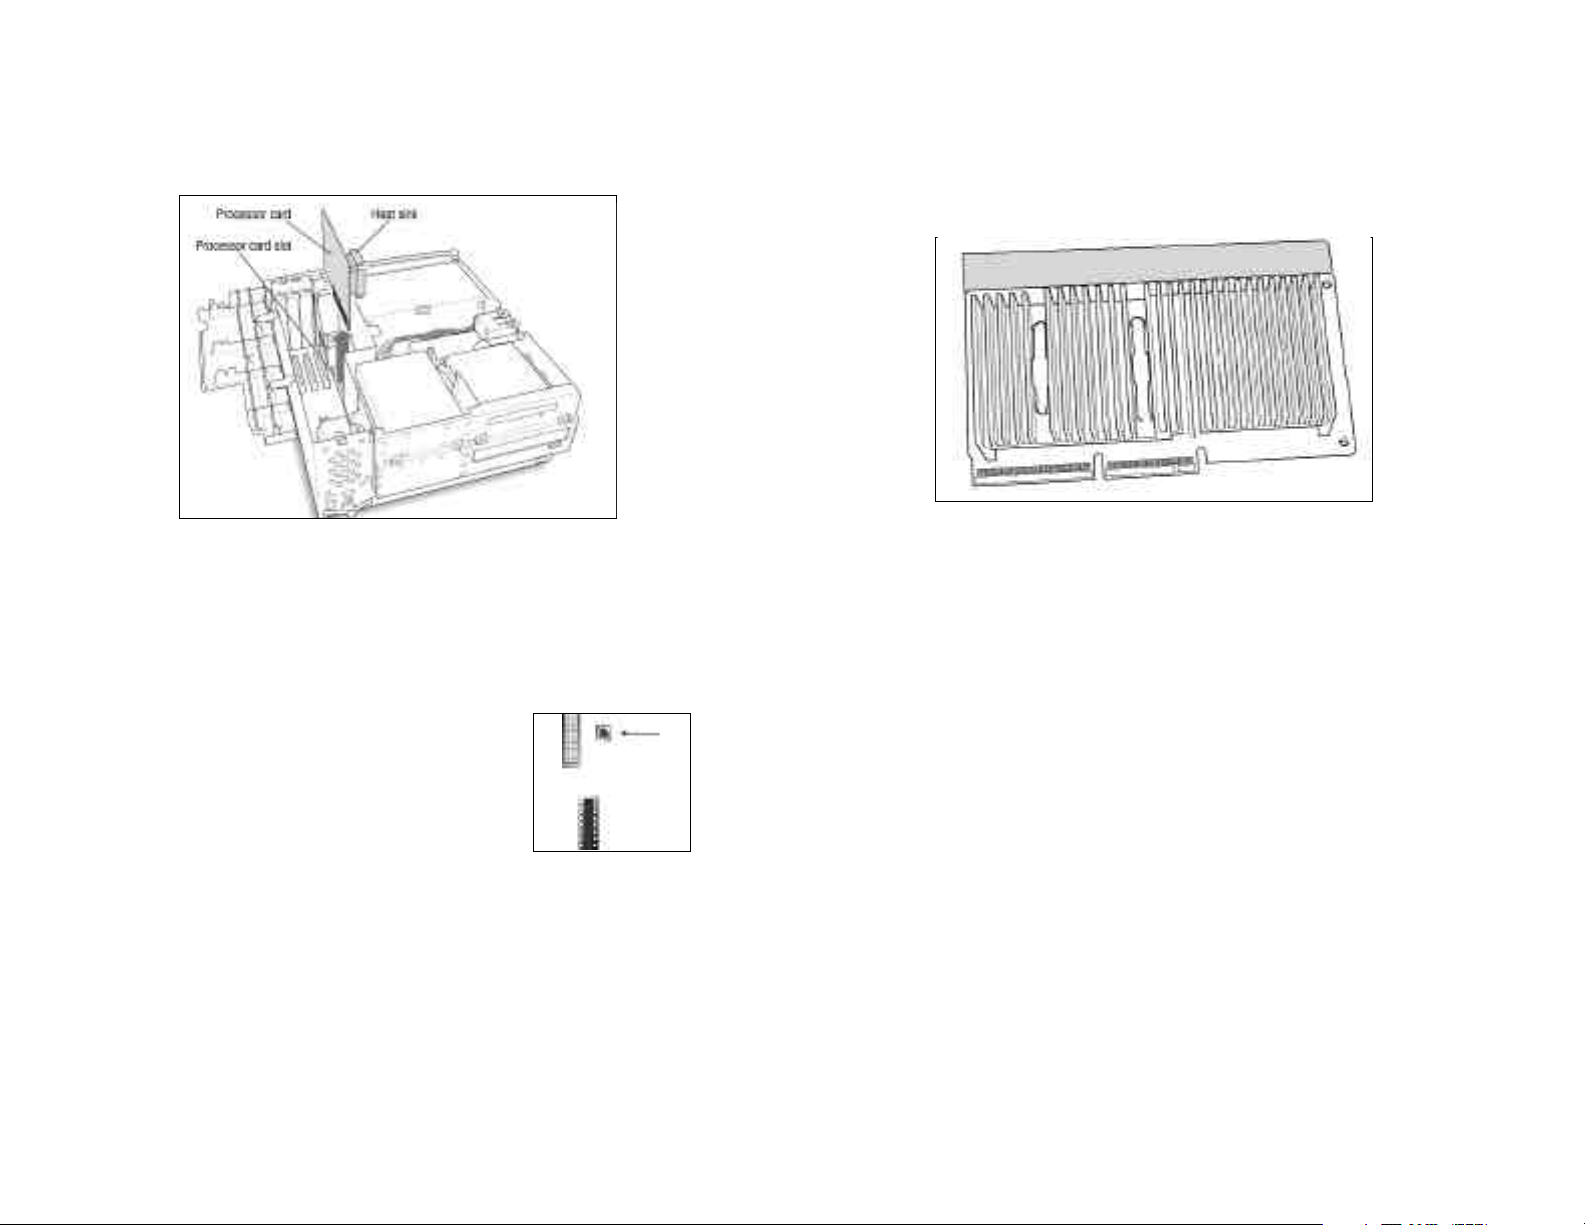
5. Remove the CPU card that’s in the computer now.
• Pull the card straight up without rocking it side-to-side.
Do not pull on the heat sink because you may damage the
card or your computer.
7. Remove the MACh Speed G3 from its protective package.
• Now that you are grounded, you can remove the MACh
Speed from its protective package.
• Inspect the card for any irregularities or possible damage
in shipment.
Removing the CPU card
6. Reset the motherboard, by depressing the CUDA switch.
• Located directly below the CPU card slot lies the motherboard reset switch, or CUDA. it is a small red button.
• Depress this switch for 5 seconds with a
small tool or pen point. failure to complete this instruction may cause the
CPU not to be recognized when booted
up for use.
Inspecting the MACh Speed G3
reset button
Chapter 2 - Installing the MACh Speed G3 Upg rade Car d
Page 14
Chapter 2 - Installing the MACh Speed G3 Upg rade Car d
Page 15
8. Install the MACh Speed G3 into your system.
IMPORTANT: Handle by the edges only! Do not push
down on the heat sink. Doing so may damage the card
and/or computer. Excessive force is not needed to seat the
card. if steady, gentle pressure does not work, pull the
card out and insert again.
• The MACh Speed G3 Upgrade will face the same direction as the older card that you just removed. In most cases
this is with the heat sink towards the Power Supply. The
connector is designed to fit only one way.
•Holding the card by the edges (do not depress the heat
sink), insert, into the connector without twisting or rocking.
• You may feel the card going into the slot in two stages: the
first row of contacts slides in, and then the second row. Be
sure that you push the card all the way into the slot.
• When the card is properly installed, you cannot see any of
the gold contacts.
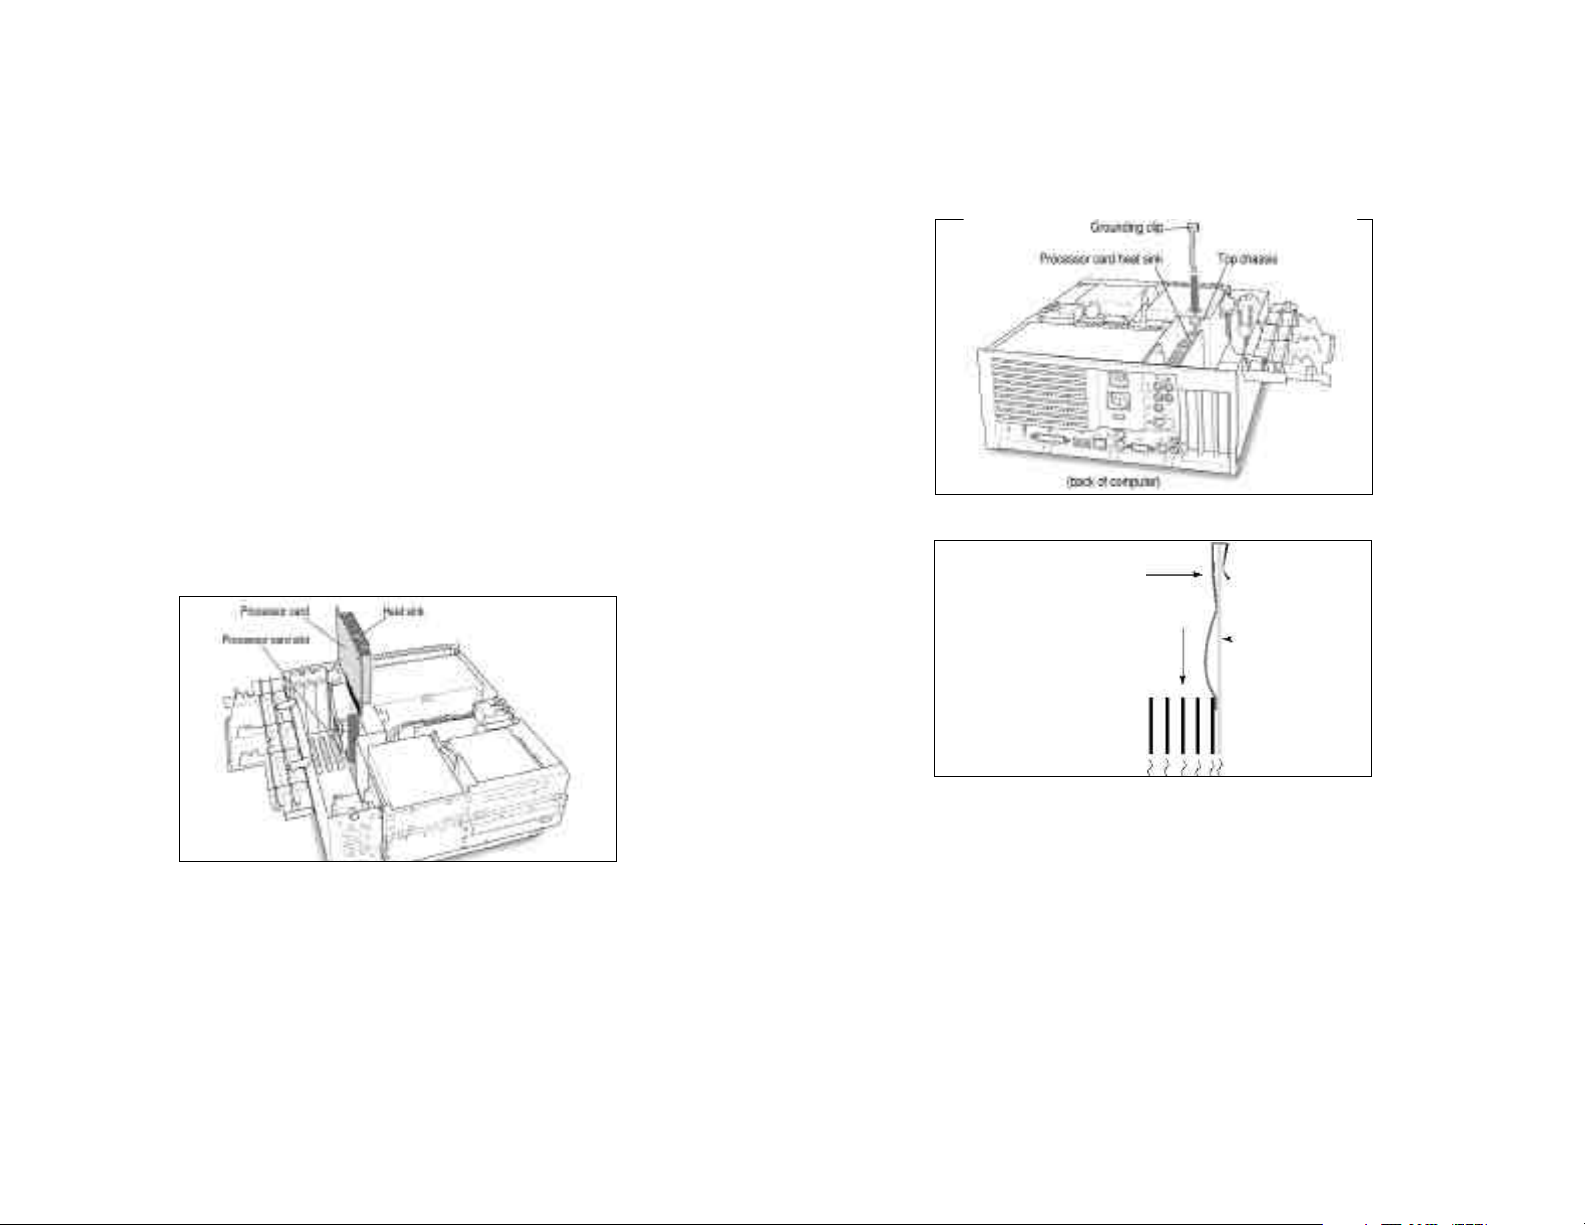
9.
Install the grounding clip.
• The clip slides over one wall of the top chassis. Make sure
the grounding clip also touches the CPU card heat sink.
NOTE: If your Mac does not have a Grounding Strap,
ignore this step.
Installing the grounding clip
clip attached
to wall
expansion
MACh Speed G3
Upgrade Card
wall
Installing the MACh Speed G3 Upgrade Card
Chapter 2 - Installing the MACh Speed G3 Upg rade Car d
Page 16
clip contacts card
and wall
Cutaway view of the installed grounding clip
Chapter 2 - Installing the MACh Speed G3 Upg rade Car d
Page 17

10
.Close the expansion card cover and snap it into place
• If the cover won’t close, make sure the CPU card has
been inserted all the way into the connector.
Closing the expansion card cover
11
.Boot your Mac to test the Card/installation.
• Check that you get a successful boot up “chime”, ensuring
that the card is well seated and working.
• Simply plug the power cord and keyboard into the Mac,
and start up the Mac. Once you have verified the “chime,
you can disconnect power, and complete the card installation. If you do not hear a “chime”, refer to Chapter 5 Tech Support.
12.
Replace the cover on the computer
Closing the cover
Snapping the cover into place
13
.Reconnect all cables.
Chapter 2 - Installing the MACh Speed G3 Upg rade Car d
Page 18
14
.Package the old CPU card for later.
• Put the used card into MACh Speed anti-static bag. If you
ever have a problem, it may be handy to be able to use
the old card while troubleshooting the system.
15
Reboot your system and work faster than ever before!
• Proceed to Chapter 3 - Installing Softwar e
Chapter 2 - Installing the MACh Speed G3 Upg rade Car d
Page 19
 Loading...