

Page 1
ITA-200 Quick Installation Guide
Copyright © InterEdge Technologies, LLC. All Rights Reserved. ITA-200 QIG Rev. 2.0-081505
This Quick Installation is meant to help you to install the product easily and quickly. For
detailed instructions on installation, configuration, and further setup options, please
consult the Technical Reference Manual.
Package Contents
One Intelligent Telephone Adapter
Model ITA-200
One Power Adapter +12Volts DC, 500 mA
One RJ-45 Ethernet Network Cable
Quick Installation Guide
Intelligent Telephone Adapter
Model ITA-200
Quick Installation Guide
Page 2
ITA-200 Quick Installation Guide
Copyright © InterEdge Technologies, LLC. All Rights Reserved. ITA-200 QIG Rev. 2.0-081505
1
Connect the ITA-200
A
Before you begin, make sure that you have
the setup information for your specific type of
internet connection.
B
Make sure that all of your network’s
hardware is powered off, including PCs,
ITA-200, and cable or ADSL modem.
C
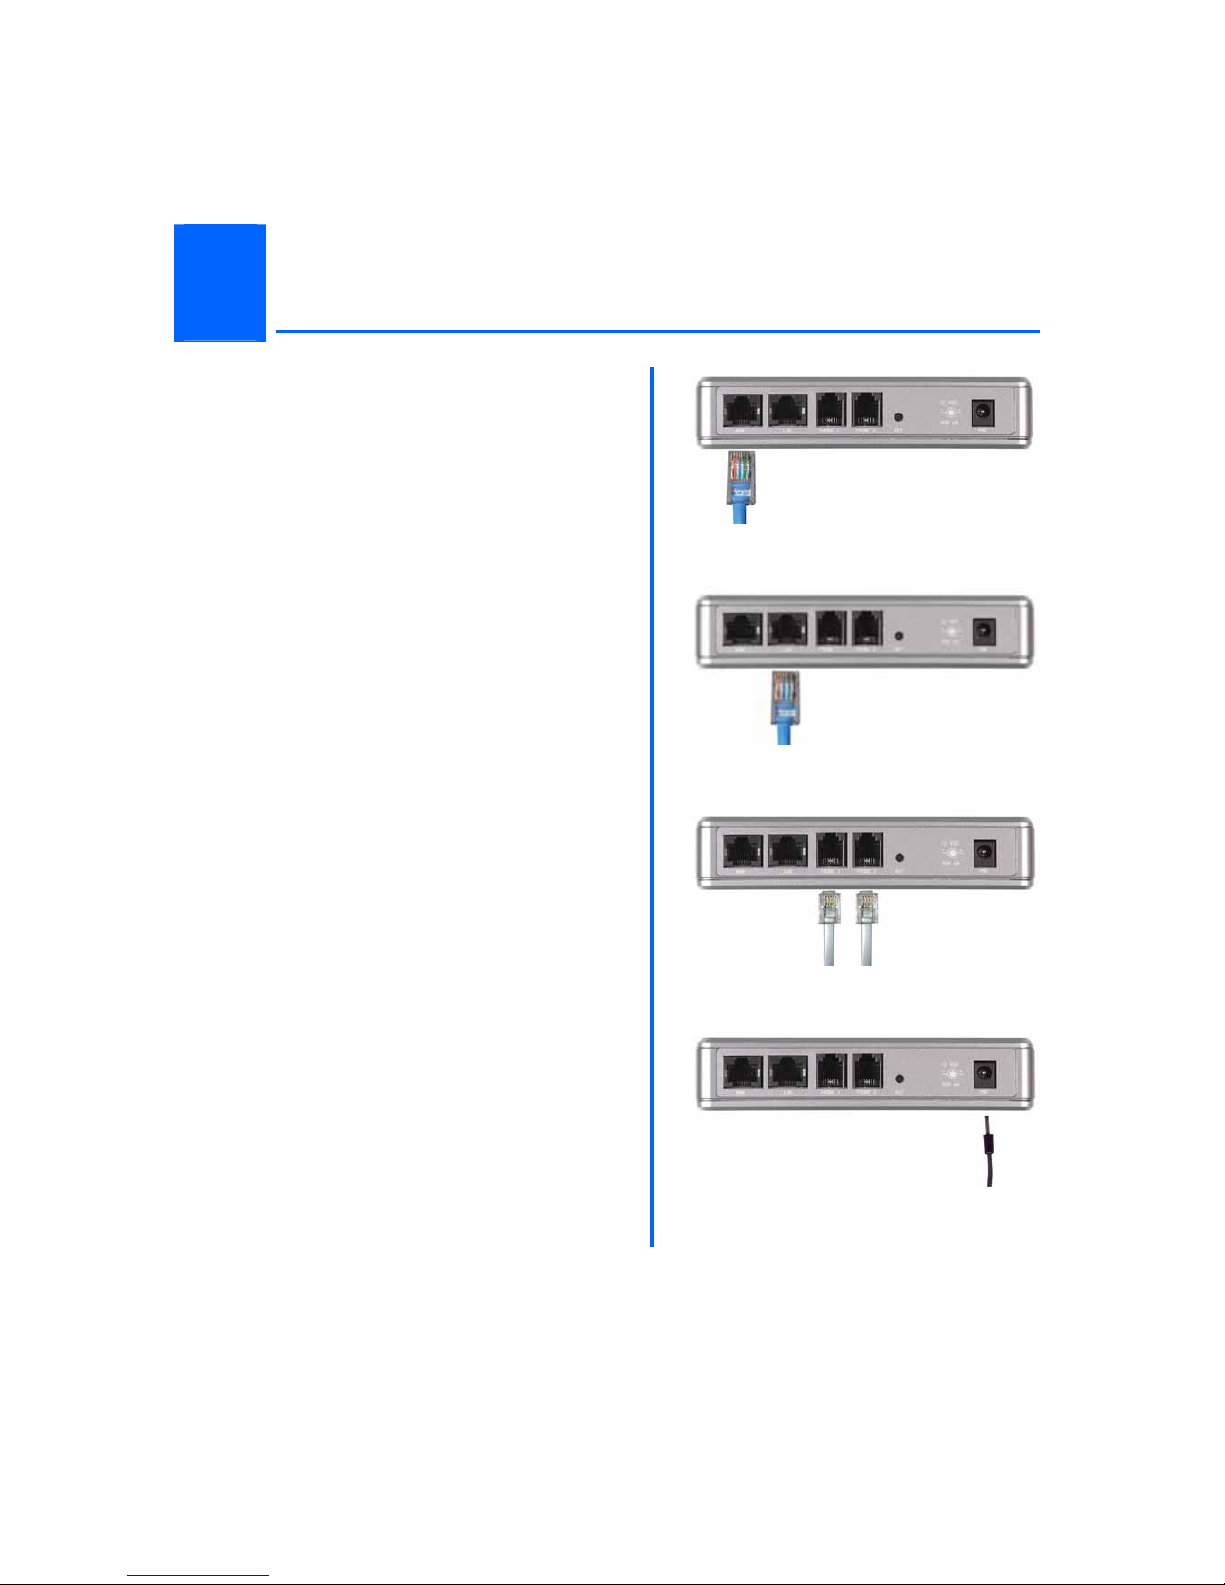
Connect one end of the included Ethernet
network cable to the WAN port, and the
other end to the Ethernet port of the cable/
ADSL modem or Ethernet connection.
D
Connect one end of another Ethernet
network cable to the LAN port of the device,
and the other end to the Ethernet adapter on
your PC.
E
Connect two analogue telephone sets to the
Phone ports 1 & 2.
F
Connect the AC Power Adapter to the Power
and the other end into an electrical outlet.
G
Power on the following devices in this order:
PC, ITA-200 and cable or ADSL modem,
router.
C
D
E
F
Important:
Make sure to use the power adapter that is supplied with ITA-200. The use of different
power adapter could damage the ITA-200.
Page 3
ITA-200 Quick Installation Guide
Copyright © InterEdge Technologies, LLC. All Rights Reserved. ITA-200 QIG Rev. 2.0-081505
2
Configuring the ITA-200
These instructions will show you how to configure the ITA-200.
A
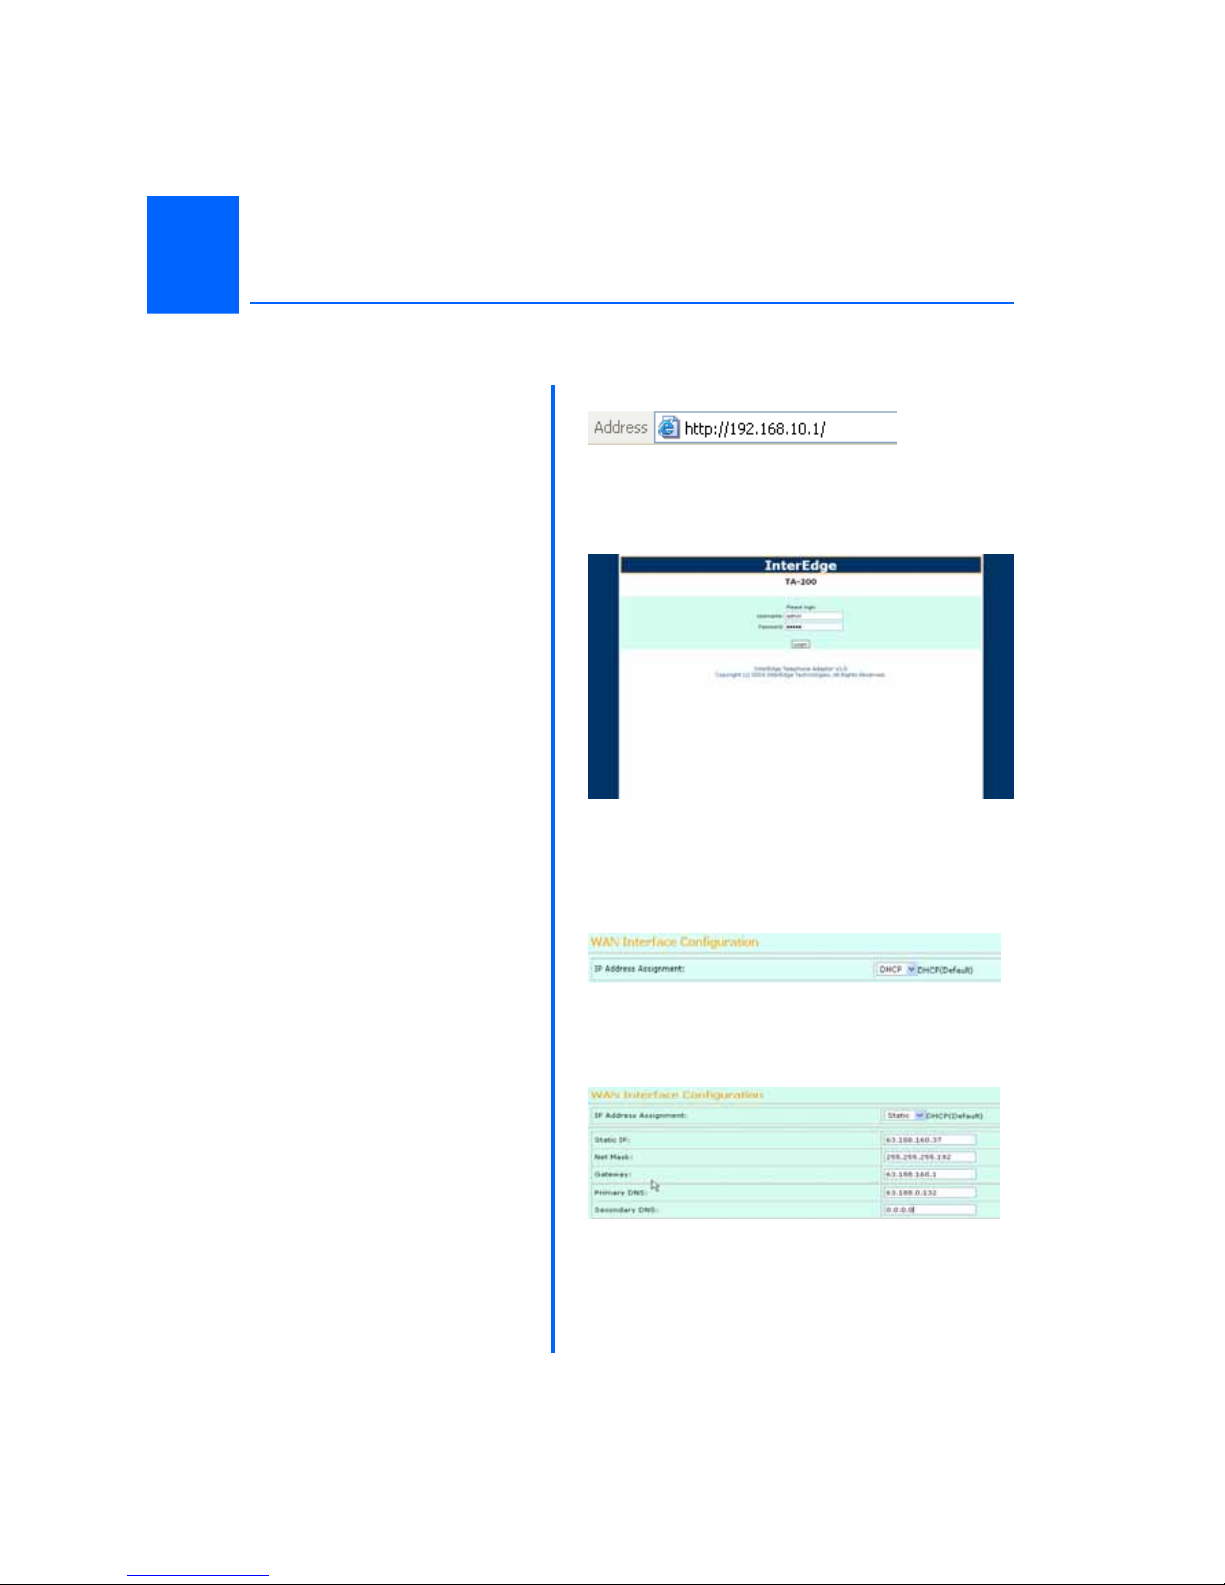
Open the web browser in your PC.
Enter http://192.168.10.1 in its
Address field. Press the Enter key.
B
A login screen will appear. Enter the
default Username, admin and
Password, admin, in lowercase
letters in the Username and
Password fields. (For added
security, you should later set a new
password in the Maintenance tab).
Then click the Login button.
C
For the WAN/ LAN Configuration,
three connections types are offered
though the drop-down menu. Each
setup screen and available features
will differ depending on which
connection type you select.
Internet Configuration Type
Automatic Configuration – DHCP:
If you are connecting through
DHCP or a dynamic IP address
from your ISP, keep this default
setting. (C1)
Static: If your ISP assigns you a
static IP address, select Static IP
from the drop-down menu.
Complete the Internet IP address,
Subnet Mask, Gateway and DNS
fields. You need to enter at least
one DNS address. (C2)
A
B
C1
C2
Page 4
ITA-200 Quick Installation Guide
Copyright © InterEdge Technologies, LLC. All Rights Reserved. ITA-200 QIG Rev. 2.0-081505
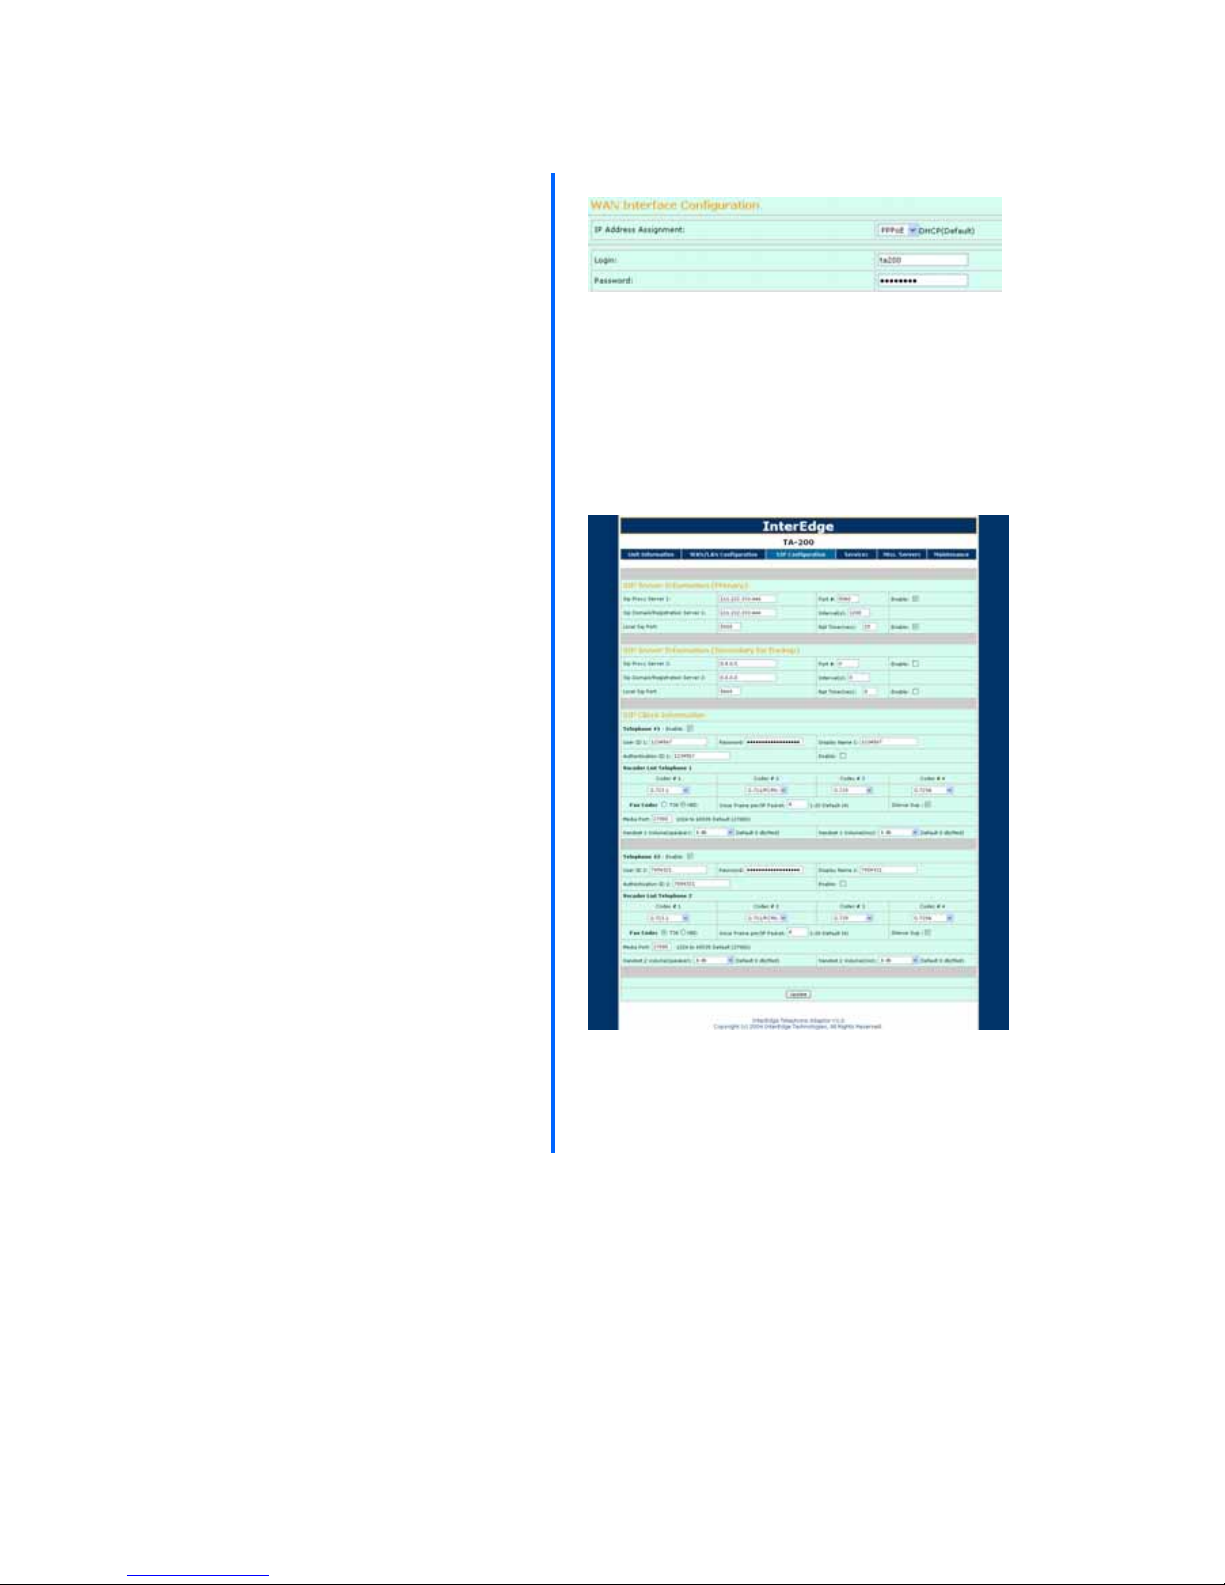
PPPoE: if you are connecting
through PPPoE, select PPPoE
from the drop-down menu.
Complete the Username and
Password fields. (C3)
D
When you are finished entering your
Internet connection settings, click on
the Update button to save your
changes.
C3
E
If the user wants to obtain full
access to all the web pages to
configure SIP and other server
information, he has to enter the
super password in the password
field. Super password is created
using the following combination,
the last 2 digits of the MAC
address plus the 7
th
and 8th digits
of the MAC address followed by
ieta200.
For example:
MAC address =
000f26001f88
the password will be 8800ieta200
password is in lower case.
To configure the VoIP Number, go to
the SIP Configuration tab. Enter the
SIP Proxy, VoIP number and
password field. Click on the Update
button to apply your changes.
F
Reset ITA-100 to save the settings.
E
 Loading...