


FM246 -Generation II FM413 -Generation II
R
R
This photo shows FM246 -Generation II in Black color.
USER MANUAL

NOTES

Safety Instructions
Warning: To prevent fire or shock hazard. Do not expose this
unit to rain or moisture.
The lighting flash with an
arrowhead within a triangle
alerts you to uninsulated
dangerous voltage within the
product's enclosure that
could cause an electric shock
The lighting flash with an
arrowhead within a triangle
alerts you to uninsulated
dangerous voltage within the
product's enclosure that
could cause an electric shock
The lighting flash with an
arrowhead within a triangle
alerts you to uninsulated
dangerous voltage within the
product's enclosure that
could cause an electric shock
The lighting flash with an
arrowhead within a triangle
alerts you to uninsulated
dangerous voltage within the
product's enclosure that
could cause an electric shock
The lighting flash with an
arrowhead within a triangle
alerts you to uninsulated
dangerous voltage within the
product's enclosure that
could cause an electric shock
The lighting flash with an
arrowhead within a triangle
alerts you to uninsulated
dangerous voltage within the
product's enclosure that
could cause an electric shock
The lighting flash with an
arrowhead within a triangle
alerts you to uninsulated
dangerous voltage within the
product's enclosure that
could cause an electric shock
The lighting flash with an
arrowhead within a triangle
alerts you to uninsulated
dangerous voltage within the
product's enclosure that
could cause an electric shock
The lighting flash with an
arrowhead within a triangle
alerts you to uninsulated
dangerous voltage within the
product's enclosure that
could cause an electric shock
The lighting flash with an
arrowhead within a triangle
alerts you to uninsulated
dangerous voltage within the
product's enclosure that
could cause an electric shock
The lighting flash with an
arrowhead within a triangle
alerts you to uninsulated
dangerous voltage within the
product's enclosure that
could cause an electric shock
The lighting flash with an
arrowhead within a triangle
alerts you to uninsulated
dangerous voltage within the
product's enclosure that
could cause an electric shock
The lighting flash with an
arrowhead within a triangle
alerts you to uninsulated
dangerous voltage within the
product's enclosure that
could cause an electric shock
The lighting flash with an
arrowhead within a triangle
alerts you to uninsulated
dangerous voltage within the
product's enclosure that
could cause an electric shock
The lighting flash with an
arrowhead within a triangle
alerts you to uninsulated
dangerous voltage within the
product's enclosure that
could cause an electric shock
The exclamation point
within a triangle alerts you
to pressence of important
operating, maintenance
and servicing instructions
in this user's manual.
The exclamation point
within a triangle alerts you
to pressence of important
operating, maintenance
and servicing instructions
in this user's manual.
The exclamation point
within a triangle alerts you
to pressence of important
operating, maintenance
and servicing instructions
in this user's manual.
The exclamation point
within a triangle alerts you
to pressence of important
operating, maintenance
and servicing instructions
in this user's manual.
The exclamation point
within a triangle alerts you
to pressence of important
operating, maintenance
and servicing instructions
in this user's manual.
The exclamation point
within a triangle alerts you
to pressence of important
operating, maintenance
and servicing instructions
in this user's manual.
The exclamation point
within a triangle alerts you
to pressence of important
operating, maintenance
and servicing instructions
in this user's manual.
The exclamation point
within a triangle alerts you
to pressence of important
operating, maintenance
and servicing instructions
in this user's manual.
The exclamation point
within a triangle alerts you
to pressence of important
operating, maintenance
and servicing instructions
in this user's manual.
The exclamation point
within a triangle alerts you
to pressence of important
operating, maintenance
and servicing instructions
in this user's manual.
The exclamation point
within a triangle alerts you
to pressence of important
operating, maintenance
and servicing instructions
in this user's manual.
The exclamation point
within a triangle alerts you
to pressence of important
operating, maintenance
and servicing instructions
in this user's manual.
The exclamation point
within a triangle alerts you
to pressence of important
operating, maintenance
and servicing instructions
in this user's manual.
The exclamation point
within a triangle alerts you
to pressence of important
operating, maintenance
and servicing instructions
in this user's manual.
The exclamation point
within a triangle alerts you
to pressence of important
operating, maintenance
and servicing instructions
in this user's manual.
TO REDUCE THE RISK OF
ELECTRIC SHOCK DO NOT
REMOVE COVER (OR BACK) NO
USER SERVICEABLE PARTS
INSIDE. REFER SERVICING TO
QUALIFIED PERSONNEL.
RISK OF ELECTRIC SHOCK
DO NOT OPEN
CAUTION
1. Read these instructions.
2. Keep these instructions.
3. Read all warnings.
4. Follow all instructions
5. Do not use this device near water.
6. Clean only with a dry cloth.
7. Do not block any ventilation openings. Install in accordance with the
manufacturer's instructions.
8. Do not install near any heat sources such as radiators, heat registers,
stoves, or other
9, Do not tamper with the polarized & Grounding plug. Each blade of the plug
has a special purpose for seamless communication & safety. A grounding
type plug has two blades and a third grounding prong.
10. Protect the power cord from being walked on or pinched particularly at
plugs, convenience receptacles, and the point where they exit from.
11. Only use attachments/accessories specified by the manufacturer.
12. Use only with the cart, stand, tripod, bracket, or table specified by the
manufacturer, or sold with the product. When moving the cart/product
combination to avoid injury from tip-over (When applicable).
13. Unplug this product during lightning storms or when unused for a long
periods of time.
14. Refer all servicing to qualified service personnel. Servicing is required
when the product has been damaged in any way, such as power-supply
cord or plug is damaged, liquid has been spilled or objects have fallen
into the product, the product has been exposed to rain or moisture, does
not operate normally, or has been dropped.
15. This product shall not be exposed to dripping or splashing water and that
no object filled with liquids such as vases shall be placed on the product.
Liquid damage is not covered by warranty.
16. Mains plug is used as disconnect device and it should remain readily
operable during intended use. In order to disconnect the apparatus from
the mains completely, the mains plug should be disconnected form the
mains socket outlet completely.
17. Caution marking is located at the bottom of device.
18. The marking information is located at the bottom of device.
Important Safety Instructions
1
Knowledge Base
* The term "wireless" is a branding employed by those BIG retailers from
over 20 years ago. The official product name is Power-line Intercom
System.
* If you cannot insert the 3 pronged plug to your outlet that means the
wiring at your house is not meeting the System Requirement. Do not
attempt to alter the power cord or the plug. Use the 3 prong to 2 prong
adapter and set up the system like a Traditional 2 pronged system (see
Solution 1: Electrical Wirings on page 9)
* There are no fixed rules on how to utilize the channels. It can be used
as all paging, monitoring or unit to unit per designated channel
communicating. Combinations can be 2 sets of 3 channel twin sets &
makes it six units, or one twin units 4 channel sets. Some users would
believe the number of channels = to the number of units. This is not
exactly true.
* Power-line Intercom Systems communicate via the power-lines of the
house; therefore, it has further distance than a Radio wave Frequency
intercom, which is free from building material obstruction like concrete.
* Power-line Intercom Systems use the AC power line as the medium. It
is subject to any interference already existed in the power-lines, such
as your AC AM Radio. There is NO defectiveness with the system.
* Static & noise interferences were fed into the power-lines by bad
appliances with characteristics of hums, buzz, sizzle or roar
punctuated by pops & crackles. About 8 to 10% of the households are
affected by these Interferences. Power-line intercoms rely on powerlines for communication. Interference affects 1 maybe 2 channels on
the whole spectrum of the bandwidth. To meet the challenges, multichannel intercoms were created as a solution for users to pick a clean
channel for the monitoring purpose.
* Dual Phase AC wiring is defined as one 220 volts service drop from the
utility company coming in to the building. The 220 volts are divided into
two phases of 110 volts each with half the building wired on one phase
and half on the other to even out the load. In an optimal scenario, the
upper outlet is phase one & the lower outlet is phase two. Dual Phase
wiring affects all buildings in North America.
* Power meter: In general utilities supply & billing, one household should
have only one power-meter. Multiple power meter situations is common
in some commercial units, when the tenant rents 2 units & joins them as
one. In a residential situation, multiple power meters are possible with
duplex, shops & multi-units rental businesses. All power-line Intercoms
transmit & receive within one power meter. This is a major security
feature.
12

READ THIS BEFORE OPERATING YOUR UNIT
Units shipped to North America are designed for operation on
120 V AC only.
Safety precaution with use of a polarized AC plug.
Improper extension cords are a major cause of fatalities. The
fact that the equipment operates satisfactorily does not imply
that the power source is grounded and that the installation is
completely safe.
For your safety, if in any doubt about the effective grounding of
the power source, consult a qualified electrician.
The power supply cord should be routed so that they are not
likely to be walked on or pinched by items placed upon or
against it.
Never take hold of the plug or cord if your hand is wet, always
grasp the plug body when connecting or disconnecting it.
To reduce the risk of fire and electric shock, do not expose this
product to water, rain, splashing, dripping or moisture.
Do not use this product near water - for example bathtub, sink
etc.
When the unit is not used for a period, turn the power off and
unplug it from the outlet.
Do not attempt to modify this product in any way without written
authorization from Intercom Central. Unauthorized modification
could void the user's authority to operate this product
To prevent electric shock, match the wide blade of the plug to
the wide slot ONLY, fully insert.
To ensure safe operation, the three-pin plug supplied must be
inserted only into a standard three-pin outlet which is
effectively grounded throughout the building's wiring.
Extension cords used with the equipment must be three-core,
three prongs and be correctly wired. If the plug should fail to fit
into the socket/outlet, contact a licensed electrician to replace
the old and obsolete outlet. Do Not TAMPER with the plug.
2
Solution:
Locating the Source of Interference
The only way to eliminate the noise is to locate the source. The system is
NOT Defective
Scenarios Cause Action
A device was being
turn on at that
moment. One of
such candidate
would be a
microwave oven.
* Not all microwaves
are bad.
1. Find out what device
was being used at the
time when the
interference occurred.
2. Replicate the scenarios.
Avoid using that device
where the intercom is
engaged.
3. use a different Channel
The system is NOT
defective
Interference &
noise happened at
a certain period of
time. For example
evening & night
time or vice versa
A CFL ( fluorescent
bulb) ) using a noncompatible timer
was turned on
because of a preset
schedule
Other device being
turn-on at a specific
schedule
1. Replaced the CFL non-
compatible timer with a
compatible model.
2. Replace the CFL light
with a traditional
incandescent bulb
3. Mark the time when the
statics starts & check
the devices in the
building to see what
was being scheduled to
turn on at that time
4. Use a different channel
The system is NOT
defective
Other Alternatives: Use the system in a different location
Interference &
noise occurred
intermittently
11

Solution 2: Power Meter
This is common in business offices when one or more units were
combined as one business. For the ease of management, the property
owner usually employed the "one meter per unit" policy. For the tenants,
they will end up with more than one meter.
The solution to this problem is to run an electrical wire from one meter to
the other meter, or use the system in a different location
Solution 3: Bad Unit
Troubleshooting - refer to the 4 steps in "Troubleshooting a Bad unit" on
page 9.
DOA (dead on arrival): Contact us by email via your e-store (Amazon,
eBay, buy.com etc) for free replacement.
Warranty claim: Contact us by email via your e-store (Amazon, eBay,
buy.com etc) for free replacement.
Interference and Noise
(Recap of the disclosure from the "Knowledge Base" section of the
on-line sales page)
The Power-line intercom system communicates by using the power-line in
the building. It is subject to any interference already existed in the power-
line, just like your AC AM radio.
Static, noises and interferences will feed into power-lines by bad
appliances with characteristics of hums, buzz, sizzle or roar punctuated
by pops & crackles. About 8 to10% of the households are affected by
Interference. Interference usually affects 1 or maybe 2 channels on the
whole spectrum of the bandwidth. To meet the challenges, multi-channel
intercom was created as a solution for users to pick a clean channel for
communication. The most common appliances that create interference
are microwave ovens, hair dryers, motors and non compatible electrical
component combinations, like CFL non-compliance timers.
The only way to eliminate the noise is to locate the source. The system is
NOT Defective.
10
Provide the wiring in the premise is properly grounded at the third leg of
the socket & you have only ONE Power meter, the system will works off
the existing electrical wire of the building. There is NO radio wave in
operating the system. Therefore you are no longer limited by building
materials like "thick Walls". There is no need for socket matching (same
line) like the TRADITIONAL 2 pronged system does.
You can use all the wiring at the house vs. just half of the house with
the traditional 2 wire intercoms. Just simple plug and use.
Illuminate characters function switch enable dark and dim environment
usage.
Illuminate characters function switch enhance vision impaired
customers.
Red LED function buttons, White LED power button & Blue LED channel
buttons.
Direct access channel selector instead of the traditional analogue slide
/scroll switch.
Digital Control function Panel. No intermittence contact problem
Constant on monitor mode. Eliminate the voice activation problem of
missing out the first part of the conversation.
Multi-channels for designated station setting or for monitoring purpose.
Security- All conversation travel from outlets to outlets within the same
power meter of the building. No bugging and no eavesdropping.
Our Advance 3 Pronged G2 intercoms are specially designed with 3
pronged power cables (live, neutral & ground) to bridge the dual phases
of the electrical wirings for household & small business.
Features:
Included In the Box:
Intercoms
User Manual
Quick setup Guide
Troubleshooting Guide
Warranty:
All Intercom Central system carries a 12 month warranty.
Contacting Intercom Central:
Please utilize the internal email system of the on-line store where the
system is purchased. Please always include the Order ID issued by that
store for proper reference.
3
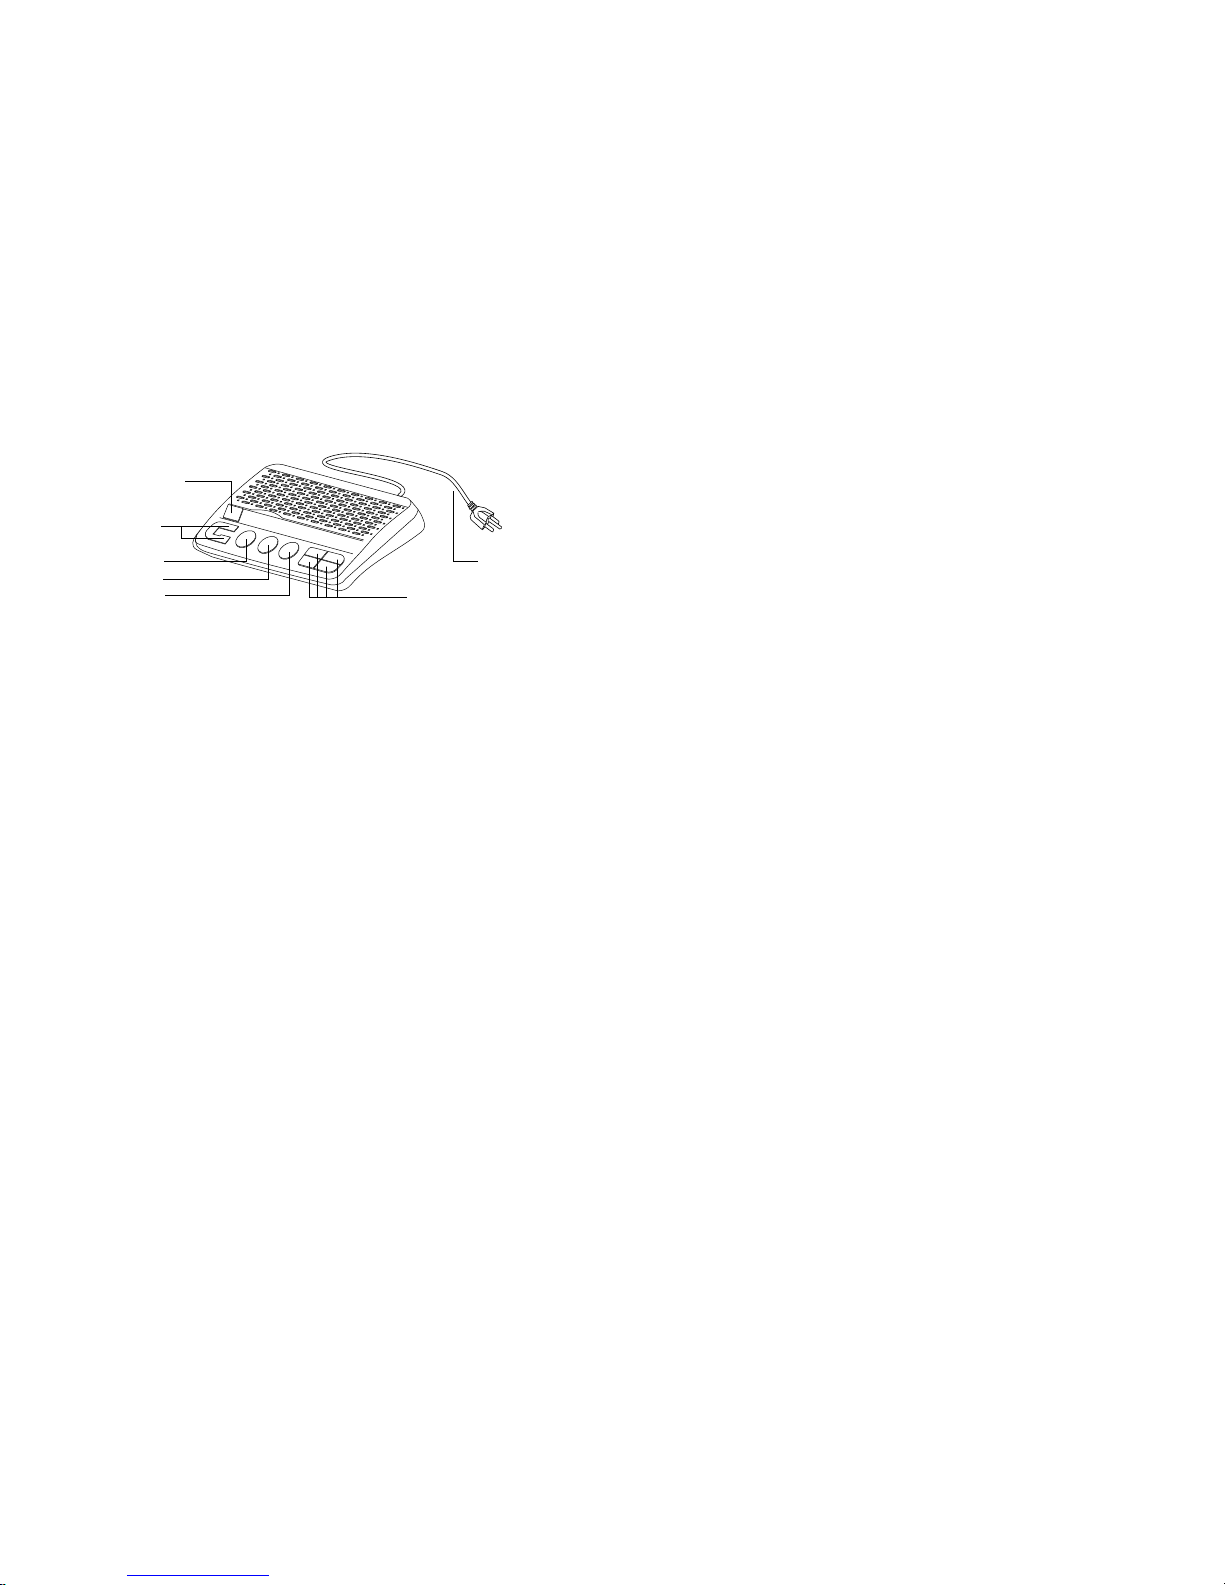
Getting to know the Intercom
Volume control
Lock
Talk
Call
Power button &
Power Indicator
Channel
3 Pronged
Power cord
Function Key Descriptions:
All Function Keys are illuminated by RED lights from underneath the
button. Illuminations are dim when de-activated and highlighted when
activated.
Power Button and Power Indicator:
Channel Keys
All Channel Keys are illuminated by BLUE lights from underneath the
button. Illuminations are dim when de-activated and highlighted when
activated.
When the intercom is powered on, the power indicator is illuminated in
WHITE.
4
Troubleshooting a Bad Unit
For any communication problem ranging from "right out of the box" or
having using the system for a while and changing locations, most of the
problem are caused by electrical wiring problem in the house. However
occasionally, a bad unit could also be the culprit. To isolate the problem,
please follow the following steps.
Solutions:
Solution 1: Electrical Wiring
Although the electrical wiring failed to meet the system requirements, you
can resolve the issue by setting up the system like a Traditional 2 wire
Intercoms by following these simple steps.
1) Set all units to the SAME channel. For example, channel 2
2) Plug the 1st unit to one of the outlets.
3) Adjust the unit to mid-volume. Feed a radio to the intercom as a sound
source.
4) Leave the 1st unit at its location. Never relocate the 1st unit.
5) Press the "lock" button on the 1st unit. This will activate the unit to
constant on.
6) Take the 2nd unit to another location. Make sure it is also on channel 2.
Adjust the unit to mid volume. If you can hear the radio from the 1st
unit, you have found the right outlet.
7) If you cannot hear the radio from the 1st unit, try plugging the 2nd unit
to other outlets from within the same location, e.g. the upper or lower
socket.
8) Repeat the same procedures for all the remaining units.
1. Plug all units into one SINGLE POWER STRIP. Set all units to the
same channel, e.g. channel 3. Adjust the volume for all units at midlevel to avoid feedback. Try communicating all units with each other
2. If anyone one of units that is not communicating while on the SINGLE
POWER STRIP, that unit IS defective. That unit must be replaced.
3. If all units are communicating. The system is NOT DEFECTIVE.
4. You can RESOLVE the above issue by following the Installation Steps
in Solutions #1 below. If you have performed the Installation Steps
and the system is communicating while on a power strip, but not at the
outlets throughout the house, please also check if you would have
more than one power meter. If you do, you can resolve the problem
with Solution #2.
** The test must be performed on a Single Power strip.
*** Never perform the test on any in-wall electrical outlets. Your test will
be affected by the dual phase wiring & therefore inconclusive.
** The Power strip is ONLY for TESTING purpose. NOT meant for
operations.
9

Don't s
Do not operate the system in a shared power meter environment.
Should there are more than one household sharing the power meter,
every households will have the same access to the conversation. There
will be neither privacy nor security if the system is operated in a shared
power meter environment.
No surge protector. It will degrade the system's performance
significantly.
Do not operate the system in an outdoor environment. This system is NOT
designed for outdoor operation.
Do not use 2 prongs extension cord. It will lose connections to the other
half of the house.
Do not tamper with this 3 prong plug. Each blade of the plug has a
special purpose for seamless communication. If your socket is not fit with
the plug, you are not meeting the system requirement (see System
Requirement on the sales page). You should
When Thing Gone Wrong - Troubleshooting & Solutions:
There are only THREE causes for communication problems.
1) Electrical Wirings. ** Power-line Intercoms rely on electrical wirings
to communicate with each other.
1) Set up the system as a Traditional 2 prong system (refer to solution #1
on page 9)
2) Contact a qualify electrician to upgrade the electric wire system in the
building.
Some houses were built before ground
pronged is required.
These old wirings were upgraded; but not
throughout the whole building.
The ground prong in the socket is not
grounded (connected)
All these can easily be identified
(troubleshoot) by using this 3-wire tester.
You can get it from Amazon, Home Depot &
OSH for a few dollars. Please keep the tester
should any of your home appliances fail in the
future. (To resolve wiring problems please
refer to Solution #1)
2) Power Meter: There is more than one meter in the service area.
(Solution #2).
3) Bad Units: one of the units is bad.
8
Power Line/Electiic Wire
Wall socket
Phase
one
Phase
two
Installation and Setup
Provided that the system requirements are met, setup and installation are
just simple plug and play. Simply plug the intercoms into any electrical
outlets and enjoy communications throughout the whole premises.
This power line communication device uses the electrical wiring from
inside the building. It DOES NOT require radio waves as the
communication is no longer limited to building materials, walls, etc. The
system communicates wherever the electrical wire goes.
System Requirement:
ALL electrical sockets are 3 pronged with the third prong properly
GROUNDED. 110V and 240 volts the SAME
Using the system from within ONE SINGLE power meter.
No Power meter sharing.
What would happen if my wirings are not GROUNDED???
Can I still use this system???
Yes, you can. You do need to set up the Advance 3 Prong as a Traditional 2
pronged system. Please refer to the Troubleshooting and Solution
section on page 9. Without the ground wire, the dual phases of the
electric wires can no longer be bridged. You can only use one of the two
phases in your electrical wire.
5
Electric-wire
Outlet Tester

Using the Function Keys:
Volume:
Press the + to increase the volume and a beep corresponding to the audio
level will sound every time when the + is pressed.
Press the to decrease the volume and a beep corresponding to the
audio level will sound every time when the - is pressed.
The beeps will stop after the level reaches the max & the min.
LOCK:
Press the LOCK button to engage into monitor mode. In the monitor
mode the system is constantly on.
We have replaced voice activation with constant on. There is no need
to raise your voice to activate the mode anymore. Constant-on eliminates
such problems like missing the first part of the conversation which is a
common defect among voice activation design. It also eliminates the
problem of not triggering the voice activation if the sound is not loud
enough. Only one party is able to engage in the monitor mode at any given
time. To talk to the party being monitored, the LOCK button at the
monitored unit must be disengaged. Depress the LOCK button or pressing
any function button will de-activate the LOCK mode.
TALK:
Press the TALK button to initiate a conversation. Depress the button to
wait for the reply.
CALL:
Press the CALL button to "ring" your intended party. A ring tone is
generated to the intended party that you are calling. Depress the button to
terminate the ringing.
Standby:
Idling all function buttons (LOCK, TALK, and CALL) will put the system
into a standby mode such as waiting for incoming communication
6
Using The Channel Keys & Channel Setup
Set all units to the same channel for Pan-Paging Communication Mode.
Functionality:
Any time when the LOCK, TALK & CALL function is pressed, the
conversation will be sent to all units on the same channel.
Recommended Usage:
1) Use in a PA system setup
2) Baby monitor throughout the whole system
Dedicated Communication:
Set each unit to different channels for designated communication
Functionality:
Any time when the LOCK, TALK & CALL button is pressed, the
conversation will only be sent to the unit that is on that designated
channel.
Recommended Usage:
For different parts of the household or different departments in the
business
Mixed Mode Communication:
Set some units on the same channel, while the remaining units on
different Channels.
Functionality:
Any time when the LOCK. TALK & CALL button is pressed, the
conversation will be sent to designated unit on the same channel. When
the conversation is ended, you can go back to monitoring channel.
Recommended Usage:
Set one unit in monitor mode on one channel. Set all remaining units to
other designated channels. From any of the remaining units, you can
switch the channel back and forth & use the system as monitors and
designated communicators.
7
Pan-paging Communication:
 Loading...