

Ultra SAM4W User Guide V1.3
I
Ver1.3
Ultra SAM4W
(Enhanced Software)
User Guide

Ultra SAM4W User Guide V1.3
II
Ver1.3
Revision History
Version
Modified By
Date
Description
1.0 21/11/2013
Initial version
1.1 12/02/2014
Second Release
1.2 11/09/2014
Third Release
1.3
AMSabangan
15/09/2015
Fourth Release

Ultra SAM4W User Guide V1.3
II
Ver1.3
Using this Manual
Thank you for purchasing the UltraSAM4W. The UltraSAM4W is an Industrial 3G/4G Ethernet router. It performs data
communication functions between a wired Local Area Network (LAN) and the WCDMA 3G/4G cellular network (Wide
Area Network WAN). It can access the World Wide Web through the 3G/4G network.
This manual provides information relating to the installation, operation, and application of UltraSAM4W device.
If you find the product to be broken or malfunctioning, please contact technical support for immediate service by
email at www.intercel.com.au/contact
For product updates, manual revisions, or software upgrades, please visit our website at www.intercel.com.au,
access our DOWNLOADS page.
Copyright
Copyright @ 2014 Intercel. All rights reserved.
This manual is protected under international copyright laws.
No part of this manual may be reproduced, distributed, translated, or transmitted in any form or by any means, electronic or mechanical, including
photocopying, recording, or storing in any information storage and retrieval system, without the prior written permission of Intercel.
Cautions
This product should be operated only from the type of power source indicated on the product label.
This product operated on 12V DC power supply with 1.5A current limit.
Do not open this product.
Do not operate this product near/under water.
Do not place or operate this product near or over a radiator or heat register.
Do not expose this product to dampness, dust or corrosive liquids.
This product should be kept 25cm or more away from the human body.
This product should not be carried by hand during operation.
This product should work in a good ventilation environment. Insufficient airflow may harm the product.
This product shall not be installed inside metal cases.
Unplug the product from the power supply when cleaning or assembly changing.

Ultra SAM4W User Guide V1.3
1
Ver1.3
Contents
1 Introduction ..........................................................................................................................................................4
1.1 Overview............................................................................................................................................................4
1.2 Features ............................................................................................................................................................4
1.3 Packing List/Accessories ................................................................................................................................4
1.4 Optional Accessory ..........................................................................................................................................4
2 Hardware Description ........................................................................................................................................5
2.1 Front Panel........................................................................................................................................................5
2.1.1 Front Panel LEDs .....................................................................................................................................5
2.1.2 Logos Indication........................................................................................................................................5
2.2 Right Side Panel ..............................................................................................................................................6
2.3 Left Side Panel .................................................................................................................................................7
2.4 Back Panel ........................................................................................................................................................7
3 Installation Instructions ......................................................................................................................................8
3.1 SIM Card Installation .......................................................................................................................................8
3.2 Antenna, Ethernet & Power Plug Connection ..............................................................................................9
4 Specification ......................................................................................................................................................10
4.1 Physical ...........................................................................................................................................................10
4.2 Environment ....................................................................................................................................................10
4.3 Power supply input.........................................................................................................................................10
4.4 Interfaces .........................................................................................................................................................10
4.5 3G/4G/GPRS Radio.......................................................................................................................................11
5 Web Interface ....................................................................................................................................................12
5.1 Login User Interface ......................................................................................................................................13
5.2 Logout User Interface ....................................................................................................................................13
5.3 Quick start up configuration ..........................................................................................................................14
5.4 Expanded Index Menu (EIM)........................................................................................................................15
5.5 Status Menu Page .........................................................................................................................................16
5.5.1 Hardware Configuration ........................................................................................................................16
5.5.2 LAN ...........................................................................................................................................................16
5.5.3 WWAN .....................................................................................................................................................16
5.5.4 PPPoE ......................................................................................................................................................16
5.5.5 Ipsec .........................................................................................................................................................17
5.5.6 PPTP ........................................................................................................................................................17
5.5.7 Network Connection ...............................................................................................................................17
5.6 Internet Setting > Mobile Network Configuration .......................................................................................18

Ultra SAM4W User Guide V1.3
2
Ver1.3
5.6.1 Network Setting ......................................................................................................................................18
5.6.2 PPPoE ......................................................................................................................................................19
5.6.3 Mode/Operator ........................................................................................................................................20
5.6.4 SIM Management ...................................................................................................................................21
5.7 Internet Setting > LAN Configuration ..........................................................................................................22
5.7.1 Local IP Setting .......................................................................................................................................22
5.7.2 DHCP .......................................................................................................................................................23
5.7.3 DDNS .......................................................................................................................................................24
5.7.4 NSUpdate ................................................................................................................................................25
5.8 Advanced Setting > Routing Configuration ................................................................................................26
5.8.1 Static ........................................................................................................................................................26
5.8.2 NAT ..........................................................................................................................................................27
5.8.3 RIP ............................................................................................................................................................28
5.8.4 VRRP .......................................................................................................................................................29
5.8.5 DMZ ..........................................................................................................................................................30
5.9 Advanced Setting > VPN Configuration ......................................................................................................31
5.9.1 PPTP ........................................................................................................................................................31
5.9.2 Ipsec .........................................................................................................................................................33
5.9.3 OpenVPN.................................................................................................................................................36
5.10 Applications > NTP/DTS Configuration ....................................................................................................38
5.10.1 Network Time ........................................................................................................................................38
5.11 Applications > PAD Configuration .............................................................................................................39
5.11.1 PAD ........................................................................................................................................................39
5.12 Applications > SNMP Configuration ..........................................................................................................40
5.12.1 SNMP .....................................................................................................................................................40
5.13 Applications > SMS Configuration .............................................................................................................41
5.13.1 New Message .......................................................................................................................................41
5.13.2 Inbox ......................................................................................................................................................41
5.13.3 Outbox ...................................................................................................................................................42
5.13.4 Diagnostics ............................................................................................................................................42
5.13.5 Setup ......................................................................................................................................................43
5.14 Applications > GPS Configuration .............................................................................................................44
5.15 System > Periodic Management ...............................................................................................................45
5.15.1 Periodic Management Configuration .................................................................................................45
5.15.2 Periodic Ping Setting ..........................................................................................................................45
5.15.3 Periodic Reset .....................................................................................................................................45
5.16 System > Firewall Configuration ...............................................................................................................46
5.16.1 Firewall Setup .......................................................................................................................................46
5.17 System > File Upload/Save Configuration ...............................................................................................47
5.17.1 Setting ....................................................................................................................................................47
5.17.2 Firmware Upgrade ...............................................................................................................................48
5.18 System > System Log Configuration ........................................................................................................49
5.18.1 Log ..........................................................................................................................................................49
5.19 System > Reboot Configuration .................................................................................................................49

Ultra SAM4W User Guide V1.3
3
Ver1.3
5.20 Remote SMS Administration ......................................................................................................................50
5.20.1 SMS ........................................................................................................................................................50
6 Troubleshooting ................................................................................................................................................53
7 Appendix: Abbreviations and Acronyms .......................................................................................................54

Ultra SAM4W User Guide V1.3
4
Ver1.3
1 Introduction
1.1 Overview
The UltraSAM4W is an Industrial 3G/4G Ethernet Router designed to perform data communication functions between
a wired Local Area Network (LAN) and the cellular network (Wide Area Network, WAN).
Its environmental qualities, notably its wide temperature range of operation, its robustness and throughput
performances, make it a perfect tool for industrial application like metering, telemetry or security monitoring.
1.2 Features
HSPA+/UMTS/4G/LTE Wireless Module
10/100Mbps Ethernet Port
External Antenna (Main Antenna and Aux Antenna)
GPS Feature (Optional Antenna)
12VDC 1.5A Input Power Supply (Microfit Connector)
Protocols and protocol settings: TCP/IP, DHCP server, DDNS, NAT, non-NAT, port forwarding, HTTP, ARP, PPP,
APN, NTP, VPN – IPsec, VPN – PPTP, VPN – OpenVPN
Web Base Interface, Periodic Administration, Local/Remote Firmware Upgrade via HTTP, SIM Management, Time
Configuration, NTP Time Synchronization.
SMS Administration and control
1.3 Packing List/Accessories
The UltraSAM4W modem is delivered with:
External Multiband Antennas with SMA RF Connector
RJ45 Ethernet Cable for PC Connection
Quick User Guide
220Vac Adapter with Microfit Connector
1.4 Optional Accessory
External GPS antennas with SMA RF connector
Ultra SAM4W User Guide V1.3
5
Ver1.3
2 Hardware Description
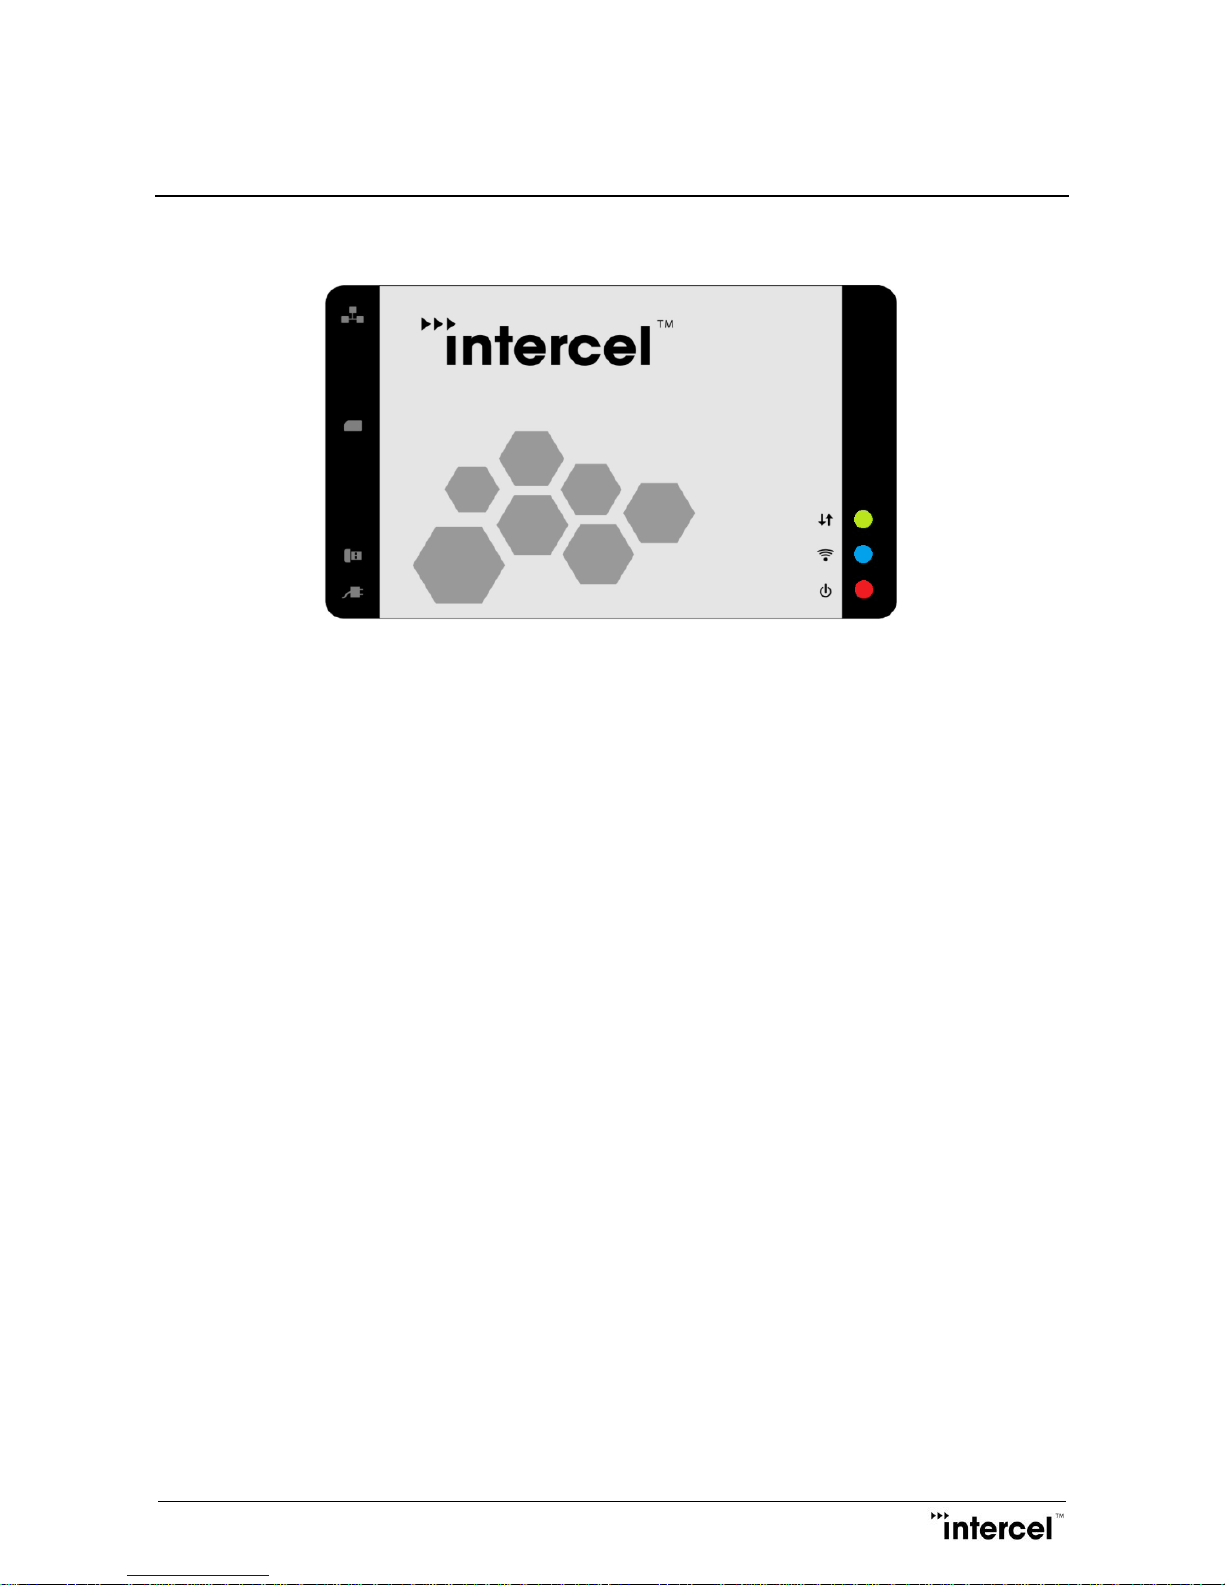
2.1 Front Panel
2.1.1 Front Panel LEDs
3 LEDs indicate different modem’s status:
Power LED
Turns ON when power is applied and system initialization is successful.
Blinking LED means SIM card not properly installed or system initialization failed. The modem will go into
non-WAN mode (standby condition).
Stays OFF when main power is off.
LAN Network LED
Blinking when packet switched data is being transferred through the modem
Stays OFF when there is no network activity.
WWAN LED
Stays ON when connected to the 3G/4G network.
Stays OFF when disconnected to from the 3G/4G network.
2.1.2 Logos Indication
Ethernet Port – UltraSAM4W and PC connection interface
SIM Card – SIM Card Holder
USB Host – USB Port; support uZiP ZigBee Dongle (not included in the package)
Power Supply – Input Power Supply (Microfit connector)
Power LED
LAN Network LED
WWAN LED
LAN
SIM
USB Host
Power Supply
Ultra SAM4W User Guide V1.3
6
Ver1.3
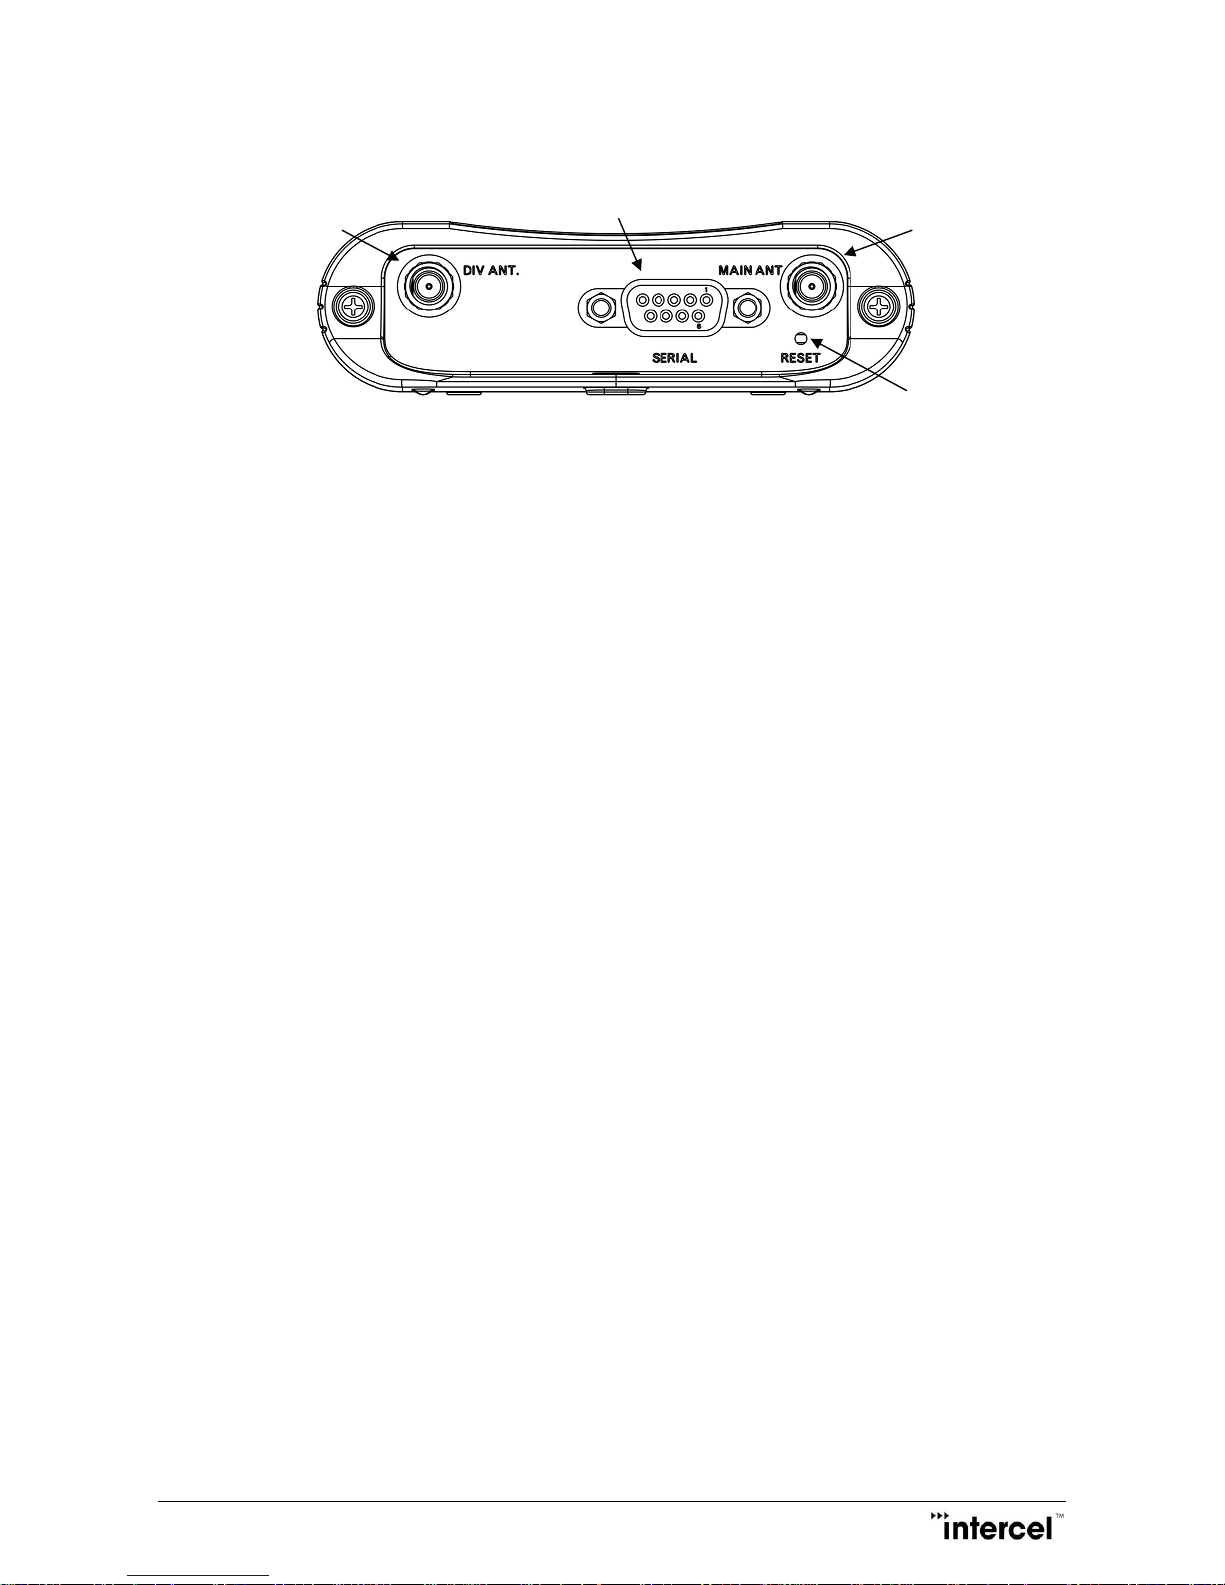
2.2 Right Side Panel
A. MAIN ANT - Main Antenna Connector
Main RF Antenna (SMA-F); Customer should use provided Antenna for connection.
B. DIV ANT. - Aux/DIV Antenna Connector
Auxiliary antenna connection, RX antenna, improve the radio sensitivity
(Caution: DIV Antenna, should point at a different direction compared to Main Antenna to improve
Diversity Gain, Isolation and reduce mutual interaction.)
C. SERIAL - Serial Port / PAD Port
Serial Port between external device and UltraSAM4W. PAD feature is supported.
D. RESET - Reset Button Hole
Long press (longer than 5 seconds) to perform factory reset. After factory reset, modem will
automatically restart. Note remote login will be disabled after factory reset.
A
B
C
D

Ultra SAM4W User Guide V1.3
7
Ver1.3
2.3 Left Side Panel
A. LAN - Ethernet Port
Plug the supplied Ethernet Cable into this port and plug the other end of the cable to your PC before
using the UltraSAM4W modem
B. SIM - SIM Card Holder
Be sure that a SIM card is properly inserted before switching on the modem
C. USB - USB Port
USB Host with uZiP ZigBee Dongle Supported
D. DC - DC Power Supply Port
Input Power Supply (Microfit connector)
Power supply socket pin assignment
*** Be sure that a SIM card is installed properly before power on ***
E. GPS Antenna Port (Option)
GPS antenna input (SMA-F) which enable user to connect with external antenna to improve the
sensitivity of GPS performance.
2.4 Back Panel
Product Label
Model Name, Serial Number, IMEI, MAC address and default access web browser link’s information.
D
C B A
Ultra SAM4W User Guide V1.3
8
Ver1.3
3 Installation Instructions
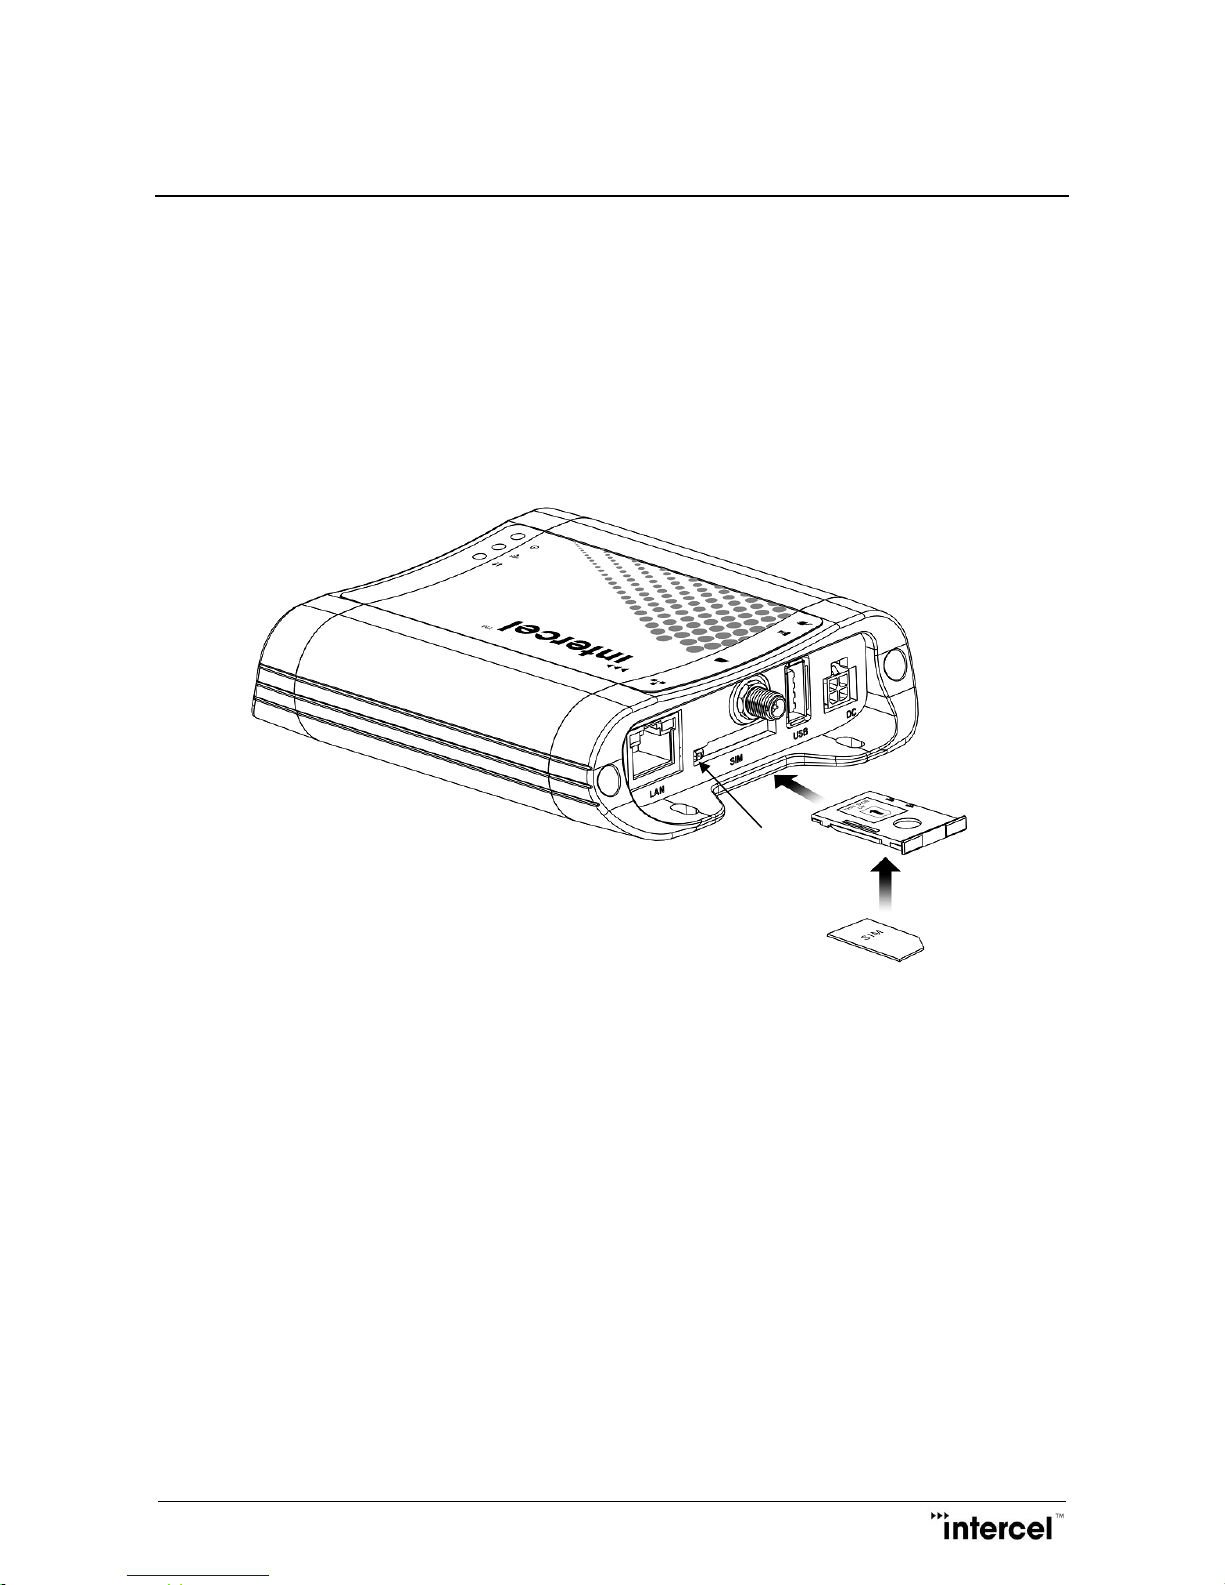
3.1 SIM Card Installation
A. SIM Card Holder
B. Button to extract the SIM Holder from the UltraSAM4W Modem (when inserted)
C. SIM Card
Extract the SIM Card Holder (A) from the modem by pushing the button (B) on the Left Side Panel.
Insert your SIM Card (C) to the SIM Card Holder (A), as shown in the picture.
Re-insert the SIM Card Holder with SIM Card into the SIM card slot in the appropriate direction.
Be sure as well that SIM card is properly inserted before switching on the modem.
A C B

Ultra SAM4W User Guide V1.3
9
Ver1.3
3.2 Antenna, Ethernet & Power Plug Connection
Before connecting the Power Supply to your UltraSAM4W modem, the Main Antenna and the Ethernet Cable must
be properly connected.
The antennas are positioned on the Main & DIV Antenna Connector on the Right Side Panel. The Ethernet cable and
power supply cable is plugged in the appropriate port on the Left Side Panel.

Ultra SAM4W User Guide V1.3
10
Ver1.3
4 Specification
4.1 Physical
Size
122 mm x 102 mm x 29 mm
Weight
250 g (including Antenna)
220 g (net weight)
4.2 Environment
Storage Temperature
-40°C to 85°C
Operating Temperature
-40°C to 85°C
Relative humidity (operational)
< 95% non-condensing
Maximum supported Air Discharge
(IEC 61000-4-2)
±15kV
Maximum supported Contact Discharge
(IEC 61000-4-2)
±8kV
4.3 Power supply input
Working supply voltage
12VDC 1.5A
Power supply connector
Molex MicroFIT
4.4 Interfaces
Supported SIM card voltage
1.8V / 3V
Ethernet speed, link
10-100 Mb/s, Auto-MDIX
Ethernet line isolation
2kV

Ultra SAM4W User Guide V1.3
11
Ver1.3
4.5 3G/4G/GPRS Radio
Network Band Support
GSM/GPRS/EDGE
850/900/1800/1900MHz
UMTS WCDMA/HSDPA/HSUPA/HSPA+
Band I
2100MHz
Band II
1900MHz
Band V
850MHz
Band VI
800MHz (Available in AUS version)
Band VIII
900MHz
4G/LTE (AUS/EUR Version)
Band I
2100MHz
Band III
1800MHz
Band VII
2600MHz
Band VIII
900MHz
Band XX
800MHz
4G/LTE (USA Version)
Band II
1900MHz
Band IV
1700MHz (AWS)
Band V
850MHz
Band XIII
700MHz
Band XVII
700MHz
Band XXV
1900MHz

Ultra SAM4W User Guide V1.3
12
Ver1.3
5 Web Interface
The UltraSAM4W is configured through its web interface. To launch the web interface, connect the UltraSAM4W
modem to a PC with the supplied Ethernet cable.
Web interface could be accessed by browsing the webpage with IP address 192.168.1.1
On your PC, the configuration of the “connection to the local network” must be checked so that it has a good IP
Address:
Either the PC gets the IP address automatically from the UltraSAM4W modem (DHCP).
Or set the IP address to 192.168.1.X where X is from 2 to 253.
Suggested Web Browser for the configuration of the UltraSAM4W are as follow: Internet Explorer 8.0 or later, Mozilla
Firefox 22.0 or later.
Open a web browser. Power on the module, wait until the IP address of the PC is well distributed by the UltraSAM4W
modem, then type in the address bar 192.168.1.1, which is the default IP address of the modem. You will be
forwarded to login page for entering Username and Password. By default, the Username and Password are both
“admin”. They could be changed through the web interface later.
Ultra SAM4W User Guide V1.3
13
Ver1.3
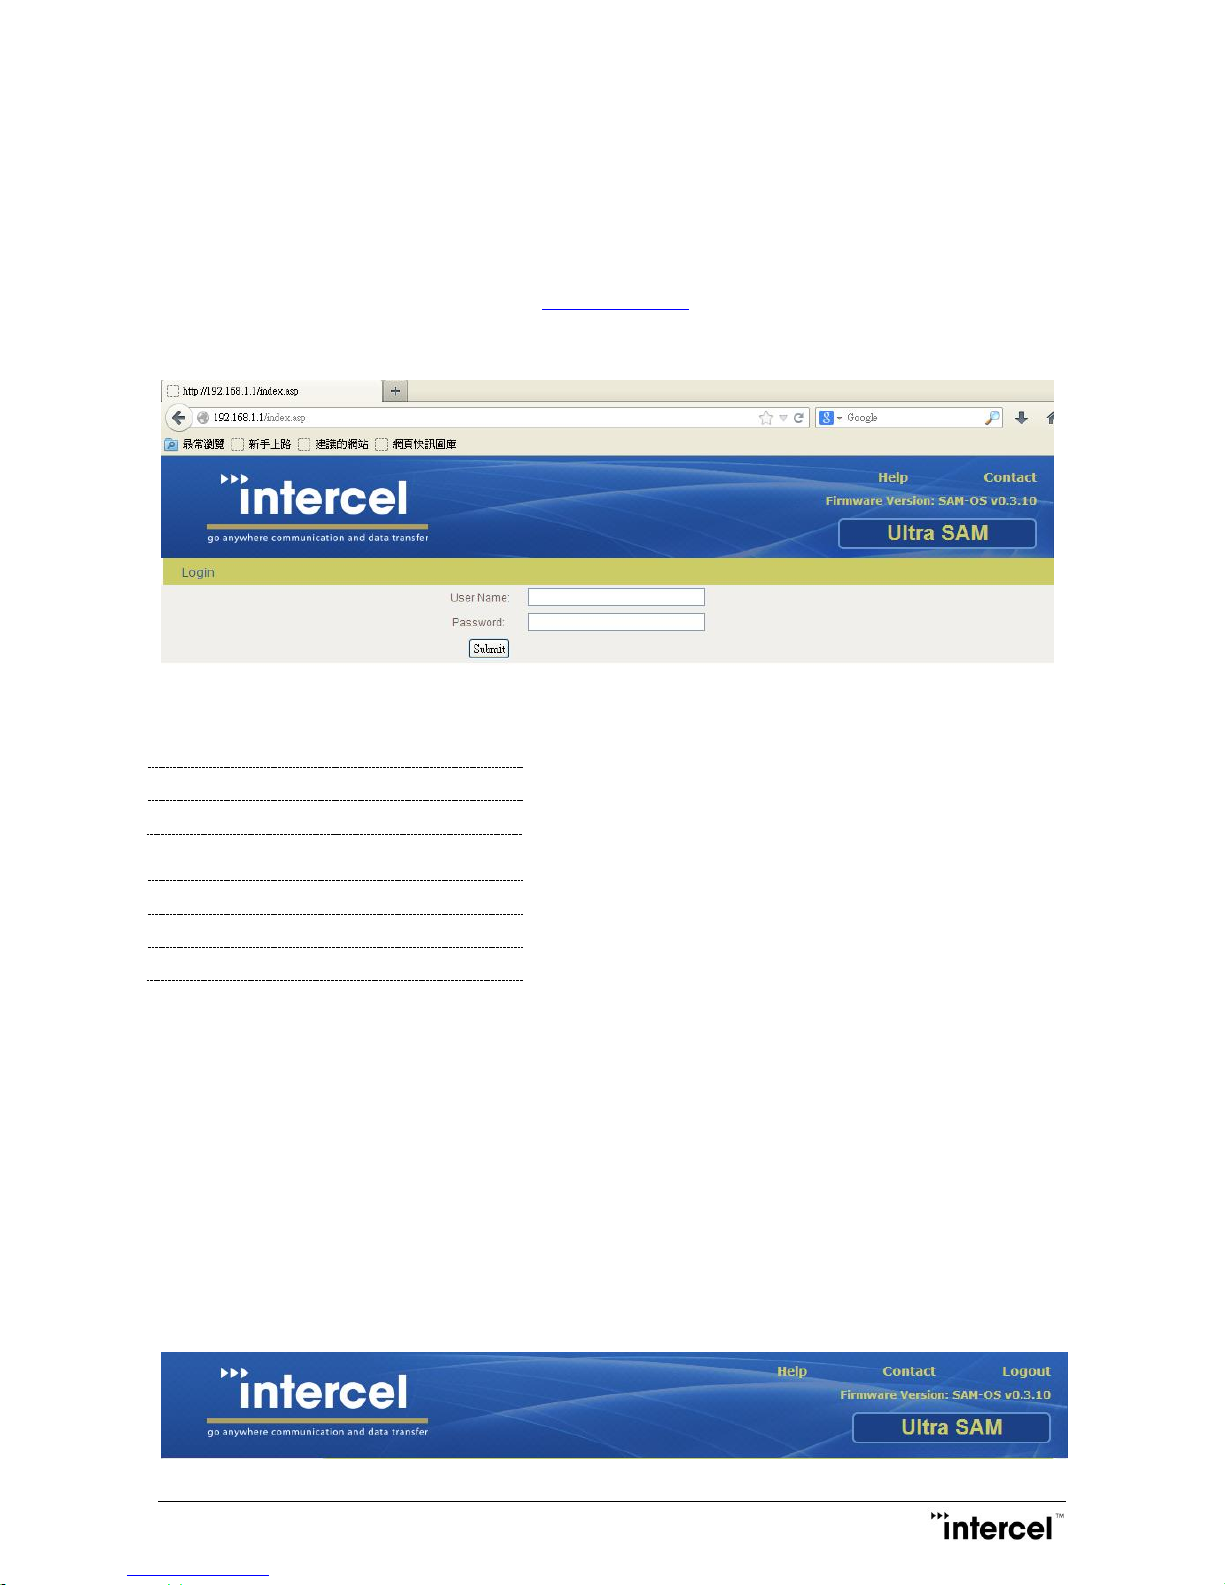
5.1 Login User Interface
User can access UltraSAM4W configuration menu by login web browser system.
Please follows below instructions for the access
1. Open web browser and navigate address http://192.168.1.1
2. Enter username and password
3. Click Submit to login.
Two default user accounts are preset in the system: Root Account and Admin Account
Root Account
Username
root
Password
root
Admin Account
Username
admin
Password
admin
Root Account allows full control and access to all settings.
Admin Account allows lower level of authorization on the configuration.
Only Root Account allows firmware upgrade, configuration backup, restoring and factory reset function.
Once the Username and Password are confirmed, the status page of the web interface with basic information of the
LAN and WAN connection will show up.
5.2 Logout User Interface
For security reasons, make sure to logout from the web interface after configuring the UltraSAM4W modem by clicking
Logout on the top manual bar.
After a successful logout, the system will re-direct to Login Menu.

Ultra SAM4W User Guide V1.3
14
Ver1.3
5.3 Quick start up configuration
For a quick start up when you first use the UltraSAM4W modem, you just need to configure some basic parameters.
For advanced settings and detailed explanations, please refer to the configuration section.
To configure a simple setting and make your UltraSAM4W modem work, the two parameters you may need to specify
are the APN (Access Point Name) and SIM PIN code.
Quick Startup Parameter Setting:
1. SIM PIN Setting
If your SIM card needs a PIN code, select Internet Setting -> Mobile Network -> SIM Management, Fill the PIN
code in the bar and check the Enable box.
2. APN Setting
Select Internet Setting -> Mobile Network -> Network Setting; fill in the APN in the first line: the APN depends on
your 3G/4G operator.
After these modifications, your UltraSAM4W modem should work properly.
Ultra SAM4W User Guide V1.3
15
Ver1.3
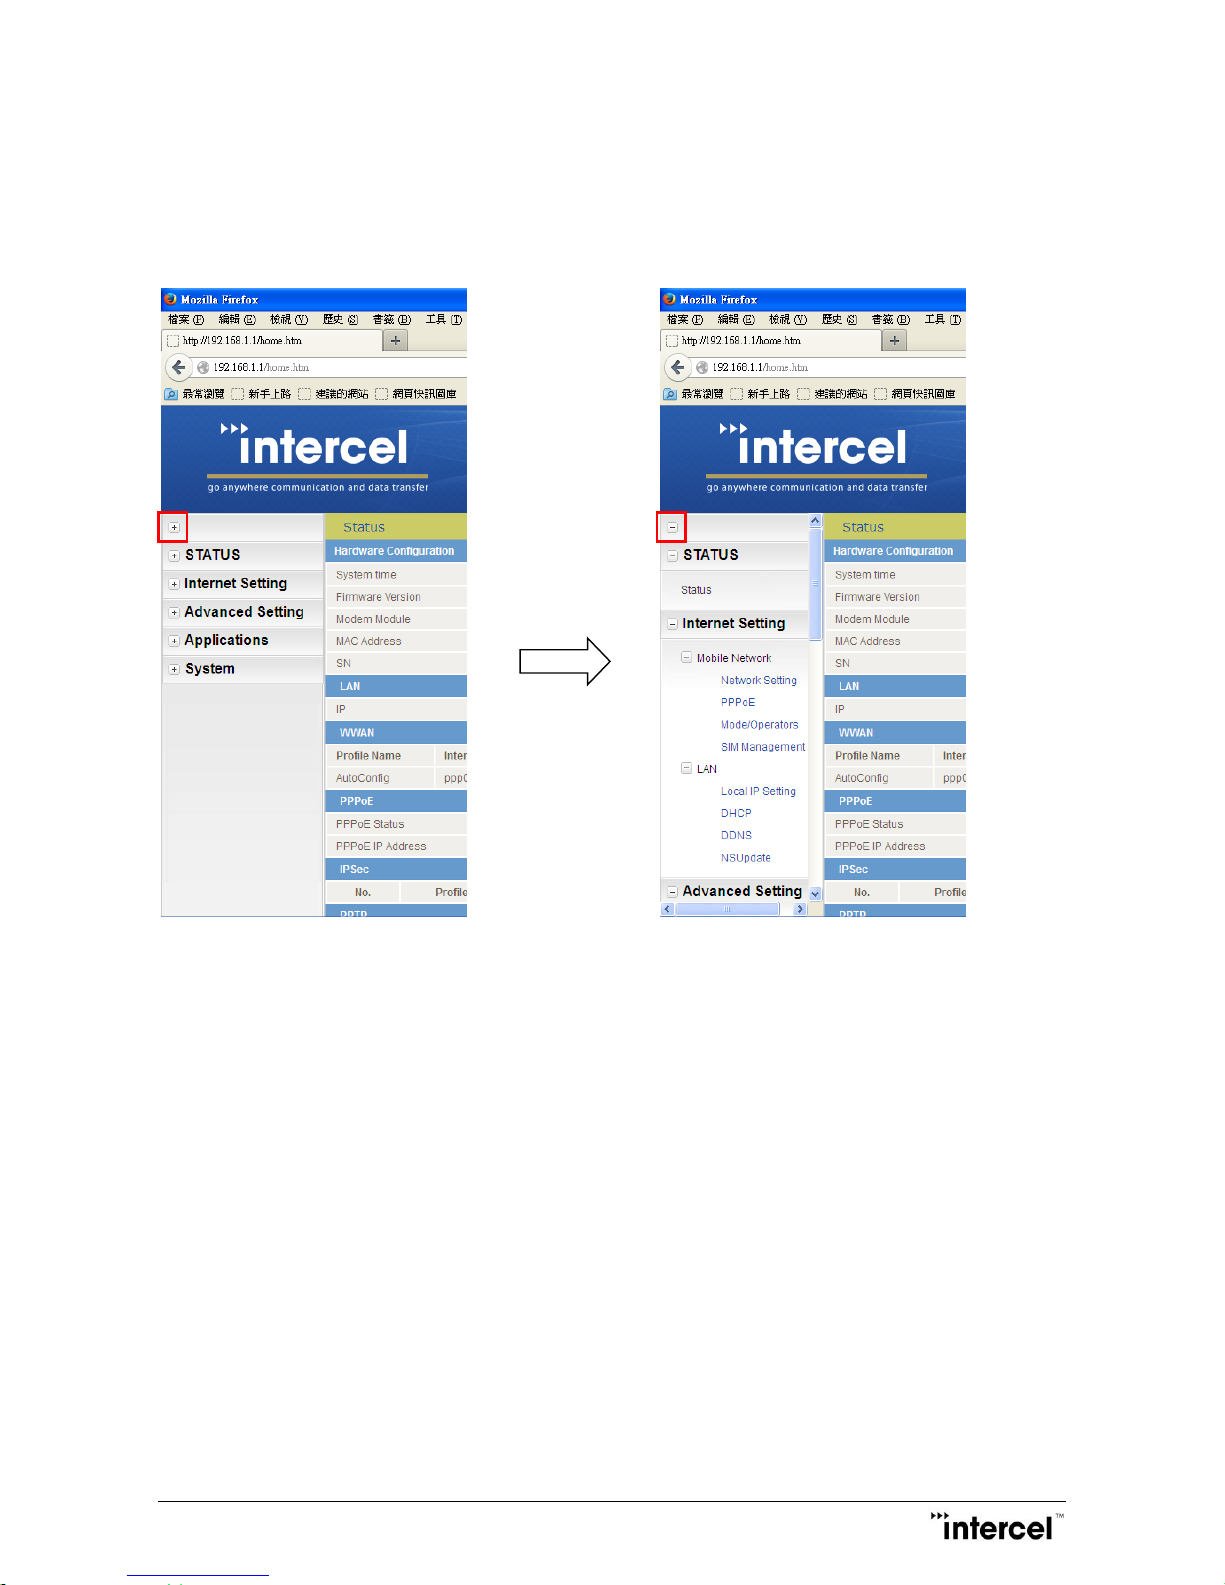
5.4 Expanded Index Menu (EIM)
EIM provides users with easier access to all function controls. User could expand all the function features by clicking
the top left PLUS symbol. This helps user to find any feature within the modem control.
Ultra SAM4W User Guide V1.3
16
Ver1.3
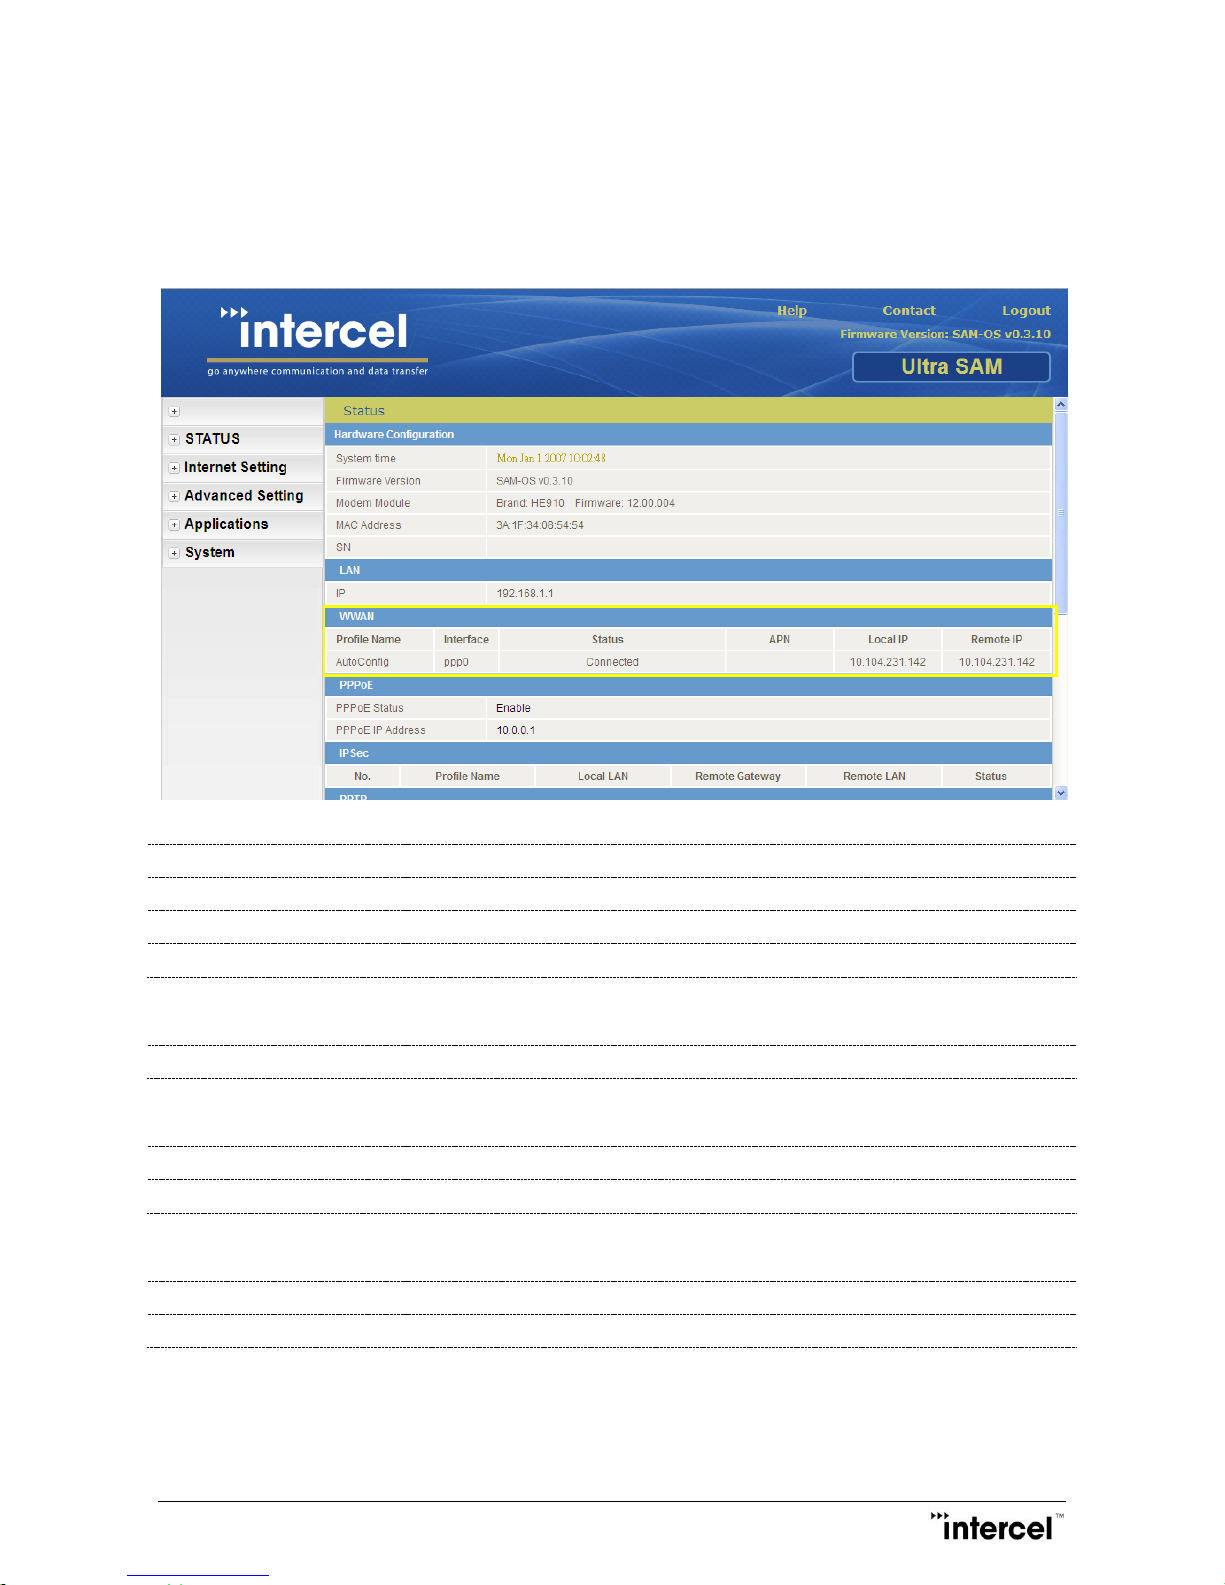
5.5 Status Menu Page
Status Menu Page lists out the current condition on the whole UltraSAM4W modem which include Basic hardware
information, LAN connection setting, Mobile Network condition, PPPoE setting and IPsec / PPTP OpenVPN Setting.
5.5.1 Hardware Configuration
System Time
Firmware Version
UltraSAM4W’s Firmware Version
Modem Module
RF Mobile Module’s Information
MAC Address
UltraSAM4W’s MAC Address
5.5.2 LAN
IP
Local IP Address Setting; Default: 192.168.1.1
5.5.3 WWAN
Profile Name
Setting Profile Name
Status
Connection Status
5.5.4 PPPoE
PPPoE Status
Setting Status, Enable/Disable
PPPoE IP Address
PPPoE IP Address

Ultra SAM4W User Guide V1.3
17
Ver1.3
5.5.5 Ipsec
Profile Name
Ipsec Profile Name
Local LAN
Local LAN IP Address
Remote Gateway
Gateway IP Address
Remote LAN
Remote LAN IP Address
Status
Ipsec Connection Status
5.5.6 PPTP
PPTP Satus
PPTP connection status
PPTP IP Address
PPTP connection IP Address
PPTP P-t-P
PPTP Remote Gateway Address
5.5.7 Network Connection
Provider
Operator Name
Coverage
Mobile Network Connection
IMEI
IMEI (International Mobile Equipment Identity)
Signal Strength (dBm)
Signal Strength Level in dBm
SIM Status
SIM Card Status

Ultra SAM4W User Guide V1.3
18
Ver1.3
5.6 Internet Setting > Mobile Network Configuration
5.6.1 Network Setting
Allow users to setup their own pre-defined settings to access the WWAN. APN should be entered with reference to
operator’s requirement.
Profile Name
User can setup their own Profiles which suit for different operators’ services
APN Name
APN, Access Point Name which provided by the 3G/4G operator
Mobile Broadband Connection
Default Enable to turn on the data traffic for the mobile service
Username/Password
The User Account information can be setup through Account and Password if
needed. Most of the cellular operators do not require a username / password to
access internet but it may happen in some countries
Ultra SAM4W User Guide V1.3
19
Ver1.3
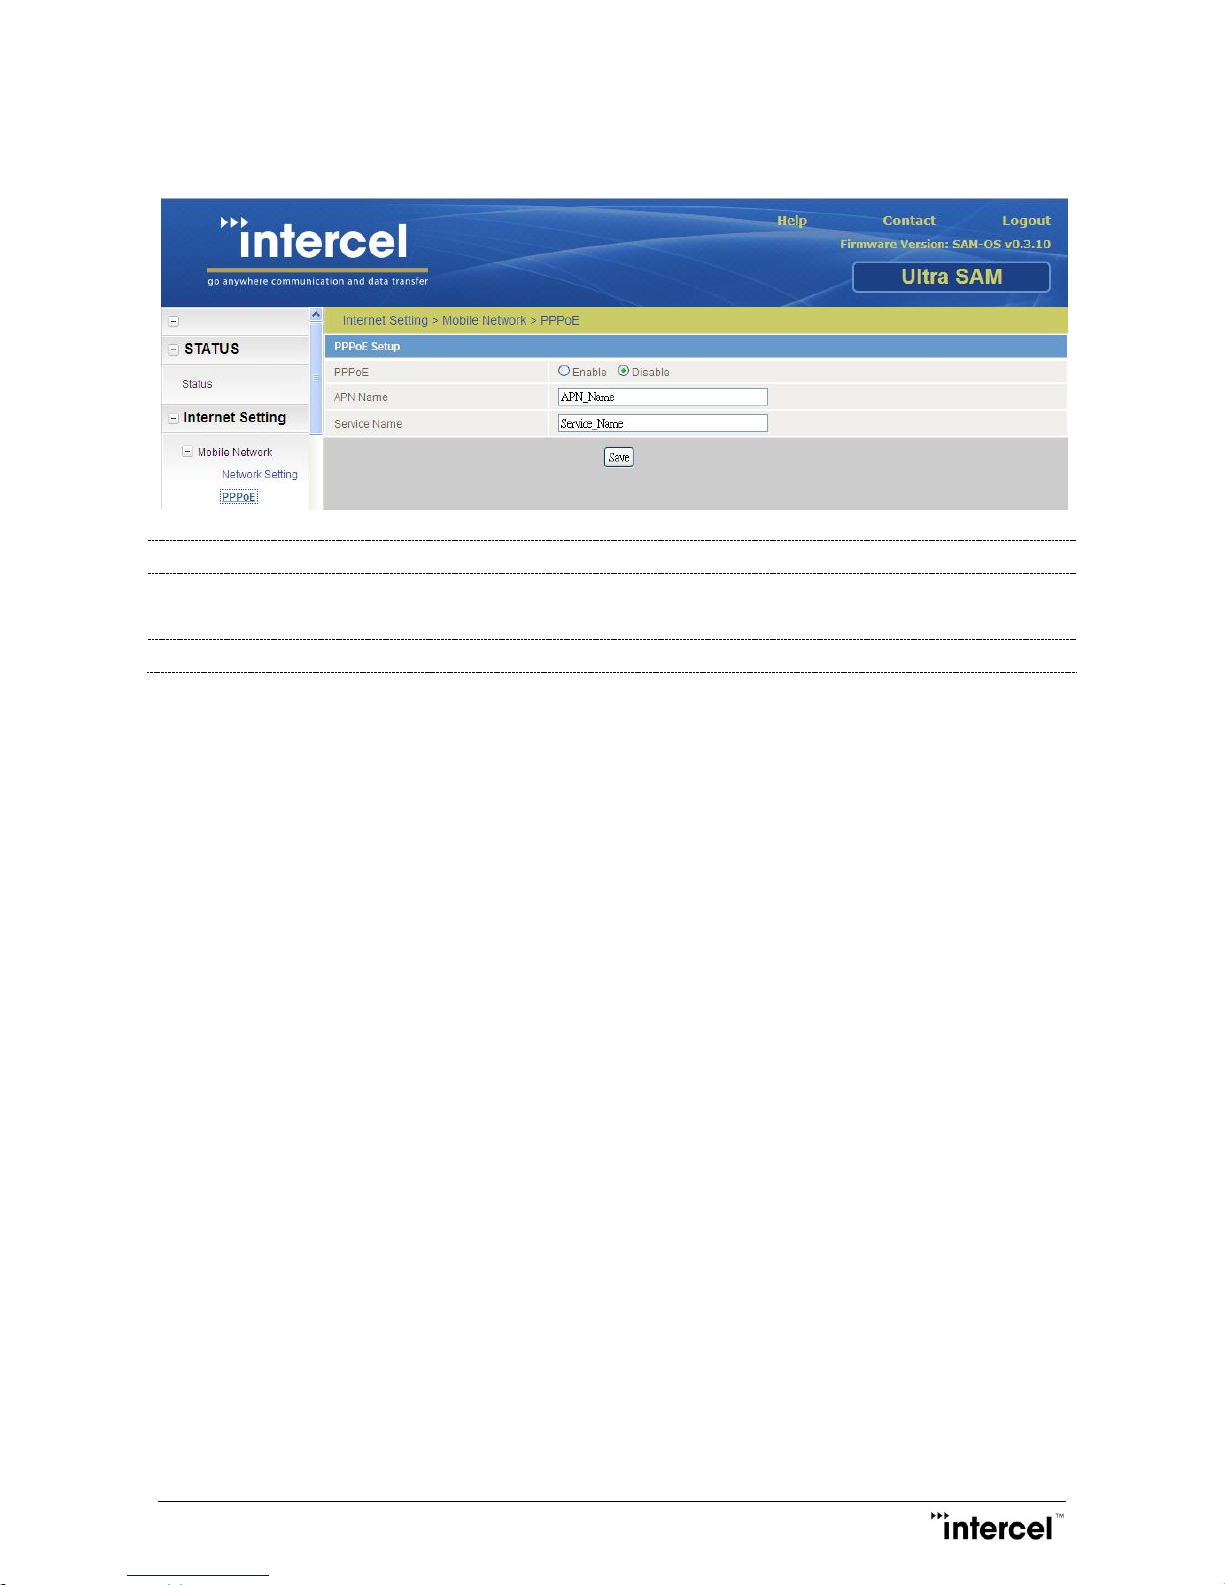
5.6.2 PPPoE
PPPoE
PPPoE connection control (Enable / Disable)
APN Name
PPPoE connection APN Name
If PC connection, Username & Password set to be same as APN Name defined
Service Name
Service Name (Optional)
Ultra SAM4W User Guide V1.3
20
Ver1.3
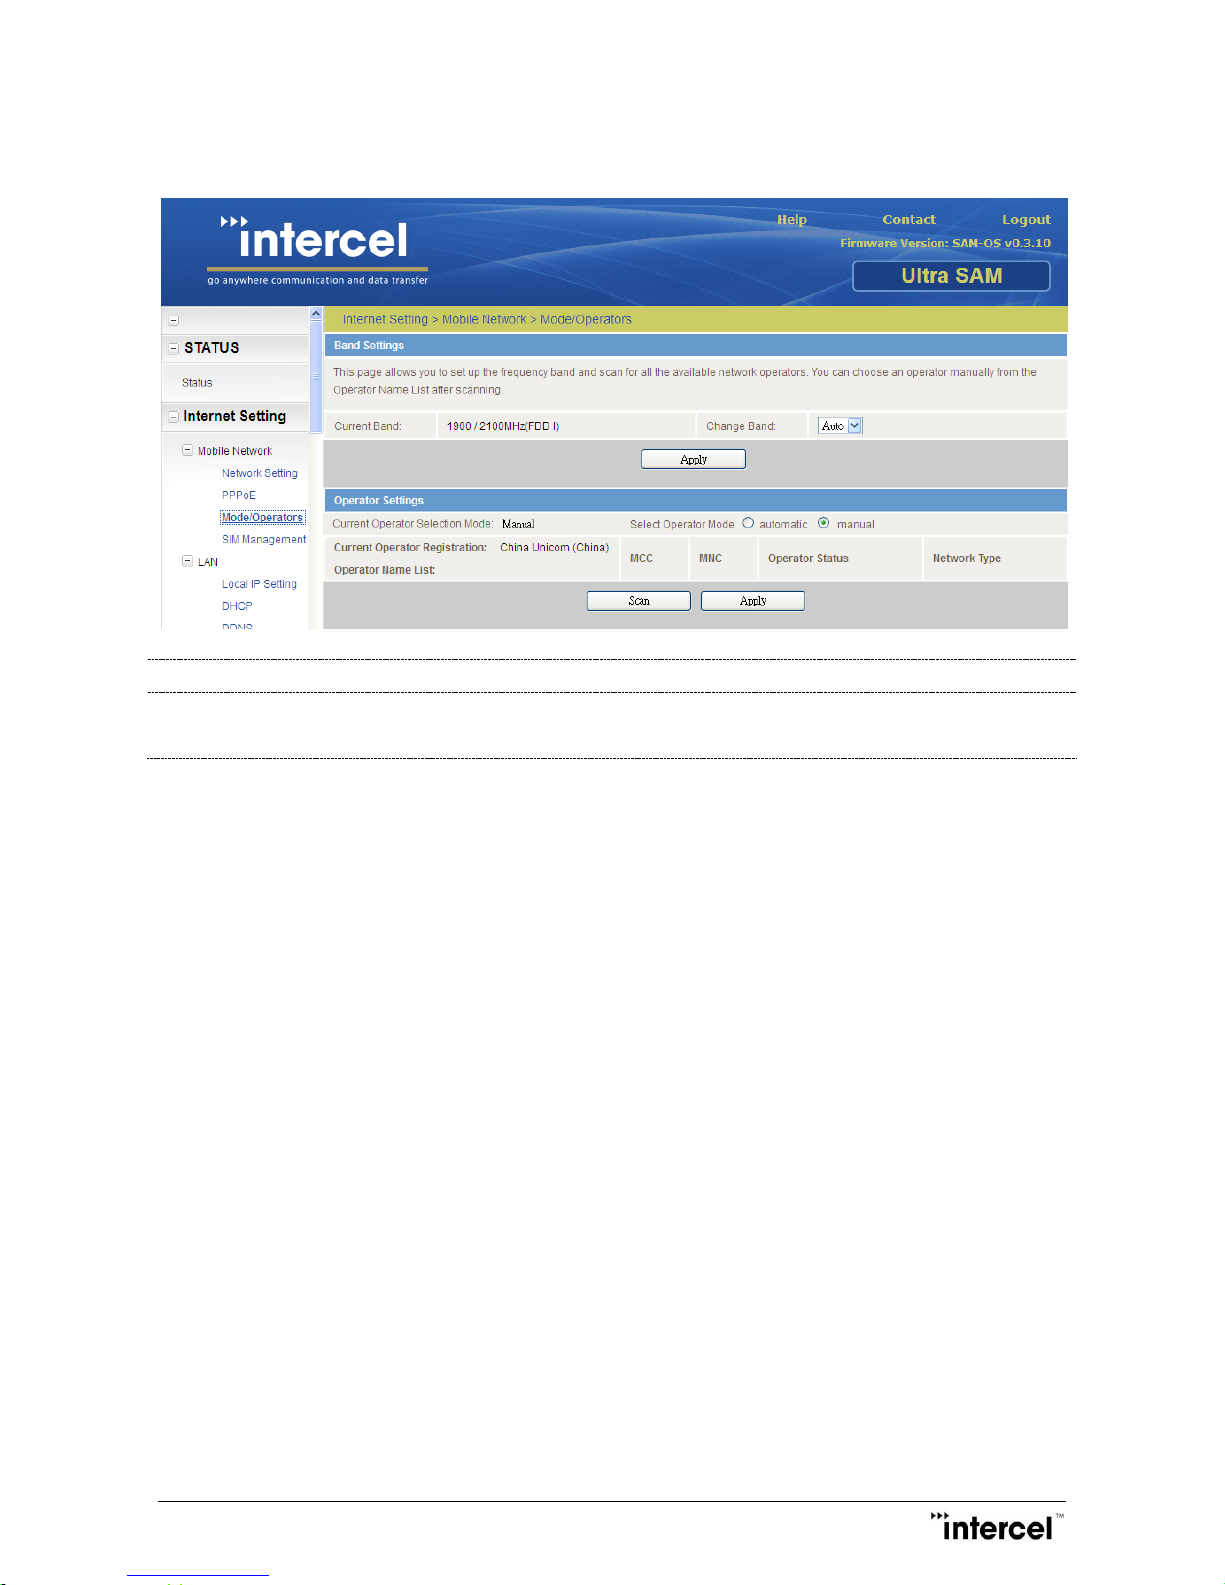
5.6.3 Mode/Operator
Change Band
Selection of the mobile network, User could choose 2G/3G/4G/Auto
Operator Settings
Customer could select operator by manual or automatic
To enable this feature, user should disable the network
Ultra SAM4W User Guide V1.3
21
Ver1.3
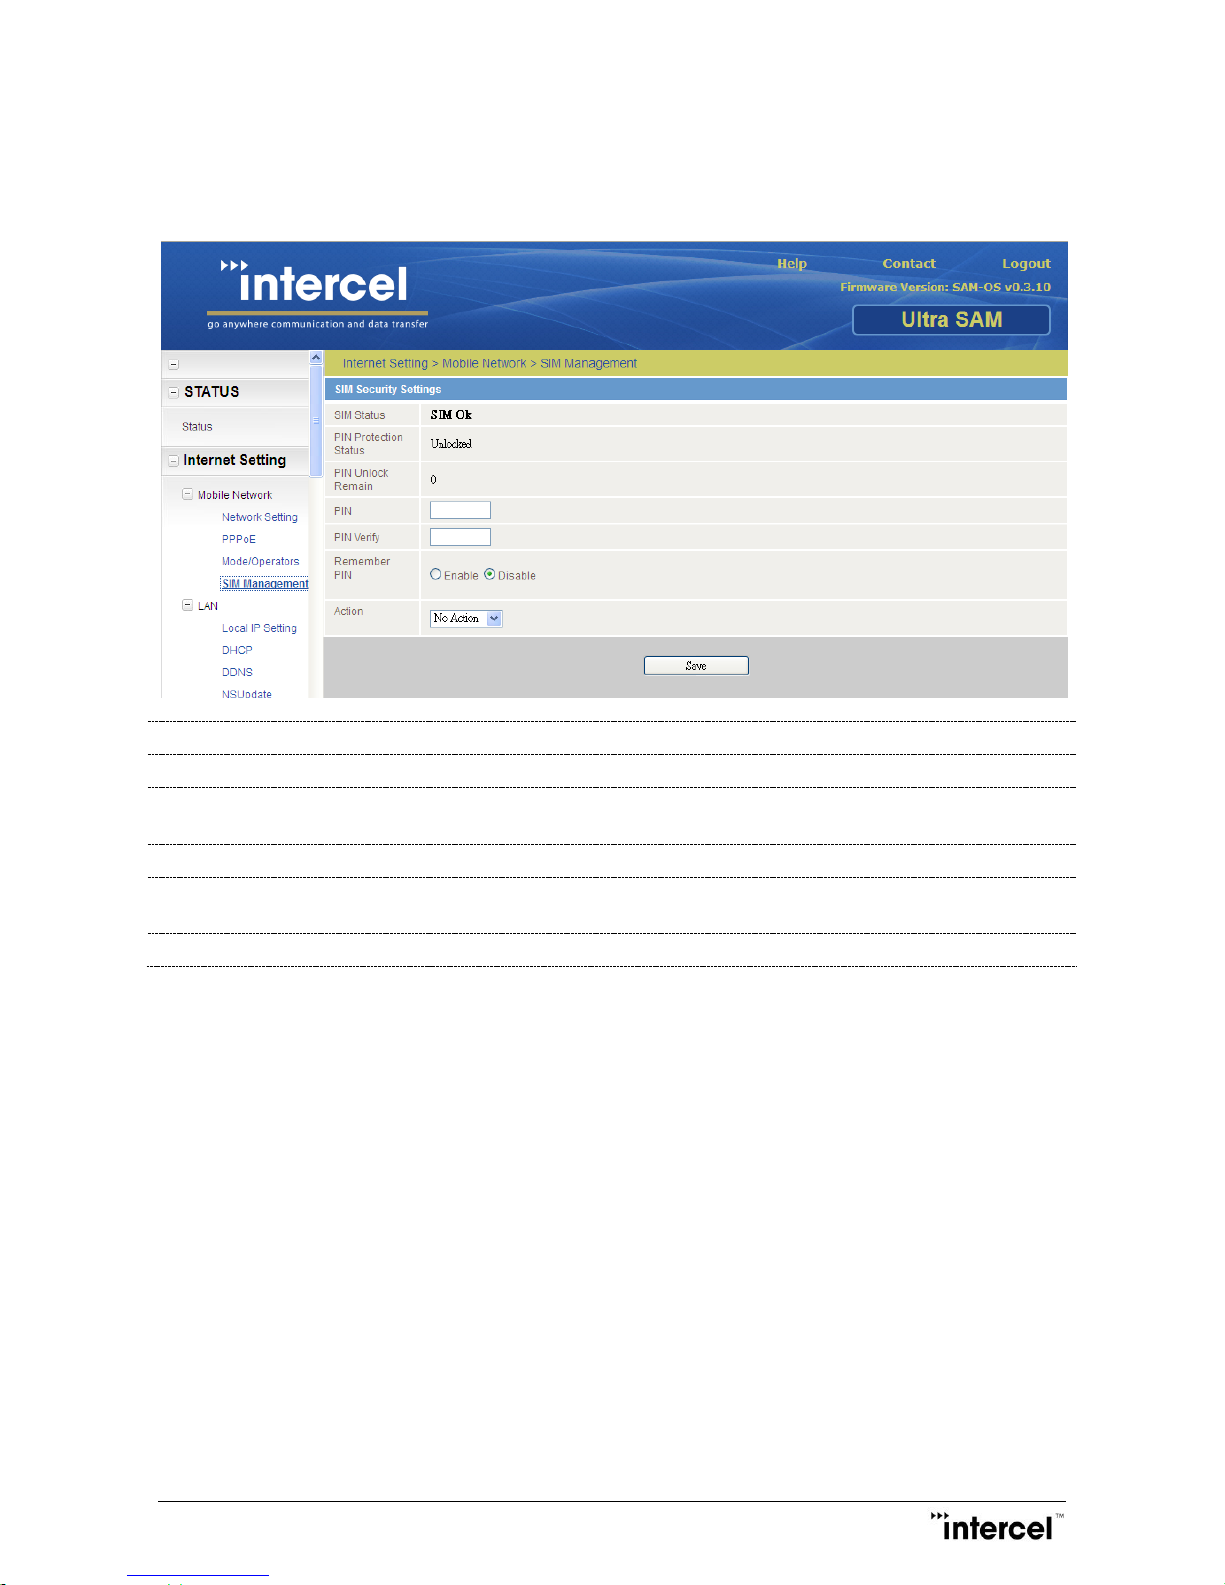
5.6.4 SIM Management
The UltraSAM4W modem is able to manage the SIM pin code when required. UltraSAM4W will automatically enter
the PIN code for the corresponding SIM card if the “Remember PIN” field is enabled.
SIM Status
SIM card condition
PIN Protection Status
Showing SIM Card PIN Protection Status
PIN Unlock Remain
Unlock time remain. If remain is zero, SIM card will be locked permanently. Need
to use PUK code to unlock the card
PIN / PIN Verify
User PIN code Entry
Remember PIN
Enable to store the PIN inside system. System will automatically enter the PIN
which startup
Action
Providing SIM Lock / SIM unlock Action
Ultra SAM4W User Guide V1.3
22
Ver1.3
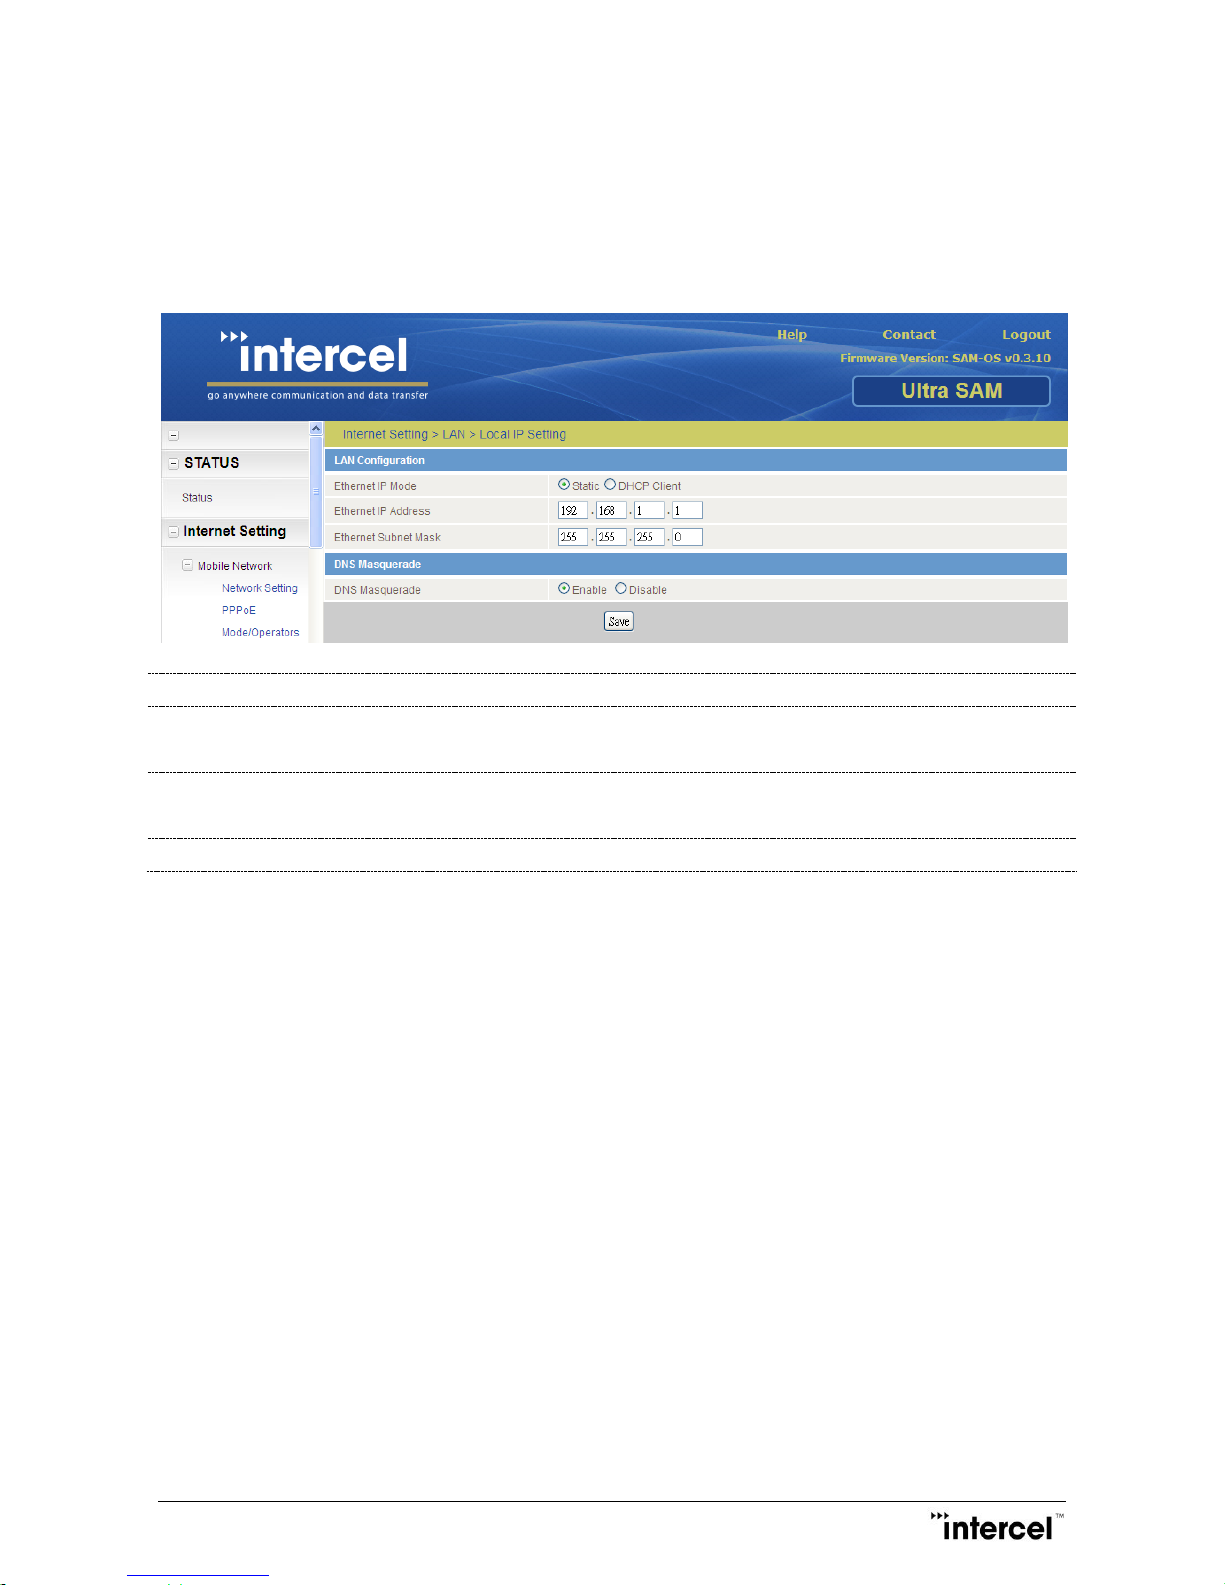
5.7 Internet Setting > LAN Configuration
This page allows users to configure the parameters of LAN, such as local IP address of your UltraSAM4W modem
subnet mask and DNS servers.
5.7.1 Local IP Setting
Ethernet IP Mode
Modes of IP configure. Static IP or DHCP Client mode
Ethernet IP Address
Current Ethernet connection IP Address
(Auto disable when DHCP client mode selected)
Ethernet Subnet Mask
Current Ethernet connection Subnet Mask
(Auto disable when DHCP client mode selected)
DNS Masquerade
Attention: If the IP address is changed, you must use the new IP address to enter the web interface.
Remark: your PC must change its IP address also if the network sub-address (third number of IP address) is changed:
either your PC gets the IP address from the UltraSAM4W modem automatically after a new DHCP allocation (may take
a while on Windows, it is better to disconnect and reconnect the Ethernet cable) or manually by changing it in the PC’s
configuration.

Ultra SAM4W User Guide V1.3
23
Ver1.3
5.7.2 DHCP
The DHCP protocol (Dynamic Host Configuration Protocol) is a communication protocol that makes automatic
assignment of IP addresses in an organization’s network. This page allows users to configure the DHCP range and lease
time. By default, the first PC connected to your UltraSAM4W modem will be assigned 192.168.1.100 as an IP address,
the second PC will obtain 192.168.1.101, etc.
DHCP Status
DHCP setting status (Enable / Disable)
DHCP Start Range
DHCP allocated IP address (Start Range)
DHCP End Range
DHCP allocated IP address (End Range)
DHCP Lease Time
Time period for the address is leased
DHCP Relay
DHCP Relay status (Enable / Disable)
DHCP Server Address
DHCP server IP address
Address Reservation List
Administrator can reserve IP address for dedicate PC device
Information could be Clone from Dynamic DHCP Client List
DHCP lease time specifies the time period during which a given IP address will be valid.

Ultra SAM4W User Guide V1.3
24
Ver1.3
5.7.3 DDNS
DDNS (Dynamic Domain Name Server) enables your PC to associate its current IP address, received from public
network, with a domain name automatically. Thus, a remote user can obtain the current IP address of the home
computer through a DNS query and connect to the home computer.
DDNS Status
Status for DDNS (Enable / Disable)
Server Address
DDNS Server address
Host Name
DDNS Hostname Information
Username
DDNS Username information
Password
DDNS Account’s Password
Verify Password
DDNS Account’s Password Verification
Note:
The DDNS password can accept any characters (special, alpha-numeric) except the hash symbol (#).

Ultra SAM4W User Guide V1.3
25
Ver1.3
5.7.4 NSUpdate
UltraSAM4W modem provide utility (NSUpdate) used by network administrators to request the name server of a DNS
zone to update its database.
NSUPDATE Status
Status of NSUPDATE (Enable / Disable)
Server Address
Primary Name Server Address to update the DNS entry
Secondary Server Address
Secondary Name Server Address to update the DNS entry
DNS Zone
Domain name space which DNS entry is contained with
Host Name
Hostname of the rounter to put in the DNS entry
Expiry Time
Time period for DNS entry will remain valid

Ultra SAM4W User Guide V1.3
26
Ver1.3
5.8 Advanced Setting > Routing Configuration
5.8.1 Static
Customer could define some routes out of the other route method (NAT / Port forwarding).
Route Name
Customer defined Route Name
Destination IP Address
The IP address want to forward to
IP Subnet Mask
Subnet Mask of destination IP
Gateway IP Address
Gateway of the destination network
Network Interface
Routing network interface (auto / eth0 / ppp0)
Metric
Priority of the routes. The lower the metric value, the higher priority.

Ultra SAM4W User Guide V1.3
27
Ver1.3
5.8.2 NAT
NAT (Network Address Translation) protocol translates a public IP address in the WAN to several private IP addresses
within the LAN. This page allows users to enable or disable NAT.
Protocol
TCP / UDP / ALL protocol selection
Source IP Address
Defined IP address that would like to take routing action
IP address is 0.0.0.0, which defined to be all external IP information will be
routed.
Incoming Port Range
Network Port (s) Range of the network that would like to take routing action
Destination IP Address
Local Area Network Address of the device which forward to
Destination Port Range
Local Area Network Port (s) to forward to
Commonly used port numbers include:
Application
Port number
Protocol
FTP (data)
20
TCP
FTP (command)
21
TCP
SSH
22
TCP, UDP
HTTP
80
TCP, UDP
POP3
110
TCP
SMTP
25
TCP, UDP

Ultra SAM4W User Guide V1.3
28
Ver1.3
5.8.3 RIP
RIP (Routing Information Protocol) which employs the hop count as a routing metric. RIP prevents routing loops by
implementing a limit on the number of hops allowed in a path from the source to a destination.
RIP Status
Status of RIP (Enable / Disable)
Version
Version of RIP protocol support

Ultra SAM4W User Guide V1.3
29
Ver1.3
5.8.4 VRRP
The Virtual Router Redundancy Protocol (VRRP) is a computer networking protocol that provides for automatic
assignment of available Internet Protocol (IP) routers to participating hosts. This increases the availability and
reliability of routing paths via automatic default gateway selections on an IP sub-network.
VRRP Status
Status of VRRP (Enable / Disable)
Virtual Device ID
ID of the route. This ID is different for each virtual router on the network
Router Priority
Master routers have a priority of 255 and backup router(s) can have priority
between 1 and 254.
Virtual IP Address
The virtual IP address that both virtual routers share.
A virtual router must use 00-00-5E-00-01-XX as its (MAC) address. The last byte of
the address (XX) is the Virtual Router Identifier (VRID), which is different for each
virtual router in the network. This address is used by only one physical router at a
time, and is the only way that other physical routers can identify the master
router within a virtual router.
Ultra SAM4W User Guide V1.3
30
Ver1.3
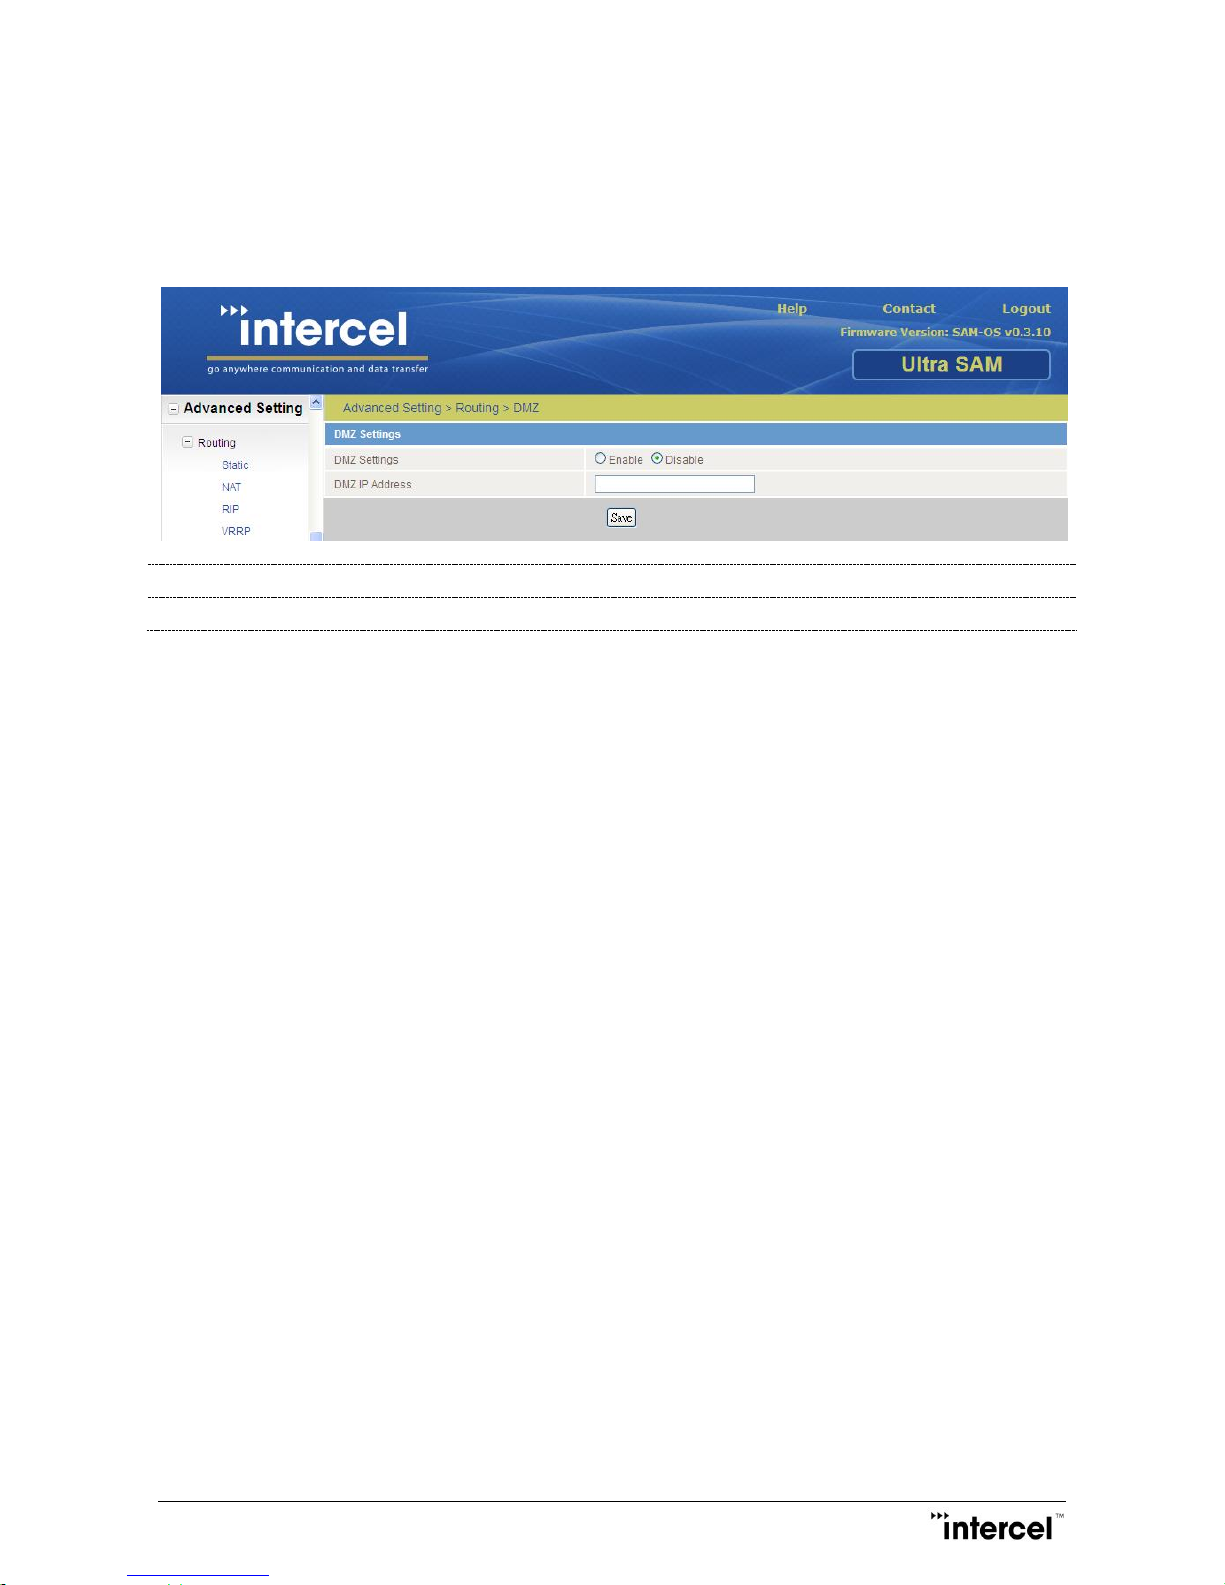
5.8.5 DMZ
The UltraSAM4W modem can help you add an additional layer of security to your LAN by setting up a DMZ
(demilitarized zone) through a PC that contains and exposes your organization’s services to the unsecured WAN for
external client visit. An external hacker can only access this particular PC in the DMZ but the other part of your
network will be protected.
DMZ Status
Status of DMZ (Enable / Disable)
DMZ IP Address
DMZ Host IP Address
Fill in the IP address of the PC that you want to assign it in DMZ.
Check the “Enable” to activate the DMZ function.
Note: This function only works when NAT mode is enabled.
Ultra SAM4W User Guide V1.3
31
Ver1.3
5.9 Advanced Setting > VPN Configuration
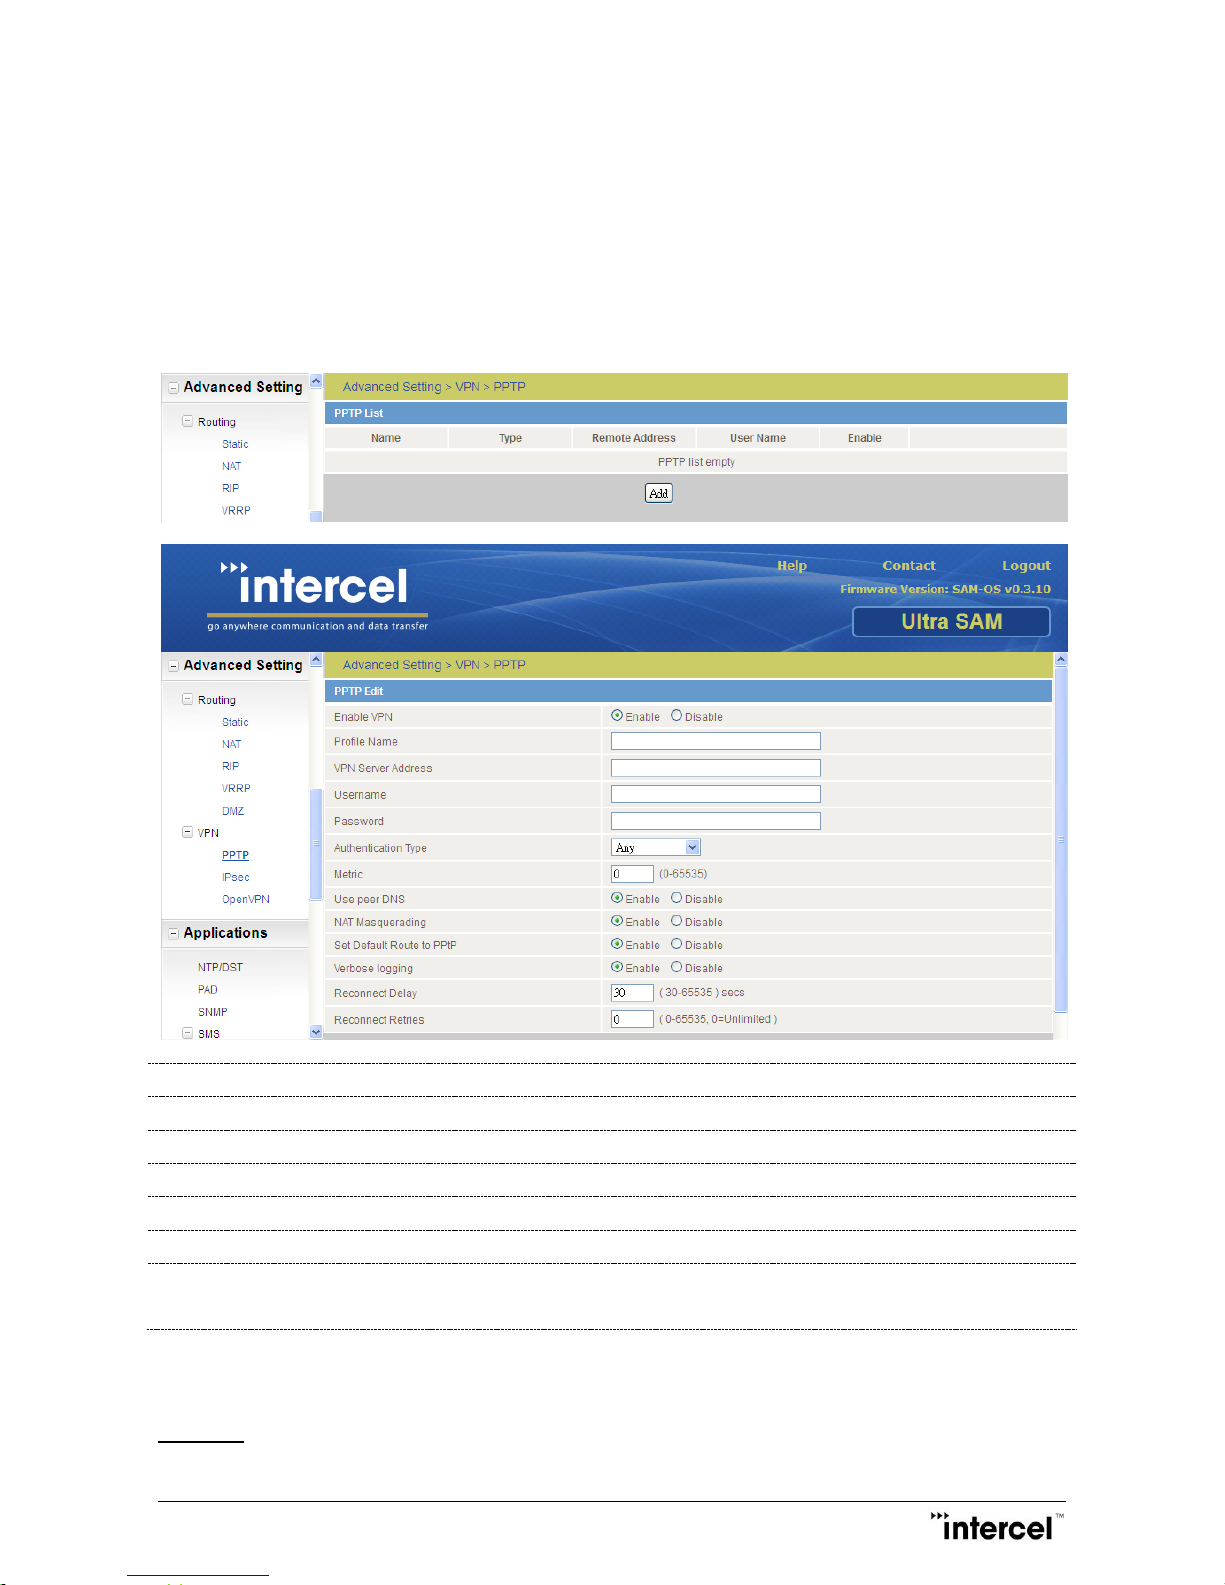
5.9.1 PPTP
PPTP (Point-to-Point Tunneling Protocol) enables user to set up a virtual point-to-point tunnel over the Internet
between UltraSAM4W and PPTP server. All the data are encrypted during the transmission so that the security of data
transmission is guaranteed.
To create a new profile, please click Add button.
Enable VPN
Enable / Disable PPTP service
Profile Name
User defined PPTP profile name
VPN Server Address
IP address of VPN server which UltraSAM4W connect to
Username
Username for PPTP service
Password
Password for the PPTP service
Authentication Type
Authentication method in a PPTP
Metric
Priority of the PPTP setting profile
The lower the metric value, the higher the priority
Fill in the username, password and IP address of the remote server that you want to connect to through PPTP.
After fill in the information, click Save to activate the function.
TEMPLATE:

Ultra SAM4W User Guide V1.3
32
Ver1.3
1. Access UltraSAM4W Main Page, Enter APN/PIN and achieved Public IP condition.
2. Internet Setting -> VPN -> PPTP
3. Click Add button to create a new profile
4. Fill in the parameter
Profile Name Customer defined name
VPN Server Address PPTP Server IP Address
Username corresponding PPTP’s account username
Password corresponding PPTP’s account password
Authentication Type Type of authentication (eg. MS-CHAP-V2)
Metric 10
5. Click Save to store the setting
Ultra SAM4W User Guide V1.3
33
Ver1.3
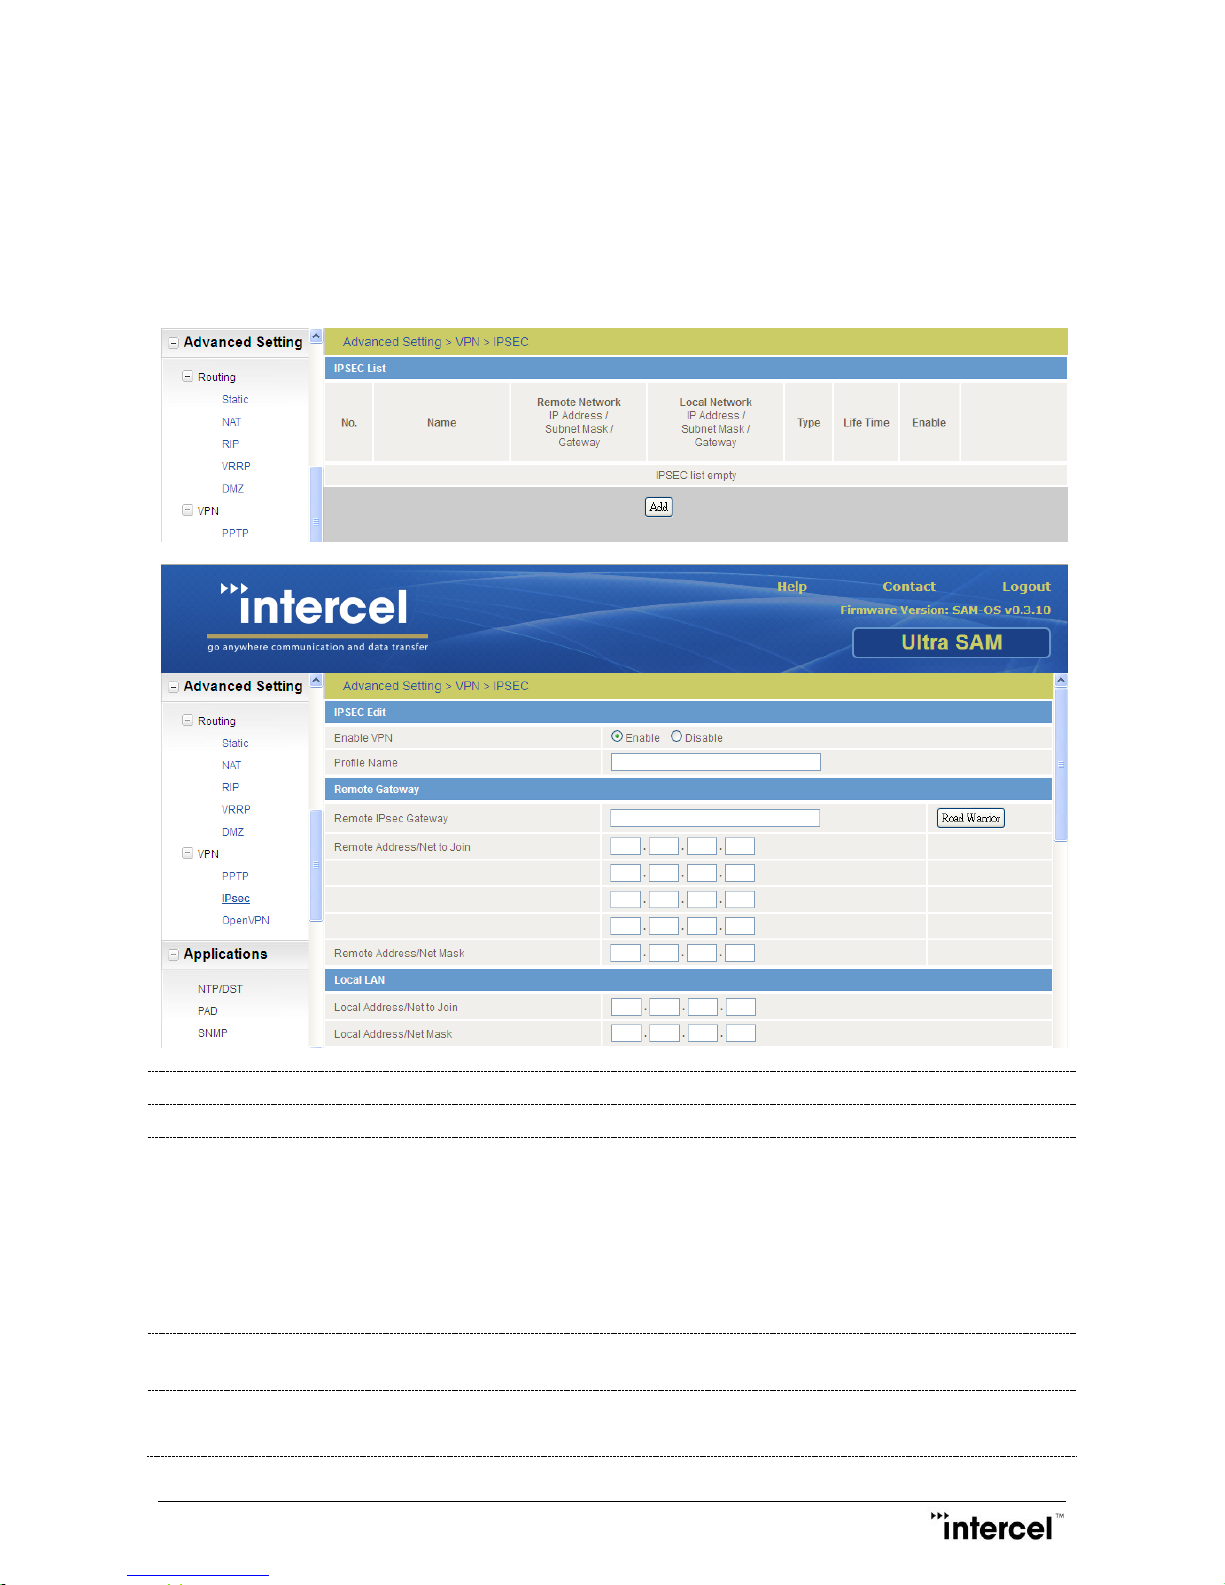
5.9.2 Ipsec
The UltraSAM4W modem can help you set up a VPN (Virtual Private Network) over a public telecommunication
infrastructure such as the Internet, providing remote offices or individual users secure access to your organization’s
network. It aims to avoid an expensive system of owned or leased lines that can be used by only one organization.
To create a new profile, please click Add button.
Enable VPN
Enable / Disable Ipsec service
Profile Name
User defined Ipsec profile name
Remote Gateway
Remote Ipsec Gateway
- Public IP address of the Ipsec server
Remote Address/Net to Join
- IP address of Remote server on the VPN connection (eg. 192.168.1.1)
Remote Address/Net Mask
- Network Mask of Remote server on the remote network
Road Warrior
Click this to configure the VPN connection for Road Warrior (connection from a
dynamic IP Address) use.
Local LAN
Local Address/Net to Join
- Local IP address of the VPN connection

Ultra SAM4W User Guide V1.3
34
Ver1.3
Local Address/Net Mask
- Local IP Network Netmask of the VPN connection
Negotiation
Encap Protocol
- Encapsulation protocol used in the VPN connection
IKE Mode
- IKE mode used in the VPN connection
PFS
- PFS On/Off Selection
IKE Encryption
- IKE encryption type used in the VPN connection
IKE Hash
- IKE Hash type used in the VPN connection
Ipsec Encryption
- IPSec encryption type used in the VPN connection
Ipsec Hash
- IPSec Hash type used in the VPN connection
DH Group
- DH Group used in the VPN connection
DPD Action
- DPD Action used in the VPN connection
DPD Keep Alive Time
- Time in seconds for DPD to keep alive
DPD Timeout
- Time in seconds for DPD to timeout
IKE Rekey Time
- IKE Rekey time used in the VPN connection
SA Life Time
- SA Life time used in the VPN connection
Key Mode
- Type of key mode used in the VPN connection. User can choose:
Pre Shared Key
RSA Keys
Certificates
Key mode requires different configuration options

Ultra SAM4W User Guide V1.3
35
Ver1.3
TEMPLATE:
1. Access UltraSAM4W Main Page, Enter APN/PIN and achieved Public IP condition.
2. Internet Setting -> VPN -> Ipsec
3. Click Add button to create a new profile
4. Fill in parameter
Remote Ipsec Gateway Remote Gateway Public IP Address
Remote Address/Net to Join Remote Gateway Local IP Address
(the 4th group set to be “0” represent 1~255, 192.168.1.0 represent
192.168.1.1 ~ 192.168.1.255)
Remote Address/Net Mask Remote Gateway Local IP Address Net Mask
Local Address/Net to Join Local Address IP Address
(the 4th group set to be “0” represent 1~255, 192.168.2.0 represent
192.168.2.1 ~ 192.168.2.255)
Local Address/Net Mask Local Address Net Mask
Encap Protocol ESP
IKE Mode Main
Pfs On
IKE Encryption AES
Ipsec Hash MD5
DH Group Group2 (1024)
DPD Action None
DPD Keep Alive Time 10
DPD Timeout 60
IKE Rekey Time 3600
SA Life Time 28800
Key Mode Pre Shared Key
Pre Shared Key customer defined (example: 123456)
Remote ID customer defined
Local ID customer defined
5. After parameters entry, click Save to store & activate the Ipsec feature
6. If using another UltraSAM4W for another side, all parameters should be similar except the Addressing

Ultra SAM4W User Guide V1.3
36
Ver1.3
5.9.3 OpenVPN
OpenVPN is an open source software application that implements virtual private network (VPN) techniques for
creating secure point-to-point or site-to-site connections in routed or bridged configurations and remote access
facilities. It uses a custom security protocol that utilizes SSL/TLS for key exchange.
To create a new profile, please click Add button.
Enable VPN
Enable / Disable OpenVPN service
Profile Name
User defined OpenVPN profile name
OpenVPN Type
Server, Client or Peer-to-peer Setting of OpenVPN
Server Port
Server setting: Port definition, UDP or TCP
VPN Network Address
VPN services Network IP Address
VPN Network Mask
VPN services Network Mask
Generate DH.
DH. Difie-Hellman parameter. Generate the server and client keys used by the
VPN service.
Server Certificates
The applicable details to identify the OpenPVN server and create a CA certificate
based on the information entered.
Authentication Type
Authentication type used on the VPN connection.
Certificate
Username / Password
Certification Management
Certification Generate/Download/Revoke Management
TEMPLATE:
UltraSAM4W Server

Ultra SAM4W User Guide V1.3
37
Ver1.3
1. Access UltraSAM4W Main Page, Enter APN/PIN and achieved Public IP condition.
2. Internet Setting -> VPN -> OpenVPN
3. Click Add button to create a new profile
4. VPN Edit
Profile Type OpenVPN
Enable VPN Enable
Profile Name Any profile name is fine
OpenVPN Type Server
Server Port 1194 (any port which is not being used) UDP/TCP
VPN Network Address 10.0.0.0(Private Network)
VPN Network Mask 255.255.255.0
Click Generate DH
If first time using, Generate DH will take over 30mins to complete
5. After finishing step 3, fill in Server Certificates’ information & click Generate CA certificate
6. Authentication Type, choose Certificate
7. Certificate Management, adding certificate name and fill in the corresponding information
8. Finished Step 6, click Generate, this action should waiting around 3~5 seconds, and click Download to download
the certificate to PC terminal
9. Repeat Step 6~7 for multi-certificate generation
10. Click Save
TEMPLATE:
UltraSAM4W Client
1. Access UltraSAM4W Main Page, Enter APN/PIN and achieved Public IP condition.
2. Internet Setting -> VPN,Select OpenVPN with type Client
Server IP Address Fill in the Server Public IP Address
Server Port Server’s Port number & connection type UDP/TCP
3. Click Upload to upload the Certificate generate by the server

Ultra SAM4W User Guide V1.3
38
Ver1.3
5.10 Applications > NTP/DTS Configuration
5.10.1 Network Time
NTP Synchronization Status
Status of NTP Synchronization (Enable / Disable)
Enable DST
Enable DST function
Time Zone
Time Zone Selection
NTP Server Address
Customer defined NTP server IP address
This page enables the UltraSAM4W modem to synchronize its time with a server in the internet in using TIME protocol.
Users can indicate the server in the server address bar. Time zone can be chosen from the Time Zone list, and if the
Enable DST is checked, the Daylight saving time will be used.

Ultra SAM4W User Guide V1.3
39
Ver1.3
5.11 Applications > PAD Configuration
5.11.1 PAD
Host Name
User defined Host Name
Port
Communication Port, beware some port no. used in the system.
Baud Rate
UART communication Baud Rate
Inter-character timeout
Timeout if longer then defined value
Local Encoding
Encoding Activate (Enable / Disable)
PAD Mode
Mode of communication protocol (TCP / UDP / GMTP)
PAD Auto Answer
PAD Auto Answer (default Disable)

Ultra SAM4W User Guide V1.3
40
Ver1.3
5.12 Applications > SNMP Configuration
5.12.1 SNMP
SNMP (Simple Network Management Protocol) enables one or more PCs in the LAN to monitor and manage a group of
hosts and devices in the computer network.
SNMP Status
Status of SNMP (Enable / Disable)
Read-Only Community Name
Allows a managed device for read-only access to node-specific information
Read-Write Community Name
Allows a managed device for read-write access to node-specific information

Ultra SAM4W User Guide V1.3
41
Ver1.3
5.13 Applications > SMS Configuration
5.13.1 New Message
Destination Number
Phone Destination Number, default to be 5 entry.
Customers could add or reduce the destination number by themselves.
Message Body
Maximum number of characters can vary depending on coding scheme. In GSM7
bit mode 160 characters can be sent within a message but the limit changes to 50
characters if the message includes special characters.
The Mobile Phone column should contain the entire phone number information
with country code (e.g. +61 for Australia), area code and phone number.
5.13.2 Inbox
From
Source of the Message sent from
Time
Time of SMS message received

Ultra SAM4W User Guide V1.3
42
Ver1.3
Message
Message Body Content
5.13.3 Outbox
To
Destination of the Message sent to
Time
Time of SMS message sent out
Message
Message Body Content
5.13.4 Diagnostics
SMS Diagnostic providing channel to execute command through an authorized mobile device (white list device).
Device could be added to the white list on Inbox / Outbox page.

Ultra SAM4W User Guide V1.3
43
Ver1.3
5.13.5 Setup
General SMS Configuration
Status of SMS (Enable / Disable)
Message per Page setting
SMS Encoding Scheme
SMSC Address
SMS Configuration for
Redirection
Setting for Redirecting SMS message
Administrator could set to Redirect SMS to another mobile device or PC device
through TCP / UDP connection
SMS Configuration for Remote
Diagnostics
Status of Remote Diagnostic feature (Enable / Disable)
IMPORTANT:
If the remote SMS administration & control feature will be use, please disable the Web GUI SMS capability above. This
is to avoid interference with the remote SMS feature.

Ultra SAM4W User Guide V1.3
44
Ver1.3
5.14 Applications > GPS Configuration
Applies to UltraSAM4W modem equipped with GPS feature which assist users to have GPS tracking function.
By using the web browser interface, administrator could get the modem installation location. Please ensure that GPS
antenna is properly connected and is located outdoor.
GPS Operation
Status of GPS (Enable / Disable)
GPS Status
GPS Information Status, including location update and satellites information

Ultra SAM4W User Guide V1.3
45
Ver1.3
5.15 System > Periodic Management
5.15.1 Periodic Management Configuration
5.15.2 Periodic Ping Setting
UltraSAM4W providing periodic ping function which transmit controlled ping packets to Destination Address or
Redundant Address. If UltraSAM4W not receives responses to ping command, UltraSAM4W will automatically reboot
after “Failure Before Reset” retry.
Destination Address
IP Address for ping packets to transmit to
Redundant Address
Secondary IP Address for ping packets to transmit to
Retry Period
Time period for sending Ping packets
Default 0 means Disable
Failure Retry Period
Time for retry if previous trial failed
Default 0 means Disable
Failure Before Reset
Time of failure to reset the modem unit
Default 0 means Disable
5.15.3 Periodic Reset
UltraSAM4W providing automatically reboot function after a defined time period (minutes). Administrator could
configure this feature with adapted to their network.
Force Reset Every
Self-defined Periodic reset time (min)
Default 0 means Disable
Ultra SAM4W User Guide V1.3
46
Ver1.3
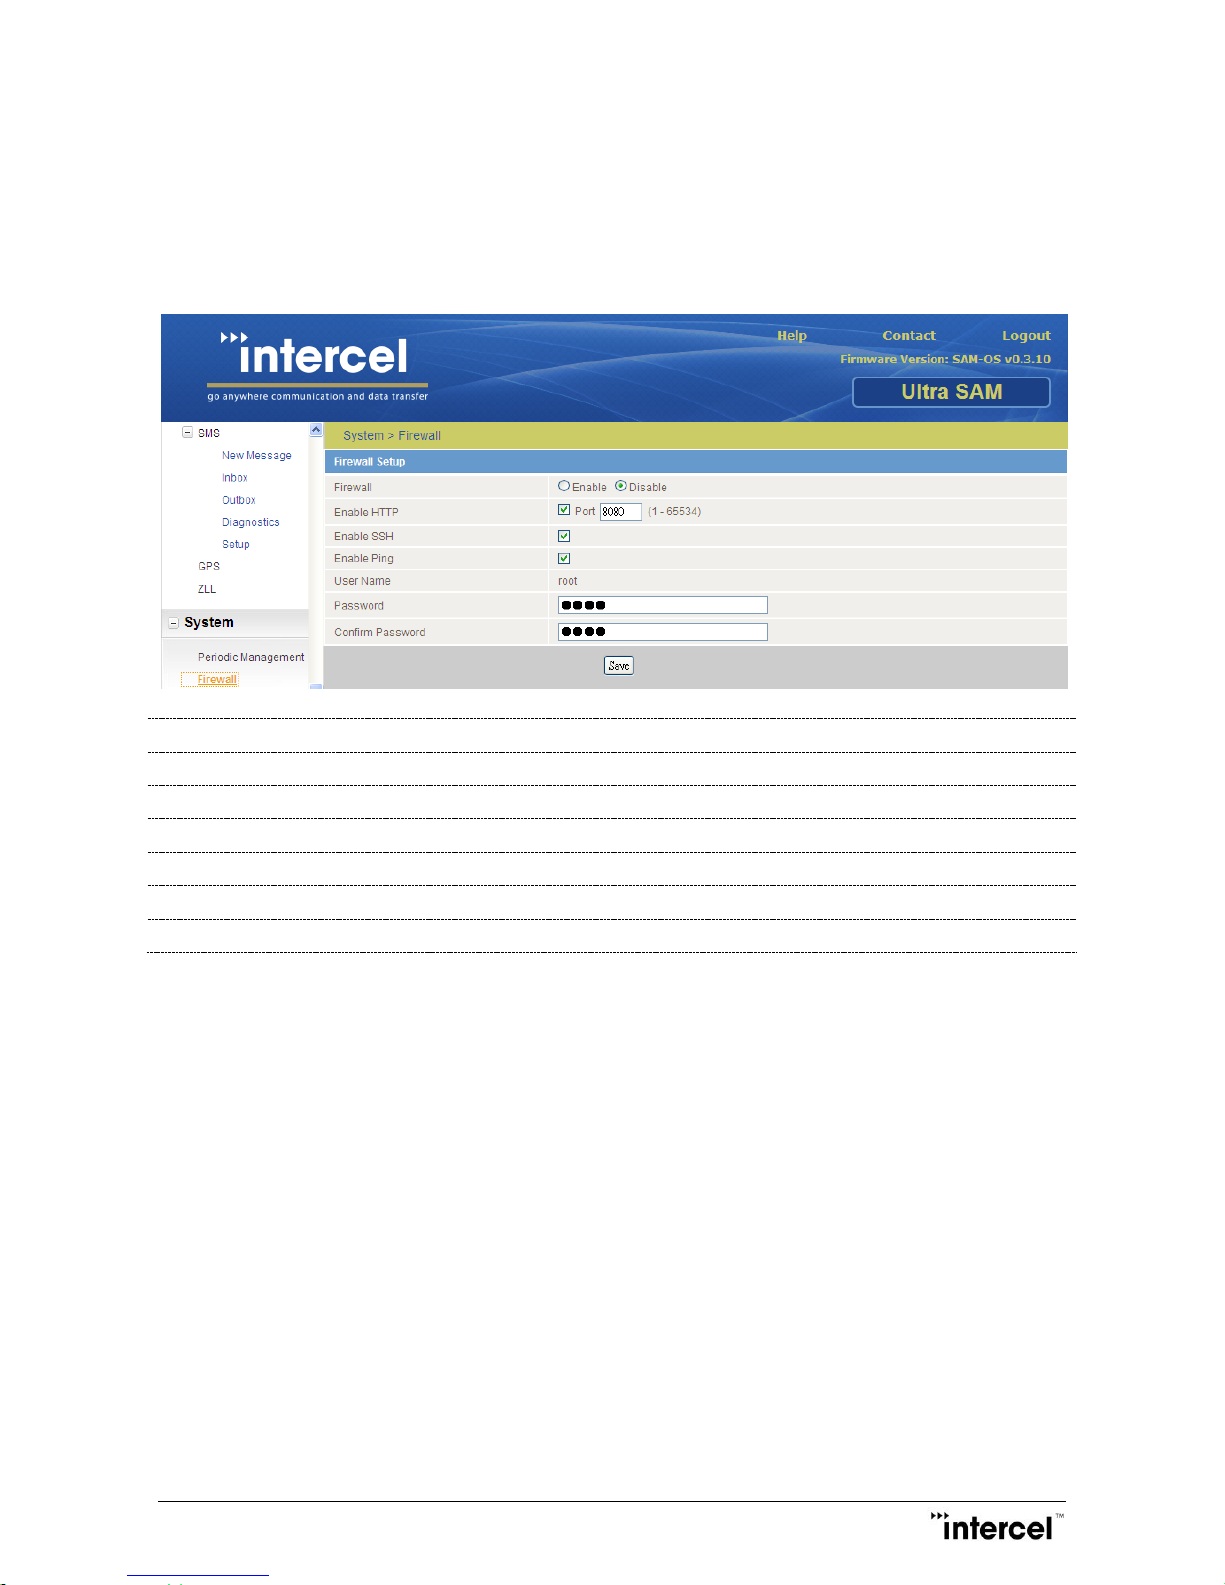
5.16 System > Firewall Configuration
5.16.1 Firewall Setup
UltraSAM4W providing automatically reboot function after a defined time period (minutes). Administrator could
configure this feature to adapt to their network. Also, Administrator could change the root password.
Firewall
Status of Internal Firewall setting(Enable / Disable)
Enable HTTP
Enable or Disable for remote HTTP access
Enable SSH
Enable or Disable for remote Telnet SSH access
Enable Ping
Enable or Disable for ping responses on the WWAN connection
Username
Web Browser UI Root Account
Password
New Web Browser UI’s Password
Confirm Password
Reconfirmation of New Web Browser UI’s Password
Ultra SAM4W User Guide V1.3
47
Ver1.3
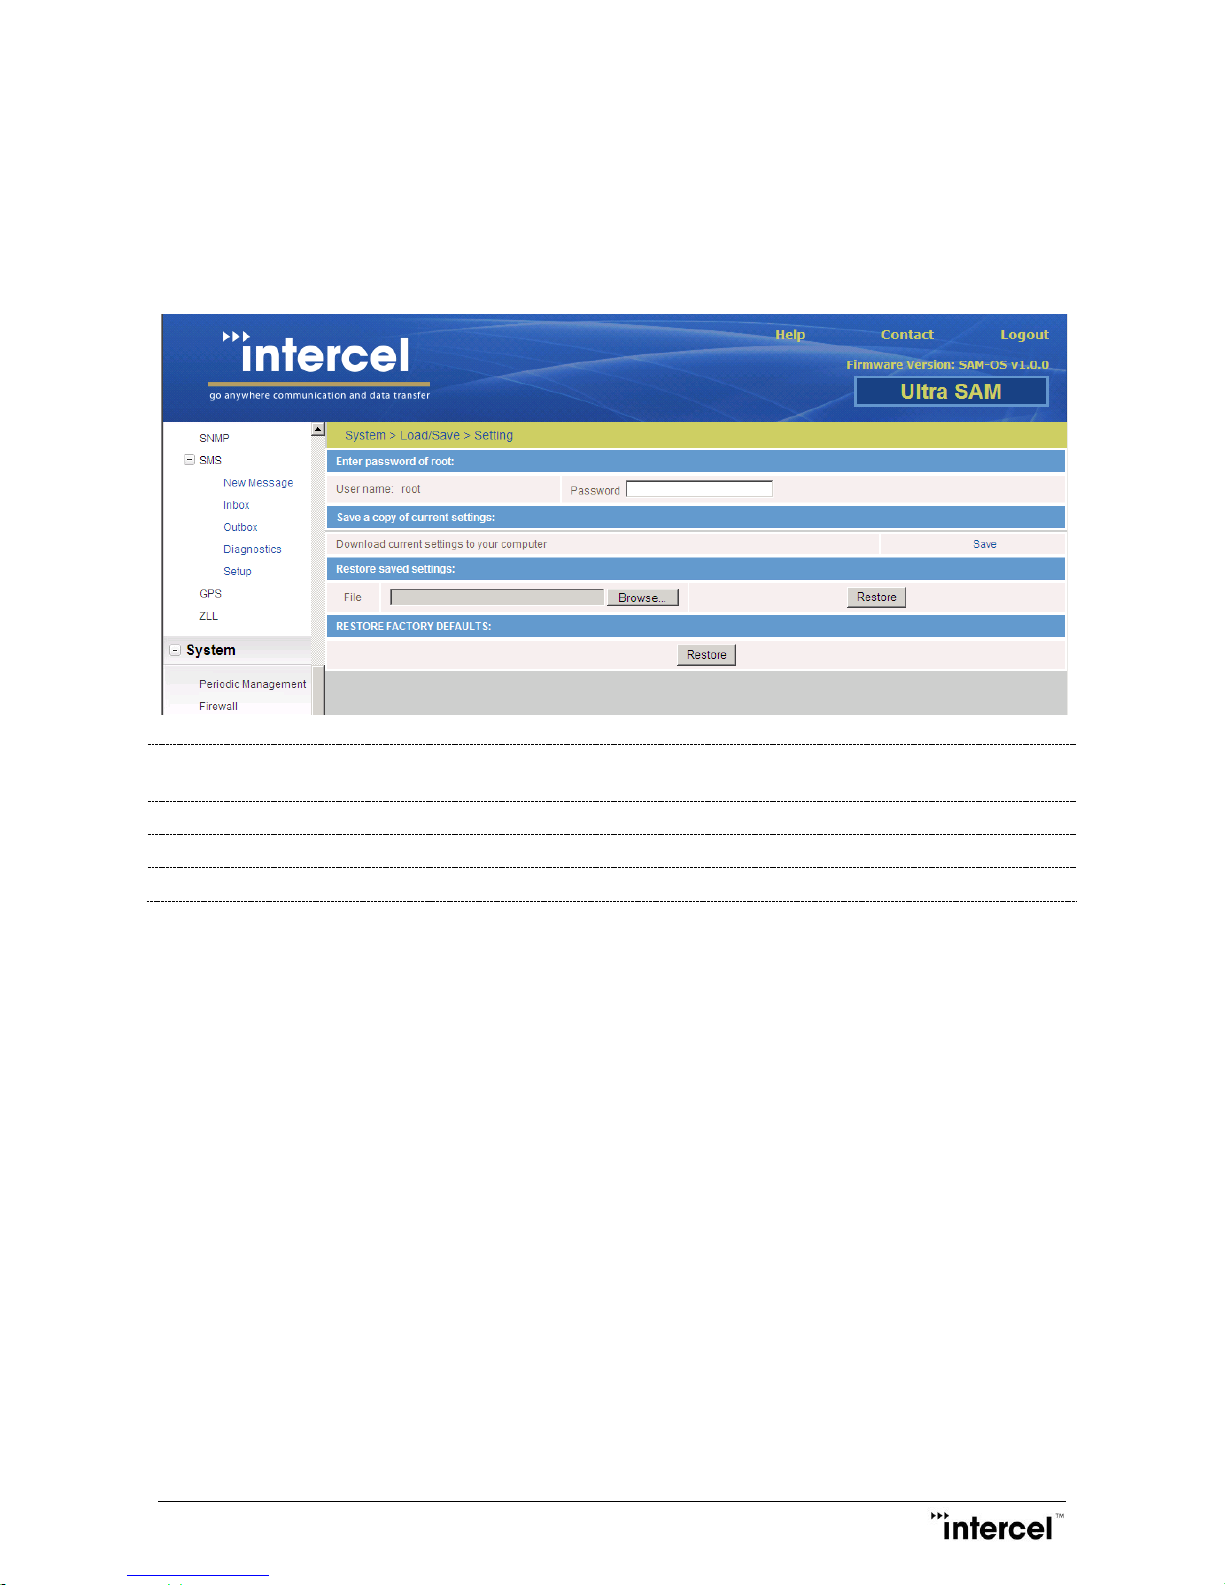
5.17 System > File Upload/Save Configuration
5.17.1 Setting
Administrator need to re-enter the root account password to get the right of save, restore UltraSAM4W setting file or
even Restore UltraSAM4W device to factory default setting.
Enter password of root
Root account’s password to get authority to save setting to local PC, restore
setting from PC file and Factory Reset
Save a copy of current settings
Click Save button to read the UltraSAM4W setting file
Restored saved setting
Select the setting file by click browse button, click Restore to process
Restore Factory Default
Click Restore to process factory reset
Ultra SAM4W User Guide V1.3
48
Ver1.3
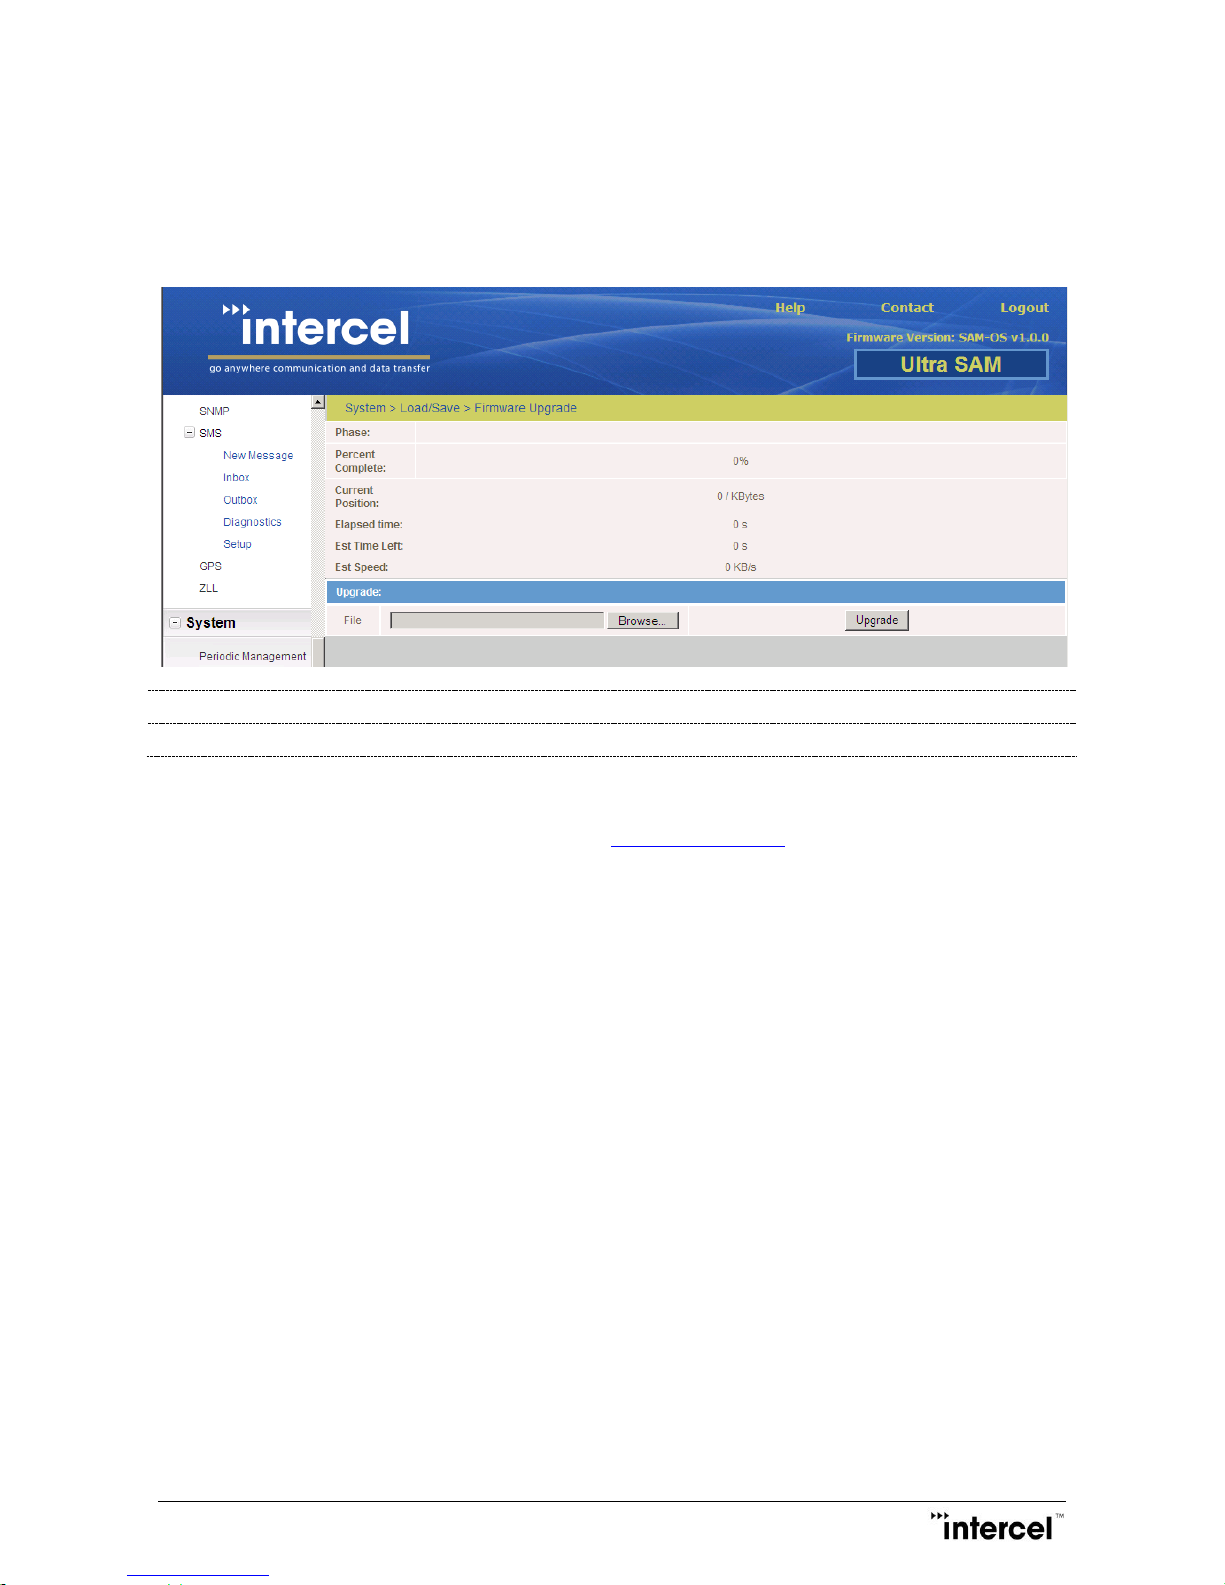
5.17.2 Firmware Upgrade
Firmware Upgrade page allows administrator to upgrade the UltraSAM4W with a new firmware which stored in local
disk.
Only root account has the authority to perform the upgrade process. After upgrade process, the UltraSAM4W will
restart automatically.
File
Browse the upgrade firmware in Local PC
Upgrade
Upgrade button to start the upgrade process
Caution: DO NOT interrupt the power, network connection or press the reset button during firmware upgrade.
Latest firmware can be access through Intercel’s webpage: www.Intercel.com.au
Ultra SAM4W User Guide V1.3
49
Ver1.3
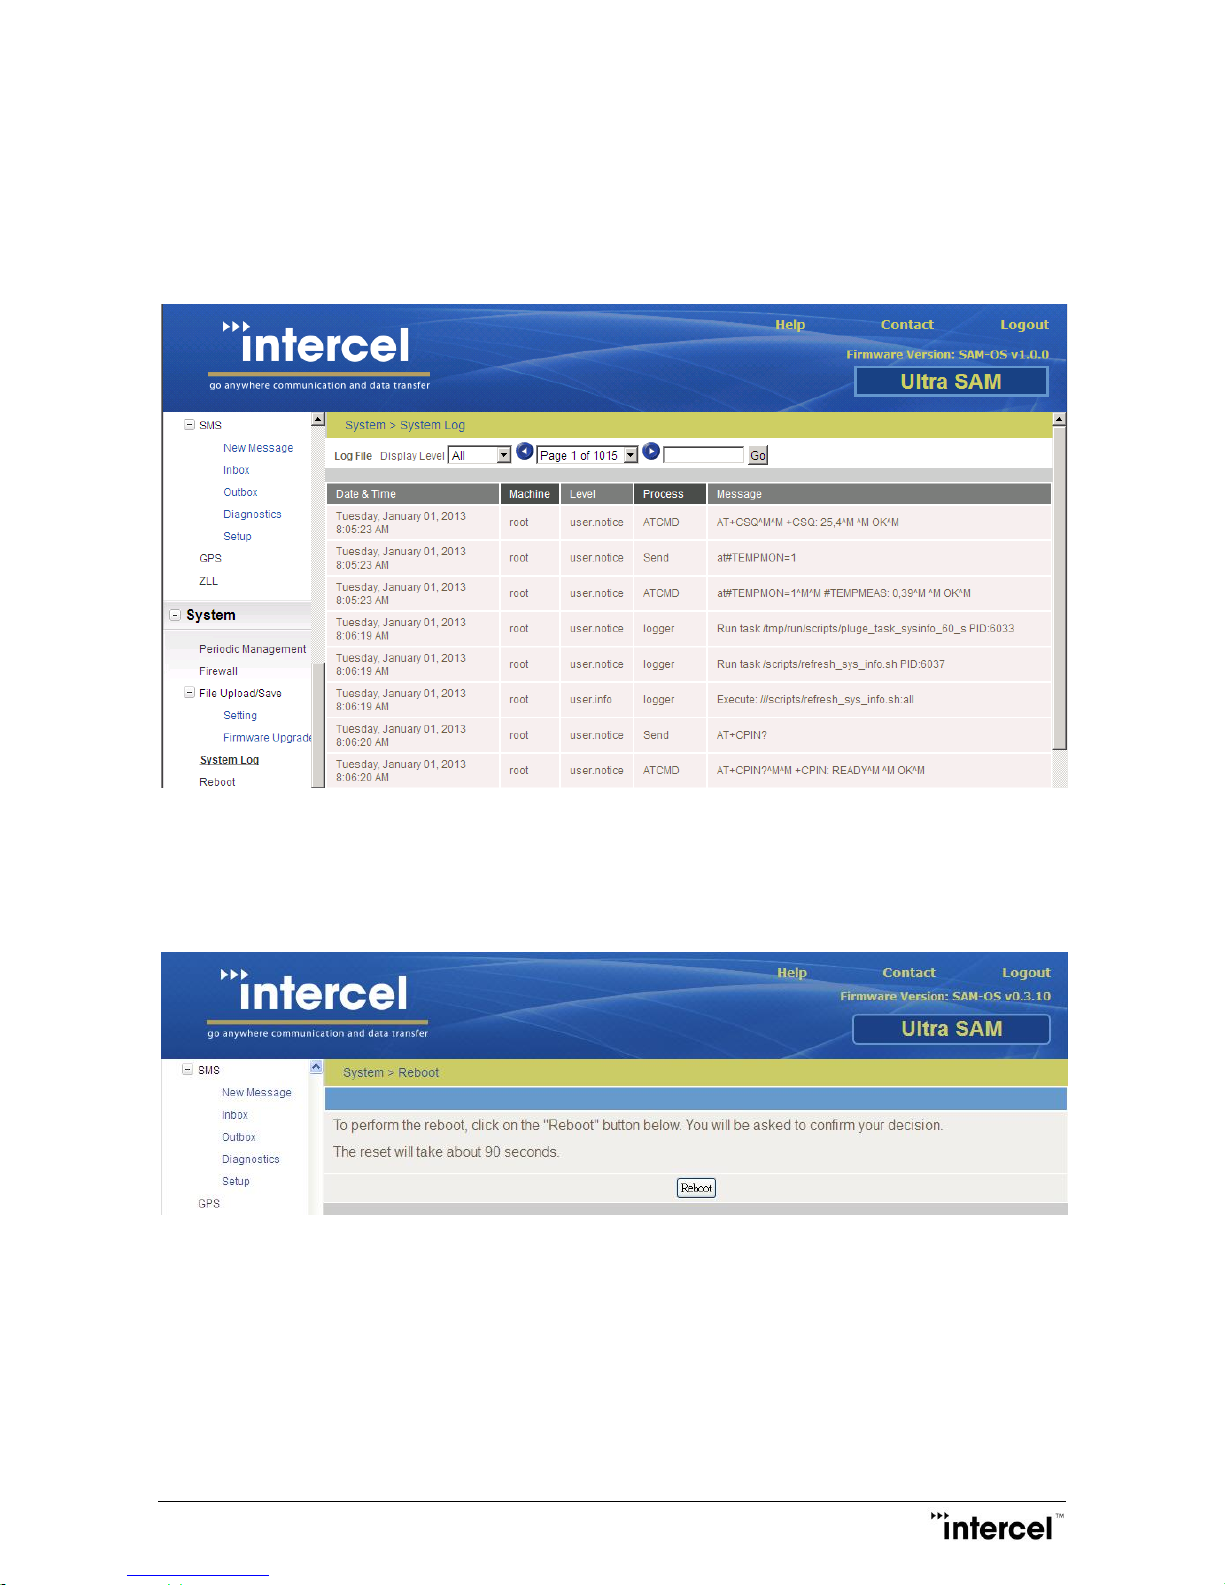
5.18 System > System Log Configuration
5.18.1 Log
The log page shows the most recent log record of the system. It shows some important data during the set-up of the
3G connection. It is only useful for customer support.
5.19 System > Reboot Configuration
To perform the reboot, click on the Reboot button. User will be asked to confirm the decision. The reset will take
about 90 seconds to be finished.

Ultra SAM4W User Guide V1.3
50
Ver1.3
5.20 Remote SMS Administration
5.20.1 SMS
The remote SMS administration feature enables the user to control and manage the UltraSAM4W thru the use of SMS
commands. This feature is available on specific firmware releases (from V0.0.9 and onwards). Please check with
Intercel if you need this feature.
IMPORTANT:
The SMS feature in GUI must be “Disabled” prior to running this feature. Otherwise, the feature will not work as all
received SMS will be diverted to the GUI inbox. The SMS commands are case-sensitive hence, must be used exactly as
depicted below.
The syntax as follows:
Cellinfo
Expected response:
DevName: UltraSAM
FW: Ver-0.0.5
SerNo: XXXXXXXXXXXXXXX
IMEI: XXXXXXXXX
IMSI: XXXXXXXXXXXX
Cellstatus
Expected response:
System mode: LTE
Technology: WCDMA/LTE
Band: 850/LTE B1
Status: ‘connected’
Access Tech: SELRAT=XX
RSSI:
RSRP:
RSRQ:
CSQ:
GetAPN
Expected response:
APN: Telstra.internet
Addr: <IP Address>
GetPLMN
Expected response:
+COPS: (1, “Telstra Mobile”, “Telstra”, 50501,2 ……….
Note:
This is a scan network command. Please give it a little more time to process.

Ultra SAM4W User Guide V1.3
51
Ver1.3
Gethistory
Expected response:
Tx/Rx Traffic as of today:
TX Bytes: XXXXX
RX Bytes: XXXXX
Note:
If the device is not connected to the 3G/4G network, the statistics cannot be downloaded. The Tx/Rx statistics is
computed for every start of PDP session and is zeroed out if the APN is changed/disconnected.
Setplmn=<OprIdentifier>,<AcT>
Expected response:
+COPS: (1, “Telstra Mobile”, “Telstra”, 50501,2 ……….
Note:
<OprIdentifier> is the Operator Identifier Code (MCC/MNC in numeric format only for operator selection)
i.e. Telstra : 50501
<AcT> is the Access Technology
i.e.
0 : GSM
2 : WCDMA
7 : LTE
SetBand=<Band Index No>
Expected response:
System Mode: XXXX
BAND: xxxx
Note:
Band Index No. can be as the following:
00, Automatic
01, UMTS 3G Only
02, GSM 2G Only
03, Automatic
04, Automatic
05, GSM and UMTS Only
06, LTE Only
07, GSM, UMTS, LTE
08, CDMA, HRPD, GSM, UMTS, LTE
09, CDMA only
0A, HRPD only
0B, Hybrid CDMA/HRPD
0C, CDMA, LTE
0D, HRPD, LTE
0E, CDMA, HRPD, LTE
0F, CDMA, GSM, UMTS
10, CDMA, HRPD, GSM, UMTS
11, UMTS and LTE Only
12, GSM and LTE Only
Note: After doing “SetBand”, please do “CellStatus” and check if the !SELRAT parameter is equal to the sent band index number.
(SELRAT correspond to SELected Radio Access Technology).

Ultra SAM4W User Guide V1.3
52
Ver1.3
Reboot
Expected response:
Reboot command received, please do cellstatus after 90 seconds (2 times)
Action:
Device will reboot.
Setapn=<APNName>,<username>,<password>,<AuthType>
Expected response:
APN will be changed, device will reboot. Pls do Cellstatus after 90 sec
Note:
<APNName> is the Operator Access Point Name (APN). I.e. Telstra: Telstra.extranet
<Username> is the user name for the APN access
<Password> is the password for the APN (Not to be confused with SIM Code)
<AuthType> is either CHAP if no authentication is required (no user/password) or PAP if authentication is required.
IMPORTANT:
If the received SMS does not contain any of the above SMS commands, the SMS will be automatically
removed/deleted from the SIM card storage.

Ultra SAM4W User Guide V1.3
53
Ver1.3
6 Troubleshooting
The modem is switched on but it cannot connect to the network (internet LED is
OFF).
Please check:
That the antenna is properly connected and the value of the signal strength, please refer to status summary.
If the signal is too weak, the modem might have difficulties to connect.
That SIM card has a valid subscription and is not locked due to a pin code (see the configuration instructions
to take care of the pin code). Put the SIM card in a mobile phone to check it if necessary.
That the SIM card is properly inserted in the UltraSAM4W modem. Remove it from the modem and plug it
again.
Your firmware configuration: APN and PPP username/password, SIM pin code management.
If you do not see any improvement, please use the “Reset to Default” function (either use the Reset Button or the
HTTP interface): it is going to reset the UltraSAM4W modem to its factory default configuration. You will need to
configure again the UltraSAM4W modem.
The modem is connected to the network (Internet LED is ON) but the PC, that is
connected to the UltraSAM4W modem through an Ethernet cable, cannot browse
internet.
Please check:
That the Ethernet cable is properly connected between the UltraSAM4W modem and the PC.
The IP configuration of PC. The Ethernet connection can be set to have either a “static” IP address or
configuration or to use the “automatic” mode (DHCP). It is preferable to use the automatic mode to get the IP
and DNS addresses from the UltraSAM4W modem.
There is no DNS addresses discrepancy between the UltraSAM4W modem and the PC. Check the DNS
addresses on the “Summary” page of the HTTP interface of UltraSAM4W and on your PC Ethernet connection
status.
If you do not see any improvement, please use the “Reset to Default” function (either use the Reset Button or the
HTTP interface): it is going to reset the UltraSAM4W modem to its factory default configuration. You will need to
configure again the UltraSAM4W modem.
To disable and re-enable the Ethernet connection of your PC can also help to reset the IP configuration.

Ultra SAM4W User Guide V1.3
54
Ver1.3
7 Appendix: Abbreviations and Acronyms
APN Access Point Name
DHCP Dynamic Host Configuration Protocol
DNS Domain Name Service
HTTP Hypertext Transfer Protocol
IMEI International Mobile Equipment Identity
LAN Local Area Network
NAT Network Address Translation
PPP Point-to-Point Protocol
PUK PIN UnBlock
WAN Wide Area Network
WWW World Wide Web
.

Ultra SAM4W User Guide V1.3
55
Ver1.3
Notes

Ultra SAM4W User Guide V1.3
56
Ver1.3
Contact Information
Australia (Headquarters)
33 Glenvale Crescent
Mulgrave 3170
Victoria, Australia
Ph: +61 (0)3 9239 2000
Fx: +61 (0)3 9561 2614
Email: Intercel@Intercel.com.au
Internet: www.Intercel.com.au
New Zealand
For New Zealand Customers
Toll Free No: 0800 742 600
United Kingdom
5 Elstree Gate
Elstree Way
Borehamwood
Hertfordshire
WD6 1JD
Email: intercel@intercel.co.uk
Hong Kong
Unit 6, 17th Floor
Vanta Industrial Centre
21-33 Tai Lin Pai Road
Kwai Chung, New Territories
HKSAR of the PRC
Ph: +852 2362 9018
Fx: +852 2648 8806
Shenzhen
Room 1303, 13/F, West Wing
Tian’an High-Tech Plaza Phase II
Tian’an Cyber Park
Futian, Shenzhen
China
Ph: +86 755 8835 3778
Fx: +86 755 8835 2489
The information in this document is believed to be accurate in all respects at the time of publication but is subject to
change without notice. intercelTM assumes no responsibility for errors and omissions, and disclaims responsibility for
any consequences resulting from the use of information included herein. Additionally, intercelTM assumes no
responsibility for the functioning of undescribed features or parameters. intercelTM reserves the right to make changes
without further notice. intercelTM makes no warranty, representation or guarantee regarding the suitability of its
products for any particular purpose, nor does intercelTM assume any liability arising out of the application or use of any
product or circuit, and specifically disclaims any and all liability, including without limitation consequential or
incidental damages. intercelTM products are not designed, intended, or authorized for use in applications intended to
support or sustain life, or for any other application in which the failure of the intercelTM product could create a
situation where personal injury or death may occur. Should Buyer purchase or use intercelTM products for any such
unintended or unauthorized application, Buyer shall indemnify and hold intercelTM harmless against all claims and
damages.
 Loading...