

Page 1
www.intercel.com.au
QUICKSTART
GUIDE
Page 2
2
This quick start guide is intended to get you up and running with the eSAM Modem, and to familiarize yourself
with its basic functions and capabilities.
To follow this guide, you will need an active SIM Card from a mobile provider of your choice and a computer
with an available Ethernet port or USB to Ethernet Converter.
For a more complete guide to this modem, please see the full User Guide available on our website or contact
us at [email protected].
Page 3
3
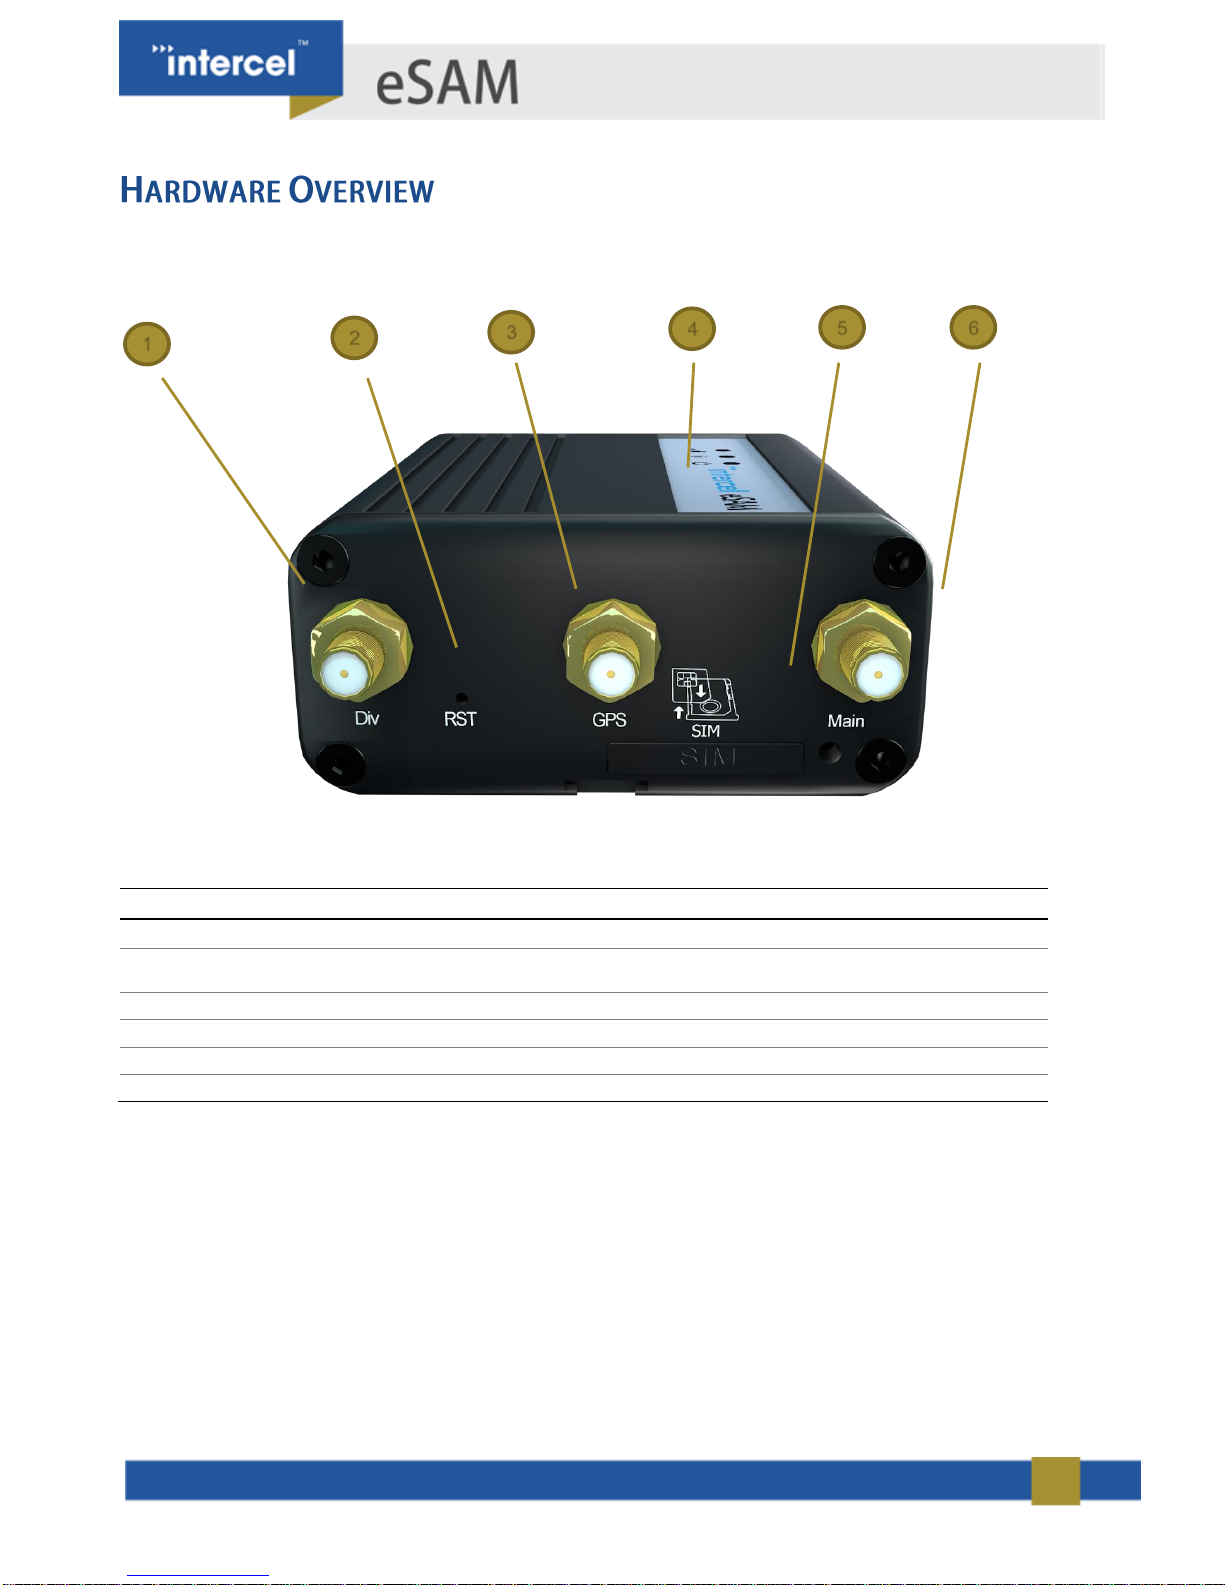
NUMBER
ITEM
Description
1
DIV Antenna Connector
Connection for Diversity (Secondary) 4G LTE Antenna
2
Reset Button
Reset Button. Press to reset the modem, hold to reset modem
to factory settings
3
GPS Antenna Connector
Connection for GPS Antenna
4
SIM Card Tray
Ejectable SIM Card Tray
5
Sim Card Eject Button
Press to eject the SIM Card Tray
6
MAIN Antenna Connector
Connection for Primary 4G LTE Antenna
2 3 4
5 1 6
Page 4
4
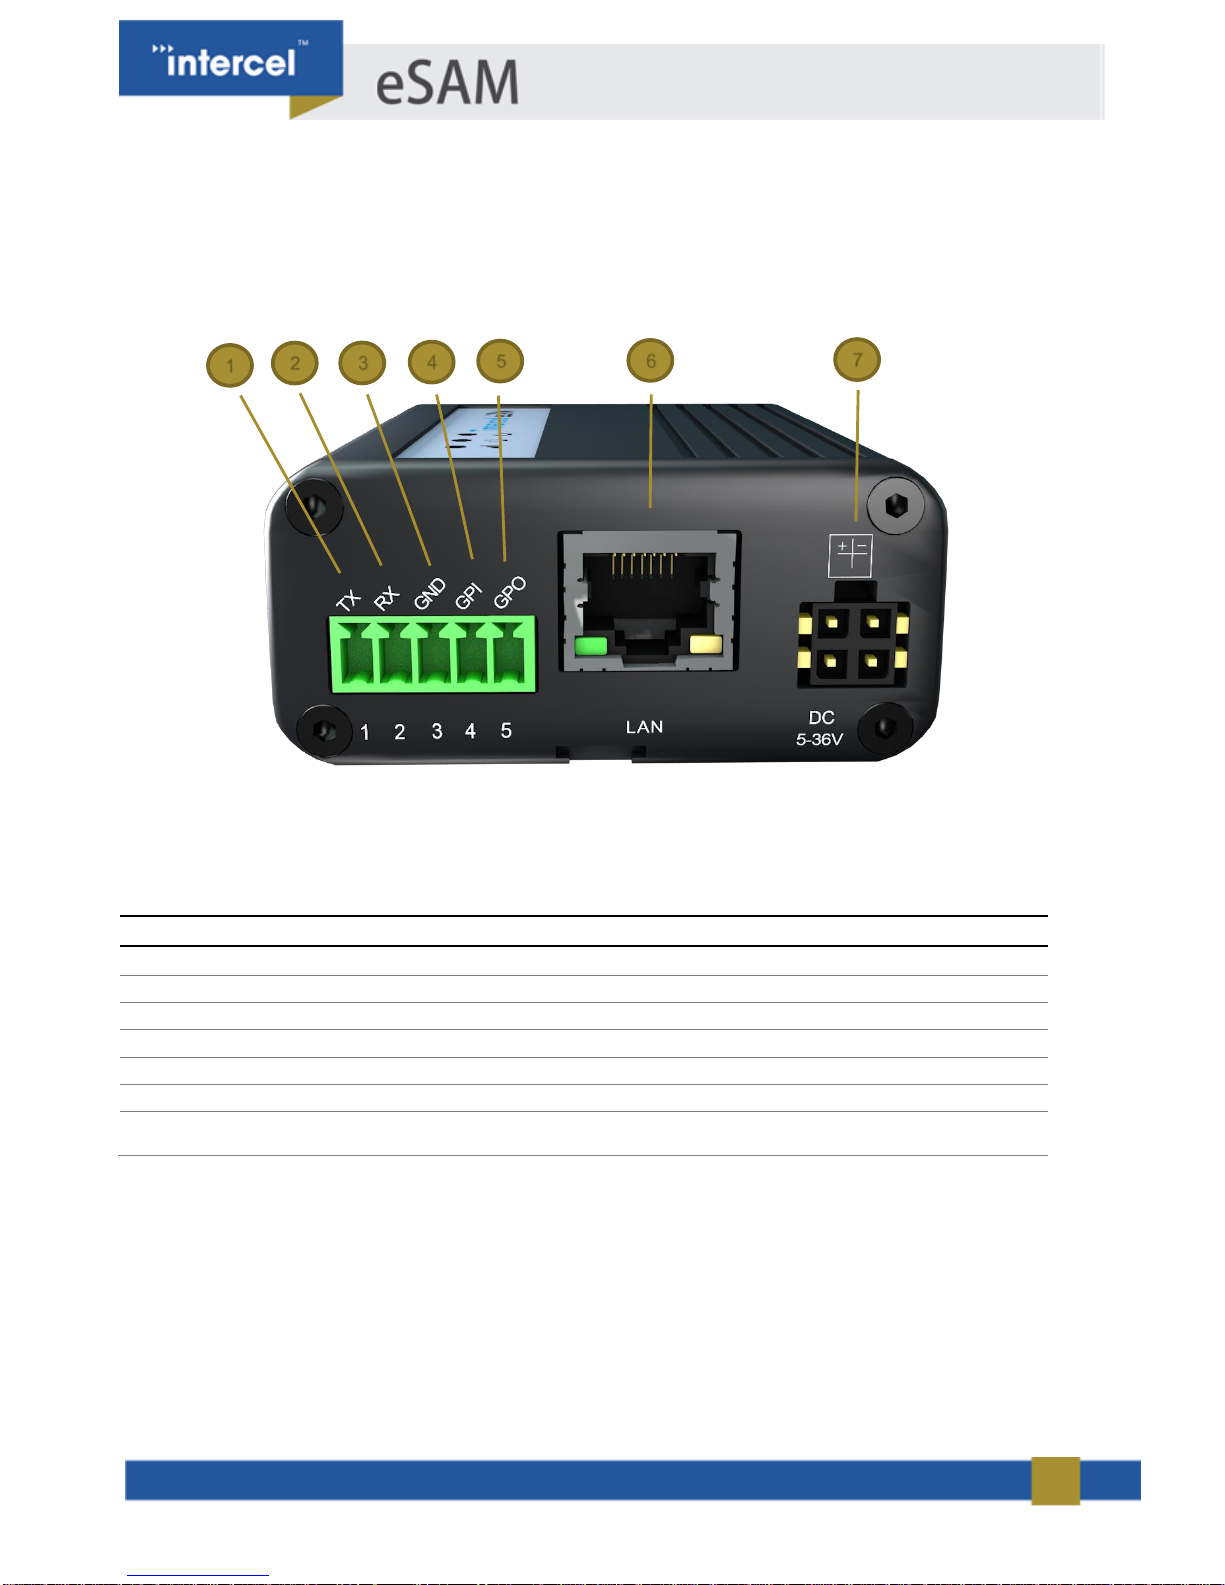
NUMBER
ITEM
Description
1
TX Port
RS232 or RS485 Transmit Port 1
2
RX Port
RS232 or RS485 Receive Port 1
3
GND
Ground, used with RS232 or RS485 Connection 1
4
GPI
GPIO Port, used as a digital input
5
GPO
GPIO Port, used as a digital output
6
LAN Port
Used to connect client devices to the eSAM Router
7
Power Connector
Micro-fit connector used to supply power to the eSAM – wide 930V input voltage range.
RS485 mode only supported on specific Models
1 2 3 4 5 6 7
Page 5
5
1.
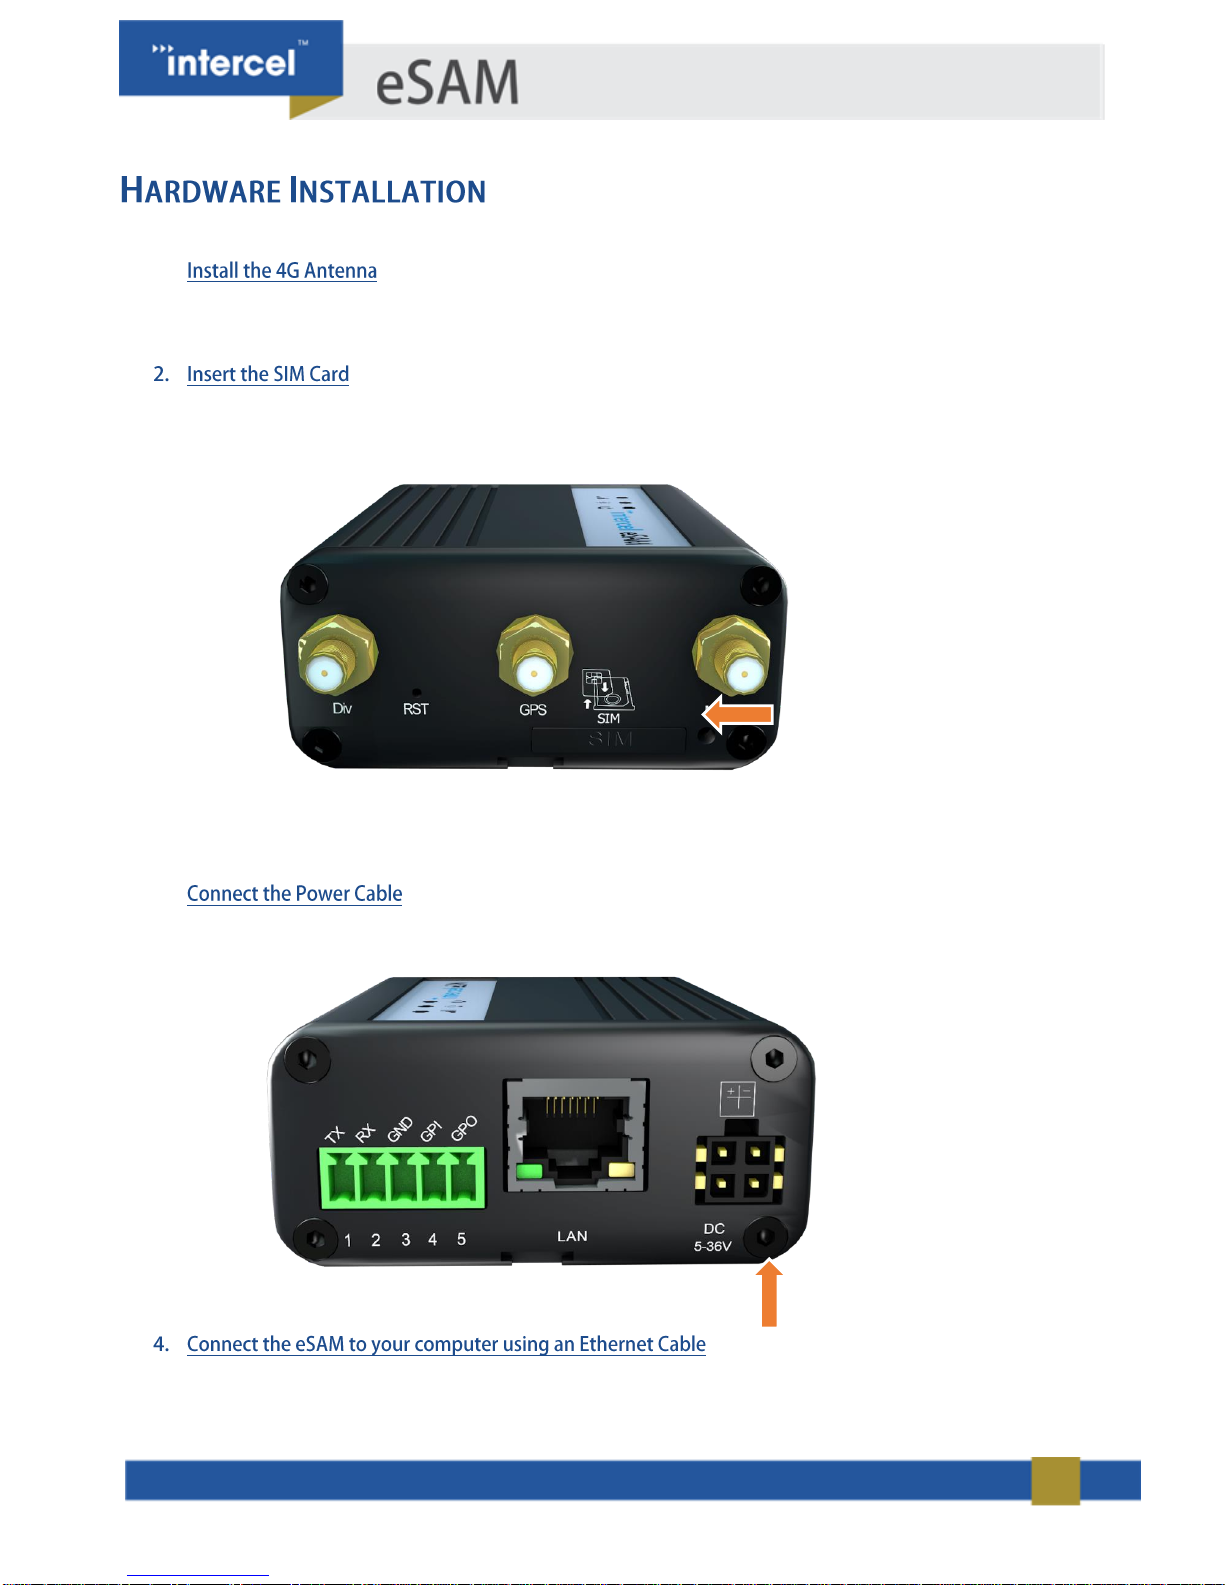
The Ultra eSAM comes supplied with two 4G LTE Antenna. Mount these antenna to the rear of the eSAM, to
the connectors labelled ‘MAIN’ and ‘DIV’
a. Remove the SIM Carrier tray from the eSAM by pressing the small ‘eject’ button located to the right of
the SIM Tray
b. Insert your SIM Card into the tray, with the gold contacts facing upwards and the cutout in the SIM
Card matching the cutout in the carrier tray
c. Re-insert the SIM Tray into the eSAM.
3.
Plug the supplied 12V Power Adapter into the wall and connect the micro-fit connector on the other side of the
power lead into your eSAM.
a. Connect an Ethernet cable between the LAN port of your eSAM and the LAN Port of your computer
b. Enable DHCP on your computer, if not enabled by default (typically not required)
Page 6
6
a. Open your preferred web browser
b. Enter ‘192.168.8.1’ into the address bar
c. Press Enter
2.
Username: admin
Password: admin
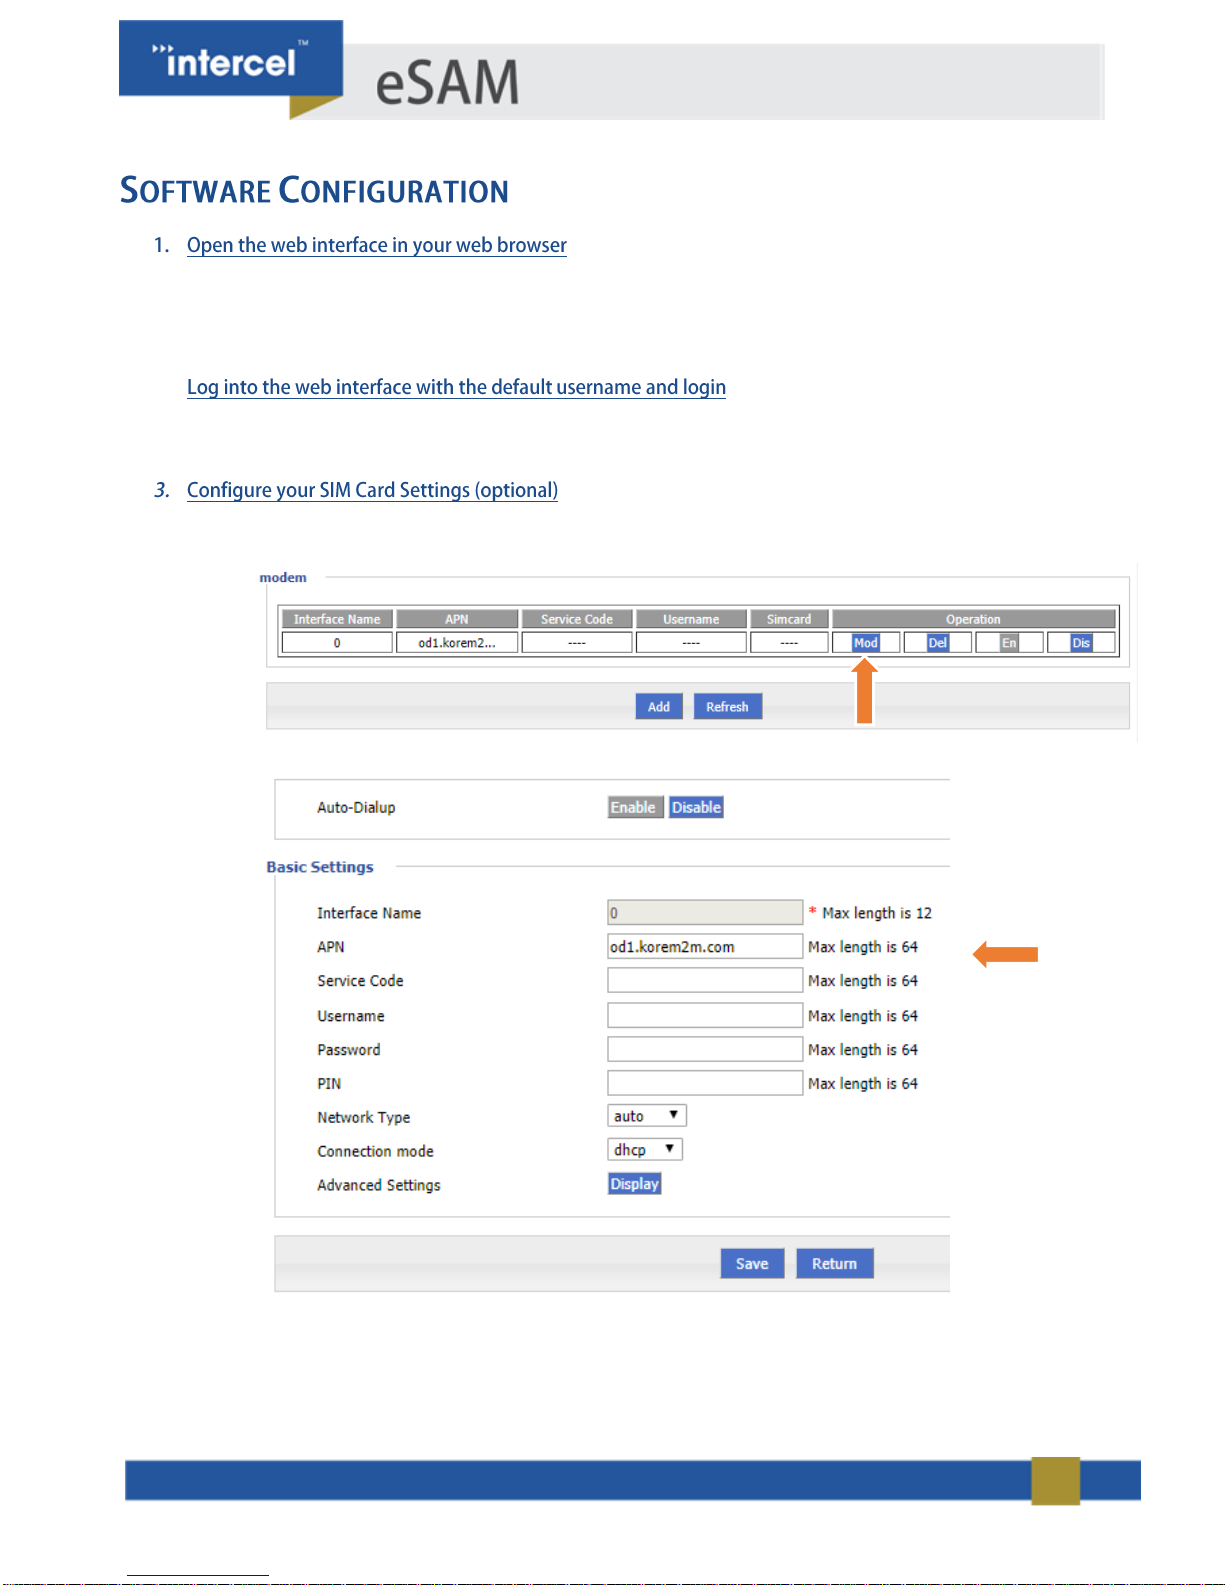
a. From the right-most menu, open the ‘Network > Modem’ Window
b. Select ‘Mod’ to modify your current Modem Settings
c. Enter the APN Provided by your mobile provider
d. Press ‘Save’ once complete.
Page 7
7
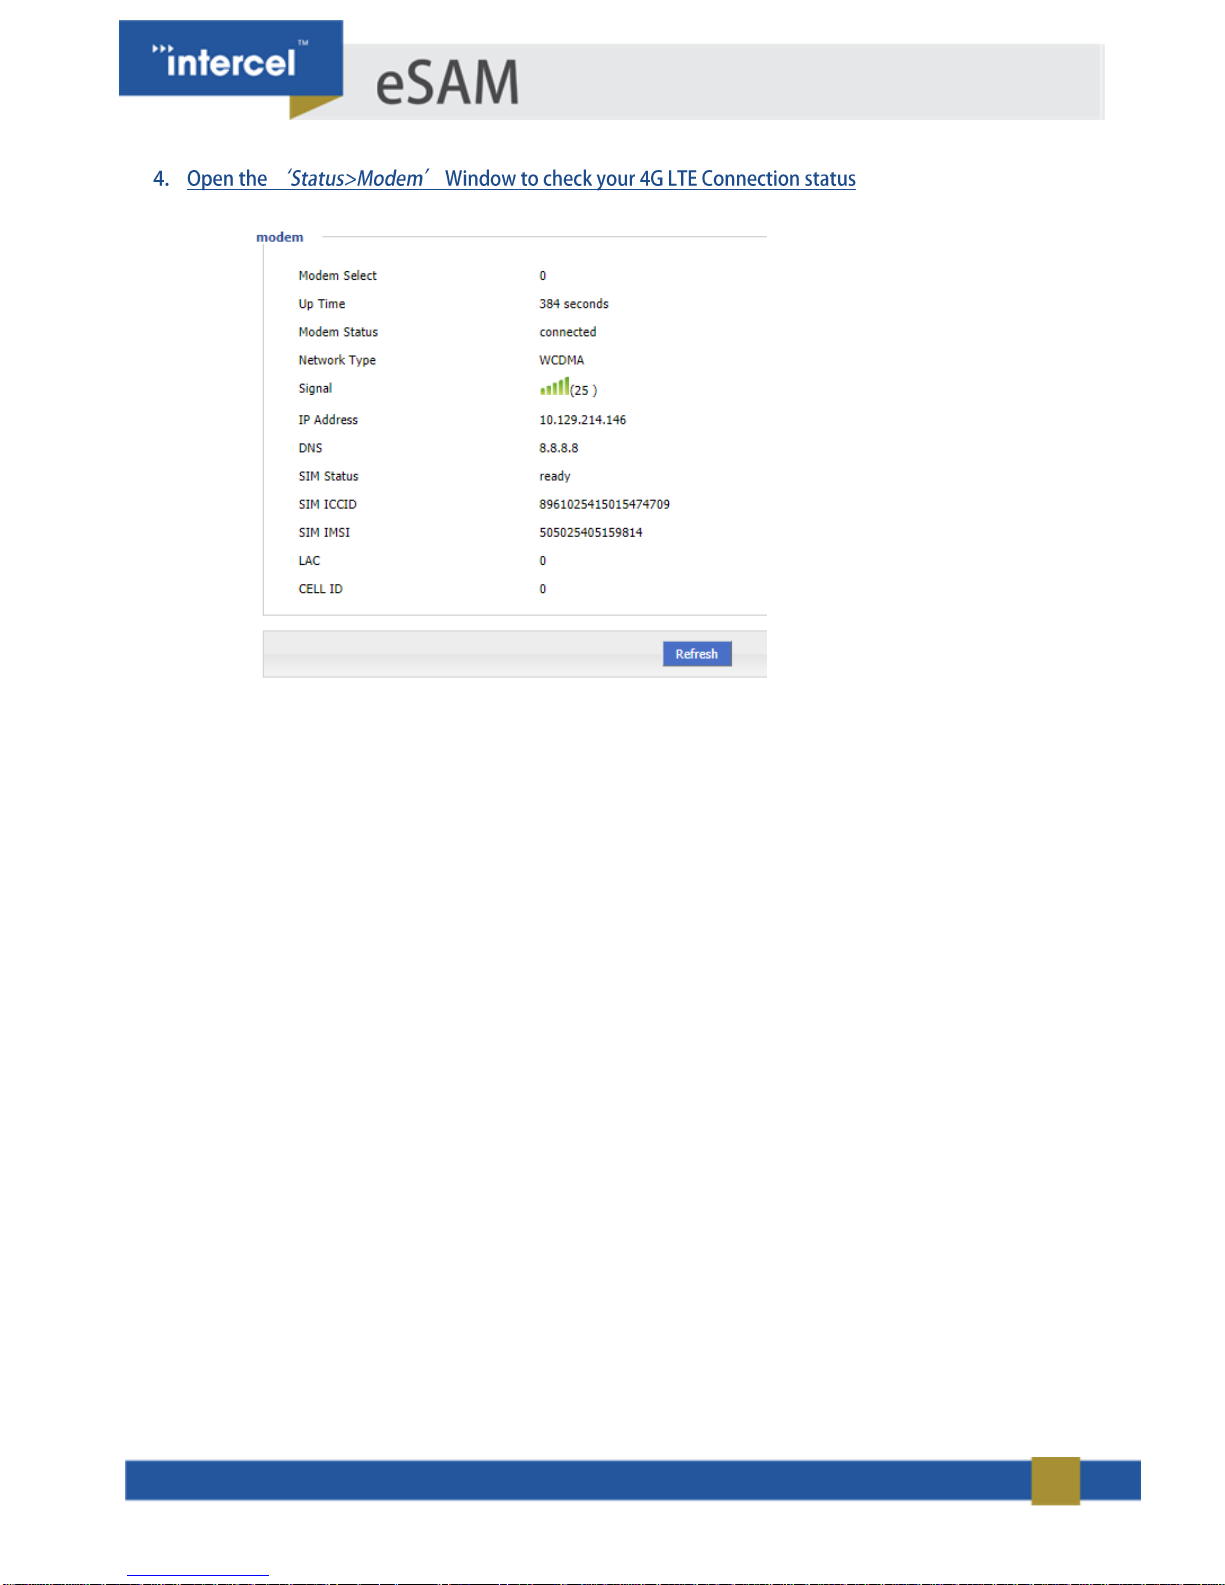
a. From the right-most menu, open the ‘Status> Modem’ window
b. Check your 4G Signal Strength (0-31), and your connection status.
Page 8
8
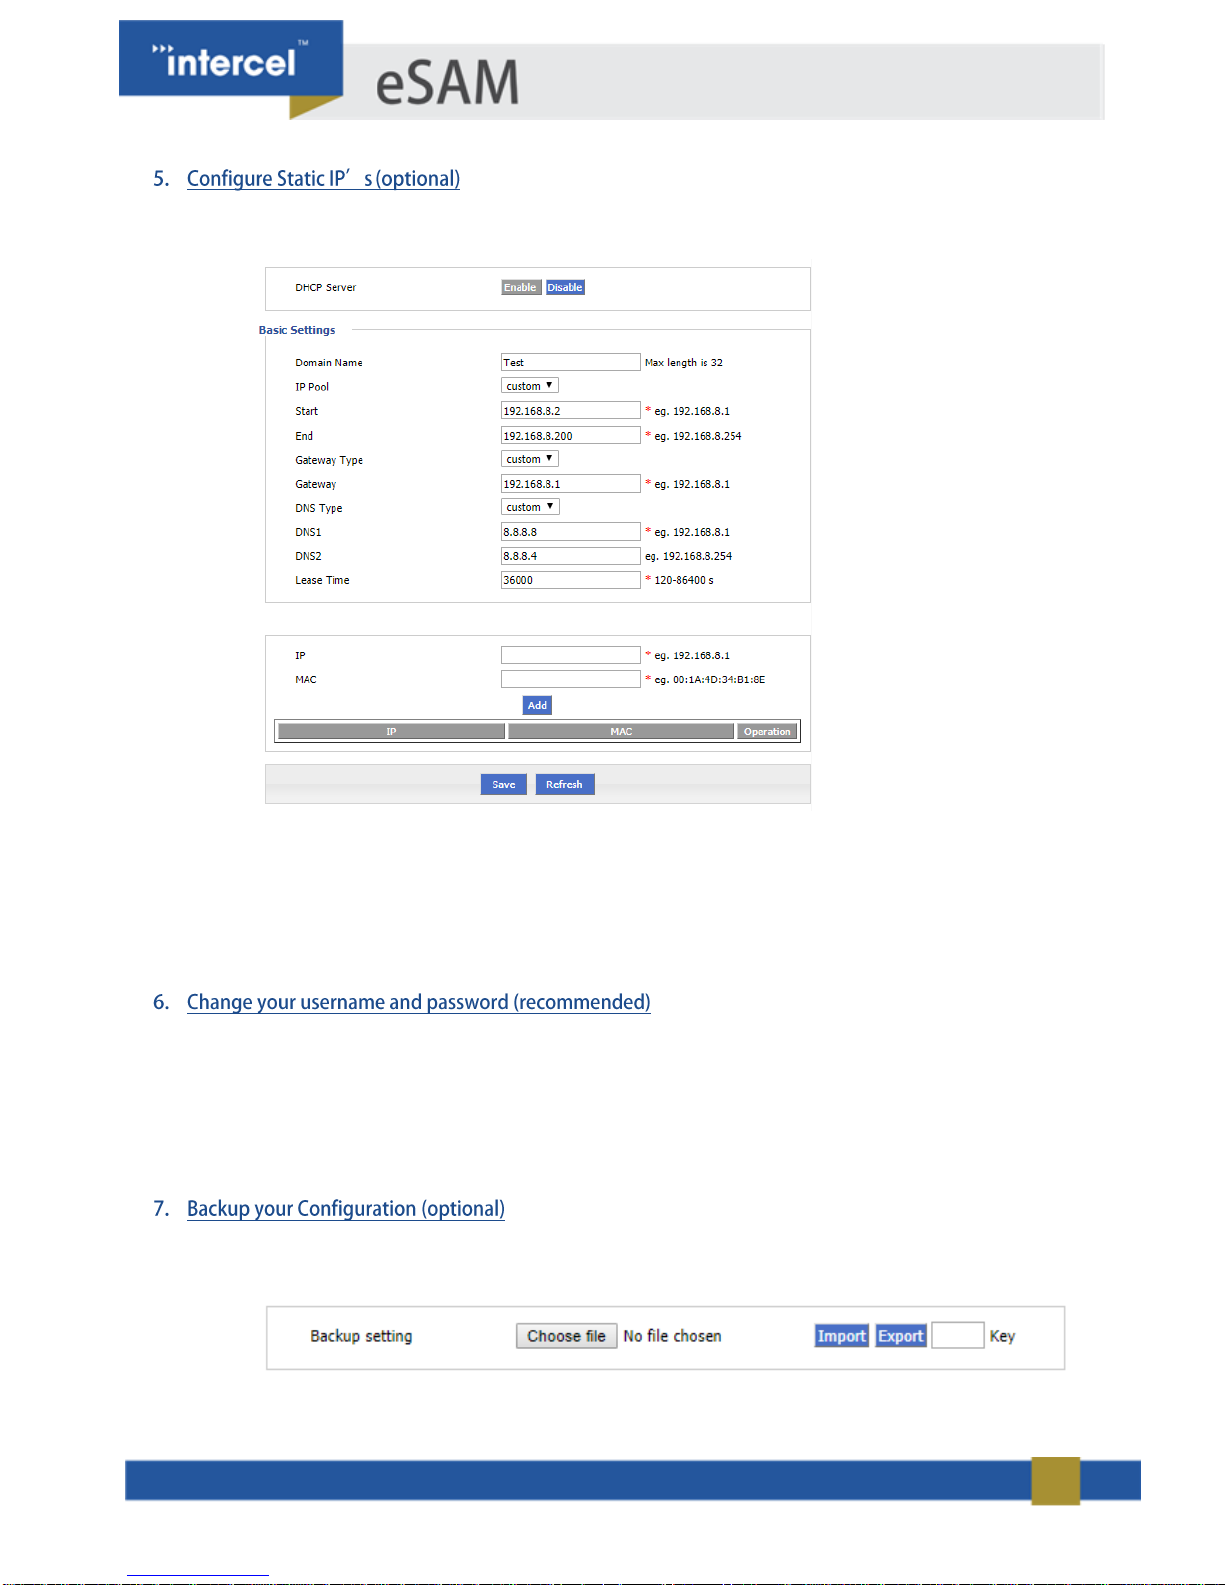
Static IP’s are fixed to a specific device and won’t change over time.
a. Open the ‘Network > DHCP’ window from the rightmost menu
b. Enter the desired Static IP Address and the MAC Address of the device you want to assign this IP to.
c. Press ‘Add’ to add this MAC-IP pair.
d. Add as many static IP’s as desired
e. Press ‘Save’ to save your settings
a. Open the ‘System>Account’ window from the right-most menu
b. Enter your desired Username and Password.
c. Enter the port you want to use to access the web interface (80 is suggested)
d. Press ‘Save’ to save your new settings.
a. Open the ‘System>Files’ window from the right-most menu
b. Press the ‘Export’ button to download your eSAM Configuration
Page 9

9
www.facebook.com/Intercel-775004365883748 www.linkedin.com/company/intercel
www.intercel.com.au 33 Glenvale Crescent Mulgrave VIC 3170 Australia
[email protected] +61 (0) 3 9239 2000
 Loading...