

Page 1
iProMOH-SU / Simple Audio Mixer
Installation and User Manual
Page 2

iProMOH-SU |
Installation and User Manual
Interalia | iProMOH-SU Simple Audio Mixer Installation and User Manual Page 2
Canada
United States
United Kingdom
6815 - 8th Street NE.
701-24th Ave. SE.
58 Hershal Street
Calgary, Alberta
Minneapolis, Minnesota
Slough, UK
Canada T2E 7H7
U.S.A. 55414
SL1 1HD
Tel: 403 288 2706
Tel: 952 942 6088
Tel: +44 (0) 1476 594207
Toll Free 800 661 9406
Toll Free 800 531 0115
Fax: +44 (0) 1476 594208
Fax: 403 288 5935
Fax: 952 942 6172
Copyrights
This manual and the software accompanying it are copyrighted © 2015 by Interalia Inc. ®
iProMOH-SU / Simple Audio Mixer Installation and User Manual
46-UM-512-002-00-EN-85
All rights reserved. No part of this book, including interior design, cover design, and icons, may
be reproduced or transmitted in any form, by any means (electronic, photocopying, recording, or
otherwise) without the prior written permission of Interalia Inc.
Interalia Inc. Marketing Department
6815 8th Street N.E, Suite N275
Calgary, Alberta, Canada T2E 7H7
Phone: (800) 661-9406 or (403) 288-2706
Fax: (403) 288-5935
Interalia and the publisher have used their best efforts in preparing this book as accurately and
completely as possible, however we do not make any guarantees or warranties regarding its
content.
Trademarks
Interalia is a registered trademark of Interalia Inc.
iProMOH is a registered trademark of Interalia Inc.
All other product names and services identified throughout this book are used in an editorial
fashion only, and for the benefit of such companies. No such use, or the use of any trade name,
is intended to convey endorsement or other affiliation with the book.
Page 3

iProMOH-SU |
Installation and User Manual
Interalia | iProMOH-SU Simple Audio Mixer Installation and User Manual Page 3
1 Table of Contents
2 iProMOH-SU Playback Device ............................................................................... 5
2.1 Included in the Package ............................................................................................ 5
2.2 Installation .................................................................................................................. 5
2.3 Status LED Table ....................................................................................................... 7
2.4 Diagnostics ................................................................................................................ 8
3 Simple Audio Mixer Software Application ............................................................ 8
3.1 Simple Audio Mixer Software Installation ................................................................ 8
3.2 Simple Audio Mixer Software Upgrade .................................................................... 9
3.3 Application Controls .................................................................................................. 9
3.3.1 Save / OK Button ................................................................................................................. 9
3.3.2 Cancel Button / Corner "X" ................................................................................................ 9
3.3.3 Need Help? Button .............................................................................................................. 9
3.4 Login Window ................................ ................................................................ ...........10
3.4.1 Changing Your Login Password ...................................................................................... 11
3.5 Home Screen .............................................................................................................12
3.6 File Menu ...................................................................................................................13
3.6.1 Open Existing File ............................................................................................................. 13
3.6.2 Save Current Content to File ............................................................................................ 13
3.7 Security and Settings Page (Music On Hold Mode Only) .......................................15
3.7.1 Service Provider Key ........................................................................................................ 15
3.7.1.1 Assigning a Service Provider Key ................................................................................... 16
3.7.1.2 Removing a Service Provider Key from a Device ........................................................... 17
3.7.2 Adding Devices ................................................................................................................. 18
3.7.2.1 Add Device Button........................................................................................................... 18
3.7.2.2 Delete Device Button ...................................................................................................... 19
3.7.2.3 Update Desc./Zone ......................................................................................................... 19
3.7.3 Restore Data Button ......................................................................................................... 19
3.7.4 Backup Data Button .......................................................................................................... 20
3.7.5 Enable Media Stale Date ................................................................................................... 21
3.7.6 Cancel Button .................................................................................................................... 21
3.7.7 OK Button .......................................................................................................................... 21
3.8 Content Administration Page ...................................................................................22
3.8.1 Music and Messages ........................................................................................................ 24
3.8.1.1 Music / Messages Lists ................................................................................................... 24
3.8.1.2 Add Default Music ........................................................................................................... 24
3.8.1.3 Enable Music Shuffle / Enable Message Shuffle ............................................................ 25
3.8.2 Settings .............................................................................................................................. 25
3.8.2.1 Time between Messages ................................................................................................ 25
3.8.2.2 Music Cross-Fade Volume .............................................................................................. 25
3.8.2.3 Bass ................................................................................................................................ 26
Page 4

iProMOH-SU |
Installation and User Manual
Interalia | iProMOH-SU Simple Audio Mixer Installation and User Manual Page 4
3.8.2.4 Treble .............................................................................................................................. 26
3.8.2.5 Master Output Volume .................................................................................................... 26
3.8.2.6 Music Volume .................................................................................................................. 27
3.8.2.7 Message Volume............................................................................................................. 27
3.8.2.8 Time Between Repeats ................................................................................................... 27
3.8.2.9 Enable Local Volume Control .......................................................................................... 28
3.8.2.10 Enable External Music................................................................................................. 28
3.8.2.11 Enable Auto-Add Default Music .................................................................................. 28
3.8.2.12 Save Settings Button ................................................................................................... 28
3.8.2.13 Load Defaults Button ................................................................................................... 29
3.8.2.14 Time Remaining .......................................................................................................... 29
3.8.3 Scheduled Messages (Music On Hold Mode Only) ........................................................ 29
3.8.3.1 Scheduled Messages List ............................................................................................... 29
3.8.3.2 Start Time ........................................................................................................................ 30
3.8.3.3 Start Date ........................................................................................................................ 30
3.8.3.4 Stop Date ........................................................................................................................ 30
3.8.3.5 Days of Week .................................................................................................................. 30
3.8.4 Content and Administration Page Buttons .................................................................... 31
3.8.4.1 Save Button ..................................................................................................................... 31
3.8.4.2 Cancel Button .................................................................................................................. 31
3.9 Creating a Content File .............................................................................................31
4 Loading Your Content onto the iProMOH-SU ..................................................... 32
5 Upgrading Firmware ............................................................................................. 32
6 Setting the iProMOH-SU Time ............................................................................. 33
7 Technical Specifications ...................................................................................... 34
Page 5
iProMOH-SU |
Installation and User Manual
Interalia | iProMOH-SU Simple Audio Mixer Installation and User Manual Page 5
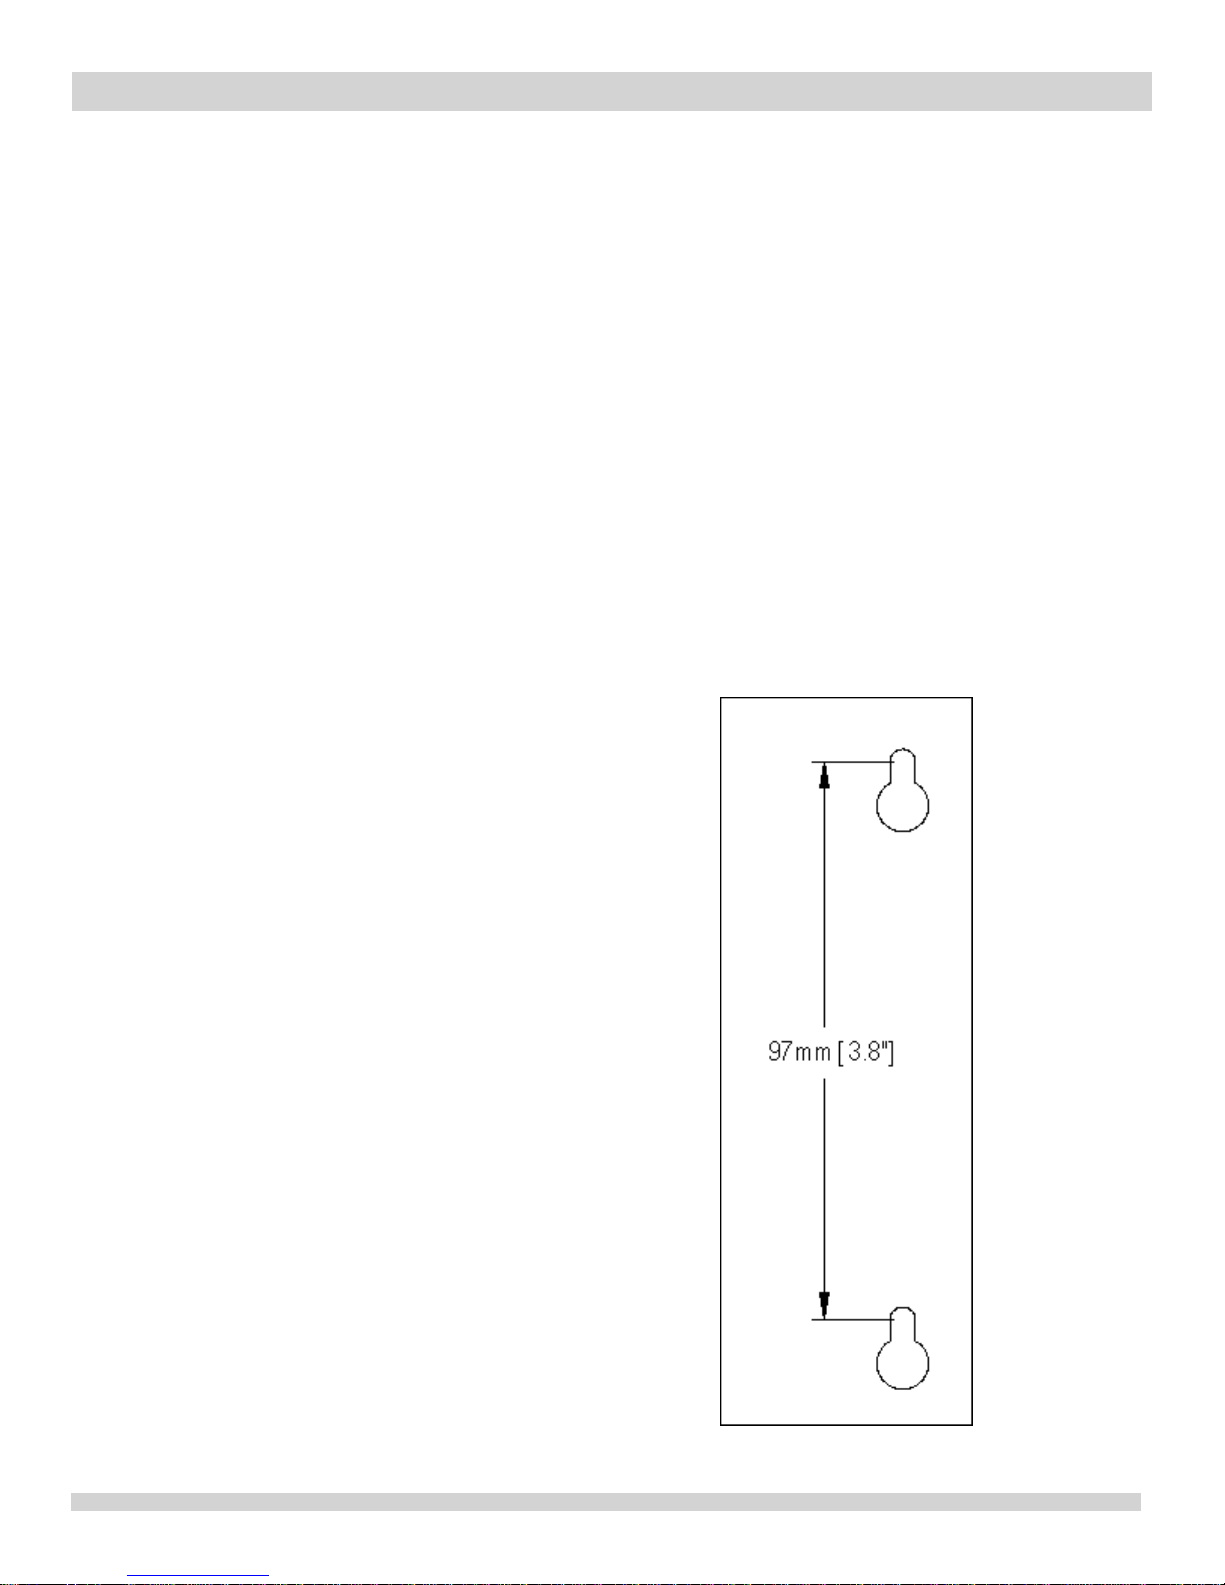
To mount the iProMOH-SU on a vertical surface.
If there is a plywood panel you may simply use the
enclosed screws and using the template shown
here place the screws 97 mm (3.8 inches) apart
leaving about a 3.2 mm (1/8 inch) gap between the
base of the screw head and the plywood.
Line up the keyholes in the base of the iProMOHSU with the screw heads and pull down lightly until
the unit locks into place.
If you are mounting onto drywall drill two 2.4 mm
(3/32 inch) holes 97 mm (3.8 inches) apart and
then drive the plastic drywall anchors flush with the
drywall.
Insert the screws into the drywall anchors and
leave a 3.175 mm (1/8 inch) gap between the
screw head and the drywall.
Line up the keyholes in the base of the iProMOHSU with the screw heads and pull down lightly until
the unit locks into place.
If you wish to place this on a desk or shelf affix the
4 rubber feet to the base of the iProMOH-SU.
2 iProMOH-SU Playback Device
2.1 Included in the Package
2x
RCA
to
RCA
cables
1x wall mounting
1x AC to DC power adap
2x RCA to 3.5mm audio adapters
4x Adhesive rubber bumper feet
1x RCA to 2 screw terminal connector
1x Ethernet cable
kit (2 x #6 x ¾ inch Philips pan head screw 2 x plastic drywall anchors)
ter
2.2 Installation
Install the iProMOH-SU on a wall or place it on a flat surface near the PBX or overhead PA
system.
Page 6
iProMOH-SU |
Installation and User Manual
Interalia | iProMOH-SU Simple Audio Mixer Installation and User Manual Page 6
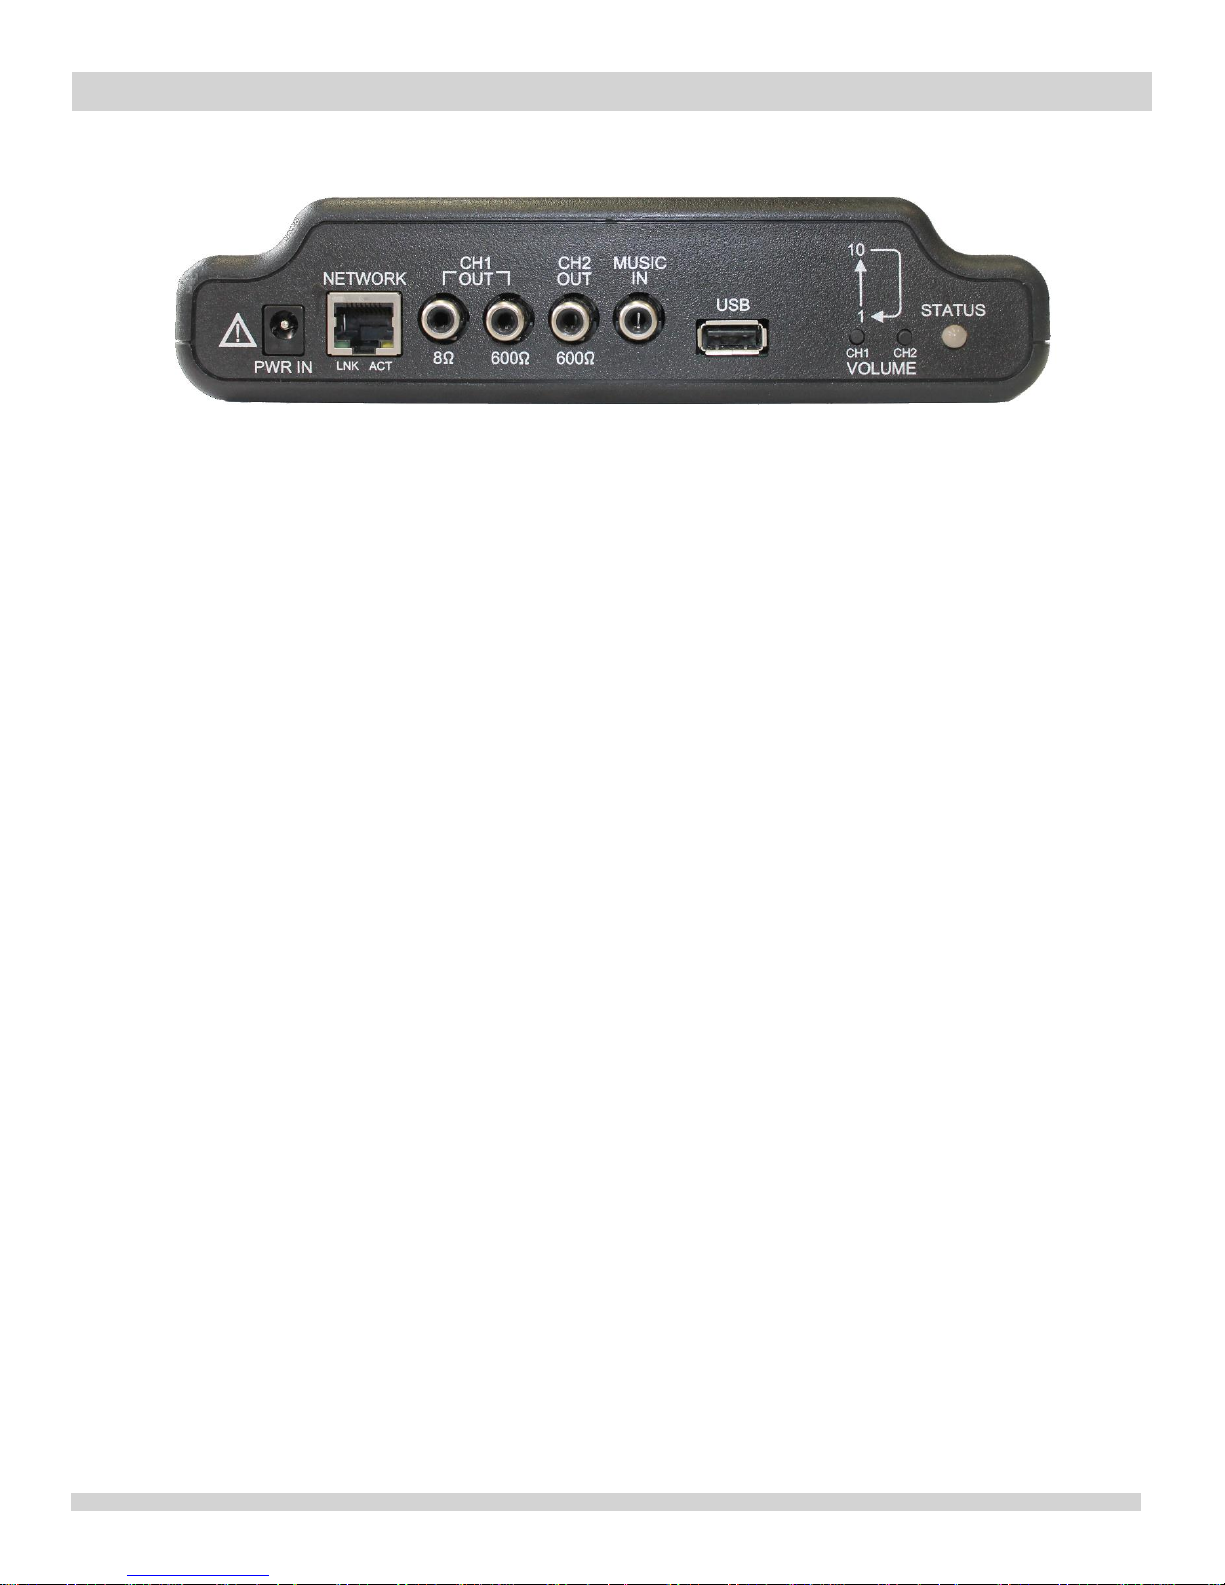
From left to right, the faceplate elements are:
Power Input: Connect ONLY the adapter supplied with the iProMOH-SU to this
input.
Network
NOTE:
Messages to operate correctly.
Channel 1 Output: Use either the 8 Ω or 600 Ω to connect to your system depending
on its
Channel 2 Output: Second 600 Ω output plays different
channel 1.
Music In: Connect to the “Line-out” of a
(e.g. The Background Music Company, Play Network).
USB Connector: Utilized for loading content and firmware updates.
Volume Control: Adjusts the output level of channel 1 and 2.
their respective ch
Jack: Used to set the iProMOH-SU internal clock via internet time
The iProMOH-SU must have its internal clock set for Stale Date and Scheduled
requiremen
ts.
annel
volume from 1 to 10 then back to 1 in a circular manner.
music/messages fr
background licensed
music source
CH1 & CH2
increment
om
Status LED: Shows the state of the iProMOH-SU based on the color displayed. See
the "Status LED Table" on the following page for details about the flashing patterns and
their meaning.
Connect the wall adaptor power cord to the iProMOH-SU, and plug into the wall outlet. After a
short time, the status LED will begin flash green, and the default royalty free music will play from
the audio output jacks.
Page 7
iProMOH-SU |
Installation and User Manual
Interalia | iProMOH-SU Simple Audio Mixer Installation and User Manual Page 7
Normal Operation
Flashes Green on 1 second intervals.
System OK
Solid Amber.
System booting
Flashes Amber on 1 second intervals.
Media stale date reached
Time Synchronization Operation
Alternates between Red and Green on ½ second
intervals.
Clock time invalid
Alternates between Red and Green on 1 second
intervals.
Time update in progress
Solid Red
Time update failed
Media Update Operation
Alternates between Red on ½ second intervals and
Green on 1 second intervals.
Media has already been updated with this
file.
Alternated between Amber and Green on 1 second
intervals.
Searching USB stick / validating update file
Flashes Red on 1 second intervals.
Configuration file load/save failure, update
file corrupt
Alternated between Amber and Red on 1 second
intervals.
Media update in progress
Flashes Red on ½ second intervals.
Update file not found for this iProMOH
Solid Green
Media update success
Firmware Update Operation
Alternated between Amber and Red on 1 second
intervals.
Firmware update in progress.
Alternated between Amber and Green on 1 second
intervals.
Searching USB stick / validating update file
Solid Red
Firmware update failed
Flashes Green on ½ second intervals.
Update not needed.
Flashes Amber on ½ second intervals.
Update successful
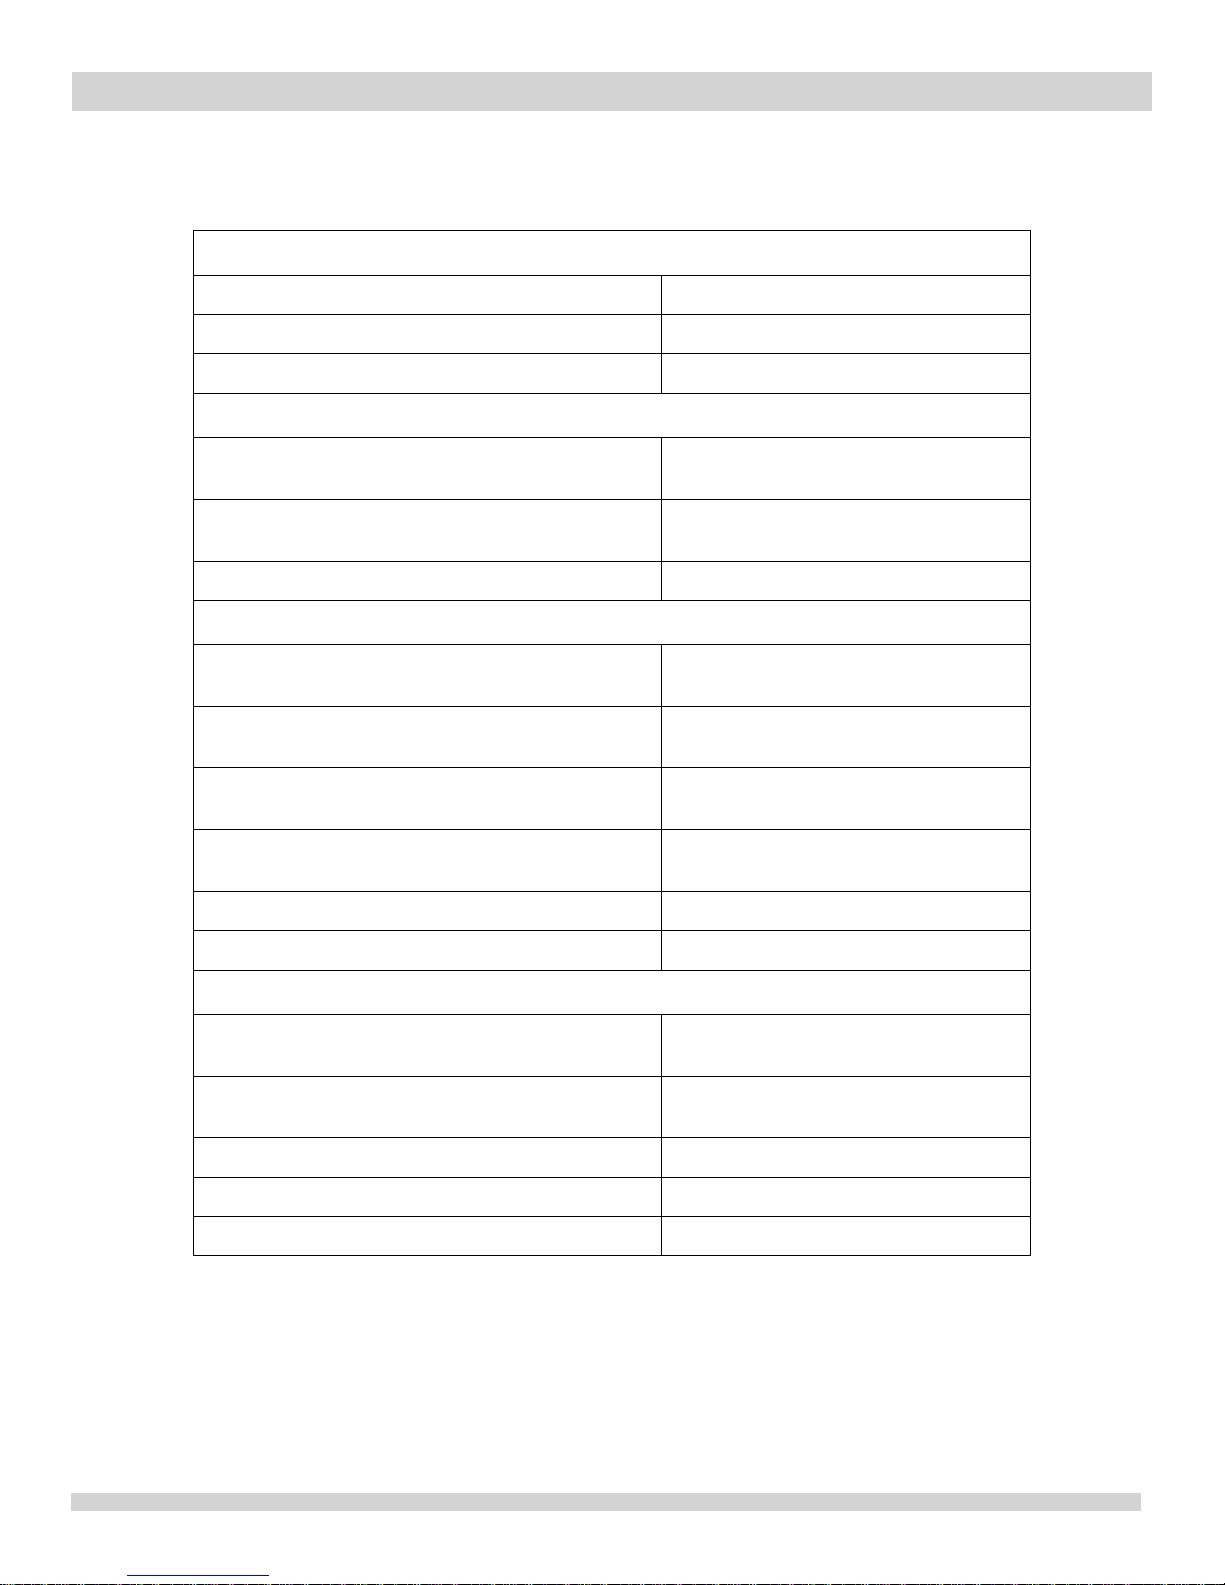
2.3 Status LED Table
Page 8
iProMOH-SU |
Installation and User Manual
Interalia | iProMOH-SU Simple Audio Mixer Installation and User Manual Page 8
2.4 Diagnostics
To aid in diagnostics, the iProMOH-SU will write a “diagnostics.txt” file the USB stick once it is
inserted. The file can be opened in any text editor, and lists the current settings and
configuration of the device.
3 Simple Audio Mixer Software Application
3.1 Simple Audio Mixer Software Installation
The iProMOH utilizes the Simple Audio Mixer software application to create content files
consisting of music and messages.
The application can be downloaded from:
http://www.interalia.com/downloads/SimpleAudioMixerInstall.zip
Save the file to your computer and select the "SimpleAudioMixerInstall_x.x.x.exe" application to
start the installation.
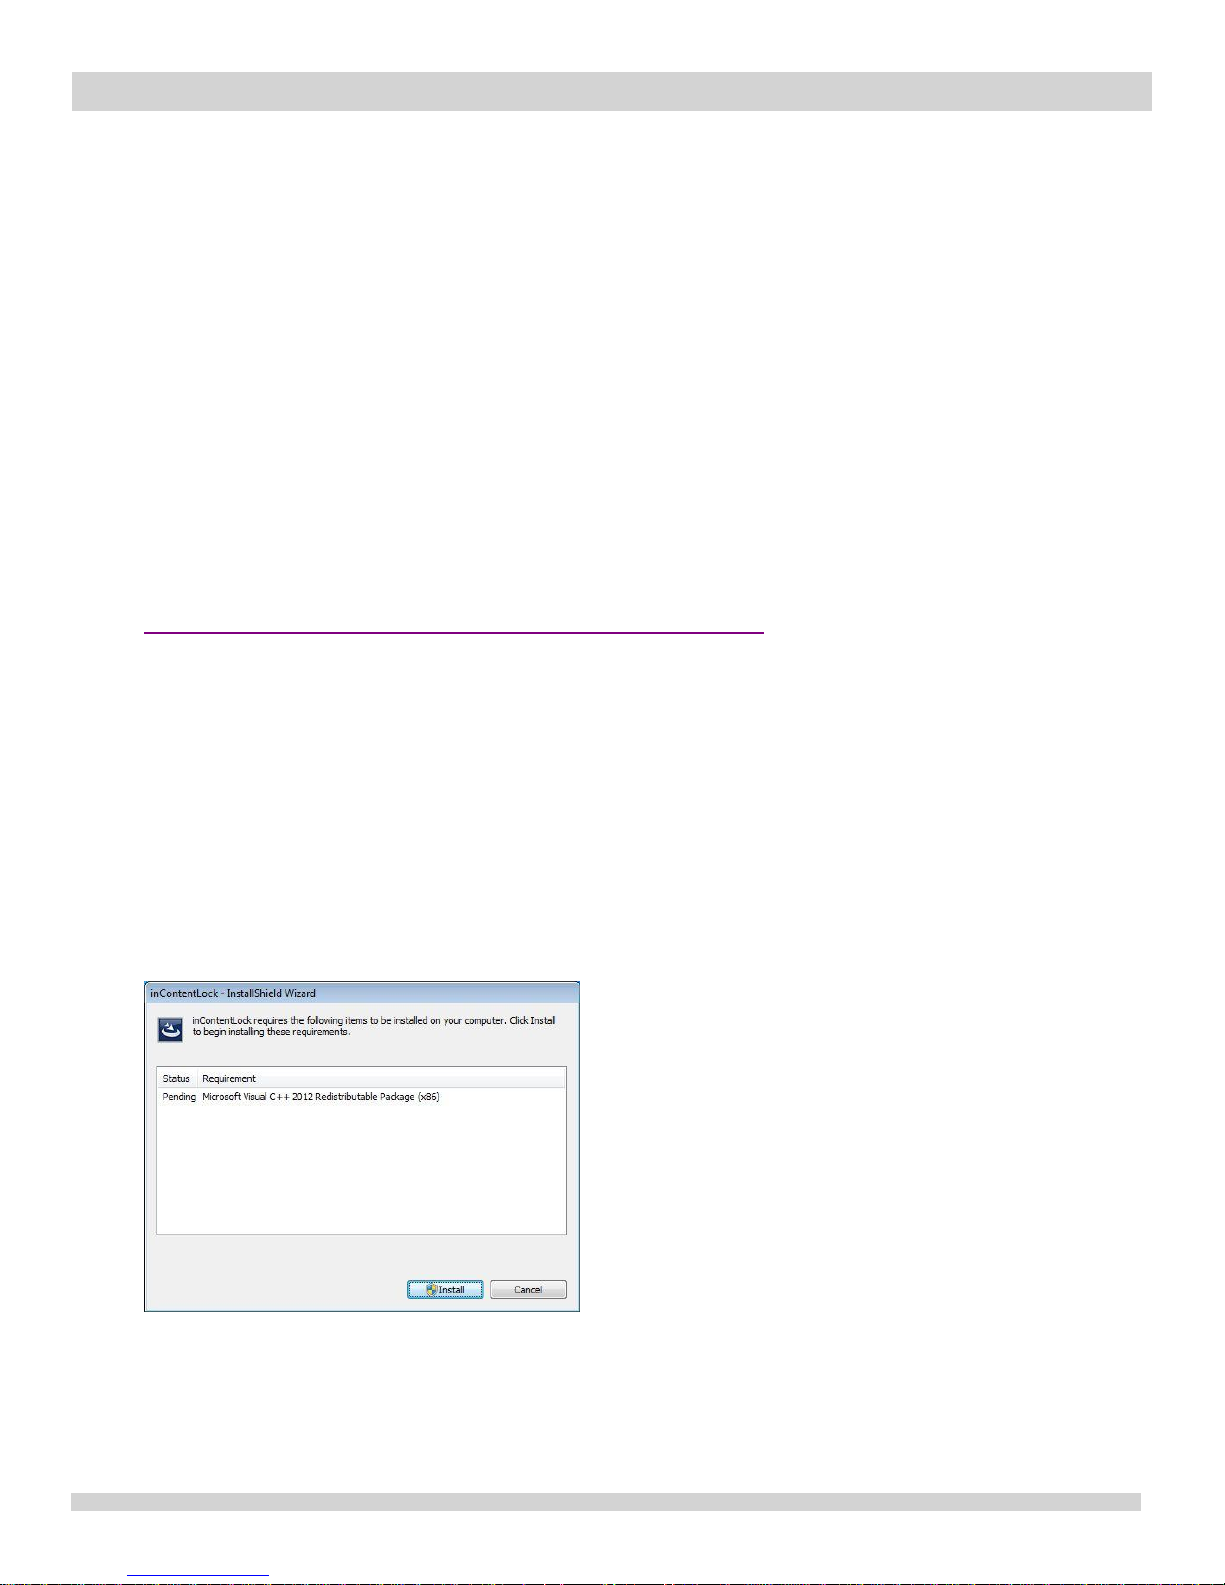
Simple Audio Mixer requires the Microsoft Visual C++ 2012 Redistributables for operation.
They will be automatically installed if they are not already present on the computer.
Select "Install" to being the installation process. If a "User Account Control" window pops up,
select “Yes” to continue installing the Microsoft Visual C++ 2012 Redistributables.
Page 9

iProMOH-SU |
Installation and User Manual
Interalia | iProMOH-SU Simple Audio Mixer Installation and User Manual Page 9
Select "Next" at the "InstallShield Wizard for Simple Audio Mixer" screen to start the installation,
and select "Next" to use the default installation folder.
If the "Launch the Program" checkbox is selected (enabled by default), Simple Audio Mixer will
automatically launch when "Finish" is selected.
When the installation completes, you will see the Simple Audio Mixer (sam) shortcut added to
your Desktop and a folder called Interalia added to your Start Menu. Simple Audio Mixer can be
launched at any time with either the desktop or menu shortcuts.
3.2 Simple Audio Mixer Software Upgrade
Before installing a new version, ensure the current Simple Audio Mixer application is closed.
Follow the same instructions as the "Simple Audio Mixer Software Installation" above.
All previous settings, devices and passwords are retained during the upgrade.
3.3 Application Controls
Simple Audio Mixer uses consistent controls across all pages in the application.
3.3.1 Save / OK Button
Saves all changes for that particular page, and returns to the Home Screen.
3.3.2 Cancel Button / Corner "X"
Abandon all changes for that particular page, and returns to the Home Screen.
3.3.3 Need Help? Button
Displays the help screen which contains buttons to allow quick access to technical support, as
well as display the application version.
Page 10
iProMOH-SU |
Installation and User Manual
Interalia | iProMOH-SU Simple Audio Mixer Installation and User Manual Page 10
3.4 Login Window
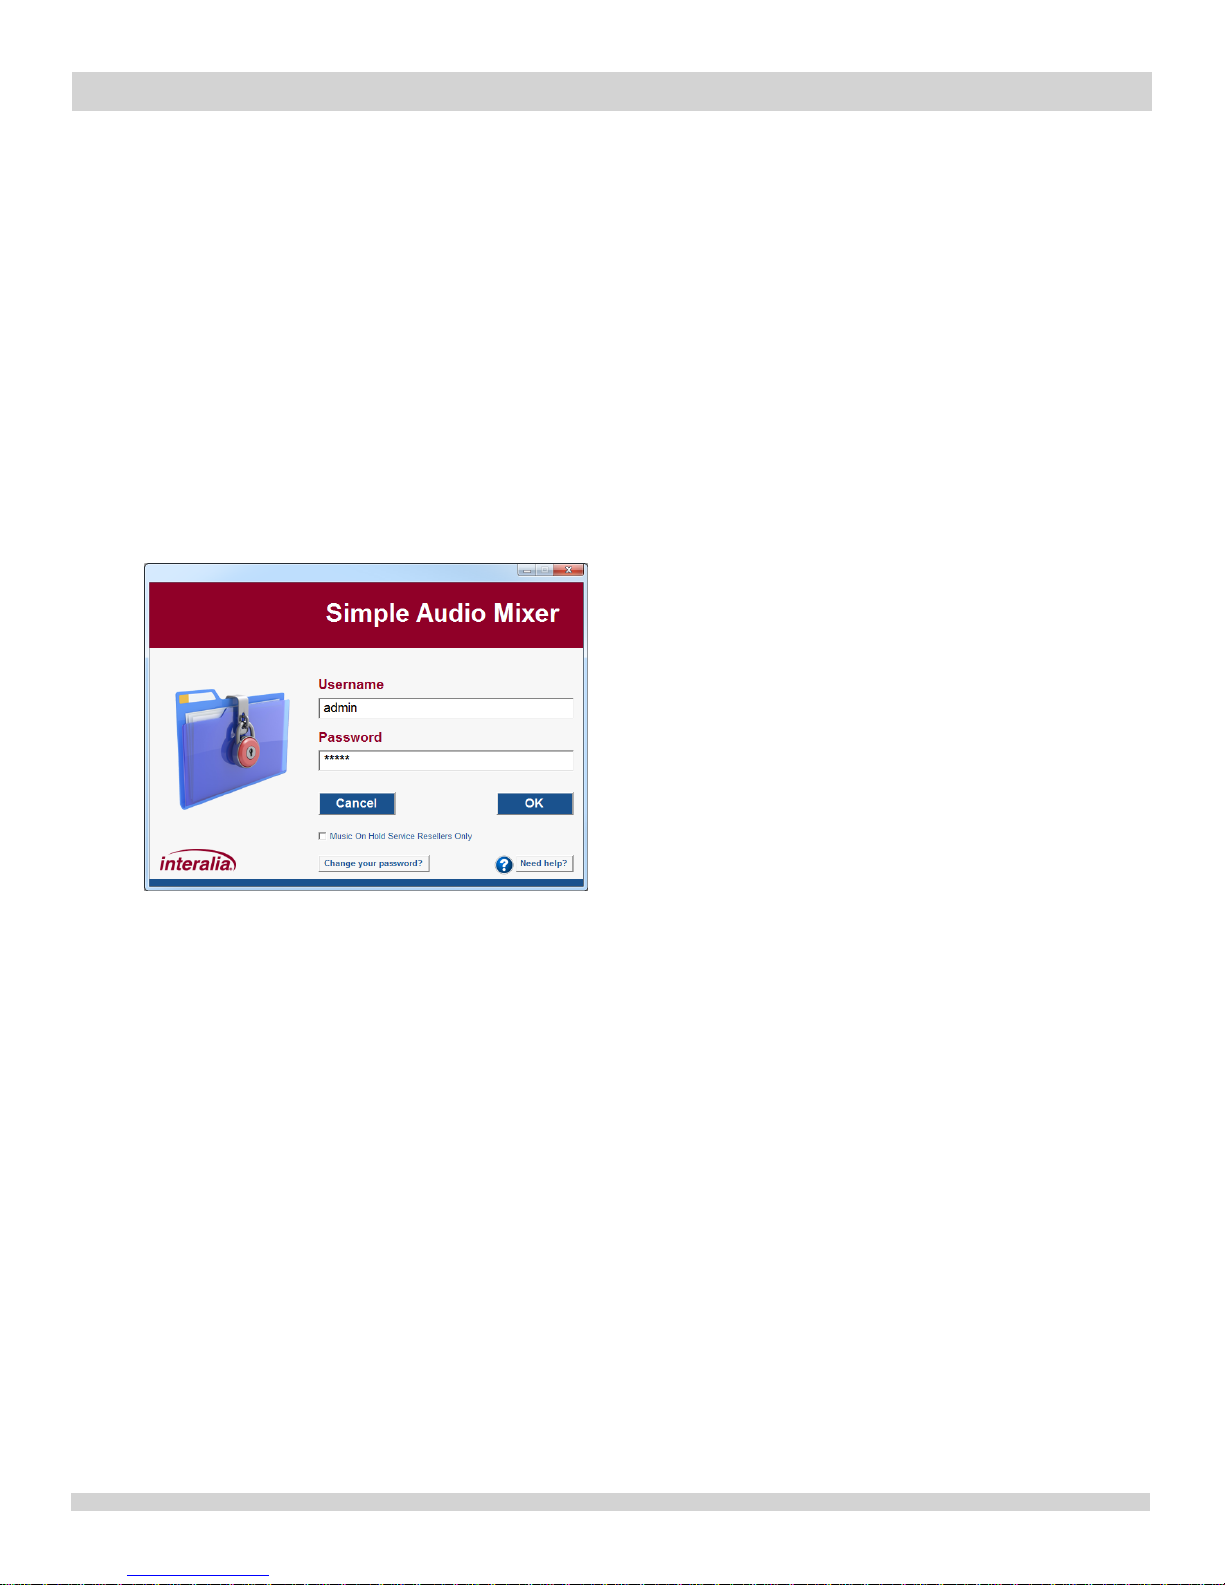
The Login Window is used to log into Simple Audio Mixer, or change the application password.
Enter the username ("admin") and your password to log into the application. The default
password is "admin", if you have not previously changed it. It is recommended that the
password is changed from the default value of "admin" for security reasons. When the “Music
On Hold Service Resellers Only” checkbox is selected, the software changes to allow media
to be secured to a device as well as lock it to a particular vender. To prevent the device from
inadvertently being locked, it is recommended that this is not used unless you sell Music On
Hold services.
Page 11
iProMOH-SU |
Installation and User Manual
Interalia | iProMOH-SU Simple Audio Mixer Installation and User Manual Page 11
3.4.1 Changing Your Login Password
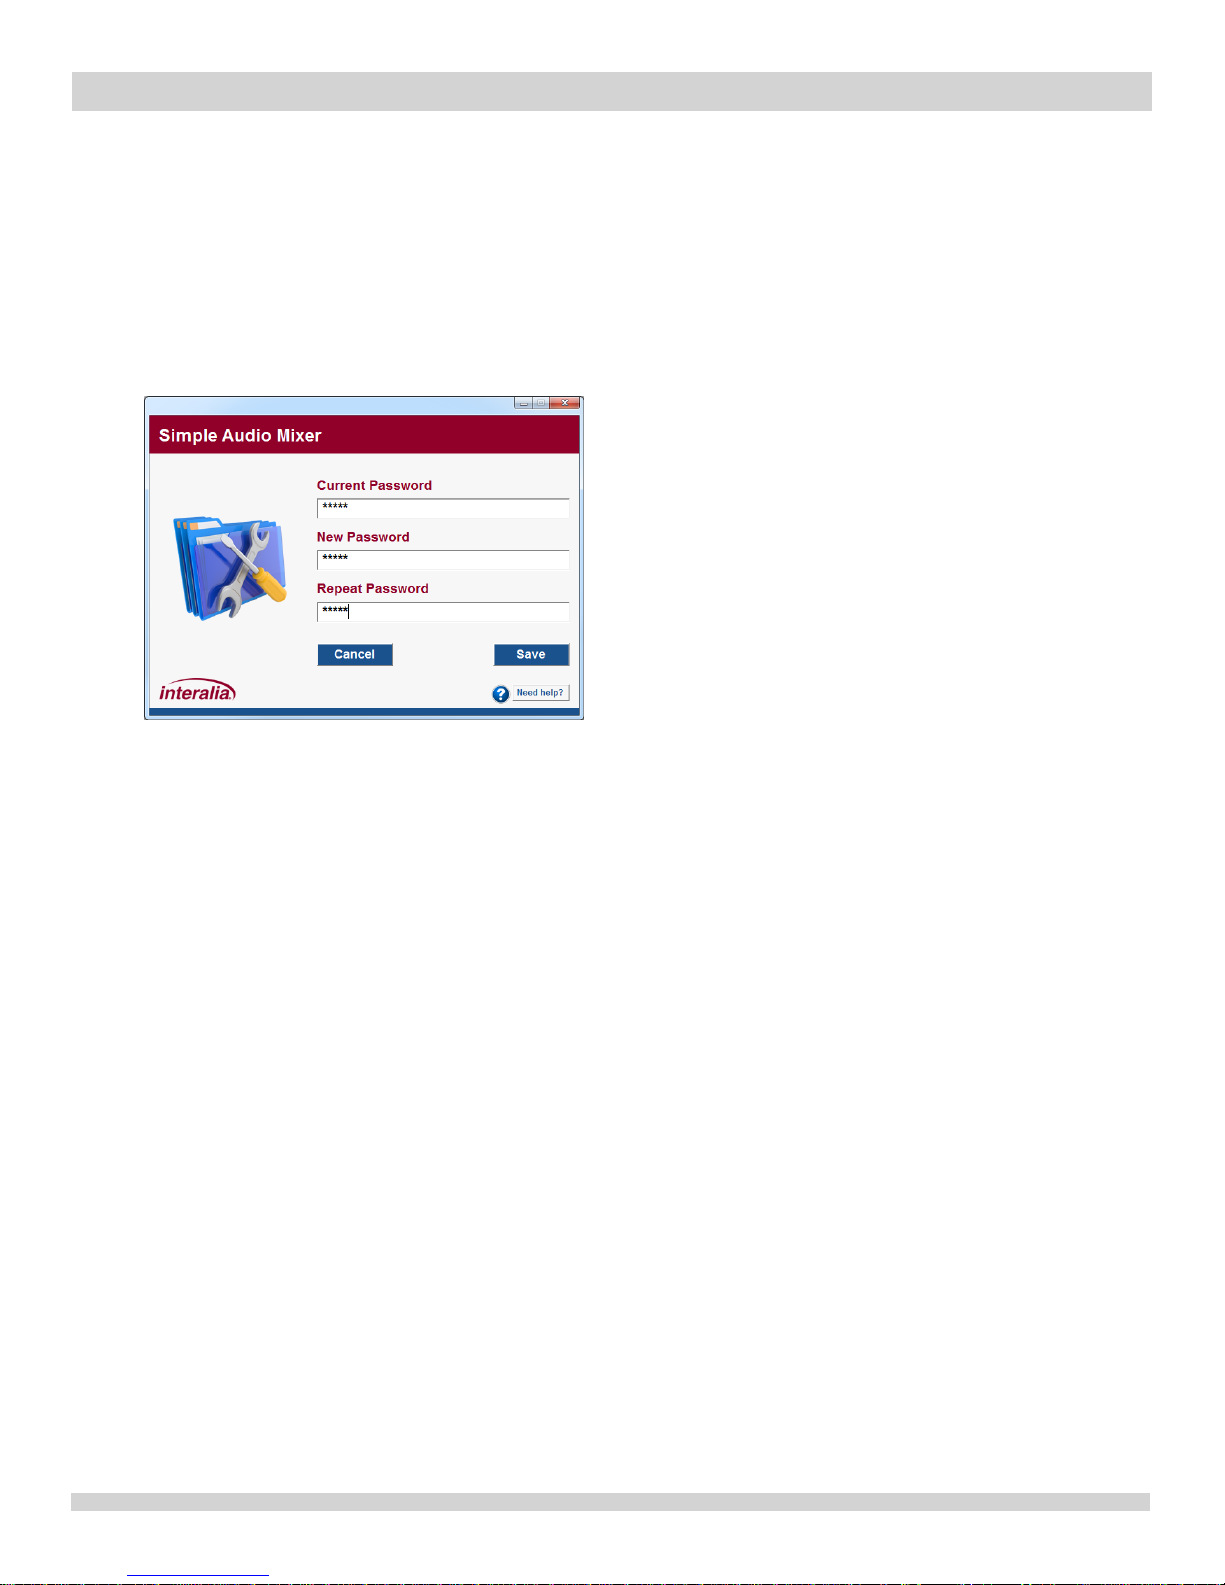
Select the "Change your password?" button. Enter your current password (default "admin"),
followed by your new password in the "New Password" and "Repeat Password" fields. Select
the "Save" button to change your password or "Cancel" to discard changes. Record this
password for safe keeping, as if the password gets lost, it cannot be retrieved.
Page 12
iProMOH-SU |
Installation and User Manual
Interalia | iProMOH-SU Simple Audio Mixer Installation and User Manual Page 12
3.5 Home Screen
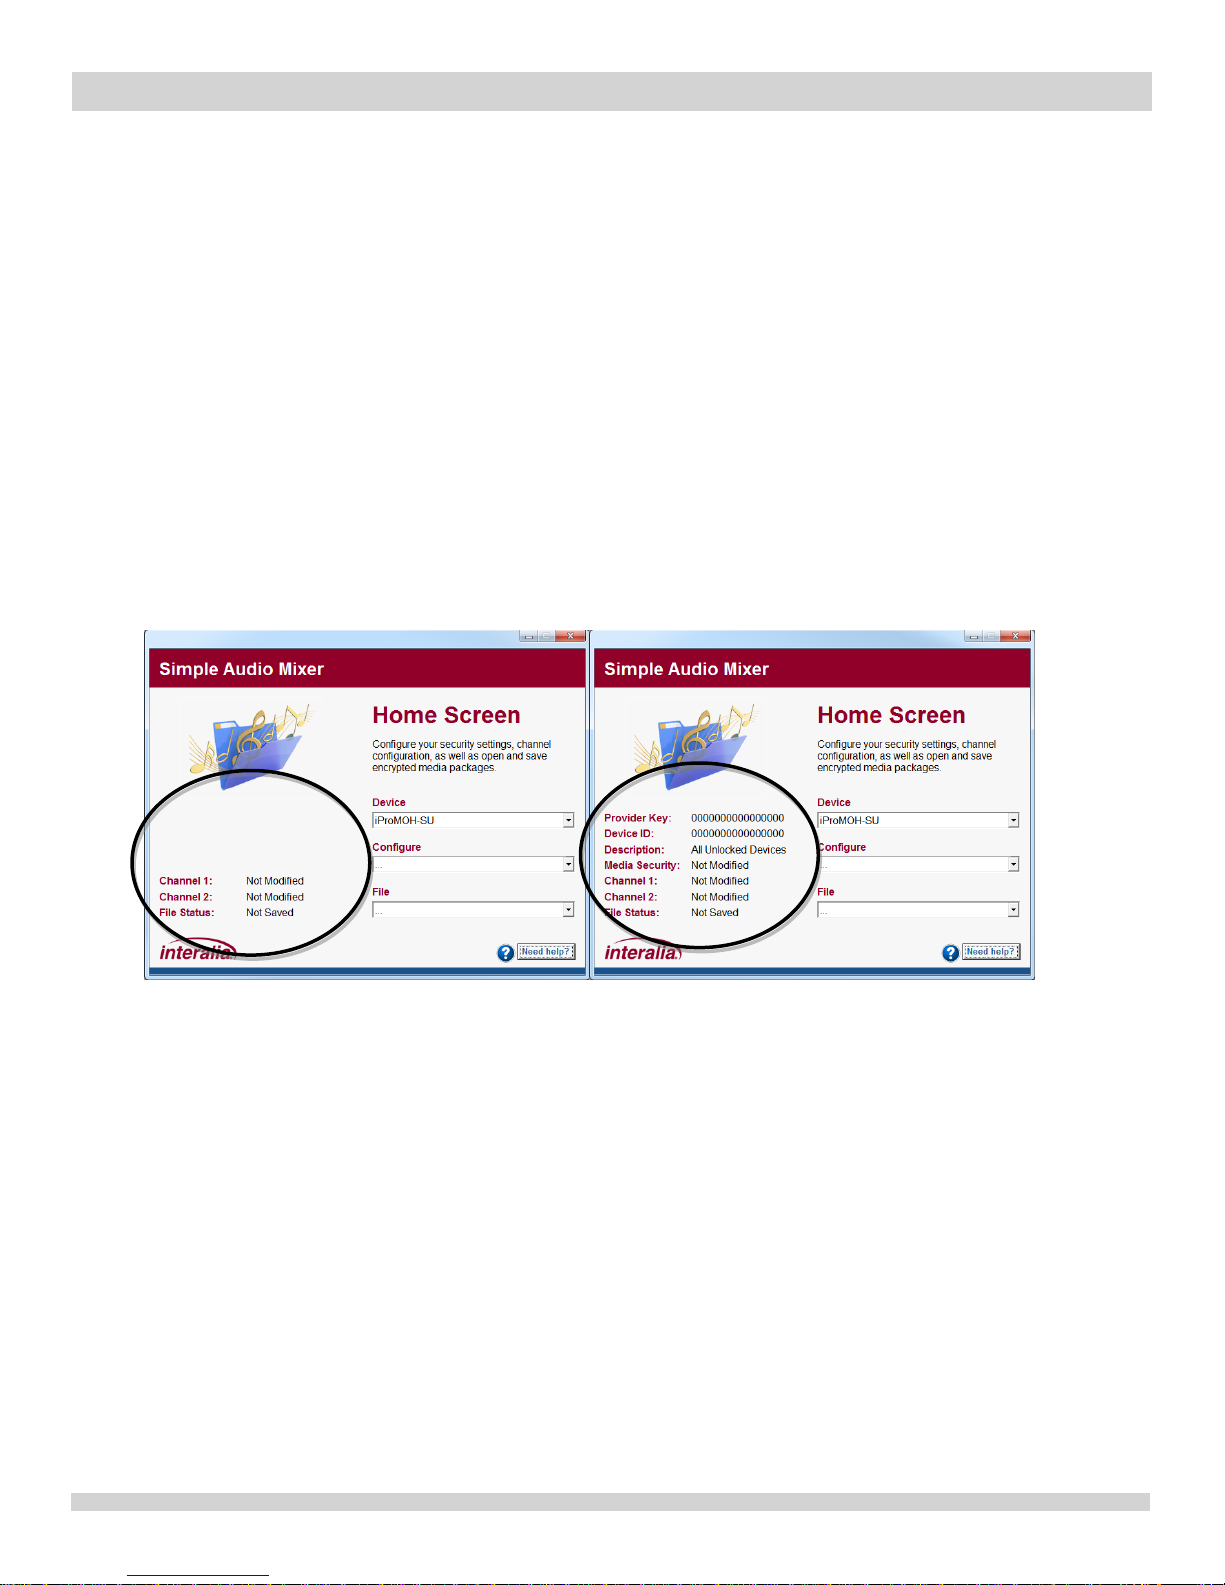
The "Home Screen" is the hub for all application operations. Every operation returns to this
screen once complete.
The "Home Screen" allows access to:
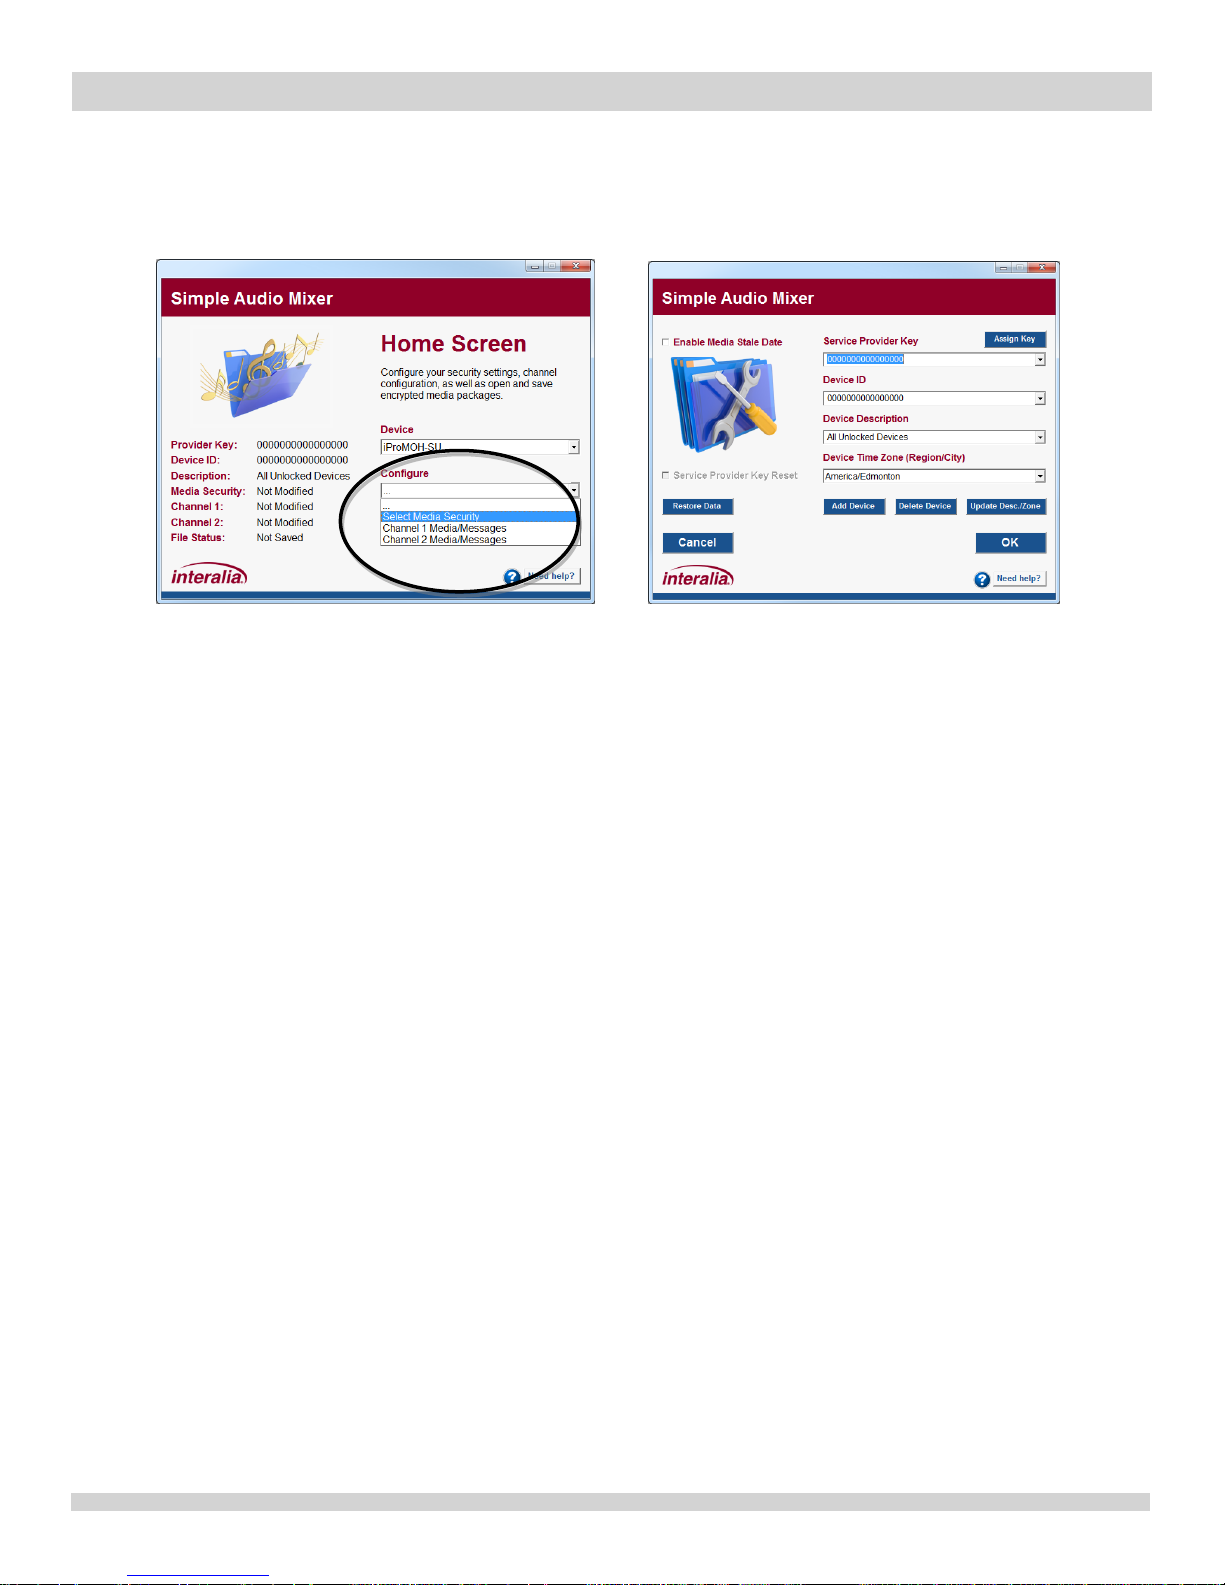
Device - Select the device to create content for. i.e. iProMOH-SU
Configure - Select media security (in Music On Hold mode only), modify channel settings
and playlists.
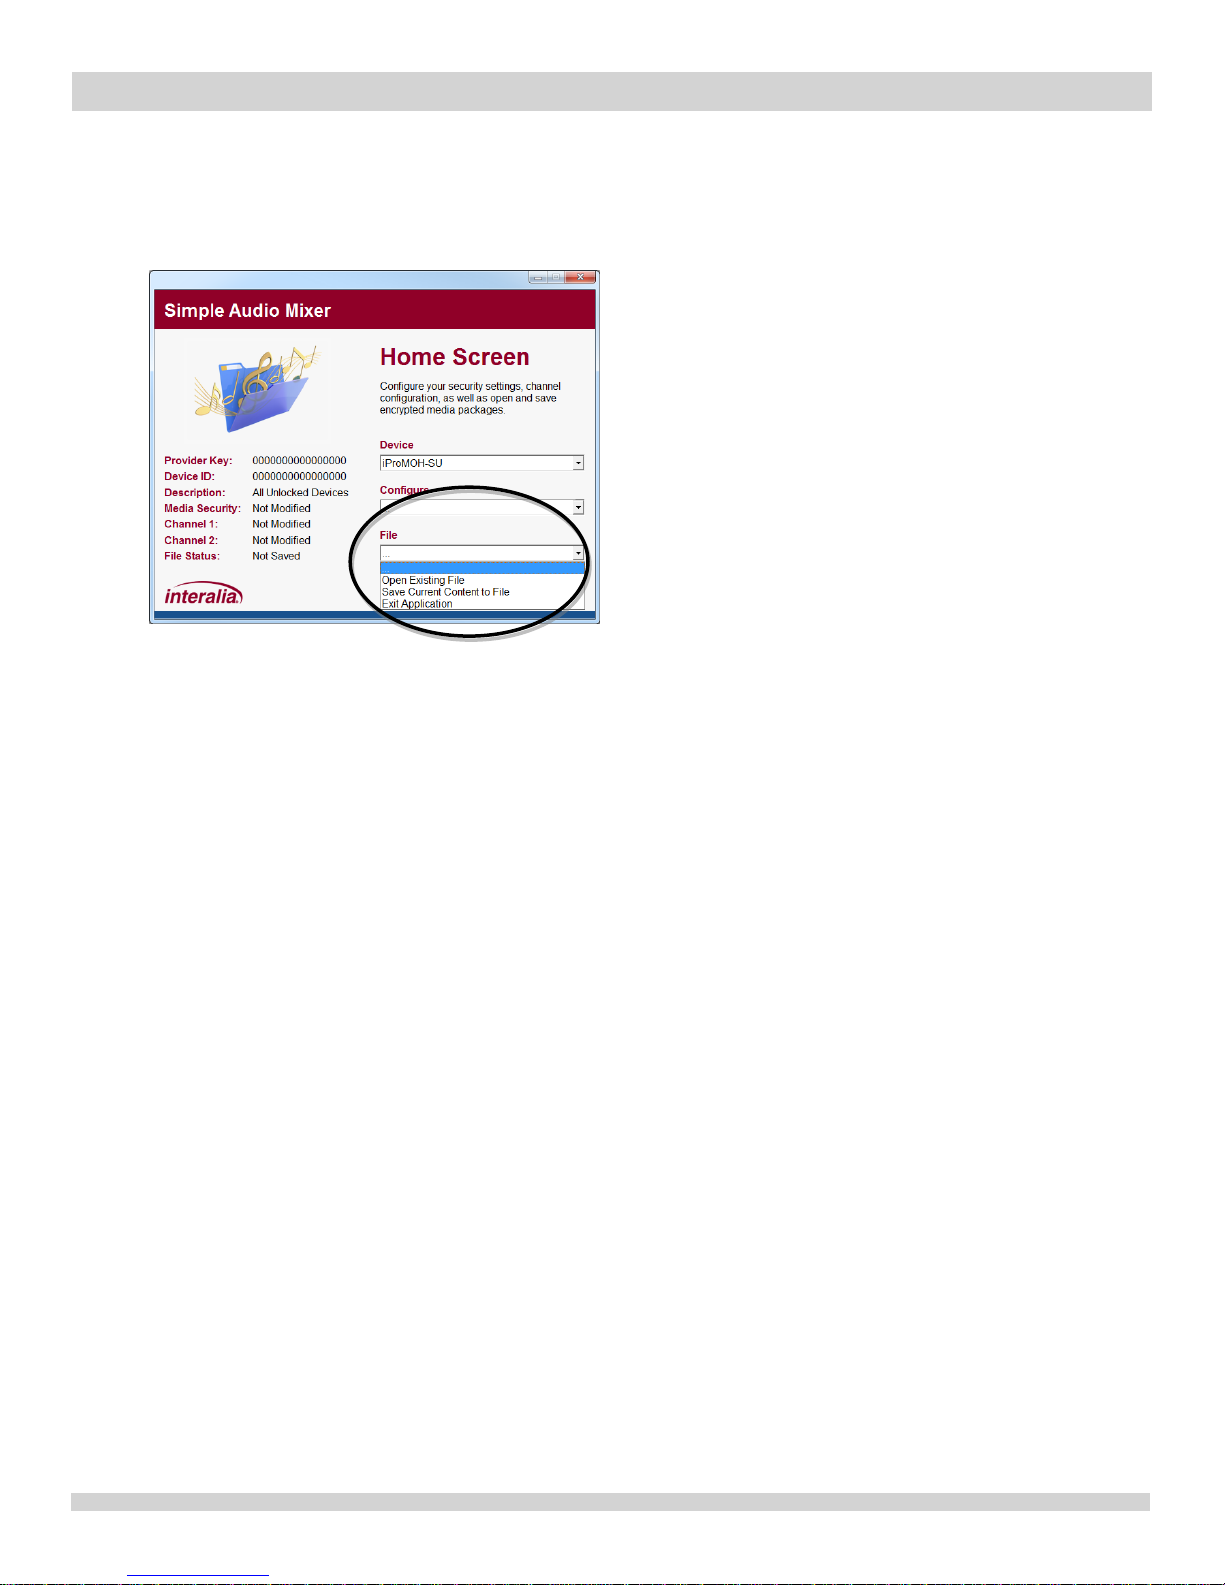
File - Open files, save files, and exit application.
For ease of use, the Home Screen" lists the current status of the application (circled, below).
These fields get populated as playlists are created, and devices are selected. In Music On Hold
mode, the extra device and security information is visible.
Normal Mode Music On Hold Mode
Page 13
iProMOH-SU |
Installation and User Manual
Interalia | iProMOH-SU Simple Audio Mixer Installation and User Manual Page 13
3.6 File Menu
The file menu allows access to the main application functions.
3.6.1 Open Existing File
To open an existing Simple Audio Mixer content file, select this menu item to launch the
Windows Explorer file browser.
Each Simple Audio Mixer file contains information from the device it was created for. The
application will automatically change to match the device type when the file is opened.
3.6.2 Save Current Content to File
The current progress of the file being configured may be saved at any time using this menu
item. To save the current content to a Simple Audio Mixer file, select this menu item to launch
the Windows Explorer file browser.
The Simple Audio Mixer filename consists of the following format:
<sam>_<DEVICE TYPE>_<DATE OF CREATION>_<u(OPTIONAL)><SPK(OPTIONAL)>_<DEVICE ID>.ipc
In the file explorer, the default "sam" text can be changed to make the file easier to identify by
the user. During the save process, the application will automatically append the rest of the
information.
Page 14

iProMOH-SU |
Installation and User Manual
Interalia | iProMOH-SU Simple Audio Mixer Installation and User Manual Page 14
Example 1:
Device Type: iProMOH-SU
Date of Creation: January 7, 2014
Service Provider Key: Selected, none zero
Reset Service Provider Key: No
Device Number: 00007070FFFF
Content Filename: sam_ONE_20140107_SPK_000000007070FFFF.ipc
Example 2:
Device Type: iProMOH-SU
Date of Creation: January 7, 2014
Service Provider Key: Selected, none zero
Reset Service Provider Key: Yes
Device Number: 00007070FFFF
Content Filename: sam_ONE_20140107_uSPK_000000007070FFFF.ipc
Example 3:
Device Type: iProMOH-SU
Date of Creation: January 21, 2014
Service Provider Key: Not selected, all zeros.
Reset Service Provider Key: No
Device Number: 00007070FFFF
Content Filename: sam_ONE_20140121_000000007070FFFF.ipc
IMPORTANT! The Simple Audio Mixer expects the filename to remain in this format. Only the
"sam" section may be renamed. Any other modification to the file name will result in the content
file NOT being loaded by Simple Audio Mixer and/or the iProMOH-SU.
Page 15
iProMOH-SU |
Installation and User Manual
Interalia | iProMOH-SU Simple Audio Mixer Installation and User Manual Page 15
3.7 Security and Settings Page (Music On Hold Mode Only)
Access the "Select Media Security" page from the "Configure" menu on the Home Screen.
This page is used to manage devices, as well as to select specific devices for content
generation. Simple Audio Mixer supports three (3) valid security combinations:
Content open to all devices from any provider (factory unit): Service Provider Key of all
zeros, and a Device ID all zeros.
Content locked to a specific device, but from ANY provider: Service Provider Key of all
zeros, and a selected Device ID.
Content locked to a specific device, from ONE provider: Service Provider Key set, and a
selected Device ID.
Simple Audio Mixer does not allow for a set Service Provider Key, and a Device ID of all zeros.
3.7.1 Service Provider Key
The Service Provider Key is a customer assignable key used in conjunction with the Device ID
to secure content created with the Simple Audio Mixer software to the playback device. This
key can be up to sixteen (16) characters, and is a unique identifier for your company. For
security reasons, it is recommended that it contains at least one uppercase letter, one number
and one symbol.
Page 16
iProMOH-SU |
Installation and User Manual
Interalia | iProMOH-SU Simple Audio Mixer Installation and User Manual Page 16
If a content file was generated with a Service Provider Key assigned to it, this key is
permanently linked to the device the first time the content is loaded. Subsequent updates would
require this same key to be present in the content file.
IMPORTANT!
Record the Service Provider Key and store it in a secure location. Once a device has been
linked to a Service Provider Key, future content updates are not allowed without that same key.
Service Provider Keys should ONLY be used by MOH Service Providers. If you are not an
MOH Service Provider you should not use this feature as it will permanently lock your device if
you lose the key.
Any locked device would need to return to the factory for reprogramming and would be subject
to a reprogramming fee. Unless you are a MOH Service Provider, leave this field at the default
zeros.
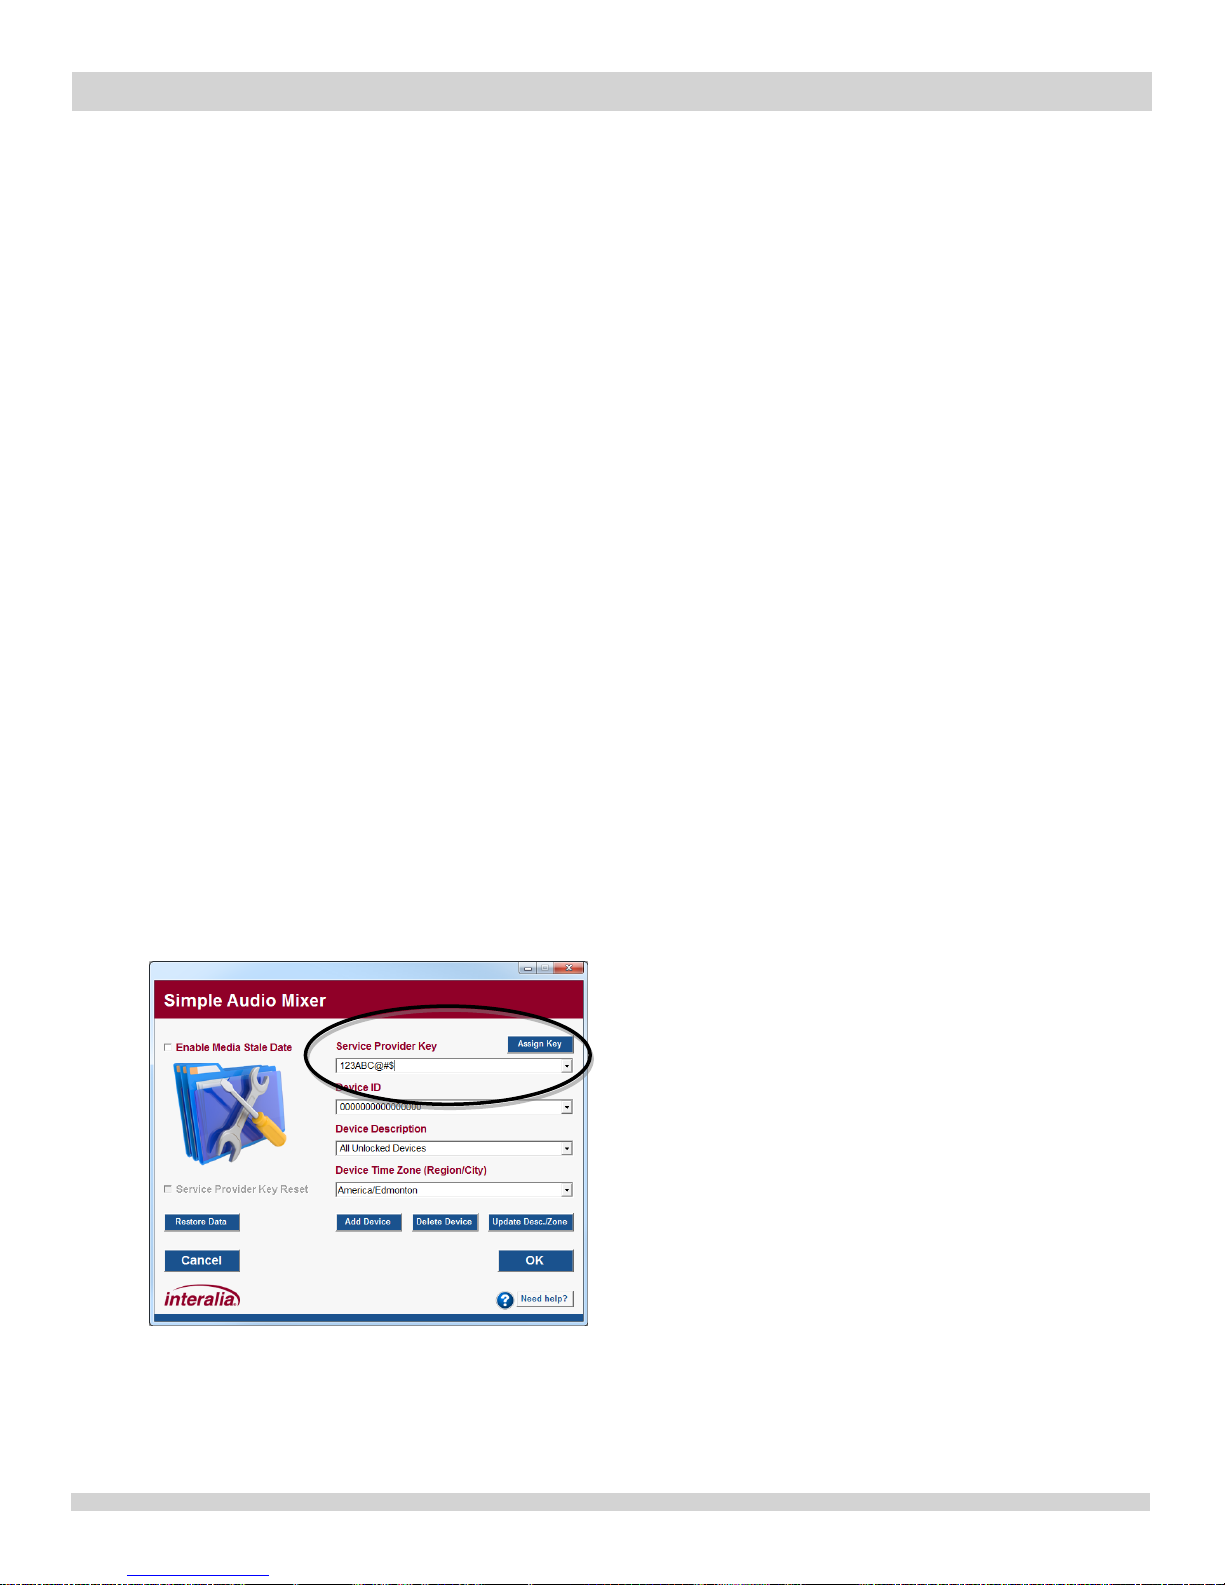
3.7.1.1 Assigning a Service Provider Key
Enter the key in the "Service Provider Key" field. Select "Assign Key" to link it to the
application.
Once assigned, the application will automatically default to this key for future content files, and
the "Assign Key" button is no longer visible. The blank service provider key can be selected for
Page 17
iProMOH-SU |
Installation and User Manual
Interalia | iProMOH-SU Simple Audio Mixer Installation and User Manual Page 17
any devices that have not been loaded with content files containing this key. The Service
Provider Key will be permanently assigned to the Simple Audio Mixer application once the "OK"
button is selected.
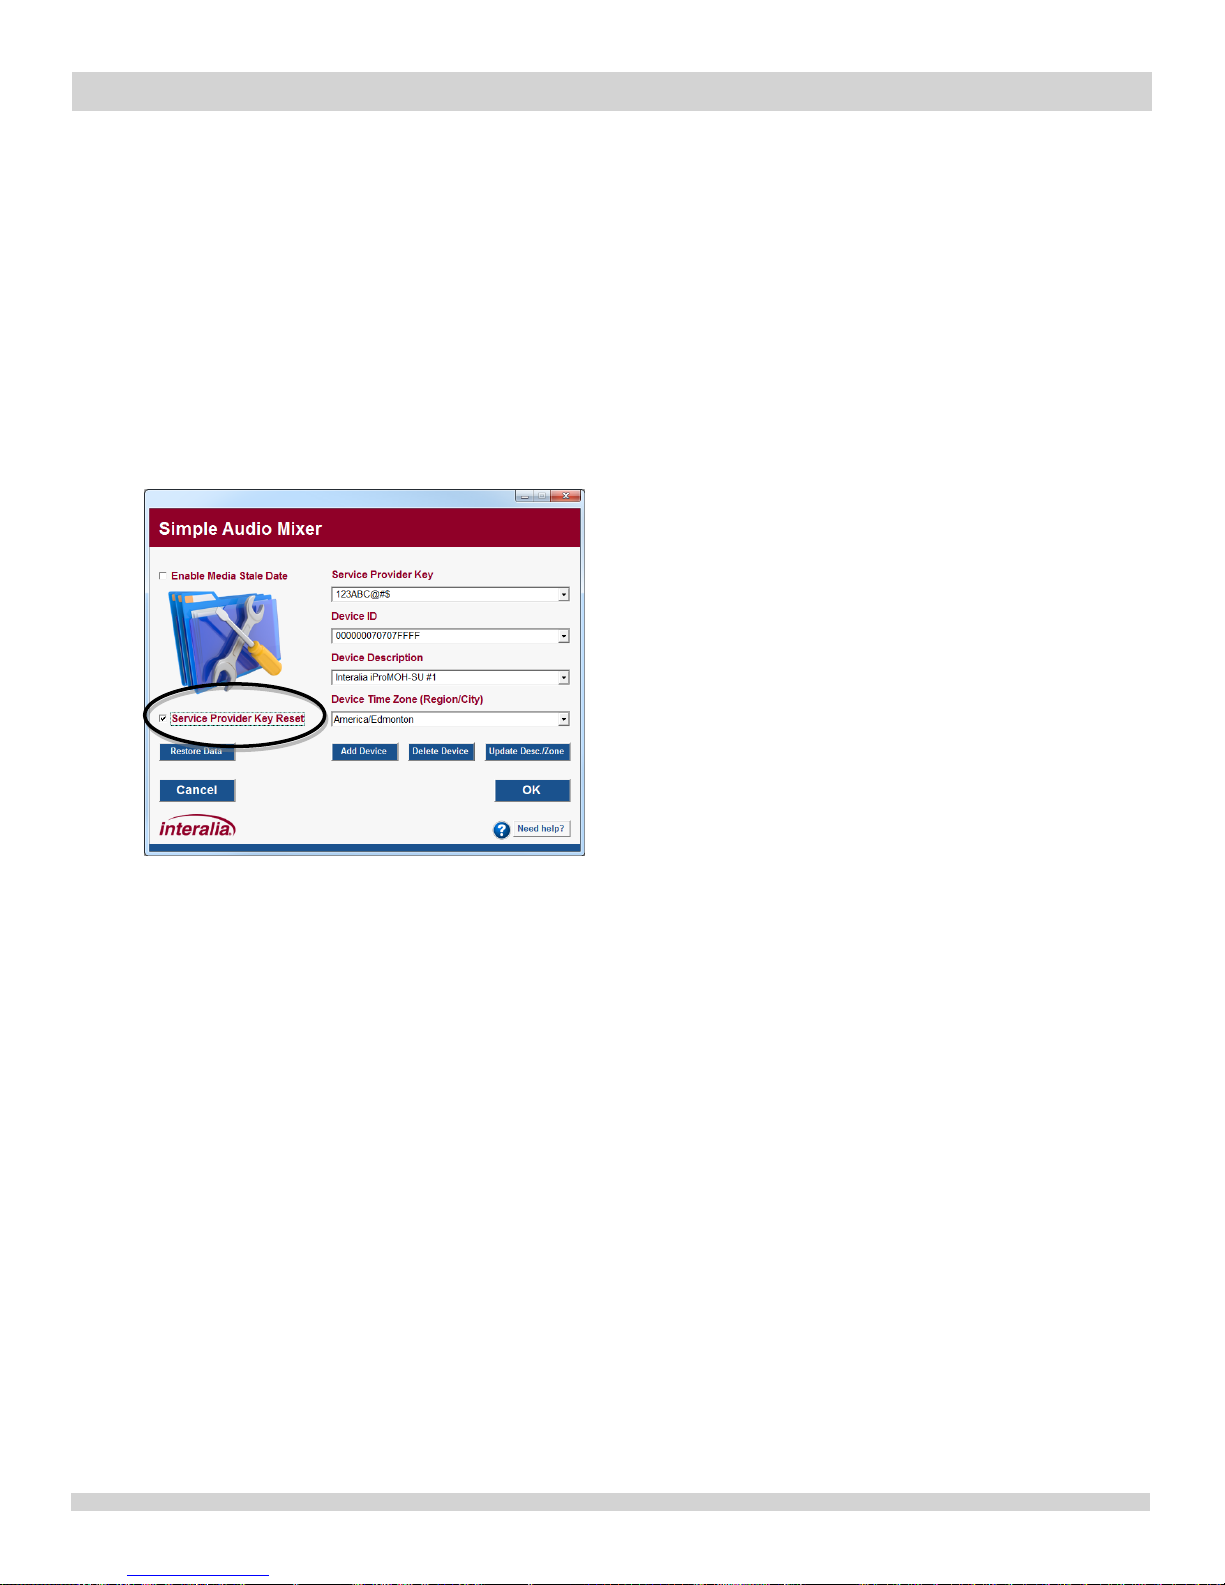
3.7.1.2 Removing a Service Provider Key from a Device
If a device has been locked to a particular Service Provider Key, it can be unlocked and
returned to factory security settings with the “Service Provider Key Reset” checkbox.
NOTE: The "Service Provider Key Reset" checkbox is only selectable if a non-zero Service
Provider Key is selected.
NOTE: The Service Provider Key can only be reset in a device if the update file contains the
SAME Service Provider Key in which it was locked to. This prevents unauthorized unlocking of
the device.
Page 18
iProMOH-SU |
Installation and User Manual
Interalia | iProMOH-SU Simple Audio Mixer Installation and User Manual Page 18
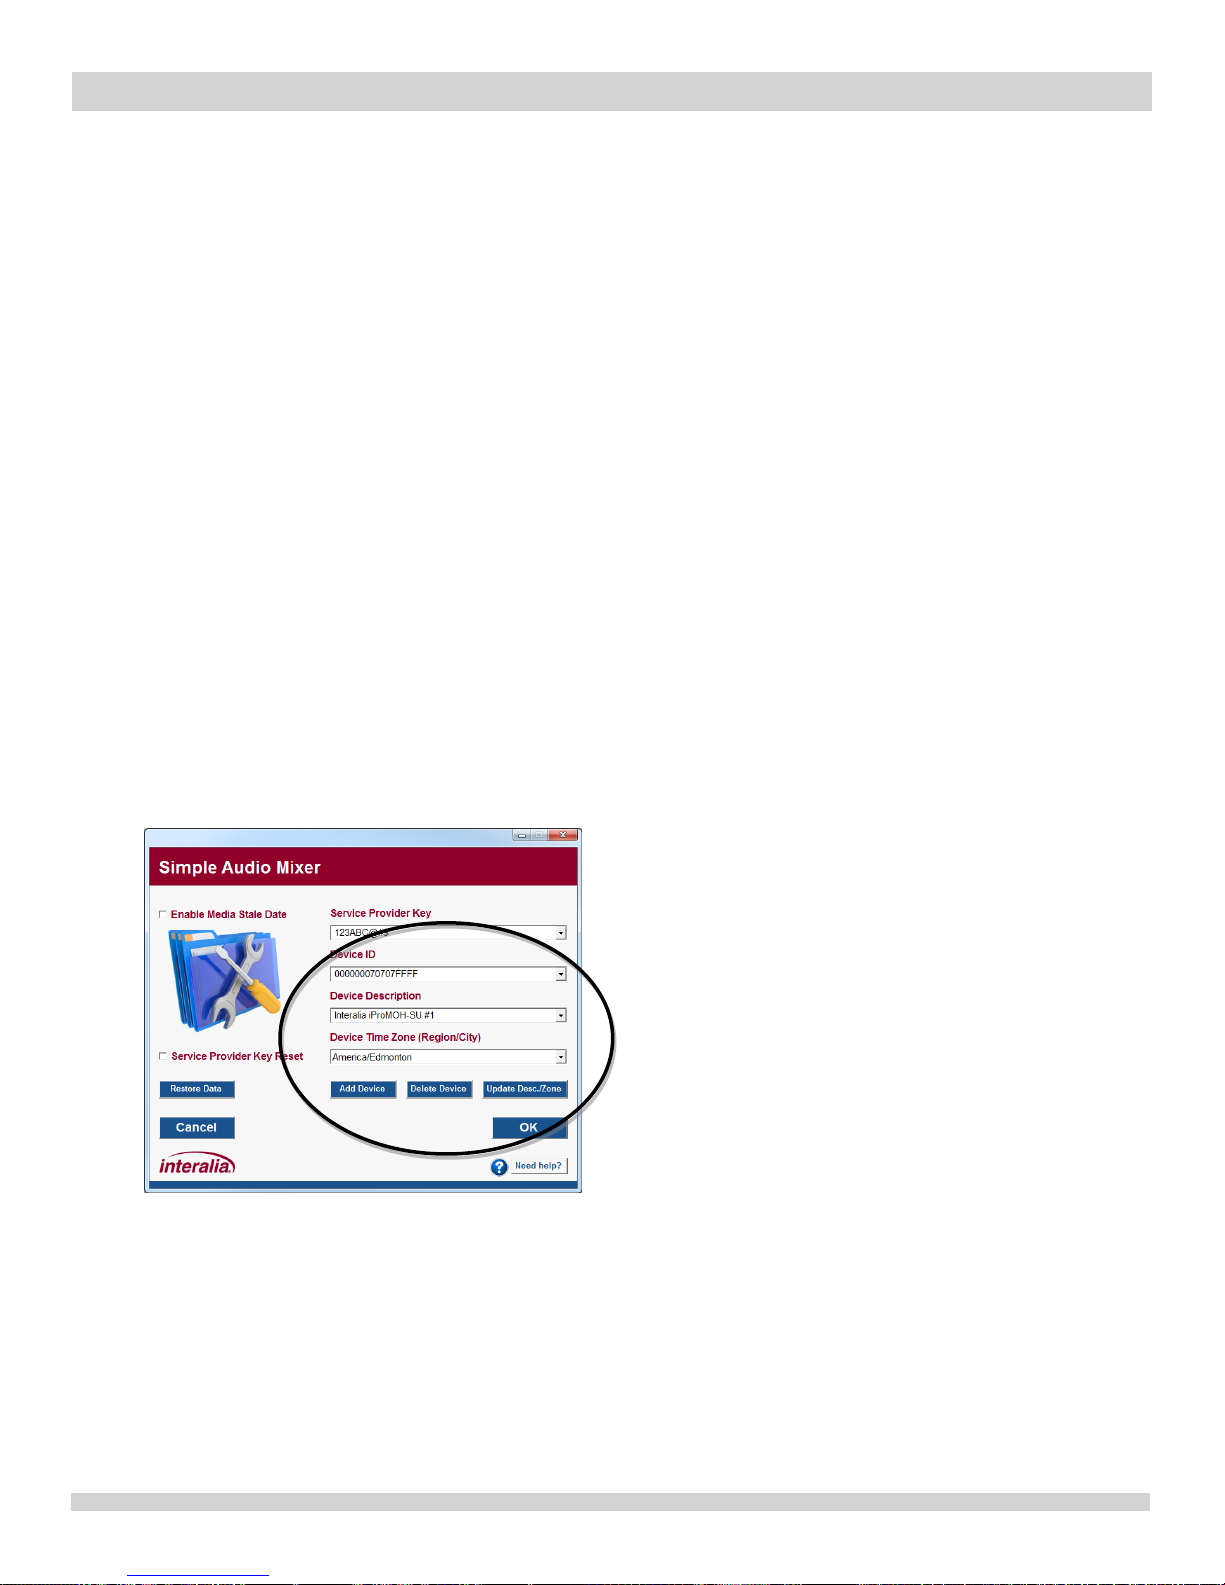
3.7.2 Adding Devices
Adding a device consists of configuring the following three (3) areas:
"Device ID" - Enter the 12-digit MAC address from the product label. The application
will automatically add zeros to the left of the number to create a 16-digit ID, and will
automatically convert it to uppercase. To facilitate the addition of multiple devices, a bar
code scanner may be used.
"Device Description" - Enter a description up to 24 characters that makes identifying
the device easier (i.e. Clothing Store #1). This field is case insensitive, and the
application will not allow for same phrase, with a different case (i.e. "store" and
"STORE").
"Device Time Zone" - Use the pull down to select the region and city closest to where
the iProMOH will be physically installed. The list is populated by continents, with
"America" covering North, Central and South America.
The "Device ID" and "Device Description" fields will auto-complete to allow quick selection of a
device.
3.7.2.1 Add Device Button
Once the "Device ID", "Device Description", and "Device Time Zone" are entered, select the
"Add Device" button to add it to the list.
Page 19

iProMOH-SU |
Installation and User Manual
Interalia | iProMOH-SU Simple Audio Mixer Installation and User Manual Page 19
3.7.2.2 Delete Device Button
Select the device by either the "Device ID" or "Device Description", and select the "Delete
Device" button to delete it from the list. Use this button to remove devices that are no longer in
service, or if an error was made entering the "Device ID" when the device was added.
3.7.2.3 Update Desc./Zone
Make changes to the description and/or time zone fields for a particular device, and then select
the "Update Desc./Zone" button to update the information.
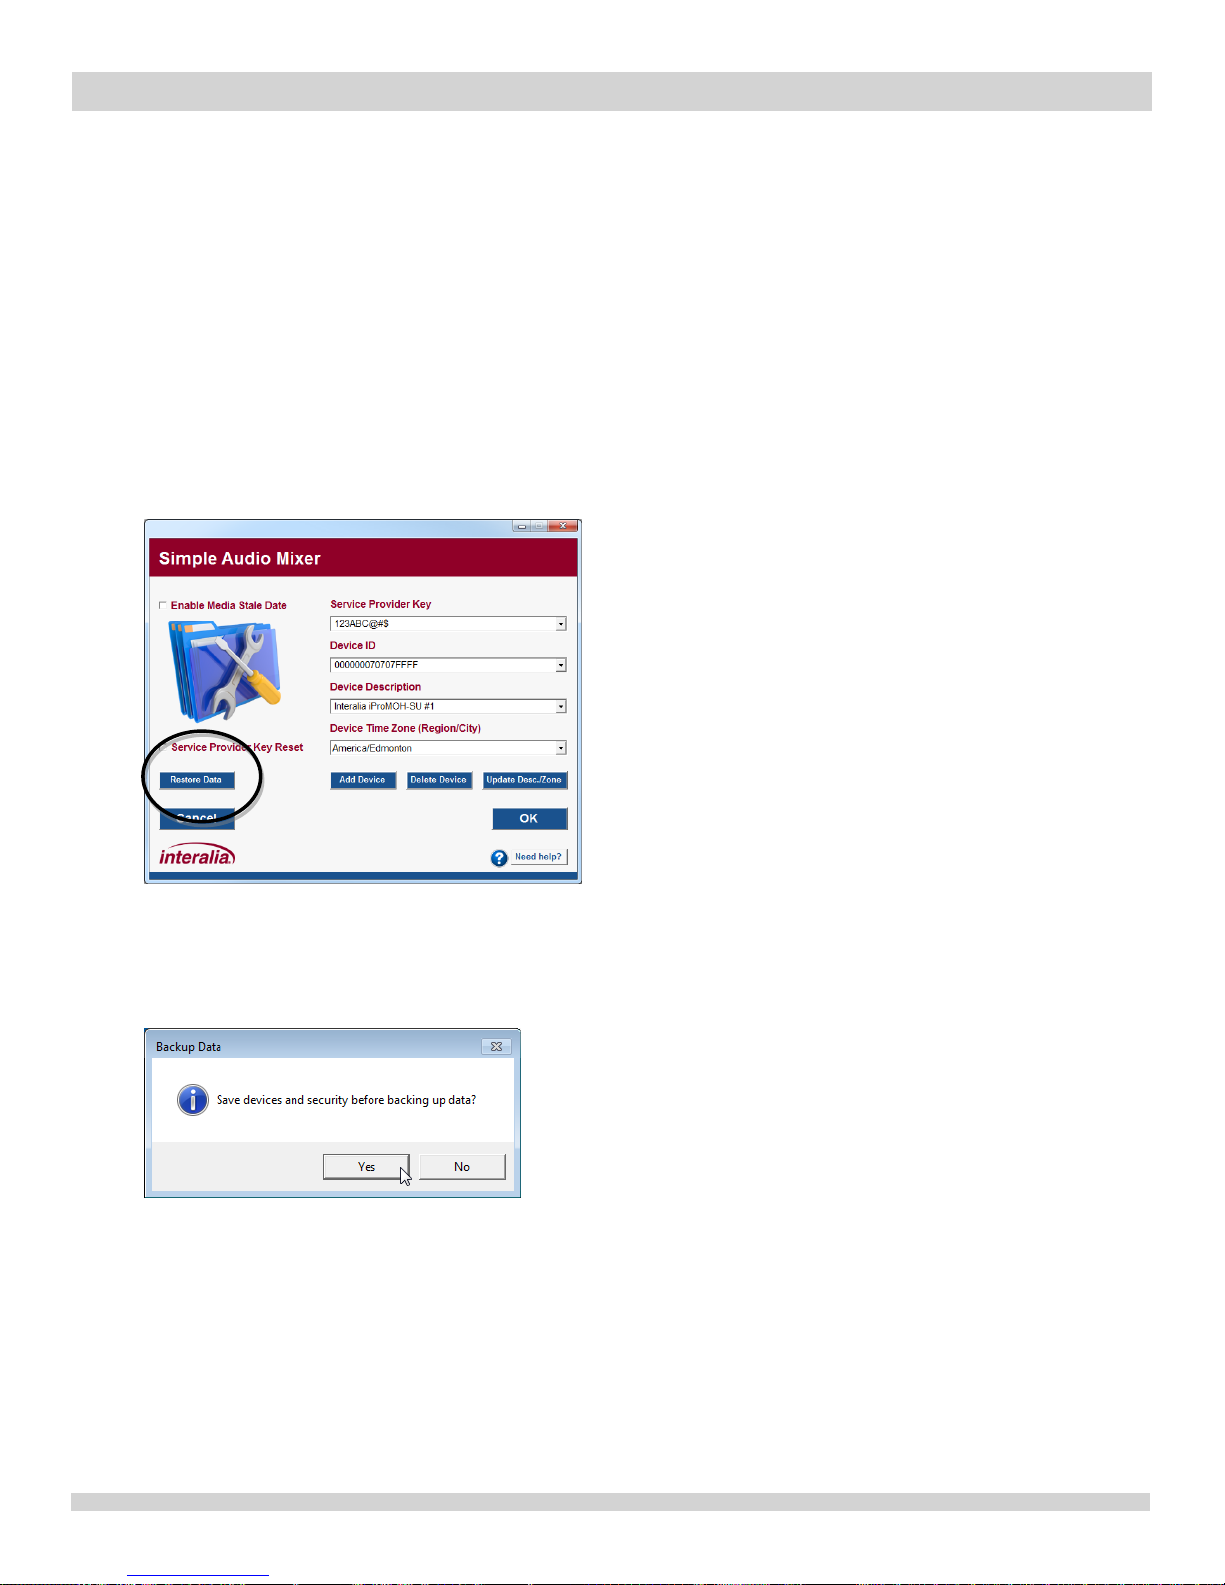
3.7.3 Restore Data Button
In the event that a previous install of Simple Audio Mixer becomes corrupt or the application is
installed on a different computer, the "Restore Data" button allows you to restore a backup
copy of the Simple Audio Mixer password, security settings, and device information. It does not
restore any content information.
NOTE: The "Restore Data" button is only visible when the Security and Settings page has not
been modified. Once the “OK” button has been selected on the page, the button changes to
“Backup Data”, and the application no longer allows you to restore a previous backup.
To restore a previously backed up instance of Simple Audio Mixer, select the "Restore Data"
button and browse to the location where you have previously saved the backup file. Select the
"ICL_settings.isf" file and select "Open". Simple Audio Mixer will be restored to its state at the
time of the backup.
IMPORTANT! The backup file MUST REMAIN NAMED "ICL_settings.isf".
Page 20
iProMOH-SU |
Installation and User Manual
Interalia | iProMOH-SU Simple Audio Mixer Installation and User Manual Page 20
3.7.4 Backup Data Button
The "Backup Data" button is used to save the state of the Simple Audio Mixer application by
allowing an easy means to save the "ICL_settings.isf" file. This file contains the log in
password, Service Provider Key, and all Device information, and can be used to restore the
application in case of computer failure. It is recommended to do regular backups to protect
against data loss, and store that file in a safe location (different computer, network location,
flash drive, etc).
NOTE: The "Backup Data" button is only visible after a Restore Data was completed, or when
the Security and Settings page has not been modified by pressing the “OK” button on the page.
In normal operation, all information entered in the Security and Settings screen do not get
committed to the "ICL_settings.isf" file until the "OK" button is pressed. To ensure all new
information is backed up, the following confirmation window appears.
Select the "Yes" button to save all new information to the "ICL_settings.isf" file before doing
the backup, or "No" to create the backup without adding new information.
Page 21
iProMOH-SU |
Installation and User Manual
Interalia | iProMOH-SU Simple Audio Mixer Installation and User Manual Page 21
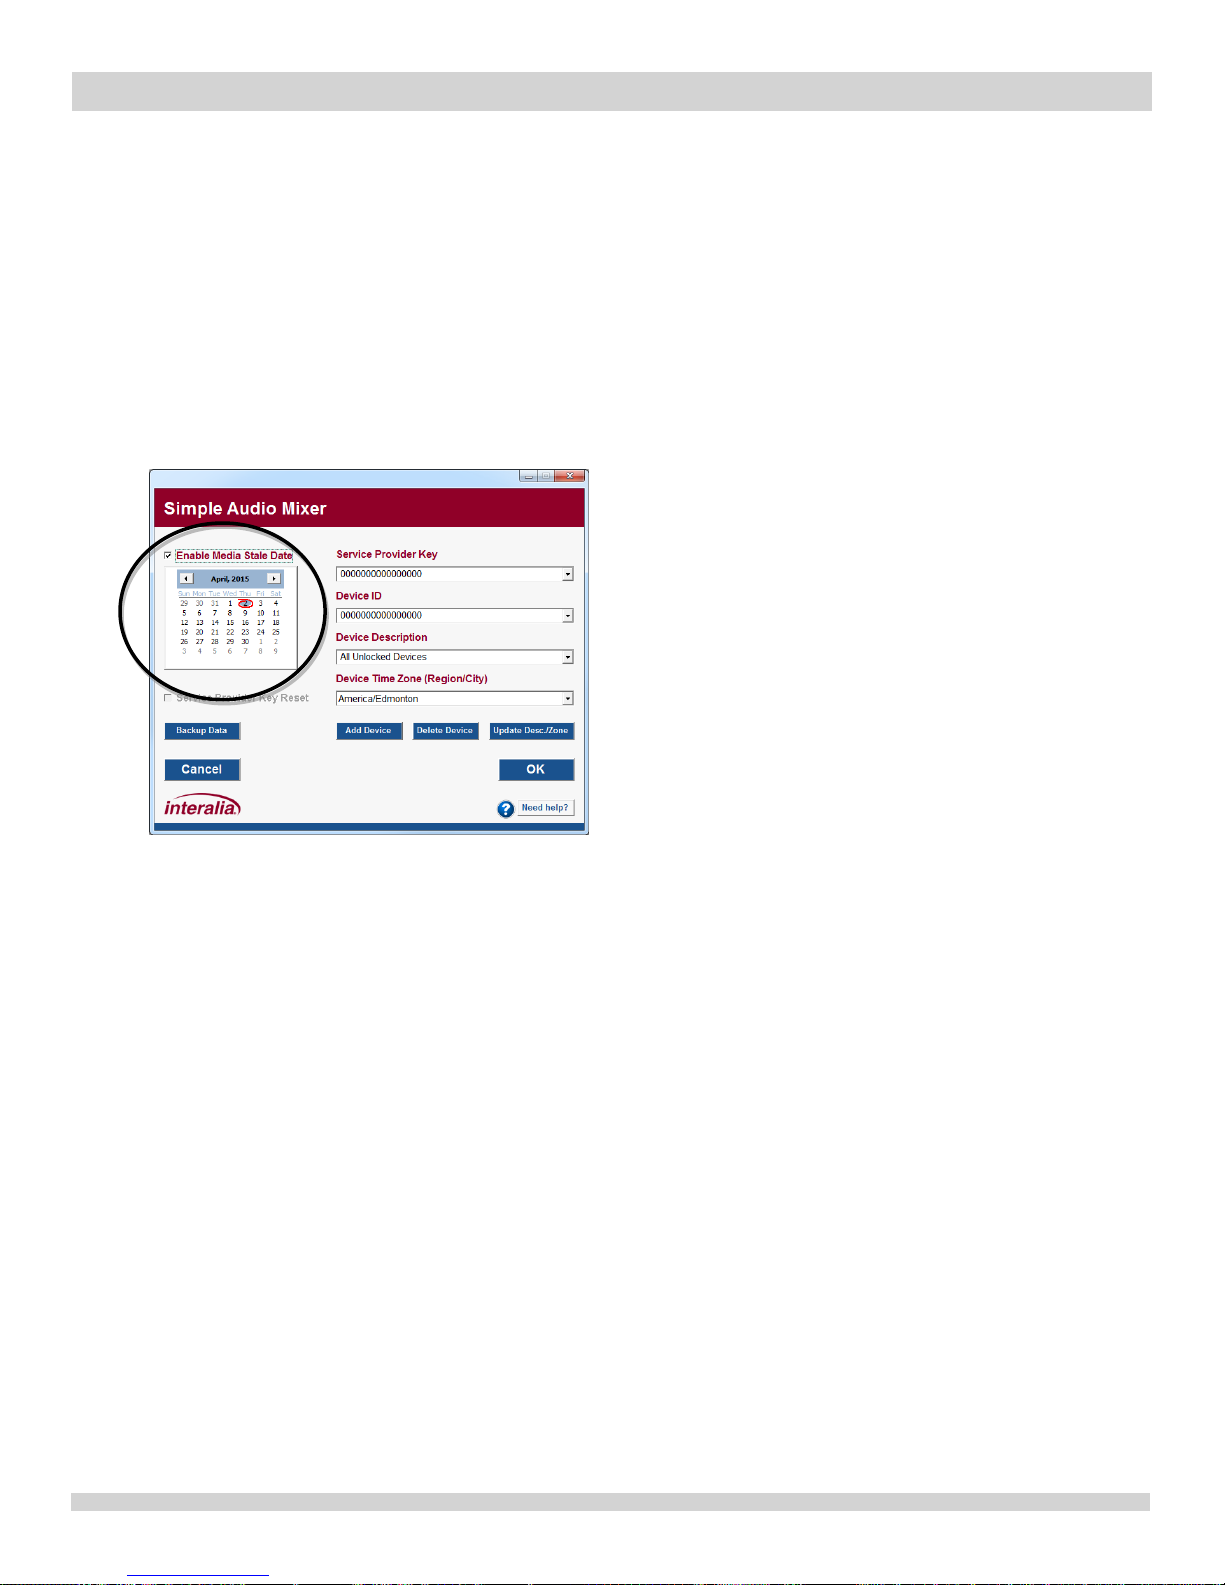
3.7.5 Enable Media Stale Date
Media Stale Date allows the iProMOH to stop playing audio at a preset future date. This allows
protection of content for customers being serviced on contract. Once the stale date is reached,
the iProMOH will stop playing content, and a new content file with a new stale date would need
to be loaded for operation to continue.
To enable Media Stale Date, select the "Enable Media Stale Date" check box to reveal the
calendar. Select the day, month and year that the iProMOH will stop playing, up to January 31,
2036.
3.7.6 Cancel Button
Abandons all changes and returns to the Home Screen.
3.7.7 OK Button
Saves all changes and returns to the Home Screen.
Page 22
iProMOH-SU |
Installation and User Manual
Interalia | iProMOH-SU Simple Audio Mixer Installation and User Manual Page 22
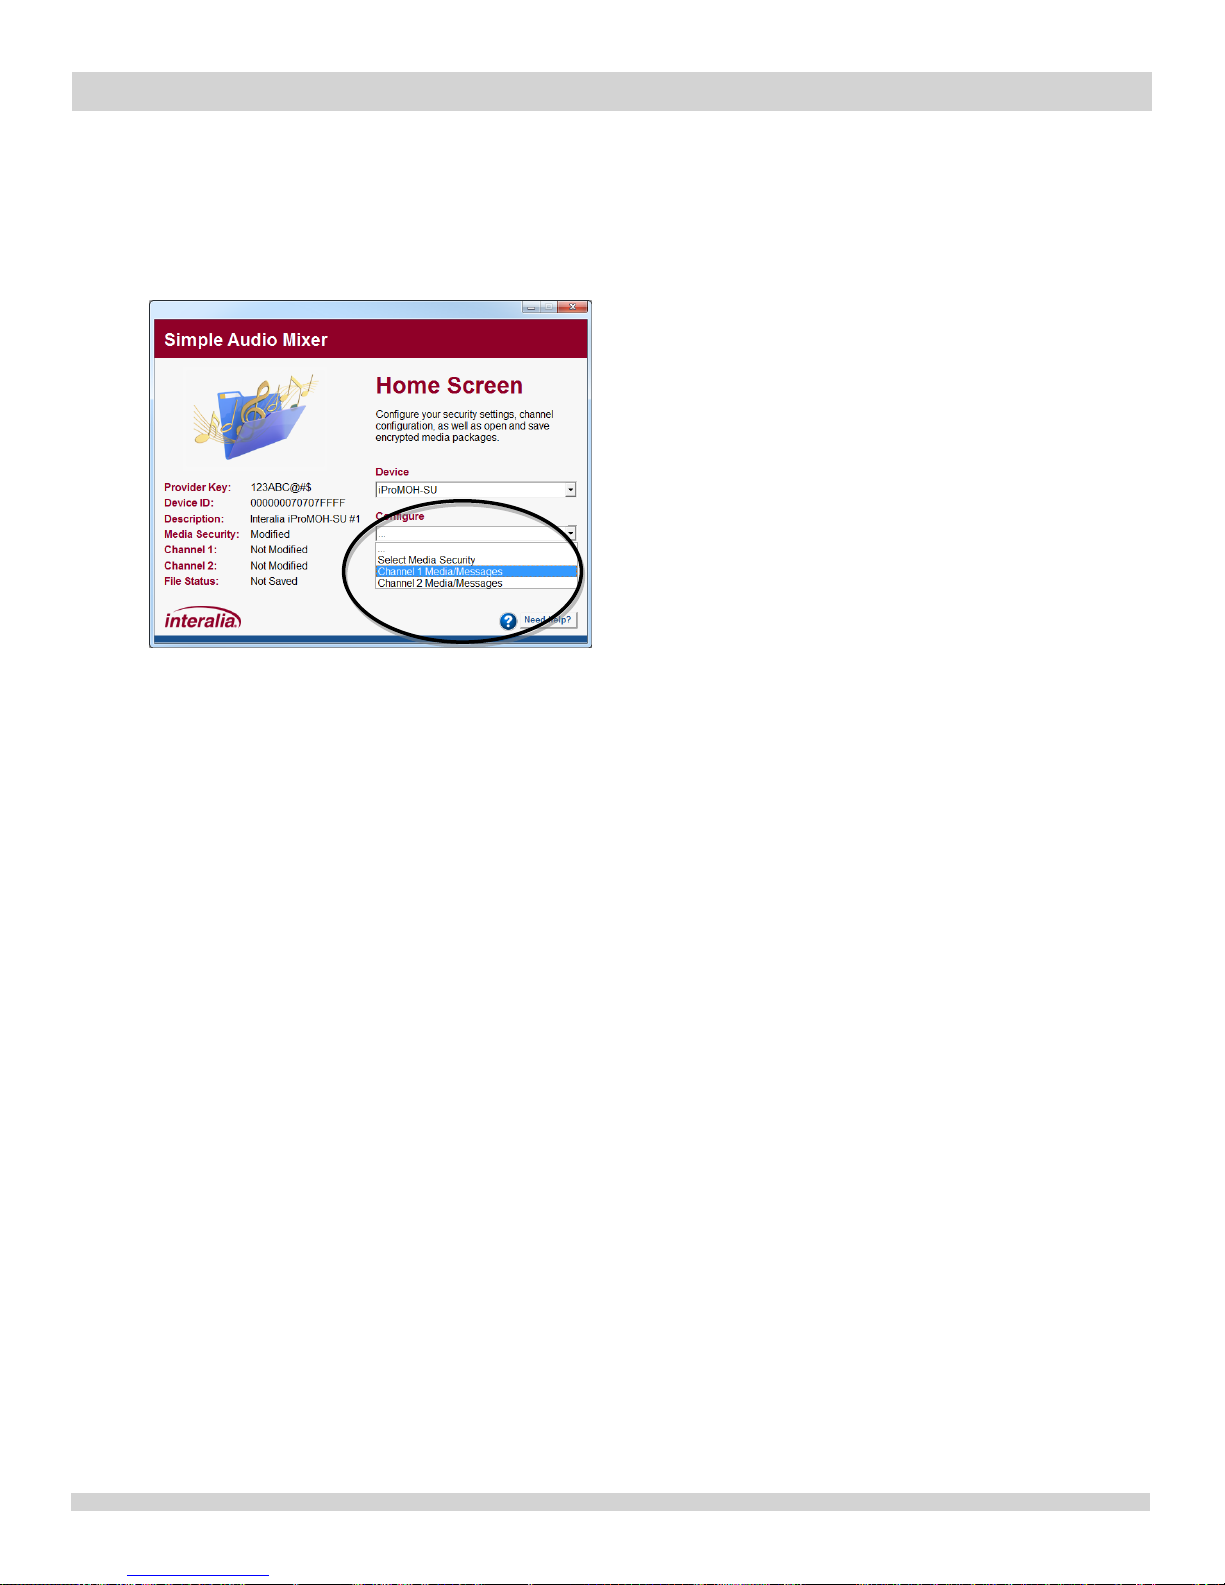
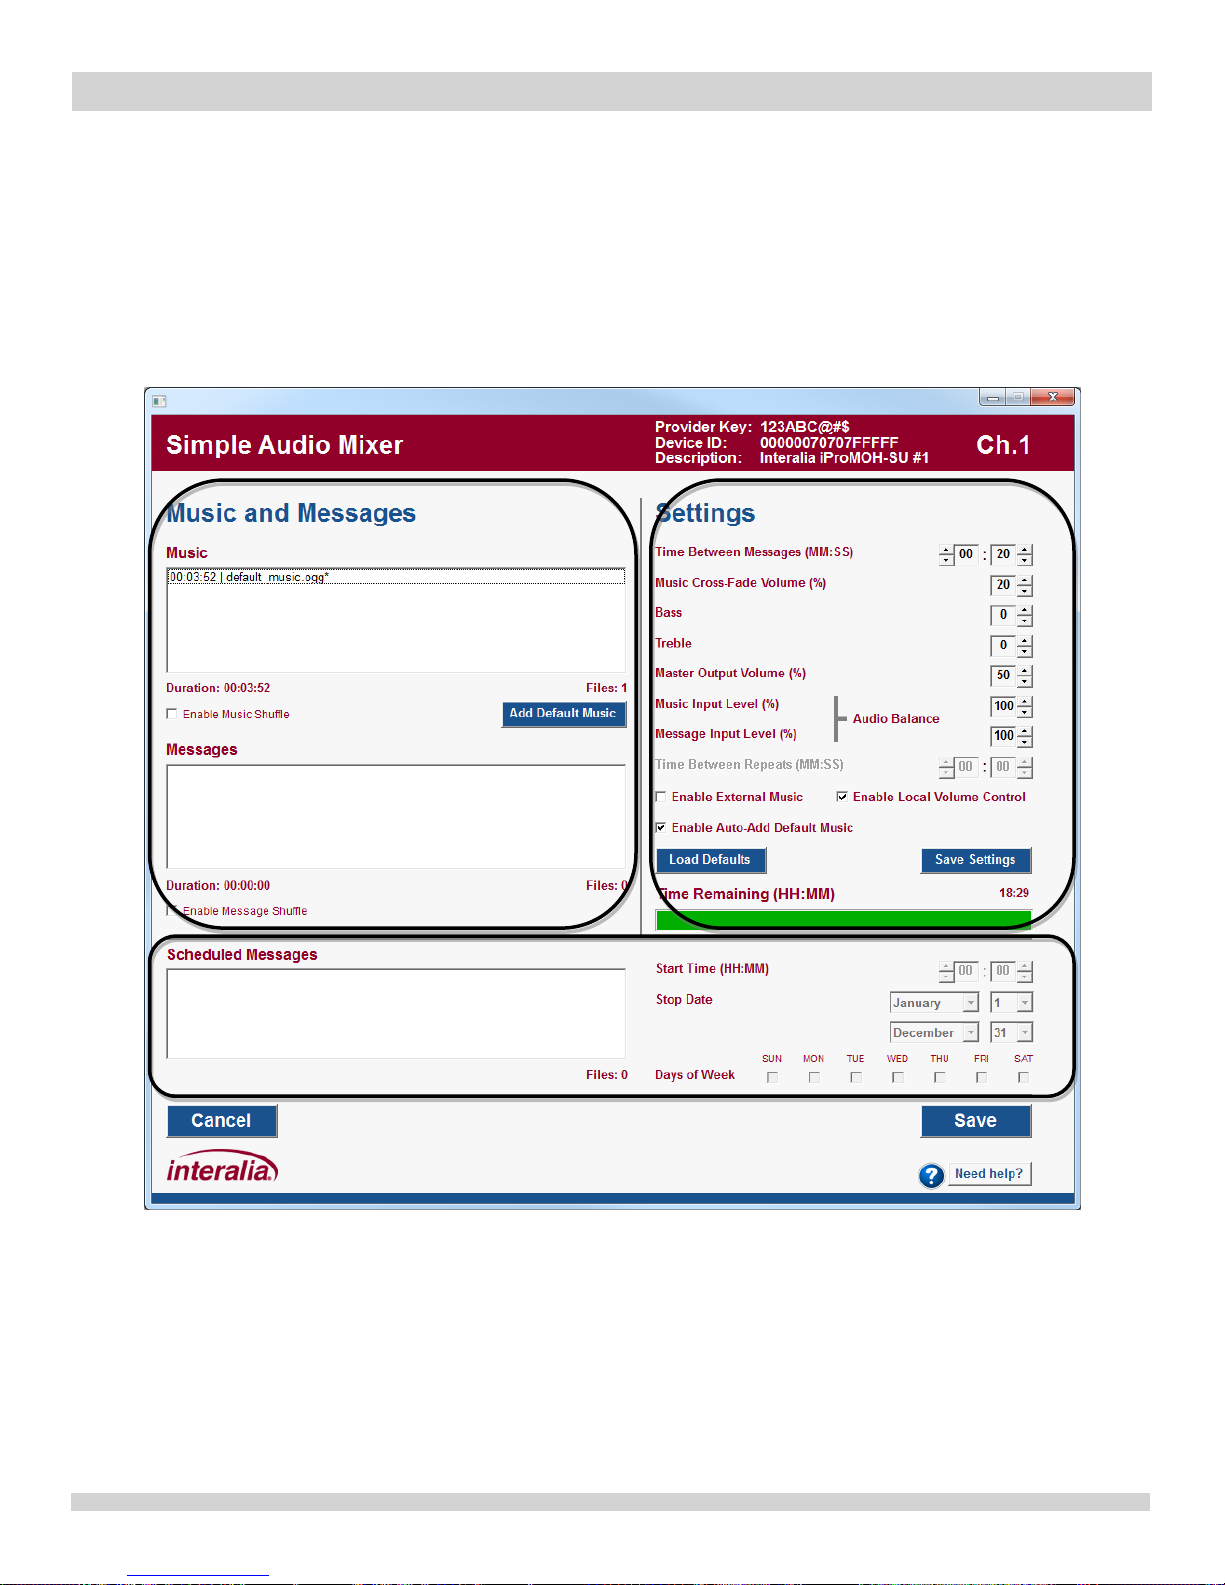
3.8 Content Administration Page
Access the "Channel 1 Media/Messages" or "Channel 2 Media/Messages" page from the
"Configure" menu on the Home Screen
The "Content Administration Page" is used for:
Adding music to play on the selected channel.
Adding messages to play on the selected channel.
Scheduling up to 10 messages to play at preset times on the selected channel (Music
On Hold mode only).
Adjust channel specific audio playback settings.
Page 23
iProMOH-SU |
Installation and User Manual
Interalia | iProMOH-SU Simple Audio Mixer Installation and User Manual Page 23
The "Content Administration Page" has three areas:
Music and Messages
Settings
Scheduled Messages (Only available in Music On Hold mode)
The iProMOH-SU utilizes an .OGG compression format to maximize storage capacity.
Page 24

iProMOH-SU |
Installation and User Manual
Interalia | iProMOH-SU Simple Audio Mixer Installation and User Manual Page 24
3.8.1 Music and Messages
The music and message lists are used to configure reoccurring media. The operation is the
same between the two lists, except the music list gets populated with the royalty free music by
default.
3.8.1.1 Music / Messages Lists
Music and messages can be added by dragging and dropping them onto the desired list from a
location on the computer. Alternatively, right-click on the desired list, and select "Add Files"
from the menu. Multiple files can be added at once by selecting them in Windows Explorer.
The name contains a playback time prefix in "hours:minutes:seconds" format, and all unsaved
media files have a "*" suffix after the name. As media is added, the "Files", "Duration", and
"Time Remaining" bar get updated to reflect the current status.
NOTE: The default music is already stored on the iProMOH-SU. Adding this music does not
affect the "Time Remaining".
NOTE: Simple Audio Mixer only stores one copy of each media file. If multiple copies are
added, only one is actually stored, and the "Time Remaining" will only get updated once.
Multiple items can be selected at once by using the "shift" and "control" keys on the keyboard.
Holding "control" while selecting items allows for multiple individual items to be selected and
deselected. To select a block of items, first select the start item, hold the "shift" key, and then
select the last item. All items in the block will be selected. Utilize the intuitive right-click menu
to manage files in each list. Files can also be moved in the list by left-clicking on highlighted
items, and dragging them.
The music and message lists support keyboard input (arrow keys, delete, etc). The hot-key
combinations are shown in the right-click menu.
3.8.1.2 Add Default Music
Select the "Add Default Music" button to add the royalty free music to the music list. Multiple
copies can be added.
Page 25

iProMOH-SU |
Installation and User Manual
Interalia | iProMOH-SU Simple Audio Mixer Installation and User Manual Page 25
3.8.1.3 Enable Music Shuffle / Enable Message Shuffle
Select the desired shuffle checkbox to enable the music and/or message shuffle functionality.
When enabled, the iProMOH-SU will create a non-repeating playback order. All list items will
get played before the list is shuffled again.
3.8.2 Settings
The "Settings" area allows the customization of the following items on a “per channel”, and "per
device" basis. This allows for user preferences to be loaded each time the application is
started.
NOTE: All changes are only retained for the current channel / current device instance, unless
the "Save Settings" button is selected. Then they will be applied to each future channel / future
device instance.
3.8.2.1 Time between Messages
The time between the end of one message until the start of the next message. During this time,
music will continue to play, if configured.
Default: 20 seconds
Minimum: 0 seconds
Maximum: 99 minutes, 59 seconds
Increment: 1 second
3.8.2.2 Music Cross-Fade Volume
During the message playback, the music will be reduced to this volume level, and still play in the
background. If set to 0%, only the message will be heard.
Default: 20%
Minimum: 0%
Maximum: 100%
Increment: 10%
Page 26

iProMOH-SU |
Installation and User Manual
Interalia | iProMOH-SU Simple Audio Mixer Installation and User Manual Page 26
3.8.2.3 Bass
Bass level for the media playback.
Default: 0
Minimum: -5
Maximum: +5
Increment: 1
3.8.2.4 Treble
Treble level for the media playback.
Default: 0
Minimum: -5
Maximum: +5
Increment: 1
3.8.2.5 Master Output Volume
Main volume from the audio output connectors. This value is linked to the volume buttons on
the device.
Default: 50%
Minimum: 10%
Maximum: 100%
Increment: 10%
Page 27

iProMOH-SU |
Installation and User Manual
Interalia | iProMOH-SU Simple Audio Mixer Installation and User Manual Page 27
Perceived
Music/Message Level
Music Input
Level
Message Input
Level
Master Output Volume
Music sounds 20% louder
than message
80%
100%
Adjust to give desired
output level
Message sounds 40%
louder than music
100%
60%
Adjust to give desired
output level
Music and message level
sounds the same
100%
100%
Adjust to give desired
output level
Note: Only one input level should be changed at any given time. The goal is to
keep them as close to 100% for best audio quality, and lower one so that both
media sources sound approximately the same. They should not be used to tailor
the output level.
3.8.2.6 Audio Balance
3.8.2.7 Music Input Level
Sound level for the music playlist / external music. Normally it is set to 100%, and is used to
balance differences in volume between music and messages.
Default: 100%
Minimum: 10%
Maximum: 100%
Increment: 10%
3.8.2.8 Message Input Level
Sound level for the message playlist. Normally it is set to 100%, and is used to normalize
balance in volume between music and messages.
Default: 100%
Minimum: 10%
Maximum: 100%
Increment: 10%
3.8.2.9 Time Between Repeats
Not available on this device.
Page 28

iProMOH-SU |
Installation and User Manual
Interalia | iProMOH-SU Simple Audio Mixer Installation and User Manual Page 28
3.8.2.10 Enable Local Volume Control
When selected, the volume buttons on the iProMOH can be used to change the device volume
("Master Output Volume"). If deselected, the user cannot change the volume on the device.
3.8.2.11 Enable External Music
When selected, the iProMOH-SU will use the external music input as the source of the music
played. The “Music” list box will get disabled, with an option to delete all music in the music list
to optimize storage space, and reduce content update time.
3.8.2.12 Enable Auto-Add Default Music
When selected, the application will automatically add the royalty free default music, if the
following conditions are true:
Channel and Settings page is not modified.
There are no items in the music, messages, or scheduled messages lists.
3.8.2.13 Save Settings Button
Select the “Save Settings” button to use the above settings each time the application is started.
Page 29

iProMOH-SU |
Installation and User Manual
Interalia | iProMOH-SU Simple Audio Mixer Installation and User Manual Page 29
3.8.2.14 Load Defaults Button
Select the "Load Defaults" button to return the settings to the factory defaults.
NOTE: This change is only retained for the current channel / current device instance, unless
the "Save Settings" button is selected. Then they will be applied to each future channel / future
device instance.
3.8.2.15 Time Remaining
Indicates the available play time remaining on the iProMOH, based on the current amount of
media files loaded.
3.8.3 Scheduled Messages (Music On Hold Mode Only)
Up to ten (10) scheduled messages can be assigned to play on specific times, days and/or
dates. This functionality is useful for seasonal announcements, or store open and close
announcements. All functionality in the "Scheduled Messages" area is governed with the
mouse right-click menu, and unlike the music / message lists, no keyboard inputs are allowed.
The "Files" counter at the bottom of the list indicates the number of scheduled messages
loaded.
IMPORTANT! In order to use stale date and scheduled messages, the iProMOH-SU must be
first connected to a network, and synchronized with a time server. See the "Setting the
iProMOH-SU Time" section in this manual for details.
3.8.3.1 Scheduled Messages List
Messages can be added by dragging and dropping them onto the list from a location on the
computer. Alternatively, right-click on the list, and select "Add Files" from the menu. Multiple
files can be added at once by selecting them in Windows Explorer. Up to ten (10) scheduled
messages can be loaded, and will play at the assigned time, between the start and stop dates,
for the selected days of the week. The scheduled messages will repeat on the next calendar
year.
Once added, the message file name is visible in the list. The name contains a playback time
prefix in "minutes:seconds" format, and all unsaved media files have a "*" suffix after the name.
Page 30

iProMOH-SU |
Installation and User Manual
Interalia | iProMOH-SU Simple Audio Mixer Installation and User Manual Page 30
As media is added, the "Files" counter and "Time Remaining" bar get updated to reflect the
current status.
The playback schedule is shown for the selected message. Any changes to that message
schedule are retained when a different message is selected in the list. Right-click on the
selected message for the menu to quickly set / clear schedule items using the follow menu
items:
Clear All Days (Disables message)
Set All Days (Checks Sunday through Saturday)
Set Week Days (Checks Monday through Friday)
Set Weekend Days (Checks Saturday and Sunday)
Reset Start/Stop Date (Resets Start Date to January 1 and Stop Date to
December 31 - All year playback)
Exit (Closes the popup menu)
NOTE: Simple Audio Mixer only stores one copy of each media file. If multiple copies are
added, only one is actually stored, and the "Time Remaining" will only get updated once
3.8.3.2 Start Time
Time of day that the message will be played in 24-hour format.
3.8.3.3 Start Date
The month and day that the message will start playing. This date must occur before the "Stop
Date".
3.8.3.4 Stop Date
The month and day that the message will stop playing. This date must occur after the "Start
Date".
3.8.3.5 Days of Week
The days of the week that the message should play. Any message can be disabled by
deselecting all the "Days of Week" boxes.
Page 31

iProMOH-SU |
Installation and User Manual
Interalia | iProMOH-SU Simple Audio Mixer Installation and User Manual Page 31
3.8.4 Content and Administration Page Buttons
3.8.4.1 Save Button
Saves all changes for that particular channel to the media package being created, and returns
to the "Home Screen".
3.8.4.2 Cancel Button
Abandon all changes for that particular channel, and returns to the "Home Screen".
3.9 Creating a Content File
The typical process for creating content files is:
Select the device, security settings and stale date if required.
Configure the channel 1 media and settings.
Configure the channel 2 media and settings.
Save the content file.
During the process, the status section on the left side of the "Home Screen" will indicate the
completion and file status.
Page 32

iProMOH-SU |
Installation and User Manual
Interalia | iProMOH-SU Simple Audio Mixer Installation and User Manual Page 32
4 Loading Your Content onto the iProMOH-SU
IMPORTANT!
A Simple Audio Mixer file with a "Service Provider Key" of all zeros and the "Device ID"
of all zeros (unlocked, playback on all devices), MUST NOT be present on a USB stick
that contains other content files.
The USB stick MUST NOT contain multiple Simple Audio Mixer files for the same Device
ID.
To update the iProMOH-SU media:
1) Power on the iProMOH-SU, wait for it to boot.
2) Copy the Simple Audio Mixer media file to the root folder of a USB flash drive. Multiple
Device ID files can be present on the drive, as long as they meet the criteria stated
above.
3) Insert the USB stick into the USB port of the iProMOH-SU. Once the stick is detected,
playback will stop, while the update occurs. Consult the "Status LED Table" for
expected LED patterns during this process.
4) If successful, the status LED will flash green, and playback will resume.
5 Upgrading Firmware
The latest firmware for the iProMOH-SU can be obtained from Firmware/Software section on
the Interalia site:
http://interalia.com/ipromoh-su.php
To update the iProMOH-SU firmware:
1. Power on the iProMOH-SU.
2. Copy the firmware file to the root folder of a USB flash drive. There MUST NOT be
more than one firmware file in the root directory of that drive.
3. Insert the USB flash drive into the iProMOH-SU to start the update. Consult the
"Status LED Table" for expected LED patterns during this process.
4. Once the upgrade is completed, the iProMOH-SU will reboot, and start playback.
NOTE: To eliminate confusion of the upgrade process status, it is recommended that no Simple
Audio Mixer media files are on the USB stick at the same time.
Page 33

iProMOH-SU |
Installation and User Manual
Interalia | iProMOH-SU Simple Audio Mixer Installation and User Manual Page 33
6 Setting the iProMOH-SU Time
The iProMOH-SU utilizes an internet NTP time server to synchronize its internal clock. If the
time is not synchronized, stale date and scheduled messages may not occur at the proper
date/time.
NOTE: This is only required if the content loaded into the iProMOH-SU utilizes stale date
and/or scheduled messages. Normal playback does not require the time to be synchronized.
NOTE: The iProMOH-SU will retain the clock setting for approximately one week without being
powered on. After this period, the clock will need to be reset. It is recommended that the clock
is set at the installation site.
To synchronize the time:
1. Connect the Ethernet cable from the iProMOH-SU to a network jack which has
access to the internet.
2. Power on the iProMOH-SU.
3. Once the iProMOH-SU has booted (status LED flashing green), press and hold both
volume buttons for two (2) seconds.
4. The status LED will change to an alternating sequence of 1 second red / 1 second
green.
5. After approximately thirty (30) seconds, the status light will return to flashing green if
the time synchronization was successful.
6. If the synchronization was not successful, the status light will turn to solid red.
NOTE: If the process fails after several minutes, this is an indication of a firewall/network
issue. NTP time requires the firewall to pass UDP packets on port 123, and requires a DHCP
server to assign an IP address to the iProMOH-SU.
NOTE: If the iProMOH-SU clock is outside acceptable limits, it will power on with a ½ second
red / ½ second green alternating sequence. Until the time is synchronized, only the stale date
tone will play. This will only occur if the media loaded into the iProMOH-SU is dependent on
time (i.e.: stale date and/or scheduled messages)
Page 34

iProMOH-SU |
Installation and User Manual
Interalia | iProMOH-SU Simple Audio Mixer Installation and User Manual Page 34
7 Technical Specifications
Audio Play Time:
18 hours 29 minutes, stored in non-volatile flash memory (no back-up battery required)
Audio Formats:
Audio storage format: .OGG
Decoded audio sampling frequency: 22.1 KHz
Supports the following file formats,
AIFF (*.aiff)
FLAC (*.flac)
PCM (*.pcm)
MPEG4 (*.mp4, *.mpeg4)
MP3 (*.mp3)
WAV (*.wav)
WMA (*.wma)
OGG (*.ogg)
Audio Inputs:
One input for cross fading with
Background Music Company, Play Network)
Audio Outputs:
Two channels for output. First channel 600 Ohm (+5 dBm) or 8 Ohm (1W, RMS) and
second channel 600 Ohm (+5 dBm)
48 VDC tolerant for direct connection to a FXO port (no additional line protection
hardware required)
Play Options:
Music only
Messages only
Studio quality mixed music and messages
Messages cross-faded with external licensed music services
Power Supply:
AC to DC adapter with multi-region connectivity
Input: 100-240 VAC 50/60 Hz, 0.3 A Output: 9-12 VDC @ 600 mA
Dimensions:
44mm H x 190mm W x 127mm D (1.75" H x 7.5" W x 5" D)
Weight:
344 grams (0.76 lbs.)
Specifications are approximate and subject to change without notice.
background licensed
music source (e.g. The
 Loading...