

Page 1
STORING YOUR SQUEELER:
If you will be storing your Squeeler for a longer period of time, remove the 9-Volt Battery from the controller and
the 9.6V NIMH Rechargeable Battery Pack from the Squeeler. This will prolong the operational life of the Batteries. It is a good idea to store the Squeeler, Controller, Charger, Battery Pack, Tire Inflation Needle, this Instruction
Manual and Tire Inflation Gauge Template together so no components become misplaced or lost. Please respect
the below points to extend the operational life of your Squeeler during storage.
1. Product may be damaged or performance may be adversely affected if your Squeeler is not properly stored.
2. Never place any items on top of any components of the Squeeler.
3. Always keep your Squeeler in a cool dry place.
4. Keep Squeeler away from pets and other household animals.
5. Do not rest your Squeeler on any potential heat source such as electronic equipment or a radiator.
6. Store the 9.6V NIMH Rechargeable Battery Pack in a safe location out of the reach of children and at room
temperature. Do not store any batteries inside the Squeeler or Controller for longer periods of time.
7. It is a good idea to deflate the Squeeler’s tires during storage. This is easily accomplished by gently inserting
the Tire Inflation Needle into each tire (without an air pump) and allowing the pressurized air to drain out of each
tire.
8. Do not allow your Squeeler to get wet or come in contact with water or any other liquids. The Squeeler
is NOT water resistant.
TROUBLESHOOTING
ISSUE:
Squeeler will not start. 1. Squeeler is not turned on.
2. Battery Pack is not charged.
3. The Controller is not turned on.
4. The Squeeler has gotten wet or
has been in water.
CAUSE:
CORRECTIVE ACTION:
1. Turn the Squeeler on by sliding the On / Off Switch
to the On position.
2. Charge the battery pack as described in this
manual.
3. Turn the Controller on by sliding the On / Off Switch
to the On position.
4. Allow your Squeeler to completely dry out before
attempting to use it again. Ensure that the Battery
Pack has not sustained water damage. It is very likely
that the Squeeler has been permanently damaged by
getting wet. If this is the case, such damage is not
covered under warranty.
IMPORTANT SAFETY INFORMATION
Keep the Squeeler away from face, eyes and hair at all times. Keep fingers away from spinning Tires and
the spinning Body of the Squeeler. Do not drive the Squeeler near or at other people or animals. Use
caution when operating the Squeeler. Make sure people around you know that you are playing with the
Squeeler. Recommended for use outdoors and indoors. When playing outdoors avoid operating your
Squeeler near roads, trees, or other hazardous areas. Do not play with your Squeeler during, rain or any
other form of precipitation or harsh weather. Also make sure that your Squeeler is not operated in a wet
area such as snow, water, or mud. When operating the Squeeler indoors, only play in rooms without
obstacles, or breakable objects. The Charger provided in this package is for charging the 9.6V NIMH
Rechargeable Battery Pack ONLY. Do not use any other source to charge the Battery Pack. Do not
attempt to overcharge your Battery Pack as this may damage it. Follow the charging instructions provided
in this instruction manual.
FCC NOTE: U.S. ONLY
This device complies with Part 15 of the FCC Rules. Operation is subject to the following two conditions:
1) This device may not cause harmful interference.
2) This device must accept any interference received including interference that may cause undesired
operation.
Warning: Changes or modifications to this unit not expressly approved by the party responsible for
compliance could void the user’s authority to operate the equipment. The manufacturer is not responsible
for any radio or TV interference caused by unauthorized modifications to this equipment. Such
modifications could void the user’s authority to operate the equipment. Note: This equipment has been
tested and found to comply with the limits for a class B digital device, pursuant to Part 15 of the FCC
Rules. These Limits are designed to provide reasonable protection against harmful interference in a
residential installation. This generates, uses and can radiate radio frequency energy and if not installed
and used in accordance with the instructions, may cause harmful interference to radio communications.
However, there is no guarantee that interference will not occur in a particular installation. If this equipment
does cause harmful interference to radio or television reception, which can be determined by turn the
equipment off and on, the user is encouraged to try and correct the interference by one or more of the
following measures: •Reorient or relocate the receiving antenna • Increase the separation between the
equipment and receiver • Connect the equipment to an outlet on a circuit different from that to which the
receiver is connected • Consult the dealer or an experienced radio/TV technician for help.
Industry Canada Notice: Canada only.
TM
Congratulations on the purchase of your Squeeler
off-road stunt RC vehicle! The Squeeler is a radical new
ground vehicle that will conquer just about every terrain! With
inflatable tires, the Squeeler bounces, jumps and flips like nothing else
out there! To make the stunts even more spectacular, the Squeeler also
twists its body along its lateral axis. Available in radio-control frequency 27
MHz, the Squeeler comes in 2 different bands: A and B. The Squeeler also
has a radical RC controller which twists to control the twisting action of the
vehicle! The operational range of the Squeeler is 80’ (24 M) from the controller.
The Squeeler can travel at actual speeds of up to 9.3 MPH (15 KM/H). That is a scale
speed of up to 168 MPH (270 KM/H)!!! Do not throw away this instruction manual as it
contains valuable information for the operation of your Squeeler as well as warranty information. The
helpful tips in this user’s manual will improve your skill and enhance your experience.
Look for these TIP! symbols for extra help.
INSTRUCTION MANUAL
INSTRUCTION MANUAL
Item# 44072
UNPACKING YOUR SQUEELER:
WARNING:The Squeeler is a rugged machine. However, improper operation of this toy can still result in
damage. Before removing the Squeeler from the packaging please read the instructions!
To prevent damage during shipping, the Squeeler is securely fastened in the package. Please ensure that all of
the fastening locations are unfastened before attempting to remove the Squeeler from the package. Be very
careful when removing the Squeeler to prevent damaging the vehicle and its components.
8+
The Body of the Squeeler
is getting scratched or
damaged.
When the Squeeler is
driving towards you, the
controls appear to reverse.
PLEASE! DO NOT RETURN THIS
PLEASE! DO NOT RETURN THIS
PRODUCT TO ANY RETAIL STORE!
PRODUCT TO ANY RETAIL STORE!
Web site: www.interactivetoy.com
1. The Tires are underinflated or not
inflated evenly
1. This is a normal phenomenon
called “Control Reversal”.
1. Inflate the Tires properly as described in this manual.
1. There is no need to correct this as this is a normal
phenomenon. If this causes difficulties in controlling the
Squeeler, the only solution is more practice.
For any questions or problems with this product please contact us at:
Email: info@interactivetoy.com
Phone: Inside North America: +1-416-444-6873
Outside North America: 1-866-214-2220
Address: Interactive Toy Concepts,
17 Vulcan Street, Toronto, Ontario, Canada. M9W 1L3
This radiocommunication device complies with all the requirements and limits of Industry Canada Standard RSS-310.
Operation is subject to the following two conditions: 1) This device may not cause harmful interference. 2) This device
must accept any interference received, including interference that may cause undesired operation.
Field Strength and measurement distance: 27.145MHz – 55.49 dBµV/m at 3 meter.
Only use the Charger provided with the Interactive Toy Concepts Squeeler, Do not use any other source to charge the
rechargeable Battery Pack. Never leave the Charger unattended in the presence of children. The Charger must be
periodically examined by an adult or a parent for conditions that may result in the risk of fire, electric shock, or injury to
persons. In the event that such conditions should arise, the Charger should not be used until properly repaired.
Limited 30-day warranty
Product is warranted by Interactive Toy Concepts Limited against
manufacturing defects in material and workmanship under normal use
for (30) days from the date of purchase.
Warranty is validated upon receipt of proof or purchase
and confirmation of UPC code.
Squeeler is a trademark of Interactive Toy Concepts Ltd. © 2011 All Rights Reserved.
Manufactured by and distributed by Interactive Toy Concepts Ltd.
Conforms to Safety Standards ASTM F963-03 Regulatory Requirements.
Products and colors may vary. MADE IN CHINA.
Proof of Purchase
INS-44072-110609-US
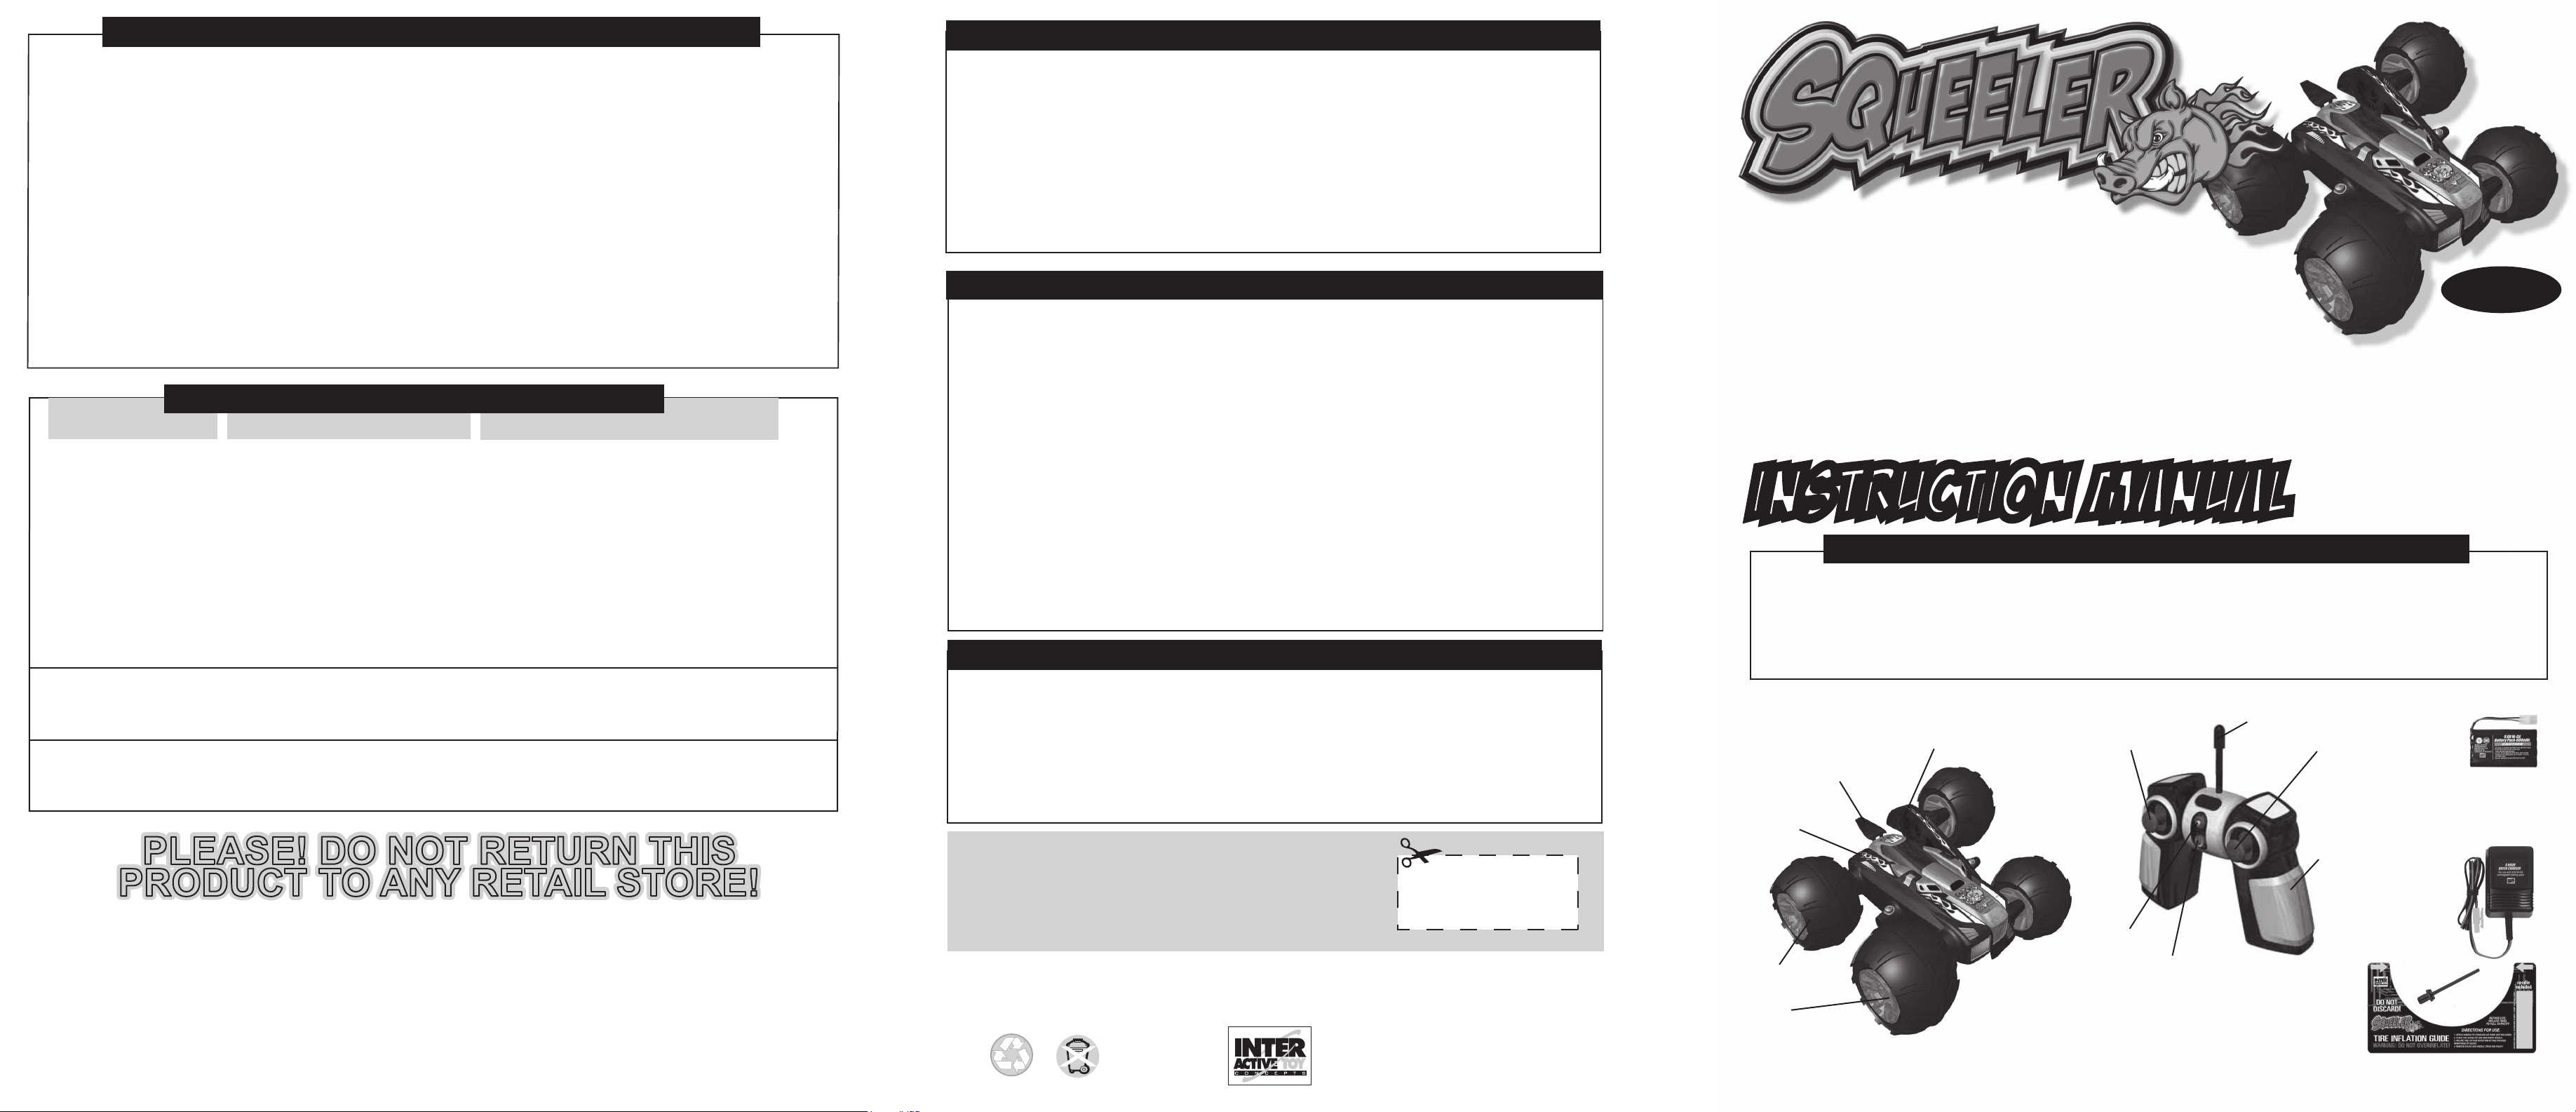
Rear Spoiler
Main body
Inflatable Tires
Tire Inflation Point
Squeeler Off-road Stunt RC Vehicle
COMPLETE PACKAGE CONTENTS AND COMPONENT BREAKDOWN:
Antenna
Body Twist Section
- Controls Forward /
Reverse speed on
left side wheels of
Squeeler (also adds
minimal thrust on
right side wheels)
Left Stick
Power On LED
On / Off Switch
Radio Controller & Antenna
Right Stick
- Controls Forward /
Reverse speed on
right side wheels of
Squeeler (also adds
minimal thrust on
left side wheels)
Twist Control
- Controls twisting
of Squeeler
Tire Inflation Gauge Template
Tire Inflation
Needle
9.6V NI-MH
Rechargeable
Battery Pack
Charger
with Cable
Page 2
QUICK START INSTRUCTIONS:
INSTALLING BATTERIES: -Continued
PREPARING THE SQUEELER CONTROLLER:
1. Charge the 9.6V NIMH Rechargeable Battery Pack (included). (As outlined in the section: "INSTALLING
BATTERIES", sub-section: "Charging the 9.6V NIMH Rechargeable Battery Pack and Installing it into the
Squeeler"). Insert the fully charged Battery Pack into the Squeeler.
2. Insert the Antenna into the Controller and extend it. Also insert a 9-Volt Battery into the Controller (not
included). (As outlined in the section: "INSTALLING BATTERIES", sub-section: "Installing the 9-Volt Battery into
the Squeeler Controller".)
3. Inflate the Squeeler’s tires using a standard pump (not included) and the Tire Inflation Needle (Included). (As
outlined in the section: "INFLATING THE TIRES".)
4. Turn on the Squeeler and the Controller. You’re ready to play!
5. Control the Squeeler using the Left and Right Sticks as if the Squeeler were operated using “Tank Drive”.
Also use the Twist Control on the Controller by twisting the right handle forward and backward. Experiment with
the controls to see what sorts of high-speed stunts you can perform, or refer to the section "OPERATING THE
SQUEELER" for a more in-depth description of the controls and functions.
IMPORTANT BATTERY INFORMATION:
Use only batteries recommended in this manual. Do not mix old and new batteries, different types of batteries,
standard, carbon zinc, alkaline or rechargeable batteries of different capacities. Battery installation should be
performed by an adult. Rechargeable batteries are only to be charged under adult supervision. Batteries should
not be left unattended during recharging. Please respect the correct polarity (-) or (+). Do not try to recharge
non-rechargeable batteries. Do not throw batteries into the fire. Replace all batteries of the same type/brand at
the same time. The supply terminals are not to be short-circuited. Remove exhausted batteries from the toy.
Remove batteries if the toy is not going to be played with for some time. Rechargeable batteries are to be
removed from the toy before they are charged. Never leave a battery unattended in the presence of children.
INSTALLING BATTERIES:
The Squeeler uses a 9.6V NIMH Rechargeable Battery Pack (included). The
Squeeler Controller requires one 9-Volt Battery (not included).
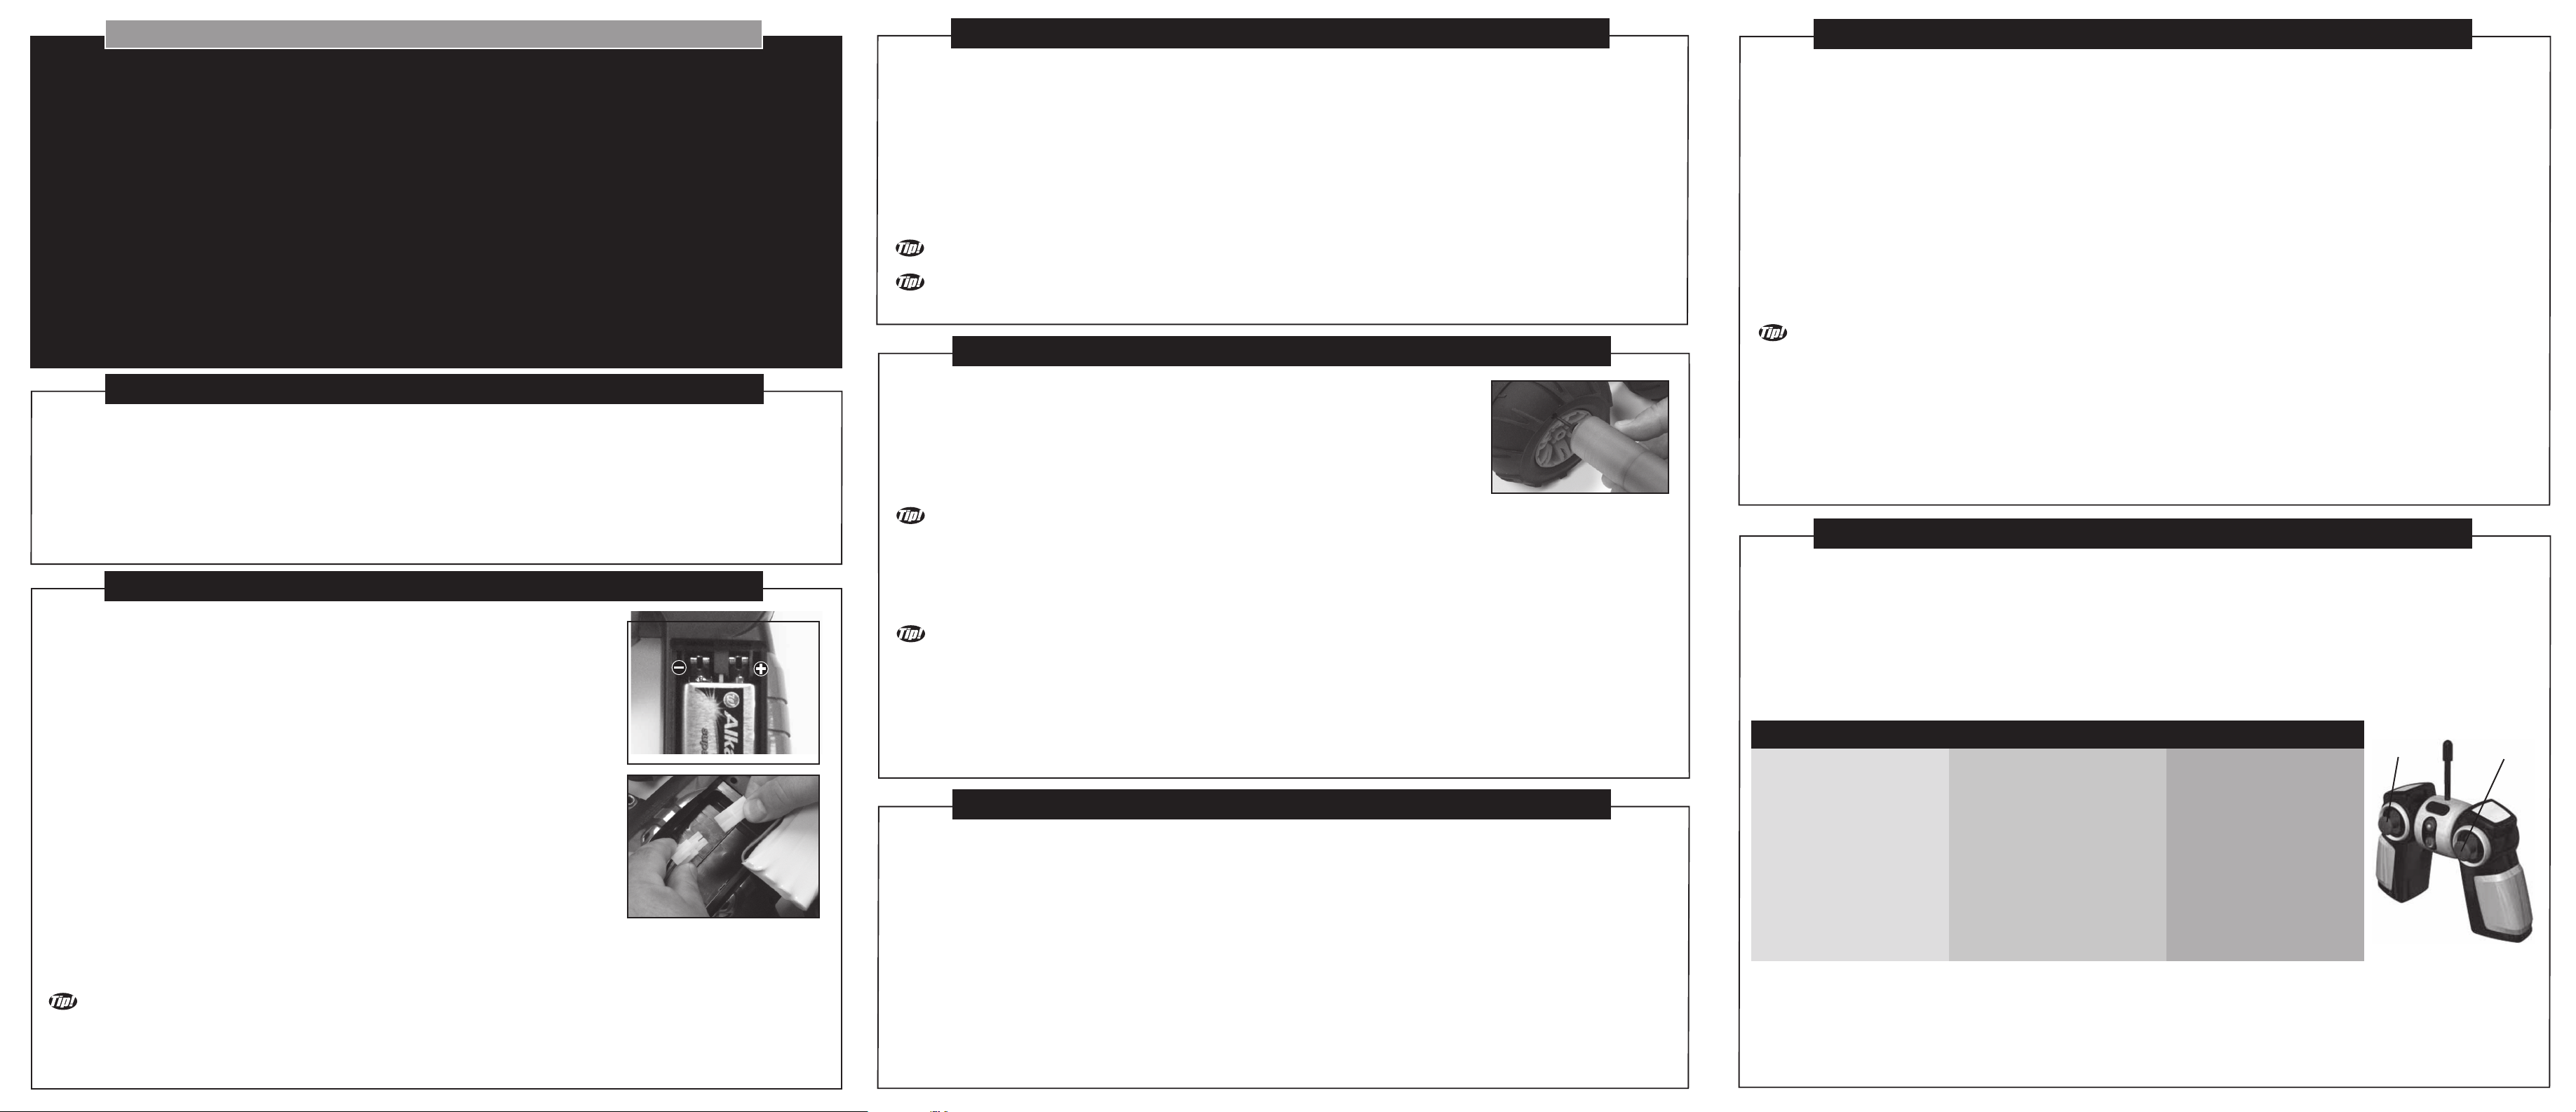
Installing the 9-Volt Battery into the Squeeler Controller:
1. Open the battery compartment door on the back of the Squeeler controller
by sliding it down. (Note, there is no screwdriver required)
2. Insert the 9-Volt battery as shown. Make sure to respect the polarity.
3. Replace the battery compartment door and slide it up until it clicks to be
sure it is closed.
Charging the 9.6V NIMH Rechargeable Battery Pack and installing it into
the Squeeler:
Attention: It is important to fully charge the Battery Pack prior to using the
Squeeler for the first time! This will prolong the life of your Battery Pack.
1. To Charge the 9.6V NIMH Rechargeable Battery Pack, ensure that it is not
inside the Squeeler’s Battery Compartment and it is not connected to the
Squeeler.
2. Connect the Battery Pack’s connector cable to the Charger’s Connector
Cable.
3. Plug the Charger into a standard household electrical outlet and allow the
Battery Pack to Charge for 4 hours. Do not charge the Battery Pack for a period longer than 4 hours as this may
damage the Battery Pack!
It is not necessary to completely deplete the Battery Pack before recharging. It is also not necessary to
completely recharge the Battery Pack in order to use it. However, if the Battery Pack is charged for a shorter
period of time, then the Squeeler will operate for a shorter period of time. On a full 4 hour charge, the Squeeler
should operate for up to 8 minutes. The duration of the Squeeler’s operation period will vary depending on how
aggressively the Squeeler is driven.
4. Once the Battery Pack is fully charged, the Battery Pack will be ready for use. First disconnect the Charger
from the electrical outlet and then disconnect the Charger from the Battery Pack.
5. To install the Battery pack into the Squeeler, ensure that the Squeeler's On/Off Switch is in the OFF position.
6. Open the Squeeler’s Battery Compartment Door located at the bottom of the Squeeler, by unscrewing the
retaining screw with a Philips screwdriver. Remove the Battery Compartment Door.
7. Locate the Connector Cable inside the Squeeler’s Battery Compartment and Connect the mating Connector
Cable from the fully charged Battery Pack to it.
8. Insert the fully charged and connected Battery Pack into the Battery Compartment.
9. Replace the Battery Compartment Door in its location on the bottom of the Squeeler and tighten the Philips
screw. Do not over tighten the retaining screw.
Charge time varies based on the battery pack’s internal charge conditions. Typically after playing for up to 8
minutes the battery pack will need a 4 hour charge.
You do not need to wait for the charge to be complete to drive your squeeler. Shorter charge times = shorter
play times.
INFLATING THE TIRES:
1. Attach the Tire Inflation Needle (included) to any standard air pump (not included).
2. Gently insert the Tire Inflation Needle into the Tire Inflation Point on one of the
Tires (as shown).
3. Position the cardboard Tire Inflation Gauge Template (Included with the Squeeler)
on the tire to ensure that the Tire is fully inflated to the proper size. Inflate the Tire so
that the outer rim of the Tire touches the inner edge of the Tire Inflation
Gauge Template.
The Squeeler is designed to operate properly when the tires are fully inflated and have the same diameter.
The Tire Inflation Gauge Template is a handy tool to ensure that your tires are properly inflated. For the Squeeler
to operate properly, the Tires need to have a maximum diameter of 6.1" (155 MM). Underinflated tires may cause
the body of the Squeeler to contact the ground and the body may become scratched or damaged. Overinflated
tires may cause the Squeeler to bounce uncontrollably or for the Tires to physically conflict with the body. Inflating
the tires is fun and easy so inflate the tires fully as specified to avoid damage!
Do not lose your Tire Inflation Gauge Template as it is an important part of the toy. If you happen to lose your
Tire Inflation Gauge Template, you can download an image of it at www.interactivetoy.com. The image will be at
the proper scale so you can print it out, mount it on cardboard, and cut it out to the proper size. Adult supervision
is required when operating a knife or a pair of scissors.
4. Once the Tire is fully inflated, disconnect the Tire Inflation Needle from the Tire by pulling it out, and remove
the Tire Inflation Gauge Template. Repeat these steps on the other 3 Tires until all 4 Tires are inflated to the
exact same size. You are now ready to play!!
CHOOSING YOUR PLAYING LOCATION:
You can operate your Squeeler indoors or outdoors. The Squeeler is designed to operate in most rugged condi-
tions and terrains. Do not operate your Squeeler on roads or any areas where there are cars. Operating your
Squeeler on roads or any areas with cars is extremely dangerous and most likely illegal! The Squeeler is not
water resistant. Do not operate your Squeeler in any wet conditions, mud, puddles, rain or any other form of
precipitation or harsh weather. The Squeeler has open Cooling Vents in some strategic locations. If water gets
into these Cooling Vents, the Squeeler could sustain damage which would not be covered under warranty. If
operating your Squeeler indoors, be careful to avoid contact with any objects such as furniture, plants, electron-
ics, and any other items which can break easily. The Squeeler is capable of some relatively high speed stunts
and could easily damage some household objects. Avoid operating your Squeeler around pets or people, and
especially crowds. If the Squeeler is stepped on or otherwise crushed, it will sustain damage that would not be
covered under warranty. Ensure that people around you are aware that you are playing with your Squeeler. Be
aware of changes in your operational environment and play safe! The radio control range of your Squeeler is up
to 80’ (24 M), and varies depending on interference within the operational environment.
WARNING:The relatively high speed stunts of the Squeeler are capable of damaging or injuring plants,
furniture, pets or people so play carefully.
The Squeeler Controller is a Radio Control Transmitter. The Squeeler Controller works in a manner similar to
“Tank Drive”. In other words, the Left Stick controls forward / reverse speed on the left side wheels (while also
adding minimal thrust on right side wheels). The Right Stick controls forward / reverse speed on the right side
wheels (while also adding minimal thrust on left side wheels). The Wheels of the Squeeler do not actually turn in
the direction of the intended steering input like in a real car. Instead, the Squeeler turns by operating the Wheels
on one side faster than the Wheels on the other side like a tank.
ON / OFF SWITCH - Turns the Controller on and off.
RED LED - Turns on when the transmitter is on. Blinks on and off when the Battery is low.
ANTENNA - Fully extend to ensure the greatest control range.
LEFT STICK - UP / DOWN - Controls Forward / Reverse speed on left side wheels of Squeeler (also adds mini-
mal thrust on right side wheels)
RIGHT STICK - UP / DOWN - Controls Forward / Reverse speed on right side wheels of Squeeler (also adds
minimal thrust on left side wheels)
TWIST CONTROL - Controls twisting of the Squeeler
As the Squeeler is driving towards you, you will naturally experience a phenomenon called “Control Reversal”. For example, moving the right stick forward on its own will make the Squeeler turn to your right as it drives
towards you. Moving the left stick forward on its own will make the Squeeler turn to your left as it drives towards
you. It is as if “Tank Drive” were reversed. This is normal.
1. Once the 9-Volt battery is inserted into the Battery Compartment, insert the Antenna into the Controller and
rotate it until it is securely in place.
2. Extend Controller Antenna.
3. Turn on the Controller by sliding the switch at the front. The red LED will light up. Your Controller is now
ready.
OPERATING THE SQUEELER:
Once the fully charged Battery Pack is inserted into the Squeeler and the Controller is likewise prepared you are
ready to play with your Squeeler! Operation of the Squeeler is simple as described below. See what sorts of
stunts you can come up with!
1. Ensure that the On / Off Switches on the Squeeler and the Controller are in the On position.
2. Move the Left and Right Sticks on the Controller and also twist the Controller to drive the Squeeler. Twisting
the Controller will twist the Squeeler under certain circumstances. It is recommended to experiment with this
feature and develop your own stunts. Let the off-road stunt driving begin! The following is a table of Squeeler
Controller Stick inputs and their functional results:
Left Stick Right Stick Function
LEFT
STICK
Neutral Neutral Nothing
Up Up Forward
Down Down Reverse
Up Down Spin Right
Down Up Spin Left
Up Neutral Forward & Turn Right
Down Neutral Reverse & Turn Left
Neutral Up Forward & Turn Left
Neutral Down Reverse & Turn Right
3. If your Squeeler’s Battery Pack becomes depleted, you will need to recharge your Battery Pack as outlined in
the section: "INSTALLING BATTERIES", sub-section: "Charging the 9.6V NIMH Rechargeable Battery Pack and
Installing it into the Squeeler"
4. When you are finished playing with your Squeeler or if the Battery Pack is depleted, turn off the Controller and
the Squeeler.
RIGHT
STICK
 Loading...