

Congratulations on the purchase of your Airtech R/C
Aircraft. These planes are designed to fly great and be
easy to "learn how to fly". But remember, these are aircraft,
so you must spend a bit of time reading through this
manual so you can learn what to do, and what not to do.
Look for these symbols for extra help!
®
INSTRUCTION MANUAL
INSTRUCTION MANUAL
TM
Tip!
TM
Don’t forget
Before leaving home to fly the aircraft don’t forget to take with you –
-Remote control unit (with antenna), charger, rechargeable battery, repair kit and
Aircraft (5 items altogether).
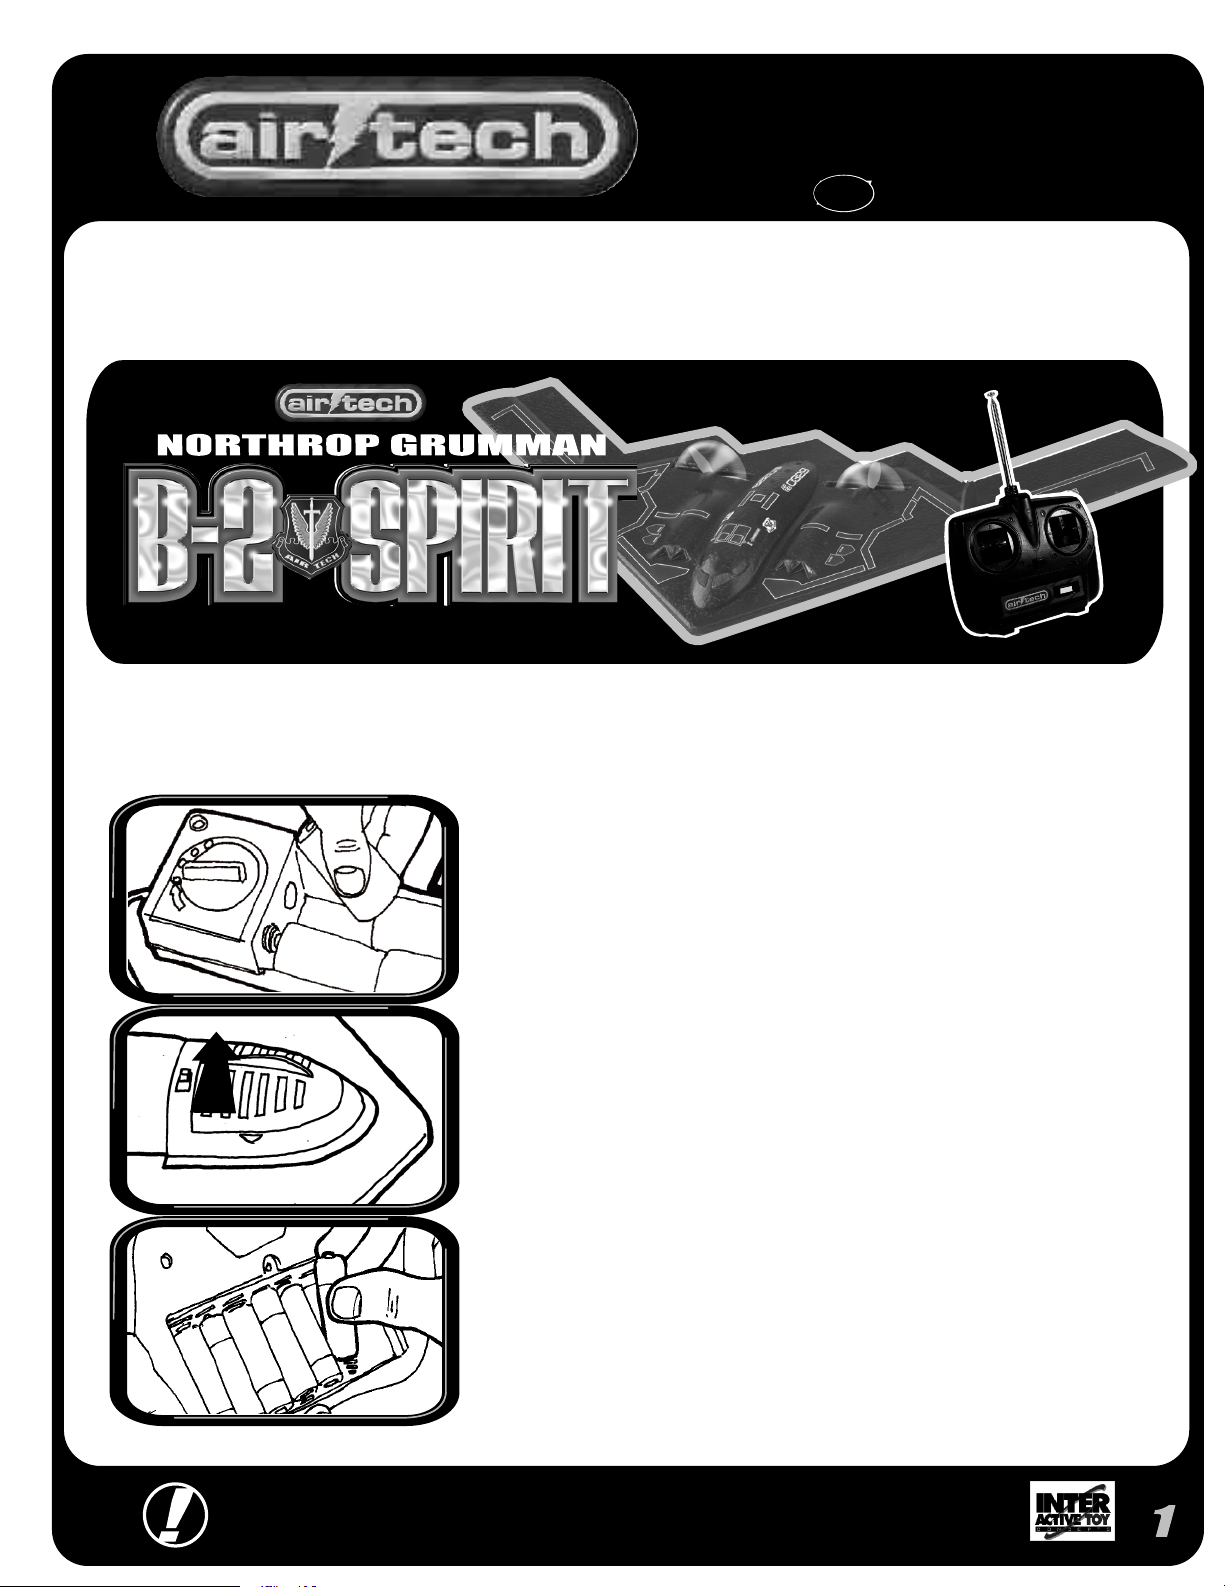
PRE-FLIGHT
PRE-FLIGHT
ON
-Fresh new Alkaline batteries (not included): 8 ‘AA’ (for remote) and 8 ‘D’ (for charger).
-Little screwdriver (not included) to unscrew the protective cover of the
rechargeable battery on the belly of the aircraft.
Charging flight battery
-Slide the charger’s cover open, insert 8 fresh ‘D’ Alkaline type batteries
(not included) in the marked orientation and between the white separators.
Note: The white separators aid in the insertion of the batteries in the correct orientation.
Verify that the connector at the end of the charging cable is clean and ready.
-Find the rechargeable battery inside the box and verify that the connector
at the end of the charging cable is clean and ready. Plug the rechargeable
battery connector to the connector of the charger until you hear the ‘click’ of connectors locking.
The correct orientation of the connectors is when the red /black wires from one side
match the red /black wires from the other side.
-the LED should begin blinking in red indicating that charging has begun.
When charging is complete the LED stops blinking and stays solid red.
Note: Battery heats up during charging. A properly charged battery should be warm to
the touch but not overly hot.
-When charging is complete, disconnect the connectors. To disconnect, depress
the clip and gently pull the two connectors apart. Do not use excessive force as you may cause damage.
Prepare the aircraft
On the belly of the aircraft identify the battery compartment and the on/off switch.
Slide the switch to the OFF positions.
Unscrew, release and remove the cover.
-Connect the rechargeable battery to the connector inside the aircraft (in a similar way
as you just did with the charger). Then insert the battery carefully and gently in place,
making sure not to break the wire and not to position the connectors on the top, where
it may block the cover from closing.
-Put protective battery compartment door in place and secure with the screw.
Prepare the remote control
-Remove the battery cover located on the rear of the transmitter by sliding it downward.
-Insert the 8 AA’ batteries. Ensure correct orientation as marked. Slide the cover back in place.
-Insert antenna into position and screw it clockwise to secure in place. Do not over tighten.
-Switch to ON, verify that both LEDs light up, and then switch back to OFF.
TM
Kit Includes: R/C plane, Radio-Control, Quick-Charger System, Repair Kit and Instructions.
INS-33811-40623-US
PLEASE DO NOT RETURN THIS
PRODUCT TO ANY RETAIL STORE!
Continued next page...
For any questions or problems with this
product please call 1-866-214-2220.
Visit our website: www.interactivetoy.com
or E-mail us at info@interactivetoy.com
PRE-FLIGHT
PRE-FLIGHT
continued
continued
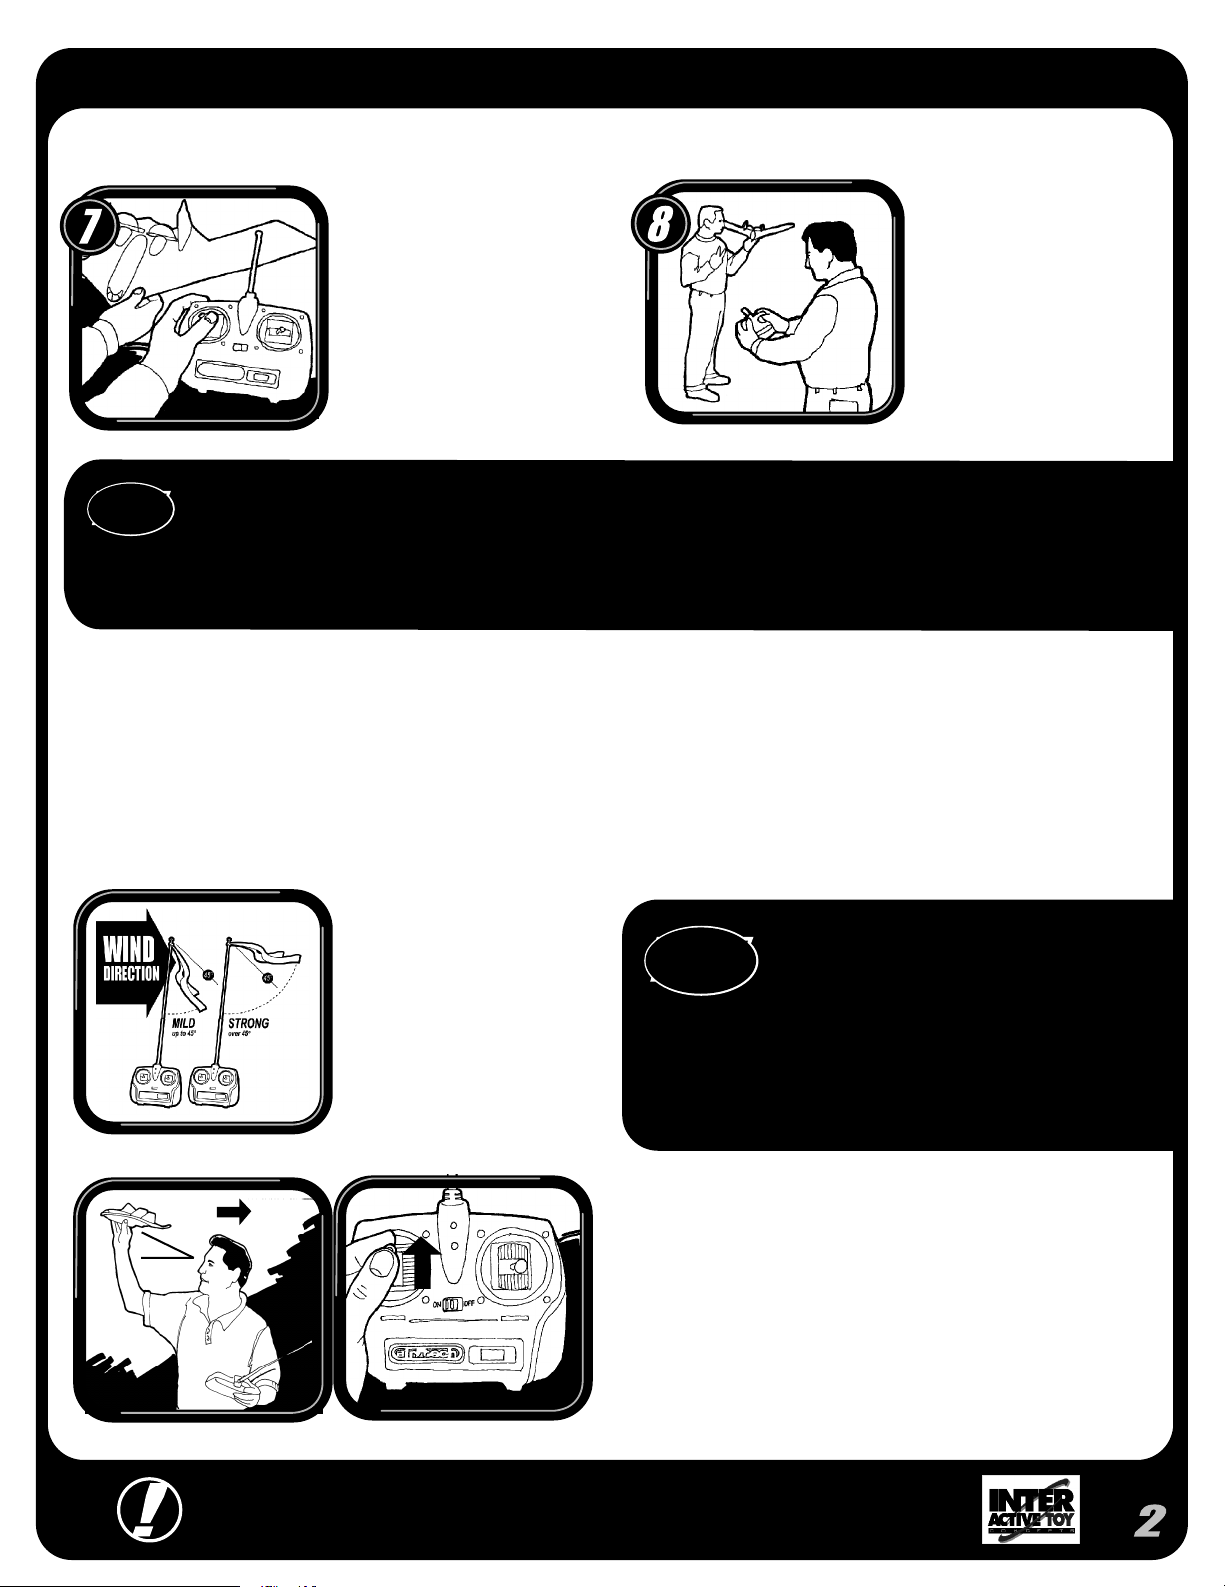
Motor Check.
-While a friend holds the aircraft,
test the following:
•Move the left transmitter stick
forward -Both motors should run.
•Move the left transmitter stick
backward -both motors should stop.
•Move the right stick to the right
-The left motor should run faster.
•Move the right stick to the left
-The right motor should run faster.
Tip!
Do not try these tests alone as the aircraft propellers could cause injury if they come in contact with your fingers
while running. Also the aircraft could actually take off causing damage to the plane's structure.
LAUNCH
LAUNCH
•Do not fly near cars, people, pets, overhead wires, bodies of
water, buildings, trees, etc. -Use common sense!
•Fly only in large grassy open areas. -Keep plane away from people,
vehicles and any other
IMPORTANT!
Never attempt the Motor Check and Radio Range-Check Pre Flight without the help of a friend or parent.
•Be sure to operate and fly your
aircraft only under adult supervision.
•Keep clear of the propeller blades!
Radio Range-Check.
-Turn on the transmitter but
leave the antenna down, then
switch on the plane. Have a
friend hold the plane, walk
about 20ft. away and with the
antenna down, make sure
that the plane's motors
respond to control inputs from
the transmitter.
Flight Conditions.
-Wind speed must be below 5mph.
(8km/h). The wind-indicator
ribbon should be at no more than
a 45 degree angle.
-Humidity and temperature must
be comfortable (not too hot) so
that the air is fairly dense.
-Your altitude should be below
2000ft. above sea level.
Wind
0
20-30
PLEASE DO NOT RETURN THIS
PRODUCT TO ANY RETAIL STORE!
IMPORTANT!
Tip!
It must leave your hand at the recommended 20-30
degrees upwards angle to launch properly.
Be sure not to hold onto the plane past these angles
when releasing or the plane may crash and damage to
the plane structure is possible.
Launch.
-Hold the controller in your left hand and the plane in your right hand.
-Turn so that you are facing into the wind.
-Push the left throttle stick forward so that both motors are running.
-Gently toss the plane at an upwards angle of about 20-30 degrees.
Do not throw the plane too hard or the motors may stall. Use about
the same force as you would throwing a dart at a dart board.
-Keep the throttle on until you reach a safe altitude of about 40ft.
-If plane veers, or drops to the ground, release the throttle
immediately and check to make sure the motors
are working correctly.
For any questions or problems with this
product please call 1-866-214-2220.
Visit our web site: www.interactivetoy.com
or E-mail us at info@interactivetoy.com
When hand launching the plane be careful
not to release the plane with the nose
pointed downwards!

CONTROL IN FLIGHT
CONTROL IN FLIGHT
Left or Right Turn While the
Plane is Flying Away from You.
-Pulse the right stick in the
direction of the desired turn.
Do not hold the stick without
pulsing, or the plane will turn
too sharply and stall.
The pulsing of the stick
is the key to great control!
Practice this tip the most!
Control Reversal.
-When the plane is coming
towards you it appears to turn
in the "wrong" direction. But
if you imagine yourself in the
pilots seat, the model is in
fact turning correctly. Try turning
your back to the aircraft and
looking over your shoulder,
when it is coming towards you.
Climb.
-Push the left stick forward all the
way, the plane will start to climb
Glide/Descend.
-Release the left stick, the plane
will glide at a gentle angle.
Flying.
-Keep the plane in front of you.
Don't let it pass overhead, since
this is very disorienting.
REPAIR
REPAIR
Repair Kit.
-This emergency field repair kit
comes included in your Airtech
package and contains clear
repair tape, glue, prop removal
tool and spare props.
Make sure to take your
repair kit with you when
flying. A small, easily fixed problem
and no repair kit with you can
ground you for the day.
Landing.
-Turn the plane into the wind and aim it at the landing area.
-Allow the plane to gently descend by pulsing the power
(left stick) on and off to achieve a gentle descent rate.
-If a turn is needed, use only gentle pulsing of the right-hand
transmitter stick.
-Try to avoid turning the plane when it is within 10ft. of the ground.
-The plane will essentially land itself once you achieve a
smooth descent rate.
-Just before touchdown give the plane a short burst of power
to level it out and allow it to land at a flat angle.
CAUTION: When landing the plane be sure to land up-wind
(into the wind) and aim for a soft, flat grassy area!
Broken Prop.
-If you happen to break a
propeller use the included propremoval tool to remove it.
-Then press fit a replacement
onto the shaft leaving 1/16" gap
between the prop and airframe.
Need extra props?
Visit out website under
the Customer Service Tab.
Glue
INS-33811-40623-US
Broken Wing or Vertical
Stabilizer.
-This is a common problem with
flying planes, but surprisingly
easy to fix.
-Apply white or repair kit glue to
Tape
the broken areas, press them
back into position and reinforce
with clear cellophane tape provided.
At Interactive Toy Concepts we try to provide the
highest quality high tech toys at competitive prices.
Visit our web site and check-out our complete line of
cutting edge radio controlled action toys!
PLEASE DO NOT RETURN THIS
PRODUCT TO ANY RETAIL STORE!
For any questions or problems with this
product please call 1-866-214-2220.
Visit our web site: www.interactivetoy.com
or E-mail us at info@interactivetoy.com
Broken Antenna.
-Unscrew the antenna from
the transmitter.
-We can provide a replacement
at a modest cost. Please see
our web site under
Customer Service Tab.

INFORMATION
INFORMATION
®
Use this instruction Manual to get these Airtech planes assembled and into the air!
Replacement Parts.
If you need to, you can order replacement parts directly from us via telephone or email.
Please call (416) 444-6873 or send an email to info@interactivetoy.com
Warranty
Interactive Toy Concepts guarantees your Stealth, Burner and Icer to be free from manufacturing defects. This warranty
does not cover any modifications or parts damaged by the owner. In no case will Interactive Toy Concepts' liability exceed
the original cost of the kit. Interactive Toy Concepts reserves the right to change this warranty without notice.
Interactive Toy Concepts assumes no liability over final assembly or for any damage resulting from the use of this product.
If the buyer is not prepared to accept the liability associated with the use of the aircraft, he/she should return it in unused
condition to the place of purchase.
We reserve the right to make improvements to the design of the airplane. Thus, your aircraft may vary slightly from that
depicted in the preceding photographs.
Battery Recycling & Disposal.
It may be illegal to dispose of the NiMH battery in your municipal waste. The battery pack contains a chemical known to
the State of California to cause birth defects or other reproductive problems. Do not try to open the battery pack!
Battery Care Information.
1) Never allow the battery pack to become hot during charging -This will cause permanent irreversible damage.
Warm is OK -HOT IS NOT!
2) Never leave a battery unattended while it is being charged.
3) Never leave a battery unattended in the presence of small children.
4) Charging time required for a full charge increases with the number of charge cycles due to the gradual draining of the
chargers "D" cells.
5) Never recharge a hot battery. Always allow it to cool before charging.
6) If you use an after-market charger, never charge the battery at a rate greater than 500mA.
7) If the flight battery is not completely discharged before recharging, the charging may be less than that of an "empty" battery.
Again, do not allow the battery to get too hot!
8) If a day or more passes without charging the battery, or if you are unsure whether or not it is fully charged, discharge the
battery, then fully recharge it.
9) Rechargeable batteries are to be removed from the toy before being charged (if removable).
10) Rechargeable batteries are only to be charged under adult supervision (if removable).
Troubleshooting.
If you are experiencing any problems with your Airtech aircraft, visit our website under the
Customer Service Tab -Troubleshooting Tips.
There you will find answers to many of your questions, supplied by our Airtech Flight Technicians.
FCC Note: USA only.
This device complies with Part 15 of the FCC Rules. Operation is subject to the following two conditions:
1) This device may not cause harmful interference. 2) This device must accept any interference received, including
interference that may cause undesired operation.
Note: This equipment has been tested and found to comply with the limits for a class B digital device, pursuant to Part 15 of the FCC Rules. These limits are designed to provide
reasonable protection against harmful interference in a residential installation. This generates, uses and can radiate radio frequency energy and, if not installed and use in accordance
with the instructions, may cause harmful interference to radio communications. However, there is no guarantee that interference will not occur in a particular installation.
If this equipment does cause harmful interference to radio or television reception, which can be determined by turning the equipment off and on, the user is encouraged to try to correct the
interference by one or more of the following measures: - Reorient or relocate the receiving antenna - Increase the separation between the equipment and receiver - Connect the
equipment into an outlet on a circuit different from that to which the receiver is connected - Consult the dealer or an experienced radio/TV technician for help.
Contact Us:
Interactive Toy Concepts Ltd.
1192 Martin Grove Road
Toronto, Ontario, Canada. M9W 5M9
For more info,
visit our website at
www.interactivetoy.com
info@interactivetoy.com
Toll Free within North America:
1 (866) 214-2220
or outside North America
(416) 444-6873
 Loading...