


W
PLEASE!
PRODUCT
For any questions or problems with this product please contact us at:
Do not modify your Micro Fighter! Do not point the antenna directly at the plane! Do not use in strong winds, use only in ‘very’
mild conditions! Do not use in rain, snow or around heavy debris! Do not use near electrical lines! Do not use around smoke or
conditioning! Do not use around air vents! Do not use around ceiling fans! Do not use around large obstacles! Do not use in very
small spaces! Do be conscious of
Micro Fighter and transmitter when not in use. Always remove batteries from transmitter during storage. Always place
Micro Fighter charging time will increase with usage as the condition of
1) This device may not cause harmful interference. 2) This device must accept any interference received including interference
that may cause undesired operation.
compliance could void the user's authority to operate the equipment.
the limits for a Class B digital device, pursuant to Part 15 of the FCC Rules. These Limits are designed to provide reasonable
does cause harmful interference to radio or television reception, which can be determined
eb sit
flames! Do
will void product warranty. Keep moving propellers away from eyes, hands, hair and loose clothing. Always turn off your
with NEW alkaline batteries for optimal performance. Keep your Pilots manual in a safe place for future use. Only use the
Battery installation should be performed by an adult. Be careful to install the batteries with the correct polarity, as indicated.
Do not use rechargeable batteries. Do not mix alkaline, standard, lithium, rechargeable, or different types of batteries.
The supply terminals are not to be short-circuited. Exhausted batteries are to be removed as they will hinder performance.
Never leave a battery unattended w hile it is being charged. Never leave a battery unattended in the presence of children.
protection against harmful interference in a residential installation. This generates, uses and can radiate radio frequency
communications. However, there is no guarantee that interference will not occur in a particular installation. If this equipment
the user is encouraged to try and correct the interference by one or more of the following measures: -
receiving antenna - Increase the separation between the equipment and receiver - Connect the equipment
circuit different from that to which the receiver is connected - Consult the dealer or an experienced radio/TV technician for help.
Field Strength and measurement distance: 27.195MHz –
Ce disposi tif de radiocommunication rencontre tout es les exigences de la norme CNR-310 d'Industrie Canada. Son fonctionnement est
sujet aux deux conditi ons suivantes: 1) ce dispositif ne doit pas causer d'interférences nocives et. 2) ce dis positif doit accepter toutes les
not use around water! Do not use around electricity! Do not use in crowded areas! Do not use around air
provided charger included with the Micro Fighter to charge the lithium polymer battery installed in the Micro Fighter.
Use only batteries recommended in this instruction manual. Do not mix old and new batteries.
influence flight characteristics. Micro Fighter’s Li-Po rechargeable battery is not replaceable.
This device complies with Part 15 of the FCC Rules. Operation is subject to the following two conditions:
energy and if not installed and used in accordance with the instructions, may cause harmful interference to radio
This radiocommunication device complies with all the requirements of Industry Canada Standard RSS-310.
Operation is subject to the following two conditions: 1) This device may not cause harmful interference.
2) This device must accept any interference received, including interference that may cause undesired operation.
interférences reçues, y compris les interférences susceptibles de provoquer un fonctionnement indésirable.
Puissance du champ et distance: 27.195mHz ???? dBμV/m à 3 mètres. 49.890mHz
DO NO
T
O ANY RETAIL STORE!
e:
www
Email: info@interactivetoy.com
Phone: Outside North America: +1 416 444 6873
Inside North America: 1 866 214 2220
Address: Interactive Toy Concepts
1192 Martin Grove Road
Toronto, Ontario, Canada
IMPORTANT SAFETY INFORMATION
changes in your area! Any changes or modifications to this product are strictly prohibited and
IMPORTANT BATTERY INFORMATION
Micro Fighter takes 6 AA battery (not included).
FCC NOTE: U.S. ONLY
Warning: Changes or modifications to this unit not expressly approved by the party responsible for
Industry Canada Notice: Canada only.
Avis d'Industrie Canada: Canada seulement
T RETURN
.int
eractiv
M9W 5M9
the AA cells diminish. Battery performance may greatly
Note: This equipment has been tested and found to comply with
???? dBμV/m at 3
meter. 49.890MHz - ???? dBμV/m at 3 meter.
THIS
etoy.com
by turning the equipment off and on,
Reorient or relocate the
to an outlet on a
???? dBμV/m
à 3 mètres.
transmitter
This product is warranted by Interactive To y Ltd. against manufacturing defects in material and workmanship
under normal use for ninety (90) days from the date of purchase.
Limited 90-day warranty
Lithium Polymer
Rechargeable Batteries
must be recycled or
disposed of properly.
AirRage Series and Micro Fighter are registered
trademarks of Interactive Toy Concepts © 2006
All Rights Reserved. Manufactured by and distributed
by Interactive Toy Concepts Ltd. Conforms to Safety
Standards ASTM F963-03 Regulatory Requirements.
Products and colors may vary. MADE IN CHINA.
8
FCC NOTE:
The manufacturer is not responsible for any radio or TV interference caused by unauthorized modifications to this
equipment. Such modifications could void the user's authority to operate the equipment.
Thank you for purchasing the Micro Fighter, the world’s smallest and most progressive digital proportional
radio control aircraft. To insure safe and reliable operation, please read the entire contents of this manual
Micro Fighter is an advanced aircraft
that uses sophisticated onboard technology
unlike any found in similar vehicles. Even
experienced pilots should read the full contents
of this manual
IMPORTANT!
most from your flying experience.
Parts Index
MICRO FIGHTER
1.Propellers
2.Tail stabilize
3.Charge port
4.ON/OFF Switch
IMPORTANT! To prevent damage during shipping, your Micro Fighter is securely fastened in the
package. Please insure that all tie downs and fastening locations have been unfastened before
Before You Fly
1. Use a Phillips head screw driver (cross head) to loosen screw
and remove cover.
2. Insert 6AA batteries in the correct polarity as indicated inside the
battery compartment.
3. Place cover back and re-tighten screw.
4. Screw antenna in place.
Charging The Micro Fighter
1. Make sure the power switch of the Micro Fighter is in the OFF position.
NOTE: Always switch OFF the plane after flying!
2. Make sure the controller antenna is collapsed to avoid breaking it while not flying and to prevent
accidentally interfering with anoth er RC aircraft on the same frequency.
3. Remove the charge Lead on the transmitter and insert it into the charge port on the Micro Fighter.
NOTE: Always insure the lead is in the correct orientation.
4. Turn the transmitter switch to the ON position.
5. Green LED will blink indicating plane is now being charged.
6. Charge the Micro fighter fully which typically takes about 30min.
7. Green LED will steady, indicating that the plane is fully charged.
8. Remove Lead and place back inside storage compartment.
9. Turn transmitter OFF, and your Micro Fighter is ready to fly!
NOTE: If you forget to turn off the transmitter and not moving the
control sticks, after 3 minutes the Red LED will start blinking to
remind you to turn it off!
TIP!
Unlike other types of re-chargeable batteries, Lithium Polymer re-chargeable Batteries do not
require a full charge for operates. However, it is necessary to FULLY charge on the first
before removing the aircraft from its package.
carefully to receive the
Do not touch the running propeller!
Adult supervision is required!
TRANSMITTER
3
4
1.
Throttle control
2. steering control
3. Charging lead compartment
4. Antenna
5. Steering Trim knob
6. Power LED “Red”
7. Charging LED “Green”
8. ON/OFF switch
1
2
attempting to remove the aircraft from its package.
*Shorter Charges Times = Shorter Flight Times.
flights for best results.
PACKAGE CONTENTS
•Micro Fighter
•Transmitter
•Antenna
•Instruction manual
•Landing gear
•Spare Propeller
•Mylar tape
1PC
1PC
1PC
1PC
1PC
2PCS
2PCS
4
6
7
1
2
8
3
5
3
2
1
2
4
5
1
3
Select the Control Mode With Your Perference
Micro Fighter is equipped an advanced system that can provide different control preference
for both beginner and experienced users!
EASY MODE – for beginner users
The CAC will automatically smooth the flight and turn by providing a SteadyFly feature to
eliminate the normal nervous "stick jitters" when you flying the plane.
The throttling power of the plane will be automatically reduce while holding a turn action for
more than 2 seconds.
The transmitter will be
Further, to properly fly this highly maneuverable aircraft you must learn to control turns with
BOTH sticks at the same time. After you have gained experience on the control methods,
you can skip this feature by using the unrestricted “Pro Mode”.
PRO MODE – for experienced users
You can take full control with your own control technique.
To enter “Pro Mode”, Hold the RIGHT stic ks hard over to the right then turn on the controller.
The Red LED will blink three times to indicating the Pro Mode had activated.
entering the “Easy Mode” by default when power on.
Pre-Flight
• Always fly your aircraft in a large grassy area free of trees and oth er obstructions. This will help
protect your Micro Fighter during impact.
• The Micro Fighter was designed for very stable outdoor flying with wind conditions not to exceed
7 KPH / 4mph. If you can feel the
• Make first flights with the landing gear on to help stabilize the flight and simplify the control
of this sensitive and maneuverable aircraft. After you have gained experience you can try
flying with the Landing gear removed!
• Your Micro Fighter can be flown with
takeoffs and landings from smooth surfaces, the landing gear has the additional function of
slightly degrading the performance of this sensitive aircraft and also making it more stable and
easier to control smoothly, especially for beginners. It is strongly recommended that
all first flights WITH the Landing gear on AND to use a normal hand-launch over grass.
Notes: ONLY after you have gained experience should you consider a ground takeoff.
• After you have advanced to the Pro Mode you can remove the
stabilizing Landing gear to do wild
full-size jet fighter!
• For Perfect Indoor fights, we recommend the use of 2 pieces
of thin mylar tape (provided) on the tail section of the rear wings.
Flying your Micro Fighter
1. Switch the Micro Fighter to the “ON” position.
2. Turn transmitter switch to “ON” position.
The steady red LED will light.
3. Fully extend the antenna.
4. Move throttle control (left control stick)
fully forward and back to activate the
transmitter.
5. Make sure trim knob is centered with
arrow pointing up.
6. Push throttle control forward to half
(middle) before launch for FIRST flights
7. Hold the nose of the Micro Fighter with two
8. Launch the Micro Fighter as straight and level
as possible; always launch gently INTO the wind.
9. Add throttle gently while adjusting the steering
trim knob on the transmitter.
10. Adjust trim Left when the Micro Fighter turns Right.
11. Adjust trim Right when the Micro
12. Repeat steps 10 and 11 several times to make sure
your Micro Fighter travels in a straight line.
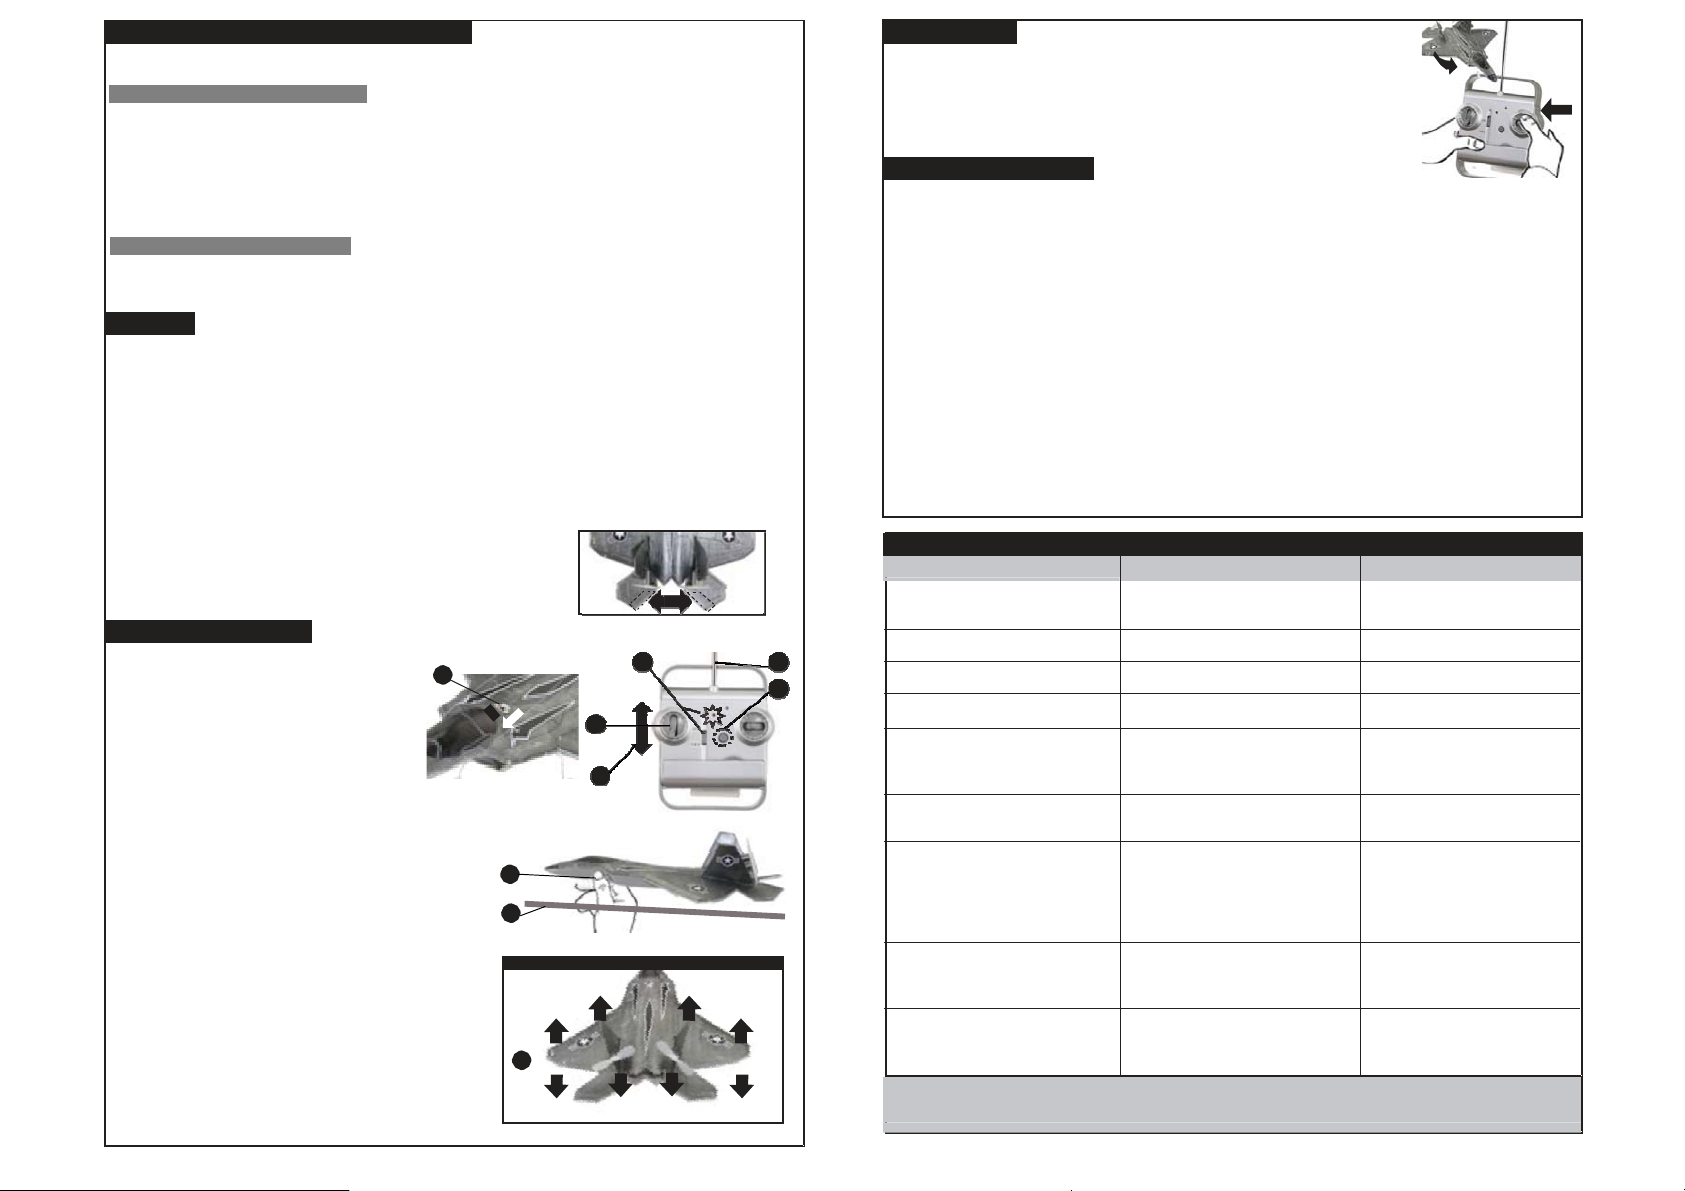
IMPORTANT!
It is important that the Micro Fighter be calibrated to
fly straight (with the steering stick centered) before
continuing! If the Micro Fighter still continues to turn
uncontrollably, a slight manual adjustment of the wings
may be required. To do this, GENTLY twist the rear
horizontal tails (and wings if
wind, DO NOT FLY!
or without Landing gear. In addition it is enabling realistic
maneuvers just like a
1
fingers to launch.
Fighter turns Left.
necessary) as shown.
you make
Tape
2
6
4
7
8
WING CORRECTION IF PLANE TURNS TO THE LEFT
15
Twist Up
Rear Edge
Twist Down
Front Edge
Twist Up
Rear Edge
Twist Down
Front Edge
Twist Down
Rear Edge
Twist Up
Front Edge
Twist Down
Rear Edge
Twist Up
Front Edge
Control Reversal
When the plane is coming towards you it appears to turn in the "wrong"
direction. But if you imagine yourself in the pilots seat, the model is in fact
turning correctly. Try turning your back to the aircraft and looking over you.
Advanced Flight Tehniques
Micro Fighter is designed to make sharper and tighter turns as you reduce the throttle power!
Maximum turning will be during gliding. Control is thus less sensitive during full throttle.
Sharp Turns can be performed by quickly reducing throttle power to pitch the nose up and to
increase control sensitivity. Then while holding the right stick for a turn, you can precisely control
the amount or radius of the turn with the “LEFT” (throttle) stick: pushing forward on the left stick
widens the turn; pulling back the “LEFT” stick for tightens the turn. The left stick functions as an
ELEVATOR control in this case!
Once the inside wing begins to bank a little move right stick back to center. The Micro Fighter will
maintain the turn by itself; push right stick
NOTE: Your Micro Fighter is designed to self-stabilize automatically when power is reduced.
In an "emergency" situation in which the plane is out of control, quickly pulling the left throttle
stick ALL the way back to stop the motors will let the plane save itself and not crash!
To land your
descent. For perfect landings on smooth surfaces with the landing gear however, land WITH the
wind in the sa me direction it is blowing for a gentle touchdown on a gentle touchdown.
To let your MicroFighter
and even more clear space for climb out, point it INTO any slight wind and give full power while
making careful steering corrections.
Practice with your Micro Fighter until you are confident and skilled enough to
feature of Easy Mode and use the Pro Mode.
Micro Fighter direct it INTO any slight wind and decrease throttle for slow and steady
in the opposite direction to straighten out.
take off from any smooth surface allowing about 17 m / 50 ft takeoff run
cancel the restricting
Trouble shooting
SYMPTOM CAUSE CORRECTION
Propeller not activating.
3
5
Circles and descends after take off Trim knob requires Adjustment. Adjust the trim knob.
Can’t create lift MicroFighter not facing the wind Point MicroFighter Into the wind
ON/OFF switch is “OFF”.
Low battery.
Adjust wing tips Not enough power Recharge MicroFighter
Poor response To transmitter
Frequency interference may occur
near high voltage lines, transformers
and some large buildings
Difficult to control Stong wind Only fly during extremely calm
Loss of control
Another controller on the same
Frequency is being operated in
the same vicinity
Controller out of range from vehicle
Landing gear bent
Landing gear will not
stay inside plane insert
NO
TE: In
the ev
easily remedied by
ent that y
our MicroFighter sustains damage during impact, the pr
Landing gear may bend on impact
(T
his will not affect flight performance
)
Damage occurred during impact
simply applying clear household tape to
Set switch to “ON” Position.
Recharge battery.
Change location
conditions or indoors
Change location
Ensure the antenna is fully
extended and reduce distance
Remove Landing gear from
plane and bend back into
position
Use small amount of clear
household tape to hold landing
gear in place.
the damaged area.
oblem may be
 Loading...