


TM
TM
CAUTION: ELECTRICALLY OPERATED PRODUCT:
NOT RECOMMENDED FOR CHILDREN UNDER 14 YEARS OF AGE.
AS WITH ALL ELECTRIC PRODUCTS, PRECAUTIONS SHOULD BE
OBSERVED DURING HANDLING AND USE TO PREVENT ELECTRIC SHOCK.
INPUT: AC 100-240V 0.32A MAX 50-60Hz
OUTPUT: DC 5V 1A
14
The Wi-Spi Intruder is a delicate machine, before removing it
from the packaging please read the instructions!
Congratulations on the purchase of your Wi-Spi Intruder. The Wi-Spi Intruder combines advanced, indoor hobby-level vehicle together with the
fun of social media. With its built-in camera, the Wi-Spi Intruder transmits streaming video to your Wireless Control Device which you can post to
your favorite social media website. This is the world’s premier hobby-level performance vehicle at mass-market featuring state-of-the-art Wi-Fi
control and video transmission capability. The Wi-Spi Intruder can be controlled by a smartphone such as an iPhone® or Android® phone. The
Wi-Spi Intruder can also be operated by an iPod touch®, iPad® or an Android® tablet. (For the purposes of this manual these third-party
products are referred to as “Wi-Fi Control Devices”). Up to 6 Wi-Spi Intruders can be operated simultaneously in the same general area. The
operational range of the Wi-Spi Intruder is about 100 feet (30 meters) depending on objects within the environment that can interfere with the
signal. The Wi-Spi Intruder can be controlled in two different ways. There is a “Control Pad Mode” and an “Accelerometer Control Mode” for
more advanced users. The built-in camera allows the user to record QVGA resolution (320 x 240 pixels) video, take still photos, or to see the
streaming live video as it is displayed on the Wireless Control Device’s screen. Do not throw away this instruction manual as it contains valuable
information for the operation of your Intruder as well as warranty information. The helpful tips in this pilot’s manual will improve your skill and
enhance your experience.
Look for these symbols for extra help.
UNPACKING YOUR WI-SPI INTRUDER:The Wi-Spi Intruder is a precision crafted, delicate machine. Before removing it from the
packaging please read the instructions!
To prevent damage during shipping, the Wi-Spi Intruder is securely fastened in the package. Please ensure that all of
the fastening locations are unfastened before attempting to remove the
careful when removing the
Wi-Spi Intruder to prevent damaging it.
PACKAGE CONTENTS:
1. 1 x Wi-Spi Intruder
2. 1 x AC Charger
3. 1 x Instruction Manual
Wi-Spi Intruder from the package. Be very
QUICK-START INSTRUCTIONS: QUICK-SYNC - CONNECT YOUR WI-SPI INTRUDER
1. Download Intruder Control App from the Apple App Store® or from the Google Play® .
2. Turn on Wi-Spi Intruder and wait around 20 - 25 seconds.
3. Under the settings function on your Wi-Fi Control Device, connect to the Wi-Fi signal from Intruder (intruderXXXXXXX).
4. Exit Wi-Fi Control Device settings and launch Intruder app.
5. Press the Connect Button in the app and take off.
QUICK-START INSTRUCTIONS:DRIVE YOUR WI-SPI INTRUDER
1. The screen displays your Wi-Spi Intruder’s camera view. You will always be able to see live streaming video on your Wi-Fi
Control Device. Press the options button to select the video or photo mode. Depending on which option you select, you will be
able to press the photo icon to snap a picture, press the video icon to shoot a movie clip. You can also select night vision mode.
2. Select the Control Pad Mode or the Accelerometer Control Mode using the toggle at the top of the Wi-Fi Control Device’s
screen. Please note, Accelerometer Control Mode requires more skill and experience to use. It is intended as an advanced
mode of control.
3. A) In Control Pad Mode, you can use the Forward/Reverse Slider on the left hand side to control the Forward / Reverse of
the Wi-Spi Intruder. You can also use the Left/Right Slider on the right hand side to control the Left – Right turning of the Wi-Spi
Intruder.
3. B) In Accelerometer Control Mode, advanced users control the Forward, Reverse, and Left – Right turning of the Wi-Spi
Intruder by tilt the Wi-Fi Control Device.
4. Use the Trim Control near the bottom center of the Wi-Fi Control Device to eliminate any unbalance left or right turn when it
move Forward / Backward, so it can keep to move in a straight line.
WI-SPI INTRUDER BATTERY REQUIREMENTS:
The Wi-Spi Intruder has a built-in, non-removable, non-replaceable, rechargeable Lithium-Polymer Battery. Do not tamper with
this battery. Tampering with this battery is dangerous and will void the warranty.
There are no further battery requirements as the Wi-Spi Intruder can only be controlled by certain third party Wi-Fi Control
Devices. To ensure that your particular Wi-Fi Control Device has sufficient power during the operation of the Wi-Spi Intruder,
consult the manufacturer's specifications for your specific model.
WARNING:
CHARGING YOUR WI-SPI INTRUDER: -Continued
3. Insert the circular charging Plug into the Wi-Spi Intruder. Charging will start automatically.
Note, the white headlight LED in the front of the Wi-Spi Intruder will light up during
charging even though the Wi-Spi Intruder is turned off.
Charging will take 30 – 45 minutes for up to 30 minutes of run.
4. Once the charging is complete, the white headlight LED in the front of the Wi-Spi Intruder
will turn off.
6. Make sure to unplug the circular charging plug from the Wi-Spi Intruder’s charging port first.
Secondly, unplug the AC Charger from the power source.
7. The Wi-Spi Intruder is now ready to run.
Wi-Spi Intruder LED functions:
The Wi-Spi Intruder has white headlight LED in the front of the body.
White headlight LED is flashing after Intruder is turned on: Wi-Spi Intruder’s on-board computer is in the booting phase, it should take
around 20 to 25 seconds.
White headlight LED is On: The Wi-Spi Intruder is turned on and ready to sync with the Wi-Fi Control Device. It is also possible that the
Wi-Spi Intruder has already been synced with the Wi-Fi Control Device and is in operation while the head light is turned on.
White headlight LED is On during charging: The White Headlight is ON when Wi-Spi Helicopter is charging.
White headlight LED is Off: Wi-Spi Intruder is turned off and is not charging. It is also possible that the Wi-Spi Intruder is turned on but its
internal battery is depleted.
White headlight LED flashes after run: The internal battery voltage is low and needs to be recharged.
CHARGE TIME VARIES BASED ON THE WI-SPI INTRUDER’S INTERNAL BATTERY CHARGE
CONDITIONS. TYPICALLY AFTER A 30 MINUTE RUN THE WI-SPI INTRUDER WILL NEED A 30 – 45
MINUTE CHARGE.
YOU DO NOT NEED TO WAIT FOR THE CHARGE TO BE COMPLETE TO FLY. SHORTER CHARGE
TIMES = SHORTER RUN TIMES.
INTERRUPTING THE CHARGE BEFORE THE CHARGE CYCLE IS COMPLETED WILL NOT
DAMAGE THE WI-SPI INTRUDER’S INTERNAL BATTERY, HOWEVER FOR THE LONGEST RUN TIMES
PLEASE LET THE WI-SPI INTRUDER FINISH ITS CHARGE CYCLE.
WARNING!!:
Never leave the charger unattended in the presence of children. The charger must be periodically examined
by an adult or a parent for conditions that may result in the risk of fire, electric shock, or injury to persons. In
the event that such conditions should arise, the charger should not be used until properly repaired.
AC CHARGER - 1 Standard Electrical Outlet Plug
-1 Circular Charging Plug
ON/OFF SWITCH
(under)
CHARGE PORT
(under)
Always insert the AC adapter into the power source before inserting the Circular
Charging Plug into the Wi-Spi Intruder.
Your Wi-Spi Intruder is intended for indoor operation. The actual control range for most of the Wi-Fi Control Devices compatible
CHOOSING YOUR DRIVING LOCATION:
with your Wi-Spi Helicopter is up to 100 feet (30 meters). This range may vary from model to model and may also be affected
by interference within the operational environment. Make sure that your Wi-Spi Intruder does not have the opportunity to run in
a wet or hazardous area such as snow, water, mud, or dangerous rocks. The Wi-Spi Intruder is not water resistant.
CHARGING YOUR WI-SPI INTRUDER:
LED SURVEILLANCE
LIGHTS
CAMERA AND SOUND RECORDER
1
The Wi-Spi Intruder needs to be charged prior to the first flight. Please charge the Wi-Spi Intruder before the first run for
optimal performance. It is necessary to charge the Wi-Spi Intruder before all subsequent runs where the internal battery has
been depleted on the previous run. Follow the below steps to charge your Wi-Spi Intruder:
1. Ensure the Wi-Spi Intruder's On / Off Switch is in the OFF position. The white headlight LED in the front of the Wi-Spi
Intruder will turn off.
2. Plug the AC Charger into an electrical power outlet.
Continued.
2
3
WI-FI CONTROL DEVICE SPECIFICATIONS:
GETTING TO KNOW THE INTRUDER CONTROL APP INTERFACE:
OPERATING YOUR WI-SPI INTRUDER CAMERA
There are a few select Wi-Fi Control Devices which are compatible with your Wi-Spi Intruder. It is very likely that other Wi-Fi Control
Devices will be compatible with the Wi-Spi Intruder in the future. For the latest updates on device compatibility, it is recommended to
check the latest information at the following website: www.interactivetoy.com. In addition, it is recommended to download the latest
Wi-Spi Control App update for your specific Wi-Fi Control Device. The Intruder Control App updates may contain information on device
compatibility, troubleshooting tips, new features and replacement part availability.
Wi-Fi Control Device Compatibility:
For Apple iOS based devices: iPhone 4, iPhone 4S, iPad 1, 2 & iPad(3rd Generation), iPod Touch 4G, with iOS 5.0 or up.
For Android based phone devices: Dual core processor required. Android OS 2.3.5 or up with Multi-touch screen
For Android based tablet devices: Dual core processor required. Android OS 3.2 or up with Multi-touch screen
DOWNLOADING YOUR INTRUDER CONTROL APP.
The Intruder Control App is available as a free download for all Wi-Spi compatible Wi-Fi Control Devices. There are some differences in
the methods for downloading the Intruder Control App for your particular device. Follow the basic steps as described below:
Apple based Wi-Fi Control Devices:
1. Access the Apple App Store.
2. Use the Keywords "intruder controller" to search for the latest version of the Intruder Control App.
3. Download and install the Intruder Control App on your specific Apple based Wi-Fi Control Device. For a description of all current
compatible Apple based Wi-Fi Control devices see section “WI-FI CONTROL DEVICE SPECIFICATIONS”.
Android based Wi-Fi Control Devices:
1. Access the Google Play.
2. Use the Keywords "intruder controller" to search for the latest version of the Intruder Control App.
3. Download and install the Intruder Control App on your specific Android based Wi-Fi Control Device. For a description of all current
compatible Android based Wi-Fi Control devices see section “WI-FI CONTROL DEVICE SPECIFICATIONS”.
SYNCING THE WI-SPI INTRUDER WITH YOUR WI-FI CONTROL DEVICE:
Regardless of which Wi-Fi Control Device you are using, the basic operation of the Wi-Spi Intruder is the same. Follow these easy
instructions to sync (connect) your Wi-Spi Intruder to your Wi-Fi Control Device.
1. When your Wi-Spi Intruder is charged and ready to sync with your Wi-Fi Control Device, slide the On-Off Switch located at the
bottom of the chassis to the On position. The white headlight LED located in the front of the Wi-Spi Intruder will light up. Wait for
around 20 -25 seconds before proceeding to the next step. This will allow the Wi-Spi Intruder’s Internal Computer to boot up.
IF APPLICABLE, ENABLE YOUR WI-FI CONTROL DEVICE’S AIRPLANE MODE WHENEVER YOU DRIVE THE WI-SPI
INTRUDER. IF AIRPLANE MODE IS NOT ENABLED, INCOMING CALLS ON THE WI-FI CONTROL DEVICE WILL DISRUPT THE
OPERATION OF YOUR WI-SPI INTRUDER AND MAY CAUSE IT TO STOP AND CRASH!!
2. Enable the Wi-Fi connection on your Wi-Fi Control Device.
3. Sync (connect) your Wi-Fi Control Device with the Wi-Spi Intruder by selecting the SSID “intruderXXXXXXX”. The 7 characters
XXXXXXX are an alphanumeric code that represents the unique ID of your Intruder. Allow 3-5 seconds to complete Synchronization.
AN SSID OR “SERVICE SET IDENTIFIER” IS A NAME OR CODE USED TO IDENTIFY A PARTICULAR WIRELESS LAN TO
WHICH A USER WANTS TO SYNC WITH OR CONNECT TO. IT HELPS TO THINK OF YOUR WI-SPI INTRUDER AS IF IT WERE A
WI-FI SIGNAL EMITTER.
4. Launch the Intruder Control App from your Wi-Fi Control Device.
5. When the first screen of the Intruder Control App loads onto the Wi-Fi Control Device, press the “Connect” button on the screen.
The Intruder Control App interface screen will show up on your Wi-Fi Control Device. You are now ready to drive the Wi-Spi Intruder!
IT IS POSSIBLE TO OPERATE UP TO 6 WI-SPI INTRUDERS IN THE SAME GENERAL VICINITY WITHOUT ANY
INTERFERENCE ISSUES. SIMPLY FOLLOW THE ABOVE STEPS TO SYNC EACH WI-SPI INTRUDER WITH ITS INDIVIDUAL WI-FI
CONTROL DEVICE. EACH WI-SPI INTRUDER MUST BE SYNCED INDIVIDUALLY AND ONE AT A TIME. DO NOT ATTEMPT TO
SYNC MORE THAN ONE WI-SPI INTRUDER AT A TIME WITH A WI-FI CONTROL DEVICE.
The Wi-Fi Control Device of your choice will effectively operate your Wi-Spi Intruder with full digital proportional control. Small
adjustments of the control features will produce precise control. There are 2 different Control Modes available for your Wi-Fi Control
Device. These are, Control Pad Mode, and Accelerometer Control Mode. Please note, Accelerometer Control Mode requires more skill
and experience to use. It is intended as an advanced Control Mode. Below is a listing of features common to both Control Modes
followed by a description of the unique features of the 2 Control Modes.
Features common to both Control Modes:
•
Trim Control – Allows you to compensate for unwanted left / right turning of the Wi-Spi Intruder from moving straight. If the Wi-Spi
Intruder is slight turning to the left when it move straight, press the trim button on the right side of the trim control range. If the Wi-Spi
Intruder is slight turning to the right when it move straight, press the trim button on the left side of the trim control range.
•Wi-Fi Signal Indicator – The Wi-Spi Intruder emits a Wi-Fi signal to your Wi-Fi Control Device during operation and vice versa. If the
Wi-Spi Intruder encounters interference or goes out of range, you will lose control of the Wi-Spi Intruder. The Wi-Fi signal indicator provides
information on the strength of the Wi-Fi Signal and allows you to avoid areas where the Wi-Fi signal is poor.
•Helicopter Battery Level – This Indicator shows the Wi-Spi Intruder’s internal battery’s level of charge.
•Control Mode Toggle – This toggle allows you to switch between Control Pad Mode and Accelerometer Control Mode.
•Options Button - This button takes you to the camera options screen where you will be able to choose your camera settings. You can
either set your camera to photo or video mode. You can also select the night vision mode.
•Camera Button - Depending on which camera setting you have selected such as photo camera, or video camera, with or without night
vision mode, the camera button will allow you to start and stop filming video, or to take a still photo with the Wi-Spi Intruder’s built-in camera.
This button is active during operation of your Wi-Spi Intruder.
•Album Button - Pressing this button will take you to the Wi-Fi Control Device's Photo / Video Album. The Videos and Photos taken during
the Wi-Spi Intruder's operation will automatically appear here.
•Headlight Button - Pressing this button will turn on the headlight LED of the Wi-Spi Intruder.
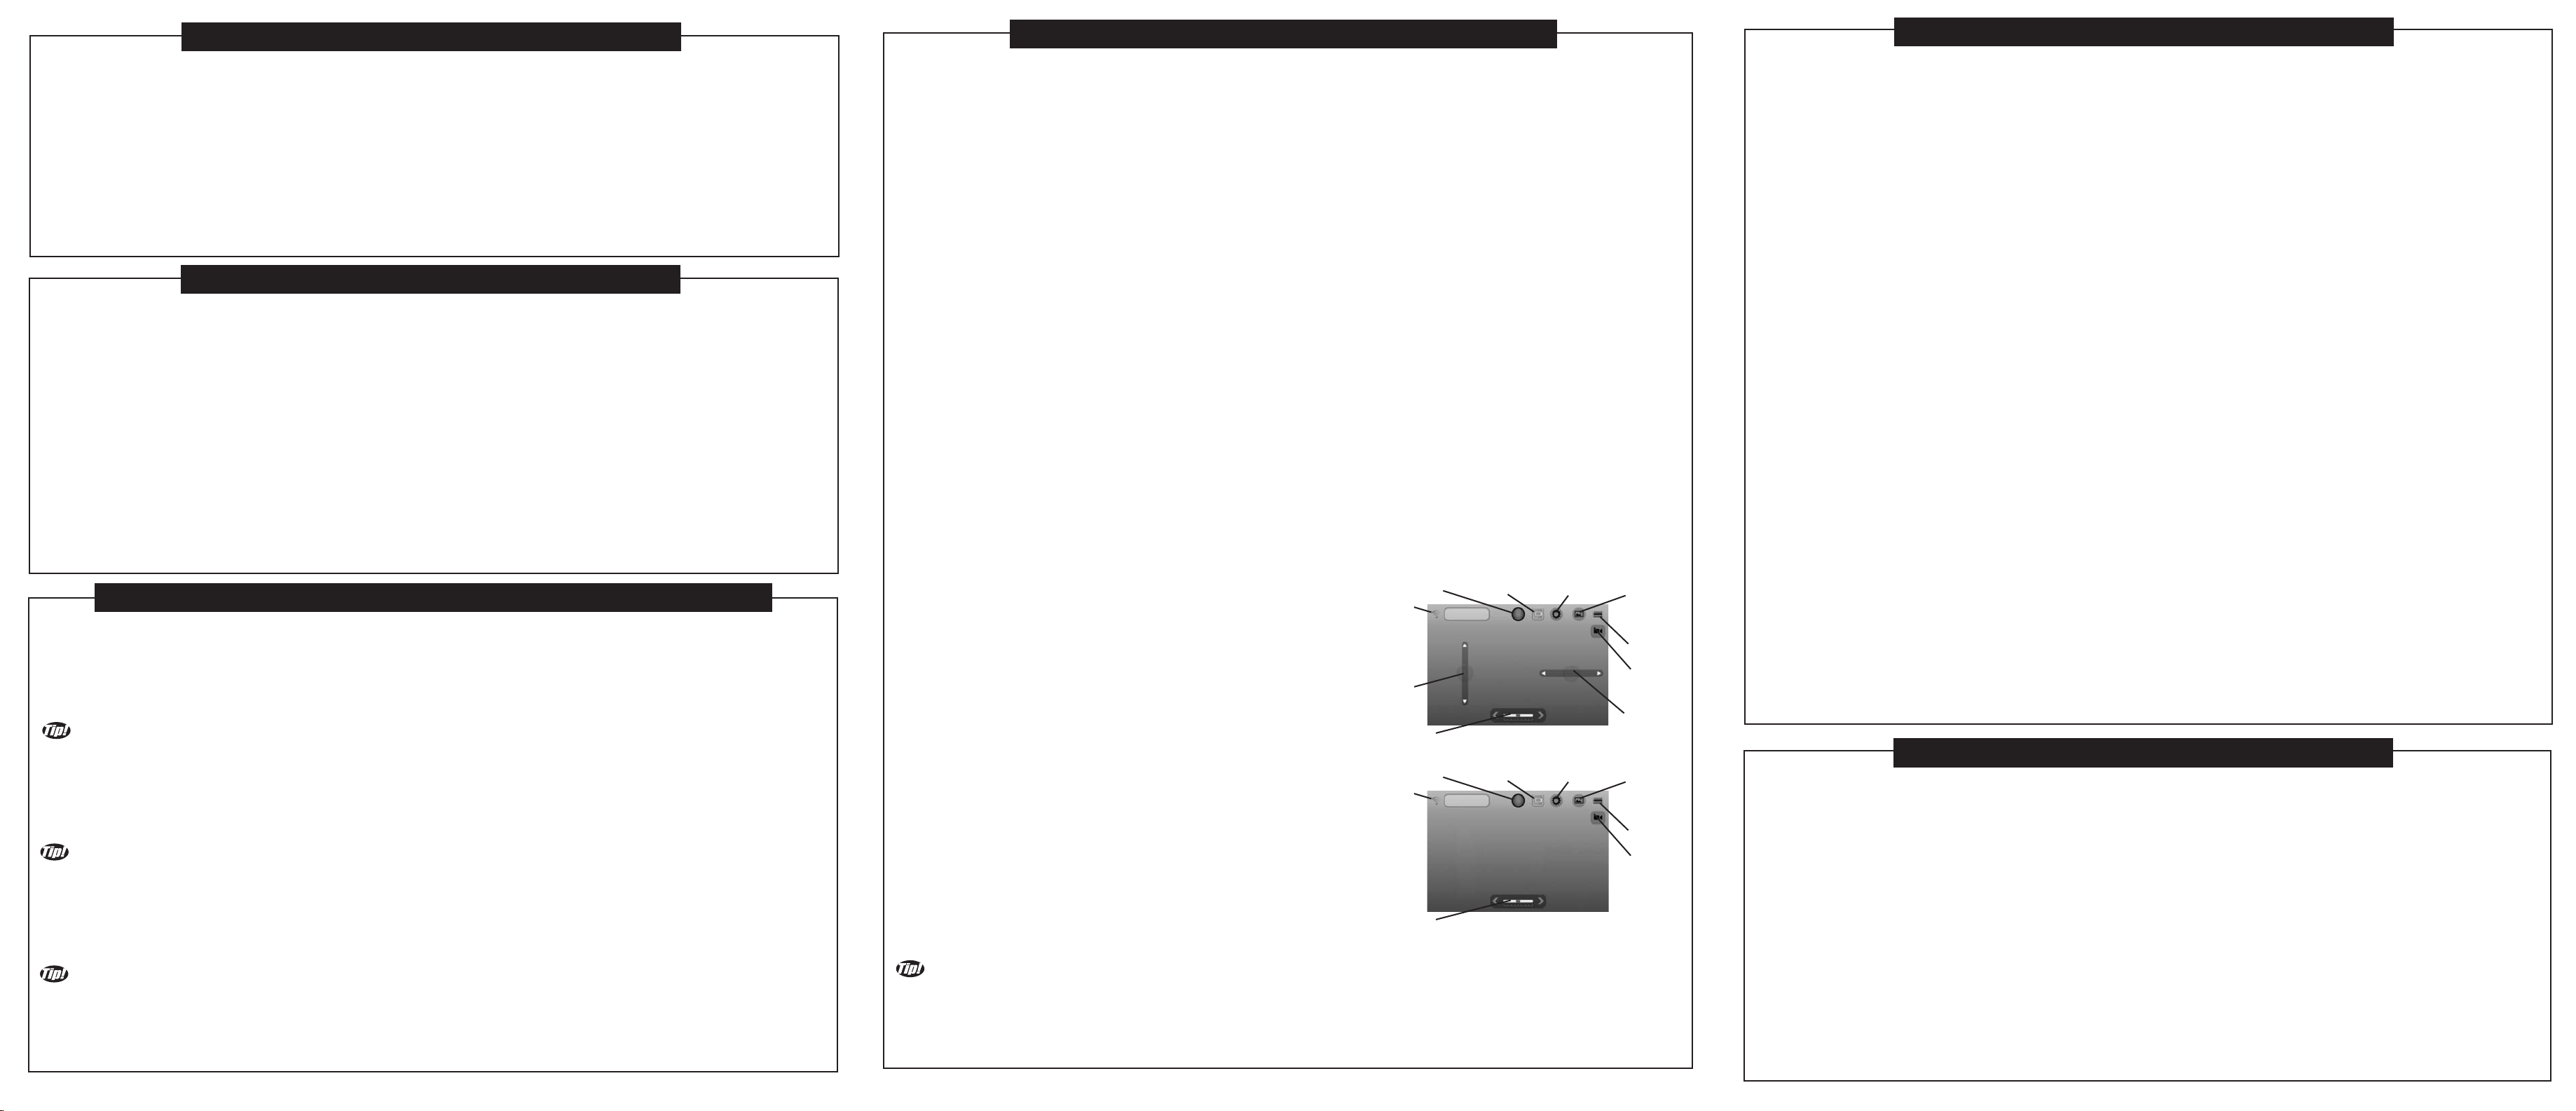
Control Pad Mode:
The Control Pad Mode uses the Sliders on the Wi-Fi Control Device’s screen to
Wi-Fi Signal
Indicator
Headlight
Button
Control
Mode Toggle
Options
Button
Album
Button
control the Wi-Spi Intruder’s direction of run.
It controls forward, reverse, and left to right turning of the Wi-Spi Helicopter.
•Forward/Reverse Slider – Use the left thumb to operate the Forward/Reverse
slider. This will allow you to drive your Wi-Spi Intruder forward / reverse.
Forward/
Reverse
Slider
•Left/Right Slider – Use the right thumb to operate the Left/Right slider. This will
allow you to turn your Wi-Spi Intruder Left / Right.
Accelerometer Control Mode (For Advanced Users!):
The Accelerometer Control Mode uses the Wi-Fi Control Device’s internal
accelerometer to control the Wi-Spi Intruder’s direction of run. It controls forward,
Wi-Fi Signal
Indicator
reverse, and left to right turning of the Wi-Spi Intruder by tilting the Wi-Fi Control
Device in the desired direction of run. Please note, Accelerometer Control Mode
requires more skill and experience to use. It is intended as an advanced Control
Trim
Control
Headlight
Button
Control Pad Mode
Control
Mode Toggle
Options
Button
Helicopter
Battery Level
Camera
Button
Left/Right
Slider
Album
Button
Helicopter
Battery Level
Camera
Button
Mode
•Accelerometer Control – Tilt the Wi-Fi Control Device in the desired run
direction. This will allow you to turn your Wi-Spi Intruder left to right and also to
run forward or in reverse.
Trim
Control
Accelerometer Control
(Tilting of the Device)
the Wi-Spi Intruder is running towards you, you will naturally experience a phenomenon called “Control Reversal”. Thus steering
inputs to the right will make the Intruder run to your left side. Also, steering inputs to the left will make the Intruder run to your right side.
This can be a bit tricky but it is normal and it just requires patience and practice to master the controls.
The Wi-Spi Intruder's built-in camera can be used readily once the Intruder is synced. Observe the following procedures
during operation, and you will be able to generate great digital video or photographic footage. The QVGA pixel aspect ratio is
320 x 240. The video and photographic footage can easily be posted to your favorite social media sites!
1. Once your Wi-Spi Intruder is fully charged and synced with your Wi-Fi Control Device, open the Intruder Control App.
You will note that in the background of your Wi-Fi Control Device's screen you are able to see everything that your Intruder’s
camera picks up.
2. You can set up the camera view angle. Roll the camera view angle button at the bottom of the Intruder to select the angle
you want.
3. Before you begin driving, press the options button on the upper right side of the Wi-Fi Control Device's screen. This will
take you to the camera options screen. Press On the camera options screen you will find a toggle with 3 icons. For the
upper 2 icons, one icon is a video camera and the other one icon is a photo camera. Select the icon which represents your
intended camera mode and press the green checkmark. The lower icon is Night vision icon, press the green checkmark to
turn on the night vision mode.
4. You are now able to start driving your Wi-Spi Intruder. You will see a continuous live stream video feed from your Intruder’s
camera as you drive. For detailed instructions on flying see the next section "DRIVING YOUR WI-SPI HELICOPTER".
5. a) If you selected Video Camera Mode, you will be able to capture video segments (with no audio) directly onto your Wi-Fi
Control Device. Simply press the camera button to start recording the live video stream. Press the camera button again to
stop recording video. Note, there is a microphone in the Intruder, and sound is recording at the same time with the video. The
recorded video is sent directly to your Wi-Fi Control Device's video / photo album.
5. b) If you selected Photo Camera Mode, you will be able to capture still frame photos directly onto your Wi-Fi Control
Device. Simply press the camera button to snap a photo from your Intruder's live video stream. Each time you press the
camera button, your Wi-Spi Intruder will snap another photo and send it back to your Wi-Fi Control Device. Each photo is
sent directly to your Wi-Fi Control Device's video / photo album.
6. If you drive your Intruder in darkness, you can turn on the night vision mode. The camera can see the environment in
darkness (in black and white color mode), and you can also capture video / photo in darkness!!
7. To review your photo or video footage, press the album button will take you directly to your Wi-Fi Control Device's video /
photo album where you will be able to review your videos and photos just as you would normally. Press the cancel button in
your video / photo album to return to the Intruder Control App.
8. Once your videos and photos are in your video / photo album, you can easily view and share them just as you would with
any other videos and photos. You can easily upload them to popular social media sites.
DRIVING YOUR WI-SPI INTRUDER:
Once the steps outlined in the section, “SYNCING THE WI-SPI INTRUDER WITH YOUR WI-FI CONTROL DEVICE” have
been executed correctly, follow the next steps to fly your Wi-Spi Intruder.
1. Select either the Control Pad Mode or the Accelerometer Control Mode by pressing the appropriate Control Mode Toggle
button on the Wi-Fi Control Device screen.
2. Under Camera Options, select either the Video Camera mode or Photo Camera mode. Select to turn on or off the night
vision mode. A more detailed description of the Camera operation is described in the section above, "OPERATING YOUR
WI-SPI INTRUDER CAMERA".
3. Position the Wi-Spi Intruder on a secure flat surface.
4
5
6

DRIVING YOUR WI-SPI INTRUDER -(Continued):
4. Slide the Forward/Reverse slider on the Wi-Fi Control Device upwards/downwards to move the Wi-Spi Intruder
forward/reverse.
5. Press the Trim button to make sure the Wi-Spi Intruder can move forward / reverse in straight line. The trim setting will
vary as the helicopter battery drains. Re-adjust trim during flight as required.
Limited 30-day warranty
Product is warranted by Interactive Toy Concepts Limited against manufacturing
defects in material and workmanship under normal use for thirty (30) days from
the date of purchase.
Warranty is validated upon receipt of proof or purchase and
confirmation of UPC code.
6. a) If you are in Control Pad Mode, use the slider on the Wi-Fi Control Device to move the Wi-Spi Intruder.
6. b) If you are in Accelerometer Control Mode, tilt the Wi-Fi Control Device to move the Wi-Spi Intruder. It will take a little
practice to get used to this method of flight control.
7. Congratulations! You are driving your Wi-Spi Intruder. The maximum run time is up to 30 minutes. The operational range
of the Wi-Spi Intruder is about 100 feet (30 meters). Enjoy your run!
8. a) To drive again, it may or may not be necessary to recharge your Wi-Spi Intruder, depending on the charge that is
remaining in the Wi-Spi Intruder’s internal Lithium-Polymer battery. Simply follow the steps described in the “CHARGING
YOUR WI-SPI INTRUDER” section above, to recharge your Wi-Spi Intruder.
9. b) If you are finished playing, slide the Wi-Spi Intruder’s On / Off Switch to the off position to turn it off. Then turn off the
Intruder Control App on your Wi-Fi Control Device in the manner that is recommended by the third part manufacturer of your
specific Wi-Fi Control Device.
Wi-Spi Intruder is a registered trademark of
Interactive Toy Concepts Ltd.
iPhone, iPod touch, iPad, Apple, and App Store are trademarks of
Apple Inc. registered in the U.S. and other countries.
IOS is a trademark or registered trademark of Cisco in the U.S. and
other countries and is used under license.
Android, Android Robot and Google Play are trademarks of Google Inc.
Wi-Fi is a trademark of the Wi-Fi Alliance.
Interactive Toy Concepts © 2012 All Rights Reserved.
Manufactured by and distributed by Interactive Toy Concepts Ltd.
Conforms to Safety Standards ASTM F963 Regulatory Requirements.
Products and colors may vary. MADE IN CHINA.
Lithium Polymer Rechargeable
Batteries must be recycled or
disposed of properly.
Proof of Purchase
INS-44074-120521-US
DRIVING TIPS!
Forward/Reverse Control - the Forward/Reverse Slider is a digital proportional system, therefore fine movement of the slider
will produce minor changes in the Wi-Spi Intruder’s speed.
Take time to practice controlling the speed and getting accustomed to the slider sensitivity.
Trimming - If the Wi-Spi Intruder is not moving forward/backward in a straight line, adjust the trim control so that the Wi-Spi
Intruder move in straight line. If the Wi-Spi Intruder is slight turn left, press the button on the right side of the trim control
range. If the Wi-Spi Intruder is slight turn right, press the button on the left side of the trim control range.
Many factors affect the Trim of the Wi-Spi Intruder such as Internal Battery Condition, slider setting and damage to the
tires. It may be required to adjust the trim control more than once during a drive.
Direction Control - Direction Control convention is based as if you were sitting in the pilot's seat of the Wi-Spi Intruder.
Control Reversal - When the Wi-Spi Intruder is flying towards you, the steering will appear to reverse. This is normal and just
takes some practice to control.
STORING YOUR WI-SPI INTRUDER:
It is a good idea to store the Wi-Spi Intruder, AC charger and this instruction manual together so no components become
misplaced or lost. Please respect the below points to extend the operational life of your Wi-Spi Intruder during storage.
1. Product may be damaged or performance may be adversely affected if your Wi-Spi Intruder is not properly stored.
2. Never place any items on top of any components of the Wi-Spi Intruder.
3. Always keep your Wi-Spi Intruder in a cool dry place. Do not allow your Wi-Spi Intruder to get wet as it is not water
resistant.
4. Keep the Wi-Spi Intruder away from pets and other household animals.
5. Do not rest your Wi-Spi Intruder on any potential heat source such as electronic equipment or a radiator.
TROUBLESHOOTING
ISSUE:
Wi-Spi Intruder is not
responding to Wi-Fi
Control Device inputs.
1. The Wi-Spi Helicopter is not
synced with the Wi-Fi Control Device..
2. You have driven your Intruder out
of control range.
3. You forgot to enable "Airplane
Mode" on your Wi-Fi Control Device.
CAUSE:
CORRECTIVE ACTION:
1. Sync the Wi-Spi Intruder as outlined in the "QUICK-SYNC CONNECT YOUR WI-SPI INTRUDER" section.
2. The operating range of your Wi-Spi Intruder is up to 100 feet
(30 meters). Once you go out of this range you will lose control
and video feed. Drive the Wi-Spi Intruder within the specified
range. Interactive Toy Concepts Ltd. is not responsible for
damages sustained by the Wi-Spi Intruder if driven out of range.
3. Enable "Airplane Mode" on your Wi-Fi Control Device
whenever driving your Wi-Spi Intruder or incoming calls, text
messages or other notifications will disconnect the link to the
Intruder.
7
8

ISSUE:
Wi-Spi Intruder will not
start, Wi-Spi Intruder’s
White headlight LED is off.
Wi-Spi Intruder will not
start, Wi-Spi Intruder’s
white headlight LED is on.
TROUBLESHOOTING -Continued
CAUSE:
1. Wi-Spi Intruder not turned on.
2. Battery is not charged.
3. Wi-Spi Intruder was not set to off
during charging.
4. Wheels locked for overload
protection.
1. Wi-Spi Intruder is not properly
synced with your Wi-Fi Control Device.
2. Another Wi-Fi Control Device is
already synced to it.
CORRECTIVE ACTION:
1. Turn Wi-Spi Intruder on and sync it with your Wi-Fi
Control Device.
2. Charge Internal Wi-Spi Intruder battery.
3. Ensure Wi-Spi Intruder is off and charge Internal Wi-Spi
Intruder Battery.
4. Slide Wi-Spi Intruder's on / off switch to off, then switch it
on again and sync it with your Wi-Fi Control Device.
1. Sync your Wi-Spi Intruder properly with your Wi-Fi
Control Device.
2. Log off from another Device, then sync your Wi-Spi
Intruder with your Wi-Fi Control Device.
IMPORTANT SAFETY INFORMATION
Keep the Wi-Spi Intruder away from face, eyes and hair at all times. Do not drive the Wi-Spi Intruder near or at other people or
animals. Use caution when driving. Make sure people around you know that you are playing with the Wi-Spi Intruder. The Wi-Spi
Intruder is recommended for use indoor only. Make sure that your Wi-Spi Intruder does not have the opportunity to drive in a wet or
hazardous area such as snow, water, mud, or dangerous rocks. The charger provided in this package is for charging the Wi-Spi
Intruder ONLY. Only use the Charger provided with the Interactive Toy Concepts Wi-Spi Intruder. Do not use any other source to
charge the Wi-Spi Intruder. Do not attempt to overcharge your Wi-Spi Intruder. Follow the charging instructions provided in this
instruction manual. Do not attempt to replace the Lithium Polymer rechargeable battery in the Wi-Spi Intruder! The Intruder’s Lithium
Polymer rechargeable battery is sealed inside the unit and is not replaceable. Any attempts to replace the Intruder's Lithium
Polymer Rechargeable battery will void the warranty. Do not throw battery into the fire. Rechargeable battery is only to be charged
under adult supervision. Never leave a battery unattended while it is being charged. Never leave a battery unattended in the
presence of children. The supply terminals are not to be short-circuited. The packaging should be kept since it contains important
information.
Wi-Spi Intruder will not start,
Wi-Spi Intruder’s white
headlight LED is blinking.
Wi-Spi Intruder doesn't
move forward fast enough.
Wi-Spi Intruder cannot move
in straight line.
1. Wi-Spi Intruder’s battery is low.
1. The internal battery charge is
getting low.
1. Trim control is not set correctly.
1. Ensure Wi-Spi Intruder is off and charge Internal
Wi-Spi Intruder battery.
1. Turn the Wi-Spi Intruder off and charge the internal Wi-Spi
Intruder battery.
1. Adjust the trim control on the Wi-Fi Control Device.
PLEASE! DO NOT RETURN THIS PRODUCT TO ANY RETAIL STORE!
For any questions or problems with this product please contact us at: Email: info@interactivetoy.com
Phone: Inside North America: 1-866-214-2220 Outside North America: +1-416-444-6873
Address: Interactive Toy Concepts, 17 Vulcan Street, Toronto, Ontario, Canada. M9W 1L3
Web site:
This device complies with Part 15 of the FCC Rules. Operation is subject to the following two conditions:
1) This device may not cause harmful interference.
2) This device must accept any interference received including interference that may cause undesired operation.
Warning: Changes or modifications to this unit not expressly approved by the party responsible for compliance could void the us
to operate the equipment. The manufacturer is not responsible for any radio or TV interference caused by unauthorized modifications to this
equipment. Such modifications could void the user’s authority to operate the equipment. Note: This equipment has been tested an
comply with the limits for a class B digital device, pursuant to Part 15 of the FCC Rules. These Limits are designed to provide reasonable
protection against harmful interference in a residential installation. This generates, uses and can radiate radio frequency energy and if not
installed and used in accordance with the instructions, may cause harmful interference to radio communications. However, there
guarantee that interference will not occur in a particular installation. If this equipment does cause harmful interference to r
reception, which can be determined by turn the equipment off and on, the user is encouraged to try and correct the interference
more of the following measures: •Reorient or relocate the receiving antenna • Increase the separation between the equipment and
Connect the equipment to an outlet on a circuit different from that to which the receiver is connected • Consult the dealer or
radio/TV technician for help.
Federal Communications Commission (FCC) Radiation Exposure Statement
This equipment complies with FCC radiation exposure limits set forth for an uncontrolled environment. In order to avoid the pos
exceeding the FCC radio frequency exposure limits, human proximity to the antenna shall not be less than 20 cm (8 inches) durin
operation.
Industry Canada Notice: Canada only.
www.interactivetoy.com
FCC NOTE: U.S. ONLY
er’s authority
d found to
is no
adio or television
by one or
receiver •
an experienced
sibility of
g normal
This device complies with Industry Canada licence-exempt RSS standard(s). 1.Operation is subject
to the following two conditions: (1) this device may not cause interference, and (2) this device must accept any interference,
interference that may cause undesired operation of the device."
2. Changes or modifications not expressly approved by the party responsible for compliance could void the user's authority to
operate the equipment.
French:
1.Le présent appareil est conforme aux CNR d'Industrie Canada applicables aux appareils radio
exempts de licence. L'exploitation est autorisée aux deux conditions suivantes : (1) l'appareil ne
doit pas produire de brouillage, et (2) l'utilisateur de l'appareil doit accepter tout brouillage
2.radioélectrique subi, même si le brouillage est susceptible d'en compromettre le fonctionnement.
9
10
including
 Loading...