


UNPACKING YOUR SKEET SHOOTER
COMPLETE PACKAGE CONTENTS
1) 1 x Skeet Launcher
2) 1 x Skeet Blaster
3) 3 x Skeets
4) 1 x Instruction Manual
Congratulations on your purchase of the SKEET SHOOTER from Interactive Toy Concepts.
The SKEET SHOOTER is a revolutionary new toy that allows anyone to have the virtual learning experience of shooting a “Skeet” or “Trap” in complete
safety. The SKEET SHOOTER Blaster uses a narrow infra-red beam to target an electronic Skeet. When the Skeet is hit with the IR beam, it breaks apart
like a real Skeet would!
There are 3 reusable Skeets included with the SKEET SHOOTER. The Skeet Launcher has the secondary purpose of charging the Skeets, and is capable
of launching all 3 Skeets consecutively with variable speed and launch trajectory.
SKEET SHOOTER can easily be played by one person or more. Single play consists of one player trying to shoot down all the Skeets. Multiple player mode
allows for competition to see who can shoot down more Skeets. In multiple player mode, the players can take turns reloading the launch mechanism.
The SKEET SHOOTER has been carefully packaged to avoid damage during shipping. PLEASE USE CAUTION WHEN UNPACKING.
Skeet
Launch
Speed
Adjustment
Knob
Speaker
Skeet Loading
Illustrations
Infrared
Receiver
Reload
Handles
ON - OFF switch
Play Button
Skeet Launch
Angle Adjustment
Slider
Battery
Compartment
Door
Launch Slots
(with built-in
chargers)
Upper Half
Lower Half
Infrared
Beam
Sensor
Alignment
Arrows
Charge Port
Soft Bumper
INSTRUCTION MANUAL
INS-44057-100820-US
Keep your body, (especially the face, eyes and hair) away from the Skeet Launcher mechanism during operation. Keep fingers away from operating the Skeet Launcher and flying Skeets. Do not stand over the Skeet
Launcher or look into the launch slots. Keep other people or animals away from the Skeet Launcher during operation. Do not aim the Skeet Launcher or Skeets at any people, animals, plants, or property. Make sure people
around you know that you are playing with your SKEET SHOOTER. The SKEET SHOOTER is intended to be an indoor toy with occasional outdoor play under certain conditions. When playing indoors, only play in rooms
without obstacles, breakable objects or fans. When playing outdoors, it is recommended to play in large open areas. Do not play near buildings, roof-tops, trees, roads, or overhead wires. Do not play near crowds. Do not play
near any bodies of water such as puddles, pools, rivers, or lakes. Do not play during any form of precipitation, including rain and snow. Do not use any other source to charge the Skeets other than the Skeet Launcher
provided with your Skeet Shooter toy. Do not attempt to overcharge your Skeets. Follow the charging instructions provided in this instruction manual.
IMPORTANT SAFETY INFORMATION
Address: Interactive Toy Concepts, 17 Vulcan Street, Toronto, Ontario Canada. M9W 1L3
Skeet Launcher will not operate although
it is turned on.
1. If not using the Skeet Blaster to start Skeet Launcher
operation, the play button may not have been pressed.
1. Press play button when ready to launch the Skeets or use the Skeet Blaster to start the launch
mechanism by reloading the Skeet Blaster and pressing the trigger.
Skeets do not break apart after being
shot in the air.
1. Skeet Blaster is not turned on.
2. Skeet Blaster is not reloaded.
3. Skeet did not charge properly.
4. The Skeet Blaster’s infrared beam missed the target.
5. The Skeet Launcher is positioned at an angle which
disables the launch mechanism.
1. Ensure the ON/OFF switch on the Skeet Blaster is in the ON position.
2. Reload the Skeet Blaster by sliding the reload handle backward then forward before each shot.
3. Ensure that the Skeet is assembled and inserted correctly in the Skeet Launcher’s launch slot.
Refer to “CHARGING THE SKEETS” section.
4. Your Skeet Blaster’s shot may have missed the mark.
5. The Skeet Launcher is designed to operate only when it is positioned horizontally or by using one of
the launch angle presets. Tilting the Skeet Launcher further will disable the launch mechanism for
safety reasons. Position the Skeet Launcher correctly and try playing again.
Skeets are launched too high.
1. Your Skeet Launcher is positioned too high. 1. Place the Skeet Launcher on the floor or on the ground. This is the ideal elevation.
Skeets launch at an undesirable angle. 1. The Skeet Launcher is not positioned horizontally.
1. Ensure that the Skeet Launcher is sitting horizontally on the ground or that it is using one of its launch angle pre-sets.
After slide the reload handles down, the
skeets cannot be inserted into the launch
slots.
1. The launch bars cannot be lock in ready position
and they block the Launch Slots.
1. Remove all Skeets form the Skeet Launcher (if any). Press the PLAY button, the Skeet Launcher will
be reset, then slide the reload handles down again. The launch bars can be set in ready position.
Insert the Skeets into the Launch Slots.
The Skeet Launcher fails to operate
and the speaker on the Skeet
Launcher says “Check Skeet”.
1. The Skeet is not sitting correctly in the Launch Slot and the Skeet
Launcher either failed to charge or even recognize the Skeet.
2. One or more of the Skeets are not inserted into the Skeet Launcher.
1. Make sure that the Skeets are assembled so that the “alignment arrows” are visible on only one side of each Skeet.
As you are looking at the Skeet Launcher with the SKEET SHOOTER logo facing you, insert all 3 Skeets into the launch
slots so that the alignment arrows on each Skeet are facing you and aiming down. It is very important that the Skeets are
inserted into the Skeet Launcher correctly or the Skeets will not fit or charge. Please note there are also 3 images on the
SKEET SHOOTER Launcher that illustrate how to insert the Skeets properly. Turn the Skeet Launcher’s on / off switch to
the on position for charging. A red power LED will light up on the Skeet Launcher when it is turned on. The 3 Skeets will
automatically charge once the Skeet Launcher’s on / off switch is turned to the on position. A red charge LED will start
flashing on each Skeet during charging. Once a Skeet is charged the red charge LED remains on constantly. If the red
charge LED on any of the Skeets does not turn on at all, the Skeet is not sitting properly and it will fail to charge, and the
Skeet Launcher will not operate.
2. The Skeet Launcher requires all 3 Skeets to be inserted into the Skeet Launcher in order to operate. Please make sure to
insert all 3 Skeets carefully and correctly.
TROUBLESHOOTING
All three Skeets have built-in, non-removable, non-replaceable, rechargeable capacitors. Do not attempt to open the Skeets to modify or tamper with the capacitors. The Skeet Blaster uses 3 “AAA” batteries (not included). The Skeet Launcher
uses 4 “C-size” alkaline batteries (not included). The charger is built into the Skeet Launcher. Use only the charger provided in this SKEET SHOOTER package to charge the Skeets. Use only batteries recommended in this instruction manual.
Do not mix old and new batteries. Do not mix alkaline, standard, lithium, rechargeable, or different types of batteries. Do not use rechargeable batteries. Be careful to install the batteries with the correct polarity, as indicated. Battery should be
replaced by adults. Rechargeable batteries are only to be charged under adult supervision. Never leave a battery unattended while it is being charged. Never leave a battery unattended in the presence of children. Non-rechargeable batteries
are not to be recharged. Rechargeable batteries are to be removed from the toy before being charged. Do not throw batteries into the fire. Exhausted batteries are to be removed from the toy. The supply terminals are not to be short-circuited.
IMPORTANT BATTERY INFORMATION
FCC NOTE: U.S. ONLY
Limited 30-day warranty
Product is warranted by Interactive Toy Concepts Limited against manufacturing defects in
material and workmanship under normal use for thirty (30) days from the date of purchase.
Warranty is validated upon receipt of proof or purchase
and confirmation of UPC code.
Skeet Shooter is a registered trademark of Interactive Toy Concepts.
© 2010 All Rights Reserved.
Manufactured by and distributed by Interactive Toy Concepts Ltd.
Patent Pending. Products and colors may vary. MADE IN CHINA.
Proof of Purchase
To prevent damage during shipping the SKEET SHOOTER is securely fastened in the package. Please ensure that all of the tie down and
fastening locations are unfastened before attempting to remove the SKEET SHOOTER. Be very careful when removing the SKEET
SHOOTER to prevent damaging any of the components.
SKEET LAUNCHER
SKEET:
PLEASE! DO NOT RETURN THIS
PRODUCT TO ANY RETAIL STORE!
PLEASE! DO NOT RETURN THIS
PRODUCT TO ANY RETAIL STORE!
Reload Handle
Infrared
Beam
Emitter
ON-OFF Switch
Speaker
Battery
Compartment
Door
Targeting Sights
Trigger
SKEET BLASTER
INSTRUCTION MANUAL
8
This device complies with Part 15 of the FCC Rules. Operation is subject to the following two conditions:
1) This device may not cause harmful interference.
2) This device must accept any interference received including interference that may cause undesired operation. Warning: Changes or modifications to this unit not expressly approved by the party responsible for compliance
could void the user's authority to operate the equipment. The manufacturer is not responsible for any radio or TV interference caused by unauthorized modifications to this equipment. Such modifications could void the user’s
authority to operate the equipment. Note: This equipment has been tested and found to comply with the limits for a Class B digital device, pursuant to Part 15 of the FCC Rules. These Limits are designed to provide reasonable
protection against harmful interference in a residential installation. This generates, uses and can radiate radio frequency energy and if not installed and used in accordance with the instructions, may cause harmful interference
to radio communications. However, there is no guarantee that interference will not occur in a particular installation. If this equipment does cause harmful interference to radio or television reception, which can be determined by
turning the equipment off and on, the user is encouraged to try and correct the interference by one or more of the following measures: - Reorient or relocate the receiving antenna - Increase the separation between the
equipment and receiver - Connect the equipment to an outlet on a circuit different from that to which the receiver is connected - Consult the dealer or an experienced radio/TV technician for help.
Keep your body, especially the face, eyes, hair and fingers away from the Skeet Launcher mechanism during operation.
Do not aim the Skeet Launcher or Skeets at any people, animals, plants, or property. Do not modify this toy or any of the included components.
The skeets can reach up to 2 to 3 meters (6.6 to 9.8 feet) height. Make sure there is enough height allowance when operating Skeet Shooter.
CAUTION !!
All three Skeets have built-in, non-removable, non-replaceable, rechargeable capacitors. Do not attempt to open the Skeets to modify or tamper with
the capacitors. The Skeet Blaster uses 3 “AAA” batteries (not included). The Skeet Launcher uses 4 “C-size” alkaline batteries (not included). The
charger is built into the Skeet Launcher. Use only the supplied charger provided in this SKEET SHOOTER package to charge the Skeets.
Skeet Shooter Blaster Battery Installation:
1. Open the battery compartment door located
at the upper rear of the Skeet Blaster by
using a Philips screwdriver (not included).
2. Insert the
3 AAA batteries
(not included)
as shown.
Ensure that the + and – polarities match the
illustrations inside the battery compartment.
3. Replace the battery compartment door and
tighten the screw using the screwdriver. Do
not over tighten.
The 3 Skeets require 10 seconds of continuious charging. Charging the Skeets is a simple process as outlined in the following steps.
Arming your Skeet Blaster:
1. To fire your Skeet Blaster, make sure the ON/OFF switch on the
Skeet Blaster is in the on position.
2. Every time the Skeet Blaster is fired, it needs to be reloaded by
sliding the reload handle backwards and forward. A reload
double-click will be heard. At the beginning of your game, make
sure to reload your Skeet Blaster.
Shooting down Skeets with your Infrared Skeet Blaster:
Once you have adjusted the Skeet launch speed and angle to
your desired settings, charged up your 3 Skeets and turned on
your Skeet Blaster, you are ready to shoot some Skeets! The
Skeet Launcher’s launch mechanism can be activated either
directly by pressing a button on the Skeet Launcher, or remotely,
by sending an infrared beam from your Skeet Blaster.
1. Ensure that your Skeet Launcher is turned on and the fully
charged Skeets are in their launch slots.
2-A. To activate your Skeet Launcher’s launch mechanism
directly, just press the play button on the Skeet Launcher as
shown. You will have about 5 seconds to walk back to your
shooting position.
2-B. To activate your Skeet Launcher’s launch mechanism
remotely, just aim your Skeet Blaster directly at the Skeet
Launcher and press the trigger. (Note, if nothing happens, make
sure your Skeet Blaster is reloaded.)
3. Once the Skeet Launcher’s launch mechanism has been
activated, make sure to stand clear of the Skeet Launcher as it
will start launching Skeets momentarily.
4. Reload your Skeet Blaster by sliding the reload handle forward
and backward once.
5. Prior to the first launch, the Skeet Launcher’s speaker will say,
“Ready, aim, pull!”
6. The first Skeet will launch.The Skeet will be launched into the
air up to about 6.5 feet (2 meters). (Please note, the first Skeet
will be launched from a random launch slot)
7. Shoot down the first Skeet with your safe infrared beam Skeet
Blaster. You can fire a narrow infrared beam at the Skeet by
pressing the trigger button on the Skeet Blaster. A firing sound
is heard. To get best aiming results, align the single targeting
sight notch located at the upper front of the Skeet Blaster with
the double targeting sight notches located at the upper rear of
the Skeet Blaster. When viewing with one eye from the top rear
down the barrel of the Skeet Blaster, the front targeting sight
should be in between the 2 rear targeting sights, and the target
should appear directly in front of the aligned targeting sights. If
you miss, quickly reload and fire again. It is fair game to take
multiple shots at each Skeet as long as it has not hit the ground
yet. It is necessary to reload your Skeet Blaster after each shot.
8. The Skeet Launcher will say “Pull” before every subsequent
Skeet launch.
9. Once all 3 Skeets are launched, the Skeet Launcher will remain
turned on but the launch mechanism will stop working. Did you
shoot down all 3 Skeets before they hit the ground? If so, how
many shots did it take? If you were able to shoot down all 3
Skeets with only 3 shots, you have a perfect score!
10-A. To play again, it is not necessary to turn off or reset the
Skeet Launcher. Simply reload the Skeet Launcher, reassemble
the 3 Skeets and insert them into the Launcher as described in
the “Charging the Skeets” section. Then follow steps 1 through
10 in the “Shooting down Skeets with your Infrared Skeet
Blaster” section.
10-B. If you are finished playing, turn off the Skeet Launcher by
pressing the ON/OFF switch as shown. Also, make sure to turn
off your Skeet Blaster by moving the ON/OFF switch to the off
position. If you will be storing your SKEET SHOOTER toy for a
longer period of time, remove the batteries from the Skeet
Launcher and the Skeet Blaster. This will prolong the
operational life of the toy and the batteries. It is a good idea to
store the 3 Skeets, Skeet Blaster and the Skeet Launcher
together so no components become misplaced.
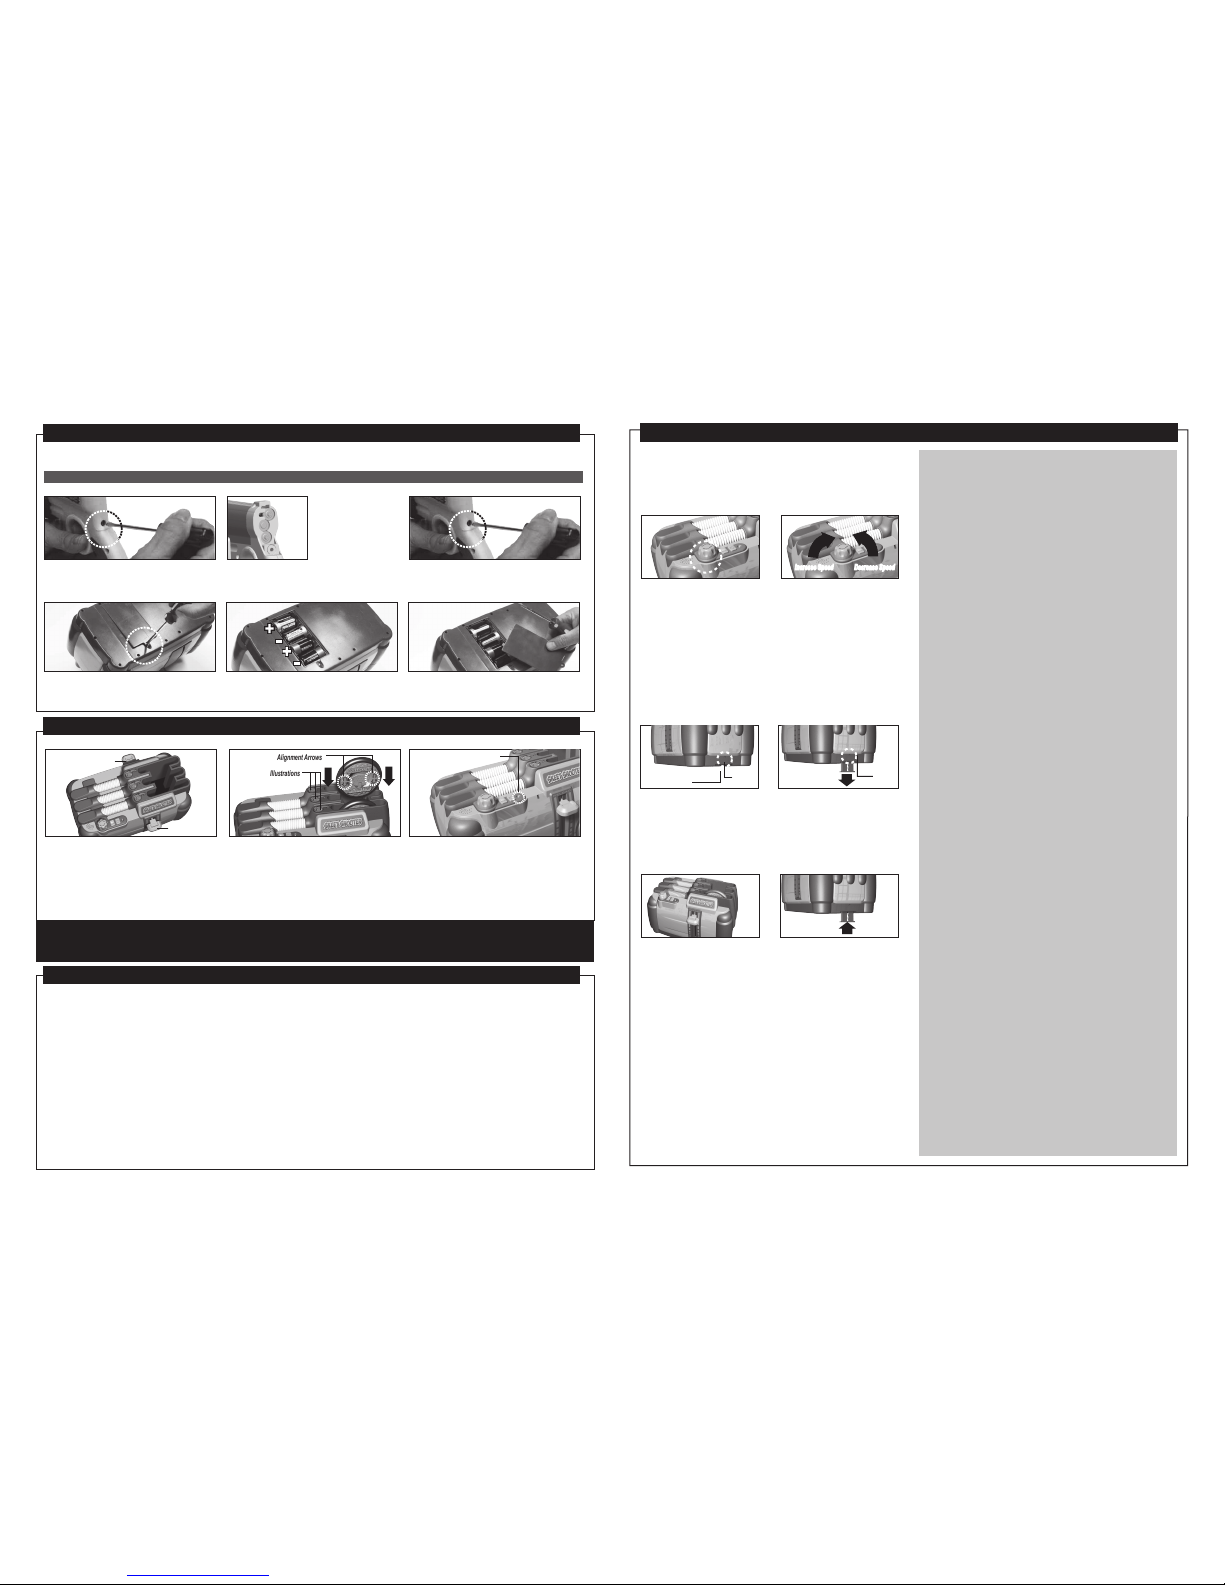
Adjusting Skeet Launch Speed:
The speed of the launch can be adjusted from 3 Skeets launched
within a span of 15 seconds to 3 Skeets launched within a span of 30
seconds.
1. Ensure that the Skeet Launcher is not in the process of launching
the Skeets. The Skeet Launcher’s ON/OFF switch can be in the on
or off position during Skeet launch speed adjustment.
Adjusting Skeet Launch Angle:
The angle of launch for the Skeets can be adjusted before and
between plays. All 3 Skeets will be launched in the same angle and
direction as preset. By default, the Skeets launch vertically with no
launch angle adjustment.
1. Ensure that the Skeet Launcher is not in the process of launching
the Skeets. The Skeet Launcher’s ON/OFF switch can be in the ON
or OFF position during Skeet launch angle adjustment.
DO NOT USE ANY OTHER SOURCE TO CHARGE THE SKEETS OTHER THAN THE SKEET LAUNCHER .
Skeet Shooter Launcher Battery Installation:
1. Ensure that the Skeet Launcher is turned off.
2. Open the battery compartment door located
at the bottom of the Skeet Launcher by using
a Philips screwdriver (not included).
3. Insert the 4 C-size batteries (not included)
as shown. Ensure that the + and –
polarities match the illustrations inside the
battery compartment.
4. Replace the battery compartment door and
tighten the screw using the screwdriver. Do
not over tighten.
CHARGING THE SKEETS
PLAYING WITH YOUR SKEET SHOOTER-(continued)
You can start playing SKEET SHOOTER as soon as the Skeets are finished charging. The objective of the SKEET SHOOTER game is to shoot the
individual Skeets once they are launched from the Skeet Launcher and before the Skeets hit the ground. When a Skeet is hit by the harmless infrared
beam of your Skeet Blaster, the Skeet will break apart just as a real clay Skeet would.
The SKEET SHOOTER can be played as a 1 player or 2 player (or more) game. In 1 player mode, the player tries to shoot down as many of the 3
Skeets as possible. In 2 or more player mode, all players take turns in attempting to shoot down as many of the 3 Skeets as possible. Only 3 Skeets
can be launched per turn. If this results in a tie, the best players should have another round of turns until only the best player remains. The winner
shoots down the most Skeets in the final turn. Another way to find out who is the better shooter is to count how many shots it takes to shoot down all
3 Skeets. Obviously, the shooter who can shoot down all 3 Skeets with only 3 shots is a master Skeet Shooter!
To make the game more challenging, it is possible to adjust the launch speed of the Skeets and the launch angle. Increasing the launch speed will
decrease the amount of time between Skeet launches but it will not affect the launch height. If you would like to change or adjust the Skeet launch
speed or Skeet launch angle, you must do so before launching the Skeets.
Sometimes the Skeet will also break apart when it hits the ground. The Skeet’s red LED flashes after the Skeet is shot by
the Infrared Beam. It is the accurate way to judge whether the Skeet is hit by your shot.
PLAYING WITH YOUR SKEET SHOOTER
INSTALLING BATTERIES
2. Find the “Skeet launch speed
adjustment knob” located on
the Skeet Launcher as shown.
3. Dial the knob to the left
(anti-clockwise) to reduce the
launch speed. Dial the knob to
the right (clockwise) to increase
the Skeet launch speed.
2. Find the “Skeet launch angle
adjustment slider” located on
the Skeet Launcher as
shown.
3. Press the button on the side
of the Skeet Launcher above
the slider as shown.
4. Pull the slider down to
increase the Skeets’ angle of
launch. The further the slider
is pulled down, the greater
the angle of launch.
5. Release the button on the side
of the Launcher above the
slider to lock the Skeet launch
angle in position as desired.
6. Looking at the Launcher with
the SKEET SHOOTER logo
facing you, the Skeets will
now be launched at an angle
to your left. To launch the
Skeets to your right, just rotate
the Launcher in the desired
direction.
7. To launch the Skeets
vertically up into the air, revert
the Skeet launch angle setting
to its factory pre-set by
moving the slider to its
maximum up position.
When in doubt, follow the arrows on the Skeet launch speed
adjustment knob.
+
+
-
Skeet Launch Angle
Adjustment Slider
Increase Speed
Decrease Speed
Alignment Arrows
Illustrations
Reload Handle
Reload Handle
Red LED Light
Press
Button
Release
Button
Increase Speed Decrease Speed
If the Skeet Launcher is not in use for over 3 minutes, it will go into POWER SAVING MODE. In this
mode, the LED on the Skeet Launcher’s ON/OFF switch will flash. Also, the charging of the Skeet will
stop and the LED on Skeet will turn off.
To start playing again, Power Saving Mode can be deactivated using one of the following three steps:
a. Press the Play button on the Skeet Launcher once to wake it up. Press the Play Button a
second time to activate the Skeet Launcher’s launch mechanism and the Skeets will be launched in
accordance with the normal playing procedure.
b. Reload your Skeet Blaster, aim the blaster directly at the Skeet Launcher and press the trigger.
The first shot will wake up the Skeet Launcher. Reload and press the trigger again. The second
shot will activate the Skeet Launcher’s launch mechanism and the Skeets will be launched in
accordance with the normal playing procedure.
c. Press the ON / OFF switch on the Skeet Launcher once to turn the Skeet Launcher OFF. Press the
ON / OFF switch a second time to turn the Skeet Launcher on again. This will reset the Skeet
Launcher. You can use the Play Button or the Skeet Blaster to activate the Skeet Launcher in
accordance with the normal playing procedure.
Power Saving Mode:
Choosing your playing location:
You can operate your SKEET SHOOTER toy indoors or outdoors. The outdoor space should be roughly 16.4 feet x 16.4 feet (5 meters x 5 meters) with a
height allowance of about 9.8 feet (3 meters). Avoid operating your SKEET SHOOTER near power-lines, trees, or roof-tops. Do not operate your SKEET
SHOOTER during windy conditions or any harsh weather. If operating your SKEET SHOOTER indoors, the indoor area should be up to 16.4 feet x 16.4 feet
(5 meters x 5 meters) with the average household ceiling height.
Ensure the SKEET SHOOTER Launcher is turned off.
Using both hands, slide the 2 reload handles located on
either side of the Skeet Launcher all the way down and
release them. (The handles will return to their “up” position).
This will allow you to insert the Skeets into the launch slots.
When assembling a Skeet, make sure the “alignment arrows”
are visible on one side only. Looking at the Skeet Launcher
with the SKEET SHOOTER logo facing you, insert all 3
Skeets into the launch slots so that the alignment arrows on
each Skeet are facing you and aiming down (shown). It is
very important that the Skeets are inserted into the Skeet
Launcher correctly or the Skeets will not fit or charge.
Note: see illustrations on SKEET SHOOTER Launcher.
1.
2.
4.
5.
6.
3.
Turn the Skeet Launcher’s ON/OFF switch to the ON position for
charging. A red power LED will light up on the Skeet Launcher
when it is turned ON.
The 3 Skeets will automatically charge once the Skeet Launcher’s
ON/OFF switch is turned to the ON position. A red charge LED will
light up on each Skeet during charging. Once a Skeet is charging
the red charge LED remains on constantly.
The 3 Skeets are ready for launching after charging for 10 seconds.
In order for the Skeet Launcher to operate, all 3 Skeets must be inserted correctly into their launch slots. If any of the Skeets should become misplaced or sustain
damage, replacement Skeets are available on-line through the Interactive Toy Concepts Shopping Cart. Please follow the below link to access the Shopping Cart:
WWW.INTERACTIVETOY.COM
 Loading...