

WARNING:
The Micro Mosquito is a delicate machine, before removing
it from the packaging please read the instructions.
Congratulations on the purchase of your BladeRunner Series Micro Mosquito helicopter, the world’s smallest indoor R/C
helicopter. The Micro Mosquito is designed for fun and easy flying; however the helpful tips in this pilot’s manual will improve
your skill and enhance your experience. Look for these symbols for extra help.
12
A
B
C
D
E
F
To prevent damage during shipping the Micro Mosquito is securely fastened in the
package. Please ensure that all of the tie down and fastening locations are unfastened
before attempting to remove the Micro Mosquito. Be very careful when removing the
Micro Mosquito to prevent damaging the helicopter.
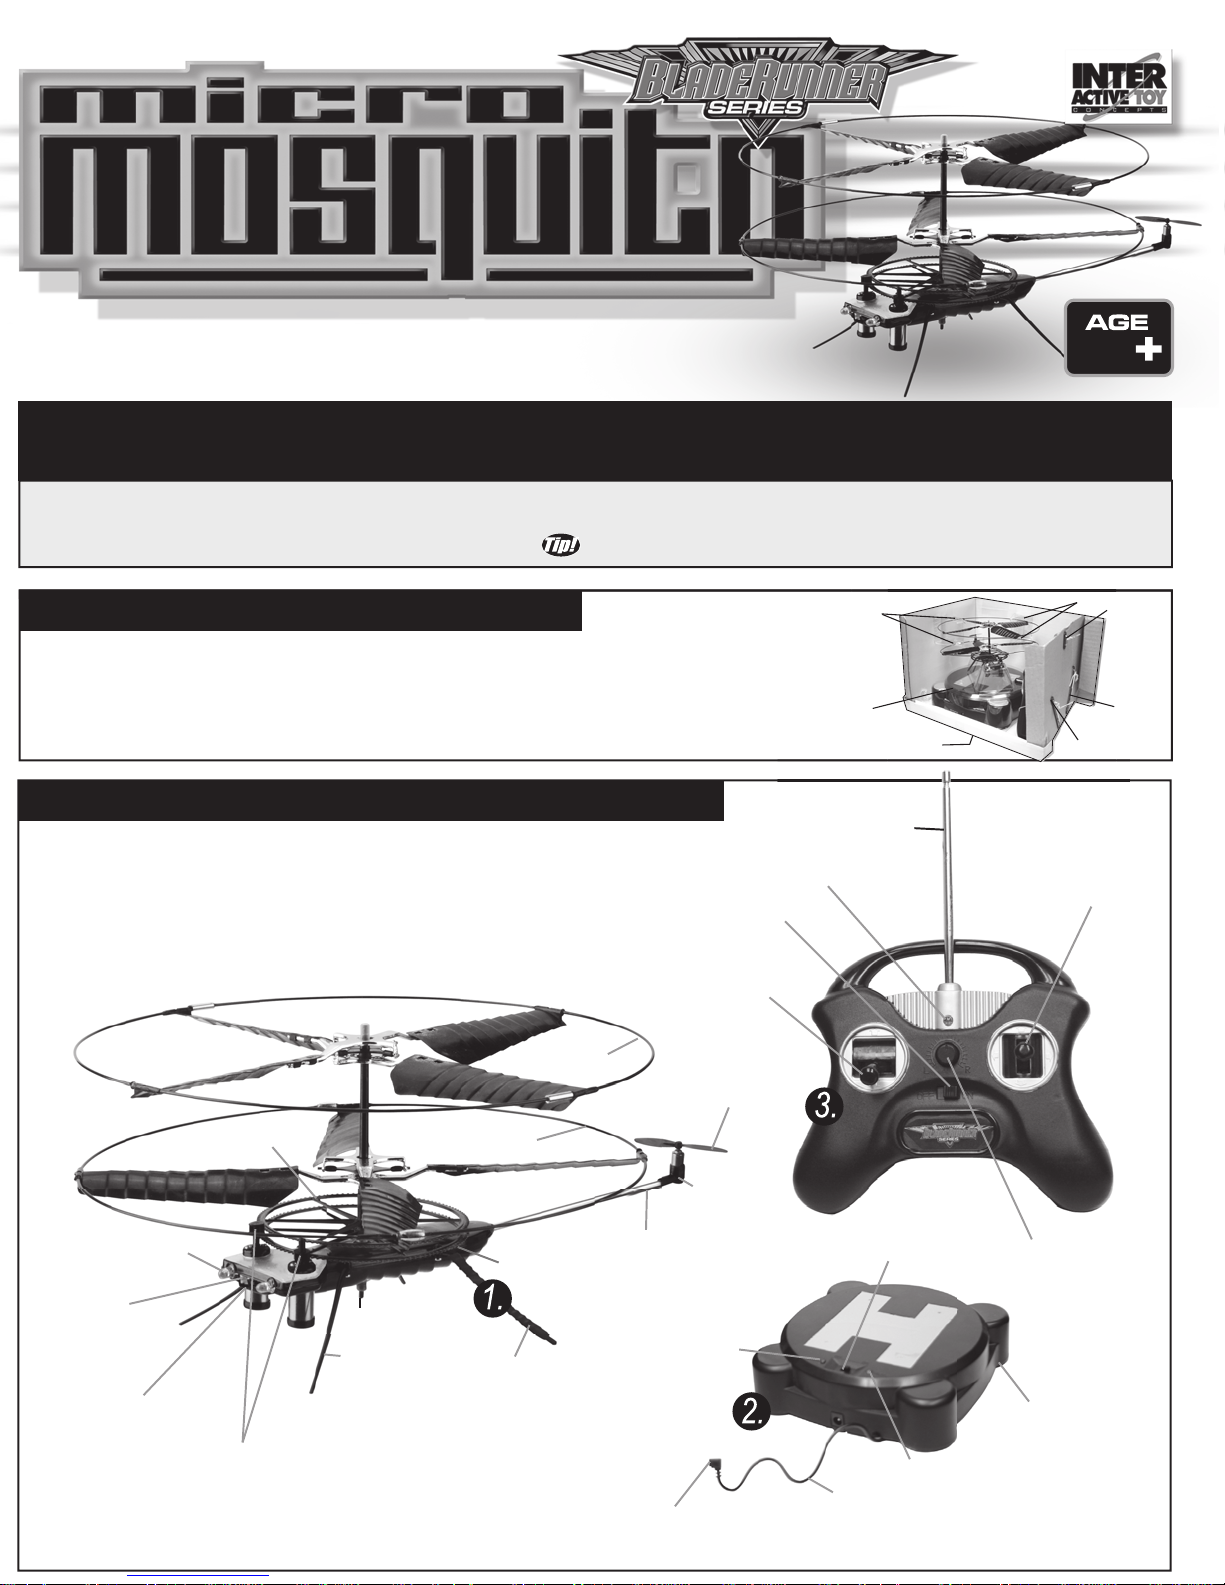
UNPACKING YOUR MICRO MOSQUITO HELICOPTER
Top Rotor
Bottom Rotor
Top Rotor Gear
Bottom Rotor Gear
Motor Pinions
LED Lights
Charge Jack
On/Off Switch
Landing Gear
Antenna
Tail Boom
Tail Rotor
Tail Motor
Up/Down Throttle
Left/Right-
Forward/Reverse
Control
Left/Right
Trim Control
On/Off
Switch
Power On
LED
Antenna
Display Stand
On/Off Switch
Power On LED
Charge Status LED
Charge Cable
Charge Nozzle
COMPLETE PACKAGE CONTENTS AND COMPONENT BREAKDOWN
1) Micro Mosquito Helicopter
2) Charging/Display Station
3) Radio Controller & Antenna
4) Instruction Manual
TM
TM
F
INSTRUCTION MANUALINSTRUCTION MANUAL
INSTRUCTION MANUAL
HELICOPTER
The Micro Mosquito comes fully assembled and ready to fly with a partially charged battery.
ASSEMBLY
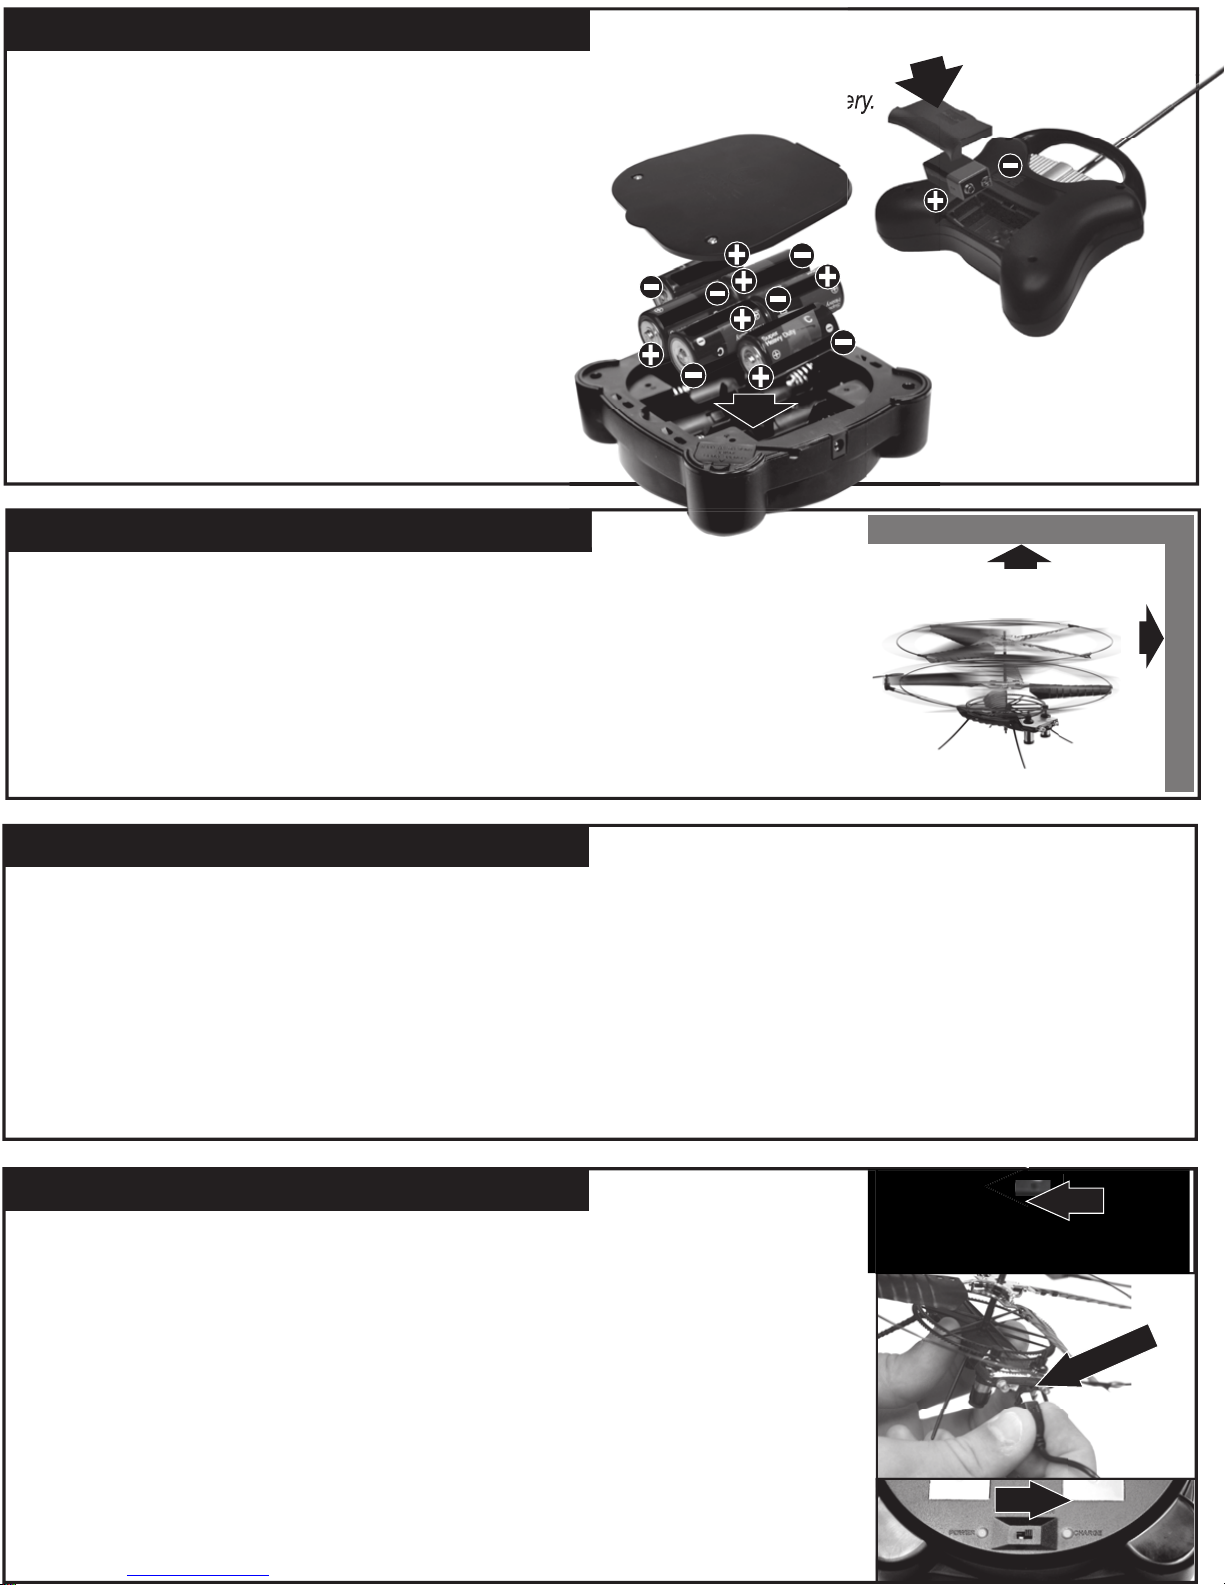
TRANSMITTER:
The transmitter requires one 9V alkaline battery.
1) Open the battery cover.
2) Install the battery with correct polarity (as shown).
3) Replace the battery cover.
Insert the antenna into the radio control transmitter
and screw in to place finger tight.
.
CHARGER/DISPLAY STATION
The charger requires six C size batteries.
1) Open the battery cover.
2) Install the battery with the correct polarity
(as shown).
3) Replace the battery cover.
Your BladeRunner Series Micro Mosquito is designed for indoor flight only!
Due to its size, light weight structure and stability it is very sensitive to air currents,
keep away from fans, air vents, open windows and any other sources of moving air.
DO NOT fly outdoors – even days that appear to be calm and have no wind does
have air currents that will greatly effect the Micro Mosquito’s performance.
Control range is limited to about 30 feet (10 meters) which is more than enough
for the average indoor environment. Only fly in areas that are free of furniture, and
keep the Micro Mosquito at least 3 feet (1 meter) away from walls and ceilings.
FLYING AREA/LOCATION
CEILING
W
A
L
L
3 FT
3 FT
FLIGHT SAFETY
DO inform people in the area that you are flying an Interactive Toy Concepts BladeRunner Series Micro Mosquito.
DO NOT fly the Micro Mosquito near people or pets. Stay clear of furniture and other obstructions. If you lose control of
the helicopter, reduce the throttle and allow the helicopter to land.
DO NOT attempt to replace or overcharge the Micro Mosquito’s internal battery. To prevent damage use only the
supplied battery charger.
DO have fun flying being conscious of changes in your area.
DO NOT attempt to open the body of the Micro Mosquito or modify the design, doing so may damage the helicopter and
the results could be hazardous.
CHARGING YOUR HELICOPTER
1) Ensure the helicopter’s on/off switch is in the off position. Note: The helicopter will not
charge “if” the on/off switch is in the ON position, the helicopter’s Green LED Eyes will
be On “if” the Helicopter is on.
2) Plug the charger nozzle into the helicopter charger jack in the correct orientation.
Note: it takes very little pressure to insert the nozzle, if you are using heavy pressure
then the nozzle is not correctly aligned, in the reverse position or upside down.
3) Turn the Charger On/Off switch to the On Position, the red power LED will light up and
the Green LED will light up showing a charge is in progress.
4) When the charge cycle is finished the Green LED will turn off, for a depleted battery a
full charge might require 30 minutes or longer depending on the condition of the
Chargers batteries.
5) Turn off the Charger and disconnect the charge nozzle from the helicopter.
OFF
ON
PLUG IN
OFF
LED INDICATORS
Red LED ON – Charger Power Switch is on.
Red LED Dim – Charger batteries voltage is
low and should be replaced.
Green LED ON – The Helicopter is charging.
Green LED OFF – The Helicopter is charged.
Helicopter Green LED Eyes ON – The Helicopter is not
turned off. See point #1 of CHARGING
YOUR HELICOPTER.
CHARGING TIP: – You do not need to wait for the charge
cycle to be compete to fly, shorter charge timed = shorter
flight times. If the helicopter is fully charged and turned off it
can be stored for long periods of time and will be ready to fly
when turned on. The charger does not require six “C” sized
batteries if powered by a standard 12V 1 Amp wall adaptor
with a positive central pin (must be purchased separately).
BATTERY SAFETY
The Helicopter contains a Lithium Polymer Battery that does not “like” to be discharge to a low voltage. To prevent this,
recharge the helicopter when it will no longer lift off from the ground. The BladeRunner Series Micro Mosquito is
extremely safe but for maximum safety always charge on hard, non-flammable surfaces, do not charge near flammable
substances. Do not leave the Micro Mosquito unattended while charging and always disconnect the helicopter from the
charger after charging or when not in use.
FLIGHT INSTRUCTION
-ESSENTIAL KNOWLEDGE
Helicopter Performance
- Do not overheat the Micro Mosquito’s motors and battery.
- After a Hard Landing or crash refer to the maintenance section to ensure the helicopter is okay to fly again.
- It is normal for the Helicopter to get “sucked” towards a wall or ceiling due to the circulation of air into the rotors, if this
happens slowly reduce the throttle and land the helicopter.
CONTROL REVERSAL
Control reversal is a problem for novice R/C pilots because it will
appear that the helicopter moves the opposite direction from the
pilot’s command, ie commanding a left turn seems to result in a
right turn – this happens when the nose of the helicopter is pointed
towards you instead of away. When flying the Micro Mosquito imagine
you are looking thru the green eyes and a left turn command will result in
a left turn from that point of view – but it will look like a right turn to someone
facing the nose of the helicopter.
For novice pilots the easiest way to adjust for control reversal is to always
face the same way as the nose of the helicopter. This means if the helicopter
is flying towards you, turn your back to the helicopter and look over
your shoulder.
When flying the Micro Mosquito imagine you are
looking thru the green eyes and a right turn command
will result in a right turn from that point of view – but it
will look like a left turn to someone facing the nose of
the helicopter.

“Off”
(bottom)
“Full On”
(full up)
“Off”
(LED “ON”)
Ensure that the tail
rotor spins freely
PRE FLIGHT
Just like the pilot of a full-size aircraft always does, you should
pre-flight your helicopter before each flight by completing the checklist
below:
Walk Around:
1) Ensure the rotors can tilt freely on their central hinge points.
If they bind, your helicopter will oscillate and you will have to land
immediately.
2) Ensure that there is not too much up/down play in the central rotor
drive shaft – check the fit of the upper tube cap
3) Ensure that the retaining clip for the central rotor drive shaft is
properly locked on the bottom of the helicopter
4) Ensure that the upper and lower drive gears are properly aligned
with the motor pinions
5) Ensure that the tail rotor spins freely
TILT
Central
Hinge
Point
TILT
TILT
TILT
TILT
Ensure that the
upper and lower
drive gears are
properly aligned
with the motor
pinions
Fit Upper
Tube Cap
Secure
Drive
Shaft
Lock Retaining Clip
Pre Flight
1) Extend the Radio Controller antenna
2) Turn the Radio Controller to the On position – the Green LED will
stay off
3) Turn the Micro Mosquito On – the Green LED’s
4) Position the Micro Mosquito on the ground with the tail pointed
towards you and the nose facing away. (as shown)
5) Arm the throttle by cycling the throttle control from off (bottom) to full
on (full up) and back to off, the Green LED on the Controller will turn
on – this is a safety feature to prevent accidental starts
6) Test the helicopter response but slowly applying throttle – the rotors
will start to spin – Do not take off until you are familiar with the next
section!
“ON” Position
“ON” Position
GETTING IN THE AIR
Take Off
Once the throttle is armed, smoothly move the throttle control (left hand stick marked up /down) upwards; the main rotors
will start spinning. The further you move the stick the faster the rotors will spin causing the helicopter to lift off.
For the best take-offs move the throttle control swiftly and smoothly but do not “jam” it to full throttle – do not allow the
helicopter to sit on the ground an spin because the gear will drag causing the helicopter to roll over . As the helicopter
takes off from the ground back off on the throttle control to reach a hover – leaving too much throttle control on will cause
the helicopter to fly straight to the ceiling in an uncontrolled climb.
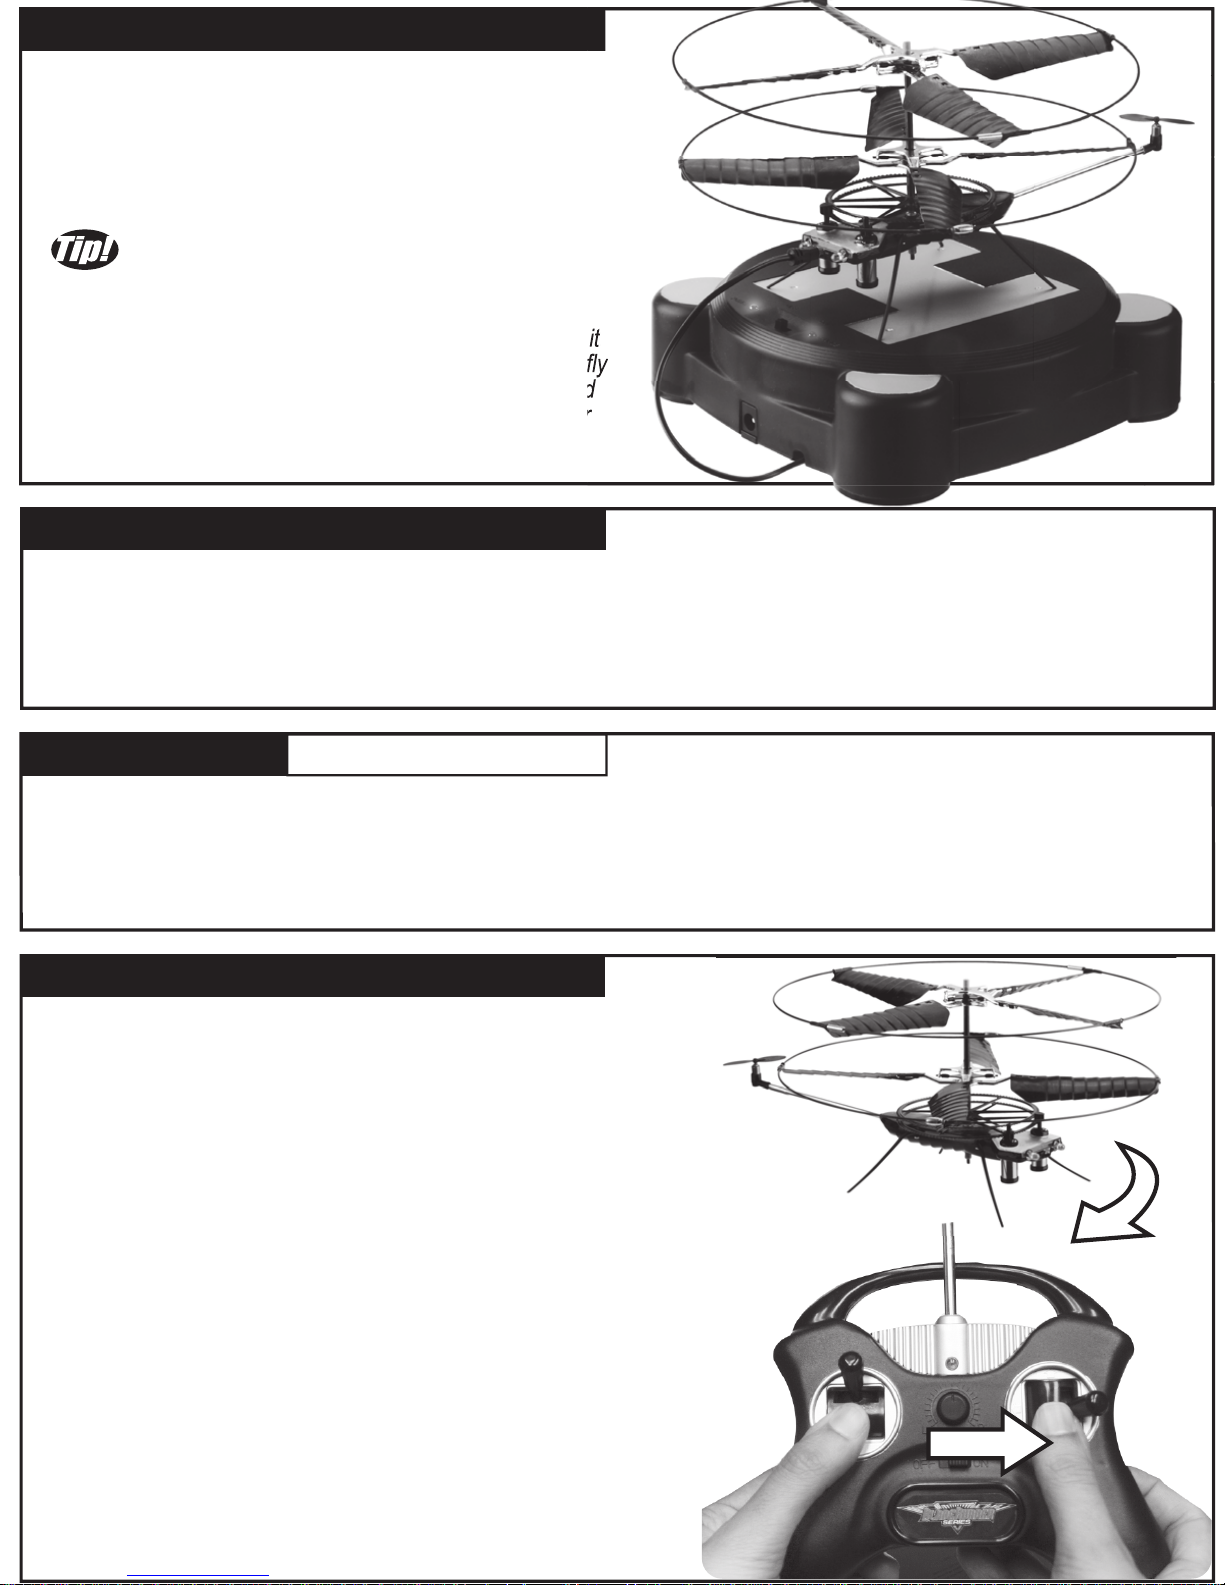
Trimming the helicopter
The Trim tab in the middle of the Radio Controller can be adjusted so that the helicopter does not spin when it is hovering.
After take off place the helicopter into a hover at a steady altitude, the body of the helicopter may be spinning. Turn the trim
control left to eliminate a clockwise (right) spin or turn the trim
control right to eliminate a counter-clockwise (left) spin.The trim
setting will change as throttle setting changes or the battery condition
changes, this can be compensated by using the right hand stick
to apply more or less turn to the left or right. If flying with constant
input on the right stick to prevent the helicopter from spinning then
re-adjust the trim control.
Helicopter
Spins Left
Transmitter
Trims Right
Helicopter
Spins Right
Transmitter
Trims Left
1.
2.
3.
4.
5.

GETTING IN THE AIR -Continued
Hovering & Altitude Control
To gain altitude advance the throttle control forward. To descend, slowly move the throttle control backward.
Hover is controlled buy keeping the helicopter at a constant altitude, you may be required to use the FWD/BK or Left/Right
control to maintain the helicopter’s position.
Forward & Backward Flight
To fly forward or backward, move the right hand control stick forward or backward respectively. Note that the Micro
Mosquito is intentionally design not to move forwards and backwards extremely fast. This prevents novice pilots from
becoming disoriented, flying into obstacles and losing control; it is also part of the design that makes the Micro Mosquito
so stable. When flying forward or backward your will need to constantly adjust the left/right heading (yaw) of the helicopter
using the right stick; the Micro Mosquito does not use a gyro or other electronic heading systems.
Landing
To make the heli descend, slowly move the throttle stick backwards. The Micro Mosquito will start to sink – your challenge
as a pilot is to let the heli decent slowly and smoothly to ensure a gentle landing. Applying a bit of throttle when the
helicopter is a couple of inches above the ground will help slow the descent rate even further. Immediately move the
throttle control to the down position when on the ground to completely stop the rotors
FLYING TIPS!
- During your first flights keep the Micro Mosquito close to the ground so that you can safely cut the throttle and land without
FLIGHT SCHOOL _Continued
damage if you become disoriented or lose control.
- To avoid unwanted oscillation avoid sudden control stick movements – always use smooth motion of the control sticks.
- Until you are comfortable with control reversal try to always keep the helicopter nose pointed away from you so that the
helicopter responds the way you expect it too.
- Expect flight times of 7 to 10 minutes from a fully charged battery.
- If the helicopter gets too close to a wall or ceiling you will notice that it gets sucked towards the surface, gently decrease the
throttle and land if this happened.
- Immediately cut the throttle when the helicopter lands to prevent it from bouncing around and tipping over.
- The control range is approximately 30 feet (10 meters) however, the presence of other electrical devices, electrical
wiring walls etc. may reduce this range
FLIGHT SCHOOL
Developing Advanced Flight Skills. Throttle Control – Developing Hover Skills
The purpose of this exercise is to develop good hover control – essential to flying a helicopter. Place the Micro Mosquito in the
center of a fairly large area – this will be your training zone. Increase the throttle to takeoff and hover at a target height of about
1 foot above the ground. Once in the air, trim the helicopter to eliminate any left / right spin with the trim control but do not touch
the left/right control stick (right hand stick). Focus on maintaining a stable hover – try not to let the helicopter move up or down
just hold the altitude steady. Maintain the hover for 5 seconds then land. Repeat 5 times, if the Micro Mosquito starts to drift off
center land immediately and manually reposition it in the center of the training zone. Once you are proficient at this increase the
target height by 1 foot and repeat the training exercise. You will be skilled at throttle control when you can determine the height
you want to hover at before taking-off and be able to climb and maintain the desired altitude without over or under shooting your target.
Throttle and Rotation (Yaw) Control
From a hover, intentionally put the Micro Mosquito in a spin by giving it a left or right turn command and then regain control.
Do not apply forward or backward control. Repeat 5 times, if the Micro Mosquito drifts to the edge of the training zone land
immediately and manually reposition it in the center of the zone. You will be skilled at combined Throttle/Rotation control
when you can maintain a hover altitude with the helicopter spinning and be able to stop the rotation with the helicopter
nose pointing in a pre determined direction without over or under shooting your desired heading.
Straight Line Mission
Mark takeoff and landing targets at approximately 3 feet apart. Takeoff, fly forward to your
target area and land. Repeat 5 times. Initially orient the Micro Mosquito in the direction of flight
prior to take off, as your skill increases orient the Micro Mosquito in other directions that require
you to steer first then fly forward. As your skill increases further try flying backwards between
targets. You will be proficient when you can fly the shortest path between targets with the
helicopter starting from any orientation and flying either forward or backward.
Figure-8 pattern
Fly a controlled figure-8 pattern. Make the loops of the figure-8 even in size and don’t
allow the center to drift away

MAINTENANCE
The Micro Mosquito was engineered to be a light weight robust structure; however, as a real flying helicopter it is possible to
damage the rotors or structure. Use these simple procedures to repair your helicopter and get back into the air.
TROUBLESHOOTING
CORRECTIVE ACTION:
CAUSE:ISSUE:
Helicopter will not start,
LED on helicopter is off
1) Helicopter not turned on.
2) Battery is not charged.
3) Helicopter was not set to OFF during charging.
4) Rotors locked for overload protection.
1) Turn helicopter on.
2) Ensure helicopter is off and charge battery.
3) Ensure batteries are fresh.
4) Adjust helicopter's on/off switch to OFF, then switch on again.
Helicopter will not start, LED
on helicopter is ON.
1) Transmitter is not turned ON.
2) Speed control is not initialized .
3) Battery is low.
1) Turn transmitter on.
2)
Push UP/DOWN completely to UP, then back to DOWN to
initialize speed control.
3) Ensure helicopter is OFF and charge battery.
Helicopter is flying too high.
1) You need to reduce the throttle.
1) Move the throttle stick down.
Helicopter is flying too low.
1) Needs more power/throttle.
2) The battery in the helicopter is low.
3) The batteries in the charger are drained.
1) Move the throttle stick up.
2) Ensure the helicopter is OFF and charge the battery.
3) Remove batteries from charger & replace
with new batteries
and charge the helicopter again.
Helicopter doesn’t hover.
1) The helicopter drifts forward.
2) The helicopter drifts backwards.
1) Compensate with the back stick to hold helicopter in position.
2) Compensate with forward stick to hold helicopter in position.
Helicopter doesn't move
fast enough.
1) The battery charge is getting low.
2) The tail rotor is damaged.
3) The helicopter center of gravity is no longer
correct.
1) Turn the helicopter off and charge the battery.
2) Replace tail rotor with new unit from the replacement
rotor kit (available in stores)
3) Tape a paper clip or other light weight item under the nose
of the helicopter.
The Helicopter always spins
in hover.
1) Trim control is not set correctly.
2) The rotor blades have sustained damage / or
wear from use:
a. Helicopter spins counter clockwise.
b. Helicopter spins clockwise.
1) Adjust the trim control knob.See the FLYING TIPS section.
2) Gently bend more curvature into the blades.
a. Adjust the top rotor blades.
b. Adjust the lower rotor blades.
Helicopter doesn’t fly backwards
1) The helicopter only flies backwards briefly then
spins to fly forward.
1) Aerodynamics make flying backwards more difficult than
flying forwards and this flight pattern is normal, practice flying
backward and control the left/right motion to keep the tail
pointed in the direction you desire.
Helicopter fails to take off.
1) The large, top cog (under the bottom rotor) is
misaligned.
2) Shaft lock under the body has detached from the
drive shaft.
3) The rubber stopper on the top of the drive shaft
has detached.
1) Realign with equal spacing between the pair of large cogs.
Large, top cog should be in contact with the small front cog
(top).
2) Replace shaft lock as shown.
3) Replace the rubber stopper (part separately available inside
Replacement Kit, 60-4461).
Broken Rotor
If the ring or centre is broken – replace with new rotor. (spare part kit available separately.)
If the blades are broken or cracked, you can use clear tape to fix. Hold the broken or cracked blades in the correct position
and using as little tape as possible, secure the rotor together. Trim or fold over any extra tape. If too much tape is used it
will throw out the balance and hinder your stable flight.
Broken Leg
Use clear tape or Crazy glue to reattach the broken leg (under adult supervision).If the leg is lost,try to use a piece of the
plastic tube from a Q-tip to replace the broken part of the leg (plus a little glue).
Rotor Head
If the ring or centre (head) is broken – replace with new rotor. (spare part kit available separately.)
If it is only bent out of shape try to use some force to permanently bend it back again.
-Be careful to not destroy the hinges, the rotor must be able to tilt absolutely freely (when you tap on it, it should tilt up and
down for at least 2 seconds before it comes to rest again – if this is not the case the helicopter will be unstable and
start to oscillate).
Tail Rotor
If the propeller is broken replace. (spare part kit available separately.)
Broken motor not possible for the average customer to change. Remove the propeller and add a little weight to the front
e.g. a metal paper clip attached to the motors (hold by the motor magnet) to get a slow constant forward speed.
Tail Boom
Will normally not break.
If problems it is possibly the mounting into the body that is the problem – be careful as there are two very thin wires
for the tail motor going inside the boom. Try to glue the boom to the body without pulling it out first.
(the thin wires can be damaged).

FREQUENTLY ASKED QUESTIONS
How much space do I need to fly?
What about fans, air conditioners, vents and windows?
Can I fly outdoors?
The Rotors are tilted an not level, is this okay?
Repairing the rotor blades.
Replacing the rotor blades
The top rotor will not side on the rotor shaft.
At least a mid size living room, clear of any obstructions is needed. Be sure to keep
the Micro Mosquito away from walls, ceiling and other fixtures. Because of the
aerodynamics of the rotors the Micro Mosquito will seem to get sucked towards any
obstacle/wall if it gets too close.
The Micro Mosquito is very light weight and hence sensitive to wind, any air
movement from heating vents, fans, windows, etc will make it more difficult to
control.
The Micro Mosquito is and indoor helicopter. The same innovations that make it
super stable also make’s it easily effected by wind and turbulence. Even the
calmest out door day has wind that will effect the Micro Mosquito’s performance.
When the rotors are not spinning it is normal fro the rotors to rest in a tilted position.
This is normal even if they are properly balanced. In hover the rotors will level out;
however, in moving flight the lower rotor will usual tilt sideways due to aerodynamic
and gyroscopic forces and is necessary to maintain stability.
Repairing the rotor blade is possible, please refer to the maintenance section of
this manual
Rotor Replacement kits are available for the Micro Mosquito and have detailed
instruction to replace the rotors.
The upper rotor has been keyed to match the D shape of the drive shaft. When
replacing the upper rotor you must ensure to orient it properly so that the D shape
of the rotor’s central opening matches the D shaped drive shaft.
The Micro Mosquito tips over during take off.
How long will the Micro Mosquito Fly
How long does it take to charge the Micro Mosquito
What if I disconnect the Micro Mosquito before
the charge is complete
Why does my Controller light flash when I turn the
On/Off switch to On.
Launch the Micro Mosquito from hard flat surfaces only. When taking off briskly
move the throttle stick forward to get the Micro Mosquito airborne quickly. Letting
the helicopter sit on the ground with the rotors spinning will almost always result in
the helicopter tipping over.
This is very dependent on the condition of the battery and how you are flying the
Micro Mosquito. Typical flight times are between 8 and 10 minutes. Should you be
able to fly over 10 minutes you should land and let your motors cool down to ensure
you do not burn them out, this will ensure many more fun flights.
This depends on the condition of the charger batteries (the six C sized alkaline cells)
and the condition of the helicopter battery. After a long flight of 10 minutes or more it
can take 30 to 45 minutes to fully recharge the battery. If the charge batteries are
old, performed multiple charges, or been used in other product then the charge time
can be longer. If the charge time becomes excessive or you are having short flights
from a charge replace your charger’s batteries with new alkaline batteries.
Stopping a charge cycle before it is finished will not effect the helicopter battery or
the charger, it is just like not completely filling a car’s gas tank. Just like the car will
not drive a far before running out of gas if the tank is not full, the Micro Mosquito
will not fly as long if the charge is stopped early.
The helicopter is programmed with a safety feature that helps prevent
damage to the helicopter. When the controller is turned on it the helicopter
will not respond to it until the helicopter control is initialized. To do this you
must cycle the throttle from 0% to 100% to 0%, at which point the LED will
stop flashing and be steady – the flashing is to remind you that the speed
control is not initialized.
HARD LANDING?
In the event of a hard landing it is very important
to check over your helicopter to ensure the gears
and drive shaft are in the correct positions!
-use this guide to check your helicopter before
getting back into the air!
Always turn off the helicopter and transmitter
before doing any adjustments!
A
CORRECT
MAIN DRIVE GEARS
Check that the main drive gears
are in the proper position.
B
INCORRECT
Each gear drives a different rotor.
Gear A (as shown)drives the
lower rotor gear and gear B
(as shown) drives the upper rotor
gear. Check for proper alignment.

Web site: www.interactivetoy.com
PLEASE! DO NOT RETURN THISPLEASE! DO NOT RETURN THIS
PRODUCT TO ANY RETAIL STORE!PRODUCT TO ANY RETAIL STORE!
PLEASE! DO NOT RETURN THIS
PRODUCT T
O ANY RETAIL STORE!
For any questions or problems with this product please contact us at:
Email: info@interactivetoy.com
Phone: Outside North America: +1 416 444 6873
Inside North America: 1 866 214 2220
Address: Interactive Toy Concepts
1192 Martin Grove Road
Toronto, Ontario, Canada
M9W 5M9
IMPORTANT SAFETY INFORMATION
Keep the helicopter away from face, eyes and hair at all times. Keep fingers away from moving rotors or propellers.
Do not fly the plane near or at other people or animals. Use caution when flying, make sure people around you
know that you are playing with the helicopter.
Recommended for use indoors only in rooms without obstacles, breakable objects or fans.
The charger provided in this package is for charging the helicopter ONLY . Do not use any other source to charge the helicopter.
Do not attempt to overcharge your helicopter. Follow the charging instructions provided in this instruction manual.
IMPORTANT BATTERY INFORMATION
Use only batteries recommended in this instruction manual. Do not mix old and new batteries.
Battery installation should be performed by an adult. Be careful to install the batteries with the correct polarity, as indicated.
Do not use rechargeable batteries. Do not mix alkaline, standard, lithium, rechargeable, or different types of batteries.
The supply terminals are not to be short-circuited. Exhausted batteries are to be removed as they will hinder performance.
Never leave a battery unattended while it is being charged. Never leave a battery
unattended in the presence of children. Helicopter charging time will increase with usage as the condition of the C cells diminish.
The helicopter takes one 9V battery and six C size batteries (not included).
FCC NOTE: U.S. ONLY
This device complies with Part 15 of the FCC Rules. Operation is subject to the following two conditions:
1) This device may not cause harmful interference.
2) This device must accept any interference received including interference that may cause undesired operation.
Warning: Changes or modifications to this unit not expressly approved by the party responsible for compliance could void the user's
authority to operate the equipment.
Note: This equipment has been tested and found to comply with the limits for a Class B digital device,
pursuant to Part 15 of the FCC Rules. These Limits are designed to provide reasonable protection against harmful interference in a
residential installation. This generates, uses and can radiate radio frequency energy and if not installed and used in accordance with the
instructions, may cause harmful interference to radio communications. However, there is no guarantee that interference will not occur
in a particular installation. If this equipment does cause harmful interference to radio or television reception, which can be determined
by turning the equipment off and on, the user is encouraged to try and correct the interference by one or more of the following measures:
-
Reorient or relocate the receiving antenna - Increase the separation between the equipment and receiver - Connect the equipment
to an outlet on a circuit different from that to which the receiver is connected - Consult the dealer or an experienced radio/TV technician for help.
Lithium Polymer
Rechargeable Batteries
must be recycled or
disposed of properly.
Micro Mosquito Helicopter and BladeRunner Series are registered trademarks of
Interactive Toy Concepts © 2006 All Rights Reserved.
Manufactured by and distributed by Interactive Toy Concepts Ltd.
Conforms to Safety Standards ASTM F963-03 Regulatory Requirements.
Products and colors may vary.
MADE IN CHINA.
INS-61081-60831-RSUS
Limited 30-day warranty
This product is warranted by Interactive Toy Ltd. against manufacturing defects in material and workmanship
under normal use for thirty (30) days from the date of purchase.
This radiocommunication device complies with all the requirements of Industry Canada Standard RSS-310.
Operation is subject to the following two conditions: 1) This device may not cause harmful interference.
2) This device must accept any interference received, including interference that may cause undesired operation.
Field Strength and measurement distance: 27.195MHz –
60.49 dBµV/m
at 3 meter. 49.890MHz - 61.61 dBµV/m at 3 meter.
Industry Canada Notice: Canada only.
 Loading...