

Page 1

Interactive Intelligence, Inc.
7601 Interactive Way
Indianapolis, Indiana 46278
Telephone/Fax: (317) 872-3000
www.ININ.com
Interaction Edge
Installation and Configuration Guide
For
Model # EDGE-01X0 – 0 span
Model # EDGE-01X1 – 1 span
Model # EDGE-01X2 – 2 span
Model # EDGE-01X4 – 4 span
Model # EDGE 01X8 – 8 span
Interactive Intelligence Customer Interaction Center® (CIC)
Version 2016
Last updated November 13, 2015
(See Change Log for summary of changes.)
Abstract
This document provides essential information for initial installation and configuration of the Interaction Edge
appliance. For the latest version of this document, see the Interactive Intelligence product information website
(https://my.inin.com/products/edge/Pages/Documentation.aspx).
Page 2

ii
Copyright and Trademark Information
Interactive Intelligence, Interactive Intelligence Customer Interaction Center, Interaction Administrator, Interaction Attendant, Interaction
Client, Interaction Designer, Interaction Tracker, Interaction Recorder, Interaction Mobile Office, Interaction Center Platform, Interaction
Monitor, Interaction Optimizer, and the “Spirograph” logo design are registered trademarks of Interactive Intelligence, Inc. Customer
Interaction Center, EIC, Interaction Fax Viewer, Interaction Server, ION, Interaction Voicemail Player, Interactive Update, Interaction
Supervisor, Interaction Migrator, and Interaction Screen Recorder are trademarks of Interactive Intelligence, Inc. The foregoing products are
©1997-2015 Interactive Intelligence, Inc. All rights reserved.
Interaction Dialer and Interaction Scripter are registered trademarks of Interactive Intelligence, Inc. The foregoing products are ©2000 -2015
Interactive Intelligence, Inc. All rights reserved.
Messaging Interaction Center and MIC are trademarks of Interactive Intelligence, Inc. The foregoing products are ©2001-2015 Interactive
Intelligence, Inc. All rights reserved.
Interaction Director is a registered trademark of Interactive Intelligence, Inc. e-FAQ Knowledge Manager and Interaction Marquee are
trademarks of Interactive Intelligence, Inc. The foregoing products are ©2002-2015 Interactive Intelligence, Inc. All rights reserved.
Interaction Conference is a trademark of Interactive Intelligence, Inc. The foregoing products are ©2004-2015 Interactive Intelligence, Inc.
All rights reserved.
Interaction SIP Proxy and Interaction EasyScripter are trademarks of Interactive Intelligence, Inc. The foregoing products are ©2005-2015
Interactive Intelligence, Inc. All rights reserved.
Interaction Gateway is a registered trademark of Interactive Intelligence, Inc. Interaction Media Server is a trademark of Interactive
Intelligence, Inc. The foregoing products are ©2006-2015 Interactive Intelligence, Inc. All rights reserved.
Interaction Desktop is a trademark of Interactive Intelligence, Inc. The foregoing products are ©2007-2015 Interactive Intelligence, Inc. All
rights reserved.
Interaction Process Automation, Deliberately Innovative, Interaction Feedback, and Interaction SIP Station are registered trademarks of
Interactive Intelligence, Inc. The foregoing products are ©2009-2015 Interactive Intelligence, Inc. All rights reserved.
Interaction Analyzer is a registered trademark of Interactive Intelligence, Inc. Interaction Web Portal, and IPA are trademarks of Interactive
Intelligence, Inc. The foregoing products are ©2010-2015 Interactive Intelligence, Inc. All rights reserved.
Spotability is a trademark of Interactive Intelligence, Inc. ©2011-2015. All rights reserved.
Interaction Edge, CaaS Quick Spin, Interactive Intelligence Marketplace, Interaction SIP Bridge, and Interaction Mobilizer are registered
trademarks of Interactive Intelligence, Inc. Interactive Intelligence Communications as a Service℠, and Interactive Intelligence CaaS℠ are
trademarks or service marks of Interactive Intelligence, Inc. The foregoing products are ©2012-2015 Interactive Intelligence, Inc. All rights
reserved.
Interaction Speech Recognition and Interaction Quality Manager are registered trademarks of Interactive Intelligence, Inc. Bay Bridge
Decisions and Interaction Script Builder are trademarks of Interactive Intelligence, Inc. The foregoing products are ©201 3-2015 Interactive
Intelligence, Inc. All rights reserved.
Interaction Collector is a registered trademark of Interactive Intelligence, Inc. Interaction Decisions is a trademark of Interactive Intelligence,
Inc. The foregoing products are ©2013-2015 Interactive Intelligence, Inc. All rights reserved.
Interactive Intelligence Bridge Server and Interaction Connect are trademarks of Interactive Intelligence, Inc. The foregoing products are
©2014-2015 Interactive Intelligence, Inc. All rights reserved.
The veryPDF product is ©2000-2015 veryPDF, Inc. All rights reserved.
This product includes software licensed under the Common Development and Distribution License (6/24/2009). We hereby agree to indemnify
the Initial Developer and every Contributor of the software licensed under the Common Development and Distribution License (6 /24/2009) for
any liability incurred by the Initial Developer or such Contributor as a result of any such terms we offer. The source code for the included
software may be found at http://wpflocalization.codeplex.com.
A database is incorporated in this software which is derived from a database licensed from Hexasoft Development Sdn. Bhd. ("HDSB"). All
software and technologies used by HDSB are the properties of HDSB or its software suppliers and are protected by Malaysian an d
international copyright laws. No warranty is provided that the Databases are free of defects, or fit for a particular purpose. HDSB shall not be
liable for any damages suffered by the Licensee or any third party resulting from use of the Databases.
Other brand and/or product names referenced in this document are the trademarks or registered trademarks of their respective companies.
INTERACTIVE INTELLIGENCE (INTERACTIVE) HAS NO RESPONSIBILITY UNDER WARRANTY, INDEMNIFICATION OR OTHERWISE, FOR
MODIFICATION OR CUSTOMIZATION OF ANY INTERACTIVE SOFTWARE BY INTERACTIVE, CUSTOMER OR ANY THIRD PARTY EVEN IF SUCH
CUSTOMIZATION AND/OR MODIFICATION IS DONE USING INTERACTIVE TOOLS, TRAINING OR METHODS DOCUMENTED BY INTERACTIVE.
Interactive Intelligence, Inc.
7601 Interactive Way
Indianapolis, Indiana 46278
Telephone/Fax (317) 872-3000
www.ININ.com
DISCLAIMER
Page 3

iii
Table of contents
Safety instructions .............................................................................................. 5
Rack mounting considerations ...............................................................................................................................5
Before installing the chassis into a rack: ..............................................................................................................5
Electrical and general safety guidelines ...................................................................................................................5
General electrical safety guidelines .....................................................................................................................6
Electric static discharge safety guidelines ............................................................................................................7
For more Interaction Edge information ............................................................... 8
Interactive Intelligence product information website .................................................................................................8
Interactive Intelligence newsgroups .......................................................................................................................8
Feedback ............................................................................................................................................................8
Overview of Interaction Edge .............................................................................. 9
What is in the Interaction Edge shipping box?..........................................................................................................9
Introduction to Interaction Edge ............................................................................................................................9
Interaction Edge feature summary ....................................................................................................................... 10
Interaction Edge physical description and specifications .......................................................................................... 11
Interaction Edge front side .............................................................................................................................. 12
Interaction Edge back side ............................................................................................................................... 12
Interaction Edge dimensions ............................................................................................................................ 13
Interaction Edge environment specifications ...................................................................................................... 13
Interaction Edge power specifications................................................................................................................ 13
Requirements for proper connectivity ................................................................................................................... 13
Determine connection type .............................................................................................................................. 13
Determine the associated protocols .................................................................................................................. 13
RJ-48C wiring diagrams................................................................................................................................... 13
Interaction Edge setup ...................................................................................... 15
Install Interaction Edge....................................................................................................................................... 15
Unpack and mount Interaction Edge ................................................................................................................. 15
Connect the cables to Interaction Edge ............................................................................................................. 17
Start Interaction Edge ........................................................................................................................................ 17
Establish the IPv4 address of Interaction Edge ....................................................................................................... 18
Use a DHCP server to assign the Interaction Edge IPv4 address ........................................................................... 18
Assign the Interaction Edge IPv4 address through the web interface ..................................................................... 18
Assign the Interaction Edge IPv4 address through the LCD panel ......................................................................... 20
Establish the IP address of the IPMI ..................................................................................................................... 23
Use a DHCP server to assign the IPMI IP address ............................................................................................... 23
Configure the IPMI IP address settings manually ................................................................................................ 23
Start additional product servers on Interaction Edge .............................................................................................. 23
Apply the latest Interaction Edge updates ............................................................................................................. 25
Optional Interaction Edge configuration ............................................................ 27
Change network settings..................................................................................................................................... 27
Split teamed network interfaces ........................................................................................................................... 27
Join split network interfaces ................................................................................................................................ 29
Configure time settings ....................................................................................................................................... 30
Change diagnostic port (IPMI) network settings ..................................................................................................... 31
Configure SNMP ................................................................................................................................................. 31
Manage Interaction Edge restore points ................................................................................................................ 32
Create an Interaction Edge restore point ........................................................................................................... 32
Retrieve an Interaction Edge restore point ......................................................................................................... 33
Administrator accounts ....................................................................................................................................... 34
Change system administrator credentials .......................................................................................................... 36
Change FTP account credentials ........................................................................................................................... 36
Interaction Edge LCD panel ............................................................................... 38
Introduction to the Interaction Edge LCD panel ...................................................................................................... 38
Page 4

iv
View the Interaction Edge LCD panel .................................................................................................................... 38
Use the Interaction Edge LCD panel buttons .......................................................................................................... 38
Navigate the Interaction Edge LCD menus ............................................................................................................ 39
Edit an Interaction Edge field value ...................................................................................................................... 40
Interaction Edge IPMI reference ....................................................................... 43
System ............................................................................................................................................................. 43
Server Health .................................................................................................................................................... 43
Sensor Readings ............................................................................................................................................ 44
Event Log ...................................................................................................................................................... 44
Configuration..................................................................................................................................................... 44
Date and Time ............................................................................................................................................... 45
Mouse Mode .................................................................................................................................................. 45
Network ........................................................................................................................................................ 45
SSL Certification ............................................................................................................................................. 47
Port .............................................................................................................................................................. 48
IP Access Control............................................................................................................................................ 48
Remote Control ................................................................................................................................................. 49
Console Redirection ........................................................................................................................................ 49
Power Control ................................................................................................................................................ 49
Maintenance ...................................................................................................................................................... 50
Firmware Update ............................................................................................................................................ 50
Unit Reset ..................................................................................................................................................... 51
IKVM Reset .................................................................................................................................................... 51
Factory Default .............................................................................................................................................. 51
IPMI Configuration .......................................................................................................................................... 51
Troubleshooting Interaction Edge ..................................................................... 53
Enable diagnostic captures .................................................................................................................................. 53
Gather log and trace files .................................................................................................................................... 53
Initiate a factory default reset from Interaction Edge .............................................................................................. 54
What if Interaction Edge network configuration fails? .............................................................................................. 55
One-way audio after stopping and starting Interaction Media Server ........................................................................ 55
Assign static IP address for DIAG port through IPMI ............................................................................................... 55
A hosted software product fails to register with a remote Customer Interaction Center server ..................................... 57
Cannot connect to the IPMI on the Interaction Edge appliance ................................................................................. 57
Selecting Close button does not close web interface ............................................................................................... 57
Appendix A: Third-party licenses ....................................................................... 59
LibTeletone ....................................................................................................................................................... 59
Change Log ........................................................................................................ 60
Index ................................................................................................................. 61
Page 5

Safety instructions
5
Warning: To avoid potential for an electrical shock hazard, you
must provide proper grounding from the chassis to the cabinet
frame. Do not attempt to connect power to the system until
Safety instructions
Follow these safety instructions when working with Interaction Edge. These instructions cover the following
topics:
Rack mounting considerations ...............................................................................................................................5
Electrical and general safety guidelines ...................................................................................................................5
Important!
Interaction Edge is a network appliance that is permanently sealed. You must not attempt to open it
for any repair or modification. Breaking the seal on the appliance automatically voids all warranty and
support for the product.
Rack mounting considerations
1. Elevated Operating Ambient Temperature – If the system is installed in a closed or multi-unit rack
assembly, the operating ambient temperature of the rack environment may be greater than room
ambient. Therefore, consideration should be given to installing the equipment in an environment
compatible with the maximum ambient temperature (Tma) specified.
2. Reduced Airflow – Installation of the equipment in a rack should be such that the amount of airflow
required for safe operation of the equipment is not compromised.
3. Mechanical Loading – Mounting of the equipment in the rack should be such that a hazardous condition is
not achieved due to uneven mechanical loading.
4. Circuit Overloading - Consideration should be given to the connection of the equipment to the supply
circuit and the effect that overloading of the circuits might have on over-current protection and supply
wiring.
5. Reliable earthing of rack-mounted equipment should be maintained. Particular attention should be given
to supply connections other than direct connections to the branch circuit (use of power strips).
Before installing the chassis into a rack:
1. Make sure that the rack is securely anchored onto an unmovable surface or structure before installing the
chassis into the rack.
2. Unplug the power cord(s) of the rack before installing the chassis into the rack.
3. Make sure that the system is adequately supported. Make sure that all the components are securely
fastened to the chassis to prevent components falling off of the chassis.
4. Be sure to install an AC Power Disconnect for the entire rack assembly. The Power Disconnect must be
clearly marked.
5. The rack assembly shall be properly grounded to avoid electrical shock.
6. The rack assembly must provide sufficient airflow to the chassis for proper cooling.
Tip:
For the procedure to install Interaction Edge into a rack, see Unpack and mount Interaction Edge.
Electrical and general safety guidelines
Page 6
6
Safety instructions
grounding cables are installed.
Warning: To avoid electrical shock, check the power cords as
follows:
Warning: Follow the guidelines below to avoid possible damages to
the system or injury to yourself.
1. This product is to be installed in a Restricted Access Location only, such as dedicated equipment rooms,
service closets, and so forth.
2. A qualified electrician must perform all connections to AC power and safety grounds, the server must be
safety grounded at all time.
3. To avoid potential for an electrical shock hazard, you must provide proper grounding from the chassis to
an earth ground. Ground conductor is 12 AWG minimum and is connected from the earth ground stud to
the rear of the appliance. The safety ground conductor should be connected to the chassis stud (hexagon
green stud) terminated with a closed-loop ring terminal Digikey catalog part number: 920010-09-ND
manufactured by 3M (part number MVU10-8RK). Refer to instructions provided with terminals for
crimping tool and assembly instructions.
4. Be sure to use power cords that include safety certifications. The power cords must be compliant with the
AC voltage requirements in your region. Power cords should be 18 AWG in copper and about 6 feet in
length. The power cords connect to each AC power supply unit where each wire is terminated with a lug
(Digikey catalog part number: 94774-01-ND).
5. AC power input is at the rear of the system. Connect the AC power cords (terminated with lugs) to the
chassis power supply units and connect the other end to a circuit breaker. The circuit breaker shall be
Listed, rated max 20A, @ -48Vdc
Checking the Power Cords:
Use the exact type of power cords as required.
Be sure to use power cord(s) that include safety certifications.
The power cord(s) must be compliant with the AC voltage requirements in your region.
The power cord plug caps must have an electrical current rating that is at least 125% of the electrical
current rating of this product.
The power cord plug caps that plug into the AC receptacles on the power supply units must be an IEC 320,
sheet C13, type female connector.
Plug the Power cord(s) into a socket that is properly grounded before turning on the power.
General electrical safety guidelines
A readily-accessible disconnect device must be incorporated into the location where Interaction Edge is
installed.
Be aware of the locations of the power switches on the chassis and in the room, so you can disconnect the
power supply if an accident occurs.
Take extra precautionary measures when working with high voltage components. It is not recommended
that you work alone.
Before removing or installing main system components, be sure to disconnect the power first. Turn off the
system before you disconnect the power supply.
Use only one hand when working with powered-on electrical equipment to avoid possible electrical shock.
Use rubber mats specifically designed as electrical insulators when working with computer systems.
Page 7

Safety instructions
7
Danger!
There is a risk of explosion if the CMOS battery is installed inverted
or is replaced by an incorrect type of battery. Use only CR2032 3V
Lithium batteries. Dispose of used batteries according to the
instructions on the battery packaging.
Warning: Electrostatic Discharge (ESC) can damage electronic
components. To prevent damage to your system, it is important to
handle it very carefully. The following measures can prevent ESD
damage to critical components:
The power supply units or power cords must include a grounding plug and must be plugged into grounded
outlets.
Electric static discharge safety guidelines
Use a grounded wrist strap designed to prevent static discharge.
Handle all sensitive components in a static-safe area. If possible, use antistatic floor pads and workbench
pads.
Page 8

8
For more Interaction Edge information
For more Interaction Edge information
Interactive Intelligence product information website
The Interaction Edge product information website contains updates along with other resources related to
usage. Each update includes a Readme document that explains new features and fixes included in the update.
The Interaction Edge product information website requires a user name and password for access. If you do not
have an Interactive Intelligence account, contact your reseller or Interactive Intelligence sales representative.
The Interaction Edge product information website is at the following address:
https://my.inin.com/products/edge/pages/default.aspx
Interactive Intelligence newsgroups
Visit the community forum at http://community.inin.com/ to ask questions and gather information regarding
Interaction Edge. The Interactive Intelligence Interactive Community is a free and public service provided by
Interactive Intelligence to promote an online community devoted to the sharing of ideas and information
regarding Interactive Intelligence products. Opinions expressed on the Interactive Community are not those of
Interactive Intelligence, and Interactive Intelligence accepts no legal responsibility for their veracity or nature.
Feedback
Submit product feedback and suggestions for Interaction Edge and Interaction Gateway at
http://ideas.inin.com. Select the Hardware link to review and promote the ideas of others in the community
for Interaction Edge and use Post Idea to submit your own ideas and suggestions.
Page 9

Overview of Interaction Edge
9
Overview of Interaction Edge
This section contains the following introductory topics about the Interaction Edge platform:
What is in the Interaction Edge shipping box?..........................................................................................................9
Introduction to Interaction Edge ............................................................................................................................9
Interaction Edge feature summary ....................................................................................................................... 10
Interaction Edge physical description and specifications .......................................................................................... 11
Requirements for proper connectivity ................................................................................................................... 13
What is in the Interaction Edge shipping box?
Your Interaction Edge package includes the following items:
One Interaction Edge appliance
Two power cables
A product information sheet
A warning card advising of temperature change limits and other information
Rack mounting brackets
Mounting bracket screws
Ensure that all of these parts are available in the box before you proceed.
Introduction to Interaction Edge
Interaction Edge is a hardware appliance that, along with Interaction Gateway software, enables voice and
data traffic to be sent over the same network, including IP fax transmissions. It connects T1/E1/ISDN spans
from the telephone company (PSTN) or service provider to the LAN. Along with serving as a general telephony
gateway, Interaction Edge and Interaction Gateway enable SIP stations, which are defined in the Customer
Interaction Center (CIC) server, to communicate with telephones outside of the contact center by using voice
over IP (VoIP).
You can use one or more Interaction Edge appliances, including different models, in multiple network
configurations. These configurations can use one or more Customer Interaction Center servers, various
subsystem servers, and multiple network connections.
Page 10

10
Overview of Interaction Edge
Interaction Edge is available in the following models:
EDGE-01X0 with no TDM spans
EDGE-01X1 with 1 TDM span (T1 for 23 channels, E1 for 30 channels)
EDGE-01X2 with 2 TDM spans (T1 for 46 channels, E1 for 60 channels)
EDGE-01X4 with 4 TDM spans (T1 for 92 channels, E1 for 120 channels)
EDGE-01X8 with 8 TDM spans (T1 for 184 channels, E1 for 240 channels)
This document applies to all models and indicates any distinctions between models when necessary.
Interaction Edge feature summary
Interaction Edge supports the following features:
Dual Network Interface Cards (NICs) – Interaction Edge contains two NICs that enable redundancy,
also known as fallback, in a single network. If the primary NIC or the network to which it is connected
fails, the secondary NIC, using the same IP address, assumes the responsibility for network
communications for the Interaction Edge appliance. You are also able to split the teamed NICs into
separate functional interfaces for connecting to different networks, customized call routing, and facilitating
the sending of different protocols over different interfaces. For more information about splitting the
teamed NIC, see Split teamed network interfaces.
Customer Interaction Center software product hosting – Interaction Edge can host both Interaction
Media Server 4.0 and 20nn Rn, and Interaction SIP Proxy 4.0 R2 and 20nn Rn. This feature is available
on the following Interaction Edge models:
01x0
01x1
01x2
Important!
If Interaction Media Server and Interaction SIP Proxy are both installed on Interaction Edge,
you must apply only those updates that are produced specifically for Interaction Edge.
Updates for these software products have a filename prefix of EDGE and an .MSP or .MSI
extension.
Page 11

Overview of Interaction Edge
11
Product
HTTP port
HTTPS port
Interaction Edge
8081
443
Interaction Gateway
8082
444
Interaction SIP Proxy
8080
442
Interaction Media Server
8083
446
When hosted on the Interaction Edge appliance, Interaction Media Server and Interaction SIP Proxy
communicate through IP addresses and port numbers, not through any internal mechanism. This method
ensures that you can use protocol tracing, also known as packet capture, to view the communications
between these applications, Interaction Gateway, and Interaction Edge.
Intelligent Platform Management Interface (IPMI) – This interface enables you to remotely monitor
the system status and manage it independently from the operating system.
Important!
To use IPMI, you must connect the DIAG port and the NIC1 port on the front of the
Interaction Edge appliance to one or more networks.
LCD interface –Interaction Edge possesses an LCD panel that displays statistics, status, and enables you
to configure the unit, such as setting a static IPv4 address.
Ease of IP address setup – Interaction Edge requires only one IPv4 address for communications. By
default, Interaction Edge uses DHCP to acquire an IP address. Alternatively, you can configure Interaction
Edge to use a static IP address.
Internal USB drive – Interaction Edge contains an internally-mounted USB drive that contains the
factory default settings. You can use this feature to restore the settings that this appliance had when it
arrived at your location.
Form factor – Interaction Edge is packaged in a 17-inch, router-size, 1U chassis. This chassis is
designed for reduced noise generation and improved airflow. All network and TDM connection ports are
on the front, providing straightforward and easily accessible cable connections. You can mount Interaction
Edge in a rack or you can place it on a flat surface, such as a shelf.
Dual, redundant power supplies – To ensure that Interaction Edge remains functional on a consistent
basis, it contains two redundant power supply units.
International Certifications – Certifications and approvals for Telephony, Safety, Emissions, and
Packaging have been obtained to allow Interaction Edge to be sold into many countries in the world
including all EU countries. For a complete list of countries in which Interaction Edge can be sold, send an
e-mail message to ProductManagement@inin.com.
Independent operation – Interaction Edge does not require a keyboard, mouse, or monitor to be
attached.
Web interfaces – You can configure Interaction Edge with a web browser. Open a web browser and
navigate to the IP address of the Interaction Edge appliance. You can also directly access the web
interfaces for Interaction Gateway, Interaction Media Server (if installed and started), and Interaction SIP
Proxy (if installed and started). Each product uses specific HTTP and HTTPS as displayed in the following
table:
Other specifications and features are listed in other sections of this document.
Interaction Edge physical description and specifications
This section illustrates and describes the front and back side controls, ports, interface controls, and indicators
on Interaction Edge.
Page 12

12
Overview of Interaction Edge
Item
Description
A
LCD panel– displays status and diagnostic messages.
B
LCD panel buttons - Use these buttons to navigate menus, check system status,
and edit field values
C
Soft power switch
D
USB ports
E
Diagnostic Port for IPMI
F
Network Interface Card (NIC) ports
G
Time-Division Multiplexer (TDM) ports @ 120 Ω
H
Power Supply Unit (PSU) status indicator – This indicator is off when both PSUs
are operating normally. If one of the PSUs fails or is not installed, this indicator
displays a flashing green light.
Item
Description
A
Top cover screws
B
Fan exhaust openings
C
(2) 100 - 240v~1A AC power supply
D
Grounding connector
E
Power supply "hot swap" latches
F
Power supply handles
G
Power supply status indicators
H
Power supply alarm silence button
Interaction Edge front side
Interaction Edge back side
Page 13

Overview of Interaction Edge
13
Item
Specification
Operating temperature range
0° to 35°C; 32° to 95°F
Non-operating temperature range
-20° to 70°C; -4° to 158°F
Relative humidity
Operating: 20% to 80% @ 30°C (86°F)
Non-operating: 10% to 90%
Acoustic noise (max)
53dB (office)
Weight (typical)
7.8 kilograms (17.2 pounds)
Item
Specification
AC input for power supply
100 – 240V 50/60Hz 4-2A per cord
Fuse rating
T5A / 250V
DC output
275 watts
Interaction Edge dimensions
All Interaction Edge models have the same physical dimensions:
Width: 17 7/16 inches (43.3 cm)
Height: 1 7/8 inches (4.8 cm)
Depth: 16 ¼ inches (41.3 cm)
Interaction Edge environment specifications
Interaction Edge power specifications
Requirements for proper connectivity
This section provides the requirements and planning that you must complete before you attempt to connect
Interaction Edge to lines from the telephone company.
Determine connection type
Contact the telephone company that will be providing Public Switched Telephone Network (PSTN) lines and
inquire about the connections types that it will be distributing to your location. The following list provides
some of the connection types that are available:
T1 (North America, Japan, and South Korea)
E1 (All other locations)
ISDN PRI
Determine the associated protocols
Different connection types support different protocols. Each of these protocols has specific features. Contact
the telephone company and acquire a list of the available protocols for your connection type. Then, determine
which features you want to have available in your contact center. This process enables you to determine
which connection type and protocol best suits your needs. For a list of supported protocols, see Interaction
Gateway Administrator's Guide.
RJ-48C wiring diagrams
If you want to build your own cables to connect the Interaction Edge RJ-48C trunk ports to the TELCO
connections, use the following wire-to-pin designations:
Page 14

14
Overview of Interaction Edge
Pin Function
8 NC
7 NC
6 NC
5 XMT_TIP
4 XMT_RING
3 NC
2 RCV_TIP
1 RCV_RING
Pin Function
8 NC
7 NC
6 NC
5 XMT_TIP
4 XMT_RING
3 NC
2 RCV_TIP
1 RCV_RING
T1/E1/ISDN PRI Cross-over wiring diagram – Most TELCO connections require this type of cable
between the connections and Interaction Edge.
T1/E1/ISDN PRI Straight-through wiring diagram – Use this type of cable between the TELCO
connections and Interaction Edge only if the Network Interface Unit (NIU), Smart Jack, or TELCO
equipment possesses an internal cross-over feature.
Page 15

Interaction Edge setup
15
Interaction Edge setup
This section contains the following topics:
Install Interaction Edge....................................................................................................................................... 15
Start Interaction Edge ........................................................................................................................................ 17
Establish the IPv4 address of Interaction Edge ....................................................................................................... 18
Establish the IP address of the IPMI ..................................................................................................................... 23
Start additional product servers on Interaction Edge .............................................................................................. 23
Apply the latest Interaction Edge updates ............................................................................................................. 25
Note:
Interactive Intelligence recommends that you read all instructions in this section to determine the best
way to proceed with your installation of Interaction Edge.
Install Interaction Edge
The installation of Interaction Edge requires the following tasks:
Unpack and mount Interaction Edge
Connect the cables to Interaction Edge
Warning:
Ensure that you have configured your rack assembly and its surrounding environment according to the
guidelines in Rack mounting considerations.
Unpack and mount Interaction Edge
1. Decide on a suitable location for the rack unit that will hold Interaction Edge. It should be situated in a
clean, dust-free area that is well-ventilated. Avoid areas where heat, electrical noise, and electromagnetic
fields are generated. You must also place it near a grounded power outlet.
2. Choose a setup location. You must remember the following needs of Interaction Edge when choosing the
location where it will reside:
Leave approximately 30 inches of clearance in the back of the rack to allow for sufficient airflow and
ease of servicing.
You should only install this product in a Restricted Access Location, such as dedicated equipment
rooms or service closets.
3. Consider the following rack precautions:
Ensure that the leveling jacks on the bottom of the rack are fully extended to the floor with the full
weight of the rack resting on them.
In a single rack installation, ensure that stabilizers are attached to the rack.
In multiple rack installations, ensure that the racks are coupled together.
Always make sure that the rack is stable before extending a component from the rack. You should
never extend more than one component at a time as extending two or more components
simultaneously can cause the rack to become unstable.
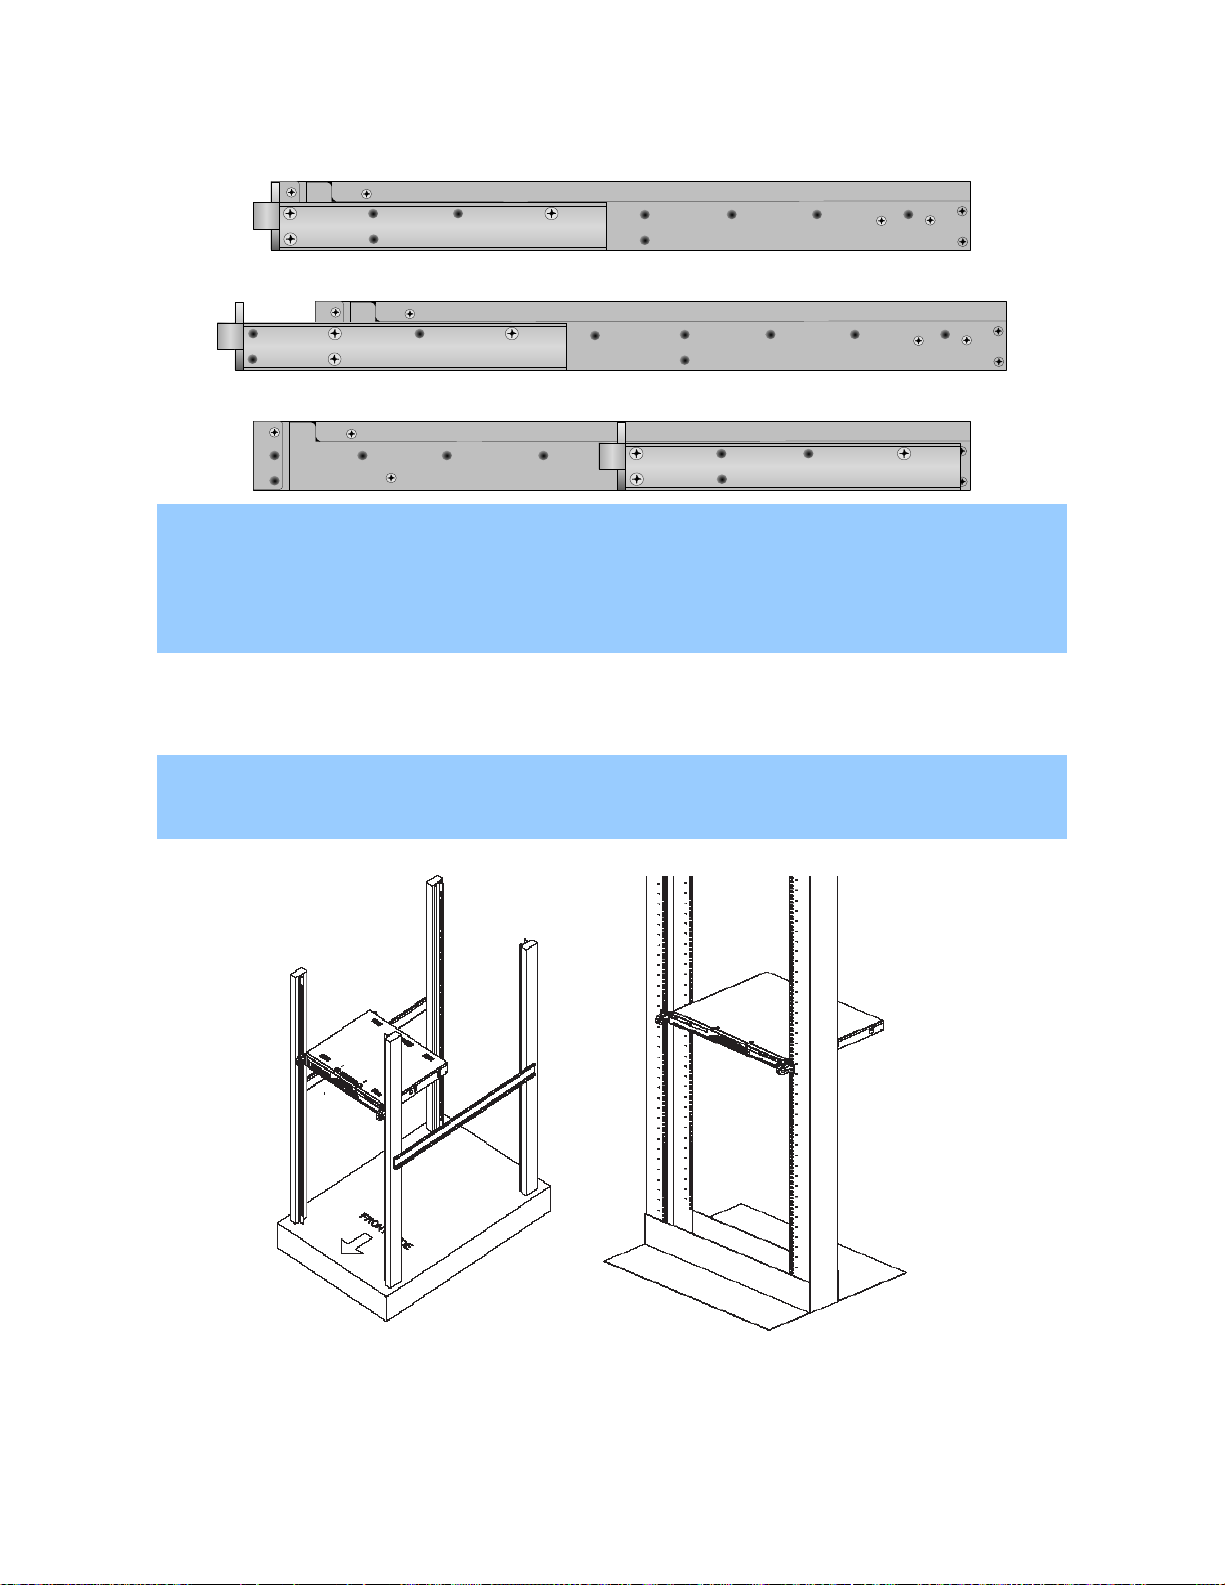
4. Attach the provided mounting brackets to the Interaction Edge chassis with the provided screws.
There are multiple methods with which you can install the mounting brackets:
Page 16
16
Interaction Edge setup
Flush with front:
Recessed:
Midpoint:
Important!
Always use a screw in the last position (farthest from the front face of the bracket) to ensure
that the mounting bracket is fastened securely to the Interaction Edge chassis. Failure to do
so can result in wear or damage to the chassis, which can then cause a change in its mounted
angle or separation from the mounting brackets.
5. Install the system into a rack.
To mount the system into a rack, screw the faceplate of each mounting bracket on the Interaction Edge
chassis directly to the front of the rack.
Important!
Ensure that you use two screws for each bracket faceplate.
Page 17

Interaction Edge setup
17
Cable
Task
Ethernet cables
Plug a category 5 (CAT5) or better network cable into the left
Interaction Edge NIC port (NIC1) and then connect the
available end to a 100Base-T or 1000Base-T network switch.
Note:
Interactive Intelligence recommends that you connect
both NIC ports to the network for fallback situations or,
if you split the teamed NIC, for connections to separate
networks.
Plug a CAT5 or better network cable into the DIAG port and
then connect the available end to a 100Base-T or 1000Base-T
network switch.
AC power cables
Plug the power cables into each socket on the back of the
Interaction Edge appliance. There are two redundant power
supplies in Interaction Edge.
Time-Division Multiplexer
(TDM) cables
Plug the cable with RJ-48C connectors into the top-left available
TDM port on the Interaction Edge appliance.
You must connect subsequent TDM cables to the next sequential
port (top-to-bottom, left-to-right), as displayed in the following
diagram:
Note:
If you use E1 spans, you must change the default span
setting on the Settings-Administration page in the
Interaction Gateway web interface.
Connect the cables to Interaction Edge
After you have mounted Interaction Edge into a rack or placed it on a shelf, you must connect the necessary
cables for successful operation. The exact number and type of cables that you connect is dependent on your
telephony system. To connect the necessary cables, refer to the following table:
Start Interaction Edge
After you have unpacked, installed, and connected the necessary cables to Interaction Edge, you can turn it
on by connecting the power cables to a power source.
When you start Interaction Edge for the first time, the LCD panel displays the following series of messages:
1. Interactive Intelligence
2. Service Starting…
3. Init System…
4. Init Resources…
Page 18

18
Interaction Edge setup
5. Opening Spans…
Note:
Initialization of Interaction Edge can take a few minutes.
Once the spans have been opened, the LCD panel displays Interaction Edge and the Interactive Intelligence
logo, which indicate that the system is ready for operation.
Establish the IPv4 address of Interaction Edge
You can use the following methods to assign an IPv4 address to an active Interaction Edge appliance:
Use a DHCP server to assign the Interaction Edge IPv4 address
Assign the Interaction Edge IPv4 address through the web interface
Assign the Interaction Edge IPv4 address through the LCD panel
Note:
If you have trouble establishing an IP address for Interaction Edge, see What if Interaction Edge
network configuration fails?
Use a DHCP server to assign the Interaction Edge IPv4 address
Note:
If your network environment has a DHCP server, Interaction Edge automatically acquires an IPv4
address.
1. Press and briefly hold the upper left LCD panel control button, as shown below. This displays the IPv4
address that was automatically assigned to Interaction Edge when it started.
2. Write down this IPv4 address and enter it in the address field of a web browser to log on to the Interaction
Edge web interface.
Assign the Interaction Edge IPv4 address through the web interface
You can assign a static IPv4 address to Interaction Edge by using the web interface.
Important!
To do this procedure, you must first allow Interaction Edge to receive an IPv4 address through DHCP.
If you do not have a DHCP server in your network, you must assign the IPv4 address through the
procedure, Assign the Interaction Edge IPv4 address through the LCD panel.
1. Connect Interaction Edge to your network using a category 5 (CAT5) or better Ethernet network cable.
2. Start the Interaction Edge appliance.
3. After approximately five minutes, press and hold the upper left LCD panel button to view the IPv4 address
that was assigned by your DHCP server to the Interaction Edge appliance.
Page 19
Interaction Edge setup
19
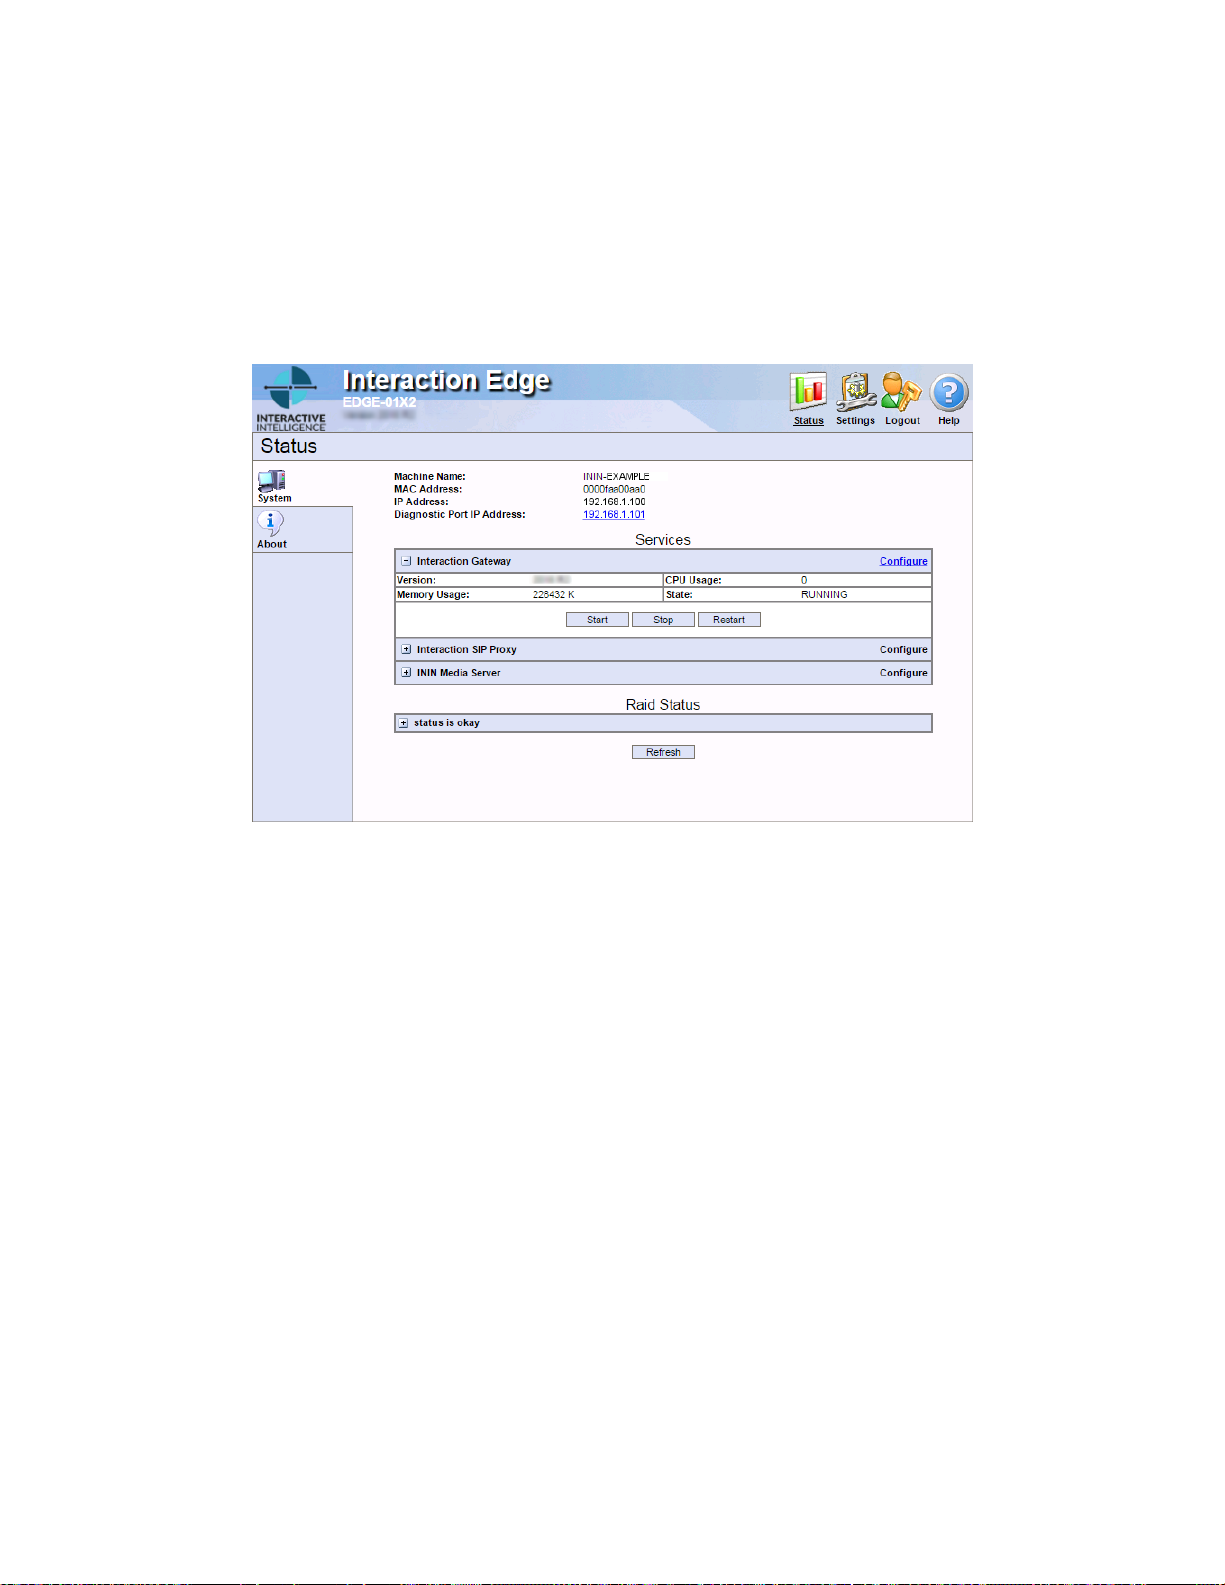
4. Using a remote computer, open a web browser and navigate to the IPv4 address that was displayed on
the LCD panel for the Interaction Edge appliance.
A dialog box is displayed that prompts you for the user name and password.
5. In the displayed dialog box, enter the following information and select the OK button:
User name: admin
Password: 1234
The Status-System page is displayed.
6. Select the Settings icon in the upper right corner of the page.
The Settings-System page is displayed.
7. If you have split the network interfaces to be separate and not teamed, use the Network Adapter list
box to select the network interface for which you want to set the IP address. Otherwise, continue to the
next step.
8. In the Address Type list box, select Static IP.
9. In the IP Address box, enter the static IPv4 address that you want to assign to the selected NIC in the
Interaction Edge appliance.
10. In the Subnet Mask box, enter the appropriate sub-network identifier.
11. In the Default Gateway box, enter the IPv4 address of the device through which Interaction Edge will
send communications to the IP-based network.
12. To enable DNS lookup and resolution, enter the IP addresses of the primary and secondary DNS servers in
the Preferred DNS Server and Alternate DNS Server boxes.
13. If you want to use short host names through Interaction Edge, supply the DNS suffix of the network
domain in the DNS Suffix box.
Interaction Edge appends the character string in the DNS Suffix box to any short host name that it
attempts to contact.
14. Enable the Reboot Interaction Edge check box at the bottom of the page.
15. Select the Apply button.
Interaction Edge restarts and uses the static IPv4 address that you configured.
Page 20

20
Interaction Edge setup
The Interaction Edge installation and configuration is complete and you are ready to begin the initial
configuration of the Interaction Gateway software.
Assign the Interaction Edge IPv4 address through the LCD panel
This procedure sets the IP address for the NIC1 interface of Interaction Edge. If you have split the teamed
network interfaces, you must use the Interaction Edge web UI to set the IP address of NIC2. For more
information about setting the IP address of NIC2 in a split network interface configuration, see Assign the
Interaction Edge IPv4 address through the web interface.
Note:
If you do not have a DHCP server, you must manually assign an available static IPv4 address through
the LCD panel.
1. Press and release the lower right button to enter the Configuration menu.
The LCD Panel displays Status About.
2. Press the lower right button to display Settings System in the LCD panel.
3. Press the upper left button to enter the Settings System configuration menu.
The Machine Name menu item is displayed.
4. Press the lower right button until the Address Type menu item is displayed.
5. Press the upper left button to edit the Address Type menu item.
6. Press the lower right button until Static IP is displayed.
7. Press the upper left button to confirm Static IP as the Address Type.
8. Press the lower right button once to display the Host IP Address menu item.
9. Press the upper left button to edit the IPv4 address.
10. Move the cursor along the IPv4 address by using the upper left and upper right buttons. Once you reach
a digit that you want to change, proceed to the next step.
11. Use the lower left and lower right buttons to change the digit.
Note:
When you are changing digits, you can only move between 0 (zero) and 9. The sequence of
digits does not restart to the beginning or the end of the list. For example, if the current digit
is 9 and you attempt to go to the next higher number, 0 (zero) is not displayed; only 9, as it is
the end of the digit sequence.
12. When you have finished configuring the IPv4 address, move the cursor to the right—using the upper right
LCD panel button—until a check mark is displayed in the LCD panel button icons.
13. Press the upper left button, which corresponds to the check mark icon in the LCD panel, to confirm the
change. If you want to cancel your changes, press the lower left button, which corresponds to the X icon
in the LCD panel.
14. Press the lower left button to return to the Settings System menu.
15. Press the lower right button to scroll to the Apply menu item.
16. Press the upper left button, which corresponds to the check mark icon in the LCD panel, to confirm.
Interaction Edge restarts and the static IP address is assigned to NIC1.
Page 21

Interaction Edge setup
21
Important!
If you exit the Settings System menu without applying the change, the IP address
procurement process reverts to DHCP.
You have successfully set Interaction Edge to a static IPv4 address.
Page 22

Page 23

Interaction Edge setup
23
Establish the IP address of the IPMI
Interaction Edge has an Intelligent Platform Management Interface (IPMI). This interface enables you to view
statistics, configure IMPI settings, control the power state of the appliance, and remotely use the Interaction
Edge operating system.
Important!
To use IPMI, you must connect the DIAG port and the NIC1 port on the front of the
Interaction Edge appliance to one or more networks.
Use a DHCP server to assign the IPMI IP address
By default, the IPMI port is set to obtain an IP address from a Dynamic Host Control Protocol (DHCP) server.
The IPMI cannot obtain the IP address until you connect category 5 or better Ethernet network cables to the
DIAG and NIC1 ports on the front of the Interaction Edge appliance and then connect those cables to your
network.
Configure the IPMI IP address settings manually
Note:
If you do not use a DHCP server in your network environment, you must do this procedure to set a
static IP address.
1. Using a remote computer, open a web browser and navigate to the IPv4 address of the Interaction Edge
appliance.
A dialog box is displayed that prompts you for the user name and password.
2. In the displayed dialog box, enter the system administrator user name and password, and select the OK
button.
The Status-System page is displayed.
3. In the upper right corner of the page, select the Settings icon.
The Settings-System page is displayed.
4. Using the controls in the Diagnostic Port Settings area, enter the appropriate information for the IPMI
NIC.
Note:
For descriptions of the controls in the Diagnostic Port Settings area, see Interaction Edge
Help.
5. When you finish configuring IP address settings for the IPMI NIC, select the Apply button at the bottom of
the page.
Start additional product servers on Interaction Edge
Interaction Edge models 01X0, 01X1, and 01X2 include the following Interactive Intelligence products:
Interaction SIP Proxy Server
Interaction Media Server
Page 24

24
Interaction Edge setup
Note:
To use these products, you must purchase and install the appropriate licenses. By default, these
products are not configured to start automatically when Interaction Edge starts. If you plan to install
the license for these products, you must first start each product with this procedure.
Caution!
If you are using a release of Interaction Media Server 4.0 prior to SU5 hosted on Interaction Edge
models 01x1 (1 TDM span) or 01x2 (2 TDM spans), do not configure Interaction Media Server to use
all CPU cores on the Interaction Edge appliance for processing interactions. Interaction Edge hosts
other systems, such as Interaction Gateway, Interaction SIP Proxy, and the drivers for the
components that connect to TDM spans. Conflicts in CPU core usage can result in irresponsiveness,
instability critical process failures, and complete failure of the Interaction Edge appliance.
In the Interaction Media Server web interface, you must enable only the following CPU cores to
support Interaction Media Server media engines:
1
2
5
6
If you change the CPU core usage configuration, you must restart the Interaction Edge appliance for
the changes to take effect. The Interaction Edge edition of Interaction Media Server 4.0 SU5 or later
disables your ability to modify the CPU core usage configuration. The CPU core assignments for all
applications and services are now controlled internally by Interaction Edge. Also with the Interaction
Edge edition of Interaction Media Server 4.0 SU5 or later, the following fields in the Interaction Media
Server web interface are now read-only:
ASR Worker Max. Work Ratio
ASR Worker Thread Priority
ASR Worker Max. Threads
Media Engine CPU Mask
Media Engine Load Limit
Media Engine Selection Algorithm
Media Engine Thread Priority
Media Engine UDP Sender Loopback
Allow Hyper Threaded Media Engines
Max Number of Media Engines (0: one per CPU)
Min Scheduler Latency [ms]
Process Priority Class
1. On a remote personal computer, open a web browser and navigate to the IP address of the Interaction
Edge appliance.
The Authentication Required dialog box is displayed.
2. In the Authentication Required dialog box, enter the administrator credentials for this Interaction Edge
appliance and select the OK button.
Page 25

Interaction Edge setup
25
Note:
The default administrator user name and password are admin and 1234.
The Status-System page is displayed.
3. For the product that you want to start, select the associated expandable button next to the product name
in the Services list.
4. In the viewable area under the product name, select the Start button.
The product service is started.
5. After the service starts, select the associated Configure hyperlink on the right side of the row.
The web interface for the selected product is displayed.
6. In the upper right corner of the page, select the Help icon.
7. Use the displayed documentation to install the license file for the selected product.
When you selected the Start button for the product, Interaction Edge changed the product service to start
automatically when Interaction Edge restarts.
8. If you purchased a license for an additional product, repeat this procedure for that product.
Apply the latest Interaction Edge updates
Periodically, Interactive Intelligence releases updates that contain new features and fix identified problems in
the Interaction Edge appliance or its hosted software products.
Important!
The latest information on updates for Interaction Edge and its hosted software products is available in
the Interaction Edge Updates whitepaper on the Interaction Edge product information website
(http://my.inin.com/products/edge/pages/default.aspx).
Page 26

26
Interaction Edge setup
Note:
The internal components of the Interaction Edge appliance are not upgradeable. Opening the
Interaction Edge appliance to add, remove, or replace any internal component violates the terms of
the warranty. Interactive Intelligence will not provide technical support for an Interaction Edge
appliance for which the warranty terms have been violated.
If Interactive Intelligence produces a new appliance product that replaces Interaction Edge, a refresh
program will be available. The refresh program enables existing Interaction Edge customers to
purchase the new replacement product at a discount. The refresh process requires that you return the
replaced product to Interactive Intelligence.
Page 27

Optional Interaction Edge configuration
27
Optional Interaction Edge configuration
This section contains the following topics:
Change network settings..................................................................................................................................... 27
Split teamed network interfaces ........................................................................................................................... 27
Join split network interfaces ................................................................................................................................ 29
Configure time settings ....................................................................................................................................... 30
Change diagnostic port (IPMI) network settings ..................................................................................................... 31
Configure SNMP ................................................................................................................................................. 31
Manage Interaction Edge restore points ................................................................................................................ 32
Administrator accounts ....................................................................................................................................... 34
Change FTP account credentials ........................................................................................................................... 36
Change network settings
1. On a computer, open a web browser and navigate to the IP address of the Interaction Edge appliance.
Note:
The default HTTPS port number for Interaction Edge is 443.
2. When prompted, supply the administrator credentials and select the Log in button.
The Status-System page of the Interaction Edge interface is displayed.
3. In the upper right corner of the page, select the Settings icon.
The Settings-System page is displayed.
4. In the Network Settings area, make the necessary configuration changes.
Note:
You can find descriptions of each control and its settings in Interaction Edge Help. Select the
Help icon in the upper right corner of the page.
5. After you have made the necessary changes, select the Apply button at the bottom of the page.
Interaction Edge saves your changes to the configuration.
Tip:
Select the Cancel button at the bottom of the page to discard any changes you made since
you last selected the Apply button.
Split teamed network interfaces
Splitting the teamed Ethernet network interfaces on the Interaction Edge appliance enables you to have
separate connections for connecting to two different networks, VLANs, or routing calls or media through
different interfaces. Note that splitting the teamed Ethernet network interfaces disables any redundant
functionality if the primary NIC fails.
Important!
Disabling the team NICs requires a restart of the Interaction Edge appliance. Ensure that it is not
servicing calls when you do this procedure so that you avoid disconnecting any active calls.
1. On a computer, open a web browser and navigate to the IP address of the Interaction Edge appliance.
Page 28

28
Optional Interaction Edge configuration
Note:
The default HTTPS port number for Interaction Edge is 443.
2. When prompted, supply the administrator credentials and select the Log in button.
The Status-System page of the Interaction Edge interface is displayed.
3. In the upper right corner of the page, select the Settings icon.
The Settings-System page is displayed.
4. In the Network Settings area, select the Disable Teaming button.
Interaction Edge prompts you to confirm the action.
5. Select the Confirm button.
Interaction Edge notifies you of a pending restart of the appliance.
6. Select the OK button to restart the appliance immediately.
7. Wait approximately five minutes to ensure that the Interaction Edge appliance and any hosted services
have started.
Page 29

Optional Interaction Edge configuration
29
8. Open a web browser and navigate to the IP address of the Interaction Edge appliance.
9. When prompted, supply the administrator credentials and select the Log in button.
The Status-System page of the Interaction Edge interface is displayed.
10. In the upper right corner of the page, select the Settings icon.
The Settings-System page is displayed.
11. In the Network Settings area, ensure that two network interfaces are present in the Network Adapter
list box.
Join split network interfaces
Important!
Joining the separate NICs as a team requires a restart of the Interaction Edge appliance. Ensure that
it is not servicing calls when you do this procedure so that you avoid disconnecting any active calls.
1. On a computer, open a web browser and navigate to the IP address of the Interaction Edge appliance.
Note:
The default HTTPS port number for Interaction Edge is 443.
2. When prompted, supply the administrator credentials and select the Log in button.
The Status-System page of the Interaction Edge interface is displayed.
3. In the upper right corner of the page, select the Settings icon.
The Settings-System page is displayed.
4. In the Network Settings area, select the Enable Teaming button.
Interaction Edge prompts you to confirm the action.
Page 30

30
Optional Interaction Edge configuration
5. Select the Confirm button.
Interaction Edge makes the requested change and restarts.
6. Wait approximately five minutes to ensure that the Interaction Edge appliance and any hosted services
have started.
7. Open a web browser and navigate to the IP address of the Interaction Edge appliance.
8. When prompted, supply the administrator credentials and select the Log in button.
The Status-System page of the Interaction Edge interface is displayed.
9. In the upper right corner of the page, select the Settings icon.
The Settings-System page is displayed.
10. In the Network Settings area, ensure that only one network interface is present in the Network
Adapter list box.
Configure time settings
Note:
Interaction Edge synchronizes the system clock with an NTP server for the following events:
During the Interaction Edge start sequence
Once a week during operations
When you select the Synchronize button in the Interaction Edge Settings-System web interface
1. On a computer, open a web browser and navigate to the IP address of the Interaction Edge appliance.
Note:
The default HTTPS port number for Interaction Edge is 443.
2. When prompted, supply the administrator credentials and select the Log in button.
The Status-System page of the Interaction Edge interface is displayed.
3. In the upper right corner of the page, select the Settings icon.
The Settings-System page is displayed.
4. In the System Time area, make the necessary configuration changes.
Note:
You can find descriptions of each control and its settings in Interaction Edge Help. Select the
Help icon in the upper right corner of the page.
5. After you have made the necessary changes, select the Apply button at the bottom of the page.
Interaction Edge saves your changes to the configuration.
Page 31

Optional Interaction Edge configuration
31
Tip:
Select the Cancel button at the bottom of the page to discard any changes you made since
you last selected the Apply button.
Change diagnostic port (IPMI) network settings
1. On a computer, open a web browser and navigate to the IP address of the Interaction Edge appliance.
Note:
The default HTTPS port number for Interaction Edge is 443.
2. When prompted, supply the administrator credentials and select the Log in button.
The Status-System page of the Interaction Edge interface is displayed.
3. In the upper right corner of the page, select the Settings icon.
The Settings-System page is displayed.
4. In the Diagnostic Port Settings area, make the necessary configuration changes.
Note:
You can find descriptions of each control and its settings in Interaction Edge Help. Select the
Help icon in the upper right corner of the page.
5. After you have made the necessary changes, select the Apply button at the bottom of the page.
Interaction Edge saves your changes to the configuration.
Tip:
Select the Cancel button at the bottom of the page to discard any changes you made since
you last selected the Apply button.
Configure SNMP
1. On a computer, open a web browser and navigate to the IP address of the Interaction Edge appliance.
Note:
The default HTTPS port number for Interaction Edge is 443.
2. When prompted, supply the administrator credentials and select the Log in button.
The Status-System page of the Interaction Edge interface is displayed.
3. In the upper right corner of the page, select the Settings icon.
The Settings-System page is displayed.
4. On the left side of the page, select the Snmp tab.
The Settings-Snmp page is displayed.
5. Make the necessary configuration changes.
Page 32

32
Optional Interaction Edge configuration
Note:
You can find descriptions of each control and its settings in Interaction Edge Help. Select the
Help icon in the upper right corner of the page.
6. After you have made the necessary changes, select the Apply button at the bottom of the page.
Interaction Edge saves your changes to the configuration.
Tip:
Select the Cancel button at the bottom of the page to discard any changes you made since
you last selected the Apply button.
Manage Interaction Edge restore points
A restore point is an archive of the operating system, configuration, and files on the Interaction Edge
appliance at a specific point in time. The restore points feature enables you to return these components of
the Interaction Edge appliance to a previous state. For example, if you make multiple configuration changes
that cause Interaction Edge to stop functioning normally, you can retrieve a restore point to return Interaction
Edge to its previous operational state. You can create and retrieve restore points manually through the
Interaction Edge web interface.
Note:
Interaction Edge creates restore points automatically when you apply Interaction Edge/Interaction
Gateway updates. Interaction Edge does not create restore points when you apply updates for
Interaction SIP Proxy or Interaction Media Server. Interaction Edge does not create restore points
when you apply patches for Interaction Edge/Interaction Gateway.
All Interaction Edge restore points are built upon a base image. The base image is a restore point upon which
subsequent restore points are based. Setting a base image on Interaction Edge captures the current state of
the operating system, configuration, and files, and deletes all existing restore points. Each restore point that
you or Interaction Edge creates contains the changes between the current state of the components on the
Interaction Edge appliance and that of the base image.
Interaction Edge supports a maximum number of eight restore points. Once Interaction Edge reaches this
maximum number of restore points, it no longer creates restore points when you apply updates. To correct
this situation, you must create a new base restore point, which deletes all existing restore points.
Important!
You cannot reverse the application of a restore point. Also, when you apply a restore point,
Interaction Edge deletes all subsequent restore points in the list. For example, if the Restore Point
Retrieve list box contains four restore points, applying the second restore point deletes the third and
fourth restore points from the list.
#1 (Wednesday, May 23, 2012)
#2 (Friday, May 25, 2012)
#3 (Wednesday, June 13, 2012)
#4 (Thursday, September 6, 2012)
Create an Interaction Edge restore point
1. On a computer, open a web browser and navigate to the IP address of the Interaction Edge appliance.
Page 33

Optional Interaction Edge configuration
33
Note:
The default HTTPS port number for Interaction Edge is 443.
2. When prompted, supply the administrator credentials and select the Log in button.
The Status-System page of the Interaction Edge interface is displayed.
3. In the upper right corner of the page, select the Settings icon.
The Settings-System page is displayed.
4. On the left side of the page, select the Updates tab.
The Settings-Updates page is displayed.
5. Ensure that the Restore Point Layer Usage data indicates that a layer is available.
Important!
If Interaction Edge is using all restore point layers, you must create a new base restore point,
which is a manual process. The manual creation of a base restore point removes all
previously saved restore points. You cannot delete specific restore points from the Restore
Point Retrieve list box.
6. In the Restore Point Management area, enter a brief description in the User Restore Point Save box.
Tip:
You do not need to specify a date in the User Restore Point Save box. Interaction Edge
adds this information automatically.
7. Select the Save button that is located to the right of the User Restore Point Save box.
Interaction Edge creates the restore point.
Retrieve an Interaction Edge restore point
Caution!
Retrieving a restore point removes all subsequent restore points and software changes, such as
updates and patches, which you applied after the creation date of the restore point. In such a
situation, you must reapply updates and patches.
1. On a computer, open a web browser and navigate to the IP address of the Interaction Edge appliance.
Note:
The default HTTPS port number for Interaction Edge is 443.
2. When prompted, supply the administrator credentials and select the Log in button.
The Status System page of the Interaction Edge interface is displayed.
3. In the upper right corner of the page, select the Settings icon.
The Settings-System page is displayed.
4. On the left side of the page, select the Updates tab.
The Settings-Updates page is displayed.
5. In the Restore Point Retrieve list box of the Restore Point Management area, select the restore point
that you want to apply to Interaction Edge.
Page 34

34
Optional Interaction Edge configuration
System
User account defined in
Interaction Edge1
(models 01X1, 01X2, 01X4, 01X8)
Interaction Gateway web interface
Settings
Administration
Gateway Web Administrator Account
Gateway Web Restricted Account
Interaction Edge
(model 01X0)
Interaction Edge web interface
Settings
Administration
Edge Web Administrator Account
Edge Web Restricted Account
Important!
Interaction Edge model 01X0 does not support
or host Interaction Gateway. For the 01X0
model, the Interaction Edge web interface
displays custom sets of controls that enable to
you define the web accounts that you use to
log on to the Interaction Edge web interface.
Interaction Gateway
Interaction Gateway web interface
Settings
Administration
Gateway Web Administrator Account
Gateway Web Restricted Account
6. To the right of the Restore Point Retrieve list box, select the Apply button.
Interaction Edge applies the selected restore point to the operating system files, configuration, and data
and restarts automatically. All subsequent applications of release updates will create restore points built
upon this base image.
For more information about the controls in the Restore Point Management area, see Interaction Edge
Help.
Administrator accounts
The Interaction Edge appliance can host the following software systems:
Interaction Edge web interface (all models)
Intelligent Platform Management Interface (IPMI) (all models)
Interaction Gateway (supported on models 01X1, 01X2, 01X4, 01X8)
Interaction Media Server (supported on models 01X0, 01X1, 01X2)
Interaction SIP Proxy (supported on models 01X0, 01X1, 01X2)
Each of these systems has an interface through which you can log on using the user name and password for
an account. The following table provides the interfaces through which you define the different accounts for
these systems:
Page 35

Optional Interaction Edge configuration
35
IPMI
Interaction Edge web interface
Settings
Administration
System Administrator Account
Interaction Media Server
Interaction Media Server web interface
Config
Administration
Change Login Credentials
Interaction SIP Proxy
Interaction SIP Proxy web interface
Config
Administration
Change Login Credentials
1
Interaction Edge models 01X1, 01X2, 01X4, and 01X8 validate log on attempts to the Interaction
Edge web interface against the web accounts defined for Interaction Gateway.
The method of defining administrator accounts for Interaction Edge, Interaction Gateway, and IPMI are
different than the method for Interaction Media Server and Interaction SIP Proxy. The following diagram
displays how you use an account defined in one of these products to log on to another product:
Page 36

36
Optional Interaction Edge configuration
Change system administrator credentials
The system administrator account user name is ADMIN and the default password is 1234. Use these
credentials to log on to the IPMI.
Important!
Interactive Intelligence recommends that you change the administrator account credentials from the
default values to ensure system security.
Important!
The System Administrator Account credentials are not the credentials that you use to log on to the
Interaction Edge web interface. The Interaction Edge web interface uses the credentials that you
define through the Interaction Gateway web interface. For more information, see Interaction Gateway
Administrator's Guide.
1. On a computer, open a web browser and navigate to the IP address of the Interaction Edge appliance.
Note:
The default HTTPS port number for Interaction Edge is 443.
2. When prompted, supply the administrator credentials and select the Log in button.
The Status System page of the Interaction Edge interface is displayed.
3. In the upper right corner of the page, select the Settings icon.
The Settings-System page is displayed.
4. On the left side of the page, select the Administration tab.
The Settings-Administration page is displayed.
5. In the User Name box of the System Administrator Account area, enter a string of characters as the
identifier of this account.
6. In the New Password box, enter a password for this administrative account.
7. In the Confirm New Password box, re-enter the password to ensure that it is set correctly.
8. At the bottom of the page, select the Apply button.
Change FTP account credentials
The default FTP account user name is iguser and the default password is Fetchl0gs.
Important!
Interactive Intelligence recommends that you change the FTP account credentials from the default
values to ensure security.
1. On a computer, open a web browser and navigate to the IP address of the Interaction Edge appliance.
Note:
The default HTTPS port number for Interaction Edge is 443.
2. When prompted, supply the administrator credentials and select the Log in button.
The Status System page of the Interaction Edge interface is displayed.
Page 37

Optional Interaction Edge configuration
37
3. In the upper right corner of the page, select the Settings icon.
The Settings-System page is displayed.
4. On the left side of the page, select the Administration tab.
The Settings-Administration page is displayed.
5. In the User Name box of the FTP Account area, enter a string of characters as the identifier of this
account.
6. In the New Password box, enter a password for this account.
7. In the Confirm New Password box, re-enter the password to ensure that it is set correctly.
8. At the bottom of the page, select the Apply button.
Interaction Edge saves the new FTP account credentials.
Page 38

38
Interaction Edge LCD panel
3
4
1
2
Interaction Edge LCD panel
This section contains the following topics:
Introduction to the Interaction Edge LCD panel ...................................................................................................... 38
View the Interaction Edge LCD panel .................................................................................................................... 38
Use the Interaction Edge LCD panel buttons .......................................................................................................... 38
Navigate the Interaction Edge LCD menus ............................................................................................................ 39
Edit an Interaction Edge field value ...................................................................................................................... 40
Introduction to the Interaction Edge LCD panel
Interaction Edge contains a 20-character, 2-line Liquid Crystal Display (LCD) panel through which you can
view the status of Interaction Edge, settings, menus, and field values.
To the right of the LCD panel are four buttons that you use for viewing current status information, navigating
menus, and editing field values.
View the Interaction Edge LCD panel
The LCD panel displays the following information depending on the state of Interaction Edge:
Power-on screen – This screen is displayed when Interaction Edge is first started. It displays the
Interactive Intelligence logo. In this mode, the LCD buttons are not functional.
Startup screen – The LCD panel displays text messages during the startup sequence. These messages
provide the current status of Interaction Edge during each phase of the sequence. If no errors occur,
these messages are displayed until Interaction Edge reaches the normal runtime state. If there are
errors, the LCD panel displays the error and the startup sequence is halted.
Runtime screen – The LCD panel displays the Interactive Intelligence logo when Interaction Edge reaches
the normal runtime state. In this state, the LCD buttons are enabled and can be used to enter the menu
system.
Use the Interaction Edge LCD panel buttons
To the right side of the LCD panel are four square buttons that enable you to interact with Interaction Edge.
These buttons are active only when Interaction Edge has entered the normal runtime state.
Page 39

Interaction Edge LCD panel
39
Button
Description
1
Press and hold the upper-left button to display the currently-configured IP address
and the version of the Interaction Gateway software. Release this button to return
to the normal runtime screen.
2
Press and hold the upper-right button to display a subset of the current state of the
SIP and TDM spans.
For the SIP spans, the panel displays three arrows on the left that indicate the state
of the UDP, TCP, and TLS connections, respectively. An arrow pointing up indicates
that the connection is active. An arrow pointing down indicates that the connection
is not functioning.
For the TDM spans, the panel displays one to eight arrows on the right that indicate
the state of the span connections. An arrow pointing up indicates that the Dchannel for the span is functional. An arrow pointing down indicates that the Dchannel is not functioning.
3
Press and hold the lower-left button to display the last Interaction Edge status
message.
4
Press and release the lower-right button to enter the Configuration menu.
When you navigate through a menu, the buttons have the following corresponding functions:
1 – This button corresponds to the check mark icon in the LCD panel. Pressing this button enables you to
edit the current menu item or to enter the submenu for this item.
2 – This key corresponds to the down arrow icon in the LCD panel. Pressing this key selects the next item
in the menu or, in edit mode, changes the value of the current item in the field to the next lower value.
3 – This key corresponds to the X icon in the LCD panel. Pressing this key cancels the current operation
and returns to the previous menu or exits the root menu if it is currently displayed.
4 – This key corresponds to the up arrow icon in the LCD panel. Pressing this key selects the previous
item in the menu or changes the value of the current item in the field to the next higher value.
When you press a button while in a menu, the corresponding navigation icon in the panel changes color to
indicate that the action has been executed or to indicate that the appropriate navigation within the menu is
conducted.
Navigate the Interaction Edge LCD menus
When you enter the Configuration menu by pressing button 4, the LCD panel displays the Product Version
menu item on the left and navigation icons on the right.
The LCD panel can display the following submenus:
Status About
Settings System
Page 40

40
Interaction Edge LCD panel
Status About menu
Settings System menu
Product Version
File Version
Factory Image
Machine Name
IP Address
Machine Uptime
Diagnostic IP
Machine Name
Address Type
Host IP Address
Subnet Mask
Default Gateway
Primary DNS
Alternate DNS
Apply
Status
About
ü
X
ê
The following table displays the items in each submenu:
Note:
Use the Apply item of the Settings System menu to save any changes that you have made to one or
more menu items in that menu. If you select the X LCD panel button to return to the Runtime screen,
all of your changes are discarded.
Edit an Interaction Edge field value
When you are in a submenu, you can edit the values in some fields, such as Machine Name and Address
Type.
1. From the Runtime screen, press the lower right LCD panel button (button #4).
The Configuration menu is entered and the Status About menu item is displayed. The navigation icons
change to the following example:
2. Press the lower right LCD panel button (button #4) again.
The Settings System menu item is displayed.
3. Select the top left LCD panel button (button #1), which corresponds to the check mark navigation icon.
The Machine Name field is displayed with the current value and the navigation icons change to the
following example:
The first character in the name is highlighted, which indicates that you can change the value of that
character by using the LCD panel buttons that correspond to the up and down navigational arrow icons.
4. Press the LCD panel button that corresponds to the up arrow icon (button #4).
The value changes to a P.
5. To move the cursor to a different location, press the right or left navigation arrow icons (buttons #1 and
#2).
Page 41

Interaction Edge LCD panel
41
6. When you are finished editing the value of this field, move the cursor to the beginning or end of the value.
The navigational icons change to display a check mark and an X.
7. To save your changes, press the LCD panel button that corresponds to the check mark icon (button #2).
To discard your changes, press the LCD panel button that corresponds to the X icon (button #3).
The screen returns to the Machine Name menu item with the right, left, up, and down navigational icons.
8. Press the LCD panel button that corresponds to the down arrow navigation icon (button #4) until the
Apply menu item is displayed.
9. Press the LCD panel button that corresponds to the check mark navigation icon.
The changes that you made are applied to Interaction Edge.
Important!
When you are editing a value in a field, Interaction Edge restricts the values to ones that are valid for
the field. You may need to first edit adjacent values to ensure that you can change the initial value as
necessary. IP addresses and host names must always be valid, which can restrict moving the cursor
into an empty space as it would invalidate the address or name.
Page 42

Page 43

Interaction Edge IPMI reference
43
Item
Description
Firmware Revision
This control displays the version number of the IPMI firmware
that is currently used.
Firmware Build Time
This control displays the date when the firmware was created.
IP address
This control displays the Internet Protocol (IP) address of the
IPMI network interface (the DIAG port on the front of the
Interaction Edge appliance).
MAC address
This control displays the Media Access Control address of the
IPMI network interface.
Remote Console Preview
This control displays the view of the operating system on the
Interaction Edge appliance. You can start a remote session
that enables you to interact with the Interaction Edge
operating system by selecting Remote Control > Console
Redirection.
Power Control via IPMI
This set of controls enables you to control the power state of
the Interaction Edge appliance.
Interaction Edge IPMI reference
This section contains reference information for the pages and their included controls in the Intelligent Platform
Management Interface (IPMI). This section includes the following topics:
System ............................................................................................................................................................. 43
Server Health .................................................................................................................................................... 43
Configuration..................................................................................................................................................... 44
Remote Control ................................................................................................................................................. 49
Maintenance ...................................................................................................................................................... 50
Important!
To use IPMI, you must connect the DIAG port and the NIC1 port on the front of the
Interaction Edge appliance to one or more networks.
System
The System area contains pages that display summary information for the IPMI and power control options for
the Interaction Edge appliance. This area contains the System and System Information pages, which are
identical.
This page contains the following controls:
Server Health
This area enables you to view pages that display the following information:
Sensor Readings
Event Log
Page 44

44
Interaction Edge IPMI reference
Item
Description
Select a sensor type category list box
This control enables you to select which sensors
are displayed in the table.
Table
This control displays the current observed state
from the sensor, the name of the sensor, the
status of the observed component, and the
current reading for the component.
Refresh button
This control refreshes the sensor data that is
displayed in the table. The data is not
automatically refreshed.
Show Thresholds button
This control displays the minimum and
maximum states that a sensor observed for the
associated component in the table on this page.
Item
Description
Select an event log category list box
This control enables you to select which events
are displayed in the table.
Table
This control displays the event items for the
currently selected category.
Clear Event Log button
This control removes all events from the log.
Caution!
This action cannot be undone.
Sensor Readings
Select this tab to display the current state of the hardware in the Interaction Edge appliance.
This page contains the following controls:
Event Log
Select this tab to display the events that have occurred regarding the IPMI or Interaction Edge hardware
components.
This page contains the following controls:
Configuration
This area enables you to change settings for the IPMI and for the Interaction Edge appliance. It contains the
following tabs:
Date and Time
Mouse Mode
Network
SSL Certification
Port
IP Access Control
Page 45

Interaction Edge IPMI reference
45
Item
Description
Time Zone list box
This control enables you to select the time zone in
which this Interaction Edge appliance is located. This
setting does not affect any time zone configuration
that you set through the Interaction Edge web
interface.
NTP Enable options
This set of controls enables you to set whether the
IPMI synchronizes the date and time through the
Network Time Protocol (NTP). This protocol uses a
separate server with which the time is synchronized.
Primary NTP Server box
This control enables you to enter the IP address of an
NTP server with which the time for IPMI is
synchronized.
Secondary NTP Server box
This control enables you to enter the IP address of a
fallback NTP server should the primary NTP server be
unreachable.
Date list boxes
These controls enable you to set the current month,
day, and year for the IPMI.
Time boxes
These controls enable you to set the current hours,
minutes, and seconds for the IPMI.
Daylight Saving Time check box
This control enables you to specify if IPMI will
automatically adjust the time according to Daylight
Saving Time.
Refresh button
This control refreshes the data displayed on this page.
Save button
This control saves any changes that you have made
on this page.
Item
Description
MAC Address box
This control contains the Media Access Control (MAC)
address of the network interface card (NIC) of the IPMI.
Date and Time
Select this tab to display the Date & Time page, which enables you to configure various chronological
settings.
This page contains the following controls:
Mouse Mode
Select this tab to display the Mouse Mode Setting page, which enables you to configure the mouse for the
Interaction Edge operating system.
Important!
The mouse mode should always be set to Set Mode to Absolute.
Network
Select this tab to display the Network Settings page. This configuration is only for the IPMI network port.
It does not affect the configuration of the Interaction Edge network interface cards (NICs).
This page contains the following controls:
Page 46

46
Interaction Edge IPMI reference
Hostname box
This control enables you to enter the assigned name of
the IPMI, if it has one. Normally, the IPMI is identified
through an IP address and not a host name.
Obtain an IP address
automatically (use DHCP)
option
This control enables you to select if the IPMI obtains an IP
address from a Dynamic Host Control Protocol (DHCP)
server.
Use the following IP address
option
This control enables you to select if the IPMI uses a static
IP address as specified in either the IPv4 Setting box or
the IPv6 Setting box.
IP Address box
This control enables you to specify a static IPv4 address
for the IPMI network connection.
Subnet Mask box
This control enables you to specify a network subdivision
to increase routing efficiency or ease of management.
Gateway box
This control enables you to specify the IP address of the
device through which the IPMI can send communications
to another network.
DNS Server IP box
This control enables you to specify the Domain Name
System (DNS) through which the IPMI submits hostnames
and receives an IP address for transmission of network
communications.
IPv6 Address box
This control enables you to add an IPv6 address for the
IPMI network connection.
Add IP option
This control enables you to add the entered IPv6 address
in the IPv6 Address box to the list of configured IP
addresses. To complete the process of adding this
address, you must select the Save button at the bottom
of the page.
Delete IP option
This control enables you to remove the IPv6 address in
the IPv6 Address box from the configured address list.
To complete the process of removing this address, you
must select the Save button at the bottom of the page.
Auto Configuration check box
This control enables Interaction Edge to obtain an IPv6
address on an IPv6 routed network.
DHCPv6 Stateless option
This control enables Interaction Edge to obtain an IPv6
address and connect to the IPv6 networks, wireless
networks, and the Internet without a Dynamic Host
Control Protocol (DHCP) server. A stateless IPv6
connection enables devices that support IPv6 to create a
unique IPv6 address independent of any other network
device, proxy server, or DHCP server. This type of IPv6
addressing is intended for small networks and individual
devices.
DHCPv6 Stateful option
This control enables Interaction Edge to obtain an IPv6
address through a DHCPv6 server in an IPv6 network.
This type of IPv6 addressing is intended for large
networks.
Address List list box
This control contains the IPv6 addresses that have been
added manually.
DNS Server IP box
This control enables you to specify the IP address of the
DNS server that translates hostnames to IPv6 addresses.
Page 47

Interaction Edge IPMI reference
47
DUID box
This control displays the DHCPv6 Unique Identifier (DUID)
for the IPMI.
VLAN enable option
This control enables you to specify that the IPMI uses a
virtual local area network (VLAN) for its network
communications.
VLAN disable option
This control enables you to specify that the IPMI does not
use a VLAN for its network communications.
VLAN ID box
This control enables you to specify the numeric identifier
of the VLAN that you want the IPMI to use for its network
communications.
Lan Interface list box
This control enables you to select the type of network
connection that IPMI uses. The default setting is Failover,
which uses the dedicated LAN port and the shared LAN
port giving precedence to the dedicated port. The
dedicated LAN port is the port provided to communicate
with the IPMI interface.
RMCP Port box
This control enables you to specify the port number on
which IPMI receives Remote Management and Control
Protocol (RMCP) requests.
The default value for this port is 623 (TCP/UDP).
Save button
Select this button to save and enable all changes that you
specified on this page.
Important!
Changing the IP address results in disconnection
of the current session in your web browser. You
must navigate to the new IP address and log on
again to continue using the IPMI configuration
interface.
Item
Description
New SSL Certificate box
This control enables you to enter the drive, path, and filename
of an SSL certificate that you acquired from a valid source.
This certificate enables the IPMI to establish a secure
connection with other network devices.
New Private Key box
This control enables you to enter the private key that the IPMI
uses to encrypt network communications to other devices.
Browse buttons
These controls enable you to browse through a window for the
location of the associated files.
Upload button
This control places the new SSL certificate and private key to
the IPMI, where they are enabled and used.
SSL Certification
Select this tab to display the SSL Upload page, which enables you to set the Secure Socket Layer (SSL)
certificate and a private key for the secure transmission of communications through the IPMI network
connection.
This page contains the following controls:
Page 48

48
Interaction Edge IPMI reference
Item
Description
Web port box
This control enables you to specify the port number through
which the IPMI accepts HyperText Transfer Protocol (HTTP)
requests.
The default value is 80 (TCP).
Web SSL port box
This control enables you to specify the port number through
which the IPMI accepts Hypertext Transfer Protocol Secure
(HTTPS) requests.
The default value is 443 (TCP).
IKVM server port box
This control enables you to specify the port number through
which the IPMI accepts Integrated Keyboard Video Mouse (IKVM)
requests of remote control connections.
The default value is 5900 (TCP).
Virtual media port box
This control enables you to specify the port number through
which the IPMI accepts Virtual Media requests (CD/DVD drive,
USB drive, and diskette drive access) for remote control
connections. The Virtual Media can be connected to the
Interaction Edge appliance or shared as a network resource.
The default value is 623 (UDP/TCP).
Save button
This control enables you to save all port changes to the IPMI
configuration.
Item
Description
Enable IP Access Control check box
This control enables you to specify if the IPMI will
use the IP Access Control feature.
Table
When the Enable IP Access Control check box is
enabled, this control enables you to select a rule
from the displayed rows.
Add button
This control enables you to add a new rule to the
table.
Modify button
This control enables you to change the settings for
Port
This page displays the Port Settings page, which enables you to set the ports through which the IPMI
receives specific types of network communications. If the specific network communication type does not use
the associated port number, the communication request is denied by the IPMI.
This page contains the following controls:
Tip:
Ensure that any firewalls between a remote computer and the Interaction Edge appliance allow
communications for the ports and protocols specified on the Port page.
IP Access Control
This tab displays the IP Access Control page, which enables you to specify the IP addresses that the IPMI
will accept or deny as network connections.
This page contains the following controls:
Page 49

Interaction Edge IPMI reference
49
a selected rule in the table.
Delete button
This control removes a selected rule from the
table.
Item
Description
IP Address/Mask box
This control enables you to specify the IP address and subnet
mask that identifies a specific network device.
Policy list box
This control enables you to specify whether the indicated
network device is allowed or denied access.
Save button
This control enables you to save any changes to the current IP
Access Control rule to the IPMI configuration.
Cancel button
This control enables you to discard any changes to the existing
IP Access Control rule.
Item
Description
Caution!
When you delete a rule from the table, that rule is immediately removed from the IPMI configuration.
This action is not reversible.
When you choose to add or modify a selected rule, the Add Rule page is displayed. This page contains the
following controls:
Remote Control
This area enables you to open a remote console to the operating system of the Interaction Edge appliance and
manipulate the power state of the Interaction Edge appliance. It contains the following tabs:
Console Redirection
Power Control
Console Redirection
Select this tab to display the Console Redirection page.
This page contains the following control:
Launch Console button – This button enables you to start a remote control session of the Interaction Edge
operating system. After processing security certificates, this button launches a Java-based window that
displays the interface of the Interaction Edge operating system.
Caution!
All changes to the host operating system of the Interaction Edge appliance must be done through the
direction of Interaction Intelligence technical support personnel. Any undirected software installations,
removals, or configuration changes nullify the warranty of the Interaction Edge appliance.
Power Control
Select this tab to display the Power Control and Status page, which enables you to affect the power state of
the Interaction Edge appliance.
This page contains the following controls:
Page 50

50
Interaction Edge IPMI reference
Reset Server option
This control enables you to restart the server as though
you selected the Restart feature from the operating
system. This is considered a "warm boot" or "soft
restart".
Power Off Server –
Immediate option
This control enables you to shut down the Interaction
Edge appliance as though you removed all power from
the system.
Important!
Interactive Intelligence does not recommend
using this option on a functioning Interaction
Edge appliance as it could cause problems with
the operating system, different aspects of the
Interaction Edge appliance, or the Interaction
Gateway software. You should use this option
only if the Interaction Edge appliance is in an
unresponsive state.
Power Off Server – Orderly
Shutdown option
This control enables you to shut down the Interaction
Edge appliance as though you selected the Shutdown
feature through the operating system.
Power On Server option
This control enables you to start the Interaction Edge
appliance after a shutdown.
Power Cycle Server option
This control enables you to have the Interaction Edge
appliance shut itself down as though you selected the
Shutdown feature from the operating system. It is then
immediately restarted. This is a considered a "cold boot"
or a "hard restart".
Perform Action button
This control enables you to issue the selected power
command to the Interaction Edge appliance.
Item
Description
Maintenance
This area enables you to do maintenance tasks on the IPMI. It contains the following tabs:
Firmware Update
Unit Reset
IKVM Reset
Factory Default
IPMI Configuration
Firmware Update
This tab displays the Firmware Update page, which enables you to place the IPMI in a state that allows you
to apply a new revision of firmware for the IPMI device.
This page contains the Enter Update Mode button, which enables you to place the IPMI device in a state in
which the firmware for the device can be updated.
This page contains the following controls:
Page 51

Interaction Edge IPMI reference
51
Select Firmware to Upload box
This control enables you to specify the drive, path, and
filename of the firmware revision that you want to apply
to the IPMI device.
Browse button
This control enables you to use a window to navigate
through the file system and locate the firmware revision
file that you want to apply to the IPMI device.
Upload Firmware button
This control enables you to start the updating process
for the IPMI device firmware after you have specified
the firmware revision file in the Select Firmware to
Upload box.
Cancel button
This control enables you to abandon the firmware
update process.
Note:
When you cancel a firmware update, the IPMI
device must restart itself. It will then attempt
to reconnect your web browser to the IPMI.
Item
Description
Save button
This control enables you to save the current IPMI
configuration to a file. A window is displayed that
enables you to select the recipient location and
filename.
Reload IPMI Configuration box
This control enables you to specify the location where a
previously-saved configuration file exists.
Browse button
This control enables you to display a window through
Unit Reset
This tab displays the Unit Reset page, which enables you to restart the IPMI device.
This page contains the Reset button, which enables you to restart the IPMI device. It will then attempt to
reconnect your web browser to the IPMI.
IKVM Reset
This tab displays the IKVM Reset page, which enables you to restart the Integrated Keyboard Video Mouse
(IKVM) feature.
This page contains the Reset button, which enables you to restart the IKVM feature and the any associated
virtual media connection that you have configured.
Factory Default
This tab displays the Factory Default page, which enables you to set the IPMI configuration back to the
settings that were present when you received your Interaction Edge appliance.
This page contains the Restore button, which enables you to load the IPMI configuration that was present
when you received your Interaction Edge appliance.
IPMI Configuration
This tab displays the IPMI Configuration page, which enables you to save the current configuration of the
IPMI device to a file on your personal computer or network, or load a previous-saved IPMI configuration from
a file.
This page contains the following controls:
Page 52

52
Interaction Edge IPMI reference
which you can navigate a file system and locate a
previously-saved IPMI configuration file.
Reload button
This control enables you to apply the configuration file
that you specified in the Reload IPMI Configuration
box.
Page 53

Troubleshooting Interaction Edge
53
Troubleshooting Interaction Edge
This section contains information and procedures related to possible problems with the Interaction Edge
appliance. It also explains tasks that Interactive Intelligence technical support personnel need to diagnose
potential problems with your Interaction Edge appliance. This section contains the following topics:
Enable diagnostic captures .................................................................................................................................. 53
Gather log and trace files .................................................................................................................................... 53
Initiate a factory default reset from Interaction Edge .............................................................................................. 54
What if Interaction Edge network configuration fails? .............................................................................................. 55
One-way audio after stopping and starting Interaction Media Server ........................................................................ 55
Assign static IP address for DIAG port through IPMI ............................................................................................... 55
A hosted software product fails to register with a remote Customer Interaction Center server ..................................... 57
Cannot connect to the IPMI on the Interaction Edge appliance ................................................................................. 57
Selecting Close button does not close web interface ............................................................................................... 57
Enable diagnostic captures
If you experience network problems with Interaction Edge, you can enable the logging of diagnostic data,
which you can then submit to Interactive Intelligence Support for analysis. This diagnostic data is recorded in
log files in the \FTP\Logs directory of the Interaction Edge appliance. You can download these log files
through an FTP connection with the Interaction Edge appliance.
You can enable diagnostic captures for the following areas:
General
Network Time Protocol (NTP)
Performance
Network packet captures
You enable most of these diagnostic capture areas through the Diagnostics section of the SettingsAdministration page of the Interaction Edge web interface.
For more information about these diagnostic capture features, see the "Diagnostics" topic of Interaction Edge
Help, which you access by selecting the Help icon in the upper right corner of the Interaction Edge web
interface.
Gather log and trace files
If issues develop that suggest a problem with Interaction Edge, Interactive Intelligence technical support
personnel will likely request log and trace files from both the suspected Interaction Edge appliance, Interaction
Gateway software, and any related Interactive Intelligence systems.
Interaction Edge and Interaction Gateway files:
The following files are located in the \Logs directory:
AdminLog.csv
CallLog.csv
IGateway.ininlog
SIPEngine-IG.ininlog
The following files are located in date-specific directories under the \Logs directory:
D-Channel trace log files
Page 54

54
Troubleshooting Interaction Edge
These files are named Tdmx_yyyyyy.pcap where x represents the TDM span number and yyyyyy
represents the time that logging was started. For example, Tdm1_072412.pcap indicates the D-channel
trace on span 1 was started at 7:24:12 AM.
SIP protocol trace files
These log files contain packet capture (PCAP) information. They are named SipXXX_yyyyyy.pcap, where
the XXX represents the protocol configured for tracing (UDP, TCP, or TLS) and yyyyyy represents the time
the tracing started. For example, Sip1UDP_072412.pcap indicates the SIP tracing on UDP traffic started at
7:24:12 AM.
Customer Interaction Center server files:
TsServer.ininlog and SIPEngine.ininlog from the appropriate days.
Initiate a factory default reset from Interaction Edge
If, for some reason, the Interaction Edge web interface is not accessible, you can initiate a factory default
reset of the Interaction Edge appliance by using the LCD panel buttons
Caution!
The default factory settings do not include any software patches, fixes, image updates, default
configuration modifications, or updates that were applied prior to you receiving the Interaction Edge
appliance. Interactive Intelligence strongly recommends that you do not use this feature unless
directed to do so by an Interactive Intelligence Support representative.
1. Restart Interaction Edge through the IPMI.
2. While Interaction Edge is starting, hold down any of the four LCD panel buttons. This will take
approximately 60 seconds from a reset or power cycle to the point where the reset sequence begins.
3. The following message is displayed on the LCD panel:
Factory Reset? Release All Keys
4. Release the held button.
5. After you release the button, the following message is displayed:
Press & Hold any key for 5 seconds.
You have 60 seconds to hold any of the four LCD panel buttons down for 5 seconds. If you do not,
Interaction Edge starts normally.
6. Press and hold any LCD panel button for 5 seconds.
The following message is displayed:
Verify Reset!!! Release All Keys.
7. After you release the held LCD panel button, the following message is displayed:
Factory Reset in XXs Held Key will cancel.
Interaction Edge starts a 60 second countdown timer and displays the remaining time on the LCD panel,
replacing the XX in the message with the number of seconds remaining. At any time during this
countdown, you can hold down any LCD panel button to cancel the factory reset. If the countdown timer
reaches 0 (zero), the factory reset process begins.
Page 55

Troubleshooting Interaction Edge
55
Important!
If you restore factory settings, Interactive Intelligence strongly recommends that you apply the most
recent updates for the Interaction Edge appliance and all software products that it hosts. These
software products can include the Interaction Edge editions of Interaction Media Server and
Interaction SIP Proxy.
What if Interaction Edge network configuration fails?
In some situations, Interaction Edge is unable to establish a satisfactory network configuration, either using
DHCP or a static IPv4 address.
In the event that you are installing an update to any version of Interaction Edge and Interaction Edge does
not return to a running state after the normal delayed restart, do the following steps:
If you are using static IPv4 address settings, verify that the configuration values are valid and reserved on
the network.
Verify that the IPv4 addresses are not in use by any other devices on the network.
Verify that the IPv4 address is on the correct subnet and that Interaction Edge has a complete physical
connection to the network, such as ensuring that the network cables are functioning, the jacks are
completely inserted, and so on.
If you use DHCP to assign an address, verify that the DHCP server on the network is configured correctly.
Also, verify that Interaction Edge has network access to that DHCP server.
If the issue persists, contact Interactive Intelligence Technical Support.
One-way audio after stopping and starting Interaction Media Server
If you manually stop Interaction Media Server that is hosted on an Interaction Edge appliance for any reason,
such as applying an Interaction Media Server update, you must manually restart Interaction Media Server and
then restart the Interaction Edge appliance.
Interaction Edge contains optimizations for CPU resource assignments and network settings when it the
appliance starts and Interaction Media Server is set to start automatically. Manually stopping and restarting
Interaction Media Server, even without applying an update, interferes with those optimizations, which can
result in one-way audio issues.
If you ever manually stop and restart Interaction Media Server, you must restart the Interaction Edge
appliance to ensure proper operation.
If you fail to restart Interaction Media Server before restarting the Interaction Edge appliance, the
optimizations for CPU resources and network settings will still not be active. In this situation, start Interaction
Media Server through the Interaction Edge web interface and then restart the Interaction Edge appliance.
Assign static IP address for DIAG port through IPMI
Important!
Interactive Intelligence strongly recommends that you use the Diagnostic Port Settings area to
configure the IP address settings for the diagnostic port of Interaction Edge. Use this procedure only
if you cannot access the Interaction Edge web interface and need to change the static IP address of
the diagnostic port.
1. To the right of the LCD panel on the Interaction Edge appliance, press and hold the lower right button.
The LCD panel displays the Product Version menu item on the left and navigation icons on the right.
2. Press the upper right button to scroll down through the Status About menu until you reach the
Diagnostic IP menu item.
Page 56

56
Troubleshooting Interaction Edge
3. Press the upper left button to display the default IP address of the IPMI (DIAG) port.
4. Connect a category 5 or better Ethernet cable to the DIAG port on the front of the Interaction Edge
appliance.
5. Connect the other end of the Ethernet cable to one of the following:
Personal computer – If you are using a cross-over Ethernet cable, connect the available end of the
Ethernet cable into an available network port on a personal computer.
Network – If you are not using a cross-over Ethernet cable, connect the available end of the Ethernet
cable into an appropriate device on your network, such as an Ethernet switch.
6. On a connected personal computer, open a web browser and navigate to the IP address that the LCD
panel displayed for the Diagnostic IP item.
The Please Login page of the IPMI is displayed.
7. Enter the system administrator username and password for the IPMI.
The default credentials are ADMIN and 1234.
Note:
You define these credentials for the IPMI through the System Administrator Account area
of the Settings-Administration page of the Interaction Edge web interface.
8. Select the login button.
The Summary page is displayed.
9. Near the top of the page, select the Configuration button.
The Configuration page is displayed.
10. On the left side of the page, select the Network tab.
The Network Settings page is displayed.
11. Select the Use the following IP address option.
12. In the IPv4 Setting or IPv6 Setting box, enter the appropriate IP address information.
13. You can also enter the following configuration settings:
VLAN – If you use Virtual Local Area Networks (VLANs), select the enable option and indicate the
network number on which you want to access the Interaction Edge IPMI in the VLAN ID box.
Lan Interface – Select one of the following values from the list box:
Dedicate – This is the default setting. IPMI uses its own NIC.
Share – Both IPMI and Interaction Edge use the address and settings of the NIC1 port.
Failover – If the IPMI NIC fails, IPMI uses the address and settings of the NIC1 port.
RMCP Port – Enter the port number that you want to use for Remote Management and Control
Protocol (RMCP) connections. The default value is 623.
14. After you have entered all necessary network settings, select the Save button at the bottom of the page.
Note:
If you changed the IP address, your session with IPMI is disconnected. You must navigate
your web browser to the new IP address that you specified and log on once again.
Page 57

Troubleshooting Interaction Edge
57
A hosted software product fails to register with a remote Customer Interaction Center server
Interaction Edge models 01x0, 01x1, and 01x2 can host Interaction Media Server and Interaction SIP Proxy.
One or both of the hosted software products can fail to register with a Customer Interaction Center in a
remote location if the network provider restricts the size of the maximum transmission unit (MTU) to fewer
than 1500 bytes.
To resolve this issue, use one of the following solutions:
Have the network provider change the MTU size to 1500 to match those sent by Interaction Media Server
on the Interaction Edge appliance.
Contact Interactive Intelligence technical support to use the Console Redirection feature of the IPMI and
then use a Registry editor to create an entry that specifies the maximum MTU size to match that of the
network provider:
HKLM\SYSTEM\CurrentControlSet\Services\Tcpip\Parameters\Interfaces\<adapter ID>
New DWORD name: MTU
New DWORD value: (the value specified by the network provider, such as 1300)
Caution!
Improper edits to the Registry can cause significant failures in the host operating system of
the Interaction Edge appliance. Any edits of the Registry should be done by an Interactive
Intelligence technical support representative.
Cannot connect to the IPMI on the Interaction Edge appliance
Important!
To use IPMI, you must connect the DIAG port and the NIC1 port on the front of the
Interaction Edge appliance to one or more networks.
The default network ports and protocols for the IPMI on the Interaction Edge appliance are as follows:
80 TCP – HTTP
443 TCP – SSL/HTTP
623 TCP/UDP – RMCP (IKVM server port)
5900 TCP – VNC (Virtual media port)
Important!
Ensure that any firewalls between the remote computer and the Interaction Edge appliance allow
communications for these ports on the specified transport layer protocols.
Selecting Close button does not close web interface
The Mozilla Firefox web browser does not close the tab for the Interaction Edge or Interaction Gateway web
interface when you select the Close button. This problem occurs because of the default JavaScript security
settings in Firefox.
To enable the Close button in Firefox, do the following steps:
1. Start the Firefox web browser.
2. In the address box, enter the following string:
Page 58

58
Troubleshooting Interaction Edge
about:config
3. If a warranty warning is displayed, select the I'll be careful, I promise! button.
4. In the Search box at the top of the resulting page, enter close and press the Enter key.
5. In the displayed results, double-click the following entry:
dom.allow_scripts_to_close_windows
The value for the item is set to true.
6. Navigate to the Interaction Edge web interface and log on.
7. In the top right corner of the page, select the Logout icon.
8. When prompted, select the OK button.
9. On the resulting page, select the Close button.
The Firefox tab displaying the Interaction Edge web interface closes.
Page 59

Appendix A: Third-party licenses
59
Appendix A: Third-party licenses
This section contains the licenses for third-party products that this Interactive Intelligence product uses.
LibTeletone
libteletone
Copyright (C) 2005/2006, Anthony Minessale II <anthmct@yahoo.com>
Version: MPL 1.1
The contents of this file are subject to the Mozilla Public License Version 1.1 (the "License"); you may not use
this file except in compliance with the License. You may obtain a copy of the License at
http://www.mozilla.org/MPL/
Software distributed under the License is distributed on an "AS IS" basis, WITHOUT WARRANTY OF ANY KIND,
either express or implied. See the License for the specific language governing rights and limitations under the
License.
The Original Code is libteletone
The Initial Developer of the Original Code is Anthony Minessale II <anthmct@yahoo.com>
Portions created by the Initial Developer are Copyright (C) the Initial Developer. All Rights Reserved.
Contributor(s):
Anthony Minessale II <anthmct@yahoo.com>
libteletone.c -- Tone Generator
Exception:
The author hereby grants the use of this source code under the following license if and only if the source code
is distributed as part of the openzap library. Any use or distribution of this source code outside the scope of
the openzap library will nullify the following license and reinact the MPL 1.1 as stated above.
Copyright (c) 2007, Anthony Minessale II
All rights reserved.
Redistribution and use in source and binary forms, with or without modification, are permitted provided that
the following conditions are met:
Redistributions of source code must retain the above copyright notice, this list of conditions and the
following disclaimer.
Redistributions in binary form must reproduce the above copyright notice, this list of conditions and the
following disclaimer in the documentation and/or other materials provided with the distribution.
Neither the name of the original author; nor the names of any contributors may be used to endorse or
promote products derived from this software without specific prior written permission.
THIS SOFTWARE IS PROVIDED BY THE COPYRIGHT HOLDERS AND CONTRIBUTORS "AS IS" AND ANY
EXPRESS OR IMPLIED WARRANTIES, INCLUDING, BUT NOT LIMITED TO, THE IMPLIED WARRANTIES OF
MERCHANTABILITY AND FITNESS FOR A PARTICULAR PURPOSE ARE DISCLAIMED. IN NO EVENT SHALL THE
COPYRIGHT OWNER OR CONTRIBUTORS BE LIABLE FOR ANY DIRECT, INDIRECT, INCIDENTAL, SPECIAL,
EXEMPLARY, OR CONSEQUENTIAL DAMAGES (INCLUDING, BUT NOT LIMITED TO, PROCUREMENT OF
SUBSTITUTE GOODS OR SERVICES; LOSS OF USE, DATA, OR PROFITS; OR BUSINESS INTERRUPTION)
HOWEVER CAUSED AND ON ANY THEORY OF LIABILITY, WHETHER IN CONTRACT, STRICT LIABILITY, OR
TORT (INCLUDING NEGLIGENCE OR OTHERWISE) ARISING IN ANY WAY OUT OF THE USE OF THIS
SOFTWARE, EVEN IF ADVISED OF THE POSSIBILITY OF SUCH DAMAGE.
Page 60

60
Change Log
Date
Change
May 1, 2012
Initial Release
July 26, 2012
Fix hidden e-mail address
October 19, 2012
Service Update 1
May 20, 2013
Service Update 2
December 17, 2013
Service Update 3
September 2, 2014
Updated documentation to reflect changes required in the transition from
version 4.0 SU# to CIC 2015 R1, such as updates to product version
numbers, system requirements, installation procedures, references to
Interactive Intelligence Product Information site URLs, and copyright and
trademark information.
March 10, 2014
2015 R1:
IGW-1155 - Add "@ 120 Ω" for the TDM span connections
IGW-1120
Add procedure for splitting and joining the NIC1 and NIC2
Update content affected by the new teamed NIC split feature
IGW-1231 - Add "One-way audio issue after stopping and starting
Interaction Media Server" topic in "Troubleshooting" section.
Add admonishments for network connections to IPMI requiring that NIC1
also has an active network connection
Document configuration restrictions for Interaction Media Server 4.0 SU5
or later when hosted on a 01x1 or 01x2 model of an Interaction Edge
appliance
Update "Copyright and Trademark Information" page
Update content with new terminology for release updates and patches
November 13, 2015
Corporate rebranding
Change Log
The following changes have been made to this document since the Interaction Edge release.
Page 61

Index
61
Index
A
administrator
credentials ............................................................. 34, 36
airflow ............................................................................... 5
B
battery .............................................................................. 7
C
certifications ................................................................... 11
chassis ............................................................................. 11
circuit breaker ................................................................... 6
circuit overloading ............................................................ 5
CMOS battery ................................................................... 7
configure
LCD panel, using .......................................................... 40
network ....................................................................... 27
NTP .............................................................................. 30
optional tasks .............................................................. 27
SNMP ........................................................................... 31
D
D-channel trace ............................................................... 54
DHCP ............................................................................... 18
diagnostic port .......................................................... 11, 12
E
E1 spans .......................................................................... 17
earthing ............................................................................. 5
electrical requirements ..................................................... 5
environment specifications ............................................ 13
F
factory default ................................................................ 54
fallback ............................................................................ 10
features ........................................................................... 10
feedback ........................................................................... 8
FTP account..................................................................... 36
fuse rating ....................................................................... 13
G
grounding .......................................................................... 5
I
information
additional ...................................................................... 8
installation
hardware ....................................................................... 5
Interaction Edge
features ....................................................................... 10
introduction .................................................................. 9
overview ........................................................................ 9
Interaction Media Server
start ............................................................................. 23
Interaction SIP Proxy
start ............................................................................. 23
Interactive Community ..................................................... 8
introduction ...................................................................... 9
IP address
DHCP ........................................................................... 18
static ...................................................................... 18, 20
IPMI
IP address .................................................................... 23
network, configure ...................................................... 31
reference ..................................................................... 43
reference, Configuration ............................................. 44
reference, Maintenance.............................................. 50
reference, Remote Control ......................................... 49
reference, Server Health ............................................. 43
reference, System ....................................................... 43
static IP address .......................................................... 55
IPv4 address .................................................................... 18
L
LCD panel ........................................................................ 38
buttons .................................................................. 12, 38
edit values ................................................................... 40
menus.......................................................................... 39
start ............................................................................. 17
licenses
third-party ................................................................... 59
log files
enable ......................................................................... 53
gather .......................................................................... 53
log on .............................................................................. 34
IPMI ............................................................................. 36
M
model numbers .............................................................. 10
N
network
change settings ........................................................... 27
connectivity ................................................................. 13
interfaces, join ............................................................ 29
interfaces, split ............................................................ 27
IPMI, configure ............................................................ 31
setup ........................................................................... 17
Network Interface Card (NIC) ......................................... 12
NTP
Page 62

62
Index
configure ..................................................................... 30
O
overview ........................................................................... 9
P
packet capture files......................................................... 54
password
change ......................................................................... 34
change, IPMI ................................................................ 36
physical description ........................................................ 11
physical dimensions ........................................................ 13
power cords ...................................................................... 6
power specifications ....................................................... 13
power supply ............................................................ 12, 13
power switch .................................................................. 12
R
requirements
network ....................................................................... 13
reset ................................................................................ 54
restore point
retrieve ........................................................................ 33
restore points
create .......................................................................... 32
overview ...................................................................... 32
S
safety instructions ............................................................ 5
setup ............................................................................... 15
cables .......................................................................... 17
electrical safety ............................................................. 5
IP address .................................................................... 18
mount .......................................................................... 15
precautions, rack ........................................................... 5
rack mounting ............................................................... 5
safety instructions ......................................................... 5
start appliance ............................................................ 17
SIP trace files .................................................................. 54
SNMP
configure ..................................................................... 31
span
connectivity ................................................................. 13
RJ-48C wiring ............................................................... 13
specifications .................................................................. 11
environment ............................................................... 13
power .......................................................................... 13
start Interaction Edge ..................................................... 17
static discharge ................................................................. 7
T
TDM
RJ-48C wiring ............................................................... 13
technical support .............................................................. 8
temperature ............................................................... 5, 13
time
configure ..................................................................... 30
troubleshooting .............................................................. 53
audio issues ................................................................. 55
close web interface ..................................................... 57
factory default ............................................................. 54
IPMI ............................................................................. 55
IPMI ............................................................................. 57
log files, enabling ........................................................ 53
log files, gathering ....................................................... 53
network failure ............................................................ 55
product registration .................................................... 57
U
updates
apply ............................................................................ 25
USB ports ........................................................................ 12
user forum ........................................................................ 8
 Loading...