

Interactive Intelligence Audiocodes Mediant 800 based, HP ProLiant Gen8 Medium Installation And Configuration Manual
Page 1
Interaction Media Server Appliance
Installation and Configuration Guide
Audiocodes Mediant 800 based Media Server
HP ProLiant Gen8 Medium Interaction Media Server
HP ProLiant Gen8 Large Interaction Media Server
Interaction Media Server ™ 4.0
Interaction SIP Proxy Server ™ 4.0
Last updated April 10, 2014
(See Change Log for summary of changes made to this document since GA.)
Abstract
The Interaction Media Server appliance is a pre-built Windows Server 2008 R2 server. Additional
configuration is required once the server is connected to the network. This guide describes the
basic installation and configuration process for the Interaction Media Server Appliance.
Interactive Intelligence, Inc.
7601 Interactive Way
Indianapolis, Indiana 46278
Telephone/Fax (317) 872-3000
www.ININ.com
DC-014-4.0-IMSD-03
Page 2

ii
Copyright and trademark information
Interactive Intelligence, Interactive Intelligence Customer Interaction Center, Interaction Administrator, Interaction Attendant, Interaction
Client, Interaction Designer, Interaction Tracker, Interaction Recorder, ION, icNotify, Interaction Mobile Office, Interaction Optimizer, and the
“Spirograph” logo design are registered trademarks of Interactive Intelligence, Inc. Interactive Intelligence Group, Inc., Interaction Center
Platform, Interaction Monitor, Customer Interaction Center, EIC, Interaction Fax Viewer, Interaction Server, Interaction Voicemail Player,
Interactive Update, Interaction Supervisor, Interaction Migrator, and Interaction Screen Recorder are trademarks of Interactive Intelligence,
Inc. The foregoing products are ©1997-2014 Interactive Intelligence, Inc. All rights reserved.
Interaction Dialer and Interaction Scripter are registered trademarks of Interactive Intelligence, Inc. The foregoing products are ©2000-2014
Interactive Intelligence, Inc. All rights reserved.
Messaging Interaction Center and MIC are trademarks of Interactive Intelligence, Inc. The foregoing products are ©2001-2014 Interactive
Intelligence, Inc. All rights reserved.
e-FAQ and Interaction Director are registered trademarks of Interactive Intelligence, Inc. e-FAQ Knowledge Manager, Interaction FAQ, and
Interaction Marquee are trademarks of Interactive Intelligence, Inc. The foregoing products are ©2002-2014 Interactive Intelligence, Inc. All
rights reserved.
Interaction Conference is a trademark of Interactive Intelligence, Inc. The foregoing products are ©2004-2014 Interactive Intelligence, Inc.
All rights reserved.
Interaction SIP Proxy and Interaction EasyScripter are trademarks of Interactive Intelligence, Inc. The foregoing products are ©2005-2014
Interactive Intelligence, Inc. All rights reserved.
Interaction Gateway is a registered trademark of Interactive Intelligence, Inc.
Intelligence, Inc. The foregoing products are ©2006-2014 Interactive Intelligence, Inc. All rights reserved.
Interaction Desktop
rights reserved.
Interaction Process Automation is a trademark of Interactive Intelligence, Inc. Deliberately Innovative, Interaction Feedback, and Interaction
SIP Station are registered trademarks of Interactive Intelligence, Inc. The foregoing products are ©2009-2014 Interactive Intelligence, Inc.
All rights reserved.
Interaction Web Portal, Interaction Analyzer, and IPA are trademarks of Interactive Intelligence, Inc. The foregoing products are ©20102014 Interactive Intelligence, Inc. All rights reserved.
Spotability is a trademark of Interactive Intelligence, Inc. ©2011-2014. All rights reserved.
Interaction Edge and Interaction Mobilizer are registered trademarks of Interactive Intelligence, Inc. Interaction SIP Bridge, Interactive
Intelligence Marketplace℠, Interactive Intelligence Communications as a Service℠, CaaS Quick Spin™, and Interactive Intelligence CaaS℠
are trademarks of Interactive Intelligence, Inc. The foregoing products are ©2012-2014 Interactive Intelligence, Inc. All rights reserved.
Bay Bridge Decisions, Interaction Script Builder, and Interaction Speech Recognition are trademarks of Interactive Intelligence, Inc. The
foregoing products are ©2013-2014 Interactive Intelligence, Inc. All rights reserved.
The veryPDF product is ©2000-2014 veryPDF, Inc. All rights reserved.
This product includes software licensed under the Common Development and Distribution License (6/24/2009). We hereby agree to indemnify
the Initial Developer and every Contributor of the software licensed under the Common Development and Distribution License (6/24/2009) for
any liability incurred by the Initia l Developer or such Contributor as a result of any such terms we offer. The source code for the included
software may be found at http://wpflocalization.codeplex.com
A database is incorporated in this software which is derived from a database licensed from Hexasoft Development Sdn. Bhd. ("HDSB"). All
software and technologies used by HDSB are the properties of HDSB or its software suppliers and are protected by Malaysian and
internationa l copyr ight laws. No warranty is provided that the Databases are free of defects, or fit for a particular purpose. HDSB shall not be
liable for any damages suffered by the Licensee or any third party resulting from use of the Databases.
Other brand and/or product names referenced in this document are the trademarks or registered trademarks of their respective companies.
Interactive Intelligence (Interactive) has no responsibility under warranty, indemnification or otherwise, for modification or customization of
any Interactive software by Interactive, Customer or any third party even if such customization and/or modification is done using Interactive
is a trademark of Interactive Intelligence, Inc. The foregoing products are ©2007-2014 Interactive Intelligence, Inc. All
.
DISCLAIMER
tools, training or methods documented by Interactive.
Interactive Intelligence, Inc.
7601 Interactive Way
Indianapolis, Indiana 46278
Telephone/Fax (317) 872-3000
www.ININ.com
Interaction Media Server is a trademark of Interactive
Page 3

Interaction Center Platform statement
This document may describe Interaction Center (IC) features that are not available or licensed in
your IC product. Multiple products are based on the Interaction Center Platform, and some features
are disabled or unavailable in some products.
Products based on the Interaction Center Platform include:
• Interactive Intelligence Customer Interaction Center® (CIC)
• Messaging Interaction Center™ (MIC™)
Since these products share some common features, this document is intended for use with all IC
products, unless specifically stated otherwise on the title page or in the context of the document.
How do I know if I have a documented feature?
Here are some indications that the documented feature is not currently licensed or available in your
version:
• The menu, menu item, or button that accesses the feature appears grayed-out.
• One or more options or fields in a dialog box appear grayed-out or do not appear at all.
• The feature is not selectable from a list of options.
If you have questions about feature availability, contact your vendor regarding the feature set and
licenses available in your version of this product.
Interaction Media Server Appliance Installation and Configuration Guide 3
Page 4

Table of Contents
Introduction .................................................................................................................. 7
About the Interaction Media Server appliance..................................................................... 7
Interaction Media Server appliance contents ...................................................................... 7
Safety precautions (Medium and Large Interaction Media Servers only) ................................. 7
About this guide ............................................................................................................. 8
For more information ...................................................................................................... 8
Interaction Media Server appliance hardware specifications ............................................... 8
Factory Image Restoration Procedures (Medium and Large Interaction Media Servers only) . 8
Interaction Media Server Technical Reference .................................................................. 8
Interaction SIP Proxy Technical Reference....................................................................... 9
Interaction Recorder Remote Content Service (not available on all models) ......................... 9
Interaction Session Manager (not available on all models) ................................................ 9
IC Documentation Library ........................................................................................... 10
Interactive Intelligence Support website ....................................................................... 10
Interactive Intelligence Test Lab site ............................................................................ 10
Set up the Interaction Media Server appliance ............................................................ 11
Preliminary hardware setup ........................................................................................... 11
Complete the Windows Server installation ....................................................................... 11
Interaction Recovery Module (Medium and Large Interaction Media Servers only) ................ 13
Add the server to the domain ......................................................................................... 13
View Network Fault Tolerant (NFT) network interface controller teams ................................ 15
Interaction Media Server licenses ................................................................................... 18
I3_FEATURE_MEDIASERVER_TYPE_STANDARD ............................................................. 18
I3_LICENSE_MEDIASERVER_MAX_MEDIA_ENGINES ...................................................... 18
Media sessions .......................................................................................................... 18
Basic sessions ........................................................................................................... 18
Conference sessions ................................................................................................... 18
Fax sessions .............................................................................................................. 19
I3_LICENSE_MEDIA_SERVER_G.729_SESSIONS ............................................................ 19
Acquire an Interaction Media Server license ..................................................................... 19
Apply an Interaction Media Server license ........................................................................ 19
Apply the Interaction SIP Proxy license ........................................................................... 22
Disable Interaction SIP Proxy ......................................................................................... 23
Optional post-installation configuration ...................................................................... 25
Save an as-configured system state ................................................................................ 25
Enable Integrated Lights-Out 4 (iLO 4) (Medium and Large Interaction Media Servers only) .. 25
Install Interaction Recorder Remote Content Service ......................................................... 25
Install Interaction Session Manager ................................................................................ 31
Change log .................................................................................................................. 35
Interaction Media Server Appliance Installation and Configuration Guide 5
Page 5

Introduction
The Interaction Media Server appliance is a pre-certified server that supports IC applications out of
the box. Interaction Media Server is a required subsystem of Interaction Center. Its main purpose
is to handle IP-based audio streams. These audio streams include Voice-over-IP (VoIP) active call
connections, recordings, and the playing of prompts. This guide describes the Interaction Media
Server appliance and the basic installation and configuration process.
In this section:
• About the Interaction Media Server appliance
• Interaction Media Server appliance contents
• Safety precautions
• About this guide
• For more information
About the Interaction Media Server appliance
The Interaction Media Server appliance is a pre-built Windows Server 2008 R2 server. The
Interaction Media Server and Interaction SIP Proxy software are pre-installed on the server, and
additional configuration is required once the server is connected to the network.
Interaction Media Server appliance contents
Included in the box with the Interaction Media Server appliance are the following items:
• Medium and Large Interaction Media Servers only: The certified Media Server, including
an internal USB flash drive (“Interaction Recovery Module”) for restoring the factory image.
• Medium and Large Interaction Media Servers only: Factory Image Restoration Procedures
technical reference, HP Proliant server documentation/documentation disk, HP iLO Advanced
License (1-yr),
• Interaction Media Server appliance “goody bag” containing Interaction Media Server Appliance
Installation and Configuration Guide (this guide), Quality Assurance Report, and Burn In Report.
• Rails for the server rack, along with accompanying documentation.
Safety precautions
(Medium and Large Interaction Media Servers only)
Please review the safety precautions included in the HP documentation for information about rack
mounting considerations, electrical and general safety guidelines, and server setup. You can find
more information on the enclosed HP Proliant documentation disk, on the HP ProLiant Servers page
at http://hp.com/go/foundation or at the HP Technical Support site at http://www.hp.com/cgibin/hpsupport/index.pl
.
Interaction Media Server Appliance Installation and Configuration Guide 7
Page 6

Introduction
About this guide
About this guide
This guide provides the procedures necessary for a successful basic installation and configuration of
an Interaction Media Server appliance, pre-installed components, and staged-for-installation
components.
The guide is intended for partners and implementers who plan to install and configure the
appliance. While the Interaction Media Server appliance simplifies the installation process, it does
not eliminate the need for a qualified installer.
For more information
For more information about the Interaction Media Server appliance and Interaction Media Server in
general, see the documents and website pages listed in this section.
Interaction Media Server appliance hardware specifications
For information about your server’s hardware specifications and hard drive configuration, contact
GlobalLogistics@inin.com
Factory Image Restoration Procedures
(Medium and Large Interaction Media Servers only)
.
See the Factory Image Restoration Procedures document for instructions on how to restore the
factory image (operating system and/or any Interactive Intelligence software) using an internal
USB flash drive (“Interaction Recovery Module”).
The Factory Image Restoration Procedures document is included in the box with the Interaction
Media Server appliance, and is also located in the Packaged Hardware Documents section of the IC
Documentation Library.
Check the IC Documentation Library on the Support website at
https://my.inin.com/support/products/ic40/Documentation/index.htm for the latest version.
Interaction Media Server Technical Reference
Interaction Media Server Appliance Installation and Configuration Guide (this guide) makes many
references to Interaction Media Server Technical Reference, the guide for new installation and
configuration of Media Server 4.0.
Note: The Interaction Media Server Technical Reference includes detailed Media Server installation
procedures, functional overviews, configuration details, and optional prerequisites and postinstallation procedures.
The Interaction Media Server Technical Reference is available in the Technical Reference
Documents section of the IC Documentation Library. Check the IC Documentation Library on the
Support Web site at https://my.inin.com/support/products/ic40/Documentation/index.htm
latest version. This document is also located in the Interaction Media Server Appliance’s D:\ININ
Documentation directory.
for the
Interaction Media Server Appliance Installation and Configuration Guide 8
Page 7

Interaction SIP Proxy Technical Reference
Interaction SIP Proxy is a program that enables a server to act in a similar fashion as an
Interaction Center server in its ability to route SIP calls to a local area network (LAN), a wide area
network (WAN), or to the Public Switched Telephone Network (PSTN).
Additionally, Interaction SIP Proxy can host configuration files and firmware for IP telephones,
facilitate locally-based call routes, and provide consistent call routing should a network connection
or an Interaction Center server interruption occur.
Note: The Interaction SIP Proxy Technical Reference provides installation and upgrade instructions
for the Interaction SIP Proxy software, and also describes initial configuration tasks needed for
operation.
The Interaction SIP Proxy Technical Reference is available in the Packaged Hardware Documents
section of the IC Documentation Library. See the IC Documentation Library on the Support website
at https://my.inin.com/support/products/ic40/Documentation/index.htm
document is also located in the Interaction Media Server appliance’s D:\ININ Documentation
directory.
for the latest version. This
Interaction Recorder Remote Content Service (not available on all models)
Interaction Recorder Remote Content Service facilitates the retrieval and storage of both audio and
screen recordings in your Interaction Center environment. This capability offloads those actions
from the Interaction Recorder server that resides on the Interaction Center server thereby granting
the Interaction Center server more processing and bandwidth resources for facilitating and
handling interactions.
The Interaction Recorder Remote Content Service install is available as a shortcut on the
Interaction Media Server appliance desktop (not available on all models).
For licensing, requirements, and installation and configuration instructions, see the Interaction
Recorder Remote Content Service Installation and Configuration Guide in the Technical Reference
Documents section of the IC Documentation Library.
Check the IC Documentation Library on the Support website at
https://my.inin.com/support/products/ic40/Documentation/index.htm
document is also located in the Interaction Media Server appliance’s D:\ININ Documentation
directory.
for the latest version. This
Interaction Session Manager (not available on all models)
Interaction Session Manager is an Interaction Center server subsystem designed to interact with
client applications written with IceLib. It provides a layer of business logic, security, and caching
that enables commonly shared behavior between client applications. In larger environments, one or
more Interaction Session Manager instances can be installed on “off-server” machines to off-load
CPU and memory utilization that could potentially affect the performance of the Interaction Center
server, if run on the same physical machine.
The Interaction Session Manager install is available as a shortcut on the Interaction Media Server
appliance desktop (not available on all models).
For more information on planning, licensing, requirements, and configuration instructions, see
Session Manager Developer Application Note in the Technical Reference Documents section of the
IC Documentation Library.
See the IC Documentation Library on the Support website at
https://my.inin.com/support/products/ic40/Documentation/index.htm
document is also located in the Interaction Media Server appliance’s D:\ININ Documentation
directory.
Interaction Media Server Appliance Installation and Configuration Guide 9
for the latest version. This
Page 8

Introduction
For more information
IC Documentation Library
The IC Documentation Library merges all help systems and documentation installed on the
Interaction Media Server into a single searchable unit. You can view or search the entire
documentation set for a document title, topic, term, or keyword. The IC Documentation Library is
available on the Support website at
https://my.inin.com/support/products/ic40/Documentation/index.htm
.
Interactive Intelligence Support website
The IC 4.0 Support website at https://my.inin.com/support/products/ic40/Pages/default.aspx is
the central location for the latest IC 4.0 release information, documentation, system software and
hardware requirements, telephony platform information, Service Updates, and downloadable
utilities.
Interactive Intelligence Test Lab site
The Interactive Intelligence Test Lab site at http://testlab.inin.com/ is a resource for tracking
hardware and software components recommended for use with Interaction Center products, tested
and approved by Interactive Intelligence.
Interaction Media Server Appliance Installation and Configuration Guide 10
Page 9
Set up the Interaction Media Server appliance
After you confirm the Interaction Media Server appliance contents, review safety precautions, and
understand where to obtain help and additional resources information, you are ready to set up the
Interaction Media Server appliance.
In this section, you will learn how to:
• Perform the preliminary hardware setup
• Complete the Windows server OS installation
• Locate the Interaction Recovery Module
• Add the server to the domain
• View Network Fault Tolerant (NFT) Network Interface Controller teams
• Retrieve the required Interaction Media Server licenses
• Apply the Interaction Media Server license and the Interaction SIP Proxy Server license
Preliminary hardware setup
When the Interaction Media Server appliance arrives, unpack it and connect it to the appropriate
Ethernet network.
1. Unpack the appliance and install it on a rack with monitor and keyboard access.
2. Connect the appliance to the network.
3. Turn on the appliance. The machine runs through a series of installation and system settings
applications and then reboots. The Set Up Windows wizard opens.
Complete the Windows Server installation
This section describes how to run the Set Up Windows wizard and perform other tasks to
complete the Windows Server 2008 R2 operating system installation.
1. Run the Set Up Windows wizard. The system installs applicable devices, applies system
settings, and reboots the machine. When the system reboots, the Set Up Windows dialog
opens.
Interaction Media Server Appliance Installation and Configuration Guide 11
Page 10
Set up the Interaction Media Server appliance
Complete the Windows Server installation
2. Select the appropriate Country or Region, Time and Currency, and Keyboard layout from
the respective drop-down lists and click Next.
3. In the Microsoft Software License Terms dialog, review the agreement, select the I accept
the license terms check box, and click Start.
4. After Windows finalizes the settings and returns a message stating the user’s password must be
changed before logging on for the first time, click the OK button. The Administrator login
appears.
5. Type the Administrator password, enter it again to confirm the password, and then click the
right arrow key.
6. When the Your password has been changed message appears, click the OK button.
Windows prepares your desktop.
7. Minimize the Initial Configuration Tasks dialog and double-click the HP Software License
Agreement icon located on the Desktop.
8. Medium and Large Interaction Media Servers only: When the Hewlett Packard
Software License Agreement screen opens, review the agreement and click I Agree.
Note: If you click I Disagree, the Shutdown Server? dialog appears. Click Yes to shut down
the server.
9. Maximize the Initial Configuration Tasks dialog to configure the server. For example, you
can set computer information, install updates and determine how future updates are received,
and customize settings.
Interaction Media Server Appliance Installation and Configuration Guide 12
Page 11

Interaction Recovery Module
(Medium and Large Interaction Media Servers only)
This Interaction Media Server appliance is equipped with a factory restore feature using an internal
USB flash drive (“Interaction Recovery Module”). This module does not appear under My
Computer but is visible in the Disk Management console as the ININ_RECOV volume.
Important: Do not attempt to mount or modify the contents of the Interaction Recovery Module.
Doing so may result in the inability to restore the system to its factory state in the future.
For instructions on how restore the appliance (operating system and/or any Interactive Intelligence
software) to its factory state using the Interaction Recovery Environment software stored on the
Interaction Recovery Module, see the Factory Image Restoration Procedures technical reference
included with the Interaction Media Server appliance.
Add the server to the domain
This section describes how to join the Interaction Media Server appliance to the domain.
1. Open the Start menu and select Computer. The Computer dialog opens.
2. Select System properties. The System dialog opens.
Interaction Media Server Appliance Installation and Configuration Guide 13
Page 12

Set up the Interaction Media Server appliance
Add the server to the domain
3. In the Computer name, domain, and workgroup settings area click Change settings.
The System Properties dialog opens.
4. Click Change. The Computer Name/Domain Changes dialog opens.
5. Enter the following information in the Computer Name/Domain Changes dialog:
• Computer name: Keep the same server name or, if requested by the network
administrator, type a new server name.
• Member of: Select Domain and type the appropriate domain name.
Interaction Media Server Appliance Installation and Configuration Guide 14
Page 13

6. Click OK. The Windows Security dialog opens.
7. In the User name and Password fields, type the appropriate credentials and click OK. The
Computer Name/Domain Changes displays a message, welcoming you to the domain.
8. Click OK. The Computer Name/Domain Changes dialog displays a message indicating that
you must restart the computer to apply the changes.
9. Click OK.
10. On the System Properties dialog, click OK. The Microsoft Windows dialog opens, and
displays a message, again indicating that you must restart the computer to apply the changes.
11. Click Restart Now.
View Network Fault Tolerant (NFT) network interface controller
teams
When a user logs onto Interaction Media Server for the first time, the HP Network Configuration
Utility automatically creates a Network Fault Tolerant NIC (Network Interface Controller) team
using all available NICs for the particular server. Interaction Media Server teams available NICs to
provide redundancy for reliability purposes if a network link fails.
Note: An Interaction Center Media Server, or any server that deals with real time audio across the
network, may only use certain forms of adapter teaming. Some vendors may use varying terms for
different teaming models, but the basic rule is that only fault-tolerant configurations are supported.
Interactive Intelligence software does not support a teaming method that employs load balancing
due to increased jitter incidence in the RTP audio streams that Voice over Internet Protocol (VoIP)
solutions use. The stream's assembly becomes less reliable, resulting in packet loss or latency as
the jitter buffer attempts to handle out of sequence packets. The only teaming type to use for
audio and signaling is a fault tolerant type.
You can view NIC teams in the HP Network Configuration Utility (NCU).
Interaction Media Server Appliance Installation and Configuration Guide 15
Page 14

Set up the Interaction Media Server appliance
View Network Fault Tolerant (NFT) network
To open the HP Network Configuration Utility (NCU):
1. In the system tray, click the double arrows and from the menu that appears, double-click the
HP icon.
The HP Network Configuration Utility dialog opens:
Interaction Media Server Appliance Installation and Configuration Guide 16
Page 15

2. Click OK. The HP Network Configuration Utility Properties dialog opens.
Note: The above dialog shows an Interaction Media Server with 4 NICs combined into one NIC
team (HP Network Team #1).
3. Double-click the team name (for example, HP Network Team #1). The Team Properties dialog
opens.
From the Team Properties dialog, you can view the NIC team’s properties and modify settings
if necessary.
Interaction Media Server Appliance Installation and Configuration Guide 17
Page 16

Set up the Interaction Media Server appliance
Interaction Media Server licenses
Interaction Media Server licenses
Interaction Media Server requires the following licenses in the Interaction Center environment:
I3_FEATURE_MEDIASERVER_TYPE_STANDARD
You need one instance of this license for each physical Interaction Media Server. This license is
unique and is associated with the host ID of the computer on which Interaction Media Server is
installed.
I3_LICENSE_MEDIASERVER_MAX_MEDIA_ENGINES
Each instance of this license permits media engines to use 32 CPU cores, both physical and hyper-
threaded, to process interactions on the host computer.
Media sessions
A media session is required for each audio operation on an Interaction Media Server. Basic
sessions, conference sessions, and fax sessions all require a media session. You must have
enough media sessions to support your purchased basic, conference, and fax sessions.
Basic sessions
Interaction Media Server requires a basic session for each external call. Basic sessions permit the
following operations:
• Manual outbound calls
• Inbound Direct Inward Dialing (DID) calls
• Voice mail access through a telephony user interface (TUI) or Interaction Mobile Office
• Non-ACD workgroup calls
• Interaction Attendant voice actions
• Dial by name
• Dial extension
• Remote access
• Play an Interaction Voice Response (IVR) menu
Each basic session requires a media session. Basic sessions are defined in the Interaction Center
server license.
Note: Configured remote stations do not require sessions while dynamic stations do. For more
information about the different types of stations, see the "Remote Station Types" topic in
Interaction Client Help.
Conference sessions
Each participant in an ad-hoc or scheduled CIC conference call requires a conference session.
External parties also use a basic session to participate in a CIC conference call. Each conference
session requires a media session. Conference sessions are defined in the Interaction Center server
license.
Interaction Media Server Appliance Installation and Configuration Guide 18
Page 17

Fax sessions
Fax communications through Interaction Media Server require a fax session, a basic session, and a
media session for each external fax call. Fax sessions are defined in the Interaction Center server
license.
I3_LICENSE_MEDIA_SERVER_G.729_SESSIONS
The G.729 codec requires less bandwidth usage at the expense of dynamic audio range. The
G.729 codec is proprietary and requires that you purchase licenses for each interaction that uses
the codec. The number of licenses that you purchase must equal the maximum number of
simultaneous interactions that you want to support. For example, if you have two Interaction
Media Servers that support up to 100 simultaneous G.729 sessions each, purchase 200 sessions in
the Interaction Center license. Use the Interactive Intelligence Online Ordering System to
purchase these licenses. You can then download the license from the Interactive Intelligence
License Management website at the following URL address:
http://license.inin.com.
Acquire an Interaction Media Server license
The Interactive Intelligence License Management website (http://license.inin.com) enables you to
create Interaction Media Server and Interaction Center licenses. If you have purchased the
appropriate products, you are certified and authorized to generate these licenses through the
website.
If you are not certified to log on to this website, you can contact Interactive Intelligence through
this e-mail address:
When you contact Interactive Intelligence through this e-mail address, include your order number
and request a license file. If you are installing the Interaction Media Server software on your own
hardware, which was not purchased from Interactive Intelligence, include your server name and
MAC address ID numbers for the machine that you intend to host Interaction Media Server.
For more information on generating your Interaction Center server license for Interaction Media
Server, see the Interaction Center Licensing Overview Technical Reference document.
licenseissues@inin.com
Apply an Interaction Media Server license
After you acquire an Interaction Center license that includes Interaction Media Server, you must
apply it to both Interaction Media Server and Interaction Center.
1. Load the license on Interaction Media Server:
a. Place your Interaction Center license on a local or shared network location.
b. Open a web browser and navigate to the URL and port number of the Interaction Media
Server Web interface.
Note: See the following example for the format of specifying this URL. Your address will
likely be different. The default HTTP port is 8083 (HTTP for a non-secure connection) and
the default HTTPS port is 446 (HTTPS for a secure connection).
http://mediaserver1:8083/
The webpage prompts you to supply a user name and password.
Interaction Media Server Appliance Installation and Configuration Guide 19
Page 18

Set up the Interaction Media Server appliance
Apply an Interaction Media Server license
c. Log on to the Media Server configuration webpage with the administrative user ID and
password. The Status-About page opens.
d. In the upper right corner, select the Config icon. The Config-Servers page is displayed.
e. On the left side of the page, select the License tab. The Config-License page opens.
f. Click the Add License hyperlink to open the To add a License page.
Interaction Media Server Appliance Installation and Configuration Guide 20
Page 19
g. Follow the instructions at the top of the To add a license page.
h. After you load the license, select the Servers icon on the left side of the page.
i. Choose an Interaction Center server to which this Interaction Media Server will connect and
select the Server button associated with that server. The Configuration of Command
Server page opens.
j. In the Accept sessions list, select Yes and then select the Apply Changes button.
k. Repeat the Accept sessions configuration for each Interaction Center server with which
this Interaction Media Server will communicate.
2. Load the license on Interaction Center:
a. Place the license file in a local or network-accessible directory.
b. Open Interaction Administrator, select File, then choose License Management. The
License Management dialog opens.
c. Select the Load License button. The Load License dialog opens.
d. In the Load License dialog, navigate to the location where the license file is stored and
double-click the license file. The included licenses and features are loaded into Interaction
Center.
e. Select Close to complete the process. The Interaction Media Server that you configured to
communicate with this Interaction Center server is now displayed in Interaction
Administrator under the Configuration > Media Servers > Servers object.
Interaction Media Server Appliance Installation and Configuration Guide 21
Page 20

Set up the Interaction Media Server appliance
Apply the Interaction SIP Proxy license
Apply the Interaction SIP Proxy license
Interaction SIP Proxy is pre-installed on the hard drive of the appliance and its service starts
automatically. However, Interaction SIP Proxy remains idle until it is activated with a license file
and configured to manage SIP traffic.
After you acquire an Interaction Center license that includes Interaction SIP Proxy, you must load
the license through the Interaction SIP Proxy interface.
1. Place the Interaction SIP Proxy license on a local or shared network location.
2. Open a web browser and navigate to the URL and port number of the Interaction SIP Proxy web
interface. The URL prompts you to supply a user name and password.
Note: See the following example for the format of specifying this URL. Your address will likely
be different. The default HTTP port is 8080 (HTTP for a non-secure connection) and the default
HTTPS port is 442 (HTTPS for a secure connection).
http://mediaserver1:8080/
3. Log on to the Interaction SIP Proxy configuration webpage with the IC administrative user ID
and password. The default User Name is admin and the default Password is 1234. Be sure to
change these default values as soon as possible.
Note: The exact appearance of the credentials dialog depends on which browser you use. For
example:
4. Click OK. The Status-About page opens, indicating that a license is required.
Interaction Media Server Appliance Installation and Configuration Guide 22
Page 21
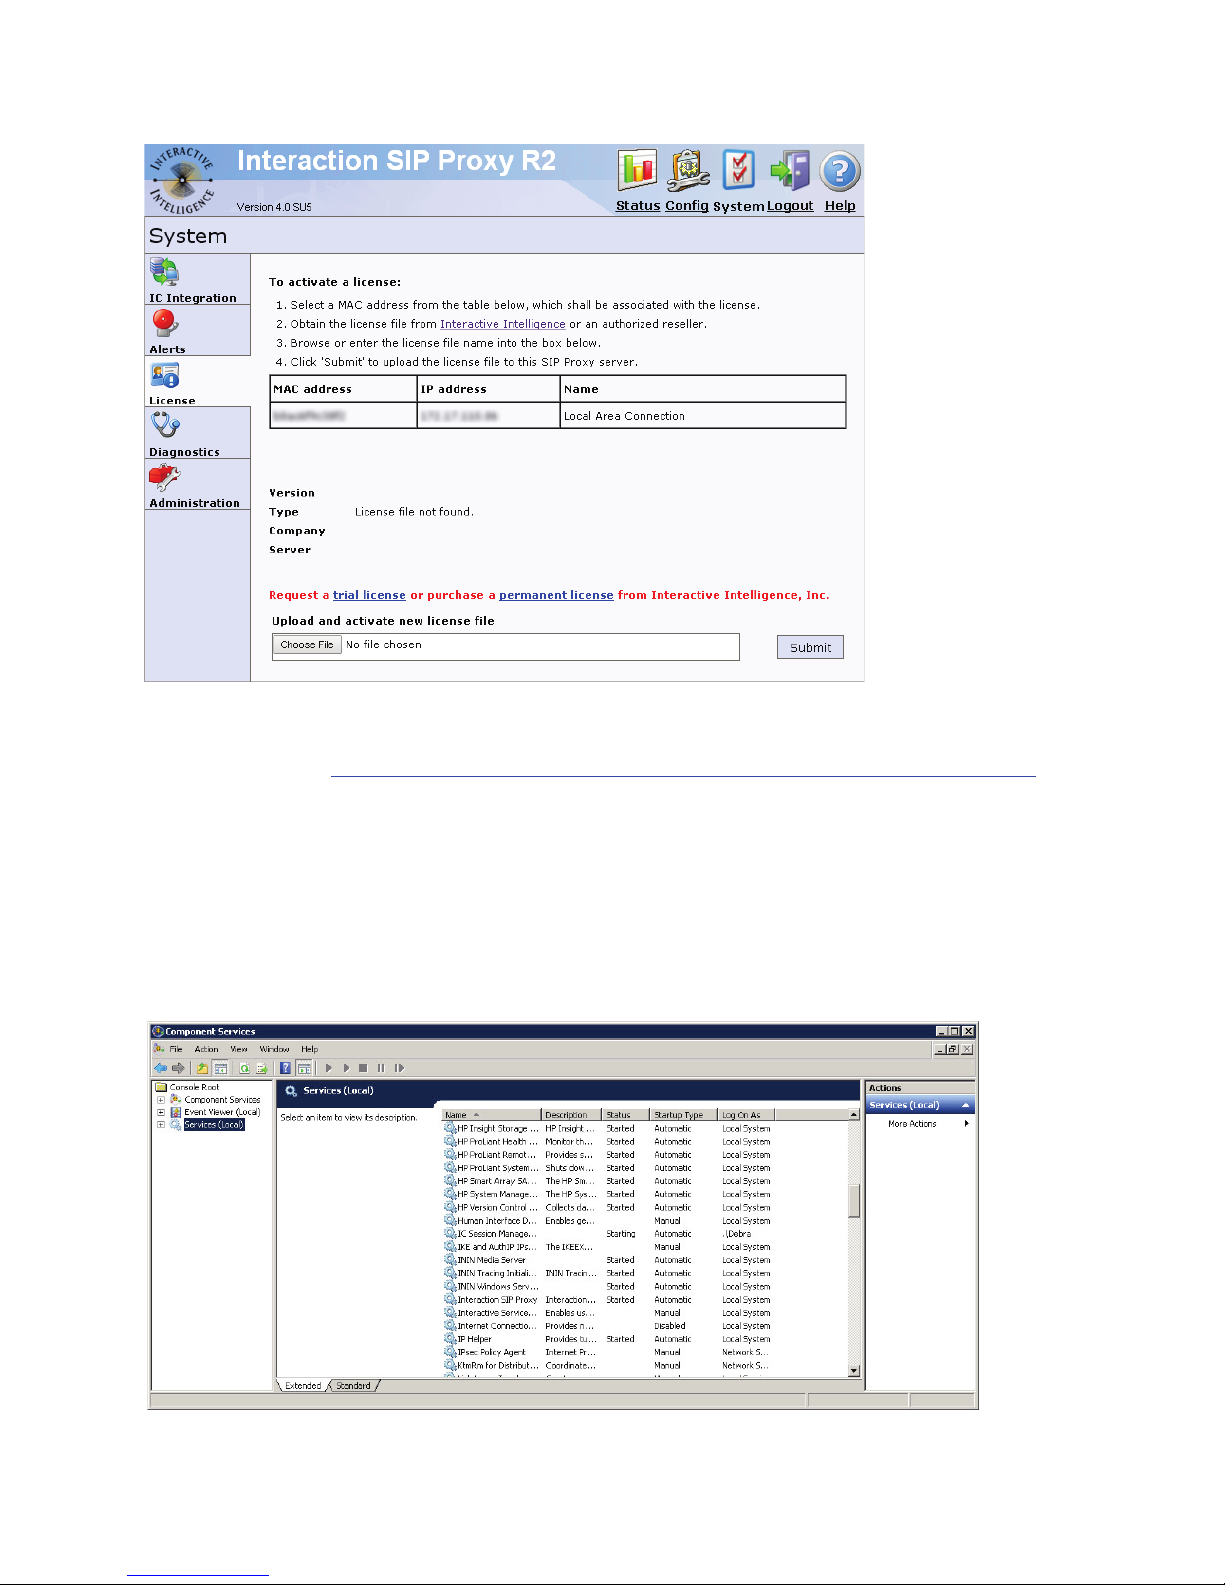
5. Select the License page hyperlink. The System-License page opens.
6. Follow the instructions at the top of the page.
For more information about documentation and licensing Interaction SIP Proxy, see the Interactive
Intelligence website: https://my.inin.com/support/products/sipproxy40/Pages/default.aspx
click the Help icon in the Interaction SIP Proxy web interface.
, or
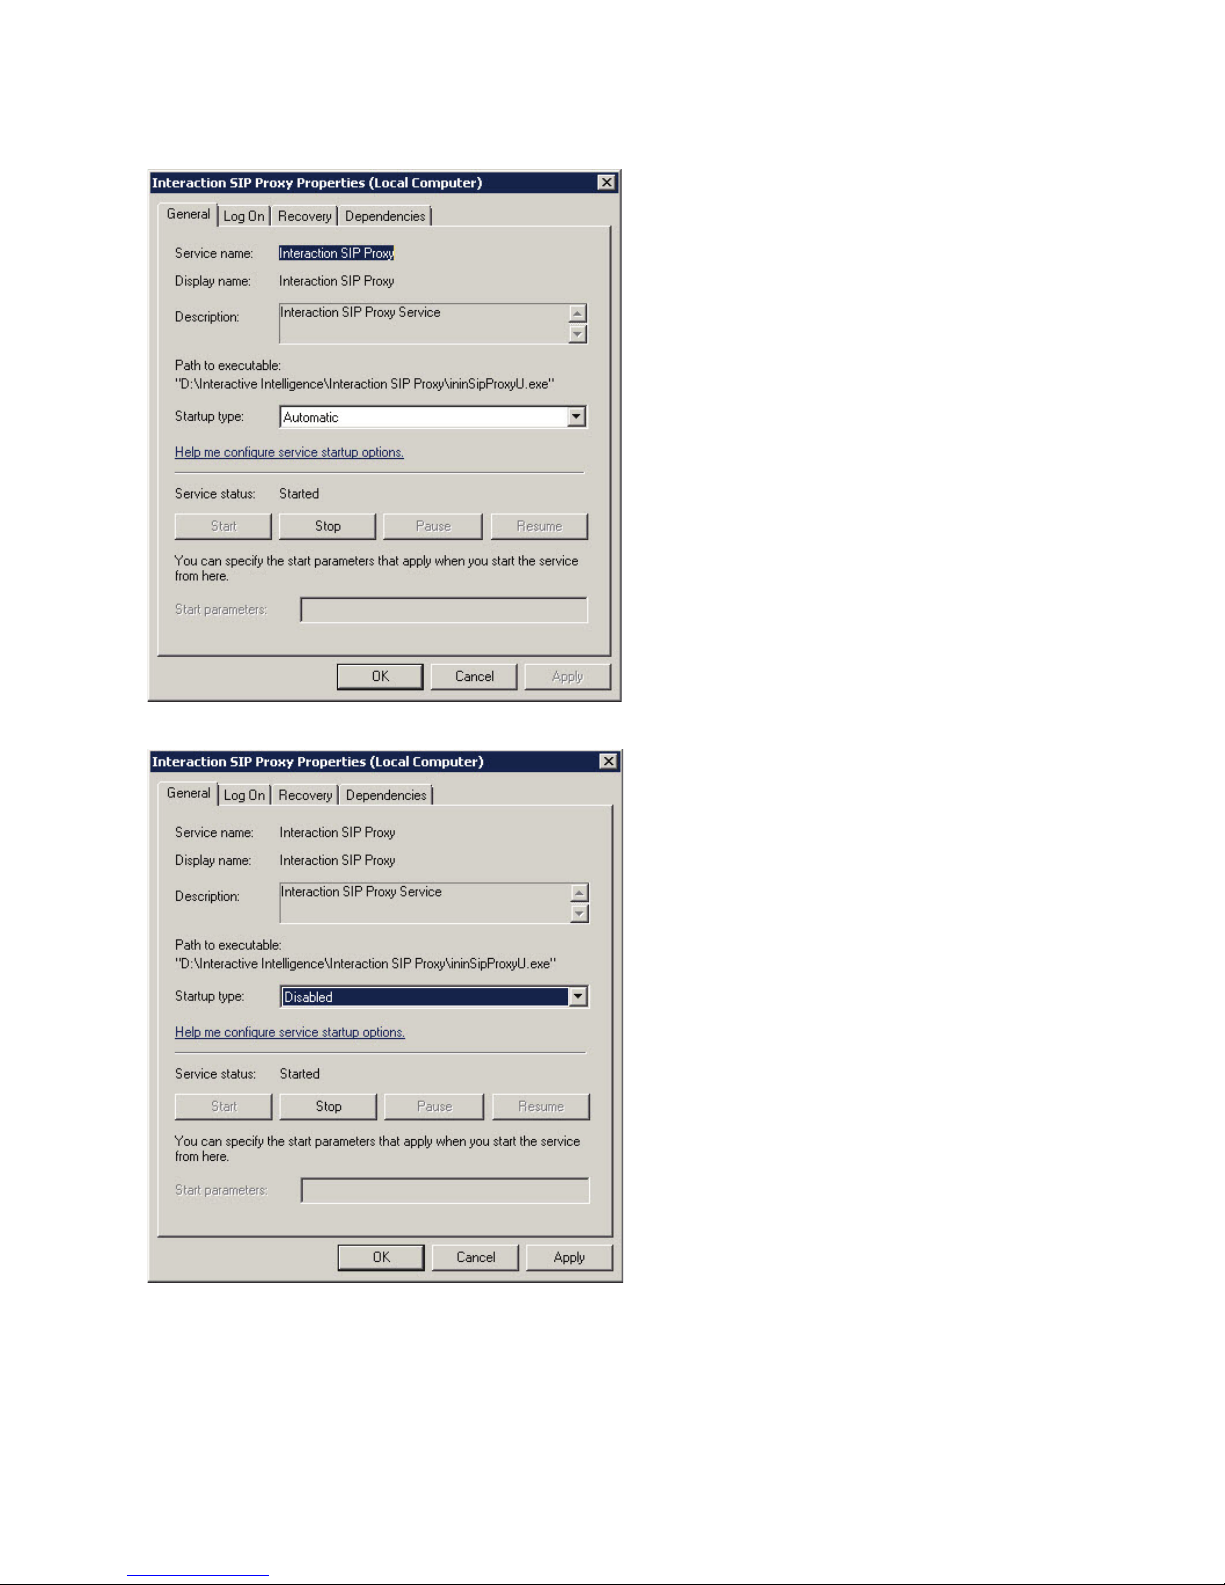
Disable Interaction SIP Proxy
If you do not intend to use Interaction SIP Proxy, you can disable it from the Services dialog.
To disable Interaction SIP Proxy:
1. Open the Start menu, select Administrative Tools, and choose Component Services. The
Component Services dialog opens.
Interaction Media Server Appliance Installation and Configuration Guide 23
Page 22
Set up the Interaction Media Server appliance
Disable Interaction SIP Proxy
2. Select the Services (Local) node and in the Services (Local) list, double-click Interaction
SIP Proxy. The Interaction SIP Proxy Properties dialog opens.
3. In the Startup type drop-down list, select Disabled.
4. Click OK. Interaction SIP Proxy is disabled until you change the Startup type to Automatic.
Interaction Media Server Appliance Installation and Configuration Guide 24
Page 23

Optional post-installation configuration
The Interaction Media Server appliance at the customer site may also include one or more optional
servers/services. Most require additional licenses and customization.
After you set up the Interaction Media Server appliance, you can optionally install other
applications and utilities.
In this section, you will learn how to:
• Save an as-configured system state
• Enable Integrated Lights-Out 4
• Install Interaction Recorder Remote Content Service (not available on all models)
• Install Interaction Session Manager (not available on all models)
Save an as-configured system state
This feature allows you to save the current system state for restoration at a future date (if
necessary). You can save all configuration changes made to the server during setup, and thus
restore the previously-configured system state if the server needs to be restored after a server
component failure (hard drive failure, etc.). If you want to use this feature, it is recommended to
do so soon after a good working configuration is in place. See the Factory Image Restoration
Procedures document for more information.
The Factory Image Restoration Procedures document is included in the box with the Interaction
Media Server appliance, and is also located in the Packaged Hardware Documents section of the IC
Documentation Library.
See the IC Documentation Library on the Support website at
https://my.inin.com/support/products/ic40/Documentation/index.htm
, for the latest version.
Enable Integrated Lights-Out 4 (iLO 4)
(Medium and Large Interaction Media Servers only)
Integrated Lights-Out 4 (iLO 4) provides remote administrative access for server management.
This server comes with a 1-year HP iLO Advanced Single Server License packaged in the box. If
desired, user will need to enter license information.
Install Interaction Recorder Remote Content Service
The Interaction Recorder Remote Content Service install is available as a shortcut on the
Interaction Media Server appliance desktop, which not available on all models.
This section contains Interaction Recorder Remote Content Service installation procedures. For
prerequisites, requirements, licensing, configuration, and other procedures, see Interaction
Recorder Remote Content Service Installation and Configuration Guide in the Technical Reference
Documents section of the IC Documentation Library. The IC Documentation Library is located on
the Support website at https://my.inin.com/support/products/ic40/Documentation/index.htm
document is also located in the Interaction Media Server appliance’s D:\ININ Documentation
directory.
. This
Interaction Media Server Appliance Installation and Configuration Guide 25
Page 24
Optional post-installation configuration
Install Interaction Recorder Remote Content
To install Interaction Recorder Remote Content Service:
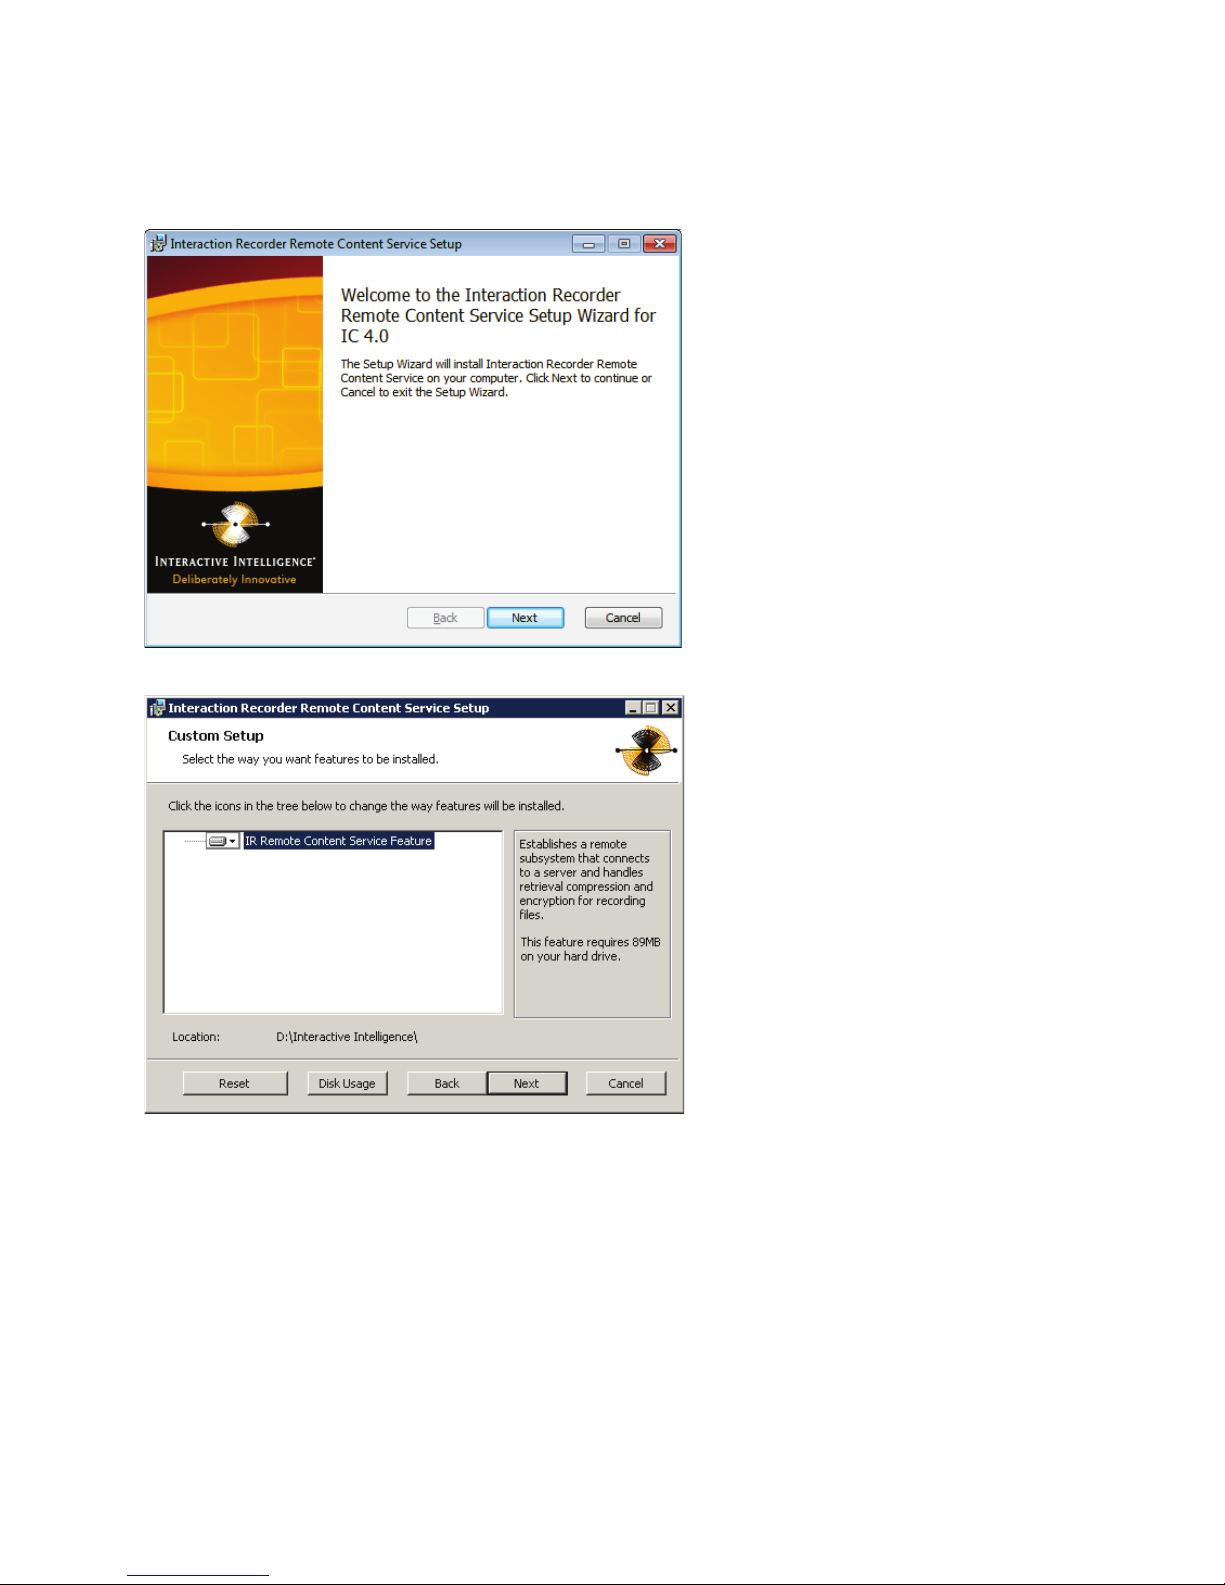
1. On the Interaction Media Server desktop, double-click the Click to Install Interaction
Recorder Remote Content Service icon. The Welcome to the Interaction Recorder
Remote Content Service Setup Wizard for IC 4.0 dialog opens.
2. Click Next. The Custom Setup dialog opens.
3. If applicable, do the following optional actions:
• To access custom installation features, select the IR Remote Content Service Feature icon.
• To reset your Custom Setup selections to the default level, click Reset.
• To ensure that the hard drive has enough free space to install the software, click the Disk
Usage button and, in the resulting dialog, verify that you have at least 350 megabytes of
free space.
• To choose a different installation location, click Browse and select a different directory.
Note: By default, the Interactive Intelligence QoS driver will be silently installed and the
certificate will be added to the Trusted Publishers list. If your site has reasons to modify this
default behavior, see KB article Q131006915300479 and follow the instructions provided to
modify the QoS properties and run the install using Group Policy or other methods.
Interaction Media Server Appliance Installation and Configuration Guide 26
Page 25
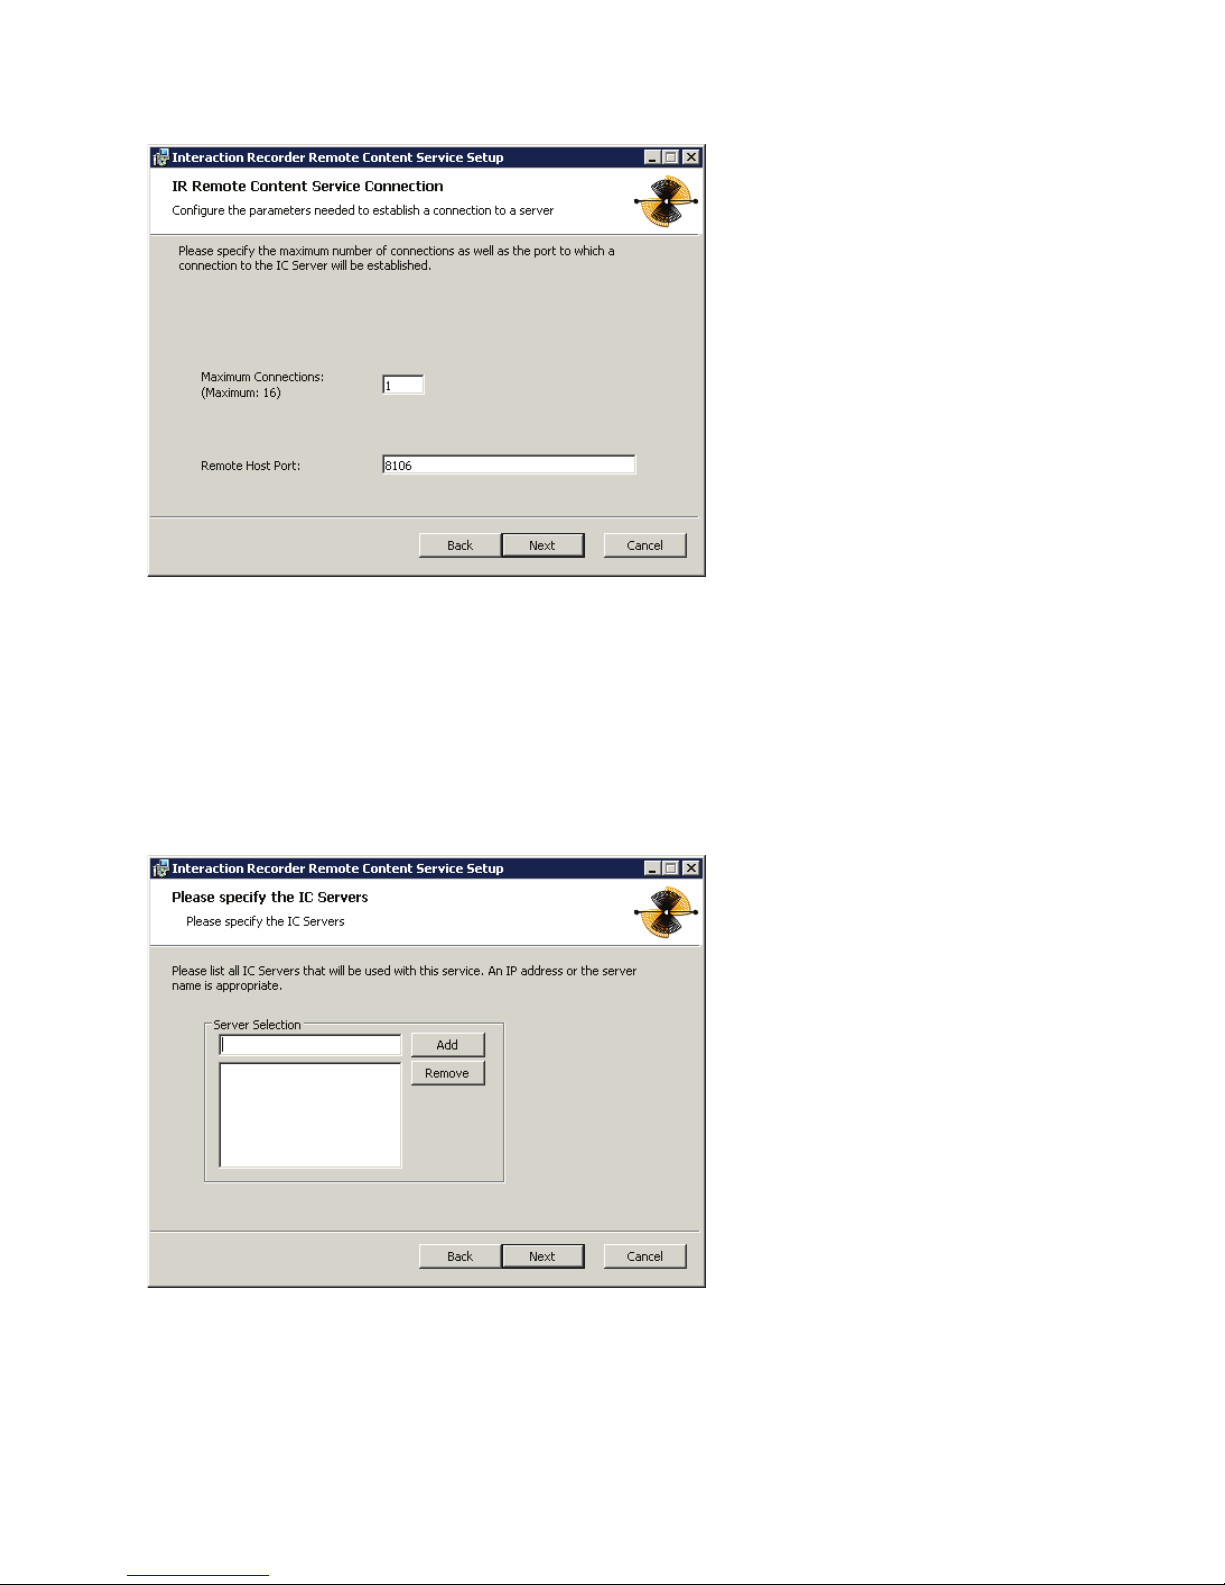
4. Click Next. The IR Remote Content Service Connection dialog opens.
5. In the Maximum Connections text box, enter a number that corresponds to the number of
simultaneous recording playback connections that can be made to Interaction Recorder Remote
Content Service. Valid values range from 0 (zero) to 16.
6. In the Remote Host Port text box, enter the port number on this server that Interaction
Recorder Remote Content Service will use for communications to Interaction Recorder,
Interaction Recorder Client, and Interaction Media Server.
Note: Ensure that the port number is not in use by any other service or application. This also
applies to the Interaction Center server and Interaction Media Server.
7. Click Next. The Please specify the IC Servers dialog opens.
8. In the Server Selection text box, enter the fully-qualified domain name of an Interaction
Center server that will communicate with Interaction Recorder Remote Content Service and
then click Add.
Note: If you have a fallback Interaction Center server, you should also enter it in the Server
Selection field. If you add an erroneous entry, highlight that entry and select the Remove
button.
Interaction Media Server Appliance Installation and Configuration Guide 27
Page 26

Optional post-installation configuration
Install Interaction Recorder Remote Content
9. If necessary, repeat the previous step for any additional Interaction Center servers that you
want to connect with this Interaction Recorder Remote Content Service server.
10. Click Next. The Domain User Validation dialog opens.
11. In the Password text box, enter the password of the currently logged in user.
Note: The user account that you used to log on to this server machine must be a member of
the Administrators group and must be able to access the shared network resources of the
Interaction Media Server.
12. Click Next. The IC Server Name dialog opens.
13. In the IC Server Name text box, enter the fully-qualified domain name for the main
Interaction Center server and then click Next. This step creates the necessary security
certificates to that the systems can communicate.
14. If the Interaction Center server resides in a different domain than the machine on which you
are installing Interaction Recorder Remote Content Service, select the Use IC Credentials To
Login To IC Server check box.
15. In the User and Password textboxes, supply the credentials of a defined Interaction Center
server administrator.
Interaction Media Server Appliance Installation and Configuration Guide 28
Page 27

16. Click Next. The Ready to install Interaction Recorder Remote Content Service dialog
opens.
17. Click Install to begin the installation process. The Installing Interaction Recorder Remote
Content Service dialog appears. It displays a Status bar and messages as the installation.
Interaction Media Server Appliance Installation and Configuration Guide 29
Page 28

Optional post-installation configuration
Install Interaction Recorder Remote Content
18. When the installation is complete, click Finish in the Completed the Interaction Recorder
Remote Content Setup wizard dialog.
Interaction Media Server Appliance Installation and Configuration Guide 30
Page 29

Install Interaction Session Manager
Interaction Session Manager is an Interaction Center server subsystem designed to interact with
client applications written with IceLib. It provides a layer of business logic, security, and caching
that enables commonly shared behavior between client applications.
The Interaction Session Manager install is available as a shortcut on the Interaction Media Server
appliance desktop (not available on all models).
This section contains Interaction Session Manager installation procedures. For information on
planning, licensing, requirements, and configuration instructions, see Session Manager Developer
Application Note in the Technical Reference Documents section of the IC Documentation Library.
The IC Documentation Library is located on the Support website at
https://my.inin.com/support/products/ic40/Documentation/index.htm
located in the Interaction Media Server appliance’s D:\ININ Documentation directory.
To install Interaction Session Manager:
1. On the Interaction Media Server desktop, double-click the Click to Install Interaction
Session Manager icon. The Welcome to the Interaction Recorder Remote Content Service
Setup Wizard for IC 4.0 dialog opens.
. This document is also
Interaction Media Server Appliance Installation and Configuration Guide 31
Page 30

Optional post-installation configuration
Install Interaction Session Manager
2. Click Next. The Session Manager Setup/Custom Setup dialog opens.
3. Click Next. The Domain User Validation dialog opens.
4. Enter the user name, password, and domain that you want to associate with this instance of
Session Manager
Note: The information you enter is used to connect to the IC server and as the account under
which the local service process runs. This account must be an IC account that is bound to an NT
domain account. The NT user must have local administrator rights for the server on which you
are installing Session Manager.
Interaction Media Server Appliance Installation and Configuration Guide 32
Page 31

5. Click Next. The Interaction Center Server and Credentials dialog opens.
Note: If the installation is utilizing WAN-switchover, then the IC server Name specified must be
the particular IC server of the WAN-switchover pair to which this off-server Session Manager
instance is to stay connected.
6. Enter the name of the active IC server, enter IC credentials if preferred, and then click Next.
The Ready to install IC Session Manager dialog opens.
Interaction Media Server Appliance Installation and Configuration Guide 33
Page 32

Optional post-installation configuration
Install Interaction Session Manager
7. Click Install to begin the installation process. The Installing IC Session Manager dialog
opens. It displays a Status bar and messages as the installation progresses.
8. When the installation is complete, click Finish in the Completed the IC Session Manager
Setup Wizard dialog.
The installation program performed the following operations:
• Copied the Session Manager files to the target directory
• Created certificates to connect with the IC server
Note: Be sure to trust the certificate through Interaction Administrator.
• Created services to run Session Manager (IC Session Manager Service and I3 Windows
Service Monitor)
• Started the services
Interaction Media Server Appliance Installation and Configuration Guide 34
Page 33

Change log
Change Log Date Changed…
3/29/2012 • Updated changes to and the location of the Factory Image Restoration
Procedures technical reference. It is available in the box and in the
Packaged Hardware Documents section of the IC Documentation
Library.
• Updated the location of the Interaction Media Server Technical
Reference is available in the Packaged Hardware Documents section
of the IC Documentation Library.
• Interaction Media Server and Interaction SIP Proxy are now preinstalled on the Interaction Media Server appliance. Included
information on how to access the Installation and Configuration
Guides for each, and procedures to install licenses for both
applications.
• Added information on Network Fault Tolerant (NFT) Network Interface
Controller Teams and how to view these NIC teams in the HP Network
Configuration Utility (NCU).
• Interaction Recorder Remote Content Service and Interaction Session
Manager are optional post-installation applications, with shortcuts on
the desktop. Included information on installing these features, as well
as the location of installation and configuration guides for both
applications.
3/15/2013 • Updated Title page, Copyright page and Platform Statement page.
• Updated document part number
• Changed the HTTPS port number for media server to 446.
• Updated content to comply with Gen8 servers, which replace the G7
models.
7/8/2013 • Updated document to include Audiocodes Mediant 800 based Media
Server.
• Distinguished between Medium and Large Interaction Media Serverspecific information and Audiocodes Mediant 800 based Media Serverspecific information.
4/10/2014 • Updated Copyright and trademarks page.
• Updated content for licensing changes for Interaction Media Server.
• Updated content for Interaction SIP Proxy procedures.
Interaction Media Server Appliance Installation and Configuration Guide 35
 Loading...