

I
11_[J-
_2_ _'_,_
perating gu_(:leand warranty
Return the product registration card,
and y_[ Inteqentertainment machine
f_oiJld-_e free!
] StarSight
1 2 'Tuner PIP
] Dolby Prologic Surround Sound
] BBE Audio
] Intraq Remote
rTIFa.... d
pRO • LOGI C
B/I/,:"
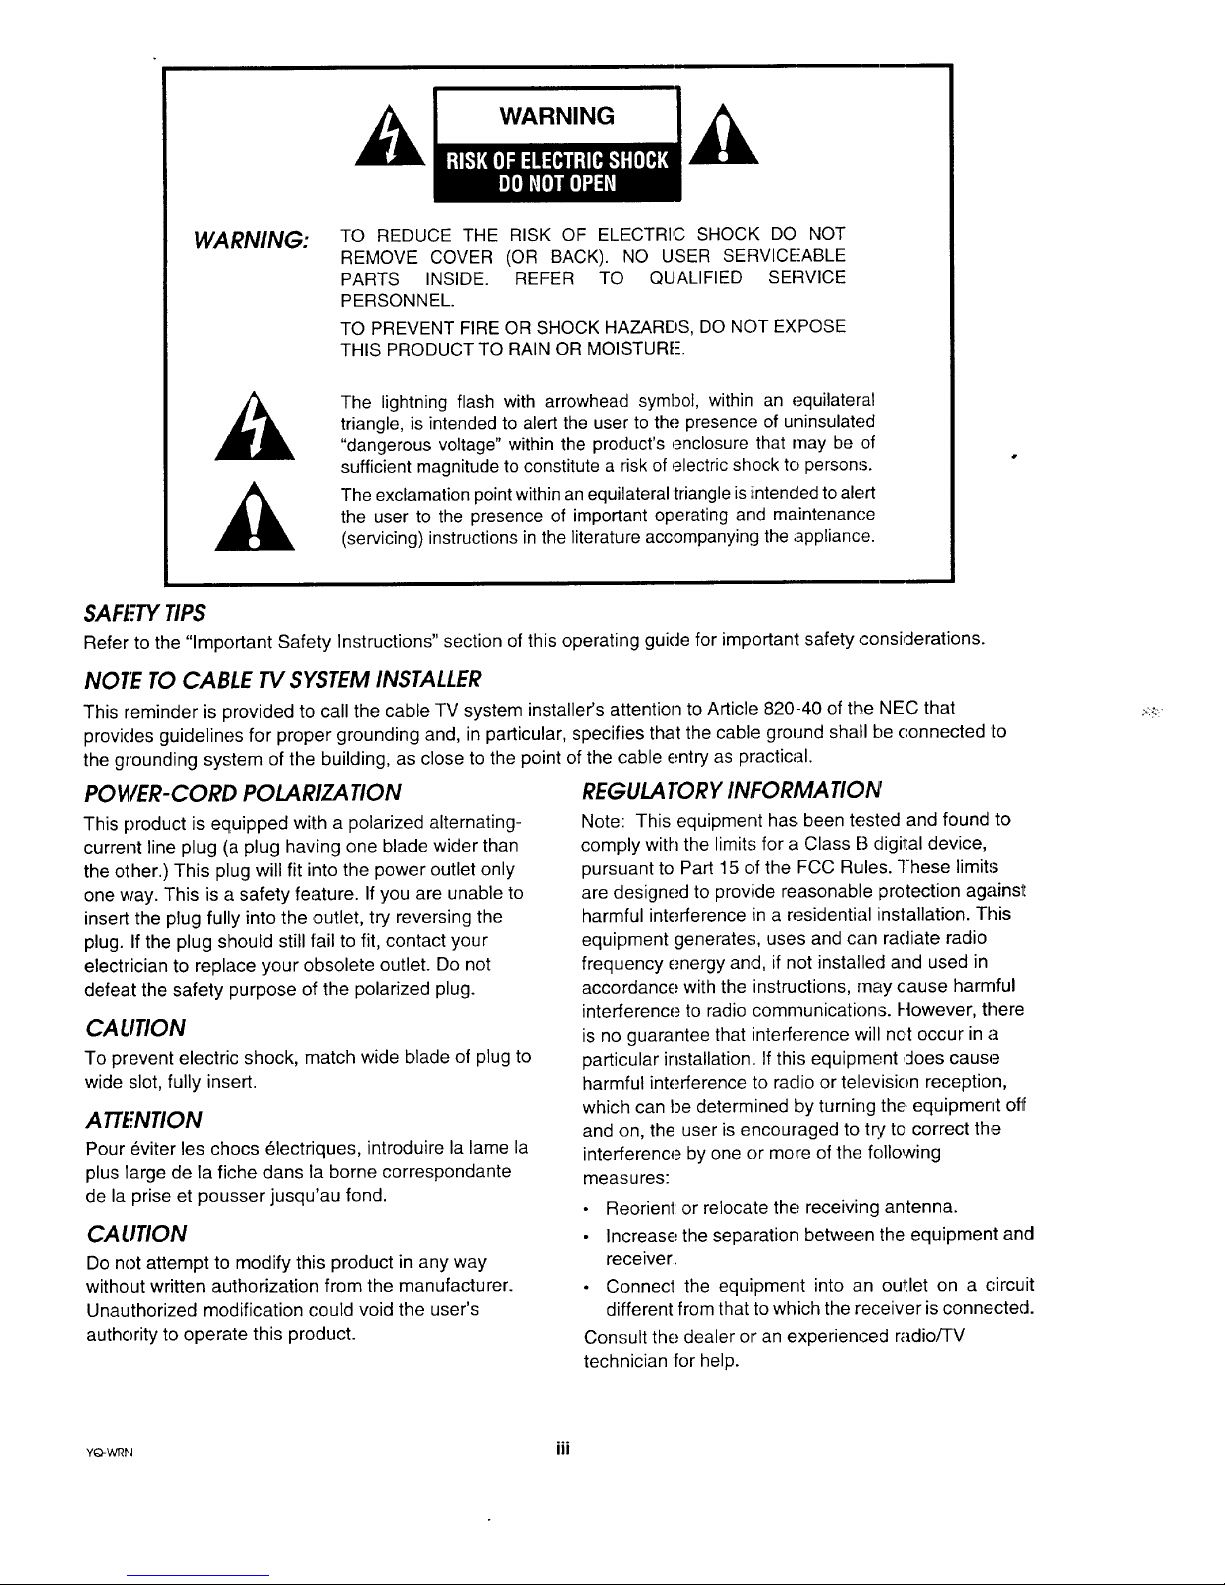
WARNING:
TO REDUCE THE RISK OF ELECTRI,C SHOCK DO NOT
REMOVE COVER (OR BACK). NO USER SERVICEABLE
PARTS INSIDE. REFER TO QUALIFIED SERVICE
PERSONNEL.
TO PREVENT FIRE OR SHOCK HAZARDS, DO NOT EXPOSE
THIS PRODUCT TO RAIN OR MOISTURE-.
The lightning flash with arrowhead symbol, within an equilateral
triangle, is intended to alert the user to the presence of uninsulated
"dangerous voltage" within the product's enclosure that may be of
sufficient magnitude to constitute a risk of electric shock to persons.
The exclamation point within an equilateral triangle is intended to alert
the user to the presence of important operating and maintenance
(servicing) instructions in the literature accompanying the appliance.
SAFETYTIPS
Refer to the "Important Safety Instructions" section of this operating guide for important safety considerations.
NOfE TO CABLE TV SYSTEM INSTALLER
This reminder is provided to call the cable TV system installer's attention to Article 820-40 of the NEC that
provides guidelines for proper grounding and, in particular, specifies that the cable ground shall be connected to
the grounding system of the building, as close to the point of the cable entry as practical.
POWER-CORD POLARIZATION
This product is equipped with a polarized alternating-
current line plug (a plug having one blade wider than
the other.) This plug will fit into the power outlet only
one way. This is a safety feature. If you are unable to
insert the plug fully into the ,outlet, try reversing the
plug. Ifthe plug should still fail to fit, contact your
electrician to replace your obsolete outlet. Do not
defeat the safety purpose of the polarized plug.
CAUTION
To prevent electric shock, match wide blade of plug to
wide slot, fully insert.
ATTENTION
Pour _viter les chocs (_lectriques, introduire la lame la
plus large de la fiche dans la borne correspondante
de la prise et pousser jusqu'au fond.
CAUTION
Do not attempt to modify this product in any way
without written authorization from the manufacturer.
Unauthorized modification could void the user's
authority to operate this product.
REGULA TORY INFORMATION
Note: This equipment has been tested and found to
comply with the limits for a Class B digital device,
pursuant to Part 15 of the FCC Rules. These limits
are designed to provide reasonable protection againsl:
harmful interference in a residential installation. This
equipment generates, uses and can radiate radio
frequency energy and, if not installed and used in
accordance with the instructions, may cause harmful
interference to radio communications. However, there
is no guarantee that interference will net occur in a
particular installation. If this equipment ,doescause
harmful interference to radio or television reception,
which can be determined by turning the equipment off
and on, the user is encouraged to try to correct the
interference by one or more of the following
measures:
• Reorient or relocate the receiving antenna.
Increase the separation between the equipment and
receiver,
• Connect the equipment into an outlet on a circuit
different from that to which the receiver is connected.
Consult the dealer or an experienced radio/TV
technician for help.
.o.
YO-WI_N III

IMPORTANT SAFETY INSTRUCTIONS
Your product has been manufactured and tested with your safety in mind. However, improper use can result in potential elec_trical
shock or :fire hazards. To avoid defeating the safeguards that have been built into your new product, please read and observe the
following safety points; when installing and using your new product, and save them for future: reference.
Observing the simple precautions discussed in this section of the operating guide can help you get many years of enjoyment ;and
safe operation that are built into your new product.
Read Instructions
All the safety and operating instructions should be
read before the product is operated.
Follow Instructions
All operating and use instructions should be fol-
lowed.
Retain Instructions
The safety and operating instructions should be re-
tained for future reference.
Heed Warnings
All warnings on the product and in the operating in-
structions should be adhered to.
Cleaning
Unplug this product from the wall outlet before
cleaning. Do not. use liquid cleaners or aerosol
cleaners. Use a clamp cloth for cleaning.
Water and Moisture
Do not use this product near water -- for example,
near a bath tub, wash bowl, kitchen sink, or laundry
tub, in a wet basement, or near a swimming pool.
Accessories
Do not place this product on an unstable cart,
stand, tripod, bracket, or table. The product may
fall, causing serious injury to a child or adult, and
serious damage to the product. Use only with a
cart, stand, tripod, bracket, or table recommended
by the manufacturer, or sold with the product. Any
mounting of the product should follow the manufac-
turer's instructions, and should use a mounting
accessory recommended by the manufacturer.
Transporting Product
A product and cart combination should be moved
with care. Quick: stops, excessive force, and uneven
surfaces may cause the product and cart combina-
tion to overturn.
PORTABLE CART WARNING
9. Attachments
Do not use attachments not recommended by the
product manufacturer as they may cause hazards.
10. Ventilation
Slots and openings in the cabinet are provided for
ventilation and to ensure reliable operation of the:
product and to protect it from overheating, and
these openings must not be blocked or covered. The
openings should never be blocked by placing the
product on a bed, sofa, rug, or other similar sur-
face. This product should not be placed in a built-in
installation such as a bookcase or rack unless
proper ventilation is provided or the manufacturer's
instructions have been adhered io.
11. Power Sources
This product should be operated o_ly from the type
of power source indicated on the marking label. If
you are not sure of the. type of power supply to
your home, consult your product dealer or local
power company. For products intended to operate
from battery power, or other sources, refer to the
operating instructions.
12. Line-Cord Polarization
This product is equipped with a polarized alternat-
ing-current line plug (a plug having one blade
wider than the other). This plug will fit into the
power outlet only one way. This is a safety feature.
If you are unable: to insert the plug fully into the
outlet, l:ry reversing the plug. If the plug should
still fail to fit, contact your electrician to repllace
your obsolete outlet. Do not defeat the safety pur-
pose of the polarized plug.
13. Power-Cord Protection
Power-_upply cords should be routed so that the)'
are not likely to be walked on or p!,nched by items
placed upon or against them, paying particular at-
tention to cords at plugs, convenience receptacles,
and the point where they exit from the product.
YSAFE-Q V
I
IMPORTANT SAFETY INSTRUCTIONS
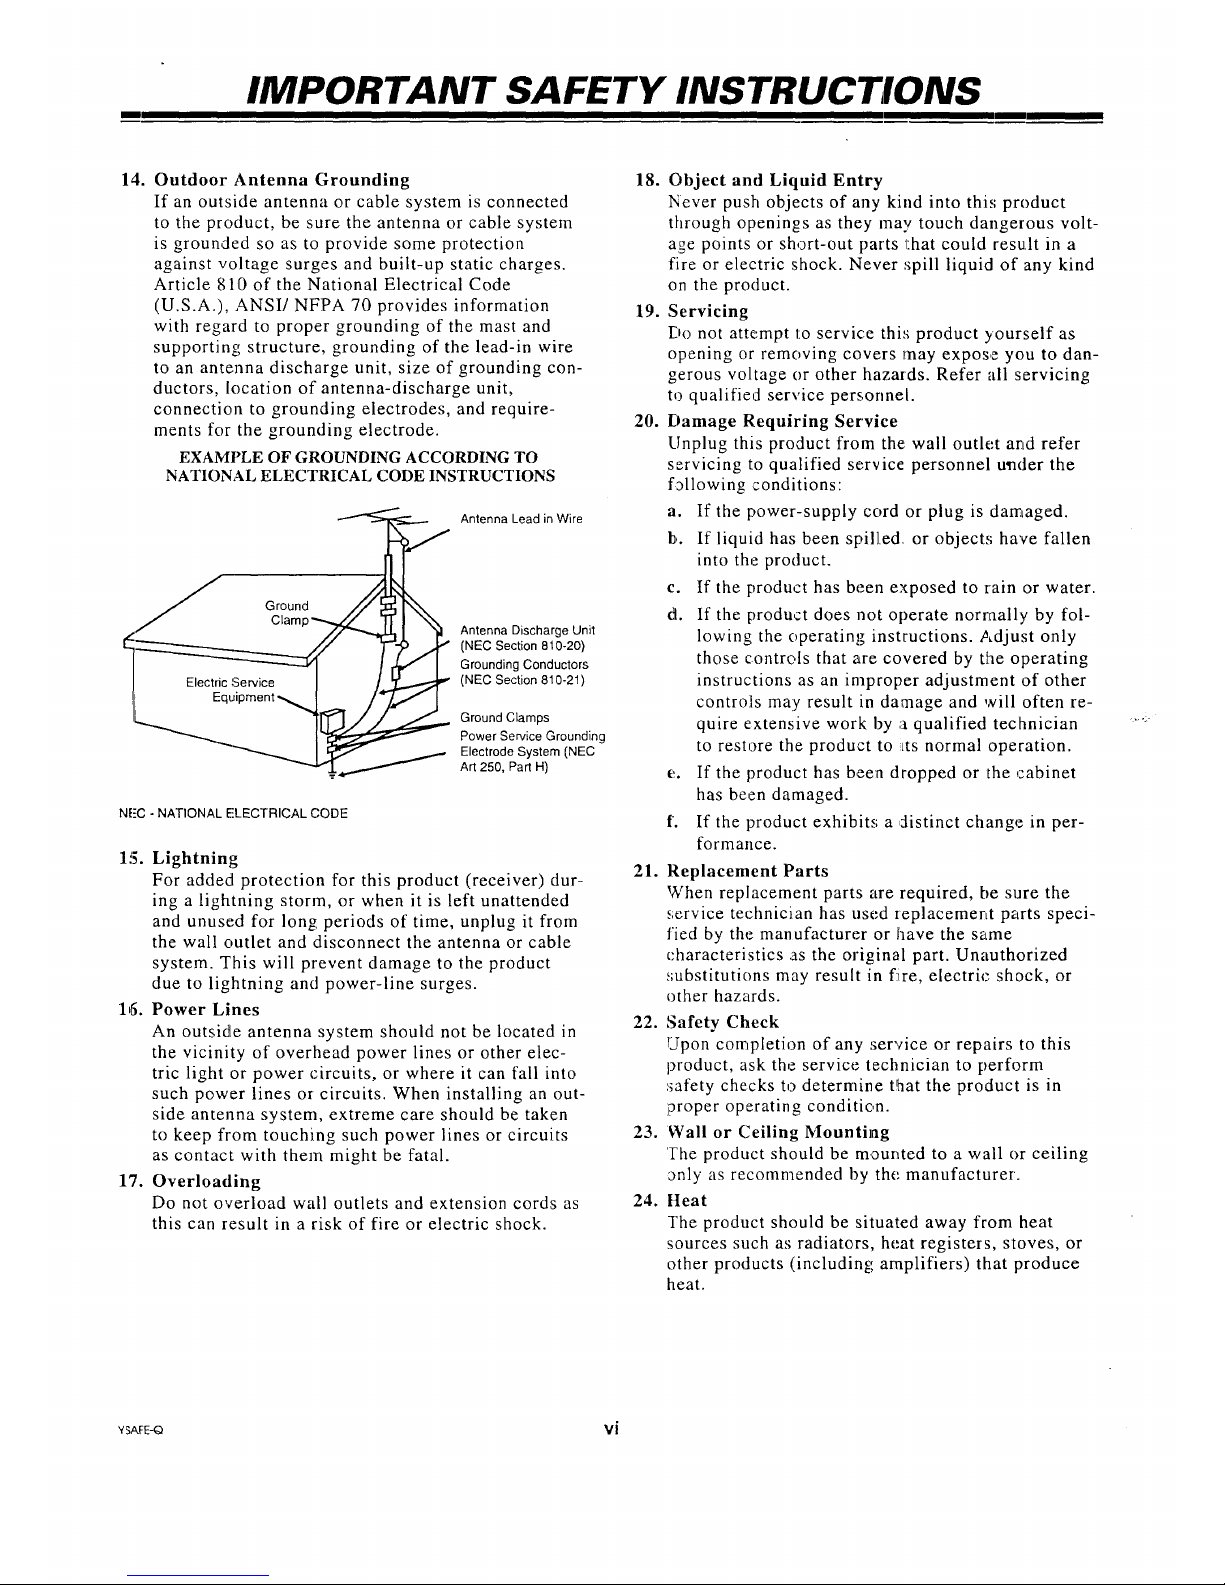
14. Outdoor Antenna Grounding 18.
If an outside antenna or cable system is connected
to the product, be sure the antenna or cable system
is grounded so as to provide some protection
against voltage surges and built-up static charges.
Article 810 of the National Electrical Code
(U.S.A.), ANSI/NFPA 70 provides information 19.
with regard to proper grounding of the mast and
supporting structure, grounding of the lead-in wire
to an antenna discharge unit, size of grounding con-
ductors, location of antenna-discharge unit,
connection to grounding electrodes, and require-
ments for the grounding electrode. 20.
EXAMPLE OF GROUNDING ACCORDING TO
NATIONAL ELECTRICAL CODE INSTRUCTIONS
Antenna Lead in Wire
J Ground
Clamp_ _ _I Antenna Discharge Unit
Grounding Conductors
(NEC Section 810-21)
1' Equipment-_ I J
__,._ ]_ Ground Clamps
Power Service Grounding
Electrode System (NEC
Art 250, Part H)
NFC - NATIONAL ELECTRICAL CODE
1!5. Lightning
For added protection for this product (receiver) dur-
ing a lightning storm, or when it is left unattended
and unused for long periods of time, unplug it from
the wall outlet and disconnect the antenna or cable
system. This will prevent damage to the product
due to lightning and power-line surges.
16. Power Lines
An outside antenna system should not be located in
the vicinity of overhead power lines or other elec-
tric light or power circuits, or where it can fall into
such power lines or circuits. When installing an out-
side antenna system, extreme care should be taken
to keep fiom touching such power lines or circuits
as contact with them might be fatal.
17. Overloading
Do not overload wall outlets and extension cords as
this can result in a risk of fire or electric shock.
Object and Liquid Entry
Never push objects of any kind into thi,; product
through openings as they may touch dangerous volt-
age points or short-out parts that could result in a
fire or electric shock. Never spill liquid of any kind
on the product.
Servicing
Do not attempt to service this product yourself as
opening or removing covers may expose you to dan-
gerous voltage or other hazards. Refer all servicing
to qualified service persorme[.
Damage Requiring Service
[lnplug this product from the: wall outlet and refer
servicing to qualified service personnel u_der the
following conditions:
a. If the power-supply cord or plug is damaged.
b. If liquid has been spilled or objects have fallen
into the product.
c. If the product has been exposed to rain or water.
d. If the product does not operate normally by fol-
lowing the operating instructions. Adjust only
those controls that are covered by the operating
instructions as an improper adjustment of other
contro]is may result in damage and will often re-
quire extensive work by a qualified technician
to restore the product to LtS normal operation.
e. If the product has been dropped or the cabinet
has been damaged.
f'. If the product exhibits; a ,distinct change in per-
formance.
21. Replacement Parts
When replacement parts are required, be sure the
service technician has used zeplacement parts speci-
fied by the manufacturer or have the same
characteristics as the original part. Unauthorized
substitutions may result in f:ire, electric shock, or
other hazards.
22. Safety Check
Upon completion of any service or repairs to this
product, ask the service technician to perform
safety checks to determine that the product is in
proper operating condition.
23. Wall or Ceiling Mounting
The product should be mounted to a wall or ceiling
_nly as recommended by the manufacturer.
24. Heat
The product should be situated away from heat
sources such as radiators, heat registers, stoves, or
other products (including amplifiers) that produce
heat.
YSAFE_ Vi
INTRODUCTION
CONTF.NTS
Safety Warnings .................................... ii
Important Safety Instructions .......................... iii
Introduction
Welcome ......................................... v
Installation Considerations ............................ v
Inteq Defined, Other Good Stuff ....................... vi
Features Chart ..................................... vii
Contents ......................................... viii
Setup Checklist .................................... ix
/
Getting To Know Your Entertainment Machine
Typical Location of User Items, Typical Control Panel,
TV Source Connection Panel, Front A/V Input Jacks ..... 1-1
Conne<:ting Your TV
Overview: Source Equipment Connection Options,
Overview of Connection Options, Setups: 1- Antenna
or Direct Cable-TV, 2- Cable-TV with Cable Box, 3- VCR or
Super-VHS VCR, 4- VCR and Cable Box, Front A!V
Connections, Optional Audio Amplifier/Surround
Connections, Typical Home Theater Setup .............. 2-1
What You Should Do First
Install the Batteries, Connect the Power, Select Main
and PIP Sources, Use,Auto Program, Set the Clock,
Verify Color Convergence, Auto Demo, Other Options ..... 3-1
Picfure-in-Picfure (PIP) Operation
Overview, Two Tuner PIP, Turning PIP On, Selecting Main
Picture and PIP Source, PIP Features/Controls Options with
Universal and Trakball Remotes, Audio Swap ........... 4-1
Multi- Brand Remote Control Menus
Multi-Bland Remote Control MBR3465
Introduction, Battery Installation, Operating Mode, TV
Operations, Key Functions Chart, ProgrammingYour,
Remote, Auto Find, and Brand Codes .................. 5-1
MBR Remote Menus Reference
Quick Reference to Menus, Basic Menu Operation ....... 6-1
Source Menu
Menu Operation, Source Selection .................... 7-1
Setup Menu
Menu Operation, Channel Add/DeVSurf, Turning Captions On
and Off, Choosing Captions or Text, Language, Background,
StarSight, . ...................................... 8-1
Special Features Menu
Menu Operation, Timer Setup, Sleep Timer, On/
Off Timer, Channel Labels, Source ID, Parental Control .... 9-1
Audio Ivlenu
Menu Operation, Bass, Treble, Balance, Audio Mode,
SoundRite, Enhance, BBE, Speakers, Selecting
Audio Enhancements .............................. 10-1
V'Kleo Menu
Menu Operation, Contrast, Brightness, Color, Tint, Sharpness,
ColorTemp, Video Filter, Skin Tone, Video Preset....... 11-1
PIPVideo Menu
MenuOperation, Ch. Guide, Ch. Review, Contrast,
Tint, Size ....................................... 12-1
INTRAQ TM Remote Control Menus
INTRAQ Trakball Remote Control
Introduction, Battery Installation, Choosing Operating Mode,
Basic Operations, TV and VCR Functions, F:'rogramming Your
Intraq Remote, Auto Find, VCR Brand Codes,
Cleaning the Trakball ............................. 13-1
INTRAQ Remote Menus Overview
Quick Reference to Menus, Basic Menu Operation, Poiint"
and Press Operation, Menu Icons,
On-Screen Displays ............................... 14.-1
Source Menu: INTRAQ Remote
Menu Operation, Source Selection ................... 15-I
Setup Menu: INTRAQ Remote
Menu Operation, Auto Program, Channel Add/Del/Surf, Clock
Set, Captions, Caption/Text, Language, Background,
StarSight, Projo Setup (Projection TVs Only) ........... 16-1
Special Features: INTRAQ Remofe
Menu Operation, Timer Setup, Sleep Timer, On/Off
Timer, Channel Labels, Source ID, Parental
Control, Auto Demo ............................... 17-1
Audio Menu: INTRAQ Remote
Menu Operation, Bass, Treble, Balance, Audio Mode,
SoundRite, Enhance, ',Speakers ....................... 18-1
INTRAQ Remote Video Menu
Menu Operation, Contrast, Brightness, Color, Tint,
Sharpness, Color Ternp, Video Filter, Skin Tone, and
Video Preset .................................... 19-1
INTRAQ Remote Pip,Video Menu
Menu Operation, Contrast, Tint, Size ................. 20-I
Maintenance and Warran_,
Maintenance And Troubleshooting
Caring For Your Projection TV, Caring for four Direct
View TV, Extended Absence, Interference,
Before Calling for Sen/ice .......................... 21-1
Replacement Product Registration Sheet
Inteq Accessories
Your Inteq Warranty
How i_ouse this operating guide
Standard TV installation and operation is given in this portion of the operating guide. Follow the procedures given if you
will not be using StarSight_. Two remote controls are provided, each with its own set of on-screen menus. Refer to
the appropriate sections of this guide when using the different remote controls.
3o6_ vii
m
INTRODUCTION
WELCOME
Welcome into the family of II--ITE[:_ TM Color Television
owners. This guide provides instructions on how to operate
your new IV. In addition, we strongly advise you to read
and observe the precautions listed in the Important Safety
Instructions section of this operating guide.. We urge you
to read these publications carefully so that you will receive
full: enjoyment from your new II'-ITI_(:_- TV for many
years to come.
Your new TV has been designed and built to give you the
very best in quality, features and performance. There are
thousands of II--ITF::O- authorized service centers
throughout the U.S., Canada and Mexico who can attend
promptly and effectively to ordinary service needs.
If you should have an unusual performance or service prob-
lern that cannot be satisfactorily resolved by your Ir--ITEE[_
dealer or II--IT(----(ZI- authorized service center, contact us
toll free at:
IFqTEG-
Customer Service Department
1000 Milwaukee Avenue
Glenview, IL 60025-2493
Telephone: (888) 376-6825
Mon-Fri, 8:00 a.m. - 4:30 p.m. Central Time
IIVSTALLATION CONSIDERATIONS
Before you install your TV...
Ventilation -- Proper ventilation keeps yourTV run-
ning cool. Air circulates through perforations in the
back: and bottom of the cabinet. Do not block these
vents or you will shorten the life of your TV.
,&
,&
,&
Power Source -- Your TV is designed tooperate on
nomlal household current, 120 volt 60 Hertz AC. Do
not attempt to operate it on DC current.
Power Cord -- Your power cord has a polarized
plug as required by Underwriters' Laboratories. It
has one regular blade and one wide blade and fits
only one way into a standard electrical outlet. If the
blades will not enter either way, your outlet is very
old and non-standard. A new outlet should be in-
stalled by a qualified electrician.
Safe Operation -- Your TV is manufactured and
tested with your safety in mind. However, unusual
stress caused by dropping or mishandling, expo-
sure to flood, fire, rain or moisture, or accidental
spilling of liquids into the TV, can result in potential
electrical shock: or fire hazards, if this happens,
have your TV checked by a service technician be-
fore using it again.
PLEASE READ AND OBSERVE EACH SAFETY POINT
IN THE "SAFETY TIPS" FOLDER WHEN INSTALLING
AND USING YOUR TV.
Send the model number, serial number, and date of pur-
chase or original installation, with a full explanation of the
problem and the service history. We will welcome the op-
porturfity to look into your specific question or 13roblem and
to be ,3fassistance in resolving it promptly.
The model and serial numbers of your new "IV are located on
the back of the TV cabinet. For your future conwanience and
protection, we suggest that you record these numbers here:
BrlIoo,.,.,,u-ol
P R O ,, L O G I C
Manufactured underlicense from DolbyLaboratoriesLicensingCorpo-
ration. Additionally licensed under Canadian patent number
1,037,977. "Dolby","Pro Logic"and the ¢ouble-D symbol are trade-
marksof Dolby Laboratories Licensing Corporation.
Model No.
Serial No.
VIDEO GAMES AND OTHER FIXED
PA'I-rERN DISPLAY CAUTION --- If you use your "IV for
video games or other fixed displays, avoid setting the
BRIGHTNESS control for an excessively briglnt picture. A
fixed display is any image which does not change fre-
quently, such as a channel/neh_ork identification or other
symbol that remains in the same location for long periods
of time. A bright, fixed pattern, if left on for long periods of
time, can result in a permanent imp3rint on the TV picture
tube. You can reduce this possibility by alternating the use
of the fixed pattern display with normal TV picture viewing,
by turning down the CONTRAST control for sustained fixed
pattern use, and by turning off 'the fixed pattern display
when not in use.
PLUGGING IN YOUR -rv -- Be sure to plug your TV into
an "unswitched" AC power source. The "switched" AC out-
lets found on some video equipment will not continue sup-
plying power to the IV once the equipment is turned off. If
the power to the TV is interrupted, you will have to reset
the clock in the TV to the current time.
PICTURE SCREEN CLEANING -- Use a soft cloth mois-
tened with warm water and rub lightly in the .,;oiled areas of
the screen. DO NOT USE A TISSUE OR PAPER TOWEL,
AS THESE MAY DAMAGE SURFACE. Wipe. only in the
vertical (up/down) direction (along the groow.,s). If there is
a dirt buildup, a mild solution of warm water and Ivory dish-
washing detergent rnay be used. iJse dry soft cloth to dry
the screen. Care should be taken to avoid scratches or
damage to the, screen surface.
NOTE -- The TV screen is easily damaged. Avoid acciden-
tal contact with the screen.
V_WEU viii

INTRODUCTION
m
INTEQ .......DEFINED ....... UNLEASHED
Your new Inteq TV is a "high-tech," sophisticated, entertainment machine. ,Justwatching TV is no longer enough: It's
time to sEartexperiencing TV. Do you want your teeth to be rattled loose by the sound and your eyes aazzled by the
brilliance and sharpness of the picture? then start your ignition (press POWER), fasten your seat belt, and experience
this ....
Look of the Video,,..
650+, or 700, or even 800 lines of horizontal resolution
(depending on the TV model). Add to this a 3-line comb
filter that provides wicked reds and tight, cool blues, and
you have;picture quality that can only be described as
enNeserrle! But there's more .... Invar picture tube tech-
nology in the direct view TV prevents warping and other
video distortion that can occur in larger picture tube
sizes operating at high temperature. Improved signal
brightness defined with truer color is the end result.
For the projection entertainment machine, the lens sys-
tems deliver high contrast and optimum brightness for
extreme picture performance. Also, the short focal opti-
cal path gives the system its slim profile so it takes up
less floor space without sacrificing performance. And,
the screen'.,; Frennel lens provides uniform light distribu-
tion - witho,Jt "hot spots" - for a more realistic pic'Iure
with a whopping 160° wide viewing angle. (That means
you don't have to sit directly in front of the projection TV
to see a quality picture.)
Usten k) the Audio ....
Dolby Pro-Logic Surround Sound TM , Dolby Phantom Pro-Logic TM , Dolby 3TM , BBE Sonic Maximizer TM : With a line-up
like this, '"full frontal entertainment for your head" - especially for your ears - is no joke! The really great part is that all
of this audio performance occurs inside the TV. So, if you choose to route the TV sound through your :stereo system or
external amplifier to create a home theater system, you'll still have the benefit of these audio enhancing features.
D01by Pro-Logic Surround SoundTM : This technology util-
izes the same logic steering, directional enhancement
system found in theaters to put sound where it belongs.
With optional speakers hooked up, the separate center
channel keeps dialogue and other central sounds close
to the screen while other sounds (like background noise)
come from the back, in a "surrounding" effect. You
might actually think you're in a theater.
Dqlby Phantom Pro-Logic TM : This phantom takes noth-
ing away. Instead, it actually creates the illusion of a
"true" center channel and uses the same logic steering
Dolby is famous for in systems without a surround sound
speaker system.
Dolby 3TM ; A perceptual digital audio coding technique
of phenomenal efficiency, quality and versatility. Now,
true stereo sound effects can be achieved for expanded
depth, localization, and realism -- even without surround
sound speakers.
BBE $0ni¢ Maximized M: Nothing can compare to being
at a live performance .... until now! When sound is re-.
corded, transmitted, and wrung through miles of wires
and countless audio circuits, it's obvious that some of
the live performance experience will be lost. That's
where the BBE Sonic Maximizer comes to the rescue::
BBE technology compensates for phase and amplitude
distortions to return sound to a near live-performance
state. The result is crystal-clear highs and earth-
shattering lows.
OTHERGOOD STUFF
As ifthe Video and Audio stuff isn't enough, your entertainment machine is packed full of other featLJresyou'll love. At
the head of the list is the StarSight_ program guide. Why thumb through -IV listings in the newspaper when you can
see the listings on your TV screen? Not to mention having detailed descriptions of movies and shows and automatic
programming of VCR-record features at your finger tips. You'll want to activate this optional service immediately.
All TV o:)erations, video picture adjustments, and audio sound adjustments are performed through the use of on-screen
menus and displays. And, most of the TV's features can be selected and adjusted from the comfort of your favorite
chair by using either of the two infrared remote controls: The Multi-brand (7 function) remote or the Intraq trakball
(TV/VCR) remote.
The multi-brand programmable remote can operate up to seven different pieces of audio/video equ!ipment. Talk about
convenience: Your VCR, Video Disk Player, TV, Audio Amplifier, and others can all be operated by this one remote.
About the only thing it doesn't do is change its own battery - that's up to you.
_ ix
INTRODUCTION
Ill I I
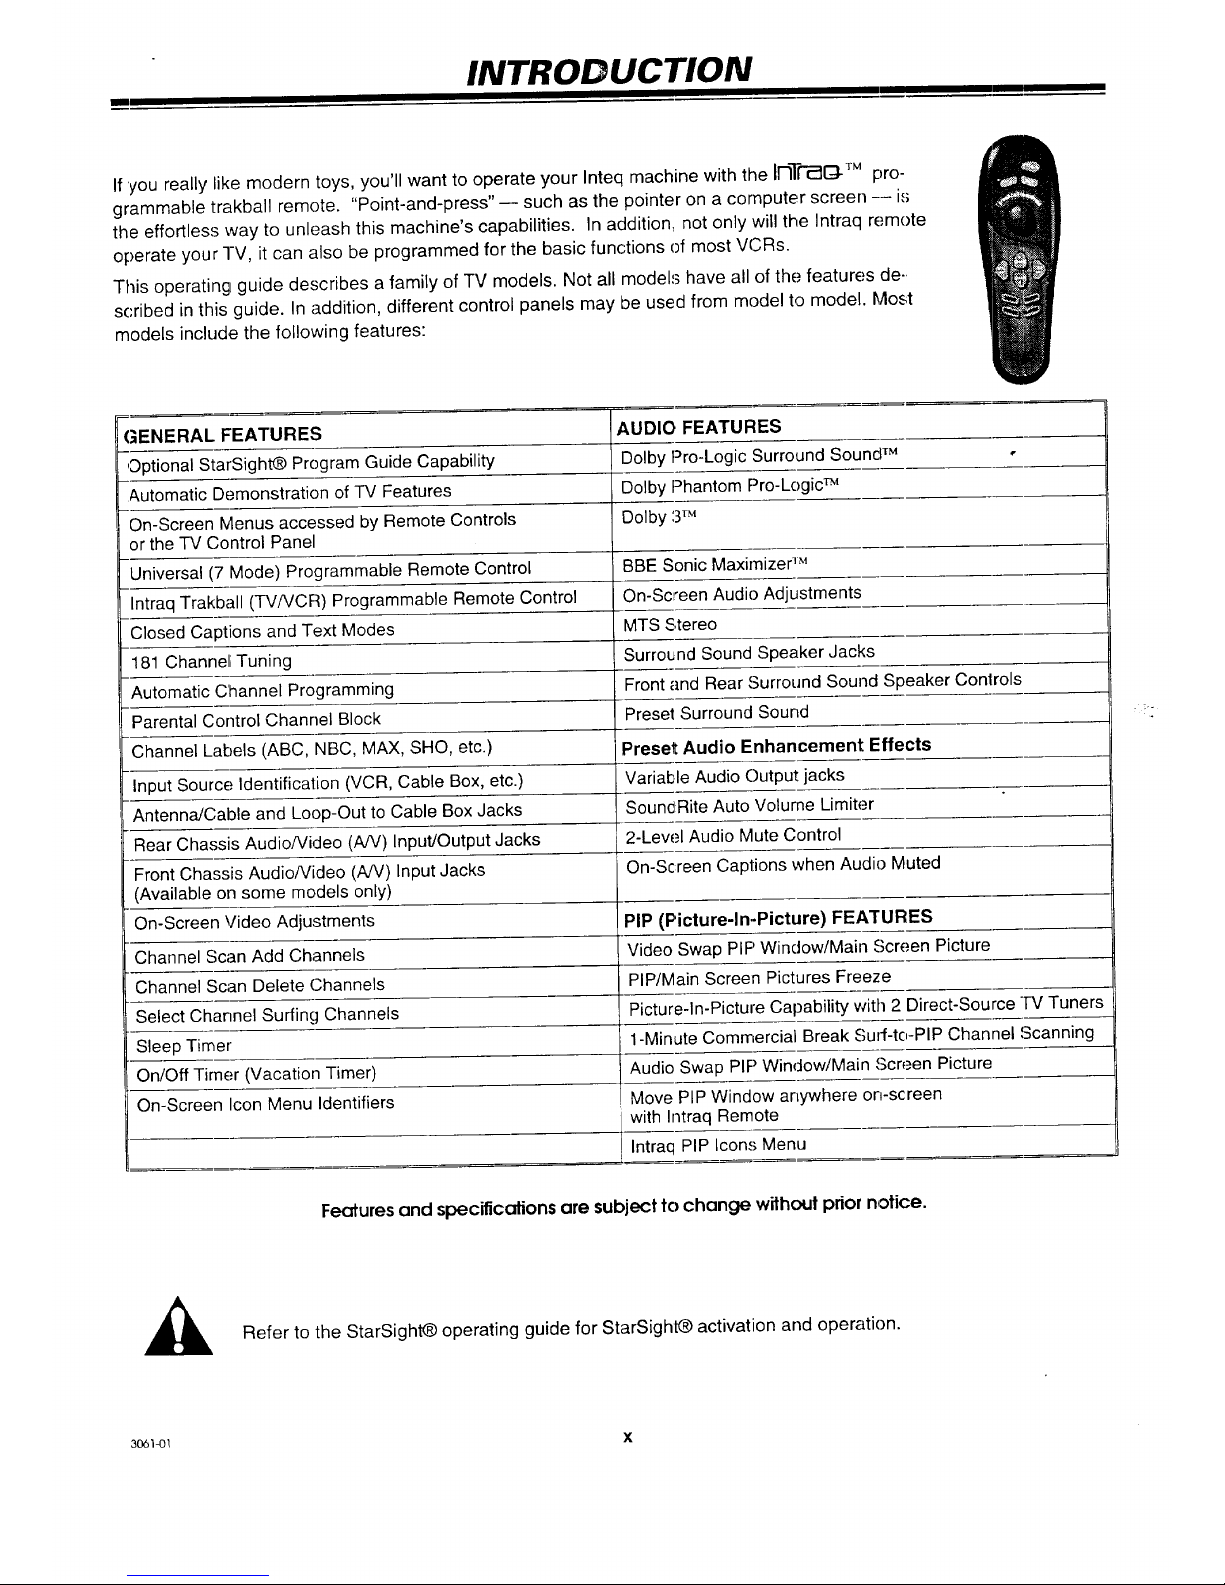
If 'youreally like modern toys, you'll want to operate your Inteq machine with the liqTI-_Q-TMpro-
grammable trakball remote. "Point-and-press"-- such as the pointer on a computer screen -- is
the effortless way to unleash this machine's capabilities. In addition, not only will the Intraq remote
operate your -I-V,it can also be programmed for the basic functions of most VCRs.
This operating guide describes a family of TV models. Not all models have all of the features de-,
scribed inthis guide. Inaddition, different control panels may be used from model to model. Most
models include the following features:
GENERAL FEATURES AUDIO FEATURES
,Optional StarSightO Program Guide Capability Dolby Pro-Logic Surround Sound TM -
&utomatic Demonstration of TV Features Dolby Phantom Pro-Logic TM
On-Screen Menus accessed by Remote Controls Dolby 3TM
or the TV Control Panel
Universal (7 Mode) Programmable Remote Control BBE Sonic Maximizer TM
Intraq Trakball (TV/VCR) Programmable Remote Control On-Screen Audio Adjustments
Closed Captions and Text Modes MTS Stereo
181 Channe_ Tuning Surround Sound Speaker Jacks
Automatic Channel Programming Front and Rear Surround Sound Speaker Conlrols
Parental Control Channel Block Preset Surround Sound
Channel Labels (ABC, NBC, MAX, SHO, etc.) Preset Audio Enhancement Effects
Input Source; Identification (VCR, Cable Box, etc.) Variable Audio Output jacks
Antenna/Cable and Loop-Out to Cable Box Jacks SouncRite Auto Volume Limiter
Rear Chassis AudioNideo (AJV) Input/Output Jacks 2-Lew.,I Audio Mute Control
Front Chassis AudioNideo (AN) Input Jacks On-Screen Captions when Audio Muted
(Available on some models only)
On-Screen Video Adjustments PIP (Picture-In-Picture) FEATURES
Channel Scan Add Channels Video Swap PIP Window/Main Screen Picture
Channel Scan Delete Channels PIP/Main Screen Pictures Freeze
Select Channel Surfing Channels Picture-In-Picture Capability with 2 Direct-Source TV Tuners
Sleep Timer 1-Minute Commercial Break Surf-tc,-PIP Channel Scanning
On/Off Timer (Vacation Timer) Audio Swap PIP Window/Main Screen Picture
On-Screen Icon Menu Identifiers Move PIP Window anywhere on-screen
with Intraq Remote
i Intraq PIP Icons Menu
Features and specifications are subject to change without prior notice.
,_ Refer to the StarSight@ operating guide for StarSight@ activation and operation.
306)4)1 X
GET TO KNOW YOUR ENTERTAINMENT MACHINE
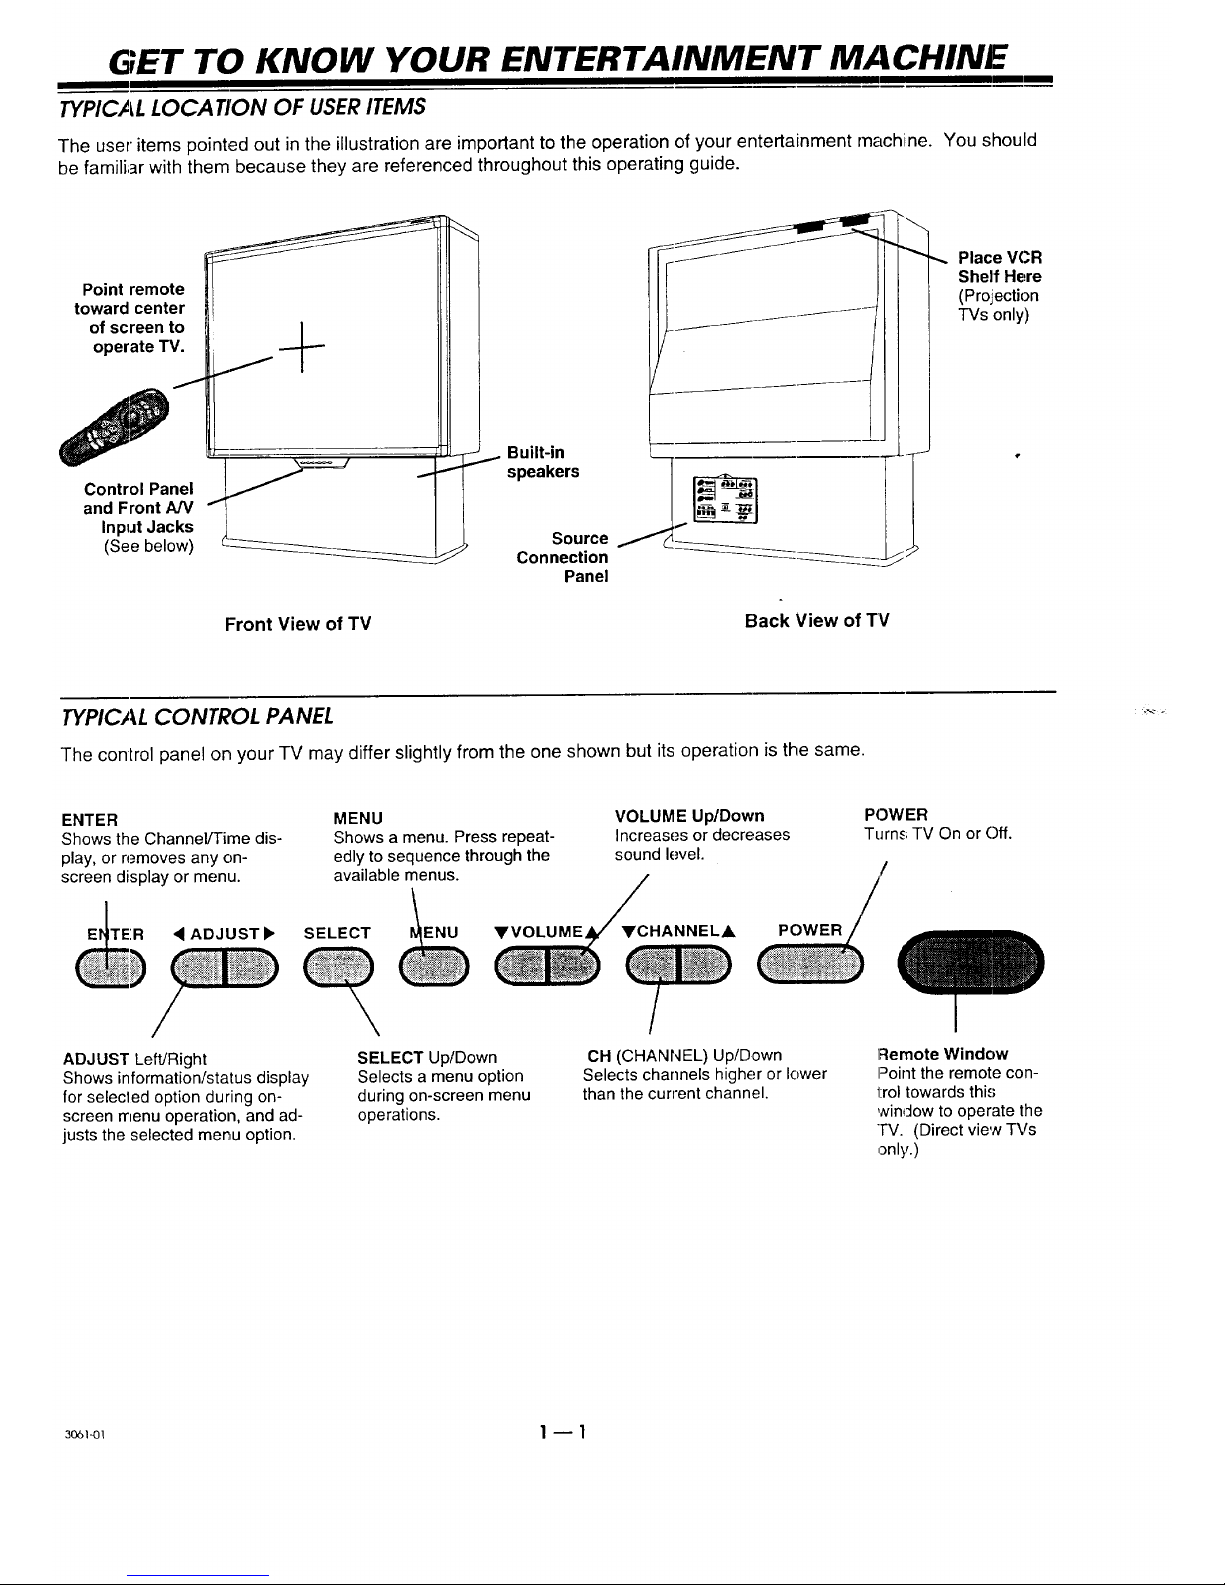
TYPICAL LOCATION OF USER ITEMS
The user items pointed out in the illustration are important to the operation of your entertainment machine. You should
be familiar with them because they are referenced throughout this operating guide.
Point remote
toward center
of screen to
operate TV.
Control Panel
and Front A/V
Input Jacks
(See below)
Front View of TV
Built-in
speakers
Source
Connection
Panel
Back View of TV
Place VCR
SheffHere
(Pro.iection
TVsonly)
TYPICAL CONTROL PANEL
The control panel on your TV may differ slightly from the one shown but its operation is the same.
ENTER
Shows the Channel/Time dis-
play, or removes any on-
screen display or menu.
TE:R • ADJUST •
ADJUST Left/Right
Shows information/status display
for selecled option during on-
screen menu operation, and ad-
justs the selected menu option.
MENU
Shows a menu. Press repeat-
edly to sequence through the
available menus.
SELECT ENU YVOLUME
SELECT Up/Down
Selects a menu option
during on-screen menu
operations.
VOLUME Up/Down
Increases or decreases
sound level.
YCHANNELj_
POWER
Turns TV On or Off.
OH (CHANNEL) Up/Down
Selects channels higher or lower
than the current channel.
Remote Window
Point the remote con-
l:rol towards this
winclow to operate the
TV. (Direct view TVs
only.)
_o61_1 1 -- 1
GET TO KNOW YOUR ENTERTAINMENT ,MACHINE
I
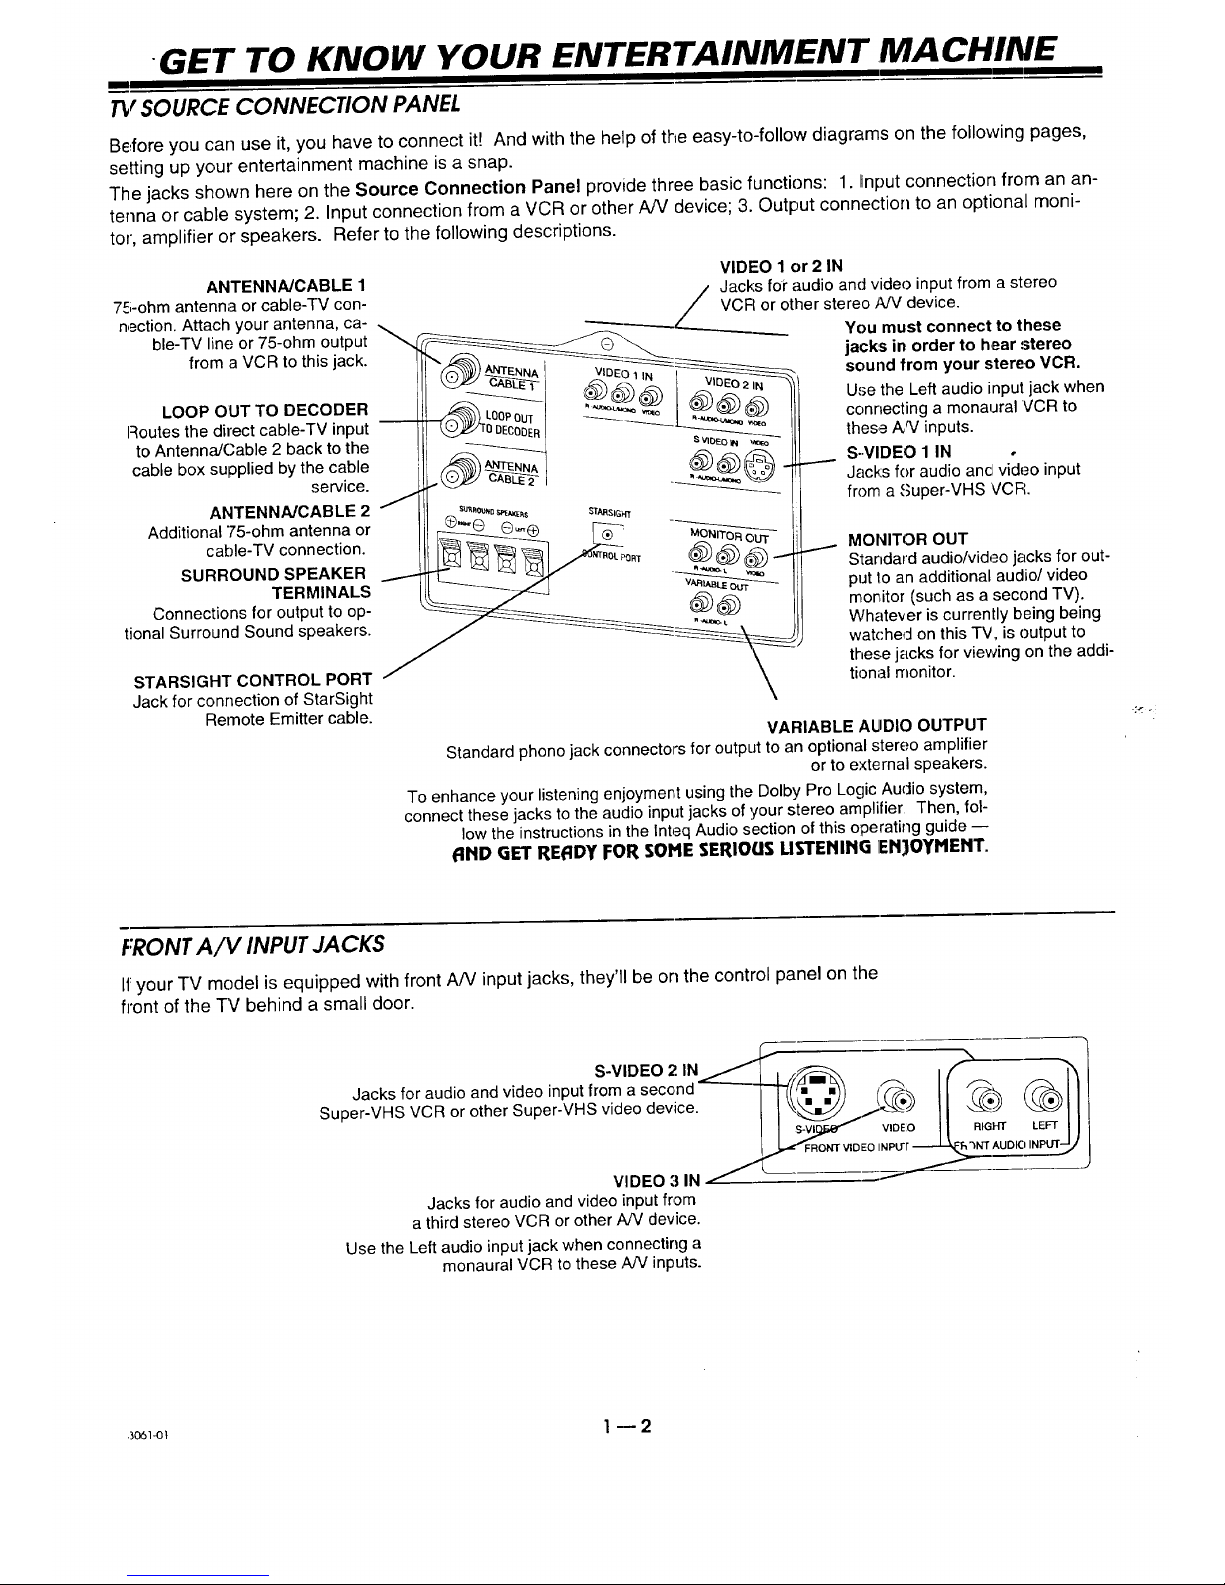
TV SOURCE CONNECTION PANEL
Before you can use it, you have to connect itt And with the help of the easy-to-follow diagrams on the following pages,
setting up your entertainment machine is a snap.
The jacks shown here on the Source Connection Panel provide three basic functions: 1. Input connection from an an-
tenna or cable system; 2. Input connection from a VCR or other A/V device; 3. Output connection to an optional moni-
tor', amplifier or speakers. Refer to the following descriptions.
ANTENNA/CABLE 1
75-ohm antenna or cable-TV con-
nection. Attach your antenna, ca-
ble-TV line or 75-ohm output
from a VCR to this jack.
LOOP OUT TO DECODER
Routes the direct cable-TV input
to AntennaJCable 2 back to the
cable box supplied by the cable
service.
ANTENNA/CABLE 2
Additional 75-ohm antenna or
cable-TV connection.
SURROUND SPEAKER
TERMINALS
Connections for output to op-
tional Surround Sound speakers.
STARSIGHT CONTROL PORT
Jack for connection of StarSight
Remote Emitter cable.
VIDEO 1 or 2 IN
/ Jacks for audio and video input from a stereo
---__. / VCF/or other stereo ,_W device.
"---'--_------_---___ You must connect to these
jacks in order to hear stereo
sound from your stereo VCR.
Use the Left audio input jack when
connecting a monaural VCR to
these A_/inputs.
S..VIDEO 1 IN
Jacks for audio ancl video input
from a Super-VHS VCR.
MONITOR OUT
Standard audio/video jacks for out-
put 1oan additional audio/video
moritor (such as a second TV).
Whatever is currently being being
watched on this TV, is output to
these jacks for viewing on the addi-
tional monitor.
VARIABLE AUDIO OUTPUT
Standard phono jack connectors for output to an optional stereo amplifier
or to external speakers.
To enhance your listening enjoyment using the Dolby Pro Logic Auclio system,
connect these jacks to the audio input jacks of your stereo amplifier Then, fol-
low the instructions in the Inteq Audio section of this operating guide --
AND GET READY FOR SOME SERIOUS USTENING ]ENJOYMENT.
FRONTA/V INPUT JACKS
If your TV model is equipped with front A/V input jacks, they'll be on the control panel on the
front of the TV behind a small door.
S-VIDEO 2 IN _.-"_, f_---_ f-% ' ,_1
Jacks for audio and video input from a second .=-.-___._..(,(/_m=_,_ ,._,. _-'_ _ I }_
Soper-VHS VCR or other Super-VHS video device. I I 11|
VIDEO 3 IN/- -
Jacks for audio and video input from
a third stereo VCR or other AN device.
Use the Left audio input jack when connecting a
monaural VCR to these A/V inputs.
3061_t 1--2
CONNECTING YOUR TV
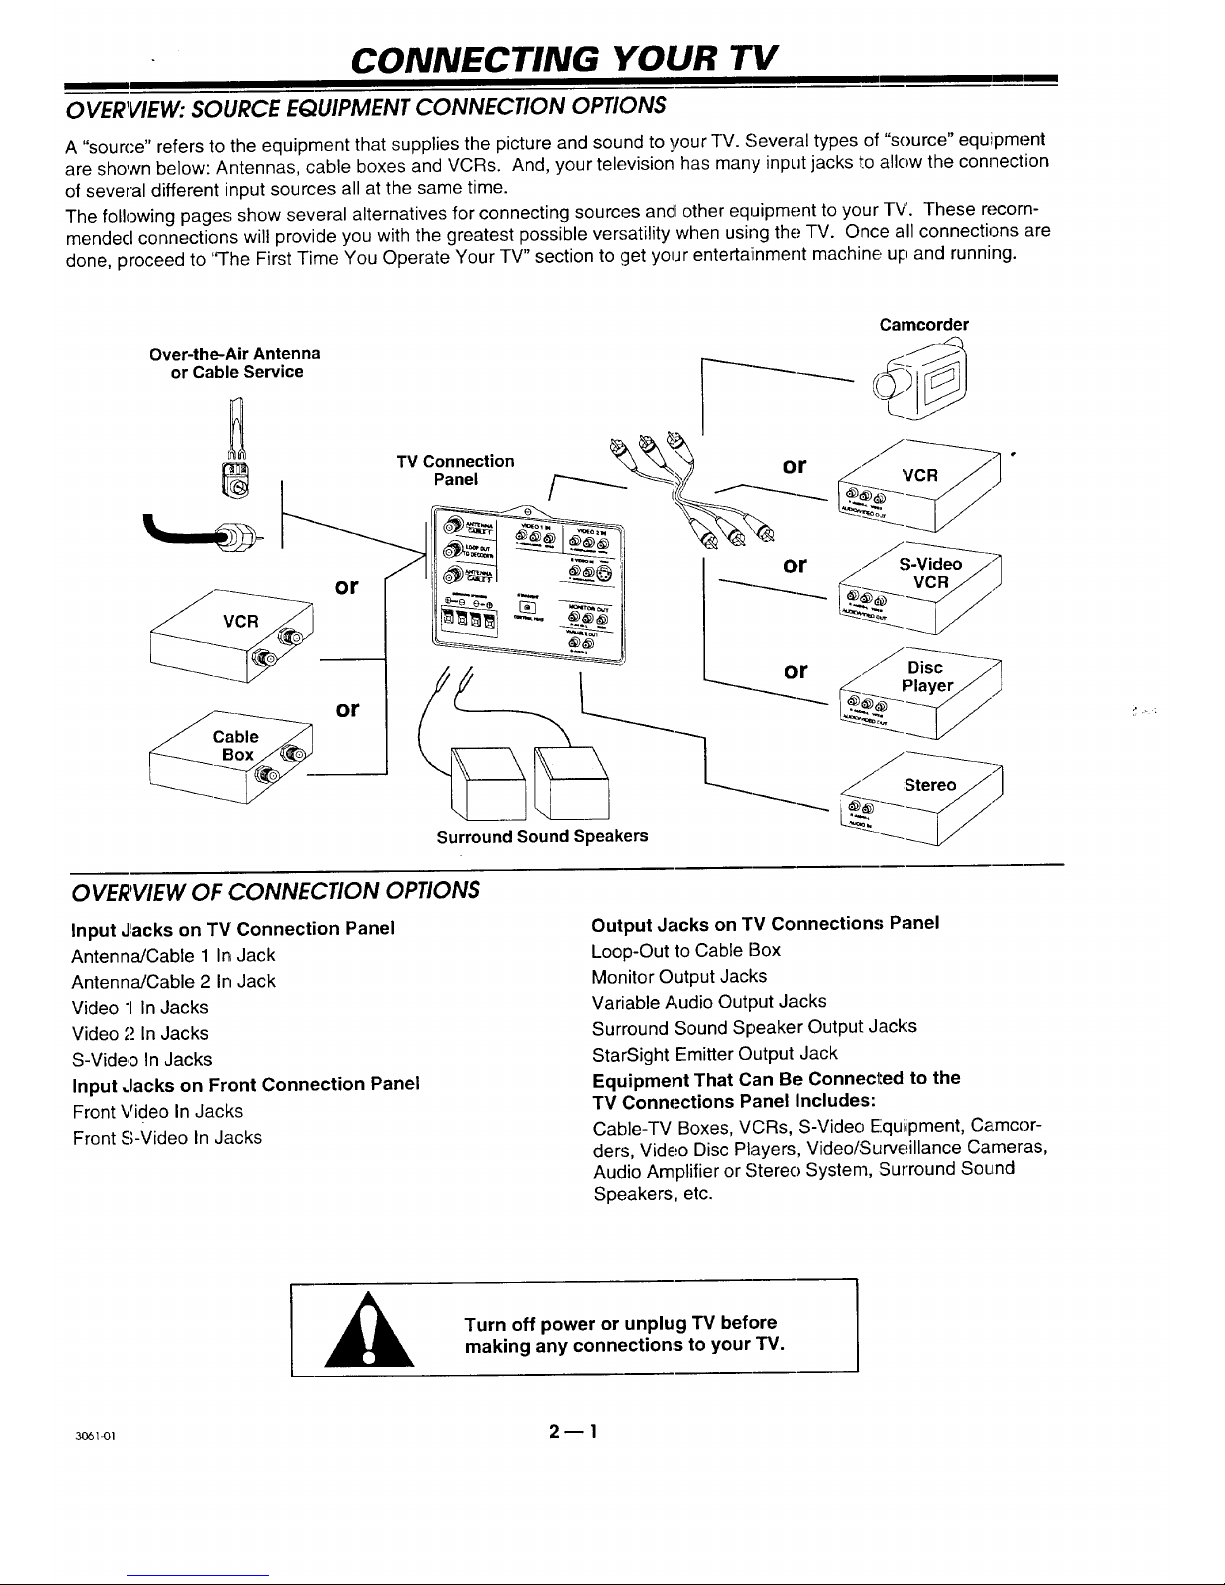
OVERVIEW: SOURCE EQUIPMENT CONNECtiON OPtiONS
A "source" refers to the equipment that supplies the picture and sound to your TV. Several types of "source" equiipment
are shown below: Antennas, cable boxes and VCRs. And, your television has many input jacks to allow the connection
of several different input sources all at the same time.
The following pages show several alternatives for connecting sources ancl other equipment to your TV. These recom-
mendecl connections will provide you with the greatest possible versatility when using the TV. Once all connections are
done, proceed to 'q-he First Time You Operate Your TV" section to get your entertaiinment machine up and running.
Over-the-Air Antenna
or Cable Service I ___
|
TV Connection or
Panel _ ( ___
or
or
Surround Sound Speakers
l or
or
Camcorder
/ S-Video
OVERVIEW OF CONNECtiON OPtiONS
Input Jlacks on TV Connection Panel
Antenna/Cable 1 In Jack
Antenna/Cable 2 In Jack
Video "1In Jacks
Video ,'._In Jacks
S-Video In Jacks
Input .lacks on Front Connection Panel
Front Video In Jacks
Front S-Video In Jacks
Output Jacks on TV Connections Panel
Loop-Out to Cable Box
Monitor Output ,.lacks
Variable Audio Output Jacks
Surround Sound Speaker Output Jacks
StarSight Emitter Output Jack
Equipment That Can Be Connected to the
TV Connections Panel Includes:
Cable-TV Boxes, VCRs, S-Video Equipment, Camcor-
ders, Video Disc Players, Video/Surveillance Cameras,
Audio Amplifier or Stereo System, Surround Sound
Speakers, etc.
Turn off power or unplug TV before
making any connections to your "IV.
:_I 2 _ 1
CONNECTING YOUR "IV
I
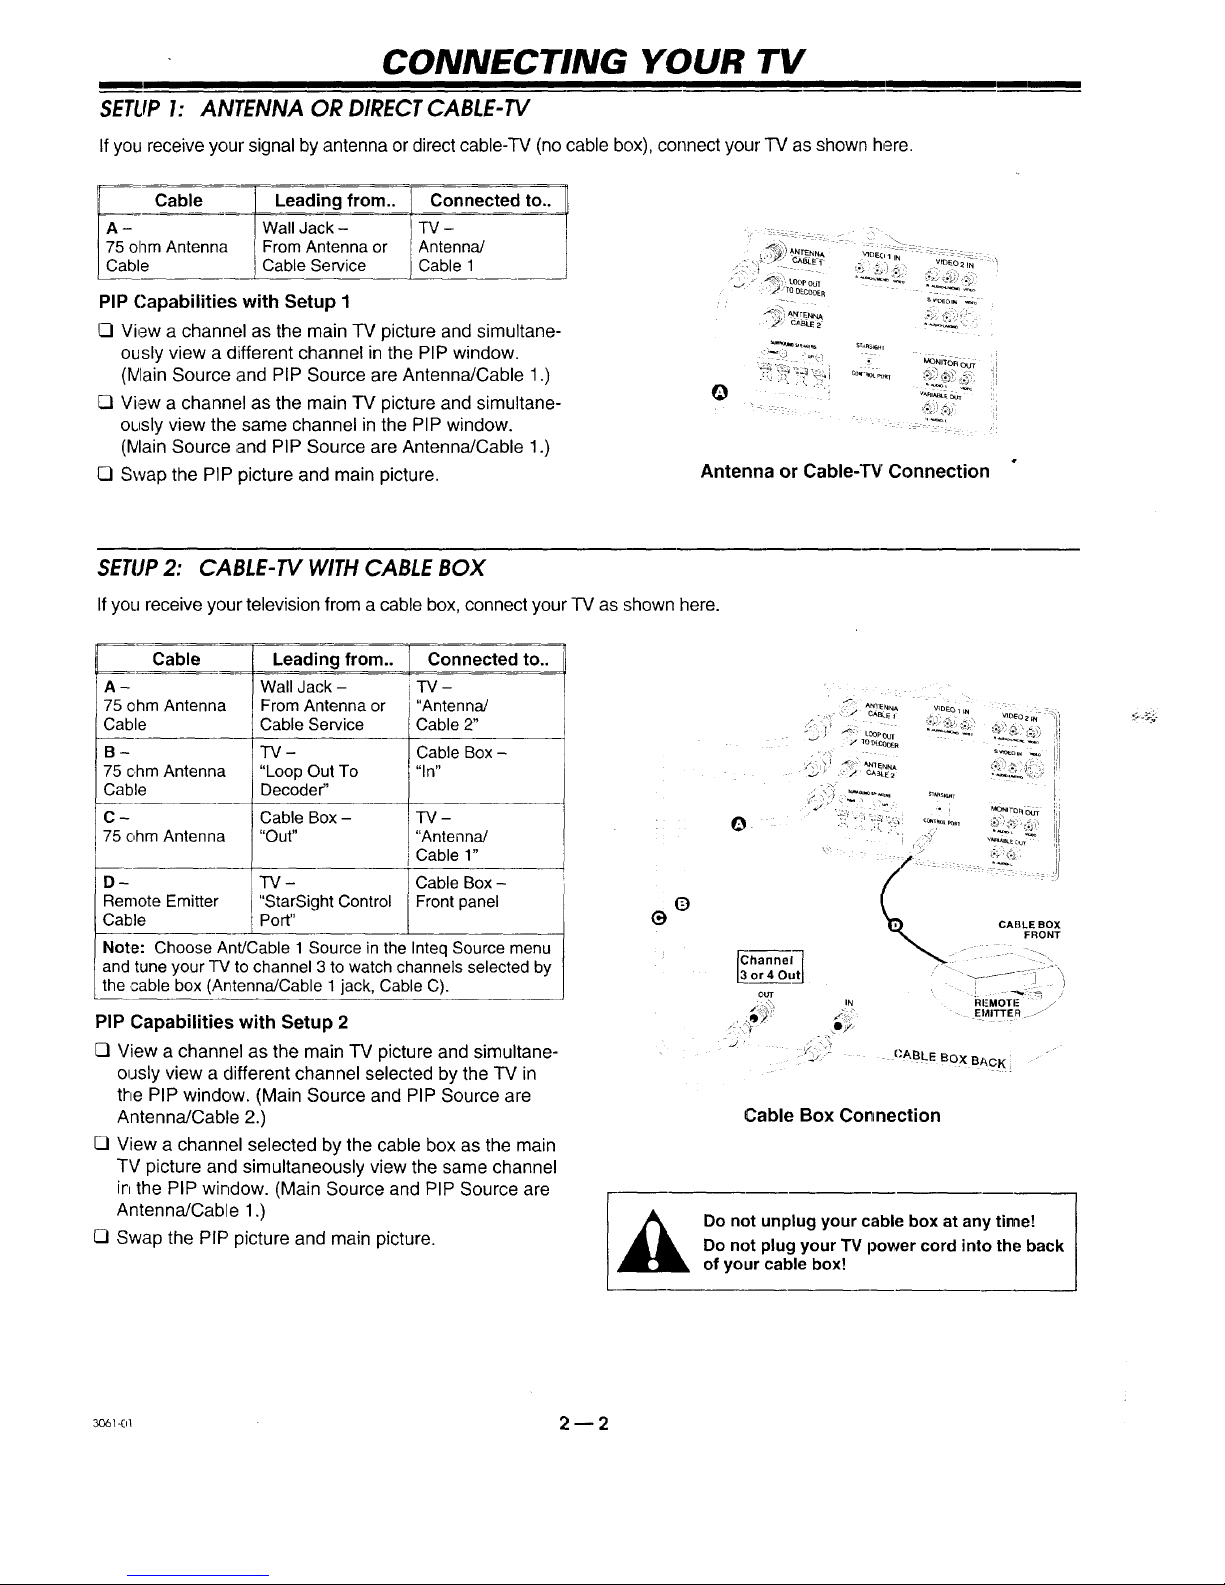
SETLIP I: ANTENNA OR DIRECT CABLE-TV
If you receive your signal by antenna or direct cable-TV (no cable box), connect your TV as shown, here.
Cable Leading from.. _onnected to..
A- Wall Jack - _TV -
75 ohm Antenna From Antenna or Antenna/
Cable Cable Service / Cable 1
J
PIP Capabilities with Setup 1
Q View a channel as the main TV picture and simultane-
ously view a different channel in the PIP window.
(IVlainSource and PIP Source are Antenna/Cable 1.)
View a channel as the main TV picture and simultane-
ously view the same channel in the PIP window.
(IVlainSource and PIP Source are Antenna/Cable 1.)
[] Swap the PIP picture and main picture.
_" _:,,_ _ BLE1- '_ "l ' IDEO2 N "!
__TO DECODER
• _ CABt.E2
Antenna or Cable-TV Connection
SETUP2: CABLE-TV WITH CABLE BOX
If you receive your television from a cable box, connect your TV as shown here.
Cable Leading from.. Connected to..
A - Wall Jack - TV-
75 ohm Antenna From Antenna or ' "Antenna/
Cable Cable Service Cable 2"
B - TV - Cable Box-
75 ohm Antenna "Loop Out To "In"
Cable Decoder"
C- Cable Box- TV-
75 ohm Antenna "Out .... Antenna/
I Cable 1"
D- TV- Cable Box-
Remote Emitter "StarSight Control Front panel
Cable Port"
Note: Choose Ant/Cable 1 Source in the Inteq Source menu
and tune your TV to channel 3 to watch channels selected by
the cable box (Antenna/Cable 1jack, Cable C).
PIP Capabilities with Setup 2
[7 View a channel as the main TV picture and simultane-
ously view a different channel selected by the TV in
the PIP window. (Main Source and PIP Source are
Antenna/Cable 2.)
[] View a channel selected by the cable box as the main
TV picture and simultaneously view the same channel
in the PIP window. (Main Source and PIP Source are
Antenna/Cable 1.)
[] Swap the PIP picture and main picture.
(_
e
v_E c_
or40utJ
OU_"
• >
RI-MOTI: /"
EMITTEfl:I .o J"
j , _> ,._'
'_ {'ABLE BOX BACK, "
Cable Box Connection
Do not unplug your cable box at any time!
Do not plug your TV power cord into the back
of your cable box!
_o_<,_ 2 --2

CONNECTING YOUR TV
SETUP3: VCR OR SUPER-VHS VCR
If you receive your signal through your VCR, connect your TV as shown here.
Cable
A-
75 ohm Antenna
Cable
B-
75 ohm Antenna
Cable
Leading from..
Wall Jack-
From Antenna or
Cable Service
VCR -
Out to TV
Connected to..
VCR -
VHF In
TV-
Antenna/
Cable 1
C - VCR - TV -
Audio/Video R-Audio-L! Video 1 or 2 In (or
Cables Video Out. S-Video In)
D - TV - VCR -
Remote Emitter StarSight Control Front panel
Cable Port
Notes:
C} The Video 1, Video 2, S-Video or Front AN connections
must be used if you wish to hear stereo sound from your
stereo VCR.
C1 Ifyou have a Super-VHS VCR, see connections diagram
below for Super-VHS VCR.
C] Choose Ant/Cable 1 Source in the Inteq Source menu and
tune your TV to channel 3 to watch a tape or a channel
selected by the VC,R (Ant/Cable 1 jack, Cable B).
PIP Capabilities with Setup 3
Q View a channel as the main TV picture and simultane-
ously view a different channel selected by the TV in
the PIP window. (Main Source and PIP Source are
Antenna/Cable 11;TV/VCR switch on VCR set to TV.)
[] View a channel selected by the TV as the main TV
picture and simultaneously view a different channel
selected by the VCR, or a video tape in the PIP win-
dow. (Main Source is Ant/Cable 1; PIP Source is
Video 1 In; TV/VCR switch on VCR set to TV.)
[] View a channel :selectedby the VCR or a video tape
as the main picture of the TV and simultaneously
view the same channel or video tape in the PIP win-
dow. (Main Source and PIP Source are Video 1.)
[] Swap the PIP picture and main picture.
Most stereo VCRs do /_ )" -_-_ ._._ I ,-_'_
not passstereo sound /F_ _'_%,1 ._,_-_L:_
on the 75-ohm output.:. _ _)_.._. ..' ,._,_--
\ ..
.4=-.d./ ._L_ _,# _,.....,,_
....
_ VCR BACH
/
Standard VHS VCR Connection
VCRFRONT
Super-VHS VCR Conr=ection
3o6_-o_ 2 _ 3
CONNECTING YOUR TV
mm
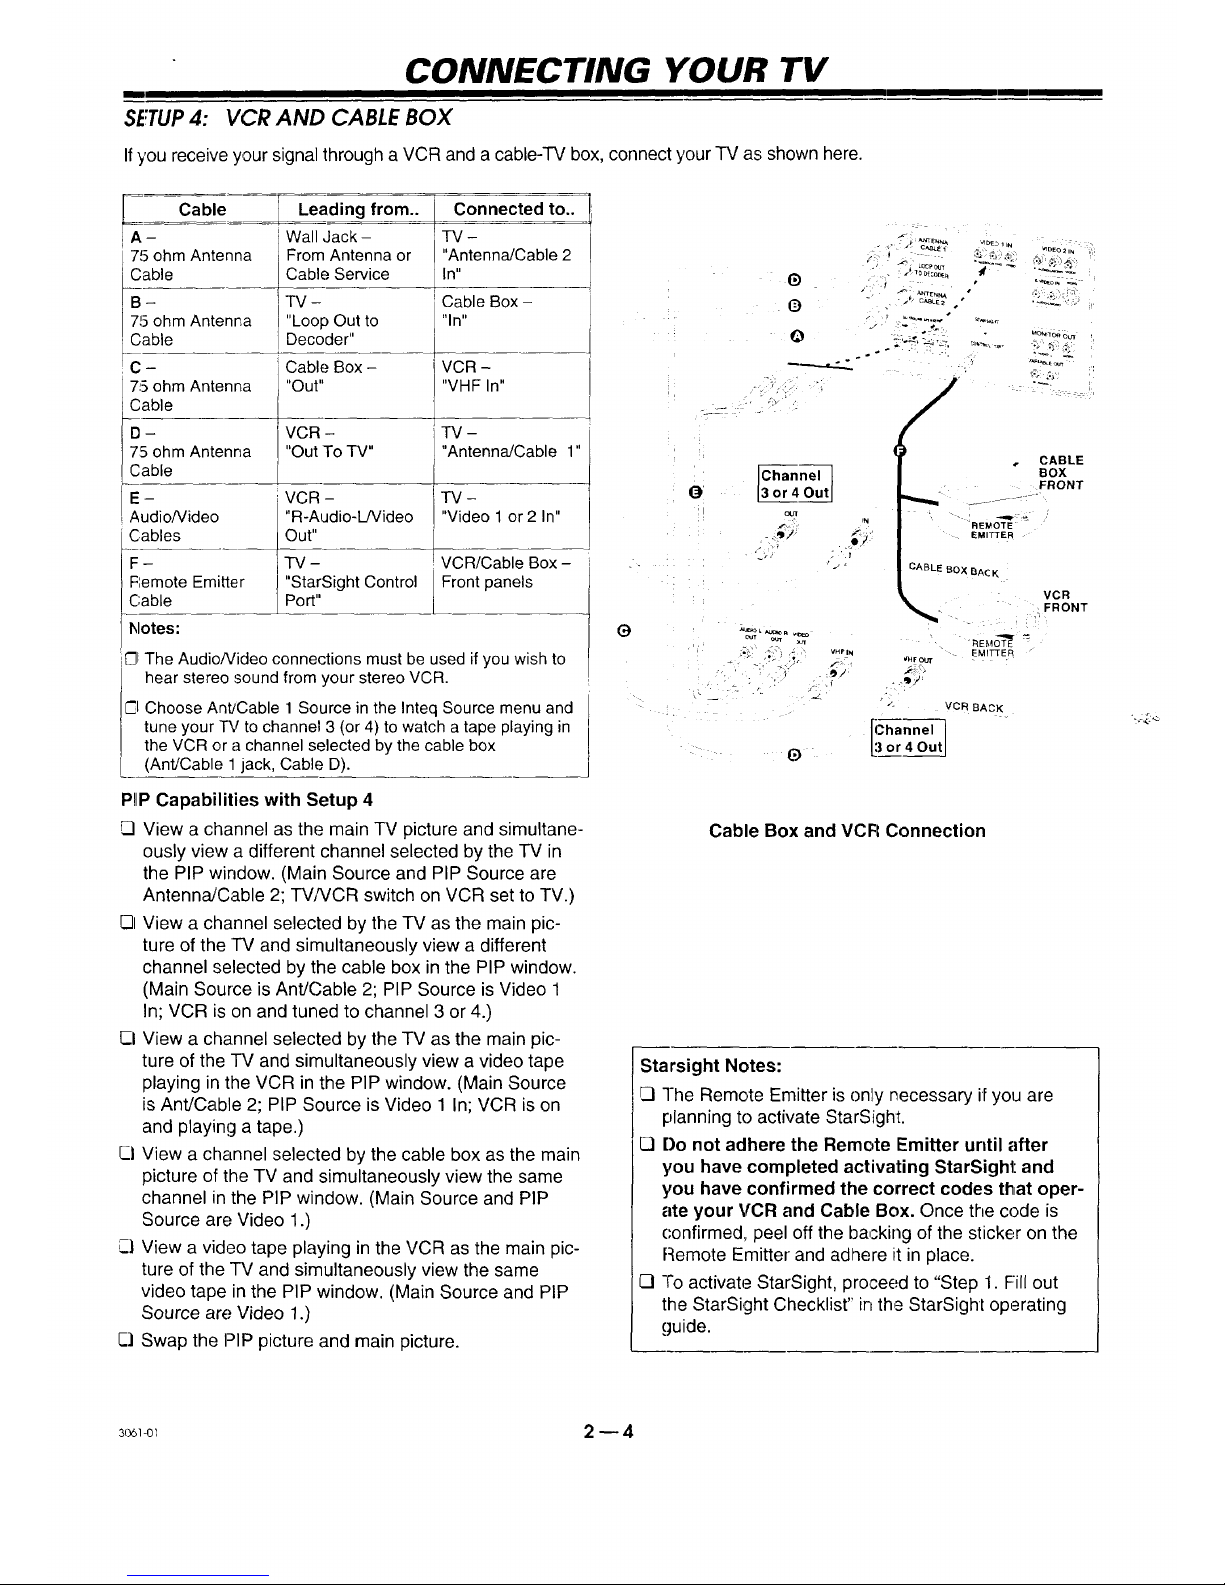
SETUP4: VCR AND CABLE BOX
If you receive your signal through a VCR and a cable-TV box, connect your TV as shown here.
Cable Leading from.. Connected to..
A - Wall Jack- -FV-
75 ohm Antenna From Antenna or "Antenna/Cable2
Cable Cable Service In"
B - TV- Cable Box -
715ohmAntenna "LoopOut to "In"
Cable Decoder"
C - Cable Box- VCR -
75 ohm Antenna "Out.... VHF In"
Cable
D- VCR - TV -
75 ohm Antenna "Out ToTV.... Antenna/Cable 1"
Cable
E - VCR - TV -
Audiofideo "R-Audio-L/Video "Video1 or 2 In"
Cables Out"
F- TV- VCR/CableBox-
Remote Emitter "StarSight Control Frontpanels
Cable Port"
C]IThe AudioNideo connections must be used if you wish to
El hear stereo sound from your stereo VCR.
Choose Ant/Cable 1 Source in the Inteq Source menu and
tune your TV to channel 3 (or 4) to watch a tape playing in
the VCR or a channel selected by the cable box
(Ant/Cable 1 jack, Cable D).
P!IPCapabilities with Setup 4
View a channel as the main TV picture and simultane-
ously view a different channel selected by the TV in
the PIP window. (Main Source and PIP Source are
AntennaJCable 2; TVNCR switch on VCR set to TV.)
E31View a channel selected by the TV as the main pic-
ture of the TV and simultaneously view a different
channel selected by the cable box in the PIP window.
(Main Source is Ant/Cable 2; PIP Source is Video 1
In; VCR is on and tuned to channel 3 or 4.)
CI View a channel selected by the TV as the main pic-
ture of the TV and simultaneously view a video tape
playing in the VCR in the PIP window. (Main Source
is Ant/Cable 2; PIP Source is Video 1 In; VCR is on
and playing a tape.)
Q View a channel selected by the cable box as the main
picture of the TV and simultaneously view the same
channel in the PIP window. (Main Source and PIP
Source arc; Video 1.)
Ci View a video tape playing in the VCR as the main pic-
ture of the TV and simultaneously view the same
video tape in the PIP window. (Main Source and PIP
Source are Video 1.)
Q Swap the PIP picture and main picture.
G
6)
O
Q
-t/ C_eLE2 *
, "_-i_'__' _- .........
°
.°
_; .-_ _,:
OUT
N
j.
k.e ,'_
_ I
_T R _q_
6)
• CABLE
BOX
FRONT
REI_OTE
EMITTER
CABLE BOX BA¢K
"_Et_O-'_ "_
EMITTER
_HFOUr
VCR BACK
VCR
. FRONT
Cable Box and VCFI Connection
Starsight Notes:
CI The Remote Emitter is only necessary i[ you are
planning to activate StarSight.
[7 Do not adhere the Remote Emitter until after
you have completed activating StarSight and
you have confirmed the correct codes that oper-
ate your VCR and Cable Box. Once the code is
confirmed, peel off the backing of the sticker on the
Remote Emitter and adhere it in place.
13 To activate StarSight, proceed to "Step 1. Fill out
the StarSight Checklist'" in the StarSight operating
guide.
:_ 2 _ 4

CONNECTING YOUR TV
I
:RONT AUDIO/VIDEO (A/V) CONNECTIONS
Stereo Camcorder _1_
,"
\
l
Super-VHS VCR YJCVIDEO ^UD,OOUT
I OUT L
," "'-
OPTIONAL AUDIO AMPLIFIER/SURROUND SOUND CONNECTIONS TO TV "
If you wish to listen to the TV audio through an external amplifier or stereo system, or connect Surround Sound speakers to
your TV, refer to the connections diagrams shown below.
8 ohm
Surround
Speakers
_ Silver ,_
L ___/ Copper - 1_
{_ O°pperl
StereoAmplifier
Copper /__ 8ohm
Surround
S_eaker
Silver
Amplifier and Dual Surround Speaker Connections Single Surround Speaker Connection
TV Speakers Only
CI INTEQ Audio Menu
"Speakers" set to "ON,"
stere() amplifier turned
"OFF" _ The TV's
speakers are On. Sound is
heard from the TV's
speakers.
[_ Use tlne TV's volume
control to raise and lower
the sound level of the TV's
speakers.
0
0
WAYS TO LISTEN TO YOUR TV
Amplifier Speakers Only
INTEQ Audio Menu
"Speakers" set to "OFF,"
stereo amplifier turned
"ON" _ The TV's speakers
are Off. Sound is heard from
the amplifier's speakers.
Use the TV's volume
control to raise and lower
the sound level of the
amplifier's speakers.
TV & Amp!ifier Speakers
INTEQ Audio Menu
"Speakers" set to "ON,"
stereo amplifier turned
"ON" --- Sound is heard
from both the TV's and
amplifier's speakers.
C] Use TV's volume control to
raise and lower the sound
level of both sets of speakers. !
Surround Sound
C] Connec:t Surround Sound
spea as shown. The
level Surround Sound will
vary, depending on the
prog_ being viewed. Note
that nol all programs have
Surr( Sound audio.
If yot want to use only one
surr¢ peaker with your
TV, ('onnect the speaker
wire,,_to ell:her the left or right
term l
Notes:
C3See the INTEQ Audio section of this operating guide for information regarding the INTEQ Audio Menu.
C] Cables shown above, and in the diagrams on the preceding pages, are not supplied with your TV. Optional cables can be our-
chased at your local home electronics retailer.
_ 2 -- 5
CONNECTING YOUR TV
m
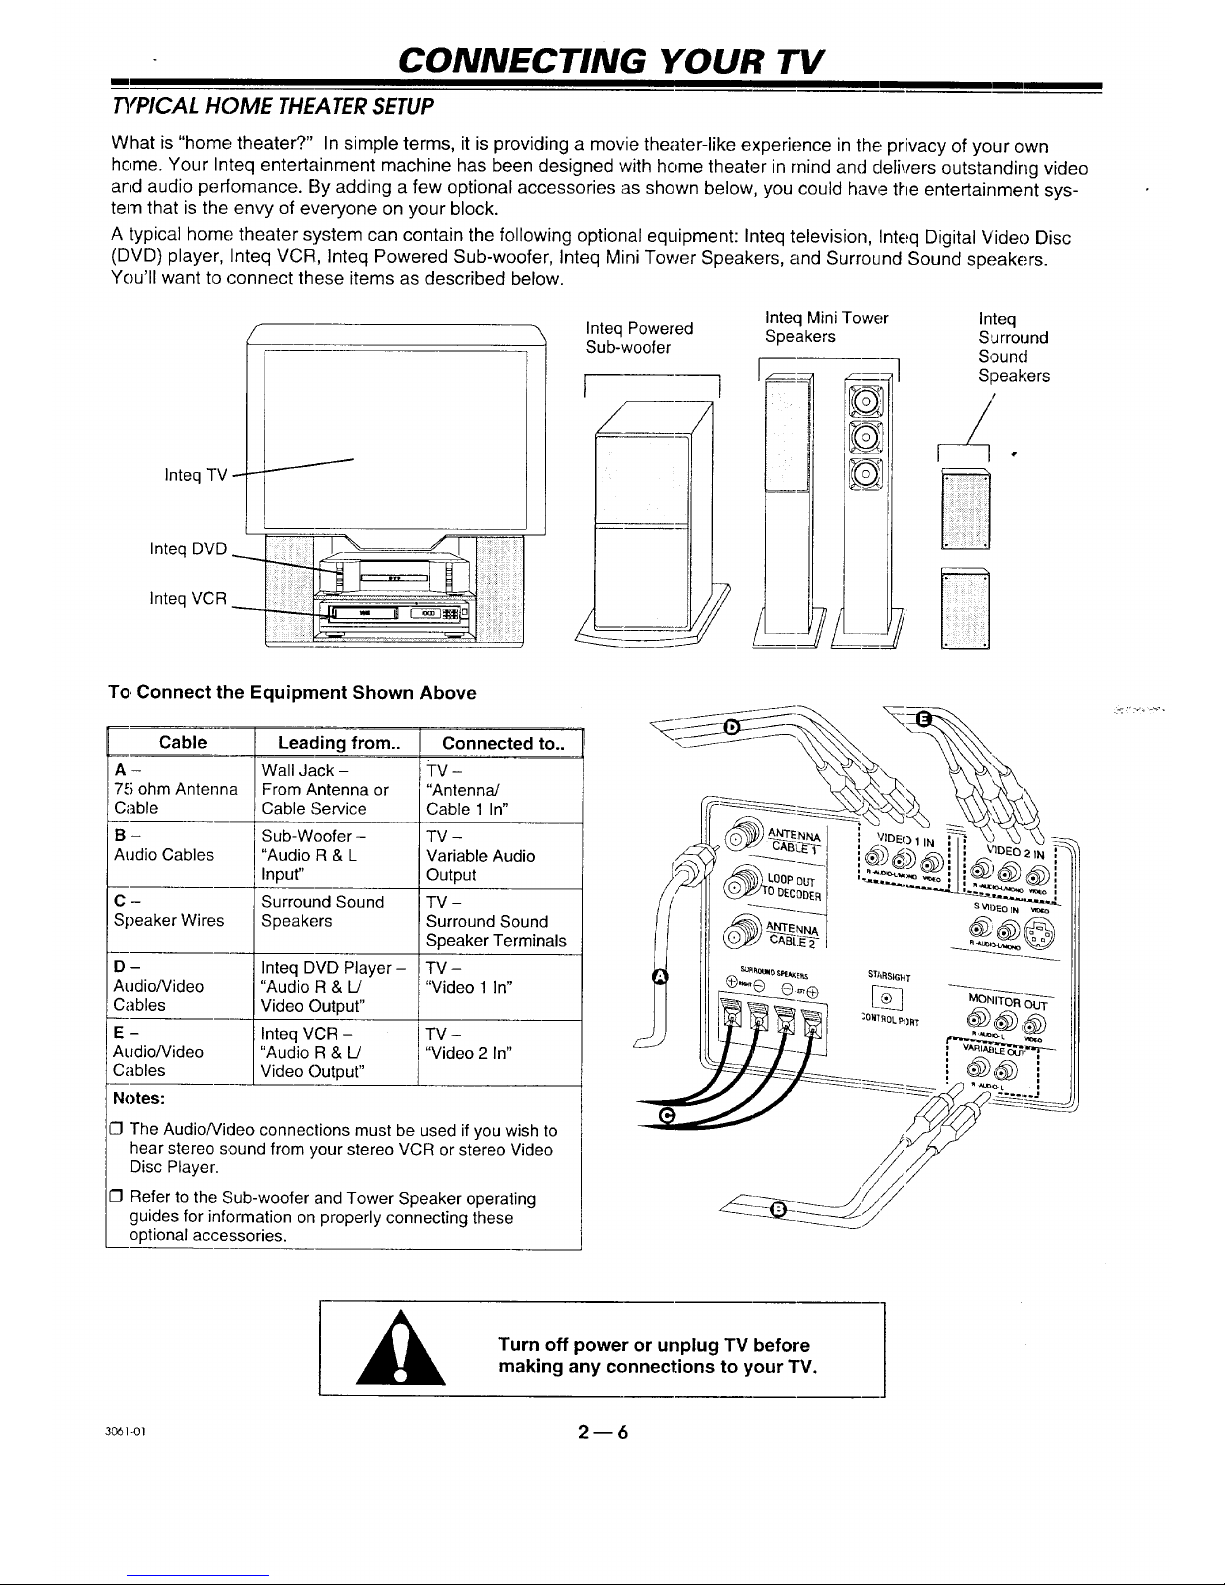
TYPICAL HOME THEATER SETUP
What is "home theater?" In simple terms, it is providing a movie theater-like experience in the privacy of your own
home. Your Inteq entertainment machine has been designed with home theater in mind and delivers outstanding video
and audio perfomance. By adding a few optional accessories as shown below, you could have the entertainment sys-
tem that is the envy of everyone on your block.
A typical home theater system can contain the following optional equipment: Inteq television, Inteq Digital Video Disc
(DVD) player, Inteq VCR, Inteq Powered Sub-woofer, Inteq Mini Tower Speakers, and Surround Sound speakers.
You'll want to connect these items as described below.
Inteq TV - -
Inteq DVD
Inteq VCR _
Inteq Mini Tower Inteq
Inteq Powered Speakers Surround
Sub-woofer
[ 1 II_-_ _,}_] S'I!un(l'lers
To,Connect the Equipment Shown Above
Cable Leading from.. Connected to..
A - Wall Jack - TV -
75 ohm Antenna From Antenna or "Antenna/
Cable Cable Service Cable 1 In"
B - Sub-Woofer - TV -
Audio Cables "Audio R & L Variable Audio
Input" Output
C - Surround Sound TV -
Speaker Wires Speakers Surround Sound
Speaker Terminals
D- Inteq DVD Player- TV-
Audio/Video "Audio R & L/ "Video 1 In"
Cables Video Output"
E - Inteq VCR - i TV -
AudioNideo "Audio R & L! I "Video 2 In"
Cables Video Outpur' ]
Notes:
ICIThe AudioNideo connections must be used if you wish to
hear stereo sound from your stereo VCR or stereo Video
Disc Player.
CI Refer to the Sub-woofer and Tower Speaker operating
guides for information on properly connecting these
optional accessories.
Turn off power or unplug TV before
making any connections to your TV.
3o_-o_ 2 -- 6
CONNECTING YOUR TV
mm
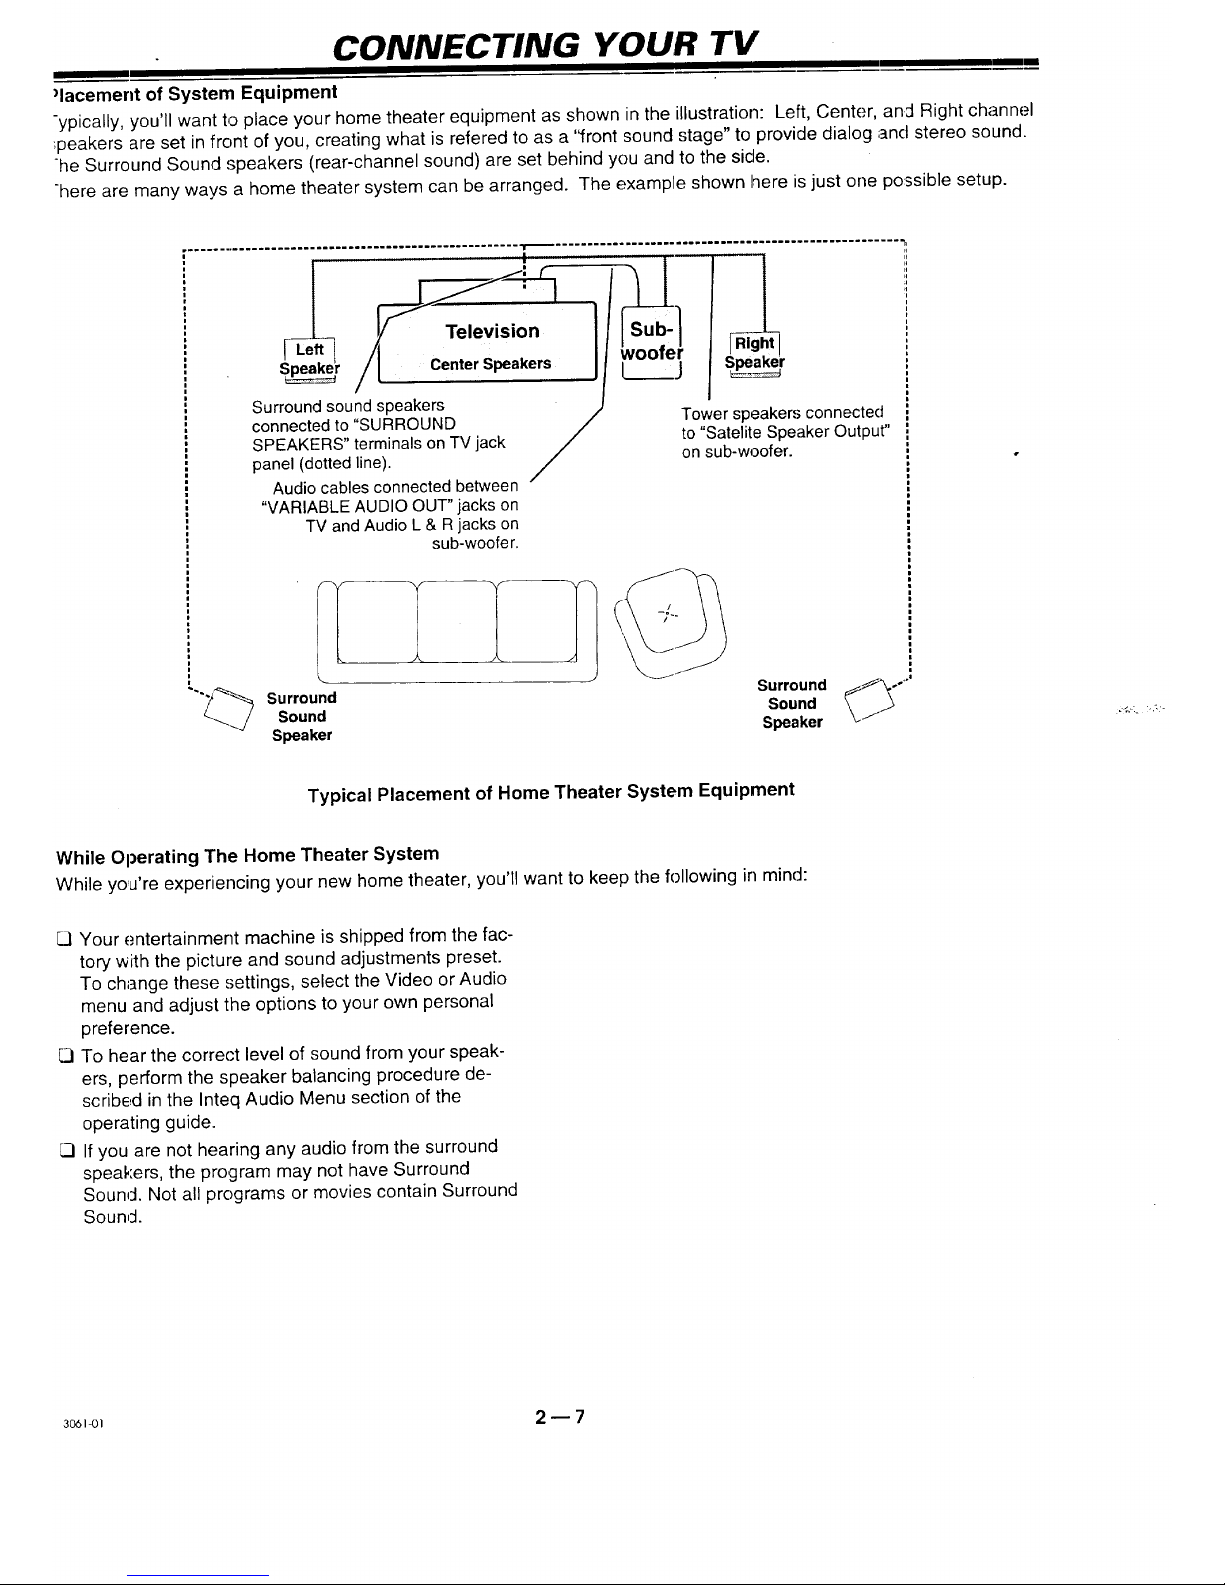
)lacement of System Equipment
-ypically, you'll want to place your home theater equipment as shown inthe illustration: Left, Center, and Right channel
:peakers are set in front of you, creating what is refered to as a '<frontsound stage" to provide dialog and stereo sound.
he Surround Sound speakers (rear-channel sound) are set behind you and to the side.
-here are many ways a home theater system can be arranged. The example shown here is just one possible setup.
....
woofer
S_r Center Speakers [_.___.j S_r
Surround sound speakers
connected to "SURROUND /
SPEAKERS" terminals onTVjack
/
panel (dotted line).
Audio cables connected between '
"VARIABLE AUDIOOUT" jacks on
TV andAudio L & R jacks on
sub-woofer.
Tower speakers connected
to "Satelite Speaker Output"
on sub-woofer.
Surround
Sound
Speaker
SurroundSound __°'"
Speaker /1
Typical Placement of Home Theater System Equipment
While Operating The Home Theater System
While yo,a're experiencing your new home theater, you'll want to keep the followingin mind:
Cl Your entertainment machine is shipped from the fac-
tory with the picture and sound adjustments preset.
To change these settings, select the Video or Audio
menu and adjust the options to your own personal
preference.
CI To hear the correct level of sound from your speak-
ers, perform the speaker balancing procedure de-
scribed in the Inteq Audio Menu section of the
operating guide.
CI If you are not hearing any audio from the surround
speakers, the program may not have Surround
Sound. Not all programs or movies contain Surround
Sound.
3o61-ol 2 -- 7
WHAT YOU SHOULD DO FIRST
mm
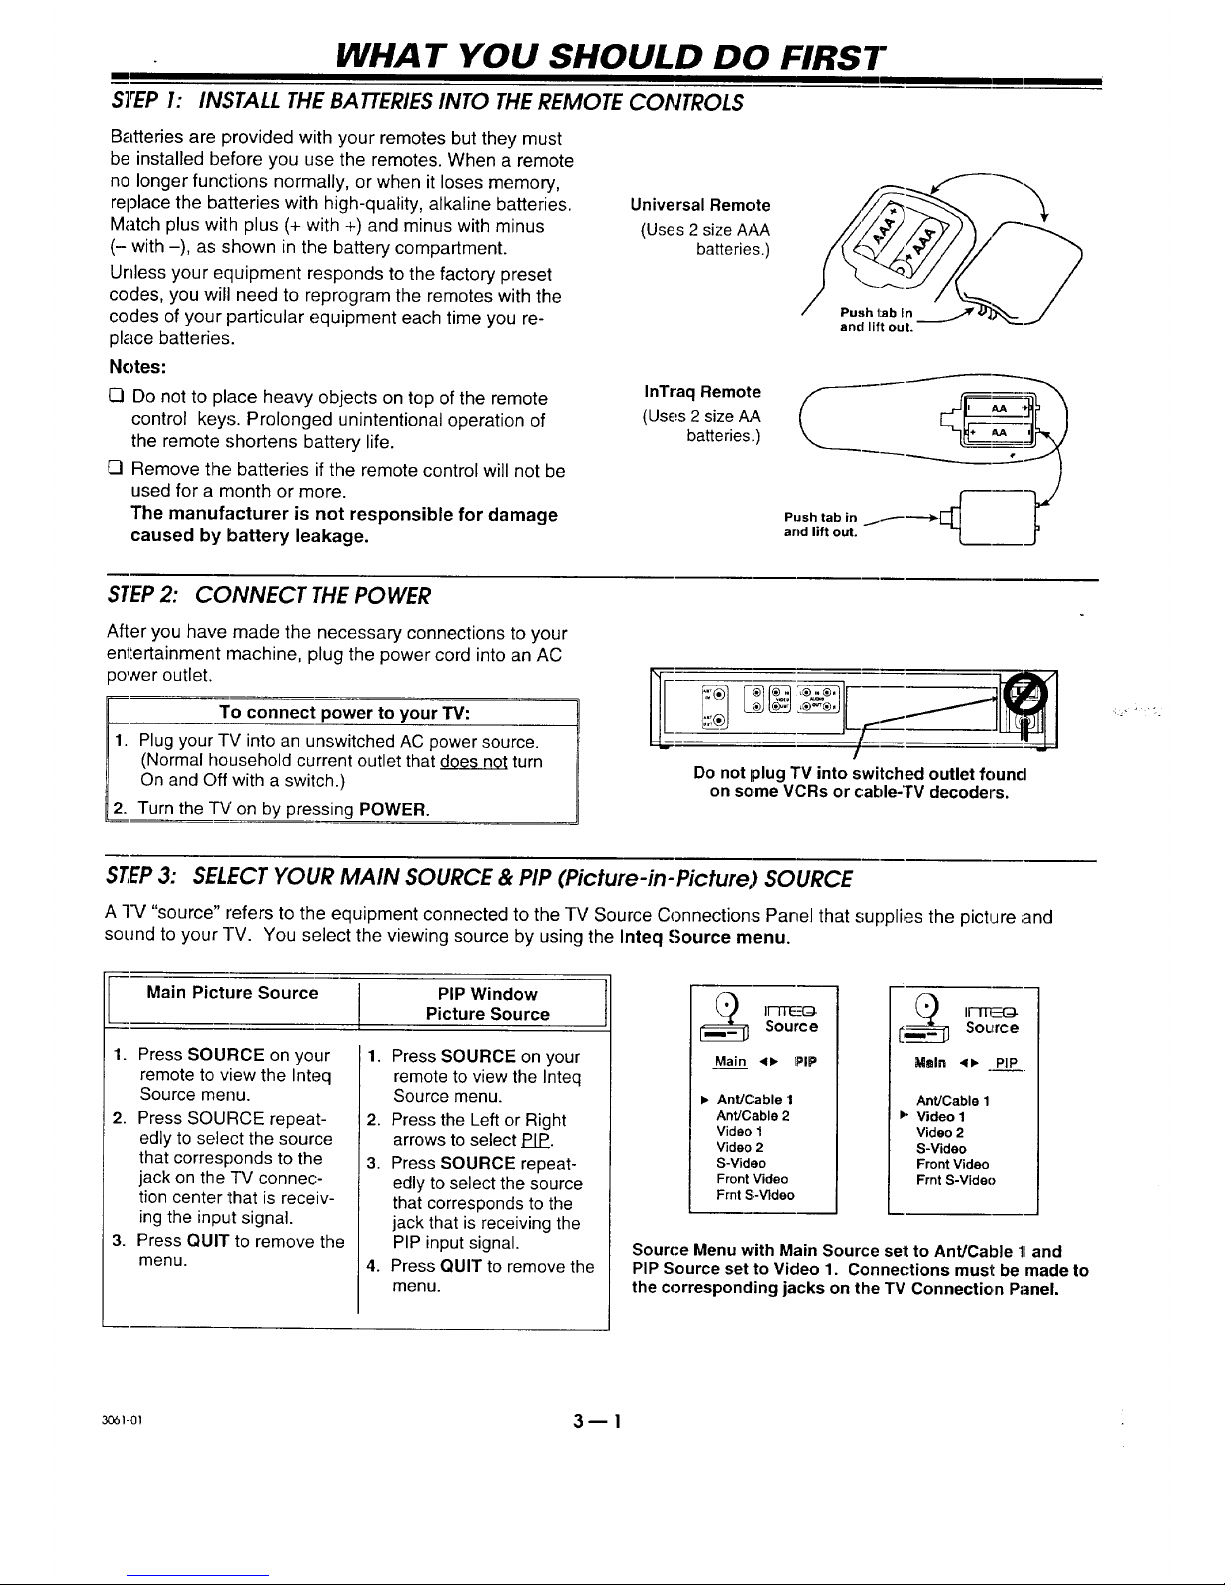
STEP 1: INSTALL THE BATTERIESINTO THEREMOTE CONTROLS
Batteries are provided with your remotes but they must
be installed before you use the remotes. When a remote
no longer functions normally, or when it loses memory,
replace the batteries with high-quality, alkaline batteries.
Match plus with plus (+ with +) and minus with minus
(- with -), as shown in the battery compartment.
Unless your equipment responds to the factory preset
codes, you will need to reprogram the remotes with the
codes of your particular equipment each time you re-
place batteries.
Notes:
C3Do not to place heavy objects on top of the remote
control keys. Prolonged unintentional operation of
the remote shortens battery life.
Remove the batteries if the remote control will not be
used for a rnonth or more.
The manufacturer is not responsible for damage
caused by battery leakage.
Universal Remote
(Uses 2 size AAA
batteries.)
InTraq Remote
(Uses 2 size AA
batteries,.)
and lift ouL
STEP2: CONNECT THE POWER
After you have made the necessary connections to your
entertainment rnachine, plug the power cord into an AC
_ower outlet.
To connect power to your TV:
1. Plugyour TV intoan unswitchedAC power source.
(Normal household currentoutlet that d_g_e_s__0_0_turn
On and Off with a switch.)
2. Turn the -IV' on by pressing POWER.
Do not plug TV into switchedoutlet found
on some VCRs or cable-TV decoders.
STEP3: SELECT YOUR MAIN SOURCE & PIP (Picture-in-Picture) SOURCE
A -IV "source" refers to the equipment connected to the TV Source Connections Panel that supplies the picture and
sound to your -I-V. You select the viewing source by using the Inteq Source menu.
I ain Picture Source PIP Window
Picture Source
1. Press SOURCE on your
remote to view the Inteq
Source menu.
2. Press SOURCE repeat-
edly to select the source
that corresponds to the
jack on the -iV connec-
tion center that is receiv-
ing the input signal.
3. Press QUIT to remove the
menu.
1.
Press SOURCE on your
remote to view the Inteq
Source menu.
2. Press the Left or Right
arrows to select PIP.
3. Press SOURCE repeat-
edly to select the source
that corresponds to the
jack that is receiving the
PIP input signal.
4. Press QUIT to remove the
menu.
Main 4_ PIP
I_ AnUCable 1
Ant]Cable 2
Video 1
Video 2
S-Video
Front Video
Frnt S-Video
Maln <1,, PIP
Ant]Cable 1
_" Video 1
Video 2
S-Video
Front Video
Frnt S-Video
Source Menu with Main Source set to Ant/Cable 11and
PIP Source set to Video 1. Connections must be made to
the corresponding jacks on the TV Connection Panel.
:_1-ol 3- 1
WHAT YOU SHOULD DO FIRST
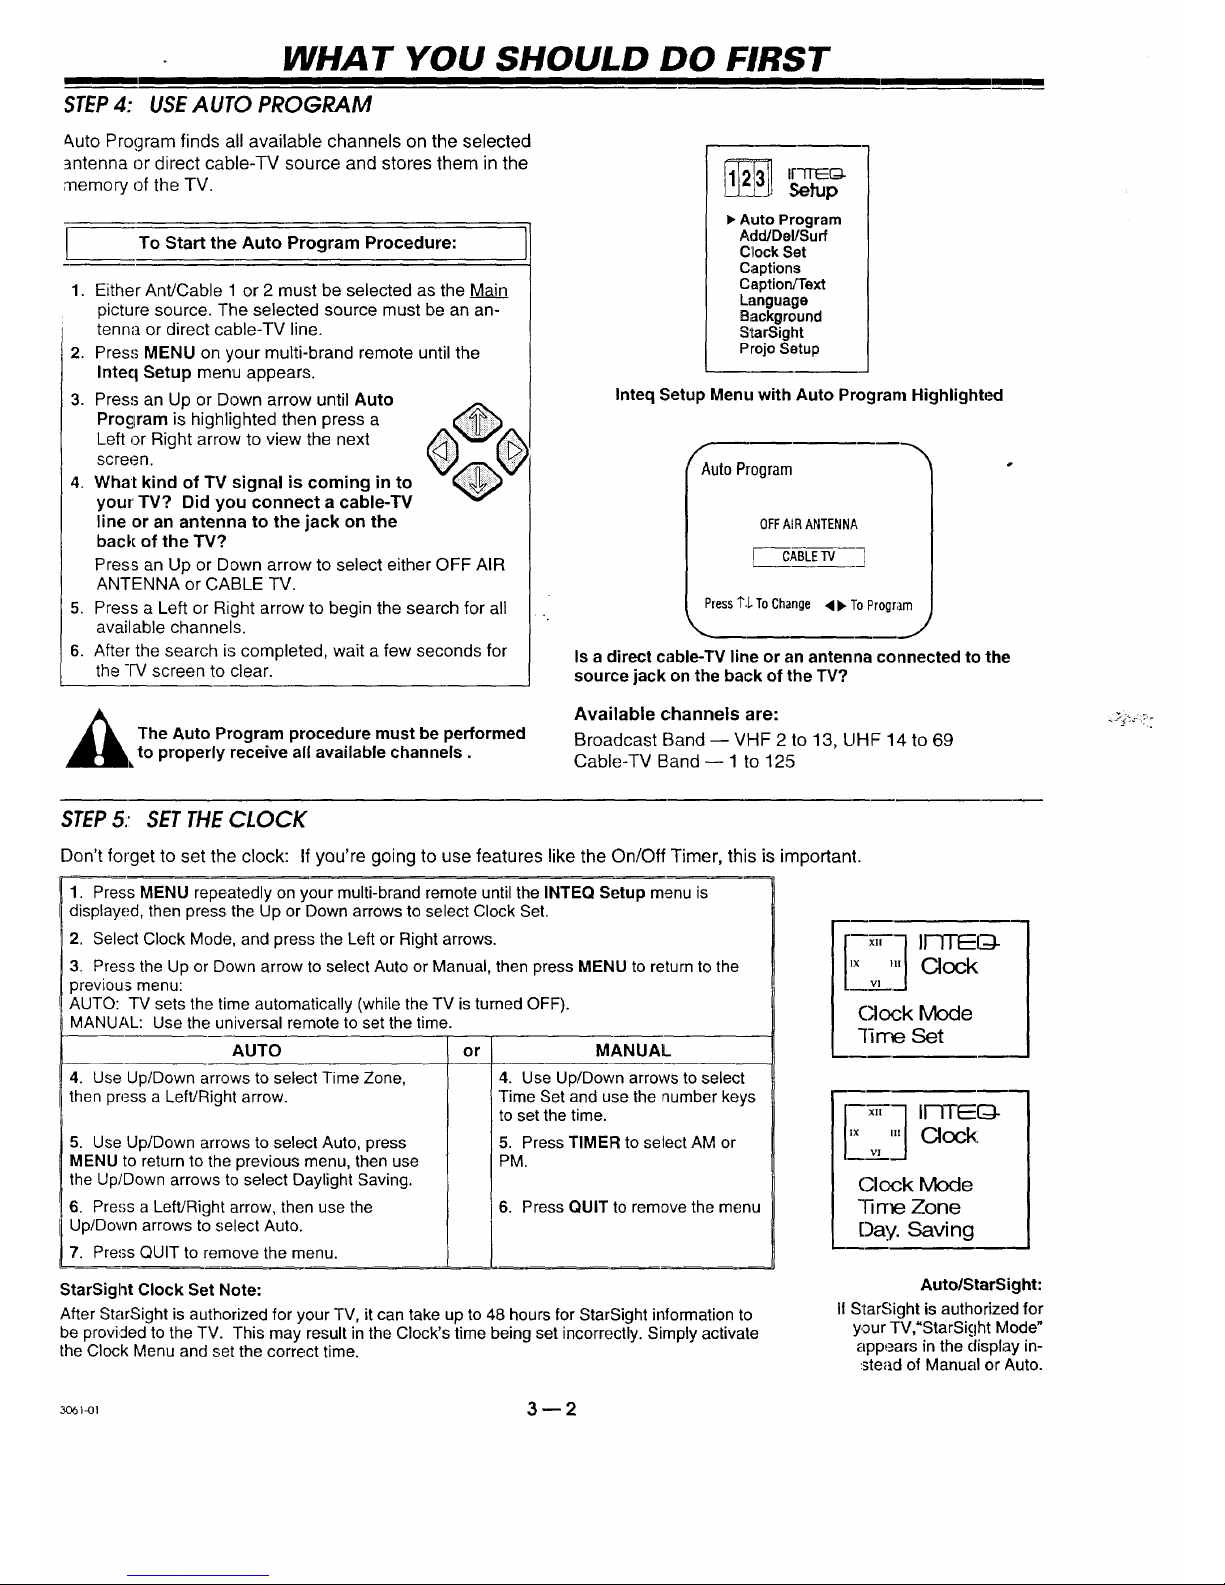
STEP4: USEAUTO PROGRAM
&uto Program finds all available channels on the selected
antenna or direct cable-TV source and stores them in the
memory of the TV.
To Start the Auto Program Procedure:
1. Either Ant!Cable 1 or 2 must be selected as the Main
picture source. The selected source must be an an-
tenna or direct cable-TV line.
2. Press MENU on your multi-brand remote until the
Inteq Setup menu appears.
3. Press an Up or Down arrow until Auto
Procjram is highlighted then press a
Left or Right arrow to view the next
screen.
4. What kind of TV signal is coming in to
your' TV? Did you connect a cable-'lV
line or an antenna to the jack on the
back of the TV?
Press an Up or Down arrow to select either OFF AIR
ANTENNA or CABLE TV.
5. Press a Left or Right arrow to begin the search for all
available channels.
6. After the search is completed, wait a few seconds for
the -IV screen to clear.
1_ II'-FFEE(:D-
Setup
• Auto Program
Add/Del/Surf
C_ockSet
Captions
Caption/Text
Language
Background
StarSight
ProjoSetup
Inteq Setup Menu with Auto Program Highlighta_
Auto Program
OFFAIRANTENNA
[ CABLE V]
Press1"$ToChange<b" ToProgram
IS a direct cable-TV line or an antenna connected to the
source jack on the back of the TV?
_hl he Auto Program procedure must be performed
to properly receive all available channels.
Available channels are:
Broadcast Band -- VHF 2 to 13, UHF 14 to 69
Cable--IV Band -- 1 to 125
I
STEP5: SET THE CLOCK
Don't forget to set the clock: If you're going to use features like the On/Off Timer, this is important.
1. Press MENU repeatedly on your multi-brand remote until the INTEQ Setup menu is
displayed, then press, the Up or Down arrows to select Clock Set.
2. Select Clock Mode, and press the Left or Right arrows.
3. Press the Up or Down arrow to select Auto or Manual, then press MENU to return to the
previous menu:
AUTO: TV sets the time automatically (while the TV is turned OFF).
MANUAL: Use the universal remote to set the time.
AUTO
4. Use Up/Down arrows to select Time Zone,
then press a Left/Right arrow.
5. Use Up/Down arrows to select Auto, press
MENU to return to the previous menu, then use
the Up/Down arrows to select Daylight Saving.
6. Press a LeflJRight arrow, then use the
Up/Down arrows to select Auto.
7. Press QUIT to remove the menu.
or
MANUAL
4. Use Up/Down arrows to select
Time Set and use the number keys
to set the time.
5. Press TIMER to select AM or
PM.
6. Press QUIT to remove the menu
,,-_-_ II-qTl_(_-
'× '" Clock
Clock Mode
lirre Set
'× '" Clock:
"v']
(:lock Mode
"ll me Zone
Day. Saving
StarSight Clock Set Note:
After StarSight is authorized for your TV, it can take up to 48 hours for StarSight information to
be provided to the TV. This may result in the Clock's time being set incorrectly. Simply activate
the Clock Menu and set the correct time.
Auto/StarSight:
I1StarSight is authorized for
your TV,"StarSight IVlode"
appears in the display in-
stead of Manual or Auto.
_I_, 3 _ 2
m
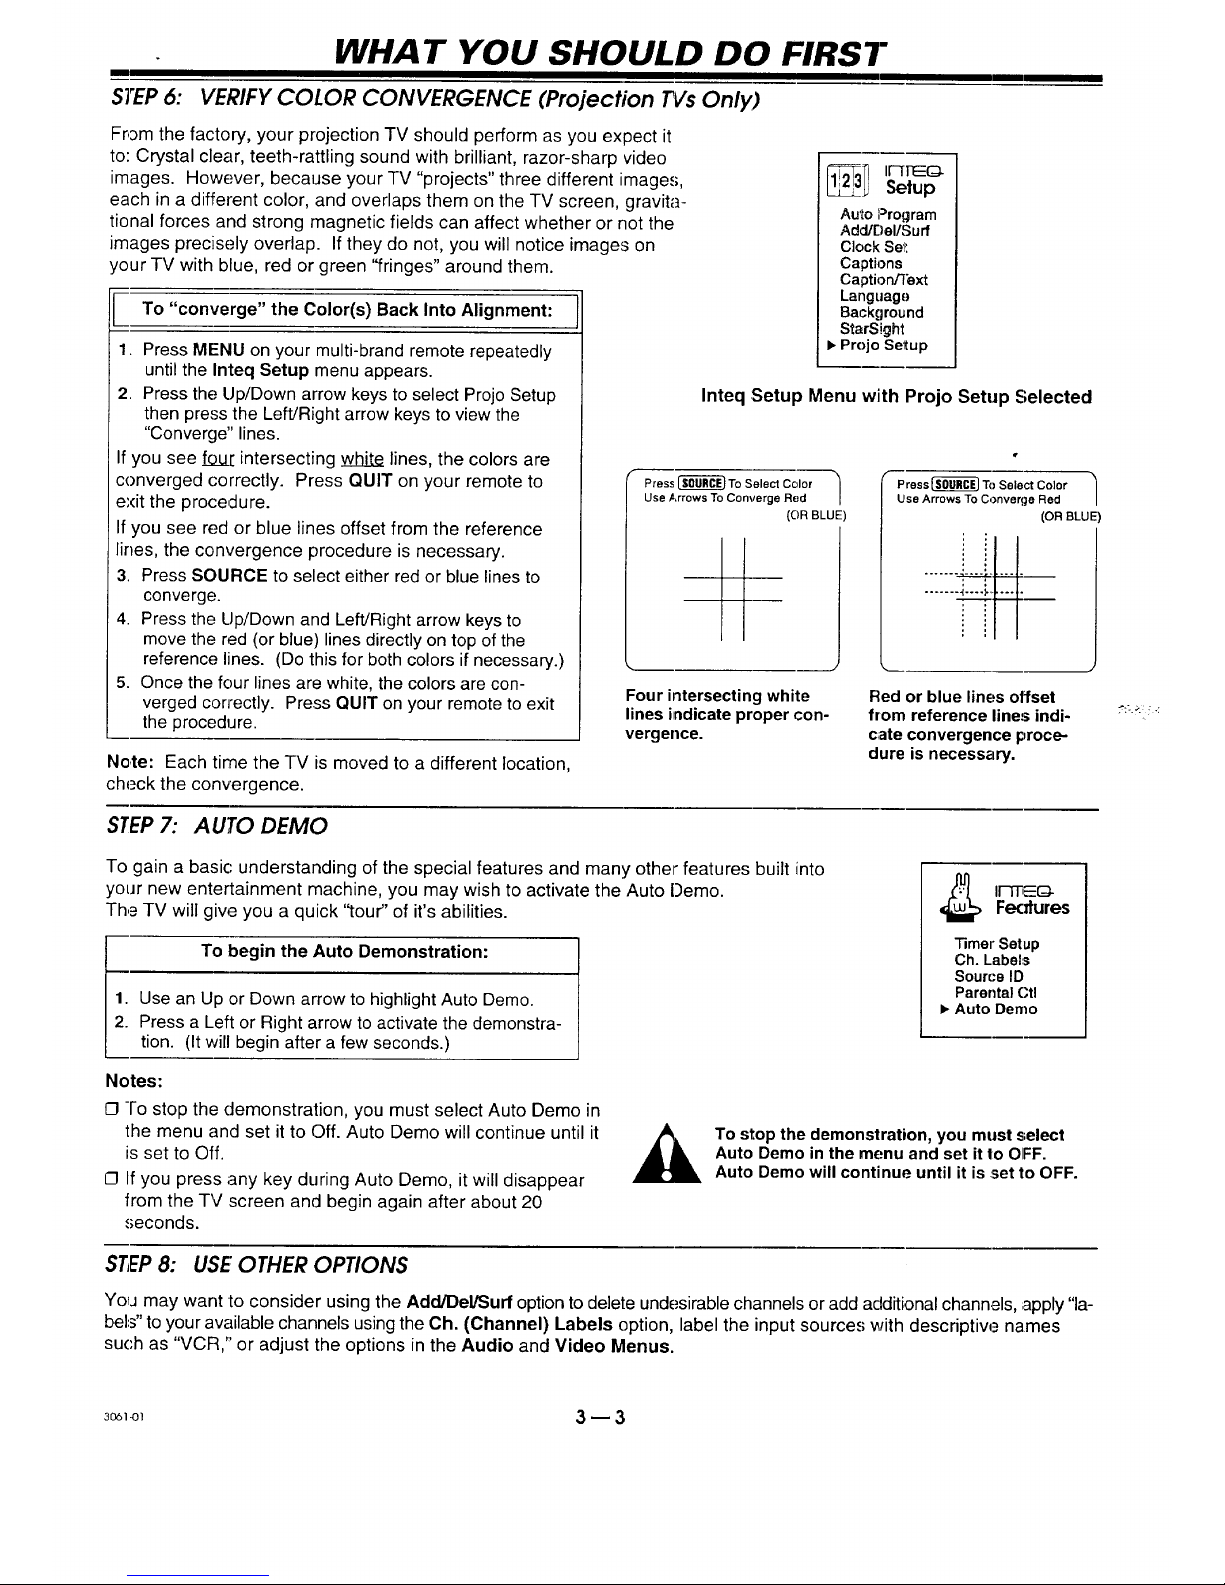
STEP6:
WHAT YOU SHOULD DO FIRST
VERIFY COLOR CONVERGENCE (Projection £Vs Only)
From the factory, your projection TV should perform as you expect it
to: Crystal clear, teeth-rattling sound with brilliant, razor-sharp video
images. However, because your TV "projects" three different image.,;,
each in a different color, and overlaps them on the TV screen, gravita-
tional forces and strong magnetic fields can affect whether or not the
images precisely overlap. If they do not, you will notice images on
your TV with blue, red or green "fringes" around them.
To "converge" the Color(s) Back Into Alignment:
1. Press MENU on your multi-brand remote repeatedly
until the Inteq Setup menu appears.
2. Press the Up/Down arrow keys to select Projo Setup
then press the Left/Right arrow keys to view the
"Converge" lines.
If you see foul: intersecting white lines, the colors are
converged correctly. Press QUIT on your remote to
exit the proceclure.
If you see red or blue lines offset from the reference
lines, the convergence procedure is necessary.
3. Press SOURCE to select either red or blue lines to
converge.
4. Press the Up/Down and Left/Right arrow keys to
move the red (or blue) lines directly on top of the
reference lines. (Do this for both colors if necessary.)
5. Once the four lines are white, the colors are con-
verged correctly. Press QUIT on your remote to exit
the procedure.
Note: Each time the -IV is moved to a different location,
check the convergence.
_31 I1-[FEG.
Setup
Auto Program
Add/r_el/Surf
Clock Se_:
Captions
CaptiordText
Language
Background
StarSight
• Projo Setup
Inteq Setup Menu with Projo Setup Selected
Press _ To Select Color
Use Arrows To Converge Red
(OR BLUE
I
Four intersectingwhite
linesindicate proper con-
vergence.
Press_ To Select Color
Use Arrows To Converge Red
(OR BLUE
Red or blue lines offset
from reference line:; indi-
c;ate convergence proce-
dure is necessary.
STEP7: AUTO DEMO
To gain a basic: understanding of the special features and many other features built into
your new entertainment machine, you may wish to activate the Auto Demo.
The TV will give you a quick "tour" of it's abilities.
To begin the Auto Demonstration:
1. Use an Up .orDown arrow to highlight Auto Demo.
2. Pressa Left or Right arrowto activate the demonstra-
tion. (It will begin after a few seconds.)
"13merSetup
Ch. Labels
Sourc'e ID
Parental Ctl
• Auto Demo
Notes:
O -I'o stop the demonstration, you must select Auto Demo in
the menu and set itto Off. Auto Demo will continue until it
is set to Off.
O Ifyou press any key during Auto Demo, it will disappear
from the TV screen and begin again after about 20
seconds.
To stop the demonstration, you must select
Auto Demo in the menu and set it1:oOIFF.
Auto Demo will continue until it is :setto OFF.
STEP8: USE OTHER OPTIONS
YoIj may want to consider using the Adcl/DelPSurfoption to delete undesirable channels or add additional channels, apply "la-
bels" to your available channels usingthe Oh. (Channel) Labels option, label the input sources with descriptiw_ names
such as "VCR," or adjust the options in the Audio and Video Menus.
30_1-ol 3 -- 3
PICTURE-IN-PICTURE (PIP) OPERA TION
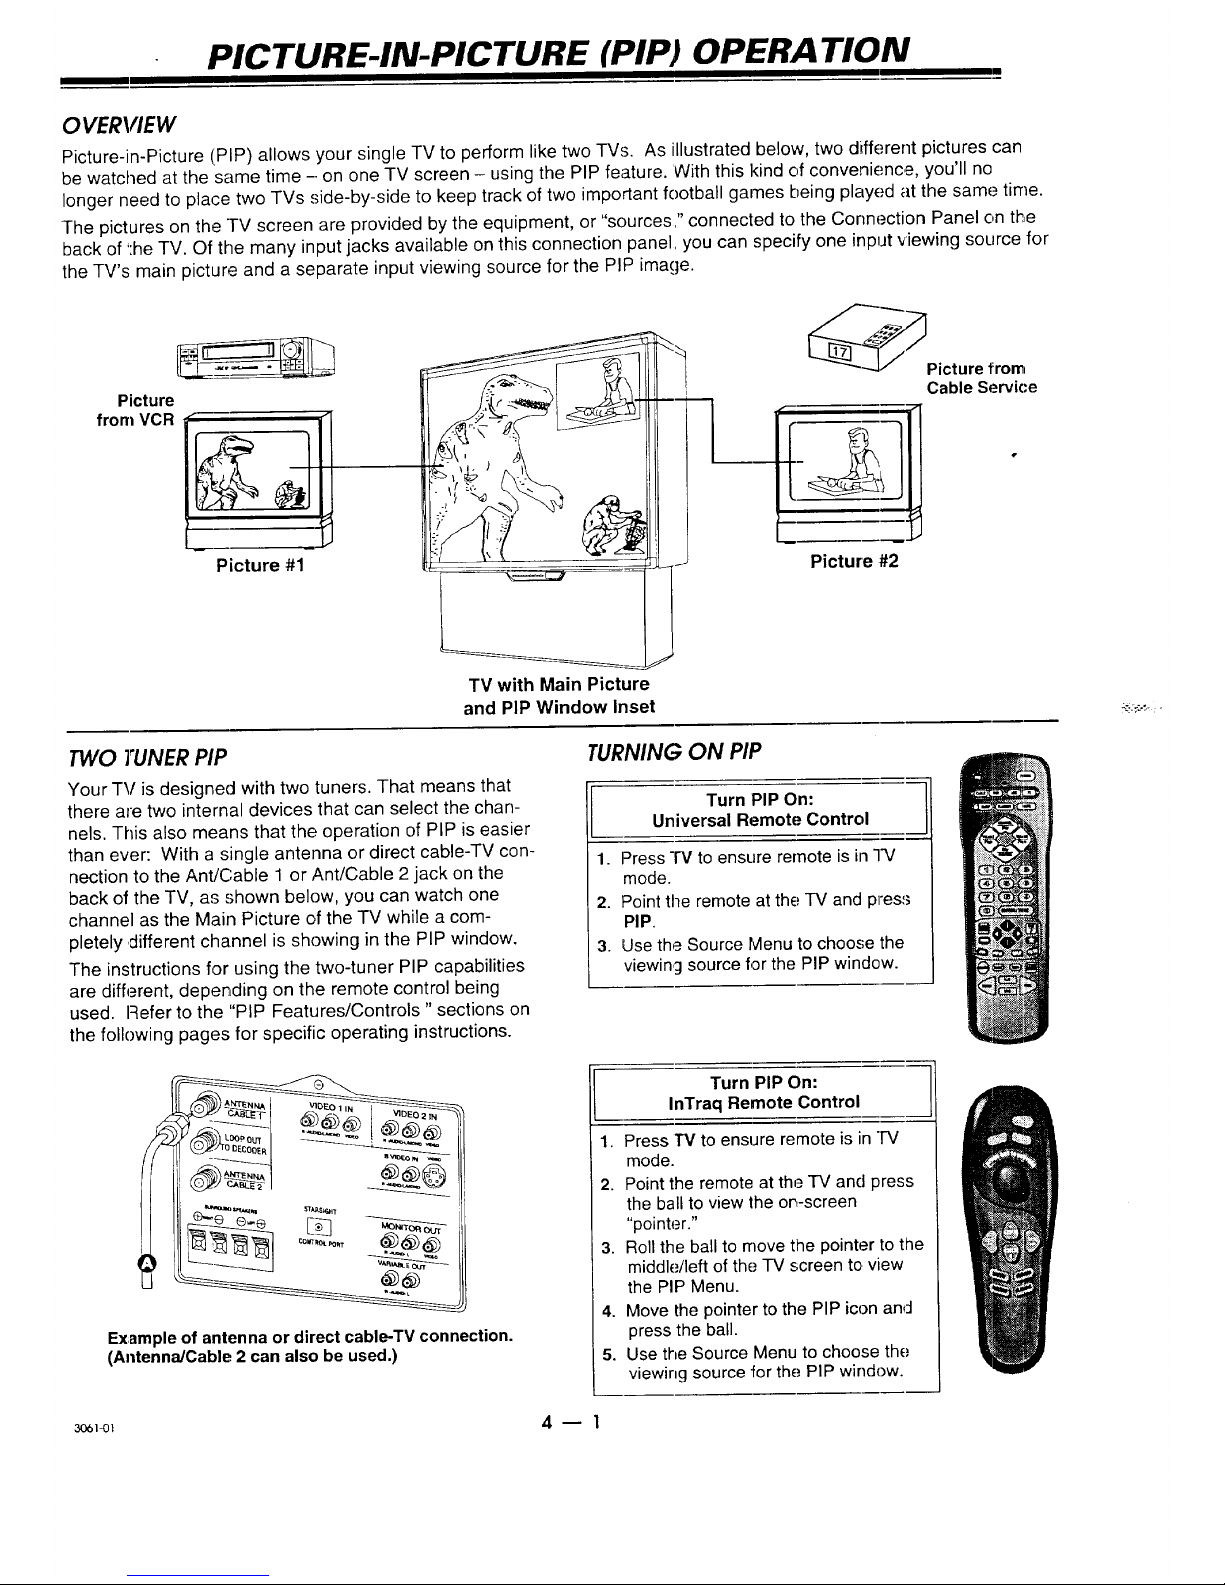
OVERVIEW
Picture-in-Picture (PIP) allows your single TV to perform like two TVs. As illustrated below, two different pictures can
be watched at the same time - on one TV screen - using the PIP feature. 'With this kind of convenience, you'll no
longer need to place two TVs side-by-side to keep track of two important football games being played at the same time.
The pictures on the TV screen are provided by the equipment, or "sources," connected to the Connection Panel on tire
back of ':he TV. Of the many input jacks available on this connection panel, you can specify one input viewing source for
the TV's main picture and a separate input viewing source for the PIP image.
Picture
from VCR
Picture #1
TV with Main Picture
and PIP Window Inset
__Picture from
Cable Service
Picture #2
TWO TUNER PIP
Your TV is designed with two tuners. That means that
there are two internal devices that can select the chan-
nels. This also means that the operation of PIP is easier
than ever: With a single antenna or direct cable-TV con-
nection to the Ant/Cable 1 or Ant/Cable 2 jack on the
back of the TV, as shown below, you can watch one
channel as the Main Picture of the TV while a com-
pletely different channel is showing in the PIP window.
The instructions for using the two-tuner PIP capabilities
are different, depending on the remote control being
used. Refer to the "PIP Features/Controls "sections on
the following pages for specific operating instructions.
TURNING ON PIP
I Turn PIP On:Universal Remote Control
1. Press IV to ensure remote is in IV
mode.
2. Point the remote at the TV and pres:_
PIP.
3. Use the Source Menu to choose the
viewin9 source for the PIP window.
Example of antenna or direct cable-TV connection.
(Antenna/Cable 2 can also be used.)
Turn PIP On:
InTraq Remote Control
1. Press "IV to ensure remote is in FV
mode.
2. Point the remote at the TV and press
the ball to view the on-screen
"pointer."
3. Roll the ball to move the pointer to the
middle/left of the TV screen to view
the PIP Menu.
4. Move the pointer to the PIP icon and
press the ball.
5. Use the Source Menu to choose the
viewing source for the PIP window.
so6]_) 4 _ 1
PICTURE-IN-PICTURE (PIP) OPERA TION
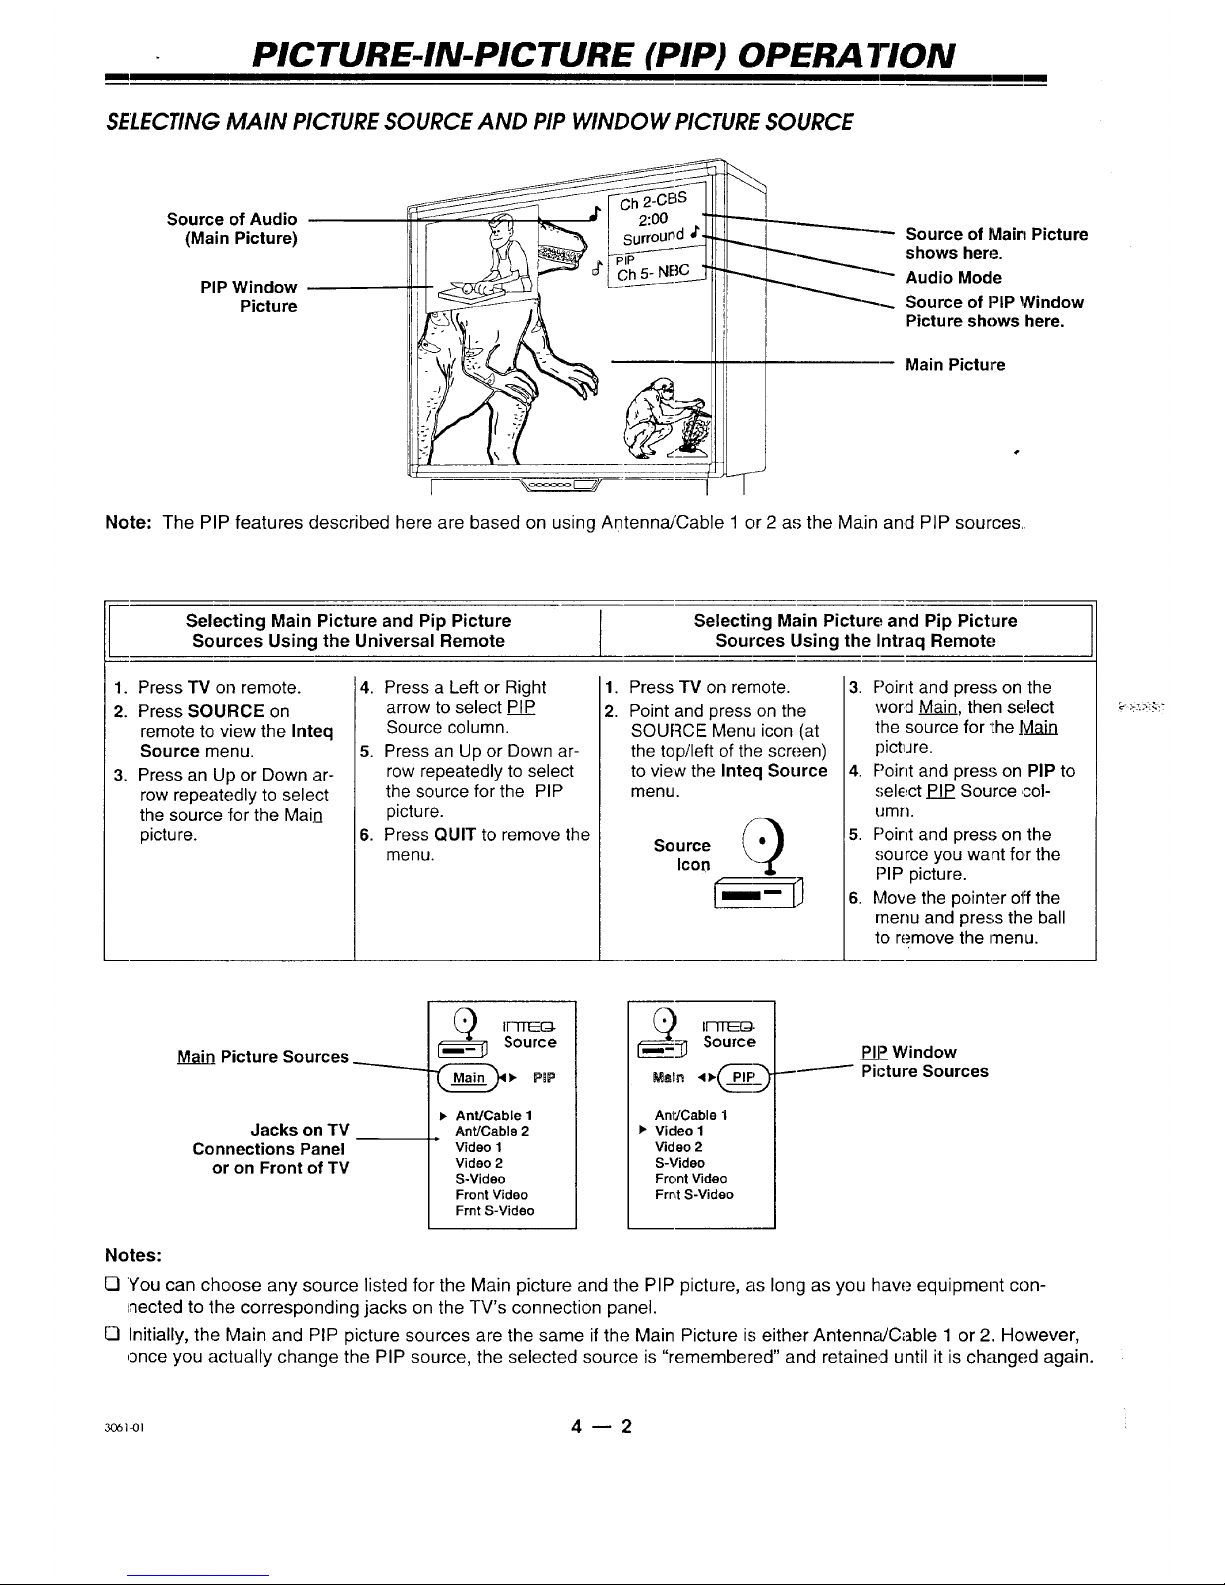
SELECTING MAIN PICTURE SOURCE AND PIP WINDOW PICTURE SOURCE
Source of Audio
(Main Picture)
PIP Window
Picture
PiP
II11! -
__'_ Source of Main Picture
_.... shows here.
Audio Mode
__ Source of PIP Window
Picture shows here.
Main Picture
Note: The PIP features described here are based on using Antenna/Cable 1 or 2 as the Main and PIP sources.
Selecting Main Picture and Pip Picture Selecting Main Picture and Pip Picture
Sources Using the Universal Remote Sources Using the Intraq Remote
1. Press TV on remote.
2. Press SOURCE on
remote to view the Inteq
Source menu.
3. Press an Up or Down ar-
row repeatedly to select
the source for the Main
picture.
4. Press a Left or Right
arrow to select PIP
Source column.
5. Press an Up or Down ar-
row repeatedly to select
the source for the PIP
picture.
6. Press QUIT to remove the
menu.
1. Press'IV on remote.
2.
Point and press on the
SOURCE Menu icon (at
the top/left of the screen)
to view the Inteq Source
menu.
Source I_)
Icon
i--.-
3. F)oint and press on the
word Main, then select
the source for the ]vlain
pictiJ re.
4. Point and press on PIP to
select PIP_Source col-
umn.
5. F)oint and press on the
source you want for the
PiP picture.
6. Move the pointer off the
rnenu and press the ball
to remove the menu.
Picture Sources
Jacks on TV
Connections Panel
or on Front of TV
IFqTEEG_-Source
v PBP
• Ant/Cable 1
Ant/Cable 2
=
Video 1
Video 2
S-Video
Front Video
Frnt S-Video
___ I_-Source
Anl"JCable 1
• Video 1
Video 2
S-Video
Front Video
Frr4 S-Video
PIP_Window
-/ Picture Sources
Notes:
[] You can choose any source listed for the Main picture and the PIP picture, as long as you haw._equipment con-
nected to the corresponding jacks on the TV's connection panel.
[] Initially, the Main and PIP picture sources are the same if the Main Picture is either Antenn_dCable 1 or 2. However,
once you actually change the PIP source, the selected source is "remembered" and retained until it is changed again.
_1-01 4 -- 2 :

PICTURE-IN-PICTURE (PIP) OPERA TION
PIP FEATURES/CONTROLS OPTIONS WITH UNIVERSAL REMOTE
Up/Down/Left/Right
Arrow Keys
PIP (On/Off)
PiP ch
REPLAY
(Audio Swap)
SOURCE
PIP Active Remote Control Functions
]-he "hi§lhlighted" text of the Channel/Time display shows
whichwindow - Main or PIP - is "active." The active mode (in
this case PIP) is the window that the remote will operate.
When PIP is first turned On, the remote is immediately ready
to operate in the PIP mode. The functions such as Channel
Up/Down, Channel Flashback and the number keys for direct
channel entry will be functioning and operate on the PIP win-
dow picture.
To change the active window:
Press PIP ch to switch the remote functions to the Main
Picture source. Press again to return to PIP window
operations.
To change source of Audio (Audio Swap):
To switch Audio sound from the Main Picture source to
the sound from the PIP inset picture source, (without
any other menus on-screen) repeatedly press the musi-
cal note,( j' ) key.
PIP (On/Off)
Press PIP to turn the PiP feature On and Off.
PIP ch
Press to switch the channel selection from the PIP win-
dow to the Main picture.
PIP Replay
While a PIP window is on: Use to stop-action (freeze)
the motion of the image in the PIP window. Press again
to return to live action.
When a PIP window is P_o_ton: Use to "replay" four stop-
action images, in a PIP window, of the last ten seconds
of the main TV picture. Press again to '_freeze"the view
on one of the four images.
Source
Press to change the source of the PIP window.
PIP Active Arrow Keypad
When you press PIP on the Universal remote a help
menu will appear. This is an on-screen reference show-
ing which arrow keys perform which function.
Main Picture
Channel Display
Audio is heard from the
source that has the
musicall note next to it.
PIP channel display:
"Highlighted" indicating
the PIP window is active.
PIP Move
Press a Left or Right arrow
repeatedly to move the PIP
window to any corner of the
TV screen.
PIP Swap
Press an Lip or Down arrow
to swap the picture in the
Main Picture screen with the
picture from the PIP window.
Press again to restore.
Ch 20
3;56
Ster÷o
PIP
-- Ch5
PIP channel display is
added to the bottom of the
Channel/Time display
when PIP is turned On.
)_PIP Move
Mov
Swap I
(_'1__ PIP Sv,ap
TWO-TUNER PIP: UNIVERSAl'. REMOTE
To View Two Different Channels
Using One Antenna Input:
1. Turn the TV ON.
2. Press :SOURCE to view the Source Menu.
3. Select Ant/Cable 1 for both thE;Mair:[ and the PIP
Source. (If Ant/Cable 2 has the antenna or cable-TV
connection, select Ant!Cable 2 for both sources.)
4. Press PIP to turn on the PIP window.
5. Press PIP ch to view the Channel/Time display. Press
PIP ch until the Main Picture channel display is hiqh-
lighted. Use the channel up or clown controls lo
change channels of the main IV picture.
6. Press PIP ch until the PIP Picture c:'hannel display is
highlighted. Use the channel up and down controls
to change channels of the PIP window.
3o61-oI 4 -- 3

PICTURE-IN-PICTURE (PIP) OPERA TION
PiP FEATURES/CONTROLS OPTIONS WITH TRACKBALL REMOTE
Listed below are descriptions of the PIP features available when using the Tra(-kball remote. When PIP is Off, PIP
Or/Off, PIP Freeze, Surf-to-PIP, and PIP Replay are the only PIP fe_Ltures available to you. However, once PIP is
turned On, all PIP features are available for use. Unavailable menu options appear in a shaded gray color.
PIP Trackball Menu I('ons
Select these options with the
InTraq remote on-screen
pointer to perform the PIP
functions described below.
PIP
D
O
FREEZ
I
l-
"JI
i
El-"
P
CHAN
PIP Move ]
Move the pointer to a menu icon and
the TV identifies the feature. Even if
PIP is turned off, the TV still identifies
the icon's feature.
TRACKBALL PIP FUNCTION ICONS
PIP PIP On/Off
Turn PIP window on and off.
D
r-:l
FREEZ
PIP Freeze
Stop-action (freeze) the picture in the PIP win-
dow. Note: If PIP is not active, pressing on this
icon freezes the Main Picture in PIP window.
Point and press on the PIP Freez icon again to
return to live action.
Surf-To-PIP
Places your main TV program in a PIP window
for 60 seconds. During this time, use channel
up or down to scan your "surf' channels on the
Main picture screen to see what is showing on
other channels. After 60 seconds, the PIP win-
dow is removed and your original program re-
turns to the Main TV screen.
Notes:
The Surf-to-PIP feature works whether or not
the Main picture channel is a Surf Channel.
CI The Surf-to-PIP feature works with Ant/Cable
1 or 2 Sources only and is not available in
StarSight mode.
PIP Swap
Swap the Main Picture with the PIP Window pic-
ture and back again.
(Not available when PIP is off.)
F1E-IFI
o •
E1-)
PIP
CHAN
PIP Audio Swap
Swap the sound from the Main picture source
with the PIP source.
Note: Main picture will stay, however, audio will
be from PIP window source instead of Main
picture source.
(Not available when PIP is off.)
PIP Replay
"Replays" four stop-action images, in a PIP win-
dow, of the last ten seconds of the Main TV pic-
ture. Move pointer to PIP window and press to
"freeze" the view on one of the four images.
Press again to continue replay.
Move pointer off replay area and press trackball
to end replay.
PiP Size
Changes the PIP window size to small,
medium, or large.
(Not available when PIP is off.)
PIP Move
Moves the PIP window {with the pointer) to any
location on the Main picture screen
(Not available when PIP is off.)
Channel Mode
Switch channel changing modes from PIP win-
dow to Main picture. (Feature works witln
Ant/Cable 1 or 2 Sources only.
(Not available when PIP is off.)
3061-[[11 4 -- 4

PICTURE-IN-PICTURE (PIP) OPERA TION
AUDIO SWAP USING THECHANNEL/TIME DISPLA Y
the Audio Swap feature can be performed using the
nTraq remote while the Channel/Time display is show-
ng on the TV screen.
Fo hear the sound from the Main picture source: Point
_nd press here. The note will appear "highlighted."
Fo hear the sound from the PIP picture source: Point
]nd press here. The note will appear "highlighted."
1")/"%
3'56,
Stereo
PIP
Ch 5
PIP Channel display appears
while PIP is turned On.
TWO-TUNER PIP: INTRAQ REMOTE
To View Two Different Channels
Using One Antenna Input:
1. Turn the TV On.
2. Point and press on the Source icon to
view the Source Menu, then select
Ant/Cable 1 for both the J_eJg.Source
and the PIP source. (If Ant/Cable 2 has t'_.- ¢
the antenna or direct cable--IV connec-
/ P
tion. select Ant/Cable 2 for both sources.)
3. Point and press on the PIP On/Off icon
to turn on the PiP window.
PIP
4. Point and press on the PIP CHAN icon
repeatedly until (Main) appears in the
display.
PIP
CHAN
5. Point and press on the channel up or down arrows
to change channels of the Main -IV picture.
6. Point and press on the PIP CHAN icon repeatedly
until (PIP) appears in the display.
7. Use the channel up or down controls to change chan-
nels in the PIP window.
0
Main Picture /"
Channel Display
PIP Channel Display: ._-_"
"Highlighted" indicating
the PIP window is active.
Ch 20
--- 3:56
PIP
__ Ch5
Point and Press here to
change channels
All Chan
Flashback
3o_i-m 4 -- 5

MULTI-BRAND REMOTE CONTROL: MBR3465
INTRODUCTION
This multi-brand (MBR) remote control operates the common features of most, but not all, models and brands of IR (in-
frared) controlled TVs, VCRs, cable boxes, video disc players, and audio equipment. The remote may be capable of func-
tions that are not provided by your equipment, for example, on-screen menu operations. Ifsome functions of optional
equipment are not controlled by this remote, usethe original remote that came with your equipment.
BA TTERYINSTALLATION
Batteries are provided with the remote, but it's up to you to install them. When the remote no longer functions normally,
or il appears to have lost memory, replace the batteries with two high-quality, alkaline, size AAA batteries. Match plus
with plus (+with +) and minus with minus (- with -) as shown in the battery compartment.
Once the fresh batteries are installed, your remote returns to normal operation.
However, if you programmed it to operate AN equipment other than Inteq brand,
the remote must be reprogrammed for those products. Refer to the "Program-
ming Your Remote" section later in this chapter. The factory preset codes for
your Inteq euipment are 101 for TV, 201 for VCR, 353 for
CABLE, and 401 for AUX.
Nores:
l-I Do not place heavy objects on top of the remote con-
trol keys. Prolonged unintentional operation of the re-
rnote shortens battery life.
IQ P,emove the batteries if the remote will not be used for a
month or more.
Push tab In
and lift out,,
The manufacturer is not responsible "for
damage Caused By Battery Leakage.
CHOOSING OPERAtiNG MODE
To control your TV, VCR, cable box, or auxiliary equipment with this remote, you must first choose the "mode" of opera-
tion. Press the clesired mode key for TV, VCR, CABLE or AUX. Pressing the -k (Star) key puts the remote into
StarSight mode. To exit out of the StarSight mode, press TV or one of the other mode keys. Some keys on the remote will
always operate a particular product function regardless of which mode the remote is in. For example, PLAY controls the
VCR play function.
INDICATOR LIGHT
Lightswhenever
remote sends signal.
OPERATING MODE KEYS
Selects equipment to be controlled.
NUMBER KEY PAD
Initiates menu/equipment
programming, direct channel
selection, and other functions.
LOWER ARROW KEY PAD
Up/Down/Left/Right arrows
perform different functions
depending on the operating mode
that is selected. See the following
pages for details.
POWER KEY
Turns power of selec'ted equipment
On and Off.
UPPER ARROW KEY PAD
Keys perform different functions depend-
ing on the operating mode currently se-
lected. See the following pages for details.
SPECIAL FUNCTION KEYS
Activates special features on some -rvs,
VCRs, and other devices.
StarSight@ is a trademark of StarSight Telecast Inc., Fremont, CA 94538.
3o61ol 5 m 1

MULTI-BRAND REMOTE CONTROL: MBR3465
I
TV OPERA TIONS
These descriptions apply to functions and operations of your TV.
First, press "IV on the remote to select the TV mode of operation.
PRG (Program)
Use for programming your remote to
operate other equipment. See "Pro-
gramming Your Remote" later in this
chapter for more details.
FLASHBK (Flashback)
Returns to the previous TV channel.
SURF
Activates and cancels "Surfing"
channel scan mode. When Surf is ac-
tiw.%use channel Up and Down to
scan "Surf" channels.
CHANNEL/DAY
(Up or Down Arrows)
Tunes to the next higher (or lower)
channel programmed into the TV
memory. Press and hold to repeat.
NUMBER KEY PAD
Enter number for direct
channel tuning.
MENU/GUIDE
Displays on-screen menus for TV
mode of operation. Press repeatedly
to view other on-screen menus.
LEFT/RIGHT ARROW KEYS
Typically adjusts a selected on-
screen menu option. Also moves the
PIP window to a new location on the
TV screen.
PIP, PIP ch, and REPLAY
See "PIP Operation"
section for more details.
TIMER
Displays the SLEEP TIMER menu.
Sets desired TV shut-off time. Also
specifies AM or PM when setting the
TV's clock or programming a timer
feature. See 'q-he First Time You Op-
erate Your TV" section for more de-
tails.
t
Point Remote at TV
TV Operations
POWER
Turns TV On or Off.
TV (Mode Key)
Selects TV mode ol operation.
MUTE (2-Level, some TV models)
Reduces sound level and turns off
sound while the picture remain.,;.
Press again to restore the sound."
VOLUME/PAGE; (Left Side)
Decreases the TV's sound level.
Press and hold 1:orepeat.
VOLUME/PAGE" (Right Side)
Increases the TV's sound level. Press
and hold to repeat.
ENTER/TUNE
Shows the Channel/Time display or
"enters" channel numbers.
QUIT/,_
Exits from the current menu operatiion
and returns to the current channel. If
no display is on-screen, it activates
the BBE audio options. In PIP mode, it
performs Audio swap.
UP/DOWN ARROW KEYS
__ Typically selects an option in an on-
screen menu. In PIP mode, use to
swat) Main and PIP picture.
(Star), THEME
Activates the StarSight mode of the
TV. See the StarSight operating
guide for more details.
TO DO
In TV mode, turns Closed Cap tion'_
On and On.
TV/VCR - SOURCE
Displays the menu of TV sources.
Press repeatedly to step through the
source selections.
Note: Keys dedicated to VCR functions may be used to operate your VCR
while the remote is in TV mode.
3o61-ol 5 _ 2
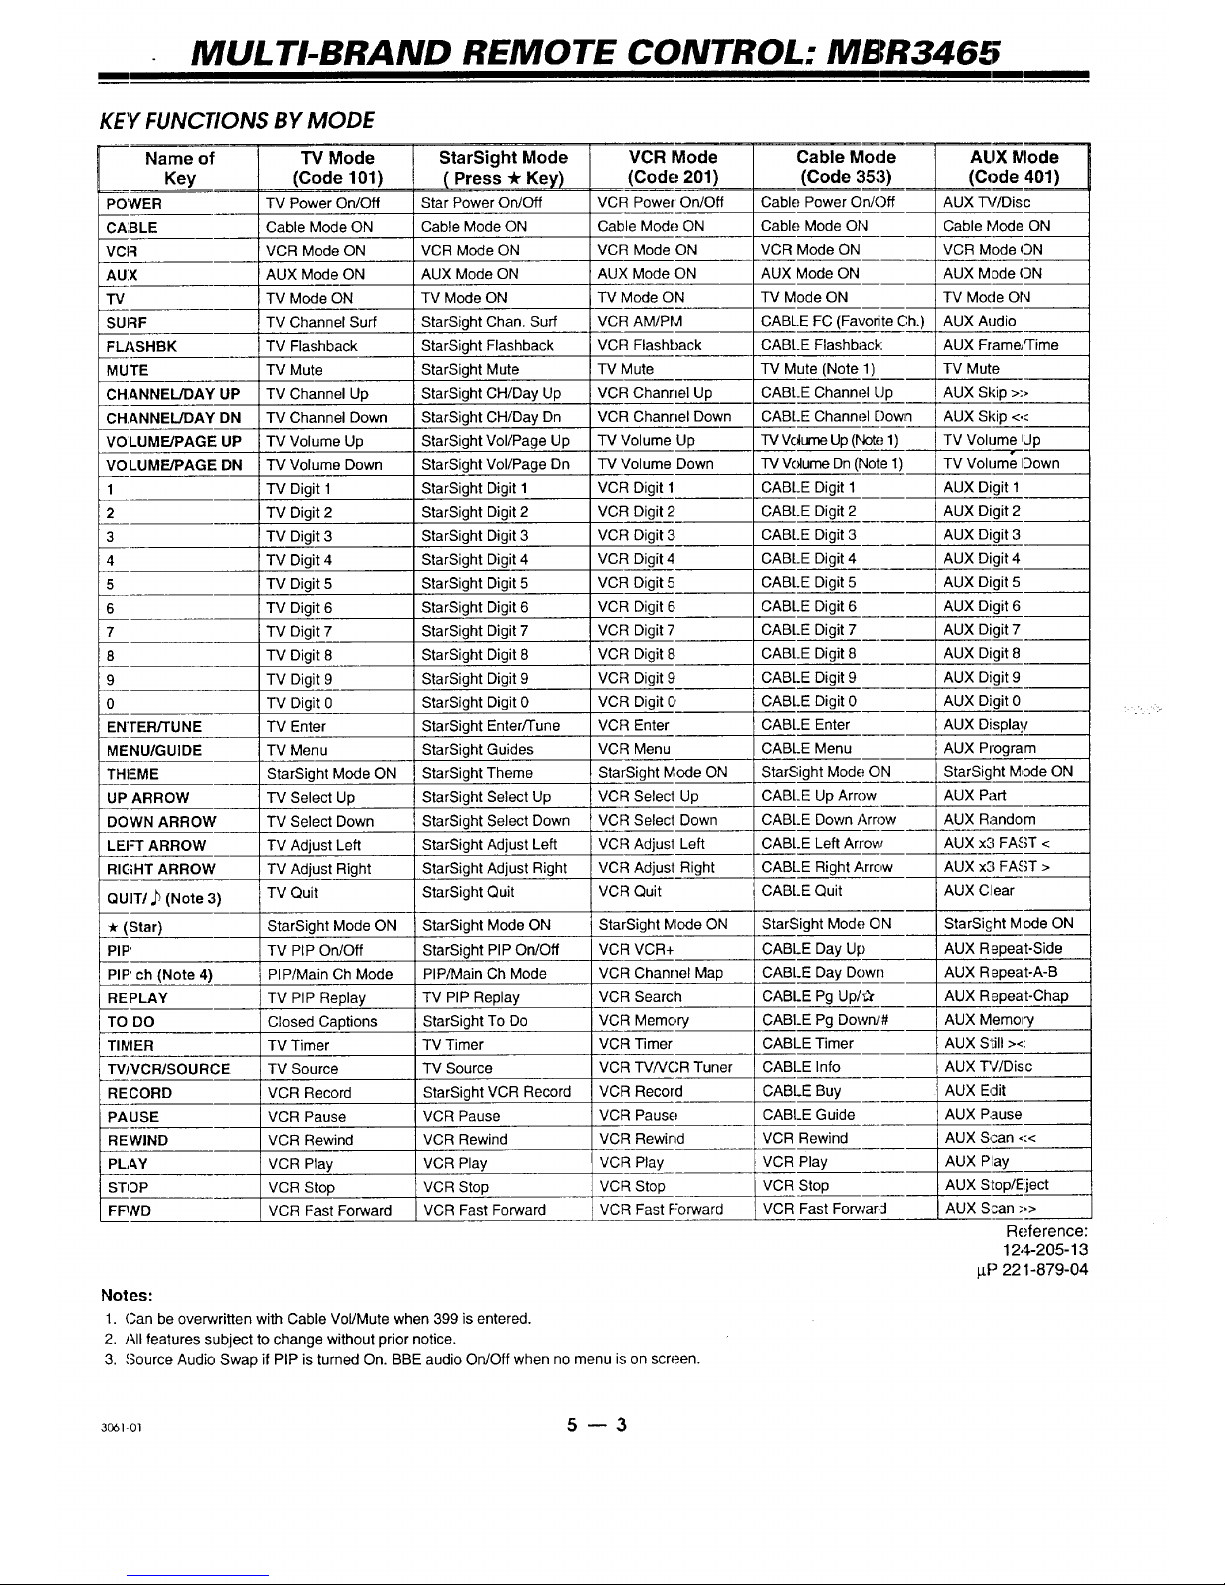
MULTI-BRAND REMOTE CONTROL: MBR3465
KEY FUNCTIONS BY MODE
Name of
Key
POWER
CA3LE
VCR
AUX
TV
2
3
4
5
6
7
8
9
TV Mode
(Code 101)
TV Power On/Off
Cable Mode ON
VCR Mode ON
AUX Mode ON
TV Mode ON
SURF TV
FLASHBK TV
MUTE "I-V
CHANNEL/DAY UP TV
CHANNEL/DAY DN -rv
VOLUME/PAGE UP TV
VOLUME/PAGE DN TV
1 -IV
TV
TV
TV
TV
TV
TV
TV
Channel Surf
Flashback
Mute
Channel Up
Channel Down
Volume Up
Volume Down
Digit 1
Digit 2
Digit 3
Digit 4
Digit 5
Digit 6
Digit 7
Digit 8
TV Digit 9
0 TV Digit 0
ENTER/TUNE TV Enter
MENU/GUIDE TV Menu
THEME
UP ARROW
DOWN ARROW
LEI=T ARROW
RIGHT ARROW
QUIT/J_ (Note 3)
(Star)
PIP
PIP' ch (Note 4)
REPLAY
TO DO
TIIVlER
"rvJMCR/SOU RCE
RECORD
PAUSE
REWIND
PLAY
STOP
FFWD
StarSight Mode ON
TV Select Up
TV Select Down
TV Adjust Left
TV Adjust Right
TV Quit
StarSight Mode ON
TV PIP On/Off
PIP/Main Ch Mode
TV PIP Replay
Closed Captions
TV Timer
TV Source
VCR Record
VCR Pause
VCR Rewind
VCR Play
VCR Stop
VCR Fast Forward
StarSight Mode
( Press -/rKey)
Star Power On/Off
Cable Mode ON
VCR Mode ON
AUX Mode ON
TV Mode ON
StarSight Chan. Surf
StarSight Flashback
StarSight Mute
StarSight CH/Day Up
StarSight CHiDay Dn
StarSight Vol/Page Up
StarSight Vol/Page Dn
StarSight Digit 1
StarSight Digit 2
StarSight Digit 3
StarSight Digit 4
StarSight Digit 5
StarSight Digit 6
StarSight Digit 7
StarSight Digit 8
StarSight Digit 9
StarSight Digit 0
StarSight Enter/Tune
StarSight Guides
StarSight Theme
StarSight Select Up
StarSight Select Down
StarSight Adjust Left
StarSight Adjust Right
StarSight Quit
StarSight Mode ON
StarSight PIP On/Oft
PIP/Main Ch Mode
TV PIP Replay
StarSight To Do
TV Timer
TV Source
StarSight VCR Record
VCR Pause
VCR Rewind
VCR Play
VCR Stop
VCR Fast Forward
VCR Mode
(Code 201)
VCR Power On/Oft
Cable Mode ON
VCR Mode ON
AUX Mode ON
TV Mode ON
VCR AM/PM
VCR Flashback
TV Mute
VCR Channel Up
VCR Channel Down
"IV Volume Up
TV Volume Down
VCR Digit 1
VCR Digit 2
VCR Digit 3
VCR Digit 4
VCR Digit 5
VCR Digit 6
VCR Digit 7
VCR Digit 8
VCR Digit 9'
VCR Digit 0
VCR Enter
VCR Menu
StarSight Mode ON
VCR Select Up
VCR Select Down
VCR Adjust Left
VCR Adjust Right
VCR Quit
StarSight Mode ON
VCR VCR+
VCR Channel Map
VCR Search
VCR Memory
VCR Timer
VCR TV/VCR Tuner
VCR Record
VCR Pause
VCR Rewind
VCR Play
VCR Stop
VCR Fast Forward
Cable
(Code 35:3)
Cable Power On/Off
Cable Mode O
VCR Mode Oh
AUX Mode ON
IV Mode ON
CABLE FC (Favonte Ch.)
CABt.E Flashb
-IV Mute (Note 1)
CABLE Charm Up
CABLE Chann Down
TV Vdume Up (r 1)
TV Volume Dn (Note 1)
CABLE Digit 1
CABLE Digit 2
CABLE Digit 3
CABLE Digit 4
CABLE Digit 5
CABLE Digit 6
CABLE Digit 7
CABLE Digit 8
CABLE Digit 9
CABLE Digit 0
CABLE Enter
CABLE Menu
StarSight Mod_ ON
CABLE Up Arr
CABLE Down.
CABLE Left Arrow
CABLE Right Arrow
CABLE Quit
StarSight Mod, ON
CABLE Day UI
CABLE Day Down
CABLE Pg Up/#
CABLE Pg Dowry#
CABLE Timer
CABLE Info
CABLE Buy
CABLE Guide
VCR Rewind
VCR Play
VCR Stop
VCR Fast For_
Notes:
1. Can be overwritten with Cable Vol/Mute when 399 is entered.
2. All features subject to change without prior notice.
3. Source Audio Swap if PIP is turned On. BBE audio On/Off when no menu is on screen.
ALIX Mode
(Code 401)
AUX _//Disc
Cable Mode ON
VCR Mode ON
AUX Mode ON
TV Mode ON
AUX Aodio
AUX Frame,q-ime
TV Mute
AUX Skip >-,
AUX Skip <<
TV Volume ijp
TV Volume Oown
AUX Digit 1
AUX Digit 2
AUX Digit 3
AUX Digit 4
AUX Digit 5
AUX Digit 6
AUX Digit 7
AUX Digit 8
AUX Digit 9
AUX Digit 0
AUX Display
AUX Program
StarSight Mode ON
AUX Part
AUX Random
AUX x3 FAST <
AUX x3 FAST >
AUX Clear
StarSi£ht Mode ON
AUX R epeat-Side
AUX Repeat-A-B
AUX Repeat-Chap
AUX Memory
AUX S'Lill><
AUX PC/Disc
i AUX E4it
AUX Pause
AUX Scan <<
AUX Play
AUX Slop/Eject
AUX Scan -'.>
Reference:
12,$-205-13
p,P 221-879-04
3_1-ol 5 -- 3

MULTI-BRAND REMOTE CONTROL: MBR3465
PROGRJ_MMING YOUR REMOTE
If you are using Inteq products, the remote is programmed for the most cornmonly used codes. For other brands ,-- or if
your remote fails to (-ontrol your Inteq product -- you will have to program the remote.
Basic Programming Modes: TV, VCR, Cable, Aux
1. Locate the three-digit code for your brand (such as
Zenith) and type of equipment (such as VCR) in the
code table on the following page.
2. Press and hold PRG with a small blunt object
for about three seconds until the indicator
lights. (Release the button after the indicator
is oil.)
3. Press TV, VCR, CABLE, or AUX __
to select the product you want _.(_(_) (_D(_) 1)
your remote to control. (If you
wart, CABLE or AUX may be
used for a second TV or VCR or to program your re-
mote for a video disc player or audio equipment.)
4. Use the number keys to enter the
three-digit code(s) for your equip- (_ (_ (_
ment, then press ENTER/TUNE. (_ (_ (_
The indicator light shduld flash a cou-
ple of times, then turn off to indicate (_ (_) (_
that the code was accepted. If the in- @
dicator stays on, repeat steps 3 and
4 or try using a different code.
5. Write your codes; on the label inside the battery com-
partment for future reference.
6.To erase all code program-[___
ming and return to the
factory preset codes,
enter 9-1-1 when
programming the remote.
Additional Programming Modes:
AUX+I, AUX+2, AUX+3
Your remote can control up to seven audio/video appli-
ances using the TV, VCR, CABLE and AUX keys, and
the AUX+I, AUX+2, AUX+3 modes.
1. Begin with basic programming steps 1 and 2.
2. Press and hold the AUX key and at the same
time, press either 1, 2 or 3. Then release the
keys.
3. Use the number keys to enter the
4
three-digit code for your equip-
ment, then press ENTER/TUNE
To operate the equipment that you
just programmed into this auxiliary
mode, press the AUX key and the
same number (either 1, 2, or 3) used
during programming. The remote is
now ready to operate the unit.
Cable Box Volume
The remote can operate the volume and mute functions
of your cable box - if your cable box is equipped with
these features.
1. Program the remote for your cable box using basic pro-
gramming steps 1-4.
2. Perform the programming _--.._1____]_I_,_----- j
procedure a second time,
but instead of entering the
cable box code (in step 4), [ !J/ E__T_m_."
key in code 3-9-9, then press ENI"ER/
TUNE. This tells the remote to ,oper-
ate the .cable box volume/mute func-
tions while you use the remote in cable mode.
If you no longer want to operate the cable box volume
and mute while the remote is in cable mode, reprogram
the remote for your cable code. Volume/mute functions
are restored to the TV.
Amplifier Volume Override
If your TV is connected to an external amplifier, and
you want to control the volume and mute features of
the amplifier rather than those of the; TV or cable box:
1. Program your amplifier's code into one of the ALIX
modes.
2. Select the mode on your remote: (TV, VCR, etc.) where
you want the amplifier volume control function to re-
side. For example, if you want to operate the volume
and mute of your amplifier while; the remote is in TV
mode, press TV for this step.
3. Begin the programming E(_.L_]_I-_q_----- 1
procedure described in
"Programming Your ....
Remote," and enter code J_ )
4-9-9, followed by ENTER/TUNE. NTER]TUNE
Now, while you are watching TV, and the remote is in
TV mode, the VOLUME Up/Down and MUTE keys on
the remote,operate those functions of the amplifier.
4. To restore volume; and muting contro] to your -I%_or ca-
ble box, reprogram the remote for these units into the
mode (IV, Cable, etc.) to berestored.
Note: When operating a CD or audio tape device with
your remote, amplifier volume ancl mute are automat-
ically selected, if an amplifier code has been pro-
grammed i,nto the remote.
3061-ol 5 -- 4

MULTI-BRAND REMOTE CONTROL: MBR3465
AUTO FIND OPTION
If you have tried all the codes listed for your brand and type of product in the code table, and none of those codes oper-
ate your equipment, you can use Auto Find to search for the code you need.
L To perform an Auto Find for the product codes:
1. Tum the unit ON and aim the remote toward it.
2. Press and hold PRG with a small blunt object
until the indicator lights.
3.
Press the mode key on the re-
mote for the product you want to
control: TV, VCR, CABLE, or
AUX.
,.Enter0-0-O,theopress@ @ @1
ENTER within two seconds.
When the indicator light
flashes three times and re-
mains lit, Auto Find is active.
5. F'ress and hold POWER, then release it, re-
#,eating this action about once asecond until
the product turns OFF.
6.
Press ENTER immediately to save the
code. If your remote fails to operate
the functions you use most often, you
can re-enter Auto Find and search for
ELbetter code.
[ _NTER/TUNE _
Programming Notes:
[3 During Auto Find, the indicator light will flash off each
time you press POWER, and back on when you re-
lease it. If the indicator light stays on when you press
POWER, Auto Find has tried all available cocles. If you
finish Auto Find and the product you want to control
has notturned off, your remote cannot control that
product.
[] You may cancel programming at any time by
pressing PRG.
[] The remote cannot be programmed while in the Star-
Sight mode: Press TV, VCR, CABLE or AUX before
pressing PRG.
[] If no key on your remote is pressed within 60 seconds,
the programming process wil! stop, and you will have
to start again.
3_-o 5 -- 5

MULTI-BRAND REMOTE CONTROL: MBR3465
OPERATING CODES BY BRAND NAME
TVS
Admiral 116,
133
Adventura 154
TVNCR
Akai 104
Amark 103,
AOC 104
Bell & Howell 121
Broksonic 131,
Candle 139
Centurion 119
Citizen 121,139
Contec 141
Coronado 103
Crown 103
Curtis Mathes 116, 119, 121
Daewoo 149, ! 59
Daewoo 148
TV/VCR
Daytron 119
Elektra 121
; Emerson 103,104,123,
124, 131,136,
i 145
Emerson 158
TVNCR
Fisher 109, 118
Funai TV/VCR 154
General 106, 107, 114,
Electdc 116, 117, 161
Goldstar 103,104, 119,
147
Goldstar 153
TV/VCR
Hitachi 102, 103, 1-_'.9,
163
Inteq 101,149
J.C. Penney 104, 110. 114,
117,119
JVC 125, 132. 164
KMC 103
KTV 103, 104, 138
Kurazai 121
Lodgenet 121
Legik 121
LXI 133, 137
Magnavox 103, 112, 113,
117,119, 1;!7,
128, 139, 1(;5
x 173
Majestic 121
Marantz 104, 120,155
Megatron 146
Memorex 121
MG.N 104,119,120,
Mitsubishi 130, 140, 155
Montgomery 103, 104,105,
Ward 113,114, 119,
121,130, 1:33
NEC 104, 119
Panasonic 106, 107, 160,
166
Panasonic 174
TVNCR
Philco
Phi]ips
121,130,
146
136
103,104,112,
113,139
112,113
Pioneer 135
Portland 103
ProScan
Quasar 106, 107
RCA 104, 116, 126,
157,161,162,167
168
Realistic 105, 123, 124
Sampo 119
Samsung 103,119, 134,
141
Sanyo 108, 109, 118
Scott 119, 124
Sears 103, 108, 109,
110, 111,118,
134
Sharp ! 103, 105, 122,
133, 137, 156,
169
Signature 103, 104, 105,
2000 113, 114,119,
121,130, 133
Sony 115, 143. 151,
170
Soundesign 139
Sylvania 112, 113, 117,
119, 127, 128,
139
Syml::/t'_f_ 154
TVNCR
Tatung 106
Teknika 103, 112, 121,
124, 139
Telerent 103, 121
Toshiba 110, 111,134,
t71
XR1000 121
Yorx 119
Zenith 101,149
Zenith TV/VCR 153, 154, 172
VCRS
Admiral 208, 261
Adventura 231
Aiwa 231
Akai 223, 238, 241
Audio 202, 218
Dynamics
Bell & Howell 206, 247
Broksonic 221,226,250,
255
Canon 214
Citizen 209
Craig 212
Curtis Mathes 214, 259
Daewoo 244, 246, 248,
254
Daytron 236, 246
DBX 202, 218
Emerson 203, 221,223,
226,233,235,
243,250
Fisher 211,212, 213,
247
Funai 231
General 214, 216, 220
Electric
Goldstar 209
Go Video 256,262, 263
Hitachi 215, 257
Inslant Replay
Inteq
16, 157, 162, J.C. Penney
167
JVC
Kenwood
Logik
LXl
Magnavox
i Marantz
Marta
Memorex
Mitsubishi
Montgomery
Ward
Multi Tech
NEC
Orion
Panasonic
Pentax
Philco
Philips
Pioneer
Portland
Pro Scan
Quasar
RCA
Realistic
Samsung
Sansui
Sanyo
Sco_
Sears
Sharp
Shintom
Signature 2000
Sony
Sylvania
Symphonic
Tashiko
Tatung
Teac
Teknika
Toshiba
XR1000
Vector Re-
search
Yamaha
Zenith
214,227
201
214,215,218,
227
202,226,258
2O2
239
209,231
207,214,231
207,218
209
206,212,214,
231
2O4,222,252
208,214,216,
219,231,249
239
202,218
J250
214,251,259
215
207,214
207,214,227
210,215
246
216,260
214,259
215,216,220,
227,240, 242,
260
206,208,212,
214,231
220,230
239
206,212, 247
204,205,233,
243
206,209,211,
212,215
208,261
239
208,214,216,
219,231,249
217,232,237
207,214,227
231
209
202
202,231
234
205,215
239
204,218
i202,218
201,224,225,
229,237
CABLE/SATELLITE
Allegro 358, 362
AllegrOswitch.Ai8 361
Gemini 305, 331,338
General 367
Eleclric
Genera] 305, 306Instrument
Hamlin
Jerrold
Kale Vision
Macom
Magnavox
NSC
Oak
Panasonic
Paragon
Philips
Pioneer
RCA DSS
Pegency
Samsung
Scientific
Atlanla
Sprucer
Standard Comp
Texscan
Tocom
Unika
United Satellite
Iniversal
'rid Tech
Video Way
Viewstar
Zenith
Zenith Satellite
302,303,345,
365,366
304,307,308,
309,310, 318,
360,363
335
314,321
334
i335,339,368,
369,370
311,332,342
313,320
333
347,350,352,
354,355
315, 343
373
329
335
316,323,336,
364
313
335
339,356,371
317,318,346
348,362
344
358,362
34O
349
354,355,372
301,353
312,326,330,
351
VIDEO DISC
PLAYERS
Pioneer 402,403
Sanyo 401
Sony 404
Zenith 401
DIGITAL VIDEO DISC
I'_lteq ITBD
AUDIO CD PLAYERS
Akai
Crown
Denon
Fisher
Goldstar
ttarman/Kardon
_VC
Kenwood
Magnavox
Mitsubishi
NAD
Nakamichi
NEC
Onkyo
Panasonic
Philips
Pioneer
13uasar
409,424
410
411
412,438
460
413
415
412,416,417,
441
421,422,433,
434
423,424
425,426,447
427,428
429
430
431,432
421,433,434
431,435
432
Re.dio Shack
RCA
Sanyo
Scott
Sharp
Scny
S¢,undesign
Teac
Technics
Tcshiba
Yamaha
Zenith
431,436,439,
440,441
437
438,439
440
441,442
443,444,445
461,498,501,
5O2
446
432,459
447
448
460,461,498,
501,502
-I_DIO TAPE DECKS
Denon
Harman/
Kardon
JVC
Kenwood
Onkyo
Philips DCC
Pi3neer
Sony
Technics
Yamaha
455 ,,
456
457
:450
458
454
451,478
452
454, 497
453
AUDIO TUNrRS
AND AMPLIFIERS
Denon
Fisher
Goldstar
HarmarJ
Kardon
JVC
Kenwc, od
Maramz
O "_kyo
Philips
Pioneer
Radio Shack
Realistic
Sanyo
;cott
Sharp
Sherwood
Sony
Soundesign
Tii3ac
Technics
Yamaha
Z_nith
462,463
464
46O
465
466
468,469
472,503
473
475,476
477,478,479
487,488
48O
481
482
483
487,488
489490,491,
492
461498,501,
5O2
494,495
497
496
460,461,498,
501,502
Ref:
124_-205-012
pP 221-879-04
_1-m 5 -- 6

MBR REMOTE MENUS REFERENCE
QUICK REFERENCE TO ON-SCREEN MENUS WITH MBR REMOTE
Your TV is menu operated; in other words, features and adjustments c,fthe TV are all operated from a list of options
that appear on the TV screen. When you select a feature from the list, an adjustment window (or sub-menu) ,appears
so that the adjustment may be completed. And all of these adjustments can be accomplished from the comfort ot:your
favorite chair by using the MBR remote control.
To view the on-screen menus using the MBR remote control, first press TV to make sure the remote is in TV mode.
Then press MENU repeatedly to sequence through the available menus.
Main <• PiP
• AnUCable 1
Ant/Cable 2
Video 1
Video 2
S-Video
Front Video
Fret S-video
L"J_j_SI Setup
• Auto Program
Add/Del/Surf
Clock Set
Captions
Caption/Text
Language
Background
StarSight
Projo Setup
Features
• Timer Setup
Ch. Labels
Source ID
Parental Cfl
Auto Demo
Speakers
I
it-FrE_;-
Video
• Contrast
Brightness
Color
Tint
Sharpness
Color Ternp
Video Filter
Skin Tone
_ldeo Preset
[_ f-lrE_Q.
PIP
• Ch. GuidJ)
Oh. Review
Contrast
Tint
Size
Language I
EngRsh
EspaSol
Fran_ais
Adjustment window (sub-menu) appears for most
menu options after they are selected.
Menu icon and title ol=menu.
List of options available
for this menu.
BASIC MENU OPERA TION
Operating the on-screen menus is a simple 4-step process. Some operations may involve one or two extra steps, such
as entering numbers for setting the time. But for the most part, operating the menus goes like this:
Press MENU repeat-
edly to choose an
on-screen menu.
Press a Left or Right _--_
arrowto adjust or make
a change to these-
lected o3tion.
Press an Up or Down
_2_ arrow repeatedly until
one of the options in
the menu is
highlighted.
Press QUIT to remove
menus or wait a few
seconds and the TV
will return to normal
operation.
Typical Remote Control
_-ol 6- I

SOURCE MENU: MBR REMOTE
Front Video and Front
S-Video are source
options on some
models only.
) I[-TFEG_
Source
Main <, POP
AnUCable 1
Ant/Cable 2
Video 1
Video 2
S-Video
"_Front Video h
k,,Frnt S-Video)
Maln <, PI__.PP.
Ant/Cable 1
I_ Video 1
Video 2
S-Video
Front Video
Frnt S-Video
Source IVlenus:
Main picture source menu se-
lected (left)
PIP Window Source menu
selected (right)
Initially, the Main and P=iPpicture
sources are the same if the Main
Picture i,; either Antenn,EdCable
1 or 2 However, once you actu-
ally change the PIP source, the
selected source is "remem-
bered" and retained until it is
changed again.
MENU OPERAtiON
Q Press SOURCE for direct entry to the I/s_
Inteq Source menu, or press MENU
_.._==) or repeatedly until the Source Menuis _ o(_(_,_
selected.
Use a Left!Right arrow key to select
either _ picture source menu or
PIP picture source menu.
Press SOURCE repeatedly, or use
an Up/Down arrow key until the de-
sired Source is selected.
Press QUIT to exit from menu opera-
tions or wait a few seconds for the TV
to return to normal operation.
SOURCE SELECtiON
The term "Source" refers to the equipment and antenna wires connected to the jacks on the TV's connection panel on
the back of the TV. To place the picture and sound being received by these jacks (or Source) on the TV screen, you
"select" the appropriate "source" - Antenna/Cable 1, Video 1, etc. - using the Source menu shown above.
Ant/Cable 1 or 2
Video I or 2
S-Video
Front Video or
Frnt S-Video
Routes the antenna or cable-TV source to the TV for viewing. You see program material from
the source equipment that is connected to the corresponding ANT/CABLE 1 or 2 jack. (If the
signal is from a VCR or a cable box, tune the TV to either channel 3 or 4.)
Routes the audio and video from an A/V source (such as a VCR or a video disc player) to tl'_e
TV for viewing. You see program material from the source equipment that is .connected to the
corresponding VIDEO 1or 2 IN jacks.
Routes the audio and video from an auxiliary Super-VHS video source (such as a VCR or a
video disc player) to the TV for viewing. You see program material from the source equipment
that is connected to the corresponding S-VIDEO INjacks.
Routes the audio and video from an auxiliary AN or Super-VHS video source (such as a VCR
or a video disc player) to the TV for viewing. You see program material from the source
equipment that is connected to the corresponding FRONT VIDEO or FRNT S-VIDEO IN jacks.
Note: Refer to the "Connecting Your TV" chapter to make the proper equipment connections to the TV. For information aLboutPIP
sources, refer to the "PIP Operation" section.
3061-01 7- 1

SETUP MENU: MBR REMOTE
Setup
I_Auto Program
Add/Del/Surf
Clock Set
Captions
Caption/Text
Language
Background
StarSight
ProjoSetup
I_Clock Set
Captions
Ce.ptiorv'Text
Language
Background
Projo Setup
Setup Menu While
Video or Super-Video
Source is Chosen
MENU OPERATION
_',' Inteq Setup menu appears.
Press the Left]Right buttons'repeat-
edly to complete the adjustment.
Press an Up or Down button to select
an option.
@
or
Press MENU to return to the main
Setup menu and select another op-
tion or prc,ss QUIT to exit from menu
operation,';.
Auto Program Finds all active channels and stores them in the TV's memory for use when a CHANNEL
up/down button is pressed. See the "What You Should Do First" chapter for more details
(Clhannel)
Acld/Del/Surf
Edit the channels found by Auto Program to create your own personal list of channels using the
Channel Add or Delete feature. You may want to add (or' delete) a weak-signal channel to the
channel scan. Also, create your own "Surf" Channel Scan to scan your most frequently tuned,
favorite channels when using Chan Up/Down. See the information following this chart for more
details.
Clock Set Use to set the clock in the TV. The time may be set manually or automatically. See the "What
You Should Do First" chapter for more details.
Captions Use to turn on-screen Caption/Text On or Off. Options are: On, Off or Captions When Muted.
Caption/Text Select from different "types" of Closed Captions or informational text. Closed captioning or
informational text appears on the IV screen when available on the selected channel. Options
are: Caption 1, Caption 2, Caption 3, Caption 4, Text 1, Text 2, Text 3, or Text 4. See the
information following this chart for more details.
Language Selects the language for the on-screen menus. Options are: English, Spanish or French.
Background Adds or removes a background behind the on.-screen menus.
StarSight Begins the StarSight Setup procedure. Refer to the StarSight operating guide for delEails.
Before you activate the StarSight feature, review the StarSigtlt instruction guide for the
information you will need to complete the Star.Sight activation process.
Projo Setup
(Projection TVs
only)
Lets you verify and adjust, if needed, the color convergence of the TV picture. If you move your
TV from its original location, or if after time, you notice color "fringes" around objects in the
picture, you should check the alignment (convergence) of the; projected colors. See the "What
You Should Do First" chapter for more details.
continued on next page
3o_I-oI 8- I

SETUP MENU: MBR REMOTE
USING (CHANNEL) ADD/DEL/SURF
To Add or Delete Channels: I To Setup Surf Channels:
"Added" channels are tuned
when using the CHANNEL Up
and Down arrow keys. All chan-
nels found by Auto Program
are initially set as "Added"
channels.
"Deleted" channels are
blocked from tuning when us-
ing the CHANNEL Up and
Down keys. However, they
may be tuned directly by using
the number keys on the re-
mote control.
1. Use the Up or Down ar-
rows to choose Add/Dell
Surf and press a Left/
Right arrow to view the
Add/Delete/Surf screen
2. Use the number keys to
select a channel.
3. Use the Left/Right arrows
to show "Added" or
"Deleted."
4. Press QUIT to remove the
menu.
"Surf" channels act as a
list of favorite channels, in-
tended for your most fre-
quently watched channels.
When "SURF" is activated,
these are the only chan-
nels that are tuned while
using the CHANNEL
Up/Down keys.
1. Use the Up or Down
arrows to choose
Add/Del/Surf and
press a Left/Right
arrow to view the Add/
Delete/Surf screen
2. Use the number keys to
select a channel.
3. Use the Left/Right ar-
rows to show "Surf."
4. Repeat steps 2 and 3
for your most fre-'
Available Channels
I
r
P
quently watched channels.
2 _ 4_
7 9
36_
5. Press QUIT to remove the menu.
37 38
47 48
52_[
59
63
Selector Highlight
/
1 / Live view of
// _<.-"_ selected channel
5 ___ _ Added Channel
,5 _/!'-'7_- (Boh'l)
25_ .... _ Surf Channel
, (Boh:l & Surf
35 Icon)
40 Ch 2 ..-.....
CBS -"'-"'--- Channel
5o Added_..-.._ _ Status
Instructrons
_ ,,,,,,,,,,..P_ .__._"I___ER_
60
-- Deleted Channel
(Shaded)
Use Down button to move selector
to additional numbers if present.
To activate "SURF" mode, press the SURF key on the remote control.
[Surf's Up! _] appears on the screen.
To deactivate "SURF," press SURF again.
[ No Surfing (_)] appears on the screen.
Notes: Add/Del/Surf can only be used with ANT/CABLE 1or 2 Source.
TURNING CAPTIONS ON AND OFF
Provides, to the hearing-impaired, words (Captions) on-screen of the audio portion of the broadcast. If a program has
captions included, the CC or captions notice will appear for 2 or 3 seconds before the broadcast begins.
To Turn Closed Captions On and Off:
1. Press MENU repeatedly until the INTEQ Setup menu
appears, then press an Up or Down arrow to select
Captions.
2. Press a Left!Right arrow button to see the adjustment
window.
3. Continue pressing the Left/Right arrow button to select
Off, On or Captions When Muted.
4. Press QUIT to remove the menu.
To Turn Closed Captions
On and Off with TO DO button:
1. Press TV, then press TO DO on remote.
2. Press TO DO repeatedly to cycle through the options:
Off, On or Captions When Muted.
"_i IF]TE[_-
.. _, Setup
Auto Program
Add/Del/Sud
Clock Set
I_Captions
Caption/Text
Language
Background
StarSight
Projo Setup
Captions
LYt
• On
Cal)ti(lr/ VV}lerl bll 4_d
1
Notes:
Q After Captions are turned On, proceed to "Choosing
CaptionsfText."
[] If you select Captions When lVluted, Closed Captions
will appear when the Audio is Muted.
_o61-ci 8 -- 2

SETUP MENU: MBR REMOTE
CHC)OSING CAPTIONS OR TEXTOPTIONS
To select the type of Caption/Text:
1. Press MENU repeatedly on your remote until the Inteq
Setup menu is displayed.
2. Use the Up/Down buttons to highlight Caption/Text then
press a Left/Right arrow button to see the adjustment
window.
3. Continue pressing a Left/Right arrow key to cycle through
the choices: Caption 1, Caption 2, Caption 3, Caption 4,
Text 1, Text 2, Text 3, or Text 4.
_ Ir'-FrEE{_-
Setup
Auto Program
Add/Del/Surf
Clock Set
Captions
• Caption/Text --
Language
Background
StarSight
Projo Setup
Capt_orVTe.'d
• Ca!:,tion 1
Note:
[3 At :present, ve.ry few TV programs or video tapes offer text captioning for any option other than CAPTION 1. There-
fore, CAPTION 1is the only recommended choice, unless you know thefta specific program is providing captioning-using
on(; of the other selections.
LANGUAGE
To select the Language for the on-screen menus:
1. Press MENU repeatedly on your remote until the Inteq
Setup menu is displayed.
2. Use an Up/Down arrow button to highlight Language then
press a Left/Right arrow button to see the adjustment
window.
3. Use a Left/Right arrow button to choose English, EspaSol or
F:ran(2ais. (English, Spanish or French)
4. Press QUIT to remove the menu.
Setup
Auto Program
Add/DeVSurf
Clock Set
Captions
Caption/Text
• Language
Background
StarSight
Projo Setup Language ]
• Er_g_ish .- :
BACKGROUND
'To turn the on-screen menus background On or Off:
1. Press MENU repeatedly on your remote until the Inteq
Setup menu iisdisplayed.
2. Use an Up/Down arrow button to highlight Background
then press a ]Left/Right arrow button to view the adjust-
ment window.
3. Use a Left/Right arrow key to select On or Off.
4. Press QUIT to remove the menu.
Setup
Auto Program
Add/Del/Surf
Clock Set
Captions
Caption/Text
Language
• Background----
StarSight
Projo Setup
Bac_grou_xt
Off
STARSIGHT
To begin the StarSight subscription procedure:
1. Press MENU repeatedly on your remote until the the Inteq
Setup menu is displayed.
2. Use an Up/Down arrow button to highlight StarSight.
3. Use a Left/Right arrow button to begin the StarSight Setup
procedure, then follow the on-screen instructions.
Note;: Another method to begin the StarSight activation
procedure is to simply point the remote at the TV and
press the "STAR" or the THEME button.
_] _
Setup
Auto Program
Add/Del/Surf
Clock Set
Captions
Capti°n/Text
Language
Background
• StarSight
Projo Setup
8 -- 3

SPECIAL FEATURES MENU: MBR REMOTE
Ir-TTEE_.Features
• Timer Setup
Ch. Labels
Source ID
Parental Ctl
Auto Demo
MENU OPERA flON
_;) _ Press MENU repeatedly until the Inteq
Features menu is shown.
Press the Le'ft/Right buttons repeat-
edly to complete the adjustment.
Press the Up/Down buttons to select an
option.
Press Left/Right buttons to view the op-
tion's adjustment window.
@
or
Press MENU to return to the main
Features menu and select another
option or p,re:ss QUIT to exit from
menu operations.
Timer Setup Sets the TV's Sleep Timer and On/Off Timer features. See the information following this
chart for more details.
Ch (Channel)
Labells
Assigns a network/station label, name or call letters to specified channel.,;. For example, if
you choose the label "ABC" for channel 7, then "ABC" will appear in the ChannelFFime
display whenever channel 7 is selected. See information following this chart for more details.
(Ch. Labels can only be used with ANT/CABLE 1or 2 Source.)
Source ID Assigns a descriptive "name" to the input sources. For example, the Video 1 source may be
named VCR. "VCR" will now appear in the Source Menu as a reminder that your VCR is
connected to the Video 1 input jacks.
Parental Ctl Use this feature to block viewing of any undesirable channels or the entire video signal. See
(Control) the information following this chart for more details.
Auto Demo Use to view a demonstration of the on-screen menus and features available on this TV. See
'qHE FIRST TIME YOU OPERATE YOUR TV" chapter for more details.
TIMB? SETUP:Sleep Timer
Do you have a habit of falling asleep in front of the TV? The Sleep Timer feature ,willtake care of that: Your TV can be
programmed to automatically turn itself OFF after a period of 15 minutes, or up to 4 hours.
To Set Sleep Timer From The Setup Menu:
1. Make sure the time on the TV's clock is set.
2. Use an Up/Down arrow button to highlight Timer Setup then
press a Left/Right arrow button view the Inteq Timer menu.
3. With Sleep Timer highlighted, press a Left/Right arrow button to
view the adjust window.
4. Continue pressing the Left/Right arrow button to set the period of
time the TV will remain on.
• Sleep Timer--
On Time
Off Time
On/Off Timer
[:'(i': Sleel:,0:1571mer I
Sleep Timer Set to Turn TV
OFF in 15 Minutes
_1-ol 9- 1

SPECIAL FEATURES MENU: MBR REMOTE
To Set Sleep Timer By Direct Access:
1. With no menus showing on the TV, press TIMER on your remote
to directly access the Sleep Timer.
2. Press TIMER repeatedly to set the period of time the TV will re-.
main on.
One minute before the TV turns off, the GOOD NIGHT display ap-
3e_trs on the screen. At this time you have a choice of the follow-
ing two actions:
a. Do nothing. The GOOD NIGHT display remains on the screen.
The TV will turn off in one minute.
b. Delay the turn-off by resetting the timer with a new time period.
Notes:
(3 To cancel the Sleep Timer, turn off the TV or press
TIMER repeatedly until OFF is selected.
[] As the Good Night display counts down the final 60
seconds, the audio and video of the TV also "dim" for
a soft, discreet turn-off.
• 58 Seconds
"Good Night" Display Appears 60
Seconds Before Shut-Off
TINIERSETUP: On/Off Timer
Picture this: It's very early in the morning - maybe the sun is not even up so the room is dark - and you can't find the
remote control to turn the TV on to see what the weather is expected to be like for the day. The solution is simple:
Make the TV turn itself on by using the On/Off Timer.
To Set Set On/Off Timer:
1. Make sure the TV's clock is set.
2. Use an Up/Down arrow button to highlight Timer Setup
then press a Left/Right arrow button to view the Inteq
Timer menu.
3. Use the Up/Down arrow button to highlight On Time
then press a Left/Right arrow button to view the adjust
window.
4. Use the numbered buttons on your remote to enter a
time for the TV to turn itself ON, then press TIMER
on the remote to select AM or PM. (You can also use
a Left/Right arrow button to advance the time.)
5. Press MENU to return to the previous (Inteq Timer)
menu, use the Up/Down buttons to highlight Off
Time, then press a Left/Right arrow button to view the
adjust window.
6. Use the numbered buttons on your remote to enter a
time for the TV to turn itself OFF, then press TIMER
on the remote to select AM or PM. (Or use the
Left/Right arrow button to advance the time.)
7. Press MENU to return to the previous (Inteq Timer)
menu, use the Up/Down buttons to highlight On/Off
Timer then press a Left/Right arrow button to view
the adjust window
Sleep Timer
On 3]me -.-..
Off ]3me
On/Off Timer
"dk On 77me
11:00 AM,q_
On/Off Timer Set to Turn
TV On at 11:00 am
]
8. Press the Left/Rightarrow bu'_on repeatedly to turn the
timer ON (or OFF).
9. Press QUIT to remove menu.
Note:
[] Before the On/Off Timer can be turned on, you must
specify an _Off_time.
3o61-o_ 9 _ 2

SPECIAL FEATURES MENU: MBR REMOTE
USING CHANNEL LABELS
To assign preset Labels to channels:
1. Highlight Ch. Labels in the Features menu and press a
Left/Right arrow button to view the list of preset Labels.
2. Select a channel number by using the CHANNEL
Up/Down buttons or enter a channel number with the
numbered buttons.
3. Use the Left/Right/Up/Down arrow buttons to move the
selector to the label you want to assign to the channel.
(The illustration shows "WGN" assigned to channel 9.)
4. Repeat steps 2 and 3 for each channel.
5. Press QUIT to remove menu.
To create "custom" channel Labels:
1. Access the Channel Label screen and choose a channel
number. (Steps 1 and 2 above.)
2. Use the Left/Right/Up/Down arrow buttons to move the se-
lector to any label other than the "- - - -" or "NONE" op-
tions, then press TIMER to view the custom labels screen.
3. Use the Up/Down/Left/Right arrow buttons to select a char-
acter, then press ENTER to set the character in place.
(Do this for up to 4 characters.)
4. Press TIMER to exit the custom label screen and return to
Ch. Labels menu.
5. Press QUIT to remove menu.
Notes:
C] The four dashes (.... ) means that no channel label
is assigned and the TV may accept the channel label
that is transmitted by some television stations. Or, in
addition to not assigning a label, NONE blocks the la-
belstransmitted by some television stations.
Live view of selected channel.
f TSI_ --_
..... NONE A&E ABC AC _-_
ADC AM[ BCC BET BRAV
CA CBC CBN CBS CMTV _._,_%_'_
CNBC CNN COM CSPN DSP2 _'_!_
CTN CTV DIS DISC E [
ENC ESP_I ESPN2 ET EWTN
FAM FNN FOX F&V FX Ch 9
GALA HBO HN HSE HSN WGN
IC INSP JCN LIFE MAX
ME/U MMT MTV NBC NICK
NOS PBS PLAY PTL QVC
RDS REQ SC SCFI SHOW
SIN TBS TBN TELE TLC
TMC TNN TNT TI_IAV TWC Press _
UPN TSA VC VCR VH-1 to edit
VISN WB _ WrBS WWOR
Selector Box
List of Preset Labels
A B C D E F G H I J
P Q R S T U V W X Y Z
5 6 7 8 9 0 - / & # .
K L M N O
0 1 2 3 4
I ? * _1
Use Arrows to Select Character
PressENTERTo Add Character
PressTIMERTo Return
Custom Channel Labels Screen
USING SOURCE ID
Channel
Nurnber
Channel
Label
Appear,'; after
a label is
chosen.
Enter up to 4
characters for
custom labels.
To assign identifying names to your sources:
1. Highlight Source ID in the Features Menu and press a
Left/Right arrow button to view the Source ID screen.
2. Press the Up/Down arrow button to highlight a Source.
3. Press the Left/Right arrow button repeatedly to choose a
label (name) for the chosen Source.
4. Repeat steps 2 and 3 for each source.
5. Press QUIT to remove menu.
Optional names for ANT/CABLE 1 or 2 Sources are:
.... , Disabled, Antenna, Cable, Cable Box, VCR, Satellite,
StarSight, Video Game, Laser Disc or DVD.
Optional names for VIDEO and S-Video Sources are:
.... , Disabled, VCR, VCR 1, VCR2, Satellite, Camcorder,
Vide() Game, Laser Disc, DVD, Photo CD or Audio Only.
Live view of highlighted Source.
%
Source Label
[Ant/Cable 1] _i_nT_
Ant/Cable 2 ....
Vicleo 1 VCR
Video 2 Video Game
S-Video - -
Front Video - -
Frnt S-Video ....
Note:
[] A "Source" that is disabled will not appear in the
Inteq Source Menu.
3o6_i 9 -- 3

SPECIAL FEATURES MENU: MBR REMOTE
USING PARENTAL CONTROL (PC)
Parental Control allows you to be selective about the channels and video sources that can be watched on yo_lr TV. If
there are undesirable programs or channels that you do not want viewed by someone in your hcusehold, you can use
Parental Control to block specific channels or the video input sources.
To set the Parental Control:
17 Select Parental Ctl. then press a Left/Right arrow but-
ton to view the Parental Control menu.
1. Select the individual channels to block.
a. Select Block Ch. (channel) and press a Left/Right ar-
row button to view the Block Channels screen.
b. Press SOURCE on your remote control to select Ant/
Cable 1 or 2.
c. Use the Left/Flight/Up/Down arrow buttons to move
the selector to each channel you want to block and
press TIMER to set the channel to "blocked." (A pad-
lock icon appears next to the number.)
d. Press MENU to return to the Inteq Par. Ctl. menu.
Par. Ctl
I, Block Oh. _/i
Block Video jl
Set Hours ------
Set Password -_
Lock On/Off ___
Blocks individual chan-
j" nels for Ant/Cable 1 or 2
J sources.
Blocks Video and
/J" S-Video Sources,
._____-_. Period of time PC:will
be active.
--------- Sets 4-digit password.
------'---- Turns PC feature
On/Off.
Inteq Parental Control Menu
2. Block the Video and S-Video sources.
a. :Select Block Video and press a Left/Right arrow button
to view the adjust screen.
b. Press a Left/Right arrow button to select "Blocked."
All Video and S-Video sources will be blocked
while PC is active.
c. Press MENU to return to the Inteq Par. Ctl. menu.
3. Set the number of hours PC will remain
active once it is turned on.
a. Select Set Hours and press a Left/Right arrow button
to view the adjust screen.
b. Press a Left/Right arrow button to advance the num-
ber to the number of hours you want PC to remain ac-
tive. (The maximum is 99 hours.)
c. Press MENU to return to the Inteq Par. Ctl. menu.
Channel Selector
/
/
1 3/4ij 5
:: 7 [] ! 10_
_:ii 14 151J
18_1lg 20_I ----
: ! _. ::i :i:_ 3,5_
:!_: 39
42 43 _.:: .:_
:: • 54. ..
_::: 6,5
C:h 8_
C:BS
Unbl ocked-.-._
_'_ _
Block Channel Screen
[.ive view of
Selected
channel.
- Unblocked
Channel
Blocked
Channel
Channel
Number
"-- Status
Instructions
......SOUlCeof
',Signal
4. Set a 4-digit password.
a. Select Set Password and press a Left/Right arrow but-
ton to view the adjust screen.
b. Use the number buttons to enter a 4-digit password.
(You will be prompted to verify the number by enter-
ing a second time.)
c. Press MENU to return to the Inteq Par. Ctl. menu.
5. Turn Parental Control ON.
a. Select Lock On/Off and press a Left/Right arrow but-
ton to view the adjust screen.
b. Press a Left/Right arrow button to select On.
c. Press QUIT to exit the PC operations.
Note:
E] REMEMBER YOUR PASSWORD! The password is
the only way you can return to the PC operations to
make changes or to deactivate it. If you have forgot-
ten the password, simply wail:for the speciIied time to
elapse.
3ool-ol 9 _ 4

AUDIO MENU: MBR REMOTE
Audio
I_ Bass
Treble
Balance
Audio Mode
SoundRite
Enhance ,t
BBE Audio
Speakers
All adjustments on the Audio Menu
are optional. IYou do not have to
adjust these features in order to use
your TV.
MENU OPERATION
_._ _ Press MENU repeatedly untilthe Inteq
Audio menu isshown.
Press the Left/Right keys irepeatedly
to complete the adjustment. •
Press Up/Down keys to select an
option.
Press Left/Right keys to view the
option's adjustment window.
®
or
Press MEI_IUto return to the main
Audio mer_,uand select another op-
tion or press QUIT to exit from menu
operations.
Bass
Treble
Balance
Audio Mode
SAP i.,;not an option for
the Video or S-Video
source:_. Audio signal.,;
into a video source are
assumed to be monaural
or stereo. )
SoundRite
Enhancement
(Dotby Pro Logic audio
systems only)
BBE ,Audio
Speakers
Increases and decreases the level of low-frequency sound.
Increases and decreases the level of high-frequency sound.
Adjusts the balance of sound between the TV's speakers.
Allows you to select STEREO, MONO or 2ND AUDIO/SAP operation.
Stereo:
Mono:
Directs the sound to the Left and Flight speakers as supplied by the program
Stereo is the recommend choice: l'he TV switches automatically between the
STEREO and MONO modes depending on the type of signal being received.
Directs the same sound to both Left and Right speakers, even ifthe program
being received is in stereo.
2nd Audio/
SAP:
Directs the sound for the Second Audio Program to both the Left and Right speakers.
SAP sound is always monaural. IfSAP is selected, you hear the SAP - usually a
second language. When the SAP broadcast ends, the IV switches automatically
(defaults) to the type of signal being received, STEREO or MONO. The TV switche.,_
back to 2ND AUDIO/SAP when the SAP broadcast resumes.
Turn this feature ON to maintain the television's volume at a constant level. In other words,
commercials and audio from the auxiliary input source will rio longer appe_Lrto sound louder
than the volume level you have set. (Note that th_isfeature is automatically deactivated if any of
the Dolby Enhancements are selected for use.)
Provides options for enhancing the TV's audio. Your options are Off, Concert Hall, Theater,
Night Club, Stadium, Pseudo Stereo, Pro Logic Phantom, Dolby 3 Stereo, and Dolby Pro Logic
Normal. See the information following this chart for more details.
Use this to compensate for phase and amplitude distortionsfor a more faithful reproduction of
original sound. Select Level 1 (good), Level 2 (better), or set BBE Audio to OFF, according to
your personal listening preference.
Use to turn TV's internal speakers OFF and ON.
__: : ?.
so6;_l 10- I

AUDIO MENU: MBR REMOTE
I
SELECTING AUDIO ENHANCEMENTS
Your Inteq entertainment machine is engineered with many audio adjustments which can be set for your individual lis-
tening taste. However, Inteq has included several pre-set enhancement "effects" which may be used to emul_Lte differ-
ent viewing environments. These enhancements are Concert Hall, Theater, Night Club, Stadium and Pseudo Stefreo.
Select the enhancement that sounds best to you.
Instead of selecting an audio "effect," you can enhance the
stereo sound from your TV. Select either Dolby Pro Logic
Phantom, Dolby :3Stereo or Dolby Pro Logic Normal. Refer
to the following procedures to balance the level of sound be-
ing heard from the speakers:
SPEAKER BALANCE
Nhen Dolby 3 Stereo Enhancement is selected, balance
the speaker sound like this:
1. :Select Stereo as the Audio option.
2. ',Select Dolby 3 Stereo as the Enhancement then press
MENU to return to the main Audio menu.
3..Adjust Bass and Treble to your preference
4. Select Balance and press the Left/Right arrow key to
view the speaker balance screen.
5. Press the Up/Down keys to select a speaker to adjust.
The text highlight and an audible "hissing" "bounces"
between the speaker and the Center Reference.
6. Press the Left/Right keys to set the volume of the
"hissing" - for the selected speaker - to about the
same level as the "hissing" of the Center Reference.
Do this for each speaker.
When Pro Logic Normal or Phantom Enhancement is
selected, balance the speaker sound like this:
1. Turn on the external amplifier and set its volume to ap-
proximately the same volume as the TV. (This step is
for Pro Logic Normal enhancement only.)
2. Select Pro Logic Normal (or Phantom) as the Enhance-
ment then press MENU to return to the Audio menu.
3. Adjust the Bass and Treble to your preference.
4. Select Balance and press the Left/Right arrow key to
view the Pro Logic speaker balance screen.
5. Press the Up/Down keys to select a speaker to adjust.
The text highlight and an audible "hissing" sound will
"bounce" between the selected speaker and the Center
Reference.
6. Press the Left/Right keys until the volume of the "hissing"
- for the selected speaker - is about the same level as
the "hissing" of the Center Reference. Do this for each
speaker.
Notes:
Q To fully appreciate the quality of sound provided by your
Inteq entertainment machine and the Dolby Pro Logic
audio system, make sure an external amplifier iscon-
nected to the TV and the speakers are balanced as de-
scribed above.
Q Optional Surround speakers must be connected for
you to hear Surround Sound.
Message appears
when adjusting
Surround Sound.
_,'_" To Change Speaker
• • Tc Change Level
Left Speaker
• 11 IIIIIIIllllIIIIIl•
Right Speaker
'_ll IIIlllltlllllllll•
Sl JlTOund Speaker's
• 11 IIIllllllllllllll•
_______J
BASIC SPEAKER BALANCE
Use Up/Down arrow keys to select a speaker.
Use Left/Right arrow keys to adjust the level of sound.
Text highlight
':'bounces"
between selected
speaker and
Center
Reference.
_,? ro Change Speaker
• • To Change Level
Center Reference
Le_Speaker
• 11 IIIIIIIIIIIIIIIili•
F_g_Speaker
•lllll{Illllrlllll(ll(_
%.__
DOLBY 3 STEREO SPEAKER BALANCE!
Use Up/Down arrow keys to select a speaker.
Use Left/Right arrow keys to adjL_stthe level of .=;ound.
Text highlight
"bounces"'
between selected
speaker and
Center
Reference.
Message appears
when adjusting
Surround Sound.
J,'_ To Change Speaker
'4 I_ To Change Level
Center Reference
Left Speaker
• ltllll[ 11111111111111•
Right Speaker
•lllilllllllllllltllll•
Surround Speaker;
• 1 I II111111111111111•
PRO LOGIC BALANCE
Use Up/Down arrow keys;to select a speaker.
Use Left/Right arrow keys to adiust the level of sound.
3_-o_ 10 -- 2

VIDEO MENU: MBR REMOTE
Video
• Contrast
Brightness
Color
]]nt
Sharpness
Color Temp
Video Filter
Skin Tone
Video Preset
All adjustments on the Video Menu
are optional. You do not have to
adjust these features in order to use
your TV.
MENU' OPERATION
=) _ Press MENU repeatedly untilthe InteqVideo menu is shown.
Press theLeft/Right keys repeatedly
to complete the adjustment.
Press Up/Down keys to select an
option.
Press Left/Right keys to view the
option's adjustment window.
®
or
Press MENU to return to the main
Video menu and select another op-
tion or press QUIT to exit from menu
operations.
Contrast Adjusts the picture's overall contrast and color level.
Brightness Adjusts the picture's brightness level of black areas in the picture.
Color Adjusts the picture's color intensity.
Tint Adjusts the flesh tones to more Green or more Red.
Sharpness Adjusts the object edge definition for best picture quality.
Color l"emp Adjusts the "color temperature" or picture white balance between cooler white,,; and warmer reds.
(Temperature)
Video Filter Reduces video "noise"or interference in dark picture areas resulting in clearer overall pictures.
Skin Tone Maintains natural skin tones under changing scene and video source conditions.
Video Preset Adjusts the picture to different viewing conditions. Options are:
Custom ................
Preset ..................
Movie ..................
Video ...................
Game
Sports ..................
Daylight ...............
Weak Signal ........
Saves personal preference changes made to the Video Menu and stores
them as your Custom settings.
Restores the factory Video Menu settings.
Provides clear, cinema-like effects by optimizing the video adjustments for
use in a home theater setting with dim lighting.
Reduces bright video game color intensities and graphics for prolonged
close-range viewing conditions.
Provides a bright, sharp picture with vivid color and crisp detail.
Enhances picture contrast in a bright daylight environment.
Reduces "noise" (snow) in poor quality signal transmissions or video tapes.
3061_I 11 -- I

PIP VIDEO MENU: MBR REMOTE
• Ch. Guide
Ch. Review
Contrast
"13nt
Size
Selecting the PIP Menu does
not "activate" PIP. However, a
PIP window will appear during
menu operations to show the
effect of any setting changes.
Press PIP to access PIP feature.
MENU OPERA TION
Press MENU repeatedly until the Inteq
PiP menu is shown.
Press Up/Down keys to select an
option.
Press Left/Right keys to view the
option's adjustment window.
@
or
Press the LeftJRight keys repeatedly
to complete the adjustment.
Press MENU to return 1:othe main
PIP menu and select another option
or press QUIT to exit from menu op-
eratiens.
Ch. Guide Provides a visual review - in a column of four PIP windows - of all channels in the channel
scan memory for the currently selected ANT/CABLE source.
Ch. Review Provides a visual review - in two PIP windows- of the last two channels you were watching
(prior to the channel you are currently watching).
Contrast Adjusts the overall contrast and color level of the PIP picture.
"T'int Adjusts the flesh tones of the PIP picture to more Green or more Red,
Size Adjusts the size of the PIP inset. Choose between small, medium or large.

INTRAQ TRACKBALL REMOTE CONTROL
INTRODUCTION
This multi-brand remote control operates the common features of most, but not all, models and brands of IR (infrared)
controlled VCRs. Some functions of your particular VCR may not be controlled by this remote. In such cases, use the
original remote control for your VCR.
BATTERYINSTALLATION
Batteries are provided, but must installed before using the remote control. When it
no longer functions normally, or if it loses memory, replace the batteries with "-_
two high-quality, alkaline, size AA batteries. Match positive with positive (4.with
+), negative with negative (- with -) as shown inside the battery compartment.
AA Batteriies
VCR Brand Code Auto Find Option
Unless your VCR responds to the factory preset code commonly used for In-
teq VCRs, you may need to use Auto Find to program the VCR code when-
ever you replace batteries. See following pages for remote programming Auto
Find instructions.
Notes:
Q Do not place heavy objects on top of the remote con-
trol keys. Prolonged unintentional operation of the re-
mote shortens battery life.
Q Remove the batteries if the remote will not be usedfor a
month or more.
THE MANUFACTURER IS NOT RESPONSIBLE F:OR
DAMAGE CAUSED BY BATI'E'RY LEAKAGE
CHOOSING OPERATING MODE
To control your TV or VCR with this remote, you must first choose the mode of operation.
Press the TV mode key to control the TV or press the VCR mode key to control the VCR.
TV VCR
Press to select Press to select
TV mode. VCR mode.
3o_i-A 13- I

INTRAO TRACKBALL REMOTE CONTROL
BASIC OPERATIONS
Poin'I remote at TV, press POWER. Press down on trackball to activate on-screen pointer. Rotating trackball will
mow.=pointer around screen to access on-screen menus. Click on highlighted menu or option. (See Quick Re!ferefnceto
On-screen Menus section.)
TY___d_ VCR Mode
POWER Power
TV TM
Selects TV operation mode.
VOL Rewind
(Down)
MUTE Pause
RECRD Record
(Record)
Point Remote at
TV or VCR
]_J_l__ VCR Mod._
VCR VCR
Selects VCR operation
mode.
Trackball
Move on-screen po_ter to
desired menu selection.
Press trackball down to
"choose" the selection.
CHAN Play
([Jp)
VOL Fast
(UP) Forward
CHAN Stop
(Down)
ENTER Enter
TV AND VCR KEY FUNCTIONS BY MODE
TV Mode Function Keys
Press TV to access -IV functions
VCR Mode PlaylRecord Function Keys
Press VCR to access VCR functions
TV
VCR
POWER
CHAN
(Up)
VOL
(Up)
VOL
([)own)
C:HAN
(Down)
MUTE
FIECRD
E:NTER
FLSHBK
Selects TV Mode.
Selects VCR Mode.
Turns TV On.
Tunes to next higher channel,
Increases sound level.
[')ecreases sound level.
Tunes to next lower channel.
Turns Sound Off.
Begins VCR recording.
Shows Channel/Time/Audio Mode Display.
Tunes to previous TV channel.
TV
VCR
Power
Play
Fast
Forward
Record
Pau.,;e
Enter
Stop
TV/VCR
Rewind
Selects TV Mode.
Selects VCR Mode
Turns VCR On.
Begins tape playback.
Advances tape rapidly,
Begins VCR recording.
Momentarily stops tape movement.
Shows VCR Status display.
Ends tape playback.
Acts as the TV/VCR (or video) switch that is
present on most VCRs.
Rewinds tape rapidly.
_l-A 13 -- 2

INTRAQ TRACKBALL REMOTE CONTROL
PROGRAMMING YOUR INTRAQ TRACKBALL REMOTE
The Inteq Trackball remote is already programmed to work with most Inteq VCRs. If your VCR is not an Inteq, or if your
Inteq VCR does not respond to the trackball remote, you will need to program the remote.
To program the remote to operate a VCR other than an Inteq brand:
1. Make sure the I'V and VCR are ON.
2. Refer to the "VCR Codes BY Brand Name" table on the next page. Locate the 3-digit number which corresponds 1:oyour
brand of VCR.
3. Point the Intraq remote at your TV and simultaneously press the MUTE and ENTER keys until
the on-screen Intraq Setup display appears near the bottom of TV screeq.
Notice that the current VCR brand code (initially 201) is displayed on the screen. Roll the track-
ball up or down (or use Chan Up/Down) to choose the 3-digit number of your VCR.
4. When your 3-digit number is displayed on the TV screen, point the remote at your VCR and
press POWER to see if your VCR turns OFF. If the VCR does not respond, select a different
number.
If your VCR turns On and Off successfully, press the trackball (or ENTER) to save the code. The VCR Setup screen will
disappear from the TV and the VCR key will blink 3 times upon exiting the Programming Mode and the remote will be
in the VCR mode.
5. Now try other controls on your VCR, such as PLAY, REWIND, etc., to make sure that the correct VCR brand code num-
ber was selected. (If not, repeat steps 1 to 4.)
Notes:
O The MUTE key can be pressed at any time to cancel programming mode. The original VCR brand code will rernain
unchanged.
Only the VCR Mode can be programmed. Pressing the VCR or TV mode key has no effect in the programming
mode. Similarly, the VOL Up/Down RECRD, and FLSHBK keys have no function in the programming mode.
The remote will exit programming mode automatically after 60 seconds Jfno key or trackball movement is detected.
AUTO FIND: PROGRAMMING YOUR INTRAQ REMOTE TO CONTROL VCR
If you have tried all 3-digit codes listed for your VCR manufacturer, and none of them operate your VCR, you will nee,d
to try "A,JtoFind" to ._;eeif a different code will operate your VCR. Proceed as follows:
To Auto Findthe VCR brand code:
1. Make sure your -I-Vand VCR are turned ON.
2. Simultaneously press the MUTE and ENTER keys until the VCR key lights up.
3. Point the Intraq remote towards your VCR and press CHAN (Up) followed by POWER.
If your VCR turns OFF, the correct code was found. Press ENTER to save the code.
4. If your VCR did not turn off, continue the sequence of pressing CHAN (Up) followed by
POWER until the VCR finally responds. When your VCR turns OFF, pres.'_ ENTER 1:osave
the code.
5. Now try other controls on your VCR, such as Play, Rewind, etc., to make sure that the correct
VCR brand code number was selected. (If not, repeat steps 2 to 4.)
Notes:
['3The MUTE key can be pressed at any time to cancel programming mode. The original VCR brand code will rernain
unchanged.
O The remote will exit Auto Find automatically after 60 seconds if no key or trackball movement is detected.
'_-A 13 _ 3
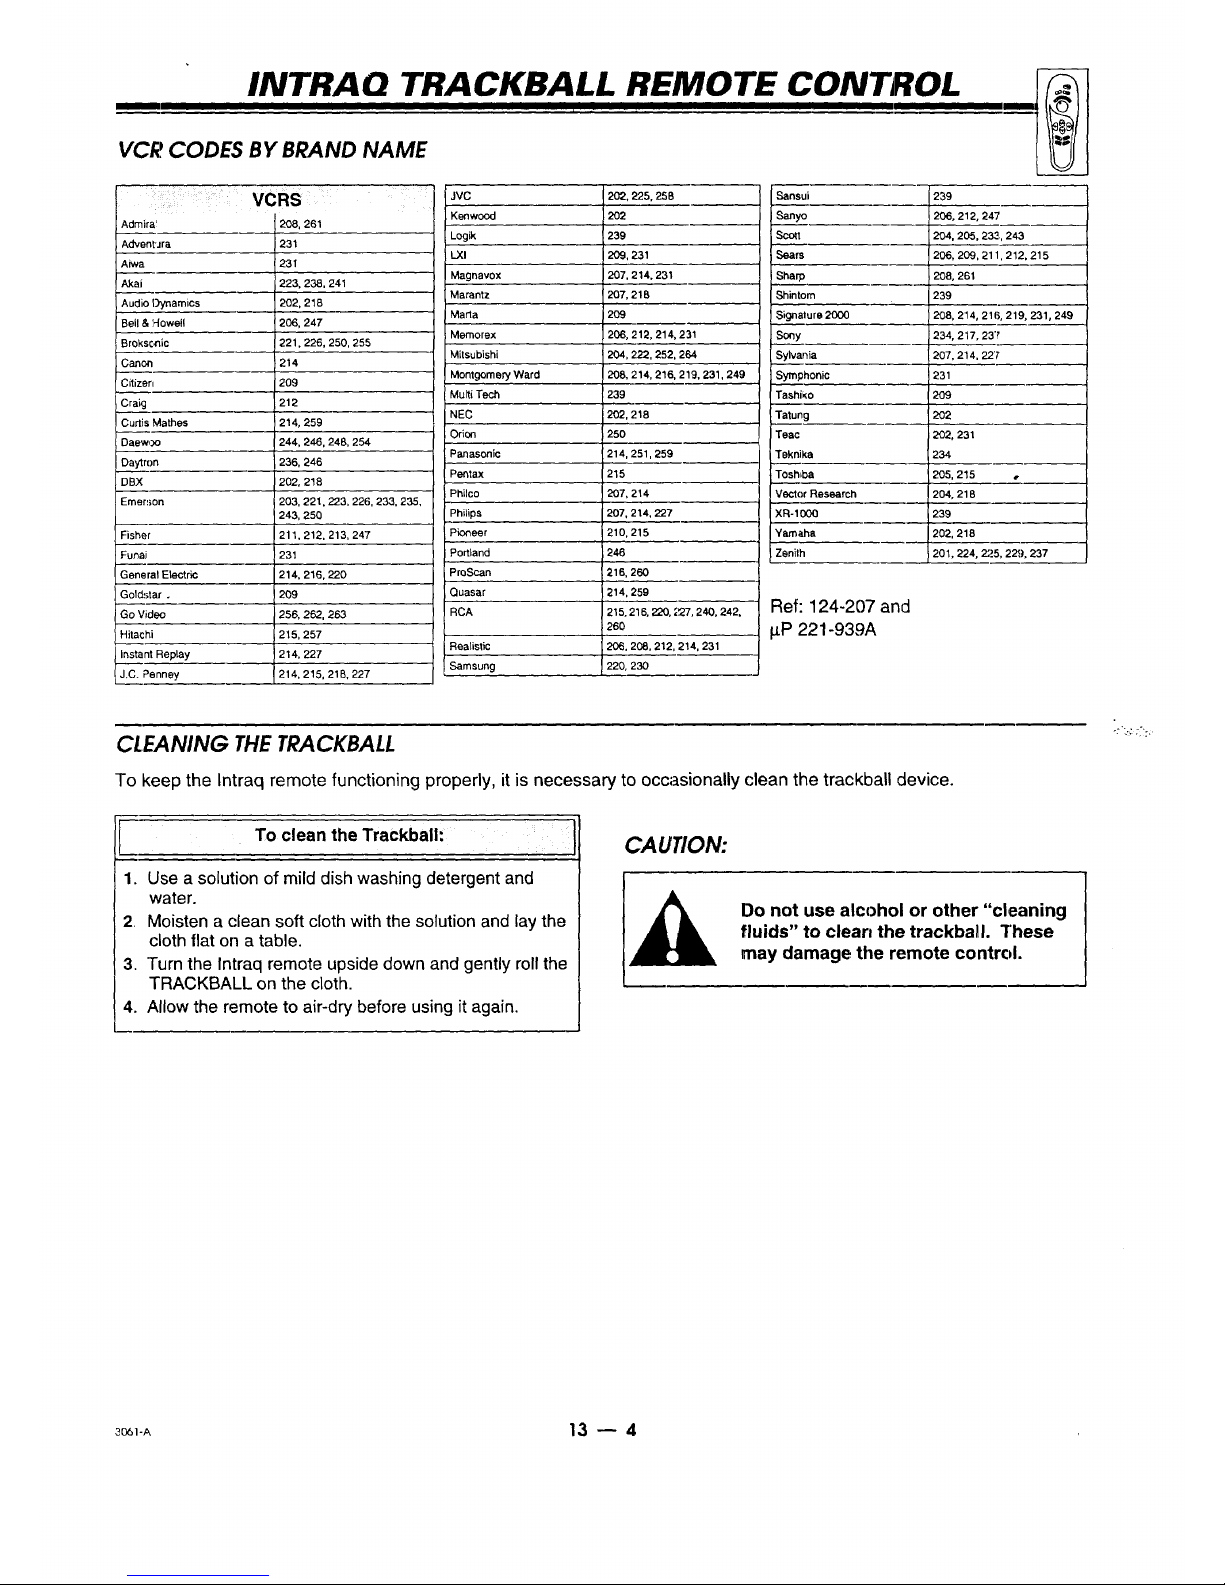
INTRAQ TRACKBALL REMOTE CONTROL
I i ,
VCR CODES BY BRAND NAME
i¸_iii!il i _
Adrnira!
Advent'Jra
Aiwa
Akai
Audio Dynamics
Bell & Howell
Broksc,nic
Canon
Citizen
Craig
Curtis Mathes
Daewoo
Daytron
DBX
Emer!;on
Fisher
FunaJ
General Etectric
Gold,;tar .
Go Video
Hitachi
Instant Replay
J.C. Penney
VCRS
208, 261
231
231
223, 238, 241
202, 216
206, 247
221,226, 250, 255
214
209
212
214, 259
244, 246, 248, 254
236, 246
202, 218
203, 221. 223, 226, 233, 235,
243, 250
211,212, 213, 247
231
214, 216, 220
209
256, 262, 263
215, 257
214, 227
214, 215, 21B, 227
JVC 202, 225,258
Kenwood 202
Logik 239
LXl 209, 231
Magnavox 207, 214, 231
Marantz 207, 218
Marta 209
Memorex 206, 212, 214, 231
Mitsubishi 204, 222, 252, 264
Montgomery Ward 208, 214, 216, 219, 231, -249'
Multi Tech 239
NEC 202,218
Orion 250
Panasonic 214, 251,259
Pantax 215
Philco 207, 214
Philips 207, 214, 227
Pioneer 210, 215
Portland 246
ProScan 216, 260
Quasar 214, 259
RCA 215, 216, 220, 227, 240, 242,
260
Realistic 206, 208,212, 214, 231
Samsung 220, 230
Sansui 239
i Sanyo 206, 212, 247
_3tt 204, 205, 233,
243
i Seats 206, 209, 211,212,215
i Sharp 208, 261
Shintom 239
Signature 2000 208, 214, 216, 219, 231,249
Sony 234, 217, 237
Sylvania 207,214, 22'7
Symphonic 231
TashiKo 209
Tatung 202
Teac 202, 231
Teknika 234
Tosh=ba 205, 215 •
Vector Research 204, 216
XR-100Q 239
Yamaha 202, 218
Zenilh 201,224, 225, 2_), 237
Ref: 124-207 and
#P 221-939A
CIEANING THETRACKBALL
To keep the Intraq remote functioning properly, it is necessary to occasionally (-lean the trackball device.
To clean the Trackball:
1. Use a solution of mild dish washing detergent and
water.
2 Moisten a clean soft cloth with the solution and lay the
cloth flat on a table.
3. Turn the Intraq remote upside down and gently roll the
TRACKBALL on the cloth•
4. Allow the remote to air-dry before using it again.
CAUTION:
Do not use alcohol or other "cleaning
fluids" to clean the trackballl. These
may damage the remote control.
3_t-A 13 -- 4

INTRAQ REMOTE MENUS REFERENCE
, i r , ,
QUICK REFERENCE TO ON-SCREEN MENUS WITH INTRAQ REMOTE
Shown below are some of the on-screen displays that appear when using the Intraq remote control. These displays ap-
pear when the pointer is moved to the Top, Bottom, Left, and Right locations on the TV screen
On-screen
Menu icons
TV on-screen
menu options
PIP functions
when using
Intraq remote
Volume Display
• E31
"I'V Screen
[] ;,,t "*
Ch 20
3:56
Mono
Ch,_
All Chan'
Flashback
[Surf's Up! _-
Channel/Time/Audio
I)isplay
-- On-Screen Pointer
,r
Channel Up/Down
"------ All Channel Access
Channel Flashback
Status of Channel
Surfing Option
BASIC MENU OPERATION
The trackball on-screen menus can only be seen when
using the trackball remote.
To use the trackball on-screen menus: J
1. Press TV to set the remote in TV mode.
2. Press the trackball to view the on-screen pointer.
3. "Roll" the trackball forward, back, left or right to move
the pointer to the Top, Bottom, Left or Right side of
TV screen.
4. Wi_en the pointer is over the desired display, press the
trackball to see your adjustment options.
5. Afl:er the adjustments are complete, move the pointer
to center of screen and press trackball to remove it
or wait a few seconds and the pointer removes itself
from the TV screen.
For example, to see the volume Up and Down display,
press the trackball to place the pointer on the TV screen.
Then roll the trackball backward to move pointer to the
bottom of the TV screen.
.._..
3o61-oi 14 _ 1

INTRAQ REMOTE MENUS REFERENCE
I
POINT AND PRESS OPERATION
A typical on-screen menu, as it would appear when you use the INTRAQ remote,, is shown below. The on-screen
menus are accessed by rolling the pointer to the top of the TV screen and pressing on one of the menu icons to see its
list of options. These options represent television features that you may or may not wish to use. When a feature iisse-
lected, an adjustment window appears so that the adjustment can be completed. Note that the phrase "point an¢_
press" is used throughout the Intraq remote control section of this operating guide. This simply means that the on-
screen pointer is moved to a menu option and the trackball is pressed to select the option.
Typical Menu Icon
Menu Options_
Selected Menu
Option
If-qTEEGg-i
Setup
I
Auto Program -
Add/Det/Surf
Clock Set
Captions
Caption/Text J
• Lang'_g_ ,, ,
Backg_ "-_
StarSi_o/
Projo Setu_Y
///
//i
Language
I_ English
Espai:;_o!
?:ran_;ais
Menu title
Menu locations wllere you
can place the pointer and
make changes
Adjustment window (sub-
menu) appears for most
menu options after they
are selected
2::__
Menu Operation Options
Use the trackball remote to point to the feature you wish
to adjust. Then press on the trackball to select the fea-
ture. Most times an adjustment window will appear.
Using the Pointer to Change
Menu Options
Depending on the menu showing on the TV, the
pointer can be placed in several places to adjust the
feature. For example, when setting one of the timer
features, you can point and press on the hours, min-
utes, and AM/PM portions of the adjustment window
to make changes.
The Menu Title
Press the trackball repeatedly on the menu title to
scroll through other available menus.
For Clock/Timer input, point
and press on these areas to
make changes.
3o_ 14 -- 2

INTRA Q REMOTE MENUS REFERENCE
Move pointer to a
menu icon.
Press trackball to
view the icon's
menu options.
Source Setup Special Audio Video
Menu Menu Features Menu Menu
PIP Video
Menu
ON-SCREEN DISPLAYS
Channel/Time/Audio Mode
Channel - Reveals the currently tuned channel
or video source.
Time - Reveals the time set on the TV.
Audio Mode Display - Reveals the audio signal currently
being received.
Channel Up/Down, All Channel, Flashback
Channel Up/Down - Use to move one channel higher or
lower in channel selection.
_l Ch 20
3:56
Mono
I Ch't' ]
k l
--_1 All C:haI_.../_
LFlashbacl'_
All Channel - Display a listing of all channels available.
Place pointer over the desired channel number and
press the trackball to select the channel.
Flashoack - Tune TV to previously viewed channel.
Channel Surfing
Reveals if the Channel Surfing option is active or not.
Point and press on this display to turn the Surf feature
On and Off. When Surf is Off, the "No Surfing" display
appears.
Audio Volume
Move pointer over an
option and press
trac;kball to access
the option or make a
change.
[Surf's
Use the pointer to increase or decrease sound level by
pointing and pressing the trackball on the volume level
indicator. Point and press on the speaker icon to soften
the sound; press again to mute the sound; press again
to restore sound.
TV Mode Icon
Place pointer over icon and press trackball to switch to
StarSight Mode.
Closed Captions Icon
Use to turn Captions On/Off. Options are: On, Off or
Captions when muted. Use Setup menu to specify the
"type" of CaptionsJq-ext to be displayed.
Trackball Speed icon
Use to specify how fast the pointer moves on the TV
screen. Options are: Slow, Medium or Fast.
Sleep Timer Icon
Use to set the Sleep Timer, which turns off the TV after
a specified period of time. Options are in hours and min-
utes: C)ff,15, 30, 1:00, 1:30, 2:00, 2:30, 3:00, 3:30, 4:00.
-0 iccl
'.:.t:.;,
3o6_-o) 14 m 3

SOURCE MENU: INTRAQ REMOTE
Point and press
on Source Icon
MENU OPERATION
1. Point and press on
a Main source,
2. Point and press on
a J%!_P__source.
Front Video and Front
S-Video are source op-
%.
tions on some TV
models only.
IFTI'EE@-
j Source
Main <• PIP
• AntlCab_
Ant/Cable_J
Video 1
Video 2
•S-Video
_(_ Front Video
Fret S-Video
_In <• PIP
Ant/Cal_
• Video T'_"_L_
Video2
S-Video
Front Video
Frnt S-Video
Source Menus shown with
Main picture source menu
selIected (left) and
PIP window menu
selected (right). "
SOURCE SELECTION
Ant/Cable 1 or 2
Routes the antenna or cable-TV source to the TV for viewing. You see ;_rogrammaterial
from whichever signal source is connected to the ANT/CABLE 1 or 2 jack. (If the signal is
from a VCR or a cable box, tune the TV to either channel 3 or 4.)
Video 1 or 2
Routes the audio and video from an A/V source (such as a VCR ¢,ra video disc player) to the
TV for viewing. The source must be connected to the corresponding VIDEO 1 or ,o_IN jacks.
S-Video
Routes the audio and video from an auxiliary Super-VHS video source (such as a VCR or a
video disc player) to the TV for viewing. The source must be connected to the corresponding
S-VIDEO jacks.
Front Video Routes the audio/video from an auxiliary video source (such as a VCR or a video dis(," player)
and Front S-Video to the TV for viewing. The source must be connected to the corresponding front Video or S-
Video IN jacks.
Note: Refer to the "Connecting Your TV" chapter to make the proper equipment connections to the _/. For information about PIP
sources, refer to the "PIP Operation" section.
ANTENNA/CABLE 1
Attach an antenna, cable-TV
line, cable box or VCR here.
LOOP OUT TO DECODER
Routes the direct cable-TV input
to Antenn_Cable 2 back to the
cable box supplied by the cable
service.
ANTENNA/CABLE 2
Attach an Antenna, cable-TV
line, cable box or VCR here.
/
VIDEO 1 or 2 IN
Jacks for audio and video inputfrom
,/ a stereo VCR or other stereo A/V de-
vice. (You must connect to these
jacks in order to hear stereo sound
from the stereo VCR,),
---... S-V_DI-'O IN
Jacks for audio and video input from
a Super-VHS VCR.
:,o61-oI 15 _ 1

SETUP MENU: INTRAQ REMOTE
Pointand press
on Setup icon
Setup Menu
MENU OPERA TION
1. Point and press on an
option.
2. Point and press on an
option in the adjust
window to complete
the adjustment.
Setup
• Auto I_qgTam
Add/Oe_" "_
ClockSe"_!
Captions
Caption/Text
Language
Background
StarSight
ProjoSetup
Setup
• Clock Set _.j_
Captions ._:
Caption/Text
Language
Background
ProjoSetup
Setup Menu while Video
or Super-Video Source, is
Chosen o
Auto Program
(Channel)
Add/Del/Surf
Finds all active channels and stores them in the TV's memory for use when a CHANNEL
up/down button is pressed. See the 'M/hat You _"
ohould Do First" chapter for more details.
Edit the channels found by Auto Program to create your own personal list of channels usin§rthe
Channel Add or Delete feature. You may want to add (or delete',)a weak-signal channel to the
channel scan. Also, create your own "Surf" Channel Scan to scan your most frequently tuned,
favorite channels when using Chan Up/Down. See the information following this chart for more
details.
Clock Set Use to set the clock in the TV. The time may be set manually or automatically. See the 'M/hat
You Should Do First" chapter for more details.
Captions Use to turn on-screen Caption/Text On or Off. Options are:: On, Off or Cal:tions When Muted.
Caption/Text Select from different "types" of Closed Captions or informational text. Closed captioning or
informational text appears on the TV screen when available on the selected channel. Options
are: Caption 1, Caption 2, Caption 3, Caption 4, "rext 1, Text 2, Text 3, or Text 4. See the
information following this chart for more details.
Language Selects the language for the on-screen menus. Options are: English, Spanist _,,or French.
Background Adds or removes a background behind the on-screen menus.
StarSight Begins the StarSight Setup procedure. Refer to the StarSight operating guide for details.
Before you activate the StarSight feature, review the StarSight instruction guide for the
information you will need to complete the StarSight activation process.
Projo Setup
(Projection TVs
only)
I
Lets you verify and adjust, if needed, the color convergence of the TV picture. If you move your
TV from its original location, or if after time, you notice color "fringes" around objects in the
picture, you should check the alignment (convergence) of the projected solors. See the WVhat
You Should Do First" chapter for more details.
continued on nexl page
3o6_-oi 16 _ I

SETUP MENU: INTRAQ REMOTE
AUTO PROGRAM
To start the Auto Program procedure:
1. Point and press on Auto Program in the Setup menu.
2. Point and press on Off Air Antenna or Cable TV.
3. Point and press on Begin Search.
IFTTEE_.
Setup
• Auto Prograr_....
Add/DelJ'Surf _ _-
C_ockSet
Captions
Caption/Text
Language
Background
StarSight
Projo Setup
Setup Menu with Auto Program Highlighted
USING (CHANNEL) ADD/DEL/SURF
To Add/Delete Channels or Include
Channels in Surf Scan:
1. Point and press on Add/Del/Surf in the Setup menu.
2. Point and press on a channel number.
3. Press on the channel number repeatedly until Add,
Delete, or Surf appears in the status line.
4. Point and press on another channel to make changes
or press on Exit to remove menu from screen.
Notes:
Q Add/Del/Surf can only be used with Ant/Cable 1or 2
Source.
Ci The audio of deleted channels is muted.
FI Surf Scan channels are shown with the Surf Icon on
menu as shown to the right.
Available Channels
, /
I I
f ----,
7 9 10 _ _.._)
26
36_ 37
47
51 ,521_
57
33 35
38 40
48 5O
59 60
63
O6
73
78 77 79
82 B3 84
Selector Highlightwith Surf Icon
Ch 2
CBS
Addecl -_
Live view of
selected channel.
Added Channel
Deleted Channel
Channel Number
Status Line
To remove menu
Use pointer to
move selector to
aclditi_nal num-
bers if present.
USING CLOCK SET
!.:
To Set The Clock:
1. Point and press on Clock Set in the Setup menu.
2. Point and press on Clock Mode.
3. Point and press on Auto or Manual, then press on EXIT to
return to the previous menu:
AUTO: f_/sets the time (while the TV is turned OFF).
MANUAL.: Use the remote control to set the time.
AUTO
4. Point and press on Time
Zone then point and press
on Auto.
5. Press on EXIT to return to
the previous menu, point
and press on Daylight
Saving, then press on Auto.
StarSight Clock Set Note:
or i
I
!
I
MANUAL
4. Pointand press on Time
Set.
5. Point and press on the
Hours, minutes, or AM (Pry1)
to adjust the time.
After StarSight is authorized for your TV, it can take up to 48 hours for Star-
Sight information to be provided to the TV. This may result in the Clock's
time being set incorrectly. Simply activate the Clock Menu and set the cor-
rect time.
"'I Clock I
I
Clock Mode _-../lJ
-nr Set
_ In-n_(_
Clock
Clock Mode
ITe Zone
Day. Saving
Auto/StarSight:
If StarSight is authorized foryour
TV,"StarSight Mode" appears in the ad-
just window instead of Manual or Auto.
3o_1_1 16 _ 2

SETUP MENU: INTRAQ REMOTE
USING CAPTIONS
To Turn Captions On and Off:
1. Point and press on Captions in the Setup menu to
view the adjust window.
2. Point and press on: On, Off or Captions when muted.
3. Move pointer off the menu and press the trackball to
remove menu from screen.
Note: If you select Captions When Muted, Closed Cap-
tions appear when the sound is muted.
[_ IF'R-E-G_
Setup Adjustment Window
AutoProgram /
Add/Del/Surf
Clock Set
• Captions _
Caption/Text_ _ -_.
Language _- / / -- _ i
Background 1<4/ V capuo_s /
StarSight I I ,_, I
ProioSetup _. o" _
USING CAPTIONS/TEXT
"1"oSelect the "type" of Closed Caption orText:
1. Point and press on Caption/Text in the Setup menu to
view the adjust window.
2. Point and press on: Caption 1, Caption 2, Caption 3,
Caption 4, Text 1, Text 2, Text 3, or Text 4..
3. Move pointer off the menu and press the trackball to
remove menu from screen.
Note: At present, very few TV programs or video tapes
offer text captioning for any option other than CAPTION
1. Therefore, CAPTION 1 is the only recommended
choice, unless you know that a specific program is pro-
viding captioning using one of the other selections.
Setup
Auto Program
Add/Del/Surf
Clock Set
Captions
• CaptionfEo4[t n-
Language _-_ L.
Backgrounb_--_
StarSight
Projo Setup
I
,, Ioutt_ " J
See speciaTnew_;ast
T tonight at 7:00PM on
channel 2.
k, j'
Typical Captions Display
Captions may be shown any-
where on the screen.
Typical Text Display
Fixed size text window fills
lower half of screen.
Language
-ro Choose a Language for On-Screen Menus: J
1. Point and press on Language in the Setup menu to
view the adjust window.
2. Point and press on on desired selection: English,
Espa6ol or Frangais. (English, Spanish or French.)
3. Move pointer off menu and press trackball to remove
menu from screen.
If-TFEG_
Setup
Auto Program
Add/DeVSurf
Clock Set
Captions
Caption/Text
I_Language _.._ r
Background "_-_ L. " |
StarSight _-._// _D,
Projo Setup J"' [
Engli
_?ii;:
3o6_-m 16 -- 3

SETUP MENU: INTRAQ REMOTE
BACKGROUND
To Turn the Background On or Off:
1. Point and press on Background in the Setup menu to
view the adjust window.
2. Point and press on desired selection: On or Off.
3. Move pointer off menu and press trackball to remove
menu from screen.
Setup
Auto Program
Add/DeVSurf
Clock Set
Captions
Caption/Text
Language
• Background_
StarSight _'
Projo Setup _',
STARSIGHT
Before you activate the optional StarSight feature, review the StarSight
operating guidE;so you will have the information you will need to com-
plete the StarSight activation process.
To Begin the StarSight Activation Procedure:
1, Point and press on StarSight in the Setup menu to
view the adjust window.
2. Follow on-screen instructions.
Note: Another method to begin the StarSight activation
procedure is to simply point and press on the StarSight
icon at the left of the TV screen.
[_ rqTEEC4-
Setup
AutoProgram
Add/Del/Sud
ClockSet
Captions
Caption/Text
Language
Background
• StarSight _t
ProjoSetup ___.
PROJO SETUP
To "converge" the color(s) back into alignment: I
1. Point and press on Projo Setup in the Setup menu to
view the adjust window.
2. Point and press on the color (at the top) to change be-
tween Red and Blue.
:3. Point and press on the arrows to converge the chosen
color onto the reference lines.
4. Move pointer off menu and press trackball to remove
menu from screen.
Setup
AutoProgram
Add/Del/Surf
ClockSet
Captions
Caption/Text
Language
Background
StarSIght
• Projo Setup _:
q
'i1'
Blue 1
_I_I 16 -- 4

SPECIAL FEATURES: INTRAQ REMOTE
Poiint and Press
on Special
F'eatures Icon
Special Features
MENU OPERATION
1.
2.
Point and press on an
option.
Point and press on an
option in the adjust
window to complete
the adjustment.
Features
_,Timer Setup
Ch. Labels _
Source ID
Parental Ctl
Auto Demo
Timer Setup Sets the TV's Sleep Timer and On/Off Timer features. See the informa::ion following this
chart for more details.
Ch. I.abels Assigns a network/station label, name or call letters to specified channels. For example, if you
choose the label "ABC" for channel 7, then "ABC" will appear in the Channel/Time dis_31ay
whenever channel 7 is selected. See information following this chart for more details.
Source ID Assigns a descriptive "name" to the input sources. For example, the Video 1 source may be
named VCR. "VCR" would then appear in the Source Menu as a reminder that your VCR is
connected to the Video 1 input jacks.
Parental Ctl Use this feature to block viewing of any undesirable channels orthe entire video signal. See
(Control) the information following this chart for more details.
Auto Demo Use this feature to view a demonstration of the on-screen menus available on this TV.
continued on next page
3o61-oI 17 -- I

SPECIAL FEATURES: INTRAQ REMOTE
TIMER SETUP: Sleep Timer
To Program the Sleep Timer:
1. Point and press on Timer Setup in the Features menu
to view the Timer Setup display.
2. Point and press on Sleep Timer to view the adjust
window.
3. Press the trackball repeatedly to choose the length of
time the TV will remain on. Options are: Off, 0:15,
0:30, 1:00, 1:30, 2:00, 2:30, 3:00, 3:30 or 4:00.
4. Move pointer off menu and press trackball to remove
menu from screen.
One minute before the TV turns off, the GOOD NIGHT
display appears on the screen. At this time you have a
choice of the following two actions:
1. Do nothing. The GOOD NIGHT display remains on the
screen. The TV will turn off in one minute.
2. Delay the turn-off by resetting the timer with a new
time period.
Notes:
CI To cancel the Sleep Timer, turn off the TV or point
and press on Sleep Timer repeatedly until OFF is
showing.
CI As the Good Night display counts down the final 60
seconds, the audio and video of the TV also "dim" for
a soft, discreet turn-off.
FI The clock must be set before the Timer menu will
appear.
I_ITEG)- ]
Timer I
_.Sleep Timer---p-.--.,_,
On Time
Off Time
On/Off Timer i':
Sleep 77rner j
O:15
Sleep Timer Set tc Turn TV
OFF in 15 Minutes
.._".. Good Niight 0:58
•._o
• 58 Seconds
"Good Night" Display Appears 60
Seconds Before Shut-Off
TIMER SETUP: On/Off Timer
[
1.
To Set the On/Off Timer:
Point and !press on Timer Setup in the Features menu
to view the Timer Setup window.
2. Point and press on On Time option.
Point and press on hours, minutes, and AM/PM digits
to set the TV's turn On time.
:3. Point and press on Off Time option.
Point and press on hours, minutes, and AM/PM digits
to set the TV's turn Off time.
5. Point and press on On/Off Timer Option.
6. Point and press repeatedly to specify On or Off.
On- On!Off Timer will be activated.
Off- On/Off Timer will be deactivated.
7. Move pointer off menu and press trackball to remove
menu from screen.
I iI-_rr t Point ana_F_press
!_ Timer 1 chhere to make
Sleep "lime
On Time l_l_ II= I / IO_ "/'i_e
Off "1]me I_"
On/Off Timer Set to Turn
TV On at 11:00 am
Notes:
Q -[he clock must be set before the Timer menu will
appear.
[3 A time must be set for Off Time in order' to use the
On/Off Timer.
:_o6_o_ 17 --- 2

SPECIAL FEATURES: INTRAQ REMOTE
USING CHANNEL LABELS
To Assign Labels to Your Channels:
1. Point and press on Ch. (Channel) Labels in the Fea-
tures menu to view the label select screen.
2. Point and press on Ch Up/Ch Down arrow repeatedly
to select channel number you want to label.
3. Point and press on the appropriate label (A&E, ABC,
etc.,) you want for the selected channel.
4. Point and press on Ch Up/Ch Down arrow repeatedly
to select another channel number you want to label
or move pointer to EXIT and press trackball to re-
move the menu.
To create "custom" channel Labels:
1. Point and press on Ch. (Channel) Labels in the
Features menu to view the label select screen.
2. Point and press on Ch Up/Ch Down arrow repeatedly
to select channel number you want to label.
3. Point and press twice on any label other than ....
and "NONE."
4. Point and press on up to four characters for your cus-
tom label.
5. Point and press on EXIT to remove the menu.
Notes:
71 Ch. Labels can only be used with ANT/CABLE 1 or 2
Source.
CI The four dashes (.... ) means that no channel label
is assigned and the TV may accept the channel label
that is transmitted by some television stations. Or, in
addition to not assigning a label, NONE blocks the la-
bels transmitted by some television stations.
(r
.... NONE A&E ABC
ADC AMC BCC BET
CA CBC CBN CBS
CNSC CNN COM CSPN
OTN CTV DIS DISC
ENC ESPN ESPN2 ET
rAM FNN FOX F&V
GALA HBO HN HSE
IC INSP JCN LIFE
ME/U MMT MTV NBC
NOS PBS PLAY PTL
RDS REQ SC SCFI
SIN Ti_S TBN TELE
TMC Ti_IN TNT TRAM
UPN TSA VC VCR
VISN WB _._
Selector Highlight
ACTS
BRAV
CMTV
CSP2
E! Ch 9
EWTN
FX [ WGN
HSN
MAX
NICK
Qvc 7-&-T-_
SHOW L c!,_
TLC
Twc
VH-1
WWOR
A B C D E F G H I J K I. i_l N O
Q R S T U V W X Y Z 0 1 2 3 4
6 7 8 9 0 - / & # . I "_ * F_I
Custom Channel Labels Screen
Live view of
sele(;ted
chatq,nel.
Enter up to 4
ChaLractersfor
custom labels.
USING SOURCE ID
To Assign Names To Your Sources:
1. Point and press on Source ID in the Features menu to
view the ID select screen.
2. Point and press on the source you want to identify.
3. Point and press on repeatedly on the space directly to
the right of the chosen source to select an identifier
label (VCR, Laser disc, etc.,).
4. Select another source you want to add an identifier la-
bel to or mow., pointer to EXIT and press trackball to
remove menu from screen.
Selectable names for ANT/CABLE 1 or 2 Sources
are: .... , Disabled, Antenna, Cable, Cable Box, VCR,
Satellite, StarSight, Video Game, Laser Disk or DVD.
Selectable names for VIDEO and S-Video Sources are: --
--, Disabled, VCR, VCR 1, VCR2, Satellite, Camcorder,
Video Game, Laser Disc, Photo Cd or Audio Only.
Selected Source Selected Label
\,o
\Source
I Ant/Cable _]_ _i_Ant/Cable
Video 1 _ VCR
Video 2 Video Game
S-Video - - -
Front Video - - -
Frnt S-Video - - -
Live view of
se]!ected
Source,.
Note:
[3 Disabling a Source prevents it from appearing in the
Source Menu.
3o6_} 17 _ 3

SPECIAL FEATURES: INTRAQ REMOTE
USING PARENTALCONTROL (PC)
1. Select the individual channels to block.
a. Point and press on Block Ch. to view the channel se-
lect screen.
b. Point and press on Ant/Cable 1 or 2 to select a source.
c. Point and press on each channel you want to block to
set it to "blocked." (A padlock icon appears next to
the number.)
d. Point and press on EXIT to return to the Inteq Par.
Ctl. menu.
2. Block the Video and S-Video sources.
a. Point and press on Block Video to view the adjust
window.
b. Point and press on "Blocked," All Video and S-Video
sources will be blocked while PC is active.
c. Point and press on EXIT to return to the Inteq Par.
Ctl. menu.
3. Set the number of hours PC will remain
active once it is turned on.
a. Point anti press on Set Hours to view the adjust
window.
b. Point and press on the arrows to advance to the num-
ber of hours you want PC to remain active. (The
maximum is 99 hours.)
c. Point and press on EXIT to return to the Inteq Par.
Ctl. menu.
IFTI-EI_-
I_ Block Oh.
Block Video
Set Hours
Set Password
Lock OrVOff
Blocks individual
channels 1ForAntiCa-
fj j" ble 1 or 2 sources.
Blocks video and
,t_ _" S-Video images.
Length of time PC
•-----_""-" will be active.
Sets a 4-numl)er
password.
"--'-'-----.-- Turns PC fealure
On/Off.
Parental Control Menu
1 3 4i 5
7 _ I 1 _
; : 14 151_
18_119 20_
ii:_ , : ::
_27 :
35_,_
: :i
54
i 65
Ch :3
CBS__
Unblocked
Ant/Cb! 1 ------..,
Ant/Cbl 2
Block Channels Menu
Live view of
selected
c:han!nel.
Channel
Selector
Charlnel
Number
Charlnel Label
Status Line
"'--- Source Signal
_'ro remove
men_
a.
|).
C.
Set a 4-digit password.
Point and press on Set Password to view the adjust
window,
Point and press on four numbers to create a 4-digit
password. (You will be prompted to verify the num-
ber by entering it a second time.)
Point and press on EXIT to return to the Inteq Par,
Ctl. menu.
5. Turn Parental Control ON.
a. Point and press on Lock O_VOff to view the adjust
window.
b. Point and press on "On."
c. Point and press on EXIT to return to the Inteq Par,
Ctl, menu.
AUTO DEMO
[
a,
b.
C.
To Turn On the Auto Demonstration:
Point and press on Auto Demo to view the adjust
window.
Point and press on "On."
Point and press on EXIT to return to the Inteq Par.
Ctl. menu.
To stop the demonstration, you must select
Auto Demo in the menu and set it to OFF.
Auto Demo will continue until it is set to OFF.
13mer Setup
Ch. Labels _..f} [
Source ID _::::._ %.1_
Parental Ctl _._i!
• Auto Demo _l
J
:_o61oi 17 _ 4
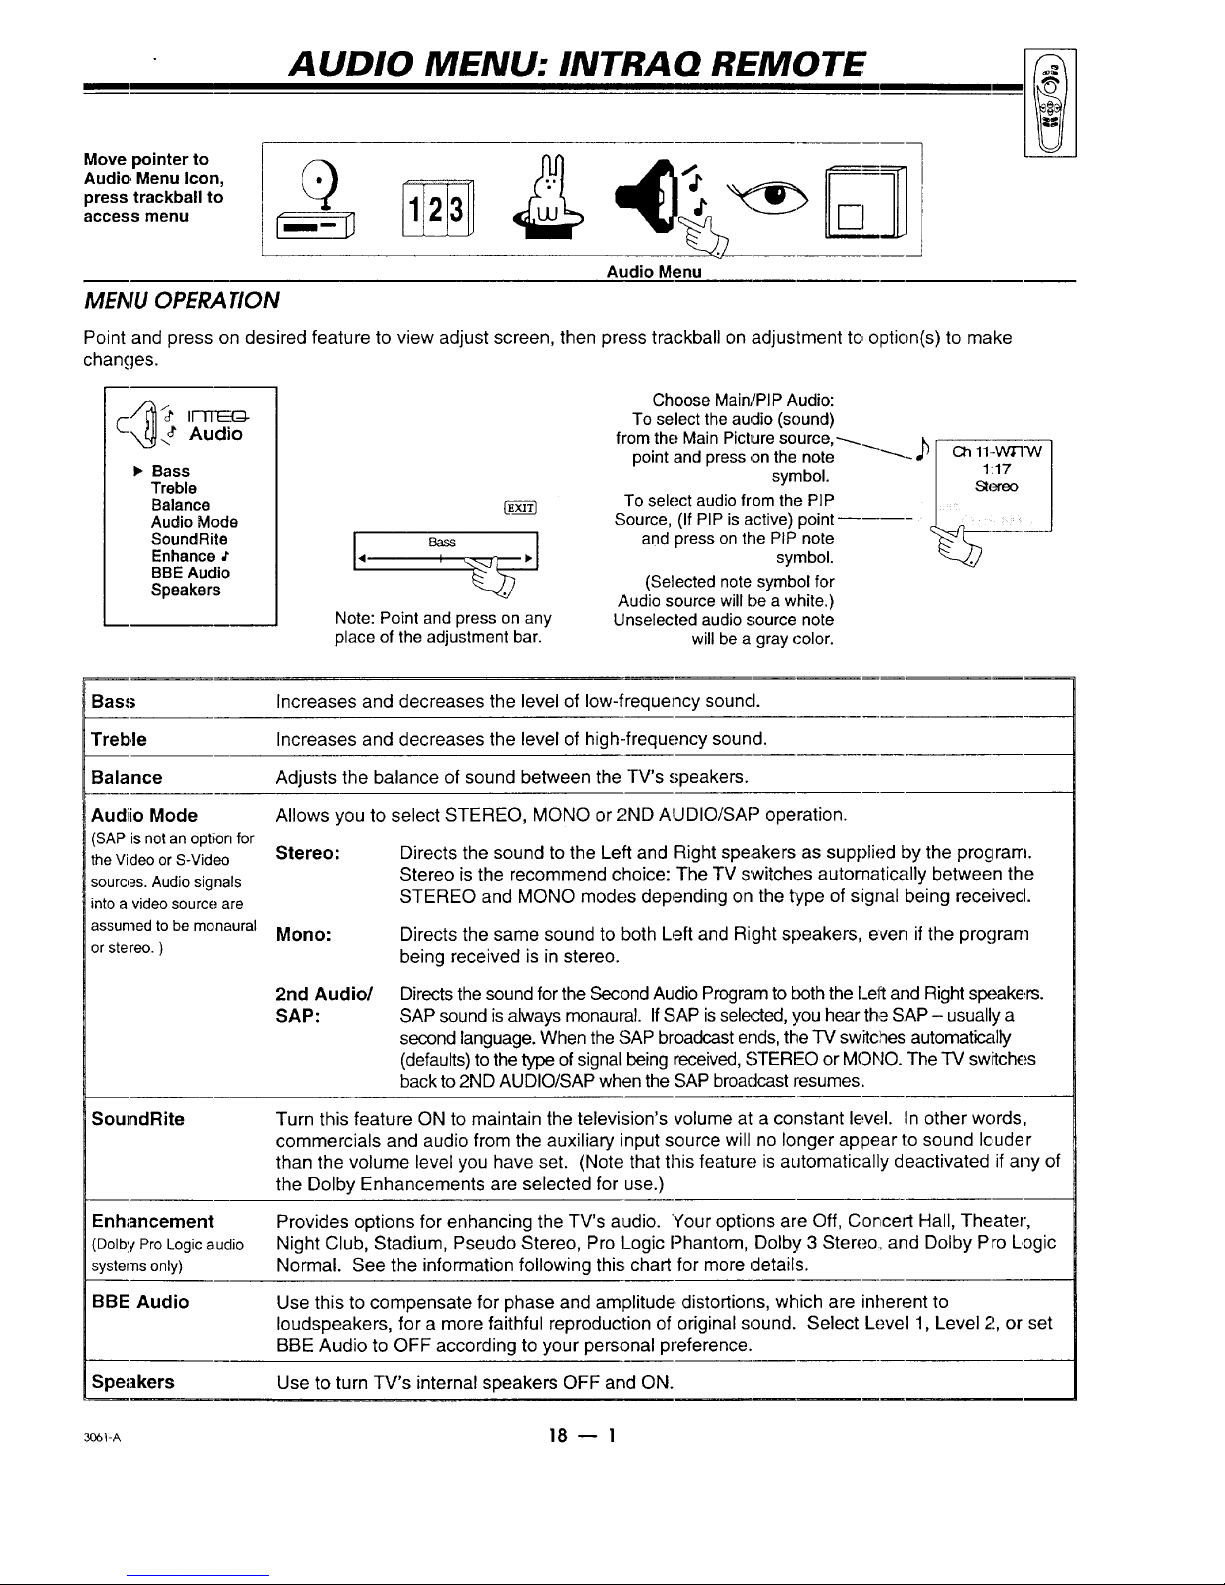
AUDIO MENU: INTRAO REMOTE
Move pointer to
Audio, Menu Icon,
press trackball to
access menu
MENU OPERA TION
Audio Menu
Point and press on desired feature to view adjust screen, then press trackball on adjustment to option(s) to make
changes.
Bass
Treble
Balance
Audio Mode
SoundRite
Enhance ,t
BBE Audio
Speakers
Note: Point and press on any
place of the adjustment bar.
Choose Main/PIP Audio:
To select the audio (sound)
from the: Main Picture source,_..., k r
point and press on the note _._ Ct111.-W_FW
symbol 1:17
• / Stereo
To select audio from the PIP /
Source, (If PIP is active) point _
and press on the PIP note "_." L.m
symbol.
(Selected note symbol for
Audio source will be a white.)
Unselected audio source note
will be a gray color.
Bass Increases and decreases the level of low-frequency sound.
Treble Increases and decreases the level of high-frequency sound.
Balance Adjusts the balance of sound between the TV's speakers.
Audiio Mode
(SAP is not an option for
the Video or S-Video
sources. Audio signals
into a video source are
assumed to be monaural
orstereo.)
SoundRite
Allows you to select STEREO, MONO or 2ND AUDIO/SAP operation.
Stereo:
Directs the sound to the Left and Right speakers as supplied by the program.
Stereo is the recommend choice: The TV switches automatically between the
STEREO and MONO modes depending on the type of signal being received•
Mono:
Directs the same sound to both Left and Right speakers, even if the program
being received is in stereo•
2nd Audio/
SAP:
Directs the sound forthe Second Audio Program to both the I_eltand Right speakers.
SAP sound is always monaural. If SAP is selected, you hear the SAP - usually a
second language. When the SAP broadcast ends, the TV switches automat_llly
(defaults)to the type of signal being received, STEREO or MONO. The TV sw_tches
back to 2ND AUDIO/SAP when the SAP broadcast resumes.
Turn this feature ON to maintain the television's volume at a constant level. In other words,
commercials and audio from the auxiliary input source will no longer appear to sound louder
than the volume level you have set. (Note that this feature; is automatically deactivated if any of
the Dolby Enhancements are selected for use.)
Enhancement Provides options for enhancing the TV's audio. Your options are Off, Cor_cert Hall, Theater,
(DolbyProLogicaudio Night Club, Stadium, Pseudo Stereo, Pro Logic Phantom, Dolby 3 Stereo, and Dolby Pro Logic
systemsonly) Normal. See the information following this chart for more cletails.
BBE Audio Use this to compensate for phase and amplitude, distortions, which are inherent to
loudspeakers, for a more faithful reproduction of original sound. Select Level 1, Level 2, or set
BBE Audio to OFF according to your personal preference.
Speakers Use to turn TV's internal speakers OFF and ON.
306_-A 18 _ 1

AUDIO MENU: INTRAQ REMOTE'
SPFAKER BALANCE
When Dolby 3 Stereo Enhancement is selected, bal-
ance the speaker sound as follows:
1. Select Stereo as the Audio option.
2. Select Dolby 3 Stereo as the Enhancement.
3. Adjust Bass and Treble to your preference.
4. Point and press on Balance to view the speaker bal-
ance screen.
5. Point and press on the speaker you want to adjust.
6. The text highlight and an audible "hissing" sound will
"bounce" between the selected speaker and the
Center Reference.
7 Point and press on the adjust bar to set the volume of
the "hissing" - for the selected speaker - to about
the same level as the "hissing" of the Center Refer-
ence. Do this for each speaker.
Message ap-
pears when ad-
justing Surround
Sound.
<1111
<=tl
<1tl
Le_Spea_r
IIIIIIIl11111111_
_g_Spe_er
IltlllllLIIIIl_l_
S_roundS_e_
IIIlllllllllllJl_
~"_"_"_-'_r-r_nd Speakers P,equ_red !
BASIC SPEAKER F]ALANCE °
When Dolby Pro Logic Normal or Phantom Enhance-
rnent is selected, balance the speaker sound as
follows:
1. Turn on the external amplifier and set its volume to ap-
proximately the same volume as the TV. (This step
is for Pro Logic Normal enhancement only.)
2. Select Dolby Pro Logic Normal (or Phantom) as the
Enhancement.
:3. Adjust the Bass and Treble to your preference.
4. Point and press on Balance to view the Pro Logic bal-
ance screen.
5. Point and press on a speaker,to adjust.
6. The text highlight and an audible "hissing" sound will
"bounce" between the selected speaker and the
Center Reference.
7. Point and press on the adjust bar to set the volume of
the "hissing" - for the selected speaker - to about
the same level as the "hissing" of the Center Refer-
ence. Do this for each speaker.
Highlight of text
"bounces"
between se-
lected speaker
and
Center
Reference.
Center Reference
LefS_aker
<111111111111111111111_
_g_S, pe_
_llLIIILIIIIblllllllll_
_ww
DOLBY 3 STEREO SPEAKER BALANCE
Text highlight
"bounces"
between selected
speaker and
Center
Reference.
Message appears
when adjusting
Surround Sound.
f....
Center Reference
Left Speaker
'_1 III I i I I Illll I I LIt I II)b
Right Speaker
_! I! IIII IIIIIII II11111_
surround Speak(;r_
_il illlllllll I IIII III1_'
PRo LOGIC BALANCE
3o61-a 18 -- 2

Point and press
on Video Menu
Icon
VIDEO MENU: INTRAQ REMOTE
Video Menu
MENU OPERATION
1.
2.
Point and press on an
option.
Point and press on an
option inthe adjust
window to complete
the adjustment.
IFrTEG
Video
Contrast
Brightness
Color _
Tint
Sharpness
Color Temp
Video Filter
Skin Tone
Video Preset
Note: Point and press on any place
of the adjustment bar.
Contrast Adjusts the overall contrast and color level of 'thepicture.
Brightness Adjusts the brightness level of black areas in lhe picture.
Color Adjusts the intensity of the colors in the picture.
Tint Adjusts the color of the flesh tones to more Green or more Red.
Sharpness Adjusts the definition of the object edges for best picture quality.
Color Temp Changes the "color temperature" or picture white balance between cooler, natural whites and
(Temperature) warmer (red) colors.
Video Filter Reduces video "noise" or interference in dark picture areas resulting in clearer overall
3ictures.
Skin Tone Automatically maintains natural skin tones under changing scene and video source
conditions.
Video Preset Adjusts the picture to different light environments. Options are: Custorr, Preset, Movie, Video
Game, Sports, Daylight or Weak Signal.
Note:
0 All adjustments on the Video Menu are optional. It is
not necessary to adjust these features in order to op-
erate the TV.
_I-oI 19 I 1

Point and press
on PIP Menu
Icon
PIP MENU: INTRAQ REMOTE
PIP Video Menu
MENU OPERA TION
1°
2,
Point and press on an
option.
Point and press on an
option in thE;adjust
window to complete
the adjustment.
• Ch. Guide
Ch. Review
Contrast
"13nt
Size
Selecting the PIP Menu does not "activate" PIP. How-
ever, a PIP window will appear during menu operation
to show the effect of any setting changes,
See PIP Operation section
4
Note: Point and pres.';on any place
ofthe adjustment bar.
C,h. Guide Provides a visual review - in a column of four PIP windows- of all channels in the channel
scan memory for the currently selected ANT/CABLE! source.
Ch. Review Provides a visual review - in two PIP windows- of the last two channels you were watching
(prior to the channel you are currently watching).
Contrast Adjusts the intensity of the colors in the PIP inset.
Tint Adjusts the color of the flesh tones in the PIP inset 1:omore Green or more Red.
Size Adjusts the size of the PIP inset. Choose between .,;mall, medium or large.
:_o6_-oI 20- I

MAINTENANCE AND TROUBLESHOOTING
CARING FOR YOUR PROJECTION 71/
Your projection TV will look better, have a longer life and per-
form better if you care for it properly.
Firs1:check to see that the TV is off. For added
safety, disconnect AC power to your TV.
NOTE: If you unplug your TV, you will have
to reset the clock to the current time.
CABINET CARF
Non-Wood Cabinet or Cabinet Components Moisten a soft
cloth with a milcl soap solution or Ivory dishwashing deter-
gent. Wipe the surface with a damp cloth. Then rinse the cloth
in clean water and wipe the surface again. Allow the TV to air-
dry before turning it on.
Wood Cabinets or Cabinet Components Use any good fur-
niture cleaner and polish. Regular care will help preserve the
finish.
PROJEC'rlON SCREEN CLEANING
Use a soft cloth moistened with warm water and
rub lightly in the soiled areas of the screen. DO
NOT USE A TISSLrE OR PAPER TOWEL,
AS "][7-IESEMAY DAMAGE SURFACE. Wipe
only in the vertical (up/down) direction (along
the grooves). If there is a dirt buildup, a mild so-
lution of warm water and Ivory dishwashing de-
tergent may be used. Use dry soft cloth to dry
the screen, Care should be taken to avoid
scratches or damage to the screen surface.
CAFlING FOR YOUR DIRECT VIEW TV
Your TV will look better, have a longer life and perform better
if you care for it properly.
,i_ First check to see that the TV is off. For added
safety, unplug the TV from the power outlet.
NOTE: If you unplug your TV, you will have
to reset the clock to the current time.
CABINET CARE
Non-Wood Cabinet or Cabinet Components Moisten a soft
cloth with a mild soap solution or Ivory dishwashing deter-
gent. Wipe the Stlrface with a damp cloth. Then rinsethe cloth
in clean water and wipe thesurface again. Allow the TV to air-
dry before turning iton.
Wood Cabinets or Cabinet Components Use any good fur-
niture cleaner and polish. Regular care will help preserve the
finish.
NOTE: THE TV SCREEN IS EASILY DAMAGED.
AVOID ACCIDENTAL CONTA CT WITH THE SC_,EEN.
DIRECT VIEW PICTURE GLASS CLEANING
The picture tube face attracts dust particles and should be
cleaned regularly. To clean the face, spray a small :unount of
glass cleaner on a cleaning cloth and wipe the picture tube
glass face until clean. Repeat if necessary.
To delay new dust accumulation, wet a soft cloth in lukewarm
water in which a little fabric softener or Ivory dishwashing de-
tergent has been mixed. Wring the cloth almost dry. Wipe the
glass face. Make sure no drops of mc)isture are squeezed onto
the glass. Do not wipe the glass dry. AlIow the glass to air-dry
before you turn the TV on again.
EXTENDED ABSENCE
Before an extended absence (such as a vacation) you may
want to disconnect AC power to your TV. This will protect
the projection TV from possible damage from lightning or
power line surges. If you have an outdoor antenna, you may
also want to disconnect the antenna from the wall plate con-
nection center
NOTE: If you unplug your TV, you will have to reset the
clock to the current time.
PICTURE INTERFERENCE
Your picture may be affected by interference caused by one or
a number of factors. These include:
Speckled or Streaked Picture Can be caused by nearby auto-
mobile ignition, electrical appliances, etc. This is most notice-
able in weak signal areas.
Snow in Picture Caused by insufficient signal. Usually
caused by the TV being located too far from the TV station or
by an improper antenna installation.
Ghosts or Reflections Caused by signals being reflected
from surrounding buildings, water tanks, or other high :_truc-
tures.
Radio Signal Police, amateur or CB radio transmitters may
cause interference.
These interference problems can often be corrected through
the use cif a better antenna, signal anaplifiers, or various filter
devices. See your TV dealer for additional information, and ac-
cessories available for your projection TV.
¥CAREDVP 21 -- 1

MAINTENANCE AND TROUBLESHOOTING
SCREEN PROTECTOR
Sorne projection TVs are equipped with a screen protector. If it is necessary to remove or adjust the protector, "peel"
the moldings away from the TV to separate them from the tabs groove and carefully lift out the screen protertor, Be
careful not to damage the moldings or scratch the surfaces of the TV screen or the screen protector.
The TV screen is easily damaged. Avoid
accidental contact with the screen.
T T
Snap-in Screen
Moldings Protector
Step 1. Install one of the long snap-in moldings into the
groove at the bottom of the TV and push the molding
tabs into the groove as shown at the right. Place screen
protector into the slot between the molding and the TV
screen with the label on the screen protector facing you.
Have someone hold the screen protector in position over
the TV screen.
Be extra careful not to scratch either
the TV screen or the screen protector
surfaces during installation.
Step 2. Carefully shift the screen protector up, down,
left, or right as needed.
Clean screen protector as
described on previous page.
Step 3. Place the remaining three snap-in moldings in
position on the top (remaining long piece), left, and right
sides of the TV (shorter pieces). Press firmly enough on
e_achsnap-in molding to force the retainer tabs into the
groove as shown above; each tab must be fully inserted.
After installation, remove the label from the front of the
screen protector, if desired.
Molding
Tabs Grobve
//
/ /
/
/ /
/
/ /
/
/ ./
Screen
Protector
Retaining
Tab
Push molding tabs into
groove on front of TV.
Groove Ol3
front of TV
3_o_A 21 -- 2

MAINTENANCE AND TROUBLESHOOTING
BEFORE CALLING FOR SERVICE
Check these items and see if you can correct the trouble by changing the adjustment of a control or a menu setting. By
making these simple checks before calling for service, you may save time and money.
Problem Try. This
Picture OK. Poor sound. Re-orient antenna. Try another channel -- possible station 'trouble. Adjust AUDIO
MENU options. Check Mute feature? Check for local interference. Is antenna/cable
connection loose?
Sound OK. Poor picture.
No picture or sound.
Picture blurred or ,distorted.
Ghost in picture.
No color, or poor color.
No sound or sound is low.
Cannot select certain channels
or other channels.
No closed captions
Black or blue box covers half of screen.
No picture or sound when VIDEO 1 or
VIDEO 2 source is selected.
No stereo sound or weak stereo sound
when using a stereo VCR.
Cannot select desired PIP source.
PIP inset frame is black or lacks contrast
when selecting VIDEO 1 for PIP inset.
PIP inset frame is "snowy" when using
ANT/CABLE 1 or 2 for PIP and
VIDEO 1 for main picture.
No picture when using VIDEO 1 for PIP
inset source and ANT/CABLE 1 or 2 for
main picture.
Remote control does not work.
Re-orient antenna. Try another channel I possible station trouble. Adjust VIDEO
MENU options. Trouble with cable-TV system? Is antenna/cable connec.tion loose?
Is TV on? Is there power in wall outlet? Is TV plugged in? Is antenna hooked up?
Is cable hooked up? Trouble with cable-TV system? Check auxiliary audio/video
equipment. Check channel selection. Is;the channel blocked by PARENTAL
CONTROL?
Check antenna or cable hook: up for broken wires. Try another channel --- possible
station trouble. Check for local interference.
Is it a color program? Check antenna or cable hook up for broken wires. Adjust
VIDEO MENU options.
VOLUME (VOL) setting may be too low. Check MUTE key operation on remote
control. Is Speaker EXT/INT ,';witch set to EXT?
Channels may be skipped in CH. ADD/r)EL/SURF option of SETUP MENU. Use
AUTO PROGRAM a second time. Is TV in Surf Channel Scan mode with only one
channel specified as a Surf channel?
Are captions available? Is CAPTION 1, CAPTION 2, CAPTION 3 or CAPTION 4
selected using the CAPTIONS option on the SE3"UP MENLI?
Is text information available? Is TEXT 1, TEXT 2, TEXT ;3or TEXT 4 selected in
the CAPTIONS option of the SETUP MENU.
Is audio/video source hooked up properly? Are all wires connected to VIDE() 1 IN
or VIDEO 2 IN jacks on connection center?
Check AUDIO mode. Was stereo sound present before selecting VIDEO 1 c r
VIDEO 2 source?
If Ant/Cable 1 or 2 is Main Source, TV makes it PIP sourc'e also.
Adjust PIP COLOR AND CONTRAST settings in PIP MENU. Are all whes
connected to VIDEO 1 IN jacks on connection center?
Is TViVCR switch on the VCR (or remote) in the TV position?
Is TV/VCR switch on the VCR (or remote) in the TV position?
Are batteries okay? Does Indicator light turn On? Is "I-Vturned ON? Is remote in
TV mode?
Note:s:
Q If your'IV fails to respond to the VIDEO PRESET selection, or to any other menu selection, you must reset:the -IV.
Sirnply disconnect the AC power cord from the power oiJtlet.Wait a few minutes, then plug the TV back into the
power outlet. You may have to reset the clock to the current time.
0 Unplugging the -IV does not deactivate the Parental Control.
_l-o_ 21 _ 3

REPLACEMENT PRODUCT REGISTRATION CARD
m i i i
You could win a full refund on your new INTEiY-
product.
Look for the Product Registration Card on your new video
product.
Ea=h month a drawing is held by I[--ITE[_ from the
completed Product Registration Cards received during the
preceding month. INTE[_D- will reimburse the winner for
the full purchase price of the product purchased.
In order to participate, simply complete and return the Product
Registration Card at once, even if you choose not to complete
the information and interests portion of the questionnaire.
The odds of winning the free drawing described above,
depend on the number of participants. Free drawing offer
is void in Canada and other places where restricted or
prohibited by law. Offer is void for Hotel/Motel and
Institutional models. Rental models are not eligible.
Product Card lost or misplaced?
The Product Registration Card furnished with your video
product is pro-printed with its Model and Serial numbers.
Please fill out the card and mail it at your earliest convenience.
It is iraperative that I[--ITEC-I- know how to reach you
promptly if we discover a safety problem that would affect
you. If the original card has been lost: or misplaced, you may
use the replacement card provided below. Either card will
qualify you for the free drawing, but you are limited to only
one entry in the drawing. Complete the card, place it in an
envelope and mail it to:
I[-TI-Ei(_ Electzonics Corporation
P,, O. Box 2353
Brea, CA 92822-8805
Use the replacement Product Registration Card only if the
original card has been misplaced or lost.
INTEQ TM is a trademark of Zenith Electronics Corporation.
Copyright © ZENITH Electronics Corporation 1996
PHOTOCOPY AND CUT ALONG DASHED LINE
IF1T6__!:_ Product Registration Card
O
Please Print Clearly or Type
1. EIMr. 2. DMrs. 3- UMs-
(_) Area Code Telephone
4.DMi- II i IIIL/-Illll
First Name Initial Last Name
II II I IIIII IIIIIIII111
Street
II ] ] I IIIIIllilllllll
City
II II IIIIIIIIII1,1 ®
State Zip Code
L_LJI I II11-11111
IILIIIII
Apt. No.
Jlllll
Date of Purcl_ase
Mo. Day Yr.
I
I
ILl I 11 LII
"OOELilIIIIIIIIli.o.°E.
Copy Numbers Here
From Label on Set
I I I I I I Il IIi
Please record the model number
and serial number from the sticker
on the back:of your set.
YREG-Q2

accessories
Don't think handbags. Think a little something
to help activate your gray matter.
Sub-woofer Cabinet
] Dual 6Y' Sub-woofers
with Bilaminate Cone
and Rubber Surround
1 2:5 Watts per Channel with
both Channels Driven
1 Fixed Bass Boost 4dB @ 70Hz
1 Glass Doors
I[ol,,_o_.-]i]
_I:IIIoI,] Surround Sound Speaker
Two Way Mini Tower Speakers:
1 Dual 4¼"Woofers with
Mineral Filled Cone and
Rubber Surround ard High
Temperature Voice Coil,
Magnetically Shielded
1 Rated Up to 100 Watts Music
Power via Subwoofer Crossover
Rear Channel Speakers:
] 4?4"Full Range Speakers
] Rated Up to 15 Watts
Music Power
Stand Alone Sub-woofer
] Dual 6_' Sub-woofers
with Bil_minate Cone
and Rubber Surround
1 25 Watts per Channel with
both Channels Driven
1 Fixed Bass Boost 4dB @ 70Hz
1 Dual Color Power Led
_jrr_hl.-_vj

4 head hi-fi V'CR
1 HQ Picture Enhancement
Syste.mfor Improved Image
Sharpness and Detail
-t MTS Hi-FiStereo
7 StarSight ® Function
-: Universal Remote Control Unit
DVD Player
• Movie Studio M_ster
Video Quality
1 MPEG2 Digital Video
Compression
] Dolby AC-3"
5.1 Stereo Surround Sound
] DVD Remote Control
°1
Custom Cabinetry
] Large Storage 3belying
7 Tempered Smoked
Glass Doors
1 19¾'H, 34_"W, 23"D
I[di_]N=]i
Custom Cabinetry
• Large Storage Shelving
1 Tempered SmckecL
Glass Doors
• 20'H, 30"W, 20"D
l,_]L'li'_Jr4• d
Custom Cabinetry
] Large Storage Shelving
] Tempered Smoked
Glass Doors
1 18_'H, 37_"W, 20'D
I._'l:lcl.1 :l I

I|
WARRANTY
Welcome into the INTEQfamily! We believe that you will be pleased with your new INTEQ Color TV. Please
read this warranty carefully. It is a "'LIMITED WARRANTY" as defined under Federal Law. This warranty gives
you spec-ific legal rights, and you may also have other rights that vary from state to state wi!-hin the U.S.A.
INTEQ's Responsibility
Service Labor and Parts -- During a period of one
year from effective warranty date, INTEQwill supply
new or remanufactured replacement picture tubes
or other parts, and will pay for service labor by an
INTEQauthorized service center, when such parts or
service, labor are needed to repair the product as a
result of manufacturing defects. Further, INTEQ will
supply a new or remanufactured replacement for
any picture tube which fails during the second year
after effective warranty date because of a
manufacturing defect. Replacement parts are
warranted for the remaining portion of the original
warranty period. The above service labor warranty
applie,,; only in the U.S.A.
On-Site Service --, Warranty service is provided
where your INTEQTV is installed.
Not Covered --This warranty covers manufacturing
defects and does not cover installation, adjustment
of cus-omer controls in the home, installation or
repair of home antenna systems, cable converters
or cable company-supplied equipment; it also does
not cover damage due to misuse, abuse,
negligence, acts of God or other causes beyond
the control of INTEQ. Any alteration of the product
after manufacture voids this warranty in its entirety.
Before you ask for Warranty service,
check the operating guide section
entitled, "Maintenance And
Troubleshooting."Itmay be possibleto
avoid a service call.
Owner's Responsibility
Effective Warranty Date --- Warrant/begins on the
date of original consumer installation. For your
convenience, keep, the dealers dated bill of sale or
delivery ticket as eviden('e of the purchase date.
Operating Guide -- Read your Operating Guide
carefully :;o that you will understand the operation
of your se_ and how to adjust the cu:;torner control:5.
Antenna -- Reception problems caused by
inadequate home antennas or faulty antenna
connections are the owner's responsibility.
Importanl: Product Registration -- Please fill out and
mail your Owner Registration Card. It i:_imperative
that INTEQ know how to reach you promptly if we
shculd discover a safety problem that could affect
you.
Warranty Service -- For warranty service
information, contact any INTEQ authorized service
center. Parts and service labor that are INTEQ's
responsibility (see above) will be provided without
charge. Other service is at the owner's expense. If
yOL! have any problem in obtaining satisfactory
warranty :;ervice, call or write:
INTEQ
Customer Service Department
1000 Milwaukee Avenue
Glenview, IL60025-?_,€;_3
Telephone: (888" F R O N T A L
(8881)3 7 6--6 8 2 5
Mon-Fri, 8:00 a.m. - 4:30 p.m. Central Time
ADDITIONAL INTEQ PROTECTION PLAN AVAILABLE
INTEQ offers you the opportunity to obtain additional long-term
protection against failure of the picture tube in your new television.
Our Picture Tube Protection Plan enable,_; you to avoid any
unexpected picture tube repair expenses and keep your television in
top condition, tt guarantees you a genuine INTEQ replacement
picture tube and service from a INTEQauthorized service center.
Be sure to send in the Product Registration Card. We will send you an
application for the Protection Plan near the expiration of the two year
manufacturer's warranty on the picture tJbe. For additional
information, call (888) 376-6825. II 11!_i[D-
'
i,i ii
Illi umml mial maai nail mall inmm till llll ammn imll mill imln maim in _
,"WRR']'MPQ


 Loading...