

Page 1

Intenso 7“ WEATHERMAN
V 1.0
Page 2

Intenso 7” WEATHERMAN
Bedienungsanleitung
Page 3

i
Inhaltsverzeichnis
EINFÜHRUNG ............................................................................................................................................................................................................. 1
ALLGEMEINE PRODUKT MERKMALE .................................................................................................................................................................... 2
ÜBERSICHT ................................................................................................................................................................................................................ 3
FERNBEDIENUNG ..................................................................................................................................................................................................... 4
EINSETZEN DER BATTERIEN .................................................................................................................................................................................. 5
Einsetzen der Batterie in die Fernbedienung ......................................................................................................................................................... 5
Einsetzen der Batterien in den Außensensor ......................................................................................................................................................... 5
ERSTE SCHRITTE ...................................................................................................................................................................................................... 6
NUTZUNG VON SPEICHERMEDIEN ........................................................................................................................................................................ 7
HAUPTMENÜ .............................................................................................................................................................................................................. 8
DIE WETTERANZEIGE .............................................................................................................................................................................................. 9
Der Wetter Indikator .............................................................................................................................................................................................. 10
Das Wetter Symbol ................................................................................................................................................................................................ 11
BETRACHTEN VON FOTOS ................................................................................................................................................................................... 12
Bilder-Vorschaumenü ............................................................................................................................................................................................ 12
Page 4

ii
Betrachten einer Diashow ..................................................................................................................................................................................... 12
Nutzen des OSD-Menüs ....................................................................................................................................................................................... 14
ANZEIGE DES KALENDERS UND DER UHRZEIT ................................................................................................................................................ 15
DATEIMENÜ .............................................................................................................................................................................................................. 15
EINSTELLUNGEN .................................................................................................................................................................................................... 16
Einstellmöglichkeiten............................................................................................................................................................................................. 16
Datum einstellen ................................................................................................................................................................................................... 18
Uhrzeit einstellen ................................................................................................................................................................................................... 18
HÄUFIG GESTELLTE FRAGEN .............................................................................................................................................................................. 19
PRODUKT SPEZIFIKATIONEN ............................................................................................................................................................................... 21
PFLEGE UND WARTUNG ........................................................................................................................................................................................ 22
Page 5

DE - 1
Wi r sin d nic ht ha ftba r für Sch äden oder Date nver lust bei ei ner F ehlf unkt ion, fe hler haft er Ha ndha bung oder eig enhä ndig er Re par atu r des
Ge räte s. B itte zer lege n Si e da s Ge rät nich t in Ein zelt eile , un d ve rsuc hen Sie bitt e ni cht, es selb st z u re pari eren , da die Ga rant ie i n di esem Fal l
er lischt. Die Sof twar e, H ardw are oder Bed ienu ngsa nlei tung k ann Änd erung en unte rlie gen. Hie rübe r w erde n wir nicht i nfor mier en. Wir beh alte n
un s al le R echt e da zu v or.
EINFÜHRUNG
Danke, dass Sie sich für den WEATHERMAN (WM) entschieden haben .
Bevor Sie dieses Gerät nutzen, lesen Sie bitte diese Bedienungsanleitung gründlich durch und beachten Sie alle Warnhinweise.
Wir empfehlen eine sichere Aufbewahrung dieser Anleitung, um etwaig auftretende Fragen selbstständig beantworten zu können.
Der Inhalt dieser Anleitung ist so gestaltet, dass Sie die gesamten Funktionen des WM sicher nutzen können.
Der WM ermöglicht es Ihnen, digitale Fotos direkt von der Speicherkarte Ihrer Kamera zu betrachten. Sie können Ihre Fotos
durch die vom WEATHERMAN bereitgestellte Diashowfunktion anschauen. Der WM ist mit folgenden Kartenformaten kompatibel:
SD (Secure Digital), SDHC (Secure Digital High Capacity), MMC(Multimedia Card), MS (Memory Stick) und USB-Stick.
Page 6

DE - 2
ALLGEMEINE PRODUKT MERKMALE
Dekorative Erscheinung, gute Qualität
Wetteranzeige mit Außentemperatur und Luftfeuchtigkeit
Anzeige von Fotos (JPEG) ohne einen Computer
Automatische Diashow mit wählbaren Übergangseffekten und individueller Anzeigedauer
Kalender Funktion
Kompatibel mit SD / MMC / MS Karten
USB Steckplatz für den Anschluss von USB Massenspeichern
2 Wege der Steuerung: 7 Tasten auf der Rückseite des WM, Infrarot Fernbedienung
Page 7
DE - 3
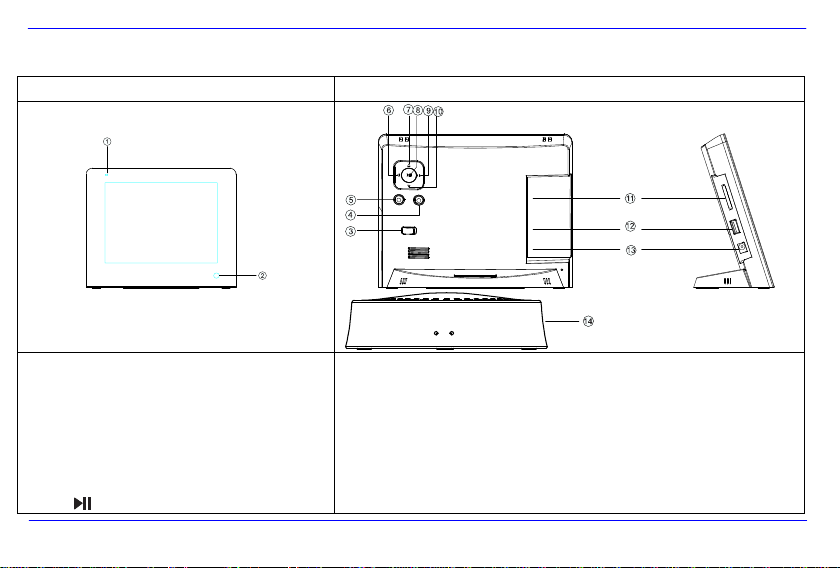
Vorderansicht
Rückansicht & Seitenansicht
1. Lichtsensor
2. Infrarotempfänger Sichtfenster
3. On/Off Schalter
4. [] Exit Taste (Verlassen eines Menüs)
5. [M] Menü Taste (Aufruf des Hauptmenüs)
6. [] Rechts / Vorwärts Taste
7. [] Aufwärts Taste
8. [ ] Play/Pause und Bestätigungs-Taste
9. [] Links / Zurück Taste
10. [] Abwärts Taste
11. SD/MMC/MS-Kartenslot
12. USB HOST
13. 5V 2A DC Eingang
14. Außentemperatursensor
ÜBERSICHT
Page 8

DE - 4
1 Anzeige von Uhrzeit und Kalender.
2 Anzeige der Temperaturdaten.
3 Aufrufen des Setup Menüs.
4 Stoppen des Alarms.
5
F°/C°
Anzeige der Temperatur in Fahrenheit oder Celsius.
6 Rotieren des Fotos.
7 Bewegt den Cursor Aufwärts im Menü.
8 Bewegt den Cursor nach links im Menü.
9 Einschalten / Ausschalten der Wetterstation.
10 Aufrufen des Dateimenüs.
11 Aufrufen des Bildervorschaumenüs.
12
MENU
Aufrufen des Hauptmenüs.
13 Vergrößern eines Fotos.
14 Rücksprung zum vorherigen Menü.
15
OK
Bestätigen der Auswahl. Start oder Pause der Diashow.
16 Bewegt den Cursor nach rechts im Menü.
17 Bewegt den Cursor Abwärts im Menü.
FERNBEDIENUNG
Page 9
DE - 5
EINSETZEN DER BATTERIEN
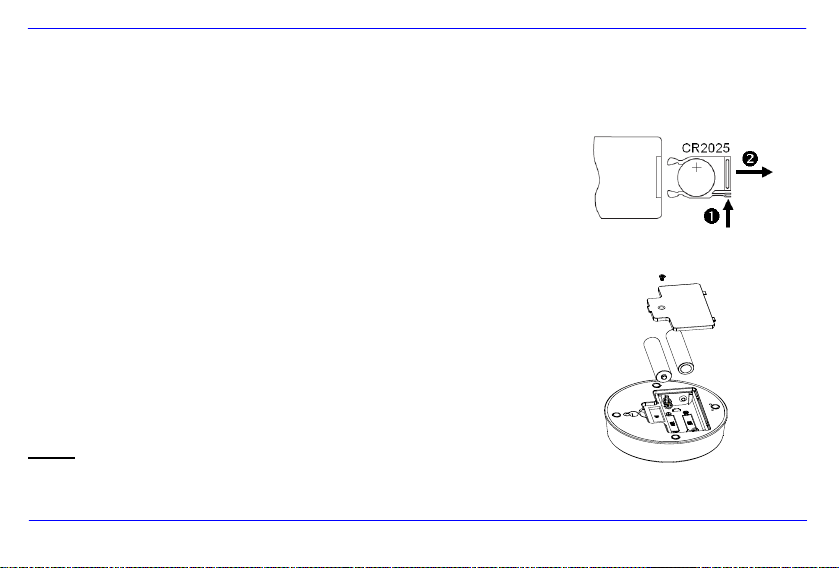
Einsetzen der Batterie in die Fernbedienung
Platzieren Sie die Fernbedienung mit den Tasten nach unten.
Drücken Sie die Feder links neben dem Batteriefach nach rechts und ziehen Sie gleichzeitig
das Batteriefach heraus.
Setzen Sie eine CR2025 Lithium Batterie mit dem Plus Symbol nach oben in das Batteriefach ein.
Schieben Sie das Batteriefach wieder vollständig in das Gehäuse der Fernbedienung.
Einsetzen der Batterien in den Außensensor
Lösen Sie die Schraube der Batteriefachabdeckung auf der Rückseite des Außensensors.
Öffnen Sie die Batteriefachabdeckung.
Setzen Sie zwei AAA Batterien in der richtigen Polarität ein.
Setzen Sie die Batteriefachabdeckung wieder auf.
Verschließen Sie die Batteriefachabdeckung durch Eindrehen der Schraube.
Hinweis: Bitte stellen Sie eine Batterieentsorgung sicher, die den gesetzlichen Bestimmungen entspricht.
Page 10
DE - 6
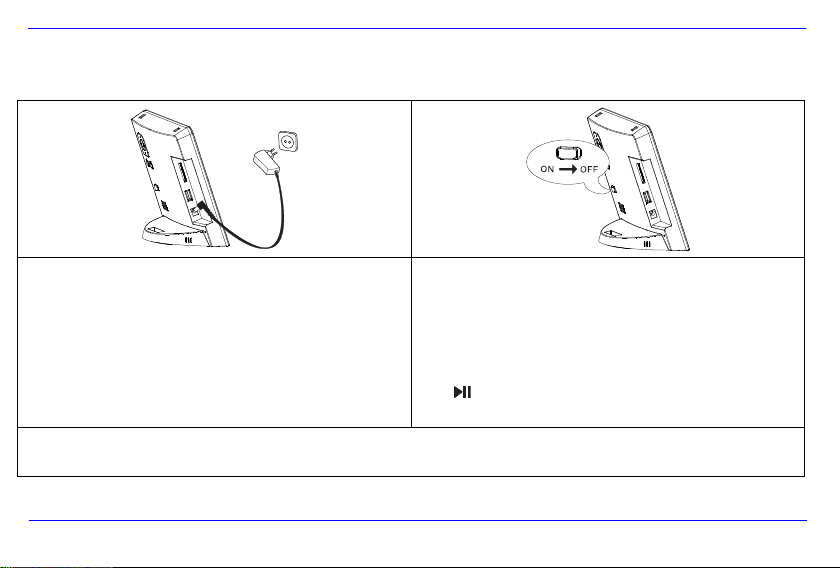
Verbinden Sie das mitgelieferte Netzteil mit dem WM. Stecken
Sie das andere Ende des mitgelieferten Netzteils in die
Steckdose.
Schieben Sie den Regler des WM
Für die erste Inbetriebnahme wählen Sie bitte nach
erstmaligem Einschalten die Sprache in dem erscheinenden
Fenster mittels der Pfeiltasten auf der Rückseite des WM oder
der Fernbedienung aus. Bestätigen Sie Ihre Auswahl mit der
[ ]-Taste auf der Rückseite oder der OK–Taste auf der
Fernbedienung.
Hinweis: Um den WEATHERMAN komplett auszuschalten, schieben Sie den Power Schalter auf der Geräterückseite von der Position
ON in die Position OFF. Durch das alleinige Ausschalten an der Fernbedienung gelangt der WM nur in den Standby Modus.
ERSTE SCHRITTE
Page 11
DE - 7
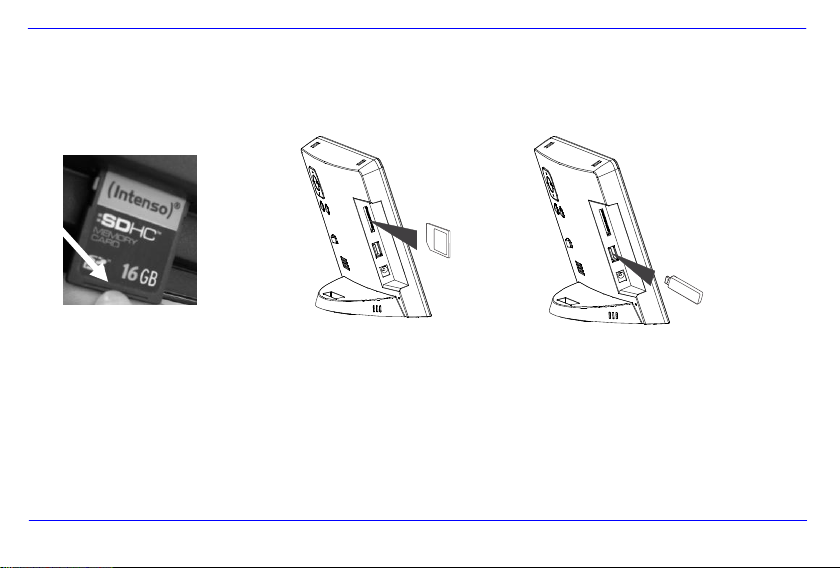
NUTZUNG VON SPEICHERMEDIEN
Setzen Sie SD / MMC / MS Karten mit den Kontakten in Richtung des Display schauend in den 3-in-1 Karten Slot ein.
Verbinden Sie USB Speichermedien mit dem WEATHERMAN durch Einsetzen der Medien in den USB Steckplatz (USB Host).
Hinweis:
Bitte setzen Sie Speicherkarten nicht mit Gewalt ein.
Das 3-in-1 Kartenlesegerät kann immer nur eine Karte zur gleichen Zeit auslesen.
Bitte verbinden Sie immer nur eine SD / MMC oder MS Karte zeitgleich mit dem WEATHERMAN.
Um verbundene Karten vom WEATHERMAN zu trennen, ziehen Sie diese vorsichtig aus dem Kartenslot heraus. (Hinweis: SD und
MMC Karten verfügen über eine Einkerbung in Querrichtung der Karte. Hier kann ein Fingernagel eingreifen, um das Herausziehen
aus dem Slot zu vereinfachen)
Page 12
DE - 8
Menü
Beschreibung
Wetter
Anzeige des Wettermodus
Foto
Anzeige des Fotomodus
Kalender
Anzeige des Kalendermodus mit Uhrzeit
Datei
Anzeige des Dateimenüs
Einstellungen
Menü, um individuelle Einstellungen vorzunehmen.
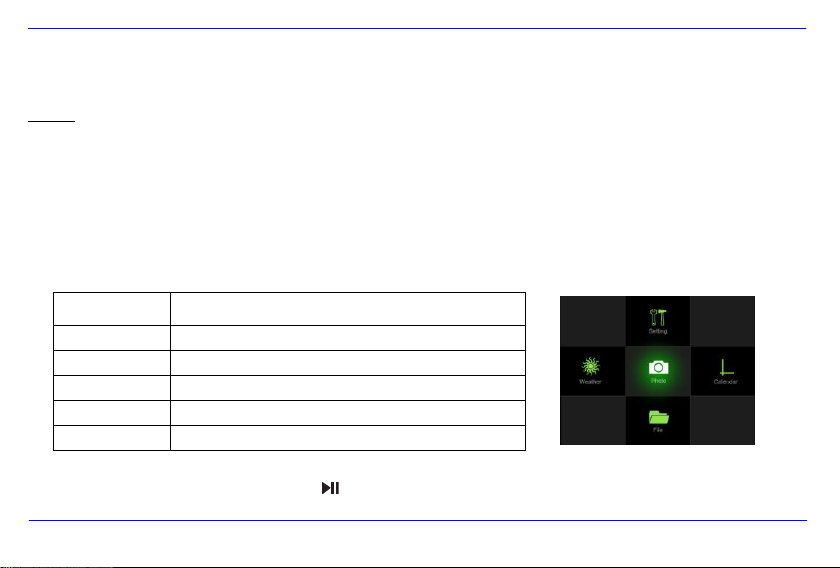
HAUPTMENÜ
Nach dem Einschalten gelangen Sie direkt in das Hauptmenü.
Hinweis: Wenn Sie eine Speicherkarte und/oder einen USB Stick in den WM eingesetzt haben, startet nach einem kurzen Moment die
Wetteranzeige mit oder ohne Diashow der Bilder auf Ihren eingesetzten Speichermedien. Dies ist abhängig von den unter Foto Einstellungen
gewählten Einstellungen. Wenn mehrere Speichermedien mit dem WM verbunden sind, liest er nach dem Einschalten aus dem Standby
immer die Bilder aus dem zuletzt genutztem Speichermedium. Nach dem Einschalten am Gerät, liest er die Bilder des USB-Host.
Im Hauptmenü haben Sie die Auswahl zwischen dem Wettermodus, dem Fotomodus, dem Kalendermodus, dem Dateimenü und dem
Einstellungsmenü.
1. Drücken Sie die [M]-Taste auf der Rückseite des WM, oder die MENÜ-Taste auf der Fernbedienung, um das Hauptmenü aufzurufen.
2. Drücken Sie die Pfeiltasten auf dem WM oder auf der Fernbedienung, um einen Menüpunkt auszuwählen.
3. Bestätigen Sie Ihre Auswahl durch Drücken der [ ] Taste auf dem WM, oder der OK-Taste auf der Fernbedienung.
Page 13
DE - 9
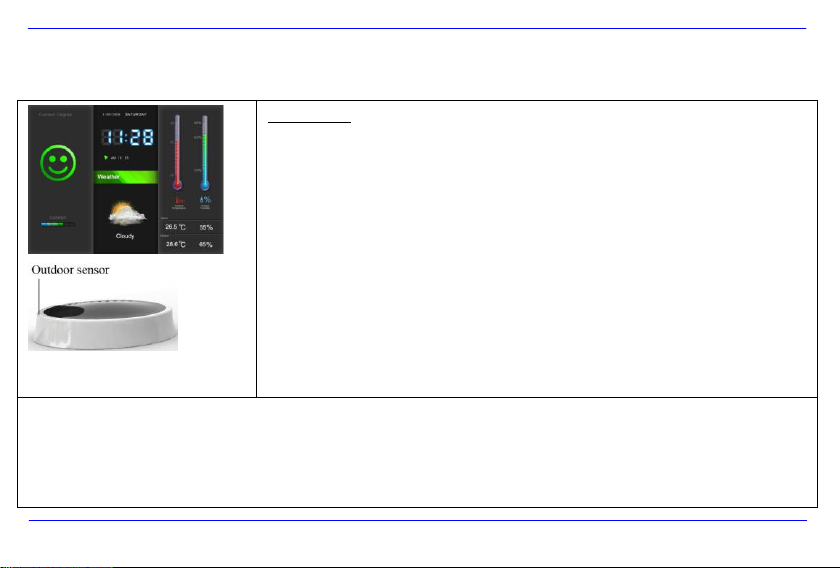
Wetteranzeige
Drücken Sie die Weather-Taste auf der Fernbedienung oder wählen Sie im Hauptmenü den Punkt
Wetter. Die Wetteranzeige erscheint nun auf dem Display.
Im Wettermodus gibt es zwei verschiedene Anzeigemöglichkeiten. Die alleinige Anzeige der
aktuellen Wetterdaten, oder eine Diashow. Bei der Diashow werden Ihnen abwechselnd ein Bild
von Ihrem gewählten Speichermedium und die Wetteranzeige angezeigt.
Der Anzeigemodus ist abhängig von der Einstellung für den Fotomodus. Wählen Sie dazu im
Hauptmenü den Punkt Einstellungen und dort den Punkt Foto Einstellungen aus.
Wenn Sie in den Foto Einstellungen Diashow auswählen, wird Ihnen im Wettermodus
ausschließlich das aktuelle Wetter angezeigt. Wenn Sie Fotos mit Wetteranzeige auswählen,
werden Ihnen immer abwechselnd Bilder von Ihrem eingesetzten Speichermedium und das
aktuelle Wetter angezeigt.
Außensensor:
Er ermöglicht das Empfangen der Außenwetterdaten.
Die maximale Entfernung des Sensors von der Station sollte nicht mehr als 25 Meter betragen.
Sollte es zu Störungen des Empfangs kommen, können keine Außenwetterdaten angezeigt werden. Überprüfen Sie den Ladestatus
der Batterien oder wechseln Sie gegebenenfalls den Standort des Außensensors.
DIE WETTERANZEIGE
Page 14

DE - 10
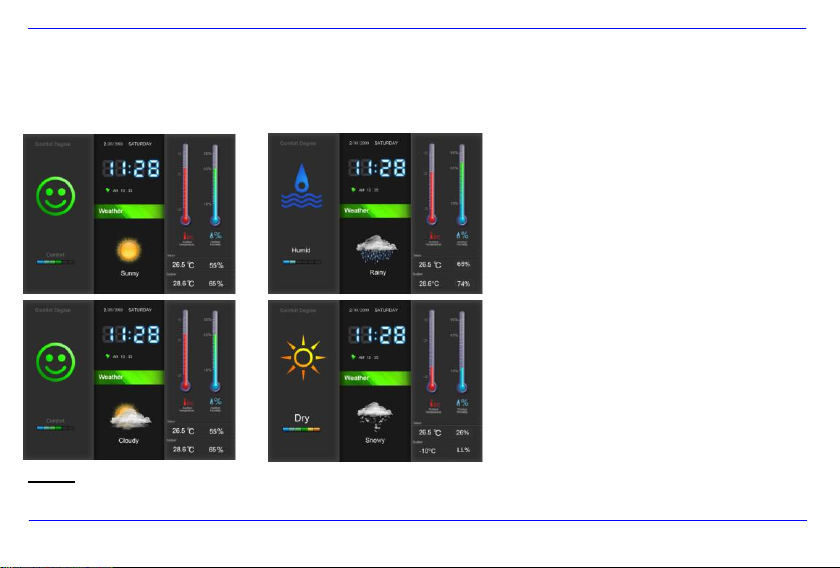
Der Wetter Indikator
Der Wetterindikator zeigt Ihnen durch ein Symbol in drei verschiedenen Stufen die Luftfeuchtigkeit an.
Die Luftfeuchtigkeit liegt bei unter 30%
Die Luftfeuchtigkeit liegt zwischen 30% und 70%
Die Luftfeuchtigkeit liegt bei über 70%
Page 15
DE - 11
Das Wetter Symbol
Basierend auf dem Luftdruck der vergangenen 12 Stunden wird Ihnen durch eine Grafik das aktuelle Wetter angezeigt.
Hinweis: Bei Luftdruckschwankungen kann es zu Abweichungen vom tatsächlichen Wetter kommen.
Page 16
DE - 12
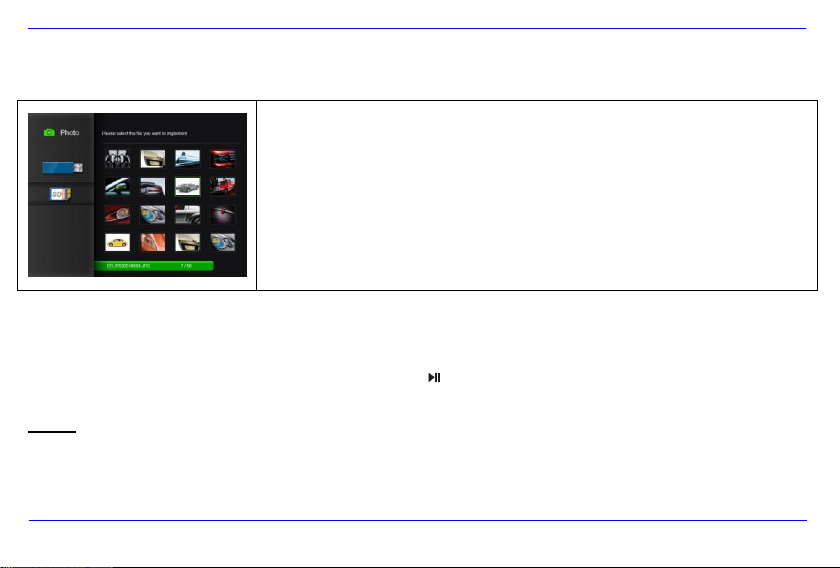
Im Fotomodus können die Bilder des ausgewählten Speichermediums als Vorschaubilder
angezeigt werden. Maximal 16 Vorschaubilder pro Seite sind möglich.
1. Wählen Sie im Hauptmenü den Menüpunkt Foto aus.
2. Wählen Sie eine Speicherquelle (USB oder Speicherkarte) aus. Die Bilder werden Ihnen
nun als Vorschaubilder angezeigt.
3. Um durch die Vorschaubilder zu navigieren, nutzen Sie die [] [][] oder [] Taste.
Um das gewünschte Bild anzuzeigen bestätigen Sie Ihre Auswahl mit der OK-Taste.
4. Zum Verlassen und Zurückkehren in das Hauptmenü drücken Sie die [] oder OK
-Taste.
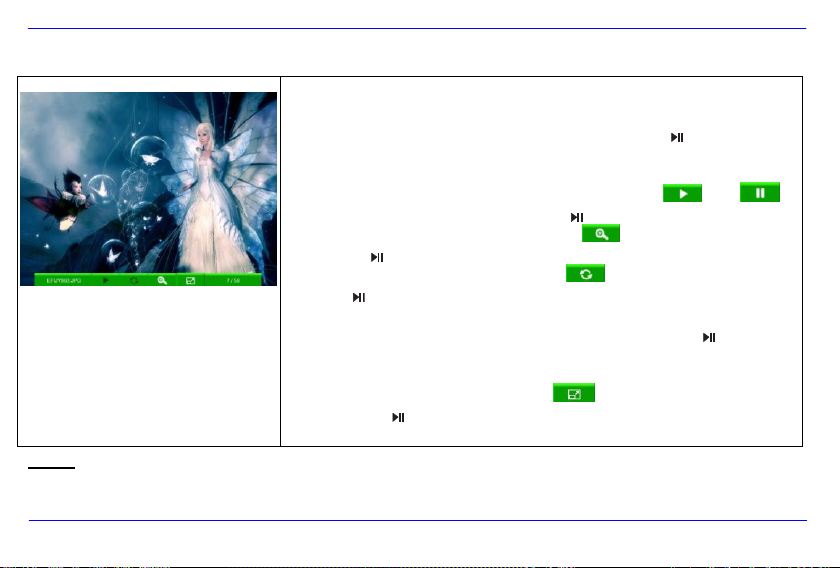
BETRACHTEN VON FOTOS
Bilder-Vorschaumenü
Betrachten einer Diashow
Eine Diashow starten:
Wählen Sie im Bilder-Vorschaumenü ein Foto aus und drücken Sie die [ ]-Taste, um die Diashow an dieser Stelle zu starten. Das gewählte
Bild wird nun angezeigt und die Diashow beginnt.
Hinweis: Das Abspielen einer Diashow kann auf zwei unterschiedliche Arten erfolgen. Fotos mit Wetteranzeige und Diashow. Dies können
Sie über die Einstellungen auswählen. Gehen Sie dazu in das Einstellungsmenü und wählen Sie die gewünschte Anzeigeart unter dem
Menüpunkt Foto Einstellungen aus.
Page 17

DE - 13
Fotos mit Wetteranzeige:
Es werden Ihnen immer abwechselnd das aktuelle Wetter und Fotos von Ihren Speichermedien angezeigt.
Um die Diashow anzuhalten und ein einzelnes Foto oder die Wetteranzeige anzuzeigen, drücken Sie an entsprechender Stelle die
[ ]-Taste.
Um mit der Diashow fortzufahren, drücken Sie nochmals die [ ]-Taste.
Um zurück in das Bildvorschau-Menü zu gelangen, drücken Sie die []-Taste. Drücken Sie die [M]-Taste, um ins Hauptmenü zu
gelangen.
Diashow
Es werden Ihnen nur die Fotos (ohne aktuelles Wetter) von Ihren eingesetzten Speichermedien angezeigt.
Um die Diashow anzuhalten und ein einzelnes Foto anzuzeigen, drücken Sie die [ ]-Taste.
Um mit der Diashow fortzufahren, drücken Sie nochmals die [ ]-Taste.
Um zum vorherigen Foto zurückzukehren oder zum nächsten Foto zu springen, drücken Sie die [] oder []-Taste.
Halten Sie die [ ]-Taste gedrückt, um das OSD-Menü zu öffnen.
Um zurück in das Bildvorschau-Menü zu gelangen, drücken Sie die []-Taste. Drücken Sie die [M]-Taste, um in das Hauptmenü zu
gelangen.
Hinweis: Sind gleichzeitig eine SD/MMC/MS-Karte und ein USB Medium an den WM angeschlossen, so werden bei der Diashow immer nur
alle Bilder des ausgewählten Mediums kontinuierlich wiedergegeben. Die einzelnen Speichermedien werden nicht automatisch
nacheinander in der Diashow wiedergegeben.
Page 18
DE - 14
Sie können im Diashow Modus das OSD-Menü öffnen. Dieses öffnet sich nicht im Fotos
mit Wetteranzeige Modus.
1. Halten Sie, während Sie das gewünschte Foto betrachten, die [ ]-Taste gedrückt.
Das OSD-Menü erscheint nun auf dem Display und die Diashow stoppt.
2. Mit der [] oder []-Taste navigieren Sie zwischen den Auswahlpunkten.
Zum Stoppen oder Fortsetzen der Diashow wählen Sie oder
und bestätigen Sie Ihre Eingabe mit der [ ]-Taste.
Zum Vergrößern eines Bildes wählen Sie und drücken Sie wiederholt
die [ ]-Taste, um das Foto zu vergrößern.
Zum Rotieren eines Bildes wählen Sie und bestätigen Sie mit der
[ ]-Taste Ihre Auswahl. Drücken Sie nun die []-Taste, um im
Uhrzeigersinn zu rotieren, oder die []-Taste, um gegen den Uhrzeigersinn
zu rotieren. Um das rotierte Foto zu speichern, drücken Sie die [ ]-Taste.
Mit der []-Taste gelangen Sie zurück zur Diashow.
Bei der Bildanzeige haben Sie die Wahl zwischen Vollbildanzeige und
Standardanzeige. Wählen Sie dazu und bestätigen Sie Ihre Eingabe
mit der [ ]-Taste.
Um das OSD-Menü zu verlassen, drücken Sie bitte die []-Taste.
Hinweis: Wenn nach Aufrufen des OSD-Menüs nicht innerhalb von 5 Sekunden eine Auswahl getroffen wird, schließt sich das
OSD-Menü automatisch.
Nutzen des OSD-Menüs
Page 19
DE - 15
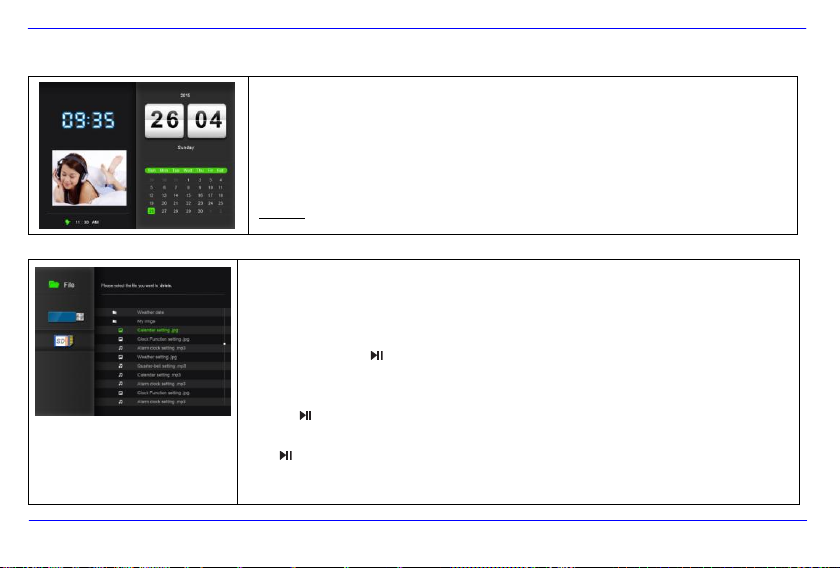
ANZEIGE DES KALENDERS UND DER UHRZEIT
In diesem Modus wird Ihnen das aktuelle Datum, die aktuelle Uhrzeit und eine verkleinerte
Diashow mit den verfügbaren Bildern angezeigt.
1. Wählen Sie im Hauptmenü den Menüpunkt Kalender aus, oder drücken Sie die
Time-Taste auf Ihrer Fernbedienung.
2. Um den Kalendermodus zu verlassen, drücken Sie die []-Taste.
Hinweis: Datum und Zeit können nur im Menü Einstellungen eingestellt werden.
DATEIMENÜ
Im Dateimenü können Sie einzelne Bilder von Ihren Speichermedien löschen.
1. Wählen Sie im Hauptmenü den Menüpunkt Datei aus, oder drücken Sie die File-Taste auf
Ihrer Fernbedienung.
2. Wählen Sie eine Speicherquelle (USB oder Speicherkarte) aus und bestätigen Sie Ihre
Auswahl mit der [ ]-Taste. Es werden nun die einzelnen Dateien und Ordner angezeigt.
3. Drücken Sie die [] oder []-Taste, um durch die Dateien und Ordner zu navigieren. Um
einen Ordner zu öffnen, drücken Sie, nachdem Sie den gewünschten Ordner markiert haben,
die [ ]-Taste oder OK-Taste. Zurück gelangen Sie durch Drücken der []-Taste.
4. Wenn Sie eine Datei löschen möchten, markieren Sie die Datei und bestätigen Sie mit der
[ ]-Ta ste oder OK-Taste. Beantworten Sie die Sicherheitsabfrage mit Ja und das Bild wird
vom Speichermedium entfernt.
5. Um das Dateimenü zu verlassen, drücken Sie die []-Taste.
Page 20
DE - 16
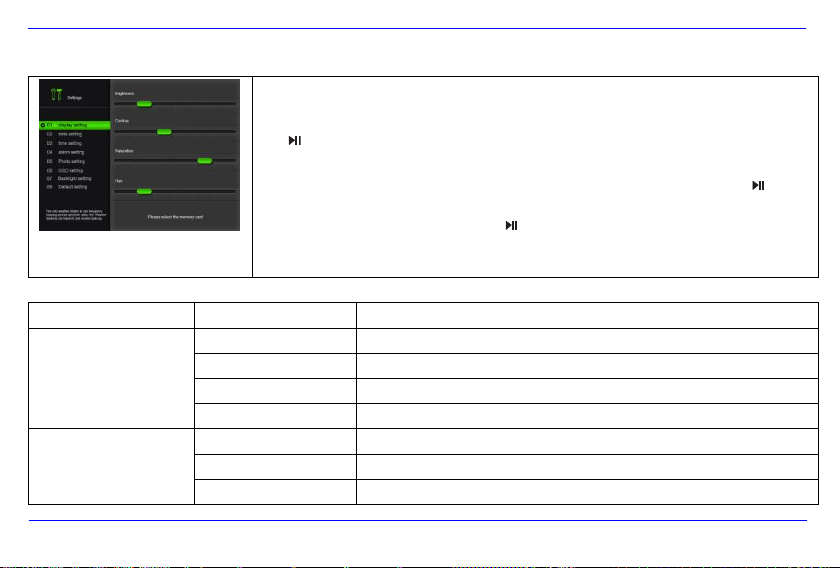
Sie können die Systemeinstellungen des WEATHERMAN ( WM ) individuell einstellen.
Wählen Sie im Hauptmenü den Menüpunkt Einstellungen aus und bestätigen Sie Ihre Auswahl mit
der [ ]-Taste auf dem WM, oder der OK-Taste auf der Fernbedienung. Sie gelangen außerdem
durch Drücken der Settings-Taste auf der Fernbedienung direkt in dieses Menü.
1. Markieren Sie den gewünschten Punkt und bestätigen Sie Ihre Auswahl mit der [ ]-Taste.
2. Um die Einstellungen zu ändern, drücken Sie die [], [], [] oder []-Taste und
bestätigen Sie Ihre Auswahl mit der [ ]-Taste.
3. Um zum vorherigen Punkt zurückzukehren, drücken Sie die []-Taste.
4. Drücken Sie die [M]-Taste, um ins Hauptmenü zurückzukehren.
Einstellmöglichkeiten
Beschreibung
Display
Einstellungen
Helligkeit
Einstellen der Helligkeit des TFT Displays.
Kontrast
Einstellen des Kontrastes des TFT Displays.
Sättigung
Einstellen der Farbsättigung des TFT Displays.
Farbe
Einstellen der Farbnuancierung des TFT Displays.
Datum
Einstellungen
Tag
Wählen Sie den aktuellen Tag.
Monat
Wählen Sie den aktuellen Monat.
Jahr
Wählen Sie das aktuelle Jahr.
EINSTELLUNGEN
Einstellmöglichkeiten
Page 21

DE - 17
Zeit
Einstellungen
Stunde
Wählen Sie die aktuelle Stunde.
Minute
Wählen Sie die aktuelle Minute.
AM / PM
Wählen sie zwischen AM und PM aus. (AM = 0-12 Uhr; PM = 12-24 Uhr)
Alarm
Einstellungen
Alarm 1
Zeit für Alarm 1 einstellen.
Alarm 2
Zeit für Alarm 2 einstellen.
Alarm 3
Zeit für Alarm 3 einstellen.
Foto
Einstellungen
Fotos mit Wetteranzeige
Abwechselnde Anzeige des aktuellen Wetters und der Fotos Ihrer verbundenen
Speichermedien im Fotomodus oder im Wettermodus.
Diashow
Im Wettermodus wird nur das aktuelle Wetter angezeigt. Die Diashow im
Fotomodus zeigt nur Ihre Fotos, ohne das aktuelle Wetter einzublenden.
Anzeigedauer
Wählen Sie die Anzeigedauer für die Diashow.
Auswahlmöglichkeiten: 3Sek., 5Sek., 15Sek., 1Min., 15Min., 1Stunde.
Übergangseffekt
Wählen Sie den Übergangseffekt für die Diashow. Es stehen die Sieben
angezeigten Übergangseffekte, sowie eine Zufallsauswahl zur Verfügung.
Sprachmenü
Wählen Sie die gewünschte Sprache aus.
Lichtsensor-Einstellungen
An
Lichtsensor ist eingeschaltet (Display passt sich der Umgebungshelligkeit an).
Aus
Lichtsensor ist ausgeschaltet
Werkseinstellung
Gerät wird auf die Werkseinstellungen zurückgesetzt.
Page 22

DE - 18
Datum einstellen
Stellen Sie das Datum auf dem Intenso WM ein:
1. Wählen Sie im Hauptmenü den Menüpunkt Einstellungen aus.
2. Drücken Sie die [] oder []-Taste, um den Eintrag Datum Einstellungen auszuwählen und bestätigen Sie Ihre Auswahl mit der
[ ]-Taste.
3. Drücken Sie die [] oder []-Taste, um das nächste oder vorherige Element auszuwählen (Tag, Monat, Jahr). Drücken Sie die []
oder []-Taste, um die gewünschten Werte einzustellen.
4. Zur Bestätigung Ihrer Eingaben drücken Sie die [ ]-Taste auf der Rückseite des WM oder die OK-Taste auf der Fernbedienung.
Uhrzeit einstellen
Stellen Sie die Uhrzeit auf dem Intenso WM ein:
1. Wählen Sie im Hauptmenü den Menüpunkt Einstellungen aus.
2. Drücken Sie die [] oder []-Taste, um den Eintrag Zeit Einstellungen auszuwählen und bestätigen Sie Ihre Auswahl mit der
[ ]-Taste.
3. Drücken Sie die [] oder []-Taste, um das nächste oder vorherige Element auszuwählen (Stunde, Minute, AM/PM). Drücken Sie die
[] oder []-Taste, um die gewünschten Werte einzustellen.
4. Zur Bestätigung Ihrer Eingaben drücken Sie die [ ]-Taste auf der Rückseite des WM oder die OK-Taste auf der Fernbedienung.
Page 23

DE - 19
HÄUFIG GESTELLTE FRAGEN
Warum ist die reale Kapazität einer Speicherkarte geringer als auf der Verpackung angegeben?
Die Angabe der Speicherkapazität eines Flash Speichermediums erfolgt analog zu der Kapazitätsangabe bei Festplatten und unterliegt den
Richtlinien des SI (International System of Units). Dieses System misst nicht nach dem Binärsystem, bei dem 1024 MB zu einem 1 GB
umgerechnet werden. Der SI Standard misst in 1000er Potenzen, wonach zum Beispiel 1000 Megabyte 1 Gigabyte ergeben. Durch diese
unterschiedliche Berechnung kommt es zu einer Differenz in der Kapazitätsangabe.
Warum werden einige Bilder meiner Speicherkarte vom WM nicht angezeigt?
Einige nicht weitverbreitete Speichermedien sind mit dem WM nicht kompatibel. Nutzen Sie bitte eine kompatible Karte.
Bedenken Sie bitte, dass dieser Bilderrahmen nur Foto
Es ist eine Speicherkarte eingesteckt. Der WM kann jedoch nicht von dieser lesen. Was kann ich machen?
Als erstes überprüfen Sie bitte, ob diese Karte kompatibel zum WEATHERMAN von Intenso ist.
Überprüfen Sie danach, ob die Karte in der richtigen Art und Weise in den Kartenslot eingesteckt wurde. Denken Sie bitte auch
daran, dass nur das Dateifo
Bitte beachten Sie: Einige Digitalkameras speichern die Bilder nicht in dem Standardformat JPEG ab. Schauen Sie bitte in
diesem Fall in der Gebrauchsanleitung Ihrer Kamera nach.
Page 24

DE - 20
Warum werden einige Bilder schneller geladen als andere?
Bilder mit einer höheren Auflösung benötigen länger bis sie angezeigt werden können. Um die Anzeigegeschwindigkeit zu
erhöhen, nutzen Sie bitte Bilder mit einer niedrigeren Auflösung.
Hinweis: Der WEATHERMAN unterstützt eine Auflösung bis 8000*8000 Pixel.
Warum startet die Software nicht, obwohl die Stromversorgung gegeben ist und Power auf “On” s teh t?
Wahrscheinlich liegt ein Systemfehler vor. Bitte starten Sie die Software neu, indem Sie für ein paar Sekunden die
Stromversorgung unterbrechen.
Warum wird auf dem Display nicht das Hauptmenü angezeigt?
Bitte überprüfen Sie, ob der WM ordnungsgemäß mit einer Steckdose verbunden ist O
Kann ich Bilder auf dem Display rotieren lassen?
Ja, gehen Sie dazu bitte wie unter dem Punkt OSD-Menü auf Seite 12 beschrieben wird vor.
Hinweis: Das rotierte Bild wird bei einer erneuten Anzeige wieder in der normalen Ansicht angezeigt, wenn Sie es nicht
gespeichert haben.
Kann ich die Farben der Bilder anpassen?
Nein. Alle Farbeinstellungen werden während der Aufnahme der Fotos vorgenommen. Sie können aber die Helligkeit und den
Kontrast des Displays anpassen.
In welcher Auflösung sollten Bilder sein, um optimal auf dem Display dargestellt werden zu können?
Die beste Auflösung für den WM beträgt 800*600 Pixel.
Page 25

DE - 21
Anzeige
Digitales TFT LCD
Anzeigemodu s: 4:3
Auflösung : 800*600 Pixel
Netzteil
Input: 100~240V AC, 50/60Hz; Ou tput: 5V 2A DC
USB Port
USB Host 2.0
Unterstützt USB Speichermedien
Unterstützte
Speicherkarten
SD (Secure Digital Card), MMC (MultiMedia Card), MS (Memory Stick)
Unterstütztes Bildformat
JPEG, Maxim ale Auflösung : 8000*8000 Pixel
Betriebstemperatur WM
0°C ~ +45°C bei einer Luftfeuchtigkeit von <80%
Betriebstemperatur
Außensensor
-20°C ~ +70°C bei einer Luftfeuchtigkeit von 20% ~ 90%
Lagertemperatur WM
-20°C ~ +60°C bei einer Luftfeuchtigkeit von <90%
Lagertemperatur
Außensensor
-20°C ~ +70°C bei einer Luftfeuchtigkeit von 15% ~ 95%
Abmessungen
151*190*80mm
Gewicht
478 gr
Zubehör
Fernbedienung u. Außensensor (inkl.Batterien), Netzgerät, mehrsprachige
Bedienungsanleitung
PRODUKT SPEZIFIKATIONEN
Page 26

DE - 22
PFLEGE UND WARTUNG
Pflege
Um die Gefahr von el ektrisc hen Stroms tößen z u vermeiden, ent fernen Sie bitte weder die Schr auben noch das Geh äuse.
Benutz en Sie dieses Gerät nicht i n de r Näh e von Wasser. Setze n Sie diese s Gerät wede r Re gen noch Feuchtigkeit aus. Stell en Sie
keine Gegenstände in der Nähe des Gerätes ab, die Wasser oder andere Fl üssigkeiten speichern .
Installi eren Sie diesen Bilderr ahmen nicht in der Nähe von Heizungen, Öfen oder anderen Wärm e abg ebenden Geräten.
Öffnen Sie das Gehäuse nicht. Versuc hen Sie bitte keine eigene Reparatur. Überl assen Sie dies es dem Fachpersonal.
Vermeiden Sie die B enutz ung a uf sandigen Plätzen.
Bitte stec ken Sie den Netzte il-Anschlus s-Steck er kompl ett in die vorhanden e Öffnung des WM. Nur so können Sie elek trost atische
Aufladung vermei den.
Verbinden Sie alle A nschlüsse korrek t und sicher.
Bitte drück en Sie nicht auf das Di splay. Schü tzen Si e das Display vor starker S onnen einstrahl ung.
Der WE ATHERMAN spielt nur ko mpati ble Dateifor mate ab .
Bilder können durch Rechte Dritte r geschützt sein. Das Abspie len ohne Liz enz k ann Copyright Re chte verletzen.
Bitte berühren Sie den WM während des Betriebes nic ht mi t met allischen Gege nstän den.
Bitte vermeiden Sie die Benutz ung auf Kissen, Sof as oder anderen Wohngegenständen , die eine Wärm eentwicklung unterstütze n,
da die Gef ahr einer Überhitz ung d es Gerätes besteht .
Bitte entfernen Sie keine Speic herkarten während des Lesevorgan ges. Ande renfalls kann es zu Systemabstürzen oder Datenverl ust
kommen.
Bitte stellen Sie das Gerät nic ht währ end einer laufenden Diashow aus.
Bitte verpacken Sie das Ger ät nicht direkt nach einem länger en Gebr auch. Stell en Sie ei ne ausreichende Abkühlung sicher. Es
besteht sons t die Gefahr der Überhitzung.
Um ein en bess eren Service zu gewährl eisten, kann es zu Änderungen in der Betriebsanleitu ng komm en.
Page 27
DE - 23
Wartung des Gerätes
Das Gerät muss ausgeschalt et sein.
Sprühen oder trage n Sie niemals ei ne Fl üssigkeit direkt auf das Display oder Gehäuse auf.
Säuberu ng des Display s / Gehäu ses / Rahmens
Wischen Sie Gehäuse, Rahm en u nd L CD D isplay v orsichti g mi t einem weic hen, fus sel - und che mikali enfreien T uch ab. Verwenden S ie
nur Reinigung smittel, die s peziell für LCD-Displays b estimm t sind.
Entsorgung von Elektro-Altgeräten
Die mit diesem Symbol gekennzeichneten Geräte unterliegen der europäischen Richtlinie 2002/96/EC.
Alle Elektro- und Elektroaltgräte müssen getrennt vom Hausmüll über die dafür vorgesehenen staatlichen Stellen entsorgt werden.
Mit der ordnungsgemäßen Entsorgung von Elektro-Altgeräten vermeiden Sie Umweltschäden.
EG-Konformitätserklärung
Hiermit erklärt die Intenso GmbH, dass der Fotorahmen (3909800) mit Außensensor (HWM803TH) mit den grundlegenden
Anforderungen und anderen relevanten Vorschriften der Richtlinie 1999/5/EG übereinstimmt. Eine Kopie der unterschriebenen und mit
Datum versehenen Konformitätserklärung erhalten Sie auf Anfrage über unseren Intenso Kundendienst.
KONFORM IN FOLGENDEN LÄNDERN. ALLE EG Staaten, Schweiz und Norwegen.
Page 28

Intenso 7” WEATHERMAN
Operating Instructions
Page 29

i
Table of Contents
Introduction ................................................................................................................................................................................................................ 1
GENERAL PRODUCT INFORMATION ...................................................................................................................................................................... 2
OVERVIEW ................................................................................................................................................................................................................. 3
REMOTE CONTROL .................................................................................................................................................................................................. 4
INSERTING THE BATTERIES ................................................................................................................................................................................... 5
Inserting the battery in the remote control .............................................................................................................................................................. 5
Inserting the batteries in the outdoor sensor .......................................................................................................................................................... 5
FIRST STEPS.............................................................................................................................................................................................................. 6
USING MEMORY DEVICES ....................................................................................................................................................................................... 7
MAIN MENU ................................................................................................................................................................................................................ 8
WEATHER MODE ....................................................................................................................................................................................................... 9
The Weather Indicator ........................................................................................................................................................................................... 10
The Weather Symbol ............................................................................................................................................................................................. 11
DISPLAY OF PHOTOS ............................................................................................................................................................................................. 12
Photo preview menu ............................................................................................................................................................................................. 12
Page 30

ii
Viewing a slideshow .............................................................................................................................................................................................. 12
Using the OSD menu ............................................................................................................................................................................................ 14
DISPLAYING CLOCK/CALENDAR ......................................................................................................................................................................... 15
FILE MENU ............................................................................................................................................................................................................... 15
SETTINGS ................................................................................................................................................................................................................. 16
Setting options....................................................................................................................................................................................................... 16
Setting the date ..................................................................................................................................................................................................... 18
Setting the time ..................................................................................................................................................................................................... 18
FREQUENTLY ASKED QUESTIONS ...................................................................................................................................................................... 19
PRODUCT SPECIFICATIONS.................................................................................................................................................................................. 21
CARE AND MAINTENANCE .................................................................................................................................................................................... 22
Page 31

EN - 1
We ar e no t l iabl e f or dama ge o r l oss of dat a d ue t o m alfu ncti on or impr oper use or in case of se -l f pe rfor med rep airs . P leas e d o n ot t ake the
de vice apa rt a nd p leas e do not try to r epai r it you rsel f, a s th is w ill c asu e the guara nt ee t o be come voi d. C hang es m ay b e ma de to the soft ware ,
ha rdwa re or op erat ing i nstr ucti ons. We will n ot a nnounc e su ch c hanges . Al l rig hts rese rved .
Introduction
Thank you for choosin g the Intenso 7“ WEATHERMAN (WM) .
Please read these ope rating ins tructions th oroughly before using the de vice and heed all sa fe ty warnings. We recommend the
ope rating manual be stored in a safe p lace in case questions a rise in the future. These operat ing instructions provid e all
informat ion necessary for the safe use of all of the WM functions.
The WM can also display digital photos directly fro m your camera‟s memo ry card. You can a lso use th e WEATHERMA N to v iew a
slidesho w o f you r pho tos. The WM is compatib le with th e following memory card f ormats: SD™ (Secure Digita l), SDHC™ (Secu re
Digital High Cap acity ), MMC™ (Multimedi a Card) , MS™ (Memory Stick) and USB sticks.
Page 32

EN - 2
GENERAL PRODUCT INFORMATION
Decorative design, fine quality
Weather display including outdoor temperature and humidity
View digital photos (JPEG) without the use of a computer
Automatic slideshow with adjustable transition effects and individual display time
Calendar function
Compatible with SD / MMC / MS memory cards
USB slot for use of USB mass memory devices
2 ways to operate: 7 buttons on the back panel of the WM, infrared remote control
Page 33

EN - 3
Front View
Rear & Side View
1. Light sensor
2. Infrared receiver window
3. On/Off switch
4. [] Exit button (leave menu)
5. [M] Menu button (go to main menu)
6. [] Right / Forward button
7. [] Upwards button
8. [ ] Play/Pause and enter button
9. [] Left / Back button
10. [] Downwards button
11. SD/MMC/MS card slot
12. USB HOST
13. 5V 2A DC input
14. Outdoor temperature sensor
OVERVIEW
Page 34

EN - 4
1 Displaying time and calendar.
2 Displaying temperature data.
3 Selection of setup menu.
4 Stopping the alarm.
5
F°/C°
Displaying temperature in Fahrenheit or Celsius.
6 Rotating the photo.
7 Moves the cursor upwards in the menu.
8 Moves the cursor to the left in the menu.
9 Switching the weather station on / off.
10 Selection of the data files.
11 Selection of the photo preview menu.
12
MENU
Selection of the main menu.
13 Zooming in of a photo.
14 Returning to the previous menu.
15
OK
Confirming the selection. Start or pause the slide show.
16 Moves the cursor to the right in the menu.
17 Moves the cursor downwards in the menu.
REMOTE CONTROL
Page 35

EN - 5
INSERTING THE BATTERIES
Inserting the battery in the remote control
Position the remote control with the buttons facing downwards.
Press the spring to the left of the battery compartment to the right and remove the battery
compartment.
Insert a CR2025 lithium battery in the battery compartment with the plus sign facing upwards.
Re-insert the battery compartment in the remote control.
Inserting the batteries in the outdoor sensor
Loosen the screw to the battery compartment cover on the back of the outdoor sensor.
Open the battery compartment.
Insert 2 AAA batteries. Pay attention to polarity.
Replace the battery compartment cover.
Re-tighten the screw to the battery compartment.
Note: Please dispose of used batteries in the proper manner in accordance with the law.
Page 36

EN - 6
Connect the included power supply to the weather station.
Plug the other end into an outlet.
Switch the button on the WM to the “on” position.
When using the device for the first time, select the language in
the display window using the arrow buttons on the back of the
WM or the remote control. Confirm your selection with the
[ ]-button on the back or with the OK–button on the remote
control.
Note: To completely turn the WEATHERMAN off, move the switch on the back of the device from the ON to the OFF position. Turning off
the WM with the remote control only puts the device in standby mode.
FIRST STEPS
Page 37

EN - 7
USING MEMORY DEVICES
Insert the SD / MMC / MS card with the contact facing in the direction of the display in the 3-1 card slot. USB memory devices can be
connected to the WEATHERMAN by inserting the device in the USB slot (USB host).
Note:
Please do not use force when inserting memory cards.
The 3-in-1 card reader can only read one card at a time. Please do not insert more than one SD / MMC or MS card in
WEATHERMAN at the same time.
Do remove a memory card connected to the WEATHERMAN, carefully pull it from the slot. (Note: SD and MMC cards are fitted with a
groove. You can use your finger nail to remove the card from the slot more easily)
Page 38

EN - 8
Menu
Description
Weather
Display in weather mode
Photo
Display in photo mode
Calendar
Display in calendar mode with time
File
Display file menu
Settings
Display menu for individual settings.
MAIN MENU
After turning on the device you will automatically arrive at the main menu.
Note: If a memory card and/or USB stick has been inserted in the device, the device will automatically display the photos on your memory
device after a short pause and may or may not start a slide show. This depends on your photo settings. If several memory devices are
connected to the WM, the device will automatically display the photos from the most recently used device after turning on or exiting standby
mode. After turning the device on using the switch on the unit, the photos on the USB host will automatically be read.
You can choose between weather mode, photo mode, calendar mode, file mode and settings from the main menu.
1. Press the [M]-button on the back of the WM or the MENU-button on the remote control to open the main menu.
2. Press the arrow buttons on the WM or remote control to make a selection.
3. Confirm your selection with the [ ] –button on the WM or the OK-button on the remote control.
Page 39

EN - 9
Weather display
Press the Weather-button on the remote control or select Weather from the main menu. The
weather will now be displayed.
There are two different display modes for the weather mode. You can either only display the
current weather conditions, or view a slideshow. If you choose the slideshow, the display will
switch between a photo from the selected memory device and the current weather conditions.
The display mode depends on your photo settings. To make changes, go to the main menu, then
settings and then select photo settings.
If you select slideshow under the photo settings menu, the device will only display the current
weather conditions when in weather mode. If you select photos with weather, the device will
always switch between photos on your memory device and the current weather conditions.
Outdoor sensor:
Allows readings on outdoor weather.
The maximum distance between sensor and station should not exceed 25 meters.
In case of interference or disruption, no weather information can be displayed. Check battery level and move the outdoor sensor to
another location if necessary.
WEATHER MODE
Page 40

EN - 10
The Weather Indicator
The weather indicator uses symbols to display humidity.
Humidity less than 30%
Humidity between 30% and 70%
Humidity greater than 70%
Page 41

EN - 11
The Weather Symbol
The current weather is displayed based on the air pressure measured in the last 12 hours.
Note: Variations in air pressure can lead to discrepancies.
Page 42

EN - 12
Previews of photos on selected memory devices can be viewed in photo mode. A maximum of
16 previews can be seen per page.
1. Select photo from the main menu.
2. Select a source (USB or memory card). The photos will now be displayed as previews.
3. To navigate between previews, use the [] [][] and [] buttons. To display a
picture, confirm your selection with the OK-button.
4. To leave and return to the main menu, press the []-button or OK -button.
DISPLAY OF PHOTOS
Photo preview menu
Viewing a slideshow
Starting a slideshow:
Select a photo from the photo preview menu and press the [ ]-button to start a slideshow with this photo. The slideshow will start with the
selected photo.
Note: There are two ways to run a slideshow: Photos with weather and slideshow. You can make adjustments under settings. To do so, go
to the settings menu and select desired display mode under photo settings.
Page 43

EN - 13
Photos with weather:
Automatically switches between current weather and photos from your memory device.
To pause a slideshow to view a photo or the weather, press the [ ]-button at the desired frame.
To continue the slideshow, press the [ ]-button again.
To return to the photo preview menu, press the []-button. Press the [M]-button, to return to the main menu.
Slideshow
Only photos (without weather) from your memory device are displayed.
To pause a slideshow to view a photo, press the [ ]-button at the desired frame.
To continue the slideshow, press the [ ]-button again
To return to the previous photo or to skip to the next photo, press the []-button or []-button.
Press and hold the [ ]-button to open the OSD menu.
To return to the photo preview menu press the []-button. Press the [M]-button, to return to the main menu.
Note: If a SD/MMC/M card and a USB device are connected to the WM at the same time, the slideshow will always continuously display
photos from the selected device only. The two memory devices will not automatically play back-to-back in the slideshow.
Page 44

EN - 14
You can open the OSD menu in slideshow mode. It cannot be opened in photos with
weather mode.
1. Press the [ ]-button while viewing the desired photo. The OSD menu will appear on
the display and the slideshow will stop.
2. Use the []-button or []-button to navigate in the menu.
To stop or continue the slideshow or and confirm your
selection with the [ ]-button.
To enlarge a photo, select and repeatedly press the [ ]-button to
enlarge the photo.
To rotate a photo, select and confirm your selection with the
[ ]-button. Press the []-button to rotate clockwise or the []-button to
rotate counter-clockwise. To save a rotated photo, press the die [ ]-button.
Press the []-button to return to the slideshow.
You can choose between full view and standard view. To do so, select
and confirm your selection with the [ ]-button.
To leave the OSD menu, press the []-button.
Note: The OSD menu will automatically close if no selection is made within 5 seconds of opening the OSD menu.
Using the OSD menu
Page 45

EN - 15
DISPLAYING CLOCK/CALENDAR
In this mode the current date, time and a small window of the slideshow featuring the
available photos are displayed.
1. Select Calendar from the main menu, or press the Time-button on your remote control
2. To exit calendar mode, press the []-button.
Note: Date and time can only be adjusted under Settings in the main menu.
FILE MENU
You can delete individual photos from your memory device in the file menu.
1. Select File from the main menu or press the File-button on your remote control.
2. Select a source (USB or memory card) and confirm your selection with the [ ]-button. The
individual files and folders will now be displayed.
3. Press the []-button or []-button to navigate between files and folders. To open a folder,
select the folder and press the [ ]-button or OK-button. Press the []-button to return to
the previous window.
4. To delete a file, select the file and confirm your selection with the [ ]-button or OK-button.
Answer the safety question with yes to delete the photo from the memory device.
5. To leave the file menu, press the []-button.
Page 46

EN - 16
You can make individual adjustments to the WEATHERMAN ( WM ) system settings.
Select Settings from the main menu and confirm your selection with the [ ]-button on the WM or
the OK-button on the remote control. You can also open this menu directly by pressing the
Settings-button on the remote control.
1. Select the desired setting and confirm your selection with the [ ]-button.
2. To change the settings, use the [], [], [] or [] buttons and confirm your selection
with the [ ]-button.
3. To return to the previous setting, press the []-button.
4. Press the [M]-button to return to the main menu.
Setting option
Description
Display
settings
Brightness
Adjust the brightness on the TFT display.
Contrast
Adjust the contrast on the TFT display.
Saturation
Adjust the color saturation on the TFT display.
Color
Adjust the fine color on the TFT display.
Date
settings
Day
Select the current day.
Month
Select the current month.
Year
Select the current year.
SETTINGS
Setting options
Page 47

EN - 17
Time
settings
Hour
Select the current hour.
Minute
Select the current minute.
AM / PM
Choose between AM and PM. (AM = 0-12; PM = 12-24)
Alarm
settings
Alarm 1
Set time for Alarm 1.
Alarm 2
Set time for Alarm 2.
Alarm 3
Set time for Alarm 3.
Photo
Settings
Photos with weather
Switches between current weather and photos on your connected memory
device while in photo mode or weather mode.
Slideshow
Only weather is displayed in weather mode. The slideshow only shows photos
and does not include the weather in photo mode.
Duration of display
Select the duration for each frame during the slide show.
Options: 3 sec, 5 sec, 15 sec, 1 min, 15 min, 1 hr.
Transition effects
Choose a transition effect for the slideshow. You can choose between the seven
transition effects in the list individually or select „random‟.
Language menu
Choose the desired language.
Light sensor settings
On
Light sensor is turned on (display adjusts to room brightness).
Off
Light sensor is turned off.
Factory settings
Reset the device to the factory settings.
Page 48

EN - 18
Setting the date
Set the date on the Intenso WM as follows:
1. Select Settings from the main menu.
2. Pres the []-button or []-button to select Date settings and confirm your selection with the [ ]-button.
3. Press the []-button or []-button to select the next/previous element (day, month, year). Press the []-button or []-button to
make desired changes.
4. Confirm your selection with the [ ]-button on the back of the WM or with the OK-button on the remote control.
Setting the time
Set the time on the Intenso WM as follows:
1. W Select Settings from the main menu.
2. Pres the []-button or []-button to select Time settings and confirm your selection with the [ ]-button.
3. Press the []-button or []-button to select the next/previous element (hour, minute, AM/PM). Press the []-button or []-button to
make desired changes.
4. Confirm your selection with the [ ]-button on the back of the WM or with the OK-button on the remote control.
Page 49

EN - 19
FREQUENTLY ASKED QUESTIONS
Why is the memory card capacity less than the amoun t ind icated on the pack ag ing?
The memory capacity of a flash memory device is specified according to SI (International System of Units) guidelines, as is the capacity of hard
drives. This system does not measure according the binary system, in which 1024 MB are equal to 1 GB. The SI Standard measures in powers
or 1,000, according to which, for example, 1000 Megabytes are equal to 1 Gigabyte. The difference in the two systems used to calculate
capacity can lead to discrepancies.
Why wo n’t the WM disp lay some photos on my memory card?
Some less-com mon memo ry devices are no t compat ible w ith the WM. Be sure to use a compat ible memory card. Please
rememb er th at the dig ital photo frame can only display photos in “JPEG” format.
The WM cann ot read th e ins erted memory card. What can I do?
Please start by checking whe the r or not the card is compatible with the Intenso WEATHE RMAN.
Then check if the card was inserted into the slot correc tly. Please remembe r, only “JP EG” f iles are suppor ted.
Please note : Some digital ca meras do not au tomat ically save pho tos in JPEG format. See the opera ting in struct ions tha t came
with you r c amera .
Page 50

EN - 20
Why do some photos lo ad fa ster than oth ers?
Photos w ith high er reso lution take longer to load. You can increase the loading speed by reducin g the reso lu tion.
Note: The WEATHERMAN supports resolutions up to 8000x8000.
Why wo n’t the software sta rt even though the device is powe red a nd tu rned to “o n?”
This is probably due to a system error. Pl ease resta rt th e software by d isconnecting th e power for a few secon ds.
Why is n’t the ma in menu sh owing up o n the scre en?
Please make sure the WM is prop erly connected to the power supply and the power switch se t to “on.”
Can I make the pho tos rota te on the screen?
Yes, to do so , ple ase p rocee d as found on Page 12 in the OSD Menu sect ion.
Note: The rotated pho to will ap pear as before if you do not save the change s.
Can I adjust the colors on the scree n?
No. All colo r settings are made when the pho to is taken. You can ad just the b rightness and contra st .
Which resolution should th e pho tos h ave to be viewe d bes t?
The best reso lution for the WM is 800x 600.
Page 51

EN - 21
Dis play
Dig it al 7 “TFT L CD
Dis play mod e: 4:3
Resolutio n: 800x600 Pix el
Power s up ply
Input: 10 0~24 0V AC, 5 0/60Hz; Ou tp ut: 5V 2 A DC
USB p or t
USB Hos t 2.0 Su pp orts USB mem ory media
Supported memory
cards
SD™ (Secure Digital Card), MMC™ (Mul tiMe di a Card ), MS™ ( Memo ry Stic k)
Supported ima ge for mat
JPE G, max. reso lu tion : 800 0x 80 00 P ix el
WM operating
temperature
0°C ~ + 45 °C a t hu midity <80%
Outdoor s en so r
operating t em pe ra ture
-20°C ~ +70°C at humidity between 20% ~ 90%
WM storag e
temperature
-20°C ~ +60°C at humidity <90%
Outdoor s en so r storage
temperature
-20°C ~ +70°C at humidity between 15% ~ 95%
Dim ension s
151*190*8 0mm
Weight
478 g
Acc essories
Remote co ntro l and outdoor sen sor (i n cl. ba tt eries) , power supply, o pera ting instru ctio ns in
several lan gu ages .
PRODUCT SPECIFICATIONS
Page 52

EN - 22
CARE AND MAINTENANCE
Care
In o rder to p revent dange r from elect ric c urren t do ne ither r emove scre ws n or the ca se of the weath er st ation .
Do not operate this devi ce n ear wate r. Do n ot ex pose the devic e to rain and mois ture. Do not put any objec ts whi ch sto re water or
oth er fl uids near the dev ice.
Do n ot instal l th e picture n ear heaters , ovens or other heat i ss uing devic es.
Do n ot op en the case. Do not try to r epair the devic e yours elf but hav e it re paired by qualifi ed pers onnel only.
Full y ins ert t he po we r suppl y plu g int o the o penin g of the WM. This will prevent elect rostati c cha rge.
Correctl y an d safel y co nnect a ll p orts .
Do n ot pu sh o nto the d isplay. Pr otect t he di sp lay from di rect sunli ght.
The WEATHE RMAN on ly pl ays c om patible data formats .
Images may be pr otect ed by t he ri ghts of third pers ons. T he pl ay ba ck without li ce nce may i nfrin ge c opy rights .
When i n opera ti on , do not t ou ch the WM wit h metal o bjects.
Av oid op er ating t he device on pill ows, so fas or o th er objects w hic h su pport the d ev elopment of heat as th ere is dang er of
overhea ti ng of the device .
Do n ot remove m em ory c ards durin g rea d ope ra ti on. This ma y cau se system cras h or data loss.
Do n ot swit ch off the d evice during a n on going s lide sh ow.
Do n ot wr ap up the devic e direc tly aft er long er u se . En sure su ffici ent enoug h co oli ng. O therw is e, th er e i s dange r of overheat in g .
In o rder to e ns ur e a bett er s ervic e, changes of the op erati ng instr uctions m ay be necessar y.
Page 53

EN - 23
Maintenance of th e dev ice
The device must be swi tched o ff .
Nev er spray or a ppl y a fluid di rectl y onto the d isplay or case .
Cleaning the displays / case / frame
Car eful ly w ip e th e case, fra me and LCD di sp la y wi th a soft cloth free fro m lint and chem ical s . On ly u se cle an ing agents whi ch are
specific al ly designed for LCD dis pl ay s .
Disposal of elec trica l was te
Devices marked with this symbol are subject to the EG Directive 2002/96/EG.
All electrical appliances and old appliances must be disposed off separately from the household
waste and are to be returned to the state authorities designed for that purpose.
By correctly disposing of electrical old appliances environmental damage may be prevented.
EC Declaration of Conformity
Hereby the company Intenso GmbH declares that the photo frame (model 3909800) with external sensor (HWM803TH) complies with
the basic requirements and the other relevant prescriptions of the EC directive 1999/5/EC. Upon request the Intenso customer service
will send you the undersigned copy of the Declaration of Conformity with the indication of the date.
CONFORM IN THE FOLLOWING COUNTRIES. ALL countries of the EC, Switzerland and Norway.
Page 54

Intenso 7” WEATHERMAN
Istruzioni per l'uso
Page 55

i
Sommario
INTRODUZIONE ......................................................................................................................................................................................................... 1
CARATTERISTICHE GENERALI DEL PRODOTTO ................................................................................................................................................. 2
PANORAMICA ............................................................................................................................................................................................................ 3
TELECOMANDO ........................................................................................................................................................................................................ 4
INSERIMENTO DELLA BATTERIA ........................................................................................................................................................................... 5
Inserimento della batteria nel telecomando ............................................................................................................................................................ 5
Inserimento della batteria nel sensore esterno ...................................................................................................................................................... 5
I PRIMI PASSI ............................................................................................................................................................................................................. 6
USO DI SCHEDE DI MEMORIA ................................................................................................................................................................................. 7
MENU PRINCIPALE ................................................................................................................................................................................................... 8
L'INDICATORE METEO.............................................................................................................................................................................................. 9
Indicatore meteo ................................................................................................................................................................................................... 10
Simbolo meteo ....................................................................................................................................................................................................... 11
GUARDARE FOTO ................................................................................................................................................................................................... 12
Menu anteprima immagini ..................................................................................................................................................................................... 12
Page 56

ii
Visualizzazione di un diashow .............................................................................................................................................................................. 12
Uso del menu OSD ............................................................................................................................................................................................... 14
VISUALIZZAZIONE DEL CALENDARIO E DELL'ORARIO ................................................................................................................................... 15
MENU FILE ............................................................................................................................................................................................................... 15
IMPOSTAZIONI ......................................................................................................................................................................................................... 16
Possibilità di impostazione .................................................................................................................................................................................... 16
Impostazione della data ........................................................................................................................................................................................ 18
Impostazione dell'ora ............................................................................................................................................................................................ 18
DOMANDE FREQUENTI .......................................................................................................................................................................................... 19
SPECIFICHE DEL PRODOTTO ............................................................................................................................................................................... 21
CURA E MANUTENZIONE ....................................................................................................................................................................................... 22
Page 57

IT - 1
No n si amo res pons abil i pe r i danni o la per dita di d ati nel c aso di un mal funz iona ment o, u n us o sc orretto o rip arazio ni p ropr ie
de ll‟app arec chia tura . La pre ghia mo di non smo ntar e l ‟app arec chia tura in co mpon enti s ingo le e d i n on cerc are di ri pararla v isto ch e in ques to
ca so la gara nzia vie ne ann ullata. Il soft ware , h ardw are o le istr uzio ni d‟uso p ossono es sere sogg etti a mod ifiche . No n dare mo in form azio ni a
ri guar do. C i ri serv iamo tut ti i dir itti in q uest o se nso.
INTRODUZIONE
Grazie d i a ver dec iso d i a cquistare una cornic e Intenso 7“ WEATHERMA N (WM ).
Prima di utilizzare que st‟apparecchiatura, La preg hiamo di leggere a fond o qu este istruzio ni d‟u so e d i attene rs i alle avve rtenze.
Raccomandiamo di conservare in un luogo sicuro queste istruzioni al fine di poter risponder. Il contenuto di queste istruzion i è
strutturato in modo tale che Lei possa utilizzare in modo sicuro tutte le funzioni del la WM.
La WM le permette di guardare le foto digitali direttamente dalla scheda di memoria della Sua videocamera. Potrà guardare le
Sue foto mediante la funzione diashow messa a disposizione dalla Sua WEATHERMAN. La WM è compatibile con i seguenti
formati di schede: SD™ (Secure Digital), SDHC™ (Secure Digita l ad alta cap acità), MMC™(scheda multimed iale) , MS™ (chiave
di memoria) e chiave USB.
Page 58

IT - 2
CARATTERISTICHE GENERALI DEL PRODOTTO
Aspetto decorativo, alto livello qualitativo
Indicatore meteo con temperatura esterna e umidità dell'aria
Visualizzazione di foto (JPEG) senza computer
Diashow automatico con effetti di passaggio e durata di visualizzazione personalizzata
Funzione calendario
Compatibile con schede SD / MMC / MS
Porta USB per il collegamento di memorie di massa USB
2 percorsi di comando: 7 tasti sul retro della WM, telecomando a infrarossi
Page 59

IT - 3
Veduta anteriore
Veduta posteriore e laterale
1. Sensore luminoso
2. Ricevitore infrarosso finestra a vista
3. Interruttore On/Off
4. [] Tasto Exit (abbandonare un menu)
5. [M] Tasto menu (richiamo del menu principale)
6. [] Tasto destro/in avanti
7. [] Tasto in alto
8. [ ] Tasto Play/Pause e tasto di conferma
9. [] Tasto sinistro / indietro
10. [] Tasto in basso
11. Slot scheda SD/MMC/MS
12. Host USB
13. Entrata 5V 2A
14. Sensore temperatura esterna
PANORAMICA
Page 60

IT - 4
1 Visualizzazione del calendario e dell„orario
2 Visualizzazione dati temperatura
3 Richiamare il menu setup.
4 Interrompere l'allarme
5
F°/C°
Visualizzazione della temperatura in Fahrenheit o Celsius.
6 Ruotare la foto.
7 Muove il cursore verso l'alto nel menu.
8 Muove il cursore a sinistra nel menu.
9 Accendere / spegnere la stazione meteo.
10 Richiamare il menu file.
11 Richiamare il menu di anteprima immagine.
12
MENU
Richiamare il menu principale.
13 Ingrandire una foto.
14 Ritornare al menu precedente.
15
OK
Confermare la selezione. Avvio o interruzione delle diapositive.
16 Muove il cursore a destra nel menu.
17 Muove il cursore verso il basso nel menu.
TELECOMANDO
Page 61

IT - 5
INSERIMENTO DELLA BATTERIA
Inserimento della batteria nel telecomando
Posizioni il telecomando con i tasti verso il basso.
Prema la molla a sinistra del comparto delle batterie verso destra, estraendo allo stesso tempo
il comparto delle batterie.
Inserisca una batteria di litio CR2025 con il simbolo più verso l‟alto nel comparto delle batterie.
Inserisca nuovamente tutto il comparto delle batterie nell‟involucro del telecomando.
Inserimento della batteria nel sensore esterno
Allenti la vite del coperchio del vano batterie sul lato posteriore del sensore esterno.
Apra il coperchio del vano batterie.
Inserisca due batterie AAA con la corretta polarità.
Posizioni nuovamente il coperchio del vano batterie.
Chiuda il coperchio del vano batterie serrando la vite.
Avvertenza: La preghiamo di assicurare uno smaltimento delle batterie corrispondente alle prescrizioni legali.
Page 62

IT - 6
Colleghi il componente di rete fornito con la WM. Inserisca
l‟altra estremità del componente di rete nella presa.
Posizioni il regolatore della WM nella posizione "ON".
Per la prima messa in funzione, La preghiamo di selezionare
l'idioma dopo la prima accensione nella finestra che appare
mediante i tasti sul retro o con il telecomando. Confermi la Sua
selezione con il tasto [ ] sul retro oppure con il tasto OK sul
telecomando.
Avvertenza: per spegnere completamente la WEATHERMAN, spostare il tasto Power sul lato posteriore dell'apparecchio dalla posizione
ON alla posizione OFF. Lo spegnimento esclusivo con il telecomando porta la WM solamente nella modalità di Standby.
I PRIMI PASSI
Page 63

IT - 7
USO DI SCHEDE DI MEMORIA
Inserisca le schede SD / MMC / MS con i contatti in direzione dello schermo nello slot di 3 schede in 1. Colleghi le chiavi USB con la
WEATHERMAN inserendo le chiavi nella porta USB (host USB).
Avvertenza:
La preghiamo di non inserire le schede di memoria con forza.
L'apparecchiatura di lettura 3 schede in 1 riesce a leggere sempre una scheda alla volta.
La preghiamo di collegare sempre una scheda SD / MMC o MS contemporaneamente con la WEATHERMAN.
Per separare le schede collegate con la WEATHERMAN, le estragga con cautela dallo slot delle schede. (Avvertenza: le schede SD e
MMC dispongono di un intaglio in direzione trasversale della scheda. Qui si può utilizzare un’unghia per facilitare l’estrazione dallo
slot).
Page 64

IT - 8
Menu
Descrizione
Meteo
Visualizzare la modalità Meteo
Foto
Visualizzare la modalità Foto
Calendario
Visualizzare la modalità Calendario con orologio
File
Visualizzazione del menu File
Impostazioni
Menu per eseguire impostazioni personalizzate.
MENU PRINCIPALE
Dopo l‟accensione Lei si trova direttamente sul menu principale.
Avvertenza: se è stata inserita una scheda di memoria e/o una scheda USB nella WM, viene avviata dopo breve tempo la visualizzazione del
meteo con oppure senza diashow delle immagini sul mezzo di memorizzazione inserito. Ciò dipende dalle impostazioni selezionate in
Impostazioni foto. Se sono collegati più supporti di memorizzazione alla WM, dopo l'accensione essa legge sempre dallo Standby le foto
sull'ultimo supporto selezionato. Dopo l'accensione dell'apparecchio essa legge le foto dell'host USB.
Nel menu principale Lei può scegliere tra la modalità Meteo, la modalità Foto, il menu Calendario e il menu Impostazioni
1. Prema il tasto [M] sul retro della WM, oppure il tasto MENU sul telecomando, per richiamare il menu principale.
2. Prema i tasti freccia sulla WM oppure sul telecomando per selezionare un punto del menu.
3. Confermi la Sua selezione, premendo il tasto [ ] sulla WM, oppure il tasto OK sul telecomando.
Page 65

IT - 9
Indicatore meteo
Prema il tasto Weather sul telecomando oppure selezioni nel menu principale il punto Meteo.
L'indicatore meteo viene ora visualizzato sullo schermo.
Nella modalità Meteo sono disponibili due diverse possibilità di impostazione. La
visualizzazione singola dei dati meteo attuali oppure un diashow. Nel diashow vengono
visualizzati alternativamente una foto del supporto di memorizzazione selezionato e l'indicatore
meteo.
La modalità di Visualizzazione dipende dalle impostazioni della modalità Foto. Selezioni quindi
nel menu principale il punto Impostazioni e quindi il punto Impostazioni foto. Se si seleziona
diashow dalle impostazioni foto, nella modalità Meteo verrà visualizzato esclusivamente il meteo
attuale. Se si seleziona Foto con indicatore meteo verranno visualizzati sempre
alternativamente le foto dal supporto di memorizzazione selezionato e il meteo attuale.
Sensore esterno:
Consente la ricezione dei dati atmosferici esterni.
La distanza massima del sensore dalla stazione non deve mai superare i 25 metri.
In caso di disturbi di ricezione, non è possibile visualizzare i dati meteo esterni. Verificare lo stato di carica della batteria oppure
modificare all'occorrenza la posizione del sensore esterno.
L'INDICATORE METEO
Page 66

IT - 10
Indicatore meteo
Attraverso un simbolo il sensore meteo indica l'umidità dell'aria in tre diversi livelli.
L'umidità dell'aria è inferiore al 30%
L'umidità dell'aria è compresa tra il 30% e il 70%
L'umidità dell'aria è superiore al 70%
Page 67

IT - 11
Simbolo meteo
Sulla base della pressione dell'aria delle ultime 12 ore viene visualizzato anche un grafico del meteo attuale.
Avvertenza: in caso di oscillazioni della pressione atmosferica possono verificarsi scostamenti dalle condizioni meteo effettive.
Page 68

IT - 12
Nella modalità Foto è possibile visualizzare le foto del supporto di memorizzazione selezionato
come anteprima immagini. Sono possibili al massimo 16 anteprime per pagina.
1. Selezioni nel menu principale il punto menu Foto.
2. Selezioni una sorgente di memorizzazione (USB o scheda di memoria). LE immagini
vengono ora visualizzate come anteprima.
3. Per la navigazione attraverso l'anteprima immagini utilizzi il tasto [] [][] o [] . Per
la visualizzazione della foto desiderata, confermi con il tasto OK.
4. Per abbandonare e ritornare nel menu principale prema il tasto [] o OK.
GUARDARE FOTO
Menu anteprima immagini
Visualizzazione di un diashow
Avviare un diashow:
Selezioni nel menu Anteprima immagini una foto e prema il tasto [ ], per avviare il diashow in questo punto. L'immagine selezionata viene
ora visualizzata e ha inizio il diashow.
Avvertenza: la riproduzione di un diashow può avvenire in due diverse modalità. Foto con indicazione meteo e diashow. Esse sono
selezionabili attraverso le Impostazioni. Passi al menu Impostazioni e selezioni il tipo di visualizzazione desiderato nel punto di menu
Impostazioni foto.
Page 69

IT - 13
Foto con indicazione meteo:
Verranno sempre visualizzati alternativamemte il meteo attuale e le foto dei Suoi supporti di memorizzazione.
Per arrestare il diashow e visualizzare una singola foto o l'indicazione meteo, prema nel punto corrispondente il tasto [ ].
Per proseguire con il diashow, prema nuovamente il tasto [ ] .
Per tornare indietro nel menu di anteprima immagini, prema il tasto []. Prema il tasto [M], per raggiungere il menu principale.
Diashow
Vengono visualizzate solamente le foto (senza il meteo attuale) dei supporti di memorizzazione inseriti.
Per arrestare il diashow e visualizzare una singola foto, prema il tasto [ ].
Per proseguire con il diashow, prema nuovamente il tasto [ ] .
Per tornare alla foto precedente o passare alla foto successiva, prema il tasto [] o [].
Tenga premuto il tasto [ ], per aprire il menu OSD.
Per tornare indietro nel menu di anteprima immagini, prema il tasto []. Prema il tasto [M], per raggiungere il menu principale.
Avvertenza: se sono state collegate alla WM contemporaneamente una scheda SD/MMC/MS-e un supporto USB, durante il diashow
verranno riprodotte in modo continuativo sempre le foto del supporto selezionato. I singoli supporti di memorizzazione non vengono
automaticamente riprodotti nel diashow uno di seguito all'altro.
Page 70

IT - 14
Nella modalità diashow è possibile aprire il menu OSD. Esso non si apre nella modalità di
visualizzazione foto e meteo.
1. Mantenga premuto il tasto [ ] mentre si osserva la foto desiderata. Il menu OSD
appare sullo schermo e il diashow viene interrotto
2. Con il tasto [] oppure [] può navigare tra i punti selezionati.
Per interrompere o proseguire il diashow selezioni o e
confermi l'immissione con il tasto [ ] .
Per ingrandire un'immagine selezioni e prema ripetutamente il tasto
[ ], per aumentare le dimensioni della foto.
Per ruotare una foto selezioni e confermi la scelta con il tasto
[ ]. Prema ora il tasto [] per la rotazione
in senso orario oppure il tasto [] per la rotazione in senso antiorario
Per salvare la foto ruotata, prema il tasto [ ].
Con il tasto [] è possibile tornare al diashow.
Durante la visualizzazione immagini è possibile selezionare tra visualizzazione
a schermo intero e visualizzazione standard. Selezioni quindi e
confermi la scelta con il tasto [ ].
Per abbandonare il menu OSD prema il tasto [].
Avvertenza: se non viene selezionata un'opzione entro 5 secondi dal richiamo del menu OSE, il menu OSD si chiuderà
automaticamente.
Uso del menu OSD
Page 71

IT - 15
VISUALIZZAZIONE DEL CALENDARIO E DELL'ORARIO
In questa modalità verranno visualizzati la data attuale, l'ora attuale e un diashow ridotto con
le immagini disponibili.
1. Selezioni nel menu principale il punto menu Calendario, oppure prema il tasto Time sul
telecomando.
2. Per abbandonare la modalità Calendario, prema il tasto [].
Avvertenza: data e ora possono essere impostate solamente nel menu Impostazioni.
MENU FILE
Nel menu File è possibile cancellare singole immagini dal supporto di memorizzazione.
1. Selezioni nel menu principale il punto menu File, oppure prema il tasto File sul telecomando.
2. Selezioni una sorgente di memorizzazione (USB o scheda di memoria) e confermi la scelta
con il tasto [ ]. Verranno ora visualizzati i file e le cartelle.
3. Prema il tasto [] o [], per la navigazione tra i file e le cartelle. Per aprire una cartella,
prema il tasto [ ] o il tasto OK dopo aver evidenziato la cartella desiderata. Per tornare
indietro prema il tasto [].
4. Se desidera cancellare un file, evidenzi il file e confermi con il tasto [ ] o il tasto OK.
Risponda Sì alla domanda di sicurezza e la foto verrà cancellata dal supporto di
memorizzazione.
Page 72

IT - 16
È possibile regolare singolarmente le impostazioni di sistema della WEATHERMAN ( WM ).
Selezioni nel menu principale il punto di menu Impostazioni e confermi la scelta con il tasto [ ]
sulla WM, oppure con il tasto OK sul telecomando. Premendo inoltre il tasto Settings sul
telecomando è possibile accedere direttamente a questo menu.
1. Evidenzi il punto desiderato e confermi la selezione con il tasto [ ].
2. Per modificare le impostazioni, prema il tasto [], [], [] oppure il tasto [] e confermi
la selezione con il tasto [ ].
3. Per tornare al punto precedente prema il tasto [].
4. Prema il tasto [M], per tornare al menu principale.
Possibilità di impostazione
Descrizione
Schermo
Impostazioni
Luminosità
Impostazione della luminosità dello schermo TFT.
Contrasto
Impostazione del contrasto dello schermo TFT.
Saturazione
Impostazione della saturazione dei colori sullo schermo TFT
Colore
Impostazione delle sfumature dei colori sullo schermo TFT
Data
Impostazioni
Giorno
Selezioni il giorno corrente.
Mese
Selezioni il mese corrente.
Anno
Selezioni l'anno corrente.
IMPOSTAZIONI
Possibilità di impostazione
Page 73

IT - 17
Orario
Impostazioni
Ora
Selezioni l'ora corrente.
Minuti
Selezioni i minuti correnti.
AM / PM
Selezionare tra AM PM. (AM = ore 0 - 12; PM = ore 12 - 24)
Allarme
Impostazioni
Allarme 1
Impostare l'ora per l'allarme 1.
Allarme 2
Impostare l'ora per l'allarme 2.
Allarme 3
Impostare l'ora per l'allarme 3.
Foto
Impostazioni
Foto con indicazione meteo
Visualizzazione alternate del meteo attuale e delle foto del supporto di
memorizzazione nella modalità Foto o nella modalità Meteo.
Diashow
Nella modalità Meteo viene visualizzato solo il meteo attuale. Il diashow in
modalità Foto mostra le foto senza scoprire il meteo attuale.
Durata di visualizzazione
Selezioni la durata di visualizzazione del diashow.
Possibilità di selezione: 3 sec., 5 sec., 15 sec., 1 min., 15 min., 1 ora.
Effetto di passaggio
Selezioni l'effetto di passaggio per il diashow. Sono disponibili i sette effetti di
passaggio visualizzati, unitamente a una selezione casuale.
Menu Lingua
Selezioni l'idioma desiderato.
Impostazioni sensore
luminoso
A
Il sensore luminoso è acceso (lo schermo si adatta alla luminosità
ambientale).
Off
Il sensore luminoso è spento
Impostazione
fabbrica
Vengono ripristinate le impostazioni di fabbrica sul dispositivo.
Page 74

IT - 18
Impostazione della data
Per impostare la data sulla WM Intenso:
1. selezioni nel menu principale il punto di menu Impostazioni.
2. Prema il tasto [] oppure [], per selezionare la voce Impostazioni data e confermi la selezione con il tasto [ ].
3. Prema il tasto [] oppure [], per selezionare l'elemento precedente o quello successivo (giorno, mese, anno). Prema il tasto [] o
[], per impostare i valori desiderati.
4. Per confermare le immissioni prema il tasto [ ] sul retro della WM oppure il tasto OK sul telecomando.
Impostazione dell'ora
Per impostare l'ora sulla WM Intenso:
1. selezioni nel menu principale il punto di menu Impostazioni.
2. Prema il tasto [] o [], per selezionare la voce Impostazioni ora e confermi la selezione con il tasto [ ].
3. Prema il tasto [] oppure [], per selezionare l'elemento precedente o quello successivo (ore, minuti, AM/PM). Prema il tasto [] o
[], per impostare i valori desiderati.
4. Per confermare le immissioni prema il tasto [ ] sul retro della WM oppure il tasto OK sul telecomando.
Page 75

IT - 19
DOMANDE FREQUENTI
Per quale m otivo la capacita reale d i una sc heda di me moria è inferio re a quella ind icata s ull„imballaggio?
L‟indicazione della capacità di memoria di un mezzo di memoria flash avviene in modo analogo rispetto all‟indicazione della capacità dei dischi
fissi e sottosta alle direttive SI (International System of Units). Questo sistema non misura sulla base del sistema binario, in cui 1024 MB
corrispondono a 1 GB. Lo standard SI misura in potenze da 1000, per cui ad esempio 1000 Megabyte danno 1 Gigabyte. Questo calcolo
differente causa la differenza nell‟indicazione della capacità.
Per quale mot ivo a lcune immagin i della mia sch eda d i memoria non vengono visualizzate dalla WM?
Alcuni mezzi di memoria non molto diffuso non sono compatibili con la WM. La preghiamo di usare una scheda compatibile. La
preghiamo d i con siderare che qu esta cornice d‟immagini può ripro durre esclusivamente fo to con il fo rmato del fi le “JPEG”.
E„ inser ita una scheda di memoria. L a WM però non r iesce a leggerla . Che cosa posso fa re?
Innanzitutto La preghiamo di controllare se questa scheda è compatibile con WEATHERMAN di Intenso.
Verifichi dunque se la scheda è stata inserita in modo corretto nello slot della scheda. La preghiamo di voler anche consider are il
fatto che l‟unico forma to fi le supportato è "JPEG“.
La preghiamo di voler considerare quanto segue: Alcune videocamere digitali non salvano le immagini nel formato standard
JPEG. In qu esto caso La preghia mo di controlla re ne lle istruzioni d‟uso della Sua v ideocame ra.
Page 76

IT - 20
Per quale m otivo a lcune immagin i si caricano p iù rapidamente rispetto ad a ltre?
Immagini con una risoluzione superiore necessitano più tempo per essere visualizzate. Per aumentare la velocità di
visualizzazione, La preghiamo di utilizzare immagini con una risoluzione ridotta.
Avvertenza: la WEATHERMAN supporta una risoluzione fino a 8000*8000 Pixel.
Per quale motivo il sof twa re non si avvia, anc he se vi è l‟alimentazion e della corrente e il tas to po wer è su “On”?
Probab ilmen te si ha un errore di sis tema. La p reghiamo d i ria vviare il so ftware, in terrompe ndo l‟a limentazione della corren te per
alcuni secondi.
Per quale m otivo sullo schermo non viene visua lizza to il menu prin cipale?
La pre ghiamo di control lare se la WM è collegata correttamente con una presa e se l‟in te rruttore power è su “On”.
Posso far ruotare immagini sullo schermo?
Sì, proceda come descritto al punto di menu OSD a pagina 12.
Avvertenza: l ‟immagin e ruo tante v iene visualizzata nuovamente nella prospett iva normale nel ca so di una nuova visualizzazione.
Posso adegu are i colo ri delle immagini?
No. Tutte le impostazioni cromatiche vengono eseguite durante la ripresa delle foto. Lei può però adeguare la luminosità e il
contrasto dello schermo.
In che r isoluzio ne devono essere le immag ini per poter esse re riprodotte in modo ottimale sullo sch ermo?
La risoluzione migliore per la WM è di 800*600 Pixe l.
Page 77

IT - 21
Visualizzazione
TFT LCD digitale 7"
Modalità di visualizzazione: 04:03
Risoluzione: 800*600 Pixel
Adattatore
Input: 100~240V AC, 50/60 Hz; Ou tput: 5V 2A DC
Port USB
USB Host 2.0
Supporto mezzi di memorizzazione USB
Sch ede di memoria supportate
SD™ ( Se cu re Dig ital Card), MMC™ (sch eda mu lt im ed ia le), MS™ (sch ed a di
memoria)
Formato immagine supportato
JPEG, risoluzione massima: 8000*8000 Pixel
Temperatura di funzionamento
WM
0°C ~ +45°C con un'umidità dell'aria di <80%
Temperatura di funzionamento
Sensore esterno
-20°C ~ +70°C con un'umidità dell'aria di 20% ~ 90%
Temperatura di stoccaggio WM
-20°C ~ +60°C con un'umidità dell'aria di <90%
Temperatura di stoccaggio
sensore esterno
-20°C ~ +70°C con un'umidità dell'aria di 15% ~ 95%
Dimensioni
151 x 190 x 80 mm
Peso
478 gr
Accessori
Telecomando e s en sore esterno (inc l. batterie), ada tt ator e, istruzioni d ‟u so in diverse
lingue
SPECIFICHE DEL PRODOTTO
Page 78

IT - 22
CURA E MANUTENZIONE
Cura
Per evitare il pericolo di scos se el ettriche, La preg hiamo di non eli minare le vit e e la scatola.
Non ut ilizzi ques to appa recch io vici no all‟acqua . Non esponga questo apparecchi o a piogg ia e umidi tà. Non mett a oggetti vicino
all ‟a pparecchio che a ss orbono acqua o al tri liquidi .
Non installi questa cornice per foto vicino a termosifoni , forni o al tri app arecchi che tr asmettono calore.
Non apra la sc atola. Non c erchi di riparare l‟apparecc hio. F accia eseguire l a riparazione da un esperto.
Eviti l‟ uso in luoghi sabbios i.
La preghiamo di inserir e la pres a di coll egamento del l‟adatt atore compl etamente all‟ inter no del l‟apert ura dell a WM. Solo in questo
modo riesc e a evitare una caric a elett rostatica.
Coll eghi tutti i c ollegamenti in m odo c orretto e si curo.
La p reghi amo d i non premere sull o scherm o. P roteg ga lo sche rm o dall‟i nsolazione intensa.
La WEATHER MAN rip roduc e solo for mati di file comp atibili.
Le i mmagi ni po ssono essere protette da di ritti di terzi. La ripr oduzi one s enza licenza p ot re bbe viola re i di ritti d‟au tore.
La p reghi amo d i non toccare la WM con oggetti metall ici dur ante il funzio namento .
La pr eghia mo di evitare l‟u so di cus ci ni, so fà e al tri ogge tti di arredam ento c he sostengon o la form azi one di calore vis to ch e
sussi ste i l pericol o che l‟o ggetto si surr iscal di.
La preg hiamo di non estrarre le schede di memo ria durante il procedimenti di lettura. Altrimenti il sist ema potrebbe inter rompersi
causando la perdit a di dati.
Page 79

IT - 23
La p reghi amo d i non i nt err ompere l‟ ap parec chiatur a dur ante una proie zi one di diapo sitiv e.
La preghi amo di non imball ar e dir ettam ente l‟app ar ecchiatura dopo un lung o periodo di non uso. Predis ponga un raffreddame nto
sufficiente. Altrimenti sussiste il pe ricolo di su rriscal damento.
Per garantire un servizio mi gliore, le is tr uzioni d‟uso po ss on o s ubire d elle mo difiche.
Page 80

IT - 24
Manutenzione dell„apparecchio
L‟ap parec ch io d eve ess ere s pento .
Non s pruzzi e non applichi m ai un liq uido diret tamente sullo schermo o sull a scatola.
Pul izia dello schermo / della s ca tola / d ella cornice
Pulisca la sca tola, la cor nice e lo schermo LCD con att enzi one, serve ndosi di una pez za morbida e priv a d i pellucchi e di sos tanze
chimiche. Usi esclusiv amente d etergenti apposi tamente co ncepiti per sc hermi LC D.
Sma ltimento di a pparecchia ture elett riche usate
Le apparecchiature designate con questo simbolo sono regolamentate dalla direttiva CEE 2002/96.
Tutte le apparecchiature elettriche e tutte le apparecchiature elettriche usate devono essere smaltite in modo separato
dai rifiuti domestici nei punti per essi predisposti dallo stato.
Con lo smaltimento corretto di apparecchiature elettriche usate evita danni all‟ambiente.
Dichiarazione di conformità CE
Con la presente Intenso GmbH dichiara che la cornice foto (modello 3909800) con sensore esterno (HWM803TH) corrisponde ai
requisiti di base e alle altre prescrizioni rilevanti della direttiva CE 1999/5/CE.
Su richiesta dal nostro servizio clienti di Intenso ottiene una copia della dichiarazione di conformità firmata con l‟indicaz ione della data.
CONFORME NEI SEGUENTI PAESI. TUTTI i paesi CE, Svizzera e Norvegia.
Page 81

Intenso 7” WEATHERMAN
Mode d’emploi
Page 82

i
Table des matières
INTRODUCTION ......................................................................................................................................................................................................... 1
CARACTÉRISTIQUES PRINCIPALES DU PRODUIT .............................................................................................................................................. 2
VUE D’ENSEMBLE..................................................................................................................................................................................................... 3
TÉLÉCOMMANDE ...................................................................................................................................................................................................... 4
Insertion de la pile dans la télécommande ............................................................................................................................................................. 5
Insertion des piles dans le capteur extérieur .......................................................................................................................................................... 5
PREMIER PAS ............................................................................................................................................................................................................ 6
UTILISATION DE SUPPORTS DE MÉMOIRE........................................................................................................................................................... 7
MENU PRINCIPAL ...................................................................................................................................................................................................... 8
L’AFFICHAGE MÉTÉO ............................................................................................................................................................................................... 9
L’indicateur météo ................................................................................................................................................................................................. 10
Le symbole météo .................................................................................................................................................................................................. 11
VISUALISATION DE PHOTOS ................................................................................................................................................................................. 12
Menu de prévisualisation de photos ..................................................................................................................................................................... 12
Visionner un diaporama ........................................................................................................................................................................................ 12
Page 83

ii
Utilisation du menu OSD ....................................................................................................................................................................................... 14
AFFICHAGE DU CALENDRIER ET DE L’HEURE .................................................................................................................................................. 15
MENU FICHIER ......................................................................................................................................................................................................... 15
RÉGLAGES............................................................................................................................................................................................................... 16
Options de réglage ................................................................................................................................................................................................ 16
Réglage de la date ................................................................................................................................................................................................ 18
Réglage de l’heure ................................................................................................................................................................................................ 18
QUESTIONS LES PLUS FRÉQUENTES ................................................................................................................................................................. 19
CARACTÉRISTIQUES DU PRODUIT ...................................................................................................................................................................... 21
ENTRETIEN ET MAINTENANCE ............................................................................................................................................................................. 22
Page 84

FR - 1
No us n e so mmes pas res pons able s de s do mmag es o u pe rtes de donn ées en c as d e dy sfon ctio nnem ent , man ipul atio n in adéq uate ou répa rati on
du dis posi tif effe ctu ée par v ous- même . Veuil lez me pa s dém onte r l’app are il et n’e ssay ez pas de le ré pare r vous -mê me, car dans c e cas la
ga rant ie s ’ann ule. Les lo giciels , h ardw are ou le mode d’ empl oi peu vent être sou mis à des mo difica tion s. N ous ne donn ons pas d’i nfor mati on à
ce suj et. Nou s no us rése rvon s to us l es dr oits .
INTRODUCTION
Nous vous remerc io ns d’avoir choisi le 7“ WEATHERMAN (WM) d ’Intenso.
Avant d’u tiliser cet appareil, veuillez lire attentivement ce mod e d’emp loi et ten ir compte des m ise s en garde . Nous vous
conseillons de conser ver ces instructions avec soin afin de trouver réponse à to ute question pouvant surg ir ultérieurement . Le
con tenu de ces instruct ions est conçu de telle manière que vous pu issiez utiliser de manière sécurita ire l’ense mble des fonction s
du WM.
Le WM vous permet de regard er des pho tos n umérique s direc temen t à partir de la carte mémoi re de votre appareil photo. Vous
pouvez regarder vos photos à l’aide de la fonction diapo rama mise à votre disposi tion par WEATHERMAN. Le WM es t compatib le
avec les formats de carte suivants : SD™ (Secure Digita l), SDHC™ (Secure Digi ta l High Capacity ), MMC™ (Multimedia Card) ,
MS™ (Memory Stick ) et clé USB.
Page 85

FR - 2
CARACTÉRISTIQUES PRINCIPALES DU PRODUIT
Aspect décoratif, bonne qualité
Affichage météo avec température extérieure et humidité de l’air
Affichage de photos (JPEG) sans ordinateur
Diaporama automatique avec sélection des effets de transition et durée individuelle d’affichage
Fonction calendrier
Compatible avec cartes SD / MMC / MS
Port USB pour la connexion de mémoires USB.
2 types de commande : 7 touches sur l’arrière du WM, commande à distance infrarouge
Page 86

FR - 3
Vue de face
Vue arrière & vue de côté
1. Capteur lumière
2. Récepteur infrarouge fenêtre
3. Interrupteur On/Off
4. [] touche Exit (pour quitter un menu)
5. [M] touche menu (appel le menu principal)
6. [] touche droite/en avant
7. [] touche avancer
8. [ ] touche lecture/pause et valider
9. [] touche gauche/en arrière
10. [] touche en arrière
11. Fente pour carte SD/MMC/MS
12. Hôte USB
13. Entrée 5V 2A DC
14. Capteur température extérieur
VUE D’ENSEMBLE
Page 87

FR - 4
1 Affichage de l’heure et du calendrier.
2 Affichage des données de température.
3 Appel du menu de réglage.
4 Arrêt de l’alarme.
5
F°/C°
Affichage de la température en Fahrenheit ou Celsius.
6 Rotation de la photo.
7 Le curseur se déplace en avant dans le menu.
8 Le curseur se déplace à gauche dans le menu.
9 Allumer/éteindre la station météo.
10 Appel du menu de données.
11 Appel du menu de prévisualisation des photos.
12
MENU
Appel du menu principal.
13 Agrandissement d’une photo.
14 Saut en arrière au menu précédent.
15
OK
Validation du choix. Démarrage ou pause du diaporama.
16 Le curseur se déplace à droite dans le menu.
17 Le curseur se déplace en arrière dans le menu.
TÉLÉCOMMANDE
Page 88

FR - 5
Insertion de la pile dans la télécommande
Tenez la télécommande avec les touches vers le bas.
Appuyez sur les languettes de gauche à côté du compartiment à piles et tirez en
même temps sur le compartiment pour l‘extraire.
Insérer une pile au lithium CR2025 avec le signe + vers le haut.
Refermez entièrement le compartiment à piles dans le boitier de la télécommande.
Insertion des piles dans le capteur extérieur
Dévissez le couvercle du compartiment à piles sur le verso du capteur extérieur.
Ouvrez le couvercle du compartiment à piles.
Insérez les deux piles AAA dans la bonne polarité.
Remettez le couvercle du compartiment à piles.
Fermez le couvercle du compartiment à piles en serrant les vis.
Indication : Assurez-vous que l’alimentation est conforme aux stipulations en vigueur.
Page 89

FR - 6
Reliez le bloc d’alimentation livré au WM. Branchez l’autre
extrémité du bloc d’alimentation livré dans la prise.
Faites glisser le régulateur du WM au verso dans la position
« ON ».
Pour la première mise en marche, après la première
connexion, veuillez sélectionner la langue dans la fenêtre qui
apparaît à l’aide de la touche fléchée sur le verso du WM ou
sur la télécommande. Validez votre choix avec la touche [ ]
au verso ou OK sur la télécommande.
Indication : Pour éteindre complètement le WEATHERMAN, faites glisser l’interrupteur Power au verso de l’appareil de la position ON
vers la position OFF. La mise hors circuit réalisée uniquement à l’aide de la télécommande n’entraîne que le mode stand-by.
PREMIER PAS
Page 90

FR - 7
UTILISATION DE SUPPORTS DE MÉMOIRE
Insérez la carte SD / MMC / MS avec les contacts en direction de l’écran dans la fente des cartes 3 en 1.
Reliez le support de mémoire USB avec le WEATHERMAN en insérant le support dans le port USB. (Hôte USB).
Indication :
Veuillez ne pas forcer l’insertion de la carte mémoire.
Le dispositif de lecture de carte 3 en 1 ne peut lire qu’une seule carte à la fois.
Veuillez ne relier qu’une carte SD / MMC ou MS en même temps avec le WEATHERMAN.
Afin de retirer une carte connectée au WEATHERMAN, tirez-la avec précaution pour la faire sortir de la fente. (Indication:les cartes
SD et MMC disposent d’une encoche transversale. Il est possible d’y insérer un ongle afin la de retirer plus facilement de la fente).
Page 91

FR - 8
Menu
Description
Météo
Affichage du mode météo
Photo
Affichage du mode photo
Calendrier
Affichage du mode calendrier avec heure
Fichier
Affichage du menu fichier
Réglages
Menu permettant d’effectuer des réglages individuels.
MENU PRINCIPAL
Après la mise en marche, vous accédez directement au menu principal.
Indication : Après l’insertion d’une carte mémoire et/ou une clé USB dans le WM, l’affichage météo se met en route après un court instant avec
ou sans diaporama des photos de votre support de mémoire inséré. Ceci dépend des réglages choisis dans réglage photo. Lorsque
plusieurs supports de données sont reliés au WM, après la mise en marche à partir du mode stand-by il lit toujours les photos du support
de mémoire utilisé en tout dernier. Après la connexion à l’appareil, il lit les photos de l’hôte USB.
Dans le menu principal, vous avez le choix entre le mode météo, le mode photo, le mode calendrier, le menu fichier et le menu de réglage .
1. Appuyez sur la touche [M] au verso du WM, ou sur la touche MENU sur la télécommande, pour appeler le menu principal.
2. Appuyez sur la touche fléchée sur le WM ou sur la télécommande pour le choix d’une option du menu.
3. Validez votre choix en appuyant sur la touche [ ] du WM, ou la touche OK de la télécommande.
Page 92

FR - 9
Affichage météo
Appuyez sur la touche Weather de la télécommande ou sélectionnez l’option météo dans le
menu principal. L’affichage météo apparaît sur l’écran.
En mode météo il existe deux possibilités différentes d’affichage. Uniquement l’affichage des
données actuelles de météo ou un diaporama. Lors du diaporama vous voyez défiler les photos
du support de mémoire sélectionné ainsi que l’affichage météo.
Le mode affichage dépend du réglage effectué pour le mode photo. Pour cela, sélectionnez dans
le menu principal l’option réglages et ensuite l’option réglages photo.
Si vous sélectionnez diaporama dans les réglages photo, seule la météo actuelle sera affichée en
mode météo. Si vous sélectionnez photos avec affichage météo, les photos de votre support de
mémoire inséré seront affichées à tour de rôle avec la météo actuelle.
Capteur extérieur :
Il permet de recevoir les données de la météo extérieure.
La distance maximum entre le capteur et la station ne doit pas être supérieure à 25 mètres.
En cas d’anomalies lors de la réception, aucune donnée de la météo extérieure ne peut être affichée. Vérifiez l’état de chargement
des piles ou déplacez le capteur extérieur le cas échéant.
L’AFFICHAGE MÉTÉO
Page 93

FR - 10
L’indicateur météo
L’indicateur météo vous montre l’humidité de l’air à l’aide d’un symbole dans trois niveaux différents.
L’humidité de l’air est inférieure à 30 %
L’humidité de l’air se trouve entre 30 % et 70 %
L’humidité de l’air est supérieure à 70 %
Page 94

FR - 11
Le symbole météo
La météo actuelle vous est présentée à l’aide d’un graphique sur la base de la pression atmosphérique des 12 dernières heures.
Indication : En cas de variation de la pression atmosphérique, il peut y avoir des divergences avec la météo réelle.
Page 95

FR - 12
En mode photo les photos du support de mémoire sélectionné peuvent être affichées en tant
qu’aperçu. Il est possible de voir 16 photos maximum par page en aperçu.
1. Sélectionnez dans le menu principal l’option photo.
2. Sélectionnez une source de mémoire (USB ou carte mémoire) . Les photos vous sont
alors présentées en tant qu’aperçu.
3. Afin de naviguer à travers les photos de l’aperçu, utilisez la touche [] [][] ou [].
Pour afficher la photo souhaitée, validez votre choix avec la touche OK.
4. Pour abandonner et retourner en arrière dans le menu principal, appuyez sur la touche
[] ou OK.
VISUALISATION DE PHOTOS
Menu de prévisualisation de photos
Visionner un diaporama
Faire démarre un diaporama :
Sélectionnez une photo dans le menu d’aperçu de photos et appuyez sur la touche [ ] pour faire démarrer le diaporama à cet endroit. La
photo choisie est alors affichée et le diaporama commence.
Indication : Le passage d’un diaporama peut avoir lieu de deux manières différentes. Photos avec affichage météo et diaporama. Vous
pouvez le sélectionner dans les réglages. Allez alors dans le menu de réglages et sélectionnez le mode d’affichage souhaité dans l’option
de menu réglages photo.
Page 96

FR - 13
Photos avec affichage météo :
La météo actuelle et des photos de votre support de mémoire sont toujours affichées à tout de rôle.
Pour stopper le diaporama et afficher une seule photo ou bien l’indication de météo, appuyez sur la touche [ ] à l’endroit
correspondant.
Pour continuer avec le diaporama, appuyez à nouveau sur la touche [ ].
Pour retourner dans le menu aperçu de photos, appuyez sur la touche []. Appuyez sur la touche [M] pour aller au menu principal.
Diaporama
Seules les photos (sans la météo actuelle) de votre support de mémoire inséré sont affichées.
Pour stopper le diaporama et afficher une seule photo, appuyez sur la touche [ ].
Pour continuer le diaporama, appuyez à nouveau sur la touche [ ].
Pour revenir à la photo antérieure ou passer à la photo suivante, appuyez sur la touche [] ou [].
Maintenez enfoncée la touche [ ] pour ouvrir le menu OSD.
Pour retourner au menu d’aperçu des photos, appuyez sur la touche []. Appuyez sur la touche [M] pour aller au menu principal.
Indication : Si une carte SD/MMC/MS et un support USB sont reliés en même temps au WM seul l’ensemble des photos du support
sélectionné est reproduit continuellement lors du diaporama. Les supports de mémoire individuels ne sont pas reproduits automatiquement
l’un après l’autre dans le diaporama.
Page 97

FR - 14
Dans le diaporama, vous pouvez ouvrir le menu OSD. Celui-ci ne s’ouvre pas en mode
photos avec affichage météo.
1. Maintenez enfoncée la touche [ ] lorsque vous observez la photo souhaitée. Le
menu OSD s’ouvre alors sur l’écran et le diaporama s’arrête.
2. Vous pouvez naviguer avec la touche [] ou [] entre les points de sélection.
Pour arrêter ou poursuivre le diaporama, choisissez ou et
validez votre entrée avec la touche [ ].
Pour agrandir une photo, choisissez et appuyez plusieurs fois sur la
touche [ ] pour agrandir la photo.
Pour faire pivoter une photo, choisisez et validez votre choix à l’aide de
la touche [ ]. Appuyez alors sur la touche [] pour la faire pivoter dans le sens
des aiguilles d’une montre ou la touche [] pour la faire pivoter dans le sens
contraire des aiguilles d’une montre. Pour sauvegarder la photo tournée,
appuyez sur la touche [ ]. Vous retournez au diaporama à l’aide de la touche
[].
Durant l’affichage photo, vous avez le choix entre affichage plein écran et
affichage standard. Choisissez alors et validez votre saisie avec la
touche [ ].
Pour abandonner le menu OSD, veuillez appuyer sur la touche [].
Indication : Si aucune sélection n’est effectuée dans les 5 secondes qui suivent l’appel du menu OSD, le menu OSD se ferme
automatiquement.
Utilisation du menu OSD
Page 98

FR - 15
AFFICHAGE DU CALENDRIER ET DE L’HEURE
Dans ce mode, la date actuelle, l’heure actuelle et un diaporama réduit des photos
disponibles sont affichés.
1. Sélectionnez dans le menu principal l’option calendrier ou appuyez sur la touche Time
de votre télécommande.
2. Pour abandonner le mode calendrier, appuyez sur la touche [].
Indication : Date et heure ne peuvent être réglées qu’à travers le menu réglages.
MENU FICHIER
Dans le menu fichier, vous pouvez effacer individuellement des photos de votre support de mémoire.
1. Sélectionnez dans le menu principal l’option fichier ou appuyez sur la touche File de votre
télécommande.
2. Sélectionnez une source de mémoire (USB ou carte mémoire) et validez votre choix avec la
touche [ ]. Les fichiers et dossiers individuels sont alors affichés.
3. Appuyez sur la touche [] ou [] pour naviguer à travers les fichiers et les dossiers. Pour ouvrir
un dossier, appuyez sur la touche [ ] ou OK après avoir sélectionné le dossier souhaité. Vous
retournez en arrière en appuyant sur la touche [].
4. Si vous souhaitez effacer un fichier, sélectionnez le fichier et validez avec la touche [ ] ou OK.
Répondez à l’interrogation de sûreté par oui et la photo est éliminée du support de mémoire.
5. Pour abandonner le menu fichier, appuyez sur la touche [].
Page 99

FR - 16
Vous pouvez configurer les réglages du système du WEATHERMAN ( WM ) de manière
individuelle.
Sélectionnez dans le menu principal l’option réglages et validez votre choix avec la touche [ ] sur
le WM, ou la touche OK sur la télécommande. Par ailleurs, vous accédez directement à ce menu
en appuyant sur la touche Settings de la télécommande.
1. Sélectionnez l’option souhaitée et validez votre choix avec la touche [ ].
2. Pour modifier les réglages, appuyez sur la touche [], [], [] ou [] et confirmez
votre choix avec la touche [ ].
3. Pour retourner à l’option antérieure, appuyez sur la touche [].
4. Appuyez sur la touche [M] pour retourner au menu principal.
Options de réglage
Description
Réglage
écran
Clarté
Réglage de la clarté de l’écran TFT .
Contraste
Réglage du contraste de l’écran TFT .
Saturation
Réglage de la saturation de couleur de l’écran TFT .
Couleur
Réglage de la nuance de couleur de l’écran TFT .
Réglage date
Jour
Choisissez le jour actuel.
Mois
Chosissez le mois actuel.
RÉGLAGES
Options de réglage
Page 100

FR - 17
Année
Choisissez l’année actuelle.
Réglage
heure
Heure
Choisissez l’heure actuelle
Minute
Choisissez les minutes actuelles
AM/PM
Choisissez entre AM et PM (AM = 0-12 h; PM = 12-24 h)
Réglage
alarme
Alarme 1
Réglez l’heure de l’alarme 1.
Alarme 2
Réglez l’heure de l’alarme 2.
Alarme 3
Réglez l’heure de l’alarme 3.
Réglage
Photo
Photos avec affichage
météo
Affichage à tour de rôle de la météo actuelle et des photos du support de mémoire
relié en mode photo ou mode météo.
Diaporama
En mode météo seule la météo actuelle est affichée. Le diaporama en mode photo
ne montre que vos photos sans insérer la météo actuelle.
Durée d’affichage
Choisissez la durée d’affichage pour le diaporama.
Options de sélection : 3 sec., 5 sec., 15 sec., 1 min, 15 min, 1 sec.
Effet de passage
Choisissez l’effet de passage pour le diaporama. Sept effets de passage sont à
votre disposition ainsi qu’une sélection aléatoire.
Menu langue
Sélectionnez la langue souhaitée
Réglage capteur lumineux
On
Le capteur lumineux est allumé (L’écran s’adapte à la clarté ambiante).
Off
Le capteur lumineux est éteint.
 Loading...