

Page 1

V.1.0
Intenso Video Traveller
Bedienungsanleitung Seite 1-12 DE
Manual Page 1-12 GB
Istruzioni per l’uso Pagina 1-12 IT
Notice d’utilisation Page 1-12 FR
Instrucciones de uso Página 1-12 ES
Manual de instruções Página 1-12 PT
Instrukcja obsùugi Strona 1-12 PL
инструкция ïî эксплуатации Ñòð.1-14 RU
Page 2

1. Inhaltsübersicht
1. Inhaltsübersicht ..................................................................................................... 1
2. Hinweise ............................................................................................................... 2
3. Funktionen ............................................................................................................ 2
4. Packungsinhalt ..................................................................................................... 2
5. Vor dem Gebrauch ............................................................................................... 3
6. Bedienung............................................................................................................. 5
7. Abspielen von Musik ............................................................................................. 6
8. Video .................................................................................................................... 6
9. Bilder .................................................................................................................... 6
10. Text ....................................................................................................................... 7
11. Durchsuchen aller Dateien.................................................................................... 7
12. Löschen einer Datei .............................................................................................. 7
13. Spiel ...................................................................................................................... 8
14. System- Einstellungen .......................................................................................... 8
15. Fehlerbehebung .................................................................................................. 10
16. Technische Daten ............................................................................................... 11
17. Bitte beachten sie folgendes ............................................................................... 12
Seite 1 von 12 DE
Page 3

2. Hinweise
Vermeiden Sie einen harten Aufprall des Gerätes.
Verwenden Sie das Gerät nicht in extrem kalten, heißen, feuchten oder staubigen
Gebieten. Setzen sie es ebenfalls keinen direkten Sonnenstrahlen aus.
Führen Sie häufiger Datensicherungen durch, um einen möglichen Datenverlust zu
vermeiden.
Vermeiden Sie das Benutzen in stark magnetisierten Feldern.
Schützen Sie das Gerät vor Nässe. Wenn Feuchtigkeit in das Gerät eintritt,
schalten Sie es bitte unverzüglich aus, danach säubern und trocknen Sie bitte das
Gerät.
Verwenden Sie bitte keine chemischen Lösungen, um das
Gerät zu säubern. Hier bitte nur ein trockenes Tuch verwenden.
Wir sind nicht haftbar für Schäden oder Datenverlust bei einer Fehlfunktion,
fehlerhafter Handhabung, eigenhändiger Reparatur des Geräts oder Wechseln des
Akkus.
Bitte zerlegen Sie das Gerät nicht in Einzelteile, und versuchen Sie bitte nicht, es
selbst zu reparieren, da die Garantie in diesem Fall erlischt.
3. Funktionen
MP3&WMA Player
AVI Video Player
JPEG Bildbetrachter
Ordner Navigation
Wechseldatenträger
Spiel
Aufladbarer Lithium-Ion Akku
Kundenspezifische Einstellung
4. Packungsinhalt
Bitte überprüfen Sie den Packungsinhalt auf Vollständigkeit
Intenso Video Traveller
Stereo-Kopfhörer
Konvertierungssoftware (AVI-Format)
USB Kabel
Bedienungsanleitung + Garantiekarte
Seite 2 von 12 DE
Page 4

5. Vor dem Gebrauch
Verbinden mit dem PC
Bei den Betriebssystemen Windows 98/SE installieren Sie bitte einen Treiber, bevor Sie
den Player mit dem PC verbinden. (Download finden Sie unter www.intenso.de). Für die
Betriebssysteme WIN 2000/XP/ME ist eine Installation des Treibers nicht nötig.
Gehen Sie hier bitte wie folgt vor:
(1) Verbinden Sie den Player mit dem USB-Anschluss des PC.
(2) Es öffnet sich das Fenster “Intenso”. Nun können Sie die Daten von ihrer Festplatte
auf dem Wechseldatenträger speichern.
Sicheres Entfernen vom PC
Für Windows 2000/XP/ME/Vista:
Klicken Sie mit der rechten Maustaste unten rechts in der Taskleiste auf das Symbol
„Hardware sicher entfernen“. Aus dem erscheinenden Kontextmenü wählen Sie bitte den
Punkt „USB- Massenspeichergerät-Laufwerk entfernen“ mit der linken Maustaste aus.
Vergewissern Sie sich bitte, dass die Datenübertragung vollständig abgeschlossen ist.
Nun können Sie das Gerät entfernen.
Für Windows 98/SE:
Wählen Sie das Gerät im „Gerätemanager“ mit der linken Maustaste aus. Klicken Sie nun
auf den Menüpunkt „Entfernen“. Stellen Sie auch hier sicher, dass die Datenübertragung
vollständig abgeschlossen ist.
Das Gerät kann nun vom PC getrennt werden.
Laden der Batterie:
Das Gerät verfügt über einen eingebauten Lithium-Ion Akku. Der Akku wird über die USBVerbindung zu Ihrem PC geladen.
Bei der ersten Benutzung des Gerätes achten Sie bitte darauf, dass Sie den Akku
vollständig aufladen, dieser Vorgang dauert in der Regel 3 Stunden.
Um die Batterie aufzuladen, verbinden Sie bitte das Gerät über das USB-Kabel mit dem
PC. Der Ladevorgang startet automatisch.
Wenn Sie den aktuellen Status des Ladevorganges erfahren möchten, trennen Sie bitte
das Gerät von dem PC. Sie sehen auf dem Display oben rechts ein Batteriesymbol.
Leuchtet dieses Symbol grün, ist der Akku vollständig aufgeladen.
Hinweis: Für eine optimale Leistungsfähigkeit muss der Lithium-Ion Akku regelmäßig
genutzt werden. Sollte dies nicht der Fall sein, laden Sie den Akku mind. einmal pro Monat
vollständig auf.
Seite 3 von 12 DE
Page 5
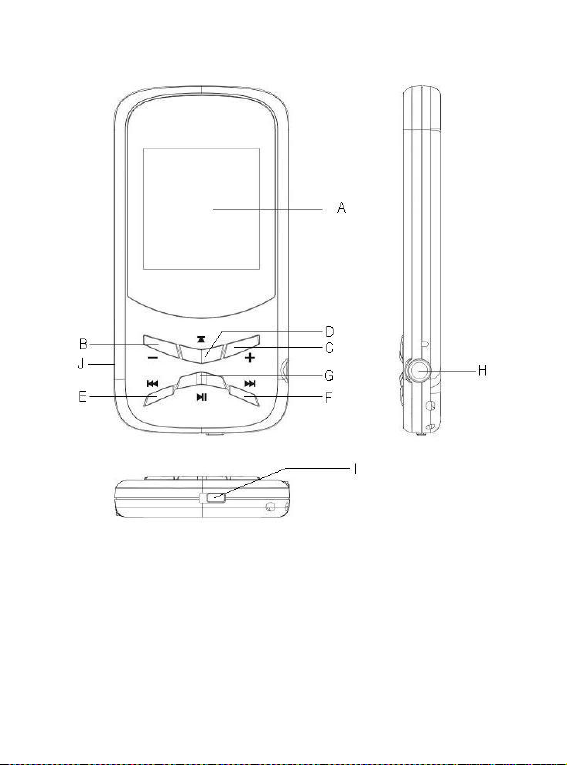
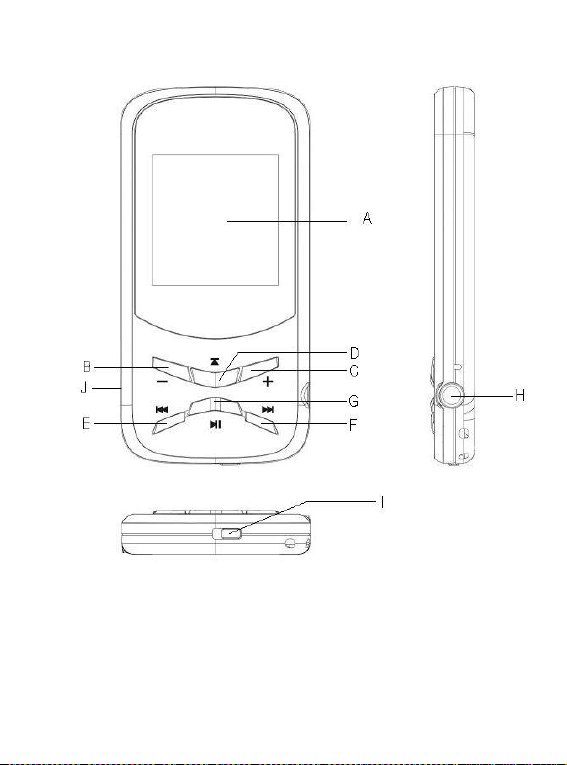
Bedienungselemente
A. LCD DISPLAY
B. VOL-: Verrringern der Lautstärke
C. VOL+: Erhöhen der Lautstärke
D. Enter/Escape: Drücken Sie diese Taste ein paar Sekunden, um aus jeder Ebene
zurück in das Hauptmenü zu gelangen. Ein kurzes Drücken, um die Auswahl zu
bestätigen oder um das Ordnermenü zu erreichen.
E. Rückwärts: Vorheriger Titel. Bewegung nach oben.
F. Vorwärts: Nächster Titel. Bewegung nach unten.
G. Play/Pause: Ein- und Ausschalten der Software.
Play / Pause Funktion.
H. Kopfhörer Anschluss
I. Power Switch: Ein- und Ausschalten des Gerätes
J. USB Port: Verbindung mit dem Computer
Seite 4 von 12 DE
Page 6

Ein- und Ausschalten,
Einschalten
(1) Verschieben Sie den ON/OFF Schalter nach rechts auf ON.
(2) Drücken Sie die PLAY/PAUSE Taste und halten Sie diese Taste gedrückt bis sich
das Display einschaltet.
Ausschalten,
(1) Drücken Sie die PLAY/PAUSE Taste und halte Sie diese gedrückt bis sich das
Display ausschaltet.
(2) Verschieben Sie den ON/OFF Schalter nach links auf OFF.
Anmerkung: Dieser Player hat eine Energiespar Einrichtung, das Gerät schaltet sich
automatisch aus wenn es mehr als drei Minuten unbenutzt ist.
6. Bedienung
Play/Pause
Betätigen Sie die Taste „G“ (Play/Pause) für Abspielen oder Pause.
Lautstärke bei Musik-/ Videowiedergabe
Drücken Sie die Taste „B“ (VOL-) bzw. „C“ (VOL+) um die Lautstärke zu regeln.
Auswahl des vorherigen Tracks (vorheriger Titel)
Kurzes Betätigen der Taste „E“ (Rückwärts).
Auswahl des nächsten Tracks (nächster Titel)
Kurzes Betätigen der Taste „F“ (Vorwärts).
Zurückspulen
Taste „E“ (Rückwärts) gedrückt halten
Vorspulen
Taste „F“ (Vorwärts) gedrückt halten
Tasten Sperren/ Entsperren
Drücken Sie die Tasten „D“ (Enter/Escape) und „B“ (VOL-) gleichzeitig.
A-B Repeat bei der Musikwiedergabe
Um einen bestimmten Ausschnitt eines Tracks in Schleife abzuspielen.
(1) Während des Abspielens die Taste „C“ (VOL+) betätigen und halten, um den
Startpunkt der Schleife festzulegen.
(2) Betätigen und halten Sie die Taste „C“ (VOL+) erneut, um den Endpunkt der
Schleife festzulegen.
(3) Durch das Bestätigen der Taste „C“ (VOL+) wird die Schleife beendet.
Seite 5 von 12 DE
Page 7

7. Abspielen von Musik
Musik-Modus
Drücken und halten Sie die Enter/Escape-Taste, um in das Hauptmenü zu gelangen.
Wählen Sie “Musik” und bestätigen Sie mit der Enter/Escape-Taste.
Starten Sie die Wiedergabe mit der Enter/Escape-Taste.
Ordner Übersicht
(1) Drücken Sie im Musik-Modus kurz die Enter/Escape-Taste.
(2) Mit der Vorwärts/ Rückwärts-Taste können Sie den gewünschten Ordner oder
Musiktitel auswählen. Mit der Enter/Escape-Taste bestätigen Sie ihre Auswahl..
8. Video
(1) Drücken und halten Sie die Enter/Escape Taste, um in das Hauptmenü zu
gelangen.
(2) Wählen Sie mit der Vorwärts/ Rückwärts-Taste das Video aus.
(3) Mit der Enter/Escape-Taste können Sie einen Videofilm starten. Die
Vorwärts/Rückwärts Taste ermöglicht die Auswahl einer beliebigen Video-Datei aus
ihrem Verzeichnis.
(4) Mit der Enter/Escape-Taste können Sie während der Wiedergabe die Ordner-
Navigation aufrufen.
Hinweis: Dieser Player kann nur AVI-Formate abspielen. Zum verwenden von RM,
RMVB, MPG, MPEG, WMV, DAT, VOB Formaten benötigen Sie die mitgelieferte, unter
Windows lauffähige Konvertierungssoftware.
9. Bilder
Anzeigen von Bilder
(1) Drücken und halten Sie den Enter/Escape-Button, um in das Hauptmenü zu
gelangen
(2) Wählen Sie mit der Vorwärts/Rückwärts-Taste Foto aus.
(3) Wenn Sie ein Foto ausgewählt haben, gelangen Sie mit der Vorwärts/Rückwärts
Taste zum nächsten Bild. Mit der Play/Pause-Taste können Sie eine Diashow
starten und stoppen. Mit der Enter/Escape-Taste können Sie während der Diashow
die Ordner Übersicht aufrufen.
Hinweis: Das Gerät kann nur Bilder im JPG-Format wiedergeben.
Seite 6 von 12 DE
Page 8

10. Text
Lesen der .txt Files
(1) Drücken und halten Sie die Enter/Escape Taste, um in das Hauptmenü zu gelangen
(2) Wählen Sie “Text” aus und drücken Sie die Enter/Escape Taste zum Bestätigen.
(3) Wählen Sie mit der Vorwärts/Rückwärts-Taste eine Textdatei aus und bestätigen
Sie mit der Enter/Escape Taste.
(4) Drücken Sie die Vorwärts/Rückwärts-Taste, um entweder zum oberen Teil oder zum
unteren Teil des Textes zu gelangen, welcher auf dem Display nicht dargestellt wird.
Oder wählen Sie mit der Play/Pause-Taste das automatische Weiterscrollen aus.
(Unter Einstellungen können Sie das Zeit-Intervall zwischen 2 und 10 sek. selbst
auswählen: “Einstellungen -> Diashow -> Text”).
(5) Während Sie lesen, können Sie mit dem Bookmark eine Stelle zum späteren
Weiterlesen markieren. Dieses Vorgehen wird im nächsten Punkt näher
beschrieben.
Hinweis: Sie können bis zu 3 Lesezeichen speichern.
Lesezeichen erstellen
(1) Gehen Sie auf die Stelle, welche Sie kennzeichnen möchten.
(2) Drücken Sie kurz die VOL+ Taste. Es erscheint „Save Bookmark“ im Display.
(3) Mit der Vorwärts/ Rückwärts-Taste wählen Sie eine Bookmark Nummer aus.
Bestätigen Sie ihre Auswahl mit der Enter/Escape-Taste. Das Lesezeichen ist
gespeichert. Es wird von der ersten Zeile der aktuellen Seite gestartet.
(4) Um die markierte Seite zu laden, drücken Sie bitte kurz auf die VOL-Taste, um die
gespeicherten Lesezeichen aufzurufen. Wählen Sie ein Lesezeichen aus und
bestätigen Sie es mit der Enter/Escape-Taste. Sie werden nun zu dieser Seite
geführt.
Hinweis: Wenn Ihre Textdatei nicht gestartet wird, liegt es daran, dass ihr gewähltes
Textformat nicht unterstützt wird. Wählen Sie bitte ein anderes Textformat aus.
11. Durchsuchen aller Dateien
Um alle gespeicherten Dateien im Player zu durchsuchen, gehen Sie wie folgt vor:
(1) Drücken und halten Sie die Enter/Escape Taste, um in das Hauptmenü zu
gelangen.
(2) Wählen Sie den Menüpunkt „Ordner Übersicht“ aus. Bestätigen Sie mit der Menü-
Taste.
(3) Mit der Vorwärts/ Rückwärts-Taste wählen Sie die gewünschte Datei aus und
bestätigen Sie die Auswahl mit der Enter/Escape-Taste.
12. Löschen einer Datei
(1) Wählen Sie in der Ordner-Übersicht die Datei aus, welche Sie löschen möchten.
(2) Drücken Sie kurz die VOL-Taste. Es erscheint eine Dialogbox.
(3) Wählen Sie mit der Vorwärts/Rückwärts-Taste “Ja” aus und bestätigen Sie mit der
Enter/Escape-Taste.
Seite 7 von 12 DE
Page 9

13. Spiel
Dieses Gerät verfügt über das Spiel Tetris World. Um dieses Spiel zu starten, wählen Sie
im Hauptmenü die Option “Spiel” aus und bestätigen Sie es mit der Enter/Escape-Taste.
Spiel starten
Drücken Sie die „PLAY/PAUSE“-Taste
Bewegen des Blockes nach rechts oder links
Drücken Sie die Rückwärts oder Vorwärts-Taste
Drehen des Blockes
Drücken Sie die Enter/Escape-Taste
Einbringen des Blockes
Drücken Sie die VOL-Taste
Verlassen des Spiels
Drücken und Halten Sie die Enter/Escape Taste
14. System- Einstellungen
Anpassen der Einstellungen:
(1) Wählen Sie im Hauptmenü den Punkt “Einstellungen” aus.
(2) Mit der Vorwärts/Rückwärts-Taste wählen Sie den von Ihnen gewünschten Menü-
Punkt aus und bestätigen Sie diesen mit der Enter/Escape-Taste, um die
Einstellungen zu ändern. Mit der „Play/Pause Taste“ kehren Sie zurück.
Musik
Wiederholung
(1) Titel einfach: Spielt den aktuellen Track und stoppt dann die Wiedergabe.
(2) Titel wiederholen: Wiederholt den aktuellen Track.
(3) Ordner einfach: Wiederholt die Titel in dem ausgewählten Ordner einmal und
stoppt dann die Wiedergabe
(4) Ordner wiederholen: Wiederholt alle Titel aus dem aktuellen Ordner.
(5) Alle Titel einmal: Spielt alle gespeicherten Titel ab und beendet die Wiedergabe
mit dem letzten Titel.
(6) Alle Titel wiederholen: Wiederholt alle gespeicherten Titel.
(7) Intro Funktion: Spielt die ersten 10 Sek. jeder Audio-Datei.
Wiedergabemodus
(1) Normale Wiedergabe: Spielt Audiodateien nach der Reihenfolge
(2) Zufällige Wiedergabe: Zufällige Wiedergabe der Titel.
Equalizer auswählen
Normal, 3D, Rock, Pop, Klassik, Bass, Jazz, Benutzerdefinierter Equalizer
Benutzerdefinierter Equalizer
(1) Drücken Sie die Vorwärts oder Rückwärts Taste, um die EQ-Spalte zu wählen.
(2) Betätigen Sie die VOL+ / VOL- Tasten, um die Werte einzustellen.
Seite 8 von 12 DE
Page 10

(3) Wiederholen Sie das Drücken der Vorwärts-Taste bis der Cursor auf dem “JA”-
Button ist und bestätigen Sie mit der Enter/Escape-Taste.
(4) Wählen Sie nun im EQ- Menü die Option “Benutzerdefinierter Equalizer” aus, um
die Einstellungen zu nutzen.
Bild & Text Diashow
Text
Wählen sie das Zeitintervall für das Umblättern von der aktuellen Seite zur nächsten Seite.
Bilder
Wählen Sie das Zeitintervall zwischen dem aktuellen Bild und dem nächsten Bild.
Display Einstellungen
Beleuchtungszeit
5 Sekunden,
10 Sekunden,
15 Sekunden,
20 Sekunden,
30 Sekunden,
Immer an
Helligkeit
(Bestimmen Sie die Helligkeit des Display)
LCD-Modus
Normal
Energiesparmodus (Schaltet die Displaybeleuchtung aus, wenn keine Bedienung erfolgt)
System
Über: Informationen über das Produkt
Firmware Update: Upgrade der Firmware
Werkseinstellungen: Lädt die Werkseinstellungen
Sleep Timer
Aus, 10 Minuten, 15 Minuten, 30 Minuten, 60 Minuten, 120 Minuten
Sprachen
Hier können Sie unterschiedliche Sprachen auswählen
Seite 9 von 12 DE
Page 11

15. Fehlerbehebung
Problem – Mögliche Gründe – Lösung Problem
Es erscheint nichts auf dem Display.
(1) Die Batterie ist leer.
Laden Sie die Batterie.
(2) Die Tasten sind gesperrt.
Entriegeln Sie die Tastensperre wie unter „6. Bedienung“ beschrieben.
Das Gerät reagiert nicht, wenn die Play-Taste betätigt wird.
(1) Die Tasten sind gesperrt.
Entriegeln Sie die Tastensperre wie unter „6. Bedienung“ beschrieben.
Bei der Wiedergabe fehlt der Ton.
(1) Die Lautstärke ist zu gering
Erhöhen sie die Lautstärke im Lautstärkemenü
(2) Audio-Datei defekt
Bitte übertragen sie die Datei erneut
Es kann keine Verbindung zum PC hergestellt werden.
(1) Der Treiber wurde nicht korrekt installiert
Installieren Sie den Treiber erneut.
(2) Bitte führen sie ein Mainboardupdate aus
(Beachten sie hierzu die Hinweise des Herstellers)
Der Anzeigewert der Zeit wechselt ständig.
(1) Die Bit-Rate des MP3-Files wechselt während der Wiedergabe.
Bitte benutzen Sie eine einheitliche Bit-Rate beim Komprimieren.
Der PC meldet einen Fehler beim Verbinden mit dem Gerät
(1) Der Player wurde während der Datenübertragung vom PC getrennt.
Bitte trennen Sie das Gerät niemals während der Datenübertragung.
Der angegebene Speicher des Gerätes stimmt mit dem wirklichen Speicher
nicht überein.
(1) Ein Teil des Speichers wird für Software, Formatierung und
Displayeigenschaften genutzt.
MP3-Daten werden nicht richtig abgespielt.
(1) Die MP3- Daten wurden in ein falsches Format komprimiert, beispielsweise in
MPEG 1 oder 2.
Löschen Sie die Dateiformate, welche nicht unterstützt werden.
Seite 10 von 12 DE
Page 12

Video-Daten können nicht abgespielt werden.
(1) Das Format wird nicht unterstützt.
Das Video Format muss AVI sein. Wenn dies nicht der Fall ist, konvertieren sie
es bitte. Achten sie dabei auf die Formatgröße 128x128 Pixel
(2) Die Video-Datei ist defekt.
Übertragen sie ihre Video Datei erneut
Die Fotos werden nicht angezeigt.
(1) Das Dateiformat wird nicht unterstützt.
Konvertieren Sie das Foto bitte in ein JPG- Format.
(2) Das Bild hat eine Auflösung mit mehr als 3520x2816 Pixel
Das Gerät unterstützt eine maximale Auflösung von 3520x 2816 Pixel. Stellen
Sie sicher, dass diese Auflösung nicht überschritten wird.
Die Textdatei kann nicht gelesen werden.
(1) Das Format wird nicht unterstützt.
Bitte benutzen sie das .txt –Format
16. Technische Daten
Batterietyp
Wiederaufladbare Lithium Ion Akku
Batteriedauer
5-7 Stunden
LCD
1,5“ Zoll TFT Bildschirm
Kopfhörer
5mW+5mW
Video Format
AVI (XviD) 128x128
Audio Formate
MP3, WMA
Foto Format
JPEG
Bildauflösung
3520 X 2816 Pixel (Max.)
Bit Rate
MP3: 8-320kbps;
WMA: 32-384kbps
Seite 11 von 12 DE
Page 13

SNR
90dB
USB Port
USB2.0
Betriebsbereit zwischen
0 Celsius ~ +55 Celsius
Lagertemperatur zwischen
-20 Celsius ~ +55 Celsius
Betriebsbereit bei einer rel. Luftfeuchtigkeit von
20% ~ 90% (40 Celsius)
Lagerfähig bei einer rel. Luftfeuchtigkeit von
20% ~ 93% (40 Celsius)
17. Bitte beachten sie folgendes
(1) Plug & Play ist nur bei Windows 2000/XP und Vista möglich.
Bitte installieren Sie bei Windows 98/SE den Treiber.
(2) Bitte entriegeln Sie die Tastensperre, um mit dem Gerät zu arbeiten.
(3) Bitte laden Sie die Batterie, wenn dieses im Display angezeigt wird.
(4) Bitte trennen Sie das Gerät vom PC nur wie erwähnt, um einen möglichen
Datenverlust zu vermeiden.
(5) Wenn die Aufnahmedatei sehr groß ist, dauert das Laden der Datei länger.
(6) Softwareunterstützung für Windows 2000, Windows XP und Windows Vista.
Seite 12 von 12 DE
Page 14

1. Index
1. Index ..................................................................................................................... 1
2. Cautions................................................................................................................ 2
3. Key Features ........................................................................................................ 2
4. Package Content .................................................................................................. 2
5. Before Using ......................................................................................................... 3
6. Basic operation ..................................................................................................... 5
7. Playing music ........................................................................................................ 6
8. Playing videos ....................................................................................................... 6
9. Viewing photos ..................................................................................................... 6
10. Reading Text ........................................................................................................ 7
11. Browsing all files ................................................................................................... 7
12. Deleting file ........................................................................................................... 7
13. Playing a game ..................................................................................................... 8
14. Customizing Settings ............................................................................................ 8
15. Troubleshooting .................................................................................................. 10
16. Technical Specifications ..................................................................................... 11
17. Notice ................................................................................................................. 12
Page 1 of 12 GB
Page 15

2. Cautions
Protect the device from blows and don’t drop it.
Do not use the player in extreme heat or cold, or dusty or damp areas. Do not
expose it to direct sunshine.
Back up the data frequently in case of accidental data loss.
Avoid using the player in a strong magnetic field.
Keep the device away from water or other liquids. In the event that water or other
liquids enter the device, power off the product immediately, and clean the device.
Do not use chemical solutions to clean the device in order to avoid corrosion. Clean
it with a dry cloth.
We are not responsible for damage or lost data caused by malfunctions, misuse,
repairing the device or battery replacement.
Do not attempt to disassemble, repair or modify the product. This will void the
guarantee.
3. Key Features
MP3&WMA Player
AVI Video player
JPEG image viewer
Folder navigation
Removable storage device
Game
Built-in rechargeable lithium-ion battery
Customized settings
4. Package Content
Please check the package for the following items. If any one of them is missing, please
contact the vendor:
Intenso Video Traveller
Stereo earphones
Application CD
USB cable
User manual and warranty card
Page 2 of 12 GB
Page 16

5. Before Using
Connecting to the PC
If your PC’s operating system is Windows 98/SE, please install a driver before connecting
the player to your PC. (Driver downloads are available at www.intenso.de). It is not
necessary to install a driver if your operating system is WIN 2000/XP/ME.
Please proceed as follows:
(1) Connect the player to a USB connector on the PC.
(2) The ‘Intenso’ window opens. You can now save data from your hard disk to the
removable medium.
Safe removal from the PC
For Windows 2000/XP/ME/Vista:
Right click the ‘Safely Remove Hardware’ icon in the taskbar at the bottom right. Left click
‘Remove USB storage device’ in the context menu that appears. Please first make sure
that the data transfer has been completed.
You can now remove the device.
For Windows 98/SE:
Left click the device in the Device Manager. Now click the menu item ‘Remove’. Make sure
in this case too that the data transfer has been completed.
You can now disconnect the device from the PC.
Charging the battery:
The device has a built-in lithium-ion battery. The battery is charged via the USB
connection to your PC. Before using the device for the first time, please make sure that the
battery is fully charged. This usually takes about 3 hours. To charge the battery, connect
the device to the PC using the USB cable. The charging procedure begins automatically. If
you wish to check the current status of the charging procedure, please disconnect the
device from the PC. You can see a battery symbol at the top right of the display. If this
symbol lights up green, then the battery is fully charged.
Note: for optimum performance, the lithium-ion battery must be used regularly. If this is not
the case, fully charge the battery at least once per month.
Page 3 of 12 GB
Page 17
Keys Description
A. LCD Display
B. VOL-: Turn down the volume.
C. VOL+: Turn up the volume.
D. Enter / Escape: Hold for a while to enter the main menu. Briefly press to confirm
selection confirm or enter the folder navigation mode.
E. Previous: Play the previous track. Also move up.
F. Next: Play the next track. Also move down.
G. Play/Pause: Turn on or turn off the device. Also play or pause audios.
H. Earphone Jack
I. Power Switch: Turn on or turn off the power
J. USB Port: Connect to a computer
Page 4 of 12 GB
Page 18

Power On/Off
To switch on,
(1) Slide the ON/OFF Switch to the right to turn on the power.
(2) Press and hold the PLAY/PAUSE button until the display starts.
To switch off,
(1) Press and hold the PLAY/PAUSE button until the display stop.
(2) Slide the ON/OFF Switch to the left to turn off the power.
Note: This player has a power-saving feature which enables the device to power off
automatically if it is idle for about 3 minutes.
6. Basic operation
Play/Pause
Press the PLAY/PAUSE button to play or pause.
Adjust Volume
Briefly press the VOL+/VOL- button to decrease or increase volume.
Previous Track
Briefly press the PREVIOUS button.
Next Track
Briefly press the NEXT button.
Fast Forward
Press and hold the NEXT button.
Rewind
Press and hold the PREVIOUS button.
Lock/unlock buttons
To protect the buttons against being pressed accidentally or unlock buttons, hold down the
Enter/Escape button and the VOL- together.
A-B Repeat To repeat a specified section of a track,
(1) During play, press and hold the VOL+ button to select the start point of the repeat.
(2) Press and hold the VOL+ button again to select the stop point. The music section
between the start point and the stop point is repeated.
(3) To stop A-B repeat, press another time the VOL+ button.
Page 5 of 12 GB
Page 19

7. Playing music
Enter the music mode
Press and hold the Enter/Escape button to display the main menu. Use the
PREVIOUS/NEXT button to select “Music” menu, and press the Enter/Escape button to
confirm selection. Now you are in MUSIC mode, referring to music playing using the basic
operations.
.
Folder navigation
To navigate through folders:
(1) In the MUSIC mode, briefly press the Enter/Escape button to enter folder navigation
mode.
(2) Press the PREVIOUS/NEXT button to select a folder or track, and press the
Enter/Escape button to confirm selection, or press the PLAY/PAUSE button to
return.
8. Playing videos
(1) Press and hold the Enter/Escape button to display the main menu.
(2) Use the PREVIOUS/NEXT button to select the “Video” menu, and press the
Enter/Escape button to enter the video player mode.
(3) Press the PREVIOUS/NEXT button to search a video file that you want to play, and
press the Enter/Escape button to play. For detail information about playing, see the
“Basic Operation” section.
(4) During playing, you can briefly press the Enter/Escape button to enter folder
navigation mode.
Note: This player can only play AVI videos. For other formats, you need to use the
conversion tool included on the driver CD to convert them. For detailed information about
the converter, see AVI Converter Quick User Guide on the CD.
9. Viewing photos
To view photos,
(1) Press and hold the Enter/Escape button to display the main menu.
(2) Select “Photo” and press the Enter/Escape button to confirm. Press the
PREVIOUS/NEXT button to select a folder or image, and press Enter/Escape to
confirm.
(3) Select the photo that you want to display and press the Enter/Escape button to
enlarge it to full screen. In full screen mode, you can press the PREVIOUS/NEXT
button to display the previous or the next photo. Press the PLAY/PAUSE to start an
automatic slide show, or press the Enter/Escape button to enter folder navigation
mode.
Note: Some images may not be displayed. Try to convert the image in JPEG.
Page 6 of 12 GB
Page 20

10. Reading Text
Reading
(1) Press and hold the Enter/Escape button to display the main menu.
(2) Select “Text” and press the Enter/Escape button to confirm.
(3) Press the PREVIOUS/NEXT button to select a .txt file, and press the Enter/Escape
button to open the selected file.
(4) Press the PREVIOUS/NEXT button to page up or page down, or press the
PLAY/PAUSE button to page up or down automatically (by setting the time interval
between 1 and 5 in Settings/Auto Slide show/Text).
(5) During reading, you can use the bookmark to mark the page for resume reading
later. For information about the bookmark, see “Using bookmark” section.
Using bookmark
(1) Go to the page that you want to mark.
(2) Briefly press the VOL+ button to display a “Save Bookmark” window for saving
bookmark.
(3) Press the PREVIOUS/NEXT button to select one line on the menu and press the
Enter/Escape button to confirm. The bookmark is saved. It starts from the first line
of current page.
(4) To read the page that you marked, briefly press the VOL- button to display the
“Load Bookmark” window. Select the bookmark and press the Enter/Escape button
to confirm. You will be guided to that page.
Note: Some TXT file may not be read. This may because its format is not supported.
Skip it or reload another file.
11. Browsing all files
To browse all files stored in the player,
(1) Press and hold the Enter/Escape button to display the main menu.
(2) Select“Navigation” and press the Enter/Escape button to enter the browser mode.
(3) Press PREVIOUS/NEXT button to select a file that you want to view, and press the
Enter/Escape button to play or display it.
12. Deleting file
(1) In the folder navigation mode, select the file that you want to delete.
(2) Press and hold the VOL button until a dialogue box appears.
(3) Use the PREVIOUS/NEXT button to select “YES” and press the Enter/Escape
button to confirm.
Page 7 of 12 GB
Page 21

13. Playing a game
This player provides a popular and fun game - Tetris World. To activate the game, on the
main menu, select “Game” and press the MENU button to enter the gaming mode. The
basic operation is as follows:
Start game Press the PLAY/PAUSE button
Move the block left and right Press PREVIOUS an NEXT button
Rotate the block Press the VOL+ button
Insert the block Press the VOL- button
Exit the Game Press the play Button to pause the Game and hold
then the Enter/Escape Button
14. Customizing Settings
To customize the player settings:
(1) On the main menu, select the “Settings” option and press the Enter/Escape button
to enter the system settings mode.
(2) Press the PREVIOUS/NEXT button to select the setting option and press the
Enter/Escape button to confirm or press the Play/Pause button to cancel/return.
Music
Repeat Mode
(1) Once: Play current track once and then stop
(2) Repeat 1: Repeat current track
(3) Folder once: Play all audio files in the current folder and stop after playing
(4) Folder Repeat: Repeat all audio files in the current folder
(5) All Once: Play all audio files stored in the player and stop after playing all
(6) All Repeat: Repeat all audio files stored in the player
(7) Intro: Play the first 10 seconds of every audio file
Play mode
(1) Order: Play audio files in order
(2) Shuffle: Play audio files randomly
EQ Select
Normal, 3D, Rock, Pop, Classical, Bass, Jazz, User EQ
User EQ Set
(User-defined equalizer setting)
(1) Press the PRIVOUS/NEXT button to switch EQ column.
(2) Press the VOL+/VOL- button to adjust value.
(3) Repeat pressing the NEXT button until the cursor is on the YES button, and then
press the Enter/Escape button to confirm.
(4) Go to the EQ Select menu, and select User EQ to enable the equalizer setting.
Page 8 of 12 GB
Page 22

Auto Browse
Text Browse
(Set interval between the previous and the next page when the device is in auto page
up/down mode.)
Photo Browse
(Set interval between the previous and the next slide in auto slide show mode.)
Display
Blight Time
5 seconds, 10 seconds, 15 seconds, 20 seconds, 30 seconds, Always On.
Lum
(Set the brightness of the screen)
Blight Mode
Normal
Power Save (Turn off the screen when there is no activity within a certain time)
System
About: Information about the product
Upgrade: Upgrade the firmware
Default Set: Restore the player to default setting
Power Off
(Set the continuous playing time before the player is turned off automatically.)
Off, 10 minutes, 15minutes, 30 minutes, 60 minutes, 120 minutes
Language
(Select language in which the on-screen text is displayed)
Here you can choose between different languages
Page 9 of 12 GB
Page 23

15. Troubleshooting
Problem - Possible Cause - Solution
The LCD displays nothing when the device is started.
(1) Battery is too low.
Charge the battery.
(2) The keys are locked.
Unlock the Hold switch by holding down the PLAY/PAUSE and VOL
The player doesn’t respond when the Play button is pressed to play an audio
No sound when playing an audio file.
The player cannot be connected to the PC.
The displayed time is changing constantly.
The PC has an error when you plug-in and unplug the player.
Total memory displayed on the player is not in accordance with the marked
Some of MP3 files cannot be played properly.
button.
file.
(1) The keys are locked by Hold switch
Unlock the Hold switch by holding down the PLAY/PAUSE and VOL
button.
(1) The volume is too low.
Adjust the volume.
(2) Bad audio file.
Delete or skip the file.
(1) The USB port is not supported by PC’s motherboard.
Update or replace the PC’s motherboard.
(1) The bit rate of the MP3 file is changing during playback.
Try to use fixed bit rate to compress the MP3 file.
(1) The player is disconnected from the PC abruptly while transferring files.
Do not disconnect the player from the PC when transferring files.
amount.
(1) Part of memory is used to store programs and display characters.
(1) The MP3 file is compressed by a standard, such as MPEG I Layer 1 or
Layer 2 that the player does not support.
1. Delete the unsupported MP3 files.
2. Use MPEG I Layer 3 standard to compress the unsupported MP3 files.
Page 10 of 12 GB
Page 24

The video cannot be played.
(1) The file format is not supported.
Make sure the video is in AVI format. If not, use the provided converting
tool to convert it.
(2) The video data is corrupted
The photo cannot be displayed
The TXT file cannot be read
Skip it or reload another file
(1) The file format is not supported
Try to use an image editor to convert it.
(2) The image resolution is beyond limitation of the device.
The device supports a maximum resolution of 3520 X 2816 Pixel. Make
sure resolution of the image does not excess this limitation.
(1) The file format is not supported.
Skip it or reload another file.
16. Technical Specifications
Battery Type
Rechargeable lithium battery
Battery Life
Approx. 5-7 hours
LCD Display
1.5-inch TFT screen
Earphone Power
5mW+5mW
Video Format
AVI (XviD) 128x128 Pixel
Audio Format
MP3, WMA
Photo Format
JPEG
Image Resolution
3520 X 2816 pixels (Max.)
Bit Rate
MP3: 8-320kbps; WMA: 32-384kbps
Page 11 of 12 GB
Page 25

SNR
>90dB
USB Port
USB2.0
Operating Temperature
0℃ ~ +55℃
Storage Temperature
-20℃ ~ +55℃
Operating Relative Humidity
20% ~ 90% (40℃)
Storage Relative Humidity
20% ~ 93% (40℃)
17. Notice
(1) Plug & Play is available only with Windows 2000/XP and Vista. Please install the
driver in the case of Windows 98/SE.
(2) Make sure all keys are enabled before operation. If they are locked, hold down the
PLAY/PAUSE and VOL button to unlock them.
(3) Please charge the battery immediately when the display indicates low battery, or
the device will be powered off automatically.
(4) Please disconnect the player from PC properly to avoid data loss.
(5) When the recorded voice file is too large, the response of the device may be slow.
(6) Software Support only for Windows 2000, Windows XP and Windows Vista.
Page 12 of 12 GB
Page 26

1. Indice
1. Indice .................................................................................................................... 1
2. Note ...................................................................................................................... 2
3. Funzioni ................................................................................................................ 2
4. Contenuto della confezione .................................................................................. 2
5. Prima dell’utilizzo .................................................................................................. 3
6. Comandi ............................................................................................................... 5
7. Riproduzione di file musicali ................................................................................. 6
8. Video .................................................................................................................... 6
9. Immagini ............................................................................................................... 6
10. Testo ..................................................................................................................... 7
11. Ricerca di tutti i file ................................................................................................ 7
12. Cancellazione di un file ......................................................................................... 7
13. Gioco .................................................................................................................... 8
14. Impostazioni di sistema ........................................................................................ 8
15. Eliminazione degli errori ..................................................................................... 10
16. Dati tecnici .......................................................................................................... 11
17. Attenzione ........................................................................................................... 12
Pagina 1 di 12 IT
Page 27

2. Note
Non sottoporre l’apparecchio a forti scosse.
Non utilizzare l’apparecchio in ambienti molto freddi, caldi, umidi o polverosi. Non
esporlo all’azione diretta dei raggi solari.
Eseguire regolarmente un backup per evitare la perdita di dati.
Non utilizzare l’apparecchio in presenza di forti campi magnetici.
Proteggere l’apparecchio dal bagnato. Se l’umidità dovesse penetrare
nell’apparecchio, spegnerlo immediatamente. Poi ripulire e asciugare l'apparecchio.
Non utilizzare soluzioni chimiche, per ripulire l’apparecchio. Utilizzare a questo
scopo un panno asciutto.
Decliniamo qualsiasi responsabilità per danni o per la perdita di dati causati da
malfunzionamento, manovre errate, riparazioni eseguite di propria iniziativa o
sostituzione degli accumulatori.
Non smontare l’apparecchio e non cercare di ripararlo autonomamente. Queste
operazioni fanno decadere la validità della garanzia.
3. Funzioni
Lettore MP3&WMA
AVI Video Player
Visualizzatore JPEG
Navigazione per cartelle
Periferica
Gioco
Accumulatore ricaricabile agli ioni di litio
Impostazioni personalizzate
4. Contenuto della confezione
Verificare il contenuto della confezione
Intenso Video Traveller
Cuffie stereo
Software di conversione (formato AVI)
Cavo USB
Istruzioni d’uso + Tagliando di garanzia
Pagina 2 di 12 IT
Page 28

5. Prima dell’utilizzo
Collegamento con il PC
Per il funzionamento con il sistema operativo Windows 98/SE è necessario installare un
driver prima di collegare il lettore con il PC. (I link sono disponibili al sito Internet
www.intenso.de)
Per i sistemi operativi WIN 2000/XP/ME non è necessario installare il driver.
Procedere nel seguente modo:
(1) Collegare il lettore con la porta USB del PC.
(2) Si apre la finestra “Intenso” Ora è possibile salvare i dati dal disco fisso alla
periferica.
Selezionare la funzione “Rimozione sicura dell’hardware”
Per Windows 2000/XP/ME/Vista:
Fare clic con il tasto destro del mouse sulla barra degli strumenti, a destra, sul simbolo
“Rimozione sicura dell’hardware” Selezionare la voce del menu “Rimozione sicura della
periferica di archiviazione di massa” con il tasto sinistro del mouse. Assicurarsi che la
trasmissione dei dati sia terminata completamente.
Rimuovere quindi l’apparecchio.
Per Windows 98/SE:
Selezionare l’apparecchio in “Gestione periferiche“ con il tasto sinistro del mouse. Fare clic
sulla voce del menu “Rimozione“. Assicurarsi che la trasmissione dei dati sia terminata
completamente.
Scollegare ora l'apparecchio dal PC.
Caricamento della batteria
L’apparecchio dispone di un accumulatore integrato agli ioni di litio. L’accumulatore si
ricarica tramite collegamento USB al computer.
Per il primo utilizzo dell’apparecchio accertarsi che l’accumulatore sia caricato
completamente. Questa operazione richiede solitamente 3 ore.
Per ricaricare la batteria collegare l’apparecchio al PC mediante il cavo USB. L’operazione
di caricamento si avvia automaticamente.
Se si desidera consultare lo stato dell’operazione di caricamento scollegare l’apparecchio
dal PC. Sul display, a destra in alto, compare un simbolo che indica una batteria. Quando
l’accumulatore è caricato completamente questo simbolo si illumina di verde.
Nota: l’accumulatore agli ioni di litio necessita di un utilizzo regolare per assicurare
prestazioni ottimali. In caso contrario ricaricare completamente l’accumulatore almeno una
volta al mese.
Pagina 3 di 12 IT
Page 29

Comandi
A. DISPLAY LCD
B. VOL-: riduzione del volume
C. VOL+: aumento del volume.
D. Enter / Escape: Tenere premuto questo tasto per due secondi per ritorna al menu
da ogni livello. Premere una volta per confermare la selezione oppure per passare
al menu di navigazione delle cartelle.
E. Indietro: titolo precedente. Spostamento verso l’alto.
F. Avanti: titolo successivo. spostamento verso il basso.
G. Play/ Pause: accensione e spegnimento del software.
Funzione Play/ Pause.
H. Presa cuffie
I. Power Switch: accensione e spegnimento dell’apparecchio.
J. Porta USB: collegamento con il computer.
Pagina 4 di 12 IT
Page 30

Accensione e spegnimento
Accendere
(1) Spostare il pulsante ON/OFF verso destra, su ON.
(2) Premere il tasto PLAY/PAUSE e tenerlo premuto fino all'attivazione del display.
Spegnere
(1) Premere il tasto PLAY/PAUSE e tenerlo premuto fino alla disattivazione del display.
(2) Spostare il pulsante ON/OFF verso sinistra, su OFF.
Osservazione: questo lettore dispone di una funzione di risparmio energetico.
L’apparecchio si spegne automaticamente se non viene utilizzato per più di tre minuti.
6. Comandi
Play/ Pause
Azionare il tasto "G“ (Play/Pause) per la riproduzione di file o la pausa.
Volume della riproduzione musicale/video
Premere il tasto “B“ (VOL-) oppure ”C“ (VOL+) per regolare il volume.
Selezione della traccia precedente (titolo precedente)
Premere una volta il tasto “E“ (Indietro).
Selezione della traccia successiva (titolo successivo)
Premere una volta il tasto “F“ (Avanti).
Riavvolgimento
Tenere premuto il tasto “E“ (Indietro)
Avanzamento
Tenere premuto il tasto “F“ (Avanti)
Blocco/sblocco tasti
Premere i tasti “D“ (Enter/Escape) e “B“ (VOL-) contemporaneamente.
Ripetizione A-B di un titolo musicale
Per riprodurre in continuazione un determinato brano di una traccia musicale.
(1) Durante la riproduzione tenere premuto il tasto “C“ (VOL+) per stabilire l’inizio del
brano da ripetere.
(2) Premere il tasto “C“ (VOL+) di nuovo per stabilire la fine del brano da ripetere.
(3) Premendo il tasto “C“ (VOL+) si interrompe la ripetizione continua.
Pagina 5 di 12 IT
Page 31

7. Riproduzione di file musicali
Modalità musicale
Tenere premuto il tasto Enter/ per passare al menu principale.
Selezionare “Musica” e confermare con il tasto Enter/Escape.
Avviare la riproduzione con il tasto Enter/Escape.
Panoramica cartelle
(1) Premere una volta il tasto Enter/Escape in modalità musicale.
(2) Con il tasto Avanti/Indietro è possibile selezionare la cartella o il titolo musicale
desiderato. Confermare la selezione con il tasto Enter/Escape.
8. Video
(1) Tenere premuto il tasto Enter/Escape per passare al menu principale.
(2) Selezionare la modalità video con il tasto Avanti/Indietro.
(3) Con il tasto Enter/Escape è possibile avviare la visualizzazione di un filmato. Il tasto
Avanti/Indietro consente la selezione di un file video dalla directory.
(4) Con il tasto Enter/Escape è possibile richiamare durante la riproduzione la
panoramica cartelle.
Nota: Il lettore può riprodurre solo file in formato AVI. Per l’utilizzo di formati RM, RMVB,
MPG, MPEG, WMV, DAT, VOB è necessario il software di conversione in dotazione
eseguibile in Windows.
9. Immagini
Visualizzazione delle immagini
(1) Tenere premuto il tasto Enter/Escape per passare al menu principale.
(2) Selezionare la modalità foto con il tasto Avanti/Indietro.
(3) Una volta selezionata una foto è possibile passare alla foto successiva con il tasto
Avanti/Indietro. Con il tasto Play/ Pause è possibile avviare la visualizzazione di un
diashow. Con il tasto Enter/Escape è possibile richiamare durante la riproduzione la
panoramica cartelle.
Nota: l’apparecchio è in grado di riprodurre solo il formato JPG.
Pagina 6 di 12 IT
Page 32

10. Testo
Lettura di file .txt
(1) Tenere premuto il tasto Enter/Escape per passare al menu principale.
(2) Selezionare “Testo” e premere il tasto Enter/Escape per confermare.
(3) Selezionare con il tasto Avanti/Indietro un file di testo e confermare con il tasto
Enter/Escape.
(4) Premere il tasto Avanti/Indietro per passare alla parte superiore o inferiore del testo
non indicata sul display. Oppure selezionare lo scorrimento automatico con il tasto
Play/Pause. (In Impostazioni è possibile selezionare l’intervallo temporale tra 2 e 10
secondi: “Impostazioni -> Diashow -> Testo”).
(5) Durante la lettura è possibile contrassegnare un punto del testo con un segnalibro.
Questa procedura viene descritta al punto successivo.
Nota: esiste la possibilità di memorizzare 3 segnalibri.
Creare un segnalibro
(1) Passare al punto che si desidera contrassegnare.
(2) Premere il tasto VOL +. Sul display compare “Save Bookmark“.
(3) Con il tasto Avanti/Indietro selezionare un numero di segnalibro. Confermare la
selezione con il tasto Enter/Escape. Il segnalibro è memorizzato. Dalla prima riga si
apre la pagina attuale.
(4) Per caricare la pagina marcata premere una volta il tasto VOL richiamando il
segnalibro. Selezionare il segnalibro e confermare con il tasto Enter/Escape. Il
programma vi conduce alla pagina desiderata.
Nota: se il programma non apre il file di testo, probabilmente il formato non è supportato.
Selezionare un altro formato di testo.
11. Ricerca di tutti i file
Per eseguire una ricerca di tutti i file salvati, procedere nel modo seguente:
(1) Tenere premuto il tasto Enter/Escape per passare al menu principale.
(2) Selezionare la voce del menu "Panoramica cartelle". Confermare la selezione con il
tasto menu.
(3) Selezionare il file desiderato con il tasto Avanti/Indietro e confermare la selezione
con il tasto Enter/Escape.
12. Cancellazione di un file
(1) Selezionare il file che si desidera cancellare nella panoramica cartelle.
(2) Premere il tasto VOL -. Compare una finestra di dialogo
(3) Selezionare con il tasto Avanti/Indietro “Sì” e confermare con il tasto Enter/Escape.
Pagina 7 di 12 IT
Page 33

13. Gioco
L’apparecchio offre il gioco Tetris World. Per avviare questo gioco selezionare nel menu
principale l’opzione “Gioco” e confermare con il tasto Enter/Escape.
Avvio gioco
Premere il tasto “PLAY/PAUSE”
Spostamento del blocco a destra o sinistra
Premere il tasto Indietro oppure il tasto Avanti
Rotazione del blocco
Premere il tasto Enter/Escape
Posizionamento del blocco
Premere il tasto VOL -
Uscita dal gioco
Tenere premuto il tasto Enter/Escape
14. Impostazioni di sistema
Adeguamento delle impostazioni:
(1) Selezionare nel menu principale la voce “Impostazioni“.
(2) Con il tasto Avanti/Indietro selezionare la voce del menu desiderata e confermarla
con il tasto Enter/Escape per modificare le impostazioni. Ritornare indietro con il
tasto Play/Pause.
Musica
Ripetizione
(1) Solo una volta: riproduce la traccia attuale e termina poi la riproduzione.
(2) Ripetizione titolo: ripetizione della traccia attuale
(3) Cartella una volta: ripete i titoli nella cartella selezionata e termina poi la
riproduzione.
(4) Ripetizione cartella: ripete tutti i titoli della cartella attuale.
(5) Tutti i titoli una volta: l’apparecchio riproduce tutti i titoli memorizzati e termina la
riproduzione con l’ultimo titolo.
(6) Ripetizione di tutti i titoli: ripetizione di tutti i titoli memorizzati.
(7) Funzione Intro: riproduce i primi 10 secondi di ogni file audio.
Modalità riproduzione
(1) Riproduzione normale: riproduce i file audio in sequenza.
(2) Riproduzione casuale: riproduzione casuale dei titoli.
Selezionare l’equalizzatore
Normale, 3D, Rock, Pop, Classic, Bass, Jazz, equalizzatore definito dall’utente
Equalizzatore definito dall’utente
(1) Premere il tasto Avanti/Indietro per attivare la colonna EQ.
(2) Premere i tasti VOL+ / VOL- per impostare i valori.
Pagina 8 di 12 IT
Page 34

(3) Premere nuovamente il tasto Avanti finché il cursore si trova sul pulsante “SÌ” e
confermare con il tasto Enter/Escape.
(4) Selezionare nel menu EQ l’opzione “Equalizzatore definito dall’utente” per utilizzare
le impostazioni.
Diashow immagine & testo
Testo
Selezionare l’intervallo temporale per passare dalla pagina attuale alla pagina seguente.
Immagini
Selezionare l’intervallo temporale tra l’immagine attuale e l’immagine successiva.
Impostazioni display
Retroilluminazione
5 secondi
10 secondi
15 secondi
20 secondi
30 secondi
Sempre on
Luminosità
(Stabilisce la luminosità del display)
Modalità LCD
Normale
Modalità di risparmio energetico (disattiva la retroilluminazione del display in caso di
mancato utilizzo)
Sistema
Info: informazioni sul prodotto
Firmware Update: aggiornamento del firmware
Impostazioni di fabbrica: Carica le impostazioni di fabbrica
Sleep Timer
Off, 10 minuti, 15 minuti, 30 minuti, 60 minuti, 120 minuti
Lingue
Questa funzione consente di selezionare diverse lingue.
Pagina 9 di 12 IT
Page 35

15. Eliminazione degli errori
Problema – Possibili cause – Soluzione del problema
Sul display non compare alcun dato
(1) La batteria è scarica.
Caricare la batteria.
(2) I tasti sono bloccati.
Sbloccare i tasti come descritto al capitolo “6.Comandi”.
L’apparecchio non reagisce se si preme il tasto Play.
(1) I tasti sono bloccati.
Sbloccare i tasti come descritto al capitolo “6.Comandi”.
L’apparecchio non riproduce alcun suono.
(1) Il volume è troppo basso.
Alzare il volume nel menu volume.
(2) File audio difettoso.
Trasferire nuovamente il file.
Non è possibile collegarsi al PC.
(1) Il driver non è stato installato correttamente
Installare di nuovo il driver.
(2) Aggiornare la scheda principale
(consultare le istruzioni del produttore)
La visualizzazione dell’ora si modifica costantemente.
(1) Il bit rate del file MP3 varia durante la trasmissione.
Utilizzare un bit rate unico per la compressione.
Il PC segnala un errore durante il collegamento all’apparecchio
(1) Il lettore è stato scollegato dal PC durante la trasmissione di dati.
Non scollegare mai il lettore durante la trasmissione di dati.
La memoria indicata dal lettore non coincide con la memoria reale.
(1) Una parte della memoria viene utilizzata dal software per il display.
Non è possibile riprodurre correttamente i dati MP3.
(1) I dati MP3 sono stati compressi in un formato errato, ad esempio MPEG 1
oppure 2.
Cancellare i formati non supportati.
Pagina 10 di 12 IT
Page 36

Non è possibile riprodurre dati video.
(1) Il formato non è supportato.
Il formato video deve essere AVI. In caso contrario eseguire la conversione.
Attenzione alla dimensione del formato: 128x128 pixel
(2) Il file video è difettoso.
Trasferire nuovamente il file video.
Non è possibile trasferire le foto.
(1) Il formato non è supportato.
Convertire la foto in formato JPG.
(2) L’immagine ha una risoluzione maggiore di 3520x2816 pixel
L’apparecchio supporta una risoluzione massima di 3520x 2816 pixel.
Assicurarsi che questa risoluzione non venga superata.
Non è possibile leggere il file di testo.
(1) Il formato non è supportato.
Utilizzare il formato .txt.
16. Dati tecnici
Tipo batteria
Accumulatore ricaricabile agli ioni di litio
Autonomia della batteria
5-7 ore
LCD
Schermo TFT 1,5 pollici
Cuffie
5mW+5mW
Formato video
AVI (XviD) 128x128
Formati audio
MP3, WMA
Formato foto
JPEG
Risoluzione immagini
3520 X 2816 Pixel (max.)
Bit Rate
MP3: 8-320kbps;
WMA: 32-448kbps;
SNR
90dB
Pagina 11 di 12 IT
Page 37

Porta USB
USB2.0
Temperatura operativa:
Da 0 Celsius a +55 Celsius
Temperatura di conservazione
Da -20 Celsius a +55 Celsius
Umidità operativa relativa
Da 20% a 90% (40 Celsius)
Umidità relativa di conservazione
Da 20% a 93% (40 Celsius)
17. Attenzione
(1) Plug & Play è possibile solo con Windows 2000/XP e Vista.
Per Windows 98/SE è necessario installare il driver.
(2) Sbloccare i tasti per utilizzare l’apparecchio.
(3) Sostituire la batteria quando compare l’avviso sul display.
(4) Seguire le istruzioni per scollegare il lettore dal PC per evitare la perdita di dati.
(5) In caso di file di grandi dimensioni il caricamento richiede più tempo.
(6) Compatibile con Windows 2000, Windows XP e Windows Vista
Pagina 12 di 12 IT
Page 38

1. Aperçu du contenu
1. Aperçu du contenu ................................................................................................ 1
2. Indications............................................................................................................. 2
3. Fonctions .............................................................................................................. 2
4. Contenu du paquet ............................................................................................... 2
5. Avant l'utilisation ................................................................................................... 3
6. Commande ........................................................................................................... 5
7. Lecture de musique .............................................................................................. 6
8. Vidéo .................................................................................................................... 6
9. Images .................................................................................................................. 6
10. Texte ..................................................................................................................... 7
11. Rechercher parmi tous les fichiers ........................................................................ 7
12. Effacer un fichier ................................................................................................... 7
13. Jeu ........................................................................................................................ 8
14. Réglages de système ........................................................................................... 8
15. Résoudre des erreurs ......................................................................................... 10
16. Données techniques ........................................................................................... 11
17. Veuillez noter que : ............................................................................................. 12
Page 1 sur 12 FR
Page 39

2. Indications
Veuillez éviter un choc brutal de l'appareil.
N’utilisez pas cet appareil dans des endroits extrêmement froids, chauds ou
poussiéreux. Abstenez-vous également de l’exposer directement au soleil.
Effectuez des sauvegardes fréquentes, afin d'éviter une éventuelle perte de
données.
Evitez une utilisation à proximité de champs magnétiques intensifs.
Protégez l'appareil contre l'humidité. Veuillez immédiatement éteindre l'appareil en
cas d'introduction d'humidité. Nettoyez et séchez ensuite l'appareil.
Ne veuillez pas utiliser de produits chimiques pour nettoyer l'appareil. Utilisez
uniquement un tissu sec.
Nous ne sommes pas responsables en cas de dommages ou de pertes de
données, suite à une erreur de fonctionnement, une mauvaise manipulation, une
réparation individuelle de l'appareil ou un remplacement de l'accu.
Ne veuillez pas démonter l'appareil en pièces et n'essayez pas de le réparer tout
seul, car la garantie ne sera plus valable dans ce cas.
3. Fonctions
Lecteur MP3&WMA
Lecteur vidéo AVI
Lecture d'images JPEG
Fichier navigation
Support amovible
Jeu
Accu lithium-ion rechargeable
Réglage personnalisé
4. Contenu du paquet
Au déballage, assurez-vous que l’emballage contient bien l’intégralité des éléments listés
Video Traveller Intenso
Ecouteurs stéréo
Logiciel de conversion (format AVI)
Câble USB
Mode d'emploi + Carte de garantie
Page 2 sur 12 FR
Page 40

5. Avant l'utilisation
Connexion avec l'ordinateur
Pour les systèmes d'exploitation Windows 98/SE, veuillez installer un pilote avant de
connecter le lecteur à l'ordinateur. (Vous trouverez des possibilités de téléchargement
sous www.intenso.de)
Pour les systèmes d'exploitation WIN 2000/XP/ME, vous ne nécessitez pas une
installation du pilote.
Veuillez procéder comme suit :
(1) Connectez le lecteur au branchement USB de l'ordinateur.
(2) La fenêtre “Intenso” s'ouvre. Maintenant vous pouvez enregistrer les données de
votre disque dur sur le support amovible.
Déconnexion sécurisé de l'ordinateur
Pour Windows 2000/XP/ME/Vista :
Cliquez (droite) avec la souris en bas à droite de la barre des tâches, sur le symbole
„retirer périphérique en toute sécurité“. Dans le menu qui suit, veuillez choisir le point
„retirer appareil périphérique amovible USB“ en cliquant dessus avec la souris (gauche).
Veuillez vous assurer que la transmission des données soit entièrement terminée.
Vous pouvez maintenant retirer l'appareil.
Pour Windows 98/SE :
Choisissez l'appareil dans l'„assistant des périphériques“ en cliquant (gauche) avec la
souris. Cliquez maintenant sur le point de menu „retirer“. Veuillez aussi ici vous assurer
que la transmission des données soit entièrement terminée.
L'appareil peut maintenant être retiré de l'ordinateur.
Chargement de la batterie :
L'appareil dispose d'un accu lithium-ion intégré. L'accu est rechargé par le branchement
USB de votre ordinateur.
Lors de la première utilisation de l'appareil, veillez à charger entièrement l'accu. Cette
procédure dur en général 3 heures.
Pour recharger la batterie, connectez l'appareil à l'ordinateur à l'aide du câble USB. La
procédure de chargement débute automatiquement.
Si vous souhaitez connaître le statut actuel du chargement, veuillez débrancher l'appareil
de l'ordinateur. Vous pouvez alors voir un symbole de batterie en haut à droite de l'écran.
Lorsque le symbole s'affiche en vert, l'accu est entièrement chargé.
Indication : Pour une capacité de fonctionnement optimale, l'accu lithium-ion doit être
régulièrement utilisé. Si cela ne devait pas être le cas, veuillez recharger l'accu au moins
une fois par mois.
Page 3 sur 12 FR
Page 41

Eléments de commande
A. ECRAN LCD
B. VOL- : Diminuer le volume
C. VOL+ : Augmenter le volume
D. Enter/Escape : Appuyez pendant quelques secondes sur cette touche, pour revenir
à l'étape précédente dans le menu. Effectuez un appui bref, pour confirmer le choix
ou pour arriver dans le menu de dossier.
E. Retour : Titre précédent. Mouvement vers le haut.
F. Avancer : Titre suivant. Mouvement vers le bas.
G. Play/Pause : Allumer et éteindre le logiciel.
Fonction Play / Pause.
H. Branchement des écouteurs
I. Power Switch : Allumer et éteindre l'appareil
J. Port USB : Branchement avec l'ordinateur
Page 4 sur 12 FR
Page 42

Allumage/Extinction
Allumage de l’appareil :
(1) Pour mettre l’appareil sous tension, poussez l’interrupteur MARCHE/ARRÊT
(ON/OFF) vers la droite sur ON.
(2) Maintenez enfoncée la touche PLAY/PAUSE jusqu’à l’allumage de l’écran.
Extinction de l’appareil :
(1) Maintenez enfoncée la touche PLAY/PAUSE jusqu’à l’extinction de l’écran.
(2) Poussez l’interrupteur MARCHE/ARRÊT (ON/OFF) vers la gauche sur OFF.
Note : Ce lecteur est équipé d’une fonction d’économie d’énergie commandant l’extinction
automatique de l’appareil après environ 3 minutes d’inactivité.
6. Commande
Play/Pause
Appuyez sur la touche „G“ (Play/Pause) pour la lecture ou la pause.
Volume pour la lecture de musique/vidéos
Appuyez sur la touche „B“ (VOL-) ou „G“ (VOL+) pour régler le volume.
Choix du titre précédent (titre précédent)
Brève confirmation de la touche „E“ (retour).
Choix du titre suivant (titre suivant)
Brève confirmation de la touche „F“ (avancer).
Retour
Rester appuyé sur la touche „E“ (retour)
Avancer
Rester appuyé sur la touche „F“ (avancer)
Verrouiller / déverrouiller
Appuyez simultanément sur les touches „D“ (Enter/Escape) et „B“ (VOL-).
A-B Repeat lors de la lecture de musique
Afin de rejouer un certain passage d'un titre en boucle.
(1) Appuyez durant la lecture sur la touche „C“ (VOL+) durant la lecture et restez
appuyé sur la touche pour définir le point de départ de la boucle.
(2) Appuyez de nouveau sur la touche „C“ (VOL+) pour définir le point final de la
boucle.
(3) En confirmant avec la touche „C“ (VOL+) la boucle est terminée.
Page 5 sur 12 FR
Page 43

7. Lecture de musique
Mode musique
Appuyez et maintenez votre appui sur le bouton de Enter/Escape, pour afficher le menu
principal.
Choisissez “musique” et confirmez avec la touche Enter/Escape.
Démarrez la lecture avec la touche Enter/Escape.
Aperçu de dossiers
(1) Appuyez brièvement sur la touche Enter/Escape dans le mode de musique.
(2) A l'aide de la touche avancer/reculer, vous pouvez choisir le fichier ou le titre de
musique souhaité. Avec la touche Enter/Escape, vous confirmez votre choix.
8. Vidéo
(1) Appuyez et maintenez votre appui sur le bouton de Enter/Escape, pour afficher le
menu principal.
(2) Choisissez la vidéo à l'aide de la touche avancer/retour.
(3) Vous pouvez démarrer un film vidéo en appuyant sur la touche Enter/Escape. La
touche avancer/retour permet le choix du fichier vidéo souhaité dans votre
répertoire.
(4) Avec la touche Enter/Escape, vous pouvez ouvrir l'aperçu du dossier navigation
durant la lecture.
Indication : Ce lecteur peut uniquement lire des formats AVI. Pour l'utilisation des formats
RM, RMVB, MPG, MPEG, WMV, DAT, VOB, vous nécessitez le logiciel de conversion
inclus, compatible avec Windows.
9. Images
Affichage d'images
(1) Appuyez et maintenez votre appui sur le bouton de Enter/Escape, pour afficher le
menu principal.
(2) Choisissez la photo à l'aide de la touche avancer/retour.
(3) Lorsque vous avez choisi une photo, vous arrivez à l'image suivante à l'aide de la
touche avancer/retour. Vous pouvez démarrer et arrêter un diaporama en appuyant
sur la touche Play/ Pause. Avec la touche Enter/Escape, vous pouvez ouvrir
l'aperçu du dossier navigation durant le diaporama.
Indication : L'appareil peut uniquement lire des images en format JPG.
Page 6 sur 12 FR
Page 44

10. Texte
Lecture des fichiers txt
(1) Appuyez et maintenez votre appui sur le bouton de Enter/Escape, pour afficher le
menu principal.
(2) Choisissez “Texte” et appuyez sur la touche Enter/Escape pour confirmer.
(3) Choisissez un fichier de texte à l'aide de la touche avancer/retour et confirmez avec
la touche Enter/Escape.
(4) Appuyez sur la touche avancer/retour, pour arriver soit à la partie supérieure ou à la
partie inférieure du texte, qui n'est pas visible sur l'écran. Ou choisissez le
défilement automatique avec la touche Play/ Pause. (Vous pouvez définir l'intervalle
temporaire de 2 à 10 secondes sous réglages : “Réglages -> diaporama -> Texte”).
(5) Pendant que vous continuez de lire, vous pouvez marquer un endroit avec le
bookmark, pour y revenir plus tard. Cette procédure est décrite plus en détail dans
l'étape suivante.
Indication : Vous pouvez enregistrer jusqu'à 3 marque-pages.
Placer un marque-page
(1) Allez à l'endroit que vous souhaitez marquer.
(2) Appuyez brièvement sur la touche VOL+. Le symbole „Save Bookmark“ apparaît sur
l'écran.
(3) Grâce à la touche avancer / retour, vous choisissez un numéro de bookmark.
Confirmez votre choix avec la touche de Enter/Escape. Le marque-page est
enregistré. Il démarre de la première ligne de la page actuelle.
(4) Pour charger la page marquée, veuillez appuyer brièvement sur la touche VOL-,
afin d'afficher les marque-pages enregistrés. Choisissez un marque-page et
confirmez-le avec la touche Enter/Escape. Vous allez maintenant être mené jusqu'à
cette page.
Indication : Si votre fichier de texte ne démarre pas, le format de texte choisi n'est alors
pas compatible. Veuillez choisir un autre format de texte.
11. Rechercher parmi tous les fichiers
Pour rechercher parmi tous les fichiers du lecteur, veuillez procéder comme suit :
(1) Appuyez et maintenez votre appui sur le bouton de Enter/Escape, pour afficher le
menu principal.
(2) Sélectionnez le point de menu „Aperçu de dossiers“. Confirmez avec la touche de
menu.
(3) Avec la touche avancer/retour, vous pouvez choisir le fichier souhaité et confirmez
le choix à l'aide de la touche Enter/Escape.
12. Effacer un fichier
(1) Choisissez le fichier que vous souhaitez supprimer dans l'aperçu de dossiers.
(2) Appuyez brièvement sur la touche VOL Une boîte de dialogue s'ouvre.
Page 7 sur 12 FR
Page 45

(3) Choisissez “Oui” à l'aide de la touche avancer/retour et confirmez avec la touche
Enter/Escape.
13. Jeu
Cet appareil dispose du jeu Tetris World. Pour démarrer ce jeu, sélectionnez l'option “jeu”
dans le menu principal et confirmez avec la touche Enter/Escape.
Démarrer le jeu
Appuyez sur la touche „PLAY/PAUSE“
Déplacer le bloc vers la droite ou la gauche
Appuyez sur la touche retour ou avancer
Tourner le bloc
Appuyez sur la touche Enter/Escape
Descendre le bloc
Appuyez sur la touche VOL
Quitter le jeu
Restez appuyé sur la touche Enter/Escape
14. Réglages de système
Adapter les réglages :
(1) Veuillez choisir le point de menu “réglages”.
(2) A l'aide de la touche avancer/retour, vous choisissez le point de menu souhaité,
pour ensuite le confirmer avec la touche Enter/Escape, afin de modifier les
réglages. Vous pouvez revenir en arrière grâce à la touche „Play/Pause“.
Musique
Répétition
(1) Titre simple : Joue le titre actuel et arrête ensuite la lecture.
(2) Répéter titre : Répète le titre actuel.
(3) Dossier simple : Joue une fois les titres d'un dossier choisi et arrête ensuite la
lecture
(4) Répéter dossier : Répète tous les titres du dossier actuel.
(5) Tous les titres une fois : Joue tous les titres enregistrés et termine la lecture avec
le dernier titre.
(6) Répéter tous les titres : Répète tous les titres enregistrés.
(7) Fonction intro : Joue les 10 premières secondes de chaque fichier audio.
Mode de lecture
(1) Lecture normale : Joue les fichiers audio dans l'ordre
(2) Lecture aléatoire : Lecture aléatoire des titres.
Choisir Equalizer
Normal, 3D, rock, pop, classique, bass, jazz, equalizer personnalisé
Page 8 sur 12 FR
Page 46

Equalizer personnalisé
(1) Appuyez sur la touche avancer ou retour, pour choisir la bande EQ.
(2) Veuillez utiliser les touches VOL+ / VOL-, pour régler les valeurs.
(3) Répéter l'appui sur la touche avancer, jusqu'à placer le curseur sur le bouton “OUI”
et confirmez avec la touche Enter/Escape.
(4) Choisissez maintenant dans le menu EQ l'option “Equalizer personnalisé”, afin
d'utiliser les réglages.
Diaporama d'images & textes
Texte
Choisissez un intervalle temporaire pour tourner la page actuelle vers la page suivante.
Images
Choisissez l'intervalle temporaire entre l'image actuelle et l'image suivante.
Réglages d'écran
Durée d'éclairage
5 secondes,
10 secondes,
15 secondes,
20 secondes,
30 secondes,
Toujours allumé
Luminosité
(Définissez la luminosité de l'écran)
Mode LCD
Normal
Mode d'énergie économique (éteint l'éclairage de l'écran lorsqu'il n'y a pas de
commande)
Système
A propos : Informations relatives au produit
Actualisation du logiciel : Actualisation du logiciel
Paramètres d'usine : Charge les paramètres d'usine
Sleep Timer
Eteint, 10 minutes, 15 minutes, 30 minutes, 60 minutes, 120 minutes
Langues
Vous pouvez ici choisir différentes langues
Page 9 sur 12 FR
Page 47

15. Résoudre des erreurs
Problème – causes éventuelles – solution du problème
Votre écran n'affiche pas d'image.
(1) La batterie est vide.
Rechargez la batterie.
(2) Les touches sont bloquées.
Déverrouillez le verrouillage des touches comme indiqué sous „6. Commande“.
L'appareil ne réagit pas lors de la commande de la touche Play.
(1) Les touches sont bloquées.
Déverrouillez le verrouillage des touches comme indiqué sous „6. Commande“.
La lecture n'émet pas de son.
(1) Le volume est trop faible
Veuillez augmenter le volume dans le menu du volume
(2) Fichier audio endommagé
Veuillez de nouveau transmettre le fichier
Aucune connexion n'a pu être établie avec l'ordinateur.
(1) Le pilote n'a pas été correctement installé
Veuillez réinstaller le pilote.
(2) Veuillez effectuer une actualisation de la carte mère
(Veuillez respecter les indications du fabricant)
L'affichage du temps change en permanence.
(1) La valeur bit du fichier MP3 change durant la lecture.
Veuillez utiliser une valeur bit unitaire lors de la compression.
L'ordinateur indique une erreur lors de la connexion avec l'appareil
(1) Le lecteur a été séparé de l'ordinateur durant la transmission des données.
Ne veuillez jamais débrancher l'appareil durant la transmission des données.
La capacité de mémoire indiquée de l'appareil ne correspond pas à la mémoire
réelle.
(1) Une partie de la mémoire est utilisée pour le logiciel, le formatage et les
caractéristiques de l'écran.
Les données MP3 ne sont pas lues correctement.
(1) Les données MP3 ont été comprimées dans un mauvais format, par exemple
en MPEG 1 ou 2.
Effacez les formats de fichiers, qui ne sont pas compatibles.
Page 10 sur 12 FR
Page 48

Les fichiers vidéo ne peuvent pas être lus.
(1) Ce format de fichier n'est pas compatible.
Le format vidéo doit être AVI. Si ce n'est pas le cas, veuillez le convertir. Veillez
à la taille du format de 128x128 Pixel
(2) Le fichier vidéo est endommagé.
Transmettez de nouveau le fichier vidéo
Les photos ne sont pas affichées.
(1) Ce format de fichier n'est pas compatible !
Veuillez convertir la photo en format JPG.
(2) L'image dispose d'une résolution supérieure à 3520x2816 pixel
L'appareil supporte une résolution maximale de 3520 x 2816 pixel. Assurezvous de ne pas dépasser cette résolution.
Impossible de lire le fichier de texte.
(1) Ce format de fichier n'est pas compatible.
Veuillez utiliser le format txt
16. Données techniques
Type de batterie
Accu lithium-ion rechargeable
Durée de batterie
5-7 heures
LCD
Ecran TFT 1,5“ pouces
Ecouteurs
5mW+5mW
Format vidéo
AVI (XviD) 128x128
Formats audio
MP3, WMA
Format photo
JPEG
Résolution de l'image
3520 X 2816 pixel (max.)
Bit
MP3 : 8-320kbps ;
WMA : 32-384 kbps
SNR
90dB
Page 11 sur 12 FR
Page 49

Port USB
USB2.0
Etat de marche entre
0 celsius ~ +55 celsius
Température de stockage entre
20 celsius ~ +55 celsius
A utiliser à une humidité de l'air relative de
20% ~ 90% (40 celsius)
A entreposer à une humidité de l'air relative de
20% ~ 93% (40 celsius)
17. Veuillez noter que :
(1) Plug & Play est uniquement possible sur Windows 2000/XP et Vista.
Pour Windows 98/SE, veuillez installer le pilote.
(2) Veuillez déverrouiller le verrouillage des touches pour utiliser l'appareil.
(3) Veuillez recharger la batterie lorsque l'écran l'indique.
(4) Veuillez uniquement déconnecter l'appareil de l'ordinateur selon les indications
correspondantes, afin d'éviter une perte éventuelle des données.
(5) Lorsque le fichier est très grand, le chargement du fichier est plus long.
(6) Logiciel compatible avec Windows 2000, Windows XP et Windows Vista.
Page 12 sur 12 FR
Page 50

1. Resumen del contenido
1. Resumen del contenido ........................................................................................ 1
2. Indicaciones .......................................................................................................... 2
3. Funciones ............................................................................................................. 2
4. Contenido del paquete .......................................................................................... 2
5. Antes del uso ........................................................................................................ 3
6. Uso ....................................................................................................................... 5
7. Reproducción de música ...................................................................................... 6
8. Video .................................................................................................................... 6
9. Imágenes .............................................................................................................. 6
10. Texto ..................................................................................................................... 7
11. Búsqueda entre todos los archivos ....................................................................... 7
12. Eliminar un archivo ............................................................................................... 7
13. Juego .................................................................................................................... 8
14. Configuraciones del sistema ................................................................................. 8
15. Resolución de errores ......................................................................................... 10
16. Datos técnicos .................................................................................................... 11
17. Tenga en cuenta lo siguiente .............................................................................. 12
Página 1 de 12 ES
Page 51

2. Indicaciones
Evite que el dispositivo reciba golpes fuertes.
No utilice el aparato en zonas de calor, frío o humedad extremos ni en zonas muy
polvorientas. No lo coloque bajo la luz directa del sol.
Realice copias de seguridad a menudo para evitar una posible pérdida de datos.
Evite utilizarlo en campos magnéticos fuertes.
Proteja el dispositivo de la humedad. Si entra humedad en el dispositivo, apáguelo
inmediatamente. Posteriormente limpie y séquelo.
No use disolventes químicos para limpiarlo. Use solamente un pañuelo seco.
No nos hacemos responsables de los daños o la pérdida de datos en caso de
funcionamiento erróneo, manipulación incorrecta o reparación del dispositivo por el
propio usuario o cambio de la batería.
No desarme el dispositivo ni intente repararlo por su cuenta. La garantía quedaría
anulada.
3. Funciones
MP3&WMA Player
AVI Video Player
Visualizador de imágenes JPEG
Navegador de carpetas
Memoria extraíble
Juego
Batería recargable de iones de litio
Ajustes específicos del cliente
4. Contenido del paquete
Compruebe que el contenido del embalaje se encuentre en perfectas condiciones.
Intenso Video Traveller
Auriculares estéreo
Software de conversión (formato AVI)
Cable USB
Instrucciones de uso + Tarjeta de garantía
Página 2 de 12 ES
Page 52

5. Antes del uso
Conexión con el PC
Instale un controlador en el sistema operativo Windows 98/SE antes de conectar el
reproductor con el PC (puede descargarlo en www.intenso.de)
Los sistemas operativos WIN 2000/XP/ME no requieren la instalación de este controlador.
Proceda como se indica a continuación:
(1) Conecte el reproductor en la conexión USB del PC.
(2) Se abre la ventana “Intenso”. Ahora puede guardar los datos de su disco duro a la
memoria.
Desconexión segura del PC
Para Windows 2000/XP/ME/Vista:
Pulse con el botón derecho el símbolo "Extraer hardware con seguridad" en la barra de
herramientas situada en la parte inferior derecha. Seleccione "Extraer dispositivo de
almacenamiento masivo USB" con el botón izquierdo. Asegúrese de que la transmisión de
datos haya finalizado completamente.
Ahora puede extraer el dispositivo.
Para Windows 98/SE:
Seleccione el dispositivo en "Administrador de dispositivos" con el botón izquierdo. Ahora
pulse en el punto del menú "Extraer". Asegúrese de que la transmisión de datos haya
finalizado completamente.
Ahora puede desconectar el dispositivo del PC.
Carga de la batería:
El dispositivo dispone de una batería de iones de litio incorporada. La batería se carga
mediante la conexión USB de su PC.
La primera vez que utilice el dispositivo asegúrese que la batería esté completamente
cargada. Este proceso dura normalmente 3 horas.
Para cargar la batería, conecte el dispositivo a su PC mediante el cable USB. El proceso
de carga se inicia automáticamente.
Si quiere saber el estado actual del proceso de carga, desconecte el dispositivo del PC.
En la pantalla verá un símbolo de batería en la parte superior derecha. Si este símbolo es
de color verde, la batería está completamente cargada.
Nota: para un rendimiento óptimo, la batería de iones de litio debe usarse regularmente.
De no ser así, cargue la batería completamente como mínimo una vez al mes.
Página 3 de 12 ES
Page 53

Botones y funciones
A. PANTALLA LCD
B. VOL-: Baja el volumen
C. VOL+: Sube el volumen
D. Enter/Escape: Pulse este botón durante unos segundos para volver al menú
principal desde cualquier nivel. Pulse brevemente para confirmar la selección o
para ir al menú de carpetas.
E. Retroceso: Pista anterior. Desplazar hacia arriba.
F. Avance: Pista siguiente. Desplazar hacia abajo.
G. Play/Pause Activar o descaticar el software.
Función Play / Pause.
H. Conexión auriculares
I. Power Switch: Encender y apagar el dispositivo
J. Puerto USB: Conexión con el ordenador
Página 4 de 12 ES
Page 54

Encender y apagar
Encender
(1) Deslice el botón ON/OFF a la derecha hacia la posición ON.
(2) Pulse la tecla PLAY/PAUSE y manténgala pulsada hasta que se encienda la
pantalla.
Apagar
(1) Pulse la tecla PLAY/PAUSE y manténgala pulsada hasta que se apague la
pantalla.
(2) Deslice el botón ON/OFF a la izquierda hacia la posición OFF.
Observación: este reproductor dispone de un dispositivo de ahorro de energía. El aparato
se apaga automáticamente después de estar 3 minutos inactivo.
6. Uso
Play/Pause
Pulse el botón "G" (Play/Pause) para reproducir o ponerlo en pausa.
Volumen en la reproducción de música o video
Pulse el botón "B" (VOL-) o "C" (VOL+) para regular el volumen.
Selección de la pista anterior
Pulsar brevemente el botón "E" (retroceso).
Selección de la pista siguiente
Pulsar brevemente el botón "F" (avance).
Retroceder
Mantenga pulsado el botón "E" (retroceso)
Avanzar
Mantenga pulsado el botón "F" (avance)
Bloquear/desbloquear los botones
Pulse los botones "D" (Enter/Escape) y "B" (VOL-) simultáneamente
A-B Repeat en la reproducción de música
Esta función le permite reproducir un determinado fragmento de una pista repetidamente.
(1) Durante la reproducción, pulse y mantenga pulsado el botón "C" (VOL+), para
determinar el punto inicial del fragmento.
(2) Pulse y mantega pulsado el botón "C" (VOL+) de nuevo para determinar el punto
final del fragmento.
(3) Pulsando el botón "C" (VOL+) finalizará la reproducción.
Página 5 de 12 ES
Page 55

7. Reproducción de música
Modo música
Pulse y mantenga pulsado el botón Enter/Escape para acceder al menú principal.
Seleccione “Musik” (Música) y confírmelo con el botón Enter/Escape.
Inicie la reproducción con el botón Enter/Escape.
Vista general de las carpetas
(1) Pulse brevemente el botón Enter/Escape en el modo Música.
(2) Con el botón de Avance/Retroceso puede seleccionar la carpeta o pista deseada.
Con el botón Enter/Escape confirme su selección.
8. Video
(1) Pulse prolongadamente el botón Enter/Escape para acceder al menú principal.
(2) Seleccione con el botón Avance/Retroceso del video.
(3) Con el botón Enter/Escape puede iniciar un video. El botón Avance/Retroceso
facilita la selección del archivo de video deseado en el índice.
(4) Durante la reproducción, con el botón Enter/Escape puede acceder a la vista
general de las carpetas.
Nota: Este reproductor sólo puede reproducir formatos AVI. Para usar formatos RM,
RMVB, MPG, MPEG, WMV, DAT, VOB; es necesario usar el software de conversión para
Windows suministrado.
9. Imágenes
Visualización de imágenes
(1) Pulse y mantenga pulsado el botón Enter/Escape para acceder al menú principal.
(2) Seleccione la foto con el botón Avance/Retroceso.
(3) Cuando haya seleccionado una foto, acceda a la siguiente con el botón
Avance/Retroceso. Con el botón Play/ Pause-Taste puede iniciar y detener un
Diashow. Durante el Diashow puede acceder a la vista general de las carpetas con
el botón Enter/Escape.
Nota: el dispositivo sólo puede reproducir imágenes con formato JPG.
Página 6 de 12 ES
Page 56

10. Texto
Lectura de archivos .txt
(1) Pulse y mantenga pulsado el botón Enter/Escape para acceder al menú principal.
(2) Seleccione “Text” (Texto) y pulse el botón Enter/Escape para confirmar.
(3) Seleccione un archivo de texto con el botón Avance/Retroceso y confírmelo con el
botón Enter/Escape.
(4) Presione el botón Avance/ Retroceso para acceder a la parte superior o inferior del
texto que no aparece en la pantalla. O seleccione con el botón Play/ Pause el
avance automático. (Puede seleccionar un intervalo de tiempo de entre 2 y 10
segundos en configuraciones: “Einstellungen (Configuraciones) -> Diashow -> Text
(Texto)”).
(5) Mientras lee, puede marcar un punto con el Bookmark para leerlo de nuevo. Este
proceso se describe más detalladamente en el siguiente punto.
Nota: puede guardar hasta 3 puntos de lectura.
Crear un punto de lectura
(1) Sitúese en el punto que quiere marcar.
(2) Pulse brevemente el botón VOL+. Aparece "Save Bookmark" (Guardar marcador)
en la pantalla.
(3) Con el botón Avance/Retroceso seleccione una sección del número de marcador.
Confirme su selección con el botón Enter/Escape. El punto de lectura se ha
guardado. Se iniciará por la primera línea de la página actual.
(4) Para cargar la página marcada, pulse brevemente el botón VOL, para acceder al
punto de lectura guardado. Seleccione un punto de lectura y confírmelo con el
botón Enter/Escape. Ahora accederá a esta página.
Nota: si su archivo de texto no arranca, puede ser que el formato de texto seleccionado
no sea compatible. Seleccione otro formato de texto.
11. Búsqueda entre todos los archivos
Para buscar entre todos los archivos del Player, proceda como se describe a
continuación:
(1) Pulse prolongadamente el botón Enter/Escape para acceder al menú principal.
(2) Seleccione el punto del menú "Ordner Übersicht" (Vista general de las carpetas).
Confirme con el botón Menú.
(3) Seleccione el archivo deseado con el botón Avance/Retroceso y confirme su
selección con el botón Enter/Escape.
12. Eliminar un archivo
(1) Seleccione el archivo que quiere eliminar de la vista general de carpetas.
(2) Pulse brevemente el botón VOL. Aparecerá un cuadro de diálogo.
Página 7 de 12 ES
Page 57

(3) Seleccione "Ja" (Sí) con el botón Avance/Retroceso y confírmelo con el botón
Enter/Escape.
13. Juego
Este dispositivo dispone del juego Tetris World. Para empezar este juego, seleccione en
el menú principal la opción "Spiel" (Juego) y confírmelo con el botón Enter/Escape.
Iniciar el juego
Pulse el botón "PLAY/PAUSE"
Mover el bloque hacia la derecha o hacia la izquierda
Pulse el botón Avance o Retroceso.
Girar el bloque
Pulse el botón Enter/Escape
Colocar el bloque
Pulse el botón VOL
Abandonar el juego
Pulse prolongadamente el botón Enter/Escape
14. Configuraciones del sistema
Ajuste de las configuraciones:
(1) Ahora seleccione el punto "Einstellungen" (Configuraciones) en el menú principal.
(2) Con el botón Avance/Retroceso seleccione el punto del menú deseado y confírmelo
con el botón Enter/Escape para cambiar las configuraciones. Con el botón
"Play/Pause" puede retroceder.
Música
Repetición
(1) Pista única: reproduce la pista actual y detiene la reproducción.
(2) Repetir pista: repite la pista actual.
(3) Carpeta de pista única: repite una vez la pista de la carpeta seleccionada y
después detiene la reproducción
(4) Carpeta de repetición: repite todas las pistas de la carpeta actual.
(5) Todas las pistas únicas: reproduce todas las pistas guardadas y termina la
reproducción con la última pista.
(6) Repetir todas las pistas: repite todas las pistas guardadas.
(7) Función Intro: reproduce los primeros 10 seg. de los archivos de audio.
Modo de reproducción
(1) Reproducción normal: reproduce los archivos de audio por orden
(2) Reproducción aleatoria: reproduce las pistas aleatoriamente.
Selección del ecualizador
Normal, 3D, rock, pop, clásico, bass, bazz, ecualizador definido por el usuario
Página 8 de 12 ES
Page 58

Ecualizador definido por el usuario
(1) Pulse el botón Avance o Retroceso para seleccionar la barra de EQ.
(2) Pulse los botones VOL+ / VOL- para ajustar los valores.
(3) Pulse el botón avance hasta que el cursor esté en el botón “JA”(Sí) y confírmelo
con el botón Enter/Escape.
(4) Ahora seleccione en el menú EQ la opción “Benutzerdefinierter Equalizer”
(Ecualizador definido por el usuario) para usar las configuraciones.
Diashow imagen y texto
Texto
Seleccione el intervalo de tiempo para el cambio entre una página y la siguiente.
Imágenes
Seleccione el intervalo de tiempo entre la imagen actual y la siguiente.
Configuraciones de la pantalla
Tiempo de iluminación
5 segundos,
10 segundos,
15 segundos,
20 segundos,
30 segundos,
Siempre encendido.
Contraste
(Determine el contraste de la pantalla)
Modo LCD
Normal
Modo de ahorro de energía (desconecta la iluminación de la pantalla cuando no se usa)
Sistema
Acerca de: Información sobre el producto
Actualización del firmware: Actualización del firmware
Configuraciones de fábrica: Carga las configuraciones de fábrica
Sleep Timer
De 10 minutos, 15 minutos, 30 minutos, 60 minutos, 120 minutos
Idiomas
Esta opción le permite seleccionar entre diferentes idiomas
Página 9 de 12 ES
Page 59

15. Resolución de errores
Problema – causa posible – solución al problema
No se visualiza nada en la pantalla.
(1) La batería está gastada.
Cárguela.
(2) Los botones están bloqueados.
Desbloquéelos como se describe en "6. Uso".
El dispositivo no reacciona cuando pulsa el botón Play.
(1) Los botones están bloqueados.
Desbloquéelos como se describe en "6. Uso".
Durante la reproducción falta el sonido.
(1) El altavoz está demasiado bajo
Suba el volumen en el menú de volumen
(2) Archivo de audio defectuoso
Copie el archivo de nuevo
No se puede establecer ninguna conexión con el PC.
(1) No se ha instalado el controlador correctamente
Instale el controlador de nuevo.
(2) Actualice la placa base
(Para ello tenga en cuenta las instrucciones del fabricante)
El valor del indicador del tiempo cambia continuamente.
(1) La cuota de bits de los archivos del MP3 cambia durante la reproducción.
Utilice una cuota de bits única al comprimir.
El PC avisa de un error al conectarse con el dispositivo
(1) El Player fue desconectado del PC durante la transmisión de datos.
Nunca desconecte el dispositivo durante la transmisión de datos.
La memoria indicada del dispositivo no coincide con la memoria real.
(1) Una parte de la memoria se usa para software, formateado y propiedades de
la pantalla.
Los datos del MP3 no se reproducen correctamente.
(1) Los datos del MP3 fueron comprimidos de forma incorrecta, p. ej. en MPEG 1
o 2.
Elimine los archivos con formatos que no son compatibles.
Página 10 de 12 ES
Page 60

No se pueden reproducir los archivos de video.
(1) El formato no es compatible.
El formato del video debe de ser AVI. Si este no es el caso, conviértalo. Tenga
en cuenta el tamaño del formato 128x128 píxeles
(2) El archivo de video está defectuoso.
Copie el archivo de video de nuevo
No se muestran las fotos.
(1) El formato no es compatible.
Convierta la foto a formato JPG.
(2) La imagen tiene una resolución de más de 3520x2816 píxeles
El dispositivo acepta una resolución máxima de 3520x 2816 píxeles.
Asegúrese de que no sobrepasa dicha resolución.
Los archivos de texto no se pueden leer.
(1) El formato no es compatible.
Use archivos con formato txt
16. Datos técnicos
Tipo de batería
Batería recargable de iones de litio
Vida útil de la batería
5-7 horas
LCD
Pantalla de 1,5 pulgadas TFT
Auriculares
5mW+5mW
Formato de Video
AVI (XviD) 128x128
Formatos de audio
MP3, WMA
Formato de foto
JPEG
Resolución de la imagen
3520 X 2816 píxeles (máx.)
Cuota de bits
MP3: 8-320kbps;
WMA: 32-448kbps;
Página 11 de 12 ES
Page 61

SNR
90dB
Puerto USB
USB2.0
Intervalo de uso
0 Celsius ~ +55 Celsius
Temperatura de almacenamiento entre
-20 Celsius ~ +55 Celsius
Uso en un humedad relativa de
20% ~ 90% (40 Celsius)
Capacidad de almacenamiento en un humedad relativa de
20% ~ 93% (40 Celsius)
17. Tenga en cuenta lo siguiente
(1) Plug & Play sólo está posible en Windows 2000/XP y Vista.
Instale el controlador para Windows 98/SE.
(2) Desbloquee los botones para manejar el dispositivo.
(3) Cargue la batería cuando se indique en la pantalla.
(4) Para evitar una posible pérdida de datos sólo debe desconectar el reproductor del
PC como se ha indicado.
(5) Cuando el archivo a reproducir es muy grande, el proceso de carga es más largo.
(6) Software compatible con Windows 2000, Windows XP y Windows Vista.
Página 12 de 12 ES
Page 62

1. Vista geral do conteúdo
1. Vista geral do conteúdo ........................................................................................ 1
2. Notas .................................................................................................................... 2
3. Funções ................................................................................................................ 2
4. Volume de fornecimento ....................................................................................... 2
5. Antes de utilizar .................................................................................................... 3
6. Funcionamento ..................................................................................................... 5
7. Reprodução de música ......................................................................................... 6
8. Vídeo .................................................................................................................... 6
9. Imagens ................................................................................................................ 6
10. Texto ..................................................................................................................... 7
11. Pesquisar em todos os ficheiros ........................................................................... 7
12. Eliminar um ficheiro .............................................................................................. 7
13. Jogo ...................................................................................................................... 8
14. Ajustes do sistema ................................................................................................ 8
15. Eliminação de erros ............................................................................................ 10
16. Dados técnicos ................................................................................................... 11
17. Tenha em atenção o seguinte ............................................................................ 12
Página 1 de 12 PT
Page 63

2. Notas
Evite choques fortes com o aparelho.
Não use o aparelho em zonas extremamente frias, quentes, húmidas ou
poeirentas. Também não o exponha a radiação solar directa.
Efectue regularmente cópias de segurança, para evitar possíveis perdas de dados.
Evite a utilização em campos fortemente magnetizados.
Proteja o aparelho contra a humidade. Caso entre humidade no aparelho, desligue-
o imediatamente.
Em seguida, limpe e seque o aparelho. Não utilize quaisquer soluções químicas
para limpar o aparelho. Utilize apenas um pano seco.
Não nos responsabilizamos por danos ou perdas de dados no caso de uma falha
no funcionamento, utilização imprópria, reparação do aparelho efectuada pelo
cliente ou substituição da bateria.
Não desmonte o aparelho, nem tente repará-lo você mesmo, caso contrário a
garantia extinguir-se-á.
3. Funções
Leitor de MP3&WMA
Leitor de vídeo AVI
Visualizador de imagens JPEG
Navegação nas pastas
Dispositivo amovível de armazenamento de dados
Jogo
Bateria recarregável de iões de lítio
Ajuste específico do cliente
4. Volume de forneciment
Por favor verifique se o conteúdo da embalagem está completo
Intenso Video Traveller
Auscultadores estéreo
Software de conversão (formato AVI)
Cabo USB
Manual de instruções + Cartão de garantia
Página 2 de 12 PT
Page 64

5. Antes de utilizar
Ligar ao PC
Nos sistemas operativos Windows 98/SE, instale um controlador antes de ligar o leitor ao
PC. (O download poderá ser feito em www.intenso.de)
Para os sistemas operativos WIN 2000/XP/ME, a instalação do controlador não é
necessária.
Proceda da seguinte forma:
(1) Ligue o leitor à porta USB do PC.
(2) Em seguida, abre-se a janela “Intenso”. Agora pode guardar os dados do seu disco
rígido no dispositivo amovível de armazenamento de dados.
Desligar do PC com segurança
Para Windows 2000/XP/ME/Vista:
Com o botão direito do rato, clique no símbolo "Remover o hardware com segurança", no
canto inferior direito, na barra de tarefas. No menu de contexto surgido, seleccione o
ponto "Remover o dispositivo de armazenamento de massa USB", com o botão esquerdo
do rato. Certifique-se de que a transmissão de dados está completamente concluída.
Agora pode remover o dispositivo.
Para Windows 98/SE:
Seleccione o aparelho em "Gestor de Dispositivos" com o botão esquerdo do rato. Clique
agora no ponto de menu "Remover". Certifique-se também de que a transmissão de
dados está completamente concluída.
O dispositivo pode ser agora removido do PC.
Carregamento da bateria:
O aparelho dispõe de uma bateria integrada de iões de lítio. A bateria é carregada através
da ligação USB com o seu PC.
Na primeira utilização do aparelho, certifique-se de que carrega a bateria completamente.
Regra geral, este processo demora 3 horas.
Para carregar a bateria, ligue o aparelho ao PC através do cabo USB. O processo de
carregamento começa automaticamente.
Se quiser saber qual é o estado actual do processo de carregamento, remova o aparelho
do PC. No canto superior direito do visor encontra-se o símbolo da bateria. Se este
símbolo acender a verde, a bateria está completamente carregada.
Nota: Para um desempenho optimizado, a bateria de iões de lítio deve ser utilizada
regularmente. Se não for este o caso, carregue completamente a bateria, pelo menos,
uma vez por mês.
Página 3 de 12 PT
Page 65

Elementos de comando
A. VISOR LCD
B. VOL-: Redução do volume
C. VOL+: Aumento do volume
D. Enter/Escape: Prima esta tecla durante alguns segundos, para retroceder para o
menu principal a partir de qualquer nível. Prima brevemente para confirmar a
selecção ou para aceder ao menu de pastas.
E. Recuar: Faixa anterior. Movimento para cima.
F. Avançar: Faixa seguinte. Movimento para baixo.
G. Play/Pause: Ligar e desligar o software.
Função Play/Pause.
H. Ligação para auscultadores
I. Power Switch: Ligar e desligar o aparelho
J. Porta USB: Ligação com o computador
Página 4 de 12 PT
Page 66

Ligar e desligar,
Ligar
(1) Desloque o interruptor ON/OFF para a direita até ON.
(2) Carregue na tecla PLAY/PAUSE e mantenha esta tecla carregada até o visor ligar.
Desligar,
(1) Carregue na tecla PLAY/PAUSE e mantenha esta tecla carregada até o visor
desligar.
(2) Desloque o interruptor ON/OFF para a esquerda até OFF.
Observação: este leitor tem um dispositivo de poupança de energia que desliga
automaticamente o aparelho se este não for usado durante mais de três minutos.
6. Funcionamento
Play/Pause
Prima a tecla "G" (Play/Pause) para reproduzir ou para parar.
Volume na reprodução de música/vídeo
Prima a tecla "B" (VOL-) ou."C" (VOL+), para regular o volume.
Selecção da faixa anterior (faixa anterior)
Premir brevemente a tecla "E" (recuar).
Selecção da faixa seguinte (faixa seguinte)
Premir brevemente a tecla "F" (avançar).
Retroceder
Manter premida a tecla "E" (recuar)
Avançar
Manter premida a tecla "F" (avançar)
Bloquear/desbloquear as teclas
Prima simultaneamente as teclas "D" (Enter/Escape) e "B" (VOL-).
Repetição A-B durante reprodução de música
Para reproduzir continuamente uma determinada secção de uma faixa.
(1) Durante a reprodução, prima e mantenha premida a tecla "C" (VOL+), para
determinar o ponto inicial da reprodução contínua.
(2) Prima novamente e mantenha premida a tecla "C" (VOL+), para determinar o ponto
final da reprodução contínua.
(3) Ao premir a tecla "C" (VOL+), a reprodução contínua é concluída.
Página 5 de 12 PT
Page 67

7. Reprodução de música
Modo Música
Prima e mantenha premida a tecla Enter/Escape, para aceder ao menu principal.
Seleccione "Música" e confirme com a tecla Enter/Escape.
Inicie a reprodução com a tecla Enter/Escape.
Vista geral das pastas
(1) No modo Música, prima rapidamente a tecla Enter/Escape.
(2) Com a tecla Avançar/Recuar, pode seleccionar a pasta ou a faixa de música
pretendida. Com a tecla Enter/Escape, confirme a sua selecção.
8. Vídeo
(1) Prima e mantenha premida a tecla Enter/Escape, para aceder ao menu principal.
(2) Seleccione o vídeo com a tecla Avançar/Recuar.
(3) Com a tecla Enter/Escape, pode dar início a um filme de vídeo. A tecla
Avançar/Recuar possibilita a selecção de um ficheiro de vídeo à escolha a partir do
seu directório.
(4) Com a tecla Enter/Escape, pode aceder à navegação nas pastas, durante a
reprodução.
Nota: Este leitor pode reproduzir formatos AVI. Para a utilização de formatos RM, RMVB,
MPG, MPEG, WMV, DAT, VOB, necessitam do software de conversão fornecido,
compatível com Windows.
9. Imagens
Indicação de imagens
(1) Prima e mantenha premida o botão Enter/Escape, para aceder ao menu principal
(2) Seleccione a fotografia com a tecla Avançar/Recuar.
(3) Se tiver seleccionado uma fotografia, com a tecla Avançar/Recuar, passa para a
próxima imagem. Com a tecla Play/Pause, pode iniciar e parar uma apresentação
de diapositivos. Com a tecla Enter/Escape, pode aceder à vista geral das pastas,
durante a apresentação de diapositivos.
Nota: O aparelho pode apenas reproduzir imagens em formato JPG.
Página 6 de 12 PT
Page 68

10. Texto
Leitura de ficheiros .txt
(1) Prima e mantenha premida a tecla Enter/Escape, para aceder ao menu principal
(2) Seleccione "Texto" e prima a tecla Enter/Escape para confirmar.
(3) Com a tecla Avançar/Recuar, seleccione um ficheiro de texto e confirme com a
tecla Enter/Escape.
(4) Prima a tecla Avançar/Recuar, para aceder à parte superior ou inferior do texto que
não é apresentada no visor. Ou seleccione o scroll automático com a tecla Play/
Pause. (Em Ajustes, pode seleccionar o intervalo de tempo entre 2 e 10 seg.:
"Ajustes -> Apresentação de diapositivos -> Texto").
(5) Quando estiver a ler, poderá marcar um ponto com o marcador (bookmark), para
prosseguir com a leitura posteriormente. Este processo é descrito mais
detalhadamente no próximo ponto.
Nota: Pode memorizar até 3 marcadores.
Criar marcadores
(1) Vá para o ponto que pretende assinalar.
(2) Prima brevemente a tecla VOL+. Surge a indicação "Save Bookmark" no visor.
(3) Com a tecla Avançar/Recuar, seleccione um número do marcador. Confirme a sua
selecção com a tecla Enter/Escape. O marcador é memorizado. Começa-se a partir
da primeira linha da página actual.
(4) Para carregar a página marcada, prima brevemente a tecla VOL, de modo a aceder
aos marcadores memorizados. Seleccione um marcador e confirme com a tecla
Enter/Escape. É agora conduzido para esta página.
Nota: Se o seu ficheiro de texto não for iniciado, o formato que seleccionou não é
suportado pelo leitor. Seleccione um outro formato de texto.
11. Pesquisar em todos os ficheiros
Para pesquisar em todos os ficheiros memorizados no leitor, proceda do seguinte modo:
(1) Prima e mantenha premida a tecla Enter/Escape, para aceder ao menu principal.
(2) Seleccione o ponto de menu "Vista geral das pastas". Confirme com a tecla Menu.
(3) Com a tecla Avançar/Recuar, seleccione o ficheiro pretendido e confirme a sua
selecção com a tecla Enter/Escape.
12. Eliminar um ficheiro
(1) Na vista geral das pastas, seleccione o ficheiro que pretende eliminar.
(2) Prima brevemente a tecla VOL-. Surge uma caixa de diálogo.
(3) Com a tecla Avançar/Recuar, seleccione "Sim" e confirme com a tecla
Enter/Escape.
Página 7 de 12 PT
Page 69

13. Jogo
Este aparelho inclui o jogo Tetris World. Para iniciar este jogo, seleccione, no menu
principal, a opção "Jogo" e confirme com a tecla Enter/Escape.
Iniciar jogo
Prima a tecla "PLAY/PAUSE"
Mover os blocos para a direita ou esquerda
Prima a tecla Recuar ou Avançar
Rodar os blocos
Prima a tecla Enter/Escape
Descer os blocos
Prima a tecla VOL
Sair do jogo
Prima e mantenha premida a tecla Enter/Escape
14. Ajustes do sistema
Adaptação dos ajustes:
(1) No menu principal, seleccione o ponto "Ajustes".
(2) Com a tecla Avançar/Recuar, seleccione o ponto de menu que pretende e confirme
com a tecla Enter/Escape, para alterar os ajustes. Com a "Tecla Play/Pause", pode
retroceder.
Música
Repetição
(1) Faixa simples: Reproduz a faixa actual e, em seguida, pára a reprodução.
(2) Repetir faixa: Repete a faixa actual.
(3) Pasta simples: Repete uma vez as faixas de uma pasta seleccionada e, em
seguida, pára a reprodução
(4) Repetir pasta: Repete todas as faixas da pasta actual.
(5) Todas as faixas uma vez: Reproduz todas as faixas memorizadas e conclui a
reprodução com a última faixa.
(6) Repetir todas as faixas: Repete todas as faixas memorizadas.
(7) Função Intro: Reproduz os primeiros 10 seg. de cada ficheiro áudio.
Modo de reprodução
(1) Reprodução normal: Reproduz os ficheiros de áudio sequencialmente
(2) Reprodução aleatória: Reprodução aleatória de todas as faixas.
Seleccionar equalizador
Normal, 3D, Rock, Pop, Clássico, Bass, Jazz, equalizador definido pelo utilizador
Equalizador definido pelo utilizador
(1) Prima a tecla Avançar ou Recuar, para seleccionar a coluna EQ.
(2) Prima as teclas VOL+ / VOL-, para ajustar os valores.
Página 8 de 12 PT
Page 70

(3) Prima novamente a tecla Avançar até o cursor se encontrar no botão "SIM" e
confirme com a tecla Enter/Escape.
(4) No menu EQ, seleccione agora a opção "Equalizador definido pelo utilizador", para
utilizar os ajustes.
Apresentação de diapositivos de imagem & texto
Texto
Seleccione o intervalo de tempo para passar da página actual para a página seguinte.
Imagens
Seleccione o intervalo de tempo entre a imagem actual e a imagem seguinte.
Ajustes do visor
Duração da iluminação
5 segundos,
10 segundos,
15 segundos,
20 segundos,
30 segundos,
Sempre ligada
Brilho
(Determine o brilho do visor)
Modo LCD
Normal
Modo de poupança de energia (Desligue a iluminação do visor, se não for activada
qualquer função)
Sistema
Sobre: Informações sobre o produto
Actualização do firmware: upgrade do firmware
Ajustes de fábrica: Carrega os ajustes de fábrica
Sleep Timer
Desligado, 10 minutos, 15 minutos, 30 minutos, 60 minutos, 120 minutos
Idiomas
Aqui pode seleccionar diferentes idiomas
Página 9 de 12 PT
Page 71

15. Eliminação de erros
Problema – Possíveis causas – Resolução do problema
Não aparece nada no visor.
(1) A bateria está vazia.
Carregue a bateria.
(2) As teclas estão bloqueadas.
Desbloqueie as teclas, como é descrito em "6. Funcionamento".
O aparelho não reage quando é premida a tecla Play.
(1) As teclas estão bloqueadas.
Desbloqueie as teclas, como é descrito em "6. Funcionamento".
Durante a reprodução não há som.
(1) O volume está demasiado baixo
Aumente o volume no menu de volume
(2) Ficheiro de áudio danificado
Transfira novamente o ficheiro
Não é possível estabelecer a ligação com o PC.
(1) O controlador não foi instalado correctamente
Instale novamente o controlador.
(2) Efectue uma actualização da placa-mãe
(Para isso, siga as indicações do fabricante)
A indicação d o tempo altera-se constantemente
(1) A taxa de bits dos ficheiros MP3 altera-se durante a reprodução.
Utilize uma taxa de bits uniforme ao compactar.
O PC indica um erro na ligação com o aparelho
(1) O leitor for removido do PC durante a transmissão de dados.
Nunca remova o aparelho durante a transmissão de dados.
O espaço de memória indicado do aparelho não corresponde ao espaço de
memória real.
(1) Uma parte da memória é utilizada para o software, a formatação e para as
características do visor.
Os dados MP3 não são reproduzidos correctamente.
(1) Os dados MP3 foram compactados num formato errado, por exemplo em
MPEG 1 ou 2.
Elimine os ficheiros nos formatos não suportados pelo leitor.
Página 10 de 12 PT
Page 72

Os dados de vídeo não são reproduzidos.
(1) O formato não é suportado pelo aparelho.
O formato de vídeo tem de ser AVI. Se este não for o caso, converta o ficheiro.
Tenha em atenção que o tamanho do formato deve ser 128x128 píxeis
(2) O ficheiro de vídeo está danificado.
Transfira novamente o seu ficheiro de vídeo
As fotografias não são apresentadas.
(1) O formato do ficheiro não é suportado pelo aparelho.
Converta a fotografia para um formato JPG.
(2) A imagem tem uma resolução superior a 3520x2816 píxeis
Uma aparelho suporta apenas uma resolução máxima de 3520x 2816 píxeis.
Certifique-se de que a resolução não é ultrapassada.
Não é possível ler os ficheiros de texto.
(1) O formato não é suportado pelo aparelho.
Utilize o formato .txt
16. Dados técnicos
Tipo de bateria
Bateria recarregável de iões de lítio
Duração da bateria
5-7 horas
LCD
Ecrã TFT de 1,5“ polegadas
Auscultadores
5mW+5mW
Formato de vídeo
AVI (XviD) 128x128
Formatos de áudio
MP3, WMA
Formato de fotografia
JPEG
Resolução da imagem
3520 X 2816 píxeis (máx.)
Taxa de bits
MP3: 8-320kbps;
WMA: 32-384kbps
SNR
90dB
Página 11 de 12 PT
Page 73

Porta USB
USB2.0
Operacional entre
0 Celsius ~ +55 Celsius
Temperatura de armazenamento entre
-20 Celsius ~ +55 Celsius
Operacional com uma humidade relativa do ar de
20% ~ 90% (40 Celsius)
Pode ser armazenado com uma humidade relativa do ar de
20% ~ 93% (40 Celsius)
17. Tenha em atenção o seguinte
(1) A função Plug & Play apenas é possível no Windows 2000/XP e Vista.
Instale o controlador no Windows 98/SE.
(2) Desbloqueie o bloqueio das teclas, para poder utilizar o aparelho.
(3) Carregue a bateria quando surgir a respectiva indicação no visor.
(4) Apenas remova o aparelho do PC do modo mencionado, de modo a evitar
possíveis perdas de dados.
(5) Se o ficheiro gravado for muito grande, o seu carregamento demora mais tempo.
(6) Compatibilidade de software no Windows 2000, Windows XP e Windows Vista.
Página 12 de 12 PT
Page 74

1. Spis treœci
1. Spis treœci ............................................................................................................. 1
2. Wskazówki ............................................................................................................ 2
3. Funkcje ................................................................................................................. 2
4. Zawartoϋ opakowania ......................................................................................... 2
5. Przed u¿yciem ...................................................................................................... 3
6. Obsùuga ................................................................................................................ 5
7. Odtwarzanie muzyki ............................................................................................. 6
8. Wideo ................................................................................................................... 6
9. Zdjêcia .................................................................................................................. 6
10. Tekst ..................................................................................................................... 7
11. Przeszukiwanie wszystkich plików ........................................................................ 7
12. Usuwanie pliku ...................................................................................................... 7
13. Gra ........................................................................................................................ 8
14. Ustawienia systemu .............................................................................................. 8
15. Usuwanie bùêdów ................................................................................................ 10
16. Dane techniczne ................................................................................................. 11
17. Nale¿y pamiêtaã. ................................................................................................ 12
Strona 1 z 12 PL
Page 75

2. Wskazówki
Uwa¿aã, aby nie upuœciã urz¹dzenia.
Nie u¿ywaã urz¹dzenia w ekstremalnie zimnych, gor¹cych, wilgotnych lub
zapylonych terenach. Nie nara¿aã go tak¿e na bezpoœrednie dziaùanie promieni
sùonecznych.
Nale¿y przeprowadzaã czêsto procedurê zabezpieczania danych, aby unikn¹ã ich
utraty.
Unikaã stosowania urz¹dzenia w obszarach objêtych silnym polem magnetycznym.
Chroniã urz¹dzenie przed wilgoci¹. W przypadku, gdy do wnêtrza urz¹dzenia
dostanie siê wilgoã, nale¿y je natychmiast wyù¹czyã.
Nastêpnie nale¿y oczyœciã i osuszyã urz¹dzenie. Do czyszczenia urz¹dzenia nie
wolno stosowaã ¿adnych roztworów chemicznych. Stosowaã wyù¹cznie such¹
œciereczkê.
Nie bierzemy na siebie odpowiedzialnoœci za szkody ani za utratê danych w wyniku
nieprawidùowego dziaùania, nieprawidùowej obsùugi, samodzielnie dokonanej
naprawy urz¹dzenia lub wymiany akumulatora.
Nie wolno rozkùadaã urz¹dzenia i nie nale¿y próbowaã samodzielnie dokonywaã
napraw, poniewa¿ poci¹ga to za sob¹ wygaœniêcie gwarancji.
3. Funkcje
Odtwarzacz MP3&WMA
Odtwarzacz AVI Video
Przegl¹darka zdjêã JPEG
Nawigacja folderów
Wymienny noœnik danych
Gra
Akumulator li-ion (z mo¿liwoœci¹ ùadowania)
Ustawienia specjalne klienta
4. Zawartoϋ opakowania
Skontrolowaã, czy zawartoœã opakowania jest kompletna.
Intenso Video Traveller
Sùuchawki stereo
Program do konwertowania (format AVI)
Kabel USB
Instrukcja obsùugi + Karta gwarancyjna
Strona 2 z 12 PL
Page 76

5. Przed u¿yciem
Podù¹czanie do komputera
W przypadku systemu operacyjnego Windows 98/SE przed podù¹czeniem odtwarzacza do
komputera nale¿y zainstalowaã sterownik. (Do pobrania na stronie www.intenso.de)
W przypadku systemu operacyjnego WIN 2000/XP/ME instalacja sterownika nie jest
konieczna.
Sposób postêpowania:
(1) Podù¹czyã odtwarzacz do zù¹cza USB w komputerze.
(2) Otworzy siê okno “Intenso”. Teraz mo¿na zapisaã dane znajduj¹ce siê na twardym
dysku na wymiennym noœniku danych.
Bezpieczne usuwanie urz¹dzenia z komputera
W przypadku Windows 2000/XP/ME/Vista:
Klikn¹ã prawym przyciskiem myszy u doùu po prawej stronie paska narzêdzi na symbol
„Bezpieczne usuwanie sprzêtu“. Z wyœwietlonego menu kontekstowego nale¿y wybraã
punkt „Usuñ napêd noœnika pamiêci masowej USB“. Upewniã siê, ¿e transfer danych
zostaù zakoñczony.
Nastêpnie mo¿na usun¹ã urz¹dzenie.
W przypadku Windows 98/SE:
Przy pomocy lewego przycisku myszy w „Managerze urz¹dzeñ“ wybraã urz¹dzenie.
Klikn¹ã nastêpnie na punkt menu „Usuñ“. Tutaj tak¿e upewniã siê, ¿e transfer danych
zostaù zakoñczony.
Mo¿na odù¹czyã urz¹dzenie od komputera.
£adowanie baterii:
Urz¹dzenie wyposa¿one jest w ùadowalny akumulator litowo - jonowy. Akumulator
ùadowany jest poprzez zù¹cze USB przy komputerze.
Przed pierwszym u¿yciem nale¿y pamiêtaã o tym, aby caùkowicie naùadowaã akumulator,
proces ten trwa z reguùy 3 godziny.
W celu naùadowania akumulatora nale¿y podù¹czyã urz¹dzenie za pomoc¹ kabla USB do
komputera. Proces ùadowania rozpoczyna siê automatycznie.
Aby dowiedzieã siê, jaki jest aktualny status procesu ùadowania, nale¿y odù¹czyã
urz¹dzenie od komputera. Na wyœwietlaczu u góry po prawej stronie pojawi siê symbol
baterii. Je¿eli symbol bêdzie œwieciã siê na zielono, oznacza to, ze akumulator jest
naùadowany.
Wskazówka: Aby zapewniã optymaln¹ wydajnoœã akumulator litowo-jonowy musi byã
regularnie u¿ywany. Je¿eli jest to niemo¿liwe, nale¿y naùadowaã caùkowicie akumulator
przynajmniej raz w miesi¹cu.
Strona 3 z 12 PL
Page 77

Elementy obsùugowe
A. Wyœwietlacz LCD
B. VOL-: zmniejszanie gùoœnoœci
C. VOL+: zwiêkszanie gùoœnoœci
D. Enter/ Escape: Wciœniêcie tego przycisku powoduje powrót do menu gùównego z
ka¿dego poziomu. Krótkie wciœniêcie oznacza potwierdzenie wyboru lub przejœcie
do menu folderów.
E. Do tyùu: poprzedni tytuù, ruch do góry
F. Do przodu: nastêpny tytuù, ruch w dóù
G. Play/ Pause: wù¹czenie i wyù¹czenie oprogramowania,
funkcja Play / Pause
H. Zù¹cze sùuchawek
I. Przeù¹cznik power: wù¹czanie i wyù¹czanie urz¹dzenia
J. Port USB: podù¹czenie do komputera
Strona 4 z 12 PL
Page 78

Wù¹czanie i wyù¹czanie,
Wù¹czanie
(1) Prosimy przesun¹ã przeù¹cznik ON/OFF w prawo, na pozycjê ON.
(2) Prosimy nacisn¹ã przycisk PLAY/PAUSE i trzymaã go wciœniêty tak dùugo, a¿
wyœwietlacz wù¹czy siê.
Wyù¹czanie,
(1) Prosimy nacisn¹ã przycisk PLAY/PAUSE i trzymaã go wciœniêty tak dùugo, a¿
wyœwietlacz wyù¹czy siê.
(2) Prosimy przesun¹ã przycisk ON/OFF w lewo, na pozycjê OFF.
Uwaga: Odtwarzacz ten posiada urz¹dzenie pozwalaj¹ce na oszczêdzanie energii, które
wyù¹cza go automatycznie, jeœli pozostaje nieu¿ywany dùu¿ej ni¿ trzy minuty.
6. Obsùuga
Play/ Pause
Wcisn¹ã przycisk „G“ (Play/ Pause) w celu odtworzenia lub zatrzymania odtwarzania.
Gùoœnoœã przy odtwarzaniu muzyki/ filmów
Wcisn¹ã przycisk „B“ (VOL-) lub „C“ (VOL+) w celu regulacji gùoœnoœci.
Wybór poprzedniej œcie¿ki (poprzedniego tytuùu)
Wcisn¹ã na krótko przycisk „E“ (Do tyùu).
Wybór nastêpnej œcie¿ki (nastêpnego tytuùu)
Wcisn¹ã na krótko przycisk „F“ (Do przodu).
Przewijanie do tyùu
Wcisn¹ã i przytrzymaã przycisk „E“ (Do tyùu).
Przewijanie do przodu
Wcisn¹ã i przytrzymaã przycisk „F“ (Do przodu).
Blokowanie i odblokowywanie przycisków
Wcisn¹ã jednoczeœnie przyciski „D“ (Enter/ Escape) i „B“ (VOL-).
Powtarzanie A-B przy odtwarzaniu muzyki
Funkcja ta pozwala na wielokrotne powtarzanie fragmentu utworu.
(1) Podczas odtwarzania utworu wcisn¹ã na krótko przycisk „C“ (VOL+), aby
wyznaczyã pocz¹tek odtwarzanego fragmentu.
(2) Ponownie wcisn¹ã przycisk „C“ (VOL+), aby wyznaczyã koniec powtarzanego
fragmentu.
(3) Wciœniêcie przycisku „C“ (VOL+) zakoñczy wielokrotne odtwarzanie fragmentu.
Strona 5 z 12 PL
Page 79

7. Odtwarzanie muzyki
Tryb muzyki
Wcisn¹ã i przytrzymaã przycisk Enter/ Escape, aby przejœã do menu gùównego.
Wybraã „Muzyka“ i potwierdziã wybór przyciskiem Enter/ Escape.
Rozpocz¹ã odtwarzanie przy pomocy przycisku Enter/ Escape.
Przegl¹d folderów
(1) W trybie „Muzyka” wcisn¹ã na krótko przycisk Enter/ Escape.
(2) Przy pomocy przycisku Do przodu/ Do tyùu mo¿na wybraã folder lub utwór
muzyczny. Wybór nale¿y potwierdziã przyciskiem Enter/ Escape.
8. Wideo
(1) Wcisn¹ã i przytrzymaã przycisk Enter/ Escape, aby przejœã do menu gùównego.
(2) Przy pomocy przycisku Do przodu/ Do tyùu wybraã plik wideo.
(3) Przy pomocy przycisku Enter/ Escape mo¿na rozpocz¹ã odtwarzanie filmu wideo.
Za pomoc¹ przycisku Do przodu/ Do tyùu mo¿na wybraã dowolny plik wideo ze
spisu.
(4) Podczas odtwarzania przy pomocy przycisku Enter/ Escape mo¿na wywoùaã
Nawigacjê folderów.
Wskazówka: Niniejszy odtwarzacz odtwarza wyù¹cznie format AVI. Do odtwarzania
formatów RM, RMVB, MPG, MPEG, WMV, DAT, VOB wymagane jest zainstalowanie
dostarczonego wraz z urz¹dzeniem, kompatybilnego z Windows oprogramowania
konwertuj¹cego.
9. Zdjêcia
Pokaz zdjêã
(1) Wcisn¹ã i przytrzymaã przycisk Enter/ Escape, aby przejœã do menu gùównego.
(2) Przy pomocy przycisków Do przodu/ Do tyùu wybraã zdjêcie.
(3) Po wybraniu zdjêcia przy pomocy przycisków Do przodu/ Do tyùu mo¿na przejœã
do nastêpnego. Przy pomocy przycisku Play/ Pause mo¿na wù¹czyã i zatrzymaã
pokaz slajdów. Przy pomocy przycisku Enter/ Escape mo¿na podczas przegl¹du
slajdów wywoùaã Przegl¹d folderów.
Wskazówka: Urz¹dzenie mo¿e odtwarzaã zdjêcia wyù¹cznie w formacie JPG.
Strona 6 z 12 PL
Page 80

10. Tekst
Odczytywanie plików txt
(1) Wcisn¹ã i przytrzymaã przycisk Enter/ Escape, aby przejœã do menu gùównego.
(2) Wybraã tryb „Tekst” i potwierdziã wybór przyciskiem Enter/ Escape.
(3) Przy pomocy przycisku Do przodu/ do tyùu wybraã plik tekstowy i potwierdziã
wybór przy pomocy przycisku Enter/ Escape.
(4) Wcisn¹ã przycisk Do przodu/ Do tyùu, aby przejœã do górnego lub dolnego
fragmentu tekstu, który nie jest pokazywany na wyœwietlaczu. Lub przy pomocy
przycisku Play/ Pause wybraã automatyczne przewijanie. (W Ustawieniach
mo¿na wybraã przedziaù czasowy w zakresie od 2 do 10 sekund: “Ustawienia ->
Pokaz slajdów -> Tekst”).
(5) Podczas czytania mo¿na zaznaczyã zakùadk¹ wybrane miejsce. Czynnoœã ta
opisana jest dokùadniej w nastêpnym punkcie.
Wskazówka: Mo¿na zapisaã do 3 zakùadek.
Sporz¹dzanie zakùadki
(1) Przejœã do miejsca, które ma zostaã zaznaczone.
(2) Wcisn¹ã na krótko przycisk VOL+. Na wyœwietlaczu pojawi siê znak „Save
Bookmark”.
(3) Przy pomocy przycisków Do przodu/ Do tyùu wybraã numer zakùadki. Potwierdziã
wybór przyciskiem Enter/ Escape. Zakùadka zostaùa zapisana. Start od pierwszej
linijki bie¿¹cej strony.
(4) W celu otwarcia zaznaczonej strony, nale¿y wcisn¹ã na krótko przycisk VOL-
wywoùuj¹c zapisan¹ zakùadkê. Wybraã zakùadkê i potwierdziã wybór przyciskiem
Enter/ Escape. Nast¹pi przejœcie do tej strony.
Wskazówka: Je¿eli plik tekstowy nie zostanie otwarty, oznacza to, ¿e nie jest obsùugiwany
wybrany format tekstowy. Nale¿y wybraã inny format tekstowy.
11. Przeszukiwanie wszystkich plików
W celu przeszukania wszystkich plików znajduj¹cych siê w odtwarzaczu nale¿y
postêpowaã w nastêpuj¹cy sposób:
(1) Wcisn¹ã i przytrzymaã przycisk Enter/ Escape, aby przejœã do menu gùównego.
(2) Wybraã punkt menu „Przegl¹d folderów”. Potwierdziã wybór przyciskiem Menu.
(3) Przy pomocy przycisków Do przodu/ Do tyùu wybraã plik i potwierdziã wybór
przyciskiem Enter/ Escape.
12. Usuwanie pliku
(1) W „Przegl¹dzie folderów” wybraã plik, który ma zostaã usuniêty.
(2) Wcisn¹ã na krótko przycisk VOL-. Pojawi siê okno dialogowe.
Strona 7 z 12 PL
Page 81

(3) Przy pomocy przycisków Do przodu/ Do tyùu wybraã „Tak” i potwierdziã wybór
przyciskiem Enter/ Escape.
13. Gra
Niniejsze urz¹dzenie wyposa¿one jest w grê Tetris World. Aby uruchomiã tê grê, nale¿y
wybraã w menu gùównym opcjê „Gra” i potwierdziã wybór przyciskiem Enter/ Escape.
Uruchomienie gry
Wcisn¹ã przycisk PLAY/ PAUSE.
Poruszanie bloku w prawo lub w lewo
Wcisn¹ã przycisk Do tyùu lub Do przodu
Obracanie bloku
Wcisn¹ã przycisk Enter/ Escape.
Osadzanie bloku
Wcisn¹ã przycisk VOL-.
Wyjœcie z gry
Wcisn¹ã i przytrzymaã wciœniêty przycisk Enter/ Escape.
14. Ustawienia systemu
Dopasowanie ustawieñ:
(1) W menu gùównym wybraã punkt „Ustawienia”.
(2) W celu dokonania zmian w ustawieniach wybraã przy pomocy przycisków Do
przodu/ Do tyùu odpowiedni punkt menu i potwierdziã wybór przyciskiem Enter/
Escape. Przy u¿yciu przycisku Play/ Pause mo¿na wróciã do menu wyjœciowego.
Muzyka
Powtarzanie
(1) Jednokrotne odtwarzanie utworu: Odtwarzana jest aktualna œcie¿ka i
odtwarzanie zostaje zakoñczone.
(2) Powtarzanie utworu: Odtwarzanie wybranej œcie¿ki jest powtarzane.
(3) Jednokrotne odtwarzanie folderu: Odtwarzane s¹ wszystkie utwory znajduj¹ce
siê w danym folderze, nastêpnie odtwarzanie zostaje zakoñczone.
(4) Powtarzanie odtwarzania folderu: Odtwarzanie wszystkich utworów z
bie¿¹cego folderu jest powtarzane.
(5) Jednokrotne odtwarzanie wszystkich utworów: Odtwarzane s¹ wszystkie
zapisane utwory, po odtworzeniu ostatniego odtwarzanie zostaje zakoñczone.
(6) Powtarzanie odtwarzania wszystkich utworów: Odtwarzanie wszystkich
zapisanych utworów jest powtarzane.
(7) Funkcja Intro: Odtwarzanie pierwszych 10 s ka¿dego pliku audio.
Tryb odtwarzania
(1) Normalne odtwarzanie: Pliki audio odtwarzane s¹ po kolei.
(2) Przypadkowe odtwarzanie: Utwory odtwarzane s¹ w przypadkowej kolejnoœci.
Strona 8 z 12 PL
Page 82

Wybór equalizera
normalny, 3D, rock, pop, klasyka, bas, jazz, zdefiniowany przez u¿ytkownika equalizer
Equalizer zdefiniowany przez u¿ytkownika
(1) Wcisn¹ã przycisk Do przodu lub Do tyùu, aby wybraã kolumnê EQ.
(2) Przy pomocy przycisków VOL+/ VOL- ustawiã wartoœci.
(3) Wciskaã przycisk Do przodu, a¿ kursor znajdzie siê na polu „Tak” i potwierdziã
wybór przyciskiem Enter/ Escape.
(4) W menu EQ wybraã opcjê „Equalizer zdefiniowany przez u¿ytkownika”.
Pokaz slajdów zdjêcia & tekst
Tekst
Wybraã przedziaù czasu, po jakim nastêpuje przejœcie z aktualnej strony do nastêpnej.
Zdjêcia
Wybraã przedziaù czasu, po jakim nastêpuje przejœcie z aktualnego zdjêcia do
nastêpnego.
Ustawienia wyœwietlacza
Czas podœwietlenia
5 sekund,
10 sekund,
15 sekund,
20 sekund,
30 sekund,
zawsze wù¹czone
Jasnoϋ
(Okreœlanie jasnoœci wyœwietlacza)
Tryb podœwietlania
Normalny
Tryb oszczêdzania energii (Podœwietlenie wyœwietlacza zostaje wyù¹czone, je¿eli
urz¹dzenie nie jest obsùugiwane.)
System
O produkcie: Informacje o produkcie
Update firmware: Upgrade firmware
Ustawienia oryginalne: Powrót do ustawieñ oryginalnych
Sleep Timer
wyù¹czony, 10 minut, 15 minut, 30 minut, 60 minut, 120 minut
Strona 9 z 12 PL
Page 83

Jêzyki
Wybór jêzyka
15. Usuwanie bùêdów
Problem – Mo¿liwe powody – Rozwi¹zanie problemu
Brak wskazañ na wyœwietlaczu
(1) Bateria jest wyczerpana.
Naùadowaã bateriê.
(2) Przyciski s¹ zablokowane.
Znieœã blokadê przycisków, tak jak opisane jest to w punkcie „6 Obsùuga”.
Urz¹dzenie nie reaguje na przycisk Play.
(1) Przyciski s¹ zablokowane.
Znieœã blokadê przycisków, tak jak opisane jest to w punkcie „6 Obsùuga”.
Brak dêwiêku podczas odtwarzania.
(1) Gùoœnoœã jest zbyt maùa.
Zwiêkszyã gùoœnoœã w menu gùoœnoœci.
(2) Plik audio jest uszkodzony.
Ponownie pobraã plik.
Podù¹czenie do komputera nie udaje siê.
(1) Sterownik zostaù nieprawidùowo zainstalowany.
Ponownie zainstalowaã sterownik.
(2) Wykonaã aktualizacjê pùyty gùównej.
(Uwzglêdniã wskazówki producenta.)
Wskazanie czasu ci¹gle siê zmienia.
(1) Úrednia bitowa pliku MP3 zmienia siê podczas odtwarzania.
Podczas kompresji nale¿y zastosowaã jednolit¹ œredni¹ bitow¹.
Przy podù¹czaniu odtwarzacza komputer zgùasza bù¹d.
(1) Odtwarzacz zostaù odù¹czony od komputera podczas przenoszenia danych.
Nie odù¹czaã odtwarzacza podczas przenoszenia danych.
Podana pamiêã odtwarzacza nie odpowiada faktycznej pamiêci.
(1) Czêœã pamiêci u¿ywana jest na oprogramowanie oraz wùaœciwoœci
wyœwietlacza.
Pliki MP3 s¹ niepoprawnie odtwarzane.
(1) Pliki MP3 zostaùy skompresowane w nieprawidùowym formacie, np. MPEG 1
lub 2.
Skasowaã formaty danych, które nie s¹ obsùugiwane.
Strona 10 z 12 PL
Page 84

Odtwarzanie plików wideo jest niemo¿liwe.
(1) Urz¹dzenie nie obsùuguje danego formatu.
Wymagany format wideo to AVI. Je¿eli plik jest w innym formacie, nale¿y go
przekonwertowaã. Pamiêtaã przy tym o rozmiarze formatu 128x128 pikseli.
(2) Plik wideo jest uszkodzony.
Ponownie œci¹gn¹ã plik wideo.
Zdjêcia nie s¹ pokazywane.
(1) Urz¹dzenie nie obsùuguje danego formatu.
Przekonwertowaã zdjêcia na format JPG.
(2) Zdjêcie ma rozdzielczoœã wiêksz¹ ni¿ 3520x2816 pikseli.
Urz¹dzenie obsùuguje zdjêcia o maks. rozdzielczoœci 3520x 2816 pikseli.
Upewniã siê, ¿e dopuszczalna rozdzielczoœã nie zostaùa przekroczona.
Odczytanie pliku tekstowego jest niemo¿liwe.
(1) Urz¹dzenie nie obsùuguje danego formatu.
Zastosowaã format txt.
16. Dane techniczne
Typ baterii
Akumulatory litowo-jonowe z mo¿liwoœci¹ ùadowania
Ýywotnoœã baterii
5-7 godzin
LCD
1,5-calowy wyœwietlacz TFT
Sùuchawki
5mW+5mW
Format wideo
AVI (XviD) 128x128
Formaty audio
MP3, WMA
Format zdjêã
JPEG
Rozdzielczoϋ obrazu
3520 X 2816 pikseli (maks.)
Úrednia bitowa
MP3: 8-320kbps;
WMA: 32-384kbps
SNR
90dB
Strona 11 z 12 PL
Page 85

Port USB
USB 2.0
Praca w temperaturze
od 0 do +55 stopni C
Temperatura przechowywania
od -20 do +55 stopni C
Praca przy wzglêdnej wilgotnoœci powietrza
od 20% do 90% (40 stopni C)
Przechowywanie przy wzglêdnej wilgotnoœci powietrza
od 20% do 93% (40 stopni C)
17. Nale¿y pamiêtaã.
(1) Funkcja plug & play mo¿liwa jest tylko przy Windows 2000/XP i Vista.
W przypadku Windows 98/SE nale¿y zainstalowaã sterownik.
(2) Znieœã blokadê przycisków, aby móc pracowaã z urz¹dzeniem.
(3) Naùadowaã bateriê, je¿eli na wyœwietlaczu pojawia siê odpowiedni komunikat.
(4) Odù¹czaã odtwarzacz od komputera tylko w opisany sposób, co pozwoli unikn¹ã
utraty danych.
(5) Je¿eli plik jest bardzo du¿y, pobieranie go trwa dùu¿ej.
(6) Obsùugiwane oprogramowanie Windows 2000, Windows XP i Windows Vista.
Strona 12 z 12 PL
Page 86

1. Содержание
1. Содержание ......................................................................................................... 1
2. Предостережения ............................................................................................... 2
3. Основные функции ............................................................................................. 2
4. Комплектность поставки ..................................................................................... 2
5. Подготовка к использованию ............................................................................. 3
6. Основные операции ............................................................................................ 5
7. Воспроизведение музыки ................................................................................... 6
8. Воспроизведение видео ..................................................................................... 6
9. Просмотр фотографий ....................................................................................... 7
10. Чтение текста ...................................................................................................... 7
11. Обзор âñåõ файлов ............................................................................................. 8
12. Удаление файла ................................................................................................. 8
13. Èãðà ...................................................................................................................... 9
14. Индивидуальная настройка параметров ........................................................... 9
15. Поиск и устранение неполадок ........................................................................ 11
16. Технические данные ......................................................................................... 13
17. Замечания ......................................................................................................... 14
Ñòð. 1 èç 14 RU
Page 87

2. Предостережения
Не допускайте воздействия на устройство сильных ударов и падений
устройства с большой высоты.
Не используйте данный проигрыватель в условиях очень высоких или низких
температур, повышенной запыленности или влажности. Не допускайте
воздействия на устройство прямых солнечных лучей.
Регулярно создавайте резервные копии данных на случай их возможной
потери.
Избегайте использовать проигрыватель â условиях сильного магнитного ïîëÿ.
Избегайте контакта устройства ñ водой è другими жидкостями. Â случае
попадания воды или другой жидкости внутрь устройства немедленно
выключите его и произведите чистку устройства.
Во избежание коррозии не используйте для чистки устройства химических
растворов. Чистку осуществляйте сухой тканью.
Мы не несем ответственности за повреждения и потерю данных,
произошедшую в результате неисправной работы, неверного использования,
ремонта или замены батареи.
Запрещается самостоятельно разбирать, ремонтировать устройство либо
вносить в него изменения. Эти действия влекут за собой аннулирование
гарантии.
3. Основные функции
Проигрыватель файлов формата MP3 è WMA
Видеопроигрыватель файлов AVI
Средство просмотра изображений JPEG
Перемещение по папкам
Съемное запоминающее устройство
Èãðû
Встроенный литий-ионный аккумулятор
Индивидуально настраиваемые параметры
4. Комплектность поставки
Проверьте наличие в комплекте поставки следующих компонентов: При отсутствии
каких-либо из этих компонентов обратитесь к продавцу:
Основной áëîê
Стереофонические наушники
Кабель USB
Компакт-диск с приложениями
Руководство пользователя и гарантийный формуляр
Ñòð. 2 èç 14 RU
Page 88

5. Подготовка к использованию
Соединение с компьютером
Если у Вас стоит операционная система Windows 98/SE, инсталлируйте драйвер,
прежде чем подсоединить плеер к компьютеру (сгрузить драйвер Вы можете по
адресу www.intenso.de). Если у Вас стоит операционная система WIN 2000/XP/ME,
инсталляция драйвера не потребуется.
Вам необходимо поступить следующим образом:
(1) Подключить плеер ê USB-входу компьютера.
(2) После этого появится окно “Intenso”. Теперь Вы можете со хранить данные,
находящиеся на Вашем жестком диске, на переносном запоминающем
устройстве.
Безопасное извлечение устройства
Для операционной системы Windows 2000/XP/ME/Vista:
Нажмите правой клавишей мыши находящийся справа внизу на панели
инструментов символ «Безопасное извлечение устройства». На появившемся
контекстном меню выберите пункт „Запоминающее устройство для USB“, нажав на
устройство, которое Вы хотите удалить, левой клавишей мыши. Убедитесь в том, что
процесс передачи данных полностью завершен.
Теперь Вы можете извлечь запоминающее устройство.
Для операционной системы Windows 98/SE:
Выберите устройство в „Администраторе устройств“, нажав на него левой клавишей
мыши. Теперь нажмите на пункт меню „Удалить“. Также убедитесь в том, что
процесс передачи данных в данном случае также полностью завершен.
Теперь Вы можете извлечь запоминающее устройство.
Зарядка батареи:
Устройство имеет встроенную литиево-ионную батарею. Батарея заряжается при
подключении устройства ко входу USB Вашего компьютера. При первом
использовании устройства убедитесь в том, чтобы батарея была полностью
заряжена. Зарядка, как правило, длится 3 часа. Для зарядки батареи подключите
Ваше устройство с помощью кабеля USB к Вашему компьютеру. Процесс зарядки
начнется автоматически. Если Вы хотите узнать текущий статус зарядки,
отсоедините устройство от компьютера. Вверху справа на дисплее Вы увидите
символ батареи. Если символ горит зеленым светом, батарея заряжена полностью.
Внимание: Äëÿ òîãî чтобы устройство работало оптимально, литиев о-ионную
батарею следует регулярно использовать. Если батарея используется нерегулярно,
Вам следует полностью заряжать ее не менее одного раза в месяц.
Ñòð. 3 èç 14 RU
Page 89

Описание клавиш
A. ÆÊ-дисплей
B. VOL-: Уменьшение громкости.
C. VOL+: Увеличение громкости.
D. Âõîä/Выход: Для входа в основное меню нажмите и удерживайте нажатой
некоторое время. Для подтверждения выбора или перехода в режим обзора
папок нажмите и сразу отпустите.
E. Предыдущая дорожка: Воспроизведение предыдущей дорожки. Служит
также для перемещения вверх.
F. Следующая дорожка: Воспроизведение предыдущей дорожки. Служит также
для перемещения вниз.
G. Воспроизведение/пауза: Служит äëÿ включения è выключения устройства.
Обеспечивает также воспроизведение и приостановку воспроизведения
звуковых файлов.
H. Гнездо наушников
I. Выключатель питания: Служит для включения и выключения питания
J. Ïîðò USB: Подсоединение к компьютеру
Ñòð. 4 èç 14 RU
Page 90

Включение и выключение питания
Для включения питания
(1) Äëÿ включения питания передвиньте выключатель питания.
(2) Нажмите è удерживайте нажатой кнопку "ВОСПРОИЗВЕДЕНИЕ/ПАУЗА" äî
появления íà дисплее запроса.
Для выключения питания
(1) Нажмите и удерживайте нажатой кнопку "ВОСПРОИЗВЕДЕНИЕ/ПАУЗА" до
появления на дисплее запроса.
(2) Для выключения питания передвиньте выключатель питания. (Не забывайте
выполнять эту операцию для экономии заряда аккумулятора.)
Примечание. Этот проигрыватель имеет функцию энергосбережения,
автоматически выключающую устройство, если оно не используется примерно 3
минуты.
6. Основные операции
Воспроизведение/пауза
Для воспроизведения или приостановки воспроизведения нажмите кнопку
"ВОСПРОИЗВЕДЕНИЕ/ПАУЗА".
Регулировка громкости
На короткое время нажмите кнопку "VOL+"/"VOL-" для уменьшения или увеличения
громкости.
Предыдущая дорожка
Нажмите и сразу отпустите кнопку "ПРЕДЫДУЩАЯ ДОРОЖКА".
Следующая дорожка
Нажмите и сразу отпустите кнопку "СЛЕДУЮЩАЯ ДОРОЖКА".
Ускоренное перемещение вперед
Нажмите и удерживайте нажатой кнопку "СЛЕДУЮЩАЯ ДОРОЖКА".
Ускоренное перемещение назад
Нажмите и удерживайте нажатой кнопку "ПРЕДЫДУЩАЯ ДОРОЖКА".
Блокировка и снятие блокировки кнопок
Для защиты кнопок от случайного нажатия либо для разблокирования кнопок
одновременно нажмите кнопки "Вход/Выход" и "VOL-".
Повтор A-B Äëÿ повтора выбранного фрагмента дорожки
(1) Âî время воспроизведения нажмите è удерживайте нажатой кнопку "VOL+"
äëÿ выбора начала повторяемого фрагмента.
(2) Повторно нажмите кнопку "VOL+" äëÿ выбора конечной точки. Начинается
циклическое повторение фрагмента музыки между начальной и конечной
точкой.
(3) Для прекращения повторения A-B еще раз нажмите кнопку "VOL+".
Ñòð. 5 èç 14 RU
Page 91

7. Воспроизведение музыки
Переход в режим воспроизведения музыки
Äëÿ отображения основного ìåíþ нажмите è удерживайте нажатой кнопку
"Âõîä/Выход". Кнопками "ПРЕДЫДУЩАЯ ДОРОЖКА"/"СЛЕДУЮЩАЯ ДОРОЖКА"
выберите меню “Music” (Музыка) и нажмите кнопку "Вход/Выход" для подтверждения
выбора. Теперь устройство находится в режиме воспроизведения музыки — для
воспроизведения музыки см. основные операции.
Перемещение по папкам
Äëÿ перемещения ïî папкам:
(1) Â режиме воспроизведения музыки нажмите è сразу отпустите кнопку
"Âõîä/Выход" äëÿ перехода â режим перемещения ïî папкам.
(2) Кнопками "ПРЕДЫДУЩАЯ ДОРОЖКА"/"СЛЕДУЮЩАЯ ДОРОЖКА" выберите
папку или дорожку и нажмите кнопку "Вход/Выход" для подтверждения выбора
или кнопку "ВОСПРОИЗВЕДЕНИЕ/ПАУЗА" для возврата.
8. Воспроизведение видео
(1) Äëÿ отображения основного ìåíþ нажмите è удерживайте нажатой кнопку
"Âõîä/Выход".
(2) Кнопками "ПРЕДЫДУЩАЯ ДОРОЖКА"/"СЛЕДУЮЩАЯ ДОРОЖКА" выберите
ìåíþ “Video” (Видео) и нажмите кнопку "Вход/Выход" для перехода в режим
видеопроигрывателя.
(3) Используя кнопки "ПРЕДЫДУЩАЯ ДОРОЖКА" и "СЛЕДУЮЩАЯ ДОРОЖКА",
найдите видеофайл, который требуется воспроизвести, и нажмите кнопку
"Вход/Выход" для начала воспроизведения. Подробная информация о
воспроизведении содержится в разделе "Основные операции".
(4) Âî время воспроизведения можно нажать è сразу отпустить кнопку
"Âõîä/Выход" äëÿ перехода â режим перемещения ïî папкам.
Примечание. Данный проигрыватель поддерживает воспроизведение только
файлов AVI. Для просмотра видеофайлов других форматов воспользуйтесь
инструментом преобразования, имеющимся на компакт-диске с драйверами для
преобразования этих видеофайлов. Подробнее об инструменте преобразования см.
"Краткое руководство пользователя преобразователя AVI" на компакт-диске.
Ñòð. 6 èç 14 RU
Page 92

9. Просмотр фотографий
Äëÿ просмотра фотографий
(1) Äëÿ отображения основного ìåíþ нажмите è удерживайте нажатой кнопку
"Âõîä/Выход".
(2) Выберите “Photo” (Фотографии) è нажмите кнопку "Âõîä/Выход" äëÿ
подтверждения выбора. Кнопками "ПРЕДЫДУЩАЯ ДОРОЖКА"/"СЛЕДУЮЩАЯ
ДОРОЖКА" выберите папку или изображение и нажмите кнопку "Вход/Выход"
для подтверждения выбора.
(3) Выберите фотографию, которую требуется просмотреть, è нажмите кнопку
"Âõîä/Выход" äëÿ увеличения åå äî размера экрана. Â режиме отображения
íà âåñü экран можно использовать кнопки "ПРЕДЫДУЩАЯ ДОРОЖКА" è
"СЛЕДУЮЩАЯ ДОРОЖКА" äëÿ отображения предыдущей èëè следующей
фотографии. Нажмите кнопку "ВОСПРОИЗВЕДЕНИЕ/ПАУЗА" для запуска
автоматического слайд-шоу или нажмите кнопку "Вход/Выход" для перехода в
режим перемещения по папкам.
Примечание. Некоторые изображения могут не воспроизводиться. Попробуйте
преобразовать изображение в формат JPEG.
10. Чтение текста
Чтение
(1) Äëÿ отображения основного ìåíþ нажмите è удерживайте нажатой кнопку
"Âõîä/Выход".
(2) Выберите “Text” (Текст) è нажмите кнопку "Âõîä/Выход" äëÿ подтверждения
выбора.
(3) Кнопками "ПРЕДЫДУЩАЯ ДОРОЖКА"/"СЛЕДУЮЩАЯ ДОРОЖКА" выберите
ôàéë .txt è нажмите кнопку "Âõîä/Выход" äëÿ открытия выбранного файла.
(4) Используйте кнопки "ПРЕДЫДУЩАЯ ДОРОЖКА" è "СЛЕДУЮЩАЯ ДОРОЖКА"
äëÿ отображения предыдущей èëè следующей страницы ëèáî нажмите кнопку
"ВОСПРОИЗВЕДЕНИЕ/ПАУЗА" äëÿ автоматического перелистывания страниц
вперед èëè назад (установив интервал времени îò 1 äî 5 â пункте "Settings"
(Настройка)/"Auto Slide show" (Автоматическое слайд-øîó)/"Text" (Текст)).
(5) Âî время чтения можно использовать закладку, чтобы отметить страницу, ñ
которой позднее будет возобновлено чтение. Î закладке ñì. раздел
“Использование закладки”.
Ñòð. 7 èç 14 RU
Page 93

Использование закладки
(1) Переместитесь на страницу, которую требуется отметить.
(2) Нажмите è сразу отпустите кнопку "VOL+" äëÿ отображения îêíà “Save
Bookmark” (Сохранить закладку), служащего äëÿ сохранения закладки.
(3) Кнопками "ПРЕДЫДУЩАЯ ДОРОЖКА"/"СЛЕДУЮЩАЯ ДОРОЖКА" выберите
одну из строк меню и нажмите кнопку "Вход/Выход" для подтверждения
выбора. Закладка сохранена. Она начинается с первой строки текущей
страницы.
(4) Для чтения отмеченной страницы нажмите и сразу отпустите кнопку "VOL-"
для отображения окна “Load Bookmark” (Загрузить закладку). Выберите
закладку и нажмите кнопку "Вход/Выход" для подтверждения выбора.
Отображается соответствующая страница.
Примечание. Некоторые файлы TXT могут не читаться. Причина может состоять в
том, что их формат не поддерживается. Пропустите такой файл или загрузите
другой файл.
11. Обзор âñåõ файлов
Äëÿ обзора âñåõ файлов, хранящихся â проигрывателе
(1) Äëÿ отображения основного ìåíþ нажмите è удерживайте нажатой кнопку
"Âõîä/Выход".
(2) Выберите “Navigation” (Перемещение) è нажмите кнопку "Âõîä/Выход" äëÿ
перехода â режим обзора.
(3) Используя кнопки "ПРЕДЫДУЩАЯ ДОРОЖКА" è "СЛЕДУЮЩАЯ ДОРОЖКА"
для выбора требуемого файла, нажмите кнопку "Вход/Выход" для
воспроизведения или отображения этого файла.
12. Удаление файла
(1) В режиме перемещения по папкам выберите файл, который требуется
удалить.
(2) Нажмите и удерживайте нажатой кнопку "VOL" до отображения диалогового
îêíà.
(3) Кнопками "ПРЕДЫДУЩАЯ ДОРОЖКА"/"СЛЕДУЮЩАЯ ДОРОЖКА" выберите
пункт “YES” (ДА) и нажмите кнопку "Вход/Выход" для подтверждения.
Ñòð. 8 èç 14 RU
Page 94

13. Èãðà
В данном проигрывателе присутствует популярная и веселая игра — "Tetris World".
Для запуска игры в основном меню выберите пункт “Game” (Игра) и нажмите кнопку
"МЕНЮ" для входа в игровой режим. Ниже перечислены базовые операции:
Запуск игры
Нажмите кнопку "ВОСПРОИЗВЕДЕНИЕ/ПАУЗА"
Перемещение блока влево или вправо
Нажимайте кнопку "ПРЕДЫДУЩАЯ ДОРОЖКА" и "СЛЕДУЮЩАЯ ДОРОЖКА"
Вращение блока
Нажмите кнопку "VOL+"
Вставка блока
Нажмите кнопку "VOL-"
Выход из игры
Нажмите кнопку воспроизведения для приостановки игры и удерживайте эту кнопку
нажатой, затем нажмите кнопку "Вход/Выход"
14. Индивидуальная настройка параметров
Äëÿ индивидуальной настройки параметров проигрывателя:
(1) Â основном ìåíþ выберите пункт “Settings” (Настройка) è нажмите кнопку
"Âõîä/Выход" äëÿ входа â режим настройки системных параметров.
(2) Используйте кнопку "ПРЕДЫДУЩАЯ ДОРОЖКА" èëè "СЛЕДУЮЩАЯ
ДОРОЖКА" äëÿ выбора требуемого параметра настройки è нажмите кнопку
"Âõîä/Выход" äëÿ подтверждения ëèáî нажмите кнопку
"Воспроизведение/Пауза" äëÿ отмены операции/возврата.
Music (Музыка)
Repeat Mode (Режим повтора)
(1) Once (Однократно): однократное воспроизведение текущей дорожки, затем
остановка
(2) Repeat 1 (Повтор 1): повтор текущей дорожки
(3) Folder once (Папка однократно): воспроизведение âñåõ дорожек â текущей
папке è остановка ïî окончании воспроизведения
(4) Folder Repeat (Папка, повтор): циклическое воспроизведение звуковых
файлов текущей папки
(5) All Once (Âñå однократно): воспроизведение âñåõ хранящихся â
проигрывателе звуковых файлов è остановка ïî окончании воспроизведения
(6) Repeat All (Повтор âñåõ): циклическое воспроизведение âñåõ файлов,
хранящихся â проигрывателе
(7) Intro (Режим обзора): воспроизведение первых 10 секунд каждого звукового
файла
Ñòð. 9 èç 14 RU
Page 95

Play mode (Режим воспроизведения)
(1) Order (Ïî порядку): Воспроизведение звуковых файлов ïî порядку
(2) Shuffle (Случайный порядок): Воспроизведение звуковых файлов â
случайном порядке
EQ Select (Выбор эквалайзера)
Normal (Обычный), 3D (Объемный), Rock (Ðîê), Pop (Ïîï-музыка), Classical
(Классика), Bass (Áàñ), Jazz (Äæàç), User EQ (Пользовательская настройка)
User EQ Set
(Пользовательская настройка эквалайзера)
(1) Нажмите кнопку "ПРЕДЫДУЩАЯ ДОРОЖКА" èëè "СЛЕДУЮЩАЯ ДОРОЖКА"
äëÿ переключения между линейками эквалайзера.
(2) Äëÿ настройки значения используйте кнопки "VOL+"/"VOL-".
(3) Повторно нажимайте кнопку "СЛЕДУЮЩАЯ ДОРОЖКА", ïîêà указатель íå
выделит кнопку "YES" (ДА), затем нажмите кнопку "Вход/Выход" для
подтверждения.
(4) Перейдите â ìåíþ "EQ Select" (Выбор эквалайзера) и выберите пункт "User
EQ" (Эквалайзер пользователя) для активизации данной настройки
эквалайзера.
Auto Browse (Автоматический просмотр)
Text Browse (Просмотр текста)
(Задание интервала между отображением предыдущей или следующей страницы в
режиме автоматической смены страниц.)
Photo Browse (Просмотр фотографий)
(Задание интервала между отображением предыдущего и следующего слайдов в
режиме автоматического слайд-шоу.)
Display (Дисплей)
Blight Time (Время подсветки)
"5 seconds" (5 секунд), "10 seconds" (10 секунд), "15 seconds" (15 секунд), "20
seconds" (20 секунд), "30 seconds" (30 секунд), "Always On" (Всегда включена).
Lum (Яркость)
(Настройка яркости экрана)
Blight Mode (Режим подсветки)
Normal (Обычный)
Power Save (Экономичный) (Экран выключается, åñëè устройство íå используется
в течение определенного времени)
Ñòð. 10 èç 14 RU
Page 96

System (Система)
About (Сведения): Информация îá устройстве
Upgrade (Обновление): Обновление микропрограммы
Default Set (Настройка ïî умолчанию): Восстановление настройки проигрывателя
по умолчанию
Power Off (Выключение питания)
(Задание времени непрерывного воспроизведения, после которого проигрыватель
автоматически выключается.)
"Off" (Íåò), "10 minute" (10 минут), "15 minute" (15 минут), "30 minute" (30 минут), "60
minute" (60 минут), "120 minute" (120 минут)
Language (ßçûê)
(Выбор языка, на котором отображается текст на экране)
Здесь возможен выбор одного из нескольких языков
15. Поиск и устранение неполадок
Неполадка Возможная причина Способ устранения
При включении устройства на ЖК-дисплее отсутствует изображение.
(1) Батарея сильно разряжена.
Зарядите аккумулятор.
(2) Кнопки заблокированы.
Снимите блокировку одновременным нажатием кнопок
"ВОСПРОИЗВЕДЕНИЕ/ПАУЗА" и "VOL".
Проигрыватель не реагирует на нажатие кнопки "Воспроизведение" для
воспроизведения звукового файла.
(1) Кнопки заблокированы переключателем "Hold" (Фиксация).
Снимите блокировку одновременным нажатием кнопок
"ВОСПРОИЗВЕДЕНИЕ/ПАУЗА" и "VOL".
При воспроизведении звукового файла отсутствует звук.
(1) Недостаточная громкость.
Отрегулируйте громкость.
(2) Некорректный звуковой файл.
Удалите или пропустите данный файл.
Невозможно подсоединить проигрыватель к компьютеру.
(1) Интерфейс USB не поддерживается системной платой компьютера.
Замените системную плату компьютера на более современную или
исправную.
Ñòð. 11 èç 14 RU
Page 97

Отображаемое время постоянно изменяется.
(1) Во время воспроизведения меняется скорость потока битов файла MP3.
Попробуйте выполнить сжатие файла MP3, используя постоянную скорость
потока.
При подсоединении и отсоединении проигрывателя на компьютере
отображается сообщение об ошибке.
(1) Проигрыватель отсоединен от компьютера во время передачи файлов.
Не отсоединяйте проигрыватель от компьютера, когда выполняется передача
файлов.
Общий объем памяти, отображаемый для проигрывателя, не соответствует
указанному объему.
(1) Часть памяти используется для хранения программ и символов для
отображения.
Некоторые файлы MP3 воспроизводятся неверно.
(1) Сжатие файла MP3 выполнено по стандартному алгоритму, который не
поддерживается данным проигрывателем, например, MPEG I Layer 1 или
Layer 2.
1. Удалите неподдерживаемые файлы MP3.
2. Äëÿ сжатия файлов MP3 используйте стандарт MPEG I Layer 3.
Не воспроизводится видеофайл.
(1) Формат файла не поддерживается.
Убедитесь в том, что видео имеет формат AVI. В противном случае
преобразуйте его с помощью предусмотренного инструмента преобразования.
(2) Данные видеофайла повреждены
Пропустите этот файл или загрузите другой файл
Не отображается фотография
(1) Формат файла не поддерживается.
Попробуйте преобразовать в редакторе изображений.
(2) Ограничения устройства не позволяют отображать изображения такого
разрешения.
Данное устройство поддерживает изображения с максимальным разрешением
3520 X 2816 пикселов. Убедитесь в том, что разрешение изображения не
выходит за эти пределы.
Не отображается файл TXT
(1) Формат файла не поддерживается.
Пропустите такой файл или загрузите другой файл.
Ñòð. 12 èç 14 RU
Page 98

16. Технические данные
Тип батареи
Литиевый аккумулятор
Время работы от аккумулятора
Примерно 5-7 часов
ЖК-дисплей
Экран TFT с диагональю 1,5 дюйма
Мощность наушников
5 ìÂò +5 ìÂò
Формат видео
AVI (XviD) 128x128 пикселов
Формат звуковых файлов
MP3, WMA
Формат фотографий
JPEG
Разрешение изображений
3520 X 2816 пикселов (максимум)
Скорость потока битов
MP3: 8-320 êáèò/ñ; WMA: 32-384 êáèò/ñ
Отношение сигнал/шум
>90 äÁ
Ïîðò USB
USB2.0
Рабочая температура
0℃ ~ +55℃
Допустимый диапазон температур хранения
-20 ℃ ~ +55 ℃
Рабочая влажность
20 % ~ 90 % (40 ℃)
Допустимая относительная влажность ïðè хранении
20 % ~ 93 % (40 ℃)
Ñòð. 13 èç 14 RU
Page 99

17. Замечания
(1) Технология Plug & Play работает только в операционной системе Windows
2000/XP èëè Vista. Если у Вас стоит Windows 98/SE, инсталлируйте драйвер.
(2) Перед использованием убедитесь â òîì, ÷òî кнопки включены. Åñëè îíè
заблокированы, нажмите кнопки "ВОСПРОИЗВЕДЕНИЕ/ПАУЗА" и "VOL" для
их разблокирования.
(3) Зарядите батарею сразу после отображения на дисплее сообщения о низком
заряде батареи. В противном случае устройство автоматически выключится.
(4) Во избежание потери данных надлежащим образом отсоединяйте
проигрыватель от компьютера.
(5) При значительном размере записанного файла с речью скорость реакции
данного устройства может замедлиться.
(6) Поддержка программного обеспечения осуществляется только äëÿ Windows
2000, Windows XP è Windows Vista.
Ñòð. 14 èç 14 RU
 Loading...