

Page 1

V.1.0
Intenso Video Jumper
Bedienungsanleitung Seite 1-13 DE
Manual Page 1-13 GB
Istruzioni per l’uso Pagina 1-13 IT
Notice d’utilisation Page 1-13 FR
Instrucciones de uso Página 1-13 ES
Manual de instruções Página 1-13 PT
Instrukcja obsługi Strona 1-13 PL
инструкция по эксплуатации Стр.1-13 RU
Page 2

1. Inhaltsübersicht
1. Inhaltsübersicht ...................................................................................................... 1
2. Hinweise ................................................................................................................ 2
3. Funktionen ............................................................................................................. 2
4. Packungsinhalt ....................................................................................................... 2
5. Vor dem Gebrauch ................................................................................................. 3
6. Bedienung .............................................................................................................. 5
7. Abspielen von Musik .............................................................................................. 5
8. Foto ........................................................................................................................ 7
9. Video ...................................................................................................................... 7
10. Radio ..................................................................................................................... 8
11. Aufnahme von Sprache ......................................................................................... 9
12. Durchsuchen aller Dateien ................................................................................... 10
13. System-Einstellungen .......................................................................................... 10
14. Fehlerbehebung ................................................................................................... 11
15. Technische Daten ................................................................................................ 12
16. Bitte beachten Sie folgendes ............................................................................... 13
Seite 1 von 13 DE
Page 3

2. Hinweise
Vermeiden Sie einen harten Aufprall des Gerätes.
Verwenden Sie das Gerät nicht in extrem kalten, heißen, feuchten oder staubigen
Gebieten. Setzen Sie es ebenfalls keinen direkten Sonnenstrahlen aus.
Führen Sie häufiger Datensicherungen durch, um einen möglichen Datenverlust zu
vermeiden.
Vermeiden Sie das Benutzen in stark magnetisierten Feldern.
Schützen Sie das Gerät vor Nässe. Wenn Feuchtigkeit in das Gerät eintritt,
schalten Sie es bitte unverzüglich aus, danach säubern und trocknen Sie bitte das
Gerät.
Verwenden Sie bitte keine chemischen Lösungen, um das Gerät zu säubern. Hier
bitte nur ein trockenes Tuch verwenden.
Wir sind nicht haftbar für Schäden oder Datenverlust bei einer Fehlfunktion,
fehlerhafter Handhabung, eigenhändiger Reparatur des Geräts oder Wechseln des
Akkus.
Bitte zerlegen Sie das Gerät nicht in Einzelteile, und versuchen Sie bitte nicht, es
selbst zu reparieren, da die Garantie in diesem Fall erlischt.
Bei Verwendung von Ohr- oder Kopfhörern in zu hoher Lautstärke kann es zu einer
dauerhaften Schädigung des Gehörs kommen.
3. Funktionen
MP3 & WMA Player
MTV Video Player
JPEG / BMP Bildbetrachter
FM Radio
Ordner Navigation
Wiederaufladbarer Li-polymer Akku
Kundenspezifische Einstellung
Wechseldatenträger
4. Packungsinhalt
Bitte überprüfen Sie den Packungsinhalt auf Vollständigkeit
Intenso Video Player
Stereo-Kopfhörer
CD mit Konvertierungssoftware (MTV-Format)
USB Kabel
Bedienungsanleitung + Garantiekarte
Seite 2 von 13 DE
Page 4

5. Vor dem Gebrauch
Verbinden mit dem PC
Bei den Betriebssystemen Windows 98/SE installieren Sie bitte einen Treiber, bevor Sie
den Player mit dem PC verbinden. (Download finden Sie unter www.intenso.de). Für die
Betriebssysteme WIN 2000/XP/ME/Vista/Windows 7 ist eine Installation des Treibers nicht
nötig.
Gehen Sie hier bitte wie folgt vor:
(1) Verbinden Sie den Player mit dem USB-Anschluss des PC.
(2) Es öffnet sich das Fenster “Intenso”. Nun können Sie die Daten von ihrer Festplatte
auf dem Wechseldatenträger speichern.
Sicheres Entfernen vom PC
Für Windows 2000/XP/ME/Vista/Windows 7:
Klicken Sie mit der rechten Maustaste unten rechts in der Taskleiste auf das Symbol
„Hardware sicher entfernen“. Aus dem erscheinenden Kontextmenü wählen Sie bitte den
Punkt „USB- Massenspeichergerät-Laufwerk entfernen“ mit der linken Maustaste aus.
Vergewissern Sie sich bitte, dass die Datenübertragung vollständig abgeschlossen ist.
Nun können Sie das Gerät entfernen.
Für Windows 98/SE:
Wählen Sie das Gerät im „Gerätemanager“ mit der linken Maustaste aus. Klicken Sie nun
auf den Menüpunkt „Entfernen“. Stellen Sie auch hier sicher, dass die Datenübertragung
vollständig abgeschlossen ist.
Das Gerät kann nun vom PC getrennt werden.
Laden des Akkus:
Das Gerät verfügt über einen eingebauten Li-polymer Akku. Der Akku wird über die USBVerbindung zu Ihrem PC geladen.
Bei der ersten Benutzung des Gerätes achten Sie bitte darauf, dass Sie den Akku
vollständig aufladen, dieser Vorgang dauert in der Regel 4 Stunden.
Um den Akku aufzuladen, verbinden Sie bitte das Gerät über das USB-Kabel mit dem PC.
Der Ladevorgang startet automatisch.
Wenn Sie den aktuellen Status des Ladevorganges erfahren möchten, trennen Sie bitte
das Gerät von dem PC. Sie sehen auf dem Display oben rechts ein Batteriesymbol.
Leuchtet dieses Symbol grün, ist der Akku vollständig aufgeladen.
Hinweis: Für eine optimale Leistungsfähigkeit muss der Li-polymer Akku regelmäßig
genutzt werden. Sollte dies nicht der Fall sein, laden Sie den Akku mindestens einmal pro
Monat vollständig auf.
Seite 3 von 13 DE
Page 5
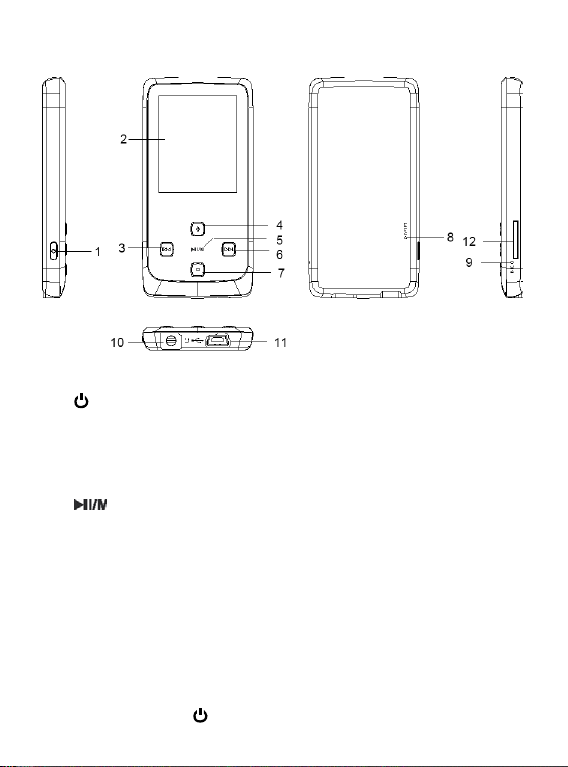
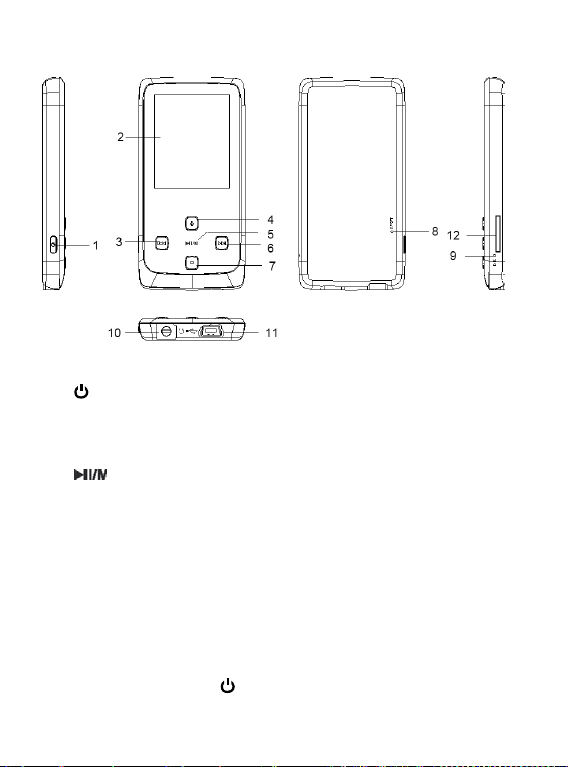
Bedienungselemente
1. [ ] Einschalten / Ausschalten und Aufruf / Verlassen des Auswahlmenüs der
einzelnen Funktionen
2. Display
3. []Zurück Taste | Bewegung nach links im Menü
4. [+] Erhöhen der Lautstärke | Bewegung nach oben im Menü
5. [ ] Play/Pause / Bestätigungstaste
6. [] Vorwärts Taste | Bewegung nach rechts im Menü
7. [-] Verminderung der Lautstärke | Bewegung nach unten im Menü
8. Reset
9. Mikrofon
10. Kopfhörereingang
11. Mini USB Anschluss
12. Micro SD - Card
Ein- und Ausschalten
Drücken und halten Sie die [ ] Taste zum Ein- oder Ausschalten des Players.
Seite 4 von 13 DE
Page 6
6. Bedienung
Play/Pause
[ ] Play/Pause / Bestätigungstaste. Drücken und halten Sie diese Taste, um in das
Hauptmenü zu gelangen.
Lautstärke bei Musik-/ Videowiedergabe
Drücken Sie die Taste [+] bzw. [-], um die Lautstärke zu regeln.
Auswahl des vorherigen Tracks (vorheriger Titel)
Kurzes Betätigen der Taste [] (Rückwärts).
Auswahl des nächsten Tracks (nächster Titel)
Kurzes Betätigen der Taste [] (Vorwärts).
Zurückspulen
Taste []gedrückt halten.
Vorspulen
Taste [] gedrückt halten.
Tasten Sperren/ Entsperren
[ ] Play/Pause - Taste. Drücken und halten sie diese Taste, um die Tastensperre
aufzuheben.
Reset
Bitte betätigen Sie die Reset Taste, sollte der Player auf keine Eingabe mehr reagieren.
7. Abspielen von Musik
Wählen Sie im Hauptmenü die Funktion Musik. Bestätigen Sie Ihre Auswahl durch einen
kurzen Druck auf die [ ] - Taste.
Optionen
(1) Drücken Sie im Musik-Modus die [ ]-Taste, um das Optionsmenü aufzurufen.
(2) Mit der [] oder []-Taste können Sie die gewünschte Funktion auswählen. Mit
der [ ]-Taste bestätigen Sie ihre Auswahl.
Auswahl:
Alle Lieder:
Seite 5 von 13 DE
Page 7

Auswahl eines bestimmten Liedes. Abspielen aller Lieder nach Zufallsauswahl.
Wiederholungsmodus:
o Keine Wiederholung: Alle Lieder werden einmal abgespielt.
o Titel wiederholen: Das ausgesuchte Lied wird wiederholt abgespielt.
o Alle Titel wiederholen: Wiederholt alle gespeicherten Lieder.
o Ordner einfach: Wiederholt die Titel in dem ausgewählten Ordner einmal
und stoppt dann die Wiedergabe.
o Ordner wiederholen: Wiederholt alle Titel aus dem aktuellen Ordner.
o Ordner Zufallswiedergabe: Alle im Ordner gespeicherten Lieder werden
nach dem Zufallsprinzip abgespielt.
Equalizer auswählen
Normal, Rock, Pop, Klassik, Bass, Jazz, Benutzerdefinierter Equalizer
Benutzerdefinierter Equalizer
(1) Drücken Sie die [] oder []-Taste, um die EQ-Einrichtung zu wählen.
(2) Betätigen Sie die [+] bzw. [-] - Tasten, um die Werte einzustellen.
(3) Bestätigen Sie Ihre Eingaben mit der [ ]-Taste.
Musik Bibliothek
Ordnen Sie Ihre gespeicherten Lieder nach Genre, Artist, Album und Titel. Sollten Sie
diese Funktion zum ersten Mal nutzen, wählen Sie „Musik Bibliothek“ und danach „JA“
aus. Nach Durchführung der Sortierung können Sie in diesem Menü Ihre gewünschte
Sortierung der Titel auswählen.
3D
Mit Hilfe dieser Funktion können Sie der Musik einen räumlichen Klang geben.
Zurück
Durch Auswahl dieses Menüpunktes gelangen Sie zurück in das Musik Menü.
Lyric (Songtexte)
Dieser Player kann Lyric Texte während der Wiedergabe eines Liedes anzeigen. Um
eine Lyric Datei einem Lied zuzuordnen, gehen Sie wie folgt vor:
(1) Speichern Sie den Lyric Text im gleichen Verzeichnis, wie das dazugehörige
Lied.
(2) Benennen Sie die Lyric Datei in exakt gleicher Weise wie das dazugehörige
Lied.
Verlassen der Funktion Musik
Drücken und halten Sie die [ ] - Taste, um in das Hauptmenü zu gelangen.
Seite 6 von 13 DE
Page 8
8. Foto
Wählen Sie im Hauptmenü die Funktion Foto. Bestätigen Sie Ihre Auswahl durch einen
kurzen Druck auf die[ ] - Taste.
Mit der Taste [+] / [-] können Sie das gewünschte Bild aus der Liste oder den
gewünschten Ordner auswählen. Mit der [ ]-Taste bestätigen Sie Ihre Auswahl. Mit
der [] – Taste gelangen Sie in das vorherige Menü zurück.
Während der Wiedergabe der Fotos können Sie:
- mit der [+] oder [-] Taste vor- oder zurückblättern
- mit der [ ]- Taste das Optionsmenü aufrufen
Auswahl
Diashow
Wiedergabe der gespeicherten Bilder im Rahmen einer Diashow.
Einzelbildbetrachtung
Anzeige eines einzelnen Bildes. Mit der [+] oder [-] Taste können Sie vor- oder
zurückblättern.
Zurück
Durch Auswahl dieses Menüpunktes gelangen Sie zurück in das Foto Menü.
Verlassen der Funktion Foto
Drücken und halten Sie die [ ] - Taste, um in das Hauptmenü zu gelangen.
9. Video
Wählen Sie im Hauptmenü die Funktion Video. Bestätigen Sie Ihre Auswahl durch einen
kurzen Druck auf die [ ] - Taste.
Mit der [+] / [-] Taste können Sie das gewünschte Video aus der Liste oder den
gewünschten Ordner auswählen. Mit der [ ]-Taste bestätigen Sie Ihre Auswahl. Mit
der [] – Taste gelangen Sie in das vorherige Menü zurück.
Während der Wiedergabe der Videos können Sie:
- das Video stoppen und fortsetzen: Drücken Sie die [ ] - Taste, um die
Wiedergabe zu stoppen. Um die Wiedergabe fortzusetzen, drücken Sie die
[ ] - Taste ein weiteres Mal.
- mit der [] oder []-Taste zum vorherigen / nächsten Video springen.
Seite 7 von 13 DE
Page 9

- schnelles Zurückspulen / Vorspulen innerhalb eines Videos. Drücken und halten
Sie die [] oder []-Taste.
- Mit der [+] / [-] – Taste die Lautstärke regeln.
- das Abspielen eines Videos beenden. Drücken und halten Sie dazu die [ ]
Taste.
Optionen
(1) Halten Sie im Video-Modus die [ ]-Taste kurz gedrückt und bestätigen Sie mit der
[ ]-Taste, um den gewünschten Wiederholungsmodus einzustellen.
(2) Mit der [] oder []-Taste können Sie den gewünschten Modus auswählen. Mit
der [ ]-Taste bestätigen Sie ihre Auswahl.
Verlassen der Funktion Video
Drücken und halten Sie die [ ] - Taste, um in das Hauptmenü zu gelangen.
10. Radio
Wählen Sie im Hauptmenü die Option “FM- Radio” aus. Bestätigen Sie Ihre Auswahl durch
Drücken der [ ] - Taste.
Während Sie gerade einen Radiosender hören, können Sie:
- mit den [+] / [-] – Tasten die Lautstärke regeln.
- mit der [ ]- Taste das Optionsmenü aufrufen
- den Radio-Modus beenden. Drücken und halten Sie dazu die [ ] Taste.
Optionen
(1) Drücken Sie im Musik-Modus die [ ]-Taste, um das Optionsmenü aufzurufen.
(2) Mit der [] oder []-Taste können Sie die gewünschte Funktion auswählen. Mit
der [ ]-Taste bestätigen Sie ihre Auswahl.
Auswahl:
Automatischer Sendersuchlauf
Der Player sucht automatisch nach Radiosendern im eingestellten Frequenzband. Findet
er eine Radiostation, stoppt der Suchlauf für einen kurzen Moment und speichert den
gefundenen Sender. Danach setzt der der Suchlauf seine Suche fort, bis er ans Ende des
Frequenzbandes gelangt ist. Es sind nun alle in Ihrem Empfangsbereich verfügbaren
Sender gespeichert. Durch Drücken der [ ]-Taste können Sie die Suche jederzeit
stoppen und der Player speichert alle bis dahin gefundenen Sender.
Manueller Suchlauf
Durch kurzes Drücken der [] oder []-Tasten springt die Suche um 0,1 in die
gewünschte Richtung im Frequenzband weiter. Halten Sie die [] oder []-Tasten kurz
gedrückt, springt die Suche auf den nächsten verfügbaren Sender in der gewünschten
Richtung des Frequenzbandes weiter.
Seite 8 von 13 DE
Page 10
Band
Stellen Sie hier das gewünschte Frequenzband entsprechend Ihres Aufenthaltsortes ein.
Station speichern
Sie können Ihre Lieblingssender speichern. Drücken Sie dazu die [+] / [-] – Tasten um
zwischen „Ja“ oder „Nein“ auszuwählen und bestätigen Sie Ihre Auswahl mit der [ ]Taste. Es handelt sich um den aktuell eingestellten Sender.
Station löschen
Sender, die Ihnen nicht gefallen, können Sie löschen. Drücken Sie dazu die [+] / [-] –
Tasten um zwischen „Ja“ oder „Nein“ auszuwählen und bestätigen Sie Ihre Auswahl mit
der [ ]-Taste. Es handelt sich um den aktuell eingestellten Sender.
Record
Sie können das Radioprogramm des aktuell eingestellten Senders aufnehmen. Bestätigen
Sie mit der [ ]-Taste, das Aufnahmefenster erscheint und die Aufnahme beginnt
automatisch. Durch Drücken der [ ]-Taste wird die Aufnahme unterbrochen und
durch erneutes Drücken der [ ]-Taste wieder fortgesetzt. Drücken Sie die [ ] –
Taste, um die Aufnahme zu speichern.
Zurück
Durch Auswahl dieses Menüpunktes gelangen Sie zurück in den Radio-Modus.
11. Aufnahme von Sprache
Wählen Sie im Hauptmenü die Funktion Aufnahme. Bestätigen Sie Ihre Auswahl durch
einen kurzen Druck auf die [ ] - Taste.
Starten und stoppen Sie die Sprachaufnahme mit der [ ]-Taste. Mit der [ ] -Taste
speichern Sie die Aufnahme ab und gelangen zurück in das Aufnahmemenü.
Hinweis: Die aufgenommenen Sprachdateien werden im Ordner „Voice“ des Players
abgespeichert. Die Aufnahme einer Sprachdatei wird automatisch beendet und
gespeichert, wenn der Player keinen Speicherplatz mehr besitzt oder die Batterie nicht
mehr genug Leistung besitzt.
Einstellen der Aufnahmequalität
Bevor Sie mit der Sprachaufnahme beginnen, haben Sie die Möglichkeit, die
Aufnahmequalität einzustellen.
(1) Drücken und halten Sie die [ ]-Taste, um in das Hauptmenü zu
gelangen. Wählen Sie “Einstellung” und bestätigen Sie mit kurzem Druck auf
die [ ]-Taste.
(2) Mit der [] oder []-Taste können Sie den Menüpunkt Aufnahmequalität
auswählen. Mit der [ ]-Taste bestätigen Sie ihre Auswahl.
Seite 9 von 13 DE
Page 11
Auswahlmöglichkeiten:
- Niedrige Qualität: normale Aufnahmequalität bei wenig Speicherverbrauch.
- Normale Qualität: gute Aufnahmequalität bei wenig Speicherverbrauch.
- Hohe Qualität: sehr gute Aufnahmequalität bei großem Speicherverbrauch.
Optionen
(1) Drücken Sie im Aufnahme – Modus die [ ]-Taste, um das Optionsmenü
aufzurufen.
(2) Mit der [] oder []-Taste können Sie die gewünschte Funktion auswählen. Mit
der [ ]-Taste bestätigen Sie ihre Auswahl.
Auswahl
Aufnahme
Starten der Sprachaufnahme.
Wiedergabe
Wiedergabe der aufgenommenen Sprachdateien.
Zurück
Durch Auswahl dieses Menüpunktes gelangen Sie zurück in das Aufnahme Menü.
Verlassen der Funktion Sprachaufnahme
Drücken und halten Sie die [ ] - Taste, um in das Hauptmenü zu gelangen.
12. Durchsuchen aller Dateien
Wählen Sie im Hauptmenü die Funktion Ordner. Bestätigen Sie Ihre Auswahl durch einen
kurzen Druck auf die [ ] - Taste.
(1) Mit der [+] / [-] – Taste können Sie zwischen den Dateien und Ordnern wechseln.
Mit der [ ] - Taste können Sie eine Datei oder einen Ordner öffnen.
(2) Mit Druck auf die [ ] – Taste, erscheint der Dialog, ob Sie die ausgewählte Datei
löschen möchten. Bestätigen Sie Ihre Auswahl mit der [ ] - Taste.
Verlassen der Funktion Ordner
Drücken und halten Sie die [ ]- Taste, um in das Hauptmenü zu gelangen.
13. System-Einstellungen
Wählen Sie im Hauptmenü die Funktion Einstellungen. Bestätigen Sie Ihre Auswahl durch
einen kurzen Druck auf die [ ] - Taste.
Seite 10 von 13 DE
Page 12

Anpassen der Einstellungen:
(1) Wählen Sie mit der [] oder [] – Taste den gewünschten Menüpunkt aus.
Bestätigen Sie Ihre Auswahl mit der [ ] - Taste.
(2) Mit der [+] / [-] – Taste können Sie zwischen den Werten wählen.
(3) Mit der [ ] – Taste bestätigen Sie Ihre Auswahl. Mit der [] – Taste gelangen
Sie in das vorherige Menü zurück ohne eine Veränderung vorzunehmen.
Einstellungsmöglichkeiten
- Energie: Einstellen der Zeit nach der der Player sich bei Nichtbenutzung
automatisch ausstellt.
- Sprache: Auswahl der gewünschten Sprache.
- Display Einstellungen: Auswahl von Helligkeit und der Beleuchtungsdauer des
Displays.
- Aufnahmequalität: Einstellen der Aufnahmequalität bei einer Sprachaufnahme.
- Systemeinstellungen: Löschen einer Datei, Player formatieren, Player
zurücksetzen, System Information, Musik Bibliothek aktualisieren und Dateien
sortieren.
- Tastensperre: Einstellen der Zeit, nachdem die Tastensperre aktiviert wird.
- Zurück: Verlassen des Menüs.
14. Fehlerbehebung
Problem – Mögliche Gründe – Lösung Problem
Es erscheint nichts auf dem Display.
(1) Der Akku ist leer.
Laden Sie den Akku.
(2) Die Tasten sind gesperrt.
Entriegeln Sie die Tastensperre wie unter „6. Bedienung“ beschrieben.
Das Gerät reagiert nicht, wenn die Play-Taste betätigt wird.
(1) Die Tasten sind gesperrt.
Entriegeln Sie die Tastensperre wie unter „6. Bedienung“ beschrieben.
Bei der Wiedergabe fehlt der Ton.
(1) Die Lautstärke ist zu gering
Erhöhen sie die Lautstärke im Lautstärkemenü
(2) Audio-Datei defekt
Bitte übertragen Sie die Datei erneut
Es kann keine Verbindung zum PC hergestellt werden.
(1) Der Treiber wurde nicht korrekt installiert
Installieren Sie den Treiber erneut.
(2) Bitte führen Sie ein Mainboardupdate aus
(Beachten Sie hierzu die Hinweise des Mainboard Herstellers)
Seite 11 von 13 DE
Page 13

Der Anzeigewert der Zeit wechselt ständig.
(1) Die Bit-Rate des MP3-Files wechselt während der Wiedergabe.
Bitte benutzen Sie eine einheitliche Bit-Rate beim Komprimieren.
Der PC meldet einen Fehler beim Verbinden mit dem Gerät
(1) Der Player wurde während der Datenübertragung vom PC getrennt.
Bitte trennen Sie das Gerät niemals während der Datenübertragung.
Der angegebene Speicher des Gerätes stimmt mit dem wirklichen Speicher
nicht überein.
(1) Ein Teil des Speichers wird für Software, Formatierung und
Displayeigenschaften genutzt.
MP3-Daten werden nicht richtig abgespielt.
(1) Die MP3- Daten wurden in ein falsches Format komprimiert, beispielsweise in
MPEG 1 oder 2.
Löschen Sie die Dateiformate, welche nicht unterstützt werden.
Video-Daten können nicht abgespielt werden.
(1) Das Format wird nicht unterstützt.
Das Video Format muss MTV sein. Wenn dies nicht der Fall ist, konvertieren
sie es bitte. Achten sie dabei auf die Formatgröße 160x128 Pixel.
(2) Die Video-Datei ist defekt.
Übertragen Sie ihre Video Datei erneut
Die Fotos werden nicht angezeigt.
(1) Das Dateiformat wird nicht unterstützt.
Konvertieren Sie das Foto bitte in ein JPG oder BMP- Format.
15. Technische Daten
Akkutyp
Wiederaufladbarer Li-polymer Akku
Akkudauer
~ 8 Stunden Musik
LCD
1,8“ Zoll Farbdisplay
Kopfhörer
5mW+5mW
Video Format
MTV 160x128 Pixel
Audio Formate
MP3, WMA, WAV
Seite 12 von 13 DE
Page 14

Foto Format
JPEG, BMP
Bit Rate
MP3: 8-320kbps;
WMA:5-320kbps
SNR
80dB
USB Port
USB 2.0
Betriebsbereit zwischen
0 Celsius ~ +40 Celsius
Betriebsbereit bei einer rel. Luftfeuchtigkeit von
< 85%
Lagerfähig bei einer rel. Luftfeuchtigkeit von
< 90%
16. Bitte beachten Sie folgendes
(1) Plug & Play ist nur bei Windows 2000/XP/Vista und Windows7 möglich.
Bitte installieren Sie bei Windows 98/SE den Treiber.
(2) Bitte entriegeln Sie die Tastensperre, um mit dem Gerät zu arbeiten.
(3) Bitte laden Sie die Batterie, wenn dieses im Display angezeigt wird.
(4) Bitte trennen Sie das Gerät vom PC nur wie oben erwähnt, um einen möglichen
Datenverlust zu vermeiden.
(5) Wenn die Aufnahmedatei sehr groß ist, dauert das Laden der Datei länger.
(6) Softwareunterstützung für Windows 2000, XP, Vista und Windows 7.
(INTENSO)
49377 Vechta
Germany
www.intenso.de
®
Seite 13 von 13 DE
Page 15

1. Table of contents
1. Table of contents ................................................................................................... 1
2. Instructions............................................................................................................. 2
3. Functions ............................................................................................................... 2
4. Package content .................................................................................................... 2
5. Before use.............................................................................................................. 3
6. Operation ............................................................................................................... 5
7. Music playback ...................................................................................................... 5
8. Photos .................................................................................................................... 7
9. Videos .................................................................................................................... 7
10. Radio ..................................................................................................................... 8
11. Speech recording ................................................................................................... 9
12. Search all files ...................................................................................................... 10
13. System settings .................................................................................................... 11
14. Troubleshooting ................................................................................................... 11
15. Technical data ...................................................................................................... 12
16. Please observe what follows ................................................................................ 13
Page 1 of 13 GB
Page 16

2. Instructions
Avoid a strong collision of the device.
Do not use the device in extremely cold, hot, humid or dusty places. Do not expose
it to direct insolation.
Carry out frequent data backups to avoid a possible data loss.
Avoid the use in strong magnetic fields.
Protect the device from humidity. If humidity penetrates the device, please switch it
off immediately and clean and dry the device.
Please do not use chemical solutions to clean the device. In this case please use a
dry cloth.
We are not responsible for damages or data loss in case of a failure malfunction
caused by a faulty operation, the reparation of the device by one’s own hand or the
battery change.
Please do not decompose the device into smaller parts and do not try to repair it by
yourself, because in this case the guarantee expires.
If you use earphones or headsets on full blast you could cause a durable damage to
your hearing.
3. Functions
MP3 & WMA Player
MTV Video Player
Picture display in JPEG / BMP
FM Radio
Folder navigation
Rechargeable Li-polymer battery
Customized setting
Removable medium
4. Package content
Please check the package content for completeness
Intenso Video Player
Stereo headset
Conversion software (MTV-format)
USB cable
Instruction manual + guarantee certificate
Page 2 of 13 GB
Page 17

5. Before use
Connect with the PC
With the operating systems Windows 98/SE please install a driver before you connect the
player with the PC. (The download is available on the following website: www.intenso.de).
For the operating systems WIN 2000/XP/ME/Vista/Windows 7 the installation of the driver
is not needed.
Please go ahead as follows:
(1) Connect the player with the USB connection of the PC.
(2) The window “Intenso” will open. Now you can save the data from your hard disk on
the removable medium.
Safe removal from the PC
For Windows 2000/XP/ME/Vista/Windows 7:
Click with the right mouse button down right in the task bar on the symbol “Remove
hardware securely”. In the displayed context menu please select the point “Remove USB
mass storage device driver“ with the left mouse button. Please make sure that the data
transmission has been completed.
Now you can remove the device.
For Windows 98/SE:
Select the device in the „device manager“ with the left mouse button. Now click on the
menu point “Remove“. Make sure also here that the data transmission has been
completed.
Now the device can by disconnected from the computer.
Battery charge:
The device is equipped with an integrated li-polymer battery. The battery is charged by the
USB connection with your PC.
At the first use of the device please pay attention that the battery is completely charged, in
general this process takes 4 hours.
To charge the battery please connect the device with the PC by the USB cable. The
charging process starts automatically.
If you would like to know the actual status of the charging process, please disconnect the
device from the PC. On the display top right you can see a battery symbol. If the symbol
flashes green, the battery is completely charged.
Instruction: To achieve an optimal performance the li-polymer battery must be regularly
used. If this is not the case, charge the battery completely at least once per month.
Page 3 of 13 GB
Page 18
Operation components
1. [ ] Switch on / switch off / leave the selection menu of the respective functions
2. Display
3. []Back key | Move to the left in the menu
4. [+] Raise the volume | Move upwards in the menu
5. [ ] Play/Pause / confirmation key
6. [] Forward key | Move to the right in the menu
7. [-] Lower volume | Move downwards in the menu
8. Reset
9. Microphone
10. Headset entry
11. Mini USB connection
12. Micro SD - Card
Switch on and switch off,
Press and keep pressed the key [ ] to switch the player on and off.
Page 4 of 13 GB
Page 19

6. Operation
Play/Pause
[ ] Play/Pause / confirmation key. Press and keep pressed this key to enter the main
menu.
Volume of the playback of music and video
Press the key [+] or [-] to adjust the volume.
Selection of the previous track (previous title)
Short activation of the key [] (backwards).
Selection of the next track (next title)
Short activation of the key [] (onwards).
Rewind
Keep the key []pressed.
Fast-forward
Keep the key [] pressed.
Lock / unlock keys
[ ] Play/Pause key. Press and keep pressed this key in order to remove the key lock.
Reset
Please confirm the reset key, if the player does not react to any entry.
7. Music playback
Select the function music in the main menu. Confirm your selection by shortly activating
the key [ ].
Options
(1) Press the key [FUNC] in the music mode to call up the option menu.
(2) With the key [] or [] you can select the desired function. With the key [ ]
you confirm your selection.
Page 5 of 13 GB
Page 20

Selection
All songs:
Selection of a certain song. Playback of all songs according to the random selection.
Repetition mode:
o No repetition: All songs are played only once.
o Repeat title: The selected song is played repeatedly.
o Repeat all titles: Repeats all saved songs.
o Simple folder: Repeats the titles of a selected folder once and then stops
the playback.
o Repeat folder: Repeats all the titles of the actual folder.
o Folder random playback: All the songs saved in the folder are played
according to the random principle.
Select equalizer
Normal, rock, pop, classic, bass, jazz, customized equalizer
Customized equalizer
(1) Press the key [] or [] to select the adjustment of the EQ.
(2) Activate the key [+] or [-] to set up the values.
(3) Confirm your entries with the key [ ].
Music library
Order the saved songs according to genre, artist, album and title. If you use this function
for the first time, select “Music library“ and then “YES“. After having carried out the
sortation you can select your sortation in this menu.
3D
With this function you can give a local sound to the music.
Backwards
By selecting this menu point you get back to the music menu.
Lyric (song texts)
This player can display lyric texts during the play back of a song. To assign a lyric to a
song, you have to proceed as follows:
(1) Save the lyric text and the corresponding song in the same register.
(2) Name the lyric file and the corresponding song exactly in the same way.
Exit the music function
Press and keep pressed the key [ ] to enter the main menu.
Page 6 of 13 GB
Page 21

8. Photos
Select the function photo in the main menu. Confirm your selection by shortly pressing the
key [ ].
With the key [+] / [-] you can select the favored image from the list or choose the
designated folder. With the key [ ] you confirm your selection. With the key [] you
get back to the previous menu.
During the reproduction of the photos you can:
- Page forward / back with the key [+] or [-]
- Call up the option menu with the key [FUNC]
Selection
Diashow
Reproduction of the saved images in a diashow.
Reproduction of single images
Reproduction of a single image. With the key [+] or [-] you can page forward / back.
Back
By selecting this menu point you get back to the photo menu.
Activation of the photo function
Press and keep pressed the key [ ] to get to the main menu.
9. Videos
Selection the function video in the main menu. Confirm your selection by shortly pressing
the key [ ].
With the key [+] / [-] you can select the designated video from the list or from the
designated folder. With the key [ ] you confirm your selection. With the key [] you
get back to the previous menu.
During the play back of the videos you can:
- Stop and continue the video: Press the key [ ] to stop the play back. To
continue the play back, press the key [ ] again.
- With the key [] or [] you can go to the previous / next video.
Page 7 of 13 GB
Page 22
- To rewind / fast-forward quickly within a video press and keep pressed the key
[] or [].
- With the key [+] / [-] you can adjust the volume.
- To exit the play back of a video, press and keep pressed the key [ ].
Options
(1) Press the key [ ] in the video mode and confirm it by pressing the key [ ] to
adjust the desired repetition mode.
(2) By pressing the key [] or [] you can select the desired mode. By pressing the
key [ ] you can confirm your selection.
Exit of the video function
Press and keep pressed the key [ ] to get to the main menu.
10. Radio
In the Main Menu please select the “FM-Radio” option. Confirm your selection by pressing
the [ ] - button.
While listening to a radio station you can:
- turn up / down the volume using the [+] / [-] – buttons.
- start the options-menu using the [ ] – button.
- stop the radio mode using the [ ] button. Press and hold this button.
Options
(3) In the music mode please press the [ ] – button to enter the options-menu.
(4) Using the [] or [] – button you can select your desired function. Using the
[ ] – button you can confirm your selection.
Selection:
Automatic station scanning
Your player searches automatically for radio stations within the wave band selected. If it
finds a radio station, the scanning process stops for a little while and the station found is
stored. Thereafter, it continues searching until the end of the wave band has been
reached. Now, all stations available within your tuning range are stored. By pressing the
[ ] – button you can stop the scanning process at all times and the player stores all
stations found so far.
Manual scanning
By pressing the [] or [] – button shortly, the search process leaps into the desired
direction in the wave band by 0.1 units. Hold the [] or [] – button shortly and the
scanning process leaps to the next station available in the desired wave band direction.
Page 8 of 13 GB
Page 23

Band
Here, you can adjust the desired wave band according to your respective location.
Storing radio stations
You can store all of your favourite stations. To do so, please press the [+] / [-] – buttons to
choose from “Yes” or “No” and confirm you selection using the [ ] - button. This is the
station currently adjusted.
Deleting radio stations
Stations which you don’t like may be deleted. To do so, please press the [+] / [-] – buttons
to choose from “Yes” or “No” and confirm you selection using the [ ] - button. This is
the station currently adjusted.
Recording radio programmes
It is possible to record the radio programme of the station currently adjusted. Please
confirm your selection using the [ ] – button; now the recording window pops up and
the recording process starts automatically. By pressing the [ ] – button you can pause
the recording process and, by repeatedly pressing the [ ] – button, you can continue
recording your programme. Please press the [ ] – button to store your recording.
Back
By selecting this menu item you will get back into the radio mode.
11. Speech recording
Select the function recording in the main menu. Confirm your selection by shortly pressing
the key [ ].
Start and stop the speech recording with the key [ ]. With the key [ ] you can save
the recording and get back to the recording menu.
Instruction: The recorded voice files are saved in the folder “Voice“ of the player. The
recording of a voice file is automatically exited and saved if the player has no memory
capacity of if the battery has not enough performance.
Setting up the recording quality
Before you start with the speech recording, you have the opportunity to set up the
recording quality.
(1) Press and keep pressed the key [ ] to get to the main menu. Select
“Setup” and confirm by shortly pressing the key [ ].
(2) With the key [] or [] you can select the menu point recording quality.
With the key [ ] you confirm your selection.
Page 9 of 13 GB
Page 24

Menu items:
- Long Time: normal recording quality with low consumption of the memory
capacity.
- Normal quality: good recording quality with low consumption of the memory
capacity.
- High quality: very good recording quality with high consumption of the
memory capacity.
Options
(1) Press the [FUNC] key in the recording mode to call up the option menu.
(2) With the key [] or [] you can select the desired function. With the key [ ]
you confirm your selection.
Selection
Recording
Start the speech recording.
Play back
Play back of the recorded voice files.
Back
By selecting this menu point you get to the recording menu.
Exit the function speech recording
Press and keep pressed the key [ ] to get to the main menu.
12. Search all files
Select the function folder in the main menu. Confirm your selection by shortly pressing the
key [ ].
(1) With the key [+] / [-] you can move from one file and/or folder to the other. With the
key [ ] you can open a file or a folder.
(2) By pressing the key [FUNC] the dialogue whether you would like to delete the
selected file is displayed. Confirm your selection with the key [ ].
Exit the function folder
Press and keep pressed the key [ ] to get to the main menu.
Page 10 of 13 GB
Page 25

13. System settings
Select the function settings in the main menu. Confirm your selection by shortly pressing
the key [ ].
Adjust the settings:
(3) Select the desired menu point with the key [] or []. Confirm your selection by
pressing the key [ ].
(4) With the key [+] / [-] you can pass from a value to another.
(5) With the key [ ] you confirm your selection. With the key [] you get back to
the previous menu without making any changes.
Setting possibilities
- Time: setting of the actual time and the valuable time zone.
- Switch off: setting of the time: if not used the player switches off automatically
after that.
- Language: selection of the designated language.
- Display settings: selection of the brightness and the illumination duration of the
display.
- Recording quality: setting of the recording quality during a speech recording.
- System settings: delete a file, format the player, reset the player, system
information, update the music library and sort files.
- Key lock: time setting: after that the key lock is activated.
- Back: exit the menu.
14. Troubleshooting
Problem – possible causes – problem solving
There is nothing on the display.
(1) The battery is empty.
Charge the battery.
(2) The keys are locked.
Unlock the key lock as described in the paragraph „6. Operation“.
The device does not react, if you press the play key.
(1) The keys are locked.
Unlock the key lock as described in the paragraph „6. Operation“.
There is no sound during the play back.
(1) The volume is too low.
Raise the volume in the volume menu.
(2) The audio file is damaged
Please transfer the files again
Page 11 of 13 GB
Page 26

There is no connection with the PC.
(1) The driver was not installed correctly
Install the driver again.
(2) Please carry out an update of the main board
(In this context, observe the instructions of the main board producer)
The displayed time value always changes.
(1) The bit rate of the MP3 files changes during the play back.
Please use a unified bit rate for the compression.
The PC displays an error message during the connection with the device
(1) The player was disconnected from the PC during the data transmission.
Please do not disconnect the device during the data transmission in any case.
The device memory indicated does not correspond to the real memory.
(1) A part of the memory is used for software, formatting and display
characteristics.
The MP3 files are not reproduced properly.
(1) The MP3 files were compressed in a wrong format, for example in MPEG 1 or
2.
Delete the file formats if they are not supported.
Video data cannot be reproduced.
(1) The format is not supported.
The video format must be MTV. If this is not the case, please convert it. Pay
attention on the format size 128x128 Pixel.
(2) The video file is damaged.
Transfer your video file again.
The photos are not displayed.
(1) The file format is not supported.
Please convert the photo into JPG or BMP format.
15. Technical data
Battery type
Rechargeable li-polymer battery
Battery duration
~ 8 hours
LCD
Display of 1,8“ inch
Headset
5mW+5mW
Video format
MTV 160x128 Pixel
Page 12 of 13 GB
Page 27

Audio formats
(INTENSO)
®
49377 Vechta
Germany
www.intenso.de
MP3, WMA, WAV
Photo format
JPEG, BMP
Bit rate
MP3: 8-320kbps;
WMA:5-320kbps
SNR
80dB
USB port
USB 2.0
Operational between
0 Celsius ~ +40 Celsius
Operational at a relative air moisture of
< 85%
Fit for storage at a relative air moisture of
< 90%
16. Please observe what follows
(1) Plug & Play is possible only with Windows 2000/XP/Vista/Windows 7.
With 98/SE please install the driver.
(2) Please unlock the key lock in order to work with the device.
(3) Please charge the battery if it is indicated on the display.
(4) Please disconnect the device from the PC only as indicated in order to avoid an
eventual data loss.
(5) If the file to be recorded is too big, the charge of the file takes longer.
(6) Support software per Windows 2000, Windows XP, Windows Vista, Windows 7.
Page 13 of 13 GB
Page 28

1. Indice dei contenuti
1. Indice dei contenuti ................................................................................................ 1
2. Avvisi ..................................................................................................................... 2
3. Funzioni ................................................................................................................. 2
4. Contenuto del pacchetto ........................................................................................ 2
5. Prima dell‟uso ........................................................................................................ 3
6. Messa in funzione .................................................................................................. 5
7. Riproduzione di musica .......................................................................................... 5
8. Immagini ................................................................................................................ 7
9. Video ...................................................................................................................... 7
10. Radio ..................................................................................................................... 8
11. Registrazione vocale .............................................................................................. 9
12. Eseguire una ricerca attraverso tutti i file ............................................................. 10
13. Impostazioni del sistema ...................................................................................... 10
14. Suggerimenti e soluzioni in caso di problemi ....................................................... 11
15. Dati tecnici ........................................................................................................... 12
16. La preghiamo di fare attenzione a ciò che segue................................................. 13
Pagina 1 di 13 IT
Page 29

2. Avvisi
La preghiamo di evitare gli impatti dell‟apparecchio con oggetti e superfici duri.
Le raccomandiamo di non utilizzare l‟apparecchio in zone estremamente fredde,
calde, umide o polverose e di non esporlo alle radiazioni solari dirette.
Le consigliamo di eseguire spesso dei backup per evitare una possibile perdita di
dati.
Le chiediamo gentilmente di evitare l‟uso nei campi fortemente magnetizzati.
È pregato/a di proteggere l‟apparecchio dall„umidità. Se dovesse entrare
dell‟umidità nell‟apparecchio, Le raccomandiamo di spegnerlo subito per poi pulirlo
ed asciugarlo.
La avvertiamo cortesemente di non utilizzare delle soluzioni chimiche per pulire
l‟apparecchio. Per quest‟operazione è consigliabile utilizzare soltanto un panno
asciutto.
Non siamo responsabili per i danni o per la perdita di dati in caso di funzionamento
errato, di maneggio scorretto, di riparazione dell‟apparecchio da Lei eseguita o del
ricambio della batteria ricaricabile.
La preghiamo di non scomporre l‟apparecchio in pezzi singoli e di non tentare di
ripararlo da sé. In questo caso la garanzia scade.
Quando si utilizzano degli auricolari o delle cuffie ad un volume troppo elevato si
possono verificare dei danni duraturi all‟udito.
3. Funzioni
Player MP3 & WMA
Player MTV Video
Lettore immagini JPEG / BMP
Radio FM
Cartella di navigazione
Batteria ricaricabile di polimero di litio
Impostazione personalizzata
Disco rimovibile
4. Contenuto del pacchetto
La preghiamo di controllare il contenuto del pacchetto riguardante la completezza
Video Player della Intenso
Cuffia stereo
Software di conversione (formato MTV)
USB
Istruzioni d‟uso + certificato di garanzia
Pagina 2 di 13 IT
Page 30

5. Prima dell’uso
Collegamento con il PC
La preghiamo di installare un driver prima di collegare il player con il PC, se utilizza il
sistema operativo Windows 98/SE. (Può scaricarlo sul sito www.intenso.de). Per i sistemi
operativi WIN 2000/XP/ME/Vista/Windows 7 non è necessaria l‟installazione del driver.
Le consigliamo di eseguire i seguenti passaggi per quest‟operazione:
(1) Colleghi il player con il raccordo USB del PC.
(2) Si apre la finestra “Intenso”. Ora può memorizzare i dati del Suo disco fisso
Rimozione sicura dal PC
Per Windows 2000/XP/ME/Vista/Windows 7:
La preghiamo di cliccare con il pulsante destro del mouse sul simbolo “rimozione sicura di
hardware“ nella barra dei task sotto alla destra. Selezioni l‟opzione “rimuovere la memoria
di massa“ dal menu di contesto che appare con il pulsante sinistro del mouse. La
avvertiamo gentilmente di assicurarsi che la trasmissione dei dati sia stata completamente
compiuta. Ora può rimuovere l‟apparecchio.
Per Windows 98/SE:
La preghiamo di selezionare l‟apparecchio nel “device manager“ con il pulsante sinistro del
mouse. Ora clicchi sull‟opzione “rimuovere”. Le chiediamo di assicurarsi anche qui che la
trasmissione dei dati sia stata interamente compiuta.
Adesso L‟arnese può essere scollegato dal PC.
Caricare la batteria:
L‟apparecchio è attrezzato di una batteria ricaricabile di polimero di litio. La batteria si
carica tramite il collegamento USB del Suo PC.
La preghiamo di fare attenzione di caricare interamente la batteria innanzi del primo
utilizzo. Di solito quest‟operazione dura 4 ore.
È pregato/a di collegare l‟apparecchio con il PC attraverso il cavo USB per caricare la
batteria. Il procedimento di ricarico inizia automaticamente.
Se desidera sapere lo stato attuale del procedimento di ricarico, scolleghi l‟apparecchio
dal PC. Può vedere il simbolo della batteria sul display sopra alla destra. Se questo
simbolo è verde, la batteria è interamente carica.
Avviso: la batteria ricaricabile in polimero di litio deve essere utilizzata regolarmente in
modo da garantire un‟ottima efficienza. Se non fosse così, è pregato/a di caricare
completamente la batteria almeno una volta al mese.
su quello rimovibile.
Pagina 3 di 13 IT
Page 31

Elementi di comando
1. [ ] Accendere / spegnere / uscire dal menu di selezione delle singole funzioni
2. Display
3. []Pulsante indietro | movimento verso sinistra nel menu
4. [+] Alzare il volume | movimento verso l‟alto nel menu
5. [ ] Play/pausa / pulsante di conferma
6. [] Pulsante avanti | movimento verso destra nel menu
7. [-] Abbassare il volume | movimento verso il basso nel menu
8. Reset
9. Microfono
10. Entrata della cuffia
11. Miniraccordo USB
12. Micro SD - Card
Accendere e spegnere,
La preghiamo di premere il pulsante [ ] e di tenerlo premuto per accendere o spegnere il
player.
Pagina 4 di 13 IT
Page 32

6. Messa in funzione
Play/pausa
[ ] Play/pausa / pulsante di conferma. Prema e mantenga premuto questo pulsante
per accedere al menu principale.
Volume di riproduzione della musica/dei video
Prema il pulsante [+] ossia [-] per sintonizzare il volume.
Selezione del track precedente (titolo precedente)
Premere brevemente il pulsante [] (indietro).
Selezione del track seguente (titolo seguente)
Premere brevemente il pulsante [] (avanti).
Riavvolgere
Tenere premuto il pulsante [].
Avvolgere
Premere il pulsante [].
Pulsanti bloccare/ sbloccare
[ ] Pulsante play/pausa. Prema e tenga premuto questo pulsante per disattivare il
blocco dei pulsanti.
Reset
La preghiamo di premere il tasto per il reset se il player non reagisce più a nessun
inserimento.
7. Riproduzione di musica
Selezioni la funzione musica nel menu principale. Confermi la Sua selezione tramite una
breve pressione sul pulsante [ ].
Opzioni
(1) Prema il pulsante [ ] nel modo di musica per entrare nel menu delle
opzioni.
(2) Con il pulsante [] o [] può selezionare la funzione desiderata. Con il
pulsante [ ] conferma la Sua selezione.
Pagina 5 di 13 IT
Page 33

Selezione
Tutte le canzoni:
Selezione di una determinata canzone. Riproduzione secondo il principio a caso.
Modo ripetitivo:
o Nessuna ripetizione: tutte le canzoni saranno riprodotte una volta sola.
o Ripetere i titoli: la canzone selezionata sarà riprodotta ripetutamente.
o Ripetere tutti i titoli: ripete tutti i titoli memorizzati.
o Singola cartella: ripete i titoli della cartella selezionata e in seguito ferma la
riproduzione.
o Ripetere la cartella: ripete tutti i titoli della cartella attuale.
o Riprodurre la cartella tramite il principio a caso: tutti i titoli memorizzati
nella cartella saranno ripetuti secondo il principio a caso.
Selezionare l’equalizzatore
Normale, rock, pop, classica, basso, jazz, equalizzatore personalizzato
Equalizzatore personalizzato
(1) Prema il pulsante [] o []per selezionare l‟impostazione
dell‟equalizzatore.
(2) Prema i pulsanti [+] ossia [-] per impostare i valori.
(3) Confermi i Suoi inserimenti con il pulsante [ ].
Biblioteca della musica
Rassetti le Sue canzoni memorizzate secondo il genere, l‟artista, l‟album e il titolo. La
preghiamo di selezionare “biblioteca della musica” e in seguito “SÌ” se dovesse
utilizzare questa funzione per la prima volta. In seguito all‟esecuzione di questo
passaggio può selezionare la sequenza desiderata dei titoli in questo menu.
3D
Tramite questa funzione può dare alla musica un suono tridimensionale.
Indietro
Tramite la selezione di quest‟opzione del menu ritorna al menu musica.
Lyric (testi delle canzoni)
Questo player può indicare i testi lyric durante la riproduzione di una canzone. La
preghiamo di procedere come segue per assegnare un file lyric a una canzone:
(1) Memorizzi il testo lyric nella stessa cartella dell„appartenente canzone.
(2) Designi il file lyric esattamente come la canzone alla quale appartiene.
Abbandonare la funzione musica
Prema e mantenga premuto il pulsante [ ] per retrocedere al menu principale.
Pagina 6 di 13 IT
Page 34

8. Immagini
La invitiamo a selezionare la funzione immagini nel menu principale. Confermi la Sua
selezione premendo brevemente il pulsante [ ].
Tramite il pulsante [+] / [-] può selezionare la fotografia desiderata dall‟elenco o dalla
cartella desiderata. Attraverso il pulsante [ ] conferma la Sua selezione. Il pulsante
[] La conduce nuovamente al menu precedente.
Durante la riproduzione delle fotografie può:
- far scorrere le fotografie in avanti o indietro tramite il pulsante [+] o [-]
- accedere al menu delle opzioni premendo il pulsante [ ]
Selezione
Show di diapositive
Riproduzione delle fotografie memorizzate a fine di eseguire uno show di diapositive.
Guardare le singole fotografie
Visualizzazione di una singola fotografia. Attraverso il pulsante [+] o [-] può fare
scorrere le fotografie in avanti o indietro.
Indietro
Tramite la selezione di quest‟opzione del menu retrocede al menu foto.
Uscire dalla funzione foto
Prema e mantenga premuto il pulsante [ ] per accedere nuovamente al menu
principale.
9. Video
La preghiamo di selezionare la funzione video nel menu principale. Confermi la Sua
selezione premendo brevemente il pulsante [ ].
Tramite il pulsante [+] / [-] può selezionare il video desiderato dall‟elenco o dalla cartella
desiderata. Attraverso il pulsante [ ] conferma la Sua selezione. Con il pulsante []
accede al menu precedente.
Durante la riproduzione dei video può:
- fermare o riprendere il video: Prema il pulsante [ ] per fermare la
riproduzione. Per riprendere la riproduzione prema nuovamente il pulsante
[ ].
- Tramite il pulsante [] o []può saltare al video precedente / successivo.
Pagina 7 di 13 IT
Page 35

- Per riavvolgere / avvolgere velocemente un video in riproduzione prema e
mantenga premuto il pulsante [] o [].
- Tramite il pulsante [+] / [-] può sintonizzare il volume.
- Per terminare la riproduzione di un video prema e mantenga premuto il pulsante
[ ].
Opzioni
(1) Prema il pulsante [ ] per accedere al menu delle opzioni.
(2) Tramite il pulsante [] o []può selezionare la funzione desiderata.
Uscire dalla funzione video
Prema e mantenga premuto il pulsante [ ] per retrocedere al menu principale.
Attraverso il pulsante [ ]conferma la Sua selezione.
10. Radio
Selezionare l‟opzione “FM-Radio” del menù principale. Confermare la selezione premendo
il tasto [ ].
Mentre state ascoltando una stazione radio, potete:
- Regolare il volume con i tasti [+] / [-].
- Richiamare il menù opzioni con il tasto [ ].
- Terminare la modalità radio con il tasto [ ]. Premetelo e mantenetelo
premuto.
Opzioni
(1) Premete il tasto [ ] sulla modalità musicale per richiamare il menù opzioni.
(2) Con il tasto [] o [] potete selezionare la funzione desiderata. Con il tasto
[ ] confermate la selezione.
Selezione:
Ricerca speciale automatica
Il lettore cerca automaticamente le stazioni radio impostate nella banda di frequenza. Se
individua una stazione, la ricerca si ferma per un attimo e memorizza la stazione trovata.
Dopodiché la ricerca si riavvia, fino alla fine della banda di frequenza. Adesso tutte le
stazioni disponibili nel Vostro campo di ricezione sono memorizzate. Premendo il tasto
[ ], potete fermare la ricerca in qualsiasi momento e il lettore memorizza tutte le
stazioni che sono state individuate fino a quel momento.
Ricerca manuale
Mediante una breve pressione sul tasto [] o [] si avvia la ricerca nella direzione
desiderata della banda di frequenza con una progressione di 0,1 unità. Mantenendo
premuto per un attimo il tasto [] o [] la ricerca continua verso la stazione disponibile
immediatamente successiva nella direzione desiderata della banda di frequenza.
Pagina 8 di 13 IT
Page 36

Banda
Impostate qui la banda di frequenza desiderata a seconda del luogo dove Vi trovate.
Memorizzare la stazione radio
Potete memorizzare la Vostra stazione preferita. Premete quindi i tasti [+] / [-] per
effettuare la selezione tra „sì“ o „no“ e confermate la Vostra selezione con il tasto[ ].
Questa è la stazione attualmente sintonizzata.
Cancellare una stazione
Le stazioni radio che non Vi soddisfano, possono essere cancellate. Premete quindi i tasti
[+] / [-] per effettuare la selezione tra „sì“ o „no“ e confermate la Vostra selezione con il
tasto [ ].Questa è la stazione attualmente sintonizzata.
Registrazione di un programma radio
Potete registrare il programma radio della stazione attualmente impostata. Confermate
con il tasto [ ], viene visualizzata la finestra della registrazione, che si avvia
automaticamente. Premendo il tasto [ ] la registrazione si interrompe e premendo
nuovamente il tasto [ ] essa prosegue. Premete il tasto [ ] per memorizzare la
registrazione.
Indietro
Selezionando questa voce del menù, tornate indietro alla modalità radio.
11. Registrazione vocale
La preghiamo di selezionare la funzione registrazione nel menu principale. Confermi la
Sua selezione premendo brevemente il pulsante [ ].
Avvii e fermi la registrazione vocale tramite il pulsante [ ]. Attraverso il pulsante [ ]
memorizza la registrazione e retrocede al menu della registrazione.
Avviso: i file vocali registrati saranno memorizzati nella cartella “voice“ del player. La
registrazione di un file vocale sarà automaticamente terminata e memorizzata quando il
player non possiede più spazio nella memoria oppure quando la batteria non è più
sufficientemente carica.
Sintonizzare la qualità della registrazione
Prima di iniziare la registrazione vocale Lei ha la possibilità di sintonizzare la qualità della
registrazione.
(1) Prema e mantenga premuto il pulsante [ ]per accedere al menu
principale. Selezioni “setup” e confermi premendo brevemente il pulsante
[ ].
(2) Tramite il pulsante [] o []può selezionare l‟opzione del menu qualità
della registrazione. Attraverso il pulsante [ ] conferma la Sua selezione.
Pagina 9 di 13 IT
Page 37

Possibilità di selezione
- Long Time: normale qualità della registrazione con consumo della memoria
scarso.
- Qualità normale: buona qualità della registrazione con consumo della
memoria scarso.
- Qualità elevata: ottima qualità della registrazione con consumo della
memoria elevato.
Opzioni
(1) Prema il pulsante [ ] per accedere al menu delle opzioni.
(2) Tramite il pulsante [] o []può selezionare la funzione desiderata.
Attraverso il pulsante [ ]conferma la Sua selezione.
Selezione
Registrazione
Avviare la registrazione vocale.
Riproduzione
Riprodurre i file vocali registrati.
Indietro
Tramite la selezione di quest„opzione del menu retrocede al menu della registrazione.
Uscire dalla funzione registrazione vocale
Prema e mantenga premuto il pulsante [ ] per retrocedere al menu principale.
12. Eseguire una ricerca attraverso tutti i file
La preghiamo di selezionare la funzione cartella nel menu principale. Confermi la Sua
selezione premendo brevemente il pulsante [ ].
(1) Tramite il pulsante [+] / [-] può alternare tra file e cartelle. Attraverso il pulsante
[ ] può aprire un file o una cartella.
(2) Premendo il pulsante [ ] appare il dialogo se desidera cancellare il file
selezionato. Confermi la Sua selezione attraverso il pulsante [ ].
Uscire dalla funzione cartella
Prema e mantenga premuto il pulsante [ ] per accedere al menu principale.
13. Impostazioni del sistema
La preghiamo di selezionare la funzione impostazioni nel menu principale. Confermi la
Sua selezione premendo brevemente il pulsante [ ].
Pagina 10 di 13 IT
Page 38

Adattare le impostazioni:
(1) Selezioni l‟opzione desiderata attraverso il pulsante [] o []. Confermi la
Sua selezione tramite il pulsante [ ].
(2) Tramite il pulsante [+] / [-] può selezionare tra i valori.
(3) Attraverso il pulsante [ ] conferma La Sua selezione. Tramite il pulsante
[]accede al menu precedente senza effettuare delle modifiche.
Possibilità d’impostazione
- Orario: impostare l‟orario attuale e il fuso orario vigente.
- Spegnimento: impostare lo spegnimento automatico dopo un certo intervallo di
tempo di inattività.
- Lingua: selezione della lingua desiderata.
- Impostazioni del display: selezione dell‟intensità luminosa e della durata di
illuminazione del display.
- Qualità della registrazione: impostare la qualità della registrazione per le
registrazioni vocali.
- Impostazioni del sistema: cancellare un file, formattare il player, resettare il
player, informazioni sul sistema, attualizzare la biblioteca della musica e ordinare i
file.
- Blocco dei pulsanti: impostare la durata dopo la quale sarà attivato il blocco dei
pulsanti.
- Indietro: uscire dal menu.
14. Suggerimenti e soluzioni in caso di problemi
Problema – possibili cause – soluzione del problema
Non appare nulla sul display.
(1) La batteria è scarica.
Carichi la batteria.
(2) I pulsanti sono bloccati.
Disattivi il blocco dei pulsanti come descritto sotto “6. Messa in funzione”.
L’apparecchio non reagisce quando si preme il pulsante play:
(1) I pulsanti sono bloccati.
Disattivi il blocco dei pulsanti come descritto sotto “6. Azionamento”.
L’audio manca durante la riproduzione.
(1) Il volume è troppo basso
Alzi il volume nel menu del volume
(2) Il file audio è difettoso
La preghiamo di trasmettere nuovamente il file
Il collegamento con il PC non può essere installato.
(1) Il driver non è stato installato in maniera corretta
Installi nuovamente il driver.
Pagina 11 di 13 IT
Page 39

(2) La preghiamo di eseguire un aggiornamento della scheda madre
(La preghiamo di notare gli avvisi del produttore della scheda madre per
eseguire quest‟operazione)
Il valore d’indicazione dell’orario cambia in continuazione.
(1) La quota Bit cambia durante la riproduzione.
La preghiamo di utilizzare una quota Bit uniforme nel comprimere i file.
Il PC segnala un errore quando lo si collega con l’apparecchio
(1) Il player è stato scollegato dal PC durante la trasmissione dei dati.
La preghiamo di non scollegare mai l‟apparecchio durante la trasmissione dei
dati.
La memoria dell’apparecchio indicata non corrisponde alla memoria effettiva.
(1) Una parte della memoria è utilizzata per il software, la formattazione e le
caratteristiche del display.
I dati MP3 non sono riprodotti correttamente.
(1) I dati MP3 sono stati compressi in un formato errato, ad es. in MPEG 1 o 2.
Cancelli i formati dei file che non sono supportati.
I dati dei video non possono essere riprodotti.
(1) Il formato non è supportato.
Il formato dei video deve essere MTV. La preghiamo di convertirlo se questo
non dovesse essere il caso. In questo faccia attenzione alla misura del formato
128x128 pixel.
(2) Il file video è difettoso.
Trasmetta nuovamente il file video.
Le fotografie non vengono riprodotte.
(1) Il formato del file non è supportato.
La preghiamo di convertire la fotografia nel formato JPG o BMP.
15. Dati tecnici
Tipo di batteria
batteria ricaricabile in polimero di litio
Durata della carica
~ 8 ore
LCD
Display 1,8“ pollici
Cuffia
5mW+5mW
Formato video
MTV 160x128 pixel
Pagina 12 di 13 IT
Page 40

Formati audio
(INTENSO)
®
49377 Vechta
Germania
www.intenso.de
MP3, WMA, WAV
Formato fotografie
JPEG, BMP
Quota bit
MP3: 8-320kbps;
WMA:5-320kbps
SNR
80dB
USB Port
USB 2.0
Pronto per la messa in funzione
0 Celsius ~ +40 Celsius
Pronto per la messa in funzione ad un’umidità relativa dell’aria di
< 85%
Idoneo al deposito ad un’umidità relativa di
< 90%
16. La preghiamo di fare attenzione a ciò che segue
(1) Il plug & play è soltanto possibile con Windows 2000/XP/Vista e Windows 7.
La preghiamo di installare il driver se utilizza Windows 98/SE.
(2) La preghiamo di disattivare il blocco dei tasti per lavorare con l‟apparecchio.
(3) Le chiediamo gentilmente di caricare la batteria quando ciò è indicato nel
display.
(4) La avvisiamo cortesemente di scollegare l‟apparecchio dal PC come già
menzionato per evitare una possibile perdita di dati.
(5) Se il file da registrare è molto grande richiede più tempo per essere
caricato.
(6) Supporto del software per Windows 2000/XP/Vista e Windows 7.
Pagina 13 di 13 IT
Page 41

1. Table des matières
1. Table des matières ................................................................................................ 1
2. Avertissements ...................................................................................................... 2
3. Fonctions ............................................................................................................... 2
4. Contenu du paquet ................................................................................................ 2
5. Avant l‘utilisation .................................................................................................... 3
6. Commande ............................................................................................................ 5
7. Lecture de musique ............................................................................................... 5
8. Photos .................................................................................................................... 7
9. Vidéos .................................................................................................................... 7
10. Radio ..................................................................................................................... 8
11. Enregistrement vocal ............................................................................................. 9
12. Parcourir tous les fichiers ..................................................................................... 10
13. Réglages du système .......................................................................................... 11
14. Dépannage .......................................................................................................... 11
15. Données techniques ............................................................................................ 12
16. Nous vous prions d’observer ce qui suit : ............................................................ 13
Page 1 sur 13 FR
Page 42

2. Avertissements
Evitez un heurt fort de l’appareil.
N’utilisez pas l’appareil dans des zones extrêmement froides, chaudes, humides ou
poussiéreuses. N’exposez jamais l’appareil aux rayons directs du soleil.
Exécutez des backups fréquents pour éviter la perte éventuelle de données.
Evitez l’utilisation dans des champs fortement magnétisés.
Protégez l’appareil de l’humidité. Si l’humidité pénètre dans l’appareil, nous vous
prions de l’éteindre immédiatement pour le nettoyer et sécher.
N’utilisez pas de solutions chimiques pour nettoyer l’appareil. Nous vous prions
d’utiliser uniquement un tissu sec.
Nous ne sommes pas responsables pour les dommages ou les pertes de données
causés par la dysfonction, la commande erronée, la réparation de l’appareil par vos
soins ou le remplacement de la batterie.
Nous vous prions de ne pas démonter l’appareil en pièces détachées et de ne pas
essayer de le réparer car dans ce cas, la garantie n´est plus valable.
Lors de l´utilisation d’écouteurs ou de casque avec volume trop fort, l’ouïe peut être
durablement endommagée.
3. Fonctions
Lecteur MP3 & WMA
Lecteur vidéo MTV
Lecteur images JPEG / BMP
Radio FM
Dossier de navigation
Batterie rechargeable Li-polymère
Ajustement adapté au client
Disque amovible
4. Contenu du paquet
Nous vous prions de vérifier si le contenu du paquet est complet
Lecteur vidéo Intenso
Ecouteurs stéréo
Logiciel de conversion (format MTV)
Câble USB
Manuel d‘instruction + certificat de garantie
Page 2 sur 13 FR
Page 43

5. Avant l‘utilisation
Connexion avec l‘ordinateur
Pour les systèmes d’exploitation Windows 98/SE, nous vous prions d’installer le driver
avant de connecter le lecteur avec l’ordinateur. (Vous trouverez le téléchargement sur le
site suivant : www.intenso.de). Pour les systèmes d’exploitation WIN
2000/XP/ME/Vista/Windows 7 l’installation du driver n’est pas nécessaire.
Nous vous prions de procéder comme suit :
(1) Connectez le lecteur au port USB de l’ordinateur.
(2) La fenêtre « Intenso » s‘ouvre. Maintenant vous pouvez sauvegarder les données
de votre disque dur sur le disque amovible.
Retrait fiable de l‘ordinateur
Pour Windows 2000/XP/ME/Vista/Windows 7 :
Avec la touche droite de la souris, cliquez en bas à droite dans la barre des tâches sur
l’icône « Retirer matériel en toute sécurité ». Dans le menu du contexte visualisé, veuillez
sélectionnez avec la touche gauche de la souris le point « Retirer le driver de la mémoire
de masse USB ». Nous vous prions de vérifier que la transmission des données soit
complétée. Vous pouvez à présent déconnecter l’appareil.
Pour Windows 98/SE :
Sélectionnez l’appareil dans le « manager de l’appareil » avec la touche gauche de la
souris. Cliquez sur le point du menu « Retirer ». Assurez-vous que la transmission des
données soit complètement terminée.
Vous pouvez à présent déconnecter l’appareil de l’ordinateur.
Charge de la batterie :
L’appareil est doté d’une batterie li-polymérique installée. La batterie est chargée par la
connexion USB avec votre ordinateur.
Pendant la première utilisation de l’appareil veuillez vous assurer que la batterie soit
complètement chargée. Cette opération dure normalement 4 heures.
Pour charger la batterie, nous vous prions de connecter l’appareil à l’ordinateur par le
câble USB. L’opération de charge démarre automatiquement.
Si vous souhaitez connaître le statut actuel de la procédure de charge, il vous faut
déconnecter l’appareil de l’ordinateur. Sur l’écran en haut à droite apparait l’icône de la
batterie. Si cet icône est allumé en vert, la batterie est complètement chargée.
Avertissement : Pour une performance optimale, veuillez utiliser régulièrement la batterie
li-polymérique. Si ce n’est pas le cas, chargez complètement la batterie au moins une fois
par mois.
Page 3 sur 13 FR
Page 44

Eléments de commande
1. [ ] Allumer / éteindre / sortie du menu de sélection des fonctions respectives
2. Ecran
3. [] Touche arrière | aller à gauche dans le menu
4. [+] Augmenter le volume | monter dans le menu
5. [ ] Touche Play/Pause / touche de confirmation
6. [] Touche avancer | aller à droite dans le menu [FUNC] Exécution
7. [-] Diminuer le volume | descendre dans le menu
8. Reset
9. Microphone
10. Entrée des écouteurs
11. Connexion mini USB
12. Micro SD - Card
Allumer et éteindre,
Appuyez et maintenez la touche [ ] enfoncée pour allumer et éteindre le lecteur.
Page 4 sur 13 FR
Page 45

6. Commande
Play/Pause
[ ] Touche Play/Pause / touche de confirmation. Appuyez et maintenez cette touche
enfoncée pour accéder au menu principal.
Volume de la lecture musicale / vidéo
Appuyez la touche [+] ou bien [-] pour régler le volume.
Sélection de la piste précédente (titre précédent)
Brève activation de la touche [] (vers l´arrière).
Sélection de la piste suivante (titre suivant)
Brève activation de la touche [] (vers l´avant).
Rembobiner
Maintenez la touche [].
Avancer
Maintenez la touche [].
Bloquer / débloquer les touches
[ ] Touche Play/Pause. Appuyez et maintenez cette touche enfoncée pour désactiver
le blocage des touches.
Reset
Nous vous prions d’activer la touche de reset, si le lecteur ne réagie plus aux entrées.
7. Lecture de musique
Sélectionnez la fonction musicale dans le menu principal. Confirmez votre sélection en
appuyant brièvement sur la touche [ ].
Options
(1) Dans le mode music appuyez la touche [ ] pour appeler le menu des options.
(2) Avec la touche [] ou [] vous pouvez sélectionner la fonction désirée.
Confirmez votre sélection avec la touche [ ].
Sélection
Toutes les chansons :
Sélection d’une certaine chanson. Lecture de toutes les chansons selon un mode
aléatoire.
Page 5 sur 13 FR
Page 46

Mode de répétition :
o Pas de répétition : Toutes les chansons sont lues une seule fois.
o Répéter le titre : La chanson sélectionnée est lue plusieurs fois.
o Répéter tous les titres : Répète tous les titres mémorisés.
o Dossier simple : Répète les titres dans le dossier sélectionné pour une fois
puis arrête la lecture.
o Répéter dossier : Répète tous les titres du dossier actuel.
o Dossier lecture random : Toutes les chansons mémorisées dans le dossier
sont lues de façon aléatoire.
Sélectionner l‘égalisateur
Normal, rock, pop, classique, bass, jazz, égalisateur personnalisé
Egalisateur personnalisé
(1) Appuyez sur la touche [] ou [] pour sélectionner l’installation de l’EG.
(2) Activez les touches [+] ou [-] pour régler les valeurs.
(3) Confirmez vos entrées avec la touche [ ].
Bibliothèque musicale
Ordonnez vos chansons mémorisées selon le genre, l’artiste, l’album et le titre. Si vous
utilisez cette fonction pour la première fois, choisissez « bibliothèque musicale », puis
« OUI ». Après l’exécution du tri dans ce menu vous pouvez sélectionnez le tri désiré
des titres.
3D
Avec cette fonction, vous pouvez donner à la musique un son à plusieurs dimensions.
Arrière
En sélectionnant ce point du menu vous retournez au menu musical.
Lyric (textes de chansons)
Ce lecteur peut visualiser des textes lyriques pendant la lecture d’une chanson. Pour
attribuer un fichier lyrique à une chanson, procédez comme suit :
(1) Mémorisez le texte lyrique dans la même liste que la chanson
correspondante.
(2) Nommez le fichier lyrique de la même façon que la chanson correspondante.
Quitter la fonction musicale
Appuyez et maintenez la touche [ ] enfoncée pour accéder au menu principal.
Page 6 sur 13 FR
Page 47

8. Photos
Sélectionnez la fonction photo dans le menu principal. Confirmez votre sélection en
appuyant brièvement sur la touche [ ].
Avec la touche [+] / [-] vous pouvez sélectionner l’image désirée à partir de la liste ou du
dossier désiré. Avec la touche [ ], vous confirmez votre sélection. Avec la touche
[] vous retournez au menu précédent.
Pendant la visualisation des photos, vous pouvez :
- Feuilleter en avant et en arrière avec la touche [+] ou [-]
- Appeler le menu options avec la touche [ ]
Sélection
Diashow
Reproduction des images mémorisées dans un diaporama.
Visualisation des images spécifiques
Visualisation de l’image spécifique. Feuilleter en avant et en arrière avec la touche [+]
ou [-].
En arrière
En sélectionnant ce point du menu vous retournez dans le menu des photos.
Quitter la fonction photo
Appuyez et maintenez la touche [ ] enfoncée pour accéder au menu principal.
9. Vidéos
Sélectionnez la fonction vidéo dans le menu principal. Confirmez votre sélection en
appuyant brièvement sur la touche [ ].
Avec la touche [+] / [-], vous pouvez sélectionner la vidéo désirée à partir de la liste ou du
dossier souhaité. Avec la touche [ ] vous confirmez votre sélection. Avec la touche
[] vous retournez au menu précédent.
Pendant la lecture des vidéos vous pouvez :
- Arrêter et continuer la vidéo : appuyez sur la touche [ ] pour arrêter la
lecture. Pour continuer la lecture, appuyez à nouveau sur la touche [ ].
Page 7 sur 13 FR
Page 48

- Avec la touche [] ou [] vous pouvez sauter vers la vidéo précédente /
suivante.
- Pour rembobiner / avancer dans une vidéo, appuyez et maintenez la touche
[] ou [] enfoncée.
- Avec la touche [+] / [-] vous pouvez régler le volume.
- Pour terminer la lecture d’une vidéo, appuyez sur la touche [ ].
Options
(1) Appuyez sur la touche [[ ] dans le mode vidéo pour appeler le menu des options.
(2) Avec la touche [] ou [] vous pouvez sélectionner la fonction désirée. Avec la
touche [ ] vous confirmez votre sélection.
Quitter la fonction vidéo
Appuyez et maintenez la touche [ ] enfoncée pour accéder au menu principal.
10. Radio
Dans le menu principal, sélectionnez l'option « FM-Radio ». Confirmez votre choix en
appuyant sur la touche [ ].
Lorsque vous êtes en train d’écouter une station de radio, vous pouvez :
- régler le volume à l’aide des touches [+] / [-] .
- appeler le menu d’options à l'aide de la touche [ ].
- quitter le mode radio à l'aide de la touche [ ]. Appuyez et maintenez
alors la touche enfoncée.
Options
(1) Dans le mode musique, appuyez sur la touche [ ] pour appeler le menu d'options.
(2) A l’aide de la touche [] ou [] vous pouvez sélectionner la fonction souhaitée.
Confirmez votre sélection à l’aide de la touche [ ].
Sélection
Recherche automatique de station
Le lecteur cherche automatiquement les stations de radio dans la bande de fréquence
réglée. Lorsqu'il capte une station de radio, il stoppe la recherche pendant un court
moment et enregistre la station captée. La recherche reprend ensuite, jusqu’à ce qu’elle
atteigne la fin de la bande de fréquence. Les stations disponibles sont alors toutes
enregistrées dans leur zone de réception. En appuyant sur la touche [ ] vous pouvez
stopper la recherche à tout moment et le lecteur enregistre toutes les stations captées
jusque-là.
Recherche manuelle
En appuyant brièvement sur la touche [] ou [] la recherche continue à passer d’une
unité de 0,1 à l'autre, dans la direction souhaitée de la bande de fréquence. Maintenez
Page 8 sur 13 FR
Page 49

enfoncée la touche [] ou [] pendant un court instant, la recherche passe alors sur la
station disponible suivante dans la direction souhaitée de la bande de fréquence.
Bande
Régler ici la bande de fréquence souhaitée selon votre lieu de résidence.
Enregistrer une station de radio
Vous pouvez enregistrer votre station préférée. Pour cela appuyez sur les touches [+] / [-]
pour choisir entre « oui » ou « non » et confirmez votre choix à l’aide de la touche [ ].
Il s’agit de la station réglée à ce moment-là.
Annuler une station de radio
Vous pouvez supprimer les stations qui ne vous plaisent pas. Pour cela appuyez sur les
touches [+] / [-] pour choisir entre « oui » ou « non » et confirmez votre choix à l’aide de la
touche [ ]. Il s’agit de la station réglée à ce moment-là.
Enregistrer un programme de radio
Vous pouvez enregistrer le programme radio de la station réglée à ce moment-là.
Confirmez à l'aide de la touche [ ], la fenêtre d’enregistrement s’ouvre et
l’enregistrement commence automatiquement. En appuyant sur la touche [ ]
l’enregistrement est interrompu et il reprend lorsque vous appuyez à nouveau sur la
touche [ ]. Appuyez sur la touche [ ] pour sauvegarder l’enregistrement.
Retour
En sélectionnant cette option de menu, vous retournez sur le mode radio.
11. Enregistrement vocal
Sélectionnez la fonction enregistrement dans le menu principal. Confirmez votre sélection
en appuyant brièvement la touche [ ].
Démarrez et interrompez l’enregistrement vocal avec la touche [ ]. Avec la touche
[ ] vous sauvegardez l’enregistrement et retournez au menu d’enregistrement.
Instruction : les fichiers vocaux enregistrés sont mémorisés dans le dossier « Voice » du
lecteur. L’enregistrement d’un fichier vocal est terminé et sauvegardé automatiquement si
le lecteur n’a plus de mémoire libre ou si la batterie n’a pas la performance suffisante.
Réglage de la qualité d‘enregistrement
Avant de commencer l’enregistrement vocal, vous avez l’opportunité de régler la qualité
d’enregistrement.
(1) Appuyez et maintenez la touche [ ] pour accéder au menu principal.
Sélectionnez « Setup » et confirmez en appuyant brièvement sur la touche
[ ].
Page 9 sur 13 FR
Page 50

(2) Avec la touche [] ou [] vous pouvez sélectionner le point de menu
qualité d’enregistrement. Avec la touche [ ] vous confirmez votre
sélection.
Possibilités de choix :
- Long Time : qualité d’enregistrement normal avec peu de consommation de
mémoire.
- Qualité normale : bonne qualité d’enregistrement avec peu de consommation
de mémoire.
- Haute qualité : très bonne qualité d’enregistrement avec beaucoup de
consommation de mémoire.
Options
(1) Appuyez sur la touche [ ] dans le mode d’enregistrement pour appeler le menu
des options.
(2) Avec la touche [] ou [] vous pouvez sélectionner la fonction désirée. Avec la
touche [ ] vous confirmez votre sélection.
Sélection
Enregistrement
Démarrage de l’enregistrement vocal.
Reproduction
Reproduction des fichiers vocaux enregistrés.
En arrière
En sélectionnant ce point du menu vous retournez dans le menu d’enregistrement.
Quitter la fonction enregistrement vocal
Appuyez et maintenez la touche [ ] enfoncée pour accéder au menu principal.
12. Parcourir tous les fichiers
Dans le menu principal, sélectionnez la fonction dossier. Confirmez votre sélection en
appuyant brièvement sur la touche [ ].
(1) Avec la touche [+] / [-] vous pouvez passer d’un fichier et/ou dossier à l’autre. Avec
la touche [ ] vous pouvez ouvrir un fichier ou un dossier.
(2) En appuyant sur la touche [ ] une fenêtre apparait vous demandant si vous
souhaitez éliminer le fichier sélectionné. Confirmez votre sélection avec la touche
[ ].
Quitter la fonction dossier
Appuyez et maintenez la touche [ ] pour accéder au menu principal.
Page 10 sur 13 FR
Page 51

13. Réglages du système
Sélectionnez la fonction réglages dans le menu principal. Confirmez votre sélection en
appuyant brièvement sur la touche [ ].
Adaptation des réglages :
(3) Sélectionnez le point du menu désiré avec la touche [] ou []. Confirmez votre
sélection avec la touche [ ].
(4) Avec la touche [+] / [-] vous pouvez sélectionner les valeurs respectives.
(5) Avec la touche [ ] vous confirmez votre sélection. Avec la touche [] vous
accédez au menu précédent sans faire de modifications.
Possibilités de réglage
- Horaire : réglage de l’horaire actuel et du fuseau horaire valable.
- Eteindre : réglage de l’horaire après que le lecteur se soit éteint automatiquement
s´il n’est pas utilisé.
- Langue : sélection de la langue désirée.
- Réglages de l’écran : sélection de la luminosité et de la durée d’illumination de
l‘écran.
- Qualité d’enregistrement : réglage de la qualité d’enregistrement dans
l’enregistrement vocal.
- Paramétrages de système : élimination d’un fichier, formatage du lecteur, reset
du lecteur, actualisation de la librairie musicale et tri des fichiers.
- Blocage des touches : réglage de l’horaire après le blocage des touches.
- Arrière : quitter le menu.
14. Dépannage
Problème – Causes possibles – Solution du problème
Rien n’est visualisé sur l’écran.
(1) La batterie est vide.
Chargez la batterie.
(2) Les touches sont bloquées.
Débloquer le blocage des touches selon la description « 6. commande ».
L’appareil ne réagit pas quand on appuie sur la touche play.
(1) Les touches sont bloquées.
Débloquer le blocage des touches selon la description « 6. commande ».
La reproduction manque de son.
(1) Le volume est trop bas.
Augmentez le volume dans le menu du volume.
(2) Le fichier audio est en panne
Nous vous prions de transmettre le fichier à nouveau
On ne réussit pas à établir une connexion avec l‘ordinateur.
(1) Le driver n’a pas été installé correctement.
Installez le driver à nouveau.
Page 11 sur 13 FR
Page 52

(2) Nous vous prions d’exécuter une actualisation de la main board
(Observez ici les instructions du constructeur de la main board)
La valeur d’indication de l’horaire change en permanence.
(1) La fréquence de bit des fichiers MP3 change pendant la lecture.
Nous vous prions d’utiliser une fréquence unitaire de bit pendant la
compression.
L’ordinateur annonce une erreur pendant la connexion à l’appareil
(1) Le lecteur a été déconnecté de l’ordinateur pendant la transmission de
données.
Nous vous prions de ne jamais déconnecter l’appareil pendant la transmission
de données.
La mémoire indiquée de l’appareil ne correspond pas à la mémoire réelle.
(1) Une partie de la mémoire est utilisée pour le logiciel, le formatage et les
caractéristiques de l’écran.
Les fichiers MP3 ne sont pas lus correctement.
(1) Les fichiers MP3 ont été comprimés dans un mauvais format, par exemple en
MPEG 1 ou 2.
Effacez les formats des fichiers non supportés.
Les fichiers vidéo ne peuvent pas être lus.
(1) Le format n’est pas supporté.
Le format vidéo doit être MTV. Si ce n’est pas le cas, veuillez le convertir.
Faites attention aux dimensions du format 128x128 Pixel.
(2) Le fichier vidéo est en panne.
Transmettez votre fichier vidéo à nouveau
Les photos ne sont pas visualisées.
(1) Le format du fichier n’est pas supporté.
Nous vous prions de convertir la photo dans un format JPG ou BMP.
15. Données techniques
Type de batterie
Batterie rechargeable li-polymérique
Durée de la batterie
~ 8 heures
LCD
Ecran de 1,8“ pouces
Ecouteurs
5mW+5mW
Format vidéo
MTV 160x128 Pixel
Formats audio
MP3, WMA, WAV
Format image
JPEG, BMP
Page 12 sur 13 FR
Page 53

Fréquence de bit
(INTENSO)
®
49377 Vechta
Allemagne
www.intenso.de
MP3: 8-320kbps;
WMA:5-320kbps
SNR
80dB
Porte USB
USB 2.0
Prêt à l’usage entre
0 Celsius ~ +40 Celsius
Prêt a l’usage à une humidité relative de
< 85%
Stockable à une humidité relative de
< 90%
16. Nous vous prions d’observer ce qui suit :
(1) Plug & Play est seulement possible avec Windows 2000/XP/ Vista/Windows 7.
Nous vous prions d’installer le driver de Windows 98/SE.
(2) Nous vous prions de débloquer le blocage de touches pour travailler avec l’appareil.
(3) Nous vous prions de charger la batterie si indiqué sur l‘écran.
(4) Déconnectez l’appareil de l’ordinateur seulement comme indiqué pour éviter une
perte possible de données.
(5) Si le fichier à enregistrer est très grand, le chargement du fichier durera plus
longtemps.
(6) Support logiciel pour Windows 2000, Windows XP/Vista/Windows 7.
Page 13 sur 13 FR
Page 54

1. Contenido
1. Contenido............................................................................................................... 1
2. Advertencias .......................................................................................................... 2
3. Funciones .............................................................................................................. 2
4. Contenido del paquete ........................................................................................... 2
5. Antes de la puesta en uso...................................................................................... 3
6. Mando .................................................................................................................... 5
7. Reproducción de música........................................................................................ 5
8. Foto ........................................................................................................................ 7
9. Vídeo ..................................................................................................................... 7
10. Radio ..................................................................................................................... 8
11. Grabación de voz ................................................................................................... 9
12. Búsqueda en todos los documentos .................................................................... 10
13. Configuración del sistema .................................................................................... 11
14. Solución de problemas ........................................................................................ 11
15. Datos técnicos ..................................................................................................... 12
16. Siga las siguientes indicaciones .......................................................................... 13
Página 1 de 13 ES
Page 55

2. Advertencias
Evite golpear fuertemente el aparato.
No utilice el aparato en condiciones extremas de frío, calor, humedad o polvo. Evite
la radiación de luz directa.
Realice a menudo copias de seguridad, para evitar una posible pérdida de datos.
Evite usar el aparato en fuertes campos magnéticos.
Proteja el aparato de la humedad. Si entra humedad en el aparato, apáguelo
inmediatamente y luego limpie y seque el aparato.
No utilice disolventes químicos para limpiar el aparato. Para ello use siempre un
paño seco.
No nos hacemos responsables de los daños o de la pérdida de datos por
funcionamiento defectuoso, por el manejo indebido, reparación propia del aparato o
cambio de la batería.
No desmonte el aparto ni trate de repararlo usted mismo, dado que entonces
prescribe el derecho a la garantía.
El uso de auriculares a un volumen demasiado alto puede causar daños
irreparables en el oído.
3. Funciones
Reproductor de MP3 & WMA
Reproductor de vídeo MTV
Visualizador de imágenes JPEG / BMP
Radio FM
Navegación de carpetas
Batería recargable polímero-Li
Configuración según las preferencias del cliente
Soporte de datos portátil
4. Contenido del paquete
Compruebe la integridad del contenido del paquete:
Reproductor de vídeo Intenso
Auriculares estéreo
Software de conversión (formato MTV)
Cable USB
Instrucciones de uso + Garantía
Página 2 de 13 ES
Page 56

5. Antes de la puesta en uso
Conectar al PC
En el sistema operativo Windows 98/SE instale un treiber, antes de conectar el
reproductor al PC (encontrará la descarga en www.intenso.de). En el sistema operativo
WIN 2000/XP/ME/Vista/Windows 7 no es necesario instalar un treiber.
Siga los siguientes pasos:
(1) Conecte el reproductor con el cable USB del PC.
(2) Se abre la ventana "Intenso". Ya puede guardar los datos de su disco duro en el
soporte de datos portátil.
Desconexión segura del PC
Para Windows 2000/XP/ME/Vista/Windows 7:
Haga clic con el botón derecho del ratón abajo a la derecha en la barra de tareas sobre el
símbolo "Quitar el software con seguridad". Aparece un menú de contexto, seleccione con
el botón izquierdo del ratón el punto "quitar la unidad de memoria de masas USB“.
Asegúrese de que la transmisión de datos haya sido completada. Ya puede retirar el
aparato.
Para Windows 98/SE:
Seleccione el aparato con el botón izquierdo del ratón en "Gestor de aparatos". Haga clic
en el punto del menú "Quitar". Asegúrese también en este caso, de que la transmisión de
datos haya sido completada. El aparato ya puede ser retirado del PC.
Carga de la batería:
El aparato dispone de una batería recargable polímero-Li integrada. La batería se carga a
través de la conexión USB a su PC.
La primera vez que use el aparato, asegúrese de cargar completamente la batería, este
proceso dura normalmente 4 horas.
Para cargar la batería, conecte el aparato a través del cable USB al PC. El proceso de
carga se inicia automáticamente.
Si desea conocer el estado actual del proceso de carga, retire el aparato del PC. Verá en
la parte superior derecha de la pantalla el símbolo de una pila. Si el símbolo está de color
verde, la batería ha sido cargada completamente.
Advertencia: para un funcionamiento óptimo la batería polímero-Li deber ser usada
regularmente. En caso contrario, cargue la batería completamente por lo menos una vez
al mes.
Página 3 de 13 ES
Page 57

Elementos de mando
1. [ ] Encender / Apagar / Acceder al menú de selección de cada una de las
funciones o abandonarlo
2. Pantalla
3. [] Tecla de retroceso | Movimiento hacia la izquierda en el menú
4. [+] Aumento del volumen | Movimiento hacia arriba en el menú
5. [ ] Play/Pausa / Tecla de confirmación
6. [] Tecla de avance | Movimiento hacia la derecha en el menú
7. [-] Reducción del volumen | Movimiento hacia abajo en el menú
8. Reset (restaurar)
9. Micrófono
10. Entrada de auriculares
11. Conexión USB mini
12. Micro SD - Card
Encendido y apagado
Pulse y mantenga oprimida la tecla [ ] para encender y apagar el reproductor.
Página 4 de 13 ES
Page 58

6. Mando
Play/Pause
[ ] Play/Pausa / tecla de confirmación. Pulse y mantenga oprimida esta tecla para
acceder al menú principal.
Altavoces en la reproducción de música y vídeo
Pulse la tecla [+] o [-] para regular los altavoces.
Selección de la pista anterior (título anterior)
Pulse brevemente la tecla [] (retroceso).
Selección de la pista siguiente (título siguiente)
Pulse brevemente la tecla [] (avance).
Rebobinado
Mantener oprimida la tecla [].
Bobinado
Mantener oprimida la tecla [].
Bloquear / desbloquear el teclado
[ ] Tecla de Play/Pausa. Pulse y mantenga oprimida esta tecla, para desbloquear el
teclado.
Reset (restaurar)
Pulse la tecla "Reset", si el reproductor no reaccionase a ninguna de las funciones.
7. Reproducción de música
Seleccione la función de música en el menú principal. Confirme su selección pulsando
brevemente la tecla [ ].
Opciones
(1) En el modo música pulse la tecla [ ], para acceder al menú de opciones.
(2) Con las teclas [] o [] puede seleccionar la función deseada. Con la tecla
[ ] confirma su selección.
Página 5 de 13 ES
Page 59

Selección
Todas las canciones:
Selección de una canción determinada. Reproducción de todas las canciones de
manera arbitraria.
Modo de repetición:
o Sin repetición: todas las canciones serán reproducidas una sola vez.
o Repetir título: la canción seleccionada será reproducida de forma repetida.
o Repetir todos los títulos: repite todas las canciones grabadas.
o Carpeta simple: repite una vez los títulos en la carpeta seleccionada y
detiene luego la reproducción.
o Repetir carpeta: repite todos los títulos de la carpeta actual.
o Reproducción arbitraria de carpeta: todas las canciones grabadas en la
carpeta son reproducidas de manera arbitraria.
Seleccionar ecualizador
Normal, rock, pop, clásica, bass, jazz, ecualizador adaptado a las preferencias del
usuario.
Ecualizador adaptado a las preferencias del usuario
(1) Pulse las teclas [] o [, para elegir la configuración del ecualizador.
(2) Confirme la selección con las teclas [+] o [-] para ajustar los valores.
(3) Confirme la entrada con la tecla [ ].
Biblioteca de música
Ordene su música grabada según género, artista, álbum y título. Si usa esta función por
primera vez, seleccione "Biblioteca de música" y a continuación "Sí". Tras la ejecución
de la clasificación puede elegir en este menú el orden deseado de los títulos.
3D
Con la ayuda de esta función puede dar a la música un sonido espacial.
Atrás
Seleccionando este punto del menú volverá al menú de música.
Lyric (letras de canciones)
Este reproductor puede mostrar las letras de las canciones durante la reproducción.
Para asignar un documento con la letra de una canción a una pieza musical, siga los
pasos siguientes:
(1) Grabe el texto con la letra de la canción en el mismo índice que el de la
canción correspondiente.
(2) Nombre el documento con la letra de la canción exactamente igual que la
canción correspondiente.
Abandonar la función música
Pulse y mantenga oprimida la tecla [ ] para acceder al menú principal.
Página 6 de 13 ES
Page 60

8. Foto
Elija la función "Foto" en el menú principal. Confirme su selección pulsando brevemente la
tecla [ ].
Con las teclas [+] / [-] puede seleccionar la foto o la carpeta de la lista que desee. Con la
tecla [ ] confirma su selección. Con la tecla [] volverá al menú anterior.
Durante la reproducción de fotos usted podrá:
- Con las teclas [+] o [-], pasar a la página anterior o siguiente.
- Con la tecla [ ], acceder al menú de opciones.
Selección
Presentación de diapositivas
Reproducción de las fotos guardadas en forma de presentación de diapositivas.
Visualización individual de fotos
Se mostrará una sola foto. Con las teclas [+] o [-] puede pasar a la página anterior o
siguiente.
Atrás
Seleccionando este punto del menú volverá al menú Foto.
Abandonar la función foto
Pulse y mantenga oprimida la tecla [ ] para acceder al menú principal.
9. Vídeo
Seleccione la función "Vídeo" en el menú principal. Confirme su selección pulsando
brevemente la tecla [ ].
Con las teclas [+] / [-] puede seleccionar el vídeo o la carpeta de la lista que desee. Con la
tecla [ ] confirma su selección. Con la tecla [] volverá al menú anterior.
Durante la reproducción de vídeo usted puede:
- Detener el vídeo y continuar con la reproducción: pulse la tecla [ ] para
detener la reproducción. Para continuar con la reproducción, pulse de nuevo la
tecla [ ].
- Con las teclas [] o [] puede saltar al vídeo anterior/ siguiente.
Página 7 de 13 ES
Page 61

- Para el rebobinado / bobinado rápido de un vídeo, pulse y mantenga oprimida
la tecla [] o [] respectivamente.
- Con las teclas [+] / [-] puede regular los altavoces.
- Para terminar con la reproducción de un vídeo pulse y mantenga oprimida la
tecla [ ].
Opciones
(1) Pulse en el modo vídeo la tecla [ ] para acceder al menú de opciones.
(2) Con las teclas [] o [] puede seleccionar la función deseada. Con la tecla
[ ] confirma su selección.
Abandonar la función vídeo
Pulse y mantenga oprimida la tecla [ ] para acceder al menú principal.
10. Radio
Seleccione en el menú principal la opción "FM- Radio". Confirme la selección pulsando la
tecla [ ].
Mientras escucha una emisora de radio, puede:
Regular los altavoces con las teclas [+] / [-].
Acceder al menú de opciones con la tecla [ ].
Salir del modo radio con la tecla [ ]. Para ello púlsela y manténgala
pulsada.
Opciones
(1) Pulse la tecla [ ] el modo música, para acceder al menú de opciones.
(2) Con la tecla [] o la tecla [] puede seleccionar la función deseada. Con la tecla
[ ] puede confirmar la selección.
Selección:
Búsqueda automática de emisora
El reproductor busca automáticamente emisoras de radio en la banda de frecuencias
sintonizada. Si encuentra una estación de radio, la búsqueda se detiene durante un
momento y se guarda la emisora encontrada. A continuación sigue la búsqueda, hasta
alcanzar el final de la banda de frecuencias. De esta manera serán guardadas todas las
emisoras disponibles en su ámbito de recepción. Pulsando la tecla [ ] puede detener
la búsqueda en todo momento y el reproductor guardará todas las emisoras halladas
hasta entonces.
Búsqueda manual
Pulsando brevemente la tecla [] o [] la búsqueda salta 0.1 unidades en la dirección
deseada en la banda de frecuencias. Si mantiene pulsada brevemente la tecla [] o
[] la búsqueda saltará a la siguiente emisora disponible en la dirección deseada en la
banda de frecuencias .
Página 8 de 13 ES
Page 62

Banda
Aquí puede sintonizar la banda de frecuencias deseada correspondiente al lugar donde se
encuentre.
Guardar emisoras de radio
Puede guardar sus emisoras preferidas. Para ello pulse las teclas [+] / [-] y "Sí" o "No"
para seleccionar, y confirme su selección con la tecla [ ]. Se trata de la emisora
sintonizada en ese momento.
Borrar emisora de radio
Puede borrar las emisoras que no desee. Para ello pulse las teclas [+] / [-] y "Sí" o "No"
para seleccionar, y confirme su selección con la tecla [ ]. Se trata de la emisora
sintonizada en ese momento.
Grabar un programa de radio
Puede grabar un programa de radio de la emisora sintonizada en ese momento. Para
confirmar pulse la tecla [ ], se abrirá la ventana de grabación y la grabación se
iniciará de forma automática. Pulsando al tecla [ ] se interrumpirá la grabación, y
pulsando de nuevo la tecla [ ] la grabación proseguirá. Pulse la tecla [ ] para
guardar la grabación.
Volver
Pulsando este punto del menú volverá al modo radio.
11. Grabación de voz
Seleccione en el menú principal la función "Grabación". Confirme su selección pulsando
brevemente la tecla [ ].
Inicie y detenga la grabación de la voz con la tecla [ ]. Con la tecla [ ] guardará la
grabación y volverá al menú de grabación.
Advertencia: los documentos de voz grabados serán guardados en la carpeta "Voz” del
reproductor. La grabación de un documento de voz termina y se guarda de forma
automática, si el reproductor ya no dispone de espacio de memoria para la grabación o la
batería no tiene suficiente carga.
Configuración de la calidad de la grabación
Antes de empezar con la grabación de voz, tiene la posibilidad de configurar la calidad de
la grabación:
(1) Pulse y mantenga pulsada la tecla [ ] para acceder al menú principal.
Seleccione "Setup" (configuración) y confirme pulsando brevemente la tecla
[ ].
(2) Con las teclas [] o [] puede seleccionar el punto de menú "Calidad de
la grabación". Con la tecla [ ] confirma su selección.
Página 9 de 13 ES
Page 63

Posibilidades de selección:
- Largo tiempo: calidad normal de grabación, en caso de poca utilización de
memoria.
- Calidad normal: buena calidad de grabación, en caso de poca utilización de
memoria.
- Alta calidad: muy buena calidad de grabación en caso de mucha utilización
de memoria.
Opciones
(1) En el modo de grabación pulse la tecla [ ] para acceder al menú de opciones.
(2) Con las teclas [] o [] puede seleccionar la función deseada. Con la tecla
[ ] confirma su selección.
Selección
Grabación
Se inicia la grabación de voz.
Reproducción
Reproducción de los documentos de voz grabados.
Atrás
Seleccionando este punto del menú volverá al menú de grabación.
Abandonar la función de grabación de voz
Pulse y mantenga oprimida la tecla [ ] para acceder al menú principal.
12. Búsqueda en todos los documentos
Seleccione la función "Carpeta" en el menú principal. Confirme su selección pulsando
brevemente la tecla [ ].
(1) Con las teclas [+] / [-] puede pasar de unas carpetas y documentos a otros. Con la
tecla [ ] puede abrir un documento o una carpeta.
(2) Pulsando la tecla [ ] se le pregunta en la ventana de diálogo, si desea eliminar el
documento. Confirme su selección con la tecla [ ].
Abandonar la función carpeta
Pulse y mantenga oprimida la tecla [ ] para acceder al menú principal.
Página 10 de 13 ES
Page 64

13. Configuración del sistema
Seleccione la función "Ajustes". Confirme su selección con la tecla [ ].
Realizar ajustes:
(1) Seleccione con las teclas [] o [] el punto del menú deseado. Confirme su
selección con la tecla [ ].
(2) Con las teclas [+] / [-] puede pasar de un valor a otro.
(3) Con la tecla [ ] confirma sus selección. Con la tecla [] volverá al menú
anterior sin realizar cambios.
Posibilidades de ajuste
- Tiempo: ajuste de la hora actual y la franja horaria correspondiente.
- Apagado: ajuste de la hora después de que el reproductor esté fuera de uso (se
desajusta entones automáticamente).
- Idioma: selección del idioma deseado.
- Ajuste de pantalla: selección de la claridad y de la duración de la iluminación de
la pantalla.
- Calidad de la grabación: ajuste de la calidad de la grabación cuando se graba la
voz.
- Ajustes del sistema: eliminar un documento, formatear el reproductor, restaurar
el reproductor (reset), información del sistema, actualizar la biblioteca de música y
clasificar los documentos.
- Bloqueo de teclas: configuración del tiempo, tras el que el teclado será activado.
- Atrás: abandonar el menú.
14. Solución de problemas
Problema – Posible causa – Solución del problema
No aparece nada en la pantalla.
(1) La batería está vacía.
Cargue la batería.
(2) El teclado está bloqueado.
Levante el bloqueo del teclado como se describe en el punto "6. Mando".
El aparato no reacciona cuando se pulsa la tecla Play.
(1) El teclado está bloqueado.
Levante el bloqueo del teclado como se describe en el punto "6. Mando".
No hay sonido durante la reproducción.
(1) El volumen está muy bajo.
Aumente el volumen en el menú de volumen.
(2) Documento de audio defectuoso.
Transfiera de nuevo el documento.
Página 11 de 13 ES
Page 65

No se puede establecer conexión con el PC.
(1) El treiber no fue instalado correctamente.
Instale de nuevo el treiber.
(2) Lleve a cabo una actualización de la placa base.
(Para ello siga las indicaciones del fabricante de la placa base).
Los valores de la hora cambian continuamente.
(1) Las tasas de bits de los archivos de MP3 cambian durante la reproducción.
Use una tasa de bits unitaria para comprimir.
En el PC aparece un mensaje de error al conectarlo con el aparato.
(1) El reproductor fue separado del PC durante la transmisión de datos.
Nunca quite el aparato del PC durante la transmisión de datos.
La memoria del aparato no coincide con la memoria real.
(1) Una parte de la memoria se usa para software, formateo y cualidades de la
pantalla.
Los documentos MP3 no son reproducidos correctamente.
(1) Los documentos de MP3 fueron comprimidos en un formato erróneo, por
ejemplo en MPEG 1 o 2.
Elimine documentos en formatos no compatibles.
No se pueden reproducir los documentos de vídeo.
(1) Formato no compatible.
El formato de vídeo debe ser MTV. Si este no es el caso, debe convertir el
vídeo. Tenga en cuenta el tamaño del formato 128x128 Píxeles.
(2) El documento de vídeo está defectuoso.
Transfiera el documento de vídeo de nuevo.
No se ven las fotos.
(1) Formato no compatible.
Convierta las fotos en formato JPG o BMP.
15. Datos técnicos
Tipo de batería
Batería recargable polímero-Li
Duración de la batería
~ 8 horas
LCD
Pantalla 1,8“
Auriculares
5mW+5mW
Formato de vídeo
MTV 160x128 Píxeles
Formato de audio
MP3, WMA, WAV
Página 12 de 13 ES
Page 66

Formato de foto
(INTENSO)
®
49377 Vechta
Germany
www.intenso.de
JPEG, BMP
Tasa de bits
MP3: 8-320kbps;
WMA:5-320kbps
SNR
80dB
Puerto USB
USB 2.0
Operable entre
0 Celsius ~ +40 Celsius
Operable a una humedad atmosférica relativa de
< 85%
Almacenaje posible a una humedad relativa de
< 90%
16. Siga las siguientes indicaciones
(1) Plug & Play (enchufar y usar) sólo es posible en Windows 2000/XP/Vista/
Windows 7. En Windows 98/SE debe instalar el treiber.
(2) Levante el bloqueo del teclado para trabajar con el aparato.
(3) Cargue la batería, cuando aparezca el símbolo correspondiente en la pantalla.
(4) Desconecte el aparato del PC sólo como descrito anteriormente, para evitar una
posible pérdida de datos.
(5) Cuando el documento a grabar es muy grande, la carga del documento dura más
tiempo.
(6) Soporta software para Windows 2000, Windows XP, Windows Vista, Windows 7.
Página 13 de 13 ES
Page 67

1. Índice
1. Índice ..................................................................................................................... 1
2. Indicações .............................................................................................................. 2
3. Funções ................................................................................................................. 2
4. Conteúdo do pacote ............................................................................................... 2
5. Antes da utilização ................................................................................................. 3
6. Utilização ............................................................................................................... 5
7. Reprodução de música .......................................................................................... 5
8. Fotografia ............................................................................................................... 7
9. Vídeo ..................................................................................................................... 7
10. Radio ..................................................................................................................... 8
11. Gravação de voz .................................................................................................... 9
12. Pesquisa de todos os ficheiros ............................................................................ 10
13. Configurações de sistema.................................................................................... 10
14. Eliminação de erros ............................................................................................. 11
15. Dados técnicos .................................................................................................... 12
16. Tenha em atenção o seguinte.............................................................................. 13
Página 1 de 13 PT
Page 68

2. Indicações
Evite embates fortes com o aparelho.
Não utilize o aparelho em ambientes extremamente frios, quentes, húmidos ou
poeirentos. Não o exponha à radiação solar directa.
Execute regularmente backups, para evitar uma eventual perda de dados.
Evita a utilização em campos magnéticos fortes.
Proteja o aparelho contra líquidos. Caso humidade penetre no aparelho, desligue-o
imediatamente e limpe-o e seque-o. Não utilize soluções químicas para
limpar o aparelho. Use apenas um pano seco.
Não nos responsabilizamos por danos ou perda de dados ocasionados por uma
anomalia, por um manuseamento incorrecto, por uma reparação própria do
aparelho ou por uma substituição da bateria.
Não desmonte o aparelho nas suas peças individuais e não tente repará-lo, uma
vez que, nesse caso, a garantia será anulada.
A utilização de auriculares e auscultadores num volume demasiado alto pode
causar danos permanentes no aparelho auditivo.
3. Funções
Leitor de MP3 e WMA
Leitor de vídeo MTV
Reprodutor de imagens JPEG / BMP
Radio FM
Navegação de pastas
Bateria Li-polímero recarregável
Configuração específica ao cliente
Suporte de dados amovível
4. Conteúdo do pacote
Verifique o conteúdo do pacote quanto à sua plenitude
Leitor de vídeo Intenso
Auscultadores estéreo
Software de conversão (formato MTV)
Cabo USB
Manual de instruções + garantia
Página 2 de 13 PT
Page 69

5. Antes da utilização
Ligação ao PC
No caso dos sistemas operativos Windows 98/SE, instale um driver antes de ligar o leitor
ao PC (poderá descarregá-lo em www.intenso.de). Para os sistemas operativos Windows
2000/XP/ME/Vista/Windows 7, não é necessária a instalação do driver.
Proceda da seguinte maneira:
(1) Ligue o leitor à ligação USB do PC.
(2) Surge a janela “Intenso”. Pode agora armazenar dados do seu disco rígido no
suporte de dados amovível.
Remoção segura do PC
Windows 2000/XP/ME/Vista/Windows 7:
Clique com o rato direito em baixo à direita na barra de tarefas no símbolo "Remover o
hardware com segurança". No menu de contexto surgido, seleccione “Dispositivo de
armazenamento de massa USB com o rato esquerdo. Certifique-se de que a transmissão
de dados se encontra terminada.
Pode agora remover o aparelho.
Windows 98/SE:
Seleccione o aparelho no “Gestor de dispositivos” com o rato esquerdo. Clique agora no
ponto de menu “Remover”. Certifique-se de que a transmissão de dados se encontra
terminada.
Pode agora remover o aparelho do PC.
Carregamento da bateria:
O aparelho dispõe de uma bateria Li-polímero. A bateria é carregada através da ligação
USB ao seu PC.
Aquando da primeira utilização do aparelho, assegure-se de que carrega totalmente a
bateria. Este procedimento dura aprox. 4 horas.
Para carregar a bateria, ligue o aparelho ao PC através do cabo USB. O procedimento de
carregamento inicia-se automaticamente.
Se desejar saber acerca do estado actual do procedimento de carregamento, desligue o
aparelho do PC. Poderá ver no ecrã um símbolo de bateria em cima à direita. Caso este
se ilumine de verde, a bateria encontra-se totalmente carregada.
Nota: Para uma capacidade de carregamento óptima, a bateria Li-polímero deve ser
utilizada regularmente. Caso tal não seja o caso, deverá carregar totalmente a bateria
pelo menos uma vez por mês.
Página 3 de 13 PT
Page 70

Elementos de comando
1. [ ] Ligar / desligar / Acesso / abandono do menu de selecção das funções
individuais
2. Ecrã
3. []Botão de retrocesso | Deslocação para a esquerda no menu
4. [+] Aumento do volume | Deslocação para cima no menu
5. [ ] Botão Reproduzir/Pausa / botão de confirmação
6. []Botão de avanço | Deslocação para a direita no menu
7. [-] Diminuição do volume | Deslocação para baixo no menu
8. Reposição
9. Microfone
10. Entrada para auscultadores
11. Mini ligação USB
12. Micro SD - Card
Ligar e desligar
Prima e mantenha premido o botão [ ] para ligar e desligar o leitor.
Página 4 de 13 PT
Page 71

6. Utilização
Reproduzir/pausa
[ ] Botão Reproduzir/Pausa / botão de confirmação Prima e mantenha premido este
botão para aceder ao menu principal.
Volume na reprodução de música / de vídeo
Prima os botões [-] ou [+] para ajustar o volume.
Selecção da faixa anterior (título anterior)
Activação breve do botão [] (Retrocesso).
Selecção da faixa seguinte (título seguinte)
Activação breve do botão [] (Avanço).
Rebobinar
Mantenha premido o botão [].
Avanço rápido
Mantenha premido o botão [].
Bloquear/desbloquear botões
[ ] Botão Reproduzir / Pausa. Prima e mantenha premido este botão para
bloquear/desbloquear os botões.
Reposição
Active o botão Reposição caso o leitor deixe de reagir a toda e qualquer introdução.
7. Reprodução de música
Seleccione no menu principal a função Música. Confirme a sua selecção com uma
activação breve do botão [ ].
Opções
(1) No modo Música, prima o botão [ ] para aceder ao menu de opções.
(2) Seleccione a função desejada com os botões [] e []. Confirme a sua selecção
com o botão [ ].
Página 5 de 13 PT
Page 72

Selecção
Todas as faixas:
Selecção de uma faixa específica. Reprodução de todas as faixas em sequência
aleatória.
Modo de repetição:
o Sem repetição: todas as faixas são reproduzidas uma vez.
o Repetir faixa: a faixa seleccionada é repetidamente reproduzida.
o Repetir todas as faixas: são repetidas todas as faixas armazenadas.
o Pasta simples: repete uma vez as faixas na pasta seleccionada e pára de
seguida a reprodução.
o Repetir pasta: repete todas as faixas na pasta actual.
o Pasta reprodução aleatória: todas as faixas armazenadas na pasta são
reproduzidas em sequência aleatória.
Seleccionar equalizador
Normal, rock, pop, clássica, bass, jazz, equalizador definido pelo utilizador
Equalizador definido pelo utilizador
(1) Prima os botões [] ou [] para seleccionar o equalizador.
(2) Active os botões [+] ou [-] para configurar os valores.
(3) Confirme as suas introduções com o botão [ ].
Arquivo de música
Ordene as suas faixas armazenadas de acordo com o género musical, o artista, o
álbum e o título. Caso utilize esta função pela primeira vez, seleccione “Arquivo de
música” e depois “SIM”. Após execução da ordenação, pode seleccionar neste menu a
sua ordenação desejada dos títulos.
3D
Com a ajuda desta função, pode dar à música um aspecto tridimensional.
Retroceder
Seleccionando este ponto de menu, retrocede ao menu Música.
Letra
Este leitor é capaz de indicar a letra durante a reprodução de uma faixa. Para atribuir
um ficheiro de letra a uma faixa, proceda da seguinte maneira:
(1) Armazene a letra na mesma directoria da faixa
(2) Nomeie o ficheiro de letra com o mesmo nome da faixa correspondente.
Abandono da função Música
Prima e mantenha premido o botão [ ] para aceder ao menu principal.
Página 6 de 13 PT
Page 73

8. Fotografia
Seleccione no menu principal a função Fotografia. Confirme a sua selecção com uma
activação breve do botão [ ].
Como os botões [+] / [-] pode seleccionar a imagem desejada da lista ou a pasta
desejada. Confirme a sua selecção com o botão [ ]. Com o botão [] retrocede ao
menu anterior.
Durante a reprodução das fotografias, é-lhe possível:
- folhear para a frente ou para trás com os botões [+] e [-]
- aceder ao menu de opções com o botão [ ]
Selecção
Sequência de imagens
Reprodução das imagens armazenadas em sequência.
Visualização individual
Visualização de uma imagem individual. Pode folhear para a frente ou para trás com
os botões [+] e [-].
Retroceder
Seleccionando este ponto de menu, retrocede ao menu Fotografia.
Abandono da função Fotografia
Prima e mantenha premido o botão [ ] para aceder ao menu principal.
9. Vídeo
Seleccione no menu principal a função Vídeo. Confirme a sua selecção com uma
activação breve do botão [ ].
Como os botões [+] / [-] pode seleccionar o vídeo desejado da lista ou a pasta desejada.
Confirme a sua selecção com o botão [ ]. Com o botão [] retrocede ao menu
anterior.
Durante a reprodução dos vídeos, é-lhe possível:
- Parar e continuar a reprodução do vídeo. Prima o botão [ ] para parar a
reprodução. Para continuar com a reprodução, volte a premir o botão
[ ].
- Mude para o vídeo anterior ou seguinte com os botões [] e [].
- Para rebobinar / avançar rapidamente num vídeo, prima e mantenha premido o
botão [] ou [].
Página 7 de 13 PT
Page 74

- Pode regular o volume com os botões [+] e [-].
- Para terminar a reprodução de um vídeo, prima e mantenha premido o botão
[ ].
Opções
(1) No modo Vídeo, prima o botão [ ] para aceder ao menu de opções.
(2) Seleccione a função desejada com os botões [] e []. Confirme a sua selecção
com o botão [ ].
Abandono da função Vídeo
Prima e mantenha premido o botão [ ] para aceder ao menu principal.
10. Radio
Seleccione no menu principal a opção “FM-Rádio”. Confirme a sua selecção através da
tecla [ ].
Enquanto escutar a emissora de rádio, pode
- regular o volume através das teclas [+] / [-].
- aceder ao menu de opções através da tecla [ ].
- terminar o modo de rádio através da tecla [ ]. Pressione e mantenha
brevemente.
Opções:
(3) Utilize a tecla [ ] no modo de música para aceder ao menu das opções.
(4) Utilize a tecla [] ou [] para seleccionar a função desejada. Confirme a sua
selecção através da tecla [ ].
Selecção:
Busca automática de emissoras
O leitor faz a busca automática das emissoras de rádio na frequência ajustada. A busca
pára brevemente quando encontra uma estação de rádio e grava a emissora encontrada.
A seguir continua a busca até atingir o final da banda de frequência. Todas as emissoras
disponíveis na sua área de cobertura encontram-se agora gravadas. A busca pode ser
parade a qualquer altura através da tecla [ ] e o leitor grava todas as emissoras
encontradas até a esse momento.
Busca manual
Ao pressionar brevemente as teclas [] ou [] a busca continua por uma unidade de
0,1 na direcção desejada na banda de frequência. Matenha as teclas [] ou []
brevemente pressionadas para que a busca continue até à próxima emissora disponível
na banda de frequência.
Página 8 de 13 PT
Page 75

Banda
Ajuste a banda de frequência desejada de acordo com a sua localização.
Gravar emissora de rádio
Pode gravar as suas emissoras preferidas. Para seleccionar “Sim” ou “Não” pressione as
teclas [+] / [-] e confirme a sua selecção com a tecla [ ]. Trata-se da emissora
ajustada actualmente.
Apagar emissoras de rádio
Tem a possibilidade de apagar as emissoras que não gostar. Utilize as teclas [+] / [-] para
seleccionar “Sim” ou “Não” e confirme a sua selecção através da tecla [ ]. Trata-se
da emissora ajustada actualmente.
Gravar um programa de rádio
Pode gravar o programa de rádio da emissora ajustada actualmente. Confirme através da
tecla [ ], surge a janela de gravação e a gravação inicia automaticamente. A tecla
[ ] interrompe a gravação e pressionando a tecla [ ] continua novamente. Utilize
a tecla [ ] para gravar a gravação.
Voltar
Utilize esta tecla do menu para voltar ao meodo do rádio.
11. Gravação de voz
Seleccione no menu principal a função Gravação. Confirme a sua selecção com uma
activação breve do botão [ ].
Inicie e pare a gravação de voz com o botão [ ]. Com o botão [ ], armazena a
gravação e retrocede ao menu de gravação.
Nota: os ficheiros de voz gravados são armazenados na pasta “Voice” do leitor. A
gravação de um ficheiro de voz é automaticamente terminada e gravada quando o leitor
deixa de ter memória suficiente ou quando a bateria deixa de ter carga suficiente.
Configuração da qualidade de gravação
Antes de iniciar a gravação de voz, é-lhe possível configurar a qualidade de gravação.
(1) Prima e mantenha premido o botão [ ] para aceder ao menu principal.
Seleccione “Setup” e confirme com uma activação breve do botão [ ].
(2) Seleccione o ponto de menu Qualidade de gravação com os botões [] e
[]. Confirme a sua selecção com o botão [ ].
Página 9 de 13 PT
Page 76

Possibilidades de selecção:
- Long Time: qualidade de gravação normal com consumo reduzido de
memória.
- Qualidade normal: boa qualidade de gravação com consumo reduzido de
memória.
- Alta qualidade: excelente qualidade de gravação com consumo elevado de
memória.
Opções
(1) No modo Gravação, prima o botão [ ]para aceder ao menu de opções.
(2) Seleccione a função desejada com os botões [] e []. Confirme a sua selecção
com o botão [ ].
Selecção
Gravação
Início da gravação de voz.
Reprodução
Reprodução dos ficheiros de voz gravados.
Retroceder
Seleccionando este ponto de menu, retrocede ao menu Gravação.
Abandono da função Gravação de voz
Prima e mantenha premido o botão [ ] para aceder ao menu principal.
12. Pesquisa de todos os ficheiros
Seleccione no menu principal a função Pasta. Confirme a sua selecção com uma
activação breve do botão [ ].
(1) Com os botões [+] / [-], pode comutar entre os ficheiros e pastas. Com o botão
[ ], pode abrir um ficheiro ou pasta.
(2) Premindo o botão [ ], surge uma mensagem pedindo a confirmação da eliminação
do ficheiro seleccionado. Confirme a sua selecção com o botão [ ].
Abandono da função Pasta
Prima e mantenha premido o botão [ ] para aceder ao menu principal.
13. Configurações de sistema
Seleccione no menu principal a função Configurações. Confirme a sua selecção com uma
activação breve do botão [ ].
Página 10 de 13 PT
Page 77

Ajuste das configurações:
(1) Seleccione o ponto de menu desejado com os botões [] e []. Confirme a sua
selecção com o botão [ ].
(2) Pode seleccionar os valores com os botões [+] e [-].
(3) Confirme a sua selecção com o botão [ ]. Com o botão [] retrocede ao
menu anterior sem armazenar qualquer alteração.
Possibilidades de configuração
- Hora: configuração da hora actual e do fuso horário váido.
- Desconexão: configuração do tempo após o qual o leitor se desliga
automaticamente no caso de não utilização.
- Idioma: selecção do idioma desejado.
- Configurações do ecrã: selecção da luminosidade e duração da iluminação do
ecrã.
- Qualidade de gravação:: configuração da qualidade de gravação durante a
gravação de voz.
- Configurações de sistema:: eliminação de um ficheiro, formatação do leitor,
reposição do leitor, informação de sistema, actualizar o arquivo de música e
ordenar ficheiros.
- Bloqueio dos botões: configuração do tempo após o qual o bloqueio dos botões
é activado.
- Retroceder abandono do menu.
14. Eliminação de erros
Problema – causas possíveis - solução
Não surge qualquer indicação no ecrã.
(1) A bateria encontra-se vazia.
Carregue a bateria.
(2) Os botões estão bloqueados.
Desbloqueie os botões tal como descrito em "6. Utilização".
O aparelho não reage aquando da activação do botão Reproduzir.
(1) Os botões estão bloqueados.
Desbloqueie os botões tal como descrito em "6. Utilização".
A reprodução efectua-se sem som.
(1) O volume está demasiado baixo.
Aumente o volume no menu Volume
(2) Ficheiro áudio com defeito.
Transfira de novo o ficheiro.
Não é possível efectuar uma ligação com o PC.
(1) O driver não foi correctamente instalado.
Instale de novo o driver.
(2) Execute uma actualização da mainboard.
(siga as indicações do fabricante da mainboard)
Página 11 de 13 PT
Page 78

O valor de indicação do tempo muda constantemente.
(1) O débito binário do ficheiro MP3 muda constantemente durante a reprodução.
Utilize um débito binário único ao comprimir.
O PC indica um erro durante a ligação com o aparelho
(1) O leitor foi desligado do PC durante uma transmissão de dados.
Nunca desligue o aparelho do PC durante uma transmissão de dados.
A memória do aparelho indicada não corresponde à memória real.
(1) Uma parte da memória é utilizada para software, formatação e características
de visualização.
Os ficheiros MP3 não são reproduzidos de maneira correcta.
(1) Os ficheiros MP3 foram comprimidos num formato errado, por exemplo MPEG
1 ou 2.
Elimine os formatos de ficheiro que não são suportados.
Não é possível reproduzir ficheiros de vídeo.
(1) O formato não é suportado.
O formato de vídeo deve ser MTV. Caso tal não seja o caso, converta o
ficheiro. Tenha em atenção o formato 128x128 pixéis.
(2) O ficheiro de vídeo apresenta defeito.
Volte a transferir o ficheiro de vídeo.
Não é possível visualizar fotografias.
(1) O formato não é suportado.
Converta as fotografias para o formato JPG ou BMP.
15. Dados técnicos
Tipo de bateria
Bateria Li-polímero recarregável
Duração da bateria
~ 8 horas
LCD
Ecrã de 1,8”
Auscultadores
5mW+5mW
Formato de vídeo
MTV 160x128 pixéis
Formatos de áudio
MP3, WMA, WAV
Formato de imagens
JPEG, BMP
Débito binário
MP3: 8-320kbps;
WMA:5-320kbps
Página 12 de 13 PT
Page 79

SNR
(INTENSO)
®
49377 Vechta
Alemanha
www.intenso.de
80dB
Porta USB
USB 2.0
Operacional entre
0 Celsius ~ +40 Celsius
Operacional com uma humidade relativa do ar de
< 85%
Passível de armazenamento com uma humidade relativa do ar de
< 90%
16. Tenha em atenção o seguinte
(1) Plug & Play só é possível no Windows 2000/XP/Vista/Windows 7.
No caso do Windows 98/SE, instale o driver.
(2) Desbloqueie o bloqueio dos botões para trabalhar com o aparelho.
(3) Carregue a bateria quando tal for indicado no ecrã.
(4) Desligue o aparelho do PC apenas tal como descrito, para evitar uma eventual
perda de dados.
(5) Se o ficheiro de gravação for muito grande, o tempo de carregamento do ficheiro
será maior.
(6) Suporte de software para Windows 2000, Windows XP, Windows Vista, Wndows 7.
Página 13 de 13 PT
Page 80

1. Spis treści
1. Spis treści .............................................................................................................. 1
2. Uwagi ..................................................................................................................... 2
3. Funkcje .................................................................................................................. 2
4. Zawartość opakowania .......................................................................................... 2
5. Przed użyciem ....................................................................................................... 3
6. Obsługa.................................................................................................................. 5
7. Odtwarzanie muzyki ............................................................................................... 5
8. Zdjęcia ................................................................................................................... 7
9. Video ...................................................................................................................... 7
10. Radio ..................................................................................................................... 8
11. Nagranie głosu ....................................................................................................... 9
12. Przegląd wszystkich danych ................................................................................ 10
13. Ustawienie systemu ............................................................................................. 10
14. Usuniecie błędów ................................................................................................. 11
15. Dane techniczne .................................................................................................. 12
16. Prosimy zwrócić uwagę na następujące punkty ................................................... 13
Strona 1 z 13 PL
Page 81

2. Uwagi
Staraj się chronić urządzenie przed mocnymi uderzeniami.
Nie korzystaj z urządzenia w miejscach wyjątkowo zimnych, gorących, wilgotnych
lub zakurzonch. Nie wystawiaj urządzenia także bezpośrednio na słońce.
Przeprowadzaj częściej kodowanie danych aby uniknąć ich utraty.
Staraj się nie korzystać z urządzenia w miejscych mocno magnetycznych.
Chroń urządzenie przed wilgocią. Jeżeli wilgoć przeniknie do wnętrza, natychmiast
wyłącz urządzenie, następnie wyczyść je i wysusz.
Nie używaj żadnych środków chemicznych w celu czyszczenia urządzenia.
Korzystaj tylko z suchej ściereczki.
Nie odpowiadamy za szkody lub utratę danych w wyniku błędnej fukcjonalności,
błędnej obsługi, własnoręcznych napraw lub wymianie baterii.
Nie demontuj urządzenia na poszczególne części i nie staraj się naprawić go
samodzielnie, ponieważ w takim przypadku gwarancja traci wartość.
Korzystanie ze słuchawek nausznych lub dousznych przy zbyt dużej głośności
może doprowadzić do stałego uszkodzenia organów słuchu.
3. Funkcje
MP3 & WMA Player
MTV Video Player
JPEG / BMP Oglądanie obrazów
Radio FM
Teczka nawigacji
Bateria Li-polymer Akku do ładowania
Ustawienie specyficzne klienta
Zmienny nośnik danych
4. Zawartość opakowania
Prosimy o sprawdzenie zawartości opakowania w celu potwierzenia pełnej
zawartości
Intenso Video Player
Słuchawki stereo
Software do konvertowania (MTV-Format)
Kabel USB
Instrukcja obsługi + karta gwarancji
Strona 2 z 13 PL
Page 82

5. Przed użyciem
Połączenie z PC
Przy systemach Windows 98/SE prosimy o zainstalowanie treiberer, zanim odtwarzacz
zostanie połączony z PC. (download znajdziecie na stronie www.intenso.de). Przy
systemach WIN 2000/CP/ME/Vista/Windows7 instalacja treibera nie jest konieczna.
Prosimy postępować w następujący sposób:
(1) Połączyć odtwarzacz z PC poprzez połączenie USB.
(2) Otworzy się okno “Intenso”. Teraz możesz zapisać dane z Twojego dysku twardego
na zmienny nośnik danych.
Pewne wymazanie z PC
Przy Windows 2000/XP/ME/Vista/Windows7:
Nacisnąć poprzez prawy przycisk myszki na dole po prawej stronie na listwie task na
symol „Hardware pewnie usunąć“. Z wyświetlonego kontekstu menu wybierz punkt
„usunąć USB- urządzenie zapisujące-mechanizm napędowy“ poprzez lewy przycisk
myszki. Upewnij się,żze przekazanie danych zostało w pełni zakończone.
Teraz możesz usunąć sprzęt.
Przy Windows 98/SE:
Wybierz urządzenie w punkcie menu „manager sprzętu“ poprzez lewy przycisk myszki.
Naciśnij teraz na pukt w menu „usunąć“. Upewnij się, że przekazanie danych zostało w
pełni zakończone.
Teraz możesz odłączyć urządzenie od PC.
Ładowanie bateri akku:
Sprzęt zaopatrzony jest w baterię Li-polymer akku. Bateria jest ładowana poprzez
połączenie USB z komputerem.
Przy korzystanie z urządzenia po raz pierwszy, zwróć uwagę aby bateria została w pełni
naładowana, proces ten trwa z reguły 4 godziny.
Aby naładować baterię, połącz urządzenie kablem USB z PC.
Proces ładowania rozpocznie się automatycznie.
Chcąc dowiedzieś się o aktualnym stanie procesu ładowania, odłącz sprzęt od komputera.
Zobaczysz na ekranie na górze po prawej stronie symbol baterii.
Jeżeli symbol pali się w zielonym kolorze, to bateria jest całkowicie naładowana.
Uwaga: Aby uzyskać optymalną wadajność, bateria Li-polymer powinna być regularnie
używana. Jeżeli nie jest to regułą, ładuj przynajmniej raz w miesiącu baterię.
Strona 3 z 13 PL
Page 83

Elementy obsługi
1. [ ] Włączenie / wyłączenie / Wezwanie / opuszczenie menu wyboru
poszczególnych funkcji
2. Ekran
3. [] przycisk w tył | Ruch na lewo w menu
4. [+] podwyższenie głośności | Ruch do góry w menu
5. [ ] Play/Pause / przycisk potwierdzający
6. [] przycisk do przodu | Ruch na prawo w menu
7. [-] zmniejszenie głośności | Ruch w dół w menu
8. Reset
9. Mikrofon
10. Wejście na słuchawki
11. Połączenie USB mini
12. Micro SD - Card
Włączenie i wyłączenie,
Przycisnąć i trzymać przycisk [ ] w celu włączenie lub wyłączenia odtwarzacza.
Strona 4 z 13 PL
Page 84

6. Obsługa
Play/Pause
[ ] Play/Pause / przycisk potwierdzający. Przyciśnij i trzymaj przycisk aby dostać się
do głównego menu.
Głośność przy odtwarzaniu muzyki / video
Przyciśnij przycisk [+] lub [-], w celu regulacji głośności.
Wybór poprzedniego Tracku (poprzedniego tytułu)
Krótkie przyciśnięcie przycisku [] (do tyłu).
Wybór następneog Tracku (następnego tytułu)
Krótkie przyciśnięcie przycisku [] (do tyłu).
Przewinąć do tyłu
Przycisk []trzymać wciśnięty.
Przewinąć do przodu
Przycisk [] trzymać wciśnięty.
Blokada przycisków/zniesienie blokady
[ ] Play/Pause - Przycisk. Przycisnąć i tzrymać przycisk w celu zniesienia blokady
przycisków.
Reset
Przyciśnij przycisk Reset, jeżeli urządzenie nie reaguja na żadne komando.
7. Odtwarzanie muzyki
Wybierz w głównym menu funkcję muzyka. Potwierdź wybór poprzez krótkie wciśnięcie
przycisku [ ].
Opcje
(1) Przysiśnij modus muzyki przyciskiem [ ], aby wywołać opcjonalne menu.
(2) Poprzez przycisk [] lub [] możesz wybrać odpowienie funkje. Poprzez
przycisk [ ] potwierdzasz swój wybór.
Strona 5 z 13 PL
Page 85

Wybór
Wszystkie utwory:
Wybór jednego z utworów. Odtwarzanie wszystkich utworów z wyboru przypadkowego.
Modus powtarzania:
o Bez powtarzania: Wszystkie utwory zostaną odtworzone tylko raz.
o Powtórzenie tytułu: Wybrany utwór zostanie odtwarzany powtórnie.
o Powtórzenie wszystkich tytułów: Odtwarza wszystkie utwory powtórnie.
o Segregator prosty: Powtarza jednorazowo wszystkie tytuły w wybranym
segregatorze i zatrzymuje odtwarzanie.
o Segregator powtórzyć: Powtarza wszystkie tytuły z aktualnego
segregatora.
o Segregator przypadkowego odtwarzania: Wszystkie zapisane utwory w
segregatorze zostaną odtworzone w sposób przypadkowy.
Wybór equalizera
Normalny, Rock, Pop, Klasyka, Bas, Jazz, Equalizer zdefiniowany przez użytkownika
Equalizer zdefinjowany przez użytkownika
(1) Przyciśnij przycisk [] lub [], aby wybrać ustawienie EQ.
(2) Przyciśnij przycisk [+] lub [-], aby ustawić wartości.
(3) Potwierdź ustawienie poprzez przycisk [ ].
Biblioteka muzyczna
Uporządkuj zapisane utwory według genre, Artystów, Albumów lub tytułów. Jeżeli
korzystasz z tej funkcji po raz pierwszy, wybierz „bibliotekę muzyczną“ i potwierdź
„TAK“. Po przeprowadzeniu sortowania możesz w tym menu wybrać poukładane tytuły.
3D
Dzięki tej funcji, możesz nadać muzyce wymiarowe dzwięki.
Do tyłu
Poprzez wybór tego punkt w menu, dostaniesz się z powrotem do menu muzycznego.
Lyric (Teksty utworów)
Odtwarzacz ten wyświetla teksty w czasie odtwarzania utworu. Aby dane lyric odnieść
do utworu, postępuj w następujący sposób:
(1) Zapisz tekst lyric w tym samym wykazie, w jakim jest odpowiedni utwór.
(2) Opisz datę Lyric w dokładnie ten sam sposób, w jaki opisany jest odpowiedni
utwór.
Opuszczenie funkcji muzycznej
Przyciśnij przycisk [ ], aby dojść do menu głównego.
Strona 6 z 13 PL
Page 86

8. Zdjęcia
Wybierz w menu głównym funkcję foto. Potwierdź wybór poprzez krótkie przyciśnięcie
przycisku [ ].
Dzięki przyciskom [+] / [-] możesz wybrać odpowiedni obraz z listy lub segregatora.
Poprzez przyciśnięcie [ ]- potwierdzasz wybór. Poprzez przycisk [] –
przechodzisz do poprzedniego menu.
W trakcie odtwarzania zdjęć możesz:
- Poprzez przycisk [+] lub [-] przechodzić do przodu lub do tyłu
- Poprzez przycisk [ ]– wywołać menu opcji
Wybór
Diashow
Odtwarzanie zapisanych zdjęć w ramach Diashow.
Oglądanie zdjęć pojedynczych
Pokazanie poszczególnych zdjęć. Poprzez przycisk [+] lub [-] możesz przechodzic do
przodu lub do tyłu.
Do tyłu
Poprzez wybór tego punktu menu dojdziesz z powrotem do menu foto.
Opuszczenie funkcji zdjęć ( Foto)
Przyciśnij i trzymaj przycisk [ ]– aby dostać się do głównego menu.
9. Video
Wybierz w głównym menu funkcję video. Potwierdź wybór poprzez krótkie przyciśnięcie
przycisku [ ].
Dzięki przyciskom [+] / [-] możesz wybrać wybrane video z listy lub wybranego
segregatora. Poprzez przycisk [ ]- potwierdzasz wybór. Przyciskiem [] –
dochodzisz do poprzedniego menu.
W trakcie odtwarzania video możesz:
- Video zatrzymać i ponowić odtwarzanie: Przyciśnij przycisk [ ]- ponownie.
- Poprzez przyciski [] lub [] możesz przeskoczyć do poprzedniego /
następnego video.
Strona 7 z 13 PL
Page 87

- W celu szybkiego przewnięcia do tyłu / przodu w trakcie trwania odtwarzania
video, naciśnij i trzymaj przycisk [] lub [].
- Dzięki przyciskom [+] / [-] – możesz regulować głośność.
- Aby zakończyć odtwarzanie video, przyciśnij i trzymaj przycisk [ ].
Opcje
(1) Przyciśnij w modusie Video przycisk [FUNC], aby wywołać menu opcji.
(2) Poprzez przycisk [] lub [] mozesz wybrać odpowiednie funkcje. Poprzez
przycisk [ ] potwierdzasz wybór.
Opuszczenie funkcji video
Przyciśnij i trzymaj wciśnięty przycisk [ ], aby powrócić do głównego menu.
10. Radio
Proszę wybrać w menu głównym opcję “FM-Radio”. Następnie należy zatwierdzić wybór
przyciskiem [ ].
Podczas słuchania audycji radiowej mogą Państwo:
- Regulować głośność za pomocą przycisków [+] / [-].
- Wywołać menu opcji za pomocą przyciska [ ].
- Zakończyć tryb pracy radia przyciskiem [ ]. Proszę przytrzymać ten
przycisk.
Opcje
(1) Naciśnięciem przycisku [ ] wywołuje się menu opcji w trybie odtwarzania muzyki.
(2) Za pomocą przycisku [] lub [] wybiera się pożądaną funkcję. Następnie
należy zatwierdzić wybór przyciskiem [ ].
Wybór:
Automatyczne wyszukiwania stacji
Urządzenie poszukuje automatycznie stacje nadające na wybranej częstotliwości. Jeżeli
urządzenie znajdzie stację, zatrzymuje się na chwilę i zapisuje tą stację. Następnie
przeszukiwanie zostaje ponowione, aż urządzenie nie dojdzie do końca zakresu
częstotliwości. W tym momencie zapisane zostały wszystkie dostępne stacje w podanym
zakresie częstotliwości. Za pomocą przycisku [ ] zatrzymuje się przeszukiwanie, a
urządzenie zapisuje wszystkie odnalezione stacje do tego momentu.
Manualne wyszukiwanie stacji
Poprzez krótkie naciśnięcie przycisku [] lub [] zmienia się obszar poszukiwania o
0,1 jednostki w wybranym kierunku. Aby przeskoczyć na kolejną dostępną stację, należy
przytrzymać przycisk [] lub [] w zależności od kierunku wyszukiwania.
Zakres częstotliwości
Proszę ustawić w tym miejscu pożądany zakres częstotliwości w zależności od miejsca, w
którym się Państwo znajdują.
Strona 8 z 13 PL
Page 88

Zapisywanie stacji radiowej
Mogą Państwo zapisywać swoje ulubione stacje radiowe. Przyciskami [+] / [-] należy
wybrać pomiędzy „Tak“ i „Nie“. Wybór zatwierdza się przyciskiem [ ]. Aktualnie
ustawiona stacja może być w ten sposób zapisana.
Kasowanie stacji radiowej
Stację radiową, która się Państwu nie spodoba, można skasować. Przyciskami [+] / [-]
należy wybrać pomiędzy „Tak“ i „Nie“. Wybór zatwierdza się przyciskiem [ ]. Aktualnie
ustawiona stacja może być w ten sposób skasowana.
.
Nagrywanie programu radiowego
Mogą Państwo nagrać program aktualnie ustawionej stacji radiowej. Proszę zatwierdzić
przyciskiem [ ], następnie pojawi się okno nagrywania. Zapisywanie rozpocznie się
automatycznie. Przyciskiem [ ] można przerywać zapisywanie, a po ponownym
naciśnięciu kontynuować je. Aby zapisać nagraną audycję, należy przycisnąć [ ].
Powrót
Poprzez wybór punktu w menu powraca się do trybu radia.
11. Nagranie głosu
Wybierz w głównym menu funkcję nagranie. Potwierdź wybór poprzez krótkie
przyciśnięcie przycisku [ ].
Rozposzęcie i zatrzymanie nagrania głosu poprzez przycisk [ ]. Przysickiem [ ]
zapisujesz nagranie i przechodzisz z powrotem do menu nagrania.
Uwaga: nagrane dane głosu zapisane zostają w segregatorze odtwarzacza „Voice“.
Nagranie głosowe zostaje automatycznie zakończone i zapisane gdy urządzenie nie
posiada miejsca do zapisania lub bateria nie ma więcej wystarczającej wydajności.
Ustawienie jakości nagrania
Zanim rozpoczniesz nagrywanie, masz możliwość ustawienia jakości nagrania.
(1) Przyciśnij i trzymaj wciśnięty przycisk [ ], aby dojść do głównego menu.
Wybierz “Setup” i potwierdź poprzez krótkie przyciśnięcie przycisku [ ].
(2) Przyciskiem [] lub [] możesz wybrać punkt jakość nagrania.
Przyciskiem [ ] potwierdzasz wybór.
Możliwości wyboru:
- Long Time: normalna jakość nagrania przy niskim wykorzystaniu pamięci.
- Jakość normalna: dobra jakość nagrania przy niskim wykorzystniu pamięci.
- W ysoka jakość: bardzo dobra jakość nagrania przy wysokim wykorzystaniu
pamięci.
Strona 9 z 13 PL
Page 89

Opcje
(1) Przyciśnij w modusie nagrania przycisk [ ] aby wywołać menu opcji.
(2) Przyciskami [] lub [] możesz wybrać odpowiednie funkcje. Przyciskiem
[ ]-potwierdzasz swój wybór.
Wybór
Nagranie
Rozpoczęcie nagrania głosu.
Odtwarzanie
Odtwarzanie nagranych danych głosowych.
W tył
Poprzez wybór tego punkt w menu, dostaniesz się do menu nagrania.
Opuszczenie funkcji nagrania głosowego
Przyciśnij i trzymaj przyciśnięty przycisk [ ] aby dostać się do głównego menu.
12. Przegląd wszystkich danych
Wybierz w głównym menu funkcję segregator. Potwierdź wybór poprzez krótkie
przyciśnięcie przycisku [ ].
(1) Przyciskami [+] / [-] – możesz poruszać się pomiędzy danymi a segregatorami.
Przyciskiem [ ]– możesz otworzyć dane lub teczkę.
(2) Poprzez przyciśnięcie przycisku [FUNC] – wyświetli się dialog, czy chesz wymazać
wybrane dane. Potwierdzasz wybór przyciskiem [ ].
Opuszczenie funkcji segregatora
Przyciśnij i trzymaj przyciśnięty przycisk [ ]– aby dostać się do głównego menu.
13. Ustawienie systemu
Wybierz w głównym menu funkcję ustawienia. Potwierdź wybór poprzez krótkie
przyciśnięcie przycisku [ ].
Przystosowanie ustawienia:
(1) Wybierz przyciskami [] lub [] – wybrany punkt menu. Potwierdź wybór
przyciskiem [ ].
(2) Przyciskami [+] / [-] – możesz wybierać pomiędzy wartościami.
Strona 10 z 13 PL
Page 90

(3) Przyciskiem [ ]– potwierdzasz wybór. Przyciskiem [] – przechodzisz do
poprzedniego menu bez dokonania zmian.
Możliwości ustawienia
- Czas: Ustawienie aktualnej godziny w odpowiednim obrębie czasowym.
- Wyłączenie: Ustawienie odtwarzacza według czasu, który zostaje automatycznie
wylączony przy nie korzystaniu.
- Język: Wybór odpowiedniego języka.
- Nastawienie Display: Wybór jasności i czasu naświetlania ekranu.
- Jakość nagrania: Ustawienie jakości nagrania przy nagraniu głosu.
- Ustawienie systemu: Wymazanie danych, formatowanie odtwarzacza,
przywrócenie urządzenia do pierwotnego stanu, informacje o systemie,
aktualizacja biblioteki muzycznej i przeprowadzenie sortowania danych.
- Blokada przycisków: Nastawienie godziny, po aktywacji blokady przycisków.
- Powrót: Opuszczenie menu.
14. Usuniecie błędów
Problem – Możliwe powody – rozwiązanie problemu
Nic nie pokazuje się na displayu.
(1) Pusta bateria.
Naładuj baterię.
(2) Przyciski są zablokowane.
Odblokuj blokadę przycisków jak opisane w punkcie „6. obsługa“.
Urządzenie nie raguje przy przyciskaniu przycisku Play.
(1) Przyciski są zablokowane.
Odblokuj blokadę przycisków jak opisane w punkcie „6. obsługa“.
Przy odtwarzaniu brakuje głosu.
(1) Nagłośnienie jest zbyt małe
Podnieś nagłośnienie w menu nagłośnienie
(2) Audio-Datei uszkodzona
Prześlij dane ponownie
Nie ma połączenia z PC.
(1) Treiber nie został dobrze zainstalowany.
Dokonaj ponownej instalacji.
(2) Przeprowadź update Mainboard
(zwróć uwagę na uwagi producenta Mainboardu)
Wyświetlany czas zmienia się ciągle.
(1) Bit-Rate od MP3-Files zmienia w trakcie odtwarzania.
Korzystaj z tego samego Bit-Rate przy komprymowaniu.
Strona 11 z 13 PL
Page 91

PC melduje błąd przy połączeniu z urządzeniem
(1) Odtwarzacz został odłączony od PC w trakcie przekazywania danych.
W trakcie przesyłania danych, odtwarzacz musi być zawsze połączony z
komputerem.
Podana pamięć urządzenia nie jest zgodna z rzeczywistą pamięcią.
(1) Część pojemności pamięci jest używany przy Software, Formatowaniu oraz
właściwości ekranu.
Dane MP3 nie odtwarzane są właściwie.
(1) Dane MP3 otrzymały niewłaściwy format komprymacji, np. MPEG 1 lub 2.
Wymaż formaty danych, które nie są wspomagane.
Dane Video nie mogą być odtworzone.
(1) Format nie jest wspomagany.
Video musi być w formacie MTV. W innym przypadku, musisz przeprowadzić
konvertowanie. Zwróć uwagę przy tym na wielkość formatu 128x128 Pixel.
(2) Dane Video są uszkodzone.
Prześlij dane ponownie
Zdjęcia nie są widoczne
(1) Format nie jest wspomagany.
Przeprowadź konwertowanie zdjęcia na format JPG lub BMP.
15. Dane techniczne
Gatunek baterii akku
Do ładowania Li-polymer Akku
Wydolność baterii
~ 8 godzin
LCD
ekran 1,8“ Zoll
Słuchawki
5mW+5mW
format ideo
MTV 160x128 Pixel
Format Audio
MP3, WMA, WAV
Format zdjęć
JPEG, BMP
Bit Rate
MP3: 8-320kbps;
WMA:5-320kbps
Strona 12 z 13 PL
Page 92

SNR
(INTENSO)
®
49377 Vechta
Germany
www.intenso.de
80dB
USB Port
USB 2.0
Gotowy do użytku w temepraturze pomiędzy
0 Celsius ~ +40 Celsius
Gotowy do użytku przy wilgotności powietrza
< 85%
Możlowość przechowywania przy wilgotności powietrza w wysokości
< 90%
16. Prosimy zwrócić uwagę na następujące punkty
(1) Plug & Play są możliwe tylko przy Windows 2000/XP/Vista oraz Windows 7.
Prosimy zainstalować treiber przy Windows 98/SE.
(2) Odblokuj blokadę przycisków aby sprzęt uruchomić.
(3) Dokonaj ładowania baterii jeżeli ukaże się odpowiedni znak na ekranie.
(4) Prosimy odłączyć urządzenie od PC tylko jak opisane, aby zapobiedz możliwej
utraty danych.
(5) Jeżeli nagranie jest bardzo duże, ładowanie danych trwa dłużej
(6) Wspomaganie Software przy Windows 2000/XP/Vista oraz Windows 7.
Strona 13 z 13 PL
Page 93

1. Содержание
1. Содержание .......................................................................................................... 1
2. Замечания: ........................................................................................................... 2
3. Функции ................................................................................................................. 2
4. Содержание пакета .............................................................................................. 2
5. Перед использованием ........................................................................................ 3
6. Обслуживание ...................................................................................................... 5
7. Воспроизведение музыки .................................................................................... 5
8. Фотография .......................................................................................................... 7
9. Видео .................................................................................................................... 7
10. Pадио FM .............................................................................................................. 8
11. Запись речи .......................................................................................................... 9
12. Просмотр всех файлов ...................................................................................... 10
13. Настройка системы ............................................................................................ 10
14. Устранение неполадок ....................................................................................... 11
15. Технические данные .......................................................................................... 12
16. Обратите внимание на следующее .................................................................. 13
Страница 1 / 13 RU
Page 94

2. Замечания:
Избегайте сильных ударов прибора.
Не используйте прибор в экстремально холодных, горячих, влажных или
пыльных областях. Не поддавайте прибор также прямому воздействию
солнечных лучей.
Проводите регулярную запись данных, чтобы избежать потери данных.
Избегайте использования в сильных магнитных полях.
Защищайте прибор от влажности. Если в прибор проникнет влажность,
отключите его немедленно, после этого почистите и высушите прибор.
Не используйте химических растворителей для чистки прибора. Для этого
используется только сухая тряпка.
Мы не отвечаем за повреждения или потерю данных, возникшую при
неисправностях, неправильном обслуживании, собственноручного ремонта
или замене батареи.
Не раскладывайте прибор на отдельные части и не пытайтесь ремонтировать
его самостоятельно, так как в этом случае теряется гарантия.
Использование наушников со слишком высоким звуком может привести к
долговременному повреждению слуха.
3. Функции
MP3- и WMA- плеер
MTV-видеоплеер
JPEG- / BMP-фильмоскоп
Радио FM
Навигация по папкам
Перезаряжаемая литийно-полимерная батарея
Настройка клиента
Сменный носитель информации
4. Содержание пакета
Проверьте полноту содержимого пакета
Видеоплеер Интенсо
Стерео-наушники
Программное обеспечение для преобразования формата (формат MTV)
Кабель USB
Инструкция по обслуживанию + гарантийный лист
Страница 2 / 13 RU
Page 95

5. Перед использованием
Подсоедините прибор к ПК
Если у Вас рабочая система Windows 98/SE, установите драйвер, прежде чем
соединить плеер с ПК. (Его Вы сможете скачать со страницы www.intenso.de). Для
систем WIN 2000/XP/ME/Vista/Windows 7 установка драйвера не требуется.
Сделайте следующие шаги:
(1) Подсоедините плеер к гнезду USB на ПК.
(2) Открылось окно «Интенсо». Теперь можно записать данные из жѐсткого диска
на переносной носитель данных.
Надежное отсоединение от ПК
Для Windows 2000/XP/ME/Vista/Windows7:
Нажмите правой кнопкой мыши внизу справа в строке заданий на символ "надѐжно
удалить прибор". Из появившегося меню контекста выберите левой кнопкой мыши
пункт „Удалить запоминающее устройство USB“. Убедитесь, полностью ли
закончился перенос данных.
Теперь можно удалить прибор.
Для Windows 98/SE:
Выберите в «менеджере приборов» левой кнопкой данный прибор. Нажмите на пункт
меню «Удалить». Убедитесь также, полностью ли закончился перенос данных.
Теперь прибор можно отключить от ПК.
Зарядка батарей:
Прибор оснащен встроенной литийно-полимерной батареей. Батарея заряжается
через кабель USB от компьютера.
Если прибор используется впервые, обратите внимание на то, чтобы батарея была
полностью заряжена, как правило, процесс зарядки длится 4 часа.
Для того чтобы зарядить батарею, соедините прибор с компьютером с помощью
кабеля USB. Процесс зарядки начинается автоматически.
Если Вы хотите узнать о степени зарядки на данный момент, отсоедините прибор от
компьютера. На дисплее сверху справа появится символ батареи. Если символ
светится зелѐным светом, батарея заряжена полностью.
Замечание: Для того, чтобы работа батареи была оптимальной, Вам необходимо
использовать литийно-полимерную батарею. Если это не так, заряжайте батарею
хотя бы один раз в месяц полностью.
Страница 3 / 13 RU
Page 96

Элементы управления
1. [ ] включить/выключить / вызов/выход из меню выбора отдельных функций
2. Дисплей
3. [] кнопка назад | движение влево в меню
4. [+] увеличить громкость | передвижение в меню вверх
5. [ ] кнопка для проигрывания/паузы/подтверждения
6. [] кнопка вперѐд | движение вправо в меню
7. [-] уменьшить громкость | передвижение в меню вниз
8. Сброс
9. Микрофон
10. Выход для наушников
11. Мини-подключение USB
12. Micro SD - Card
Включить и выключить
Нажмите на кнопку [ ], чтобы включить или выключить плеер.
Страница 4 / 13 RU
Page 97

6. Обслуживание
Воспроизведение/Пауза
[ ] кнопка для проигрывания/паузы/подтверждения. Нажмите и держите эту
кнопку нажатой, чтобы попасть в главное меню.
Громкость при воспроизведении музыки/видео
Нажмите на кнопку [+] или [-], чтобы отрегулировать громкость.
Выбор предыдущего трека (фонограммы)
Короткое нажатие кнопки [] (назад).
Выбор следующего трека (фонограммы)
Короткое нажатие кнопки [] (вперѐд).
Прокручивание назад
Держите кнопку [] нажатой.
Прокручивание вперѐд
Держите кнопку [] нажатой.
Блокировка/разблокировка кнопок
[ ] кнопка проигрывания/паузы. Нажмите и держите нажатой эту кнопку, чтобы
снять блокировку кнопки.
Сброс
Нажмите кнопку сброса, если плеер больше не реагирует ни на какие кнопки.
7. Воспроизведение музыки
Выберите в главном меню функцию Музыка. Подтвердите Ваш выбор коротким
нажатием кнопки [ ].
Опции
(1) Нажмите в режиме музыки на кнопку [ ] чтобы вызвать меню опций.
(2) С помощью кнопки [] или [] Вы можете выбрать желаемую функцию.
Подтвердите Ваш выбор кнопкой [ ].
Страница 5 / 13 RU
Page 98

Выбор
Все песни:
Выбор определѐнной песни. Воспроизведение всех песен по случайному выбору.
Режим повтора:
o Без повтора: Все песни воспроизводятся один раз.
o Повторение фонограмм: Выбранная песня воспроизводится повторно.
o Повторение всех фонограмм: Повторение всех записанных песен.
o Воспроизведение папки один раз: Повторяет фонограммы в
выбранной папке один раз и воспроизведение останавливается.
o Повторение папки: Повторяет все фонограммы в настоящей папке.
o Случайное воспроизведение папки: Все записанные в папке песни
воспроизводятся по принципу случайного выбора.
Выбор эквалайзера
Эквалайзер обычный, рок, поп, классика, бас, джаз, определѐнный
пользователем.
Определѐнный пользователем эквалайзер
(1) Нажмите кнопку [] или [], чтобы выбрать настройку эквалайзера.
(2) Нажмите кнопки [+] или [-], чтобы провести настройку параметров.
(3) Подтвердите введѐнные величины кнопкой [ ].
Музыкальная библиотека
Проведите сортировку записанных песен по жанрам, исполнителям, альбомам и
фонограммам. Если Вы используете данную функцию впервые, выберите
«Музыкальная библиотека» и после этого «ДА». После сортировки в данном меню
можно выбрать желаемую сортировку фонограмм.
3D
С помощью этой функции можно придать музыке пространственное звучание.
Назад
Выбором данного пункта меню Вы возвращаетесь назад в меню музыки.
Лирика (тексты песен)
Во время воспроизведения плеер может показывать лирические тексты. Чтобы
установить за определѐнной песней файл с лирикой:
(1) Запишите лирический текст в ту же папку, в которой находится
относящаяся к нему песня.
(2) Назовите файл с лирикой точно так же, как называется относящаяся к
нему песня.
Выход из функции музыки
Чтобы попасть в главное меню, нажмите кнопку [ ] и держите еѐ нажатой.
Страница 6 / 13 RU
Page 99

8. Фотография
Выберите в главном меню функцию Фотография. Подтвердите Ваш выбор коротким
нажатием кнопки [ ].
С помощью кнопок [+] / [-] можно выбрать из перечня нужную фотографию или
нужную папку. Подтвердите выбор кнопкой [ ]. С помощью кнопки [] Вы
попадѐте назад в предыдущее меню.
Во время воспроизведения фотографий Вы можете:
- листать список в помощью кнопки [+] или [-] вперед или назад.
- с помощью кнопки [ ] вызывается меню опций.
Выбор
Слайд-шоу
Воспроизведение записанных фотографий в рамках слайд-шоу.
Просмотр одной фотографии
Просмотр одной отдельной фотографии. С помощью кнопки [+] или [-] можно
листать список вперед и назад.
Назад
Выбором данного пункта меню Вы возвращаетесь назад в меню Фотографий.
Выход из функции Фотографии
Чтобы попасть в главное меню, нажмите кнопку [ ] и держите еѐ нажатой.
9. Видео
Выберите в главном меню функцию Видео. Подтвердите Ваш выбор коротким
нажатием кнопки [ ].
С помощью кнопки [+] / [-] можно выбрать из перечня нужное видео или нужную
папку. Подтвердите выбор кнопкой [ ]. С помощью кнопки [] Вы попадѐте
назад в предыдущее меню.
Во время воспроизведения Видео Вы можете:
- Остановить и продолжить воспроизведение видео: Нажмите на кнопку
[ ], чтобы остановить воспроизведение. Чтобы продолжить
воспроизведение, нажмите на [ ] ещѐ раз.
Страница 7 / 13 RU
Page 100

- С помощью кнопки [] или [] Вы можете перейти к предыдущему /
следующему видео.
- Для быстрого прокручивания видео назад / вперѐд нажмите и
держите кнопку [] или [].
- С помощью кнопки [+] / [-] можно регулировать громкость.
- Чтобы окончить воспроизведение видео, нажмите на кнопку [ ] и
держите еѐ.
Опции
(1) Нажмите в видеорежиме на кнопку [ ], чтобы вызвать меню опций.
(2) С помощью кнопки [] или [] Вы можете выбрать желаемую функцию.
Подтвердите Ваш выбор кнопкой [ ].
Выход из функции Видео
Чтобы попасть в главное меню, нажмите кнопку [ ] и держите еѐ нажатой.
10. Pадио FM
Выберите в главном меню “FM-Radio”. Подтвердите выбор кнопкой [ ].
Во время прослушивания радиостанции можно:
- регулировать кнопками [+] / [-] громкость.
- вызвать с помощью кнопки [ ]- меню опций
- закончить с помощью кнопки [ ] режим радио. Для этого нажмите и
держите ее нажатой.
Опции
(3) Нажмите в режиме прослушивания музыки кнопку [ ], чтобы вызвать меню
опций.
(4) Выберите необходимую функцию с помощью кнопки [] или []. Подтвердите
Ваш выбор с помощью кнопки [ ].
Выбор:
Автоматический поиск радиостанций
Плеер автоматически ищет радиостанции в настроенном диапазоне частот. Если он
найдет радиостанцию, поиск прекращается на короткий момент и записывается
найденная радиостанция. После этого поиск продолжается, пока не будет
достигнуто окончание полосы частот. Теперь записаны все радиостанции, которые
находятся в Вашем диапазоне приема. Нажатием кнопки [ ] можно в любое
время остановить поиск и плеер записывает все найденные до этого времени
радиостанции.
Ручной поиск
После короткого нажатия кнопки [] или [] поиск перепрыгивает на 0.1 единицы в
необходимое направление в частотном диапазоне. Если держать кнопки [] или []
Страница 8 / 13 RU
 Loading...