

Page 1

Intenso PhotoPilot
V 1.0
Page 2

Bedienungsanleitung
Intenso PhotoPilot
Page 3

i
Inhaltsverzeichnis
EINFÜHRUNG ............................................................................................................................................................................................................. 1
ALLGEMEINE PRODUKT MERKMALE .................................................................................................................................................................... 2
ÜBERSICHT ................................................................................................................................................................................................................ 3
FERNBEDIENUNG ..................................................................................................................................................................................................... 4
EINSETZEN DER BATTERIE IN DIE FERNBEDIENUNG ........................................................................................................................................ 5
BEFESTIGUNG DES STANDFUßES ......................................................................................................................................................................... 5
ERSTE SCHRITTE ...................................................................................................................................................................................................... 6
NUTZUNG VON SPEICHERKARTEN ....................................................................................................................................................................... 7
BETRACHTEN EINER DIASHOW ............................................................................................................................................................................. 8
HAUPTMENÜ .............................................................................................................................................................................................................. 9
BETRACHTEN VON FOTOS ................................................................................................................................................................................... 10
Abspielen einer Diashow ...................................................................................................................................................................................... 10
Anzeige eines einzelnen Bildes ............................................................................................................................................................................ 12
Ändern des Anzeigemodus ................................................................................................................................................................................... 13
Nutzung des OSD Menüs ..................................................................................................................................................................................... 14
Page 4

ii
SETUP MENÜ ........................................................................................................................................................................................................... 16
Datum und Uhrzeit einstellen ................................................................................................................................................................................ 18
Aktivieren des automatischen Ein- und Ausschaltens .......................................................................................................................................... 19
Anzeige des Kalenders ......................................................................................................................................................................................... 20
HÄUFIG GESTELLTE FRAGEN .............................................................................................................................................................................. 21
PRODUKT SPEZIFIKATIONEN ............................................................................................................................................................................... 24
PFLEGE UND WARTUNG ........................................................................................................................................................................................ 25
Page 5

DE - 1
Wi r sin d nic ht ha ftba r für Sch äden oder Date nver lust bei ei ner F ehlf unkt ion, fe hler haft er Ha ndha bung oder eig enhä ndig er Re par atu r des
Ge räte s. B itte zer lege n Si e da s Ge rät nich t in Ein zelt eile , un d ve rsu chen Sie bit te n icht , es sel bst zu r epar iere n, d a di e Ga ran tie in dies em Fa ll
er lischt. Die Sof twar e, H ardw are oder B edie nungs anle itung kan n Än deru ngen unte rlie gen. Hie rübe r w erde n wi r nich t i nfor mier en. Wir beh alte n
un s al le R echt e da zu v or.
EINFÜHRUNG
Danke, dass Sie sich für den DIGITALEN FOTORAHMEN ( DF ) von Intenso entschieden haben.
Bevor Sie dieses Gerät nutzen, lesen Sie bitte diese Bedienungsanleitung gründlich durch und beachten Sie alle Warnhinweise.
Wir empfehlen eine sichere Aufbewahrung dieser Anleitung, um etwaig auftretende Fragen selbstständig beantworten zu können.
Der Inhalt dieser Anleitung ist so gestaltet, dass Sie die gesamten Funktionen des DF sicher nutzen können.
Der DF ermöglicht es Ihnen, digitale Fotos direkt von der Speicherkarte Ihrer Kamera zu betrachten. Sie können Ihre Fotos durch
die vom Bilderrahmen bereitgestellte Diashowfunktion anschauen. Der DF ist mit folgenden Kartenformaten kompatibel: SD
(Secure Digital), SDHC (Secure Digital High Capacity ), MMC(Multimedia Card), MS (Memory Stick) und USB-Stick.
Page 6

DE - 2
ALLGEMEINE PRODUKT MERKMALE
Dekorative Erscheinung, gute Qualität
Anzeige von Fotos (JPEG) ohne einen Computer
Automatische Diashow mit Übergangseffekten und individueller Anzeigedauer
Kalender Funktion
Timer Funktion
Kompatibel mit SD / MMC / MS Karten
USB Steckplatz für den Anschluss von USB Massenspeichern
2 Wege der Steuerung: 7 Tasten auf der Rückseite des , Infrarot Fernbedienung
Page 7

DE - 3
1 Infrarot Sensor
2 SD / MMC / MS Karten Slot
3 USB Host
4 DC 5V 1A Eingang
5 Power An/Aus
6 Standfuß
7 Aufwärts/Zurück [] Taste
8 Links [] Taste
9 Menü [M] Taste
10 Play/Enter [] Taste
11 Rechts [] Taste
12 Abwärts/Vorwärts [] Taste
13 Stop/Ende [ ] Taste
ÜBERSICHT
Page 8
DE - 4
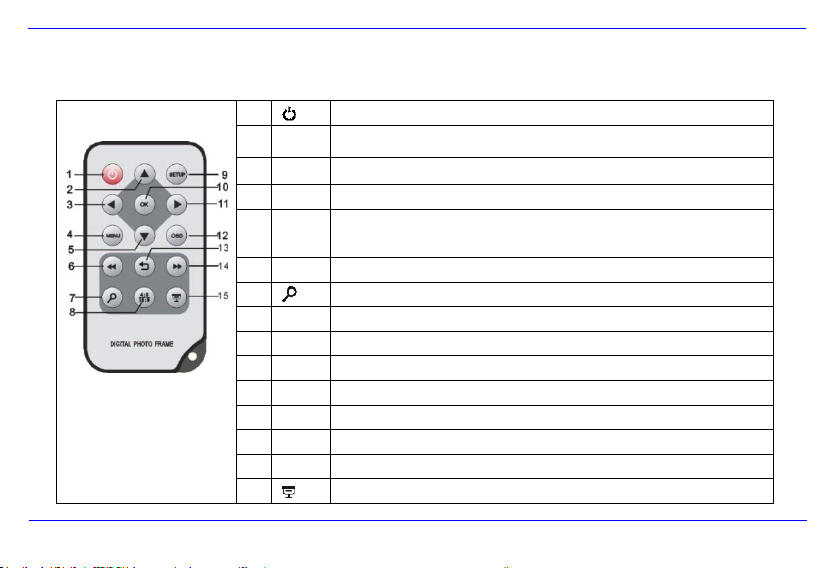
1
Power On/ Off
2
Bewegt den Cursor aufwärts im Auswahlmenü
Kippt das Bild im Uhrzeigersinn um 90 Grad im Diashow Modus.
3
Bewegt den Cursor nach links im Auswahlmenü oder zurück zum vorherigen Bild im Diashow-Modus
4
MENU
Aufrufen des Hauptmenüs
5
Bewegt den Cursor abwärts im Auswahlmenü
Kippt das Bild im Diashow Modus um 90 Grad gegen den Uhrzeigersinn.
6
Rücksprung zum vorherigen Foto in der Diashow oder zurück zur vorherigen Seite im Bilder-Vorschaumenü
7
Zoom In Vergrößert einen Bildausschnitt
8
4:3/ 16:9
Auswahl der Bildanzeige: 4:3 , 16:9
9
SETUP
Aufrufen des Setup Menüs
10
OK
Bestätigen der Auswahl. Start/Pause der Diashow
11
Bewegt den Cursor nach rechts im Auswahlmenü oder Sprung zum nächsten Bild im Dia Show Modus
12
OSD
Anzeige des On-Screen-Displays (OSD) während der Diashow
13
Rücksprung zum vorherigen Menü
14
Vorsprung zum nächsten Foto in der Diashow oder Sprung zur nächsten Seite im Bilder-Vorschaumenü
15
Start der Diashow
FERNBEDIENUNG
Page 9
DE - 5
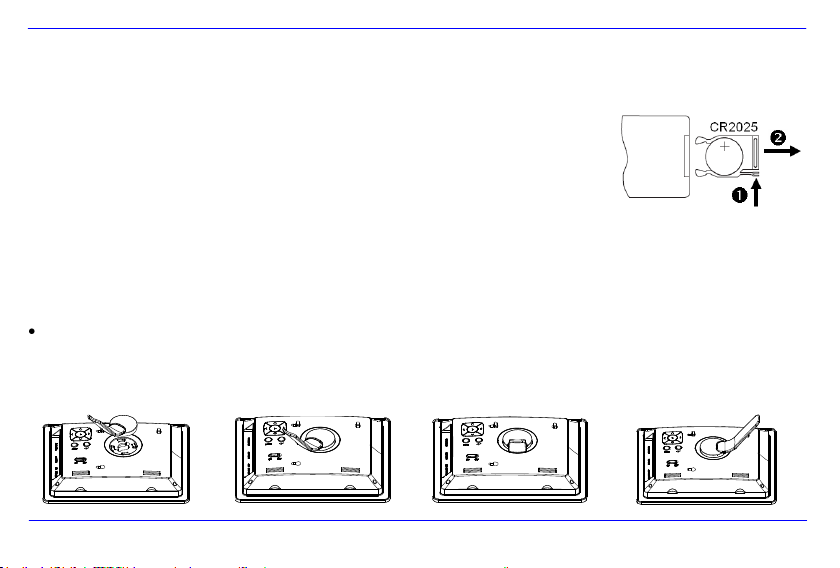
EINSETZEN DER BATTERIE IN DIE FERNBEDIENUNG
Platzieren Sie die Fernbedienung mit den Tasten nach unten.
Drücken Sie die Feder links neben dem Batteriefach nach rechts und ziehen Sie gleichzeitig
das Batteriefach heraus.
Setzen Sie eine CR2025 Lithium Batterie mit dem Plus Symbol nach oben in das Batteriefach ein.
Schieben Sie das Batteriefach wieder vollständig in das Gehäuse der Fernbedienung.
Bitte beachten Sie: Bitte stellen Sie eine Batterieentsorgung sicher, die den gesetzlichen
Bestimmungen entspricht.
BEFESTIGUNG DES STANDFUßES
Drehen Sie den Standfuß gegen den Uhrzeigersinn, um die sog. Landschafts-
oder Portrait- Position auszuwählen.
Page 10

DE - 6
ERSTE SCHRITTE
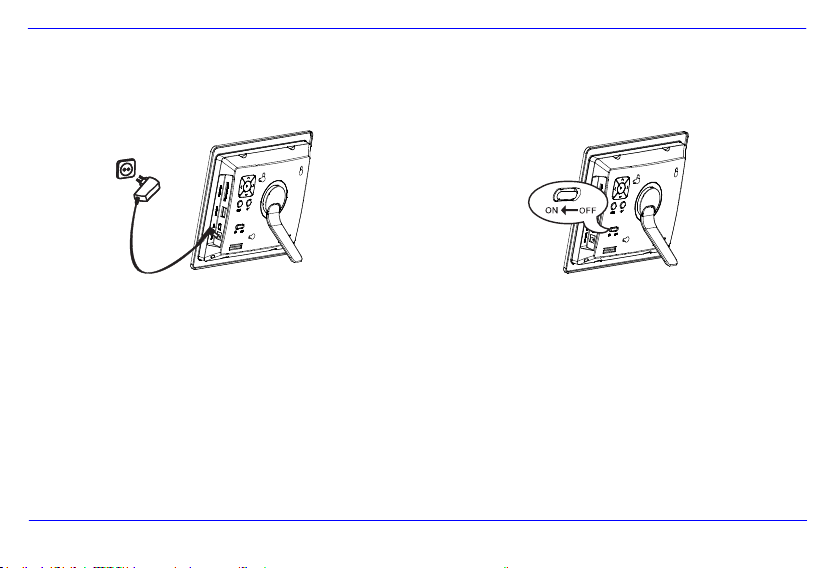
Befestigen Sie den Standfuß am DIGITALEN FOTORAHMEN ( DF ).
Verbinden Sie das mitgelieferte Netzteil mit dem DF. Stecken Sie das andere Ende des mitgelieferten Netzteils in die Steckdose.
Schieben Sie den Regler des DF ON.
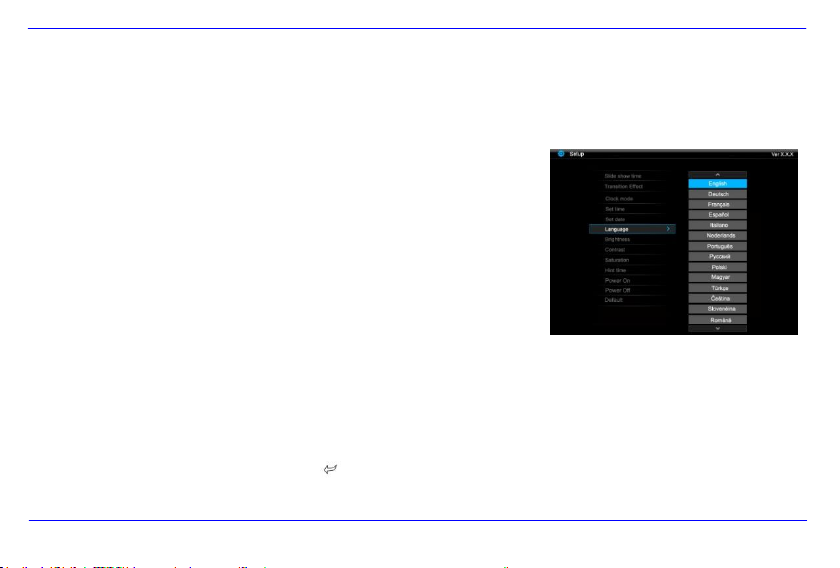
Für die erste Inbetriebnahme wählen Sie bitte nach dem ersten Einschalten die Sprache in dem erscheinenden Fenster mittels der Tasten
auf der Rückseite oder der Fernbedienung aus. Bestätigen Sie Ihre Auswahl mit der [] Taste auf der Rückseite oder der OK Taste auf
der Fernbedienung.
Page 11

DE - 7
NUTZUNG VON SPEICHERKARTEN
Setzen Sie SD / MMC / MS Karten mit den Kontakten in Richtung des Display schauend in den 3-in-1 Karten Slot ein.
Verbinden Sie USB Speichermedien mit dem DIGITALEN FOTORAHMEN durch Einsetzen der Medien in den USB Steckplatz (USB Host).
Hinweis:
Bitte setzen Sie Speicherkarten nicht mit Gewalt ein.
Das 3-in-1 Kartenlesegerät kann immer nur eine Karte zur gleichen Zeit auslesen.
Bitte verbinden Sie immer nur eine SD / MMC oder MS Karte zeitgleich mit dem Photo Frame.
Um verbundene Karten vom DIGITALEN FOTORAHMEN zu trennen, ziehen Sie diese vorsichtig aus dem Kartenslot heraus. (Hinweis:
SD und MMC Karten verfügen über eine Einkerbung in Querrichtung der Karte. Hier kann ein Fingernagel eingreifen, um das
Herausziehen aus dem Slot zu vereinfachen )
Page 12

DE - 8
Drücken Sie die MENU Taste und
anschließend die [],[] Tasten auf der Rückseite des DF oder die , Tasten auf der
Fernbedienung, um das verbundene Speichermedium, das Setup oder den Kalender
aufzurufen.
Hinweis:
Wenn ein Speichermedium in den DF eingesteckt wurde startet die Diashow automatisch nach dem Einschalten.
Wenn mehrere Speichermedien mit dem Photo Frame verbunden sind, liest der DF nach dem Einschalten immer zuerst die Bilder
aus der SD / MMC oder MS Karte.
BETRACHTEN EINER DIASHOW
Nach dem Einschalten gelangen Sie direkt in das Hauptmenü.
Wenn Sie eine Speicherkarte oder einen USB Stick mit dem DF verbunden haben, startet die Diashow direkt nach dem Einschalten.
Page 13

DE - 9
Menü
Beschreibung
USB
Erscheint, wenn ein USB Medium verbunden ist.
SD/MMC/MS
Erscheint, wenn eine SD, MS oder MMC Karte
verbunden ist.
Uhr
Anzeige des Kalenders und der Uhrzeit
Setup
Menü, um individuelle Einstellungen vorzunehmen.
2. Drücken Sie die [],[] Tasten auf dem DF oder die , Tasten auf der
Fernbedienung, um ein Speichermedium oder ein Menü auszuwählen.
3. Bestätigen Sie Ihre Auswahl durch Drücken der [] Taste auf dem DF oder der
OK-Taste auf der Fernbedienung.
HAUPTMENÜ
Im Hauptmenü haben Sie die Auswahl zwischen den verbundenen Speichermedien, dem Kalender und dem Setup.
1. Drücken Sie die MENU -Taste auf der Rückseite des DF oder auf der Fernbedienung, um das Hauptmenü aufzurufen.
Page 14

DE - 10
BETRACHTEN VON FOTOS
Abspielen einer Diashow
Sie können in jedem Menü die [ ] Taste auf der Fernbedienung zum Starten der Diashow nutzen, Sie beginnt jeweils mit dem ersten Foto.
Zum Anhalten der Diashow und zum Anzeigen eines einzelnen Fotos drücken Sie die [] Taste auf dem DF oder die OK-Taste auf der
Fernbedienung. Durch erneutes Drücken der [] Taste auf dem DF oder der OK-Taste auf der Fernbedienung wird die Diashow fortgesetzt.
Drücken Sie die [] Taste auf der Fernbedienung oder die [ ] Taste auf dem DF, um die Diashow zu verlassen und zum
Bilder-Vorschaumenü zu gelangen.
Drücken Sie die MENU-Taste auf der Fernbedienung oder auf dem DF zum Verlassen der Diashow, um in das Hauptmenü zu
gelangen.
Hinweis:
Wird beim Abspielen einer Diashow ein weiteres Speichermedium eingesetzt, so springt die Diashow automatisch zum ersten Bild des
neuen Speichermediums und beginnt die Diashow ab diesem Bild.
Sind gleichzeitig eine SD/MMC/MS-Karte und ein USB Medium an den DF angeschlossen, so werden bei der Diashow immer nur alle
Bilder des ausgewählten Mediums kontinuierlich wiedergegeben. Die einzelnen Speichermedien werden nicht automatisch
nacheinander in der Diashow wiedergegeben.
Page 15

DE - 11
Bilder-Vorschaumenü
Die Bilder auf dem ausgewählten Speichermedium werden als Miniaturbilder dargestellt. Es
können bis zu 15 Bilder gleichzeitig angezeigt werden.
1. Wählen Sie im Hauptmenü ein Speichermedium (USB, SD/MMC/MS) aus und
drücken Sie auf dem DF oder der Fernbedienung die OK-Taste.
2. Zum Navigieren zwischen den Miniaturbildern nutzen Sie die [],[],[],[] Tasten
auf dem DF oder die , , , Tasten auf der Fernbedienung. Um direkt zur
nächsten Vorschauseite zu gelangen, nutzen Sie bitte die oder Taste auf der
Fernbedienung.
Bilder-Vorschaumenü
Hinweis:
Sie gelangen ebenfalls durch das Drücken der [
Diashow oder der Bilder Einzelansicht in das Bilder-Vorschaumenü.
] Taste auf der Fernbedienung oder der [ ]- Taste auf dem DF während einer
Page 16

DE - 12
Anzeige eines einzelnen Bildes
Sie können ein einzelnes Bild auswählen.
1. Wählen Sie im Bilder-Vorschaumenü ein Bild aus und drücken Sie die [] Taste auf dem DF oder die OK-Taste auf der Fernbedienung.
Das Bild wird nun im Vollbildmodus angezeigt. Betätigen Sie jetzt innerhalb der gewählten Anzeigedauer nochmals die [] Taste auf
dem DF oder die OK-Taste auf der Fernbedienung. Sie sehen nun das Symbol in der linken unteren Ecke des Bildschirms. Für die
gewählte Hinweiszeit (siehe Seite 17).
Zum Anzeigen des vorherigen oder nächsten Fotos drücken Sie [], [] Tasten auf dem DF oder die , Tasten auf der
Fernbedienung.
Zum Rotieren des Bildes drücken Sie die [], [] Tasten auf dem DF oder die , Tasten auf der Fernbedienung.
Um ein Bild vergrößert anzuzeigen, drücken Sie wiederholt die Taste auf der Fernbedienung. Wenn ein Bild vergrößert
angezeigt wird, können Sie mit den [], [], [], [] Tasten auf dem DF oder den , , , Tasten auf der
Fernbedienung den dargestellten Bildausschnitt variieren.
2. Um zum Bilder-Vorschaumenü zurückzukehren, drücken Sie die [] Taste.
3. Drücken Sie die [] Taste auf dem DF oder die OK-Taste auf der Fernbedienung, um die Diashow, beginnend mit dem ausgewählten
Foto, zu starten.
Page 17

DE - 13
Ändern des Anzeigemodus
Während des Betrachtens eines Bildes oder während der Diashow können Sie durch mehrmaliges Drücken der [4:3/16:9] Taste auf der
Fernbedienung den Anzeigemodus wechseln.
4:3: Bei dieser Auswahl wird ein Bild, welches im 16:9 oder einem größeren Format gespeichert ist, gestreckt und als Vollbild
angezeigt.
16:9: Bei dieser Auswahl wird ein Bild, welches im 16:9 oder einem größeren Format gespeichert ist, im Originalformat mit
schwarzem Balken am oberen und unteren Rand angezeigt.
Hinweis:
Ein Foto, welches im 4:3 Format abgespeichert wurde, kann auch nur im Format 4:3 dargestellt werden.
Diese Funktion ist nicht aktiv bei Fotos mit einer geringeren Auflösung als 800X600 Pixel.
Page 18
DE - 14
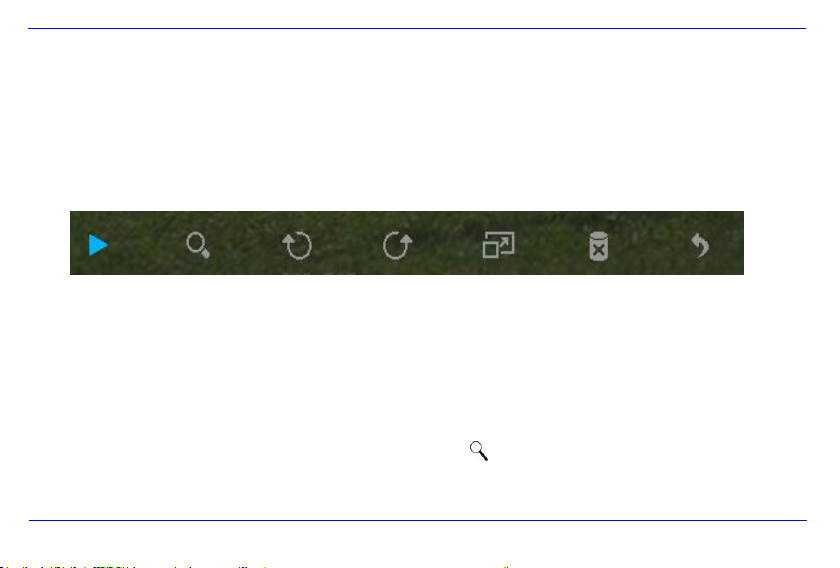
Nutzung des OSD Menüs
Sie können das OSD Menü nutzen, um die nachfolgenden Aktionen auszuführen.
1. Drücken Sie die [OSD] Taste auf der Fernbedienung während des Betrachtens eines Bildes oder einer Diashow. Das OSD Menü
erscheint auf dem Display und die Diashow wird gestoppt.
2. Drücken Sie die [], [] Tasten auf dem DF oder die , Tasten auf der Fernbedienung, um zwischen den Funktionen zu
navigieren.
Zum Stoppen oder Fortsetzen der Diashow wählen Sie bitte das Symbol aus und drücken [] auf dem DF oder OK auf der
Fernbedienung. Das (Play) Symbol im OSD-Menü wird durch das (Pause) Symbol ersetzt.
Um das Foto zu vergrößern, wählen Sie bitte das Symbol und drücken Sie [] auf dem DF oder OK auf der
Fernbedienung. Wenn ein Bild vergrößert angezeigt wird, können Sie mit den [],[],[],[] Tasten auf dem DF oder den ,
, , Tasten auf der Fernbedienung den dargestellten Bildausschnitt variieren.
Page 19
DE - 15
Um das Foto um 90 Grad im Uhrzeigersinn zu drehen, wählen Sie bitte das Symbol und drücken Sie [] auf dem DF
oder OK auf der Fernbedienung.
Um das Foto um 90 Grad gegen den Uhrzeigersinn zu drehen, wählen Sie bitte das Symbol und drücken Sie []
auf dem DF oder OK auf der Fernbedienung.
Durch das Symbol wird die Umschaltung zwischen 4:3 / 16:9 ausgewählt. Durch drücken von [] auf dem DF oder OK
auf der Fernbedienung wird die Umschaltung des Formates durchgeführt.
(Seite13)"
Durch die Auswahl des Symbols und drücken von [] auf dem DF oder OK auf der Fernbedienung wird das angezeigte
Bild vom Datenträger gelöscht. ( ACHTUNG: Es erfolgt keine zusätzliche Sicherheitsabfrage vor dem Löschen !! )
Durch die Auswahl des Symbols und drücken von [] auf dem DF oder OK auf der Fernbedienung setzt der DF die Diashow
fort.
Page 20
DE - 16
1. Wählen Sie im Hauptmenü den Menüpunkt SETUP aus und bestätigen Sie Ihre
Auswahl mit der [] Taste auf dem DF oder der OK-Taste auf der Fernbedienung.
Sie gelangen außerdem durch Drücken der [SETUP] Taste auf der Fernbedienung
direkt in dieses Menü.
2. Um eine Einstellung auszuwählen, drücken Sie die [], [] Tasten auf dem DF
oder , Tasten auf der Fernbedienung.
3. Zum Ändern der jeweiligen Einstellung drücken Sie die [], [] oder [] Taste auf
dem DF, alternativ die , oder OK Taste auf der Fernbedienung und bestätigen
Sie Ihre Auswahl durch Drücken der [] Taste auf dem DF oder der OK-Taste auf
der Fernbedienung.
4. Zum Verlassen des Menüs drücken Sie die [ ]- Taste auf dem DF oder die []
Taste auf der Fernbedienung.
SETUP MENÜ
Sie können die Systemeinstellungen des DIGITALEN FOTORAHMENS ( DF ) individuell einstellen.
Page 21

DE - 17
Einstellmöglichkeiten
Beschreibung
Anzeigedauer
Wählen Sie aus, wie lange ein Bild während einer Diashow angezeigt werden soll.
Einstellmöglichkeiten: 3 Sek., 5 Sek., 15 Sek., 1 Min., 15 Min.
Bildübergänge
Wählen Sie zwischen zufälligen und einem kontinuierlichen Bildübergang
Uhr Einstellung
Wählen Sie die die Anzeigeform für Ihren Kalender / Uhr aus. Einstellmöglichkeiten: Monatskalender,
Digitaluhr, Analoguhr
Zeit Einstellung
Einstellen der Uhrzeit.
Datum Einstellung
Einstellen des Kalenders
Sprache
Wählen Sie Ihre gewünschte Sprache aus.
Helligkeit
Einstellen der Helligkeit des TFT Displays. Einstellmöglichkeiten: -3, -2, -1, 0, 1, 2, 3.
Kontrast
Einstellen des Kontrastes des TFT Displays. Einstellmöglichkeiten: -3, -2, -1, 0, 1, 2, 3.
Farbsättigung
Einstellen der Farbsättigung des TFT Displays. Einstellmöglichkeiten: -3, -2, -1, 0, 1, 2, 3.
Hinweiszeit
Wählen Sie aus, wie lange der Hinweis auf die Funktionen der Tasten im Modus Diashow, sowie der Status
(Pause) bzw. (Play) im unteren Bild eingeblendet werden soll. Einstellmöglichkeiten: 0 Sek., 5 Sek.,
10 Sek., 20Sek.
autom. Einschalten
Aktivieren des automatischen Einschaltens. Einmal / Täglich.
autom. Ausschalten
Aktivieren des automatischen Ausschaltens. Einmal / Täglich.
Werkseinstellung
Gerät wird auf die Werkseinstellungen zurückgesetzt.
Page 22

DE - 18
Datum und Uhrzeit einstellen
Stellen Sie die Uhrzeit auf dem Intenso DF ein:
1. Wählen Sie im Hauptmenü den Menüpunkt SETUP aus.
2. Drücken Sie die [], [] Tasten auf dem DF oder die , Tasten auf der Fernbedienung, um den Eintrag Uhrzeit auszuwählen.
3. Drücken Sie die [], [] Tasten auf dem DF oder die , Tasten auf der Fernbedienung, um das nächste oder vorherige Element
auszuwählen ( Stunde, Minute). Drücken Sie die [], [] Tasten auf dem DF oder die , Tasten auf der Fernbedienung, um die
gewünschten Werte einzustellen.
4. Zur Bestätigung Ihrer Eingaben drücken Sie [] Taste auf der Rückseite des DF oder die OK-Taste auf der Fernbedienung.
Stellen Sie das Datum auf dem Intenso DF ein:
1. Drücken Sie die [], [] Tasten auf dem DF oder die , Tasten auf der Fernbedienung, um den Eintrag Datum auszuwählen.
2. Drücken Sie die [], [] Tasten auf dem DF oder die , Tasten auf der Fernbedienung, um das nächste oder vorherige Element
auszuwählen (Monat, Tag, Jahr ). Drücken Sie die [], [] Tasten auf dem DF oder die , Tasten auf der Fernbedienung, um die
gewünschten Werte einzustellen.
3. Zur Bestätigung Ihrer Eingaben drücken Sie [] Taste auf der Rückseite des DF oder die OK-Taste auf der Fernbedienung.
Page 23

DE - 19
Aktivieren des automatischen Ein- und Ausschaltens
Sie können den DIGITALEN FOTORAHMEN von Intenso zu einer von Ihnen gewünschten Uhrzeit automatisch ein- und ausschalten lassen.
Hinweis: Für diese Funktion muss im Vorfeld die korrekte Uhrzeit eingegeben werden.
1. Wählen Sie im Hauptmenü den Menüpunkt SETUP aus.
2. Drücken Sie die [], [] Tasten auf dem DF oder die , Tasten auf der Fernbedienung, um den Menüpunkt Einschalten oder
Ausschalten auszuwählen.
3. Drücken Sie die [], [] Tasten auf dem DF oder die , Tasten auf der Fernbedienung, um das nächste oder vorherige Element
auszuwählen (Stunde, Minute). Drücken Sie die [], [] Tasten auf dem DF oder die , Tasten auf der Fernbedienung, um die
gewünschten Werte und den Zeitplan einzustellen.
Aus: Deaktivieren Ein- und Ausschaltens.
Ein: Der DIGITALE FOTORAHMEN stellt sich zur voreingestellten Zeit an und/oder aus.
4. Zur Bestätigung Ihrer Eingaben drücken Sie [] Taste auf dem DF oder die OK-Taste auf der Fernbedienung.
Page 24
DE - 20
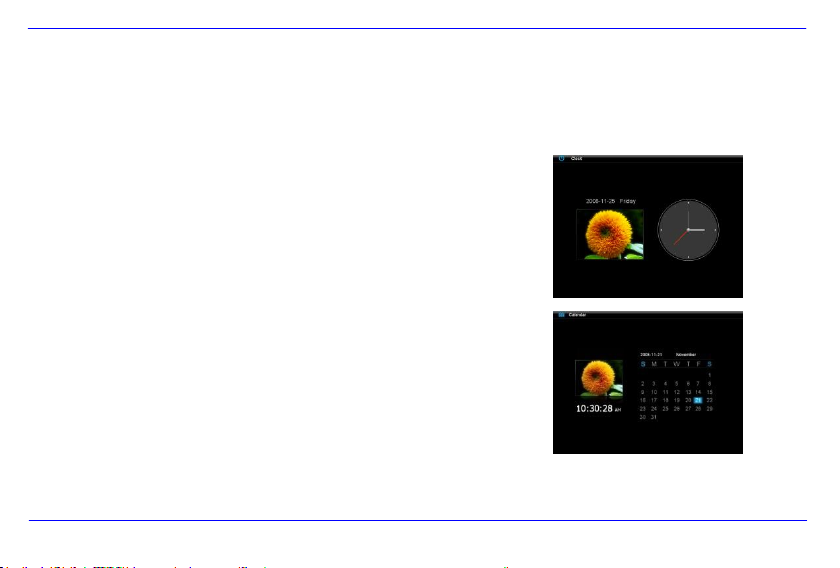
1. Wählen Sie im Hauptmenü den Menüpunkt Uhr aus.
2. Um den Kalendermodus zu verlassen, drücken Sie die [] Taste.
Hinweis:
Datum und Zeit können nur im Menü Setup eingestellt werden.
Durch Betätigen der [] Taste auf der Rückseite des DF oder
der OK-Taste auf der Fernbedienung kann die Anzeige zwischen Monatskalender,
Digitaluhr und Analoguhr gewechselt werden.
Durch Betätigen der [], [] Tasten auf dem DF oder der
, Tasten auf der Fernbedienung kann der Kalender
monatsweise vor oder zurückspringen.
Anzeige des Kalenders
Im Kalendermodus wird das aktuelle Datum, die aktuelle Uhrzeit und im Hintergrund eine Diashow mit den verfügbaren Bildern angezeigt.
Page 25

DE - 21
HÄUFIG GESTELLTE FRAGEN
Warum ist die reale Kapazität einer Speicherkarte geringer als auf der Verpackung angegeben?
Die Angabe der Speicherkapazität eines Flash Speichermediums erfolgt analog zu der Kapazitätsangabe bei Festplatten und unterliegt den
Richtlinien des SI (International System of Units). Dieses System misst nicht nach dem Binärsystem, bei dem 1024 MB zu einem 1 GB
umgerechnet werden. Der SI Standard misst in 1000er Potenzen, wonach zum Beispiel 1000 Megabyte 1 Gigabyte ergeben. Durch diese
unterschiedliche Berechnung kommt es zu einer Differenz in der Kapazitätsangabe.
Warum werden einige Bilder meiner Speicherkarte vom DF nicht angezeigt?
Einige nicht weitverbreitete Speichermedien sind mit dem DF nicht kompatibel. Nutzen Sie bitte eine kompatible Karte. Bedenken
Sie bitte, dass dieser Bilderrahmen nur Fotos
Es ist eine Speicherkarte eingesteckt. Der DF kann jedoch nicht von dieser lesen. Was kann ich machen?
Als erstes überprüfen Sie bitte, ob diese Karte kompatibel zum DIGITALEN FOTORAHMEN von Intenso ist.
Überprüfen Sie danach, ob die Karte in der richtigen Art und Weise in den Kartenslot eingesteckt wurde. Denken Sie bitte auch
Bitte beachten Sie: Einige Digitalkameras speichern die Bilder nicht in dem Standardformat JPEG ab. Schauen Sie bitte in
diesem Fall in der Gebrauchsanleitung Ihrer Kamera nach.
Page 26

DE - 22
Warum werden einige Bilder schneller geladen als andere ?
Bilder mit einer höheren Auflösung benötigen länger bis sie angezeigt werden können. Um die Anze igegeschwindigkeit zu
erhöhen, nutzen Sie bitte Bilder mit einer niedrigeren Auflösung.
Hinweis: Der Photo Frame unterstützt eine Auflösung bis 8000*8000 Pixel.
Warum startet die Software nicht, obwohl die Stromversorgung gegeben ist und Power auf “On” steht?
Wahrscheinlich liegt ein Systemfehler vor. Bitte starten Sie die Software neu, indem Sie für ein paar Sekunden die
Stromversorgung unterbrechen.
Warum wird auf dem Display nicht das Hauptmenü angezeigt?
Bitte überprüfen Sie, ob der DF ordnungsgemäß mit einer Steckdose verbunden ist O
Kann ich Bilder auf dem Display rotieren lassen?
Ja, nutzen Sie dazu die Pfeiltasten [], [] auf dem DF oder die , Tasten auf der Fernbedienung.
Bitte beachten Sie: Das rotierte Bild wird bei einer erneuten Anzeige wieder in der normalen Ansicht angezeigt .
Kann ich die Farben der Bilder anpassen ?
Nein. Alle Farbeinstellungen werden während der Aufnahme der Fotos vorgenommen. Sie können aber die Helligkeit und den
Kontrast des Displays anpassen.
Page 27

DE - 23
In welcher Auflösung sollten Bilder sein, um optimal auf dem Display dargestellt werden zu können ?
Die beste Auflösung für diesen DF ist 800*600 Pixel.
Warum funktionieren die Funktionen: Automatisches Einschalten / Ausschalten nicht, obwohl ich sie aktiviert habe?
Stellen Sie sicher, dass Sie die korrekte Uhrzeit eingestellt haben. Wenn die eingestellte Uhrzeit in der Vergangenheit liegt , wird
die Funktion zum ersten Mal am nächsten Kalendertag aktiviert.
Bitte schieben Sie den Schalter an der Rückseite des DF nicht in die POWER OFF Position. Versetzen Sie den DF lediglich in
den Standby Modus.
Page 28

DE - 24
Anzeige
Digitales TFT LCD
Display Größe: 7
Anzeigemodus: 4:3
Auflösung : 800*600 Pixel
Netzteil
Input: 100~240V AC, 50/60Hz
Output: 5V 1A DC
USB port
USB Host 2.0
Unterstützt USB Speichermedien
Unterstützte
Speicherkarten
SD (Secure Digital Card), MMC (MultiMedia Card), MS (Memory Stick)
Unterstütztes Bildformat
JPEG, Maximale Auflösung:8000*8000 pixels
Betriebstemperatur
-10°C ~ +40°C
Abmessungen
28.3*180.5*205 mm
Gewicht
600 gr
Zubehör
Fernbedienung (inkl. Batterie), Standfuß, Netzgerät, mehrsprachige Bedienungsanleitung
PRODUKT SPEZIFIKATIONEN
Page 29

DE - 25
PFLEGE UND WARTUNG
Pflege
Um die Gefa hr vo n elektris chen Stromstößen zu ver meiden, ent ferne n Sie bitt e weder die Schrauben noch da s Gehäuse.
Benutz en Sie dieses Gerät nic ht in der Nähe von Wasser. Setzen Sie d ieses Gerät weder Regen noch F euchtigkeit aus. Stell en Sie
keine Gegenstände in der Nähe des Gerätes ab , die Wa sser oder andere Flüs sigkeiten speichern.
Installi eren Sie diesen Bil derra hmen nicht in der Nähe von H eizungen, Öf en oder anderen Wärme abgebenden Geräte n.
Öffnen Sie da s Gehäuse ni cht. Versuc hen S ie bitte kei ne ei gene Reparatur. Überl assen Sie dies es dem Fachpersonal.
Vermeiden Sie die Benutzung auf sandig en Pl ätzen.
Bitte steck en Sie den Netzteil -Anschluss-Stecke r k omplett in die vorhandene Öffnung de s DF. Nur so könn en Sie elektr ostat ische
Aufladung vermei den.
Verbinden Sie alle Anschlüsse kor rekt un d sicher.
Bitte drück en Si e nic ht auf das Dis play. Schützen Sie das Display vor starker S onnen einstra hlung.
Der Bilderrahmen spielt nur k ompatible Dateiformate ab .
Bilder könn en durch Rec hte D ritter ges chütz t sei n. Das A bspielen ohne Lizenz kann Copyright Rechte v erletzen.
Bitte berühren Sie den DF wäh rend des B etriebes nic ht mi t met allischen Gegen ständen.
Bitte vermeiden Sie die Benu tzung auf Kissen, Sofas oder anderen Wohngege nständen , die eine Wärmeentwicklung unterstützen,
da die Gef ahr einer Überhi tzung des Gerätes besteh t.
Bitte entfernen Sie k eine Speicherkarten währ end des Lesevorganges. Anderenfalls kann es z u Systemabs türzen oder Datenverlust
kommen.
Bitte stellen Sie das Ge rät nicht währ end einer laufenden Diashow aus.
Bitte verpacken Sie das Ger ät nich t direkt nach einem länge ren Gebrauch. Stel len Sie eine ausreichend e Abkühlu ng sicher. Es
bes teht sonst die Gefahr der Überhitzung.
Um ein en bess eren Servi ce zu gewährleisten, kann es zu Ä nderungen in der Betriebsanl eitun g kom men.
Page 30

DE - 26
Wartung des Gerätes
DAS GERÄT MUSS AUSGESCHALTET SEIN.
SPRÜHEN ODER TRAGEN SIE NIEMALS EINE FLÜSSIGKEIT DIREKT AUF DAS DISPLAY ODER GEHÄUSE AUF.
Säuberung des Displays / Gehäuses / Rahmens
Wischen Sie Gehäuse, Rahmen und LCD Display vorsichtig mit einem weichen, fussel - und chemikalienfreien Tuch ab.
Verwenden Sie nur Reinigungsmittel, die speziell für LCD-Displays bestimmt sind.
Entsorgung von Elektro-Altgeräten
Die mit diesem Symbol gekennzeichneten Geräte unterliegen der europäischen Richtlinie 2002/96/EC.
Alle Elektro- und Elektroaltgräte müssen getrennt vom Hausmüll über die dafür vorgesehenen staatlichen Stellen entsorgt werden.
Mit der ordnungsgemäßen Entsorgung von Elektro-Altgeräten vermeiden Sie Umweltschäden.
Page 31

Operating Instructions
Intenso PhotoPilot
Page 32

i
Table of Contents
INTRODUCTION ......................................................................................................................................................................................................... 1
GENERAL PRODUCT CHARACTERISTICS ............................................................................................................................................................ 1
GENERAL PRODUCT CHARACTERISTICS ............................................................................................................................................................ 2
OVERVIEW ................................................................................................................................................................................................................. 3
REMOTE CONTROL .................................................................................................................................................................................................. 3
REMOTE CONTROL .................................................................................................................................................................................................. 4
INSERTING BATTERIES INTO REMOTE CONTROL .............................................................................................................................................. 5
FASTENING THE FRAME BASE ............................................................................................................................................................................... 5
FIRST STEPS.............................................................................................................................................................................................................. 6
USING MEMORY CARDS .......................................................................................................................................................................................... 7
WATCHING A SLIDE SHOW ...................................................................................................................................................................................... 8
MAIN MENU ................................................................................................................................................................................................................ 9
WATCHING PHOTOS ............................................................................................................................................................................................... 10
Starting a Slide Show ............................................................................................................................................................................................ 10
Displaying Individual Pictures ............................................................................................................................................................................... 12
Page 33

ii
Changing the Display Mode .................................................................................................................................................................................. 13
Using the OSD Menu ............................................................................................................................................................................................ 14
SETUP MENU ........................................................................................................................................................................................................... 16
Adjusting Date and Time ....................................................................................................................................................................................... 18
Activating Automatic Power On/Off ....................................................................................................................................................................... 19
CALENDAR DISPLAY ........................................................................................................................................................................................... 20
FAQs.......................................................................................................................................................................................................................... 21
PRODUCT SPECIFICATIONS.................................................................................................................................................................................. 24
SERVICE AND MAINTENANCE .............................................................................................................................................................................. 25
Page 34

GB - 1
We are not lia ble f or a ny dama ges or loss of dat a in the ca se o f ma lfunc tion , ma lope rati on o r if yo u re pair th e de vice yo urse lf . Pl eas e
do not dis asse mble the dev ice into ind ivid ual part s an d do not try to repa ir i t yo urse lf; in s uch a ca se g uara ntee will e xpire . So ftwa re, hard ware
an d th e op erat ing instr uct ions can be all subj ect to c hang e. We will not info rm y ou h ereo f an d re serv e al l r ights in this mat ter.
INTRODUCTION
Thank you for bu ying the Intenso’s DIGITAL PHOTO F RAM E ( DF ).
Before usin g this dev ice p lease ca refully read these operat in g ins truct ions and obse rve all sa fety notes. Please store these
ins tru ct ion s at a safe pla ce to have an answer at hand wheneve r you have questions . These ins tructions have been compiled
with great care to enable you to safely use al l functions o f the DF.
The DF a llo ws you watching digital photos directly fro m you r camera’s memory card. You can wa tch you r photos in a s lide show
mode p rovided by the photo frame. The DF is compatib le wi th the following c ard formats: SD™ (Secure Digital ), SDHC™
(Secure Dig ital High Capac ity), MMC™ (Multimedia Card), M S™ (Memory S tick) and USB flash d rive.
Page 35

GB - 2
GENERAL PRODUCT CHARACTERISTICS
Decorative appearance, excellent quality
Shows pictures (JPEG) without requiring a computer
Automatic slide show with transition effects and individual display duration
Calendar function
Timer function
Compatible with SD / MMC / MS cards
USB slot to connect USB flash drives
2-way control: 7 buttons on the rear side of the DF, infrared remote control
Page 36

GB - 3
1 Infrared sensor
2 SD / MMC / MS – card slot
3 USB host
4 DC 5V 1A input
5 Power on/off
6 Frame base
7 Up/Back [] button
8 Left [] button
9 Menu [M] button
10 Play/Enter [] button
11 Right [] button
12 Down/Next [] button
13 Stop/End [ ] button
OVERVIEW
Page 37

GB - 4
-{}-
1
Power On/ Off
2
Moves the cursor upwards in the selection menu
Tilts the picture in clockwise direction by 90 degree in the slide show mode.
3
Moves the cursor to the left in the selection menu or back to the previous picture in the slide show mode
4
MENU
Starts the main menu
5
Moves the cursor downwards in the selection menu
Tilts the picture in the slide show mode by 90 degree in anti-clockwise direction.
6
Leaps back to the previous picture in the slide show or back to the previous page in the picture preview
menu
7
Zoom in Magnifies picture details
8
4:3/ 16:9
Selection of display screen: 4:3 , 16:9
9
SETUP
Starts the setup menu
10
OK
Confirms the selection. Start/pause of slide show
11
Moves the cursor to the right in the selection menu or leaps to the next picture in the slide show menu
12
OSD
Displays the On-Screen-Display (OSD) during slide show
13
Leaps back to the previous menu
14
Leaps to the next picture in the slide show or to the next page in the picture preview menu
15
Start of slide show
REMOTE CONTROL
Page 38

GB - 5
INSERTING BATTERIES INTO REMOTE CONTROL
Turn your remote control upside down with the buttons facing down.
There is a spring on the left side of the battery compartment. Hold it to the right and simultaneously pull out the battery compartment.
Insert a CR2025 Lithium battery to the battery compartment with the Plus symbol facing upwards.
Reinsert the battery compartment into the housing of the remote control.
Please note: Please dispose batteries according to legal regulations.
FASTENING THE FRAME BASE
Turn the frame base in anticlockwise direction to select the so-called scenery or portrait position.
Page 39

GB - 6
FIRST STEPS
Connect the frame base to the DIGITAL PHOOTE FRAME ( DF ).
Connect the mains adapter provided with the DF. Plug the other end of the provided mains adapter into the power outlet.
Move the slider of the DF into “ON” position.
Using the device for the first time please select the Language in the appearing window by use of the keys on the rear side or the remote
control. Confirm your selection with the [] button on the rear side or the OK –button on the remote control.
Page 40

GB - 7
USING MEMORY CARDS
Insert SD / MMC / MS cards into the 3-in-1 card slot with the contacts facing the display. USB storage mediums can be connected with the
DIGITAL PHOTE FRAME by inserting these mediums into the USB port (USB host).
Please note:
Please do not insert memory cards by use of force.
The 3-in-1 card reader can only read one card at a time. Thus, please connect only one SD / MMC or MS card with the photo frame at a
time.
To disconnect inserted cards from the DIGITAL PHOTO FRAME remove them carefully from the card slot. (Please note: SD and MMC
cards have a small notch in cross direction. By use of your finger nail you can remove the card from the slot)
Page 41

GB - 8
Press the MENU button on the rear side of the DF or on the remote control and then the
[],[] buttons on the rear side of the DF or the ▲, ▼ buttons on the remote control to
start the storage medium connected, the setup menu or the calendar.
Please note:
If a storage medium is connected to the DF the slide show will start automatically after power on.
If more than one storage medium is connected with the photo frame, after power on the DF will at first read the pictures from the SD /
MMC or MS cards.
WATCHING A SLIDE SHOW
After power-on you will be guided directly to the main menu.
If a memory card or a USB memory stick is connected to the DF, the slide show will start directly after power on.
Page 42

GB - 9
Menu
Description
USB
Displayed if a USB medium is connected.
SD/MMC/MS
Displayed if a SD, MS or MMC card is connected.
Clock
Display of calendar or time
Setup
Menu to make individual settings.
2. Press the [], [] buttons on the DF or the ▲,▼ buttons on the remote control to
select a storage medium or a menu item.
3. Confirm your selection by pressing the [] button on the DF or the OK –button on
the remote control.
MAIN MENU
In the main menu you can select the storage mediums connected, the setup menu and the calendar.
1. 1. Press the MENU -button on the rear side of the DF or on the remote control to access the main menu.
Page 43

GB - 10
WATCHING PHOTOS
Starting a Slide Show
In each menu you can use the [ ] button on the remote control to start the slide show, starting with the first photo. To stop the slide show and
to display individual photos please press the [] button on the DF or the OK-button on the remote control. By repeatedly pressing the []
button on the DF or the OK-button on the remote control you can proceed with the slide show.
Press the [] button on the remote control or the [ ] button on the DF to leave the slide show and to access the picture preview
menu.
Press the MENU-button on the remote control or on the DF to leave the slide show and to access the main menu.
Please note:
If an additional storage medium is inserted when watching a slide show, the slide show will automatically leap to the first picture of the
new storage medium and the slide show will start with this picture.
If a SD/MMC/MS-card and a USB drive are connected to the DF at the same time, only the pictures selected on the relevant medium
will be continuously played during the slide show. The individual storage mediums are not automatically played one after the other in
the slide show.
Page 44

GB - 11
Picture Preview Menu
The pictures on the storage medium selected are depicted as thumbnails. It is possible to
display up to 15 pictures at a time.
1. In the main menu please select a storage medium (USB, SD/MMC/MS) and press
the OK-button on the DF or on the remote control.
2. To navigate within the thumbnails please use the [],[],[],[] buttons on the DF
or the , , , buttons on the remote control. To directly access the next
preview page please use the or button on the remote control.
Picture Preview Menu
Please note:
During a slide show or the picture single view mode you can also access the picture preview menu by pressing the [
remote control or the [ ] button on the DF.
] button on the
Page 45

GB - 12
Displaying Individual Pictures
You can select individual pictures without starting a slide show.
1. In the picture preview menu please select a picture and press the [] button on the DF or the OK-button on the remote control. The
picture is now displayed in full screen mode. Now please press the [] button on the DF or the OK-button on the remote control within
the selected display time. Now you will see the symbol in the screen’s lower left corner. For the selected notification time (see page
17).
To display previous or following pictures please press the [], [] buttons on the DF or the , buttons on the remote
control.
To rotate pictures please press the [], [] buttons on the DF or the , buttons on the remote control.
To display a picture with a magnification, please repeatedly press the button on the remote control. If the picture is displayed
as a magnified version, you can vary the depicted display window by using the [], [], [], [] buttons on the DF or the ,
, , buttons on the remote control.
2. To return to the picture preview menu please press the [] button.
3. Press the [] button on the DF or the OK-button on the remote control to start the slide show, starting with the selected photo.
Page 46

GB - 13
Changing the Display Mode
While watching a picture or during the slide show you can change the display mode by repeatedly pressing the [4:3/16:9] button on the remote
control.
4:3: With this selection a picture which is saved in the 16:9 or a larger format is stretched and displayed as full screen picture.
16:9: With this selection a picture which is saved in the 16:9 or a larger format is displayed in its original format with a black bar at the
upper and lower margin.
Please note:
A photo which is saved in the 4:3 format can only be depicted in the format 4:3.
This function is not possible with photos whose resolution is lower than 800X600 pixels.
Page 47

GB - 14
Using the OSD Menu
You can use the OSD menu carry out the following functions.
1. Press the [OSD] button on the remote control when watching a picture or a slide show. The OSD menu will appear on the display and
the slide show will be stopped.
2. Press the [], [] buttons on the DF or the , buttons on the remote control to navigate between the functions.
To stop or continue the slide show please select the symbol and press [] on the DF or OK on the remote control. The
(Play) symbol in the OSD-menu will be replaced by the (Pause) symbol.
To enlarge the picture please select the symbol and press the [] button on the DF or OK on the remote control. If the
picture is displayed as magnified version, you can vary the depicted display window using the [], [], [], [] buttons on the
DF or the , , , buttons on the remote control.
To rotate the picture by 90 degrees in clockwise direction please select the symbol and press the [] button on the DF or
OK on the remote control.
Page 48

GB - 15
To rotate the picture by 90 degrees in anti-clockwise direction please select the symbol and press the [] button on the DF
or OK on the remote control.
By use of the symbol you can change between the 4:3 or 16:9. By pressing [] on the DF or OK on the remote control you
can confirm the format change.
See also at: “Changing the Display Mode (page 13)”
By selecting the symbol and pressing [] on the DF or OK on the remote control the displayed picture will be deleted and
removed from the data medium. ( PLEASE NOTE: Prior to deleting there will be no security query !! )
By selecting the symbol and pressing [] on the DF or OK on the remote control the DF will continue with the slide show.
Page 49

GB - 16
1. In the main menu please select the menu item SETUP and confirm your selection
with the [] button on the DF or the OK-button on the remote control. You can also
access this menu by pressing the [SETUP] button on the remote control.
2. To select a menu item please press the [], [] buttons on the DF or the ,
buttons on the remote control.
3. To change the relevant setting please press the [], [] buttons or the [] button
on the DF, alternatively the, buttons on the remote control and confirm your
selection by pressing the [] button on the DF or the OK-button on the remote
control.
4. To leave the menu please press the [ ] button on the DF or the [] button on the
remote control.
SETUP MENU
You can individually adjust the configuration of the DIGITAL PHOTFRAME ( DF ).
Page 50

GB - 17
Settings
Description
Display duration
Select how long a picture is displayed during a slide show.
Settings: 3 sec., 5 sec., 15 sec., 1 min., 15 min.
Picture transitions
Select from random and continuous transition modes
Clock settings
Select the display mode of your calendar / clock. Options: Monthly calendar, digital clock, analogue clock
Time settings
Adjusting the time.
Date settings
Adjusting the calendar
Language
Select your preferred language.
Brightness
Adjusts the brightness of the TFT display. Options: -3, -2, -1, 0, 1, 2, 3.
Contrast
Adjusts the contrast of the TFT display. Options: -3, -2, -1, 0, 1, 2, 3.
Colour saturation
Adjusts the colour saturation of the TFT display. Options: -3, -2, -1, 0, 1, 2, 3.
Display time
Specify how long the notification window of the key’s functions is displayed in the slide show mode and the
status (pause) or (play) in the lower picture. Options: 0 sec., 5 sec., 10 sec., 20 sec.
Autom. Power-on
Enables automatic power-on. Once / daily.
Autom. Power-off
Enables automatic power-off. Once / daily.
Default setting
Device is reset to factory settings.
Page 51

GB - 18
Adjusting Date and Time
How to adjust date and time on the Intenso DF:
1. In the main menu select the menu item SETUP.
2. Press the [], [] buttons on the DF or the , buttons on the remote control to select the menu item Time.
3. Press the [], [] buttons on the DF or the , buttons on the remote control to select the next or previous element (hour, minute).
Press the [], [] buttons on the DF or the , buttons on the remote control to adjust the desired values.
4. To confirm your entries please press the button [] on the rear side of the DF or the OK-button on the remote control.
How to adjust the date on the Intenso DF:
1. Press the [], [] buttons on the DF or the , buttons on the remote control to select the menu item Date.
2. Press the [], [] buttons on the DF or the , buttons on the remote control to select the next or previous element (month, day,
year). Press the [], [] buttons on the DF or the , buttons on the remote control to adjust the desired values.
3. To confirm your entries please press the button [] on the rear side of the DF or the OK-button on the remote control.
Page 52

GB - 19
Activating Automatic Power On/Off
You can have Intenso’s DIGITAL PHOTO FRAME switch on/off automatically at a preset time.
Please note: This function requires setting the correct time in advance.
1. In the main menu select the menu item SETUP.
2. Press the [], [] buttons on the DF or the , buttons on the remote control to select the menu item autom. power-on or autom.
power-off.
3. Press the [], [] buttons on the DF or the , buttons on the remote control to select the next or previous element (hour, minute).
Press the [], [] buttons on the DF or the , buttons on the remote control to adjust the desired values and the time.
Off: Disables automatic power-on/off.
On: The DIGITAL PHOTO FRAME switches on and/or off at the preset time.
4. To confirm your entries please press the button [] on the DF or the OK-button on the remote control.
Page 53

GB - 20
1. In the main menu select the menu item CLOCK.
2. To leave the calendar mode please press the [] button.
Please note:
Date and time can only be set in the Setup menu.
By pressing the [] button on the rear side of the DF or
the OK-button on the remote control the display can show the Monthly Calendar,
the Digital Clock or the Analogue Clock.
By pressing the [], [] buttons on the rear side of the DF or
, the buttons on the remote control the calendar
can show the next months or leap back to the previous one.
CALENDAR DISPLAY
The calendar mode displays the current date, the current time and a slide show with thumbnails in the background.
Page 54

GB - 21
FAQs
Why is the actua l capacity of a me mory card less than specified on the pack aging ?
The s torage capac ity of a flash stora ge medium is spe cifie d according to capacity specifications for hard dr ives and is subje ct to
the SI regulations (In ternationa l System of Un its). This system does n ot use the binary sys tem, wh ich converts 1024 MB into o ne
1 GB. The SI standard u ses the powe rs of 1000, where 1000 Mega byte make 1 Gigab yte. Due to this d ifferent way of c alculation,
capacity sp ecification might be different.
Why do es the DF not d isplay s ome p ictures of my memory card?
Some not so widespread storage mediums are not compatib le with the DF. Please use a comp atible card. Please bear in mind
tha t this pho to frame can only play photos with the f ile format “JPEG”.
A me mory card is inser ted but the DF cannot read this card . Wha t c an I do ?
At first please check if this card is actually compatible with Intenso's DIGITAL PHOT OFRAME.
Then, please check if the card is properly inserted into the card slot. Please bear in mind that only the file forma t „JPEG“ is
supported.
Please note: Some dig ital cameras d o no t sa ve pictures by use o f the standard format JPEG. In such a case pleas e re fer to the
ope rating manual of y our came ra.
Page 55

GB - 22
Why are some pictures lo aded faste r than o thers ?
Pictures with a h igh resolu tion need longer times to be di splay ed. To increase the loading speed pleas e use p ictures with a l ower
resolution.
Please note: The photo frame supports a resolution of up to 8000*8000 pixels.
Why do es the sof twa re not sta rt althoug h power supply is ensured an d the power s witch is in “On” position?
This might be a system error. Please reset the softwa re by cutt ing o ff power su pply for a few seconds.
Why is the main menu not displayed?
Please chec k if the DF is prope rly connected to the power outlet and the power s witch is in “On” pos ition.
Can I rotate pic tures on the display?
Yes, please use your arrow keys [], [] on the DF or the , buttons on the remote control.
Please note : With a new start the ro ta ted p icture w ill b e displayed in norma l mode aga in.
Can I adjus t the colours of pictures?
No. All colours are set when the picture is b eing taken . However, you can adjus t the br igh tness and the con trast of the displ ay.
Howeve r, you ca n adjus t the brightn ess a nd the con trast of the display.
Page 56

GB - 23
What is the idea l resolution to disp lay pictures on th e DF?
The ideal resolu tion for this DF is 800*600 pixels.
Why do the functions: Automatic power-on / off not work although I have enabled them?
Please make sure your time settings are correc t. If the set time is in the past, the function will be enabled on the next cal endar
day for the first tim e.
Please do not move the slider on the rear side of the DF into POW ER OFF position. Only chan ge the status of the DF into
standb y.
Page 57

GB - 24
Dis play
Dig it al TFT LCD
Dis play s ize: 7” inch
Dis play modus : 4:3
Resolutio n: 800*600 pixe ls
Mains a dapt er
Input: 100~240V AC, 50/60H z
Output: 5 V 1A DC
USB p or t
USB Hos t 2.0
Support s USB storag e mediums
Memory cards
supported
SD™ ( Se cu re D ig ital Card), MMC™ (MultiM edia Card) , MS™ (Me mory S tick)
Pic tu re s ize supported
JPE G, max . re solution:80 00 *800 0 pixels
Operating t empe rature
-10°C ~ + 40 °C
Dim en sion s
28.3* 180. 5*205 mm
Weight
600 g ram
Acc esso ry
Remote co ntro l (incl. ba ttery), fo ot , mains adapt er , mu lti-ling ua l operating ins truction
PRODUCT SPECIFICATIONS
Page 58

GB - 25
SERVICE AND MAINTENANCE
Servic e
To avoid risk s of el ectri c shock s pleas e do no t re move sc re ws or the h ousing.
Do not us e the d evice i n the v ic inity of wat er. Do not expo se the devic e to ra in o r mois ture. Do n ot pl ace any obje cts in the vicinit y of
the devi ce that s tor e wat er or any ot her l iqui ds.
Do n ot inst all thi s pic ture fr ame i n the vici nity of heating sys tems, oven s or othe r hea t emittin g dev ices.
Do not op en th e housing. Do not tr y to re pa ir the devic e yours elf. Le ave a ny repairs to speci alise d per so nnel only.
Av oid u sing yo ur devi ce o n s andy pl aces.
Pl ease do pro per ly connec t the plu g of the ma ins adapt or to the existing ope ni ng of the D F. Thus , yo u ca n avoid electro -static
charge.
Plug i n all conn ec tions c orrec tl y and safely.
Pl ease do not to uch t he di splay. D o not e xpose the d is play to direct sunl ig ht.
The picture fram e only pl ays compati ble fil e formats .
Pi ct ures might be pr otect ed by co pyright law of t hi rd p ar ties. Playi ng such picture s wit hout licenc es might repres ent an infringement
of such co pyrig ht laws .
Please do n ot to uch the DF wit h met all ic ob ject durin g ope ra tion.
Please avoi d operation on pill ows, sofas or any other heat e mi tti ng home a pplianc es si nc e the d evic e m ig ht ov er heat in such c ases.
Pl ease do not remo ve memor y car ds while the devic e i s readi ng. Otherwis e this might resul t i n abn ormal syst em ends or loss of
dat a.
Please do n ot switch off the d evice with the sli de sh ow ru nning.
Pl ease d o not di rectl y wrap the de vice aft er l onger operati ng hours . Please make su re the devi ce has cool ed down p roper ly.
Other wise the dev ic e mig ht ov erheat.
To guara ntee better ser vice th is oper ating inst ructi on is subj ect t o alter ation s.
Page 59

GB - 26
Device Main tenance
THE DEVICE MUST BE SWITCHED OF F.
NEV ER SPRAY OR AP PLY L IQUID SUBSTANCES DIR ECT LY ONTO THE D ISPLAY OR THE HOUSING.
Cleaning th e display / hou sing / frame
Cle an the housing , frame and LCD display carefully with a soft clo th whic h is fre e of lin t and chemical s. Only use cle aning
agents wh ic h are suitabl e fo r cleaning LCD displays.
Dispos al of WEEE (Waste Electrical and Electronic Equipmen t)
Devices marked with the WEEE logo are subject to the European Community Directive 2002/96/EC.
Waste Electrical and Electronic Equipment must be separated from household rubbish and disposed at sites that collect WEEE.
By orderly disposing WEEE you will avoid damage caused to the environment.
Page 60

Istruzioni d„uso
Intenso PhotoPilot
Page 61

i
Indice
INTRODUZIONE ......................................................................................................................................................................................................... 1
CARATTERISTICHE GENERALI DEL PRODOTTO ................................................................................................................................................. 2
RIEPILOGO ................................................................................................................................................................................................................. 3
TELECOMANDO ........................................................................................................................................................................................................ 4
INSERIMENTO DELLA BATTERIA NEL TELECOMANDO ...................................................................................................................................... 5
FISSAGGIO DEL PIEDINO ........................................................................................................................................................................................ 5
I PRIMI PASSI ............................................................................................................................................................................................................. 6
USO DI SCHEDE DI MEMORIA ................................................................................................................................................................................. 7
GUARDARE UN DIASHOW ....................................................................................................................................................................................... 8
MENU PRINCIPALE ................................................................................................................................................................................................... 9
GUARDARE FOTO ................................................................................................................................................................................................... 10
Visualizzare un diashow........................................................................................................................................................................................ 10
Visualizzazione di una singola immagine ............................................................................................................................................................. 12
Modificare il modo di visualizzazione.................................................................................................................................................................... 13
Uso di menu OSD ................................................................................................................................................................................................. 14
Page 62

ii
MENU SETUP ........................................................................................................................................................................................................... 16
Impostare data e orario ......................................................................................................................................................................................... 18
Attivare accensione e spegnimento automatici .................................................................................................................................................... 19
VISUALIZZAZIONE DEL CALENDARIO .............................................................................................................................................................. 20
DOMANDE FREQUENTI .......................................................................................................................................................................................... 21
SPECIFICAZIONI DEL PRODOTTO ........................................................................................................................................................................ 24
CURA E MANUTENZIONE ....................................................................................................................................................................................... 25
Page 63

IT- 1
No n si amo res pons abil i pe r i dan ni o l a pe rdit a di dat i n el cas o di u n ma lfun zion amen to, un uso sco rret to o r ipar azio ni p ropr ie
de ll‟app arecchia tura . L a p regh iamo di no n s mont are l‟a ppar ecch iatu ra in comp onen ti sing ole e di non cer care di ri para rla vis to che in que sto
ca so la gara nzia vie ne ann ullata. Il sof twar e, hard ware o le istruz ioni d‟us o p osso no essere so gget ti a m odif iche . Non da remo in form azio ni a
ri guar do. Ci r iserv iam o tu tti i dir itti in q ues to se nso .
INTRODUZIONE
Grazie d i a ver d eciso di a cquistare una CORN ICE DI F OTO DIGITALE ( CF ) di Intenso.
Prima di ut ilizzare q uest‟apparecchiatu ra , La pre gh iamo di legge re a fon do qu este istruzioni d‟uso e d i attene rsi alle avvert enze.
Raccomandiamo di conservare in un luogo sicuro ques te is truzioni a l fine di poter rispondere in modo indipe ndente a even tuali
domande. Il contenuto di ques te istruzioni è stru ttura to in mo do tale che Lei possa utiliz zare in mo do sicuro tutte le funzio ni de lla
CF.
La CF Le permette di guardare le foto digitali d irettamente dalla scheda d i memoria della Sua videocamera. Può guardare le Sue
foto median te la funz ione diashow messa a di sposizione da lla Sua co rnice di foto. La CF è compa tibile con i seguent i formati di
schede : SD™ (Se cure Digital), SDHC™ (Secure Dig ital di al ta capacità) , MMC™(sch eda mul timed iale), MS™ (chia ve di memoria)
e chiave USB.
Page 64

IT- 2
CARATTERISTICHE GENERALI DEL PRODOTTO
Aspetto decorativo, alto livello qualitativo
Visualizzazione di foto (JPEG) senza computer
Diashow automatico con effetti di passaggio e durata di visualizzazione personalizzata
Funzione calendario
Funzione timer
Compatibile con schede SD / MMC / MS
Porta USB per il collegamento di memorie di massa USB
2 percorsi di comando: 7 tasti sul retro della CF, telecomando infrarosso
Page 65

IT- 3
1 Sensore infrarosso
2 Schede Slot SD / MMC / MS
3 Host Slot USB
4 Entrata DC 5V 1A
5 Power Accesso/Spento
6 Piedino
7 Tasto avanti/indietro []
8 Tasto destra []
9 Tasto menu [M]
10 Tasto Play/Enter []
11 Tasto [] sinistra
12 Tasto giù/su []
13 Tasto interruzione/fine [ ]
RIEPILOGO
Page 66

IT- 4
1
Power acceso/ spento
2
Muove il cursore verso l‟alto nel menu di selezione
Capovolga l‟immagine in senso orario a 90 gradi nel modo diashow.
3
Muove il cursore verso sinistra nel menu di selezione o indietro verso l‟immagine prec. nel modo diashow
4
MENU
Richiamare il menu principale
5
Muove il cursore verso il basso nel menu di selezione
Capovolga l‟immagine in senso antiorario a 90 gradi nel modo diashow.
6
Ritorno alla foto precedente nel diashow o indietro alla pagina precedente nel modo anteprima immagine
7
Zoom In Ingrandisce una sezione dell„immagine
8
4:3/ 16:9
Selezione della visualizzazione immagine: 4:3 , 16:9
9
SETUP
Richiamare il menu setup
10
OK
Confermare la selezione. Avvio/interruzione del diashow
11
Muove il cursore verso destra nel menu di selezione o indietro verso l‟immagine successiva nel modo
diashow
12
OSD
Visualizzazione dello schermo on-screen (OSD) durante il diashow
13
Ritorno al menu precedente
14
Passaggio alla foto successiva nel diashow o passaggio alla pagina successiva nel menu anteprima
immagini
15
Avvio del diashow
TELECOMANDO
Page 67

IT- 5
INSERIMENTO DELLA BATTERIA NEL TELECOMANDO
Posizioni il telecomando con i tasti verso il basso.
Prema la molla a sinistra del comparto delle batterie verso destra, estraendo allo stesso tempo
il comparto delle batterie.
Inserisca una batteria di litio CR2025 con il simbolo più verso l‟alto nel comparto delle batterie.
Inserisca nuovamente tutto il comparto delle batterie nell‟involucro del telecomando.
La preghiamo di attenersi a quanto segue: La preghiamo di assicurare uno smaltimento delle batterie
corrispondente alle prescrizioni legali.
FISSAGGIO DEL PIEDINO
Ruoti il piedino in senso antiorario per selezionare la cosiddetta posizione paesaggio o ritratto.
Page 68
IT- 6
I PRIMI PASSI
Fissi il piedino sulla CORNICE DI FOTO DIGITALE ( CF ).
Colleghi il componente di rete fornito con la CF. Inserisca l‟altra estremità del componente di rete nella presa.
Posizioni il regolatore della CF nella posizione “ON“.
Per la prima messa in funzione, La preghiamo di selezionare l‟idioma dopo la prima accensione nella finestra che appare mediante i tasti
sul retro o con il telecomando. Confermi la Sua selezione con il tasto [] sul retro oppure con il tasto OK del telecomando.
Page 69

IT- 7
USO DI SCHEDE DI MEMORIA
Inserisca le schede SD / MMC / MS con i contatti in direzione dello schermo nello slot di 3 carte in 1. Colleghi le chiavi USB con la CORNICE
DI FOTO DIGITALE, inserendo le chiavi nella porta USB (host USB).
Avviso:
La preghiamo di non inserire le schede di memoria con forza.
L’apparecchiatura di lettura 3 carte in 1 riesce a leggere sempre una carta alla volta.
La preghiamo di collegare sempre una scheda SD / MMC o MS contemporaneamente con la cornice di foto.
Per separare le schede collegate con la CORNICE DI FOTO DIGITALE, le estragga con cautela dallo slot delle schede. (Avviso:
schede SD e MMC dispongono di un intaglio in direzione trasversale della scheda. Qui si può utilizzare un’unghia per facilitare
l’estrazione dallo slot).
Page 70

IT- 8
Prema il tasto MENU sul retro della CF o sul telecomando e in seguito i tasti [],[] sul retro
della CF oppure i tasti ▲, ▼ sul telecomando per richiamare il mezzo di memoria collegato,
il set up o il calendario.
Avviso:
Se un mezzo di memoria è stato inserito nella CF, il diashow si avvia direttamente dopo l‘accensione.
Se sono stati collegati diversi mezzi di memoria con la cornice di foto, la CF dopo l’accensione innanzitutto leggere le immagini delle
schede SD / MMC oppure MS.
GUARDARE UN DIASHOW
Dopo l‟accensione Lei si trova direttamente sul menu principale.
Se ha collegato una scheda di memoria o una chiave USB con la CF, il dia show si avvia direttamente dopo l‟accensione.
Page 71

IT- 9
Menu
Descrizione
USB
Appare quando è collegata una chiave USB.
SD/MMC/MS
Appare, quando è collegata una scheda SD, MS oppure
MC.
Orologio
Visualizzazione del calendario e dell„orario
Setup
Menu per eseguire impostazioni personalizzate.
2. Prema i tasti [],[] sulla CF oppure i tasti ▲,▼ sul telecomando per selezionare
un mezzo di memoria o un menu.
3. Confermi la Sua selezione, premendo il tasto [] sulla CF o il tasto OK sul
telecomando.
MENU PRINCIPALE
Nel menu principale Lei può scegliere tra i mezzi di memoria collegati, il calendario e il set up.
1. Prema il tasto MENU sul retro della CF o sul telecomando per richiamare il menu principale.
Page 72

IT- 10
GUARDARE FOTO
Visualizzare un diashow
In ogni menu Lei può utilizzare il tasto [ ] del telecomando per avviare il diashow che inizia rispettivamente con la prima foto. Per interrompere
il diashow e per visualizzare una singola foto, prema il tasto [] sulla CF oppure il tasto OK sul telecomando. Premendo nuovamente il tasto
[] sulla CF oppure il tasto OK del telecomando, il diashow continua.
Prema il tasto [] del telecomando o il tasto [ ] della CF per abbandonare il diashow e per giungere il menu di anteprima immagini.
Prema il tasto MENU sul telecomando oppure sulla CF per abbandonare il diashow e raggiungere il menu principale.
Avviso:
Se durante la riproduzione del diashow si utilizza un altro mezzo di memoria, il diashow passa automaticamente alla prima imm agine
del nuovo mezzo di memoria, avviando il diashow a partire da quest’immagine.
Se sono collegate contemporaneamente alla CF una scheda SD/MMC/MS e una chiave USB, durante la diashow vengono riprodotti
sempre e in modo continuativo solo tutte le immagini del mezzo selezionato. I rispettivi mezzi di memoria non vengono
automaticamente riprodotto in sequenza durante il diashow.
Page 73

IT- 11
Menu anteprima immagini
Le immagini del mezzo di memoria selezionato vengono rappresentate quali immagini
miniatura. Si possono visualizzare fino a 15 immagini in contemporanea.
1. Nel menu principale selezioni un mezzo di memoria (USB, SD/MMC/MS), premendo
dunque il tasto OK sulla CF o sul telecomando.
2. Per navigare tra le immagini miniatura, utilizzi i tasti [],[],[],[] sulla CF oppure
i tasti , , , del telecomando. Per giungere direttamente alla prossima
pagina di anteprima, La preghiamo di utilizzare i tasto o del telecomando.
Menu anteprima immagini
Avviso:
Anche premendo il tasto [
visualizzazione singola, raggiunge il menu di anteprima delle immagini.
] sul telecomando o il tasto [ ] sulla CF durante il diashow o la riproduzione delle immagini in
Page 74

IT- 12
Visualizzazione di una singola immagine
Può selezionare un‟unica immagine.
1. Scelga un‟immagine nel menu di anteprima delle immagini e prema il tasto [] sulla CF oppure il tasto OK sul telecomando.
L‟immagine viene visualizzata nel modo di immagine completa. Riattivi dunque, entro la durata di visualizzazione selezionata, il tasto
[] sulla CF oppure il tasto OK del telecomando. Vede ora il simbolo nell‟angolo inferiore sinistro dello schermo. Per il tempo di
avviso selezionato (vedi pagina 17).
Per visualizzare le foto precedenti o successive, prema i tasti [], [] sulla CF oppure i tasti , del telecomando.
Per ruotare l‟immagine prema i tasti [], [] sulla CF oppure i tasti , del telecomando.
Per visualizzare un‟immagine ingrandita prema ripetutamente il tasto sul telecomando. Se un‟immagine viene visualizzata
ingrandita, con i tasti [], [], [], [] sulla CF oppure i tasti , , , del telecomando Lei può variare la sezione
dell‟immagine rappresentata.
2. Per ritornare al menu di anteprima immagini prema il tasto [].
3. Prema il tasto [] sulla CF o il tasto OK del telecomando per avviare il diashow a partire dalla foto selezionata.
Page 75

IT- 13
Modificare il modo di visualizzazione
Mentre guarda un‟immagine o durante il diashow, Lei può cambiare il modo di visualizzazione, premendo ripetutamente il tasto [4:3/16:9] del
telecomando.
4:3: Nel caso di questa selezione, un‟immagine salvata nel formato 16:9 oppure maggiore, viene visualizzata in modo esteso
oppure quale immagine completa.
16:9: Nel caso di questa selezione, un‟immagine salvata nel formato 16:9 oppure maggiore, viene visualizzata in formato originale
con una fascia nera sul bordo superiore ed inferiore.
Avviso:
Una foto salvata nel formato 4:3 può anche essere rappresentata nel formato 4:3.
Questa funzione non è attiva nel caso di foto con risoluzione inferiore ai 800X600 Pixel.
Page 76

IT- 14
Uso di menu OSD
Lei può utilizzare il menu OSD per eseguire le azioni riportate qui a seguito.
1. Prema il tasto [OSD] sul telecomando mentre guarda un‟immagine o un diashow. Il menu OSD appare sullo schermo e il diashow
viene interrotto.
2. Prema i tasti [], [] sulla CF o i tasti , del telecomando per navigare tra le funzioni.
Per interrompere o proseguire il diashow La preghiamo di selezionare il simbolo e di premere [] sulla CF o OK sul
telecomando. Il simbolo (play) nel menu OSD viene sostituito dal simbolo (pause).
Per ingrandire la foto La preghiamo di selezionare il simbolo e di premere [] sulla CF o OK sul telecomando. Se
un‟immagine viene visualizzata a dimensioni ingrandite, Lei può variare la sezione rappresentata dell‟immagine mediante i tasti
[],[],[],[] sulla CF o i tasti , , , del telecomando.
Per ruotare la foto di 90 gradi in senso orario La preghiamo di selezionare il simbolo e di premere [] sulla CF oppure OK
sul telecomando.
Page 77

IT- 15
Per ruotare la foto di 90 gradi in senso antiorario La preghiamo di selezionare il simbolo e di premere [] sulla CF oppure
OK sul telecomando.
Mediante il simbolo si seleziona il passaggio tra 4:3 / 16:9. Premendo [] sulla CF oppure OK sul telecomando si esegue
il passaggio da un formato all‟altro.
Cfr. tra l‟altro: “Modificare il modo di visualizzazione (pagina13)"
Selezionando il simbolo e premendo [] sulla CF oppure OK sul telecomando, l‟immagine visualizzata viene eliminata dal
supporto dei dati. (ATTENZIONE: Non si ha nessuna richiesta di sicurezza aggiuntiva prima dell„eliminazione!!)
Selezionando il simbolo e premendo [] sulla CF oppure OK sul telecomando, la CF continua il diashow.
Page 78

IT- 16
1. Selezioni il punto del menu SETUP nel menu principale e confermi la Sua selezione
con il tasto [] sulla CF oppure con il tasto OK del telecomando. Inoltre, premendo
il tasto [SETUP] del telecomando, Lei giunge direttamente in questo menu.
2. Per selezionare un‟impostazione, prema i tasti [], [] sulla CF o i tasti , sul
telecomando.
3. Per modificare la rispettiva impostazione prema i tasti [], [] o il tasto [] sulla
CF, in alternativa i tasti , o il tasto OK del telecomando, confermando dunque
la Sua selezione premendo il tasto [] sulla CF o il tasto OK del telecomando.
4. Per abbandonare il menu prema il tasto [ ] sulla CF oppure il tasto [] sul
telecomando.
MENU SETUP
Lei può impostare in modo personalizzato le impostazioni di sistema della CORNICE DI FOTO DIGITALE (CF).
Page 79

IT- 17
Possibili impostazione
Descrizione
Durata di visualizzazione
Selezioni per quanto tempo un‟immagine deve essere visualizzata durante un diashow.
Possibili impostazioni: 3 sec., 5 sec., 15 sec., 1 min., 15 min.
Passaggi d„immagine
Scelga tra il passaggio d‟immagine casuale e continuativo
Impostazione orologio
Selezioni la forma di visualizzazione per il Suo calendario/orologio. Possibili impostazioni: calendario
mensile, orologio digitale, orologio analogico
Impostazione orario
Impostare l„orario.
Impostazione data
Impostare il calendario
Idioma
Scelga l‟idioma da Lei desiderato.
Luminosità
Impostazione della luminosità dello schermo TFT. Possibili impostazioni: -3, -2, -1, 0, 1, 2, 3.
Contrasto
Impostazione del contrasto dello schermo TFT. Possibili impostazioni: -3, -2, -1, 0, 1, 2, 3.
Saturazione cromatica
Impostazione della saturazione cromatica dello schermo TFT. Possibili impostazioni: -3, -2, -1, 0, 1, 2, 3.
Durata avviso
Selezioni per quale durata l‟avviso riguardante le funzioni dei tasti nel modo diashow e lo stato (pause)
e/o (play) devono essere mostrati nell‟immagine inferiore. Possibili impostazioni: 0 sec., 5 sec., 10 sec.,
20 sec.
Accensione autom.
Attivi l‟accensione automatica. Una volta / ogni giorno.
Spegnimento autom.
Attivi lo spegnimento automatico. Una volta / ogni giorno.
Impostazione fabbrica
L‟apparecchiatura viene risettata sulle impostazioni di fabbrica.
Page 80

IT- 18
Impostare data e orario
Imposti l‟orario sulla CF di Intenso:
1. Selezioni il punto del menu SETUP nel menu principale.
2. Prema i tasti [], [] sulla CF oppure i tasti , sul telecomando per selezionare l‟inserimento dell„orario.
3. Prema i tasti [], [] sulla CF oppure i tasti , sul telecomando per selezionare il prossimo elemento o quello precedente (ora,
minuto). Prema i tasti [], [] sulla CF oppure i tasti , sul telecomando per impostare i valori desiderati.
4. Per confermare i Suoi inserimenti prema il tasto [] sul retro della CF oppure il tasto OK del telecomando.
Imposti la data sulla CF di Intenso:
1. Prema i tasti [], [] sulla CF oppure i tasti , sul telecomando per selezionare l‟inserimento della data.
5. Prema i tasti [], [] sulla CF oppure i tasti , sul telecomando per selezionare il prossimo elemento o quello precedente (mese,
giorno, anno ). Prema i tasti [], [] sulla CF oppure i tasti , sul telecomando per impostare i valori desiderati.
2. Per confermare i Suoi inserimenti prema il tasto [] sul retro della CF oppure il tasto OK del telecomando.
Page 81

IT- 19
Attivare accensione e spegnimento automatici
Lei può far accendere o spegnere la CORNICE DI FOTO DIGITALE di Intenso in modo automatico ad un orario da Lei desiderato.
Avviso: Per questa funzione si deve anticipatamente inserire l’orario corretto.
1. Selezioni il punto del menu SETUP nel menu principale.
2. Prema i tasti [], [] sulla CF o i tasti , del telecomando per selezionare il punto del menu accendere o spegnere.
3. Prema i tasti [], [] sulla CF o i tasti , del telecomando per selezionare l‟elemento successivo e quello precedente (ora,
minuto). Prema i tasti [], [] sulla CF o i tasti , del telecomando per impostare i valori e la tempistica desiderati.
Spento: Disattivare l‟accensione e lo spegnimento.
Acceso: La CORNICE DI FOTO DIGITALE si accende e/o si spegne nell‟orario impostato.
4. Per confermare i Suoi inserimenti prema il tasto [] sulla CF o il tasto OK del telecomando.
Page 82

IT- 20
1. Selezioni il punto del menu orologio nel menu principale.
2. Per abbandonare il modo del calendario prema il tasto [].
Avviso:
Data e orario possono essere impostati esclusivamente nel menu Setup.
Attivando il tasto [] sul retro della CF o il tasto
OK sul telecomando si può cambiare tra la visualizzazione del calendario mensile,
dell’orologio digitale e di quello analogico.
Attivando i tasti [], [] sulla CF oppure i tasti
, sul telecomando il calendario può procedere in avanti o indietro di
rispettivamente un mese.
VISUALIZZAZIONE DEL CALENDARIO
Nel modo del calendario si visualizzano la data attuale, l‟orario attuale e sullo sfondo un diashow con le immagini disponibili.
Page 83

IT- 21
DOMANDE FREQUENTI
Per quale motivo la capa cita reale di una sched a di memoria è inferiore a q ue lla indicata sull„imb al laggio ?
L‟indicazione della capacità di memoria di un mezzo di memoria flash avviene in modo analogo rispetto all‟indicazione della capacità dei dischi
fissi e sottosta alle direttive SI (International System of Units). Questo sistema non misura sulla base del sistema binario, in cui 1024 MB
corrispondono ad un 1 GB. Lo standard SI misura in potenze da 1000, per cui ad esempio 1000 Megabyte danno 1 Gigabyte. Questo calcolo
differente causa la differenza nell‟indicazione della capacità.
Per quale motivo alcu ne immagin i della mia scheda di memoria non vengono visualizzate dalla CF ?
Alcuni mezzi di memor ia non molto diffuso non sono compatib ili con la CF. La pregh iamo di usare una scheda compatibile. La
preghiamo d i considerare che questa cor nice d‟immagini pu ò rip rodurre esclusivamente fo to co n il fo rma to de l file “JPEG”.
E„ inserita una sched a di memor ia. La C F però non riesce a leggerla . Che cosa posso fare?
Innanzitutto La pregh iamo di control lare se questa scheda è compatibile con la CORNICE DI FOT O DIG ITALE di Intenso.
Verifichi du nque se la scheda è stata inserita in modo corretto nello slo t della sche da. La pregh iamo di voler a nche consi der are il
fatto che l‟unico formato file suppo rta to è “JP EG“ .
La preghiamo d i voler considerare quanto segue: Alcune videocamere digital i non sa lva no le immagini nel formato standard
JPEG. In questo caso La p reghiamo d i con tro llare nelle istruzioni d‟uso della Sua v ideocame ra.
Page 84

IT- 22
Per quale motivo alcu ne immag ini s i carica no più rap idamente r isp etto ad altre ?
Immagini con una risoluzione superiore necessitano pi ù tempo pe r esser e visualizza te. Per aumentare la velocità di
visualizzaz ione, La p reghiamo d i utiliz zare immagini con una r isoluzio ne ridotta .
Avviso: La cornice di foto supporta una risoluzione fino a 8000*8000 Pixel.
Per quale motivo il software non s i avv ia, anch e se vi è l‟alimentazione de lla corren te e il tasto power è su “on”?
Probab ilmen te s i ha un errore di sis tema. La preghiamo di riavv iare il software, i nte rrompendo l‟alimen tazione della co rrente per
alcuni second i.
Per quale motivo sullo schermo non vien e v isualizzato il menu princ ipale ?
La pre ghiamo di controllare se la CF è co llega ta corre ttamente con una p resa e se l‟ interrut tore power è su “on”.
Posso far ruotare immagini su llo schermo?
Sì, per fare ciò u ti lizzi i tasti frec cia [], [] sulla CF oppure i tas ti , del telecomando.
La pre ghiamo d i vole r co nside rare quanto s egue: L‟immagine ruotante vi ene v isualizzata nu ovamente nella prospettiva
normale nel caso di una nu ova visualizzaz ione .
Page 85

IT- 23
Posso adegu are i colo ri de lle immagini ?
No. Tutte le imposta zioni croma tiche vengo no esegu ite durante la ripresa delle foto. Le i può però adeguare la luminosità e il
con tra sto d ello schermo.
In che r iso luzione devono essere le immagin i per pote r e ssere riprodo tte in modo o ttima le su llo schermo?
La miglior risoluzione per questa CF è d i 800*600 Pixel.
Per quale motivo le funzioni Accensione automatica / Spegnimento automatico non funzionano, anche se le ho attivate?
Si assicu ri di aver impostato l‟orario esatto . Se l‟orar io impostato si trova nel passato, la funzione viene attivata per la prima
vol ta appena nel corso del prossim o gio rno del calendario .
La preghiamo di non spostare l‟inte rrutt ore sul retro della CF nella posizione POWER OFF. Impost i la CF esclusivamente nel
modo s tandby.
Page 86

IT- 24
Vis ua li zzaz ione
TFT LCD dig it al e
Dimension i de llo schermo: 7” pol lici
Modo di v isua lizzazione: 4:3
Ris oluzio ne : 800*600 Pixe l
Adattatore
Input: 100~240V AC, 50/ 60Hz
Output: 5 V 1A DC
Porta USB
USB H os t 2. 0
Support a le chiavi di me mo ria USB
Sch ede di mem or ia
supportat e
SD™ (Secure Digital C ar d) , MMC™ (MultiMedia Car d), MS™ (Mem ory Stick)
Forma to imagine
supportat o
JPE G, ris ol uz io ne massima : 8000*8000 p ix el
Temperatu ra d i
funzion amen to
-10°C ~ +40 °C
Dim en sion i
28.3*180.5*205 mm
Peso
600 g
Acc esso ri
telecom ando (inc lusa batteria), p ie dino , adattatore, istruzioni d ‟uso in diver se lingue
SPECIFICAZIONI DEL PRODOTTO
Page 87

IT- 25
CURA E MANUTENZIONE
Cura
Per ev it ar e il pericol o di sc osse elettriche L a pregh iamo di no n levare vi ti e/o involucro .
Non usi q uest‟ apparec chiat ura vicino all‟ acq ua . Non es po nga quest‟ apparecc hi atura a pioggia e/o umidi tà. Non deposit i ogge tti che
conserv an o acqua o al tri l iq ui di v icino a quest‟appa re cc hi atu ra.
Non install i quest a cor nice di fo to vi ci no a ter mosifon i, fo ri o al tr e app ar ecchi ature c he pr oducono calore .
Non apra l‟inv ol ucro . La preghia mo di non cerc ar e di ri parare l‟appar ecchi at ura. Lasci questo la voro al p erson al e speci alizz at o.
Eviti l‟ uso in lu og hi sa bbiosi.
La pregh ia mo di inser ir e tutta la pr es a di coll egame nto dell‟ adatt atore nell‟apert ura presente sul la CF. Sol o in q ue st o modo Le i
riesc e ad evitare il c aricamento elett rostatico.
Coll eghi in modo c orret to e sicuro tutti i co ll egamento.
La p reghi amo d i non eserci tare press io ne su llo sch ermo. Pr otegg a lo sc hermo da f or te insol azion e.
La c ornice delle i mm agini ripr oduce esclusivamente f ormat i di file compati bili.
Le i mm agini p ossono esser e pro tette da dirit ti di terz i. La ripro duzione priv a di licenza p otrebbe v iolare i diritti d‟au tore.
Durant e il funzi onamento La pr eghiamo di non to ccare l a CF con ogget ti m etall ic i.
La pregh iamo di evi tare l‟uso di cu sci ni, div ani o altri ogge tti di ar re damento che sos tengono la forma zione di cal ore, vi st o che
sussi st e il rischio di sur riscald ar e l‟app ar ecc hiatura .
La pre ghiam o di non togliere le sch ede di mem oria durante il procedim ent o di lettu ra . Altri me nti si pos sono avere interr uzion i di
sistema o perdit a di dati.
La p reghi amo d i non s pegnere l‟apparecc hiatura dura nte u n diashow in c orso.
La pr eghiamo di non imballa re dir ettamente l‟app ar ecchi atura dopo un l ungo periodo di n on us o. Si assi curi c he si sia raffr eddat a a
sufficienza. Al triment i si ha i l rischio che si surr iscal di.
Per gara ntire un servi zio m ig li ore, si p osson o avere m odifi ch e del le is truzi oni d„uso .
Page 88

IT- 26
Manutenzion e d el l„app arecchia tura
L‟APPARECCHIATUR A DEVE ES SERE SP ENTA.
NON SP RUZ ZI O NON APPLICHI IN NES SUN CASO UN L IQUIDO D IRETTAM ENTE SULLO SC HERMO O SULL„ INVOL UCRO.
Pul izia di schermo / involucro / cornice
Terga l‟i nvoluc ro, la corn ic e e lo s ch ermo LCD con c autela, utilizz ando una pezza morbida, s en za p el lucc i e s os tanze chimiche.
Uti lizzi esclusiva ment e de te rgenti ap po si ta mente destina ti agli schermi LCD.
Sma ltimento di apparecch iature ele ttron iche usate
Le apparecchiature caratterizzate con questo simbolo sottostanno alla direttiva CEE/2002/96.
Tutte le apparecchiature elettroniche ed elettriche usate devono essere smaltite separatamente dai rifiuti domestici pressi i punti di smaltimento
previsti dallo stato.
Smaltendo correttamente le apparecchiature elettroniche usate evita danni all‟ambiente.
Page 89

Mode d’emploi
Intenso PhotoPilot
Page 90

i
Sommaire
INTRODUCTION ......................................................................................................................................................................................................... 1
CARACTERISTIQUES GENERALES DU PRODUIT ................................................................................................................................................ 1
CARACTERISTIQUES GENERALES DU PRODUIT ................................................................................................................................................ 2
APERÇU ...................................................................................................................................................................................................................... 3
TELECOMMANDE ...................................................................................................................................................................................................... 3
TELECOMMANDE ...................................................................................................................................................................................................... 4
METTRE LES PILES DANS LA TELECOMMANDE ................................................................................................................................................. 5
FIXATION DU SUPPORT ........................................................................................................................................................................................... 5
PREMIERS PAS .......................................................................................................................................................................................................... 6
UTILISATION DE CARTES DE MEMOIRE ................................................................................................................................................................ 7
REGARDER UN DIAPORAMA .................................................................................................................................................................................. 8
MENU PRINCIPAL ...................................................................................................................................................................................................... 9
REGARDER DES PHOTOS ..................................................................................................................................................................................... 10
Passer un diaporama ............................................................................................................................................................................................ 10
Visualisation d’une seule image............................................................................................................................................................................ 12
Page 91

ii
Changer le mode d’affichage ................................................................................................................................................................................ 13
Utilisation du menu OSD ....................................................................................................................................................................................... 14
MENU SETUP ........................................................................................................................................................................................................... 16
Régler la date et l’heure ........................................................................................................................................................................................ 18
Activer la mise en marche et hors marche automatique ...................................................................................................................................... 19
INDICATION DU CALENDRIER ........................................................................................................................................................................... 20
QUESTIONS FREQUEMMENT POSEES ................................................................................................................................................................ 21
SPECIFICATIONS DU PRODUIT ............................................................................................................................................................................. 24
SOIN ET ENTRETIEN ............................................................................................................................................................................................... 25
Page 92

FR - 1
No us déc lino ns to ute res pons abil ité en cas d ’endom mage ment ou de p erte de d onné es à caus e d’u n dys fonc tion neme nt, d’ un ma niem ent
fautif ou d ’une ré parat ion au togr aphe de l’ap pare il. N e me ttez pas l’a ppar eil en p ièce s dé tach ées et n ’ess ayez pas de le r épar er, s’ il v ous plaî t.
Da ns ce c as, la g aran tie ex pire . Le lo gicie l, le m atéri el ou l e mod e d’e mploi pe uvent êtr e soumis à des chan geme nts . No us ne vou s en
in form erons pas. Tou s dr oits rés ervé s.
INTRODUCTION
Nous vou s remercions d’avoir choisi le Cadre Photo Numérique (C PN) d’Intenso.
Avant d’utiliser cet appareil, lisez ce mode d’emploi attentivement et respectez tous les avertissements, s’il vous plaît. Nous vous
recommandons d’archiver cette instruction afin de pouvoir répondre indépendamment à des questions sur venan t éve ntuellement
plus tard. Le contenu de cette instructio n vou s per met d e pro fiter de toutes les fonctions du CPN.
Le CPN vous permet de regarde r des photos numériques dire ctement de la carte de mémoire de votre ap pareil pho to . Vous avez
la possibilité de regarder les photos par la fonction de diapora ma du cadre de photo . L e CPN est com patib le av ec le s formats de
carte suivants : SD™ (Secure Digita l), SDHC™ (Secu re Digi tal H igh Capacity), MMC™(Multimedia Card), MS™ (Memory St ick)
et clé USB.
Page 93

FR - 2
CARACTERISTIQUES GENERALES DU PRODUIT
Apparence décorative, bonne qualité
Visualisation de photos (JPEG) sans ordinateur
Diaporama automatique avec des effets de transition et une durée d’affichage individuelle
Fonction Calendrier
Fonction Réveil
Compatible avec cartes SD / MMC / MS
Fente USB pour la connexion de mémoires de masse USB
2 possibilités de navigation : 7 touches à l’arrière du CPN ou télécommande infrarouge
Page 94
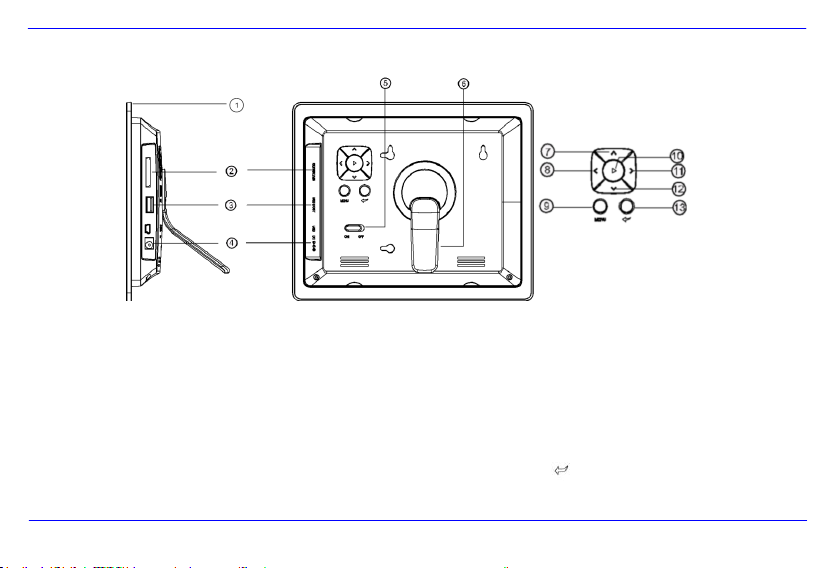
FR - 3
1 Senseur infrarouge
2 Fente de cartes SD / MMC / MS
3 Fente USB Host
4 Entrée DC 5V 1A
5 Power On/Off
6 Support
7 Touche En amont/Retour []
8 Touche Gauche []
9 Touche Menu [M]
10 Touche Play/Entrée []
11 Touche Droite []
12 Touche En aval/En avant []
13 Touche Stop/Fin [ ]
APERÇU
Page 95

FR - 4
1
Power On/ Off
2
Bouge le curseur en amont dans le menu de choix
Tourne l’image dans le sens horaire de 90° dans le mode de diaporama.
3
Bouge le curseur à gauche dans le menu principal ou affiche l’image précédente dans le mode de diaporama
4
MENU
Appeler le menu principal
5
Bouge le curseur en aval dans le menu de choix
Tourne l’image en sens antihoraire de 90° dans le mode de diaporama.
6
Affiche la photo précédente dans le diaporama ou la page précédente du menu d’aperçu d’images
7
Zoom In Agrandit le fragment d’image.
8
4:3/ 16:9
Choix de l’afichage d’image : 4:3, 16:9
9
SETUP
Appeler le menu setup
10
OK
Validation du choix. Lancement/Pause du diaporama
11
Bouge le curseur à droite du menu de choix ou affiche la prochaine image dans le mode de diaporama
12
OSD
Affichage de l’écran On-Screen (OSD) pendant le diaporama
13
Affiche le menu précédent
14
Affiche la prochaine photo dans le diaporama ou la prochaine page du menu d’aperçu d’images
15
Lancement du diaporama
TELECOMMANDE
Page 96

FR - 5
METTRE LES PILES DANS LA TELECOMMANDE
Placez la télécommande à tel point que les touches montrent vers le bas.
Pousser le ressort à la côté gauche du compartiment à piles à droite et dégagez
le compartiment en même temps.
Mettez une pile de lithium CR2025 dans le compartiment, le symbole « + » montre vers le haut.
Poussez le compartiment à piles dans le boîtier de la télécommande.
Attention : Assurez une mise en rebut conforme à la législation en vigueur, s’il vous plaît.
FIXATION DU SUPPORT
Tournez le support en sens antihoraire pour choisir la position
de paysage ou de portrait.
Page 97

FR - 6
PREMIERS PAS
Fixer le support au cadre photo numérique (CPN).
Connecter le boc d’alimentation fourni au CPN. Mettez l’autre bout du bloc d’alimentation dans la prise de courant.
Pousser le régulateur du CPN vers la position « On ».
Après la première mise en marche, vous pouvez choisir la langue dans la fenêtre qui s’ouvre à l’aide des touches à l’arrière du CPN ou
de la télécommande. Valieder le choix avec la touche [] à l’arrière du CPN ou avec la touche OK de la télécommande.
Page 98

FR - 7
UTILISATION DE CARTES DE MEMOIRE
Mettez les cartes SD / MMC / MS dans la fente trois en un. Les contacts montrent vers l’écran. Connectez le module de mémoire au CPN en
mettant les modules dans la fente USB Host.
Remarques :
Ne mettez pas les cartes de mémoire avec trop de force, s’il vous plaît.
Le lecteur de carte trois en un ne peut lire qu’une carte à la fois.
Ne connectez qu’une carte SD / MMC ou MS au CPN en même temps, s’il vous plaît.
Pour déconnecter des cartes du CPN, dégagez-les prudemment de la fente de carte. (Nota : Les cartes SD et MMC disposent d’une
entaille en direction transversale de la carte. Un ongle peut y intervenir pour simplifier le dégagement.)
Page 99

FR - 8
Appuyez sur la touche MENU à l’arrière du CPN ou de la télécommande et ensuite sur les
touches [],[] à l’arrière du CPN ou sur les touches ▲, ▼ de la télécommande pour
appeler le module de mémoire connecté, le setup ou le calendrier.
Remarques :
Si un module de mémium a été mis dans le CPN, le diaporama sera lancé automatiquement après la mise en marche.
S’il y a plusieurs modules de mémoire qui sont connectés au CPN, le CPN commence toujours à lire les images de la carte SD /
MMC ou MS en premier.
REGARDER UN DIAPORAMA
Après la mise en marche, le menu principal sera affiché.
Si vous avez connecté une carte de mémoire ou une clé USB au CPN, le diaporama sera lancé automatiquement après la mise en marche.
Page 100

FR - 9
Menu
Description
USB
Apparaît quand un module USB est connecté.
SD/MMC/MS
Apparaît quand une carte SD, MS ou MMC
Est connectée.
Horloge
Indication du calendrier et de l’heure
Setup
Menu pour les paramètres individuels
2. Appuyez sur les touches [],[] du CPN ou sur les touches ▲,▼ de la
télécommande pour choisir un moduel de mémoire ou un menu.
3. Validez votre choix en appuyant sur la touche [] du CPN ou sur la touche OK de
la télécommande.
MENU PRINCIPAL
Dans le menu principal, vous avez le choix entre les modules de mémoire connectés, le calendrier et le setup.
1. Appuyez sur la touche MENU à l’arrière du CPN ou de la télécommande pour appeler le menu principal.
 Loading...