

Page 1

V.1.0
Music Mover
Bedienungsanleitung Seite 1-10 DE
Manual Page 1-10 GB
Istruzioni per l’uso Pagina 1-10 IT
Notice d’utilisation Page 1-10 FR
Instrucciones de uso Página 1-10 ES
Manual de instruções Página 1-10 PT
Instrukcja obsługi Strona 1-10 PL
инструкция по эксплуатации Стр.1-10 RU
Page 2

1. Inhaltsübersicht
1. Inhaltsübersicht ...................................................................................................... 1
2. Zu dieser Anleitung ................................................................................................ 2
3. Hinweise ................................................................................................................ 2
4. Funktionen ............................................................................................................. 2
5. Packungsinhalt ....................................................................................................... 3
6. Vor dem Gebrauch ................................................................................................. 3
7. Bedienung .............................................................................................................. 4
8. Hauptmenü ............................................................................................................ 5
9. Musik ..................................................................................................................... 5
10. Sprach-Aufnahme .................................................................................................. 7
11. Systemeinstellungen .............................................................................................. 8
12. Fehlerbehebung ..................................................................................................... 9
13. Technische Daten ................................................................................................ 10
14. Entsorgung von Elektro-Altgeräten ...................................................................... 10
Seite 1 von 10 DE
Page 3
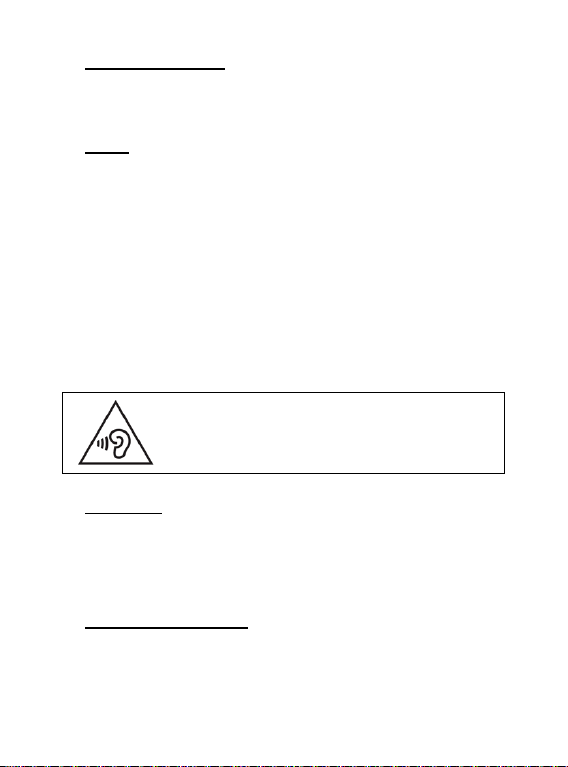
WARNUNG: Eine verlängerte Belastung durch zu laut wiedergegebene
Musik kann zu temporären oder permanenten Gehörschäden oder
Gehörverlust führen. Der Gebrauch des Video Players ist im
Straßenverkehr nicht empfohlen. Es kann dazu führen, dass der Hörer
unachtsamer gegenüber potenziellen Gefahren, wie sich nähernden
Fahrzeugen, reagiert.
2. Zu dieser Anleitung
Lesen Sie diese Anleitung sorgfältig durch und beachten und befolgen Sie bitte sämtliche
in dieser Anleitung erwähnten Hinweise, um eine lange Lebensdauer und eine
zuverlässige Nutzung des Gerätes zu gewährleisten. Heben Sie diese Anleitung griffbereit
auf und geben Sie sie an andere Nutzer des Gerätes weiter.
3. Hinweise
• Vermeiden Sie einen harten Aufprall des Gerätes.
• Verwenden Sie das Gerät nicht in extrem kalten, heißen, feuchten oder staubigen
Gebieten. Setzen Sie es ebenfalls keinen direkten Sonnenstrahlen aus.
• Führen Sie häufiger Datensicherungen durch, um einen möglichen Datenverlust zu
vermeiden.
• Vermeiden Sie das Benutzen in stark magnetisierten Feldern.
• Schützen Sie das Gerät vor Nässe. Wenn Feuchtigkeit in das Gerät eintritt, schalten
Sie es bitte unverzüglich aus, danach säubern und trocknen Sie bitte das Gerät.
• Verwenden Sie bitte keine chemischen Lösungen, um das Gerät zu säubern. Hier
bitte nur ein trockenes Tuch verwenden.
• Wir sind nicht haftbar für Schäden oder Datenverlust bei einer Fehlfunktion,
fehlerhafter Handhabung, eigenhändiger Reparatur des Geräts oder Wechseln des
Akkus.
• Bitte zerlegen Sie das Gerät nicht in Einzelteile, und versuchen Sie bitte nicht, es
selbst zu reparieren, da die Garantie in diesem Fall erlischt.
• Bei Verwendung von Ohr- oder Kopfhörern in zu hoher Lautstärke kann es zu einer
dauerhaften Schädigung des Gehörs kommen.
4. Funktionen
Abspielen von MP3, WMA
Ordner Navigation
Sprachaufnahme
eingebauter wiederaufladbarer Li-polymer Akku
Seite 2 von 10 DE
Page 4

5. Packungsinhalt
Intenso MP3-Player
Stereo Kopfhörer
USB Kabel
Bedienungsanleitung
Micro SD Karte
6. Vor dem Gebrauch
Achten Sie bitte darauf, dass eine Micro SD Karte eingesetzt ist
Verbinden mit dem PC
Gehen Sie hier bitte wie folgt vor:
(1) Verbinden Sie den Player mit dem USB-Anschluss des PC.
(2) Es öffnet sich das Fenster “Intenso”. Nun können Sie die Daten von ihrer Festplatte
auf dem Wechseldatenträger speichern.
Sicheres Entfernen vom PC
Für Windows XP/Vista/Windows7/8/8.1/10:
Klicken Sie mit der rechten Maustaste unten rechts in der Taskleiste auf das Symbol
„Hardware sicher entfernen“. Aus dem erscheinenden Kontextmenü wählen Sie bitte den
Punkt „USB- Massenspeichergerät-Laufwerk entfernen“ mit der linken Maustaste aus.
Vergewissern Sie sich bitte, dass die Datenübertragung vollständig abgeschlossen ist.
Nun können Sie das Gerät entfernen.
Laden der Batterie:
Das Gerät verfügt über einen wiederaufladbaren Li-polymer Akku. Der Akku wird über die
USB Verbindung zu Ihrem PC geladen.
Bei der ersten Benutzung des Gerätes achten Sie bitte darauf, dass Sie den Akku
vollständig aufladen, dieser Vorgang dauert in der Regel 3 Stunden.
Hinweis: Für eine optimale Leistungsfähigkeit muss der wiederaufladbare Li-polymer
Akku regelmäßig genutzt werden. Sollte dies nicht der Fall sein, laden Sie den Akku mind.
einmal pro Monat vollständig auf.
Seite 3 von 10 DE
Page 5
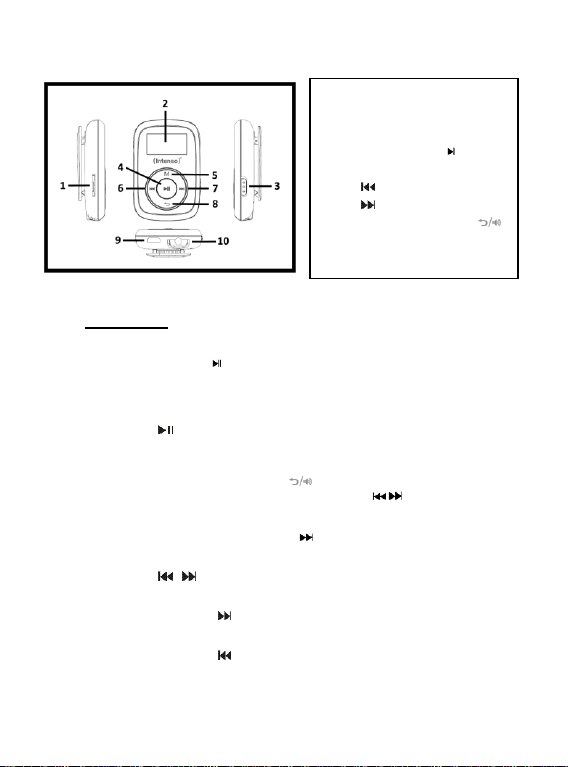
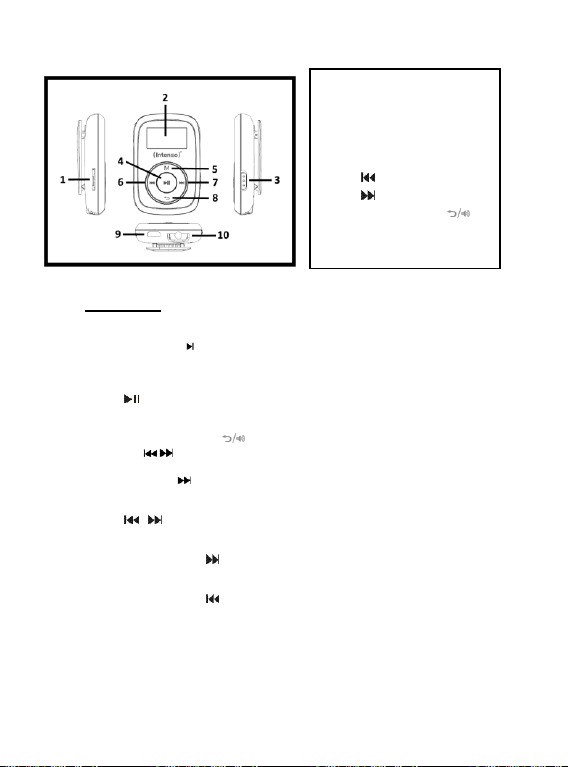
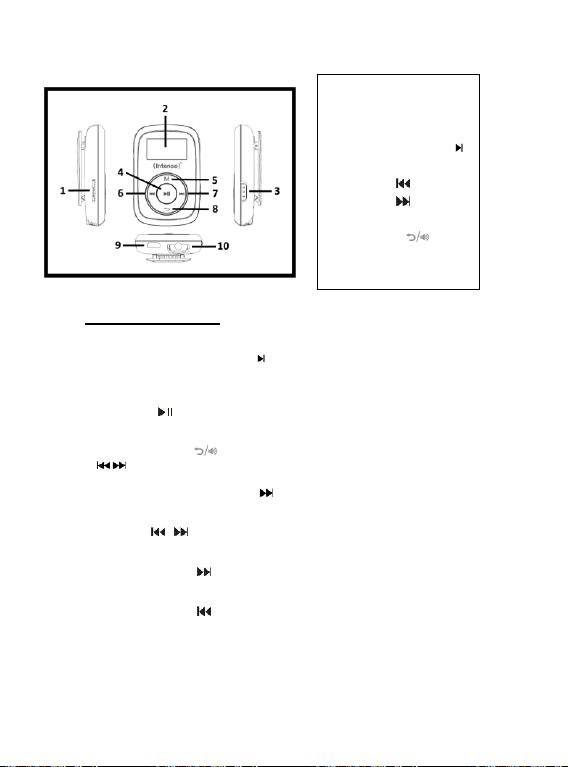
Bedienelemente
(1) Micro SD - Card
(2) LCD Display
(3) Tastensperre
(4) Play / Pause Taste
(5) Menü Taste M
(6) Taste
(7) Taste
(8) Zurück / Lautstärke Taste
(9) USB Stecker
(10) Kopfhörer Anschluss
7. Bedienung
Ein- / Ausschalten
Halten Sie die Play/Pause Taste für ca. 3
Sekunden gedrückt, um den Player einzuschalten. Zum Ausschalten
drücken Sie die Taste erneut für ca. 3 Sekunden.
Play / Pause
Drücken Sie die Taste zum Abspielen oder Anhalten eines Liedes.
Lautstärke anpassen
Halten Sie die Zurück / Lautstärke Taste gedrückt bis sich das
Lautstärkeauswahlmenü öffnet. Nun können Sie mit den Tasten die
gewünschte Lautstärke einstellen. Aufgrund gesetzlicher Bestimmungen müssen Sie
für den Wechsel von Stufe 18 auf Stufe 19 die Menü Taste drücken, um
anschließend die Lautstärke weiter mit der Taste erhöhen zu können.
Vor / Zurück
Drücken Sie die / Taste, um zum vorherigen oder nächsten Titel zu gelangen.
Vorspulen
Drücken und halten Sie die Taste, um im Titel vorzuspulen.
Zurückspulen
Drücken und halten Sie die Taste, um im Titel zurückzuspulen.
Tastensperre
Durch Betätigen der Schiebetaste an der Seite des Gerätes können Sie die
Tastensperre, je nach gewählter Position, aktivieren oder deaktivieren.
Seite 4 von 10 DE
Page 6
8. Hauptmenü
Nach dem Einschalten des MP3-Players erscheint das Hauptmenü. Hier können Sie
zwischen den Funktionen Musik, Aufnahme, Wiedergabe und Setup wählen.
Drücken Sie zur Auswahl der Funktion die / Tasten und bestätigen Ihre Auswahl mit
der Taste.
9. Musik
Wählen Sie im Hauptmenü die Funktion Musik. Sie können nun die gespeicherten Titel
abspielen.
Ordner Navigation aufrufen
(1) Drücken Sie im Musikmodus bei angehaltener Wiedergabe die Menü Taste.
(2) Wählen Sie dann im Untermenü den Punkt Verzeichnis aus.
(3) Ihnen werden nun sämtliche Titel des aktuell wiedergegebenen Ordners
angezeigt.
(4) Um gegebenenfalls innerhalb Ihrer Ordnerstruktur eine Ebene höher zu
gelangen, drücken Sie die Zurück Taste.
(5) Wählen Sie mit den / Tasten den gesuchten Titel und bestätigen Sie Ihre
Auswahl durch Drücken der Taste, um die Wiedergabe zu starten.
Titel löschen
Um einen einzelnen Titel zu löschen, gehen Sie wie folgt vor:
(1) Drücken Sie im Musikmodus bei angehaltener Wiedergabe die Menü Taste.
(2) Wählen Sie Datei löschen.
(3) Ihnen werden jetzt alle sich im Verzeichnis des angezeigten Liedes befindlichen
Musikdateien angezeigt (möchten Sie Titel aus einem anderen Verzeichnis
löschen, müssen Sie erst über die Ordnernavigation in das gewünschte
Verzeichnis wechseln).
(4) Wählen Sie mit den / Tasten zu dem gesuchten Titel und bestätigen Sie
Ihre Auswahl durch Drücken der Taste.
(5) Sie werden nun aufgefordert den Löschvorgang zu bestätigen.
(6) Drücken Sie die / Tasten, um Ja oder Nein auszuwählen. Bestätigen Sie
Ihre Auswahl mit der Taste. Drücken Sie die Zurück Taste einmal, um Ihre
Auswahl aufzuheben und eine neue Auswahl zu treffen, oder zweimal, um
zurück in den Wiedergabemodus zu wechseln.
Seite 5 von 10 DE
Page 7

Alle Musikdateien löschen
Um alle Musikdateien (MP3 und WMA) auf der Speicherkarte zu löschen, gehen Sie
wie oben beschrieben vor. Bitte wählen Sie Alle Musikdateien löschen anstatt
Datei löschen und bestätigen Sie anschließend Ihre Auswahl. Es werden nun alle
MP3 und WMA Dateien von der Speicherkarte gelöscht. Andere Dateitypen und
Ordner können über den Player nicht gelöscht werden, nutzen Sie dazu bitte Ihren
Computer.
A-B Repeat
Um einen speziellen Abschnitt eines Titels zu wiederholen, gehen Sie wie folgt vor:
(1) Drücken Sie während der Wiedergabe die Menü Taste und wählen Sie das
Untermenü A-B Wiederholung.
(2) Sie können nun die A-B Wiederholung starten (A-B Wiederholung), oder die
Anzahl der gewünschten Wiederholungen (Anzahl wdh.) sowie die gewünschte
Pausendauer zwischen den Wiederholungen (Pause zw. Wdh.) einstellen.
(3) Wenn Sie durch wählen von A-B Wiederholung den Vorgang gestartet haben,
gelangen Sie zurück in den Wiedergabemodus und das A im Symbol für den A-
B Wiederholungsmodus blinkt. Durch Drücken der Taste setzen Sie sowohl
den Startpunkt als auch durch erneutes Drücken selbiger Taste den Endpunkt
der A-B Wiederholung.
(4) Der Abschnitt zwischen dem gewähltem Start- und Endpunkt wird nun gemäß
der gewählten Anzahl wiederholt.
(5) Um die A-B Wiederholung vorzeitig zu beenden, drücken Sie die Menü Taste.
Verlassen der Funktion Musik
Drücken Sie im Wiedergabemodus die Zurück Taste, um in das Hauptmenü zu
wechseln.
Seite 6 von 10 DE
Page 8

10. Sprach-Aufnahme
Wählen Sie im Hauptmenü die Funktion Aufnahme.
Aufnahme
(1) Drücken Sie die Taste, um die Aufnahme zu starten.
(2) Während der Aufnahme können Sie durch Drücken der Taste die Aufnahme
anhalten bzw. fortsetzen.
(3) Drücken Sie die Zurück Taste, um die Aufnahme zu beenden und
abzuspeichern. Die Aufnahme wird als .wav Datei gespeichert.
(4) Drücken Sie die Menü Taste, bevor Sie eine Aufnahme starten, können Sie
durch die bisherigen Aufnahmen navigieren (Verzeichnis) und die
Aufnahmequalität einstellen (Qualität).
Achtung: Schalten Sie das Gerät nicht während der Aufnahme aus. Die Aufnahme
wird dabei nicht abgespeichert und geht verloren.
Wiedergabe
Über die Funktion Wiedergabe im Hauptmenü öffnen Sie den Wiedergabemodus für
die gespeicherten Aufnahmen. Spielen Sie Ihre Aufnahmen einfach wie bei der
Musikwiedergabe ab. Auch hier können Sie durch das Verzeichnis Ihrer Aufnahmen
navigieren, eine einzelne Datei löschen oder alles Sprachdateien löschen, indem Sie
vor Start der Wiedergabe die Menü Taste drücken, um in das Untermenü zu
gelangen.
Achtung: Wenn Sie „Alle Sprachdateien löschen“ wählen, werden alle .wav Dateien
auf der Speicherkarte gelöscht.
Verlassen der Funktion Aufnahme
Drücken Sie die Zurück Taste, um in das Hauptmenü zu gelangen.
Seite 7 von 10 DE
Page 9
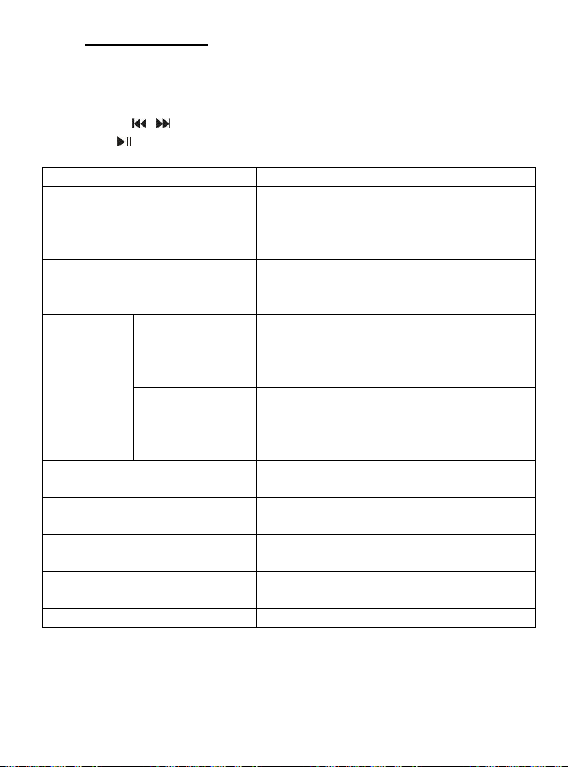
11. Systemeinstellungen
Funktion
Auswahlmöglichkeiten (Beschreibung)
LCD Auto Aus
0 – 60 Sekunden in 3 Sekunden Schritten
Legen Sie fest, nach wieviel Sekunden ohne
Eingabe das Display ausgeschaltet werden soll.
Mit der Auswahl 0 deaktivieren Sie die Funktion.
Sprache
Englisch, Französisch, Deutsch, Italienisch,
Portugiesisch, Spanisch, Polnisch, Russisch
Stellen Sie hier die gewünschte Systemsprache
ein.
Strom
sparen
Auto Aus
0 – 60 Minuten in 5 Minuten Schritten
Legen Sie fest, nach wieviel Minuten ohne
Nutzung der Player automatisch abgeschaltet
werden soll. Mit der Auswahl 0 deaktivieren Sie
die Funktion.
Sleep-Timer
0 – 120 Minuten in 10 Minuten Schritten
Legen Sie fest, nach welcher Zeit sich der
Player auch bei aktiver Wiedergabe
automatisch ausschalten soll. Mit der Auswahl 0
deaktivieren Sie die Funktion.
Helligkeit
0 – 15
Stellen Sie die gewünschte Helligkeitsstufe des
Displays ein.
Firmware Version
Es wird Ihnen die Versionsnummer der
aufgespielten Firmware angezeigt.
Speicherinfo
Es wird Ihnen der Speicherplatzstatus der
eingesetzten Speicherkarte angezeigt.
Werkseinstellungen
Wählen Sie „Yes“, um das Gerät auf die
werkseitigen Einstellungen zurückzusetzen.
Zurück
Hier wechseln Sie zurück in das Hauptmenü.
Um Ihren MP3-Player individuell einzustellen, gehen Sie wie folgt vor:
(1) Wählen Sie im Hauptmenü die Funktion Setup.
(2) Drücken Sie die / Tasten, um die gewünschte Einstellung (siehe Tabelle)
auszuwählen. Bestätigen Sie Ihre Auswahl mit der Taste. Drücken Sie die Zurück
Taste, um zum Hauptmenü zurückzukehren.
Seite 8 von 10 DE
Page 10

12. Fehlerbehebung
Es erscheint nichts auf dem Display.
(1) Der Akku ist leer.
Laden Sie den Akku auf.
(2) Die Tasten sind gesperrt.
Bitte deaktivieren Sie die Tastensperre.
Kein Ton beim Abspielen einer Datei.
(1) Die Lautstärke ist zu gering.
Erhöhen sie die Lautstärke.
(2) Die Audio-Datei ist defekt.
Bitte übertragen sie die Datei erneut.
Es kann keine Verbindung zum PC hergestellt werden.
(1) Der Treiber wurde nicht korrekt installiert.
Installieren Sie den Treiber erneut.
(2) Bitte führen sie ein Mainboardupdate aus.
(Beachten sie hierzu die Hinweise des Herstellers)
Der Anzeigewert der Zeit wechselt ständig.
(1) Die Bit-Rate des MP3-Files wechselt während der Wiedergabe.
Bitte benutzen Sie eine einheitliche Bit-Rate beim Komprimieren.
Der PC meldet einen Fehler beim Verbinden mit dem Player
(1) Der Player wurde während der Datenübertragung vom PC getrennt.
Bitte trennen Sie den Player niemals während der Datenübertragung.
MP3-Daten werden nicht richtig abgespielt.
(1) Die MP3- Daten wurden in ein falsches Format komprimiert, beispielsweise in
MPEG 1 oder 2.
Löschen Sie die Dateiformate, welche nicht unterstützt werden.
Seite 9 von 10 DE
Page 11
13. Technische Daten
Item
Parameter
LCD Display
128 x 64 Pixel
Batterie Typ
Wiederaufladbarer Li-polymer Akku
Akku Laufzeit
Max. 10 Stunden
Aufnahme-Format
WAV
Unterstützte Musik Formate
MP3, WMA
Bit Rate
MP3/WMA: 32kbps ~ 384kbps
Ausgabefrequenz
20Hz ~ 20kHz
SNR
>= 80 dB
Kanaltrennung
>= 40 dB
Frequenzverhalten
<= 3 dB (20Hz ~ 20kHz)
Ausgangsleitung Kopfhörer
L 9mW, R 9mW
USB Anschluss
USB 2.0 (High Speed)
Haftungsausschluss
Es können jederzeit ohne Ankündigung Veränderungen an der Firmware und / oder
Hardware vorgenommen werden. Aus diesem Grund ist es möglich, dass Teile der
Anleitung, technischen Daten und Bilder in dieser Dokumentation von dem Ihnen
vorliegenden Produkt leicht abweichen. Alle in dieser Anleitung beschriebenen Punkte
dienen nur dem Zweck der Verdeutlichung und müssen nicht zwangsläufig mit einer
bestimmten Situation übereinstimmen. Es können keine Rechtsansprüche auf Grund
dieser Anleitung geltend gemacht werden.
14. Entsorgung von Elektro-Altgeräten
Die mit diesem Symbol gekennzeichneten Geräte unterliegen der europäischen
Richtlinie 2012/19/EG.
Alle Elektro- und Elektroaltgeräte müssen getrennt vom Hausmüll über die dafür
vorgesehenen staatlichen Stellen entsorgt werden.
Mit der ordnungsgemäßen Entsorgung von Elektro-Altgeräten vermeiden Sie
Umweltschäden.
Seite 10 von 10 DE
Page 12

1. Contents
1. Contents................................................................................................................. 1
2. About this manual .................................................................................................. 2
3. Notes ..................................................................................................................... 2
4. Functions ............................................................................................................... 2
5. Contents of this pack ............................................................................................. 2
6. Prior to use............................................................................................................. 3
7. Operation ............................................................................................................... 4
8. Main menu ............................................................................................................. 5
9. Music ..................................................................................................................... 5
10. Voice recording ...................................................................................................... 7
11. System settings ...................................................................................................... 8
12. Troubleshooting ..................................................................................................... 9
13. Technical data ...................................................................................................... 10
14. Disposal of used electric devices ......................................................................... 10
Page 1 of 10 GB
Page 13
WARNING: Prolonged exposure to excessively loud music can result
in temporary or permanent hearing damage or hearing loss. The use
of the Video player in traffic is not recommended. It can cause the
listener to react disregardful towards potential hazards such as
approaching vehicles.
2. About this manual
Read this manual carefully and observe, read and follow all instructions mentioned in this
to ensure the long life and reliable use of the device. Please keep this manual handy for
future reference and pass it on to other users of the device.
3. Notes
• Prevent the device from dropping.
• Do not use the device in extremely cold, hot , humid or dusty areas. Do not expose it
to direct sunlight.
• Back up your device regularly to avoid possible data loss.
• Avoid using your player in strongly magnetic fields.
• Protect the device from moisture. Should moisture seep into the device, please
switch it off immediately and clean and dry the device afterwards.
• Do not use any chemical solutions to clean the device. Use a dry cloth only.
• We are not liable for damages or data loss caused by malfunctions, incorrect
operation, repairs done by you or changing of the battery.
• Please do not disassemble the device into components and do not try to repair it
yourself as the warranty expires in this case.
4. Functions
Playback of MP3, WMA files
Folder navigation
Speech recording
Built-in re-chargeable Li-polymer battery
5. Contents of this pack
Intenso MP3-Player
Stereo headphones
USB cable
User manual
Micro SD memory card
Page 2 of 10 GB
Page 14

6. Prior to use
Please assure that the Micro SD card supplied is inserted.
Connect to the PC
Please proceed as follows:
(1) Connect the player with the USB-port of the PC
(2) The window "Intenso" opens. Now you can store the data from your hard disk on the
player.
Safe removal from PC
For Windows XP/Vista/Windows7/8/8.1/10:
Click with the right mouse button bottom right in the task bar onto the symbol "safe
removal of hardware". Select "remove USB flash drive" with the left mouse button from the
appearing context menu. Please ensure that the data transfer has been finished
completely.
Now you can remove the device.
Charging the battery:
The device has a built-in re-chargeable Li-polymer battery. The battery is charged via the
USB connection to your PC. Before using the device for the first time, please make sure
that the battery is fully charged. This usually takes about 3 hours.
Note: for optimum performance, the re-chargeable Li-polymer battery must be used
regularly. If this is not the case, fully charge the battery at least once per month.
Page 3 of 10 GB
Page 15
Controls
(1) Micro SD - Card
(2) LCD Display
(3) Button Lock
(4) Play / Pause key
(5) Menu key
(6) key
(7) key
(8) Back / Volume key
(9) USB plug
(10) Ear-phone connection
7. Operation
On / Off
Keep the Play/Pause key pressed for approx. 3 seconds to switch on the player. To
switch it off, press the key again for approx. 3 seconds.
Play / Pause
Press the button for playback or stopping of a track.
Adjust volume
Keep the back / volume key pressed to open the volume selection menu. Now
with the keys you can adjust the desired volume. Because of legal provisions,
you have to press the menu key to change from level 18 to 19 to continue to increase
the volume with the key.
Forward / Back
Press the / button to go to the previous or to the next track.
Fast forward
Press and hold down the button to fast forward within the track.
Rewind
Press and hold down the button to rewind within the track.
Key lock
By confirming the sliding key on the side of the appliance you can activate or
deactivate the button lock according to the selected position.
Page 4 of 10 GB
Page 16
8. Main menu
After having switched on the MP3 player the main menu is displayed. Here you can select
the functions music, registration, display and setup.
To select the function press the keys / and confirm your selection by the key .
9. Music
Select Music from the main menu. Now you can playback the stored tracks.
Call folder navigation
(1) In the music mode press the menu key in Pause status.
(2) Then select the point List in the submenu.
(3) Now all titles of the currently displayed folders are displayed for you.
(4) To eventually reach a higher level in your folder structure, press the Back key.
(5) With the keys / select the searched title and confirm your selection by
pressing key to start playback.
Delete track
To delete a single track do the following:
(1) In music mode, press the menu key in pause status.
(2) Select Delete File.
(3) All music files of the list of a displayed song are displayed for you (if you want to
delete the title in another list, you have to change to the desired list through the
folder navigation).
(4) With the keys / select the searched title and confirm your selection by
pressing key .
(5) Now you are asked to confirm the deletion process.
(6) Press keys / to select yes or no. Confirm your selection with key 1 .
Press back key once to delete selection and make a new selection or twice to
change back to playback mode.
Page 5 of 10 GB
Page 17

Delete all music files
To delete all music files (MP3 and WMA) on the memory card, proceed as
described. Please select Delete all music files instead of Delete File and confirm
your selection. Now all MP3 and WMA files are deleted from the memory card.
Other file and folder types cannot be deleted by the player. For this purpose, use
your computer.
A-B Repeat
To repeat a special section of a title, proceed as follows:
(1) During playback press the key menu and select submenu A-B repetition.
(2) Now you can start the A-B repetition (A-B repetition) or interrupt the number of
desired repetitions (repeat number) and the desired pause duration between
repetitions (pause between repet.).
(3) If by selection A-B repetition you have started the procedure, you will go back to
the playback mode and symbol A flashes for A-B repetition mode. By press key
you set the starting point and by re-pressing the same key the end point of
the A-B repetition.
(4) Now the section between the selected start and end point will be repeated
according to the selected number.
(5) To end the A-B repetition earlier, press the key menu.
Exit music mode
Press back key in playback mode to change to main menu.
Page 6 of 10 GB
Page 18

10. Voice recording
In the main menu select the function record.
Record
(1) Press the button to start recording.
(2) During recording you can stop and/or resume the recording by pressing the
button.
(3) Press the back button to stop and save the recording. Recording is saved as
.wav file.
(4) Press the menu key before starting recording. So you can navigate through the
existing recordings (list) and set up the recording quality (quality).
Attention: Do not switch off the device during recording. The recording will not be
saved and is lost.
Playback
By the function playback in the main menu the playback mode is opened for saved
registrations. Playback your recordings like you playback music. Here you can also
navigate through the list of your recordings, delete a single file or all voice files by
pressing key menu before the playback start to reach the submenu.
Attention: If you select “Delete all voice files”, all .wav file will be deleted on the
memory card.
Exit the function record
Press the back button to go to the main menu.
Page 7 of 10 GB
Page 19
11. System settings
Function
Selection Opportunities (description)
LCD On/Off
0–60 seconds in 3 seconds steps
Define after how many seconds without entry
the display has to be switched off. By selecting
0, you deactivate the function.
Language
English, Spanish, French, German, Italian,
Portuguese, Russian, Polish
Adjust the desired system language here.
Save
energy
Auto Off
0–60 minutes in 5 minutes steps
Define after how many minutes without use the
player has to be automatically switched off. By
selecting 0, you deactivate the function.
Sleep-Timer
0–120 minutes in 10 minutes steps
Define after how much time the player has to be
switched off also during active playback. By
selecting 0, you deactivate the function.
Brightness
0–15
Set the desired brightness level of the display.
Firmware Version
The version number of the Firmware is
displayed.
Memory Information
The memory location status of the inserted
memory card is displayed.
Factory Settings
Select “yes” to reset the appliance to factory
settings.
Back
Here you can change back to the main menu.
To set your MP3 player individually do the following:
(1) In the main manu, selection the function Setup.
(2) Press keys / to select the desired setting (see table). Confirm your selection
with key . Press back key to go back to main menu.
Page 8 of 10 GB
Page 20

12. Troubleshooting
The display is blank.
(1) The battery is empty. Charge the battery.
(2) The keys are locked. Please deactivate the key lock.
No sound during playback of a file.
(1) The volume is too low. Increase the volume.
(2) The audio file is defective. Please transfer the file again.
No connection can be established with the PC.
(1) The driver was not installed properly. Re-install the driver.
(2) Please carry out a main board update.
(Please refer to the manufacturer`s instructions)
The track time displayed keeps on changing.
(1) The bit rate of the MP3 file changes during playback. Please use a universal bit
rate for compression.
The PC shows an error on connection with the player.
(1) The player was disconnected during data transfer from the PC.
Never disconnect the player during data transfer.
MP3 data is not played properly.
(1) The MP3 data was compressed in a wrong format, e.g. in MPEG 1 or 2.
Delete the file formats that are not supported.
Page 9 of 10 GB
Page 21
13. Technical data
Item
Parameter:
LCD Display
128 x 64 pixel
Battery type
re-chargeable Li-polymer battery
Battery run-time
Max. 10 hours
Record format
WAV
Supported music formats
MP3, WMA
Bit rate
MP3/WMA: 32kbps ~ 384kbps
Output frequency
20Hz ~ 20kHz
SNR
>= 80 dB
Channel separation
>= 40 dB
Frequency response
<= 3 dB (20Hz ~ 20kHz)
Output line headphones
L 9mW, R 9mW
USB port
USB 2.0 (High Speed)
Exclusion of liability
Changes to the firmware and / or hardware can be made at any time without prior
notification. For this reason it is possible that parts of the manual, technical data and
images in this documentation may deviate slightly from the product in your hand. All
products described in this manual are only for the purpose of clarification and must not
necessarily match any certain situation. No claims can be made based on this manual.
14. Disposal of used electric devices
Devices marked with this symbol are subject to the European Directive 2012/19/EG.
All electric and used electric devices must be separated from the household waste
and disposed of at the provided public locations.
With proper disposal of used electric devices you avoid damaging the environment.
Page 10 of 10 GB
Page 22

1. Indice
1. Indice ..................................................................................................................... 1
2. Informazioni sulle presenti istruzioni per l‘uso ........................................................ 2
3. Avvertenze ............................................................................................................. 2
4. Funzioni ................................................................................................................. 2
5. Contenuto della confezione.................................................................................... 3
6. Operazioni preliminari ............................................................................................ 3
7. Funzione dei tasti ................................................................................................... 4
8. Menu ...................................................................................................................... 5
9. Musica.................................................................................................................... 5
10. Registrazione vocale .............................................................................................. 7
11. Impostazioni di sistema .......................................................................................... 8
12. Risoluzione dei problemi ........................................................................................ 9
13. Specifiche tecniche .............................................................................................. 10
14. Smaltimento di apparecchi elettrici usati .............................................................. 10
Pagina 1 di 10 IT
Page 23
AVVERTENZA: un’esposizione prolungata all’ascolto di musica troppo
alta può causare danni temporanei o permanenti all’udito oppure persino
la perdita dell’udito. Non si consiglia di utilizzare il video player nella
circolazione stradale. Ciò può comportare che l’utente reagisca con
disattenzione a potenziali rischi, come ad esempio veicoli in
avvicinamento.
2. Informazioni sulle presenti istruzioni per l‘uso
Si prega di leggere accuratamente e rispettare le istruzioni per l’uso, attenendosi anche a
tutte le avvertenze citate nelle predette istruzioni, al fine di garantire una lunga durata e un
utilizzo affidabile dell’apparecchio. Tenere le istruzioni per l’uso a portata di mano e
cederle al nuovo utente qualora il dispositivo sia venduto.
3. Avvertenze
• Evitare urti violenti all'apparecchio.
• Evitare l'uso dell'apparecchio in ambienti molto freddi, caldi, umidi o polverosi.
Evitare l'esposizione ai raggi solari.
• Eseguire frequenti backup per evitare il rischio di perdite di dati.
• Evitare l'uso dell'apparecchio in zone caratterizzate da forte campo magnetico.
• Evitare di bagnare l'apparecchio. In tal caso spegnerlo immediatamente, quindi pulire
e lasciare asciugare.
• Evitare l'uso di soluzioni chimiche per la pulizia dell'apparecchio. Pulire con un panno
asciutto.
• Il produttore declina ogni responsabilità legata a danni o perdita di dati in caso di
malfunzionamento, uso scorretto, riparazione "fai-da-te" o sostituzione di batteria.
• Non smontare l'apparecchio ed evitare interventi di riparazione "fai-da-te". In tali casi
la garanzia non risponde.
4. Funzioni
Riproduzione di file MP3, WMA
Navigazione a cartelle
Registrazione vocale
Batteria LiPo ricaricabile
Pagina 2 di 10 IT
Page 24

5. Contenuto della confezione
Lettore MP3 Intenso
Auricolari stereo
Istruzioni per l'uso
Cavo USB
Scheda Micro SD
6. Operazioni preliminari
Si assicuri che la scheda Micro SD fornita sia inserita.
Collegamento al PC
Procedere come segue:
(1) Collegare il lettore alla porta USB del PC.
(2) Lo schermo del computer visualizzerà la finestra “Intenso”. A questo punto è
possibile salvare i dati del disco fisso sul supporto di memoria rimovibile.
Rimozione sicura dal PC
Per Windows XP/Vista/Windows7/8/8.1/10:
Cliccare con il tasto destro del mouse sotto a destra nella barra delle applicazioni sul
simbolo "Rimozione sicura dell'hardware“. Dal menu a comparsa selezionare con il tasto
sinistro del mouse "Rimozione periferica di archiviazione di massa USB“. Assicurarsi che
la trasmissione dei dati sia stata completata.
Ora è possibile rimuovere l'apparecchio.
Caricamento della batteria
L’apparecchio dispone di una batteria LiPo ricaricabile. La batteria si ricarica tramite
collegamento USB al computer.
Per il primo utilizzo dell’apparecchio accertarsi che la batteria sia caricata completamente.
Questa operazione richiede solitamente 3 ore.
Nota: La batteria agli ioni di litio necessita di un utilizzo regolare per assicurare prestazioni
ottimali. In caso contrario, caricare la batteria almeno una volta al mese.
Pagina 3 di 10 IT
Page 25
Strumentazione e Comandi
(1) Scheda Micro SD
(2) Display LCD
(3) Blocco tasti
(4) Tasto Play / Pause
(5) Tasto Menù
(6) Tasto
(7) Tasto
(8) Tasto Indietro /
Volume
(9) Connettore USB
(10) Attacco cuffie
7. Funzione dei tasti
Accensione/Spegnimento
Tenga premuto il tasto Play/Pause per circa 3 secondi per accendere il lettore. Per
spegnerlo prema nuovamente il tasto per circa 3 secondi.
Play / Pause
Premere il tasto per avviare o interrompere la riproduzione di un brano.
Regolazione del volume
Tenga premuto il tasto fino ad aprire il menu di selezione del volume. Ora con i
tasti può impostare il volume desiderato. Secondo le prescrizioni legali per
passare dal livello 18 al livello 19 deve premere il tasto menu per poi poter continuare
ad aumentare il volume con il tasto .
Brano successivo / Brano precedente
Premere i tasti / per passare al brano precedente o successivo.
Avanzamento
Tenere premuto il tasto per avanzare all'interno di un brano.
Riavvolgimento
Tenere premuto il tasto per tornare indietro all'interno di un brano.
Blocco tasti
Attivando il tasto a spingimento sul lato dell’apparecchio può attivare o disattivare il
blocco tasti a seconda della posizione selezionata.
Pagina 4 di 10 IT
Page 26

8. Menu
Dopo aver acceso il lettore MP3 appare il menu principale. Qui può selezionare le funzioni
musica, registrazione, riproduzione e impostazione.
Per selezionare la funzione prema i tasti / e confermi la Sua selezione premendo il
tasto .
9. Musica
Selezionare nel Menu principale la funzione Musica.
Ora potete playback le piste immagazzinate.
Lancio Navigazione a cartelle
(1) Nella modalità musica prema il tasto menu, trattenendo la riproduzione.
(2) Selezioni poi il punto del sotto-menu elenco.
(3) Le vengono visualizzati solo tutti i titoli delle cartelle attualmente riprodotte.
(4) Per raggiungere un livello superiore all’interno della Sua struttura di cartelle,
prema il tasto indietro.
(5) Con i tasti / selezioni il titolo cercato e confermi la Sua selezione
premendo il tasto al fine di avviare la riproduzione.
Eliminazione di un singolo brano
Per eliminare un solo brano, procedere come segue:
(1) Prema la modalità musica prema il tasto menu, interrompendo la riproduzione.
(2) Selezioni Eliminare File.
(3) Ora Le vengono visualizzati tutti i file musicali presenti nell’elenco della canzone
visualizzata (se desidera eliminare un titolo di un altro elenco, deve prima
passare all’elenco desiderato attraverso la navigazione delle cartelle).
(4) Selezioni il titolo cercato con i tasti / e confermi la Sua selezione,
premendo il tasto .
(5) Ora Le viene richiesto di confermare la procedura di cancellazione.
(6) Prema i tasti / per selezionare sì o no. Confermi la Sua selezione con il
tasto . Prema il tasto indietro una volta per annullare la Sua selezione e per
riselezionare o per due volte per tornare nuovamente alla modalità di
riproduzione.
Pagina 5 di 10 IT
Page 27

Eliminare tutti i file musicali
Per cancellare tutti i file musicali (MP3 e WMA) sulla carta di memoria, proceda
come descritto sopra. La preghiamo di selezionare Cancellare tutti i file musicali
invece di Eliminare file e confermi poi la Sua selezione. Ora tutti i file MP3 e WMA
vengono cancellati dalla scheda di memoria. Tutti i tipi di file e cartelle non possono
essere cancellati attraverso il lettore. A questo scopo utilizzi il Suo computer.
Ripeti A-B
Per ripetere una sezione specifica di un titolo, proceda come segue:
(1) Durante la riproduzione prema il tasto menu e selezioni il sottomenu ripetizione
A-B.
(2) Ora può avviare la ripetizione A-B (ripetizione A-B) o impostare il numero di
ripetizioni desiderate (numero delle ripetiz.) e la durata desiderata della pausa
tra una ripetizione e l’altra (pausa tra ripetiz.).
(3) Se selezionando la ripetizione A-B ha avviato la procedura, ritorna nella
modalità di riproduzione e nel simbolo della modalità A-B di ripetizione
lampeggia la lettera A. Premendo il tasto imposta il punto di partenza e
premendo nuovamente lo stesso tasto imposta il punto finale della ripetizione A-
B.
(4) La sezione tra il punto di partenza e quello finale viene ripetuta solamente
secondo il numero selezionato.
(5) Per terminare anticipatamente la ripetizione A-B, prema il tasto menu.
Per uscire dalla funzione Musica
Nella modalità di riproduzione prema il tasto indietro al fine di passare al menu
principale.
Pagina 6 di 10 IT
Page 28

10. Registrazione vocale
Selezionare nel Menu principale la funzione Registrazione.
Registrazione
(1) Premere il tasto per avviare la registrazione.
(2) Durante la registrazione è possibile interrompere o riprendere la registrazione
premendo il tasto .
(3) Premere il tasto Esci per terminare e salvare la registrazione. La registrazione
viene salvata come file .wav.
(4) Premendo il tasto menu, prima di avviare una registrazione, può navigare
attraverso le registrazioni fatte fino ad ora (elenco) e impostare la qualità di
registrazione (qualità).
Attenzione: Non spegnere il lettore MP3 durante la registrazione, perché ciò
impedirebbe il salvataggio e la conseguente perdita dei dati registrati.
Riproduzione
Attraverso la funzione riproduzione nel menu principale apra la modalità di
riproduzione per le registrazioni salvate. Riproduca le Sue registrazioni
semplicemente come con la riproduzione della musica. Qui può anche navigare
attraverso l’elenco delle Sue registrazioni, eliminare un singolo file o eliminare tutti i
file voice, premendo sul tasto menu prima dell’avviamento della riproduzione al fine
di entrar nel sottomenu.
Attenzione: Se seleziona “Eliminare tutti i file voice”, tutti i file .wav vengono eliminati
dalla scheda di memoria.
Per uscire dalla funzione Registrazione
Per tornare al Menu principale premere il tasto Esci.
Pagina 7 di 10 IT
Page 29

11. Impostazioni di sistema
Funzione
Opzioni selezionabili (descrizione)
LCD Auto spento
0 – 60 secondi in passaggi da 3 secondi
Determini dopo quanto secondi senza
inserimenti lo schermo deve spegnersi da solo.
Selezionando 0 disattiva la funzione.
Lingua
Inglese, spagnolo, francese, tedesco, italiano,
portoghese, russo, polacco
Impostare qui la lingua di sistema desiderata.
Risparmiare
corrente
Auto spento
0 – 60 minuti in passaggi da 5 minuti
Definisca dopo quanti minuti senza usarlo il
lettore deve essere spento automaticamente.
Selezionando 0 disattiva la funzione.
Sleep-Timer
0 – 120 minuti in passaggi da 10 minuti
Definisca dopo quanto tempo il lettore deve
spegnersi automaticamente anche in caso di
riproduzione attiva. Selezionando 0 disattiva la
funzione.
Luminosità
0 – 15
Imposti il livello di luminosità desiderata dello
schermo.
Versione Firmware
Viene visualizzato il numero della versione del
firmware inserito.
Informazione di memorizzazione
Le viene indicato lo stato della memoria della
scheda di memorizzazione inserita.
Impostazioni di fabbrica
Selezioni “Yes” al fine di resettare l’apparecchio
alle impostazioni di fabbrica.
Indietro
Qui si torna al menù principale.
Per inserire nel lettore MP3 impostazioni personali, procedere come segue:
(1) Nel menu principale selezioni la funzione impostazione.
(2) Prema i tasti / per selezionare l’impostazione desiderata (vedi tabella).
Confermi la Sua selezione con il tasto . Prema il tasto indietro per ritornare al
menu principale.
Pagina 8 di 10 IT
Page 30

12. Risoluzione dei problemi
Il display non visualizza niente.
(1) La batteria è scarica.
Caricare la batteria.
(2) I tasti sono bloccati.
Disattivare il blocco tasti.
Non si sente niente durante la riproduzione di un file.
(1) Il volume è troppo basso.
Aumentare il volume.
(2) Il file audio è difettoso.
Effettuare di nuovo la trasmissione del file.
Non è possibile collegare l'apparecchio al PC.
(1) Il driver non è stato installato correttamente.
Installare il driver nuovamente.
(2) Eseguire un aggiornamento della scheda madre.
(Seguire le istruzioni del produttore)
Il valore di tempo indicato continua a cambiare.
(1) Durante la riproduzione cambia il Bit-Rate del file MP3.
Utilizzare lo stesso bit-rate durante l'operazione di compressione.
Il PC segnala un errore durante il collegamento con il lettore
(1) Il lettore è stato scollegato dal PC durante la trasmissione dei dati.
Non scollegare mai il lettore durante la trasmissione dei dati.
I dati MP3 non vengono riprodotti correttamente.
(1) I dati MP3 sono stati compressi in un formato sbagliato, per esempio in
MPEG 1 o 2.
Eliminare i formati che non sono supportati dall'apparecchio.
Pagina 9 di 10 IT
Page 31

13. Specifiche tecniche
Elemento
Parametro
Display LCD
128 x 64 Pixel
Tipo di batteria
Batteria LiPo ricaricabile
Durata della batteria
Max. 10 ore
Formato di registrazione
WAV
Formati musicali supportati
MP3, WMA
Bit Rate
MP3/WMA: 32kbps ~ 384kbp
Frequenza di uscita
20Hz ~ 20kHz
SNR
>= 80 dB
Separazione canale
>= 40 dB
Risposta in frequenza
<= 3dB (20Hz ~ 20kHz)
Linea di uscita auricolari
L 9mW, R 9mW
Attacco USB
USB 2.0 (High Speed)
Clausola di esonero dalla responsabilità
Possono subentrare modifiche al firmware e / o all’hardware in qualsiasi momento e senza
preavviso. Per questo motivo è possibile che parti delle istruzioni, delle specifiche tecniche
e delle immagini contenute in questa documentazione divergano leggermente dal presente
prodotto. Tutti i punti descritti in queste istruzioni hanno uno scopo chiarificatore e non
devono necessariamente coincidere con una determinata situazione. Non è possibile far
valere rivendicazioni legali sulla base di queste istruzioni.
14. Smaltimento di apparecchi elettrici usati
I dispositivi contrassegnati da questo simbolo sono soggetti alla direttiva europea
2012/19/EG.
Tutti i dispositivi elettrici ed elettronici usati devono essere smaltiti separatamente
dai rifiuti domestici tramite le sedi indicate dalla legge. Con uno smaltimento
regolare dei dispositivi elettrici ed elettronici usate, si evitano danni all’ambiente.
Pagina 10 di 10 IT
Page 32

1. Table des matières
1. Table des matières ................................................................................................ 1
2. À propos de ce manuel .......................................................................................... 2
3. Instructions............................................................................................................. 2
4. Fonctions ............................................................................................................... 2
5. Contenu de l'emballage ......................................................................................... 3
6. Avant la première utilisation ................................................................................... 3
7. Utilisation ............................................................................................................... 4
8. Menu ...................................................................................................................... 5
9. Musique ................................................................................................................. 5
10. Enregistrements vocal ........................................................................................... 7
11. Réglages du système ............................................................................................ 8
12. Débogage .............................................................................................................. 9
13. Données techniques ............................................................................................ 10
14. Mise au rebut des appareils électriques utilisés ................................................... 10
Page 1 sur 10 FR
Page 33

Avertissement : L'exposition prolongée à l'écoute de la musique forte
peut causer des dommages auditifs temporaires ou permanents ou
même la perte de l'audition. Il n'est pas recommandé d'utiliser le lecteur
vidéo sur la route. Cela peut signifier que l'utilisateur réagisse sans faire
attention aux risques potentiels, et ne pas voir les véhicules qui
approchent.
2. À propos de ce manuel
Lisez attentivement ce manuel et observez, lisez et suivez toutes les instructions
mentionnées dans le présent manuel pour assurer la longue durée de vie et une utilisation
fiable de l'appareil. Veuillez garder ce manuel à portée de main pour référence future et le
transmettre à d'autres utilisateurs de l'appareil.
3. Instructions
• Évitez les chocs durs à l'appareil.
• N'utilisez pas l'appareil dans des endroits extrêmement froids, chauds, humides ou
poussiéreux. Ne l'exposez pas non plus directement aux rayons du soleil.
• Effectuez des sauvegardes fréquentes, afin d'éviter une éventuelle perte de
données.
• Évitez d'utiliser l'appareil dans les champs fortement magnétisés.
• Protégez l'appareil contre l'humidité. Si l'humidité pénètre dans l'appareil, éteignez-le
immédiatement, puis nettoyez et séchez-le.
• N'utilisez pas de solutions chimiques pour nettoyer l'appareil. Utilisez uniquement un
chiffon sec.
• Nous ne sommes pas responsables des dommages ou des pertes de données
occasionnés par une défaillance, une manipulation erronée, la réparation de
l'appareil ou le changement de batterie.
• Ne démontez pas l'appareil, et veuillez ne pas tenter de le réparer vous-même, car
dans ce cas la garantie perd sa validité.
4. Fonctions
Lecture de fichiers MP3, WMA
Ordonner Navigation
Enregistrement vocaux
Batterie rechargeable intégrée Li-polymère
Page 2 sur 10 FR
Page 34

5. Contenu de l'emballage
MP3-lecteur Intenso
Casque d'écoute stéréo
Câble USB
Mode d'emploi
Carte de mémoire Micro SD
6. Avant la première utilisation
Nous vous prions de vous assurer d’insérer la carte de mémoire Micro SD fournie.
Connexion au PC
Veuillez procéder comme suit :
(1) Connectez le lecteur au port USB de l'ordinateur.
(2) La fenêtre "Intenso" s’ouvre. Vous pouvez maintenant enregistrer les données de
votre disque dur sur le support amovible.
Supprimez le PC en toute sécurité
Pour Windows XP/Vista/Windows7/8/8.1/10:
Cliquez avec la touche droite de la souris en bas à droite de la barre des tâches sur l'icône
« Supprimez le périphérique en toute sécurité ». Dans le menu contextuel apparent,
sélectionnez le point « Supprimez l'installation d'enregistrement de masse - unité de
disque USB » avec le clic gauche de la souris. Assurez-vous que la transmission des
données est entièrement terminée.
Vous pouvez maintenant retirer le périphérique
Chargement de la batterie :
L'appareil dispose d'une batterie rechargeable Li-polymère. La batterie est rechargée par
le branchement USB de votre ordinateur.
Lors de la première utilisation de l'appareil, veillez à charger entièrement la batterie. Cette
procédure dure en général 3 heures.
Indication : Pour une capacité de fonctionnement optimale, l'accu lithium-ion doit être
régulièrement utilisé. Si cela ne devait pas être le cas, veuillez recharger l'accu au moins
une fois par mois.
Page 3 sur 10 FR
Page 35

Eléments d'utilisation
(1) Carte Micro SD
(2) Écran LCD
(3) Verrouillage des touches
(4) Touche de Lecture/Pause
(5) Touche Menu
(6) touche
(7) touche
(8) Touche arrière / volume
(9) Prise USB
(10) Connexion casque
7. Utilisation
Mise sous/hors tension
Maintenez la touche Play/Pause appuyée pour environ 3 seconds pour allumer le
lecteur. Pour éteindre le lecteur, appuyez encore un fois la touche pour environ 3
seconds.
Play / Pause
Appuyez sur la touche pour écouter ou arrêter une chanson.
Adaptez les haut-parleurs
Maintenez appuyée la touche arrière pour ouvrir le menu de sélection du
volume. Maintenant avec les touches vous pouvez adapter le volume désiré.
Selon les prescriptions légales vous devez appuyer la touche menu pour passer du
niveau 18 au niveau 19 pour pouvoir en suite augmenter le volume en appuyant la
touche .
Avance / Retour
Appuyez sur les touches / , pour accéder au titre précédent ou suivant.
Débobinage
Appuyez et maintenez la touche , pour débobiner le titre.
Rembobinage
Appuyez et maintenez la touche , pour rembobiner le titre.
Verrouillage touches
En activant le bouton glissant sur le côté de l’appareil selon la position sélectionnée
vous pouvez activer ou désactiver le verrouillage des touches.
Page 4 sur 10 FR
Page 36

8. Menu
Après avoir mis en marche le lecteur MP3 le menu principal est affiché. Ici, vous pouvez
sélectionner les fonctions musique, enregistrement, affichage et configuration.
Pour sélectionner la fonction appuyez sur les touches / et confirmez votre sélection
par la touche .
9. Musique
Choisissez la fonction Musique dans le menu principal.
Vous pouvez maintenant lire les titres enregistrés.
Appeler le dossier de navigation
(1) Dans le mode musique appuyez sur la touche menu dans le statut Pause.
(2) Puis, sélectionnez le point Liste dans le sous - menu.
(3) Maintenant, tous les titres des dossiers affichés à cet instant seront présentés.
(4) Pour finalement atteindre un niveau supérieur dans la structure de dossiers,
appuyez à nouveau sur la touche de Retour.
(5) Avec les touches / sélectionnez le titre recherché et confirmez votre
sélection en appuyant sur la touche pour lancer la lecture.
Supprimer fichier
Pour annuler individuellement un fichier, procédez de la manière suivante:
(1) Dans le mode musique, appuyez sur la touche menu dans le statut Pause.
(2) Sélectionnez un Supprimer le fichier.
(3) Tous les fichiers musicaux de la liste d'une chanson affichée seront présentés
(si vous voulez supprimer le titre dans une autre liste, vous changer la liste
souhaitée par navigation dans le dossier).
(4) Avec les touches / sélectionnez le titre recherché et confirmez votre
sélection en appuyant sur la touche .
(5) Maintenant, vous êtes invité à confirmer le processus de suppression.
(6) Appuyez sur les touches / pour sélectionner oui ou non, Confirmez votre
sélection avec la touche . Appuyez sur la touche retour une fois pour
supprimer la sélection et de faire une nouvelle sélection ou deux fois pour
revenir au mode de lecture.
Page 5 sur 10 FR
Page 37

Supprimer tous les fichiers musicaux
Pour supprimer tous les fichiers musicaux (MP3 et WMA) sur la carte mémoire,
procéder comme décrit. Veuillez sélectionner Supprimer tous les fichiers de
musique au lieu de Supprimer le Fichier et confirmer votre sélection. Maintenant,
tous les fichiers MP3 et WMA sont supprimés de la carte mémoire. Les autres types
de fichiers et de dossiers ne peuvent pas être supprimés par le lecteur. Pour ce
faire, utilisez votre ordinateur.
Répétition A-B
Pour répéter une section spéciale d'un titre, procédez comme suit :
(1) Pendant la lecture, appuyez sur la touche menu et sélectionnez le sous-menu
répétition A-B.
(2) Maintenant, vous pouvez commencer la répétition A-B (A-B répétition) ou
interrompre le nombre de répétitions désiré (nombre de répétitions) et la durée
de la pause souhaitée entre les répétitions (pause entre repet.).
(3) Si vous avez lancé la procédure en sélectionnant répétition A-B, vous
reviendrez en mode lecture et le symbole A clignote pour le mode de répétition
A-B. En appuyant sur la touche vous définissez le point de début et en réappuyant sur la même touche, le point final de la répétition A-B.
(4) Maintenant, la section entre le point de début et de fin sélectionnés sera
répétée en fonction du nombre sélectionné.
(5) Pour arrêter la répétition A-B plus tôt, appuyez sur la touche menu.
Quitter la fonction musique
Appuyez sur la touche retour en mode lecture pour accéder au menu principal.
Page 6 sur 10 FR
Page 38

10. Enregistrements vocal
Choisissez dans le menu principal la fonction enregistrement.
Enregistrement
(1) Appuyez sur la touche pour démarrer l'enregistrement.
(2) Pendant l'enregistrement, vous pouvez arrêter ou continuer l'enregistrement. En
appuyant sur la touche .
(3) Appuyez sur la touche Retour, pour terminer et archiver l'enregistrement.
L’enregistrement est sauvegardé en tant que fichier .wav.
(4) Appuyez sur la touche menu avant de commencer l'enregistrement. Ainsi, vous
pouvez naviguer à travers les enregistrements existants (liste) et configurer la
qualité d’enregistrement (qualité).
Attention: N'éteignez pas l'appareil pendant l'enregistrement. Sinon l'enregistrement
ne serait pas archivé et serait perdu.
Lecture
La fonction lecture dans le menu principal lance le mode lecture pour les
enregistrements sauvegardés. Ecoutez vos enregistrements comme vous écoutez de
la musique. Ici, vous pouvez aussi naviguer dans la liste de vos enregistrements,
supprimer un fichier ou tous les fichiers de voix en appuyant sur la touche menu
avant le début de la lecture pour atteindre le sous - menu.
Attention : Si vous sélectionnez « Supprimer tous les fichiers voix », tous les fichiers
.wav seront supprimés de la carte mémoire.
Quitter la fonction enregistrement
Appuyez sur la touche Retour, pour accéder au menu principal.
Page 7 sur 10 FR
Page 39

11. Réglages du système
Fonction
Opportunités de sélection (description)
LCD On/Off
0–60 seconds in 3 seconds steps
Define after how many seconds without entry
the display has to be switched off. By selecting
0, you desactivate the function.
Langue
Anglais, espagnol, français, allemand, italien,
portugais, russe, polonais
Réglez la langue du système que vous désirez ici.
Economiser
de l’énergie
Auto arrêté
0-60 minutes en étapes de 5 minutes
Définissez après combien de minutes sans
utilisation le lecteur doit s’éteindre
automatiquement. En sélectionnant 0, vous
désactivez la fonction.
Sleep-Timer
0-120 minutes en étapes de 10 minutes
Définissez après combien de temps le lecteur
doit s’éteindre, même en cours de lecture
active. En sélectionnant 0, vous désactivez la
fonction.
Luminosité
0-15
Réglez le niveau de luminosité désiré de l'écran.
Version de Microprogramme
Le numéro de version du Microprogramme
installé est affiché.
Informations sur la mémoire
L’état de l'emplacement de mémoire de la carte
mémoire de la carte mémoire insérée est
affiché.
Réglages d'usine
Sélectionnez « oui » pour réinitialiser l'appareil
aux réglages d'usine.
Retour
Ici, vous pouvez revenir au menu principal.
Pour régler votre lecteur MP3 individuellement, procédez de la manière suivante:
(1) Dans le menu principal, sélectionnez la fonction Configuration.
(2) Appuyez sur les touches / pour sélectionner la configuration souhaitée (voir
tableau). Confirmez votre sélection avec la touche . Appuyez sur la touche retour
pour revenir au menu principal.
Page 8 sur 10 FR
Page 40

12. Débogage
Il n'apparait rien sur l'écran.
(1) La batterie est vide.
Chargez la batterie.
(2) Les touches sont verrouillées.
Veuillez désactiver le verrouillage des touches.
Absence de son lors de l'écoute d'un fichier.
(1) Le haut-parleur est trop faible.
Augmentez le sont du haut-parleur.
(2) Le fichier audio est défectueux.
Veuillez renouveler le transfert du fichier.
Aucune connexion ne peut avoir lieu au PC.
(1) Le driver n'a pas été correctement installé.
Réinstallez le driver.
(2) Veuillez effectuer une mise à jour du menu principal.
(Pour cela veuillez tenir compte des instructions du fabricant)
La valeur d'affichage du temps change en permanence.
(1) Le débit binaire du fichier MP3 change au cours de la lecture.
Veuillez utiliser un débit binaire unique par compression.
Le PC affiche un message d'erreur en le connectant au lecteur
(1) Le lecteur a été séparé du PC lors de la transmission de fichiers.
Veuillez ne jamais déconnecter le lecteur au cours du transfert de fichiers.
Les fichiers MP3 ne peuvent pas être écoutés correctement.
(1) Les fichiers MP3 ont été compressés à un mauvais format, par exemple en MPEG
1 ou 2.
Supprimez les formats de fichiers qui ne sont pas soutenus.
Page 9 sur 10 FR
Page 41

13. Données techniques
Item
Paramètre
Affichage LCD
128 x 64 Pixels
Type de batterie
Batterie rechargeable intégrée Li-polymère
Durée de la batterie
Max. 10 heures
Format d'enregistrement
WAV
Formats musique soutenus
MP3, WMA
Débit binaire
MP3/WMA: 32kbps ~ 384kbps
Fréquence de sortie
20Hz ~ 20kHz
SNR
>= 80 dB
Séparation des canaux
>= 40 dB
Réponse de fréquence
<= 3dB (20Hz ~ 20kHz)
Conduite de sortie casque
d'écoute
L 9mW, R 9mW
Port USB
USB 2.0 (High Speed)
Clause de non-responsabilité
Nous nous réservons le droit de modifier le logiciel et/ou matériel à tout moment et sans
préavis. Pour cette raison, il est possible que certaines parties des instructions, des
spécifications et des images contenues dans ce document diffèrent légèrement de ce
produit. Tous les points décrits dans ce manuel le sont à des fins de clarification et ne
coïncident pas nécessairement avec une situation donnée. Il n'est pas possible de faire
valoir une réclamation sur la base de ces instructions.
14. Mise au rebut des appareils électriques utilisés
Les appareils marqués de ce symbole sont soumis à la directive européenne
2012/19/EG.
Tous les équipements électriques et électroniques doivent être mis au rebut
séparément des ordures ménagères dans les sites indiqués par la loi. Une mise au
rebut appropriée des appareils électriques et électroniques, permettra d'éviter de
nuire à l'environnement.
Page 10 sur 10 FR
Page 42

1. Contenido
1. Contenido............................................................................................................... 1
2. Sobre este manual ................................................................................................. 2
3. Avisos .................................................................................................................... 2
4. Funciones .............................................................................................................. 2
5. Contenido del paquete ........................................................................................... 3
6. Antes del uso ......................................................................................................... 3
7. Manejo ................................................................................................................... 4
8. Menú ...................................................................................................................... 5
9. Música.................................................................................................................... 5
10. Grabación de voz ................................................................................................... 7
11. Configuración de sistema....................................................................................... 8
12. Resolución de problemas....................................................................................... 9
13. Datos técnicos ..................................................................................................... 10
14. Eliminación de aparatos electrónicos usados ...................................................... 10
Página 1 de 10 ES
Page 43

ADVERTENCIA: Una exposición prolongada a música con el volumen
demasiado alto puede causar daños en la audición o pérdida de audición
temporal o permanente. No se recomienda el uso del reproductor de
vídeo en el tráfico. Puede llevar a la exposición a peligros potenciales,
como no oír vehículos que se acercan.
2. Sobre este manual
Lea este manual cuidadosamente y observe, lea y siga todas las instrucciones
mencionadas aquí para asegurar la larga vida y el uso confiable de este aparato. Por
favor tenga a mano este manual para referencia futura y páselo a otros usuarios de este
artefacto.
3. Avisos
• Evite golpear el aparato contra superficies duras.
• No utilice el aparato en ambientes extremadamente fríos, calientes, húmedos o
polvorientos. No lo exponga a los rayos solares directos.
• Realice con frecuencia respaldos de datos para evitar una posible pérdida de datos.
• Evite usarlo en campos magnéticos fuertes.
• Proteja el aparato de la humedad. En el caso de que entre humedad al aparato,
apáguelo de inmediato, luego limpie y seque el aparato.
• No utilice soluciones químicas para limpiar el aparato. Para este propósito utilice
solamente un paño seco.
• No nos hacemos responsable por daños o pérdidas de datos producto de un mal
funcionamiento, de un uso incorrecto, de una reparación realizada por usted mismo
o por un cambio de batería.
• Por favor no separe el aparato en sus componentes y no intente repararlo usted
mismo ya que la garantía perderá su validez.
4. Funciones
Reproducir archivos MP3, WMA
Navegación de carpetas
Grabación de voz
baterías de litio-polímero recargables
Página 2 de 10 ES
Page 44

5. Contenido del paquete
Intenso reproductor de MP3
Auriculares estéreo
Cable USB
Instrucciones de uso
Tarjeta Micro SD
6. Antes del uso
Pedimos de garantizar la introducción de la tarjeta Micro SD enviada.
Conectar con el PC
Por favor proceda de la siguiente manera:
(1) Conecte el reproductor con la conexión USB de su PC.
(2) Se abrirá la ventana “Intenso”. Ahora puede transferir datos de su disco duro a la
memoria portátil.
Retirar de modo seguro del PC
Para Windows XP/Vista/Windows7/8/8.1/10:
Haga un clic con el botón derecho del maus abajo a la derecha en la barra de tareas
sobre el símbolo „Quitar hardware con seguridad“. De la ventana que aparece seleccione
el punto „Quitar dispositivo de almacenamiento masivo“ con el botón izquierdo del maus.
Cerciórese de que la transmisión de dato haya finalizado.
Ahora puede retirar el aparato.
Carga de la batería:
El dispositivo dispone de una batería de iones de litio incorporada. La batería se carga
mediante la conexión USB de su PC. La primera vez que utilice el dispositivo asegúrese
que la batería esté completamente cargada. Este proceso dura normalmente 3 horas.
Nota: para un rendimiento óptimo, la batería de iones de litio debe usarse regularmente.
De no ser así, cargue la batería completamente como mínimo una vez al mes.
Página 3 de 10 ES
Page 45

Elementos de manejo
(1) Tarjeta Micro SD
(2) Pantalla LCD
(3) Bloqueo de teclas
(4) Tecla de Ejecutar / Pausa
(5) Tecla de menú
(6) Tecla
(7) Tecla
(8) Tecla Atrás / Volume
(9) Entrada USB
(10) Conexión para auriculares
7. Manejo
Encendido- / apagado
Mantener pulsada la tecla Play/Pause para aproximadamente 3 segundos para
encender el reproductor. Para apagar el reproductor volver a pulsar la tecla para
aproximadamente 3 segundos.
Reproducir/ pausa
Presione el botón para reproducir o detener una canción.
Ajustar volumen
Mantener pulsada la tecla atrás para acceder al menú de selección del
volumen. Ahora con la teclas se puede ajustar el volumen deseado. Segun los
requisitos legales, hay que pulsar la tecla menú para ir desde el nivel 18 al nivel 19
para poder aumentar aún más el volumen pulsando la tecla .
Adelante/ atrás
Presione el botón / para acceder al título anterior o siguiente.
Avanzar
Presione y mantenga presionado el botón para avanzar en el título.
Rebobinar
Presione y mantenga presionado el botón para rebobinar en el título.
Bloqueo de teclas
Activando la tecla deslizante en el costado del aparato puede activar o desactivar el
bloqueo de teclas según la posición elegida.
Página 4 de 10 ES
Page 46

8. Menú
Luego de haber encendido el reproductor de MP3, el menú principal aparece. Aquí puede
seleccionar funciones como música, registración, pantalla y configuración.
Para seleccionar la función presione las teclas / y confirme su selección con la tecla
.
9. Música
Seleccione en el menú principal la función Música.
Ahora puede reproducir los títulos almacenados.
Acceder a la navegación de carpetas
(1) En el modo de música presione la tecla de menú en el status de Pausa.
(2) Luego, seleccione el punto Lista en el sub-menú.
(3) Ahora todos los títulos de las carpetas actualmente mostradas aparecen a la
vista.
(4) A fin de eventualmente alcanzar un nivel más alto en la estructura de su
carpeta, presione la tecla de Atrás.
(5) Con las teclas / seleccione el título buscado y confirme su selección
presionando la tecla para iniciar la reproducción.
Eliminar títulos
Para eliminar un título en particular proceda de la siguiente manera:
(1) En el modo de música presione la tecla de menú en el status de Pausa.
(2) Seleccione Borrar Archivo.
(3) Todos los archives de música de la lista de una canción exhibida son
mostrados (si usted quiere borrar el título en otra lista tendrá que cambiar a la
lista deseada a través de la carpeta de navegación).
(4) Con las teclas / seleccione el título buscado y confirme su selección
presionando la tecla .
(5) Ahora se le pedirá confirmar el proceso de borrado.
(6) Presione las teclas / para seleccionar sí o no. Confirme su selección con
la tecla 1 . Presione la tecla de Atrás una vez para borrar la selección y hacer
una nueva selección, o dos veces para volver al modo de reproducción.
Página 5 de 10 ES
Page 47

Borre todos los archivos de música
Para borrar todos los archivos de música (MP3 y WMA) en la tarjeta de memoria,
proceda tal como se describe. Por favor seleccione Borrar todos los archivos de
música en lugar de Borrar Archivo y confirme su selección. Ahora todos los
archivos de MP3 y WMA serán borrados de la tarjeta de memoria. Otros tipos de
archivos y carpetas no podrán ser borrados por el reproductor. Para este propósito
utilice su computadora.
Repetición A-B
Para repetir una sección especial de un título, proceda tal como se detalla a
continuación:
(1) Durante la reproducción, presione la tecla menú y seleccione el sub-menú A-B
de repetición.
(2) Ahora usted puede comenzar la repetición A-B o interrumpir la cantidad de
repeticiones deseadas (cantidad de repeticiones) y la duración deseada de la
pausa entre repeticiones (pausa entre repet.).
(3) Si al seleccionar repetición A-B usted ha iniciado el procedimiento, usted
volverá al modo de reproducción y el símbolo A parpadeará para el modo de
repetición A-B. Al presionar la tecla usted ajusta el punto de inicio y al
presionar nuevamente la misma tecla ajusta el punto final de la repetición A-B.
(4) Ahora, la sección entre el inicio seleccionado y el punto final será repetido
según el número seleccionado.
(5) Para finalizar tempranamente la repetición A-B, presione la tecla de menú.
Abandonar la función música
Presione la tecla atrás en el modo de reproducción para cambiar al menú principal.
Página 6 de 10 ES
Page 48

10. Grabación de voz
Seleccione en el menú principal la función Grabación.
Grabación
(1) Presione el botón para iniciar la grabación.
(2) Durante la grabación presione el botón para detener o continuar la
grabación.
(3) Presione el botón Atrás para terminar y almacenar la grabación. La grabación
se guarda como archivo .wav.
(4) Presione la tecla de menú antes de comenzar a grabar. Así podrá navegar a
través de las grabaciones existentes (lista) y ajustar la calidad de grabación
(calidad).
Atención: No apague el aparato durante la grabación. La grabación no se
almacenará y se perderá.
Reproducción
A través de la función reproducción en el menú principal, el modo de reproducción
se abre para los registros ya guardados. Reproduzca sus grabaciones tal como lo
hace con su música. Aquí usted puede también navegar a lo largo de la lista de sus
grabaciones, borrar un archivo o todos los archivos de voz presionando la tecla
menú antes de que la reproducción se inicie para alcanzar el sub-menú.
Atención: Si usted selecciona “Borrar todos los archivos de voz”, todos los archivos
.wav serán borrados de la tarjeta de memoria.
Abandonar la función Grabación
Presione el botón Atrás para acceder al menú principal.
Página 7 de 10 ES
Page 49

11. Configuración de sistema
Función
Selección de Oportunidades (descripción)
LCD On/Off
0–60 segundos en pasos de 3 segundos
Defina cuántos segundos sin entradas debe
pasar la pantalla antes de apagarse
automáticamente. Al seleccionar 0, usted
desactivará esa función.
Idioma
Inglés, español, francés, alemán, italiano,
portugués, ruso, polaco
Ajuste aquí el idioma de sistema que usted
desea.
Ahorro de
energía
Auto Off
0–60 minutos en pasos de 5 minutos
Defina cuántos minutos sin uso deben pasar
para que el reproductor se apague
automáticamente. Al seleccionar 0, usted
desactivará esa función.
Sleep-Timer
0–120 minutos en pasos de 10 minutos
Defina cuánto tiempo sin uso deben pasar para
que el reproductor se apague automáticamente
también durante la reproducción activa. Al
seleccionar 0, usted desactivará esa función.
Brillo
0–15
Ajuste el nivel de brillo deseado para la
pantalla.
Versión de Firmware
El número de la versión del Firmware es
mostrado.
Información de Memoria
El status de ubicación de memoria de la tarjeta
de memoria insertada es mostrado.
Configuraciones de Fábrica
Seleccione “sí” para reajustar el artefacto a la
configuración de fábrica.
Retroceso
Aquí usted puede regresar nuevamente al
menú principal.
Para personalizar su reproductor de MP3 proceda de la siguiente manera:
(1) En el menú principal, seleccione la función Configuración.
(2) Presione las teclas / para seleccionar la configuración deseada (ver tabla).
Confirme su selección con la tecla . Presione la tecla atrás para volver al menú
principal.
Página 8 de 10 ES
Page 50

12. Resolución de problemas
No aparece nada en la pantalla.
(1) La batería está descargada.
Por favor cargue la batería.
(2) Las teclas están bloqueadas.
Por favor desactive la tecla de traba.
No hay sonido cuando reproduce un archivo.
(1) El volumen está demasiado bajo.
Suba el volumen.
(2) El archivo de audio está defectuoso.
Por favor transfiera el archivo nuevamente.
No se puede realizar una conexión con el PC.
(1) El driver no fue instalado correctamente.
Instale los drivers nuevamente.
(2) Por favor realice actualizaciones a su tarjeta madre.
(Por favor siga las instrucciones del fabricante)
El tiempo cambia constantemente.
(1) La bit-rate de los archivos MP3 cambia durante la reproducción.
Por favor utilice un bit-rate uniforme al comprimir.
El PC muestra un error al conectar con el reproductor
(1) El reproductor fue desconectado del PC durante la transmisión de datos.
Por favor no desconecte el reproductor nunca durante la transmisión de datos del
PC.
Los archivos MP3 no se reproducen correctamente.
(1) Los archivos MP3 fueron comprimidos en un formato incorrecto, por ejemplo en
MPEG 1 o 2.
Elimine los formatos que no son soportados.
Página 9 de 10 ES
Page 51

13. Datos técnicos
Item
Parámetro
Pantalla LCD
128 x 64 pixel
Tipo de batería
Baterías de litio-polímero recargables
Duración de batería
Max. 10 horas
Formato de grabación
WAV
Formatos de música
soportados
MP3, WMA
Bit Rate
MP3/WMA: 32kbps ~ 384kbp
Frecuencia de salida
20Hz ~ 20kHz
SNR
>= 80 dB
Separación de canales
>= 40 dB
Respuesta de frecuencia
<= 3dB (20Hz ~ 20kHz)
Salida de auriculares
L 9mW, R 9mW
Conexión USB
USB 2.0 (High Speed)
Exoneración de responsabilidad
Se pueden realizar en cualquier momento y sin previo aviso cambios en el firmware y o el
hardware. Por este motivo es posible que partes de las instrucciones, de los datos
técnicos y las imágenes en esta documentación difieran ligeramente del producto que
tiene delante. Todos los puntos descritos en estas instrucciones solamente sirven para la
explicación y no tienen que coincidir forzosamente con una situación en concreto. No se
pueden alegar pretensiones legales basadas en estas instrucciones.
14. Eliminación de aparatos electrónicos usados
Los aparatos marcados con este símbolo están sujetos a la directiva europea
2012/19/EG.
Todos los aparatos eléctricos y electrónicos usados deben ser eliminados por
separado de la basura doméstica en los lugares estatales previstos para ello.
Eliminando debidamente los aparatos electrónicos evita daños en el medio
ambiente.
Página 10 de 10 ES
Page 52

1. Conteúdo
1. Conteúdo ............................................................................................................... 1
2. Sobre este manual: ................................................................................................ 2
3. Advertência ............................................................................................................ 2
4. Funções ................................................................................................................. 2
5. Conteúdo da embalagem ....................................................................................... 3
6. Antes do uso .......................................................................................................... 3
7. Manuseio ............................................................................................................... 4
8. Menu ...................................................................................................................... 5
9. Música.................................................................................................................... 5
10. Gravação de voz .................................................................................................... 7
11. Configurações de sistema...................................................................................... 8
12. Solução de problemas ........................................................................................... 9
13. Informações técnicas ........................................................................................... 10
14. Eliminação de aparelhos elétricos usados ........................................................... 10
Página 1 de 10 PT
Page 53

AVISO: Ouvir música a um volume demasiado elevado durante um longo
período de tempo pode provocar lesões auditivas temporárias ou
permanentes, ou mesmo a perda da audição. A utilização do leitor de
vídeo durante a condução rodoviária não é recomendada. O condutor
pode não se aperceber de potenciais perigos, como veículos em
aproximação, e não reagir adequadamente.
2. Sobre este manual:
Leia atentamente este manual e observe, leia e siga todas as instruções mencionadas no
mesmo, por forma a garantir uma vida longa e uma utilização fiável do dispositivo. Queira
manter este manual num local acessível para consulta futura e passá-lo aos outros
utilizadores do dispositivo.
3. Advertência
• Evite impactos fortes com o aparelho.
• Não utilize o aparelho em regiões muito frias, quentes, úmidas ou empoeiradas.
Tampouco exponha-o diretamente aos raios solares.
• Para evitar possíveis perdas de dados, faça cópias de segurança regularmente.
• Evite o uso em campos magnéticos muito intensos.
• Proteja o aparelho da água. Se o aparelho for molhado, desligue-o imediatamente,
limpando-o e secando-o logo em seguida.
• Não utilize produtos químicos na limpeza do aparelho. Para isto, use somente um
pano seco.
• Não nos responsabilizamos por danos ou perdas de dados ocasionados por
defeitos, uso indevido, consertos feitos por conta própria ou troca de bateria.
• Por favor não desmonte o aparelho e não tente consertá-lo por conta própria, sob
risco de perda de validade da garantia.
4. Funções
Reprodução de arquivos MP3, WMA
Navegação de pastas
Gravação de voz
Bateria embutida recarregável de lítio-polímero
Página 2 de 10 PT
Page 54

5. Conteúdo da embalagem
MP3-Player Intenso
Fone de ouvido stereo
Cabo USB
Manual de instruções
Cartão micro SD
6. Antes do uso
Certifique-se que o cartão micro SD fornecido está inserido.
Conexão com o PC
Proceda da seguinte maneira:
(1) Conecte o Player na entrada USB do PC.
(2) A janela “Intenso” abrirá. Agora você pode salvar os dados do seu disco rígido na
mídia de armazenamento.
Remover do PC com segurança
Para Windows XP/Vista/Windows7/8/8.1/10:
Clique com o botão direito do mouse embaixo à direita da barra de ferramentas no ícone
„Remover Hardware com segurança“. No menu que aparece em seguida, selecione com o
botão esquerdo do mouse o item „Remover Unidade de Armazenamento em Massa USB“.
Assegure-se que a transferência de dados foi realizada por completo. Você pode agora
remover o aparelho.
Carregamento da bateria:
O aparelho dispõe de uma bateria integrada de iões de lítio. A bateria é carregada através
da ligação USB com o seu PC.Na primeira utilização do aparelho, certifique-se de que
carrega a bateria completamente. Regra geral, este processo demora 3 horas.
Nota: Para um desempenho optimizado, a bateria de iões de lítio deve ser utilizada
regularmente. Se não for este o caso, carregue completamente a bateria, pelo menos,
uma vez por mês.
Página 3 de 10 PT
Page 55

Elementos de manuseio
(1) Microcartão SD
(2) Visor LCD
(3) Bloqueio de botões
(4) Tecla Play / Pause
(5) Tecla do menu
(6) tecla
(7) tecla
(8) Tecla voltar / volume
(9) Entrada USB
(10) Ligação para auricular
7. Manuseio
Ligar / Desligar
Mantenha a tecla Play/Pause premida durante aprox. 3 segundos para ligar o
aparelho. Para desligar, pressione a tecla novamente durante aprox. 3 segundos.
Play / Pause
Pressione a tecla Taste para reproduzir ou dar pausa em uma música.
Regular o volume
Mantenha presionada a tecla voltar para abrir o menu selecção de volume.
Agora com as teclas pode ajustar o volume desejado. Devido a disposições
legais, você tem de premir a tecla menu para mudar do nível 18 ao 19 para continuar
a aumentar o volume com a tecla .
Faixa seguinte / Faixa anterior
Pressione as teclas / para ir para a faixa seguinte ou anterior.
Adiantar
Pressione e segure a tecla para adiantar na faixa.
Voltar
Pressione e segure a tecla para voltar na faixa.
Bloqueio das teclas
Ao confirmar o botão de deslizamento no lado do aparelho, pode activar ou
desactivar o bloqueio de botões de acordo com a posição seleccionada.
Página 4 de 10 PT
Page 56

8. Menu
Depois de ligar o leitor de MP3, o menu principal é exibido. Aqui pode selecionar as
funções de música, registo, exibir e definições.
Para selecionar a função, prima as teclas / e confirme a sua seleção com a tecla .
9. Música
No menu principal, selecione Música.
Você pode agora reproduzir os títulos armazenados.
Chamar Navegação de Pastas
(1) No modo de música, prima a tecla menu no estado Em pausa.
(2) De seguida, selecione o ponto Lista no submenu.
(3) Agora, os títulos das pastas atualmente em exibição são apresentados.
(4) Para eventualmente atingir um nível mais alto na estrutura da pasta, prima a
tecla Voltar novamente.
(5) Com as teclas / selecione o título pesquisado e confirme a sua seleção,
premindo a tecla para iniciar a reprodução.
Deletar um Título
Para deletar um único título, prossiga da seguinte maneira:
(1) No modo de música, prima a tecla menu no estado Em pausa.
(2) Selecione Eliminar ficheiro.
(3) Todos os ficheiros de música da lista de uma música apresentada são
apresentados para si (se quiser eliminar o título outra lista, deve alternar para a
lista desejada através da pasta navegação).
(4) Com as teclas / selecione o título pesquisado e confirme a sua seleção,
premindo a tecla .
(5) Agora, ser-lhe-á pedido que confirme o processo de eliminação.
(6) Prima as teclas / para selecionar sim ou não. Confirme a sua seleção
com a tecla 1 . Prima a tecla voltar uma vez para eliminar a seleção e efetuar
uma nova seleção, ou duas vezes para regressar ao modo de reprodução.
Página 5 de 10 PT
Page 57

Elimine todos os ficheiros de música
Para eliminar todos os ficheiros de música (MP3 e WMA) no cartão de memória,
proceda conforme o descrito. Selecione Eliminar todos os ficheiros de música,
em vez de Eliminar ficheiro e confirme a sua seleção. Agora, todos os ficheiros
MP3 e WMA são eliminados do cartão de memória. Outros tipos de ficheiros e
pastas não podem ser eliminados pelo leitor. Para este fim, utilize o seu
computador.
Repetição A-B
Para repetir uma secção especial de um título, proceda como se segue:
(1) Durante a reprodução, prima a tecla menu e selecione o submenu Repetição
A-B.
(2) Agora, pode iniciar a repetição A-B (Repetição A-B) ou interromper o número
de repetições desejadas (número de repetições) e a duração da pausa
desejada entre repetições (pausa entre repetições).
(3) Se, ao selecionar a repetição A-B tiver iniciado o procedimento, irá voltar ao
modo de reprodução e o símbolo A pisca para o modo de repetição A-B. Ao
premir a tecla , configure o ponto de início e, ao voltar a premir a mesma
tecla, o ponto final da repetição A-B.
(4) Agora, a secção entre o início selecionado e o ponto final será repetido de
acordo com o número selecionado.
(5) Para terminar a repetição A-B mais cedo, prima a tecla menu.
Sair da função Música
Prima a tecla voltar, no modo reprodução, para passar para o menu principal.
Página 6 de 10 PT
Page 58

10. Gravação de voz
No Menu principal, selecione a função Gravação.
Gravação
(1) Pressione a tecla para iniciar a gravação.
(2) Durante a gravação, pressionando a tecla , você pode interromper ou
continuar.
(3) Pressione a tecla Voltar para finalizar e reproduzir a gravação. A gravação é
guardada como um ficheiro .wav.
(4) Prima a tecla menu antes de iniciar a gravação. Para que possa navegar
através das gravações existentes (lista) e configurar a qualidade da gravação
(qualidade).
Atenção: Não desligue o aparelho durante uma gravação: desta forma, a gravação
não será salva e será perdida.
Reprodução
Através da função reproduzir no menu principal, o modo de reprodução é aberto
para os registos guardados. Reproduza os seus registos como reproduz a música.
Aqui, pode ainda navegar através da lista dos seus registos, eliminar um único
ficheiro ou todos os ficheiros de idioma, premindo a tecla menu antes da reprodução
iniciar, para chegar ao submenu.
Atenção: Se selecionar "Eliminar todos os ficheiros de idioma", todos os ficheiros
.wav serão eliminados no cartão de memória.
Sair da função Gravação
Pressione a tecla Voltar para ir ao Menu principal.
Página 7 de 10 PT
Page 59

11. Configurações de sistema
Função
Oportunidades de seleção (descrição)
LCD Ligado/Desligado
0–60 segundos em passos de 3 segundos
Defina após quantos segundos sem entrada o
visor deve desligar-se. Ao selecionar 0,
desativa a função.
Idioma
Inglês, espanhol, francês, alemão, italiano,
português, russo, polaco
Ajuste aqui o sistema de idioma desejado.
Poupança
de energia
Desligamento
automático
0–60 minutos em passos de 5 minutos
Defina após quantos minutos sem usar o leitor
deva automaticamente desligar-se. Ao
selecionar 0, desativa a função.
Sleep-Timer
0-120 minutos em passos de 10 minutos
Defina após quanto tempo o leitor deve ser
desligado também durante a reprodução ativa.
Ao selecionar 0, desativa a função.
Brilho
0–15
Defina o nível de brilho desejado do visor.
Versão do firmware
O número da versão do Firmware aufgespielten
é apresentado.
Informações da memória
O estado de localização da memória do cartão
de memória introduzido é apresentado.
Definições de fábrica
Selecione "sim" para redefinir o aparelho com
as definições de fábrica.
Voltar
Aqui, pode regressar ao menu principal.
Para configurar de maneira personalizada seu MP3-Player prossiga da seguinte forma:
(1) No menu principal, selecione a função Configurar.
(2) Prima as teclas / para selecionar a definição desejada (ver a tabela). Confirme
a sua seleção com a tecla . Prima a tecla voltar para voltar ao menu principal.
Página 8 de 10 PT
Page 60

12. Solução de problemas
Não se vê nada no visor
(1) A bateria está vazia.
Carregue a bateria.
(2) As teclas estão bloqueadas.
Queira desativar o bloqueio da tecla.
Não há som quando se reproduz um arquivo.
(1) O volume está muito baixo.
Aumente o volume.
(2) O arquivo de audio apresenta erro.
Transfira novamente o arquivo.
Não é possível conectar ao PC
(1) O driver não foi instalado corretamente.
Instale o driver novamente.
(2) Faça uma atualização da placa-mãe.
(Neste caso, siga as instruções do fabricante)
A duração varia constantemente.
(1) A taxa de Bits do arquivo MP3 varia durante a reprodução.
Utilize uma taxa de Bits constante quando comprimir.
O PC indica erro ao conectar com o Player
(1) O Player foi desconectado do PC durante a transferência de dados.
Nunca desconecte o Player durante a transferência de dados.
Arquivos MP3 não são reproduzidos corretamente.
(1) Os arquivos MP3 foram comprimidos em um formato incorreto, como por exemplo
MPEG 1 ou 2.
Delete os formatos de arquivo que não forem suportados.
Página 9 de 10 PT
Page 61

13. Informações técnicas
Item
Parâmetro
Visor LCD
128 x 64 Pixel
Tipo da bateria
Bateria recarregável de Lítio-Polímero
Tempo de operação da
bateria
Max. 10 Horas
Formato de gravação
WAV
Formatos de música
suportados
MP3, WMA
Bitrate
MP3/WMA: 32kbps ~ 384kbps
Frequência de saída
20Hz ~ 20kHz
SNR
>= 80 dB
Separação
>= 40 dB
Frequência de corte
<= 3dB (20Hz ~ 20kHz)
Saída de fones de ouvido
L 9mW, R 9mW
Conexão USB
USB 2.0 (High Speed)
Exclusão de responsabilidade
Podem ser efetuadas alterações no firmware e/ou no hardware a qualquer momento e
sem aviso prévio. Como tal, algumas secções das instruções, dados técnicos e imagens
nesta documentação podem divergir do produto que adquiriu. Todos os pontos descritos
nestas instruções servem apenas para efeitos de explicação e não correspondem
obrigatoriamente a uma determinada situação. Por este motivo, não consideramos válido
qualquer tipo de direito ou compensação com base nestas instruções.
14. Eliminação de aparelhos elétricos usados
Os aparelhos identificados com este símbolo são abrangidos pela
Diretiva 2012/19/EG.
Os aparelhos elétricos e eletrónicos usados devem ser eliminados
separadamente do lixo doméstico, junto das entidades para tal
previstas.
Ao efetuar uma eliminação correta de aparelhos elétricos usados,
está a prevenir danos ambientais.
Página 10 de 10 PT
Page 62

1. Zawartość
1. Zawartość .............................................................................................................. 1
2. O instrukcji obsługi ................................................................................................. 2
3. Wskazówki ogólne ................................................................................................. 2
4. Działanie ................................................................................................................ 2
5. Zawartość opakowania .......................................................................................... 3
6. Przed rozpoczęciem użytkowania .......................................................................... 3
7. Obsługa.................................................................................................................. 4
8. Menu główne .......................................................................................................... 5
9. Muzyka................................................................................................................... 5
10. Nagrywanie mowy .................................................................................................. 7
11. Ustawienia systemowe .......................................................................................... 8
12. Usuwanie błędów ................................................................................................... 9
13. Dane techniczne .................................................................................................. 10
strona 1 z 10 PL
Page 63

OSTRZEŻENIE: Przedłużone obciążenie słuchu poprzez zbyt głośne
odtwarzanie m uzyki może prowadzić do tymczasowych lub stałych
uszkodzeń słuchu lub utraty słuchu. Nie zaleca się używanie odtwarzacza
filmów Video w ruchu ulicznym. Może to doprowadzić do tego, że
słuchacz nie będzie uważał na potencjalne niebezpieczeństwa, jak np.
zbliżające się pojazdy.
2. O instrukcji obsługi
Przeczytaj uważnie instrukcję obsługi i zastosuj się do zawartych w niej wskazówek, a
zapewni to niezawodne korzystanie i długą żywotność urządzenia. Prosimy o zachowanie
instrukcji do wykorzystania jej w przyszłości i o przekazanie jej innym użytkownikom
urządzenia.
3. Wskazówki ogólne
• Chronić odtwarzacz przed upadkiem.
• Nie używać odtwarzacza w bardzo niskich bądź wysokich temperaturach oraz przy
dużej wilgotności lub zapyleniu powietrza. Nie narażać urządzenia na bezpośrednie
działanie promieni słonecznych.
• Aby uniknąć utraty danych dokonuj częstego zapisu danych.
• Unikać używania odtwarzacza w silnie namagnesowanych polach.
• Chroń odtwarzacz przed zamoczeniem. Jeśli do wnętrza dostanie się wilgoć, należy
aparat natychmiast wyłączyć i przystąpić do oczyszczenia i osuszenia wnętrza.
• Do czyszczenia nie stosować żadnych chemicznych roztworów . Do tego celu użyć
tylko suchą szmatkę.
• Producent nie ponosi odpowiedzialności za szkody bądź utratę danych wynikające z
niewłaściwego posługiwania się aparatem, dokonywanie samodzielnych napraw
aparatu i wymianę akumulatorka.
• Nie należy rozkładać aparatu na części składowe bądź naprawiać go samodzielnie,
gdyż powoduje to utratę gwarancji.
4. Działanie
Odtwarzanie plików MP3, WMA
Katalog nawigacji
Nagrywanie mowy
Wbudowana litowo-jonowa bateria z możliwością ładowania
strona 2 z 10 PL
Page 64

5. Zawartość opakowania
Intenso MP3-Player
Słuchawki stereo
Kabel USB
Instrukcja obsługi
Micro SD
6. Przed rozpoczęciem użytkowania
Należy upewnić się, że karta pamięci Micro SD dołączona w zestawie włożona jest
prawidłowo.
Podłączenie z PC
Sposób postępowania:
(1) Podłącz odtwarzacz do gniazda USB w PC.
(2) Otworzy się okno “Intenso”. Teraz możesz zapisać dane z twojego dysku twardego
na przenośny nośnik danych.
Bezpieczne usuwanie danych z PC
Dla Windows XP/Vista/Windows7/8/8.1/10:
Kliknij prawym przyciskiem myszy po prawej stronie na dole na pasku zadań na symbol
„Bezpieczne usuwanie sprzętu“. W pojawiającym się menu kontekstowym wybierz za
pomocą lewego przycisku myszy punkt „Usuwanie napędu pamięci masowej USB“.
Upewnij się, że przekazywanie danych zostało całkowicie zakończone.
Teraz można odłączyć przyrząd.
Ładowanie baterii:
Urządzenie wyposażone jest w ładowalny akumulator litowo - jonowy. Akumulator
ładowany jest poprzez złącze USB przy komputerze. Przed pierwszym użyciem należy
pamiętać o tym, aby całkowicie naładować akumulator, proces ten trwa z reguły 3 godziny.
Wskazówka: Aby zapewnić optymalną wydajność, akumulator litowo-jonowy musi być
regularnie używany. Jeżeli jest to niemożliwe, należy naładować całkowicie akumulator
przynajmniej raz w miesiącu.
strona 3 z 10 PL
Page 65

Elementy obsługi
(1) Karta Micro SD
(2) Ekran LCD
(3) Blokada przycisków
(4) Przycisk play / pauza
(5) Przycisk Menu
(6) Przycisk
(7) Przycisk
(8) Przycisk Wstecz / Volume
(9) W ejście USB
(10) Wejście słuchawek
7. Obsługa
Załączanie / wyłączanie
Przytrzymaj przez ok. 3 sekundy wciśnięty przycisk Odtwórz/Wstrzymaj , aby
włączyć odtwarzacz. W celu wyłączenia naciśnij przycisk ponownie i przytrzymaj go
wciśnięty przez ok. 3 sekundy.
Odtwarzanie/ przerwa
Naciśnij przycisk celem odtwarzania lub zatrzymania utworu.
Ustawianie głośności
Przytrzymaj wciśnięty przycisk Wstecz do momentu otwarcia menu ustawień
głośności. Przy pomocy przycisków możesz teraz ustawić preferowaną
głośność. Ze względu na przepisy ustawowe, aby zmienić ustawienie z poziomu 18
na poziom 19, musisz wcisnąć przycisk Menu, aby następnie móc zwiększyć
głośność za pomocą przycisku .
W przód / Do tyłu
Aby przejść do odtwarzania poprzedniego lub następnego utworu naciśnij przycisk
/ .
Przesuwanie do przodu
Aby przejść do przodu podczas odtwarzania utworu naciśnij i przytrzymaj
przycisk .
Przesuwanie do tyłu
Celem cofnięcia się w utworze naciśnij i przytrzymaj przycisk .
Blokada klawiszy
Za pomocą suwaka z boku urządzenia możesz - w zależności od wybranej pozycji aktywować lub wyłączyć blokadę przycisków.
strona 4 z 10 PL
Page 66

8. Menu główne
Po włączeniu odtwarzacza MP3 pojawi się menu główne, w którym możesz wybrać
spośród takich funkcji jak muzyka, nagrywanie, odtwarzanie i setup.
Aby wybrać funkcję, skorzystaj z przycisków / i potwierdź wybór przyciskiem .
9. Muzyka
W menu głównym wybierz funkcję Muzyka.
Teraz możesz odtwarzać zapisane tytuły.
Wywoływanie katalogu Nawigacja
(1) W trybie muzyki przy wstrzymanym odtwarzaniu naciśnij przycisk Menu.
(2) Następnie wybierz w podmenu punkt Katalog.
(3) Wyświetlą się wszystkie tytuły aktualnie odtwarzanego katalogu.
(4) Jeżeli w obrębie struktury katalogu potrzebujesz przejść na poziom wyżej,
naciśnij przycisk Wstecz.
(5) Za pomocą przycisków / wybierz szukany tytuł i potwierdź swój wybór,
naciskając przycisk , aby uruchomić odtwarzanie.
Usuwanie pojedynczego tytułu
Celem usunięcia pojedynczego tytułu postępuj jak opisano poniżej:
(1) W trybie muzyki przy wstrzymanym odtwarzaniu naciśnij przycisk Menu.
(2) Wybierz usuwanie pliku.
(3) Wyświetlą się wszystkie pliki muzyczne znajdujące się w katalogu wyświetlanej
piosenki (jeśli chcesz usunąć tytuł z innego katalogu, musisz najpierw przejść
do preferowanego katalogu za pośrednictwem nawigacji).
(4) Za pomocą przycisków / przejdź do szukanego tytułu i potwierdź swój
wybór, naciskając przycisk .
(5) Pojawi się komunikat wzywający do potwierdzenia procesu usunięcia pliku.
(6) Użyj przycisków / , aby wybrać Tak lub Nie. Potwierdź swój wybór
przyciskiem . Naciśnij przycisk Wstecz raz, aby anulować wybór i dokonać
nowego wyboru, lub dwukrotnie, aby powrócić do trybu odtwarzania.
strona 5 z 10 PL
Page 67

Usuwanie wszystkich plików muzycznych
Aby usunąć wszystkie pliki muzyczne (MP3 i WMA) na karcie pamięci, postępuj
zgodnie z powyższym opisem. Wybierz Usuń wszystkie pliki muzyczne zamiast
Usuń plik, a następnie potwierdź swój wybór. Wszystkie pliki MP3 i WMA zostaną
usunięte z karty pamięci. Inne typy plików i katalogi nie mogą być usunięte przy
użyciu odtwarzacza. W tym celu należy skorzystać z komputera.
Powtarzanie
Aby powtórzyć wybrany fragment jednego z tytułów, wykonaj następujące czynności:
(1) W trakcie odtwarzania naciśnij przycisk Menu i wybierz podmenu Powtórzenie
A-B.
(2) Teraz możesz uruchomić powtarzanie fragmentu od A do B (Powtórzenie A-B)
lub ustawić ilość wybranych powtórzeń (Ilość powt.) oraz preferowaną długość
przerwy pomiędzy powtórzeniami (Przerwa między powt.).
(3) Po uruchomieniu funkcji poprzez wybranie powtórzenia A-B nastąpi przejście z
powrotem do trybu odtwarzania i litera A w symbolu trybu powtórzenia A-B
zacznie migać. Naciskając przycisk , ustawiasz moment rozpoczęcia
powtórzenia A-B, natomiast poprzez powtórne naciśnięcie tego samego
przycisku ustawiasz moment jego zakończenia.
(4) Fragment pomiędzy wybranym momentem rozpoczęcia i zakończenia będzie
powtarzany stosownie do wybranej ilości powtórzeń.
(5) Aby wcześniej zakończyć powtarzanie A-B, naciśnij przycisk Menu.
Wyjście z funkcji Muzyka
W trybie odtwarzania naciśnij przycisk Wstecz, aby przejść do menu głównego.
strona 6 z 10 PL
Page 68

10. Nagrywanie mowy
W głównym menu wybierz funkcję Nagrywanie.
Nagrywanie
(1) Aby uruchomić nagrywanie naciśnij przycisk .
(2) Podczas nagrywanie możesz je zatrzymać i ponownie kontynuować naciskając
przycisk .
(3) Aby zakończyć nagrywanie i zapisać użyj przycisku Cofnij. Nagranie zostanie
zapisane jako plik w formacie .wav.
(4) Jeżeli naciśniesz przycisk Menu, zanim uruchomisz nagrywanie, możesz
nawigować pomiędzy wcześniej zapisanymi nagraniami (Katalog) i ustawić
jakość nagrania (Jakość).
Uwaga: Nie wyłączaj urządzenia podczas nagrywania. W takiej sytuacji nagranie nie
będzie zapisane i i zostaje utracone.
Odtwarzanie
Za pomocą funkcji Odtwarzanie w menu głównym otwierasz tryb odtwarzania dla
zapisanych nagrań. Odtwórz swoje nagrania, postępując jak przy odtwarzaniu
muzyki. Również w tym przypadku możesz nawigować po katalogu zapisanych
nagrań, usunąć pojedynczy plik lub wszystkie pliki dźwiękowe. W tym celu naciśnij
przycisk Menu przed uruchomieniem odtwarzania, aby przejść do podmenu.
Uwaga: jeśli wybierzesz „Usuń wszystkie pliki dźwiękowe”, zostaną usunięte
wszystkie pliki .wav na karcie pamięci.
Wyjście z funkcji Nagrywanie
Celem przejścia do menu głównego nacisnąć należy przycisk Cofnij.
strona 7 z 10 PL
Page 69

11. Ustawienia systemowe
Funkcja
Możliwości wyboru (opis)
Aut. wył. LCD
0 – 60 sekund w odstępach 3-
sekundowych
Ustaw, po ilu sekundach bez naciskania
przycisków wyświetlacz ma się wyłączyć. Po
wybraniu 0 wyłączysz funkcję
Język
Angielski, Hiszpański, Francuski,
Niemiecki, Włoski, Portugalski, Rosyjski,
Polski
Tutaj ustaw żądany język systemu.
Tryb
energooszczędny
Aut. wył.
0 – 60 minut w odstępach 5-minutowych
Ustaw, po ilu minutach bez korzystania
nastąpi automatyczne wyłączenie
odtwarzacza. Po wybraniu 0 wyłączysz
funkcję
Sleep-Timer
0 – 120 minut w odstępach 10-minutowych
Ustaw, po jakim czasie odtwarzacz ma się
automatycznie wyłączyć, nawet w przypadku
aktywnej funkcji odtwarzania. Po wybraniu 0
wyłączysz funkcję
Jasność
0 – 15
Ustaw preferowany poziom jasności
wyświetlacza.
Wersja oprogramowania firmowego
Wyświetli się numer wersji wgranego
oprogramowania firmowego.
Informacja o dostępnej pamięci
Wyświetli się status wolnego miejsca na
znajdującej się w urządzeniu karcie pamięci.
Ustawienia fabryczne
Wybierz „Yes”, aby przywrócić ustawienia
fabryczne urządzenia.
Wstecz
Powrót do menu głównego
Jeśli chcesz dokonać swoich indywidualnych ustawień odtwarzacza MP3 wykonaj
poniższe kroki:
(1) W menu głównym wybierz funkcję Setup.
(2) Użyj przycisków / , aby wybrać preferowane ustawienie (patrz: tabela).
Potwierdź swój wybór przyciskiem . Naciśnij przycisk Wstecz, aby powrócić do
menu głównego.
strona 8 z 10 PL
Page 70

12. Usuwanie błędów
Nic nie ma na wyświetlaczu.
(1) Bateria jest wyładowana.
Naładuj baterię.
(2) Klawisze są zablokowane.
Prosimy o wyłączenie blokady.
Nie ma dźwięku przy odtwarzaniu pliku.
(1) Za niska głośność dźwięku.
Zwiększ głośność dźwięku.
(2) Uszkodzony plik audio.
Przegraj ponownie plik.
Nie da się nawiązać połączenia z PC.
(1) Sterownik nie został poprawnie zainstalowany.
Zainstaluj sterownik ponownie.
(2) Wykonaj aktualizację płyty głównej.
(zwróć uwagę na wskazówki producenta).
Wskazanie czasu ciągle się zmienia.
(1) Podczas odtwarzania zmienia się wielkość bitu pliku MP3.
Użyj jednolitej wielkości bitu przy kompresji.
PC zgłasza błąd przy połączeniu z odtwarzaczem
(1) Odtwarzacz został odłączony od PC podczas transmisji danych.
Nigdy nie rozłączaj odtwarzacza od komputera podczas transmisji danych.
Dane MP3 nie są odtwarzane prawidłowo.
(1) Dane MP3 skompresowane zostały w błędny format, przykładowo w MPEG 1 lub 2.
Usuń formaty pliku, które nie są obsługiwane.
strona 9 z 10 PL
Page 71

13. Dane techniczne
Pozycja
Parametr
Wyświetlacz LCD
128 x 64 pikseli
Typ baterii
Wbudowana litowo-jonowa bateria z możliwością
ładowania
Czas pracy baterii
Max. 10 godzin
Format nagrywania
WAV
Obsługiwane formaty muzyki
MP3, WMA
Wielkość bitu
MP3/WMA: 32 kbps ~ 384 kbps
Częstotliwość wyjścia
20Hz ~ 20kHz
SNR
>= 80 dB
Rozdzielenie kanałów
>= 40 dB
Charakterystyka częstotliwości
<= 3 dB (20 Hz ~ 20 kHz)
Moc wyjściowa słuchawek
L 9mW, R 9mW
Przyłącze USB
USB 2.0 (High Speed)
Wyłączenie odpowiedzialności
W każdym momencie można dokonywać zmian w oprogramowaniu firmowym i / lub
sprzętowym, bez wcześniejszej zapowiedzi. W związku z tym możliwe jest, że części
instrukcji, dane techniczne i rysunki zawarte w niniejszej dokumentacji mogą lekko
odbiegać od produktu, który został zakupiony. Wszystkie opisane w niniejszej instrukcji
punkty służą tylko w celu objaśnienia i nie muszą zawsze zgadzać się z konkretną
sytuacją. Na podstawie niniejszej instrukcji obsługi nie przysługuje prawo do wysuwania
roszczeń prawnych.
Oznaczone tym symbolem urządzenia podlegają przepisom
europejskiej dyrektywy 2012/19/EG.
Wszystkie urządzenia elektryczne i elektronicznie powinny być
usuwane oddzielnie od odpadów i śmieci z gospodarstw domowych
tylko przez przewidziane do tego celu placówki państwowe.
Dzięki usuwaniu urządzeń elektrycznych i elektronicznych zgodnie z
przepisami unika się powstaniu szkód w środowisku naturalnym.
strona 10 z 10 PL
Page 72

1. Обзор содержания
1. Обзор содержания ............................................................................................... 1
2. О данном руководстве ......................................................................................... 2
3. Замечания: ........................................................................................................... 2
4. Функции ................................................................................................................. 2
5. Содержание пакета .............................................................................................. 3
6. Перед использованием ........................................................................................ 3
7. Обслуживание ...................................................................................................... 4
8. Главное меню ....................................................................................................... 5
9. Музыка .................................................................................................................. 5
10. Звукозапись .................................................... Fehler! Textmarke nicht definiert.
11. Настройка системы .............................................................................................. 8
12. Устранение неполадок ......................................................................................... 9
13. Технические данные .......................................................................................... 10
14. Утилизация электрического и электронного оборудования ............................ 10
Страница 1 из 10 RU
Page 73

ПРЕДУПРЕЖДЕНИЕ: Прослушивание музыки в слишком громком
режиме или постоянное прослушивание плеера не рекомендуется.
Также использование видеопроигрывателя не рекомендуется в
стрессовых ситуациях. Это может вызвать невнимательность
слушателя в потенциально опасных ситуациях, например, вблизи
движущихся транспортных средств.
2. О данном руководстве
Внимательно прочитайте данное руководство и выполняйте все инструкции,
указанные в нем для обеспечения длительного срока службы и надежного
использования устройства. Пожалуйста, держите это руководство под рукой для
дальнейшего использования и передайте его другим пользователям устройства.
3. Замечания:
• Избегайте сильных ударов прибора.
• Не используйте прибор в экстремально холодных, горячих, влажных или
пыльных областях. Не поддавайте прибор также прямому воздействию
солнечных лучей.
• Проводите регулярную запись данных, чтобы избежать потери данных.
• Избегайте использования в сильных магнитных полях.
• Защищайте прибор от влажности. Если в прибор проникнет влажность,
отключите его немедленно, после этого почистите и высушите прибор.
• Не используйте для чистки прибора химические растворы. Для этого
используется только сухая тряпка.
• Мы не отвечаем за повреждения или потерю данных, возникшую при
неисправностях, неправильном обслуживании, собственноручного ремонта или
замене батареи.
• Не раскладывайте прибор на отдельные части и не пытайтесь ремонтировать
его собственноручно, так как в этом случае теряется гарантия.
4. Функции
Проигрывание форматов MP3, WMA
Навигация по папкам
Звукозапись
встроенная перезаряжаемая батарея Li-polymer
Страница 2 из 10 RU
Page 74

5. Содержание пакета
Плеер MP3 Интенсо
Стерео-наушники
USB-кабель
Инструкция обслуживания
микрокарта SD
6. Перед использованием
Подсоедините прибор к ПК
Сделайте следующие шаги:
(1) Подсоедините плеер ко гнезду USB на ПК.
(2) Откроется окно "Интенсо". Теперь можно записать данные из жёсткого дыска
на переносной носитель данных.
Надежное отсоединение от ПК
Для Windows XP/Vista/Windows7/8/8.1/10:
Нажмите правой кнопкой мыши внизу справа в строке заданий на символ "надёжно
удалить прибор". Из появившегося меню контекста выберите левой кнопкой мыши
пункт „Удалить запоминающее уствойство USB“. Убедитесь, полностью ли
закончился перенос данных.
Теперь можно удалить прибор.
Зарядка батареи:
Устройство имеет встроенную литиево-ионную батарею. Батарея заряжается при
подключении устройства ко входу USB Вашего компьютера. При первом
использовании устройства убедитесь в том, чтобы батарея была полностью
заряжена. Зарядка, как правило, длится 3 часа.
Внимание: Для того чтобы устройство работало оптимально, литиево-ионную
батарею следует регулярно использовать. Если батарея используется нерегулярно,
Вам следует полностью заряжать ее не менее одного раза в месяц.
Страница 3 из 10 RU
Page 75

Элементы управления
(1) Карта памяти Micro SD
(2) ЖК-дисплей
(3) Кнопка Блокировки
(4) Кнопка Воспр. / Пауза
(5) Кнопка Меню
(6) кнопка
(7) кнопка
(8) Кнопка Назад / звука
(9) USB разъем
(10) Подключение наушников
7. Обслуживание
Включить/Выключить
Чтобы включить проигрыватель, удерживайте кнопку Воспроизведение/Пауза
нажатой прибл. 3 секунды. Для того, чтобы выключить его, нажмите кнопку еще раз и
удерживайте прибл. 3 секунды.
Play/Pause
Нажмите кнопку для проигрывания или задержки песни.
Регулировка звука
Чтобы открыть меню регулировки громкости, нажмите и удерживайте кнопку Назад
. Теперь с помощью кнопок можно настроить нужный уровень громкости. В
силу правовых положений, вы должны нажать кнопку Меню для перехода от уровня
18 к 19, чтобы с помощью кнопки продолжать увеличивать громкость.
Вперёд / Назад
Нажмите кнопку / , чтобы перейти к предыдущей или к следующей записи.
Прокручивание вперёд
Нажмите кнопку , чтобы прокрутить запись вперёд.
Прокручивание назад
Нажмите и держите кнопку , чтобы прокрутить запись назад.
Блокировка кнопки
Удерживая сдвижную клавишу на боковой стороне устройства, вы можете включить
или отключить кнопку блокировки в соответствии с выбранной позицией.
Страница 4 из 10 RU
Page 76

8. Главное меню
После включения MP3-плеера на дисплее появится главное меню. Здесь вы можете
выбирать между функциями музыки, записи, экрана и настройки.
Чтобы выбрать нужную функцию нажимайте кнопки / и подтвердите свой
выбор нажатием кнопки .
9. Музыка
Выберите в главном меню функцию Музыка.
Теперь вы можете воспроизведение, котор хранят следы.
Вызов папки навигации
(1) В режиме прослушивания музыки в состоянии паузы нажмите кнопку
Меню.
(2) Затем в открывшемся подменю выберите пункт Список.
(3) Названия всех активных папок отображаются на дисплее.
(4) Чтобы перейти на уровень выше в структуре вашей папки, нажмите кнопку
Назад.
(5) С помощью кнопок / выберите желаемую запись и подтвердите свой
выбор, нажав кнопку , чтобы начать воспроизведение.
Стереть запись
Для того, чтобы стереть одну запись, сделайте следующие шаги:
(1) В режиме прослушивания музыки в состоянии паузы нажмите кнопку
Меню.
(2) Выберите пункт Удалить файл.
(3) Все музыкальные файлы списка отображаются на дисплее (если вы
желаете удалить файл в другом списке, вы должны перейти к нужному
списку посредством навигации по папкам).
(4) С помощью кнопок / выберите желаемую запись и подтвердите свой
выбор, нажав кнопку .
(5) Теперь вам будет предложено подтвердить процедуру удаления файла.
(6) Нажимая на кнопки / , выберите Да или Нет. Подтвердите свой выбор
с помощью кнопки . Нажмите кнопку Назад один раз, чтобы удалить
выбранную запись и выбрать новую, или два раза, чтобы вернуться в
режим воспроизведения.
Страница 5 из 10 RU
Page 77

Удалить все музыкальные файлы
Чтобы удалить все музыкальные файлы (MP3 и WMA) на карте памяти,
выполните следующее. Выберите Удалить все музыкальные файлы вместо
Удалить файл и подтвердите свой выбор. Теперь все файлы MP3 и WMA
будут удалены с карты памяти. Другие типы файлов и папок не могут быть
удалены пользователем. Для этой цели используйте компьютер.
Повторение A-B
Для повторного воспроизведения заданного отрезка записи, выполните
следующее:
(1) Во время воспроизведения нажмите кнопку Меню и выберите подменю А-
В повторное воспроизведение.
(2) Теперь вы можете начать A-B повторное воспроизведение композиций (A-
B повтор) или прервать количество желаемых повторов (количество
повторов) и желаемую продолжительность паузы между повторами (пауза
между повторами).
(3) Если вы выбрали A-B повторное воспроизведение, то при возвращении к
режиму воспроизведения символ А будет гореть на дисплее, указывая на
режим А-В повторного воспроизведения. Нажав на кнопку , вы
устанавливаете точку начала воспроизведения и путем повторного
нажатия той же кнопки, устанавливаете конечную точку A-B повторного
воспроизведения.
(4) Теперь отрезок между установленными начальной и конечной точками
будет повторяться заданное количество раз.
(5) Чтобы отменить режим A-B повторного воспроизведения, нажмите кнопку
Меню.
Выход из функции музыки
Для перехода в Главное меню, в режиме воспроизведения нажмите кнопку
Назад.
Страница 6 из 10 RU
Page 78

10. Запись голоса
Выберите в главном меню функцию Запись.
Запись
(1) Нажмите кнопку , чтобы начать запись.
(2) Во время записи нажатием на кнопку можно задержать или продолжить
запись.
(3) Нажмите кнопку Назад, чтобы закончить и отложить запись в памяти.
Запись сохраняется в виде .wav-файла.
(4) Перед началом записи, нажмите на кнопку Меню. Таким образом, вы
можете перемещаться по уже имеющимся записям (список) и настроить
качество записи (качество).
Внимание: Не выключайте прибор во время записи. При это запись не будет
оставлена в памяти и теряется.
Воспроизведение
С помощью функции Воспроизведения в Главном меню открывается режим
воспроизведения сохраненных записей. Воспроизведение записей
производится точно так же, как и воспроизведение музыки. Здесь вы также
можете перемещаться по списку ваших записей, удалить один файл или все
языковые файлы. Для этого до начала воспроизведения нажмите кнопку Меню
и перейдите в подменю.
Внимание: При выборе «Удалить все языковые файлы» все .wav-файлы будут
удалены с карты памяти.
Выход из функции записи
Нажмите кноку Назад, чтобы попасть в главное меню.
Страница 7 из 10 RU
Page 79

11. Настройка системы
Функция
Возможности выбора (описание)
ЖК-дисплей вкл./выкл.
0-60 секунд с 3 сек. интервалом
Установите, через сколько секунд без
использования дисплей должен
отключаться. Если вы выбираете 0, то
данная функция деактивируется.
Язык
Английский, испанский, французский,
немецкий, итальянский,
португальский, русский, польский
Здесь можно выбрать нужный язык
системы.
Экономия
электроэнергии
Автоматическое
отключение
0-60 минут с 5 мин. интервалом
Установите, через сколько минут без
использования плеер должен
автоматически отключаться. Если вы
выбираете 0, то данная функция
деактивируется.
Tаймер
отключения
0-120 минут с 10 мин. интервалом
Установите, по истечении которого
времени плеер должен отключаться,
также и во время воспроизведения. Если
вы выбираете 0, то данная функция
деактивируется.
Яркость
0–15
Установите желаемый уровень яркости
дисплея.
Версия прошивки
Отображается номер версии
установленной прошивки.
Информация о памяти
Отображается статус ячейки памяти
установленной карты памяти.
Заводские настройки
Выберите “Да”, чтобы сбросить
Для индивидуальной настройки плеера MP3 сделайте следующие шаги:
(1) В Главном меню выберите функцию Настройки.
(2) Нажимая кнопки / , выберите нужную настройку (см. таблицу).
Подтвердите свой выбор кнопкой . Нажмите кнопку Назад чтобы вернуться в
Главное меню.
Страница 8 из 10 RU
Page 80

настройки устройства до заводских
настроек.
Назад
Отсюда вы можете вернуться обратно в
главное меню.
12. Устранение неполадок
На дисплее нет никаких показаний.
(1) Батарея пуста.
Зарядите батарею.
(2) Кнопки блокированы.
Отключите блокировку кнопок.
При проигрывании файлов нет звука.
(1) Настройка звука слишком низкая.
Повысьте звук.
(2) Аудиофайл повреждён.
Перезагрузите файл.
С компьютером не устанавливается связь.
(1) Драйвер полностью установлен.
Установите драйвер снова.
(2) Проведите обновление материнской платы.
(Следуйте указаниям производителя)
Величина показателя времени постоянно меняется.
(1) Количество бит файла MP3 изменяется во время воспроизведения.
Используйте при сжатии файлов одинаковое количество бит.
При подключении плеера компьютер выдает сообщение об ошибке.
(1) Плеер был отсоединён от компьютера во время передачи данных.
Никогда не отсоединяйте плеер во время передачи данных.
Файлы MP3 не проигрываются как надо.
(1) Файлы MP3 были сжаты в неподходящий формат, например в MPEG 1 или 2.
Сотрите форматы, которые не поддерживаются плеером.
Страница 9 из 10 RU
Page 81

13. Технические данные
Продукт
Параметры
Дисплей LCD
128 x 64 пикселей
Тип батареи
Перезаряжаемая батарея Li-polymer
Время работы батареи
Max. 10 часов
Формат записи
WAV
Поддерживаемые
музыкальные форматы
MP3, WMA
Количество бит
MP3/WMA: 32кб/сек ~ 384кб/сек
Частота на выходе
20Гц ~ 20кГц
Отношение сигнал-шум (SNR)
>= 80 дБ
Разъединение каналов
>= 40 дБ
Поведение в отношении
частоты
<= 3дБ (20Гц ~ 20кГц)
Выходной провод для
наушников
L 9мВт, R 9мВт
Подключение USB
USB 2.0 (высокоскоростное)
Отказ от ответственности
В любое время без предварительного уведомления могут быть произведены
изменения в аппарате и / или аппаратном обеспечении. Поэтому возможно, что
инструкции, спецификации и фотографии в данной документации продукта могут
немного отличаться. Все детали, описанные в данном руководстве, используются в
целях иллюстрации и не обязательно совпадают с той или иной ситуацией. Никакие
юридические претензии на основе данного руководства не могут быть предъявлены.
14. Утилизация электрического и электронного
оборудования
Устройства, обозначенные данным символом, подлежат
Директиве ЕС 2012/19/EG.
Все электрические и электронные устройства должны
утилизироваться отдельно от бытовых отходов через
соответствующие государственные службы.
Правильная утилизация использованного электрического
оборудования защищает от нанесения ущерба окружающей
среде.
Страница 10 из 10 RU
 Loading...