

Page 1
Memory 2 Move Pro
Long Manual
V1.0
Page 2

INHALT
1. Produktübersicht ...................................................................................................................................... 4
2. Produktfunktionen .................................................................................................................................... 4
3. Lieferumfang ............................................................................................................................................. 6
4. Technische Daten ...................................................................................................................................... 6
5. Mindestanforderungen ............................................................................................................................. 6
6. Produktansicht .......................................................................................................................................... 7
7. Vorhandene Anschlüsse ............................................................................................................................ 7
7.1 RJ45 WAN Port .......................................................................................................................................... 7
7.2 Micro USB 3.0 Interface ............................................................................................................................ 7
7.3 LED Anzeige ............................................................................................................................................... 8
8. SD KArten Sicherung (Backup) .................................................................................................................. 9
9 Nutzung eines PC’S MAC’s ...................................................................................................................... 11
9.1 Herstellen einer Wireless LAN Verbindung mit einem PC ...................................................................... 11
9.2 PC Client Software................................................................................................................................... 12
9.2.1 Mein Speicher ........................................................................................................................................ 13
9.3 Herstellen einer Wireless LAN Verbindung mit einem MAC ................................................................... 13
9.3.1 MAC WiFi Finder .................................................................................................................................... 14
9.3.2 Mein Speicher ......................................................................................................................................... 16
9.4 Konfiguration des WiFi Gerätes .............................................................................................................. 17
10. Nutzung von mobilen Geräten ................................................................................................................ 21
10.1 iOS Memory 2 Move Pro App Installation ............................................................................................... 21
10.2 Kabellose Verbindung mit Ihrem iPhone/iPad ........................................................................................ 22
10.3 Benutzeranmeldung (iOS) ....................................................................................................................... 23
10.4 Android Memory 2 Move Pro App Installation ....................................................................................... 25
10.5 Kabellose Verbindung mit Ihrem Android Gerät ..................................................................................... 26
10.6 Benutzer Anmeldung (Android) .............................................................................................................. 27
DE - 1
Page 3

11. Grundfunktionen ..................................................................................................................................... 29
11.1 Anwendung für iOS Geräte ..................................................................................................................... 29
11.2 Anwendung für Android Geräte .............................................................................................................. 30
11.3 WI-Fi Einstellungen (iOS und Android) .................................................................................................... 31
11.3.1 Wi-Fi Einstellungen Interface .................................................................................................................. 31
11.3.2 Ändern der SSID ...................................................................................................................................... 31
11.3.3 Sicherheit ................................................................................................................................................ 32
11.3.4 Internet Zugänge ..................................................................................................................................... 33
11.4 Musik-/Audiowiedergabe (iOS and android) .......................................................................................... 34
11.5 Video-/Filmwiedergabe........................................................................................................................... 36
11.5.1 iOS .......................................................................................................................................................... 36
11.5.2 Android................................................................................................................................................... 37
11.6 Wiedergabe von Bilddateien ................................................................................................................... 38
11.6.1 iOS .......................................................................................................................................................... 38
11.6.2 Android................................................................................................................................................... 40
11.7 Teilen von Bilddateien............................................................................................................................. 42
11.7.1 iOS .......................................................................................................................................................... 42
11.7.2 Android................................................................................................................................................... 43
11.8 Öffnen/Anzeigen von Dokumenten ........................................................................................................ 44
11.8.1 iOS .......................................................................................................................................................... 44
11.8.2 Android................................................................................................................................................... 47
11.9 Copy, Delete, Download, Upload functions (iOS and Android) ............................................................... 48
11.10 Sortierungsmöglichkeiten - Ansichtsformat: .......................................................................................... 49
11.11 DateiauswahlmöglichkeiteN: .................................................................................................................. 50
12. WEB Management Funktionen ............................................................................................................... 50
12.1 Explorer Funktion .................................................................................................................................... 51
12.2 Informationen ......................................................................................................................................... 51
12.2.1 Geräteinformationen .............................................................................................................................. 51
DE - 2
Page 4

12.2.2 Speicherinformation ............................................................................................................................... 52
12.2.3 Netzwerkinformation .............................................................................................................................. 52
12.3 Einstellungen ........................................................................................................................................... 52
12.3.1 Administrator .......................................................................................................................................... 52
12.4 Netzwerk Einstellungen .......................................................................................................................... 52
12.4.1 Host Name.............................................................................................................................................. 52
12.4.2 Wi-Fi & LAN ............................................................................................................................................ 53
12.4.3 DHCP Server ............................................................................................................................................ 54
12.4.4 Internet Einstellungen ............................................................................................................................ 54
12.5 Dienste .................................................................................................................................................... 55
12.5.1 Samba...................................................................................................................................................... 55
12.5.2 Media Server ........................................................................................................................................... 55
12.5.3 Zeit Einstellungen .................................................................................................................................... 56
12.5.4 Firmware Update .................................................................................................................................... 57
12.5.5 Zurücksetzen auf die Werkseinstellungen ............................................................................................. 58
13. Lizenzinformation ................................................................................................................................... 59
DE - 3
Page 5

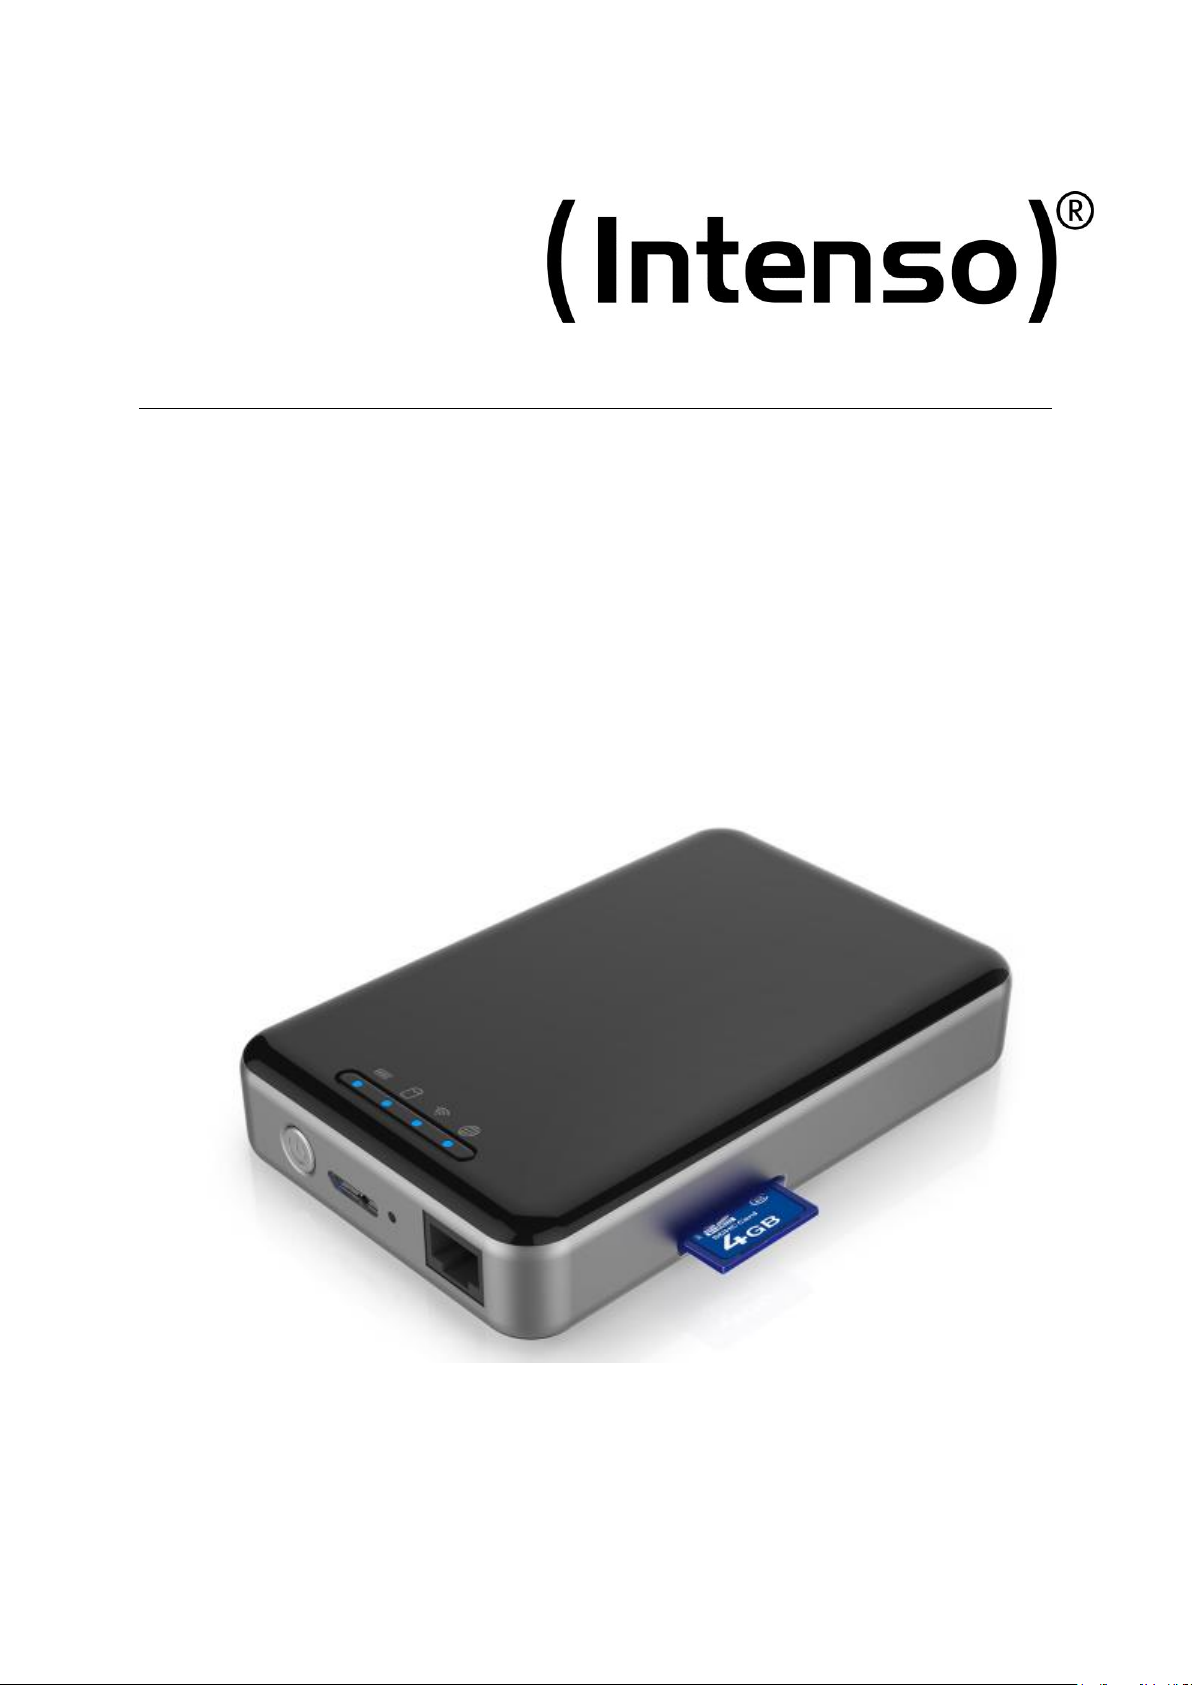
1. PRODUKTÜBERSICHT
Die Memory 2 Move Pro ermöglicht Ihnen einen kabellosen Zugang zu Ihren Videos, Musik,
Fotos und Daten, um Sie auf Ihrem iPad®, iPhone®, Tablet PC, Smartphone und Notebook zu
streamen – ohne unnötigen Kabelsalat.
Dank der integrierten Festplatte brauchen Sie sich keine Sorgen mehr um limitierten
Speicherplatz auf Ihren mobilen Geräten zu machen und der eingebaute USB 3.0 Anschluss
erlaubt einen schnellen und einfachen Datentransfer.
Für eine bestmögliche Mobilität verfügt Memory 2 Move Pro über einen wiederaufladbaren
Akku. Um den Akku aufzuladen, können Sie das Gerät einfach mit einem freien USB
Anschluss Ihres Computers verbinden und gleichzeitig Ihre Dateien auf die Festplatte
kopieren. Im Handumdrehen ist das Gerät für Sie einsatzbereit. Während des Ladevorgangs
kann auf Memory 2 Move Pro zugegriffen werden.
2. PRODUKTFUNKTIONEN
Streaming von Mediendateien über eine Wi-Fi Verbindung für bis zu 5 Benutzer
gleichzeitig.
Zugang zu Ihren Musik-, Video-, und Fotodateien über die kostenfreie App für iOS
und Android.
Batterielaufzeit von bis zu 5 Stunden*.
Internetzugriff über die optionale RJ45 Verbindung (LAN-Anschluss) oder kabellos
mit 802.11 b/g/n Standard
Unterstützt NTFS und FAT32 Formatierung
Unterstützt plattformübergreifenden Datenaustausch über LAN-Verbindung zwischen
Windows, Mac, iOS und Linux.
Unterstützt Nutzeranwendungen auf den verschiedensten Plattformen, inkl.
Windows/Mac/Linux/iPad/iPhone/Android
*Die genaue Batterielaufzeit ist abhängig von den genutzten Anwendungen und
Einstellungen.
Nutzung als externe Festplatte: Verbinden Sie hierzu die ausgeschaltete Memory 2 Move
Pro ganz einfach per USB Anschluss mit Ihrem Computer. Der Computer erkennt die „Neue
Hardware“ und installiert den Treiber automatisch. Warten Sie bis die Treiberinstallation
abgeschlossen ist. Im „Arbeitsplatz“ steht nun ein weiteres Laufwerk mit der Bezeichnung
„Intenso“ zur Verfügung.
DE - 4
Page 6
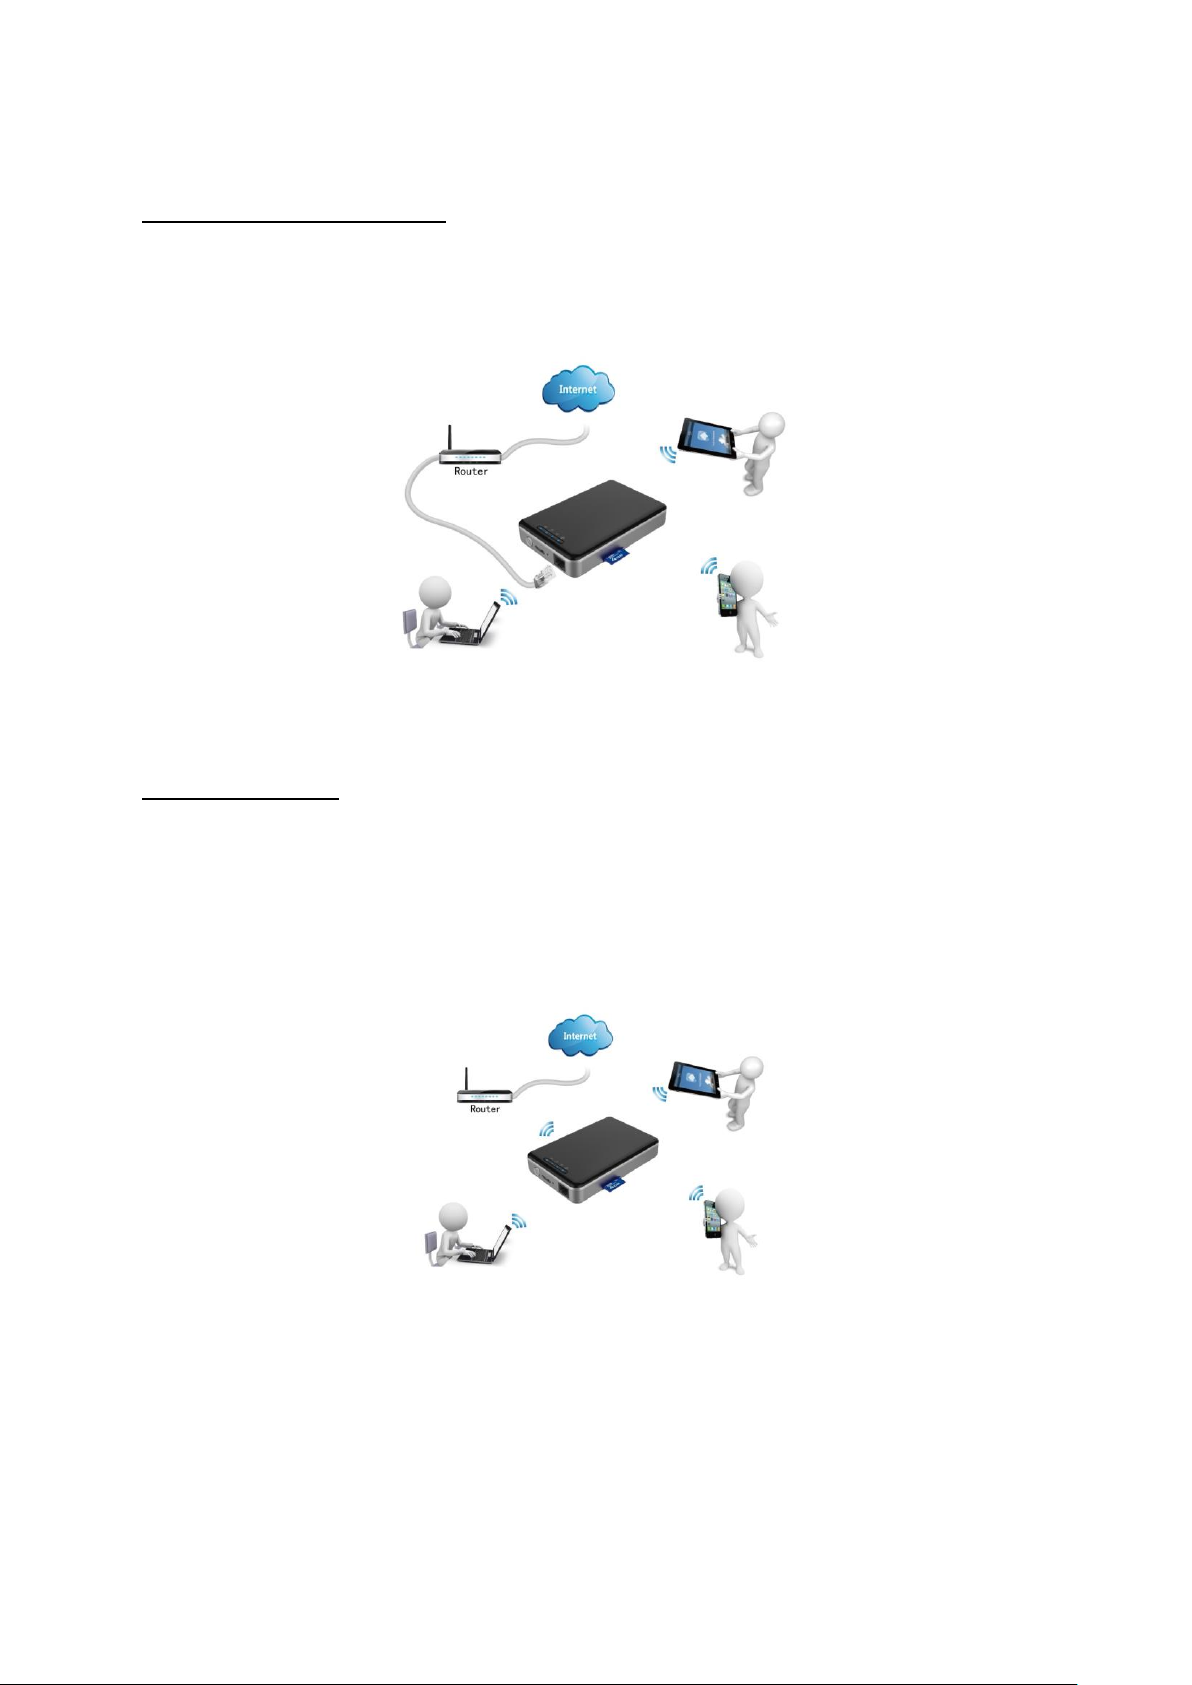
Nutzung per LAN-Verbindung: Verbinden Sie hierzu ein Ende Ihres RJ45 Kabels mit der
Memory 2 Move Pro und das andere Ende mit einem freien Port an Ihrem Router. Nun
aktivieren Sie die DHCP Funktion an Ihrer Memory 2 Move Pro für eine automatische
Vergabe der IP Adresse.
Kabellose Nutzung: Verbinden Sie die Memory 2 Move Pro mit Ihrem kabellosen Router wie
in der nachfolgenden Anleitung beschrieben, um per Wi-Fi auf das Internet zugreifen zu
können.
DE - 5
Page 7

3. LIEFERUMFANG
Memory 2 Move Pro
USB 3.0 Kabel
CD
Bedienungsanleitung
Netzteil (KTEC – KSAS0060500100VEU – 5V / 1A)
4. TECHNISCHE DATEN
Abmessungen: 130mm (L) X 83mm (B) X 26mm (H)
Wi-Fi:
o Standard: 802.11 b/g/n,
o Frequenz: 2.4 GHZ
o Übertragungsraten: 300 Mbps
Netzwerk Interface: 100 Mbps Ethernet RJ45
USB Anschluss: Micro USB 3.0, für Datentransfer und Aufladen des
Akkus
Akkukapazität: 3000 mAh
Betriebstemperatur: Die optimale Betriebstemperatur liegt zwischen 5°C und
35°C
5. MINDESTANFORDERUNGEN
Internetverbindung
Systemanforderungen:
o Windows: XP / Vista / Windows 7 / 8 / 8.1 / 10
o Mac: OS X 10.7.0 und höher
o Weitere: Fedora 12 (Linux) und höher
PC Internet Browser
o Windows: Unterstützt Internet Explorer 9 und höher
o Mac: Unterstützt Safari 5.0 und höher
o Weitere: Firefox 3.5 und höher
Router oder Switch
DE - 6
Page 8
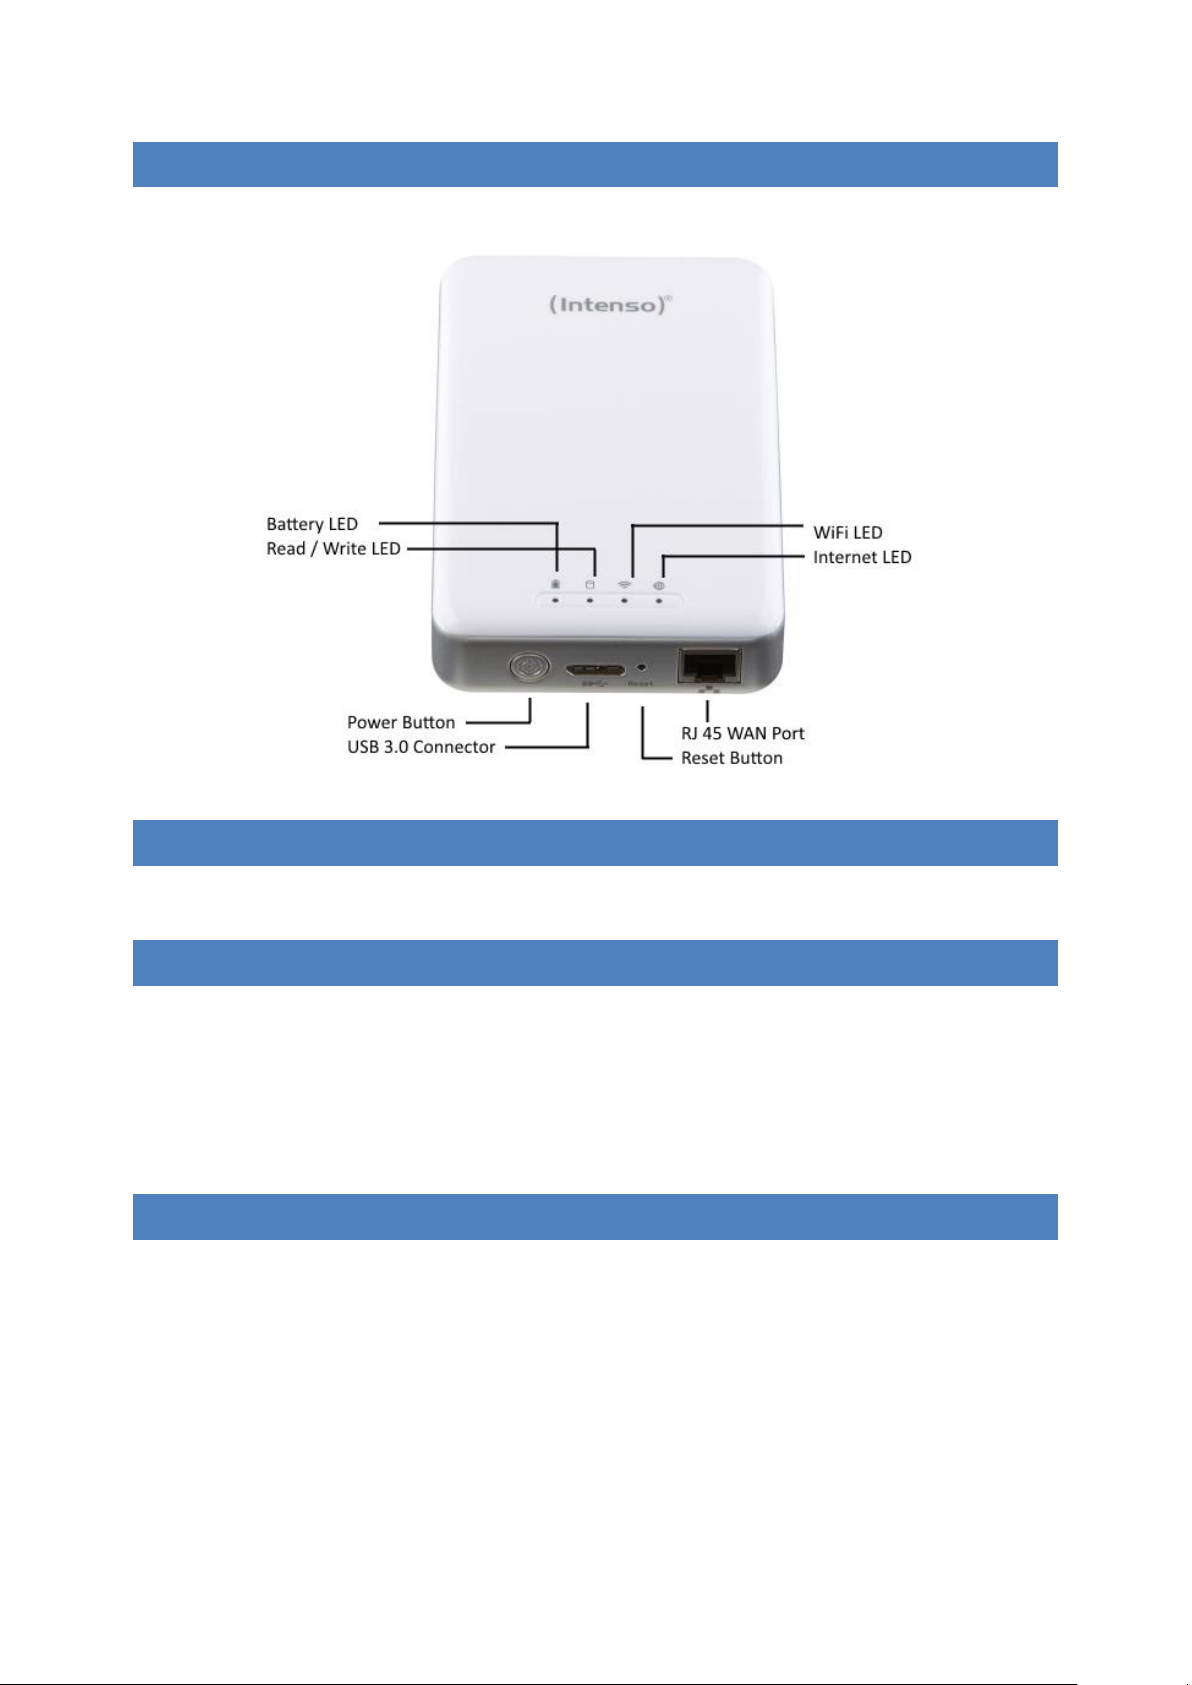
6. PRODUKTANSICHT
7. VORHANDENE ANSCHLÜSSE
7.1 RJ45 WAN PORT
A. Router Modus: Die Memory 2 Move Pro funktioniert wie ein handelsüblicher Router
und kann IP Adressen an Rechner vergeben, welche über WLAN verbunden sind.
B. Bridge Modus: Ermöglicht die Herstellung einer Netzwerkverbindung zu einem
bereits bestehenden Netzwerk.
7.2 MICRO USB 3.0 INTERFA CE
Der eingebaute USB 3.0 Anschluss ermöglicht einen schnellen Datentransfer und kann
die interne Batterie aufladen, sobald die Memory 2 Move Pro mit einem Computer oder
Netzteil verbunden ist. Um die Memory 2 Move Pro mit dem PC zu verbinden, schalten
Sie das Gerät aus und verbinden es dann mit dem PC.
DE - 7
Page 9

7.3 LED ANZEIGE
Power LED:
- Leuchtet nicht: Das Gerät ist ausgeschaltet.
- Leuchtet durchgehend –grün: Die Batterie ist komplett geladen.
- Schnell blinkend - grün: Das Gerät wird ausgeschaltet.
- Langsam blinkend - grün: Das Gerät wird geladen.
- Ständig leuchtend - rot: Akkuladung unter 30%
- Schnell blinkend - rot: Akkuladung kritisch
HDD LED:
- Ständig weiß leuchtend: Bereitschaftsmodus
- Weiß blinkend: Aktive Schreib- / Lesevorgänge
- Aus HDD ist im Energiesparmodus
Wi-Fi LED - blau:
- Flackernd: Der Initialisierungsprozess wird gestartet.
- LED leuchtet nicht: Das Gerät ist ausgeschaltet oder bekommt
keinen Strom
- Ständig leuchtend:
o Initialisierungsprozess abgeschlossen
o Bereitschaftsmodus - Geräte können verbunden werden.
Internet LED:
- LED aus: Keine Internetverbindung
- Grün blinkend Internetverbindung wird aufgebaut
- Grün leuchtend Internetverbindung vorhanden
DE - 8
Page 10
8. SD KARTEN SICHERUNG (BACKUP)
Bitte folgen Sie den nachfolgenden Schritten, um die auf der SD Karte gespeicherten Daten
auf der Memory 2 Move Pro zu sichern.
1.) Bitte starten Sie die Memory 2 Move Pro und warten Sie, bis das Gerät einsatzbereit
ist.
2.) Schieben Sie dann die SD Karte in den Karteneinschub der Memory 2 Move Pro.
3.) Drücken Sie nun zweimal kurz den Power Knopf, um den Sicherungsvorgang zu
starten.
Hinweis: Solange die weiße LED der Memory 2 Move Pro blinkt, werden Ihre Daten von der
SD Karte auf den Speicher der Memory 2 Move Pro kopiert. Bitte entfernen Sie niemals die
SD Karte während eines aktiven Sicherungsvorganges aus dem Gerät. Dies kann zu
Datenverlusten führen und die eingesetzte Karte beschädigen.
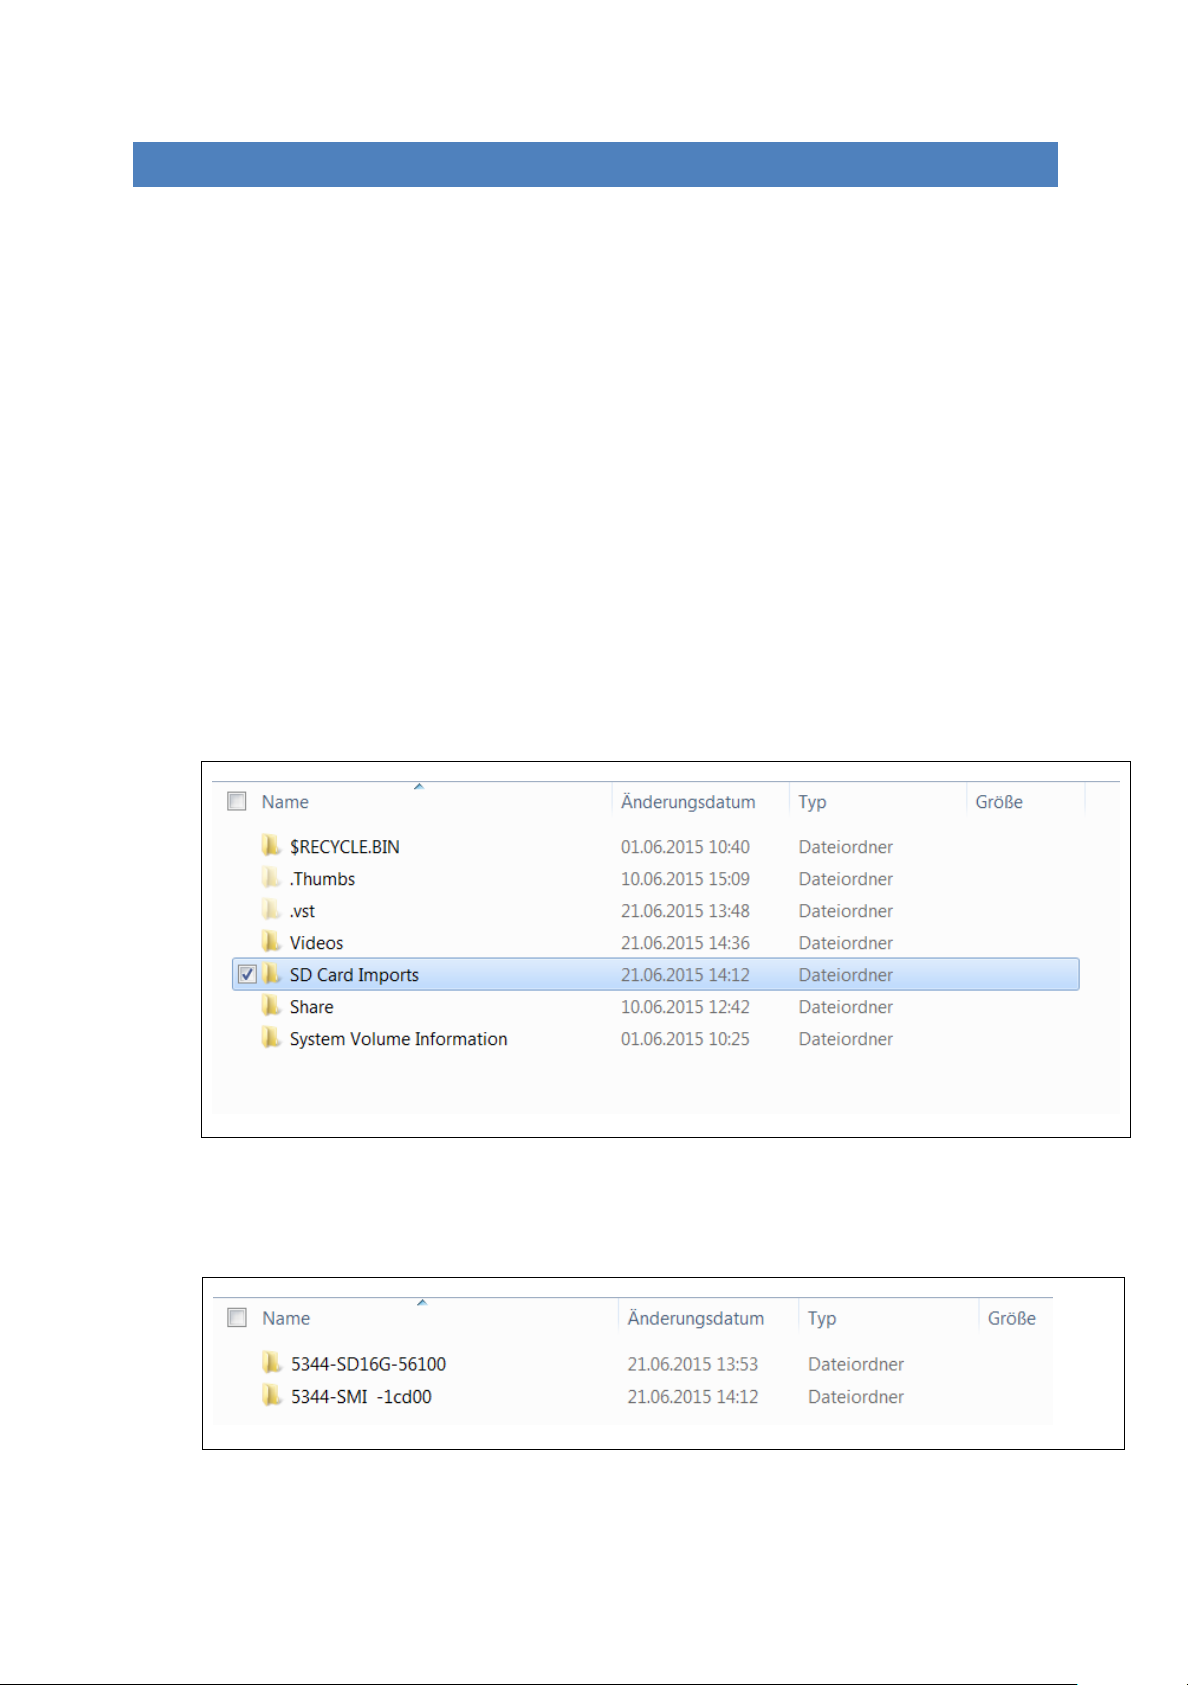
Ordnungsschema der Sicherungen:
1.) Sie finden die Sicherungsdateien der SD Karte im Ordner „SD Card Imports“ auf dem
Datenträger der Memory 2 Move Pro.
2.) Sichern Sie mehr als nur eine SD Karte auf der Memory 2 Move Pro, wird für jede
Karte ein separater Ordner angelegt. Dies ermöglicht Ihnen, die einzelnen
Sicherungen getrennt voneinander zu verwalten.
DE - 9
Page 11
3.) Zusätzlich wird innerhalb des SD Karten Ordners für jeden Tag an dem Sie eine
Sicherung durchgeführt haben, ein eigener Ordner angelegt. Es werden immer die
gesamten auf der SD Karte gespeicherten Daten gesichert. Sichern Sie etwa am 1.Juni
und am 8. Juni die Daten Ihrer SD Karte, dann können Sie sowohl die Ursprungsdaten
vom 1.Juni als auch die etwaig geänderten Daten vom 8. Juni in den einzelnen
Ordnern miteinander vergleichen.
4.) Führen Sie an einem Tag mehrfach eine Sicherung aus, dann werden ab dem zweiten
Sicherungsvorgang nur noch die neu hinzugekommenen Daten sowie Kopien der
zwischenzeitlich geänderten Daten in den Ordner des aktuellen Tages gespeichert.
DE - 10
Page 12
9 NUTZUNG EINES PC’S MAC’S
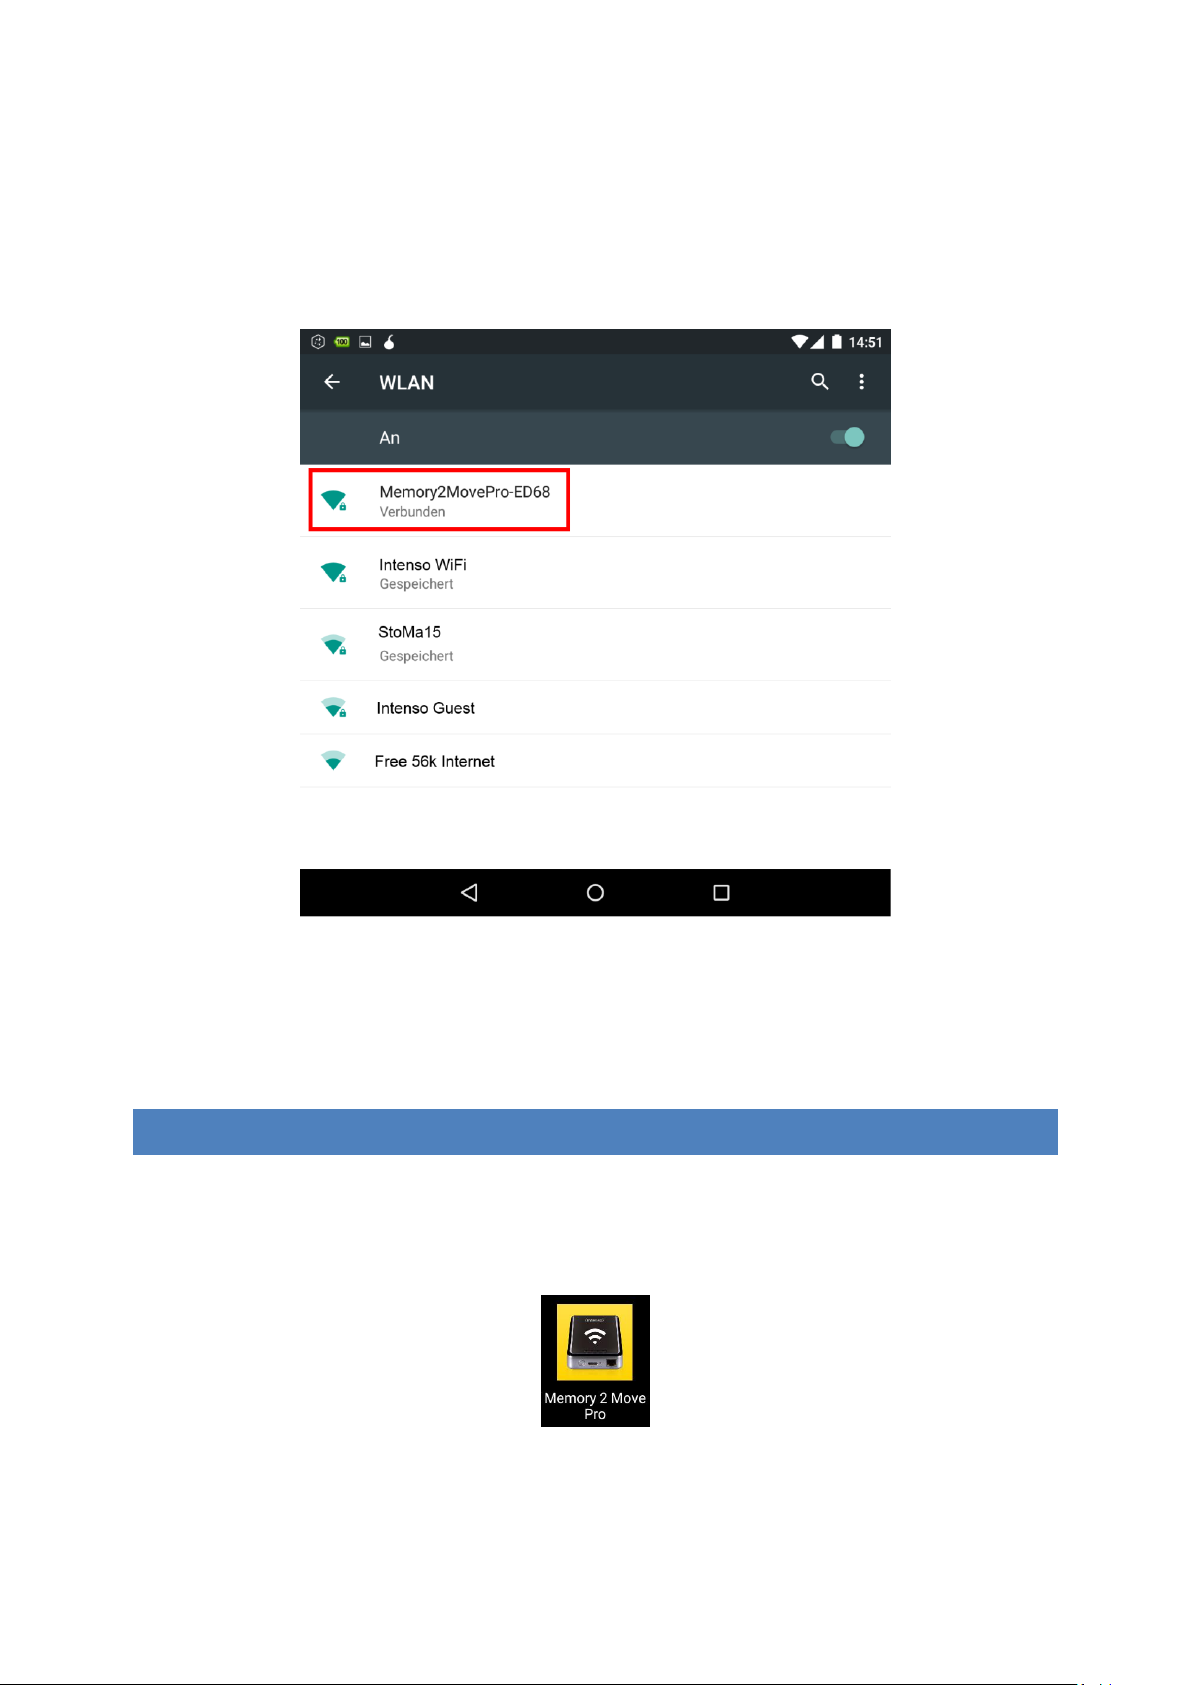
9.1 HERSTELLEN EINER WIRELESS LAN VERBINDUNG MIT EINEM PC
1.) Schalten Sie das WiFi Gerät durch Drücken des Power Knopfes auf der Vorderseite des
Gerätes an.
2.) Aktivieren Sie die WLAN Funktion an Ihrem PC und klicken Sie in der Taskleiste unten
rechts auf das WLAN Symbol. Es öffnet sich folgende Anzeige:
3.) Wählen Sie das Netzwerk mit dem Namen „Memory2MovePro-XXXX“ aus.
Hinweis: Das voreingestellte Passwort lautet im Auslieferungszustand „intenso1“. Bitte
geben Sie nach erfolgreich hergestellter Verbindung zu Ihrer eigenen Sicherheit ein neues
Passwort ein.
4.) Nachdem Sie erfolgreich eine Verbindung zu Ihrem WiFi Gerät hergestellt haben,
starten Sie bitte die mitgelieferte Client Software auf Ihrem PC oder MAC.
DE - 11
Page 13
9.2 PC CLIENT SOFTWARE
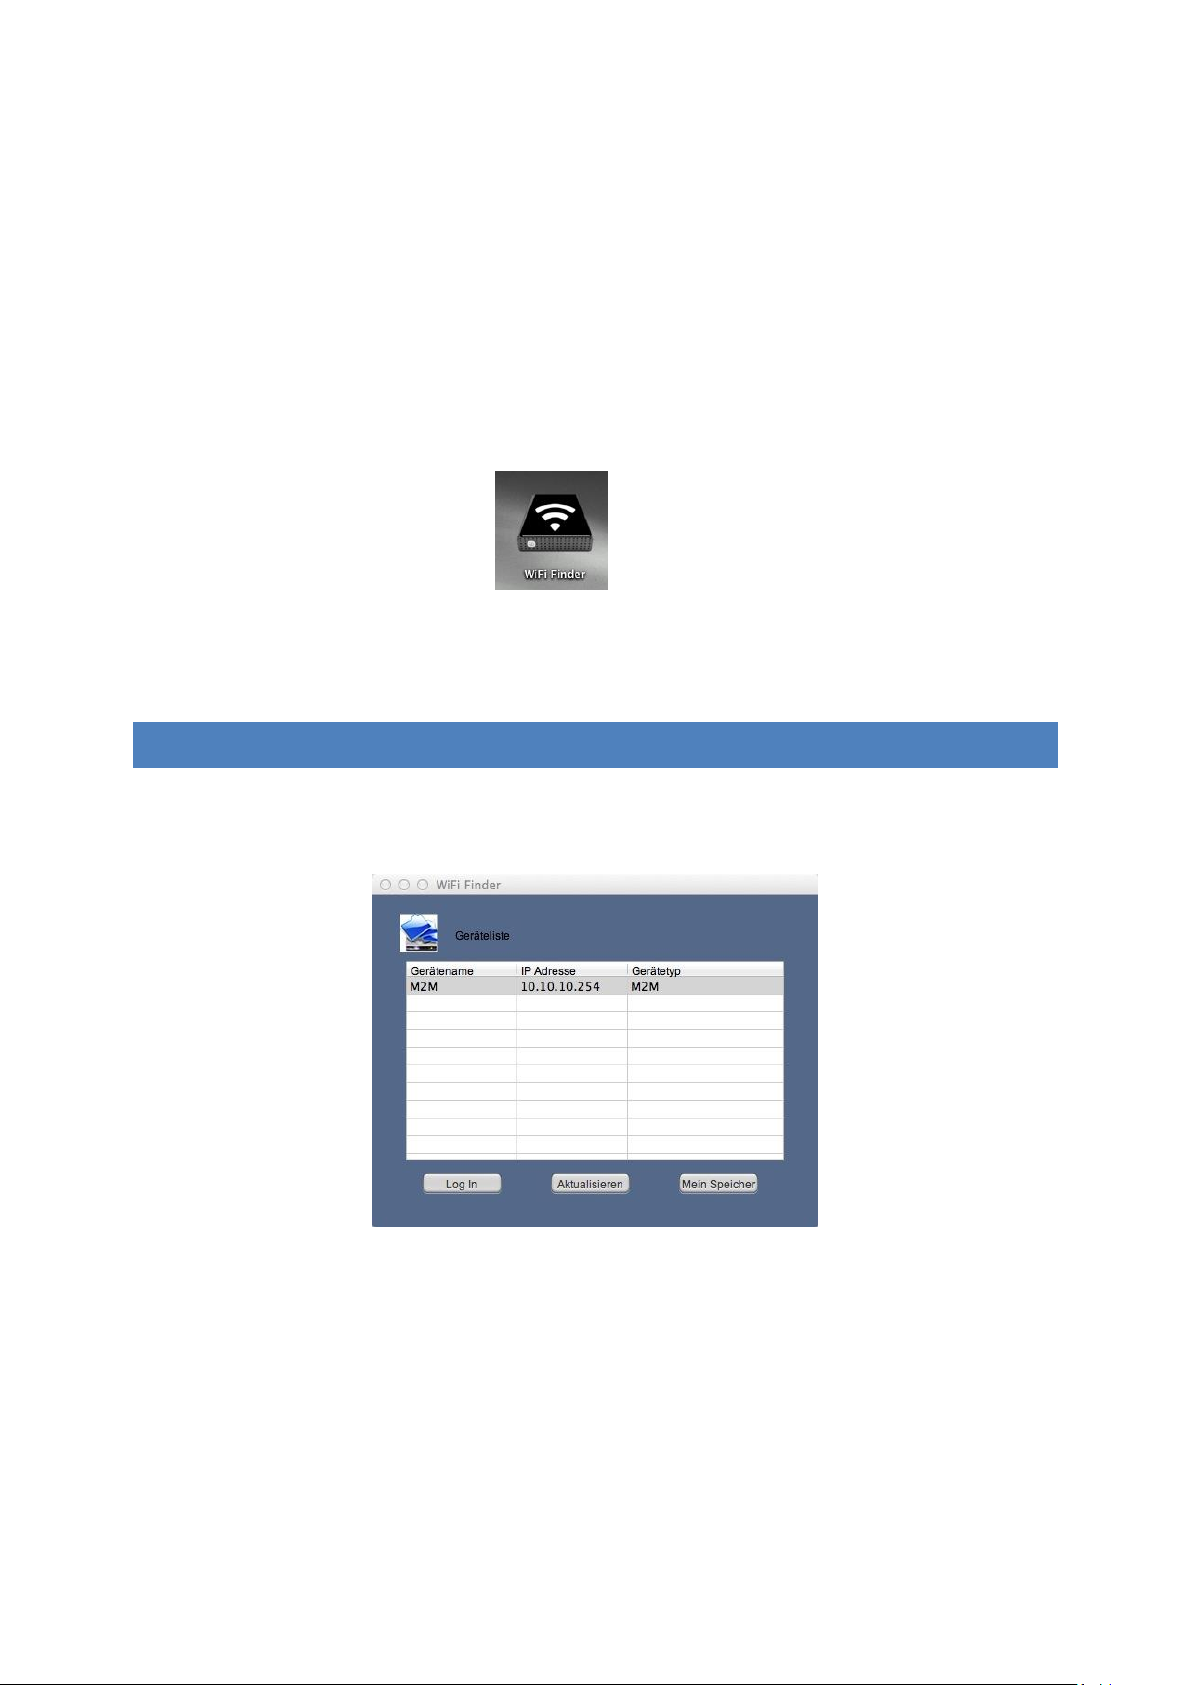
Bitte starten Sie die Anwendung mit einem Doppelklick auf die Verknüpfung „WiFi Finder“.
Die Software sucht automatisch im verbundenen Netzwerk nach Memory 2 Move Pro (siehe
Screenshot).
Hinweis: Sollte „M2M“ nicht in der Liste der verbundenen Netzwerk Clients zu finden
sein, drücken Sie bitte auf „Refresh“, um erneut nach dem Wi-Fi Gerät zu suchen.
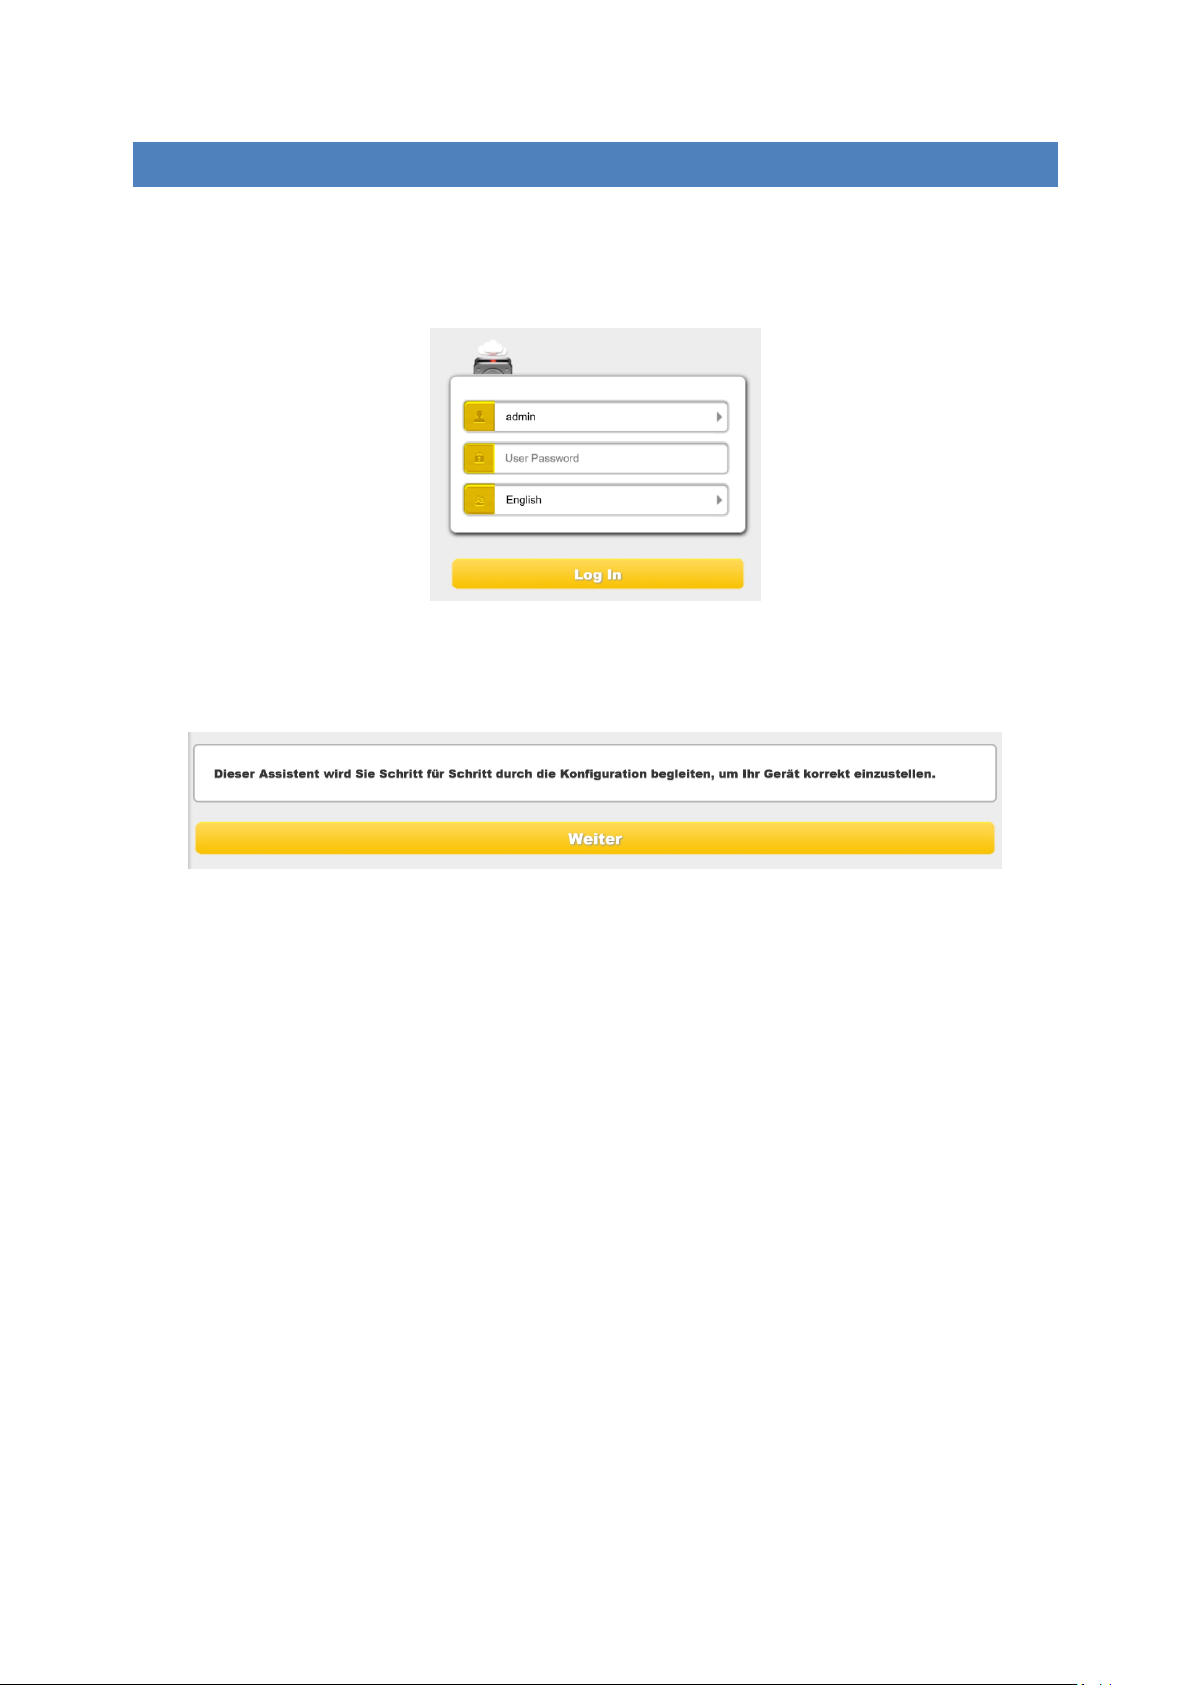
1.) Bitte wählen Sie Memory 2 Move Pro im Menü aus und drücken Sie auf „ Log In“, um
sich mit der Web Administrationsoberfläche zu verbinden (siehe Screenshot).
2.) Bitte geben Sie den Benutzernamen und das zugehörige Passwort ein:
Benutzername: admin
Passwort: 00000
Bitte wählen Sie noch die gewünschte Sprache (Standard ist Englisch).
Hinweis: Bitte geben Sie nach erfolgreich hergestellter Verbindung, zu Ihrer eigenen
Sicherheit, ein neues Passwort ein.
DE - 12
Page 14
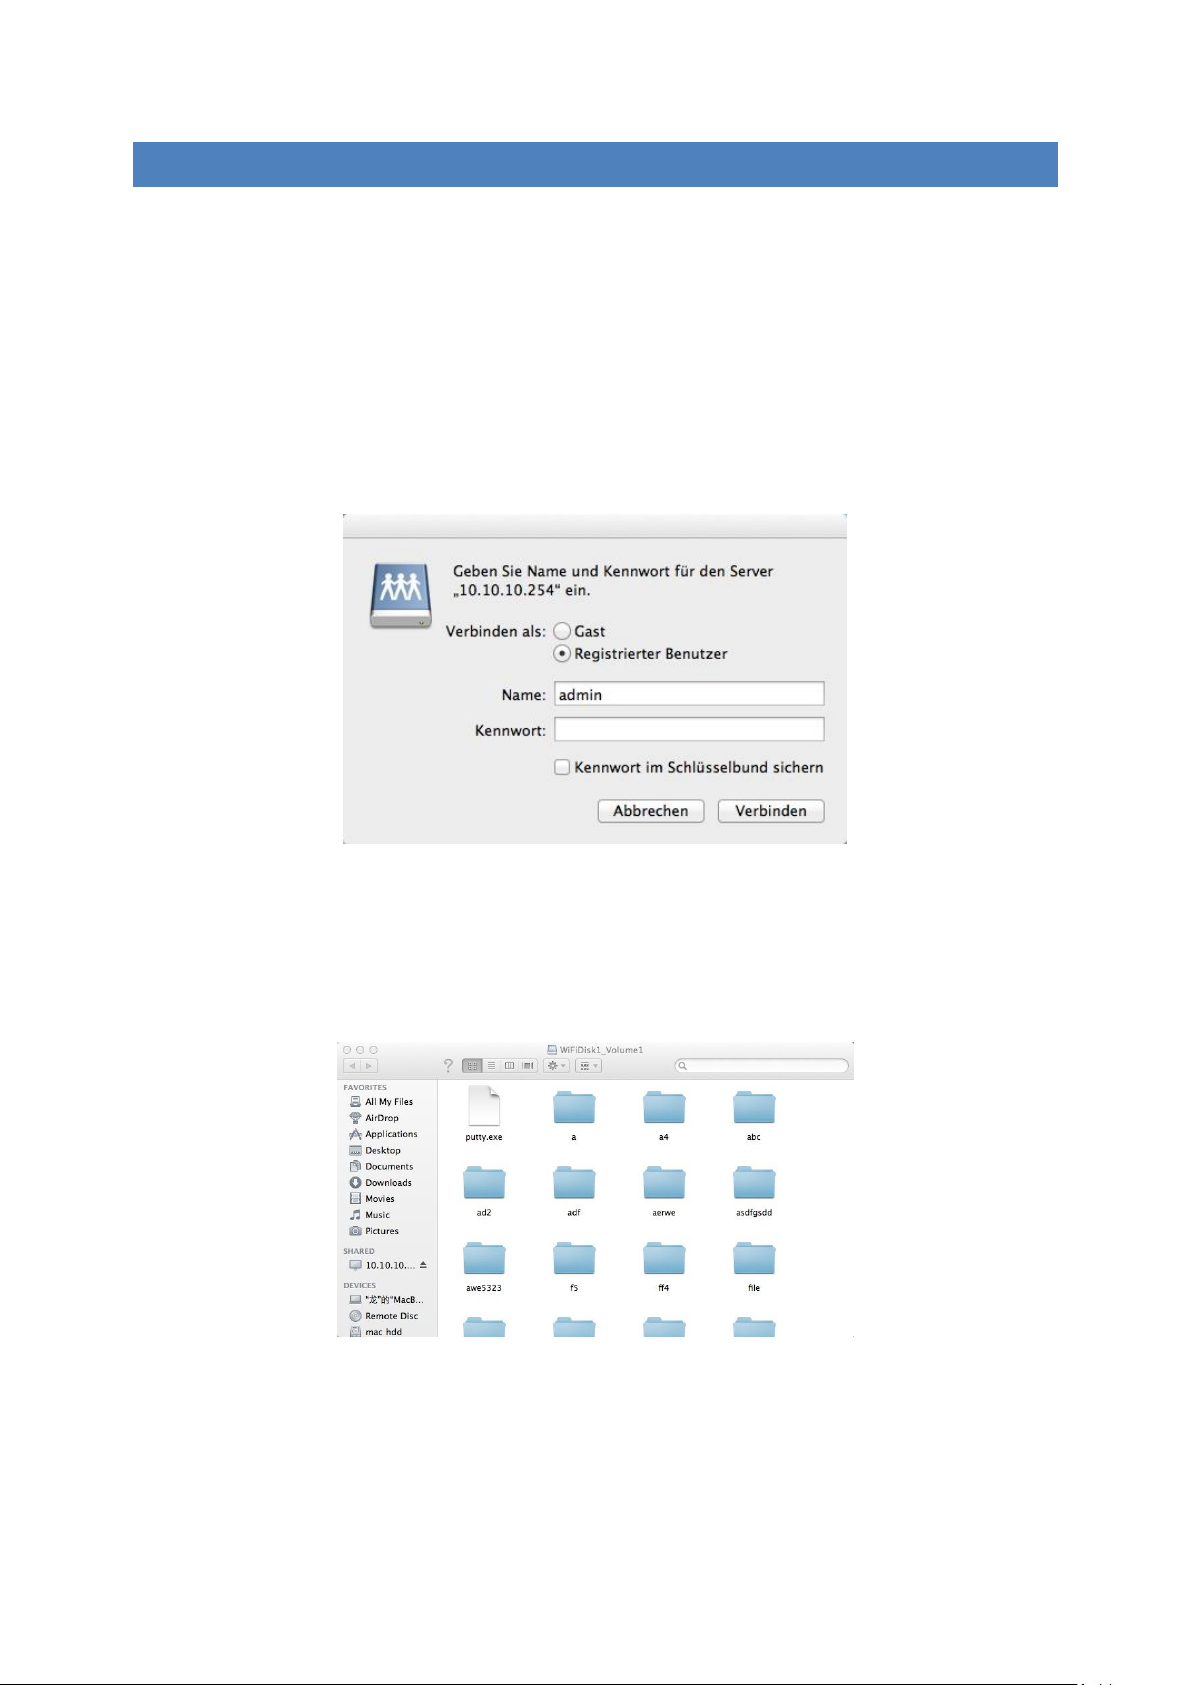
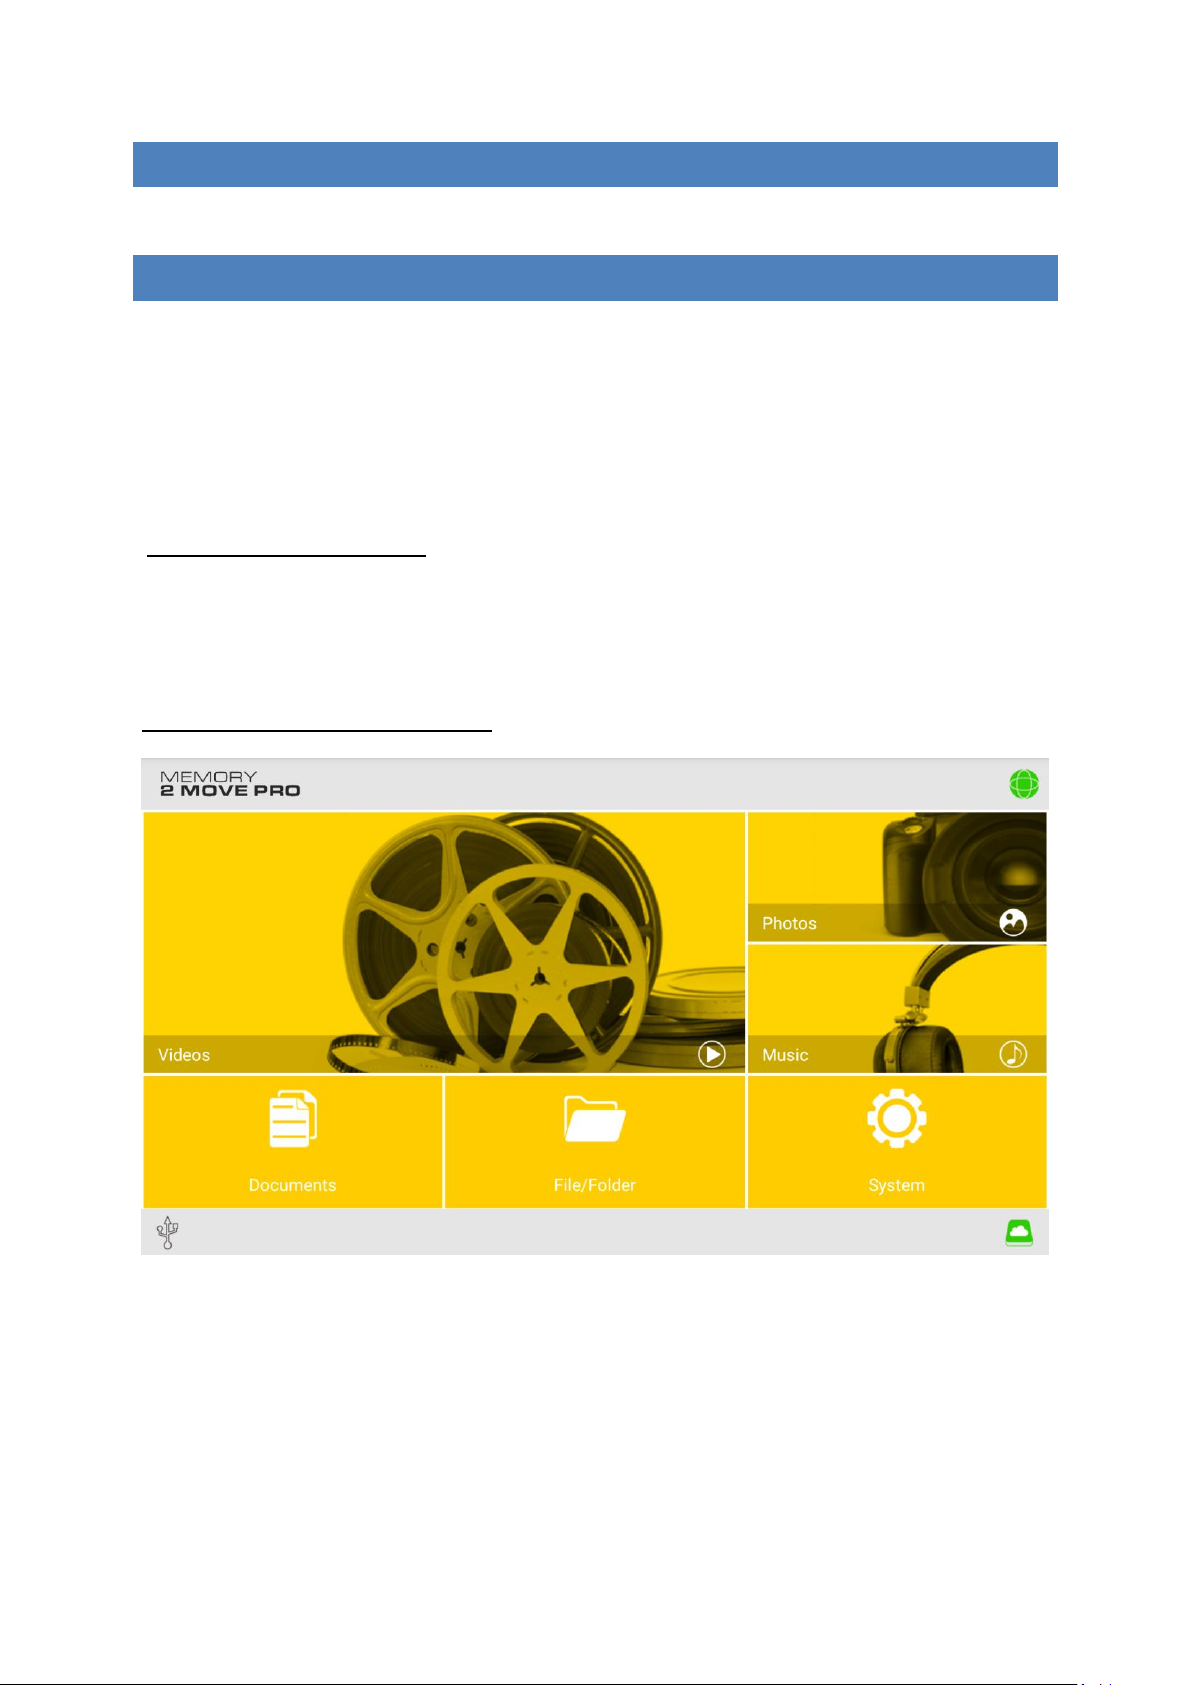
3.) Wenn Sie den Menüpunkt „Mein Speicher“ auswählen, wird Ihnen der aktuelle
Speicherinhalt der Memory 2 Move Pro angezeigt. Um sich erfolgreich zu verbinden,
müssen Sie sich als Administrator mit zugehörigem Passwort verbinden.
9.2.1 MEIN SPEICHER
Wenn Sie den Menüpunkt „My Storage“ oder „Mein Speicher“ auswählen, wird Ihnen das
unten stehende Bild angezeigt. Um sich erfolgreich zu verbinden, nutzen Sie die folgenden
Log In Details:
Benutzername: admin
Passwort: 00000
Hinweis: Bitte geben Sie nach erfolgreich hergestellter Verbindung, zu Ihrer eigenen
Sicherheit, ein neues Passwort ein.
9.3 HERSTELLEN EINER WIR ELESS LAN VERBINDUNG MIT EINEM MAC
Schalten Sie das Wi-Fi Gerät durch Drücken des Power Knopfes auf der Vorderseite des
Gerätes an. Warten Sie einige Minuten, bis die LED Leuchte aufhört zu blinken. Aktivieren Sie
die WLAN Funktion an Ihrem PC und klicken Sie in der Taskleiste unten rechts auf das WLAN
Symbol. Wählen Sie das Netzwerk mit dem Namen „Memory2Move-XXXX“ aus.
Hinweis: Das voreingestellte Passwort lautet im Auslieferungszustand „intenso1“. Bitte
geben Sie nach erfolgreich hergestellter Verbindung zu Ihrer eigenen Sicherheit ein neues
Passwort ein.
DE - 13
Page 15
Nachdem Sie erfolgreich eine Verbindung zu Ihrem Wi-Fi Gerät hergestellt haben,
installieren Sie bitte die mitgelieferte Client Software wie folgt:
Als Voraussetzung, um das verbundene Wi-Fi Gerät mit Ihrem Computer zu verbinden,
nutzen Sie bitte das inkludierte Software Tool „WiFi Finder“ von der beigelegten Treiber CD.
Die Software sucht für Sie automatisch das verbundene Wi-Fi Gerät in Ihrem Netzwerk.
Klicken Sie einfach per Doppelklick auf das Icon und folgen Sie den Anweisungen auf dem
Bildschirm.
9.3.1 MAC WIFI FINDER
Bitte starten Sie mit einem Doppelklick auf die Verknüpfung „WiFi Finder“. Die Software
sucht automatisch im verbundenen Netzwerk nach Memory 2 Move Pro (siehe Screenshot).
Hinweis: Sollte „M2M“ nicht in der Liste der verbundenen Netzwerk Clients zu finden sein,
drücken Sie bitte auf „Refresh“, um erneut nach dem Wi-Fi Gerät zu suchen.
DE - 14
Page 16

1.) Bitte wählen Sie Memory 2 Move Pro im Menü aus und drücken Sie auf „ Log In“, um
sich mit der Web Administrationsoberfläche zu verbinden (siehe Screenshot).
2.) Bitte geben Sie den Benutzernamen und das zugehörige Passwort ein:
Benutzername: admin
Passwort: 00000
Bitte wählen Sie noch die gewünschte Sprache (Standard ist Englisch).
Hinweis: Bitte geben Sie nach erfolgreich hergestellter Verbindung, zu Ihrer eigenen
Sicherheit, ein neues Passwort ein.
3.) Wenn Sie den Menüpunkt „Explorer“ auswählen, wird Ihnen der aktuelle
Speicherinhalt der Memory 2 Move Pro angezeigt. Um sich erfolgreich zu verbinden,
müssen Sie sich als Administrator mit zugehörigem Passwort verbinden.
DE - 15
Page 17
9.3.2 MEIN SPEICHER
Wenn Sie den Menüpunkt „My Storage“ oder „Explorer“ auswählen, wird Ihnen das unten
stehende Bild angezeigt. Um sich erfolgreich zu verbinden, nutzen Sie die folgenden Log In
Details:
Benutzername: admin
Passwort: 00000
Hinweis: Bitte geben Sie nach erfolgreich hergestellter Verbindung, zu Ihrer eigenen
Sicherheit, ein neues Passwort ein.
Sie können die Verzeichnisse und Ordner auf der Memory 2 Move Pro erstellen, löschen,
kopieren, editieren, umbenennen oder hin-und herschieben.
Des Weiteren können Daten zwischen Ihrem MAC und der Memory 2 Move Pro beidseitig
ausgetauscht werden (upload/download).
DE - 16
Page 18
9.4 KONFIGURATION DES WIFI GERÄTES
Bitte nutzen Sie die PC Client Software wie oben beschrieben, um eine Verbindung zum
WiFi Gerät herzustellen und loggen Sie sich als Administrator auf der WebAdministrationsoberfläche ein. Sie können nun Ihr Gerät konfigurieren.
1.) Während der ersten Nutzung des Gerätes startet nach erfolgter Anmeldung ein
sogenannter „Start-Assistent“, der es Ihnen ermöglicht, alle wichtigen Einstellungen
einfach vorzunehmen.
Hinweis: Wenn Sie auf das X (oben rechts im Assistenten) drücken, verlassen Sie den
Start-Assistenten und alle Werkseinstellungen werden als Standard Einstellungen
übernommen.
2.) Bitte drücken Sie auf den „Weiter“ Button, um Ihr Gerät zu konfigurieren.
3.) Einrichten des Internetzugriffs durch Herstellung einer Verbindung zu einem
verfügbaren Netzwerk
DE - 17
Page 19
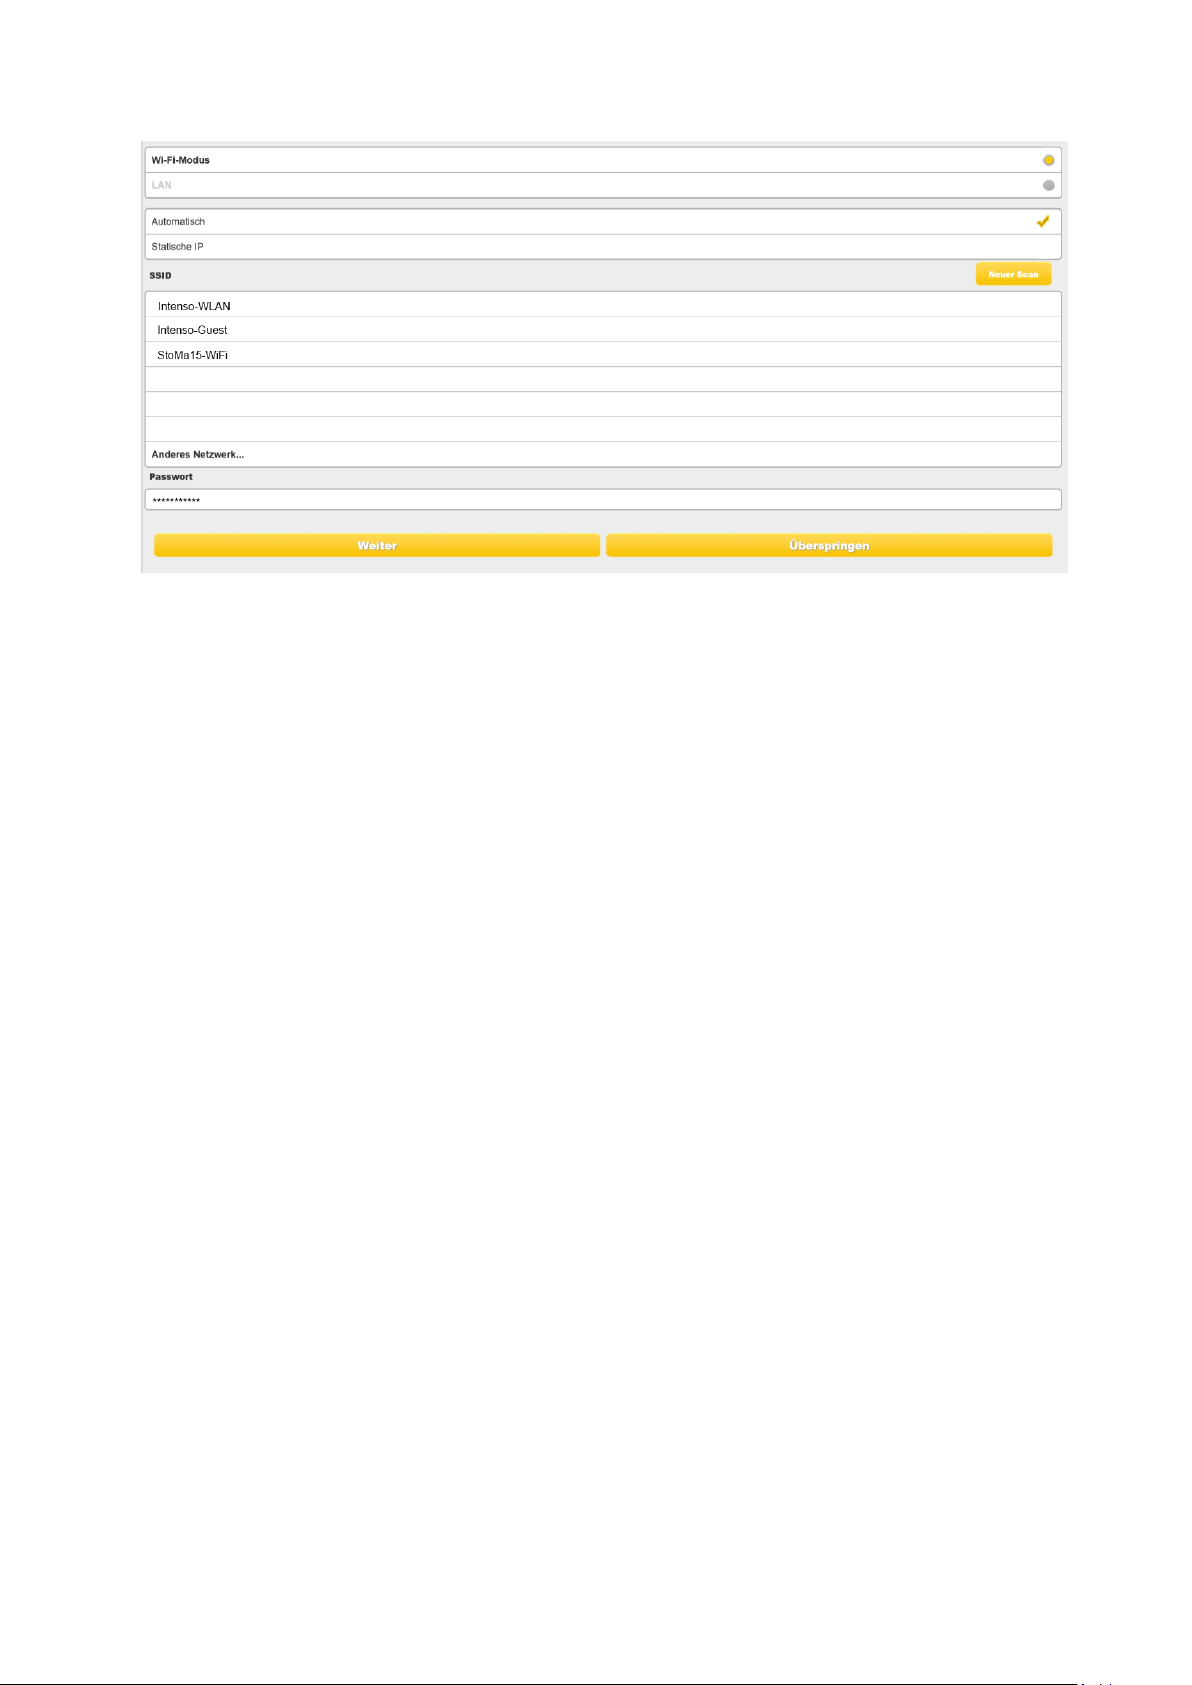
Sie haben folgende Optionen:
A) Wi-Fi-Modus: Die Memory 2 Move Pro stellt bei dieser Einstellung einen
Zugangspunkt für andere drahtlose Geräte dar, damit diese über eine weitere
verfügbare drahtlose Verbindung in das Internet gelangen können. Dieses ist die
Standardeinstellung. Hierzu müssen Sie folgende Einstellungen vornehmen:
SSID: Geben Sie den SSID Namen ihres Netzwerkes ein oder klicken
Sie auf „Neuer Scan“, um automatisch nach allen verfügbaren
Netzwerken zu suchen.
Passwort: Bitte geben Sie das Passwort für das gewählte lokale drahtlose
Netzwerk ein.
IP Adresse: 1. Bei Auswahl von „Automatisch“ stellt das Netzwerk
Ihnen automatisch eine IP Adresse zur Verfügung.
2. Bei Auswahl von „Statische IP“ müssen Sie selber Ihre IP
Adresse für das Netzwerk, mit dem Sie sich verbinden wollen,
eingeben.
B) LAN-Modus: Direkter Anschluss des Gerätes mit einem LAN Kabel an einen
vorhandenen Router. Bitte nutzen Sie hierzu einen freien Steckplatz für ein LAN
Kabel an Ihrem Router. Bei dieser Konfiguration schließen Sie das WiFi Gerät per
Netzwerkkabel an ein weiteres verfügbares Netzwerk an.
DE - 18
Page 20
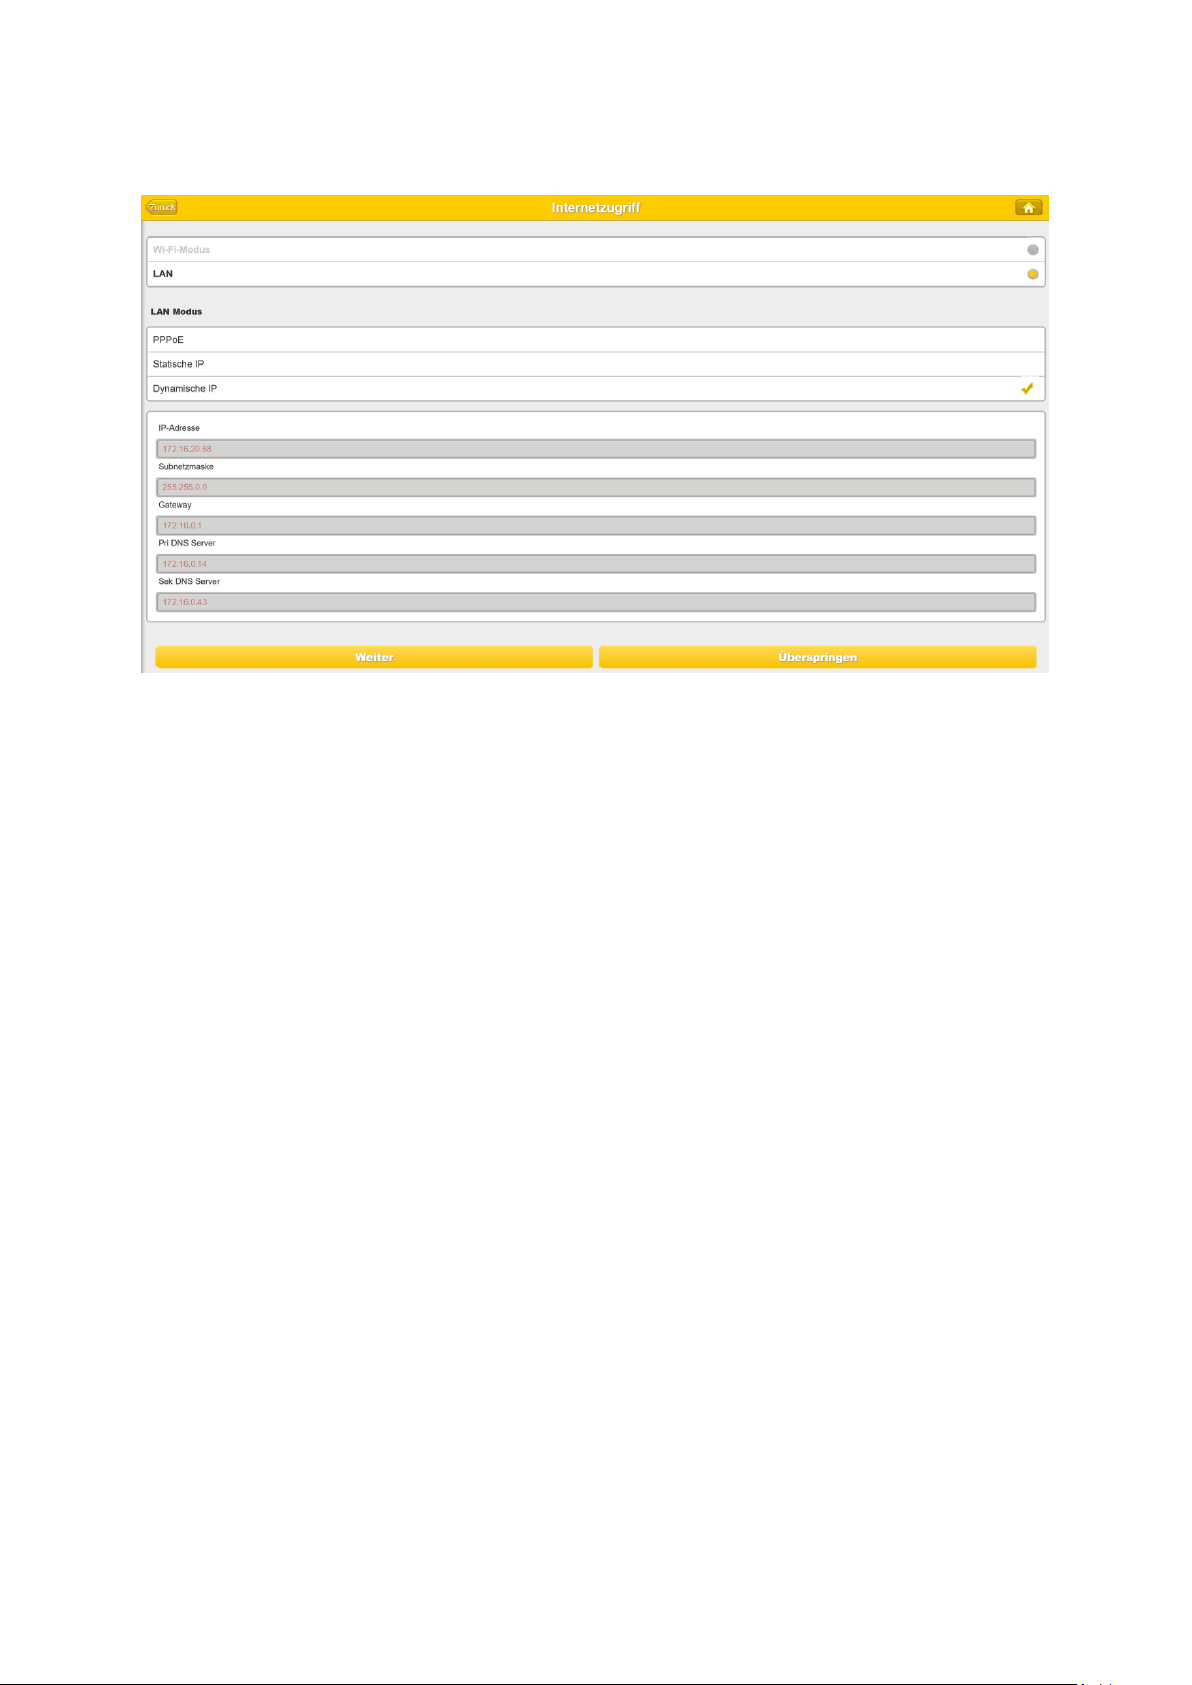
Auswahl der LAN Optionen
In der Grundeinstellung ist „Dynamische IP“ ausgewählt. Sie können manuell eine IP
Adresse vergeben, indem Sie auf den gelben Pfeil klicken und die Option „Statische
IP“ auswählen.
Hinweis: Durch Klicken auf das X (links oben) können Sie das WAN Optionsmenü
verlassen.
Hinweis: Sollten Sie keine Verbindung mit einem weiteren Netzwerk herstellen
können, fragen Sie bitte Ihren Netzwerk Administrator nach den für Sie gültigen
Richtlinien!
4.) Klicken Sie auf „Weiter“, um mit der Konfiguration des Gerätes fortzufahren. Sie
nehmen nun die WiFi Einstellungen vor.
DE - 19
Page 21
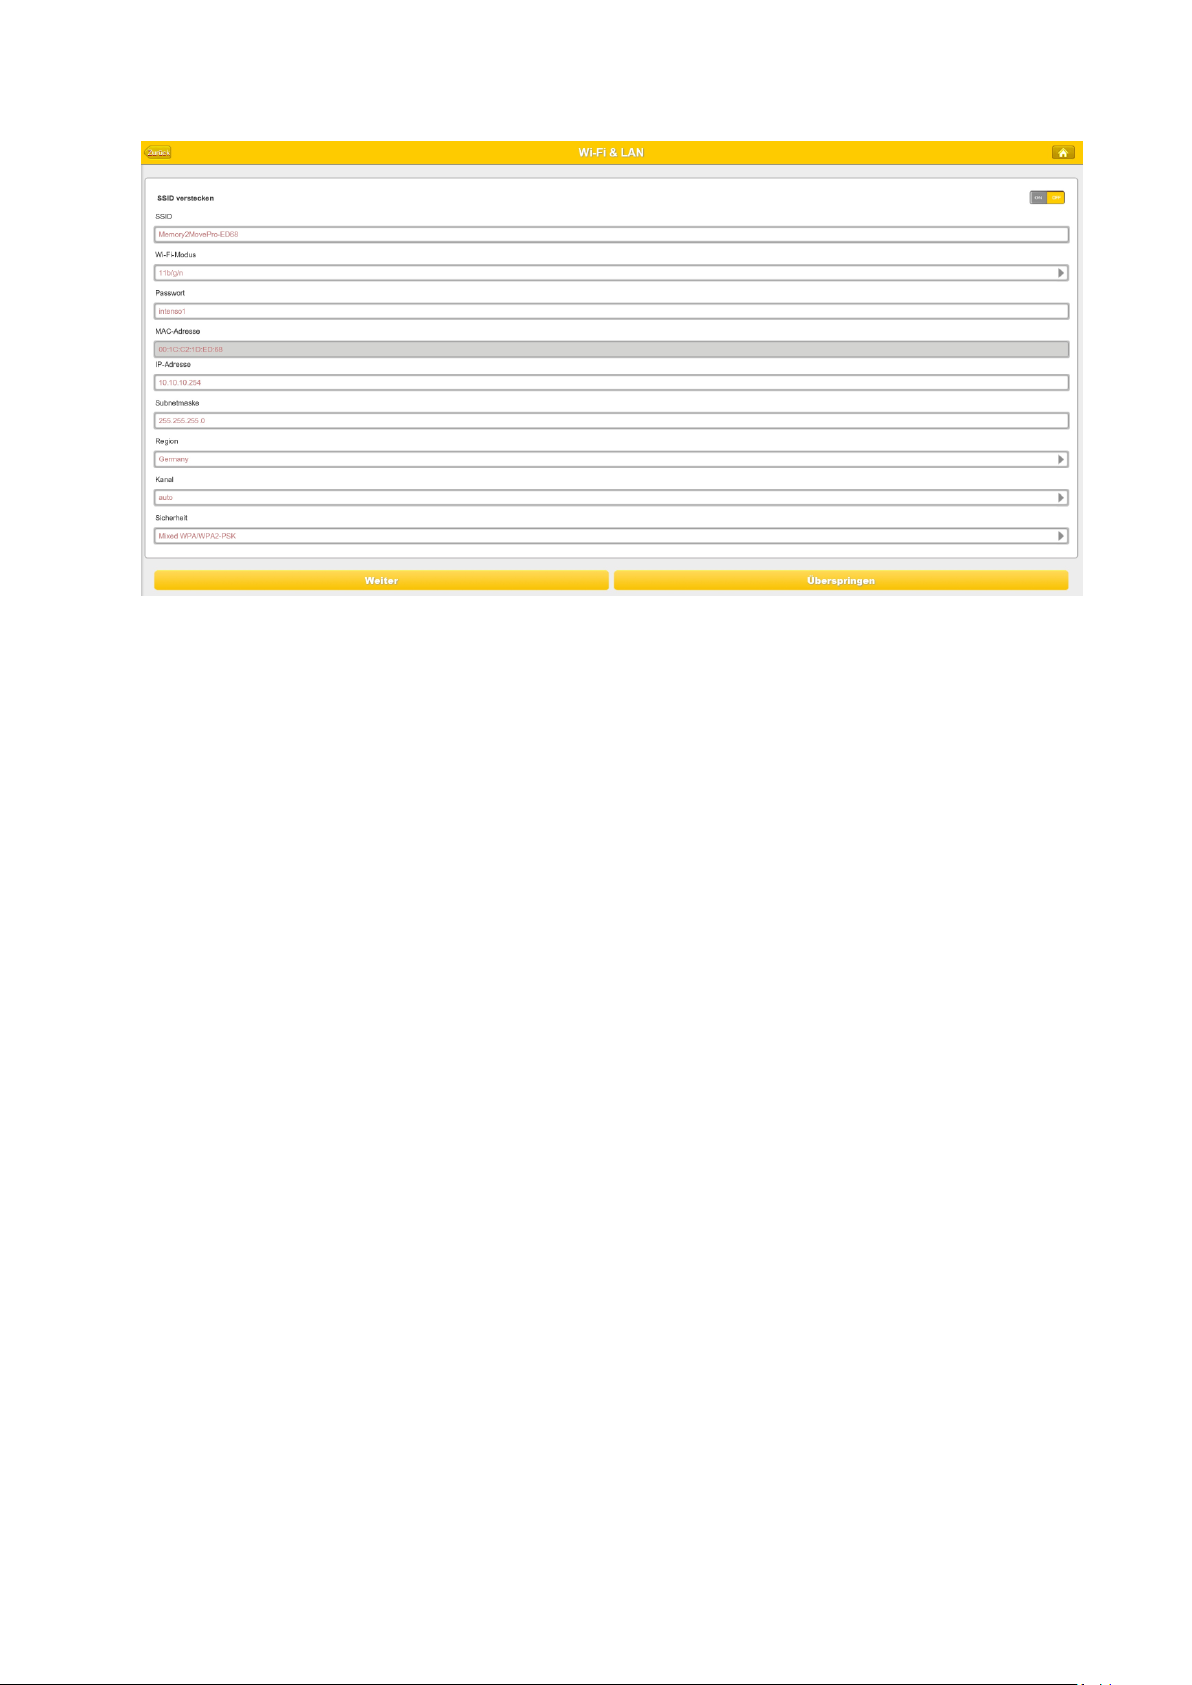
- SSID: Bitte tragen Sie hier den Namen Ihres Netzwerkes ein. In der
Grundeinstellung steht hier „Memory2MovePro-XXXX“. 32 Zeichen
sind maximal für den SSID Namen möglich.
- Kanal: Bitte tragen Sie hier den Kanal ein, auf dem das WiFi Gerät senden und
empfangen soll. Die Grundeinstellung ist „Auto“. Der Kanal wird in
diesem Fall automatisch vom Gerät festgelegt. Sie können aber auch
manuell festlegen, auf welchem Kanal empfangen und gesendet
werden soll. Es stehen die Kanäle 1 bis 14 zur Verfügung.
- Wi-Fi-Modus: Der voreingestellte drahtlose Netzwerkstandard lautet:
802.11/b/g/n. Sie können ebenfalls manuell die Modi 11Mbps
(802.11b), 54 Mbps (802.11g) oder 150Mbps (802.11n) einstellen.
- Sicherheit: Im Auslieferungszustand ist Mixed WPA/WPA2-PSK ausgewählt. Sie
haben die Wahl zwischen folgenden Verschlüsselungstypen:
WPA-PSK,WPA2-PSK, Mixed WPA/WPA2-PSK.
- Passwort: Es muss, je nach ausgewähltem Verschlüsselungstyp, ein Passwort mit
mindestens 8 und höchstens 63 Zeichen eingegeben werden.
- IP Adresse: Die voreingestellte IP Adresse lautet: 10.10.10.254 mit der
Subnetmaske 255.255.255.0 Diese IP Adresse können Sie manuell
verändern.
5.) Klicken sie auf „Weiter“, um das Administrator Passwort festzulegen. Sollten Sie auf
„Überspringen“ drücken, verzichten Sie auf die Festlegung eines neuen Passwortes
und übernehmen das Voreingestellte.
DE - 20
Page 22
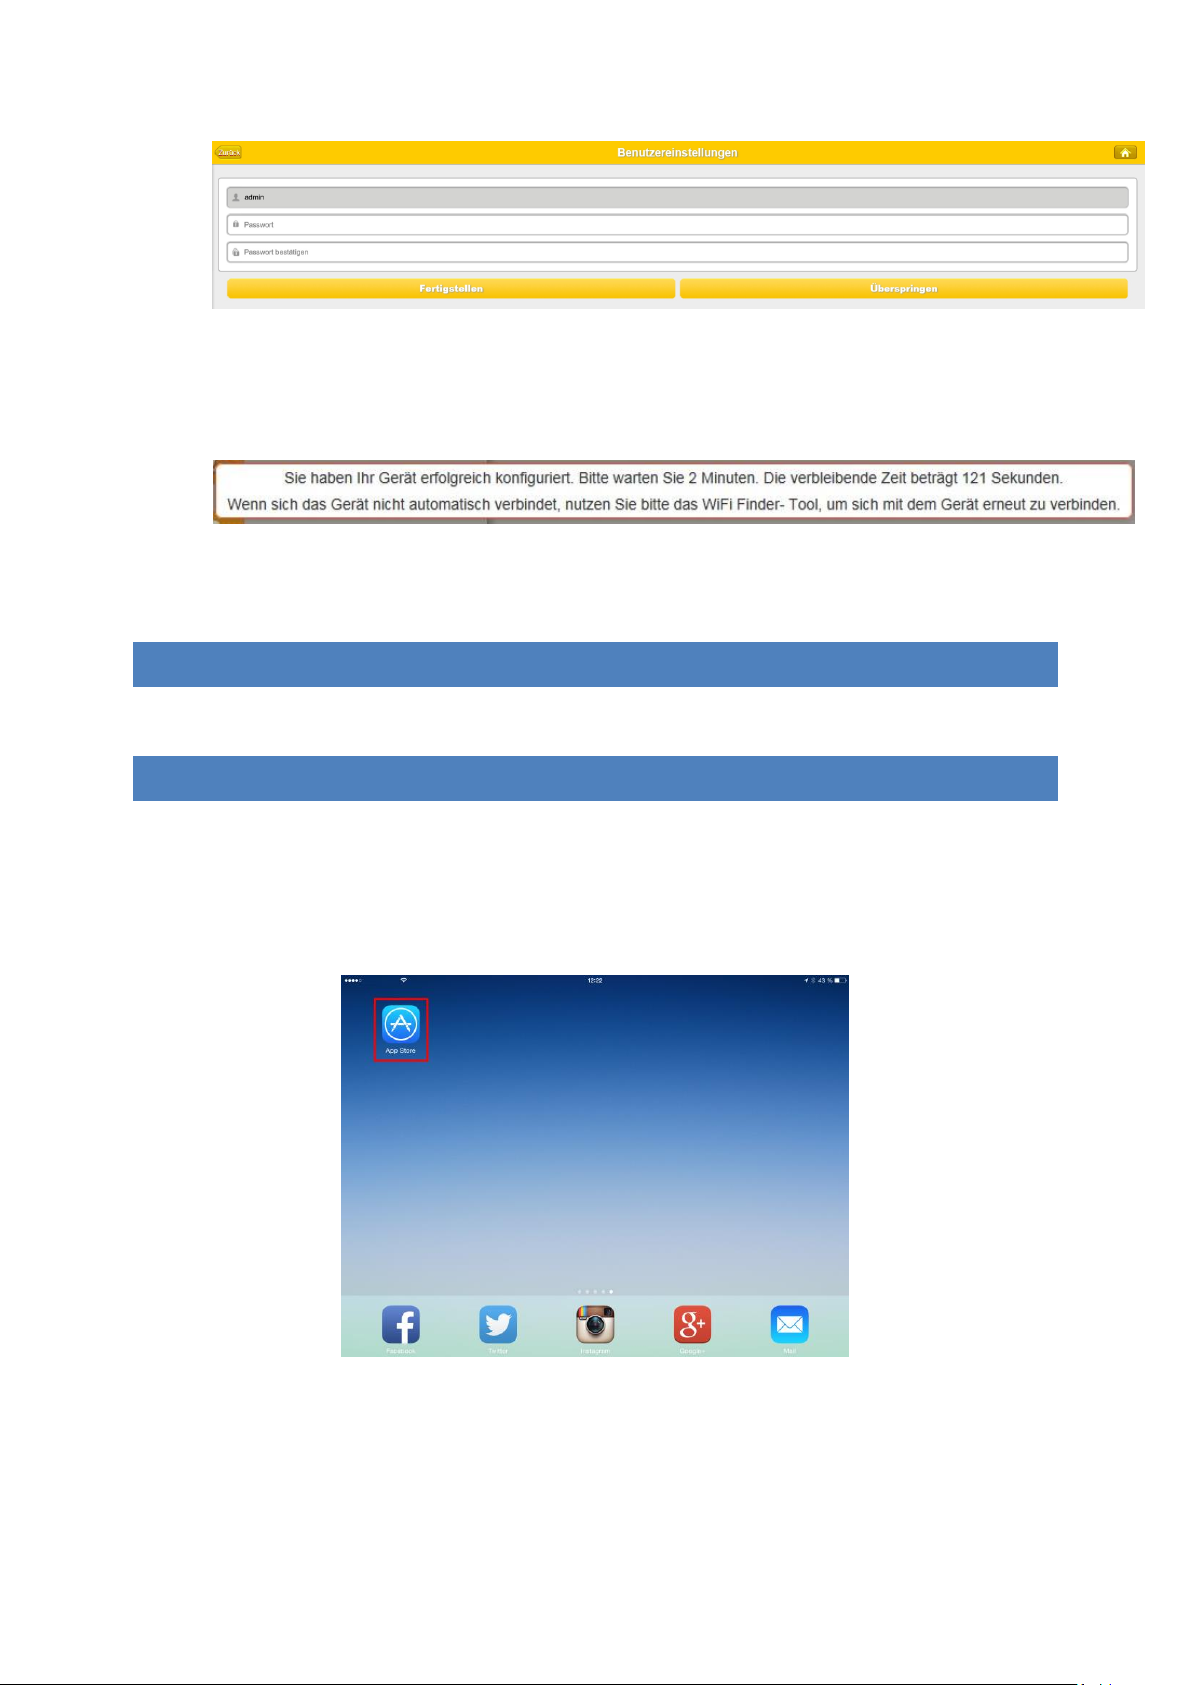
Nach Beendigung des Start-Assistenten startet das System neu. Dieser Vorgang dauert
ca. 2 Minuten. Den aktuellen Status können Sie den Benachrichtigung entnehmen.
10. NUTZUNG VON MOBILEN GERÄTEN
10.1 IOS MEMORY 2 MOVE PRO APP INSTALLATION
1. Klicken Sie auf das App Store Icon auf Ihrem Homescreen, wie auf folgendem Bild zu
sehen. Suchen Sie nach der kostenfreien „Memory 2 Move Pro“ App und folgen Sie
den Anweisungen zur Installation auf dem Bildschirm.
Sobald die Installation erfolgreich beendet wurde, ist die „Memory 2 Move Pro” App auf
dem Homescreen Ihres Gerätes zu finden (siehe folgendes Bild).
DE - 21
Page 23
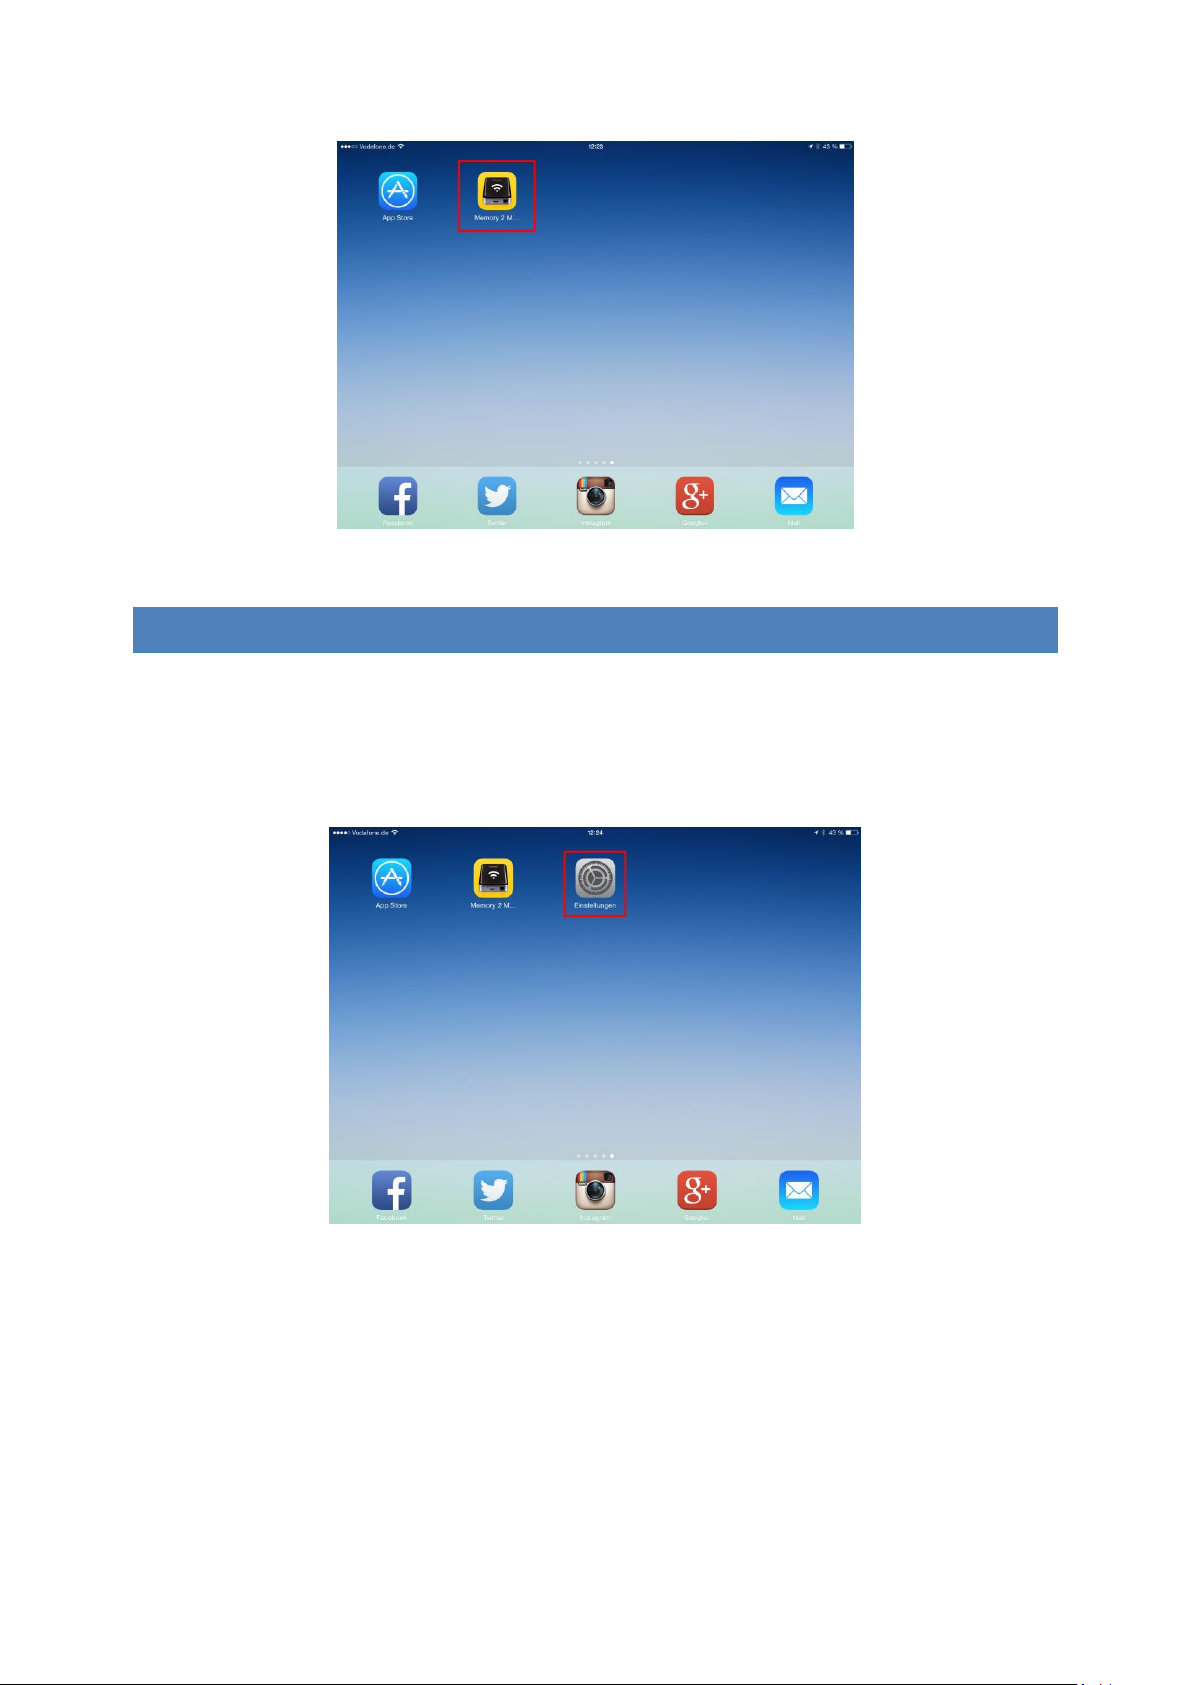
10.2 KABELLOSE VERBINDUNG MIT IHREM IPHONE/IPAD
1. Schalten Sie die Memory 2 Move Pro an. Warten Sie ein paar Minuten, bis die
Initialisierung des Geräts abgeschlossen ist. Dies ist erkennbar an der blauen Wi-Fi
LED, die nach Abschluss der Initialisierung aufhört zu blinken.
2. Klicken Sie auf das Icon für „Einstellungen”, wie in folgendem Bild zu sehen.
3. Klicken Sie auf den Menüpunkt “WLAN”. In der Liste der vorhandenen Wi-Fi
Netzwerke sollte das Netzwerk „Memory2MovePro-XXXX” angezeigt werden.
Klicken Sie auf dieses Netzwerk, wie in folgendem Bild zu sehen. Falls Sie in Schritt 9
(Schritt.5) unter „Benutzereinstellungen“ ein Passwort festgelegt haben, geben Sie
dies nun an.
DE - 22
Page 24
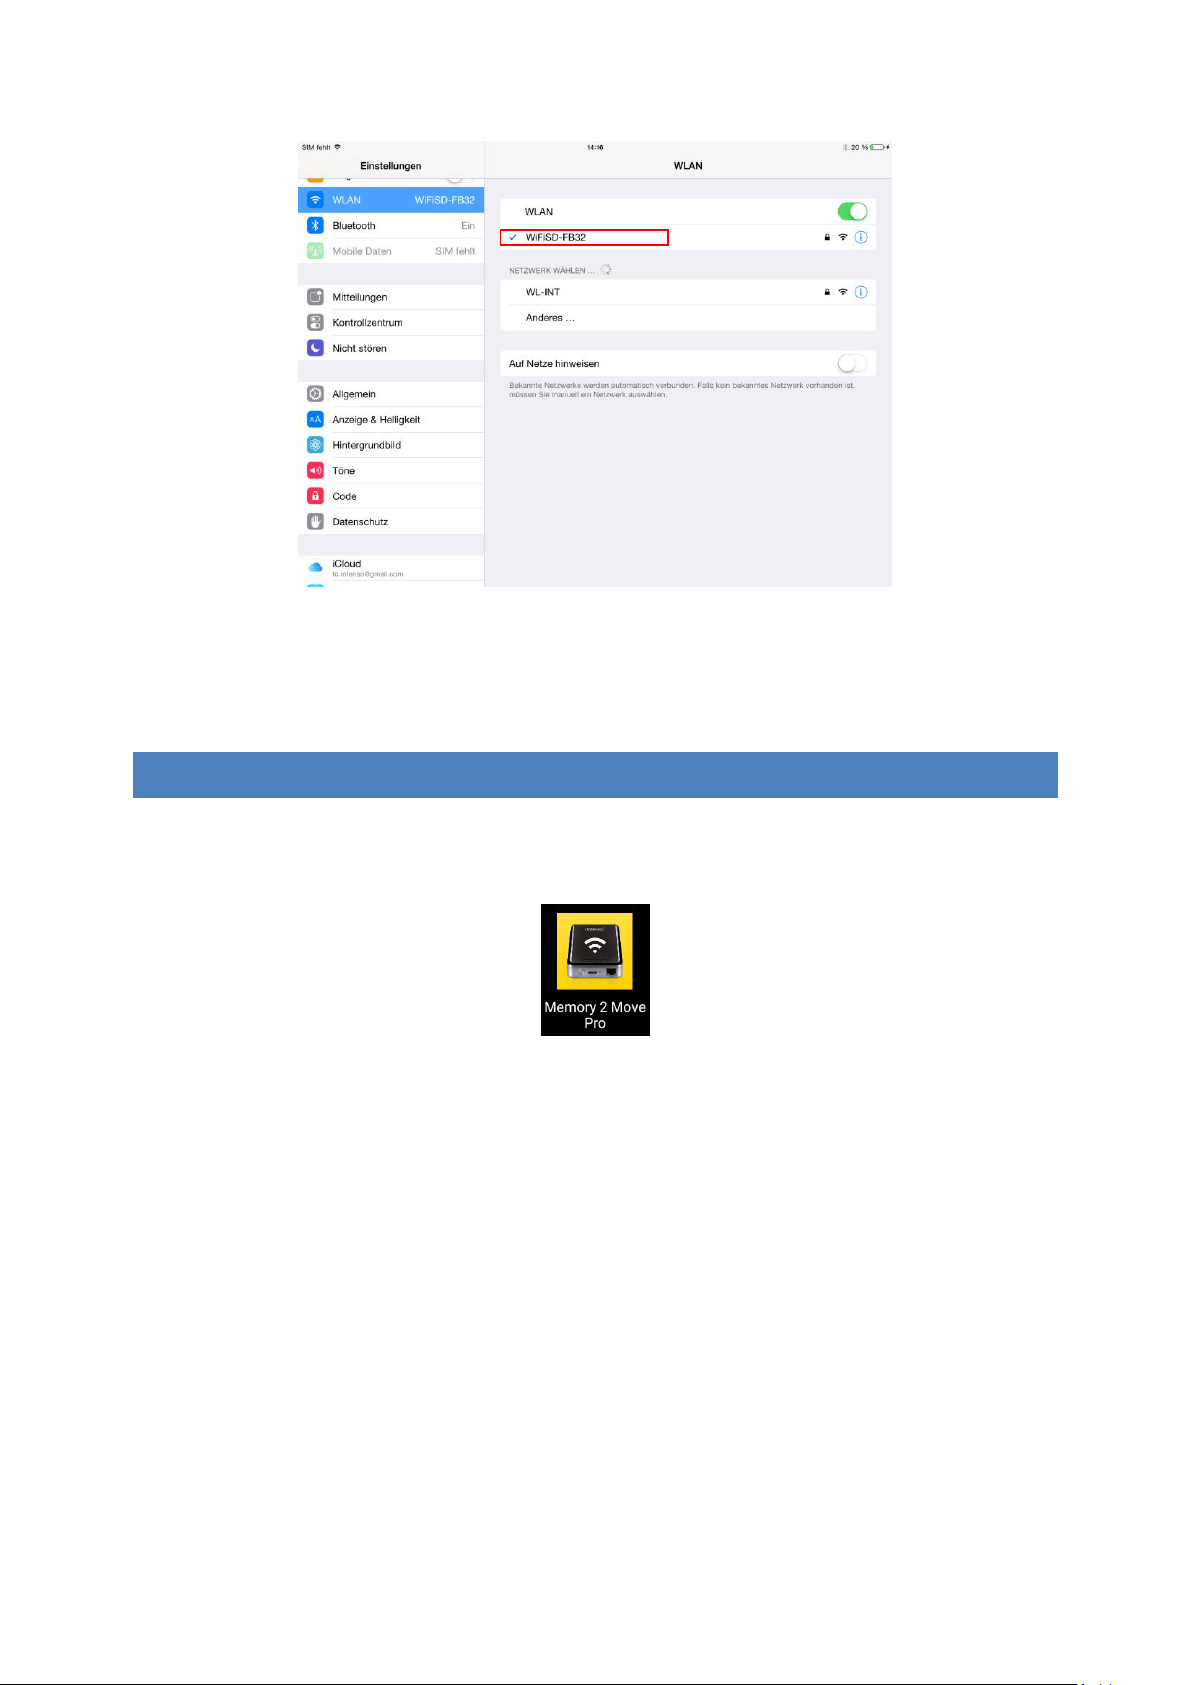
Sobald „Memory2MovePro-XXXX” ausgewählt wurde, erscheint ein Haken vor der SSID und
das Wi-Fi Logo in der linken oberen Ecke des Geräts wird angezeigt.
10.3 BENUTZERANMELDUNG (IOS)
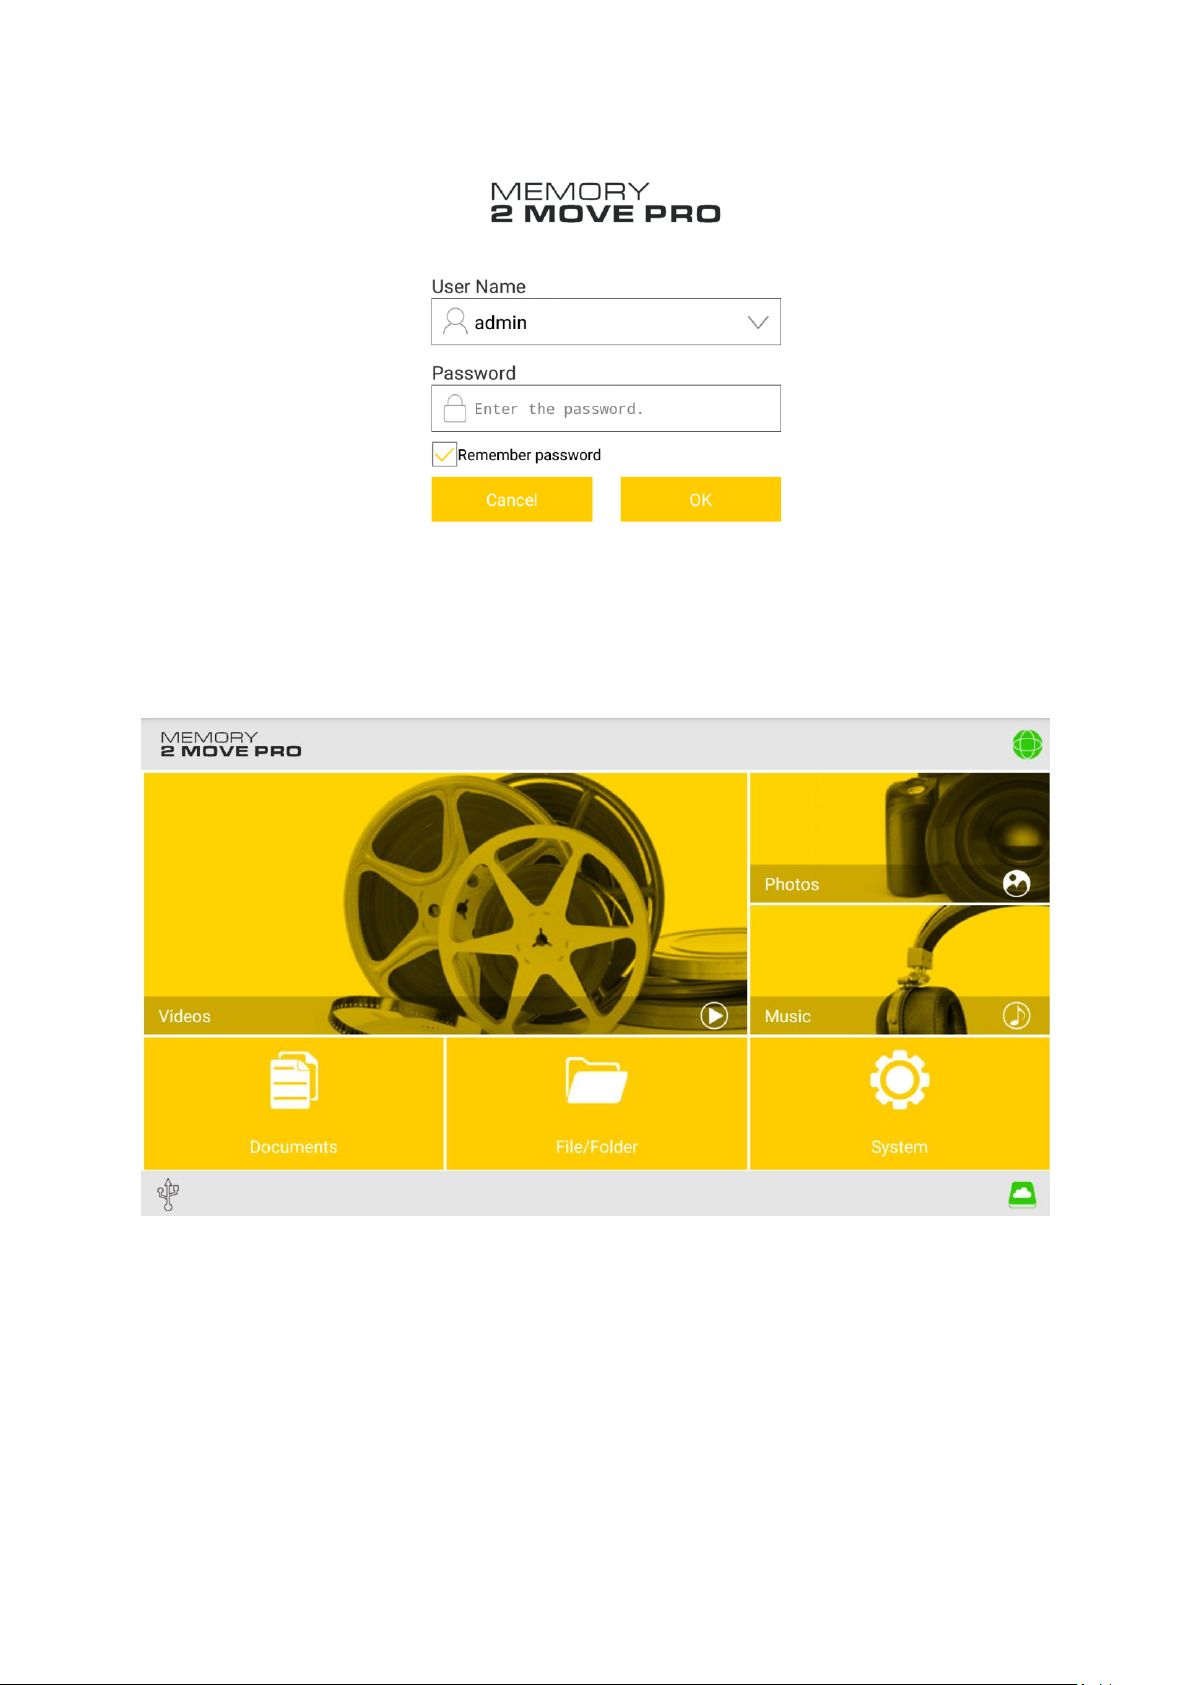
Klicken Sie auf das „Memory 2 Move Pro” Logo um die Anwendung zu starten, wie in
folgendem Bild zu sehen.
Geben Sie das Administrator Passwort ein, welches Sie während der Konfiguration vergeben
haben (Werkseinstellung: 00000). Das Passwort ist nur für die erste Anmeldung erforderlich.
Das Gerät speichert Ihre Eingabe, sodass bei der 2. Anmeldung keine Eingabe mehr
erforderlich ist.
DE - 23
Page 25
Sobald Sie das Passwort korrekt eingegeben haben, werden Sie automatisch in das Menü
„Memory 2 Move Pro“ geführt. Dies ist Ihr direkter Zugriff auf die Wi-Fi Festplatte.
DE - 24
Page 26
10.4 ANDROID MEMORY 2 MOVE PRO APP IN STALLATION
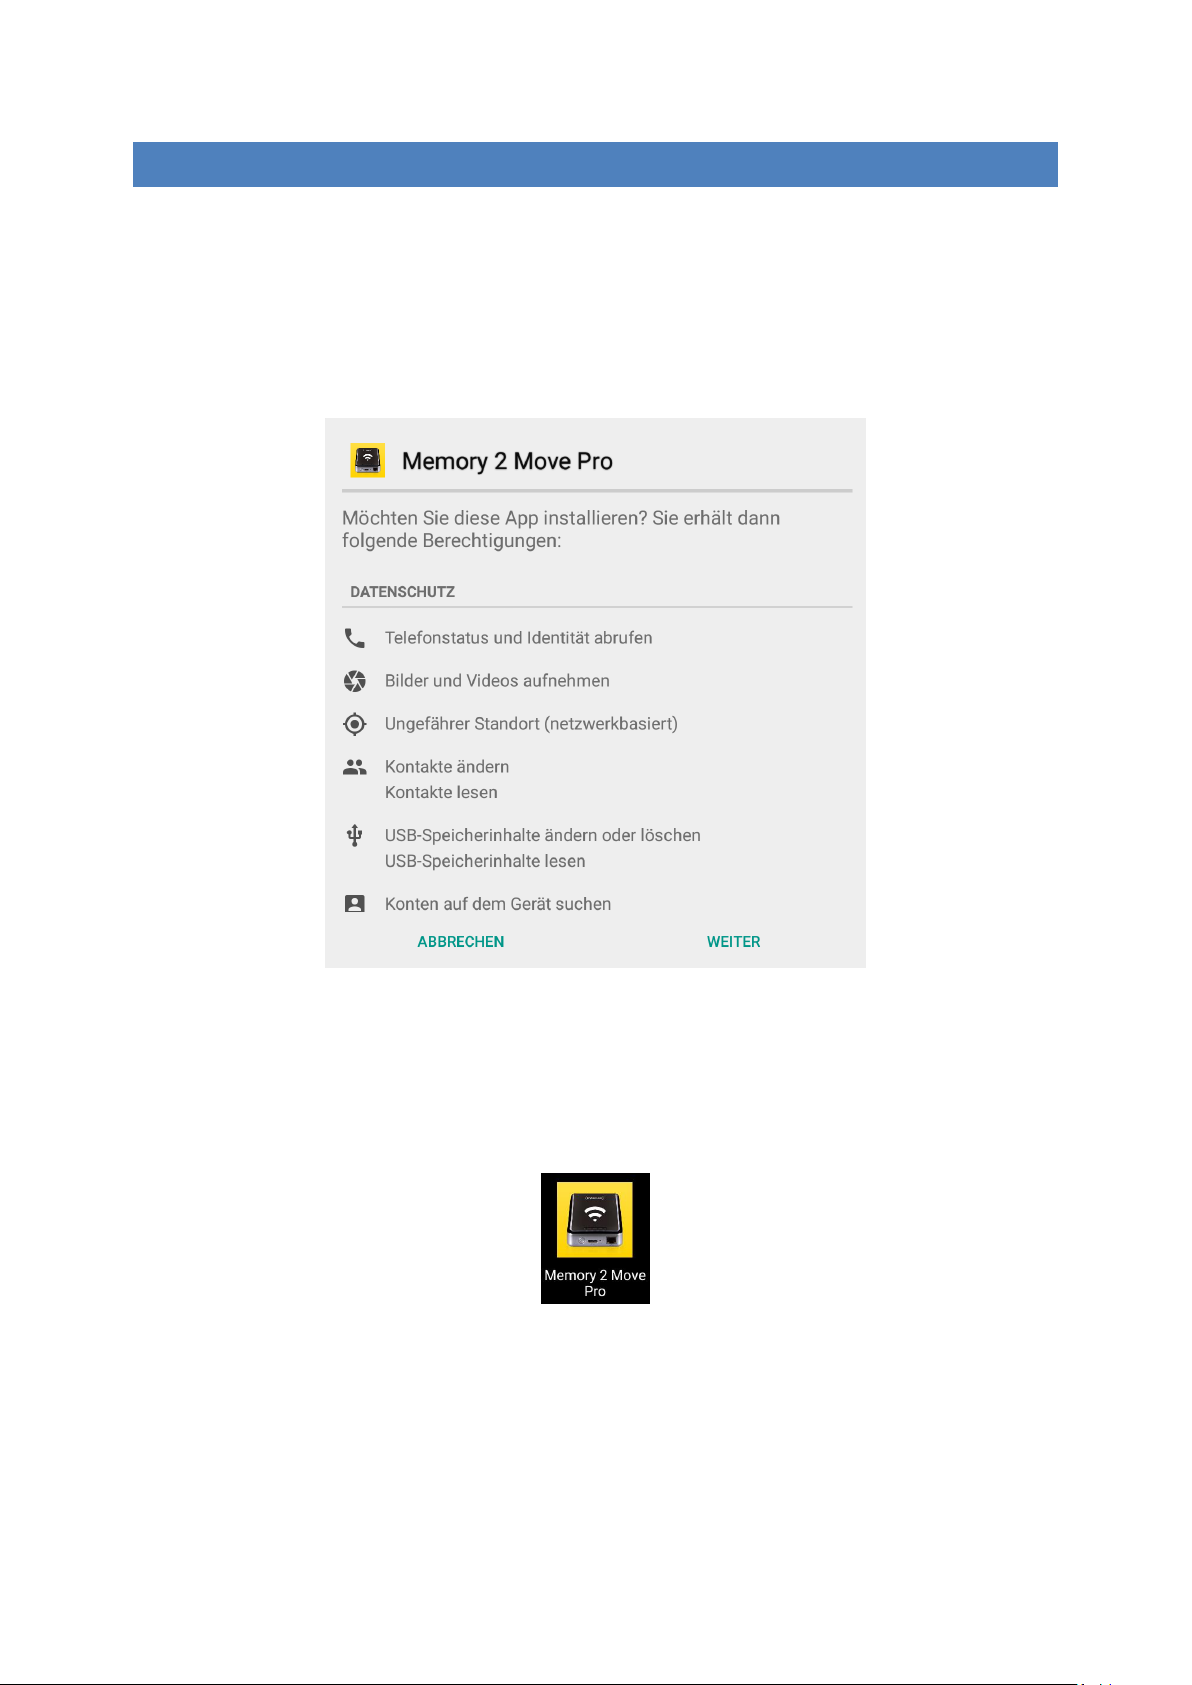
1. Öffnen Sie den „Google Playstore“ und suchen Sie nach der kostenfreien „Memory 2
Move Pro“ App.
2. Folgen Sie den Installationsanweisungen auf dem Bildschirm, wie auf dem
nachfolgenden Bild zu sehen.
3. Sobald die Installation erfolgreich beendet wurde, ist die „Memory 2 Move Pro” App auf
dem Homescreen Ihres Gerätes zu finden (siehe folgendes Bild).
DE - 25
Page 27
10.5 KABELLOSE VERBINDUNG MIT IHREM ANDROID GERÄT
1. Schalten Sie Memory 2 Move Pro an. Warten Sie ein paar Minuten, bis die
Initialisierung des Geräts abgeschlossen ist. Dies ist erkennbar an der blauen Wi-Fi
LED, die nach Abschluss der Initialisierung aufhört zu blinken.
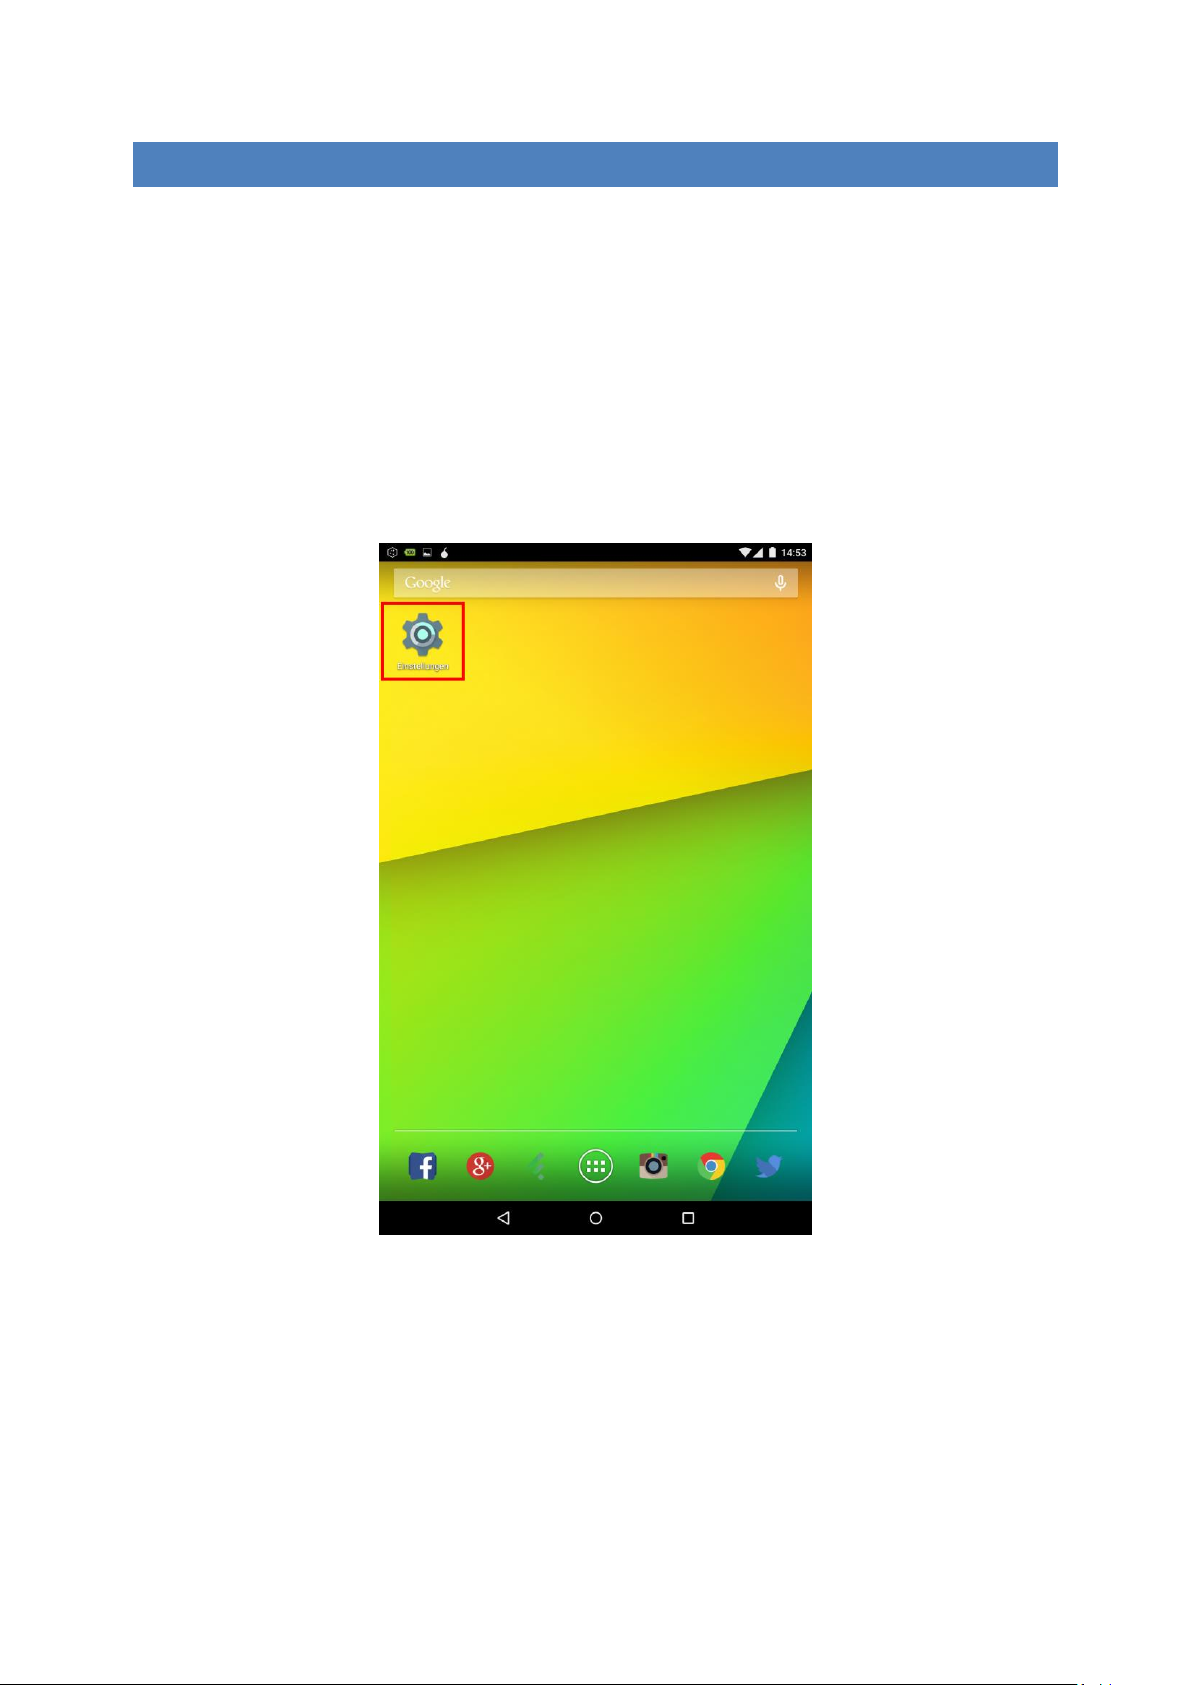
2. Klicken Sie auf das Icon für „Einstellungen” wie in folgendem Bild zu sehen.
3. Schalten Sie die Wi-Fi Funktion ein, indem Sie den “virtuellen Schalter“ beim
Menüpunkt WLAN nach rechts schieben.
DE - 26
Page 28
In der Liste der vorhandenen Wi-Fi Netzwerke sollte das Netzwerk
„Memory2MovePro-XXXX” angezeigt werden. Klicken Sie auf dieses Netzwerk, wie in
folgendem Bild zu sehen. Falls Sie in Schritt 9 (Schritt 5) unter
„Benutzereinstellungen“ ein Passwort festgelegt haben, geben Sie dieses nun an.
4. Wenn das Gerät erfolgreich mit der Wi-Fi Festplatte verbunden wurde, erscheint das
Wort “Verbunden” unter der SSID.
10.6 BENUTZER ANMELDUNG (ANDROID)
1. Klicken Sie auf das “Memory 2 Move Pro” App Logo, um die App zu starten (siehe
nachfolgendes Bild).
DE - 27
Page 29
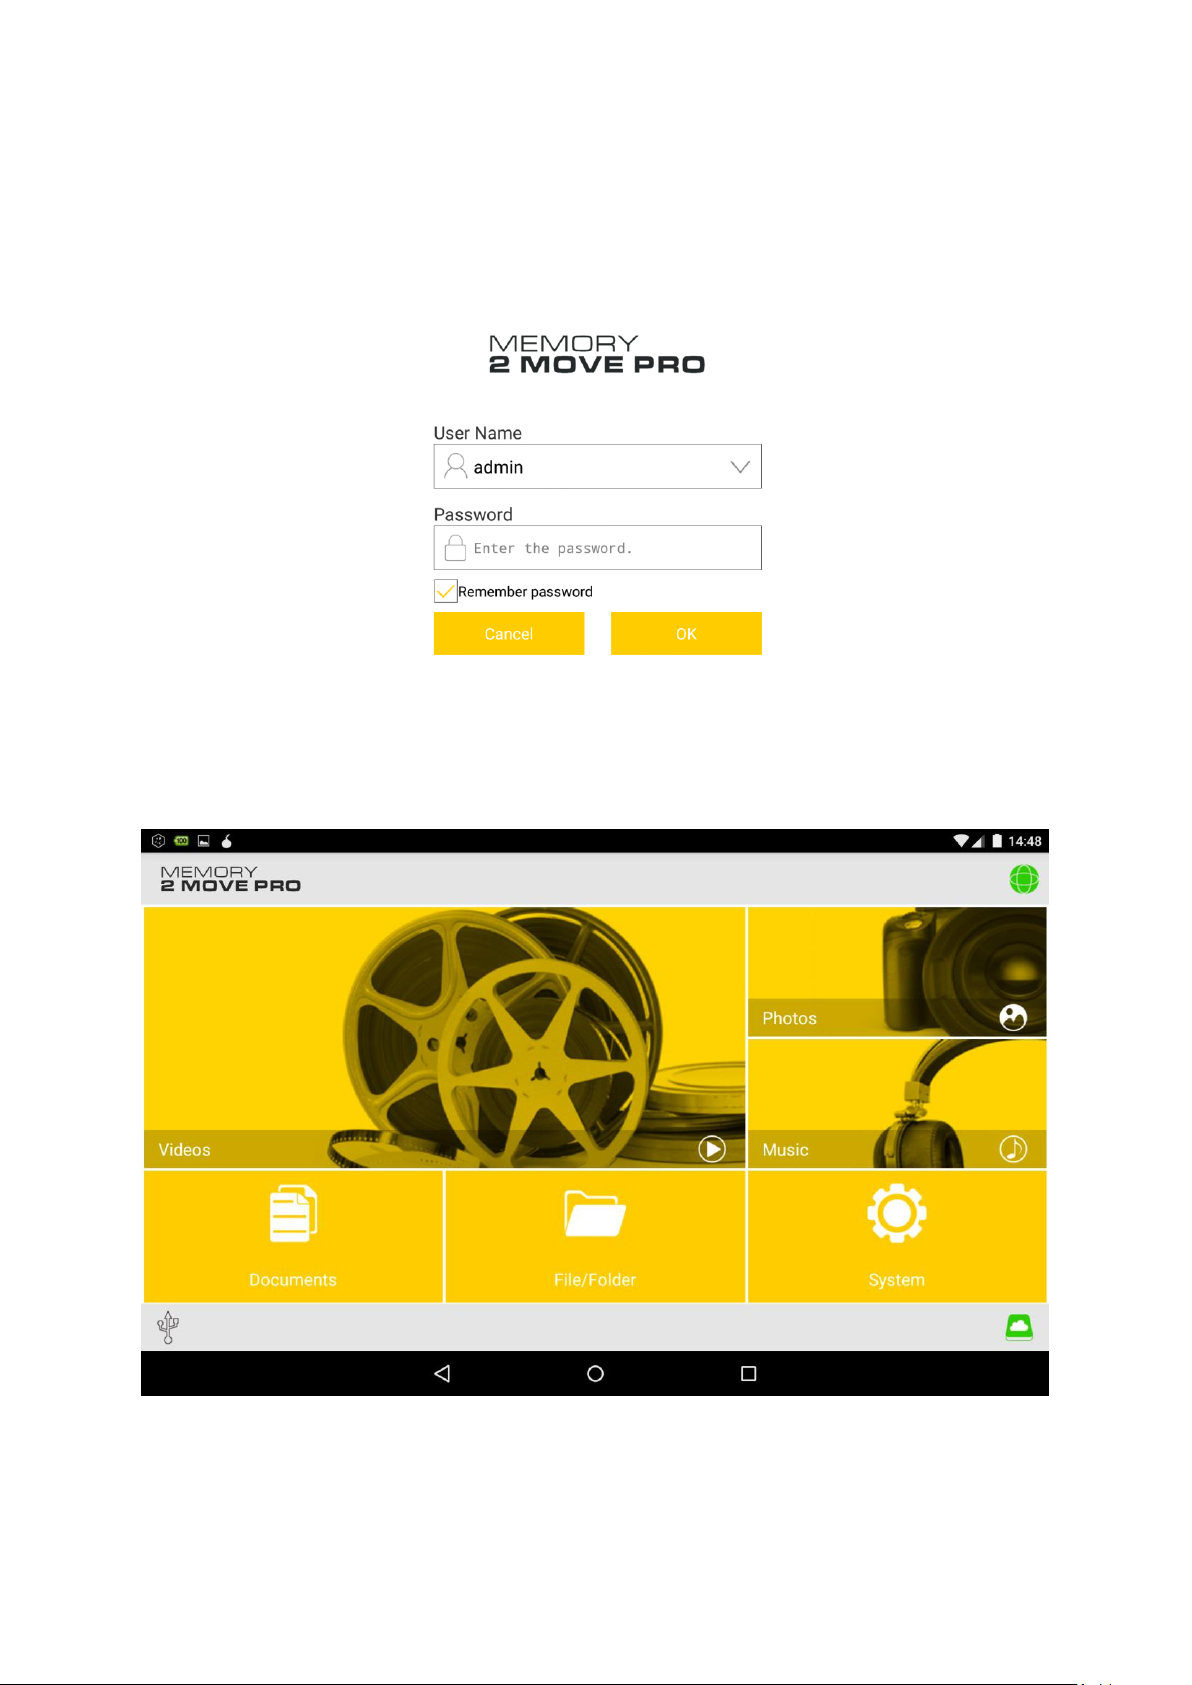
2. Geben Sie das Administrator Passwort ein, welches Sie während der Konfiguration
vergeben haben (Werkseinstellung: 00000). Das Passwort ist nur für die erste
Anmeldung erforderlich. Das Gerät speichert Ihre Eingabe, sodass bei der 2.
Anmeldung keine Eingabe mehr erforderlich ist.
3. Sobald Sie das Passwort korrekt eingegeben haben, werden Sie automatisch in das
Menü „Memory 2 Move Pro“ geführt. Dies ist Ihr direkter Zugriff auf die Wi-Fi
Festplatte.
DE - 28
Page 30
11. GRUNDFUNKTIONEN
11.1 ANWENDUNG FÜR IOS GE RÄTE
Sobald Sie sich erfolgreich mit der Memory 2 Move Pro verbunden haben, werden Sie
automatisch in das Menü „Memory 2 Move Pro” geführt. Dies ist Ihr direkter Zugriff auf die
Wi-Fi Festplatte. Das „Mein Gerät” Menü ist für Ihren Zugriff auf das Gerät, welches Sie
aktuell für die Verbindung mit der Memory 2 Move Pro nutzen.
Folgende Unterpunkte sind in den Menüs auswählbar:
„Mein Gerät“ Hauptmenü – Für die Organisation Ihrer Dateien stehen Ihnen hier
standardmäßig die Ordner „Dokumente”, „Musik”, „Fotos”, „Videos” und „iPad”/ „iPhone”
zur Verfügung.
„Memory 2 Move Pro” Hauptmenü – Zugriff auf die Dateien auf Memory 2 Move Pro.
DE - 29
Page 31

11.2 ANWENDUNG FÜR ANDROID GERÄTE
Internet Symbol wird in grün angezeigt, wenn eine
Internetverbindung aufgebaut ist.
WiFi HDD Symbol wird in grün angezeigt, wenn eine aktuelle
Verbindung zum Gerät besteht.
Sobald Sie sich erfolgreich mit der Memory 2 Move Pro verbunden haben, werden Sie
automatisch in das Menü „Memory 2 Move Pro” geführt, dies ist Ihr direkter Zugriff auf die
Wi-Fi Festplatte. Das „Mein Gerät” Menü ist für Ihren Zugriff auf das Gerät, welches Sie
aktuell für die Verbindung mit der Memory 2 Move Pro nutzen.
Folgende Unterpunkte sind in den Menüs anwählbar:
„Memory 2 Move Pro“ Hauptmenü – Für die Organisation Ihrer Dateien stehen Ihnen hier
standardmäßig die Ordner “Dokumente”, “Musik”, “Fotos”, “Videos” und “SDCard” zur
Verfügung.
DE - 30
Page 32

11.3 WI-FI EINSTELLUNGEN (IOS UND ANDROID)
11.3.1 WI-FI EINSTELLUNGEN INTERFACE
Klicken Sie auf System, um die Wi-Fi Einstellungen zu ändern.
11.3.2 ÄNDERN DER SSID
Klicken Sie auf den Button, um den Namen zu ändern.
DE - 31
Page 33

11.3.3 SICHERHEIT
Unter dem Menüpunkt Sicherheit erscheinen die Sicherheitsoptionen: Die Wi-Fi Festplatte
unterstützt folgende Sicherheitsformate: WPA-PSK, WPA2-PSK, gemischt WPA/WPA2PSK.Wenn Sie einen neuen Sicherheitscode hinzufügen möchten, werden Sie nach einem
kabellosen Passwort gefragt.
DE - 32
Page 34

11.3.4 INTERNET ZUGÄNGE
Unter Interneteinstellungen werden Ihnen die Internetzugänge aufgezeigt. Sie können
zwischen kabelgebundenem (wired) und kabellosem (W-LAN) Zugang wählen. Die kabellose
Verbindung finden Sie unter Interneteinstellungen in der Mitte des folgenden Bildes:
Wählen Sie die kabelgebundene Variante, so muss erst das Netzwerk, auf dem Sie sich
eingewählt haben, konfiguriert werden.
DE - 33
Page 35

11.4 MUSIK-/AUDIOWIEDERGABE (IOS AND ANDROID)
Tipp: Es ist empfehlenswert, einen oder mehrere Ordner für Ihre gesamten Musik/Audiodateien zu erstellen. Dies erleichtert die Nutzung und Organisation im Menü.
Die Musik- oder Audiodateien können unabhängig vom aktuellen Menü und
Speicherort („über Memory 2 Move Pro” oder „Mein Gerät”) wiedergegeben werden.
Hierzu müssen Sie lediglich nach der Datei suchen. Durch einen Klick auf die
gewünschte Datei wird diese automatisch wiedergegeben.
- Klicken Sie auf diese Taste, um die aktuell wiedergegebene Audiodatei von vorn
zu beginnen. Bei zweimaligem Klicken wird die vorherige Audiodatei wiedergegeben.
- Klicken Sie auf diese Taste, um zur nächsten Audiodatei zu gelangen.
- Klicken Sie auf diese Taste, um die Wiedergabe der Audiodatei zu starten.
Klicken Sie auf die Pause Taste , um die Wiedergabe zu pausieren / stoppen.
DE - 34
Page 36

Es gibt 4 Wiedergabemodi:
a. - Wiederholung der aktuellen Datei: Die aktuell wiedergegebene Datei wird
wiederholt
b. - Zufallswiedergabe aller Audiodateien, die sich im aktuellen Ordner
befinden.
c. - Wiedergabe des aktuellen Ordners: Die Audiodateien werden der Reihe
nach abgespielt und nicht wiederholt.
d. - Wiederholung des Ordners: Alle Audiodateien im Ordner werden der Reihe
nach abgespielt und dann wiederholt.
Hinweis: Halten Sie den Knopf der Fortschrittsanzeige gedrückt und schieben Sie
diesen nach rechts oder links, um innerhalb einer Audiodatei vor- oder
zurückzuspulen.
Tipp: Sie können die Oberfläche des Music Players jederzeit über die „Zurück Taste“
verlassen. Die Wiedergabe Ihrer Audiodateien wird im Hintergrund fortgesetzt.
DE - 35
Page 37

11.5 VIDEO-/FILMWIEDERGABE
11.5.1 IOS
Tipp: Es ist empfehlenswert, einen oder mehrere Ordner für Ihre gesamten Video/Filmdateien zu erstellen. Dies erleichtert die Nutzung und Organisation im Menü.
Die Video- oder Filmdateien können unabhängig vom aktuellen Menü und Speicherort
(„über Memory 2 Move Pro” oder „Mein Gerät”) wiedergegeben werden.
Hierzu müssen Sie lediglich nach der Datei suchen. Durch einen Klick auf die gewünschte
Datei wird diese automatisch wiedergegeben.
Hinweis: Für weitere Informationen zu den unterstützten Dateiformaten, konsultieren Sie
bitte die Bedienungsanleitung Ihres iOS Gerätes.
DE - 36
Page 38

Standardmäßig ist die Videowiedergabe im Querformat. Folgende Auswahlmöglichkeiten
haben Sie:
1. - Halten Sie diese Taste gedrückt, um die Videodatei während der Wiedergabe
zurück zu spulen.
2. - Halten Sie diese Taste gedrückt, um die Videodatei während der Wiedergabe
vor zu spulen.
3. - Klicken Sie diese Taste, um die Wiedergabe der Videodatei zu
starten/fortzusetzen.
4. - Klicken Sie diese Taste, um die Wiedergabe der Videodatei zu pausieren.
11.5.2 ANDROID
Tipp: Es ist empfehlenswert, einen oder mehrere Ordner für Ihre gesamten Video-
/Filmdateien zu erstellen. Dies erleichtert die Nutzung und Organisation im Menü.
Die Video- oder Filmdateien können unabhängig vom aktuellen Menü und Speicherort
(„über Memory 2 Move Pro” oder „Mein Gerät”) wiedergegeben werden.
Hierzu müssen Sie lediglich nach der Datei suchen. Durch einen Klick auf die gewünschte
Datei wird diese automatisch wiedergegeben.
Hinweis: Die Bedienung und Einstellungsmöglichkeiten der Videowiedergabe variieren je
nachdem welcher Movie Player auf Ihrem Android-Gerät installiert ist.
Bitte konsultieren Sie die Bedienungsanleitung Ihres jeweiligen Movie Players für
Informationen zur Bedienung.
DE - 37
Page 39

11.6 WIEDERGABE VON BILDDATEIEN
11.6.1 IOS
Tipp: Es ist empfehlenswert, einen oder mehrere Ordner für Ihre gesamten Bilddateien
auf den Datenträgern anzulegen. Dies erleichtert die Nutzung und Organisation im Menü.
Hinweis Memory 2 Move Pro unterstützt die Wiedergabe der folgenden Bildformate: .jpg,
.tiff, .gif und .bmp
Die unterstützten Bilddateien können entweder in einer Miniaturübersicht oder als Liste
angezeigt werden, wie in folgenden Bildern zu sehen.
Alle Bilder in „nicht“ unterstützten Formaten werden als exemplarische Miniaturansicht
oder als Icon angezeigt.
Miniaturansicht
Listenansicht
DE - 38
Page 40

Klicken Sie auf eine beliebige Bilddatei, um die automatische Diashow zu öffnen. Sollte
die Menüleiste sich nicht direkt öffnen, klicken Sie ein 2. Mal auf das Bild, damit diese
erscheint (siehe oben im nachfolgenden Bild).
Folgende Funktionen stehen Ihnen in der Diashow zur Auswahl:
Wischen Sie mit dem Finger über den Bildschirm von rechts nach links oder von links nach
rechts, um die Anzeige der Diashow manuell zu steuern oder klicken Sie auf die Play Taste
,um die Diashow automatisch ablaufen zu lassen.
Klicken Sie auf die Pause Taste ,um die Diashow zu pausieren. Durch erneutes Drücken der
Pause Taste setzen Sie die Diashow fort.
Klicken Sie auf ,um die Diashow fortzusetzen und nach dem letzten Bild von vorn zu
beginnen.
Klicken Sie auf ,um die Diashow einmalig durchlaufen zu lassen. Die Wiedergabe stoppt
nach der letzten Bilddatei.
Klicken Sie auf die Zurück Taste ,um zum vorherigen Menüpunkt zurückzukehren.
Eine Hintergrundmusik kann während des Abspielens einer Diashow hinzugefügt werden.
Drücken Sie dazu den Button, um die Hintergrundmusik zu starten. Um die
Hintergrundmusik zu stoppen, drücken Sie bitte auf den Button.
DE - 39
Page 41

11.6.2 ANDROID
Tipp: Es ist empfehlenswert, einen oder mehrere Ordner für Ihre gesamten Bilddateien
auf den Datenträgern anzulegen. Dies erleichtert die Nutzung und Organisation im Menü.
Hinweis Memory 2 Move Pro unterstützt die Wiedergabe der folgenden Bildformate: .jpg,
.tiff, .gif und .bmp
Die unterstützten Bilddateien können entweder in einer Miniaturübersicht oder als Liste
angezeigt werden, wie in folgenden Bildern zu sehen.
Alle Bilder in nicht-unterstützten Formaten werden als exemplarische Miniaturansicht
oder als Icon angezeigt.
Miniaturansicht
Listenansicht
DE - 40
Page 42

Klicken Sie auf eine beliebige Bilddatei, um die automatische Diashow zu öffnen. Sollte
die Menüleiste sich nicht direkt öffnen, klicken Sie ein 2. Mal auf das Bild damit diese
erscheint (siehe oben rechts im nachfolgenden Bild).
Folgende Funktionen stehen Ihnen in der Diashow zur Auswahl:
Wischen Sie mit dem Finger über den Bildschirm von rechts nach links oder von links
nach rechts, um die Anzeige der Diashow manuell zu steuern oder klicken Sie auf die Play
Taste um die Diashow automatisch ablaufen zu lassen.
1. Klicken Sie auf die Pause Taste ,um die Diashow zu pausieren. Durch erneutes
Drücken der Pause Taste setzen Sie die Diashow fort.
2. Klicken Sie auf , um die Diashow einmalig durchlaufen zu lassen. Die Wiedergabe
stoppt nach der letzten Bilddatei.
3. Klicken Sie auf die Zurück Taste , um zum vorherigen Menüpunkt zurückzukehren.
4. Eine Hintergrundmusik kann während des Abspielens einer Diashow hinzugefügt
werden. Drücken Sie dazu den Button, um die Hintergrundmusik zu starten. Um
die Hintergrundmusik zu stoppen, drücken Sie bitte auf den Button.
DE - 41
Page 43

11.7 TEILEN VON BILDDATEIEN
11.7.1 IOS
Sie haben verschiedene Möglichkeiten, Ihre Bilddateien mit Ihrer Familie und Ihren
Freunde zu teilen, z.B. per E-Mail, durch Speichern im Fotoalbum des verwendeten
Geräts oder durch ein Upload auf Facebook.
Hinweis: Für das Teilen von Bilddateien per E-Mail oder Social Media Networks
benötigen Sie eine Internetverbindung.
Klicken Sie auf im unteren Teil des Bildschirms, um die vier Möglichkeiten zum
Teilen von Bilddateien anzuzeigen. Klicken Sie auf „Zurück“ , um zum vorherigen
Menü zurückzukehren.
DE - 42
Page 44

1) E-Mail - Klicken Sie hier, um die Standard E-Mail App zu starten und wählen
Sie die gewünschte Bilddatei als Anhang aus.
2) Zum Album hinzufügen: Klicken Sie auf diese Option um die ausgewählte Bilddatei
zum Fotoalbum des verwendeten Geräts hinzuzufügen.
3) Facebook Upload: Klicken Sie auf diese Option und Sie werden automatisch zum
Facebook Login geführt. Hierfür muss die Facebook App auf Ihrem Gerät installiert
sein. Ein Facebook Konto ist ebenfalls erforderlich.
11.7.2 ANDROID
Die verschiedenen Möglichkeiten zum Teilen Ihrer Bilddateien hängen von den
verschiedenen Apps ab, die auf Ihrem Gerät installiert sind.
Hinweis: Für das Teilen von Bilddateien per E-Mail oder Social Media Networks benötigen
Sie eine Internetverbindung.
DE - 43
Page 45

Das Symbol wählen, um die verschiedenen Möglichkeiten zum Teilen der
Bilddateien anzuzeigen. Klicken Sie auf die “Zurück” Taste, um zum vorherigen
Menü zurückzukehren.
11.8 ÖFFNEN/ANZEIGEN VON DOKUMENTEN
11.8.1 IOS
Die „Memory 2 Move Pro“ App unterstützt Keynote-, Numbers-, Page-, Excel-, PowerPoint
und Word-Dateien, sowie .pdf und .txt Dateien.
Um diese Dateien zu öffnen und anzuschauen, klicken Sie ganz einfach auf die gewünschte
Datei. Unterstützte Formate werden automatisch geöffnet. Klicken Sie auf die „Zurück“ Taste
,um zum vorherigen Menü zurückzukehren oder klicken Sie auf die Taste ,um die
Bilddatei per E-Mail zu verschicken, wie in folgendem Bild zu sehen.
DE - 44
Page 46

Hinweis: Für das Senden von E-Mails wird eine Internetverbindung benötigt.
Klicken Sie auf die “E-Mail” Taste. Die Standard E-Mail App wird automatisch gestartet und
das ausgewählte Dokument kann als Anhang versendet werden.
Sobald die E-Mail verschickt wurde, erscheint in der linken unteren Ecke des Bildschirms die
Nachricht „E-Mail versendet“. Dies ist die Bestätigung, dass Ihre E-Mail erfolgreich versandt
wurde.
DE - 45
Page 47

Wenn die Nachricht “E-Mail Versand abgebrochen” in der linken unteren Ecke des
Bildschirms erscheint, konnte die E-Mail nicht erfolgreich versandt werden (vgl.
nachfolgendes Bild).
DE - 46
Page 48

11.8.2 ANDROID
Um Dokumente auf Ihrem Android Gerät zu öffnen, berühren Sie ganz einfach die
gewünschte Datei. Diese wird automatisch mit einem Standardprogramm oder einer von
Ihnen installierten App geöffnet (vgl. nachfolgendes Bild).
Um das Dokument als Anhang zu versenden, konsultieren Sie bitte die Anleitung des
Programmes, mit dem Sie die Datei öffnen.
Hinweis: Für das Senden von E-Mails wird eine Internetverbindung benötigt.
DE - 47
Page 49

11.9 COPY, DELETE, DOWNLO AD, UPLOAD FUNCTIONS (IOS AND ANDROID)
Drücken Sie einfach auf das Symbol der Datei, so dass der Bestätigungshaken angezeigt wird
und öffnen Sie das Dateimanager Menü, indem auf das Symbol klicken.
Folgenden Optionen stehen Ihnen zur Verfügung: Markierung aufheben, Verzeichnis
erstellen, Kopieren, Ausschneiden, Einfügen, Umbenennen und Löschen
Sie können ausgewählte Dateien ebenso verteilen, indem Sie auf den Button klicken.
Klicken Sie auf das Symbol, wird Ihnen der aktuelle Status des Dateitranfers angezeigt.
DE - 48
Page 50

11.10 SORTIERUNGSMÖGLICHKEITEN - ANSICHTSFORMAT:
1) sortiert nach Zeit:
a) beginnend mit dem jüngstem Element
b) beginnend mit dem ältesten Element
2) sortiert nach Name:
a) beginnend mit Buchstabe A
b) beginnend mit Buchstabe Z
3) sortiert nach Dateiformat:
a) beginnend mit Buchstabe A
b) beginnend mit Buchstabe Z
Die vorhandenen Dateien können als Liste oder mit Miniaturbildern angezeigt werden.
DE - 49
Page 51

11.11 DATEIAUSWAHLMÖGLICHKEITEN:
1.) Alle Dateien: Anzeige aller vorhandenen Dateien
2.) Top 25: Anzeige der 25 am häufigsten ausgewählten Dateien.
3.) Favoriten: durch Auswahl des roten Herzens neben dem Dateinamen können einzelne
Dateien zu ihren Favoriten hinzugefügt werden.
12. WEB MANAGEMENT FUNKTIONEN
Um das WiFi-Gerät zu konfigurieren, nutzen Sie bitte die Software „WiFi Finder“, um sich mit
der Memory 2 Move Pro zu verbinden. Sie können alternativ Ihren Web Browser öffnen und
in die Adresszeile die IP Adresse 10.10.10.254 eingeben, sofern die werksseitig
voreingestellte Adresse nicht geändert wurde.
Ansicht des Hauptmenüs:
DE - 50
Page 52

12.1 EXPLORER FUNKTION
Aktualisieren – klicken Sie auf diesen Button, um die
Bildschirmansicht zu aktualisieren.
Erstellen – um ein Verzeichnis auf der Memory 2 Move Pro zu
erstellen. Der Verzeichnisname darf maximal 26 Zeichen
enthalten.
Kopieren – um Dateien in einen anderen Ordner zu kopieren.
Verschieben- um eine Datei an einen anderen Speicherort zu
verschieben.
Löschen – um Dateien vom Gerät zu entfernen.
Umbenennen – um Veränderungen am Dateinamen
vorzunehmen.
Sie können über diese Aministrationsoberfläche Daten auf die Memory 2 Move Pro kopieren
sowie auch von der Memory 2 Move Pro Dateien auf den von Ihnen genutzten PC kopieren.
Des Weiteren können Sie Verzeichnisse anlegen, kopieren, umbenennen oder löschen, ganz
wie Sie es von Ihrem Computer gewohnt sind.
12.2 INFORMATIONEN
Hier werden Detailinformationen über die Hardware, den Netzwerkstatus und den
Speicherplatz angezeigt.
12.2.1 GERÄTEINFORMATIONEN
Hier werden Informationen wie Gerätename, Seriennummer, Hersteller, Modellnummer und
CPU Auslastung angezeigt.
DE - 51
Page 53

12.2.2 SPEICHERINFORMATION
Hier erhalten Sie Informationen über das eingebaute Laufwerk, wie etwa die
Gesamtkapazität, den Festplattenhersteller und den verfügbaren Speicherplatz.
12.2.3 NETZWERKINFORMATION
Es werden detaillierte Informationen über den aktuellen Netzwerkstatus angezeigt, wie etwa
die Netzwerkadresse, der Internetstatus oder der aktuelle Wi-Fi Netzwerkname (SSID).
12.3 EINSTELLUNGEN
12.3.1 ADMINISTRATOR
Klicken Sie im Einstellungsmenü auf die „Benutzer“ Verknüpfung, um die Administrator
Einstellungen zu ändern. Das Passwort muss aus mind. 5 und höchsten 32 Zeichen bestehen.
Mit Klick auf den „Sichern“ Button werden die Änderungen übernommen.
Im Auslieferungszustand lautet das Administrator Passwort: 00000
Sie können ebenfalls einen Gäste Account anlagen: Sie haben die Möglichkeit das Konto zu
aktivieren oder zu deaktivieren.
12.4 NETZWERK EINSTELLUNG EN
Klicken Sie im Einstellungsmenü auf die Verknüpfung Netzwerk, um die
Netzwerkinformationen aufzurufen.
12.4.1 HOST NAME
Der Host Name gehört zu einem Gerät, welches in ein Netzwerk eingebunden ist. Dieser
Name kann frei gewählt werden. Einzige Voraussetzung ist, dass der Name mit einem
Buchstaben beginnt, gefolgt von einer Kombination von Buchstaben und Zahlen. Es werden
mind. 2 Zeichen benötigt und es sind maximal 8 Zeichen erlaubt.
DE - 52
Page 54

12.4.2 WI-FI & LAN
Alle Netzwerkeinstellungen können nach Ihren Bedürfnissen gestaltet werden. Folgende
Optionen stehen zur Auswahl:
- SSID: Bitte tragen Sie hier den Namen Ihres Netzwerkes ein. In der
Grundeinstellung steht hier „Memory2Move-XXXX. 32 Zeichen sind
maximal für den SSID Namen möglich.
- Wi-Fi Kanal: Bitte tragen Sie hier den Kanal ein, auf dem das Wi-Fi Gerät senden
und empfangen soll. Die Grundeinstellung ist „Auto“. Der Kanal wird
in diesem Fall automatisch vom Gerät festgelegt. Sie können aber auch
manuell festlegen, auf welchem Kanal empfangen und gesendet
werden soll. Es stehen die Kanäle 1 bis 13 zur Verfügung.
- Wi-Fi Modus: Der voreingestellte drahtlose Netzwerkstandard lautet:
802.11/b/g/n. Sie können ebenfalls manuell die Modi 11Mbps
(802.11b), 54 Mbps (802.11g) oder 150Mbps (802.11n) einstellen.
- Sicherheit: Im Auslieferungszustand ist kein Sicherheitstyp ausgewählt. Sie haben
die Wahl zwischen folgenden Verschlüsselungstypen: keine
Verschlüsselung, WPA-PSK, WPA2-PSK, Mixed WPA/WPA2-PSK.
- Passwort: Es muss, je nach ausgewähltem Verschlüsselungstyp, ein Passwort mit
mindestens 8 und höchstens 63 Zeichen eingegeben werden.
- IP Adresse: Die voreingestellte IP Adresse lautet: 10.10.10.254 mit der
Subnetmaske 255.255.255.0 Diese IP Adresse können Sie manuell
abändern.
DE - 53
Page 55

12.4.3 DHCP SERVER
Das Dynamic Host Configuration Protocol (DHCP) ist ein Netzwerk Protokoll, welches einem
Server erlaubt, dynamisch IP Adressen an verbundene Rechner zu vergeben. In der
Grundeinstellung ist das DHCP Protokoll aktiviert. Diese Option kann bei Bedarf deaktiviert
werden und IP Adressen können manuell vergeben werden.
Klicken Sie auf Button „DHCP-Liste“ und es wird eine Liste mit allen aktuell verbundenen
Geräten angezeigt.
12.4.4 INTERNET EINSTELL UNGEN
Sie können zwischen zwei Optionen wählen.
A. Kabelloser Zugriff (WLAN): Verbinden Sie die “M2M Pro” mit einem anderen
kabellosen Netzwerk, um eine Verbindung mit dem Internet aufzunehmen.
B. Kabelgebundener Zugriff (LAN): Direkter Anschluss des Gerätes mit einem LAN Kabel
an einen vorhandenen Router. Bitte nutzen Sie hierzu einen freien Steckplatz für ein
LAN Kabel an Ihrem Router.
Auswahl des kabellosen Netzwerk Zugriffes:
Passwort: Bitte geben Sie das Passwort für das gewählte lokale drahtlose Netzwerk ein.
IP Adresse: Bei Auswahl von „Automatisch“ stellt das Netzwerk Ihnen automatisch eine
IP Adresse zur Verfügung. Bei Auswahl von „Statische IP“ müssen Sie selber Ihre IP
Adresse für das Netzwerk, mit dem Sie sich verbinden wollen, eingeben.
Auswahl des kabelgebundenen Netzwerk Zugriffes
In der Grundeinstellung ist „Dynamische IP“ ausgewählt. Sie können manuell eine IP Adresse
vergeben, indem Sie auf den gelben Pfeil klicken und die Option „Statische IP“ auswählen.
Hinweis: Durch Klicken auf das X (rechts oben) können Sie das LAN Optionsmenü verlassen.
DE - 54
Page 56

12.5 DIENSTE
12.5.1 SAMBA
Der Zugriff und der Datenaustausch sind mit dem Samba Service sehr einfach. Schon im
Auslieferungszustand ist dieser Dienst aktiviert (siehe Screenshot).
12.5.2 MEDIA SERVER
Funktionen:
Hier aktivieren / deaktivieren Sie den DLNA Service: An / Aus. Sie können hier ebenso das
DLNA Verzeichnis wechseln.
1.) Drücken Sie auf den Pfeil rechts neben dem Eintrag “Verzeichnis”.
2.) Wählen Sie OK, um das Verzeichnis zu wechseln.
3.) Wählen Sie Ihr gewünschtes Verzeichnis aus und drücken Sie OK.
DE - 55
Page 57

12.5.3 ZEIT EINSTELLUNGEN
Sie haben dazu die Möglichkeit sowohl eine Zeitzone manuell auszuwählen, als auch eine
automatische Zeit-Synchronisation durchzuführen.
Wenn Sie sich für die manuelle Auswahl einer Zeitzone entschieden haben, klicken Sie
einfach auf den gelben Pfeil neben dem Kästchen „Zeitzone“ und wählen Sie aus dem
Menüpunkt, je nach Standort, die gewünschte Zeitzone aus.
Wählen Sie die automatische Zeit Synchronisation aus, so wird die Uhrzeit jedes Mal
aktualisiert, wenn Sie mit dem Internet verbunden sind.
Optionen für Uhrzeit Synchronisation:
Frequenz: Täglich, alle 2 Tage, alle 3 Tage, .. Sie können Synchronisationsintervalle von bis zu
7 Tagen auswählen.
Die automatische Synchronisation der Uhrzeit kann jederzeit ausgestellt werden und die
Option „Übernahme der PC Zeit“ stattdessen gewählt werden. In diesem Fall wird die
aktuelle Uhrzeit Ihres PCs übernommen, sodass beide Geräte die gleiche Uhrzeit anzeigen.
DE - 56
Page 58

12.5.4 FIRMWARE UPDATE
Sollte ein Firmware Update auf www.intenso.de zur Verfügung stehen, folgen Sie bitte den
nächsten Schritten, um das Softwareupdate durchzuführen.
1.) Laden Sie die Firmware auf ihren Rechner herunter.
2.) Bitte klicken Sie auf den „Update“ Button und suchen Sie das heruntergeladene
Firmware Update auf Ihrem PC. Wählen Sie die Datei aus und klicken Sie auf „Öffnen“,
um fortzufahren.
3.) Unterhalb des „Update“ Buttons wird nun die Firmware Versionsnummer angezeigt,
auf die das Gerät aktualisiert werden wird. Bitte klicken Sie auf „Sichern“ unten rechts
im Bild, um mit dem Firmware Updatevorgang zu starten.
4.) Während des Updates erscheint eine Warnmeldung, die Ihnen Auskunft über den
aktuellen Status des Updateprozesses gibt.
Nach erfolgreichem Update startet das Gerät automatisch neu und es wird der Login
Bildschirm angezeigt.
DE - 57
Page 59

12.5.5 ZURÜCKSETZEN AUF DIE WERKSEINSTELLUNGEN
Wenn Sie Ihr Gerät auf die Werkseinstellungen zurücksetzen, werden alle vorgenommenen
Einstellungen gelöscht und die im Auslieferungszustand geltenden Einstellungen werden
wieder aktiviert.
Um das Zurücksetzen auf die Werkseinstellungen auszuwählen, klicken Sie bitte auf den On /
Off Button. Klicken Sie bitte auf den „Sichern“ Button, um den Vorgang zu starten. Um
Missverständnisse auszuschließen, bestätigen Sie Ihre Wahl bitte in den darauffolgenden
Warnhinweisen.
Hinweis: Nachdem das Gerät zurückgesetzt wurde, wird das Administrator Passwort
ebenfalls zurückgesetzt. Es gilt also das Passwort aus dem Auslieferungszustand.
DE - 58
Page 60

13. LIZENZINFORMATION
HINWEIS!
Sehr geehrte Kundin, sehr geehrter Kunde,
bei Interesse können Sie und jeder Dritte den Quelltext der verwendeten GPL/LGPL von der
Intenso Homepage http://www.intenso.de herunterladen. Der Quelltext des gesuchten
Produkts ist für jeden zugänglich über Auswahl der gültigen Produktkategorie und des
gewünschten Gerätes. In den Produktdetails finden Sie den Menüpunkt „Treiber“. Öffnen
Sie dieses Menü, um den zugehörigen GPL/LGPL Quelltext herunterzuladen. Gegen eine
Kostenpauschale von 15 € ist es ebenfalls möglich diesen Quelltext per Postzustellung zu
erhalten.
Gerne können Sie uns auch telefonisch zu dem Thema erreichen unter der kostenpflichtigen
Rufnummer 0900-1504030 (0,39€/Minute aus dem deutschen Festnetz. Mobilfunkpreise
können abweichen.) oder per Mail an support@intenso.de
Weitere Informationen über die GPL/LGPL-Lizenzen finden Sie unter www.gnu.org
GNU GENERAL PUBLIC LICENSE
Version 2, June 1991
Copyright (C) 1989, 1991 Free Software Foundation, Inc.
51 Franklin Street, Fifth Floor, Boston, MA 02110-1301, USA
Everyone is permitted to copy and distribute verbatim copies
of this license document, but changing it is not allowed.
Preamble
The licenses for most software are designed to take away your freedom to share and change
it. By contrast, the GNU General Public License is intended to guarantee your freedom to
share and change free software--to make sure the software is free for all its users. This
General Public License applies to most of the Free Software Foundation's software and to
any other program whose authors commit to using it. (Some other Free Software Foundation
DE - 59
Page 61

software is covered by the GNU Lesser General Public License instead.) You can apply it to
your programs, too.
When we speak of free software, we are referring to freedom, not price. Our General Public
Licenses are designed to make sure that you have the freedom to distribute copies of free
software (and charge for this service if you wish), that you receive source code or can get it if
you want it, that you can change the software or use pieces of it in new free programs; and
that you know you can do these things.
To protect your rights, we need to make restrictions that forbid anyone to deny you these
rights or to ask you to surrender the rights. These restrictions translate to certain
responsibilities for you if you distribute copies of the software, or if you modify it.
For example, if you distribute copies of such a program, whether gratis or for a fee, you must
give the recipients all the rights that you have. You must make sure that they, too, receive or
can get the source code. And you must show them these terms so they know their rights.
We protect your rights with two steps: (1) copyright the software, and (2) offer you this
license which gives you legal permission to copy, distribute and/or modify the software.
Also, for each author's protection and ours, we want to make certain that everyone
understands that there is no warranty for this free software. If the software is modified by
someone else and passed on, we want its recipients to know that what they have is not the
original, so that any problems introduced by others will not reflect on the original authors'
reputations.
Finally, any free program is threatened constantly by software patents. We wish to avoid the
danger that redistributors of a free program will individually obtain patent licenses, in effect
making the program proprietary. To prevent this, we have made it clear that any patent
must be licensed for everyone's free use or not licensed at all.
The precise terms and conditions for copying, distribution and modification follow.
TERMS AND CONDITIONS FOR COPYING, DISTRIBUTION AND MODIFICATION
0. This License applies to any program or other work which contains a notice placed by the
copyright holder saying it may be distributed under the terms of this General Public License.
The "Program", below, refers to any such program or work, and a "work based on the
Program" means either the Program or any derivative work under copyright law: that is to
say, a work containing the Program or a portion of it, either verbatim or with modifications
and/or translated into another language. (Hereinafter, translation is included without
limitation in the term "modification".) Each licensee is addressed as "you".
DE - 60
Page 62

Activities other than copying, distribution and modification are not covered by this License;
they are outside its scope. The act of running the Program is not restricted, and the output
from the Program is covered only if its contents constitute a work based on the Program
(independent of having been made by running the Program). Whether that is true depends
on what the Program does.
1. You may copy and distribute verbatim copies of the Program's source code as you receive
it, in any medium, provided that you conspicuously and appropriately publish on each copy
an appropriate copyright notice and disclaimer of warranty; keep intact all the notices that
refer to this License and to the absence of any warranty; and give any other recipients of the
Program a copy of this License along with the Program.
You may charge a fee for the physical act of transferring a copy, and you may at your option
offer warranty protection in exchange for a fee.
2. You may modify your copy or copies of the Program or any portion of it, thus forming a
work based on the Program, and copy and distribute such modifications or work under the
terms of Section 1 above, provided that you also meet all of these conditions:
a) You must cause the modified files to carry prominent notices stating that you changed the
files and the date of any change.
b) You must cause any work that you distribute or publish, that in whole or in part contains
or is derived from the Program or any part thereof, to be licensed as a whole at no charge to
all third parties under the terms of this License.
c) If the modified program normally reads commands interactively when run, you must
cause it, when started running for such interactive use in the most ordinary way, to print or
display an announcement including an appropriate copyright notice and a notice that there
is no warranty (or else, saying that you provide a warranty) and that users may redistribute
the program under these conditions, and telling the user how to view a copy of this License.
(Exception: if the Program itself is interactive but does not normally print such an
announcement, your work based on the Program is not required to print an announcement.)
These requirements apply to the modified work as a whole. If identifiable sections of that
work are not derived from the Program, and can be reasonably considered independent and
separate works in themselves, then this License, and its terms, do not apply to those
sections when you distribute them as separate works. But when you distribute the same
sections as part of a whole which is a work based on the Program, the distribution of the
whole must be on the terms of this License, whose permissions for other licensees extend to
the entire whole, and thus to each and every part regardless of who wrote it.
DE - 61
Page 63

Thus, it is not the intent of this section to claim rights or contest your rights to work written
entirely by you; rather, the intent is to exercise the right to control the distribution of
derivative or collective works based on the Program.
In addition, mere aggregation of another work not based on the Program with the Program
(or with a work based on the Program) on a volume of a storage or distribution medium
does not bring the other work under the scope of this License.
3. You may copy and distribute the Program (or a work based on it, under Section 2) in
object code or executable form under the terms of Sections 1 and 2 above provided that you
also do one of the following:
a) Accompany it with the complete corresponding machine-readable source code, which
must be distributed under the terms of Sections 1 and 2 above on a medium customarily
used for software interchange; or,
b) Accompany it with a written offer, valid for at least three years, to give any third party, for
a charge no more than your cost of physically performing source distribution, a complete
machine-readable copy of the corresponding source code, to be distributed under the terms
of Sections 1 and 2 above on a medium customarily used for software interchange; or,
c) Accompany it with the information you received as to the offer to distribute
corresponding source code. (This alternative is allowed only for noncommercial distribution
and only if you received the program in object code or executable form with such an offer, in
accord with Subsection b above.)
The source code for a work means the preferred form of the work for making modifications
to it. For an executable work, complete source code means all the source code for all
modules it contains, plus any associated interface definition files, plus the scripts used to
control compilation and installation of the executable. However, as a special exception, the
source code distributed need not include anything that is normally distributed (in either
source or binary form) with the major components (compiler, kernel, and so on) of the
operating system on which the executable runs, unless that component itself accompanies
the executable.
If distribution of executable or object code is made by offering access to copy from a
designated place, then offering equivalent access to copy the source code from the same
place counts as distribution of the source code, even though third parties are not compelled
to copy the source along with the object code.
4. You may not copy, modify, sublicense, or distribute the Program except as expressly
provided under this License. Any attempt otherwise to copy, modify, sublicense or distribute
the Program is void, and will automatically terminate your rights under this License.
DE - 62
Page 64

However, parties who have received copies, or rights, from you under this License will not
have their licenses terminated so long as such parties remain in full compliance.
5. You are not required to accept this License, since you have not signed it. However,
nothing else grants you permission to modify or distribute the Program or its derivative
works. These actions are prohibited by law if you do not accept this License. Therefore, by
modifying or distributing the Program (or any work based on the Program), you indicate your
acceptance of this License to do so, and all its terms and conditions for copying, distributing
or modifying the Program or works based on it.
6. Each time you redistribute the Program (or any work based on the Program), the recipient
automatically receives a license from the original licensor to copy, distribute or modify the
Program subject to these terms and conditions. You may not impose any further restrictions
on the recipients' exercise of the rights granted herein. You are not responsible for enforcing
compliance by third parties to this License.
7. If, as a consequence of a court judgment or allegation of patent infringement or for any
other reason (not limited to patent issues), conditions are imposed on you (whether by court
order, agreement or otherwise) that contradict the conditions of this License, they do not
excuse you from the conditions of this License. If you cannot distribute so as to satisfy
simultaneously your obligations under this License and any other pertinent obligations, then
as a consequence you may not distribute the Program at all. For example, if a patent license
would not permit royalty-free redistribution of the Program by all those who receive copies
directly or indirectly through you, then the only way you could satisfy both it and this License
would be to refrain entirely from distribution of the Program.
If any portion of this section is held invalid or unenforceable under any particular
circumstance, the balance of the section is intended to apply and the section as a whole is
intended to apply in other circumstances.
It is not the purpose of this section to induce you to infringe any patents or other property
right claims or to contest validity of any such claims; this section has the sole purpose of
protecting the integrity of the free software distribution system, which is implemented by
public license practices. Many people have made generous contributions to the wide range
of software distributed through that system in reliance on consistent application of that
system; it is up to the author/donor to decide if he or she is willing to distribute software
through any other system and a licensee cannot impose that choice.
This section is intended to make thoroughly clear what is believed to be a consequence of
the rest of this License.
8. If the distribution and/or use of the Program is restricted in certain countries either by
patents or by copyrighted interfaces, the original copyright holder who places the Program
DE - 63
Page 65

under this License may add an explicit geographical distribution limitation excluding those
countries, so that distribution is permitted only in or among countries not thus excluded. In
such case, this License incorporates the limitation as if written in the body of this License.
9. The Free Software Foundation may publish revised and/or new versions of the General
Public License from time to time. Such new versions will be similar in spirit to the present
version, but may differ in detail to address new problems or concerns.
Each version is given a distinguishing version number. If the Program specifies a version
number of this License which applies to it and "any later version", you have the option of
following the terms and conditions either of that version or of any later version published by
the Free Software Foundation. If the Program does not specify a version number of this
License, you may choose any version ever published by the Free Software Foundation.
10. If you wish to incorporate parts of the Program into other free programs whose
distribution conditions are different, write to the author to ask for permission. For software
which is copyrighted by the Free Software Foundation, write to the Free Software
Foundation; we sometimes make exceptions for this. Our decision will be guided by the two
goals of preserving the free status of all derivatives of our free software and of promoting
the sharing and reuse of software generally.
NO WARRANTY
11. BECAUSE THE PROGRAM IS LICENSED FREE OF CHARGE, THERE IS NO WARRANTY FOR
THE PROGRAM, TO THE EXTENT PERMITTED BY APPLICABLE LAW. EXCEPT WHEN
OTHERWISE STATED IN WRITING THE COPYRIGHT HOLDERS AND/OR OTHER PARTIES
PROVIDE THE PROGRAM "AS IS" WITHOUT WARRANTY OF ANY KIND, EITHER EXPRESSED OR
IMPLIED, INCLUDING, BUT NOT LIMITED TO, THE IMPLIED WARRANTIES OF
MERCHANTABILITY AND FITNESS FOR A PARTICULAR PURPOSE. THE ENTIRE RISK AS TO THE
QUALITY AND PERFORMANCE OF THE PROGRAM IS WITH YOU. SHOULD THE PROGRAM
PROVE DEFECTIVE, YOU ASSUME THE COST OF ALL NECESSARY SERVICING, REPAIR OR
CORRECTION.
12. IN NO EVENT UNLESS REQUIRED BY APPLICABLE LAW OR AGREED TO IN WRITING WILL
ANY COPYRIGHT HOLDER, OR ANY OTHER PARTY WHO MAY MODIFY AND/OR REDISTRIBUTE
THE PROGRAM AS PERMITTED ABOVE, BE LIABLE TO YOU FOR DAMAGES, INCLUDING ANY
GENERAL, SPECIAL, INCIDENTAL OR CONSEQUENTIAL DAMAGES ARISING OUT OF THE USE
OR INABILITY TO USE THE PROGRAM (INCLUDING BUT NOT LIMITED TO LOSS OF DATA OR
DATA BEING RENDERED INACCURATE OR LOSSES SUSTAINED BY YOU OR THIRD PARTIES OR
A FAILURE OF THE PROGRAM TO OPERATE WITH ANY OTHER PROGRAMS), EVEN IF SUCH
HOLDER OR OTHER PARTY HAS BEEN ADVISED OF THE POSSIBILITY OF SUCH DAMAGES.
END OF TERMS AND CONDITIONS
DE - 64
Page 66

How to Apply These Terms to Your New Programs
If you develop a new program, and you want it to be of the greatest possible use to the
public, the best way to achieve this is to make it free software which everyone can
redistribute and change under these terms.
To do so, attach the following notices to the program. It is safest to attach them to the start
of each source file to most effectively convey the exclusion of warranty; and each file should
have at least the "copyright" line and a pointer to where the full notice is found.
one line to give the program's name and an idea of what it does.
Copyright (C) yyyy name of author
This program is free software; you can redistribute it and/or
modify it under the terms of the GNU General Public License
as published by the Free Software Foundation; either version 2
of the License, or (at your option) any later version.
This program is distributed in the hope that it will be useful,
but WITHOUT ANY WARRANTY; without even the implied warranty of
MERCHANTABILITY or FITNESS FOR A PARTICULAR PURPOSE. See the
GNU General Public License for more details.
You should have received a copy of the GNU General Public License
along with this program; if not, write to the Free Software
Foundation, Inc., 51 Franklin Street, Fifth Floor, Boston, MA 02110-1301, USA.
Also add information on how to contact you by electronic and paper mail.
If the program is interactive, make it output a short notice like this when it starts in an
interactive mode:
Gnomovision version 69, Copyright (C) year name of author
Gnomovision comes with ABSOLUTELY NO WARRANTY; for details
DE - 65
Page 67

type `show w'. This is free software, and you are welcome
to redistribute it under certain conditions; type `show c'
for details.
The hypothetical commands `show w' and `show c' should show the appropriate parts of the
General Public License. Of course, the commands you use may be called something other
than `show w' and `show c'; they could even be mouse-clicks or menu items--whatever suits
your program.
You should also get your employer (if you work as a programmer) or your school, if any, to
sign a "copyright disclaimer" for the program, if necessary. Here is a sample; alter the
names:
Yoyodyne, Inc., hereby disclaims all copyright
interest in the program `Gnomovision'
(which makes passes at compilers) written
by James Hacker.
signature of Ty Coon, 1 April 1989
Ty Coon, President of Vice
DE - 66
Page 68

TABLE O F CONT ENT
1. PRODUCT OVERVIEW .......................................................................................................................... 4
2. PRODUCT FEATURES ........................................................................................................................... 4
3. CONTENT OF PACKAGE ....................................................................................................................... 6
4. PRODUCT SPECIFICATION .................................................................................................................... 6
5. MINIMUM HARDWARE REQUIREMENTS ............................................................................................. 6
6. PRODUCT VIEW ................................................................................................................................... 7
7. INTERFACE .......................................................................................................................................... 7
7.1 RJ45 WAN PORT .................................................................................................................................. 7
7.2 MICRO USB 3.0 INTERFACE .................................................................................................................. 7
7.3 LED PANEL ........................................................................................................................................... 8
8. SD CARD BACKUP ................................................................................................................................ 9
9. USING PC OR MAC ............................................................................................................................. 11
9.1 LIAISE A WIRELESS LAN CONNECTION WITH THE PC .......................................................................... 11
9.2 PC WIFI FINDER ................................................................................................................................. 12
9.2.1 MY STORAGE ..................................................................................................................................... 13
9.3 LIAISE A WIRELESS LAN CONNECTION WITH MAC .............................................................................. 13
9.3.1 MAC WIFI FINDER ............................................................................................................................... 14
9.3.2 MY STORAGE ...................................................................................................................................... 15
9.4 “MEMORY 2 MOVE PRO” CONFIGURATION ........................................................................................ 16
10. USING MOBILE DEVICES ...................................................................................................................... 21
10.1 IOS CLIENT APP INSTALLATION ........................................................................................................... 21
10.2 WIRELESSLY CONNECTING YOUR IPHONE/IPAD .................................................................................. 22
10.3 IOS USER LOGIN .................................................................................................................................. 23
10.4 ANDROID CLIENT APP INSTALLATION ................................................................................................. 24
10.5 WIRELESSLY CONNECTING YOUR ANDROID DEVICES .......................................................................... 25
10.6 ANDROID USER LOGIN ........................................................................................................................ 27
EN- 1
Page 69

11. BASIC FUNCTIONALITY ................................................................................................................... 28
11.1 IOS DEVICE CLIENT ......................................................................................................................... 28
11.2 ANDROID DEVICE CLIENT ............................................................................................................... 29
11.3 WI-FI SETTINGS (IOS AND ANDROID) ............................................................................................. 30
11.3.1 WI-FI SETTING INTERFACE.............................................................................................................. 30
11.3.2 MODIFY DEVICE NAME .................................................................................................................. 31
11.3.3 SECURITY ....................................................................................................................................... 31
11.3.4 INTERNET MODE ........................................................................................................................... 32
11.4 PLAYING MUSIC/AUDIO (IOS AND ANDROID) ................................................................................ 33
11.5 PLAYING MOVIE/VIDEO ................................................................................................................. 35
11.5.1 IOS ................................................................................................................................................ 35
11.5.2 ANDROID ...................................................................................................................................... 37
11.6 VIEWING/PLAYING PHOTOS .......................................................................................................... 38
11.6.1 IOS ................................................................................................................................................. 38
11.6.2 ANDROID ....................................................................................................................................... 40
11.7 SHARING PHOTOS/IMAGES ............................................................................................................ 42
11.7.1 IOS ................................................................................................................................................. 42
11.7.2 ANDROID ....................................................................................................................................... 43
11.8 OPENING/VIEWING DOCUMENTS .................................................................................................. 44
11.8.1 IOS ................................................................................................................................................. 44
11.8.2 ANDROID ....................................................................................................................................... 46
11.9 COPY, DELETE, DOWNLOAD, UPLOAD FUNCTIONS (IOS AND ANDROID) ........................................ 47
11.10 SORTING OPTIONS – DISPLAY FORMAT: ......................................................................................... 48
11.11 FILE SELECTION OPTIONS: .............................................................................................................. 48
12. WEB MANAGEMENT FUNCTIONS .................................................................................................. 49
12.1 EXPLORER FUNCTION .................................................................................................................... 49
12.2 INFORMATION ............................................................................................................................... 50
EN- 2
Page 70

12.2.1 DEVICE INFORMATION .................................................................................................................. 50
12.2.2 STORAGE INFORMATION ............................................................................................................... 51
12.2.3 NETWORK INFORMATION ............................................................................................................. 51
12.3 SETTINGS ....................................................................................................................................... 51
12.3.1 USER SETTINGS .............................................................................................................................. 51
12.4 NETWORK SETTINGS ...................................................................................................................... 52
12.4.1 HOST NAME ................................................................................................................................... 52
12.4.2 WI-FI & LAN ................................................................................................................................... 52
12.4.3 DHCP SERVER................................................................................................................................. 53
12.4.4 INTERNET SETTINGS ....................................................................................................................... 53
12.5 NETWORK SERVICES ...................................................................................................................... 54
12.5.1 WINDOWS SHARING SERVICES ...................................................................................................... 54
12.5.2 MEDIA SERVER .............................................................................................................................. 55
12.5.3 TIME SETTINGS .............................................................................................................................. 55
12.5.4 FIRMWARE UPGRADE .................................................................................................................... 56
12.5.5 RESETTING TO FACTORY DEFAULTS ............................................................................................... 57
13. LICENCEINFORMATION ABOUT GNU/LGPL .................................................................................... 59
EN- 3
Page 71

1. PRODUCT OVERVIEW
“Memory 2 Move Pro” allows to wirelessly access your videos, music, photos, data and
stream it to your iPad®, iPhone®, tablets, smartphones, and notebooks – no cords or cables to
tangle. With the internal hard drive storage, there is no need to worry about running out of
space on your mobile devices and the built-in USB 3.0 port makes the file transfer easier and
much faster.
For maximum portability, the WiFi HDD device has a built-in rechargeable battery. Simply plug
it into any available USB port on your computer to charge and copy your files.
As simple as 1-2-3, you are ready to enjoy your device and no waiting needed. “Memory 2
Move Pro” can be accessed while the battery is charging.
2. PRODUCT FEATURES
Stream media over WiFi enabled devices up to 5 users simultaneously
Access and stream your music, videos, photos and data using the free custom mobile
app supporting iOS and Android operating systems
Up to 5 Hours of continuous battery life*
Search function to locate and access your file much faster.
Internet access capability via the optional RJ45 or wireless, supporting 802.11 b/g/n
speeds
Supports NTFS and FAT32
Supports LAN data-shares and cross-platforms including Windows, Mac, Linux, iOS and
Android.
Support multiple NSA, including samba/webdav
Support multiple platform client tools, including
Windows/Mac/Linux/iPad/iPhone/Android
*Battery life subject to normal usage conditions and configurations.
EN- 4
Page 72

To function as an external HDD, simply connect “Memory 2 Move Pro” into the computer’s
available USB port. “Memory 2 Move Pro” will automatically mount on your desktop or inside
the “My Computer”. The “Memory 2 Move Pro” works as an external hard drive and charges
the internal battery.
Wired mode, connect the RJ45 cable into the available port on the back of your router, then
enable the DHCP feature of “Memory 2 Move Pro” to automatically assign an IP address.
Wireless mode; wirelessly connect “Memory 2 Move Pro” to your existing wireless
router to have internet access as illustrated below.
EN- 5
Page 73

3. CONTENT OF PACKAGE
Memory 2 Move Pro
USB 3.0 cable
CD
Manual
Power Supply (KTEC – KSAS0060500100VEU – 5V / 1A)
4. PRODUCT SPECIFICATIO N
Dimensions: 130mm (L) X 83mm (B) X 26mm (H)
Wi-Fi:
Standard: 802.11 b/g/n,
Frequency: 2.4 GHZ
Speed: 300Mbps
Network Interface: 100Mbps Ethernet RJ45
USB Interface: Micro USB 3.0, for data transfer and charging
Battery Capacity: 3000mAh
Operating temperature: The normal operating temperature of the device is
between 5-35 Degrees Celsius.
5. MINIMUM HARDWARE REQ UIRE MENT S
Internet Connection
PC Operating System Requirements
Windows: XP / Vista / Windows 7 / 8 / 8.1 / 10
Mac: OS X 10.7.0 and later
Others: Fedora 12 (Linux) and later
PC Web Browser
Windows: Supports Internet Explorer 9 and higher version
Mac: Supports Safari 5.0 and higher version
Others: Firefox 3.5 and higher version
Router or Switch
EN- 6
Page 74

6. PRODUCT VIEW
7. INTERFACE
7.1 RJ4 5 W A N PO RT
A. Router Mode. “Memory 2 Move Pro” will serve as router. With the built-in DHCP
function, it can assign IP address to connect devices through Wi-Fi.
B. Bridge Mode:Allows to access another existing network.
7.2 MICRO U SB 3.0 I NTERF ACE
The built-in USB 3.0 port allows for fast data transfer and can charge the internal
battery when the Memory 2 Move Pro is connected to a computer or power adapter.
To connect the Memory 2 Move Pro to the PC, turn off the device and then connect it
to the PC.
EN- 7
Page 75

7.3 LED PA N E L
Power LED:
- LED Off: The device is switched-off or no power
Green Color:
- Off: Battery is fully charged
- Slowly Blinking: Battery charging
- Blinking Fast: Device Shutting-Down
Red Color:
- Steady Light: Less than 30% available power
- Blinking Fast: Will soon shut-down, must be charged
immediately
HDD LED:
- Blinking: Read/Write activities
- Steady Light Connected with PC
- LED off HDD is in sleep mode
Wi-Fi LED:
- LED Off: The device is switched-off or no power
- Blinking blue: Starts the Initialization process
- Steady blue Light: Initialization process completed
Ready to use, Wi-Fi signal is normal
Internet LED:
- LED Off: No internet connection
- Blinking green: establishing connection
- Steady green Light: Connection established
EN- 8
Page 76

8. SD C A RD BA CKUP
Please carry out the following steps to backup the data saved on your SD card on Memory 2
Move Pro.
1.) Please start Memory 2 Move Pro and wait for the appliance to be ready for use.
2.) Insert the SD card into the Memory 2 Move Pro card slot.
3.) Now shortly press the power bottom twice to start backup.
Indication: As long as the white LED of Memory 2 Move Pro flashes, your data are copied from
the SD card to the memory of Memory 2 Move Pro. Please do never remove the SD card from
the appliance during an active backup. This can cause damages and subsequent data losses.
Backup Order Diagram:
1) You can find the backup data of the SD card in the folder “SD Card Backup“ on the
data support of Memory 2 Move Pro.
2.) If you protect only one SD card on Memory 2 Move Pro, for each card a separate
folder will be created. This gives you the opportunity to separately manage backups.
3.) In addition, in the SD card folder for each day on which you have executed the backup,
a separate folder is created. Backup will contain all data saved on the SD card. If you
back up the data of your SD card on 1st or 8th of June, you can compare the original
EN- 9
Page 77

data of 1st of June with the eventually modified data of 8th of June in the single
folders.
4.) If you execute various backups in one day, from the second backup only the new data
and the copies of the modified data will be saved in the folder of the actual date.
EN- 10
Page 78

9. USI N G PC O R MA C
9.1 LIAISE A W IRE LE S S LA N CONNECTION WITH THE PC
Switch-on “Memory 2 Move Pro” by pressing the power button at the front panel.
Wait for few minutes until the Wireless LED stops flashing. Enable the Wi-Fi feature on
your PC and open the Wireless Network Connection. Select the “Memory 2 Move Pro”
wireless connection (default wireless SSID: Memory2Move-XXXX and password:
intenso1).
Note: For your own safety, please change your password after successful connection.
Once you have successfully connected to “Memory 2 Move Pro”, you may now run the
“WiFi Finder” to search for your device and complete the configuration process.
Our included “WiFi Finder” is the only software that you will need to install on your
computer. This software utility allows you to easily search and look for your “Memory
2 Move Pro” that is connected from your home network. The software must not be
installed.
Simply click on the WiFi Finder Icon which is part of CD content.
EN- 11
Page 79

9.2 PC WIFI FINDE R
Double-click the “WiFi Finder” icon to start the software. This utility will search for all the
connected devices in your network as mentioned on below screenshot.
If you do not find the Memory 2 Move Pro on the list of devices connected in your network,
click on the “Refresh” button to update the device list.
1.) Select the Memory 2 Move Pro on the list, and then click on the “Log In” button to
enter the web interface.
Default user name: admin
Default password: 00000
Click on the “Log In” button to access the Web Management Interface.
Note: For your own safety, please change the password after successful connection.
2.) You may transfer the data between PC and Memory 2 Move Pro, such as upload the
data from PC into the WiFi Disk, or download the data from the WiFi Disk into PC.
EN- 12
Page 80

9.2.1 MY ST O RAGE
Click “My Storage” button. The above shown window will appear.
After input the correctly user name (admin) and password (00000), you may access
the Memory 2 Move Pro.
For your own safety, please change the password after successful connection.
You may transfer the data between PC and Memory 2 Move Pro, such as upload the
data from PC into the WiFi Disk, or download the data from the WiFi Disk into PC.
9.3 LIAISE A WIRELE SS LA N CONNECTION WITH MAC
Switch-on the “Memory 2 Move Pro” by pressing the power button at the front panel. Wait
for few minutes until the Wireless LED stops flashing. Enable the Wi-Fi feature on your MAC
and open the Wireless Network Connection. Select the Memory 2 Move Pro wireless
connection (default wireless SSID: Memory2Move-XXXX and password: intenso1). Once you
have successfully connected to “Memory 2 Move Pro”, you may now run the “WiFi Finder” to
search for your device and complete the configuration process.
Our included “WiFi Finder” is the only software that you will need to install on your computer.
This software utility allows you to easily search and look for your “Memory 2 Move Pro” that
is connected from your home network. The software must not be installed.
EN- 13
Page 81

Simply click on the WiFi Finder Icon which is part of CD content.
9.3.1 MAC WIFI FINDE R
Double-click the “WiFi Finder” icon on your desktop. The software utility will search all the
connected devices in your network. If you do not find the Memory 2 Move Pro on the list of
devices connected in your network, click on the “Refresh” button to refresh the device list.
1.) Select the Memory 2 Move Pro on the list, and then click on the “Log In” button to
enter the web interface.
EN- 14
Page 82

Default user name: admin
Default password: 00000
Click on the “Log In” button to access the Web Management Interface.
Note: For your own safety, please change the password after successful connection.
2.) You may transfer the data between PC and Memory 2 Move Pro, such as upload the
data from PC into the WiFi Disk, or download the data from the WiFi Disk into PC.
9.3.2 MY ST ORA G E
Select the Memory 2 Move Pro and click “My Storage” button. A pop-up window
appears. After input the correctly user name (admin) and password (00000), you may
access the Memory 2 Move Pro by samba.
EN- 15
Page 83

You may operate all files and directories on the Memory 2 Move Pro by samba, such
as: create, edit, delete, copy, move, rename. Furthermore you can transfer the data
between MAC and the Memory 2 Move Pro, such as upload the data from MAC into
the WiFi Storage, or download the data from the WiFi Storage into MAC.
9.4 “MEMO RY 2 MOVE PRO ” CONFIGURATION
When you are connected successfully to the Memory 2 Move Pro, your Web-Browser
opens. You have to log in to the web interface.
Default user name: admin
Default password: 00000
Click on the “Log In” button to access the Web Management Interface.
Once your Wi-Fi enabled-PC is successfully connected to the “Memory 2 Move Pro”,
using the “WiFi Finder” will allow you to access our built-in Web Management
Interface and configure your device.
EN- 16
Page 84

Startup Wizard
During the initial setup, our Wizard will automatically run and will guide you through the step-
by-step process on configuring the “Memory 2 Move Pro” as seen on the screenshot above.
You may cancel this process by clicking on the “X” at the top right corner of the window. If
you cancel the Wizard, it will keep the factory default settings of your “Memory 2 Move Pro”.
Click on the “Next” button to continue.
Internet Setting
… through another connection with an available network
You can choose between two available Internet Access options – By default Wireless Access is
selected (as you can see on the picture).
A. Wireless Access: Connecting the “M2M” device to another wireless network to have
internet access.
B. Wired Access: Directly connecting the “M2M” to the available port on the back of the
router to connect to another network.
EN- 17
Page 85

Selecting Wireless Access
SSID: Type-in the SSID name or click on the “Rescan” button to automatically search
for the available wireless networks.
Password: Type-in the correct password to join the selected wireless network
connection.
IP Address: Select either DHCP or manually assign an IP address
o By selecting DHCP, the host will provide an automatic IP address to connect to
the internet.
o By selecting Manual, you have to manually assign an IP address to connect to the
internet.
EN- 18
Page 86

Selecting Wired Access
By selecting Wired Access, the Dynamic IP is selected as the default setting. You can manually
assign your own IP address by clicking on the green arrow and select the Static IP option.
Click on the “X” button if you wish to cancel and exit this window.
Click on the “Next” button to continue the process. The next step is to configure the WiFi and
LAN settings.
WiFi & LAN Setting
EN- 19
Page 87

SSID: Type-in a combination of letters and numbers only. 32 characters is the
maximum allowable SSID length.
Channel: The default setting is set to Auto. There are 14 channels available to choose
from.
Modes: The default setting is 802.11b/g/n. You can also manually set the modes to
11Mbps (802.11b), 54MBPS (802.11G), and 150Mbps (802.11n).
Security: The WPA-PSK, WPA2-PSK , Mixed WPA/WPA2-PSK (default) are available.
Password: Minimum 8 (Maximum 63) characters.
IP Address: The default IP address is set to 10.10.10.254 with subnet mask of
255.255.255.0. The IP address can be changed.
Click on the “Next” button to change the admin default password. Click on the “Next” button
once the password has been modified. You may click on the “Skip” button to keep the default
password.
After finishing the startup wizard the system will start rebooting.
This process will take 2 minutes (see picture below)
EN- 20
Page 88

10. USING MOBILE DEVICES
10.1 IOS CLIENT A PP I NSTA LLATION
1. Click on the “App Store” icon on the Home screen as seen on the following image.
Search and locate the free “Memory 2 Move Pro” app and follow the on-screen
installation instructions.
2. Once the installation process has been completed, the “Memory 2 Move Pro” app
can be found on the home screen as seen on the image.
EN- 21
Page 89

10.2 WIRELES SLY CONNECTIN G YOUR IPHONE/IPAD
1. Turn-on the “Memory 2 Move Pro”. Wait for a few minutes to complete the
initialization process. The blue Wi-Fi LED on the device should remain solid
indicating that the initialization process has been completed.
2. Click on the “Settings” icon on the desktop as seen on the screenshot.
3. Click on “Wi-Fi”. Inside the Wi-Fi Networks, the “Memory2Move-XXXX” should
appear on the list. Click on the “Memory2Move-XXXX”. Enter the password
(default: intenso1)
EN- 22
Page 90

4. Once the “Memory2Move-XXXX” is selected, a check mark will appear before the
SSID and the Wi-Fi logo will appear after the device name on the top left of the
display.
10.3 IOS USER LOGIN
1. Click on the “Memory 2 Move Pro” icon to launch the app as seen on the image.
2. Enter the Admin password that you assigned during the configuration process
(00000). The password is only required during the first login. The device
remembers the password and there is no need to enter it again the second time
you login.
3. Once the password has been entered correctly, you will be automatically
connected into the “Memory 2 Move Pro”. This is your direct access to the
connected data carriers that are connected to the device.
EN- 23
Page 91

10.4 ANDRO I D CLIEN T A PP I NSTALLATION
1. Download the Client App called “Memory 2 Move Pro” from the official website
(Google Play Store, Android Market) as seen on the screenshot.
2. Click on the “Install” button and follow the on-screen instructions.
EN- 24
Page 92

3. Once the Client App is successfully installed, the “Memory 2 Move Pro” icon can be
found on your desktop as seen on the image.
10.5 WIRELES SLY CONNECTIN G YOUR ANDROID DEVIC ES
1. Turn-on the “Memory 2 Move Pro”. Wait for a few minutes to complete the
initialization process. The blue Wi-Fi LED on the device should remain solid
indicating that the initialization process has been completed.
2. Click on the “Settings” icon on your desktop as seen on the screenshot.
EN- 25
Page 93

3. Switch the Wi-Fi to ON position. Inside the Wi-Fi networks, the “Memory2Move-
XXXX” should appear on the list. Click on the “Memory2Move-XXXX” and enter
your password (default: intenso1).
4. The word “Connected” will appear under the SSID name of which is an indication
that the Android Device is connected to the “Memory 2 Move Pro”
EN- 26
Page 94

10.6 ANDRO I D USER LOGIN
1. Click on the “Memory 2 Move Pro” icon to launch the app as seen on the image
below.
2. Enter the Admin password that you assigned during the configuration process
(default: 00000). The password is only required during the first login. The device
remembers the password and there is no need to enter it again the second time
you login.
3. Once the password has been entered correctly, you will be automatically
connected into the “Memory 2 Move Pro” menu.
EN- 27
Page 95

11. BASIC FUNCTION ALI T Y
11.1 IOS DEVICE C LIE N T
Once you have successfully connected to the “Memory 2 Move Pro”, by default, you
will be inside the “Memory 2 Move Pro” menu. This is your direct access to the
connected data carriers. Via the menu “My Device“, you can access the data carriers.
Few buttons that can be found inside the Main Screen as listed below.
“Memory 2 Move Pro” Main Screen View
EN- 28
Page 96

Internet symbol is displayed in green, if the internet
connection has been established.
WiFi HDD symbol is displayed in green, if there is an actual
connection with the device.
11.2 AN DROID DEVICE CLIEN T
Once you have successfully connected to the “Memory 2 Move Pro”, by default, you will be
inside the “Memory 2 Move Pro” menu. This is your direct access to the connected data
carriers. Via the menu “My Device“ you can access the data carriers. Few buttons that can be
found inside the Main Screen as listed below.
EN- 29
Page 97

“Memory 2 Move Pro” Main Screen View
Internet symbol is displayed in green, if the internet
connection has been established.
The WiFi HDD symbol is displayed in green, when there is an
actual connection with the device.
11.3 WI- FI SETTINGS (IOS AND ANDRO ID)
11.3.1 WI-FI SETTING INTERFACE
Click on the System icon to change the Wi-Fi Disk configuration.
EN- 30
Page 98

11.3.2 MODIFY DEVICE NAME
Please press on icon to modify the device name. After input the new device name, the Set
button appears, click on the Set button to save the new device name.
11.3.3 SECURITY
Under WiFi HDD Settings the security options appear. The Wi-Fi Disk supports the following
security
Modes:None, WPA-PSK, WA2-PSK, Mixed WPA/WPA2-PSK. If you want to select a new
security mode (except "Disabled"), you have to ask for putting the new wireless password in;
click on set button to save the new security mode and password.
EN- 31
Page 99

11.3.4 INTERNET MO D E
Under Internet Settings you will find the internet access. The Wi-Fi Disk supports the following
internet access:, Wireless Mode and Wired Mode. Wireless Mode is AP Client that access
internet by wireless to connect wireless router, Wired Mode is WAN or LAN Router that
access internet by Ethernet port to connect wired router. After select the internet mode, click
on “Save” to save the new mode.
Below please find the picture showing the wireless access:
EN- 32
Page 100

By selecting wired mode, you have to configure the network first as seen on the screenshot.
11.4 PLA YING M USI C/AUDIO (IOS AND ANDROID)
Tip: It is highly recommended to create a folder or folders where to copy all your media files
into the “Memory 2 Move Pro” for ease of use and file organization. The Music or Audio files
can be played regardless if you are inside the “Memory 2 Move Pro” or “My Device. Simply
locate the music or audio file that you would like to play. Click on the file and your music will
automatically play.
EN- 33
 Loading...