

Page 1

Intenso 15.6“ MEDIACENTER
V1.3
Page 2
DE - 1
Bedienungsanleitung Intenso Digitaler
Fotorahmen
Folgen Sie bitte dieser Anleitung, um über die verschiedenen Funktionen des Intenso Digitalen
Fotorahmens informiert zu werden.
Page 3
DE - 2
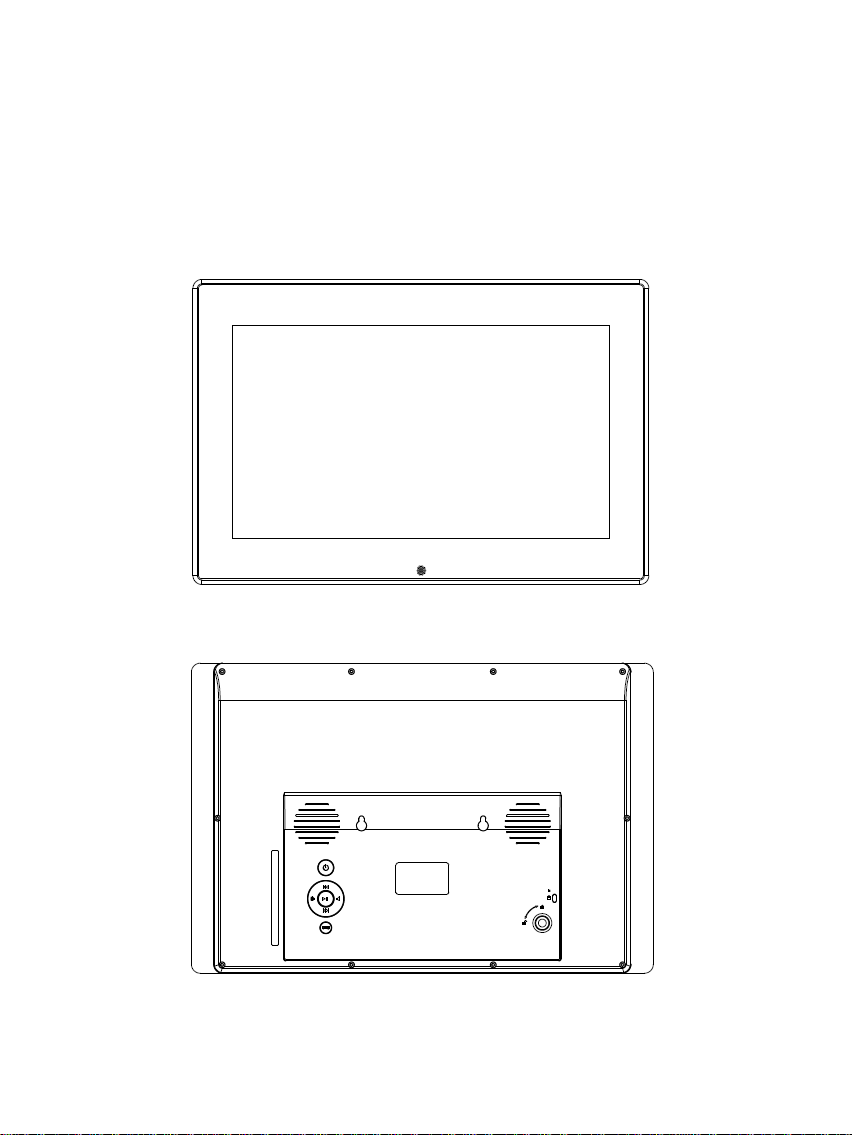
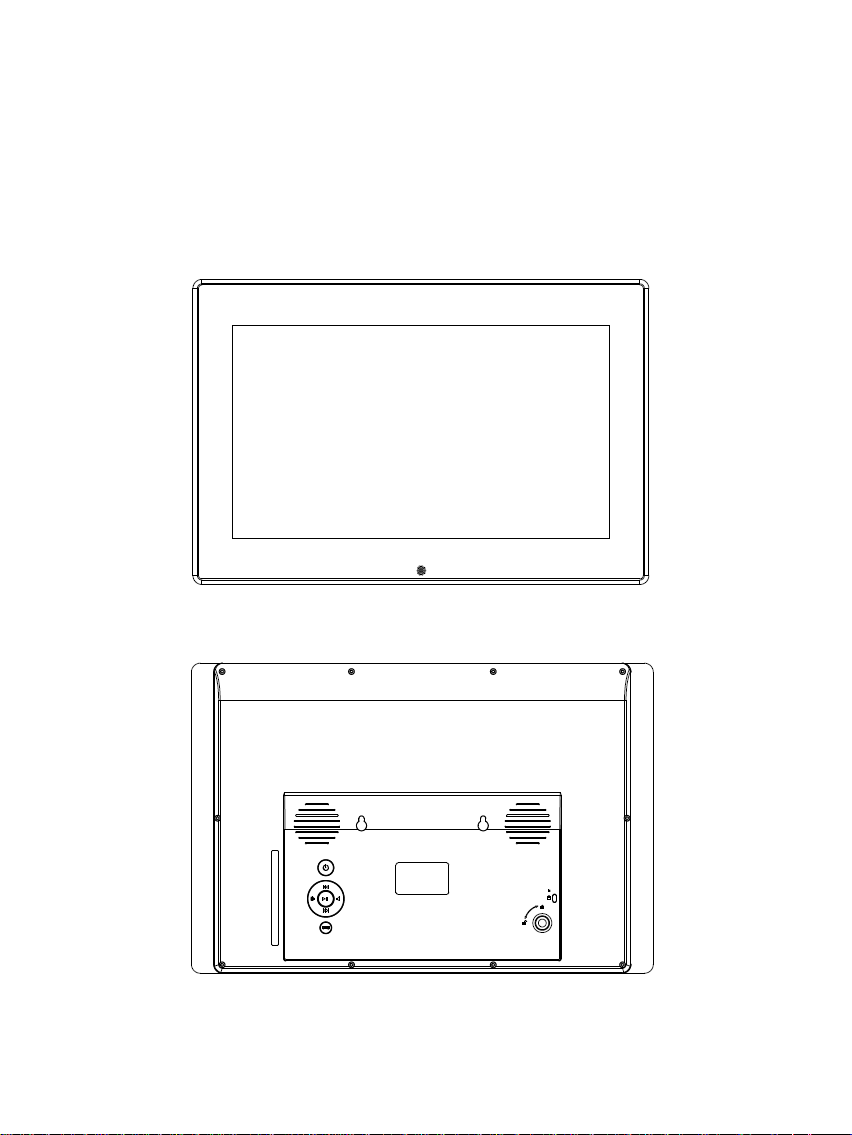
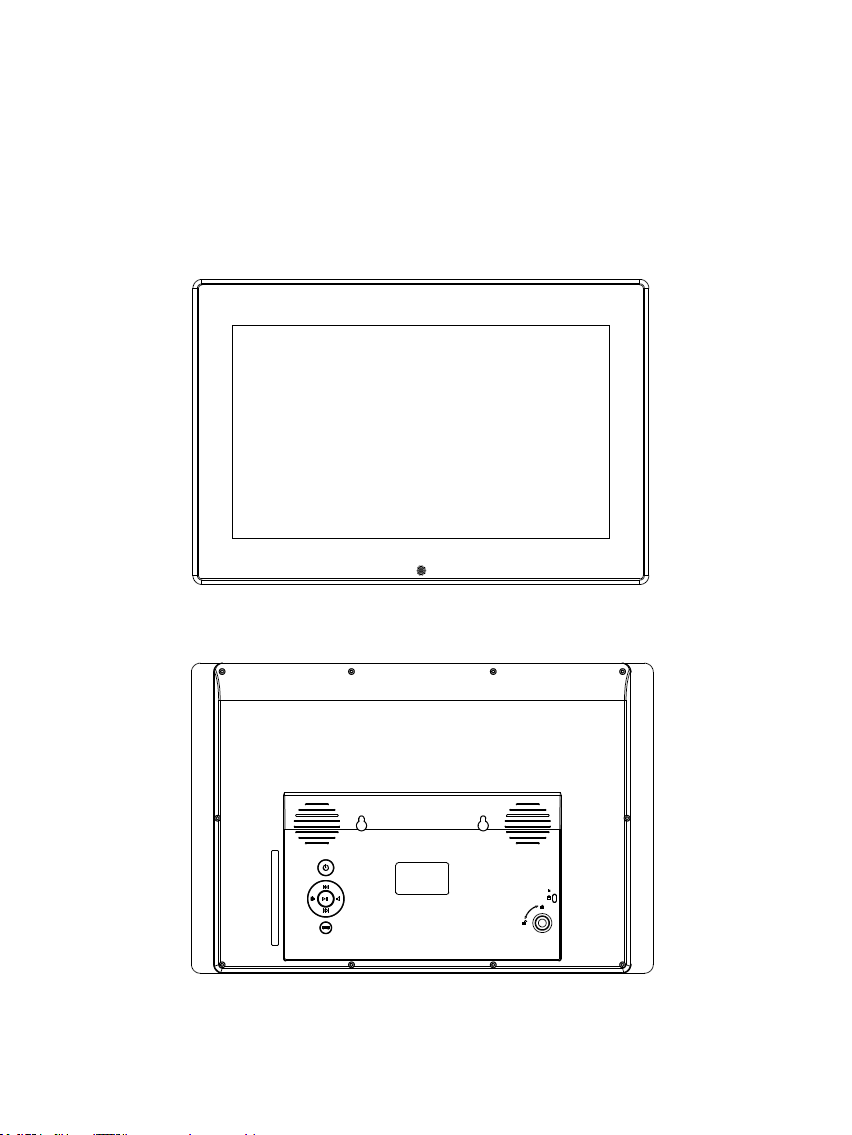
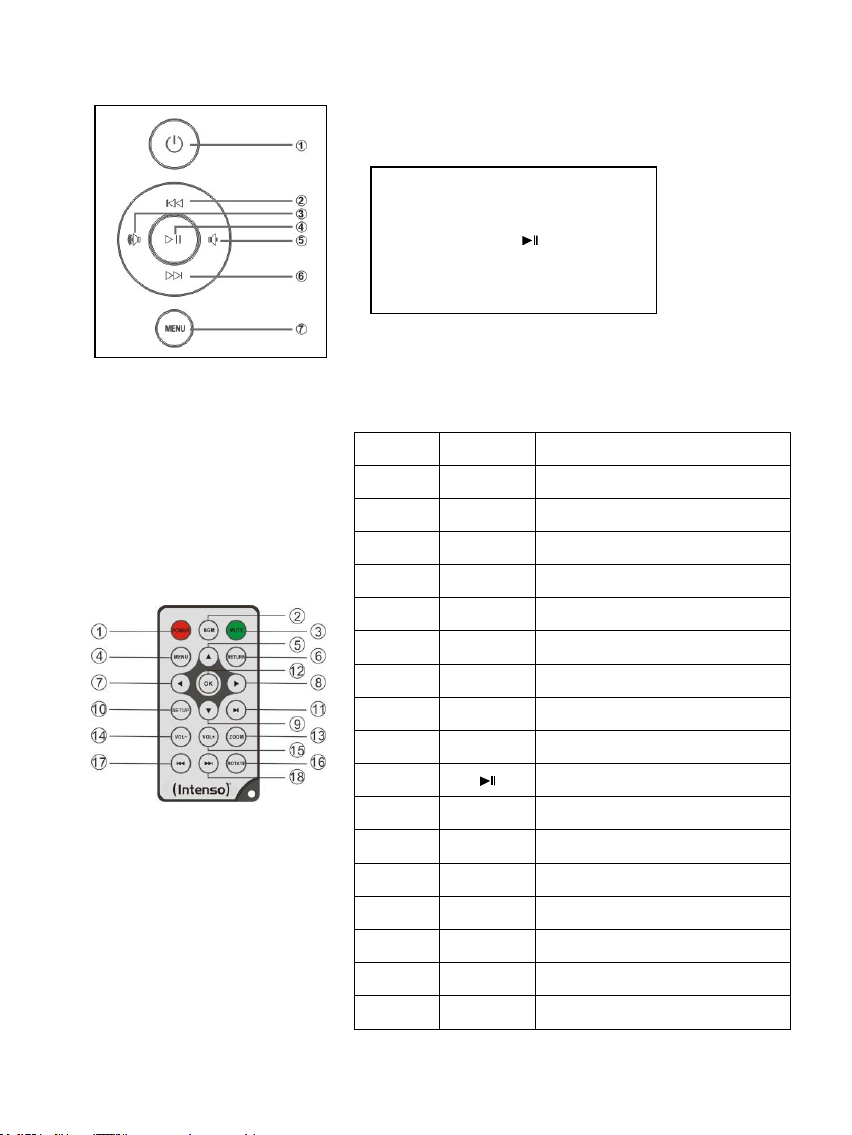
1) Tastenbelegung Geräterückseite
1
POWER
Power On / Off
2
BGM
Diashow mit Begleitmusik starten
3
MUTE
Stummschaltung
4
MENU
Anzeige des Startbildschirms
5
Bewegt den Cursor aufwärts
6
RETURN
Rückkehr in das übergeordnete Menü
7
Bewegt den Cursor nach links
8
Bewegt den Cursor nach rechts
9
Bewegt den Cursor abwärts
10
SETUP
Anzeige der Einstellungen
11
[ ]
Play/Pause Taste
12
OK
Bestätigen des ausgewählten Menüpunktes
13
ZOOM
Bei angehaltener Diashow das Bild
vergrößern
14
VOL -
Lautstärke verringern
15
VOL +
Lautstärke erhöhen
16
ROTATE
Drehung um 90° im Urzeigersinn
17
Vorheriger Titel
18
Nächster Titel
1 Power On / Off
2 Aufwärts / Vorheriges Bild
3 Vol +Taste / nach rechts bewegen
4 Play / Pause [ ] Taste
5 Vol – Taste / nach links bewegen
6 Abwärts / Nächstes Bild
7 Menü Taste / Zurück ins vorherige Menü
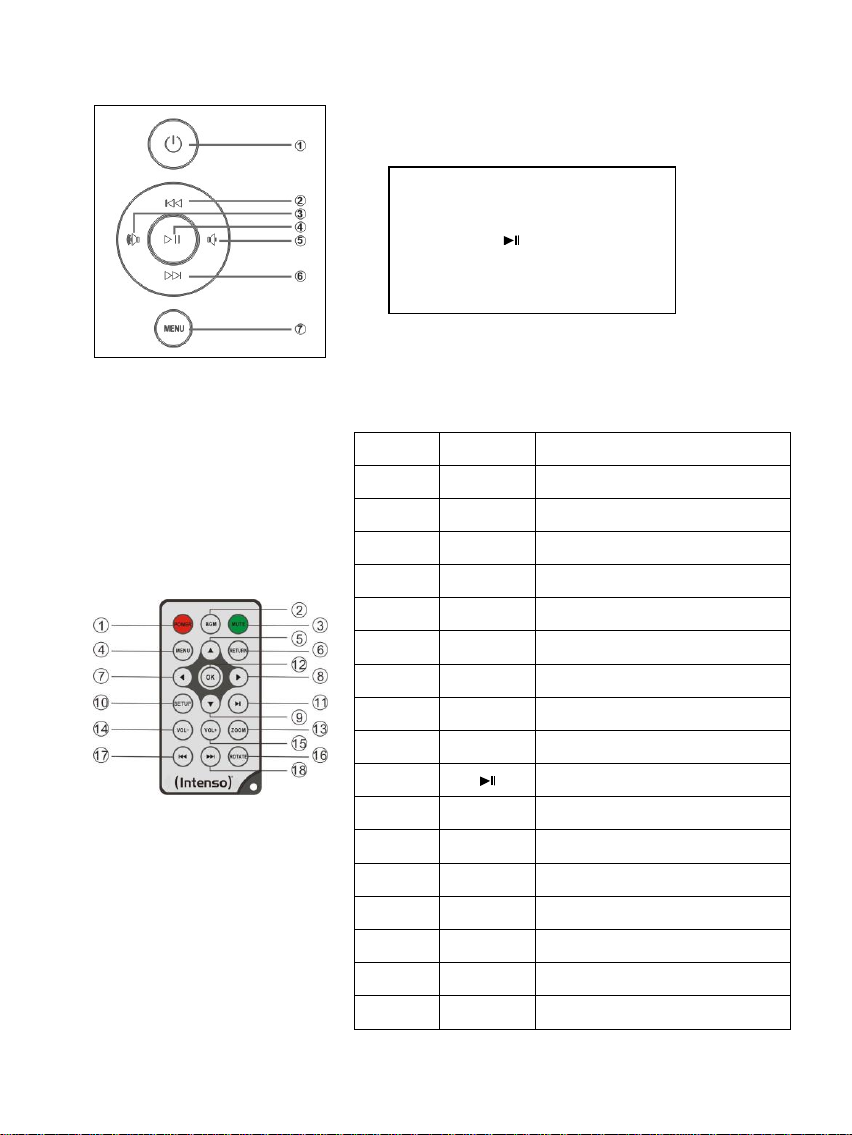
2) Fernbedienung
Page 4

DE - 3
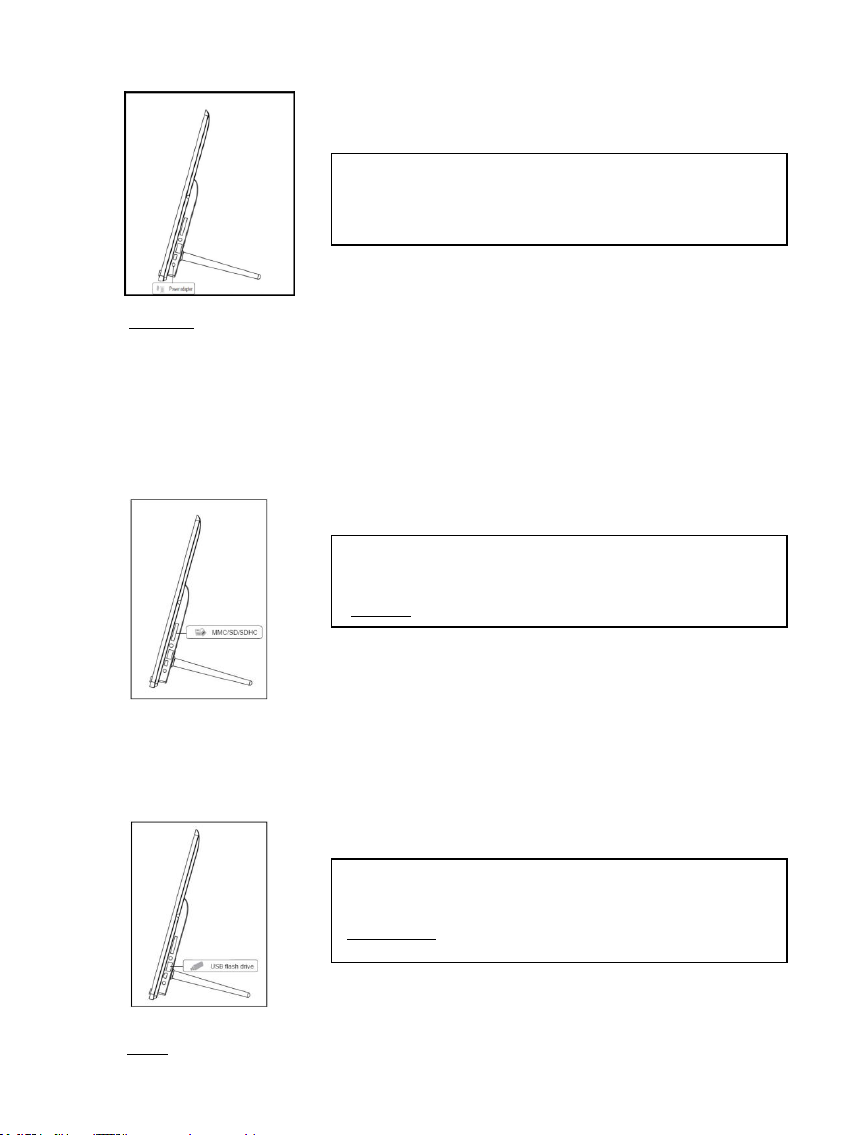
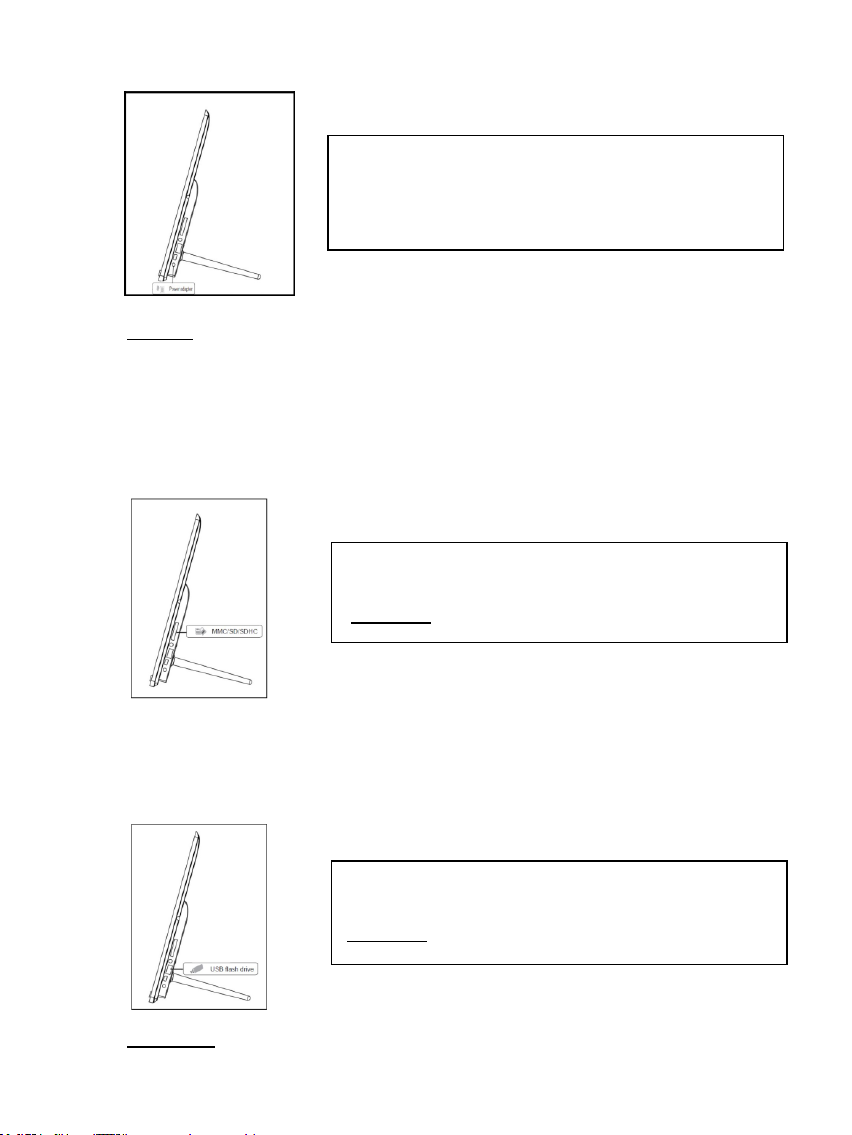
3) Anschließen und Einschalten des Intenso Digitalen Fotorahmens
Secure Digital Card (SD™ )
Secure Digital High Capacity (SDHC™)
Multimedia Card (MMC™)
Memory Stick (MS)
XD - Card
Setzen Sie die Speicherkarten mit dem Logo vom
Display abgewandt in den Slot des Kartenlesers ein.
Achtung: Die Karte bitte nicht mit Gewalt einsetzen!
Das USB Speichermedium kann nur in einer Richtung in
den USB Slot eingesetzt werden.
Achtung: Das USB Speichermedium bitte nicht mit Gewalt
Verbinden Sie das mitgelieferte Netzteil mit dem Digitalen
Fotorahmen (DC-IN). Stecken Sie das andere Ende des
Netzteils in die Steckdose. Der Digitale Fotorahmen startet
nun automatisch. Drücken Sie kurz die Power-Taste, um
den Digitalen Fotorahmen auszuschalten oder erneut
einzuschalten.
Sicherheitshinweise:
- Die Steckdose muss sich in der Nähe des Gerätes befinden und leicht zugänglich sein.
- Öffnen Sie nicht das Gehäuse des Netzadapters. Bei geöffnetem Gehäuse besteht Lebensgefahr durch elektrischen Schlag.
Es enthält keine zu wartenden Teile.
- Betreiben Sie den Netzadapter nur an geerdeten Steckdosen mit AC 100-240V~, 50/60 Hz. Wenn Sie sich der
Stromversorgung am Aufstellungsort nicht sicher sind, fragen Sie beim betreffenden Energieversorger nach.
- Benutzen Sie nur das beiliegende Netzadapter- und Netzanschlusskabel KTEC KSASB0240900150HE.
- Um die Stromversorgung zu Ihrem Gerät zu unterbrechen, ziehen Sie das Netzteil aus der Steckdose. Halten Sie beim
Abziehen immer das Netzteil selbst fest. Ziehen Sie nie an der Leitung.
4) Einlegen von Speicherkarten | Anschließen von USB Speichermedien
Folgende Speicherkarten - Formate werden vom Digitalen Fotorahmen unterstützt:
Hinweis: Der Digitale Fotorahmen ist nur für die Nutzung mit kompatiblen Speicherkarten
und USB 2.0 Speichermedien (100mA) ausgelegt.
Page 5

DE - 4
5) Allgemeine Bedienung
Hinweis: Dieses Gerät verfügt über eine Eco Funktion. Ist diese aktiviert (zum aktivieren bzw.
deaktivieren öffnen Sie bitte die Einstellungen), schaltet es sich automatisch 4 Stunden nach
der letzten getätigten Eingabe ab. Im Auslieferungszustand ist diese Funktion aufgrund
gesetzlicher Bestimmungen bereits aktiviert.
a) Hauptmenü
Nach dem Einschalten erscheint das Hauptmenü.
Im Hauptmenü haben Sie die Auswahl zwischen den verschiedenen Funktionen des Digitalen
Fotorahmens und dem Menüpunkt Einstellungen. Drücken Sie die Pfeiltasten auf der
Fernbedienung oder die Pfeiltasten sowie die Vol-/Vol+ Tasten am Gerät, um einen Menüpunkt
auszuwählen. Bestätigen Sie Ihre Wahl mit der OK Taste auf der Fernbedienung oder der
Play/Pause Taste [ ] auf dem Gerät.
b) Auswahl des Speichermediums
Die RETURN Taste auf der Fernbedienung oder die Menü Taste am Gerät führt Sie aus dem
Hauptmenü heraus zur Auswahl der verbundenen Speichermedien. In diesem Menü können
Sie, soweit vorhanden, zwischen Speicherkarte und USB Speichermedium auswählen.
Bestätigen Sie Ihre Auswahl mit der OK Taste auf der Fernbedienung oder der Play/Pause
Taste am Gerät. Sie gelangen dann automatisch wieder in das Hauptmenü.
c) Anzeigen von Fotos
Haben Sie bereits ein Speichermedium mit gespeicherten Fotos eingesetzt, so startet das
Gerät automatisch mit einer Diaschau Ihrer Fotos. Wenn kein Speichermedium eingesetzt ist,
startet das Gerät mit einer Diaschau der vorinstallierten Beispielbilder (diese können nicht
geändert werden). Drücken Sie die Menü Taste, um in das Hauptmenü zu gelangen.
Sie können eine Diaschau auch manuell starten. Navigieren Sie dazu im Hauptmenü zu der
Funktion Foto. Bestätigen Sie Ihre Auswahl mit der OK Taste auf der Fernbedienung oder der
Play/Pause Taste am Gerät. Die Diaschau wird nun gestartet. Alternativ können Sie auch die
BGM Taste auf der Fernbedienung drücken, um eine Diaschau direkt aus jeder anderen
Funktion zu starten.
In den Fotoeinstellungen können Sie festlegen, ob während einer Diaschau
Hintergrundmusik (falls auf demselben Speichermedium vorhanden) abgespielt werden soll.
Drücken Sie die RETURN Taste auf der Fernbedienung oder die Menü Taste am Gerät, um die
Diaschau zu verlassen und das Bilder-Vorschaumenü aufzurufen. Sie können nun zu einem
Foto navigieren, Ihre Auswahl mit der OK Taste auf der Fernbedienung oder der Play/Pause
Taste am Gerät bestätigen und die Diaschau direkt von dieser Stelle fortsetzen. Durch
erneutes Drücken der RETURN Taste im Bilder-Vorschaumenü gelangen Sie in den jeweils
übergeordneten Datei-Ordner. So können Sie ganz einfach durch die verschiedenen Ordner
Ihres Speichermediums navigieren.
Page 6

DE - 5
Funktionen während der Diaschau:
- Durch Drücken der Pfeiltasten auf der Fernbedienung nach rechts oder links oder der
Pfeiltasten am Gerät können Sie jeweils ein Foto vorwärts oder zurück springen.
- Durch Drücken der Play/Pause Taste auf der Fernbedienung oder am Gerät stoppen Sie
die Diaschau. Durch erneutes Drücken wird die Diaschau fortgesetzt.
- Drücken Sie die Doppelpfeiltasten [,] auf der Fernbedienung zur Auswahl des
nächsten oder vorherigen Titels der Hintergrundmusik, falls Sie diese aktiviert haben.
- Die Lautstärke der Hintergrundmusik stellen Sie mit den Vol-/Vol+ Tasten auf der
Fernbedienung oder am Gerät ein.
d) Kalender
Navigieren Sie im Hauptmenü zu der Funktion Kalender und bestätigen Sie Ihre Auswahl mit
der OK Taste auf der Fernbedienung oder der Play/Pause Taste am Gerät.
Im Kalender Modus werden Ihnen die aktuelle Uhrzeit, ein gegebenenfalls eingestellter Alarm,
das aktuelle Kalenderblatt, sowie (bei eingelegtem Speichermedium mit unterstützten
Fotodateien) eine Diaschau angezeigt.
Sie können mit den Pfeiltasten auf der Fernbedienung oder den Aufwärts/Abwärts und Vol-
/Vol+ Tasten am Gerät den Monat und das Jahr für das angezeigte Kalenderblatt ändern.
e) Wiedergabe von Musik-Dateien
Navigieren Sie im Hauptmenü zu der Funktion Musik und bestätigen Sie Ihre Auswahl mit der
OK Taste auf der Fernbedienung oder der Play/Pause Taste am Gerät.
Es werden Ihnen jetzt alle unterstützten Musik-Dateien (MP3 und WMA) angezeigt. Navigieren
Sie nun zu einer Musik Datei und bestätigen Sie Ihre Auswahl mit der OK Taste auf der
Fernbedienung oder der Play/Pause Taste am Gerät, um die gewählte Datei wiederzugeben.
Funktionen während der Wiedergabe eines Liedes:
- Durch Drücken der Play/Pause Taste auf der Fernbedienung oder am Gerät können Sie die
Musikwiedergabe stoppen und wieder fortsetzen.
- Die Lautstärke stellen Sie mit den Vol-/Vol+ Tasten auf der Fernbedienung oder am Gerät
ein.
- Zum Vor- und Zurückspulen drücken Sie die Pfeiltasten nach rechts oder links auf der
Fernbedienung.
- Drücken Sie die Doppelpfeiltasten [,] auf der Fernbedienung oder die Pfeiltasten am
Gerät zur Auswahl des nächsten oder vorherigen Titels.
Page 7

DE - 6
f) Wiedergabe von Video-Dateien
Navigieren Sie im Hauptmenü zu der Funktion Video und bestätigen Sie Ihre Auswahl mit der
OK Taste auf der Fernbedienung oder der Play/Pause Taste am Gerät.
Es werden Ihnen jetzt alle unterstützten Video-Dateien (MPEG-1/4, M-JPEG und AVI)
angezeigt. Navigieren Sie nun zu einer Datei und bestätigen Sie Ihre Auswahl mit der OK
Taste auf der Fernbedienung oder der Play/Pause [ ] Taste am Gerät, um die gewählte
Video-Datei wiederzugeben.
Funktionen während der Wiedergabe eines Videos
- Durch Drücken der Play/Pause Taste auf der Fernbedienung oder am Gerät können Sie die
Videowiedergabe stoppen und wieder fortsetzen.
- Die Lautstärke stellen Sie mit den Vol-/Vol+ Tasten auf der Fernbedienung oder am Gerät
ein.
- Zum Vor- und Zurückspulen drücken Sie die Pfeiltasten nach rechts oder links auf der
Fernbedienung.
- Drücken Sie die Doppelpfeiltasten [,] auf der Fernbedienung oder die Pfeiltasten am
Gerät zur Auswahl des nächsten oder vorherigen Titels.
g) Dateisystem
Navigieren Sie im Hauptmenü zu der Funktion Dateien und bestätigen Sie Ihre Auswahl mit
der OK Taste auf der Fernbedienung oder der Play/Pause Taste am Gerät.
Es werden Ihnen nun alle Ordner und Dateien des ausgewählten Speichermediums
angezeigt. Navigieren Sie mit den Pfeiltasten auf der Fernbedienung oder am Gerät auf den
gewünschten Unterordner und bestätigen Sie Ihre Auswahl mit der OK Taste auf der
Fernbedienung oder der Play/Pause Taste am Gerät. Ihnen werden nun alle Dateien und
Ordner innerhalb des gewählten Ordners angezeigt. Mit der RETURN Taste auf der
Fernbedienung oder der Menü Taste am Gerät gelangen Sie wieder zurück in die nächst
höhere Dateiebene.
Um eine Datei direkt aus dem Dateisystem zu öffnen, navigieren Sie bitte zu der gewünschten
Datei und bestätigen Sie Ihre Auswahl mit der OK Taste auf der Fernbedienung oder der
Play/Pause Taste am Gerät. Die Datei wird nun wiedergegeben.
Um eine Datei oder einen gesamten Ordner auf dem ausgewählten Speichermedium zu
löschen, navigieren Sie bitte zu der gewünschten Datei und drücken dann die rechte
Pfeiltaste auf der Fernbedienung oder die VOL+ Taste am Gerät. Ihnen wird nun ein Dialogfeld
angezeigt, in welchem Sie, um ein ungewolltes Löschen zu vermeiden, den Löschvorgang
bestätigen müssen. Wählen Sie Ja und die gewünschte Datei oder der gewünschte Ordner
wird nun gelöscht. Wählen Sie Nein, um wieder in die Dateiübersicht zu wechseln.
h) Ändern der Einstellungen
Navigieren Sie im Hauptmenü zu der Funktion Einstellungen und bestätigen Sie Ihre Auswahl
mit der OK Taste auf der Fernbedienung oder der Play/Pause Taste am Gerät.
Ihnen stehen nun folgende Einstellungsmöglichkeiten zur Verfügung: Fotoeinstellungen,
Kalendereinstellungen, Videoeinstellungen, Musikeinstellungen und System
Einstellungen. Navigieren Sie zum gewünschten Menüpunkt und bestätigen Sie Ihre
Auswahl mit der OK Taste auf der Fernbedienung oder der Play/Pause Taste am Gerät. Es
werden Ihnen nun alle Einstellungsmöglichkeiten angezeigt. Mit den Auf-/Abwärts
Pfeiltasten auf der Fernbedienung oder den Pfeiltasten am Gerät können Sie durch die
einzelnen Einstellungsmöglichkeiten navigieren. Mit den Links/Rechts Pfeiltasten auf der
Fernbedienung oder den Vol+/Vol- Tasten am Gerät können Sie die Einstellungen anpassen.
Page 8
DE - 7
Einstellmöglichkeiten
Beschreibung
Foto
Einstellungen
Anzeigemodus
Wählen Sie zwischen Diaschau und Vorschaubild aus.
Musik
Ein- und Ausschalten der Hintergrundmusik während einer
Diaschau (sofern unterstützte Musik Dateien auf den
Speichermedien verfügbar sind).
Fotomodus
Wählen Sie zwischen Original und Vollbild aus.
Anzeigedauer
Einstellen der Anzeigedauer der einzelnen Bilder während der
Diashow.
Diaschau anzeigen
Wählen Sie zwischen einer einmaligen Anzeige aller Bilder
und einer Endlosschleife.
Übergangseffekt
Wählen Sie einen bestimmten Übergangseffekt oder eine
zufällige Auswahl der Übergangseffekte.
Diaschau Modus
Wählen Sie zwischen der Anzeige eines einzelnen Bildes oder
zwei, drei oder vier Bilder gleichzeitig.
Abspielmodus
Wählen Sie zwischen der Anzeige der Bilder in der
Speicherreihenfolge auf dem Datenträger oder einer zufälligen
Reihenfolge.
Kalender
Einstellungen
Datum
Einstellen des aktuellen Datums.
Zeitformat einstellen
Einstellen des Formates der Uhrzeit: 12 (AM / PM) Stunden
oder 24 Stunden.
Zeit
Einstellen der aktuellen Uhrzeit.
Alarmstatus
Schalten Sie den Alarm Ein / Aus.
Alarmzeit
Einstellen der gewünschten Alarmzeit.
Alarmtonlautstärke
Stellen Sie die gewünschte Lautstärke (Niedrig, Mittel und
Hoch) ein.
Alarm-Wiederholung
Einstellen der gewünschten Alarmwiederholung (Jeden Tag,
Mo. bis Fr., Wochenende, Einmal).
Video
Anzeigemodus
Wählen Sie zwischen Original und Vollbild aus.
Wiedergabe
Wählen Sie den Wiedergabemodus aus (Einmal, Alles
wiederholen, Titel wiederholen).
Musik
Wiedergabe
Einmal
Alle Titel werden 1x abgespielt.
Titel wiederholen
Ausgewählter Titel wird in
Endlosschleife wiederholt.
Alles wiederholen
Alle Titel werden in Endlosschleife
wiederholt.
Zufällig
Alle Titel werden in zufälliger
Reihenfolge wiedergegeben.
Spektrum anzeigen
Wählen Sie, ob das Spektrum bei der Musikwiedergabe Einoder Ausgeblendet werden soll.
System
Sprache
Wählen Sie die gewünschte Sprache aus.
Helligkeit
Wählen Sie die gewünschte Helligkeit des Displays aus.
Kontrast
Wählen Sie den gewünschten Kontrast des Displays aus.
Sättigung
Wählen Sie die gewünschte Farbsättigung des Displays aus.
Farbton
Verändern Sie den Farbton des Displays.
Autom. Einschalten
Aktivieren/Deaktivieren Sie das automatische Einschalten.
Page 9

DE - 8
Einschaltzeit
Wählen Sie die Uhrzeit des automatischen Einschaltens.
Autom. Ausschalten
Aktivieren/Deaktivieren Sie das automatische Ausschalten.
Ausschaltzeit
Wählen Sie die Uhrzeit des automatischen Ausschaltens.
Wiederholung
Einstellen der Häufigkeit des automatischen Einschaltens.
(Jeden Tag, Mo. bis Fr., Wochenende, Einmal).
Lautstärke
Stellen Sie die gewünschte Lautstärke ein.
Werkseinstellungen
Stellen Sie die Werkseinstellungen wieder her.
Version
Die aktuelle Versionsnummer wird angezeigt.
Update
Sollte auf www.intenso.de ein Firmware Update zur Verfügung
stehen, können Sie es über diesen Menüpunkt installieren.
Autostart Modus
Wählen Sie die Funktion, die zum Start des Gerätes
ausgeführt werden soll (Foto, Musik, Video, Kalender).
Anzeige
Digitales TFT LCD
Display Größe: 15.6” Zoll ( 39.62 cm sichtbare Bilddiagonale)
Anzeigemodus: 16:9
Auflösung: 1366 x 768 Pixel
Netzteil
Input: 100~240V AC, 50/60Hz
Output: 9V 1.5A DC
USB Port
USB Host 2.0 (High Speed)
Unterstützt USB Speichermedien
Unterstützte
Speicherkarten
Secure Digital Card (SD™)
Secure Digital High Capacity (SDHC™)
Multimedia Card (MMC™)
Memory Stick (MS)
XD - Card
Kopfhöreranschluss
3.5mm Klinke
Unterstütztes
Bildformat
JPEG, Maximale Auflösung:9000*9000 Pixel
Unterstützte
Videoformate
MPEG 1/4, MJPEG, AVI
Unterstützte
Musikformate
MP3, WMA
Betriebstemperatur
0°C ~ +40°C
Abmessungen
~415*278*30 mm
Gewicht
~1150 gr.
Zubehör
Netzgerät, Fernbedienung (inkl. Batterie), Standfuß, mehrsprachige
Bedienungsanleitung
6) Produkt Spezifikationen
Wissen Sie einmal nicht weiter?
Unsere Technische Service Hotline beantwortet gerne weitere Fragen:
+49 (0) 900 1 50 40 30 für 0,39 €/Min. aus dem deutschen Festnetz. Mobilfunkpreise können abweichen.
Viel Spaß mit Ihrem Digitalen Fotorahmen von Intenso!
Page 10
DE - 9
Pflege und Wartung
Pflege
Um die Gefahr von elektrischen Stromstößen zu vermeiden, entfernen Sie bitte weder die Schrauben
noch das Gehäuse.
Benutzen Sie dieses Gerät nicht in der Nähe von Wasser. Setzen Sie dieses Gerät weder Regen noch
Feuchtigkeit aus. Stellen Sie keine Gegenstände in der Nähe des Gerätes ab, die Wasser oder andere
Flüssigkeiten speichern.
Installieren Sie diesen Bilderrahmen nicht in der Nähe von Heizungen, Öfen oder anderen Wärme
abgebenden Geräten.
Öffnen Sie das Gehäuse nicht. Versuchen Sie bitte keine eigene Reparatur. Überlassen Sie dieses dem
Fachpersonal.
Vermeiden Sie die Benutzung auf sandigen Plätzen.
Bitte stecken Sie den Netzteil-Anschluss-Stecker komplett in die vorhandene Öffnung des DF. Nur so
können Sie elektrostatische Aufladung vermeiden.
Verbinden Sie alle Anschlüsse korrekt und sicher.
Bitte drücken Sie nicht auf das Display. Schützen Sie das Display vor starker Sonneneinstrahlung.
Der Bilderrahmen spielt nur kompatible Dateiformate ab.
Bilder können durch Rechte Dritter geschützt sein. Das Abspielen ohne Lizenz kann Copyright Rechte
verletzen.
Bitte berühren Sie den DF während des Betriebes nicht mit metallischen Gegenständen.
Bitte vermeiden Sie die Benutzung auf Kissen, Sofas oder anderen Wohngegenständen, die ein e
Wärmeentwicklung unterstützen, da die Gefahr einer Überhitzung des Gerätes besteht.
Bitte entfernen Sie keine Speicherkarten während des Lesevorganges. Anderenfalls kann es zu
Systemabstürzen oder Datenverlust kommen.
Bitte stellen Sie das Gerät nicht während einer laufenden Diashow aus.
Bitte verpacken Sie das Gerät nicht direkt nach einem längeren Gebrauch. Stellen Sie eine ausreichende
Abkühlung sicher. Es besteht sonst die Gefahr der Überhitzung.
Um einen besseren Service zu gewährleisten, kann es zu Änderungen in der Betriebsanleitung kommen.
Bei Verwendung von Ohr- oder Kopfhörern in zu hoher Lautstärke kann es zu einer dauerhaften Schädigung des
Gehörs kommen.
Wartung des Gerätes
Das Gerät muss ausgeschaltet sein.
Sprühen oder Tragen Sie niemals eine Flüssigkeit direkt auf das Display oder Gehäuse auf.
Säuberung des Displays / Gehäuses / Rahmens
Wischen Sie Gehäuse, Rahmen und LCD Display vorsichtig mit einem weichen, fussel - und
chemikalienfreien Tuch ab. Verwenden Sie nur Reinigungsmittel, die speziell für LCD-Displays bestimmt
sind.
Entsorgung von Elektro-Altgeräten
Die mit diesem Symbol gekennzeichneten Geräte unterliegen der europäischen Richtlinie 2002/96/EC. Alle Elektro- und
Elektroaltgräte müssen getrennt vom Hausmüll über die dafür vorgesehenen staatlichen Stellen entsorgt werden.
Mit der ordnungsgemäßen Entsorgung von Elektro-Altgeräten vermeiden Sie Umweltschäden.
Page 11
Page 12
EN - 1
Operating instructions for Intenso Digital Photo
Frame
Please comply with the following instructions to be informed about the different functions of the
Intenso digital photo frame.
Page 13

EN - 2
1) Assignment of keys rear of the unit
1
POWER
Power On / Off
2
BGM
Start slide show with background music
3
MUTE
Muting
4
MENU
Displaying the starting screen
5
Moves the cursor up
6
RETURN
Return to superordinate menu
7
Moves the cursor left
8
Moves the cursor right
9
Moves the cursor down
10
SETUP
Display of all settings
11
[ ]
Play/Pause key
12
OK
Confirming the selected menu item
13
ZOOM
Enlarge the image in paused slide show
14
VOL -
Decrease volume
15
VOL +
Increase volume
16
ROTATE
Rotating 90° clockwise
17
Previous track
18
Next track
1 Power On / Off
2 Up / previous image
3 Vol +key / move right
4 Play / Pause [ ] key
5 Vol – key / move left
6 Down / next image
7 Menu key / Back to the previous menu
2) Remote Control
Page 14
EN - 3
3) Connect and switch on the digital photo frame
Secure Digital Card (SD™ )
Secure Digital High Capacity (SDHC™)
Multimedia Card (MMC™)
Memory Stick (MS)
XD - Card
Insert memory cards into the card reader slot with the logo
facing away from the display.
Caution: Please do not insert card with force!
USB data carriers can only be plugged intothe USB slot in
one direction.
Please note: Never insert USB data carriers
Connect the Power Adapter supplied with the frame (DC-
IN). Plug the other end of the Adapter into the Socket. The
photo frame will now start automatically. Hold down the
Power button briefly to turn it off or on again.
Please note:
- The plug must be placed next to the device so to be easily accessible.
- Do not open the box of the line adapter. If the box is open, there is danger of life caused by electric shock. The product does
not contain parts to be maintained.
- Actuate the line adapter only with earthed plugs of AC 100-240V~, 50/60 Hz. If you are not sure about the provision of
electricity at the installation point, ask your energy provider.
- Use the included line adapter and line connection cable KTEC KSASB0240900150HE only.
- To interrupt the power supply of your equipment, unplug the adapter. While you are unplugging it, always hold the adapter. Do
never pull the cable.
4) Insert memory cards | connect USB data carriers
The following memory card formats can be used with your digital photo frame:
Note: The digital photo frame is exclusively designed for the use with compatible memory
cards and 2.0 data media (100 mA).
Page 15

EN - 4
5) General handling
Note: This device has an Eco Function. If it is activated (please open the settings for activation
or deactivation), it automatically shuts down 4 hours after the last input. This function is
already activated in the condition on delivery due to legal requirements.
a) Main menu
After starting up, the main menu appears.
In the main menu you can choose between multiple functions of the digital photo frame and
the menu item settings. Press the cursor keys on the remote or the cursor keys and the Vol-
/Vol+ keys on the unit to select a menu item. Confirm your selection with the OK key on the
remote or the Play/Pause key [ ] on the unit.
b) Selection of storage media
The RETURN key on the remote or the menu key on the unit leads from the main menu to the
selection of connected storage media. In this menu you can, if provided, choose between
memory card and USB storage device. Confirm your selection with the OK key on the remote
or the Play/Pause key on the unit. You then get back to the main menu automatically.
c) Displaying photos
If you already have inserted a storage medium with saved photos, the unit will automatically
start a slide show of your photos. If no storage medium is inserted, the unit will start a slide
show of pre-installed sample images (these cannot be changed). Press the menu key to get
back to the main menu.
You can also start the slide show manually. To do that, navigate to the photo function in the
main menu. Confirm your selection with the OK key on the remote or the Play/Pause key on
the unit. The slide show will be started now. Alternatively you can press the BGM key on the
remote to start a slide show from any other function directly.
In the photo settings you can specify, whether background music (if provided on the same
storage medium) is played during a slide show.
Press the RETURN key on the remote or the menu key on the unit to leave the slide show and
to call up the image preview menu. You can now navigate to a photo, confirm your selection
with the OK key on the remote or the Play/Pause key on the unit and continue the slide show
from this point directly. You can reach the respective superordinate file folder by pressing the
RETURN key in the image preview menu again. This is how you navigate easily between the
various folders of your storage medium.
Functions during the slide show:
- You can switch a photo forward or back by pressing the cursor keys on the remote or the
cursor keys on the unit right or left.
- You can stop a slide show by pressing the Play/Pause key on the remote or on the unit.
The slide show is continued if you press the key again.
- Press the double arrow keys [,] on the remote for selecting the next or previous track
of the background music, if you have activated it.
- The volume of the background music can be set with the Vol-/Vol+ keys on the remote or
the unit.
Page 16

EN - 5
d) Calendar
Navigate to the calendar function in the main menu and confirm your selection with the OK key
on the remote or the Play/Pause key on the unit.
In the calendar mode you can see the current time, a possibly set alarm, the current calendar
sheet and (with inserted storage medium with supported photo files) a slide show.
You can change the month and the year for the displayed calendar sheet by pressing the cursor
keys on the remote or the Up/Down and Vol-/Vol+ keys on the unit.
e) Playing music files
Navigate to the music function in the main menu and confirm your selection with the OK key
on the remote or the Play/Pause key on the unit.
All supported music files (MP3 and WMA) will now be displayed. Navigate to a music file now
and confirm your selection with the OK key on the remote or the Play/Pause key on the unit to
play the selected file.
Functions during playback of a song:
- You can stop and continue the music by pressing the Play/Pause key on the remote or
the unit.
- You can set the volume with Vol-/Vol+ keys on the remote or the unit.
- Press the cursor keys on the remote right or left to fast-forward or rewind.
- Press the double arrow keys [,] on the remote or the cursor keys on the unit to jump
to the next or previous track.
f) Playing video files
Navigate to the video function in the main menu and confirm your selection with the OK key on
the remote or the Play/Pause key on the unit.
All supported video files (MPEG-1/4, M-JPEG and AVI) will now be displayed. Navigate to a
video file now and confirm your selection with the OK key on the remote or the Play/Pause key
[ ] on the unit to play the selected video file.
Functions during playback of a video
- You can stop and continue the video playback by pressing the Play/Pause key on the
remote or the unit.
- You can set the volume with Vol-/Vol+ keys on the remote or the unit.
- Press the cursor keys on the remote right or left to fast-forward or rewind.
- Press the double arrow keys [,] on the remote or the cursor keys on the unit to jump
to the next or previous file.
Page 17

EN - 6
g) File system
Setting options
Description
Photo settings
Display mode
Choose between slide show and preview image.
Music
Activation and deactivation of background music during a slide
show (if supported music files are provided on the storage
media).
Photo mode
Choose between original and full screen.
Display duration
Setting of display duration of individual slides during the slide
show.
Show slide show
Choose between a one-time display of an image or endless
loop.
Transition effect
Select a specific transition effect or a random selection of
transition effects.
Slide show mode
Choose between displaying a single image, or two, three, or
four images simultaneously.
Playback mode
Choose between displaying the images in the order of storage
on the medium or a random order.
Navigate to the file function in the main menu and confirm your selection with the OK key on
the remote or the Play/Pause key on the unit.
Now all folders and files of the selected storage medium will be displayed. Navigate to a sub-
folder using the cursor keys on the remote or the unit and confirm your selection with the OK
key on the remote or the Play/Pause key on the unit. Now all files and folders within the selected
folder will be displayed. You can go back to the superordinate folder by pressing the RETURN
key on the remote or the menu key on the unit.
In order to open a file directly from the file system, navigate to the desired file and confirm your
selection with the OK key on the remote or the Play/Pause key on the unit. The file will now be
played.
In order to delete a file or an entire folder from the selected storage medium, navigate to the
desired file and then press the right cursor key on the remote or the VOL+ key on the unit. You
can now see a dialogue field, in which you have to confirm the deletion to prevent accidental
deletion. Select Yes and the selected file or the selected folder will be deleted. Select No to
get back to the file overview.
h) Changing the settings
Navigate to the settings function in the main menu and confirm your selection with the OK key
on the remote or the Play/Pause key on the unit.
You now have the following setting options: Photo settings, calendar settings, video settings,
music settings, and system settings. Navigate to the desired menu item and confirm your
selection with the OK key on the remote or the Play/Pause key on the unit. Now all setting
options will be displayed. You can navigate through the individual setting options with the
Up/Down cursor keys on the remote or the cursor keys on the unit. You can customise the
settings using the Left/Right cursor keys on the remote or the Vol+/Vol- keys on the unit.
Page 18

EN - 7
Calendar
settings
Date
Setting the current date.
Set time format
Setting the time format: 12 (AM / PM) hours or 24 hours.
Time
Setting the current time.
Alarm status
Activate / deactivate the alarm.
Alarm time
Setting the desired alarm time.
Alarm sound volume
Set the desired volume (low, medium and high).
Alarm repetition
Set the desired alarm repetition (every day, Monday to Friday,
weekends, once).
Video
Display mode
Choose between original and full screen.
Playback
Select the playback mode (once, repeat all, repeat track).
Music
Playback
Once
All tracks will be played once.
Repeat track
Selected track will be repeated in
endless loop.
Repeat all
All tracks will be repeated in endless
loop.
Random
Selected track will be played in random
order.
Show spectrum
Select whether the spectrum should be faded in or out during
music playback.
System
Language
Select the desired language.
Brightness
Select the desired display brightness.
Contrast
Select the desired display contrast.
Chroma
Select the desired display chroma.
Colouring
Change the display colouring.
Automatic activation
Activate/Deactivate automatic activation.
Activation time
Select the automatic activation time.
Automatic deactivation
Activate/Deactivate automatic deactivation.
Deactivation time
Select the automatic deactivation time.
Repetition
Set the frequency of automatic activation (every day, Monday
to Friday, weekends, once).
Volume
Set the desired volume.
Factory settings
Restore to factory settings.
Version
The current version number will be displayed.
Update
Should a Firmware update be available on www.intenso.de,
then you can install it in this menu item.
Auto boot mode
Select the function that will start upon unit activation (photo,
music, video, and calendar).
Page 19

EN - 8
6) Product Specifications
Display
Digital TFT LCD
Display size: 15.6 inch (39,62 cm diagonal viewable image)
Display modus: 16:9
Resolution: 1366 x 768 Pixel
Power supply
Input: 100~240V AC, 50/60Hz
Output: 9V 1.5A DC
USB port
USB Host 2.0 (High Speed)
Supports USB storage mediums
Memory cards
supported
SD/SDHC™ (Secure Digital Card), MMC™ ( Multi Media Card)
Headphone jack
3.5 mm jack
Picture size
supported
JPEG, max. resolution: 9000*9000 pixels
Video Formats
MPEG 1/4, MJPEG, AVI
Music Formats
MP3, WMA
Operating
temperature
0°C ~ +40°C
Dimensions
~415*278*30 mm
Weight
~1150 gr.
Accessory
Remote control (incl. battery), Foot, Power supply, multi-lingual operating
instruction
You need help?
Simply call our Technical Service Hotline at:
+49 (0) 900 1 50 40 30 for 0.39 €/Min. with calls from the German telephone network. Different rates may apply to
calls from mobile phones.
Enjoy Intenso’s digital photo frame!
Page 20
EN - 9
Service and Maintenance
Care
In order to prevent danger from electric current do neither remove screws nor the case of
the weather station.
Do not operate this device near water. Do not expose the device to rain and moisture. Do
not put any objects which store water or other fluids near the device.
Do not install the picture near heaters, ovens or other heat issuing devices.
Do not open the case. Do not try to repair the device yourself but have it repaired by
qualified personnel only.
Avoid using the device on sandy areas.
Fully insert the power supply plug into the opening of the Intenso weather station. This
will prevent electrostatic charge.
Correctly and safely connect all ports.
Do not push onto the display. Protect the display from direct sunlight.
The picture frame only plays compatible data formats.
Images may be protected by the rights of third persons. The play back without licence
may infringe copyrights.
When in operation, do not touch the Intenso weather station with metal objects.
Avoid operating the device on pillows, sofas or other objects which support the
development of heat as there is danger of overheating of the device.
Do not remove memory cards during read operation. This may cause system crash or
data loss.
Do not switch off the device during an ongoing slide show.
Do not wrap up the device directly after longer use. Ensure sufficient enough cooling.
Otherwise, there is danger of overheating.
In order to ensure a better service, changes of the operating instructions may be
necessary.
If you use earphones or headsets on full blast you could cause a durable damage to your hearing.
Maintenance of the device
The device must be switched off.
Never spray or apply a fluid directly onto the display or case.
Cleaning the displays / case / frame
Carefully wipe the case, frame and LCD display with a soft cloth free from
lint and chemicals. Only use cleaning agents which are specifically
designed for LCD displays.
Disposal of electrical waste
Devices marked with this symbol are subject to the EG Directive 2002/96/EG.
All electrical appliances and old appliances must be disposed off separately from
the household waste and are to be returned to the state authorities designed for
that purpose.
By correctly disposing of electrical old appliances environmental damage may be
prevented.
Page 21
Page 22
IT - 1
Istruzioni d‘uso per foto digitale di Intenso
La preghiamo di seguire queste istruzioni per essere informata/o riguardo alle diverse funzioni della
cornice di foto digitale Intenso.
Page 23
IT - 2
1) Tasti sul retro dell’apparecchio
1
POWER
Power On / Off
2
BGM
Inizia lo slide show delle diapositive con
musica d‘accompagnamento
3
MUTE
Silenziatore
4
MENU
Visualizzazione della schermata iniziale
5
Muovere il cursore verso l’alto
6
RETURN
Tornare al menù superiore
7
Muovere il cursore verso sinistra
8
Muovere il cursore verso destra
9
Muovere il cursore verso il basso
10
SETUP
Visualizzare le impostazioni
11
[ ]
Tasto Play/Pausa
12
OK
Confermare il punto del menù selezionato
13
ZOOM
Ingrandire l’immagine con lo slide show fermo
14
VOL -
Abbassare il volume
15
VOL +
Alzare il volume
16
ROTATE
Ruotare di 90° in senso orario
17
Titolo precedente
18
Titolo successivo
1 Power On / Off
2 Verso l’alto / immagine precedente
3 Tasto Vol + / muovi verso destra
4 Tasto Play / Pausa [ ]
5 Tasto Vol. - / muovi verso sinistra
6 Verso il basso / immagine successiva
7 Tasto menù / torna al menù precedente
2) Telecomando
Page 24
IT - 3
3) Collegare e accendere la Cornice per foto digitali
Secure Digital Card (SD™ )
Secure Digital High Capacity (SDHC™)
Multimedia Card (MMC™)
Memory Stick (MS)
XD - Card
Inserire la scheda di memoria nello slot del lettore con il
logo rivolto dalla parte opposta rispetto al display.
Attenzione: Non inserire la carta con violenza!
La chiave USB può essere inserita esclusivamente in
direzione dello slot USB.
Attenzione: Non inserire la chiave USB con forza!
Colleghi l‘adattatore incluso nel volume di consegna con la
cornice di foto digitale (DC-IN). Inserisca l’altra estremità
dell‘adattatore nella presa. La cornice di foto digitale ora
si avvia automaticamente. Tenga premuto brevemente il
tasto Power per spegnerla o riaccenderla.
Attenzione:
- La presa deve trovarsi nei pressi dell’apparecchio ed essere facilmente accessibile.
- Non apra l’involucro dell’adattatore. L’involucro aperto causa pericolo di vita mediante scossa elettrica. L’apparecchio non
contiene componenti che necessitano manutenzione.
- Metta in funzione l’adattatore solo con delle prese dotate di messa a terra AC 100-240V~, 50/60 Hz. Se avesse dei dubbi
riguardanti l’approvvigionamento elettrico nel luogo d’installazione, si rivolga al rispettivo fornitore di servizi elettrici.
- Utilizzi esclusivamente l’adattatore e il cavo di connessione KTEC KSASB0240900150HE inclusi nel volume di consegna.
- Per interrompere l’approvvigionamento del Suo apparecchio con corrente, estragga l’adattatore dalla presa. Durante
l’estrazione tenga sempre l’adattatore. Non tiri mai il condotto.
4) Inserire schede di memoria | Collegare dispositivi di archiviazione USB
L'IPA supporta i seguenti formati di schede di memoria:
Attenzione: La cornice per foto digitale è prevista esclusivamente per l’uso con schede di
memoria compatibili e supporti di dati USB 2.0 (da 100 mA).
Page 25

IT - 4
5) Utilizzo generale
Nota: questo dispositivo dispone di una funzione di risparmio energetico (Eco). Se tale
funzione è attivata (per attivarla o disattivarla aprire le impostazioni), il dispositivo si spegnerà
automaticamente 4 ore dopo l’ultima digitazione. In linea con le norme previste dalla legge,
questa funzione è già attivata come impostazione predefinita.
a) Menù principale
Dopo l’accensione apparirà il menù principale.
Nel menù principale è possibile scegliere tra le diverse funzioni della cornice digitale e del
punto del menù Impostazioni. Premere i tasti freccia del telecomando o i tasti freccia e i tasti
Vol-/Vol+ sull’apparecchio per selezionare un punto del menù. Confermare la propria selezione
con il tasto OK del telecomando o con il tasto Play/Pausa [ ] sull’apparecchio.
b) Selezione del dispositivo di archiviazione
Il tasto RETURN del telecomando o il tasto Menù sull’apparecchio vi porterà dal menù
principale alla selezione del dispositivo di memoria collegato. In questo menù è possibile
scegliere, se presenti, tra la scheda di memoria e il dispositivo di memoria USB. Confermare
la selezione con il tasto OK del telecomando o il tasto Play/Pausa . Si raggiungerà quindi di
nuovo automaticamente il menù principale.
c) Visualizzazione delle foto
Una volta impostato il dispositivo di archiviazione con le foto salvate, l’apparecchio avvierà
automaticamente uno slide show delle vostre foto. Se non è stato impostato alcun dispositivo
di archiviazione, l’apparecchio avvierà uno slide show delle immagini esempio preinstallate
(quest’ultime non possono essere modificate). Premere il tasto Menù per raggiungere il menù
principale.
È possibile avviare uno slide show anche manualmente. A questo scopo, navigare nel menù
principale fino alla funzione Foto. Confermare la selezione con il tasto OK del telecomando o il
tasto Play/Pausa sull’apparecchio. Lo slide show verrà quindi avviato. In alternativa è
possibile anche premere il tasto BGM del telecomando per avviare uno slide show direttamente
da ogni altra funzione.
Nelle impostazioni delle foto è possibile stabilire se durante uno slide show deve essere
suonata una musica di sottofondo (nel caso in cui sia presente sul dispositivo d’archiviazione).
Premere il tasto RETURN del telecomando o il tasto Menù sull’apparecchio per abbandonare lo
slide show e aprire il menù dell’anteprima delle immagini. Qui è possibile cercare una foto,
confermare la selezione con il tasto OK del telecomando o il tasto Play/Pausa sull’apparecchio
e proseguire lo slide show direttamente da quel punto. Premendo nuovamente il tasto
RETURN nel menù dell’anteprima delle immagini raggiungerete la rispettiva cartella
d’archiviazione superiore. In questo modo potrete semplicemente navigare attraverso le
varie cartelle del vostro dispositivo di archiviazione.
Page 26

IT - 5
Funzioni durante lo slide show:
- Premendo i tasti freccia del telecomando verso destra o verso sinistra o i tasti freccia
sull’apparecchio è possibile passare alla foto successiva o precedente.
- Premendo il tasto Play/Pausa del telecomando o sull’apparecchio fermerete lo slide
show. Premendo nuovamente il tasto, lo slide show riprenderà.
- Premere i tasti con le doppie frecce [,] del telecomando per selezionare il titolo
successivo o precedente della musica di sottofondo, nel caso in cui sia stata attivata.
- Il volume della musica di sottofondo può essere regolato con i tasti Vol-/Vol+ del
telecomando o sull’apparecchio.
d) Calendario
Navigare nel menù principale fino alla funzione Calendario e confermare la selezione con il
tasto OK del telecomando o il tasto Play/Pausa sull’apparecchio.
Nella modalità Calendario vengono visualizzati l’ora attuale, un’eventuale sveglia (se
impostata), l’attuale pagina di calendario e (se è stato inserito un dispositivo d’archiviazione
con formati di immagine supportati) uno slide show.
Con i tasti freccia del telecomando o i tasti verso l’alto/verso il basso e i tasti Vol-/Vol+
sull’apparecchio è possibile modificare il mese e l’anno per la pagina di calendario visualizzata.
e) Riproduzione di file musicali
Navigare nel menù principale fino alla funzione Musica e confermare la selezione con il tasto
OK del telecomando o il tasto Play/Pausa sull’apparecchio.
Verranno mostrati tutti i file musicali supportati (MP3 e WMA). Navigare quindi fino a un file
musicale e confermare la selezione con il tasto OK del telecomando o il tasto Play/Pausa
sull’apparecchio per avviare la riproduzione del file selezionato.
Funzioni durante la riproduzione di una canzone:
- Premendo il tasto Play/Pausa del telecomando o sull’apparecchio è possibile fermare la
riproduzione musicale e proseguire nuovamente.
- Il volume può essere regolato con i tasti Vol-/Vol+ del telecomando o sull’apparecchio.
- Per andare avanti e indietro premere i tasti freccia verso destra o verso sinistra sul
telecomando.
- Premere i tasti con le doppie frecce [,] del telecomando o i tasti freccia
sull’apparecchio per selezionare il titolo successivo o precedente.
f) Riproduzione di video
Navigare nel menù principale fino alla funzione Video e confermare la selezione con il tasto
OK del telecomando o il tasto Play/Pausa sull’apparecchio.
Verranno visualizzati quindi tutti i file video supportati (MPEG-1/4, M-JPEG e AVI). Navigare
fino a un file e confermare la selezione con il tasto OK del telecomando o il tasto Play/Pausa
[ ] sull’apparecchio per avviare la riproduzione del video.
Page 27

IT - 6
Funzioni durante la riproduzione di un video
- Premendo il tasto Play/Pausa del telecomando o sull’apparecchio, è possibile fermare la
riproduzione del video e proseguirla.
- Il volume può essere regolato con i tasti Vol-/Vol+ del telecomando o sull’apparecchio.
- Per andare avanti e indietro premere i tasti freccia verso destra o verso sinistra sul
telecomando.
- Premere i tasti con le doppie frecce [,] del telecomando o i tasti freccia
sull’apparecchio per selezionare il titolo successivo o precedente.
g) Sistema di gestione dei file
Navigare nel menù principale fino alla funzione File e confermare la selezione con il tasto OK
del telecomando o il tasto Play/Pausa sull’apparecchio.
Verranno quindi visualizzate tutte le cartelle e tutti i file del dispositivo di archiviazione
selezionato. Navigare con i tasti freccia del telecomando o sull’apparecchio fino alla
sottocartella desiderata e confermare la selezione con il tasto OK del telecomando o il tasto
Play/Pausa sull’apparecchio. Verranno ora visualizzati tutti i file e le cartelle all’interno della
cartella selezionata. Con il tasto RETURN del telecomando o il tasto Menù sull’apparecchio
tornerete al livello di file immediatamente successivo.
Per aprire un file direttamente dal sistema di gestione dei file, navigare fino al file desiderato e
confermare la selezione con il tasto OK o il tasto Play/Pausa. Il file verrà quindi riprodotto.
Per cancellare un file o una cartella intera dal dispositivo d’archiviazione selezionato,
navigare fino al file selezionato e premere quindi il tasto freccia destra del telecomando o il
tasto VOL+ sull’apparecchio. Verrà visualizzata quindi una finestra di dialogo nella quale
dovrete confermare la cancellazione, al fine di evitare una cancellazione involontaria.
Selezionare Sì e il file desiderato o la cartella desiderata verrà cancellata. Selezionare No
per passare nuovamente alla visualizzazione dei file.
h) Modificare le impostazioni
Navigare nel menù principale fino alla funzione Impostazioni e confermare la selezione con il
tasto OK del telecomando o il tasto Play/Pausa sull’apparecchio.
Quindi saranno a disposizione le seguenti opzioni d’impostazione: impostazioni foto,
impostazioni calendario, impostazioni video, impostazioni musica e impostazioni sistema.
Navigare fino al punto del menù desiderato e confermare la selezione con il tasto OK del
telecomando o il tasto Play/Pausa sull’apparecchio. Verranno visualizzate tutte le opzioni
d’impostazione. Con i tasti freccia verso l’alto/verso il basso del telecomando o i tasti
freccia sull’apparecchio è possibile navigare tra le singole opzioni d’impostazione. Con i tasti
freccia sinistra/destra del telecomando o i tasti Vol+/Vol- sull’apparecchio è possibile
adeguare le impostazioni.
Page 28

IT - 7
Opzioni
d’impostazione
Descrizione
Impostazioni
foto
Modalità visualizzazione
Selezionare tra slide show e anteprima immagine.
Musica
Accendere e spegnere la musica di sottofondo durante uno
slide show (se sono disponibili file musicali supportati sul
dispositivo d’archiviazione).
Modalità foto
Selezionare tra immagine originale e visualizzazione a
schermo intero.
Visualizza durata
Impostare la durata di visualizzazione delle singole immagini
durante uno slide show.
Visualizza slide show
Selezionare tra una visualizzazione unica di tutte le immagini e
un ciclo ripetuto.
Effetto di transizione
Selezionare tra un particolare effetto di transizione o una
scelta casuale degli effetti di transizione.
Modalità slide show
Selezionare tra una visualizzazione di una singola immagine o
due, tre o quattro immagini contemporaneamente.
Modalità di riproduzione
Selezionare tra la visualizzazione delle immagini in una
sequenza salvata sul supporto o una sequenza casuale.
Impostazioni
calendario
Data
Impostare la data attuale.
Impostazione del
formato dell’ora
Impostare del formato dell’ora: 12 (AM / PM) o 24 ore.
Ora
Impostare l’ora attuale.
Status sveglia
Attivare o disattivare la sveglia.
Ora sveglia
Impostare l’ora desiderata della sveglia.
Volume sveglia
Impostare il volume desiderato (basso, medio, alto).
Ripetizione sveglia
Impostare la ripetizione desiderata della sveglia (ogni giorno,
da lun. a ven., fine settimana, una volta).
Video
Modalità visualizzazione
Selezionare tra l’immagine originale e la visualizzazione a
schermo intero.
Riproduzione
Selezionare la modalità di ripetizione (una volta, ripetere tutto,
ripetere titolo).
Musica
Riproduzione
Una volta
Tutti i titoli vengono riprodotti 1 volta.
Ripetere titolo
Il titolo selezionato viene ripetuto
costantemente.
Ripetere tutto
Tutti i titoli vengono ripetuti
costantemente.
Casuale
Tutti i titoli vengono riprodotti in una
sequenza casuale.
Visualizzare lo spettro
Scegliere se lo spettro deve essere visualizzato o meno
durante la riproduzione musicale.
Sistema
Lingua
Selezionare la lingua desiderata.
Luminosità
Selezionare la luminosità desiderata del display.
Contrasto
Selezionare il contrasto desiderato del display.
Saturazione
Selezionare la saturazione del colore desiderata per il display.
Tono del colore
Modificare il tono del colore del display.
Page 29

IT - 8
Accensione automatica
Attivare/disattivare l’accensione automatica.
Ora accensione
Selezionare l’orario dell’accensione automatica.
Spegnimento automatico
Attivare/disattivare lo spegnimento automatico.
Ora spegnimento
Selezionare l’ora dello spegnimento automatico.
Ripetizione
Impostare la frequenza dell’accensione automatica. (Ogni
giorno, da lun. a ven., fine settimana, una volta).
Volume
Impostare il volume desiderato.
Impostazioni di fabbrica
Ripristinare le impostazioni di fabbrica.
Versione
Viene visualizzato il numero attuale della versione.
Aggiornamento
Se su www.intenso.de è a disposizione l’aggiornamento del
firmware, è possibile installarlo tramite questo punto del menù.
Modalità Autostart
Selezionare la funzione che deve essere avviata
all’accensione (foto, musica, video, calendario).
Visualizzazione
Schermo LCD TFT digitale
Dimensioni schermo: 15.6" (39.62 cm di diagonale immagine visibile)
Modo di visualizzazione: 16:9
Risoluzione: 1366*768 pixel
Adattatore
Input: 100~240V AC, 50/60Hz
Output: 9V 1.5A DC
Porta USB
Host USB 2.0 dispositivo
Supporta le chiavi di memoria USB
Schede di memoria
supportate
Secure Digital Card (SD™)
Secure Digital High Capacity (SDHC™)
Multimedia Card (MMC™)
Memory Stick (MS)
XD - Card
Presa cuffie
Jack da 3.5mm
Formato immagine
supportato
JPEG, risoluzione massima:9000*9000 pixel
Formato video
MPEG 1/4, MJPEG, AVI
Formati audio
MP3, WMA
Temperatura di
funzionamento
0°C ~ +40°C
Dimensioni
~415*278*30 mm
Peso
~1150 gr.
Accessori
Telecomando (incl. batteria), Piedino, adattatore, istruzioni d'uso in diverse
lingue
6) Specifiche del Prodotto
Non sa come procedere?
Il nostro numero verde di supporto tecnico risponde volentieri ad altre domande:
+49 (0) 900 1 50 40 30 al costo di 0,39 €/min. da rete fissa tedesca. I prezzi delle rete dei cellulari possono variare.
Buon divertimento con la Sua Cornice per foto digitali Intenso!
Page 30

IT - 9
Cura e Manutenzione
Cura
Per evitare il pericolo di scosse elettriche La preghiamo di non levare viti e/o involucro.
Non usi quest’apparecchiatura vicino all’acqua. Non esponga quest’apparecchiatura a pioggia e/o umidità.
Non depositi oggetti che conservano acqua o altri liquidi vicino a quest’apparecchiatura.
Non installi questa cornice di foto vicino a termosifoni, fori o altre apparecchiature che producono calore.
Non apra l’involucro. La preghiamo di non cercare di riparare l'apparecchiatura. Lasci questo lavoro al
personale specializzato.
Eviti l'uso in luoghi sabbiosi.
La preghiamo di inserire tutta la presa di collegamento dell’adattatore nell’apertura presente sulla CF. Solo
in questo modo Lei riesce ad evitare il caricamento elettrostatico.
La preghiamo di non esercitare pressione sullo schermo. Protegga lo schermo da forte insolazione.
La cornice delle immagini riproduce esclusivamente formati di file compatibili.
Le immagini possono essere protette da diritti di terzi. La riproduzione priva di licenza potrebbe violare i
diritti d’autore.
Durante il funzionamento La preghiamo di non toccare la CF con oggetti metallici.
La preghiamo di evitare l’uso di cuscini, divani o altri oggetti di arredamento che sostengono la formazione
di calore, visto che sussiste il rischio di surriscaldare l’apparecchiatura.
La preghiamo di non togliere le schede di memoria durante il procedimento di lettura. Altrimenti si possono
avere interruzioni di sistema o perdita di dati.
La preghiamo di non spegnere l’apparecchiatura durante un diashow in corso.
La preghiamo di non imballare direttamente l’apparecchiatura dopo un lungo periodo di non uso. Si assicuri
che si sia raffreddata a sufficienza. Altrimenti si ha il rischio che si surriscaldi.
Per garantire un servizio migliore, si possono avere modifiche delle istruzioni d‘uso.
Quando si utilizzano degli auricolari o delle cuffie ad un volume troppo elevato si possono verificare dei
danni duraturi all’udito.
Manutenzione dell‘apparecchiatura
L’apparecc hiatura deve essere spenta.
Non spruzzi o non applichi in nessun caso un liquido direttamente sullo schermo o sull´involucro.
Pulizia di schermo / involucro / cornice
Terga l’involucro, la cornice e lo schermo LCD con cautela, utilizzando una pezza morbida, senza pelucchi e
sostanze chimiche. Utilizzi esclusivamente detergenti appositamente destinati agli schermi LCD.
Smaltimento di apparecchiature elettroniche usate
Le apparecchiature caratterizzate con questo simbolo sottostanno alla direttiva CEE/2002/96.
Tutte le apparecchiature elettroniche ed elettriche usate devono essere smaltite separatamente dai rifiuti
domestici pressi i punti di smaltimento previsti dallo stato.
Smaltendo correttamente le apparecchiature elettroniche usate evita danni all’ambiente.
Page 31

Page 32

FR - 1
Instructions d’utilisation cadre photo
numériques Intenso
Veuillez suivre les instructions de cette notice pour obtenir toute l'information sur les différentes
fonctions du cadre photo numérique d’Intenso.
Page 33

FR - 2
1) Boutons à l'arrière de l'appareil
1
DEMARRAG
E
Marche/arrêt
2
BGM
Démarrage du diaporama avec musique
d'accompagnement
3
MUET
Silencieux
4
MENU
Visualisation de l'écran d'accueil
5
Déplacer le curseur vers le haut
6
RETOUR
Retour au menu supérieur
7
Déplacer le curseur vers la gauche
8
Déplacer le curseur vers la droite
9
Déplacer le curseur vers le bas
10
INSTALLATI
ON
Visualiser les paramètres de configuration
11
[ ]
Bouton Lecture/Pause
12
OK
Confirmer l'option de menu sélectionnée
13
ZOOM
Agrandir l'image avec le diaporama fermé
14
VOL -
Diminuer le volume
15
VOL +
Augmenter le volume
16
ROTATION
Effectuer une rotation de 90° dans le sens
horaire
17
Titre précédent
18
Titre suivant
1 Marche/arrêt
2 Haut/ image précédente
3 Bouton Vol +/Déplacement vers la droite
4 Bouton Lecture / Pause [ ]
5 Bouton Vol. -/Déplacement vers la gauche
6 Bas/ image suivante
7 Bouton menu / retour au menu précédent
2) Télécommande
Page 34

FR - 3
3) Connecter et mettre le cadre photo numérique en marche
Secure Digital Card (SD™ )
Secure Digital High Capacity (SDHC™)
Multimedia Card (MMC™)
Memory Stick (MS)
XD - Card
Insérer la carte mémoire dans la fente du lecteur avec le
logo face au côté opposé de l'écran.
Attention : Ne pas insérer la carte violemment !
Le module de mémoire USB ne peut être
mis qu’en un seul sens.
Attention : N’insérez pas le module de mémoire
avec trop de force !
Connectez l’adaptateur secteur fourni à l’écran photo (DC-
IN). Branchez l'autre extrémité de l’adaptateur dans la
prise. L’écran photo démarre alors automatiquement.
Maintenez la touche power brièvement enfoncée pour
désactiver ou réactiver l’appareil.
Attention:
- La prise doit se trouver à proximité de l'appareil et être facilement accessible.
- N'ouvrez pas le boîtier de l'adaptateur réseau. Si vous ouvrez le boîtier, il existe un danger de mort par décharge électrique. Il
ne contient aucune pièce à entretenir.
- Ne branchez l'adaptateur réseau que sur des prises de terre de AC 100-240V~, 50/60 Hz. Si vous n'êtes pas sûr(e) de
l'alimentation en courant sur le lieu de montage, veuillez vous renseigner auprès du fournisseur d'énergie compétent.
- N'utilisez que l'adaptateur réseau et les câbles de raccordement KTEC KSASB0240900150HE au réseau ci-inclus.
- Pour interrompre l’alimentation de votre appareil, nous vous prions de débrancher l’adaptateur de la prise. Lorsque vous
connectez l’adaptateur, tenez-le fermement, en ne tirant jamais le câble
4) Mettre la carte de mémoire | Connecter le module de mémoire USB
Les formats de carte de mémoire suivants sont supportés :
Attention: Le cadre photo numérique est conçu uniquement pour une utilisation avec des
cartes mémoire compatibles et un support d'enregistrement USB 2.0 (100mA).
Page 35

FR - 4
5) Fonctionnement général
Note: Cet appareil dispose d'une fonction Eco. Si elle est activée (veuillez ouvrir les paramètres
pour l’activer ou désactiver), l’appareil s'éteint automatiquement 4 heures après la dernière
entrée. Cette fonction est déjà activée par défaut à la livraison en raison d'exigences
légales.
a) Menu principal
Après le démarrage le menu principal s'affiche.
Dans le menu principal il est possible de choisir parmi les différentes fonctions du cadre
digitale et les options du menu de configuration. Appuyez sur les touches fléchées de la
télécommande ou les touches fléchées et les touches Vol-/Vol+ sur l'appareil pour sélectionner
une option du menu. Confirmer votre sélection avec la touche OK de la télécommande ou avec
la touche Lecture/Pause [ ] sur l'appareil.
b) Sélection du dispositif d'archivage
La touche RETOUR de la télécommande ou la touche Menu sur l'appareil vous dirigera vers le
menu principal à la sélection du dispositif de mémoire connecté. Dans ce menu il est
possible de choisir, s'il y en a un, entre carte mémoire et le dispositif de mémoire USB.
Confirmer votre sélection avec la touche OK de la télécommande ou avec la touche
Lecture/Pause. Vous serez redirigés à nouveau automatiquement vers le menu principal.
c) Visualisation des photos
Une fois que le dispositif de stockage avec les photos enregistrées est installé, l'appareil
affichera automatiquement un diaporama de vos photos. Si aucun dispositif de stockage n'a
été installé, l'appareil affichera le diaporama des images pré-mémorisées en exemple (ce
dernières ne peuvent pas être modifiées). Appuyez sur la touche Menu pour revenir au menu
principal.
Il est possible d'afficher un diaporama manuellement. À cet effet, naviguer dans le menu
principal jusqu'à la fonction Photo. Confirmer votre sélection avec la touche OK de la
télécommande ou avec la touche Lecture/Pause sur l'appareil. Le diaporama démarrera.
Alternativement il est possible d'appuyer sur la touche BGM de la télécommande pour lancer
un diaporama directement de n'importe quelle autre fonction.
Dans les paramètres de configuration des photos il est possible de définir si pendant un
diaporama il faut une musique de fond (au cas où il y en aurait une dans le dispositif
d'archivage).
Appuyez sur la touche RETOUR de la télécommande ou la touche Menu de l'appareil pour
quitter le diaporama et ouvrir le menu d'aperçu des images. Ici il est possible de chercher une
photo, confirmer la sélection avec la touche OK de la télécommande ou la touche
Lecture/Pause sur l'appareil et lancez le diaporama directement de ce point. En appuyant à
nouveau sur la touche RETOUR dans le menu d'aperçu des images vous rejoindrez le dossier
correspondant de stockage supérieur. De cette façon vous pourrez simplement naviguer à
travers les divers dossiers de vos dispositifs de stockage.
Page 36

FR - 5
Fonctions pendant le diaporama:
- En appuyant sur les touches fléchées de droite ou de gauche de la télécommande ou sur
les touches fléchées sur l'appareil vous passez à la photo suivante ou précédente.
- En appuyant sur la touche Lecture/Pause de la télécommande ou sur l'appareil vous
arrêterez le diaporama. En appuyant encore sur la touche, le diaporama reprendra.
- Appuyez sur les touches avec les doubles flèches [,] de la télécommande pour
sélectionner le titre suivant ou précédent de la musique de fond, au cas où elle a été
activée.
- Le volume de la musique de fond peut être réglé avec les touches Vol-/Vol+ de la
télécommande ou sur l'appareil.
d) Calendrier
Naviguez dans le menu principal jusqu'à la fonction Calendrier et confirmez la sélection avec
la touche OK de la télécommande ou la touche Lecture/Pause sur l'appareil.
En mode Calendrier l'heure actuelle s'affiche, une éventuelle alarme (si définie), la page
actuelle du calendrier et (s'il a été inséré, un dispositif de stockage avec les formats d'image
reconnus) un diaporama.
Avec les touches fléchées de la télécommande ou les touches haut/bas et les touches Vol-
/Vol+ sur l'appareil il est possible de modifier le mois et l'année pour la page de calendrier
visualisée.
e) Lecture de fichiers musicaux
Naviguez dans le menu principal jusqu'à la fonction Musique et confirmez la sélection avec la
touche OK de la télécommande ou la touche Lecture/Pause sur l'appareil.
Tous les fichiers musicaux reconnus s'afficheront (MP3 et WMA). Naviguez jusqu'à un
fichier musical et confirmez la sélection avec la touche OK de la télécommande ou la touche
Lecture/Pause sur l'appareil pour lancer la lecture du fichier sélectionné.
Fonctions pendant la lecture d'une chanson:
- En appuyant sur la touche Lecture/Pause de la télécommande ou sur l'appareil il est
possible d'arrêter la lecture musicale et de la reprendre.
- Le volume de la musique de fond peut être réglé avec les touches Vol-/Vol+ de la
télécommande ou sur l'appareil.
- Pour aller en avant et en arrière appuyez sur les touches fléchées droite ou gauche sur la
télécommande.
- Appuyez sur les touches à doubles flèches [,] de la télécommande ou les touches
fléchées de l'appareil pour sélectionner le titre suivant ou précédent.
f) Lecture de fichiers vidéo
Naviguez dans le menu principal jusqu'à la fonction Vidéo et confirmez la sélection avec la
touche OK de la télécommande ou la touche Lecture/Pause sur l'appareil.
Tous les fichiers vidéo pris en charges s'afficheront (MPEG-1/4, M-JPEG et AVI). Naviguez
jusqu'à un fichier et confirmez la sélection avec la touche OK de la télécommande ou la
touche Lecture/Pause [ ] sur l'appareil pour lancer la lecture du fichier vidéo.
Page 37

FR - 6
Fonctions pendant la lecture d'une vidéo
- En appuyant sur la touche Lecture/Pause de la télécommande ou sur l'appareil il est
possible d'arrêter la lecture vidéo et de la reprendre.
- Le volume de la musique de fond peut être réglé avec les touches Vol-/Vol+ de la
télécommande ou sur l'appareil.
- Pour aller en avant et en arrière appuyez sur les touches fléchées droite ou gauche sur la
télécommande.
- Appuyez sur les touches à doubles flèches [,] de la télécommande ou les touches
fléchées de l'appareil pour sélectionner le titre suivant ou précédent.
g) Système de gestion de fichiers
Naviguez dans le menu principal jusqu'à la fonction Fichier et confirmez la sélection avec la
touche OK de la télécommande ou la touche Lecture/Pause sur l'appareil.
Tous les dossiers et les fichiers du dispositif de stockage s'afficheront. Naviguez avec les
touches fléchées de la télécommande ou sur l'appareil jusqu'au sous-dossier désiré et
confirmer la sélection avec la touche OK de la télécommande ou la touche Lecture/Pause sur
l'appareil. Tous les fichiers et dossiers à l'intérieur du dossier sélectionné s'afficheront. Avec
la touche RETOUR de la télécommande ou la touche Menu sur l'appareil vous revenez au
niveau du fichier suivant immédiatement.
Pour ouvrir un fichier directement du système de gestion de fichiers, naviguez jusqu'au fichier
désiré et confirmer la sélection avec la touche OK ou la touche Lecture/Pause. La lecture du
fichier démarrera.
Pour supprimer un fichier ou un dossier du dispositif de stockage sélectionné, naviguez
jusqu'au fichier sélectionné et appuyez sur la touche fléchée droite de la télécommande ou la
touche VOL+ sur l'appareil. Une boîte de dialogue s'affichera dans laquelle vous devrez
confirmer la suppression, au fin d'éviter une suppression involontaire. Sélectionnez Oui et
le fichier désiré ou le dossier désiré sera supprimé. Sélectionnez Non pour revenir à
l'affichage des fichiers.
h) Modifier les paramètres de configurations
Naviguez dans le menu principal jusqu'à la fonction Paramètres et confirmez la sélection avec
la touche OK de la télécommande ou la touche Lecture/Pause sur l'appareil.
Dans les paramètres les options de configurations suivantes sont disponibles : réglage des
photos, réglage du calendrier, réglage vidéo, réglage de la musique et paramètres
systèmes. Naviguez jusqu'à l'option du menu désiré et confirmez la sélection avec la touche
OK de la télécommande ou la touche Lecture/Pause sur l'appareil. Toutes les options de
réglage s'afficheront. Avec les touches fléchées haut/bas de la télécommande ou les touches
fléchées sur l'appareil il est possible de naviguer entre les options de réglage. Avec les
touches fléchées gauche/droite de la télécommande ou les touches Vol+/Vol- sur l'appareil il
est possible de régler les paramètres.
Page 38

FR - 7
Options de régalage
Description
Réglage des
photos
Mode d'affichage
Sélectionner entre diaporama ou aperçu.
Musique
Allumer et arrêter la musique de fond pendant un diaporama
(si des fichiers musicaux pris en charge sont disponibles sur le
dispositif de stockage).
Mode photo
Sélectionner entre image originale et l'affichage plein écran.
Durée d'affichage
Définir la durée d'affichage des images pendant un diaporama.
Affichage en diaporama
Sélectionner entre un affichage unique de toutes les images et
un cycle répété.
Effet de transition
Sélectionner entre un effet particulier de transition ou un choix
aléatoire d'effets de transition.
Mode de diaporama
Sélectionner entre un affichage d'une seule image ou de deux,
trois ou quatre images en même temps.
Mode de lecture
Sélectionner entre la lecture d'images dans une séquence
enregistrée sur le support ou une séquence aléatoire.
Réglage du
calendrier
Date
Régler la date actuelle.
Régler le format de
l'heure
Régler le format de l'heure : 12 (AM/PM) ou 24 heures.
Heure
Régler l'heure actuelle.
Réglage de l'alarme
Activer ou désactiver l'alarme.
Heure de l'alarme
Régler l'heure désirée pour l'alarme.
Volume de l'alarme
Régler le volume désiré (faible, moyen, fort).
Répétition de l'alarme
Régler la répétition désirée de l'alarme (chaque jour, de lundi à
vendredi, fin semaine, une fois).
Vidéo
Mode d'affichage
Sélectionner entre image originale et l'affichage plein écran.
Lecture
Sélectionner le mode de répétition (une fois, répéter tout,
répéter un titre).
Musique
Lecture
Une fois
Tous les titres sont lus 1 fois.
Répéter le titre
Les titres sélectionnés sont répétés en
boucle sans fin.
Répéter tout
Tous les titres sont répétés en boucle
sans fin.
Aléatoire
Tous les titres sont lus dans une
séquence aléatoire.
Afficher le spectre
Sélectionner si le spectre doit être affiché ou non pendant la
lecture de la musicale.
Système
Langue
Sélectionner la langue désirée.
Luminosité
Sélectionner la luminosité désirée de l'écran.
Contraste
Sélectionner le contraste désiré de l'écran.
Saturation
Sélectionner la saturation de couleur désirée pour l'écran.
Tonalité de la couleur
Modifier la tonalité de la couleur de l'écran.
Démarrage automatique
Activer/désactiver le démarrage automatique.
Heure de démarrage
Sélectionner l'heure de démarrage automatique.
Arrêt automatique
Activer/désactiver l'arrêt automatique.
Page 39

FR - 8
Heure de l'arrêt
Sélectionner l'heure de l'arrêt automatique.
Répétition
Régler la fréquence de démarrage automatique. (Chaque jour,
de lundi à vendredi, fin semaine, une fois).
Volume
Régler le volume désiré.
Paramètres par défaut
Rétablir les paramètres par défaut
Version
Afficher le numéro de la version actuelle.
Mise à jour
Si sur www.intenso.de une mise à jour du logiciel est
disponible, il est possible de l'installer avec cette option du
menu.
Mode Autostart
Sélectionner la fonction qui doit être activée au démarrage
(photo, musique, vidéo, calendrier).
Affichage
Ecran TFT LCD digital
Ecran de 15.6 pouces (39.62 cm diagonale visible de l’écran)
Affichage : 16:9
Résolution : 1366*768 pixels
Bloc d’ alimentation
Input: 100~240V AC, 50/60Hz
Output: 9V 1.5A DC
Slot USB
USB Host 2.0
Supporte modules de mémoire USB
Cartes de mémoire
supportées
Secure Digital Card (SD™)
Secure Digital High Capacity (SDHC™)
Multimedia Card (MMC™)
Memory Stick (MS)
XD - Card
Prise de casques
Prise jack de 3,5mm
Format d’images
supporté
JPEG, résolution maximale : 9000*9000 pixels
Format vidéo
MPEG 1/4, MJPEG, AVI
Formats audio
MP3, WMA
Température de
fonctionnement
0°C ~ +40°C
Dimensions
~415*278*30 mm
Poids
~1150 gr.
Accessoires
Télécommande (pile comprise), Support, adapteur secteur, m an uel d’ut il isatio n
multilingue
6) Specifications du Produit
Vous avez des questions ?
Notre hot-line de service vous les répond :
+49 (0) 90 01 50 40 30 pour 0,39 €/min. du fixe allemand. Les prix de la téléphonie mobile peuvent en différer.
Nous espérons que l’Intenso cadre photo numérique vous fait plaisir!
Page 40

FR - 9
Soin et Entretien
Soin
Pour éviter des décharges électriques n’enlevez ni les vis n i le boîtier.
N’utilisez pas c et appareil à p roximité de l’eau. N’exposez pas l’appareil à la pl uie ou à
l’humidité . Ne po sez pas des objets contena nt de l’eau ou d’ autres liquides à côté de l’appareil.
N’installez pas ce cadre photo numérique à proximité de chauffages, de poêles ou d’autres
appareils émettant de la chaleur.
N’ouv rez pas le boîtier. N’essayez pas de réparer l’appare il. Il doit être réparé par des
spécialistes.
N’utilisez pas l’appareil à des endroits sablonneux.
Mettez le connecteur adapteur du bloc d’ alimentation complètement dans l’o rific e du CPN.
Ainsi, vous évitez des chargements électrostatiques.
Connecter tous les raccordements correctement et sûrement.
N’appuyez pas s ur l’écran. Protégez l’écran d’une pénétration du soleil trop forte.
Le cadre photo numérique ne peut lire que des formats compatibles.
Des images peuvent être soumises au copyright. L’affichage sans licence peut désobéir aux
droits copyright.
Ne touchez pas le CPN avec des objets métalliques pendant le fonctionnement.
Evitez l’utilisation sur des coussins, des canapés d’autres objets qui soutiennent une
the rm ogénie, car l’appareil risque d’être s urchauffé.
N’enlevez pas de cartes de mémoire pendant la lecture. Sinon, il peut y avoir des bocages de
système ou des pertes de données.
Ne mettez pas l’appareil hors marche pend ant un diaporama.
N’emballez pas l’appareil directement après u ne utilisation de longue durée. Assurez un
ref roidissment suffissant. Sinon, l’ appareil ris que d’être surchauf fé.
Pour garantir un meill eur service, il p eut y avoir des chang ements dans le mode d’em pl oi.
Lors de l´utilisation d’écouteurs ou de casque avec volume trop fort, l’ouïe peut être durablement
endommagée.
Entretien de l’ap pa reil
L’appareil doit être mis hors marche.
Ne mettez pas de liquide directement sur l´écran ou sur le boitier.
Netto yag e de l’éc ra n du boîtier et du cadre
Nettoyez le boîti er, le c adre et l’éc ran LC D prudemm ent av ec un chiffon te ndre, sans peluches et
sans produits chimiques. N’utilisez que des dé terg ents q ui s ont de stinés à l ’écr an LCD.
Mise en rebut de vieux appareils électro
Les appareils marqués avec ce symbole sont soumis à la directive européenne 2002/96/EC.
Tous les vieux appareils électro doivent être mis en rebut séparément du déchet domestique dans les
poubelles prévues par l’État.
Avec la mise en rebut correcte de vieux appareils électro, vous évitez la pollution de l’environnment.
Page 41

Page 42

ES - 1
Manual de instrucciones del marco digital de
fotos Intenso
Por favor obedecer las siguientes instrucciones para informarse sobre las distintas funciones del
marco digital Intenso.
Page 43

ES - 2
1) Distribución de botones del dorso del aparato
1
POWER
Power On/Off
2
BGM
Iniciar presentación con música de
acompañamiento
3
MUTE
Poner en silencio
4
MENU
Pantalla de inicio
5
Mueva el cursor hacia delante
6
RETURN
Volver al menú anterior
7
Mueva el cursor hacia la izquierda
8
Mueva el cursor hacia la derecha
9
Mueva el cursor hacia detrás
10
SETUP
Pantalla de configuración
11
[ ]
Botón Play/Pause
12
OK
Confirmar los elementos del menú
seleccionados
13
ZOOM
Ampliar el tamaño de la imagen congelada
14
VOL -
Bajar el volumen
15
VOL +
Subir el volumen
16
ROTATE
Giro de 90°en el sentido de las agujas del
reloj
17
Archivo anterior
18
Siguiente archivo
1 Power On/Off
2 Imagen posterior/ anterior
3 Botón Vol + /mover hacia la derecha
4 Botón Play/Pause [ ]
5 Botón Vol –/ mover hacia la izquierda
6 Imagen anterior/imagen siguiente
7 Botón Menú/volver al menú anterior
2) Mando a distancia
Page 44

ES - 3
3) Conectar y encender el marco digital
Secure Digital Card (SD™ )
Secure Digital High Capacity (SDHC™)
Multimedia Card (MMC™)
Memory Stick (MS)
XD - Card
Inserte la tarjeta de memoria con el logo del display
hacia arriba en la ranura del lector de tarjetas.
Aviso: ¡no fuerce la insercción de la tarjeta!
La memoria USB solo puede introducirse en
la ranura en una dirección.
Atención: ¡No introduzca la memoria USB por la fuerza!
Conecte la fuente de alimentación suministrada al marco
digital (DC-IN). Enchufe el extremo opuesto de la fuente de
alimentación a la toma de corriente. El marco digital se
inicia de forma automática. Mantenga pulsada brevemente
la tecla Power, para apagarlo o volver a encenderlo.
Atención:
- El enchufe debe encontrarse cerca el aparto y ser fácilmente accesible.
- No abra la carcasa del adaptador. Si se abre la carcasa del adaptador se corre peligro de muerte por descarga eléctrica. No
contiene piezas que requieran mantenimiento.
- Use el adaptador sólo con un enchufe con descarga a tierra de AC 100-240V~, 50/60 Hz. Si no está seguro del suministro
eléctrico en el lugar de la instalación, consulte al suministrador de energía correspondiente.
- Use sólo el cable del adaptador de corriente y el cable de alimentación KTEC KSASB0240900150HE suministrados.
- Para interrumpir la alimentación de su aparato, desenchufe el adaptador del macho de enchufe. Aferre bien el adaptador
mientras lo desenchufa. No araste el cable.
4) Introducir tarjetas de memoria | Conectar memorias USB
El marco digital soporta los siguientes formatos de tarjetas:
Atención: El marco de foto digital sólo puede usarse con tarjetas de memoria compatibles
y soportes de memoria USB 2.0 (100mA).
Page 45

ES - 4
5) Instrucciones generales
Nota: este aparato dispone de Función Eco. Si esta función está activada (abra la
configuración para activarla o desactivarla), el aparato se apaga automáticamente 4 horas
después de haber hecho la última entrada. Debido a las disposiciones legales esta función ya
está activada en el estado de entrega.
a) Menú principal
Después del encendido aparece el menú principal.
En el menú principal puede elegir entre diferentes funciones del marco de fotos digital y la
configuración de los elementos del menú. Presione los botones de flecha del mando a
distancia o los botones de flecha y los botones Vol-/Vol+ en el dispositivo para seleccionar un
elemento del menú. Confirme su elección con el botón OK del mando a distancia o el botón
Play/Pausa [ ] en el dispositivo.
b) Selección del soporte de datos
El botón RETURN en el mando a distancia o el botón Menú en el dispositivo le lleva desde el
menú principal a seleccionar los soporte de datos asociados. En este menú puede elegir,
de estar disponible, entre la tarjeta de memoria y el dispositivo de almacenamiento USB.
Confirme su elección con el botón OK del mando a distancia o con el botón Play/Pause en el
dispositivo. A continuación, volverá automáticamente al menú principal.
c) Mostrar Fotos
Si ya ha insertado un soporte de datos con las fotos almacenadas, el dispositivo inicia una
presentación de las fotos automáticamente. Si no hay ningún soporte de datos insertado, el
dispositivo inicia con una presentación de imágenes de muestra predeterminadas (no puede
cambiarse). Pulse el botón Menú para acceder al menú principal.
También puede iniciar una presentación de forma manual. Vaya al menú principal de la
función Fotografía. Confirme su elección con el botón OK del mando a distancia o el botón
Play/Pause en el dispositivo. La presentación se iniciará. Alternativamente, también puede
pulsar el botón BGM del mando a distancia para iniciar una presentación directamente desde
cualquier otra función.
En la configuración de fotografías puede establecer, si durante una presentación puede
escucharse música de fondo (si está disponible en el mismo soporte de datos).
Pulse el botón RETURN en el mando a distancia o el botón Menú en el dispositivo para salir de
la presentación y mostrar el menú de imágenes predeterminadas. Ahora puede ir a una foto,
confirme su elección presionando el botón OK del mando a distancia o con el botón
Play/Pause en el dispositivo y siga con la presentación directamente desde este sitio. Al pulsar
de nuevo el botón RETURN en el menú de imágenes predeterminadas irá a las respectivas
carpeta de datos anteriores. Así podrá navegar fácilmente a través de las diferentes
carpetas del soporte de datos.
Page 46

ES - 5
Funciones durante la presentación:
- Al pulsar los botones de flecha en el mando a distancia hacia la derecha o la izquierda o
los botones de flecha en el dispositivo, puede saltar a la foto anterior o posterior.
- Al pulsar el botón Play/Pause en el mando a distancias o en el dispositivo la presentación
se detiene. Al pulsarlo de nuevo la presentación se reanuda.
- Pulse los botones de doble flecha [,] en el mando a distancia para seleccionar la
canción siguiente o anterior de la música de fondo, si la ha activado.
- Puede establecer el volumen de la música de fondo con los botones Vol-/Vol+ en el
mando a distancia o en el dispositivo.
d) Calendario
Navegue por el menú principal hata la función Calendario y confirme su elección con el botón
OK del mando a distancia o con el botón Play/Pause en el dispositivo.
En el modo calendario aparece la hora actual, dado el caso una alarma ajustable, la hoja del
calendario actual, así como (en soportes de datos insertados con archivos de fotos
compatibles) una presentación.
Puede cambiar el mes y el año de la hoja del calendario mostradas con los botones de flecha
del mando a distancia o con los botones delante/ atrás y los botones Vol-/Vol+ en el
dispositivo.
e) Reproducción de archivos de música
Vaya del menú principal a la función Música y confirme su elección con el botón OK del
mando a distancia o con el botón Play/Pause en el dispositivo.
Ahora se muestran todos los archivos de música en el soporte (MP3 y WMA). Vaya a un
archivo de música y confirme su elección con el botón OK del mando a distancia o con el
botón Play/Pause en el dispositivo para reproducir el archivo seleccionado.
Funciones durante la reproducción de una canción:
- Al pulsar el botón Play/Pause del mando a distancia o del dispositivo puede detener y
reanudar la reproducción de música.
- Puede ajustar el volumen con los botones Vol-/Vol+ del mando a distancia o del
dispositivo.
- Para rebobinar o ir hacia detrás pulse los botones de flecha hacia la derecha o la
izquierda en el mando a distancia.
- Pulse los botones de doble flecha [,] en el mando a distancia o los botones de flecha
en el dispositivo para seleccionar la pista anterior o posterior.
f) Reproducción de archivos de vídeo
Vaya del menú principal a la función Vídeo y confirme su elección con el botón OK del
mando a distancia o con el botón Play/Pause en el dispositivo.
Ahora se muestran todos los archivos de vídeo en el soporte (MPEG-1/4, M-JPEG y AVI).
Vaya a un archivo y confirme su elección con el botón OK del mando a distancia o con el
botón Play/Pause [ ] en el dispositivo para reproducir el archivo de vídeo seleccionado.
Page 47

ES - 6
Funciones durante la reproducción de un vídeo
- Al pulsar el botón Play/Pause del mando a distancia o del dispositivo puede detener y
reanudar la reproducción de vídeo.
- Puede ajustar el volumen con los botones Vol-/Vol+ del mando a distancia o del
dispositivo.
- Para rebobinar o ir hacia detrás pulse los botones de flecha hacia la derecha o la
izquierda en el mando a distancia.
- Pulse los botones de doble flecha [,] en el mando a distancia o los botones de
flecha en el dispositivo para seleccionar la pista anterior o la siguiente.
g) Sistema de ficheros.
En el menú principal diríjase a la función Archivos y confirme su elección con el botón OK del
mando a distancia o con el botón Play/Pause en el dispositivo.
Ahora se muestran todas las carpetas y los archivos del soporte de datos. Navegue con los
botones de flecha del mando a distancia o del dispositivo hasta el subdirectorio deseado y
confirme la elección con el botón OK del mando a distancia o con el botón Play/Pause en el
dispositivo. Ahora se muestran todos los datos y carpetas dentro del directorio seleccionado.
Con el botón RETURN del mando a distancia o el botón Menú en el dispositivo llega al
directorio superior siguiente.
Para abrir un archivo directamente desde el sistema de ficheros, vaya hasta el archivo
deseado y confirme su elección con el botón OK del mando a distancia o con el botón
Play/Pause en el dispositivo. Ahora se reproducirá el archivo.
Para eliminar un archivo o una carpeta entera del soporte de datos seleccionado vaya al
archivo deseado y pulse el botón de flecha de la derecha en el mando a distancia o el botón
VOL+ en el dispositivo. Ahora verá un cuadro de diálogo en el que, para evitar una
eliminación accidental, debe confirmar la eliminación. Seleccione Sí y el archivo deseado
o la carpeta deseada se eliminará. Seleccione No para volver al explorador de archivos.
h) Cambiar la configuración
En el menú principal diríjase a la función Configuración y confirme su elección con el botón
OK del mando a distancia o el botón Play/Pause en el dispositivo.
Están disponibles las siguientes opciones de configuración: configuración de fotografías,
configuración de calendario, configuración de vídeo, configuración música y
configuración de sistema. Vaya hasta el elemento del menú deseado y confirme su
elección con el botón OK del mando a distancia o con el botón Play/Pause en el dispositivo.
Ahora se muestran todas las opciones de configuración. Con los botones de flecha Hacia
delante/Hacia atrás del mando a distancia o los botones de flecha en el dispositivo puede
navegar a través de las distintas opciones de configuración. Con los botones de flechas
Izquierda /Derecha del mando a distancias o con los botones Vol+/Vol- del dispositivo puede
ajustar la configuración.
Page 48

ES - 7
Opciones de
configuación
Descripción
Configuración
de las foto
Modo de pantalla
Puede elegir entre diapositiva o miniatura.
Música
Apagado y encendido de la música de fondo durante una
presentación (si existe compatibilidad con archivos de música
del soporte de datos).
Modo foto
Elija entre pantalla original y pantalla completa.
Duración de la
visualización
Configure la duración de la visualización de cada imagen
durante la presentación.
Mostrar presentación
Elija entre mostrar las imágenes una vez o un bucle sin fin.
Efecto de transición
Elija un efecto de transición específico o una selección
aleatoria de efectos de transición.
Mode de presentación
Elija entre mostrar una sola imagen, dos, tres, o cuatro
imágenes al mismo tiempo.
Modo de reproducción
Elija entre mostrar las imágenes en el orden del dispositivo de
almacenamiento o en orden aleatorio.
Calendario
Configuración
Fecha
Configuración de la fecha actual.
Configuración del
formato de la hora
Configuración del formato de la hora: 12 horas (AM/PM) o 24
horas.
Hora
Configuración de la hora actual.
Alarma
Apague/ajuste la alarma.
Hora de la alarma
Ajuste la hora de la alarma deseada.
Volumen de la alarma
Ajuste el volumen deseado (bajo, medio y alto).
Repetición de la alarma
Ajuste la repetición de la alarma deseada (todos los días, de
lunes a viernes, fines de semana, una vez).
Vídeo
Modo de pantalla
Elija entre pantalla original y pantalla completa.
Reproducción
Ajuste el modo de reproducción(una vez, repetir todo, repetir
archivo).
Música
Reproducción
Una vez
Todas las canciones se reproducirá 1
vez.
Repetir canción
La canción seleccionada se repite en
un bucle sin fin.
Repetir todo
Todas las canciones se repiten en un
bucle sin fin.
Aleatorio
Todas las canciones se reproducen en
orden aleatorio.
Mostrar espectro
Seleccione si el espectro debe estar visible o debe ocultarse
durante la reproducción de música.
Sistema
Idioma
Seleccione el idioma deseado.
Brillo
Seleccione el brillo deseado de la pantalla.
Contraste
Seleccione el contraste deseado de la pantalla.
Satinación
Seleccione la satinación de color deseada de la pantalla.
Tonalidad
Cambie la tonalidad de la pantalla.
Encendido automático
Active/desactive el encendido automático.
Page 49

ES - 8
Hora de encendido
Seleccione la hora del encendido automático.
Apagado automático
Active/desactive el apagado automático.
Hora de apagado
Seleccione la hora del apagado automático.
Repetición
Ajuste la frecuencia del encendido automático. (Todos los
días, de lunes a viernes, fines de semana, una vez).
Volumen
Ajuste el volumen deseado.
Ajustes de fábrica
Vuelva a configurar los ajustes de fábrica.
Versión
Se muestra el número de versión actual.
Actualizaciones
En caso de que estuviera disponible una actualización de
firmware en www.intenso.de, puede instalarla mediante estos
elementos del menú.
Modo de arranque
automático
Seleccione la función que se ejecutará al encender el
dispositivo (fotos, música, vídeo, calendario).
Visualización
LCD TFT digital
Tamaño display: 15.6” pulgadas (39.62cm Diagonal de pantalla visible)
Modo de visualización: 16:9
Resolución: 1366*768 Pixel
Fuente de
alimentación
Input: 100~240V AC, 50/60Hz
Output: 9V 1.5A DC
Puerto USB
USB Host 2.0
Soporta memorias USB
Tarjetas de memoria
aceptadas
SD/SDHC™ (Secure Digital Card), MMC™ ( MultiMedia Card)
Entrada de
auticulares
Entrada de 3.5
Formato de imagen
aceptado
JPEG, resolución máxima:9000*9000 pixels
Formato de Video
MPEG 1/4, MJPEG, AVI
Formatos de audio
MP3, WMA
Temperatura de
funcionamiento
0°C ~ +40°C
Medidas
~415*278*30 mm
Peso
~1150 gr.
Accesorios
Mando a distancia (incl. pilas), soporte, fuente de alimentación, manual de
instrucciones en varios idiomas
6) Especificaciones sobre el Producto
¿Tiene alguna duda?
Nuestra línea hotline de servicio técnico le responderá con mucho gusto:
+49 (0) 900 1 50 40 30 a 0,39 €/min. desde la red telefónica fija de Alemania. Los precios para la telefonía móvil
pueden diferir.
¡Le deseamos que disfrute de su marco digital Intenso!
Page 50

ES - 9
Cuidado y Mantenimiento
Cuidado
Para evitar el riesgo de descarga eléctrica no retire ni los tornillos ni la carcasa.
No utilice este aparato cerca del agua. No ponga en contacto al aparato ni con lluvia ni con
humedad. No coloque cerca del aparato ningún objeto que almacene a gua o cualquier otro tipo
de líquido.
No instale este marco de fotos cerca de calefacciones, hornos o cualquier otro aparato que
desprenda calor.
No abra la carcasa. No intente reparar el aparato usted mismo. Déjelo en manos de personal
cualificado.
Evite su uso en lugares arenosos.
Introduzca completamente el enchufe de conexión de la fuente de alimentación en la abertura
del MD prevista. Solo de esta forma se puede evitar la carga electroestática.
Conecte de manera correcta y segura todas las conexiones.
No presione el display. Proteja al display de la radiación solar directa.
El marco de fotos reproduce solo formatos de archivo compatibles.
Las imágenes pueden estar protegidas por derecho a terceros. La reproducción sin licencia
puede violar los derechos de copyright.
No ponga en contacto el MD con objetos metálicos mientras se encuentra operativo.
Evite su uso sobre cojines, sofás u otros objetos de salón que favorezcan el desarrollo de calor,
puesto que existe riesgo de sobrecalentamiento.
No retire la tarjeta de memoria mientras se está produciendo su lectura. De otro modo podría
producirse la caída del sistema o la pérdida de datos.
No apague el aparato mientras se está llevando a cabo la presentación.
No empaquete el aparato justo después de un uso prolongado. Asegúrese de que se enfríe lo
suficiente. En caso contrario existe el riesgo de sobrecalentamiento.
Para garantizar un mejor servicio pueden producirse cambios en el manual de instrucciones.
El uso de auriculares a un volumen demasiado alto puede causar daños irreparables en el oído.
Mantenimiento del aparato
El aparato debe estar desconectado.
Nunca rocie ni ponga en contacto directo con liquidos el display o la carcasa.
Limpieza del display / carcasa / marco
Limpie cuidadosamente la carcasa, el marco y el display LCD con un paño suave, sin pelusas ni
químicos. Emplee solo productos de limpieza especialmente apropiados para displays LCD.
Eliminación de aparatos eléctricos
Los aparatos marcados con este símbolo están sujetos a la directiva europea 2002/96/EC.
Todos los aparatos y viejos aparatos eléctricos deben ser eliminados separadamente de la basura
doméstica, en los lugares previstos para ello.
Eliminando los viejos aparatos eléctricos reglamentariamente estará evitando daños al medio ambiente.
Page 51

Page 52

PT - 1
Manual de instruções Intenso
Moldura digital
Por favor siga as instruções deste manual para informações sobre as várias funções da moldura
digital Intenso.
Page 53

PT - 2
1) Atribuição das teclas da parte de trás do aparelho
1
ENERGIA
Ligar / Desligar Energia
2
IMF
Iniciar apresentação de diapositivos com
música de fundo
3
SEM SOM
Função sem som
4
MENU
Visualização do ecrã inicial
5
Movimenta o cursor para cima
6
VOLTAR
Voltar para o menu anterior
7
Movimenta o cursor para a esquerda
8
Movimenta o cursor para a direita
9
Movimenta o cursor para cima
10
Configuração
Visualização das definições
11
[ ]
Tecla Reproduzir/Tecla Pausa
12
OK
Confirmar o ponto do menu selecionado
13
ZOOM
Ao parar a apresentação de diapositivos
aumentar a imagem
14
VOL -
Reduzir o volume
15
VOL +
Aumentar o volume
16
RODAR
Virar 90° para a direita
17
Faixa anterior
18
Próxima faixa
1 Ligar / Desligar Energia
2 Para cima/ Imagem anterior
3 Tecla Vol + / deslocar para a direita
4 Tecla Reproduzir / Pausa [ ]
5 Tecla Vol + / deslocar para a esquerda
6 Para baixo / Próxima imagem
7 Tecla menu / Voltar para o menu
2) Controle remoto
Page 54

PT - 3
3) Conectar e Ligar a Moldura de Fotos Digitais
Secur e Digital Card (S D™)
Secur e Digital High Ca pacit y (SDHC™)
Mul ti media Card (MMC™)
Memory Stick (MS)
XD - Card
Coloque os cartões de memória com o Logotipo
afastado do ecrã na ranhura do leitor de cartões.
Atenção: Não introduza o cartão com violência!
A mídia de armazenamento só pode ser inserida em uma
única direção no compartimento.
Atenção: Não utilizar força na inserção da mídia de
armazenamento USB!
Conecte o transformador anexado com a moldura digital
(DC-IN). Coloque a outra extremidade do transformador
na tomada. A moldura digital inicia automaticamente.
Mantenha a tecla Power pressionada por um curto espaço
de tempo para a desligar ou voltar a ligar.
Atenção:
- A tomada deve estar acessível e situada perto do aparelho.
- Não abra a cobertura do adaptador de rede. Uma cobertura aberta pode provocar perigo de morte por choque eléctrico.
- Utilize o adaptador de rede apenas em tomadas ligadas à terra com AC 100-240V~, 50/60 Hz. Caso não esteja seguro/a da
fonte de energia no local de instalação, contacte o respectivo fornecedor de energia.
- Use apenas o adaptador de rede e o cabo de ligação à rede KTEC KSASB0240900150HE fornecidos.
- Para interromper a alimentação eléctrica para o seu aparelho, retire o transformador da tomada. Ao retirar o transformador
segure-o sempre. Nunca puxe no cabo.
4) Inserção de cartões de memória | Conexão de mídias de armazenamento USB
A moldura digital suporta os seguintes cartões de memória – formatos:
Atenção: A moldura digital está destinada apenas para o uso com cartões de memória e
dispositivos de armazenamento USB 2.0 (100mA) compatíveis.
Page 55

PT - 4
5) Utilização geral
Aviso: Este aparelho dispõe de uma função Eco. Estando essa função ativada (para ativar ou
desativar abrir as definições), o aparelho desliga-se automaticamente 4 horas após a última
entrada. Devido a disposições legais esta função já se encontra ativada no estado da
entrega.
a) Menu principal
Depois de ligar aparece o Menu principal.
No Menu principal tem a opção entre as diversas funções da moldura digital e das
Definições do ponto do menu. Pressione as teclas de setas no comando ou as teclas de
setas e as teclas Vol-/Vol+ no aparelho para selecionar um ponto do menu. Confirme a sua
seleção com a tecla OK no comando ou com a tecla Reproduzir/Pausa [ ] no aparelho.
b) Seleção do meio de memória
Com a tecla VOLTAR no comando ou a tecla menu no aparelho sai do menu principal para a
seleção dosmeios de memória conectados. Neste menu pode, caso disponível, selecionar
entre cartão de memória e o meio de memória USB. Confirme a sua seleção com a tecla OK
no comando ou com a tecla Reproduzir/Pausa no aparelho. Vai automaticamente de novo
para o menu principal.
c) Visualizar as fotografias
Se já colocou um meio de memória com fotografias gravadas, o aparelho inicia assim
automaticamente com a apresentação de diapositivos das suas fotografias. Se não houver
um meio de memória introduzido, o aparelho inicia com uma apresentação de diapositivos
de imagens exemplo pré-instaladas (estas não podem ser alteradas). Pressione a tecla menu
para ir para o menu principal.
Também pode iniciar a apresentação de diapositivos manualmente. Para tal, navegue no
menu principal para a função foto. Confirme a sua seleção com a tecla OK no comando ou
com a tecla Reproduzir/Pausa no aparelho. A apresentação de diapositivos é iniciada. Em
alternativa, também pode pressionar a tecla IMF no comando para iniciar uma apresentação
de diapositivos diretamente a partir de outra função.
Nas definições de fotografias pode determinar, se é para reproduzir música de fundo
durante uma apresentação de diapositivos (caso esteja disponível no mesmo meio de memória).
Pressione a tecla VOLTAR no comando ou a tecla menu no aparelho para sair da
apresentação de diapositivos e ir para o menu de pré-visualização de imagens. Agora pode
navegar para uma fotografia, confirmar a sua seleção coma a tecla OK no comando ou com a
tecla Reproduzir/Pausa no aparelho e continuar a apresentação de diapositivos diretamente
a partir deste ponto. Pressionando novamente a tecla VOLTAR no menu pré-visualização de
imagens, vai para as pastas dos ficheiros anteriores. Deste modo, pode simplesmente
navegar nas diversas pastas do seu meio de memória.
Page 56

PT - 5
Funções durante a apresentação de diapositivos:
- Pressionando as teclas das setas no comando para a direita ou para a esquerda ou as
teclas das setas no aparelho pode saltar uma fotografia para a frente ou para trás
respetivamente.
- Pressionando a teclas Reproduzir/Pausa no comando ou no aparelho pára a
apresentação de diapositivos. Pressionando novamente, a apresentação de
diapositivos continua a ser exibida.
- Pressione as teclas de duas setas [,] no comando para selecionar a próxima ou a
anterior faixa para música de fundo, caso a função esteja ativada.
- O volume da música de fundo pode ser ajustado com as teclas Vol-/Vol+ no comando ou
no aparelho.
d) Calendário
Navegue no menu principal para a função calendário e confirme a sua seleção com a tecla
OK no comando ou com a tecla Reproduzir/Pausa no aparelho.
No modo de calendário, ser-lhe-á mostrado a hora atual, um eventual alarme configurado, a
folha de calendário atual, assim como (com o meio de memória introduzido com ficheiros de
fotografias suportados) uma apresentação de diapositivos.
Pode com as teclas de setas no comando ou nas teclas Para cima/Para baixo e Vol-/Vol+ no
aparelho alterar o mês e o ano para a folha de calendário exibida.
e) Reprodução de ficheiros de música
Navegue no menu principal para a função música e confirme a sua seleção com a tecla OK
no comando ou com a tecla Reproduzir/Pausa no aparelho.
Agora irá ver agora todos os ficheiros de música suportados (MP3 e WMA). Navegue agora
para um ficheiro de música e confirme a sua seleção com a tecla OK no comando ou com a
tecla Reproduzir/Pausa no aparelho para reproduzir o ficheiro selecionado.
Funções durante a reprodução de uma música:
- Pressionando a tecla Reproduzir/Pausa no comando ou no aparelho, pode parar ou
continuar com a reprodução da música.
- O volume pode ser ajustado com as teclas Vol-/Vol+ no comando ou no aparelho.
- Para chegar à frente ou atrás, pressione as teclas das setas para a direita ou para a
esquerda no comando.
- Pressione as teclas das setas duplas [,] no comando ou nas teclas das setas no
aparelho para selecionar a faixa seguinte ou anterior.
f) Reprodução de ficheiros de vídeo
Navegue no menu principal para a função vídeo e confirme a sua seleção com a tecla OK no
comando ou com a tecla Reproduzir/Pausa no aparelho.
Agora irá ver todos os ficheiros de vídeo suportados (MPEG-1/4, M-JPEG e AVI). Navegue
agora para um ficheiro e confirme a sua seleção com a tecla OK no comando ou com a tecla
Reproduzir/Pausa no aparelho para
reproduzir o ficheiro selecionado.
Page 57

PT - 6
Funções durante a reprodução de um vídeo:
- Pressionando a tecla Reproduzir/Pausa no comando ou no aparelho, pode parar ou
continuar com a reprodução do vídeo.
- O volume pode ser ajustado com as teclas Vol-/Vol+ no comando ou no aparelho.
- Para chegar à frente ou atrás, pressione as teclas das setas para a direita ou para a
esquerda no comando.
- Pressione as teclas das setas duplas [,] no comando ou nas teclas das setas no
aparelho para selecionar a faixa seguinte ou anterior.
g) Sistema de ficheiros
Navegue no menu principal para a função ficheiros e confirme a sua seleção com a tecla OK
no comando ou com a tecla Reproduzir/Pausa no aparelho.
Agora irá ver todas as pastas e ficheiros selecionados do meio de memória. Navegue com
as teclas das setas no comando ou no aparelho para a subpasta desejada e confirme a sua
seleção com a tecla OK no comando ou com a tecla Reproduzir/Pausea no aparelho. Agora irá
ver todos os ficheiros e pastas dentro da pasta selecionada. Com a tecla VOLTAR no
comando ou a tecla menu no aparelho vai para o nível de ficheiros mais elevado.
Para abrir um ficheiro diretamente a partir de um sistema de ficheiros, navegue com o ficheiro
pretendido econfirme a sua seleção com a tecla OK no comando ou na tecla
Reproduzir/Pausa no aparelho. O ficheiro é agora reproduzido.
Para apagar um ficheiro ou uma pasta do meio de memória selecionado, navegue para o
ficheiro pretendido e pressione a seguir a tecla de setas direita no comando ou a tecla VOL+
no aparelho. Agora irá ver um campo de diálogo no qual, para evitar um apagar involuntário,
terá de confirmar o processo de apagar. Selecione Sim e o ficheiro pretendido ou a pasta
pretendida são apagados. Selecione Não para ir novamente para a área de visualização de
pastas.
h) Modificação de definições
Navegue no menu principal para a função definições e confirme a sua seleção com a tecla
OK no comando ou com a tecla Reproduzir/Pausa no aparelho.
Tem as seguintes possibilidades de definições à sua disposição: Definições de fotografias,
definições do calendário, definições de vídeos, definições de música e definições de
sistema. Navegue para o ponto de menu pretendido e confirme a sua seleção com a tecla
OK no comando ou com a tecla Reproduzir/Pausa no aparelho. Irá ver todas as
possibilidades de definições. Com as teclas de setas Para cima/Para baixo no comando ou
com as teclas de setas no aparelho pode navegar em cada possibilidade de possibilidade de
definições. Com as teclas de setas Esquerda/Direita no comando ou com as teclas Vol+/Vol-
no aparelho pode ajustar as definições.
Page 58

PT - 7
Possibilidades de
ajuste
Descrição
Definições das
fotografias
Modo de visualização:
Selecione entre apresentação de diapositivos e imagem.
Música
Ligar e desligar da música de fundo durante uma
apresentação de diapositivos (desde que haja ficheiros de
música suportados nos meios de memória).
Modo de fotografia
Selecione entre original e imagem inteira
Tempo de visualização
Defina o tempo de visualização de cada imagem durante a
apresentação dos diapositivos.
Mostrar a apresentação
de diapositivos
Selecione entre uma apresentação única de todas as imagens
ou de uma apresentação sem fim.
Efeito de transição
Selecione um determinado efeito de transição ou uma seleção
arbitrária nos efeitos de transição.
Modo de apresentação
de diapositivos
Selecione entre a visualização de uma imagem ou duas, três
ou quatro imagens em simultâneo.
Modo de reprodução
Selecione entre a visualização das imagens na ordem de
gravação no meio de memória ou uma ordem arbitrária.
Definições do
Calendário
Data
Acertar a data atual.
Configurar o formato da
hora
Definir o formato da hora: 12 (AM / PM) horas ou 24 horas.
Hora
Acertar a hora atual.
Estado do alarme
Ligue/Desligue o alarme.
Hora do alarme
Definir a hora de alarme desejada.
Volume do tom do
alarme
Ajuste o volume do tom de alarme pretendido (Baixo, Médio e
Alto).
Repetição do alarme
Definir a repetição do alarme (Todos os dias, Seg. até Sex.,
Fim de semana, Uma vez).
Vídeo
Modo de visualização:
Selecione entre original e imagem inteira
Reprodução
Selecione o modo de reprodução (Uma vez, Repetir tudo,
Repetir faixa).
Música
Reprodução
Uma vez
Todas as faixas são reproduzidas 1x.
Repetir faixa
A faixa selecionada é repetida sem fim.
Repetir tudo
Todas as faixas selecionada são
repetidas sem fim.
Aleatoriamente
Todas as faixas são reproduzidas em
ordem aleatória.
Visualizar o espetro
Selecione se o espetro na reprodução da música é visualizado
ou não.
Sistema
Idioma
Selecione o idioma pretendido.
Brilho
Selecione o brilho pretendido do ecrã.
Contraste
Selecione o contraste pretendido do ecrã.
Saturação
Selecione a saturação pretendida do ecrã.
Tonalidade
Altere a tonalidade do ecrã.
Ligar automaticamente
Ative/Desative a ligação automática.
Page 59

PT - 8
Hora de ligação:
Selecione a hora de ligação automática.
Desligar
automaticamente
Ative/Desative a desligação automática.
Tempo de desligamento
Selecione a hora de desligação automática.
Repetir
Definir a frequência do ligar automático. (Todos os dias, Seg.
e Sex., Fim de semana, Uma vez).
Volume
Ajuste o volume pretendido.
Definições de fábrica
Voltar para definições de fábrica.
Versão
É exibido o número de versão.
Atualização
Caso esteja uma atualização da firma www.intenso.de
disponível, pode instala-la através deste ponto de menu.
Modo Autostart
Selecione a função que deve ser ativada no início do aparelho
(Foto, Música, Vídeo, Calendário).
Visor
Visor TFT LCD Digital
Tamanho do Visor: 15.6” Polegadas (39.62 cm tamanho do ecrão visível)
Visualização: 16:9
Definição: 1366*768 Pixel
Alimentação
Input: 100~240V AC, 50/60Hz
Output: 9V 1.5A DC
USB port
USB Host 2.0
Suporta mídias de armazenamento USB
Cartões de
armazenamento
compatíveis
Secure Digital Card (SD ™)
Secure Digital High Capacity (SDHC™)
Multimedia Card (MMC™ )
Memory Stick (MS)
XD - Card
Ligação aos
auscultadores
Puxador de 3.5mm
Formatos de fotos
compatíveis
JPEG, Definição máxima:9000*9000 pixels
Formato de vídeo
MPEG 1/4, MJPEG, AVI
Formatos de áudio
MP3, WMA
Temperatura de
operação
0°C ~ +40°C
Medidas
~415*278*30 mm
Peso
~1150 gr.
Acessórios
Controle remoto (incl. 1 pilha), Pé de apoio, Alimentador, Manual de
instruções em diversos idiomas
6) ESPECIFICAÇÕES DE PRODUTO
Não sabe o que fazer?
Nossa Hotline de Assistência Técnica responde com prazer às suas perguntas:
+49 (0) 900 1 50 40 30 por 0,39 €/min. de um telefone fixo alemão. Preços de telefonia móvel podem variar.
Divirta-se com sua Moldura de Fotos Digitais da Intenso!
Page 60

PT - 9
Cuidado e Manutenção
Cuidado
Para evitar o perigo de choques elétricos, não remova parafusos nem a caixa externa.
Não utilize o aparelho próximo à água. Não submeta o aparelho à chuva ou umidade. Não coloque
outros objetos que armazenem água ou outros líquidos na proximidade deste aparelho.
Não instale esta moldura na proximidade de aquecedores, fornos ou outros aparelhos que gerem
calor.
Não abra o aparelho. Não tente consertá-lo por si próprio. Deixe-o aos cuidados de pessoal
especializado.
Evite utilizá-lo em lugares arenosos.
Introduza o cabo de alimentação completamente na abertura do aparelho. Somente assim pode-se
evitar cargas eletrostáticas.
Conecte todos os cabos de maneira correta e segura.
Não pressione o visor. Proteja o visor dos raios solares.
A moldura só reproduz formatos de dados compatíveis.
As fotos podem estra protegidas contra direitos de terceiros. A reprodução sem licença pode ir contra
a lei de direitos autorais.
Não encoste na moldura de fotos com instrumentos metálicos enquanto estiver em funcionamento.
Evite a utilização sobre almofadas, sofás ou outros objetos domésticos, que possam produzir calor,
devido ao perigo de superaquecimento do aparelho.
Não remova cartões de memória durante o processo de leitura. Podem ocorrer quedas de sistema ou
perdas de dados.
Não desligue o aparelho durante a reprodução de um Diashow.
Não embale o aparelho diretamente após o longo uso. Confira se há um resfriamento suficiente. De
outra forma, há perigo de superaquecimento.
Para garantir um melhor serviço, podem ocorrer alterações no manual de intruções.
A utilização de auriculares e auscultadores num volume demasiado alto pode causar danos permanentes no
aparelho auditivo.
Manutenção do aparelho
O aparelho deve estar desligado.
Nunca espirre ou derrame liquidos diretamente sobre o visor ou sobre a parte externa do aparelho.
Limpeza do visor / Parte externa / Moldura
Limpe a parte externa, moldura e o visor LCD cuidadosamente com pano macio, sem felpas e sem
aditivos químicos. Utilize somente produtos de limpeza especiais para Visors de LCD.
Eliminação de aparelhos domésticos
Os aparelhos que vêm marcados com este símbolo estão sujeitos às normas européias 2002/96/EC.
Todos os aparelhos elétricos e eletrodomésticos devem ser separados do lixo caseiro e depositados em lugares
próprios, determinados pelo estado.
Com a eliminação correta de aparelhos eletrodomésticos podem ser evitados danos no meio ambiente.
Page 61

Page 62

PL - 1
Instrukcja obsługi Intenso Cyfrowa ramka
fotograficzna
Prosimy o prześledzenie tej instrukcji, aby poznać różne funkcje Cyfrowej ramki fotograficznej
firmy Intenso.
Page 63

PL - 2
1) Układ przycisków z tyłu urządzenia
1
POWER
Przełącznik wł./wył.
2
BGM
Pokaz slajdów z podkładem muzycznym
3
MUTE
Wyciszenie
4
MENU
Wyświetlanie ekranu głównego
5
Ruch kursorem w górę
6
RETURN
Powrót do wyższego menu
7
Ruch kursorem w dół
8
Ruch kursorem w prawo
9
Ruch kursorem w dół
10
SETUP
Wyświetlanie ustawień
11
[ ]
Przycisk Play/Pause – odtwarzanie/pauza
12
OK
Potwierdzenie wybranego punktu menu
13
ZOOM
Powiększanie zdjęcia po zatrzymaniu pokazu
slajdów
14
VOL -
Zmniejszanie głośności
15
VOL +
Zwiększanie głośności
16
ROTATE
Obrót o 90° w prawo
17
Poprzedni utwór
18
Następny utwór
1 Przełącznik wł./wył.
2 Góra/ Poprzednie zdjęcie
3 Głośność + / Prawo
4 Przycisk Odtwarzanie/Pauza [ ]
5 Głośność – / Lewo
6 Dół/Następne zdjęcie
7 Przycisk Menu/Powrót do poprzedniego
2) Pilot zdalnego sterowania
Page 64

PL - 3
3) Podłączanie i włączanie ramki cyfrowej
Secure Digital Card (SD™)
Secure Digital High Capacity (SDHC™)
Multimedia Card (MMC™)
Memory Stick (MS)
XD - Card
Kartę pamięci należy włożyć do gniazda czytnika kart logo
skierowany w kierunku przeciwnym do wyświetlacza.
Uwaga: Karty nie wkładać na siłę!
Nośnik pamięci USB można umieszczać w slocie USB tylko
w jednym kierunku.
Uwaga: Nośnik pamięci USB należy umieszczać delikatnie
Połącz dostarczony zasilacz z ramką (DC-IN). Podłącz
drugą wtyczkę zasilacza do gniazdka sieciowego. Ramka
uruchomi się automatycznie. Wciśnij krótko przycisk Power,
aby wyłączyć lub ponownie włączyć.
Uwaga:
- Gniazdko sieciowe musi znajdować się w pobliżu urządzenia i musi być łatwo dostępne.
- Nie otwierać obudowy zasilacza. Otwarta obudowa powoduje niebezpieczeństwo śmiertelnego porażenia prądem
elektrycznym. Zasilacz nie zawiera żadnych części wymagających konserwacji.
- Zasilacz należy podłączać wyłącznie do uziemionego gniazdka o napięciu AC 100-240V~, 50/60 Hz. Jeśli nie są Państwo
pewni parametrów napięcia w miejscu montażu urządzenia proszę skontaktować się z odpowiednim dostawcą energii
elektrycznej.
- Należy używać wyłącznie zawartych w zestawie zasilacza oraz przewodu zasilania KTEC KSASB0240900150HE.
- Aby przerwać zasilanie urządzenia prądem elektrycznym należy wyciągnąć zasilacz z gniazdka wtyczkowego. Podczas
wyciągania należy zawsze trzymać w ręku sam zasilacz. Nie ciągnąć za przewód.
4) Wkładanie kart pamięci | Podłączanie nośników pamięci USB
Następujące formaty kart pamięci są obsługiwane przez ramkę cyfrową:
Uwaga: Cyfrowa ramka do zdjęć jest przeznaczona wyłącznie do pracy z kompatybilnymi
kartami pamięci oraz nośnikami danych USB 2.0 (100 mA).
Page 65

PL - 4
5) Obsługa
Wskazówka: Urządzenie to posiada funkcję Eco. Jeśli funkcja ta jest włączona (aby włączyć
wzgl. wyłączyć tę funkcję należy otworzyć Ustawienia), urządzenie wyłącza się automatycznie
po 4 godzinach od ostatniej dokonanej przez użytkownika zmiany. W ustawieniach
fabrycznych funkcja ta jest ze względu na regulacje prawne już włączona.
a) Menu główne
Po włączeniu wyświetlane jest Menu główne.
W Menu głównym do wyboru są różne funkcje cyfrowej ramki na zdjęcia oraz menu
Ustawienia. Aby wybrać punkt menu należy użyć przycisków strzałek na pilocie lub
przycisków strzałek oraz przycisków Vol-/Vol+ na urządzeniu. Wybór należy potwierdzić
przyciskiem OK na pilocie lub przyciskiem Play/Pause [ ] na urządzeniu.
b) Wybór nośnika danych
Za pomocą przycisku RETURN na pilocie lub przycisku Menu na urządzeniu przechodzi się z
Menu głównego do wyboru podłączonych nośników danych. W tym menu, o ile podłączone,
można wybrać pomiędzy kartą pamięci i pamięcią USB. Wybór należy potwierdzić
przyciskiem OK na pilocie lub przyciskiem Play/Pause na urządzeniu. Automatycznie powraca
się do Menu głównego.
c) Wyświetlanie zdjęć
Jeśli włożono już nośnik danych z zapisanymi zdjęciami, to urządzenie automatycznie
rozpocznie pokaz slajdów. Jeśli nie włożono nośnika danych, to urządzenie rozpocznie pokaz
slajdów używając zainstalowanych fabrycznie przykładowych zdjęć (nie mogą one zostać
zmienione). Naciśnij przycisk Menu, aby przejść do Menu głównego.
Pokaz slajdów można również uruchomić ręcznie. W tym celu w Menu głównym należy
przejść do funkcji Foto. Wybór należy potwierdzić przyciskiem OK na pilocie lub przyciskiem
Play/Pause na urządzeniu. Pokaz slajdów zostanie teraz uruchomiony. Alternatywnie można
użyć również przycisku BGM na pilocie, aby uruchomić w dowolnym momencie pokaz slajdów.
W menu Ustawienia zdjęć można zadecydować, czy podczas pokazu slajdu ma zostać
odtwarzany podkład muzyczny (jeśli dostępny na tym samym nośniku danych).
Aby opuścić pokaz slajdów i wyświetlić menu podglądu zdjęć, należy nacisnąć przycisk
RETURN na pilocie lub przycisk MENU na urządzeniu. Teraz można przejść do zdjęcia, wybór
potwierdzić przyciskiem OK na pilocie lub przyciskiem Play/Pause na urządzeniu i wznowić z
tego miejsca pokaz slajdów. Ponowne naciśnięcie przycisku RETURN w menu podglądu
zdjęć powoduje przejście do odpowiednio wyższego folderu plików. W ten sposób można
bardzo łatwo poruszać się pomiędzy różnymi folderami zapisanymi na nośniku danych.
Page 66

PL - 5
Funkcje dostępne podczas pokazu slajdów:
- Naciśnięcie przycisków strzałek w prawo lub lewo na pilocie lub przycisków strzałek na
urządzeniu pozwala na przejście do następnego lub poprzedniego zdjęcia.
- Naciśnięcie przycisku Play/Pause na pilocie lub urządzeniu zatrzymuje pokaz slajdów
Ponowne naciśnięcie wznawia pokaz slajdów.
- Naciśniecie przycisków podwójnych strzałek [,] na pilocie pozwala na wybór
następnego lub poprzedniego utworu podkładu muzycznego, jeśli został aktywowany.
- Głośność podkładu muzycznego reguluje się za pomocą przycisków Vol-/Vol+ na pilocie
lub urządzeniu.
d) Kalendarz
W Menu głównym należy przejść do funkcji Kalendarz i potwierdzić wybór przyciskiem OK na
pilocie lub przyciskiem Play/Pause na urządzeniu.
W trybie kalendarza wyświetlane są: bieżący czas, ewentualnie ustawiony budzik, bieżąca
kartka kalendarza, oraz (o ile włożono nośnik danych z obsługiwanymi plikami zdjęć) pokaz
slajdów.
Za pomocą przycisków strzałek na pilocie lub przycisków Góra/Dół i Vol-/Vol+ na urządzeniu
można zmieniać miesiąc i rok wyświetlanej kartki kalendarza.
e) Odtwarzanie plików muzycznych
W Menu głównym należy przejść do funkcji Muzyka i potwierdzić wybór przyciskiem OK na
pilocie lub przyciskiem Play/Pause na urządzeniu.
Wyświetlone zostaną wszystkie obsługiwane pliki muzyczne(MP3 i WMA). Aby odtworzyć
plik należy przejść do pliku muzycznego potwierdzić wybór przyciskiem OK na pilocie lub
przyciskiem Play/Pause na urządzeniu.
Funkcje podczas odtwarzania utworu:
- Przyciskiem Play/Pause na pilocie lub urządzeniu można wstrzymać i następnie wznowić
odtwarzanie muzyki.
- Głośność reguluje się za pomocą przycisków Vol-/Vol+ na pilocie lub urządzeniu.
- Aby przewinąć w przód lub w tył należy nacisnąć przycisk strzałki w prawo lub w lewo na
pilocie.
- Naciskając przyciski podwójnych strzałek [,] na pilocie lub przyciski strzałek na
urządzeniu można wybrać następny lub poprzedni utwór.
f) Odtwarzanie plików wideo
W Menu głównym należy przejść do funkcji Wideo i potwierdzić wybór przyciskiem OK na
pilocie lub przyciskiem Play/Pause na urządzeniu.
Wyświetlone zostaną wszystkie obsługiwane pliki wideo(MPEG-1/4, M-JPEG i AVI). Aby
odtworzyć plik należy przejść do pliku potwierdzić wybór przyciskiem OK na pilocie lub
przyciskiem Play/Pause [ ] na urządzeniu.
Page 67

PL - 6
Funkcje podczas odtwarzania filmu:
- Przyciskiem Play/Pause na pilocie lub urządzeniu można wstrzymać i następnie wznowić
odtwarzanie filmu.
- Głośność reguluje się za pomocą przycisków Vol-/Vol+ na pilocie lub urządzeniu.
- Aby przewinąć w przód lub w tył należy nacisnąć przycisk strzałki w prawo lub w lewo na
pilocie.
- Naciskając przyciski podwójnych strzałek [,] na pilocie lub przyciski strzałek na
urządzeniu można wybrać następny lub poprzedni utwór.
g) System plików
W Menu głównym należy przejść do funkcji Pliki i potwierdzić wybór przyciskiem OK na
pilocie lub przyciskiem Play/Pause na urządzeniu.
Wyświetlone zostaną wszystkie foldery i pliki zapisane na wybranym nośniku danych. Za
pomocą przycisków strzałek na pilocie lub urządzeniu można przejść do wybranego
podfolderu i potwierdzić wybór przyciskiem OK na pilocie lub przyciskiem Play/Pause na
urządzeniu. Wyświetlone teraz zostaną wszystkie pliki i foldery zapisane w wybranym
folderze. Za pomocą przycisku RETURN na pilocie lub przycisku Menu na urządzeniu można
powrócić do wyższego poziomu plików.
Aby otworzyć plik bezpośrednio z systemu plików, należy przejść do wybranego pliku i
potwierdzić wybór przyciskiem OK na pilocie lub przyciskiem Play/Pause na urządzeniu. Plik
zostanie teraz odtworzony.
Aby z wybranego nośnika danych usunąć plik lub cały folder, należy przejść do wybranego
pliku i następnie nacisnąć prawy przycisk strzałki na pilocie lub przycisk VOL+ na urządzeniu.
Wyświetlone zostanie okno dialogowe, w którym, aby uniknąć przypadkowego usunięcia,
należy potwierdzić usuwanie. Aby usunąć wybrany plik lub folder należy wybrać Tak. W
przypadku wyboru Nie powraca się do przeglądu plików.
h) Zmienianie ustawień
W Menu głównym należy przejść do funkcji Ustawienia i potwierdzić wybór przyciskiem OK na
pilocie lub przyciskiem Play/Pause na urządzeniu.
Dostępne są następujące możliwości ustawień: ustawienia zdjęć, kalendarza, wideo, muzyki
i systemu. Należy przejść do wybranego punktu menu i potwierdzić wybór przyciskiem OK
na pilocie lub przyciskiem Play/Pause na urządzeniu. Wyświetlone zostaną wszystkie
możliwości ustawień. Przyciskami strzałek góra/dół na pilocie lub przyciskami strzałek na
urządzeniu można przechodzić do pojedynczych możliwości ustawień. Przyciskami strzałek
lewo/prawo na pilocie lub przyciskami Vol+/Vol- na urządzeniu można zmieniać ustawienia.
Page 68

PL - 7
Możliwości ustawień
Opis
Ustawienia
zdjęć
Tryb wyświetlania
Wybór pomiędzy pokazem slajdów a pojedynczym zdjęciem.
Muzyka
Włączanie i wyłączanie podkładu muzycznego podczas
pokazu slajdów (o ile na nośnikach danych dostępne są
obsługiwane pliki muzyczne).
Tryb zdjęcia
Wybór pomiędzy oryginalnym rozmiarem a widokiem
pełnoekranowym.
Czas wyświetlania
Ustawianie czasu wyświetlanie pojedynczych zdjęć podczas
pokazu slajdów.
Wyświetlanie pokazu
slajdów
Wybór pomiędzy jednorazowym wyświetleniem wszystkich
zdjęć i wyświetlaniem w pętli.
Efekt przejścia
Wybór określonego efektu przejścia lub przypadkowy wybór
efektu przejścia.
Tryb pokazu slajdów
Wybór pomiędzy wyświetlaniem jednego lub dwóch, trzech
albo czterech zdjęć jednocześnie.
Tryb odtwarzania
Wybór pomiędzy wyświetlaniem w kolejności zapisania na
nośniku danych a kolejnością przypadkową.
Ustawienia
kalendarza
Data
Ustawianie bieżącej daty.
Ustawianie formatu
czasu
Ustawianie formatu czasu: 12 (AM / PM) godzinny lub 24
godzinny.
Czas
Ustawianie bieżącego czasu.
Stan budzika
Włączanie i wyłączanie budzika.
Czas budzika
Ustawianie wybranego czasu budzika.
Głośność budzika
Ustawianie głośności budzika (niska, średnia i wysoka).
Powtarzanie budzenia
Ustawianie powtórzeń budzenia (codziennie, pon. do pt.,
weekend, raz).
Wideo
Tryb wyświetlania
Wybór pomiędzy oryginalnym rozmiarem a widokiem
pełnoekranowym.
Odtwarzanie
Wybór trybu odtwarzania (raz, powtarzanie wszystkich,
powtarzanie filmu).
Muzyka
Odtwarzanie
Raz
Wszystkie filmy są odtwarzane raz.
Powtórz film
Wybrany film odtwarzany jest w pętli.
Powtarzanie
wszystkich
Wszystkie filmy odtwarzane są w pętli.
Losowy
Wszystkie filmy odtwarzane są w
przypadkowej kolejności.
Wyświetlanie spektrum
Wybór, czy podczas odtwarzanie muzyki wyświetlane ma być
spektrum.
System
Język
Wybierz język
Jasność
Wybór jasności wyświetlacza.
Kontrast
Wybór kontrastu wyświetlacza.
Nasycenie
Wybór nasycenia wyświetlacza.
Odcień
Zmiana odcienia wyświetlacza.
Włączanie automatyczne
Aktywowanie/deaktywowanie automatycznego włączania.
Czas włączania
Wybór godziny automatycznego włączania.
Page 69

PL - 8
Wyłączanie
automatyczne
Aktywowanie/deaktywowanie automatycznego wyłączania.
Czas wyłączania
Wybór godziny automatycznego wyłączania.
Powtarzanie
Ustawianie częstotliwości automatycznego włączania
(codziennie, pon. do pt., weekend, raz).
Głośność
Ustawianie głośności.
Ustawienia fabryczne
Zerowanie do ustawień fabrycznych.
Wersja
Wyświetlany jest bieżący numer wersji.
Aktualizacja
Jeśli na stronie www.intenso.de dostępna będzie aktualizacja
firmware, to można ją zainstalować korzystając z tego punktu.
Tryb automatycznego
uruchomienia
Wybór funkcji, która ma zostać wykonana po uruchomieniu
urządzenia (zdjęcie, muzyka, wideo, kalendarz).
Wyświetlacz
Cyfrowy TFT LCD
Wi elkość wyświetlacza: 15.6” cali (39,62cm wi docz na p rzekądna obrazu)
Tryb wyświetlania: 16:9
Rozdzielczość: 1366*768 pikseli
Zasilacz
Input: 100~240V AC, 50/60Hz
Output: 9V 1.5A DC
Port USB
USB Host 2.0
Obsługuje nośnik i danych USB
Obsługiwane kart y
pam ięci
SD/SDHC™ (Secure Digital C ard), MMC™ (M ulti Me di a Card)
Złącze słuchawek
jack 3.5mm
Obsługiwane formaty
obrazu
JPEG, maks ym al na r ozdzielczość:9000*9000 pikseli
Format wideo
MPEG 1/4, MJPEG, AVI
Formaty audio
MP3, WMA
Temperatura
robocza
0°C ~ +40°C
Wymiary
~415*278*30 mm
Waga
~1150 gr.
Akcesoria
Pilot zdalnego sterowania (w tym bateria), Stojak, zasilacz sieciowy,
wieloję zyczna instrukcja obsługi
6) Specyfikacje Produktu
Jeżeli chcą Państwo uzyskać więcej informacji, nasza gorąca linia serwisu technicznego z przyjemnością odpowie
na Państwa pytania:
+49 (0) 900 1 50 40 30 Koszt połączenia 0,39 €/min. z telefonu stacjonarnego w Niemczech. Ceny połączeń z
telefonów komórkowych mogą być różne.
Życzymy przyjemnego korzystania z ramki cyfrowej Intenso!
Page 70

PL - 9
UŻYTKOWANIE I KONSERWACJA
UŻYTKOWANIE
Aby un iknąć nieb ezpie czeńs twa p oraże nia p rą dem elek trycz ny m, nie n ależy usuwać ani śr ub an i obu do wy.
Urządz enia nie u żywać w po bliżu wody . Nie należy wy stawi ać ra mki cyfr owej na działan ie de szczu ani wilgo ci. W
pob li ży ur ząd zenia nie ustawia ć żadnych prz ed mio tów z awi erają cych wodę lub inne subs tan cje p łynne.
Ramki na zd jęcia nie in stalo wać w pobl iżu ogrzewa ni a e le ktr ycznego, piec ów or az in nych urząd zeń w ydzielających
cie pło.
Nie wo lno o twi erać obudo wy. Nie dokon ywa ć samod zieln ych n apraw . Z adani e t o nal eży p ozost awi ć spe cjali stom.
Unikać użyt ko wan ia w piaszczyst ych mie jscach.
Należy wcis nąć wtyczk ę zas ilacza w c ałośc i do odpowiedni ego o tworu urzą dzeni a. Ty lko w ten sposó b można
uni knąć naład ować el ekt rosta tyczn ych.
Wszyst kie przyłą cza n ależy połą czyć prawi dłowo i be zpiecznie.
Nie wo lno n acisk ać na wyświetla cz. N ależy go chr oni ć przed dzia łaniem s ilnyc h pro mieni słon ecznych.
Ramka na zd jęcia odtwarza jedyn ie ko mpaty bi lne formaty p li ków.
Zdjęci a mog ą być chro nione prawami osób trze cich. Ich odtwarzani e bez lice ncji może spowo dować naru szeni e pra w
autorskich
Podczas eksploatacji nie dot ykać ra mki cyfr owej metal owymi prze dmiotami.
Nie uż ywać ra mki cyfr owej na po duszk ach, sofach o raz i nnych me blach lub przed miota ch do mowych
wsp omaga jących wytwar zanie ci ep ła, g dyż i stnieje ni ebezpiecze ństwo przegr zan ia ur ządze nia.
Nie wo lno w yjmować ka rt pami ęci w trak cie p roces u i ch odcz ytu. W innym pr zypadku może doj ść do uszk odzeń
systemowych lub utraty danych.
Prosimy nie eksp onowa ć urz ądzen ia w trakcie po kazu slajd ów.
Prosimy nie pako wać urzą dzeni a bez pośre dnio po dłuższy m uży tkowa niu. Nal eż y zag wa rantowa ć wys tarcz ające
ost ygnię cie. W inn ym ra zie i stnie je niebe zpiec zeńst wo pr zegrz ani a urząd zenia .
Aby za gwara ntowa ć l epszy pozi om us ług, do ni niejszej i nstru kc ji ob słu gi mo gą zo stać wprowadzon e zmi any.
Korzystanie ze słuchawek nausznych lub dousznych przy zbyt dużej głośności może doprowadzić do stałego uszkodzenia
organów słuchu.
Konserwacj a urządzenia
URZ ĄDZEN IE MUSI BYĆ W YŁĄCZ ANE.
NIE ROZPYLAĆ ANI N IE NA KŁADAĆ BEZ POŚREDNIO NA WYŚWIET LACZ ORAZ OBU DOWĘ ŻADNYCH PŁYNÓW .
Czyszczenie wyś wietlacza / obud owy / ramy
Obudowę , ra mkę oraz wy świetl acz LCD wyci er ać delika tnie mi ęk ką ś ci ereczką, kt ór a nie jes t na sączona chemi ka li ami i
ni e pozosta wi a włosków n a cz ys zc zo ne j powierzchni .
Należy używ ać w yłącznie środków czyszcz ąc yc h pr ze zn ac zo ny ch do wyś wietlaczy L CD.
Utylizacja starych urz ądzeń elektronicznych
Urządzenia oznaczone tym symbolem podlegają europejskiej wytycznej 2002/96/EC.
Wszystkie urządzenia elektroniczne i elektryczne należy utylizować poprzez przewidziane do tego celu instytucje państwowe, a nie
razem z odpadami z gospodarstwa domowego.
Utylizując odpowiednio stare urządzenia elektroniczne dbają Państwo o środowisko i unikają tym samym jego zanieczyszczenia.
Page 71

Page 72

RU - 1
Руководство по эксплуатации Интенсо цифровой
фоторамки
В данной инструкции Вы узнаете о различных функциях цифровой фоторамки Интенсо.
Page 73

RU - 2
1) Назначение кнопок, находящихся с обратной стороны устройства
1
POWER
Электропитание включить/отключить
2
BGM
Запустить слайд-шоу с музыкальным
сопровождением
3
MUTE
Включение режима работы без звука
4
MENU
Показ экрана с начальным изображением
5
Перемещение курсора вперед
6
RETURN
Возврат в меню более высокого порядка
7
Перемещение курсора влево
8
Перемещение курсора вправо
9
Перемещение курсора назад
10
SETUP
Показ настроек
11
[ ]
Кнопка проигрывания/паузы
12
OK
Подтверждение выбранного пункта меню
13
ZOOM
Увеличение изображения при
остановленном показе слайдов
14
VOL -
Снижение громкости звука
15
VOL +
Увеличение громкости звука
16
ROTATE
Вращение на 90° по часовой стрелке
17
Переход на предыдущую надпись
18
Переход на следующую надпись
1 Электропитание включить/отключить
2 Следующее/предыдущее изображение
3 Кнопка "громкость +" / переместить вправо
4 Кнопка проигрывания/паузы [ ]
5 Кнопка "громкость -" / переместить влево
6 Предыдущее/следующее изображение
7 Кнопка "Menü" / назад в предыдущее
меню
2) Дистанционное управление
Page 74

RU - 3
3) Подключение и включение цифровой фоторамки
Secure Digital Card (SD™ )
Secure Digital High Capacity (SDHC™)
Multimedia Card (MMC™)
Memory Stick (MS)
XD - Card
Вставьте карту памяти в гнездо устройства считывания
с карты, при этом логотип должен быть направлен в
сторону, противоположную экрану.
Внимание: Не вставляйте карту с силой!
Носитель памяти USB может вставляться в гнездо USB
только одном направлении.
Внимание: Не применяйте силу при вставлении
носителя памяти USB!
Соедините приложенный блок питания с цифровой
фоторамкой (DC-IN). Вставьте другой конец блока
питания в розетку. цифровой фоторамки включается
автоматически. Держите кнопку включения Power на
протяжении короткого времени нажатой, чтобы
выключить или повторно включить ее.
Внимание:
- Розетка должна находится вблизи прибора и должна быть легко доступной.
- Не открывать корпус сетевого адаптера. Открытый корпус составляет опасность для жизни, связанную с поражением
электрическим током. Он не содержит деталей, требующих ухода.
- Использовать сетевой адаптер только с заземленными розетками с 100-240В~, 50/60 Гц переменного тока. Если Вы не
уверены, какой ток подается на месте использоания, необходимо запросить информацию об этом у поставщика
энергии.
- Использовать только приложенный кабель KTEC KSASB0240900150HE, для сетевого адаптера и подключения к сети.
- Чтобы прекратить подачу питания к Вашему прибору, вытяните блок питания из розетки. При вытягивании держитесь
за сам блок питания. Никогда не вытягивайте блок питания за провод.
4) Вкладывание карт памяти | подключение носителей памяти USB
Цифровая фоторамка поддерживает следующие форматы карты памяти:
Внимание: Цифровая фоторамка предусмотрена только для использования с
совместимыми картами памяти и носителями памяти USB 2 (100мА).
Page 75

RU - 4
5) Общий порядок действий
Примечание: данное устройство имеет функцию Эко. При ее активации (для активации
либо отключения функции Эко перейдите в меню Настройки) устройство автоматически
выключается через 4 часа после последнего ввода данных. Согласно параметрам
производителя функция Эко уже активирована в устройстве в соответствии с
правилами, установленными законом.
a) Главное меню
После включения появляется главное меню.
В главном меню Вы можете выбирать различные функции цифровой фоторамки и
настройки пунктов меню. Для того чтобы выбрать какой-либо пункт меню, нажимайте на
кнопки со стрелкой, находящиеся на пульте дистанционного управления, или на кнопки
со стрелкой, а также на кнопки "Vol-"/"Vol+", находящиеся на устройстве. Подтвердите
свой выбор кнопкой "OK", находящейся на пульте дистанционного управления, или
кнопкой проигрывания/паузы [ ], находящейся на устройстве.
b) Выбор носителя информации
Кнопка "RETURN", находящаяся на пульте дистанционного управления, или кнопка
"Menü", находящаяся на устройстве, выводит Вас из главного меню к выбору
присоединенных носителей информации. В данном меню Вы можете выбрать карту
памяти или носитель информации с разъемом USB. Подтвердите свой выбор кнопкой
"OK", находящейся на пульте дистанционного управления, или кнопкой
проигрывания/паузы, находящейся на устройстве. После этого Вы автоматически снова
попадаете в главное меню.
c) Показ фотографий
Если Вы уже вставили носитель памяти с записанными фотографиями, то устройство
автоматически начинает их показ. Если носитель памяти не вставлен, то устройство
начинает показ заранее инсталлированных образцов изображений (они не могут быть
изменены). Для того чтобы попасть в главное меню, нажмите на кнопку "Menü".
Вы можете запустить слайд-шоу также вручную. Для этого войдите в главном меню в
функцию Фото. Подтвердите свой выбор кнопкой "OK", находящейся на пульте
дистанционного управления, или кнопкой проигрывания/паузы, находящейся на
устройстве. При этом запускается слайд-шоу. Для того чтобы запустить слайд-шоу
непосредственно из любой другой функции, Вы можете альтернативно также нажать на
кнопку "BGM", находящуюся на пульте дистанционного управления.
В настройках фотографий Вы можете задать, должна ли во время слайд-шоу
проигрываться фоновая музыка (если она имеется именно на этом носителе
информации).
Для того чтобы выйти из режима слайд-шоу и вызвать меню предварительного
просмотра изображений, нажмите на кнопку "RETURN", находящуюся на пульте
дистанционного управления, или кнопку "Menü", находящуюся на устройстве. Теперь вы
можете перейти к какой-либо фотографии, подтвердить свой выбор кнопкой "OK",
находящейся на пульте дистанционного управления, или кнопкой проигрывания/паузы,
находящейся на устройстве, и продолжить слайд-шоу непосредственно с этого места.
Повторным нажатием на кнопку "RETURN" при нахождении в меню предварительного
просмотра изображений Вы попадаете в папку файлов более высокого порядка.
Page 76

RU - 5
Таким образом, Вы можете осуществлять навигацию по различным папкам Вашего
носителя информации.
Функции во время просмотра слайдов:
- Нажатием на кнопки со стрелкой вправо или влево, находящиеся на пульте
дистанционного управления, или на кнопки со стрелкой, находящиеся на
устройстве, Вы можете перейти к следующей или предыдущей фотографии.
- Нажатием на кнопку проигрывания/паузы, находящуюся на пульте дистанционного
управления или на устройстве, Вы останавливаете слайд-шоу, а повторным
нажатием продолжаете его.
- Для выбора следующей или предыдущей записи фоновой музыки, если Вы
активировали ее прослушивание, нажмите на кнопку с двойной стрелкой [,],
находящуюся на пульте дистанционного управления.
- Громкость звука фоновой музыки Вы можете настроить кнопками "Vol-" и "Vol+",
находящимися на пульте дистанционного управления или на устройстве.
d) Календарь
Перейдите в главном меню к функции Календарь и подтвердите свой выбор кнопкой
"OK", находящейся на пульте дистанционного управления, или кнопкой
проигрывания/паузы, находящейся на устройстве.
В режиме календаря Вам показываются текущее время, предупредительный сигнал,
если он настроен, текущая календарная страница, а также (при наличии вставленного
носителя информации с файлами фотографий в поддерживаемом формате)
осуществляется показ слайдов.
Кнопками со стрелкой, находящимися на пульте дистанционного управления, или
кнопками следующий/предыдущий и "Vol-/Vol+", находящимися на устройстве, Вы
можете изменить месяц и год на показываемой календарной странице.
e) Воспроизведение музыкальных файлов
Перейдите в главном меню к функции Музыка и подтвердите свой выбор кнопкой "OK",
находящейся на пульте дистанционного управления, или кнопкой проигрывания/паузы,
находящейся на устройстве.
Теперь Вам будут показаны все поддерживаемые музыкальные файлы (MP3 и WMA).
Для того чтобы воспроизвести выбранный файл, перейдите к какому-либо
музыкальному файлу и подтвердите свой выбор кнопкой "OK", находящейся на пульте
дистанционного управления, или кнопкой проигрывания/паузы, находящейся на
устройстве.
Функции, выполняющиеся во время воспроизведения песни:
- Нажатием на кнопку проигрывания/паузы, находящуюся на пульте дистанционного
управления или на устройстве, Вы можете остановить воспроизведение музыки
или продолжить его снова.
- Кнопками "Vol-" и "Vol+", находящимися на пульте дистанционного управления или
на устройстве, Вы можете настроить громкость звука.
- Для прокрутки вперед или назад нажмите на кнопку со стрелкой вправо или влево,
находящуюся на пульте дистанционного управления.
- Для выбора следующей или предыдущей записи нажмите на кнопку с двойной
стрелкой [,], находящуюся на пульте дистанционного управления, или на кнопку
со стрелкой, находящуюся на устройстве.
Page 77

RU - 6
f) Воспроизведение видеофайлов
Перейдите в главном меню к функции Видео и подтвердите свой выбор кнопкой "OK",
находящейся на пульте дистанционного управления, или кнопкой проигрывания/паузы,
находящейся на устройстве.
Теперь Вам будут показаны все поддерживаемые видеофайлы (MPEG-1/4, M-JPEG и
AVI). Для того чтобы воспроизвести выбранный видеофайл, перейдите к какому-либо
файлу и подтвердите свой выбор кнопкой "OK", находящейся на пульте дистанционного
управления, или кнопкой проигрывания/паузы, находящейся на устройстве.
Функции, выполняющиеся во время воспроизведения видеофайла
- Нажатием на кнопку проигрывания/паузы, находящуюся на пульте дистанционного
управления или на устройстве, Вы можете остановить воспроизведение
видеофайла или продолжить его снова.
- Кнопками "Vol-" и "Vol+", находящимися на пульте дистанционного управления, или
кнопками "громкость + "/"громкость - ", расположенными на устройстве, Вы можете
настроить громкость звука.
- Для прокрутки вперед или назад нажмите на кнопку со стрелкой вправо или влево,
находящуюся на пульте дистанционного управления.
- Для выбора следующей или предыдущей записи нажмите на кнопку с двойной
стрелкой [,], находящуюся на пульте дистанционного управления, или на кнопку
со стрелкой, находящуюся на устройстве.
g) Файловая система
Перейдите в главном меню к функции Файлы и подтвердите свой выбор кнопкой "OK",
находящейся на пульте дистанционного управления, или кнопкой проигрывания/паузы,
находящейся на устройстве.
Теперь Вам показываются все папки и файлы выбранного носителя информации.
Кнопками со стрелкой, находящимися на пульте дистанционного управления, или на
устройстве, перейдите к желаемой подпапке и подтвердите свой выбор. Вам будут
показаны все файлы и папки внутри выбранной папки. Кнопкой "RETURN",
расположенной на пульте дистанционного управления, или кнопкой "Menü",
расположенной на устройстве, Вы снова вернетесь назад на ближайший более высокий
файловый уровень.
Для того чтобы открыть какой-либо файл непосредственно из файловой системы,
перейдите к желаемому файлу и подтвердите свой выбор кнопкой "OK", находящейся на
пульте дистанционного управления, или кнопкой проигрывания/паузы, находящейся на
устройстве. Теперь файл будет воспроизводиться.
Для того чтобы удалить файл или целую папку с выбранного носителя информации,
перейдите к выбранному файлу, а затем нажмите на кнопку со стрелкой вправо,
находящуюся на пульте дистанционного управления, или на кнопку "VOL+", находящуюся
на устройстве. После этого Вам будет показано диалоговое поле, в котором Вы будете
должны подтвердить процесс удаления, для того чтобы предотвратить нежелательное
удаление. Если Вы выберете “Да”, то выбранный файл или выбранная папка
удаляется. Если Вы выберете “Нет”, то вернетесь снова в обзор файлов.
h) Изменение настроек
Перейдите в главном меню к функции Настройки и подтвердите свой выбор кнопкой
"OK", находящейся на пульте дистанционного управления, или кнопкой
проигрывания/паузы, находящейся на устройстве.
Page 78

RU - 7
Теперь в Ваше распоряжение предоставляются следующие возможности настройки:
Возможности
настройки
Описание
Настройки
фотографий
Режим показа
Выберите Слайд-шоу или Предварительный просмотр
изображений.
Музыка
Включение и Отключение фоновой музыки во время
слайд-шоу (если поддерживаемые музыкальные файлы
доступны на носителях информации).
Фоторежим
Выбор режима Оригинал или Изображение в
полноэкранном режиме.
Длительность показа
Настройка длительности показа отдельных изображений
во время слайд-шоу.
Показать слайд-шоу
Выбор однократного показа всех изображений или
бесконечного цикла.
Переходной эффект
Выбор определенного переходного эффекта или
случайного выбора переходных эффектов.
Режим слайд-шоу
Выбор показа отдельных изображений или двух, трех или
четырех изображений одновременно.
Режим просмотра
Выбор показа изображений в той последовательности, в
которой они расположены на носителе информации, или в
случайной последовательности.
Настройки
календаря
Дата
Настройка текущей даты.
Настроить формат
времени
Настройка формата времени: 12 (AM / PM) часов или 24
часа.
Время
Настройка текущего времени.
Статус
предупредительного
сигнала
Включение и Отключение предупредительного сигнала.
Время выдачи
предупредительного
сигнала
Настройка желаемого времени выдачи
предупредительного сигнала.
Громкость предупредительного сигнала
Настройка желаемой громкости звука (низкая, средняя и
высокая).
Повторение предупредительного сигнала
Настройка желаемой периодичности повторения
предупредительного сигнала: каждый день, с
понедельника по пятницу, в конце недели, однократно.
настройки фотографий, настройки календаря, настройки видео, настройки музыки и
системные настройки. Перейдите к желаемому пункту меню и подтвердите свой
выбор кнопкой "OK", находящейся на пульте дистанционного управления, или кнопкой
проигрывания/паузы, находящейся на устройстве. Сейчас Вам показываются все
возможности настройки. Кнопками вперед/назад, находящимися на пульте
дистанционного управления, или кнопками со стрелкой, находящимися на устройстве,
Вы можете перемещаться между отдельными возможностями настройки. Кнопками со
стрелкой вправо/влево, расположенными на пульте управления, или кнопками
"громкость+"/"громкость-", расположенными на устройстве, Вы можете изменять
настройки.
Page 79

RU - 8
Видео
Режим показа
Выбор режима Оригинал или Во весь размер экрана.
Воспроизведение
Выбор режима воспроизведения: однократно, повторить
все, повторить запись.
Музыка
Воспроизведение
Однократно
Все записи воспроизводятся один
раз.
Повторить запись
Выбранная запись повторяется в
бесконечном цикле.
Повторить все
Все записи повторяются в
бесконечном цикле.
Случайно
Все записи повторяются в случайной
последовательности.
Показать спектр
Выбор включения или отключения показа спектра при
воспроизведении музыки.
Система
Язык
Выбор желаемого языка.
Яркость
Выбор желаемой яркости экрана.
Контраст
Выбор желаемой контрастности экрана.
Насыщение
Выбор желаемой насыщенности цветов экрана.
Цветовой оттенок
Изменение цветового оттенка экрана.
Автоматическое
включение
Активация/деактивация автоматического включения.
Время включения
Выбор времени автоматического включения.
Автоматическое
отключение
Активация/деактивация автоматического отключения.
Время отключения
Выбор времени автоматического отключения.
Повторение
Настройка периодичности автоматического включения:
каждый день, с понедельника по пятницу, в конце недели,
однократно.
Громкость звука
Настройка желаемой громкости звука.
Заводские настройки
Возврат на заводские настройки.
Версия
Показывается номер текущей версии.
Обновление
Если на сайте www.intenso.de имеется обновление
микропрограммного обеспечения, то оно может быть
инсталлировано через этот пункт.
Режим автостарта
Выбор функции, которая должна быть выполнена для
запуска устройства (Foto, Musik, Video, Kalender).
Page 80

RU - 9
6) ОПИСАНИЕ ПРОДУКТА
Изображени е
Цифров ой дис пл ей T FT LCD
Размер: 15.6” дю ймов (39,62 с м видимая диагональ ф от ог рафии)
Экранный реж им: 16:9 - Р аз дельная способн ость: 1366*768 пикселей
Блок питания
Вход: 100~240В A C, 50/ 60 Гц
Выход: 9В 1.5A DC
Порт USB
USB Host 2.0 - П од держивает нос ит ел и информаци и USB
Поддержива ем ые
карты памяти
Secure Digital Card (SD™)
Secure Digital High Capacity (SDHC™)
Multimedia Card (MMC™)
Memory Stick (MS)
XD - Card
Подключени е
наушников
Гнездо 3.5 мм
Поддержи ва емый
формат
изображени я
JPEG, максим ал ьн ая раздельная с посо бность: 9000*9000 пикселей
Формат видео
MPEG 1/4, MJPEG, AVI
Скорость потока
бит ов
MP3, WMA
Рабочая
температура
0°C ~ +40°C
Измерения
~415*278*30 mm
Вес
~1150 gr.
Принадлежн ос ти
Дистанцион ное управление (вкл юч. батарею), ножка, блок питания,
многоязычная инс тр ук ция по обслуживанию
Вы не знаете, как решить проблему?
Наша горячая линия по технической поддержке клиентов ответит на Ваши вопросы:
+49 (0) 900 1 50 40 30 für 0,39 €/мин из стационарного телефона в Германии. Цены на звонки из мобильных телефонов могут
быть разными.
Желаем много радости с цифровой рамкой Интенсо!
Page 81

RU - 10
УХОД И ПРОФИЛАКТИЧЕСКИЙ ОСМОТР
Уход
Чтобы избежать импульсов тока, на удаляйт е на винты ни ко рпус.
Не используйте данный приб ор вблизи воды. Не поддава йте прибор в ли янию дождя или
влажности. Не ставьте вблизи пр ибора предметы, кот орые накапливают воду или другие виды
жидкостей.
Не устанавливайте данную фоторамку вблизи отопления, печей или других приборо в,
излучающих т епло.
Не открывайт е кор пус . Не пытайтесь ремонтировать прибор сами. Предост авьте это
профессионалам.
Избегайте использ ования на местах с песком.
Вст ав ьте в илку дл я под ключения блока питания в отв ерстие ЦФ полн остью. Только так м ож но
избеж ать электростатического заряда.
Выполняйте все подсоединения правильно и надёжно.
Не надавливайте на диспл ей. Защищайт е диспл ей от сильных солнечных лучей.
Фот орамка воспрои зводит только совмест имые фо рматы.
Фот ог рафии м огут быть защищены правами трет ьих лиц . Воспроизведение фотографий без
лицензии может быть нарушением авторских прав.
Не прикасайтесь к ЦФ во время работы металл ическими предметами.
Избегайте использ ования на подушках, дивана х или других пред метах быт а, ко то рые
под де рживают развитие тепла, так как сущ ествует о пасность перегревания прибора.
Не извлекайте карты памяти во время чтения карт. Это мо жет привести в сбоям в системе и
пот ере данных.
Не выключайте прибор во время воспроизведения.
Не упаковывайте прибор непосредственно посл е длите льного ис пользов ания. Обе спечьте
достаточное охлаж де ние. В ином случае сущ еств ует опасность перегревания .
Для обеспечения л учшего сервиса возможны изменения инструкции по обслуживанию.
Использование наушников со слишком высоким звуком может привести к долговременному
повреждению слуха.
Профилактический осмотр прибора
ПРИ БОР ДОЛЖЕН БЫТЬ ВЫКЛЮЧЕН.
НИКОГДА НЕ Б РЫЗГАЙТЕ И НЕ НАНОСИТ Е ЖИДКО СТЬ ПРЯМО НА ДИСПЛЕЙ ИЛ И КОРПУ С.
Чистка дисплея / корпуса / рамки
Протрите корпус, рам ку и д ис пл ей LCD осторо жн о мягкой, неворси с той и свободной о т химикатов
тканью. Используйт е оч истительные с ре дс тва, специально предн азначенные дл я дисплея LCD.
Утилизация старых электроприборов
Обозначенные данным символом приборы должны соответствовать европейской директиве 2002/96/EC.
Все электроприборы и старые электроприборы должны утилизироваться отдельно от домашнего мусора
через предусмотренные для этого государством пункты.
Надлежащая утилизация электроприборов и старых электроприборов служит предотвращению нанесения
вреда окружающей среде.
Page 82

 Loading...