

Page 1

Intenso 6“ PHOTOFAN
V1.0
Page 2
DE - 1
Bedienungsanleitung 6“ Intenso Digitaler Fotorahmen
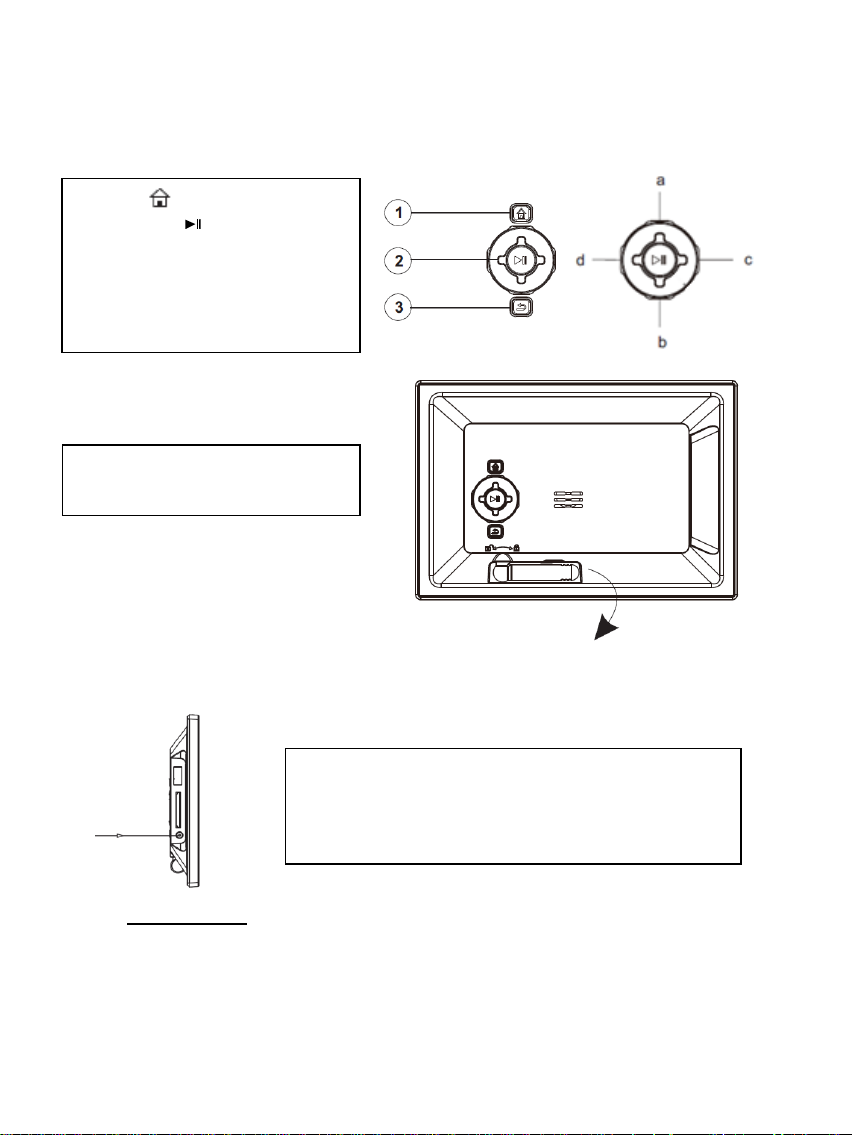
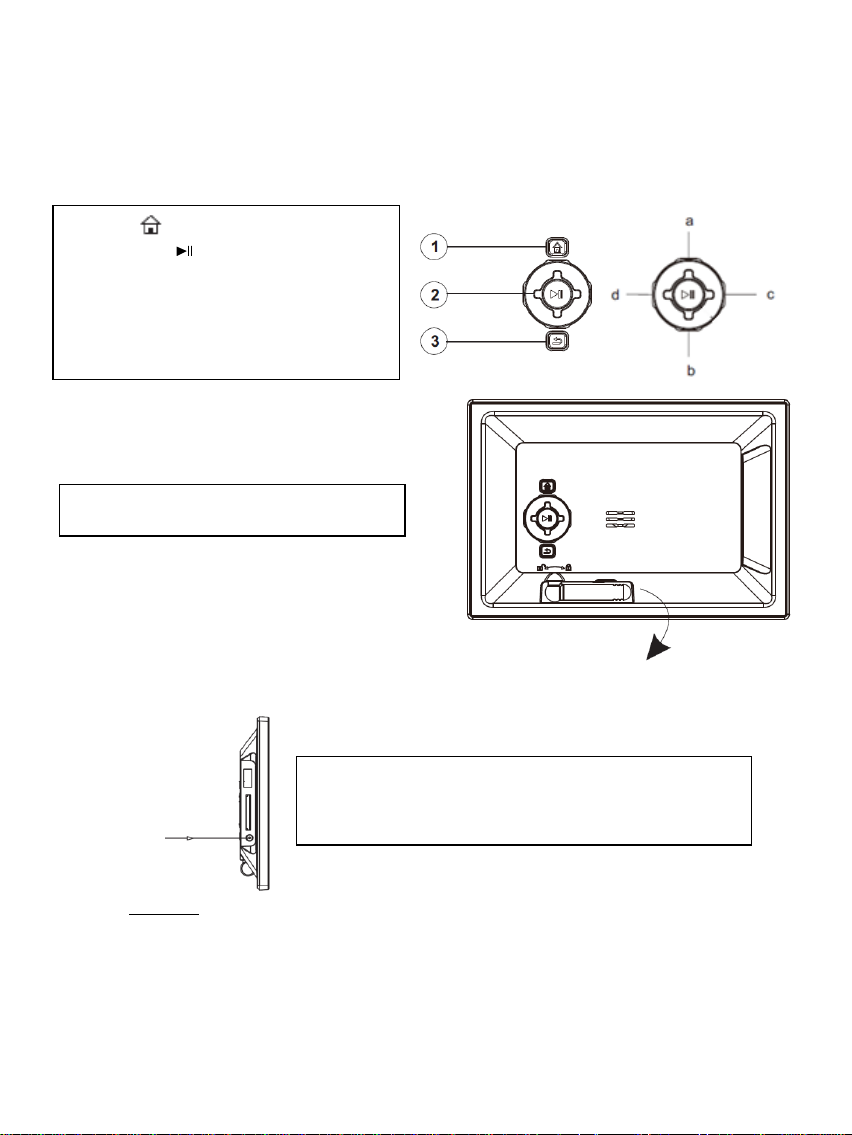
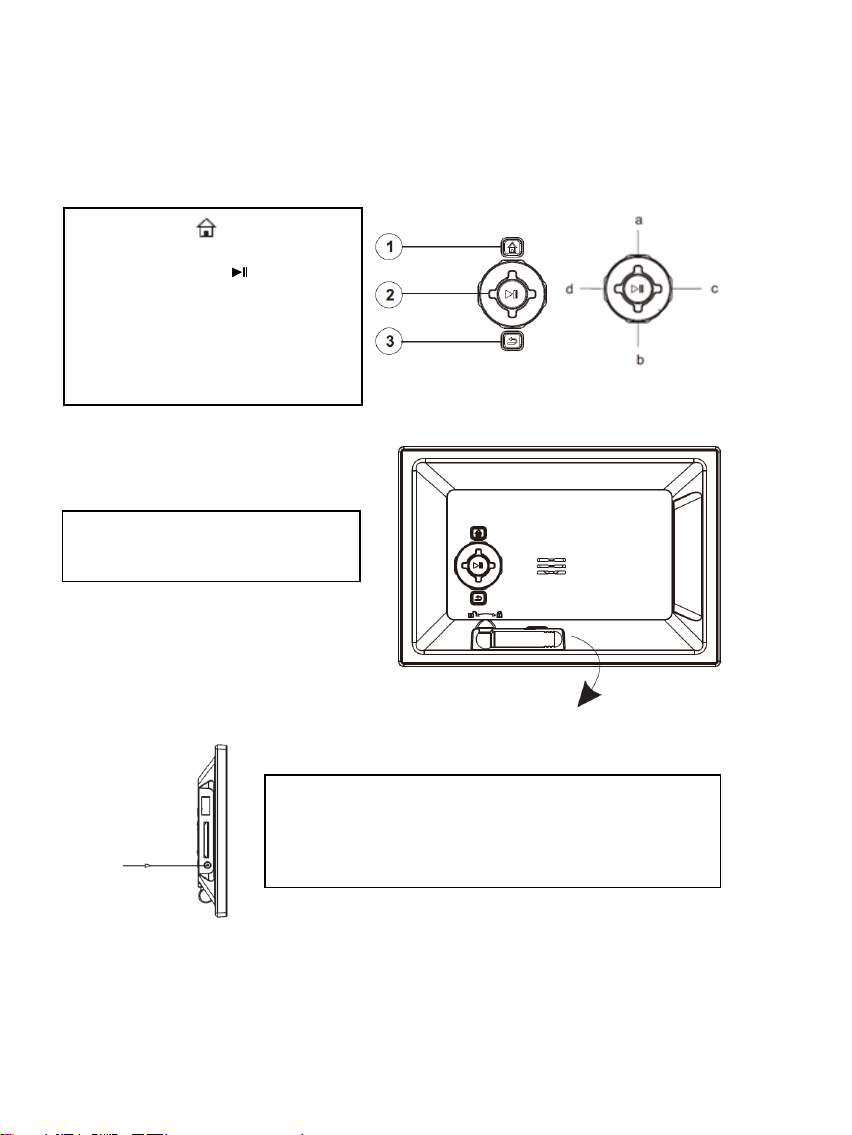
1 Home [ ] Taste - Power An/Aus
2 Play/Pause [ ] Taste
3 Zurück [] Taste
a Aufwärts [] Taste
b Abwärts [] Taste
c Rechts [] Taste
d Links [] Taste
Verbinden Sie das mitgelieferte Netzteil mit dem Digitalen
Fotorahmen (DC-IN). Stecken Sie das andere Ende des
Netzteils in die Steckdose. Der Digitale Fotorahmen startet
nun automatisch. Halten Sie die Power-Taste kurz
gedrückt, um ihn auszuschalten oder erneut einzuschalten.
Klappen Sie zum Aufstellen des
Gerätes den integrierten Standfuß
heraus.
Folgen Sie bitte dieser Anleitung, um über die verschiedenen Funktionen des Intenso Digitalen
Fotorahmens informiert zu werden.
1) Anschließen und Einschalten des Intenso Digitalen Fotorahmens
Sicherheitshinweise:
- Die Steckdose muss sich in der Nähe des Gerätes befinden und leicht zugänglich sein.
- Öffnen Sie nicht das Gehäuse des Netzadapters. Bei geöffnetem Gehäuse besteht Lebensgefahr durch
elektrischen Schlag. Es enthält keine zu wartenden Teile.
- Betreiben Sie den Netzadapter nur an geerdeten Steckdosen mit AC 100-240V~, 50/60 Hz. Wenn Sie sich der
Stromversorgung am Aufstellungsort nicht sicher sind, fragen Sie beim betreffenden Energieversorger nach.
- Benutzen Sie nur das beiliegende Netzadapter- und Netzanschlusskabel.
- Um die Stromversorgung zu Ihrem Gerät zu unterbrechen, ziehen Sie das Netzteil aus der Steckdose. Halten Sie
beim Abziehen immer das Netzteil selbst fest. Ziehen Sie nie an der Leitung.
Page 3
DE - 2
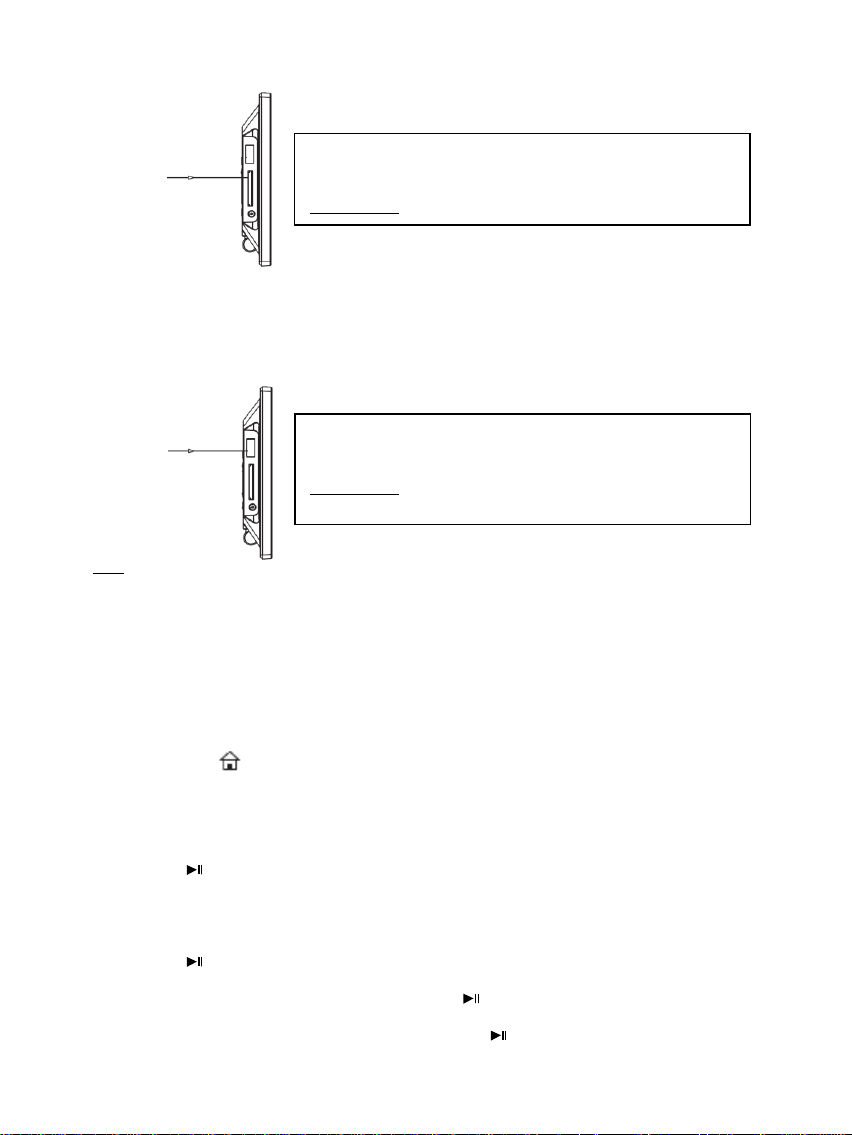
2) Einlegen von Speicherkarten | Anschließen von USB Speichermedien
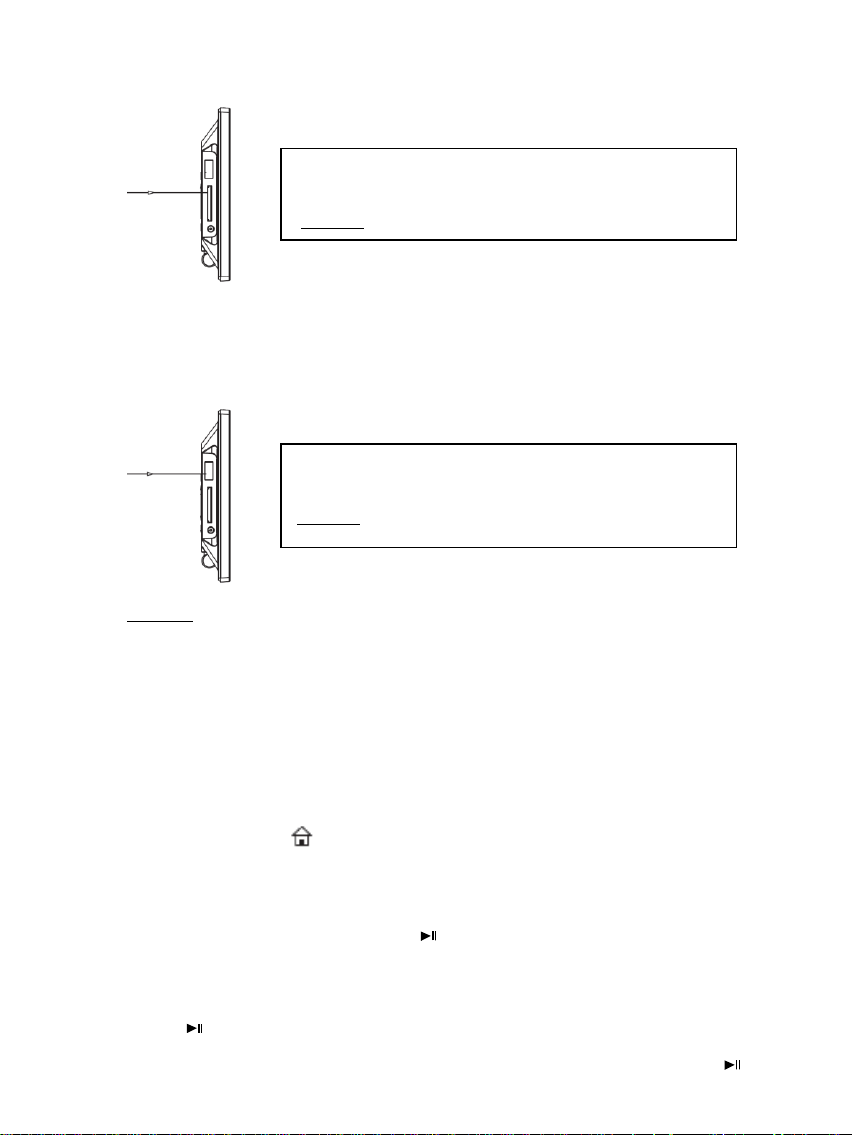
Secure Digital Card (SD™ )
Secure Digital High Capacity (SDHC™)
Multimedia Card (MMC™)
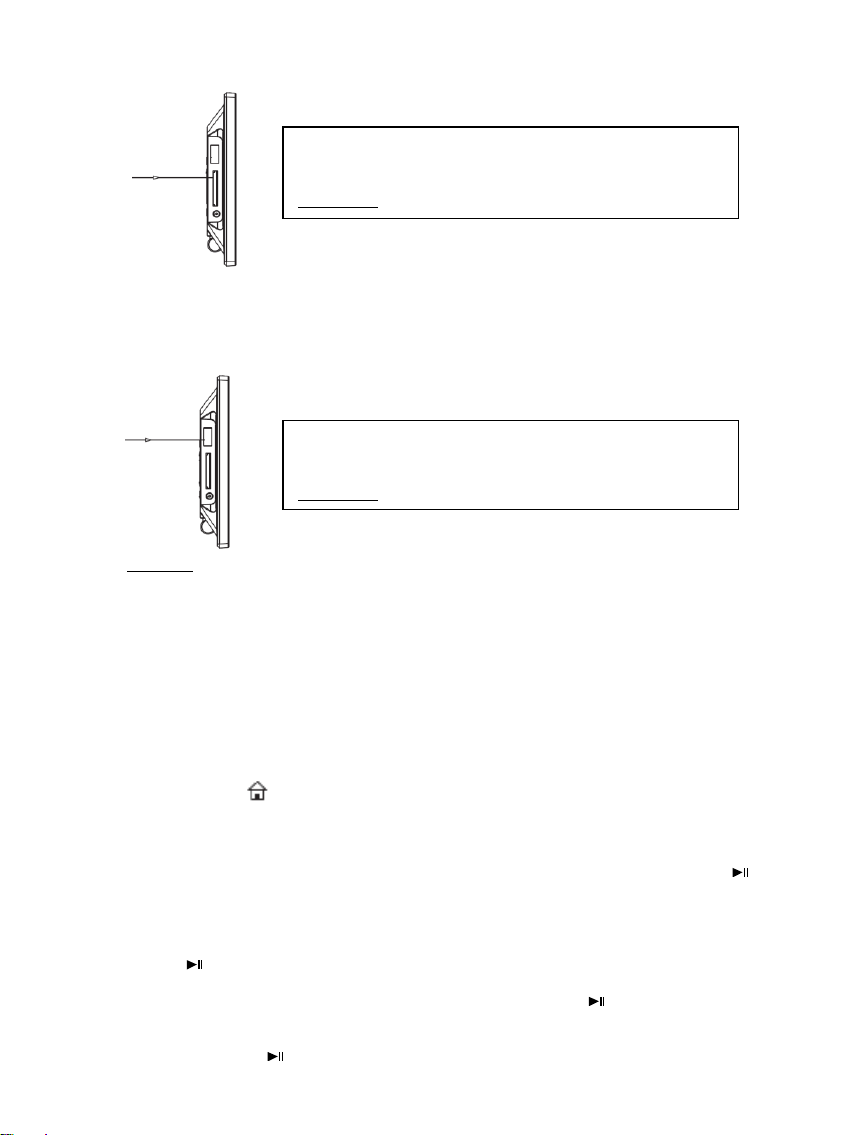
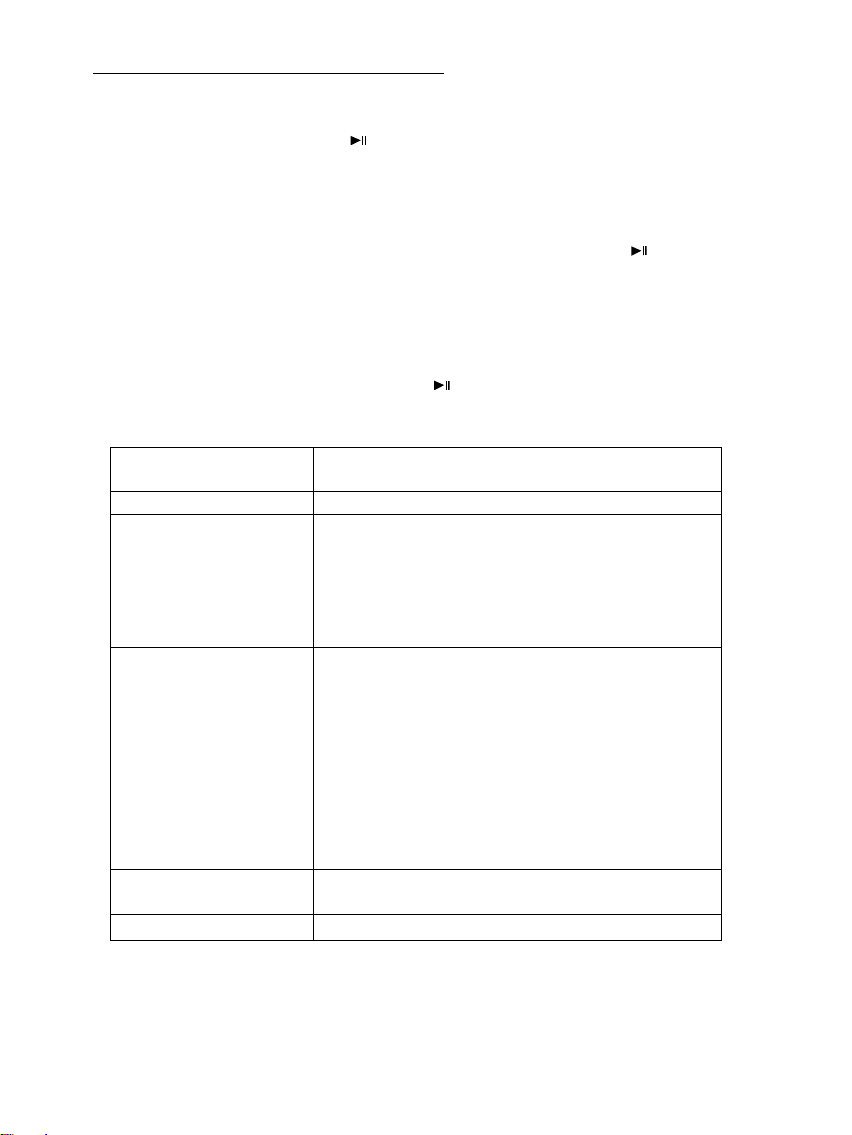
Setzen Sie die Speicherkarten mit dem Logo in Richtung
des Display schauend in den Slot des Kartenlesers ein.
Achtung: Die Karte bitte nicht mit Gewalt einsetzen!
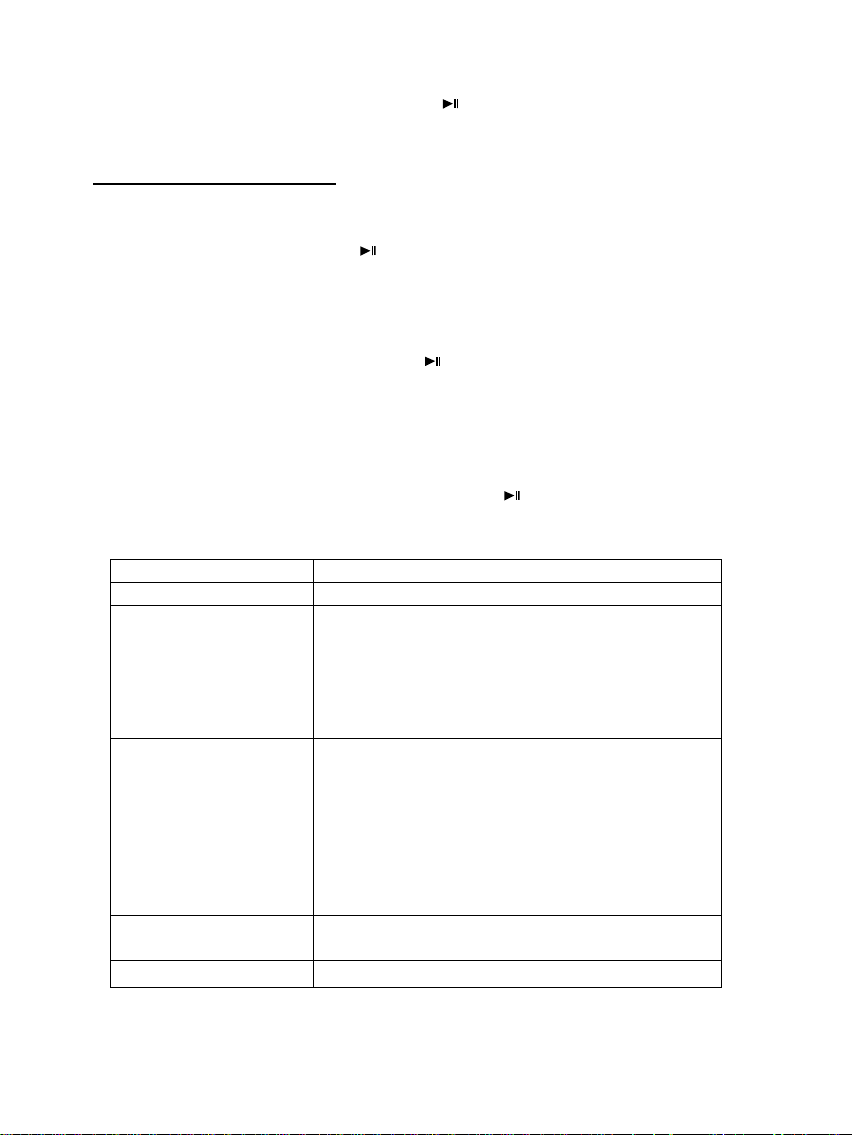
Das USB Speichermedium kann nur in einer Richtung in
den USB Slot eingesetzt werden.
Achtung: Das USB Speichermedium bitte nicht mit Gewalt
Folgende Speicherkarten - Formate werden vom Digitalen Fotorahmen unterstützt:
Hinweis: Der Digitale Fotorahmen ist nur für die Nutzung mit kompatiblen Speicherkarten
und USB 2.0 Speichermedien (100mA) ausgelegt.
3) Allgemeine Bedienung
a) Hauptmenü
Wenn Sie den Digitalen Bilderrahmen einschalten, beginnt dieser automatisch mit einer
Diashow. Haben Sie ein Speichermedium mit eigenen Fotos eingesetzt, so werden Ihnen
diese angezeigt. Alternativ zeigt das Gerät eine Diashow mit den 4 bereits vorinstallierten
Fotos.
Drücken Sie auf die Home [ ] Taste, um in das Hauptmenü zu gelangen.
Im Hauptmenü haben Sie die Auswahl zwischen den verschiedenen Funktionen des Digitalen
Fotorahmens und dem Setup Menü. Drücken Sie die , Tasten um einen Menüpunkt
auszuwählen. Durch Drücken der ▲, ▼ Tasten navigieren Sie in den jeweiligen Untermenüs.
Bestätigen Sie Ihre Wahl mit der Play/Pause [ ] Taste.
b) Anzeigen von Fotos
Navigieren Sie im Hauptmenü zu der Funktion Foto und bestätigen Sie Ihre Wahl mit der
Play/Pause [ ] Taste. Es werden Ihnen nun die verbundenen Speichermedien angezeigt. Je
nachdem, welches Speichermedium verbunden ist, haben Sie hier die Auswahl zwischen einer
Speicherkarte und einem USB Stick. Bestätigen Sie Ihre Auswahl mit der Play/Pause [ ]
Page 4
DE - 3
Taste. Es wird Ihnen jetzt das Bilder-Vorschaumenü mit allen sich auf dem Speichermedium
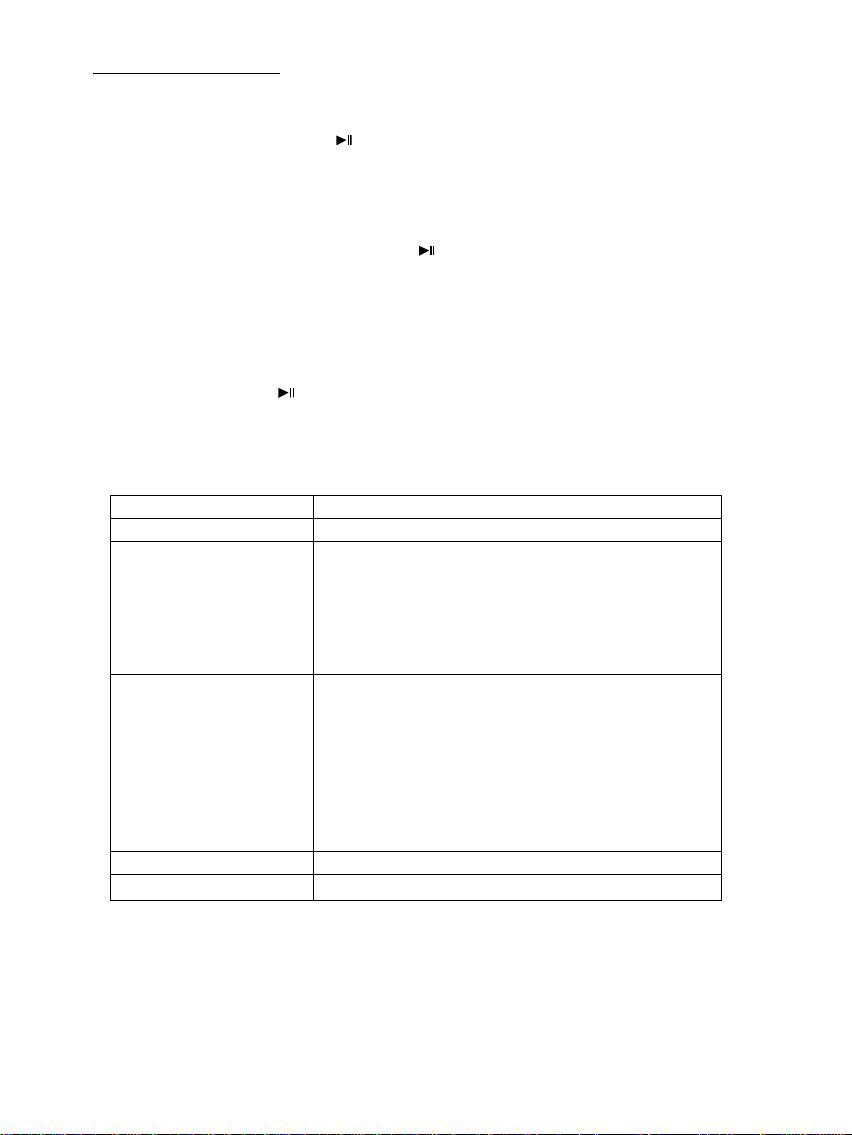
Einstellmöglichkeiten
Beschreibung
Sprache
Wählen Sie die gewünschte Sprache aus.
Foto
Wählen Sie:
- den gewünschten Übergangseffekt,
- die Anzeigedauer des Bildes,
- das gewünschte Anzeigeverhältnis und
- die Abspielfolge (Speicherreihenfolge oder
Zufällig) der Bilder aus.
Zeit
Stellen Sie:
- das aktuelle Datum,
- den Anzeigemodus für die Uhr (12/24 Stunden),
- die aktuelle Uhrzeit,
- die Anzeige der Uhr (digital, analog, analog mit
Kalender),
- die Feinjustierung der Uhr und
- den automatischen Ein- und Ausschalttimer ein.
Werkseinstellungen
Setzen Sie das Gerät wieder auf die
Werkseinstellungen zurück.
Helligkeit
Stellen Sie die Helligkeit des Displays ein.
befindenden unterstützten Bildern angezeigt. Navigieren Sie nun zu einem Foto und
bestätigen Sie Ihre Auswahl mit der Play/Pause [ ] Taste, um die Diashow von dieser Stelle
aus zu starten.
Funktionen während der Diashow:
- Durch Drücken der Pfeiltasten nach Rechts oder Links können Sie jeweils ein Foto
Vorwärts oder Zurück springen.
- Durch Drücken der Play/Pause [ ] Taste stoppen Sie die Diashow. Durch erneutes
Drücken setzen Sie die Diashow fort.
c) Uhr und Kalender
Im Uhr Modus wird Ihnen eine digitale Uhr, eine analoge Uhr oder eine analoge Uhr mit
Kalenderblatt angezeigt. Mit der Play/Pause [ ] Taste wechseln Sie die Ansicht. Durch
Drücken der ▲, ▼ Tasten navigieren Sie durch die Monatsübersicht.
d) Ändern der Einstellungen
Wählen Sie im Hauptmenü die Funktion Setup aus. Navigieren Sie mit den ▲, ▼ Tasten zu
dem gewünschten Menüpunkt. Ihnen stehen Sprache, Foto, Zeit, Werkseinstellungen und
Helligkeit zur Verfügung. Durch Drücken der Play/Pause [ ] Taste oder der ▲, ▼, , Tasten
ändern Sie je nach Menüpunkt die jeweilige Einstellung oder öffnen ein Untermenü.
Page 5
DE - 4
4) Back-Up Batterie
a) Funktion
Die Back-Up Batterie sorgt dafür, dass die Einstellungen der Uhrzeit und des Datums auch dann
erhalten bleiben, wenn das Gerät von der Stromversorgung getrennt wird.
b) Typ
Es handelt sich um eine Knopfzelle des Typs CR2032 Lithium mit 3V.
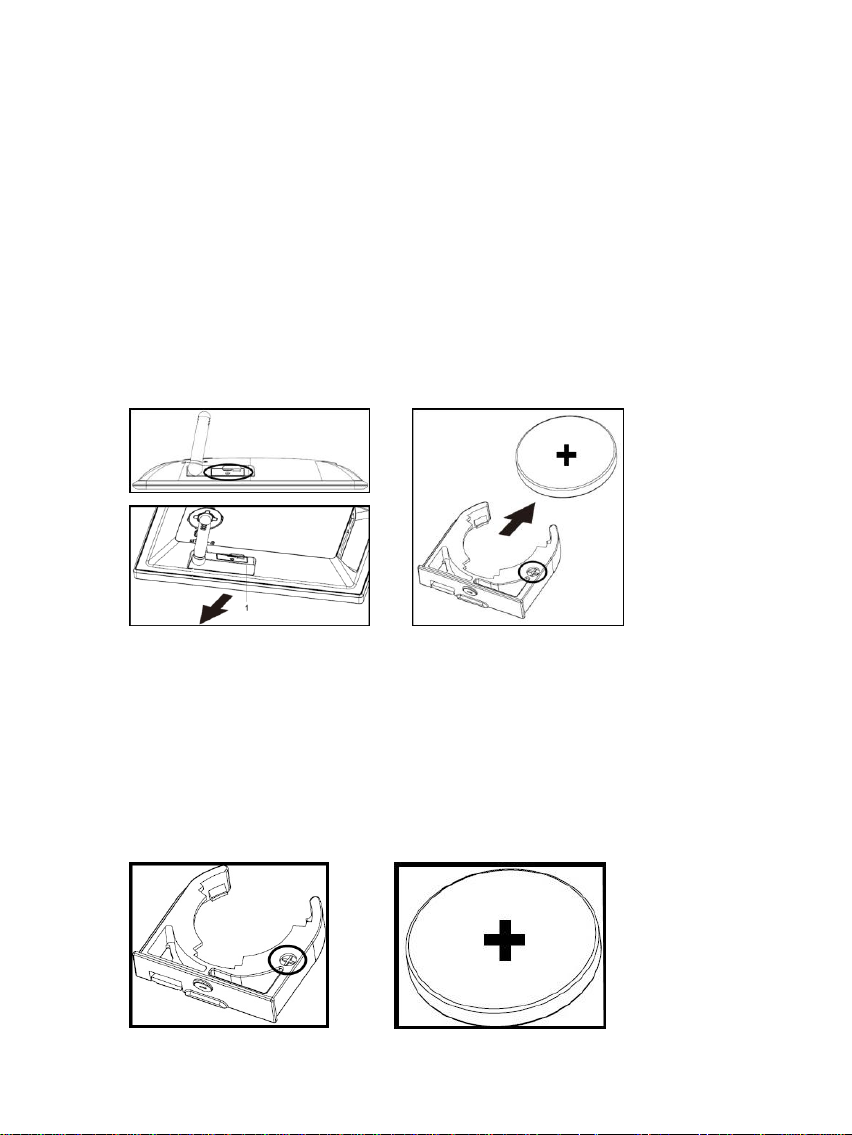
c) Batteriewechsel
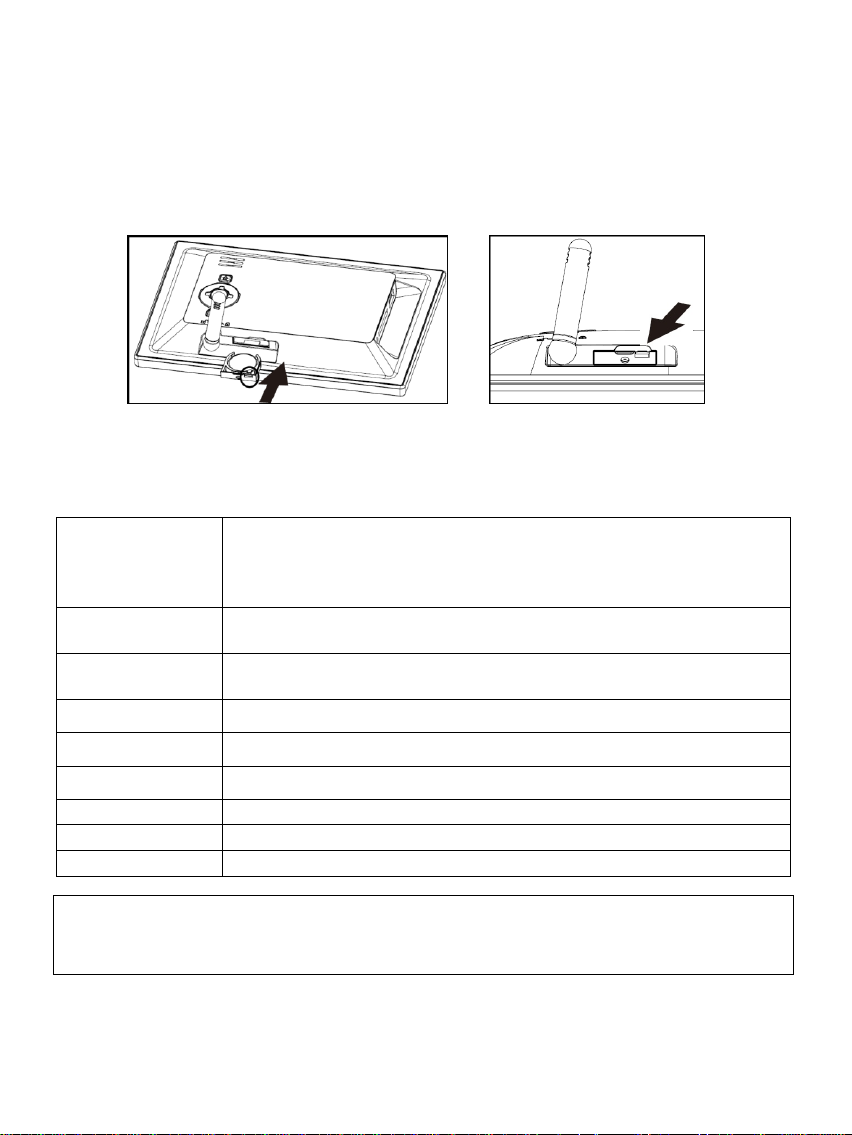
Sie können die Batterie ganz einfach selber austauschen. Gehen Sie dazu bitte wie folgt vor:
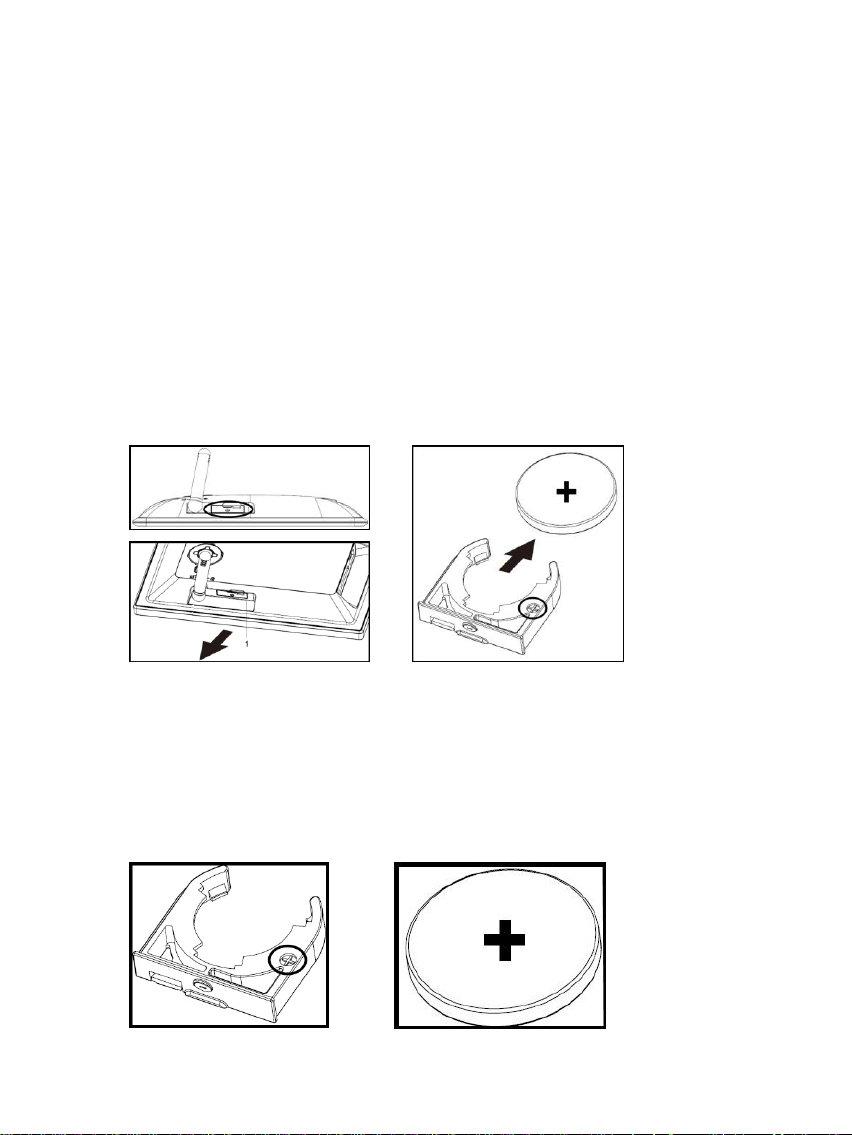
- Hinter dem Standfuß befindet sich das Batteriefach. Klappen Sie bitte den Standfuß
heraus. Drücken Sie jetzt die Sicherung des Batterieträgers (1) leicht herunter und ziehen
Sie diesen nun vorsichtig aus dem Gerät heraus.
- Ziehen Sie als nächstes die Knopfzelle einfach nach Vorne aus der Halterung.
1
- Setzen Sie jetzt die neue Knopfzelle des oben beschriebenen Typs ein.
Achten Sie bitte UNBEDINGT auf die richtige Polarität. Ein falsches Einsetzen kann
zu einem Kurzschluss führen und das Gerät beschädigen.
Auf dem Batterieträger befindet sich ein (+)-Symbol. Sie müssen die Knopfzelle so
einsetzen, dass sich der Pluspol der Knopfzelle und das (+)-Symbol des Batterieträgers
auf der gleichen Seite befinden.
Page 6

DE - 5
- Schieben Sie jetzt den Batterieträger mit der neu eingesetzten Knopfzelle zurück in das
Anzeige
Digitales TFT LCD
Display Größe: 6” Zol l (15,24 cm sichtbare Bilddiagonale)
Anzeigemodus: 16:9
Auflösung: 800*480 Pixel
Netzteil
Input: 100~240V AC, 50/60Hz
Output: 5V 1A DC
USB Port
USB Host 2.0 (High Speed)
Unterstützt USB Speichermedien
Unterstützte
Speicherkarten
SD/SDHC™ (Secure Digital Card), MMC™ ( MultiMedia Card)
Unterstütztes
Bildformat
JPEG, Maximale Auflösung:7000*7000 Pixel
Betriebstemperatur
0°C ~ +40°C
Abmessungen
170*113*22 mm
Gewicht
~180 gr.
Zubehör
Standfuß, Netzgerät, mehrsprachige Kurzanleitung
Gerätegehäuse.
Achten Sie bitte auch hier UNBEDINGT darauf, den Batterieträger richtig herum
einzusetzen. Ein falsches Einsetzen kann zu einem Kurzschluss führen und das
Gerät beschädigen.
Liegt das Gerät mit dem Display nach unten vor Ihnen, muss sich die Sicherung des
Batterieträgers auf der rechten Seite befinden und der Pluspol der Knopfzelle auf der
Unterseite sein, während Sie den Batterieträger einsetzen.
5) Produkt Spezifikationen
Wissen Sie einmal nicht weiter?
Unsere Technische Service Hotline beantwortet gerne weitere Fragen:
+49 (0) 900 1 50 40 30 für 0,39 €/Min. aus dem deutschen Festnetz. Mobilfunkpreise können abweichen.
Viel Spaß mit Ihrem Digitalen Fotorahmen von Intenso!
Page 7

DE - 6
Pflege und Wartung
Pflege
Um die Gefahr von elektrischen Stromstößen zu vermeiden, entfernen Sie bitte weder die
Schrauben noch das Gehäuse.
Benutzen Sie dieses Gerät nicht in der Nähe von Wasser. Setzen Sie dieses Gerät weder
Regen noch Feuchtigkeit aus. Stellen Sie keine Gegenstände in der Nähe des Gerätes ab,
die Wasser oder andere Flüssigkeiten speichern.
Installieren Sie diesen Bilderrahmen nicht in der Nähe von Heizungen, Öfen oder anderen
Wärme abgebenden Geräten.
Öffnen Sie das Gehäuse nicht. Versuchen Sie bitte keine eigene Reparatur. Überlassen Sie
dieses dem Fachpersonal.
Vermeiden Sie die Benutzung auf sandigen Plätzen.
Bitte stecken Sie den Netzteil-Anschluss-Stecker komplett in die vorhandene Öffnung des
DF. Nur so können Sie elektrostatische Aufladung vermeiden.
Verbinden Sie alle Anschlüsse korrekt und sicher.
Bitte drücken Sie nicht auf das Display. Schützen Sie das Display vor starker
Sonneneinstrahlung.
Der Bilderrahmen spielt nur kompatible Dateiformate ab.
Bilder können durch Rechte Dritter geschützt sein. Das Abspielen ohne Lizenz kann
Copyright Rechte verletzen.
Bitte berühren Sie den DF während des Betriebes nicht mit metallischen Gegenständen.
Bitte vermeiden Sie die Benutzung auf Kissen, Sofas oder anderen Wohngegenständen, die
eine Wärmeentwicklung unterstützen, da die Gefahr einer Überhitzung des Gerätes besteht.
Bitte entfernen Sie keine Speicherkarten während des Lesevorganges. Anderenfalls kann
es zu Systemabstürzen oder Datenverlust kommen.
Bitte stellen Sie das Gerät nicht während einer laufenden Diashow aus.
Bitte verpacken Sie das Gerät nicht direkt nach einem längeren Gebrauch. Stellen Sie eine
ausreichende Abkühlung sicher. Es besteht sonst die Gefahr der Überhitzung.
Um einen besseren Service zu gewährleisten, kann es zu Änderungen in der
Betriebsanleitung kommen.
Wartung des Gerätes
Das Gerät muss ausgeschaltet sein.
Sprühen oder Tragen Sie niemals eine Flüssigkeit direkt auf das Display oder Gehäuse auf.
Säuberung des Displays / Gehäuses / Rahmens
Wischen Sie Gehäuse, Rahmen und LCD Display vorsichtig mit einem weichen, fussel- und
chemikalienfreien Tuch ab. Verwenden Sie nur Reinigungsmittel, die speziell für LCD-Displays
bestimmt sind.
Entsorgung von Elektro-Altgeräten
Die mit diesem Symbol gekennzeichneten Geräte unterliegen der europäischen
Richtlinie 2002/96/EC. Alle Elektro- und Elektroaltgräte müssen getrennt vom Hausmüll
über die dafür vorgesehenen staatlichen Stellen entsorgt werden.
Mit der ordnungsgemäßen Entsorgung von Elektro-Altgeräten vermeiden Sie
Umweltschäden.
Page 8

Page 9
EN - 1
Operating instructions for 6" Intenso Digital Photo Frame
1 Power On/Off
2 Exit [] Button
3 Play/Pause [ ] Button
4 Up [] Button
5 Down [] Button
6 Left [] Button
7 Right [] Button
To set up the device fold out the integrated
stand.
1 Home [ ] Taste - Power On/Off
2 Play/Pause [ ] Button
3 Back [] Button
a Up [] Button
b Down [] Button
c Right [] Button
d Left [] Button
Connect the Power Adapter supplied with the frame (DCIN). Plug the other end of the Adapter into the Socket. The
photo frame will now start automatically. Hold down the
Power button briefly to turn it off or on again.
Please comply with the following instructions to be informed about the different functions of the
Intenso digital photo frame.
1) Connect and switch on the digital photo frame
Please note:
- The plug must be placed next to the device so to be easily accessible.
- Do not open the box of the line adapter. If the box is open, there is danger of life caused by electric shock. The
product does not contain parts to be maintained.
- Actuate the line adapter only with earthed plugs of AC 100-240V~, 50/60 Hz. If you are not sure about the provision
of electricity at the installation point, ask your energy provider.
- Use the included line adapter and line connection cable only.
- To interrupt the power supply of your equipment, unplug the adapter. While you are unplugging it, always hold the
adapter. Do never pull the cable.
Page 10
EN - 2
2) Insert memory cards | connect USB data carriers
Secure Digital Card (SD™ )
Secure Digital High Capacity (SDHC™)
Multimedia Card (MMC™)
Insert the Memory Card with the Logo towards the
Display into the card reader slot.
Please note: Never insert cards by use of force!
USB data carriers can only be plugged into the USB slot in
one direction.
Please note: Never insert USB data carriers
by use of force!
The following memory card formats can be used with your digital photo frame:
Note: The digital photo frame is exclusively designed for the use with compatible memory cards and 2.0 data media (100 mA).
3) General operation
a) Main menu
When you turn on the digital picture frame, it will automatically begin to display a slide show. If
you have a storage medium with own photos inserted, those will be shown. Alternatively, the
device will show the 4 preinstalled photos.
Press the Home [ ] button to open the main menu.
In the main menu, you can chose different functions of the Digital Picture Frame and of the
Setup menu. Press the , button to select a menu option. By pressing the ▲, ▼ buttons
you can navigate through the respective submenus. Confirm your selection by pressing the
Play/Pause [ ] button.
b) Viewing photos
From the main menu navigate to the photo function and confirm your selection by pressing the
Play/Pause [ ] button. Now the connected storage mediums are shown. Depending on which
medium is connected, you can chose between a memory card and an USB flash drive.
Confirm your selection by pressing the Play/Pause [ ] button. The image preview menu will
now open and display all supported images saved on the storage medium. Navigate to a photo
and confirm your selection by pressing the Play/Pause [ ] button to start the slide show from
this position on.
Page 11
EN - 3
Options during slide show:
Setting possibilities
Description
Language
Select your desired language.
Photo
Select:
- the desired transition effect,
- the image display duration,
- the desired display ratio and
- the display sequence (order of storage or
random).
Time
Adjust:
- the current date,
- the hour display mode (12/24 hours),
- the current hour
- the hour display (digital, analogue, analogue with
calendar),
- the hour fine adjustment and
- automatic On and Off timer.
Default Settings
Reset the device to its factory setting.
Brightness
Adjust the brightness of the display.
- By pressing the arrow buttons to the left or to the right you can skip a photo forward or
backwards.
- By pressing the Play/Pause [ ] button you stop the slide show. By pressing it again the
slide show continues.
c) Hour and calendar
In the hour mode a digital clock, an analogue clock or an analogue clock with calendar
sheet is shown. By pressing the Play/Pause [ ] button you change the display. By pressing the
▲, ▼ buttons you can navigate through the monthly overview.
d) Changing the settings
From the main menu select the option Setup. With the ▲, ▼ buttons navigate to your desired
menu option. You can chose of language, photo, hour, factory setting and brightness. By
pressing the Play/Pause [ ] button or ▲, ▼, , buttons you can modify the settings
according to menu option or open a submenu.
Page 12
EN - 4
4) Back-Up Battery
a) Function
The back-up battery makes sure that the time and data settings are maintained if the device is
disconnected from the electrical power supply.
b) Type
It is a coin cell of the type CR2032 lithium of 3V.
c) Battery Change
You can change the battery by your own in a simple way. Please proceed as follows:
- Behind the stand support there is the battery case. Please swivel out the stand support.
Now press the locking device of the battery tray slightly downwards and extract it
attentively from the device.
1
- As next extract the coin cell simply ahead from the support.
- Now insert the new coin cell of the type described above.
Please pay ABSOLUTELY attention that the poles of the coin cell (+) and (-)
correspond with the designation on the battery support. The wrong insertion can
cause short-circuit and damage the device.
On the battery tray there is a (+) symbol. You have to insert the coin cell so that the plus
pole of the coin cell and the (+) symbol of the battery tray are on the same side.
Page 13
EN - 5
- Now shift the battery tray with the newly inserted coin cell back into the device case.
Display
Digital TFT LCD
Display size: 6 inch (15,24 cm diagonal viewable image)
Display modus: 16:9
Resolution: 800*480 pixels
Power supply
Input: 100~240V AC, 50/60Hz
Output: 5V 1A DC
USB port
USB Host 2.0 (High Speed)
Supports USB storage mediums
Memory cards
supported
SD/SDHC™ (Secure Digital Card), MMC™ ( Multi Media Card)
Picture size
supported
JPEG, max. resolution: 7000*7000 pixels
Operating
temperature
0°C ~ +40°C
Dimensions
170*113*22 mm
Weight
~180 gr.
Accessory
Foot, Power supply, multi-lingual operating instruction
Please pay ABSOLUTELY attention to insert the battery tray correctly. The wrong
insertion can cause short-circuit and damage the device.
If the device with the display is positioned downwards in front of you, the locking device of
the battery tray must be on the right side and the plus pole of the coin cell on the under part
while you are inserting the battery tray.
5) Product Specifications
You need help?
Simply call our Technical Service Hotline at:
+49 (0) 900 1 50 40 30 for 0.39 €/Min. with calls from the German telephone network. Different rates
may apply to calls from mobile phones.
Enjoy Intenso’s digital photo frame!
Page 14
EN - 6
Service and Maintenance
Care
In order to prevent danger from electric current do neither remove screws nor the
case of the weather station.
Do not operate this device near water. Do not expose the device to rain and
moisture. Do not put any objects which store water or other fluids near the device.
Do not install the picture near heaters, ovens or other heat issuing devices.
Do not open the case. Do not try to repair the device yourself but have it repaired
by qualified personnel only.
Avoid using the device on sandy areas.
Fully insert the power supply plug into the opening of the Intenso weather station.
This will prevent electrostatic charge.
Correctly and safely connect all ports.
Do not push onto the display. Protect the display from direct sunlight.
The picture frame only plays compatible data formats.
Images may be protected by the rights of third persons. The play back without
licence may infringe copyrights.
When in operation, do not touch the Intenso weather station with metal objects.
Avoid operating the device on pillows, sofas or other objects which support the
development of heat as there is danger of overheating of the device.
Do not remove memory cards during read operation. This may cause system crash
or data loss.
Do not switch off the device during an ongoing slide show.
Do not wrap up the device directly after longer use. Ensure sufficient enough
cooling. Otherwise, there is danger of overheating.
In order to ensure a better service, changes of the operating instructions may be
necessary.
Maintenance of the device
The device must be switched off.
Never spray or apply a fluid directly onto the display or case.
Cleaning the displays / case / frame
Carefully wipe the case, frame and LCD display with a soft cloth free from
lint and chemicals. Only use cleaning agents which are specifically
designed for LCD displays.
Disposal of electrical waste
Devices marked with this symbol are subject to the EG
Directive 2002/96/EG.
All electrical appliances and old appliances must be disposed
off separately from the household waste and are to be returned
to the state authorities designed for that purpose.
By correctly disposing of electrical old appliances
environmental damage may be prevented.
Page 15
Page 16
IT- 1
Istruzioni d‘uso per foto digitale da 6“ di Intenso
1 Power Acceso/Spento
2 Tasto Interruzione []
3 Tasto Play/Pause [ ]
4 Tasto Sú []
5 Tasto Giú []
6 Tasto Sinistra []
7 Tasto Destra []
Ribalti verso l’esterno il piedino
integrato per posizionare
l’apparecchio.
1 Tasto Home [ ] - Power
Acceso/Spento
2 Tasto Play/Pause [ ]
3 Tasto Interruzione []
a Tasto Sú []
b Tasto Giú []
c Tasto Destra []
d Tasto Sinistra []
Colleghi l‘adattatore incluso nel volume di consegna con la
cornice di foto digitale (DC-IN). Inserisca l’altra estremità
dell‘adattatore nella presa. La cornice di foto digitale ora
si avvia automaticamente. Tenga premuto brevemente il
tasto Power per spegnerla o riaccenderla.
La preghiamo di seguire queste istruzioni per essere informata/o riguardo alle diverse funzioni della
cornice di foto digitale Intenso.
1) Collegare e accendere la Cornice per foto digitali
Attenzione:
- La presa deve trovarsi nei pressi dell’apparecchio ed essere facilmente accessibile.
- Non apra l’involucro dell’adattatore. L’involucro aperto causa pericolo di vita mediante scossa elettrica.
L’apparecchio non contiene componenti che necessitano manutenzione.
- Metta in funzione l’adattatore solo con delle prese dotate di messa a terra AC 100-240V~, 50/60 Hz. Se avesse dei
dubbi riguardanti l’approvvigionamento elettrico nel luogo d’installazione, si rivolga al rispettivo fornitore di servizi
elettrici.
- Utilizzi esclusivamente l’adattatore e il cavo di connessione inclusi nel volume di consegna.
- Per interrompere l’approvvigionamento del Suo apparecchio con corrente, estragga l’adattatore dalla presa.
Durante l’estrazione tenga sempre l’adattatore. Non tiri mai il condotto.
Page 17
IT- 2
2) Inserire schede di memoria | Collegare dispositivi di archiviazione USB
Secure Digital Card (SD™ )
Secure Digital High Capacity (SDHC™)
Multimedia Card (MMC™)
Inserisca le schede di memoria con il logo rivolto verso il
display all’interno dello slot di lettura per schede.
Attenzione: Non forzare l'inserimento della scheda!
La chiave USB può essere inserita esclusivamente in
direzione dello slot USB.
Attenzione: Non inserire la chiave USB con forza!
L'IPA supporta i seguenti formati di schede di memoria:
Attenzione: La cornice per foto digitale è prevista esclusivamente per l’uso con schede di memoria compatibili e supporti
di dati USB 2.0 (da 100 mA).
3) Utilizzazione generale
a) Menu principale
Quando accende la cornice foto digitale, questa inizia automaticamente con una riproduzione
diapositive. Se ha inserito un mezzo di memorizzazione con delle foto proprie, queste Le
vengono visualizzate. In alternativa l’apparecchio mostra una riproduzione di diapositive con 4
foto preinstallate.
Prema il tasto home [ ] per passare al menu principale.
Nel menu principale può selezionare tra le diverse funzioni della cornice foto digitale e il
menu delle impostazioni. Prema i tasti , per selezionare un punto del menu. Premendo i
tasti ▲, ▼ naviga nei rispettivi sub-menu. Confermi la Sua scelta con il tasto Play/Pause [ ] .
b) Visualizzazione di foto
Navighi nel menu principale verso la funzione foto e confermi la Sua scelta con il tasto
Play/Pause [ ]. Ora Le vengono visualizzati i mezzi di memorizzazione collegati. A seconda
del mezzo di memorizzazione collegato, qui ha la scelta tra una scheda di memorizzazione e
una chiave USB. Confermi la Sua selezione con il tasto Play/Pause [ ]. Ora Le viene
visualizzato il menu di anteprima delle immagini con tutte le immagini supportate che si
trovano sul mezzo di memorizzazione. Ora navighi verso una foto e confermi la Sua selezione
con il tasto Play/Pause [ ] per avviare la riproduzione delle diapositive da questo punto.
Page 18
IT- 3
Funzioni durante la riproduzione delle diapositive:
Possibilità di
impostazione
Descrizione
Idioma
Selezioni l’idioma desiderato.
Foto
Selezioni:
- L’effetto di passaggio desiderato,
- La durata di visualizzazione dell‘immagine,
- Il rapporto di visualizzazione desiderata e
- La sequenza di riproduzione (sequenza di
memorizzazione o casuale) delle immagini.
Tempo
Imposti:
- La data attuale,
- La modalità di visualizzazione dell’orologio (12/24
ore),
- L’orario attuale,
- La visualizzazione dell’orologio (digitale,
analogico, analogico con calendario),
- L’aggiustamento fine dell’orologio e
- Il timer automatico per accensione e
spegnimento.
Impostazioni predefinita
Effettui il reset dell’apparecchio sulle impostazioni di
fabbrica.
Luminosità
Imposti il livello luminoso del display.
- Premendo i tasti a freccia verso destra o sinistra, può rispettivamente passare alla foto
successiva o precedente.
- Premendo il tasto Play/Pause [ ] interrompe la riproduzione delle diapositive.
Premendo nuovamente continua la riproduzione delle diapositive.
c) Orologio e calendario
Nella modalità orologio Le viene visualizzato un orologio digitale, un orologio analogico o
un orologio analogico con foglio di calendario. Con il tasto Play/Pause [ ] cambia la
veduta. Premendo i tasti ▲, ▼ naviga attraverso il riepilogo del mese.
d) Modifica delle impostazioni
Nel menu principale selezioni la funzione setup. Navighi con i tasti ▲, ▼ verso il punto del
menu desiderato. Sono a Sua disposizione idioma, foto, orario, impostazioni di fabbrica e livello
di illuminazione. Premendo il tasto Play/Pause [ ] o i tasti ▲, ▼, , modifica la rispettiva
impostazione a seconda del punto del menu o apre un sub-menu.
Page 19

IT- 4
4) Batteria Back-Up
a) Funzione
La batteria Back-Up serve a mantenere le impostazioni dell’orario e della data anche quando
l’apparecchio viene separato dall’approvvigionamento della corrente.
b) Tipo
Si tratta di una piletta del tipo CR2032 al litio di 3V.
c) Cambio delle batterie
Può semplicemente cambiare la batteria da solo. Per farlo proceda come segue:
- Dietro al piedino si trova il comparto delle batterie. La preghiamo di estrarre il piedino.
Prema dunque leggermente verso il basso il fusibile del supporto delle batterie e lo
estragga dunque attentamente dall’apparecchio.
1
- Estragga dunque la piletta in avanti dal supporto.
- Ora inserisca la nuova piletta del tipo sopra descritto.
Faccia ASSOLUTAMENTE attenzione al fatto che i poli della piletta (+) e (-)
corrispondano alla designazione sul supporto delle batterie. L’inserimento errato può
causare un corto circuito, danneggiando l’apparecchio.
Sul supporto delle batterie si trova un simbolo (+). Deve inserire la piletta in modo tale che
il polo positivo della piletta e il simbolo (+) del supporto delle batterie si trovino sullo
stesso lato.
Page 20

IT- 5
- Spinga dunque indietro il supporto delle batterie con la nuova piletta inserita indietro
Visualizzazione
Schermo LCD TFT digitale
Dimensioni schermo: 6" (15,24 cm di diagonale immagine visibile)
Modo di visualizzazione: 16:9
Risoluzione: 800*480 pixel
Adattatore
Input: 100~240V AC, 50/60Hz
Output: 5V 1A DC
Porta USB
Host USB 2.0 dispositivo
Supporta le chiavi di memoria USB
Schede di memoria
supportate
SD/SDHC™ (Secure Digital Card), MMC™ ( MultiMedia Card)
Formato immagine
supportato
JPEG, risoluzione massima:7000*7000 pixel
Temperatura di
funzionamento
0°C ~ +40°C
Dimensioni
170*113*22 mm
Peso
~180 gr.
Accessori
Piedino, adattatore, istruzioni d'uso in diverse lingue
nell’involucro dell’apparecchio.
Faccia ASSOLUTAMENTE attenzione a inserire il supporto delle batterie nella
direzione giusta. L’inserimento errato può causare un corto circuito, danneggiando
l’apparecchio.
Se l’apparecchio si trova davanti a Lei con il display rivolto verso il basso, il fusibile del
supporto delle batterie si deve trovare sul lato destro e il polo positivo della piletta sul lato
inferiore, mentre inserisce il supporto delle batterie.
5) Specifiche del Prodotto
Non sa come procedere?
Il nostro numero verde di supporto tecnico risponde volentieri ad altre domande:
+49 (0) 900 1 50 40 30 al costo di 0,39 €/min. da rete fissa tedesca. I prezzi delle rete dei cellulari
possono variare.
Buon divertimento con la Sua Cornice per foto digitali Intenso!
Page 21

IT- 6
Cura e Manutenzione
Cura
Per evitare il pericolo di scosse elettriche La preghiamo di non levare viti e/o involucro.
Non usi quest’apparecchiatura vicino all’acqua. Non esponga quest’apparecchiatura a pioggia e/o umidità.
Non depositi oggetti che conservano acqua o altri liquidi vicino a quest’apparecchiatura.
Non installi questa cornice di foto vicino a termosifoni, fori o altre apparecchiature che producono calore.
Non apra l’involucro. La preghiamo di non cercare di riparare l'apparecchiatura. Lasci questo lavoro al
personale specializzato.
Eviti l'uso in luoghi sabbiosi.
La preghiamo di inserire tutta la presa di collegamento dell’adattatore nell’apertura presente sulla CF . Solo
in questo modo Lei riesce ad evitare il caricamento elettrostatico.
La preghiamo di non esercitare pressione sullo schermo. Protegga lo schermo da forte insolazione.
La cornice delle immagini riproduce esclusivamente formati di file compatibili.
Le immagini possono essere protette da diritti di terzi. La riproduzione priva di licenza potrebbe violare i
diritti d’autore.
Durante il funzionamento La preghiamo di non toccare la CF con oggetti metallici.
La preghiamo di evitare l’uso di cuscini, divani o altri oggetti di arredamento che sostengono la formazione
di calore, visto che sussiste il rischio di surriscaldare l’apparecchiatura.
La preghiamo di non togliere le schede di memoria durante il procedimento di lettura. Altrimenti si possono
avere interruzioni di sistema o perdita di dati.
La preghiamo di non spegnere l’apparecchiatura durante un diashow in corso.
La preghiamo di non imballare direttamente l’apparecchiatura dopo un lungo periodo di non uso. Si assicuri
che si sia raffreddata a sufficienza. Altrimenti si ha il rischio che si surriscaldi.
Per garantire un servizio migliore, si possono avere modifiche delle istruzioni d‘uso.
Manutenzione dell‘apparecchiatura
L’app ar ecchiatura deve essere spenta.
Non spruzzi o non applichi in nessun caso un liquido direttamente sullo schermo o sull´involucro.
Pulizia di schermo / involucro / cornice
Terga l’involucro, la cornice e lo schermo LCD con cautela, utilizzando una pezza morbida, senza pelucchi e
sostanze chimiche. Utilizzi esclusivamente detergenti appositamente destinati agli schermi LCD.
Smaltimento di apparecchiature elettroniche usate
Le apparecchiature caratterizzate con questo simbolo sottostanno alla direttiva CEE/2002/96.
Tutte le apparecchiature elettroniche ed elettriche usate devono essere smaltite separatamente
dai rifiuti domestici pressi i punti di smaltimento previsti dallo stato.
Smaltendo correttamente le apparecchiature elettroniche usate evita danni all’ambiente.
Page 22

Page 23

FR - 1
Instructions d’utilisation cadre photo numériques 6" Intenso
1 Power On/Off
2 Touche Stop []
3 Touche Play/Pause [ ]
4 Touche En amont []
5 Touche En aval []
6 Touche Gauche []
7 Touche Droite []
Pour poser le dispositif, déplier le
pied-support incorporé.
1 Home [ ] - Power On/Off
2 Touche Play/Pause [ ]
3 Touche Stop []
a Touche en amont []
b Touche en aval []
c Touche Droite []
d Touche Gauche []
Veuillez suivre les instructions de cette notice pour obtenir toute l'information sur les différentes
fonctions du cadre photo numérique d’Intenso.
1) Connecter et mettre le cadre photo numérique en marche
Attention:
- La prise doit se trouver à proximité de l'appareil et être facilement accessible.
- N'ouvrez pas le boîtier de l'adaptateur réseau. Si vous ouvrez le boîtier, il existe un danger de mort par décharge
électrique. Il ne contient aucune pièce à entretenir.
- Ne branchez l'adaptateur réseau que sur des prises de terre de AC 100-240V~, 50/60 Hz. Si vous n'êtes pas sûr(e)
de l'alimentation en courant sur le lieu de montage, veuillez vous renseigner auprès du fournisseur d'énergie
compétent.
- N'utilisez que l'adaptateur réseau et les câbles de raccordement au réseau ci-inclus.
- Pour interrompre l’alimentation de votre appareil, nous vous prions de débrancher l’adaptateur de la prise. Lorsque
vous connectez l’adaptateur, tenez-le fermement, en ne tirant jamais le câble.
Connectez l’adaptateur secteur fourni à l’écran photo (DC-IN).
Branchez l'autre extrémité de l’adaptateur dans la prise.
L’écran photo démarre alors automatiquement. Maintenez la
touche power brièvement enfoncée pour désactiver ou
réactiver l’appareil.
Page 24

FR - 2
2) Mettre la carte de mémoire | Connecter le module de mémoire USB
Secure Digital Card (SD™ )
Secure Digital High Capacity (SDHC™)
Multimedia Card (MMC™)
Insérez les cartes mémoire avec le logo dans le sens de
l’écran d'affichage dans les périphériques de stockage.
Attention : N’insérez pas la carte avec trop de force !
Le module de mémoire USB ne peut être mis qu’en un seul
sens.
Attention : N’insérez pas le module de mémoire avec trop
de force !
Les formats de carte de mémoire suivants sont supportés :
Attention: Le cadre photo numérique est conçu uniquement pour une utilisation avec des cartes mémoire compatibles et
un support d'enregistrement USB 2.0 (100mA).
3) Utilisation générale
a) Menu principal
Lorsque vous allumez le cadre photo numérique, celui-ci lance automatiquement un
diaporama. Si vous avez inséré un support de mémoire avec vos propres photos, celles-ci
seront affichées. Dans le cas contraire, le dispositif présente un diaporama avec les 4 photos
préenregistrées.
Appuyez sur la touche Home [ ] pour accéder au menu principal.
Dans le menu principal, vous avez le choix entre les différentes fonctions du cadre photo
numérique et le menu de configuration. Appuyez sur les touches , pour sélectionner une
option de menu. En appuyant sur les touches ▲, ▼ vous naviguez dans les sous-menus
correspondants. Confirmez votre choix avec la touche Play/Pause [ ].
b) Affichage de photos
Naviguez dans le menu principal jusqu'à la fonction photo et confirmez votre choix à l’aide
de la touche Play/Pause [ ]. Les supports mémoire reliés sont alors affichés. Selon le type
de support mémoire connecté, vous avez le choix entre une carte mémoire et une clé USB.
Confirmez votre sélection avec la touche Play/Pause [ ]. Le menu d’aperçu des photos
s'affiche alors, avec toutes les photos supportées se trouvant sur le support-mémoire.
Page 25

FR - 3
Naviguez jusqu’à une photo et confirmez votre sélection à l'aide de la touche Play/Pause [ ]
Option de
configuration
Description
Langue
Sélectionnez la langue souhaitée.
Photo
Choisissez :
- l’effet de transition souhaité,
- la durée d’affichage de la photo,
- le rapport d’affichage souhaité et
- l’ordre de présentation des photos (séquence
enregistrée ou au hasard).
Heure
Réglez :
- la date actuelle,
- le mode d’affichage pour l’heure (12/24 heures),
- l’heure actuelle,
- l’affichage de l'heure (numérique, analogique,
analogique avec calendrier),
- le réglage fin de l’heure et
- la minuterie de mise en marche et d’arrêt
automatique.
Réglages par défaut
Réinstallez les réglages par défaut en réinitialisant le
dispositif.
Luminosité
Réglez la clarté de l’écran.
pour lancer le diaporama à partir de ce point.
Fonctions pendant le diaporama :
- En appuyant sur les flèches allant vers la droite ou vers la gauche, vous pouvez passer
d’une photo à l’autre, vers l’avant ou en arrière.
- En appuyant sur la touche Play/Pause [ ], vous stoppez le diaporama. En appuyant à
nouveau, le diaporama continue.
c) Heure et calendrier
Dans le mode heure, l'heure est affichée en format numérique, analogique ou analogique
avec page de calendrier. Vous changez d'affichage à l’aide de la touche Play/Pause [ ]. En
appuyant sur les touches ▲, ▼ vous naviguez à travers l'aperçu du mois.
d) Modification des configurations
Sélectionner la fonction Setup dans le menu principal. Naviguez avec les touches ▲, ▼ pour
aller à l'option de menu souhaitée. Vous avez à votre disposition langue, photo, heure, réglages
par défaut et clarté. En appuyant sur la touche Play/Pause [ ] ou les touches ▲, ▼, , , vous
changez la configuration correspondante selon l’option de menu ou vous ouvrez un sous-menu.
Page 26

FR - 4
4) Pile de sauvegarde
a) Fonction
La pile de sauvegarde permet de sauvegarder les paramètres de l’heure et de la date même
lorsque l’alimentation électrique de l’appareil est coupée.
b) Type
Il s’agit d’une pile bouton de type CR2032 Lithium avec 3V.
c) Changement de la pile
Vous pouvez tout simplement changer la pile vous-même. Suivez les instructions suivantes :
- Derrière la patte se trouve le compartiment de la pile. Veuillez déplier la patte. Appuyez
maintenant légèrement sur l’onglet de sécurité du porte-pile et retirez-la doucement de
l’appareil.
1
- Tirez ensuite la pile bouton vers l’avant hors du compartiment.
- Installez maintenant la nouvelle pile bouton du type mentionné ci-dessus.
Il faut ABSOLUMENT vous assurez que les pôles de la pile bouton (+) et (-)
s’accordent avec les marquages du porte-pile. Une mauvaise installation peut
entrainer un court-circuit et endommager l’appareil.
Sur le porte-pile se trouve un symbole (+). Vous devez installer la pile bouton de telle façon
que le pôle positif de la pile bouton et le symbole (+) du porte-pile se trouvent du même
côté.
Page 27

FR - 5
- Réinsérez maintenant le porte-pile contenant une nouvelle pile dans le boitier de l’appareil.
Affichage
Ecran TFT LCD digital
Ecran de 6 pouces (15,24 cm di ag o nale v is ib le de l’écr an )
Affichage : 16:9
Résolution : 800*480 pixels
Bloc d’a li me nt ation
Input: 100~240V AC, 50/60Hz
Output: 5V 1A DC
Slot USB
USB Host 2.0
Supporte modules de mémoire USB
Cartes de mémoire
supportées
SD/SDHC™ (Secure Digital Card), MMC™ ( MultiMedia Card)
Format d ’i ma ges
supporté
JPEG, résolution maximale :7000*7000 pixels
Température de
fonctionnement
0°C ~ +40°C
Dimensions
170*113*22 mm
Poids
~180 gr.
Accessoires
Support, adapteur secteur, m anu el d ’u ti li sati on mu lt il ingu e
Il faut ABSOLUMENT vous assurer que le porte-pile a été bien inséré. Une mauvaise
installation peut entrainer un court-circuit et endommager l’appareil.
Si l’appareil est disposé de telle façon que l’écran d’affichage soit vers le bas, l’onglet de
sécurité du porte-pile doit se trouver du côté droit et le pôle positif de la pile bouton doit être
du côté du dessous alors que vous installez le porte-pile.
5) Specifications du Produit
Vous avez des questions ?
Notre hot-line de service vous les répond :
+49 (0) 90 01 50 40 30 pour 0,39 €/min. du fixe allemand. Les prix de la téléphonie mobile peuvent en
différer.
Nous espérons que l’Intenso cadre photo numérique vous fait plaisir!
Page 28

FR - 6
Soin et Entretien
Soin
Pour é vi te r des d éc harges él ectri qu es n’enleve z ni les vi s ni le b oîtier.
N’util is ez pas c et a pp ar eil à p ro ximité d e l’eau. N’expo se z pas l’ap pa reil à la pluie ou à
l’hum id ité. Ne p os ez pas de s objets co ntenant d e l’eau o u d’autres liquides à côt é de l’ ap pa re il.
N’in st al le z pas ce cad re photo numéri qu e à pr oximité de chauff ag es, de poêles ou d’a utres
appareils émettant de la chaleur.
N’ouvrez pas le boît ie r. N’essaye z pa s de rép ar er l’a pp areil . Il doi t être répar é par des
spécialistes.
N’util is ez pas l’ apparei l à des e nd roits s ab lo nneux.
Me tt ez le connec teur adapteur du b lo c d’al im entatio n complè teme nt da ns l’orif ic e du CPN.
Ainsi, vous évitez des chargements électrostatiques.
Connecter tous les raccordements correctement et sûrement .
N’appu yez p as s ur l’écran. P rotégez l ’é cran d’ un e pénétra ti on du s ol eil t ro p fo rte.
Le cadre photo numérique ne peut lire que des formats compatibles.
Des images pe uv en t êtr e soumi ses au copyr ig ht . L’ affic ha ge sans lice nc e peut désobéir au x
droits copyright.
Ne touchez pas le CPN avec des objets métalliques pendant le fonctionnement.
Evit ez l’uti li sation sur des couss in s, des canapés d’autres objets qui so utienne nt une
the rm ogén ie , car l’appareil risque d ’être surch au ff é.
N’enle ve z p as de cartes de m ém oire pendant la lecture. Sinon, il peut y avoir des bocages de
système ou des pertes de données.
Ne m et te z pas l ’a pp areil h or s march e pendant u n di apora ma.
N’em ba ll ez pas l’appareil direct em ent après une utilis at ion de longue dur ée. As su re z un
refroidissment suf fi ss ant. Si no n, l’ap pa reil risq ue d’être s ur ch auf fé .
Pour g ar antir u n me ill eu r se rvice, il pe ut y avoi r de s changem ents d ans l e mo de d’ em pl oi .
Entreti en de l’a pp ar eil
L’appareil doit être mis hors marche.
Ne mettez pas de liquide directement sur l´écran ou sur le boitier.
Netto yage de l ’é cr an du boî ti er et d u ca dr e
Nettoyez l e bo ît ier, le cad re e t l’ écr an L CD prud em men t av ec un c hi ff on t endre, sa ns peluch es et
sans p ro du it s chimi qu es . N’uti li se z qu e des d ét er gents q ui s ont desti nés à l’ écr an L CD.
Mise en rebut de vieux appareils électro
Les appareils marqués avec ce symbole sont soumis à la directive européenne 2002/96/EC.
Tous les vieux appareils électro doivent être mis en rebut séparément du déchet domestique
dans les poubelles prévues par l’État.
Avec la mise en rebut correcte de vieux appareils électro, vous évitez la pollution de
l’environnment.
Page 29

Page 30

ES - 1
Manual de instrucciones del marco digital de fotos 6“ Intenso
Para colocar el dispositivo,
despliegue el pie de soporte
integrado.
1 Home [ ] – Power encendido/apagado
2 Tecla Play/Pause [ ]
3 Tecla Stop []
a Tecla arriba []
b Tecla abajo []
c Tecla derecha []
d Tecla izquirda []
Conecte la fuente de alimentación suministrada al marco
digital (DC-IN). Enchufe el extremo opuesto de la fuente de
alimentación a la toma de corriente. El marco digital se
inicia de forma automática. Mantenga pulsada brevemente
la tecla Power, para apagarlo o volver a encenderlo.
Por favor obedecer las siguientes instrucciones para informarse sobre las distintas funciones del
marco digital Intenso.
1) Conectar y encender el marco digital
Atención
- El enchufe debe encontrarse cerca el aparto y ser fácilmente accesible.
- No abra la carcasa del adaptador. Si se abre la carcasa del adaptador se corre peligro de muerte por descarga
eléctrica. No contiene piezas que requieran mantenimiento.
- Use el adaptador sólo con un enchufe con descarga a tierra de AC 100-240V~, 50/60 Hz. Si no está seguro del
suministro eléctrico en el lugar de la instalación, consulte al suministrador de energía correspondiente.
- Use sólo el cable del adaptador de corriente y el cable de alimentación suministrados.
- Para interrumpir la alimentación de su aparato, desenchufe el adaptador del macho de enchufe. Aferre bien el
adaptador mientras lo desenchufa. No araste el cable.
Page 31

ES - 2
2) Introducir tarjetas de memoria | Conectar memorias USB
Secure Digital Card (SD™)
Secure Digital High Capacity (SDHC™)
Multimedia Card (MMC™)
Introduzca la tarjeta de memoria, con el logotipo de cara
al monitor, en la ranura del lector de tarjetas.
Atención: ¡No introduzca la tarjeta de memoria por la
fuerza!
La memoria USB solo puede introducirse en la ranura en
una dirección.
Atención: ¡No introduzca la memoria USB por la fuerza!
El marco digital soporta los siguientes formatos de tarjetas:
Atención: El marco de foto digital sólo puede usarse con tarjetas de memoria compatibles y soportes de memoria USB
2.0 (100mA).
3) Funcionamiento general
a) Menú principal
Al encender el marco digital, automáticamente inicia con una presentación de diapositivas.
Si un medio de almacenamiento es insertado, se mostrará los fotos contenidos. De caso
contrario, el dispositivo muestra las 4 fotografías previamente instaladas.
Pulse la tecla Home [ ] para abrir el menú principal.
En el menú principal puede seleccionar los diferentes funciones del Marco Digital y del menú
Setup. Pulse las teclas , para seleccionar una opción del menú. Al pulsar las teclas ▲, ▼
puede navegar a través de los distintos submenús. Confirme su selección con la tecla
Play/Pausa [ ].
b) Reproducción de fotos
En el menú principal navegue a la función foto y confirme su selección con el botón
Play/Pausa [ ]. Ahora se les indica los medios de almacenamiento conectados. Según el
medio conectado puede seleccionar entre una tarjeta de memoria y una memoria USB.
Confirme su selección con la tecla Play/Pausa [ ]. Ahora se le despliegue el menú de prevista
de imágenes con todos los imágenes contenidos y compatibles con en el medio de
almacenamiento. Ahora navegue hacía una foto y confirme su selección con la tecla
Play/Pausa [ ] para iniciar la presentación de diapositivas a partir de esta posición.
Page 32

ES - 3
Funciones durante la presentación de diapositivas:
Posibilidades de ajuste
Descripción
Idioma
Seleccione el idioma deseado.
Foto
Seleccione:
- el efecto de transición deseado,
- la duración de despliegue del imagen,
- la relación de visualización deseada y
- la secuencia de reproducción (orden del
almacenamiento o aleatorio) de los imágenes.
Hora
Ajuste:
- la fecha actual,
- el modo de indicación para la hora (12/24 horas),
- la hora actual,
- el despliegue de la hora (digital, análoga, análoga
con calendario),
- el ajuste fino de la hora y
- el temporizador del encendido y apagado
automático.
Ajuste de fábrica
Restablece el dispositivo a sus ajustes de fábrica.
Luminosidad
Ajuste la luminosidad del monitor.
- Al pulsar las teclas flechas hacía la derecha o la izquierda puede saltarse una foto
respectivamente para adelante o atrás.
- Al pulsar la tecla Play/Pausa [ ] detiene la presentación de diapositivas. Al pulsar
nuevamente la tecla se continua la presentación de diapositivas.
c) Hora y calendario
En el modo de hora se le indica un reloj digital, un reloj análoga o un reloj con hoja de
calendario. Al pulsar la tecla Play/Pausa [ ] cambia la visualización. Al pulsar las teclas ▲, ▼
puede navegar a través del resumen mensual.
d) Modificar la configuración
Seleccione la función Setup desde el menú principal. Navegue con las teclas ▲, ▼ hacía la
opción del menú deseado. Tiene a disposición de modificar el idioma, foto, hora, ajustes de
fábrica y la luminosidad. Al pulsar la tecla Play/Pausa [ ] o las teclas ▲, ▼, , modifica la
configuración según la opción del menú o abre un submenú.
Page 33

ES - 4
4) Batería de respaldo
a) Tipo
Se trata de una pila de botón del tipo CR2032 litio con 3V.
b) Cambio de baterías
Usted mismo puede recambiar las baterías de manera muy simple. Para ello, por favor proceda
como se indica a continuación:
- Detrás del pie de soporte se encuentra el compartimiento de pilas. Por favor despliegue
el pie de soporte. Ahora pulse suavemente el seguro del chasis de batería hacia abajo y
jálelo con cuidado hasta sacarlo del dispositivo.
1
- Ahora simplemente jale la pila de botón del soporte hacia adelante.
- Ahora inserte la nueva pila de botón del tipo previamente descrito.
Debe tener cuidado SIN FALTA, que los polos de la pila de botón (+) y (-) coincidan
con la indicación en el chasis de batería. Una colocación errónea puede causar
cortocircuitos y dañar el dispositivo.
En el chasis de batería se encuentra un símbolo (+). Debe insertar la pila de botón de tal
manera, que el polo positivo de la pila y el símbolo (+) del chasis se encuentren en el
mismo lado.
Page 34

ES - 5
- Ahora vuelva a empujar el chasis de batería con la nueva pila de botón insertada en el
Visualización
LCD TFT digital
Tamaño display: 6” pulgada s (15,24cm Diagonal de pantalla visible)
Modo de visualización: 16:9
Resolución: 800*480 Pixel
Fuente de
alimentación
Input: 100~240V AC, 50/60Hz
Output: 5V 1A DC
Puerto USB
USB Host 2.0
Soporta memorias USB
Tarjetas de memoria
aceptadas
SD/SDHC™ (Secure Digital Card), MMC™ ( MultiMedia Card)
Formato de imagen
aceptado
JPEG, resolución máxima:7000*7000 pixels
Temperatura de
funcionamiento
0°C ~ +40°C
Medidas
170*113*22 mm
Peso
~180 gr.
Accesorios
Mando a distancia (incl. pilas), soporte, fuente de alimentación, manual de
instrucciones en varios idiomas
compartimento del dispositivo.
También aquí debe tener cuidado SIN FALTA, de insertar el chasis de batería en el
sentido correcto. Una colocación errónea puede causar cortocircuitos y dañar el
dispositivo.
Si tiene el dispositivo enfrente con el display hacia abajo, el seguro del chasis de batería
debe encontrarse al lado derecho y el polo positivo de la pila de botón debe estar en el lado
inferior mientras inserta el chasis de batería.
5) Especificaciones sobre el Producto
¿Tiene alguna duda?
Nuestra línea hotline de servicio técnico le responderá con mucho gusto:
+49 (0) 900 1 50 40 30 a 0,39 €/min. desde la red telefónica fija de Alemania. Los precios para la
telefonía móvil pueden diferir.
¡Le deseamos que disfrute de su marco digital Intenso!
Page 35

ES - 6
Cuidado y Mantenimiento
Cuidado
Para evitar el riesgo de descarga eléctrica no retire ni los tornillos ni la carcasa.
No utilice este aparato cerca del agua. No ponga en contacto al aparato ni con lluvia ni con
humedad. No coloque cerca del aparato ningún objeto que almacene agua o cualquier otro tipo
de líquido.
No instale este marco de fotos cerca de calefacciones, hornos o cualquier otro aparato que
desprenda calor.
No abra la carcasa. No intente reparar el aparato usted mismo. Déjelo en manos de personal
cualificado.
Evite su uso en lugares arenosos.
Introduzca completamente el enchufe de conexión de la fuente de alimentación en la abertura
del MD prevista. Solo de esta forma se puede evitar la carga electroestática.
Conecte de manera correcta y segura todas las conexiones.
No presione el display. Proteja al display de la radiación solar directa.
El marco de fotos reproduce solo formatos de archivo compatibles.
Las imágenes pueden estar protegidas por derecho a terceros. La reproducción sin licencia
puede violar los derechos de copyright.
No ponga en contacto el MD con objetos metálicos mientras se encuentra operativo.
Evite su uso sobre cojines, sofás u otros objetos de salón que favorezcan el desarrollo de calor,
puesto que existe riesgo de sobrecalentamiento.
No retire la tarjeta de memoria mientras se está produciendo su lectura. De otro modo podría
producirse la caída del sistema o la pérdida de datos.
No apague el aparato mientras se está llevando a cabo la presentación.
No empaquete el aparato justo después de un uso prolongado. Asegúrese de que se enfríe lo
suficiente. En caso contrario existe el riesgo de sobrecalentamiento.
Para garantizar un mejor servicio pueden producirse cambios en el manual de instrucciones.
Mantenimiento del aparato
El aparato debe estar desconectado.
Nunca rocie ni ponga en contacto directo con liquidos el display o la carcasa.
Limpieza del display / carcasa / marco
Limpie cuidadosamente la carcasa, el marco y el display LCD con un paño suave, sin pelusas ni
químicos. Emplee solo productos de limpieza especialmente apropiados para displays LCD.
Eliminación de aparatos eléctricos
Los aparatos marcados con este símbolo están sujetos a la directiva europea 2002/96/EC.
Todos los aparatos y viejos aparatos eléctricos deben ser eliminados separadamente de la
basura doméstica, en los lugares previstos para ello.
Eliminando los viejos aparatos eléctricos reglamentariamente estará evitando daños al
medio ambiente.
Page 36

Page 37

PT - 1
Manual de instruções 6“ Intenso Moldura digital
1 Power On/Off
2 Tecla Stop []
3 Tecla Play/Pause [ ]
4 Tecla para cima []
5 Tecla para trás []
6 Tecla Esquerda []
7 Tecla Direita []
Para apoiar o aparelho na vertical
abra o pé de apoio integrado.
1 Home [ ] - Power On/Off
2 Tecla Play/Pause [ ]
3 Tecla Stop []
a Tecla para cima []
b Tecla para trás []
c Tecla Direita []
d Tecla Esquerda []
Conecte o transformador anexado com a moldura digital
(DC-IN). Coloque a outra extremidade do transformador
na tomada. A moldura digital inicia automaticamente.
Mantenha a tecla Power pressionada por um curto espaço
de tempo para a desligar ou voltar a ligar.
Por favor siga as instruções deste manual para informações sobre as várias funções da moldura
digital Intenso.
1) Conectar e Ligar a Moldura de Fotos Digitais
Atenção:
- A tomada deve estar acessível e situada perto do aparelho.
- Não abra a cobertura do adaptador de rede. Uma cobertura aberta pode provocar perigo de morte por choque
eléctrico.
- Utilize o adaptador de rede apenas em tomadas ligadas à terra com AC 100-240V~, 50/60 Hz. Caso não esteja
seguro/a da fonte de energia no local de instalação, contacte o respectivo fornecedor de energia.
- Use apenas o adaptador de rede e o cabo de ligação à rede fornecidos.
- Para interromper a alimentação eléctrica para o seu aparelho, retire o transformador da tomada. Ao retirar o
transformador segure-o sempre. Nunca puxe no cabo.
Page 38

PT - 2
2) Inserção de cartões de memória | Conexão de mídias de armazenamento USB
Secure Digital Card (SD™ )
Secure Digital High Capacity (SDHC™)
Multimedia Card (MMC™)
Insira os cartões de memória com o logotipo em
direcção ao display na ranhura do leitor de cartões.
Atenção: Não utilizar força na inserção do cartão!
A mídia de armazenamento só pode ser inserida em uma
única direção no compartimento
Atenção: Não utilizar força na inserção da mídia de
armazenamento USB!
A moldura digital suporta os seguintes cartões de memória – formatos:
Atenção: A moldura digital está destinada apenas para o uso com cartões de memória e dispositivos de armazenamento
USB 2.0 (100mA) compatíveis.
3) Uso geral
a) Menu Principal
Ao ligar o porta-retratos digital este começa com uma apresentação de slides automática. Se
houver inserido um aparelho de memmória as fotos deste aparelho serão exibidas. Caso
contrário o aparelho exibirá uma apresentação de slides com as 4 fotos pre-instaladas.
Pressione a tecla [ ] Home para abrir o Menu Principal.
No Menu Principal existe a opção entre a diferentes funções do porta-retratos digital e do
Menu de Setup. Pressione as teclas , para selecionar um item de menu. Pressionando as
teclas ▲, ▼ pode-se navegar nos respectivos submenus. Confirme sua escolha pressionando a
tecla Play/Pausa [ ] .
b) Exibir as fotos
Navegue no Menu Principal até a função Foto e confirme sua escolha com a tecla Play/Pausa
[ ]. Os aparelhos de memória conectados serão então exibidos. Conforme qual aparelho de
memória estiver conectado há a opção entre um cartão de memória e um stick USB.
Confirme sua escolha com a tecla Play/Pausa [ ]. Agora seré exibida o Menu de pre-
visualização com todas as imagens suportadas que estão no aparelho de memória, Navegue
até uma foto e confirme sua escolha com a tecla Play/Pause [ ] para iniciar uma
apresentação de slides deste ponto.
Page 39

PT - 3
Funções durante a apresentação de slides:
Opções de
configuração
Descrição
Idioma
Selecione o idioma desejado.
Foto
Selecione:
- o efeito de transição desejado,
- o tempo de exibição da imagem,
- a relação de exibição desejada e
- a sequencia de exibição (sequencia da memória
ou aleatóreamente) das imagens.
Hora
Defina:
- a data atual,
- o modo de exibição do relógio (12/24 horas),
- o horario atual,
- a exibição do relógio (digital, analógica, analógica
com calendário),
- ajuste exato do relógio e
- ajuste do timer para ligar e desligar
automáticamente.
Configuração de padrão
Coloque o aparelho de volta na configuração de
fábrica.
Brilho
Ajuste o brilho do display.
- Pressionando as setas direita ou esquerda pode-se pular uma foto para frente ou para
trás.
- Pressionando a tecla Play/Pausa [ ] pode-se parar a apresentação de slides.
Pressionando-a novamente continuará com a apresentação.
c) Relógio e calendário
No modo Relógio será exibido um relógio digital, um relógio analógico ou um relógio
analógico com calendário. Com a tecla Play/Pause [ ] pode-se trocar de vista. Pressionando
as teclas ▲, ▼ pode-se navegar na síntese do menu.
d) Modificações da configuração
Selecione no Menu Principal a função Setup. Navegue com as teclas ▲, ▼ para o item de
menu desejado. Á disposição estão Idioma, Foto, Horas, Configuração de fábrica e brilho.
Pressionando as teclas ▲, ▼, , dependendo do item de menu pode-se modificar a
configuração respectiva ou abrir um submenu.
Page 40

PT - 4
4) Bateria de apoio
a) Função
A bateria de apoio assegura que a configuração da hora e da data também se mantém quando
o dispositivo se desliga da rede elétrica.
b) Tipo
Trata-se de uma pilha de botão do tipo CR2032 lítio com 3V.
c) Mudança das pilhas
Você mesmo pode trocar as baterias de maneira muito simples. Para isso, por favor, proceda
conforme indicado abaixo:
- Atrás do pé de suporte, encontra-se o compartimento de pilhas. Por favor, revele o pé de
suporte. Agora, pressione suavemente o seguro do chassis de bateria para baixo e puxeo com cuidado até o tirar do dispositivo.
1
- Agora basta retirar a pilha do botão do suporte para a frente.
- Agora insira a nova pilha do botão do tipo previamente descrito.
Deve ter cuidado SEM FALTA para que os polos da pilha do botão (+) e (-) coincidam
com a indicação no chassis de bateria. Uma colocação errada pode causar curto-
circuitos e danificar o dispositivo.
No chassis da bateria, encontra-se um símbolo (+). Deve inserir a pilha do botão de forma
que o polo positivo da pilha e o símbolo (+) do chassis estão no mesmo lado.
Page 41

PT - 5
- Agora volte a empurrar o chassis da bateria com a nova pilha do botão inserida no
Visor
Visor TFT LCD Digital
Tamanho do Visor: 6” P ol eg adas (15,24 cm tamanho do ecrão visível)
Visualização: 16:9
Definição: 800*480 Pixel
Alimentação
Input: 100~240V AC, 50/60Hz
Output: 5V 1A DC
USB port
USB Host 2.0
Suporta mídias de armazenamento USB
Cartões de
armazenamento
compatíveis
SD/SDHC™ (Secure Digital Card), MMC™ ( MultiMedia Card)
Formatos de fotos
compatíveis
JPEG, Definição máxima:7000*7000 pixels
Temperatura de
operação
0°C ~ +40°C
Medidas
170*113*22 mm
Peso
~180 gr.
Acessórios
Pé de apoio, Alimentador, Manual de instruções em diversos idiomas
compartimento do dispositivo.
Também aqui tem de ter cuidado SEM FALTA para inserir o chassis da bateria no
sentido correto. Uma colocação errada pode causar curto-circuitos e danificar o
dispositivo.
Se tiver o dispositivo em frente ao visor para baixo, o seguro do chassis da bateria deve
estar do lado direito e o polo positivo da pilha do botão deve estar no lado inferior enquanto
insere o chassis da bateria.
5) ESPECIFICAÇÕES DE PRODUTO
Não sabe o que fazer?
Nossa Hotline de Assistência Técnica responde com prazer às suas perguntas:
+49 (0) 900 1 50 40 30 por 0,39 €/min. de um telefone fixo alemão. Preços de telefonia móvel podem variar.
Divirta-se com sua Moldura de Fotos Digitais da Intenso!
Page 42

PT - 6
Cuidado e Manutenção
Cuidado
Para evitar o perigo de choques elétricos, não remova parafusos nem a caixa externa.
Não utilize o aparelho próximo à água. Não submeta o aparelho à chuva ou umidade. Não coloque
outros objetos que armazenem água ou outros líquidos na proximidade deste aparelho.
Não instale esta moldura na proximidade de aquecedores, fornos ou outros aparelhos que gerem
calor.
Não abra o aparelho. Não tente consertá-lo por si próprio. Deixe-o aos cuidados de pessoal
especializado.
Evite utilizá-lo em lugares arenosos.
Introduza o cabo de alimentação completamente na abertura do aparelho. Somente assim pode-se
evitar cargas eletrostáticas.
Conecte todos os cabos de maneira correta e segura.
Não pressione o visor. Proteja o visor dos raios solares.
A moldura só reproduz formatos de dados compatíveis.
As fotos podem estra protegidas contra direitos de terceiros. A reprodução sem licença pode ir contra
a lei de direitos autorais.
Não encoste na moldura de fotos com instrumentos metálicos enquanto estiver em funcionamento.
Evite a utilização sobre almofadas, sofás ou outros objetos domésticos, que possam produzir calor,
devido ao perigo de superaquecimento do aparelho.
Não remova cartões de memória durante o processo de leitura. Podem ocorrer quedas de sistema ou
perdas de dados.
Não desligue o aparelho durante a reprodução de um Diashow.
Não embale o aparelho diretamente após o longo uso. Confira se há um resfriamento suficiente. De
outra forma, há perigo de superaquecimento.
Para garantir um melhor serviço, podem ocorrer alterações no manual de intruções.
Manutenção do aparelho
O aparelho deve estar desligado.
Nunca espirre ou derrame liquidos diretamente sobre o visor ou sobre a parte externa do aparelho.
Limpeza do visor / Parte externa / Moldura
Limpe a parte externa, moldura e o visor LCD cuidadosamente com pano macio, sem felpas e sem
aditivos químicos. Utilize somente produtos de limpeza especiais para Visors de LCD.
Eliminação de aparelhos domésticos
Os aparelhos que vêm marcados com este símbolo estão sujeitos às normas européias
2002/96/EC.
Todos os aparelhos elétricos e eletrodomésticos devem ser separados do lixo caseiro e
depositados em lugares próprios, determinados pelo estado.
Com a eliminação correta de aparelhos eletrodomésticos podem ser evitados danos no meio
ambiente.
Page 43

Page 44

PL - 1
Instrukcja obsługi 6“ Intenso Cyfrowa ramka fotograficzna
1 Moc włączona/wyłączona
2 Stop Klawisz []
3 Play/Pause Klawisz [ ]
4 Do przodu []
5 W dół Klawisz []
6 W prawo Klawisz []
7 W lewo Klawisz []
Aby ustawić urządzenie, należy
rozłożyć zintegrowaną nóżkę.
1 Home [ ] - Moc włączona/wyłączona
2 Play/Pause Klawisz [ ]
3 Stop Klawisz [] Taste
a Do przodu [] Taste
b W dół Klawisz [] Taste
c W lewo Klawisz [] Taste
d W prawo Klawisz [] Taste
Połącz dostarczony zasilacz z ramką (DC-IN). Podłącz
drugą wtyczkę zasilacza do gniazdka sieciowego. Ramka
uruchomi się automatycznie. Wciśnij krótko przycisk Power,
aby wyłączyć lub ponownie włączyć.
Prosimy o prześledzenie tej instrukcji, aby poznać różne funkcje Cyfrowej ramki fotograficznej
firmy Intenso.
1) Podłączanie i włączanie ramki cyfrowej
Uwaga:
- Gniazdko sieciowe musi znajdować się w pobliżu urządzenia i musi być łatwo dostępne.
- Nie otwierać obudowy zasilacza. Otwarta obudowa powoduje niebezpieczeństwo śmiertelnego porażenia prądem
elektrycznym. Zasilacz nie zawiera żadnych części wymagających konserwacji.
- Zasilacz należy podłączać wyłącznie do uziemionego gniazdka o napięciu AC 100-240V~, 50/60 Hz. Jeśli nie są Państwo
pewni parametrów napięcia w miejscu montażu urządzenia proszę skontaktować się z odpowiednim dostawcą energii
elektrycznej.
- Należy używać wyłącznie zawartych w zestawie zasilacza oraz przewodu zasilania.
- Aby przerwać zasilanie urządzenia prądem elektrycznym należy wyciągnąć zasilacz z gniazdka wtyczkowego. Podczas
wyciągania należy zawsze trzymać w ręku sam zasilacz. Nie ciągnąć za przewód.
Page 45

PL - 2
2) Wkładanie kart pamięci | Podłączanie nośników pamięci USB
Secure Digital Card (SD™)
Secure Digital High Capacity (SDHC ™)
Multime dia Card (MMC™)
Włóż kartę pamięci do gniazda czytnika z logo w kierunku
wyświetlacza.
Uwaga: Karty należy umieszczać w slocie delikatnie, bez
użycia siły!
Nośnik pamięci USB można umieszczać w slocie USB
tylko w jednym kierunku.
Uwaga: Nośnik pamięci USB należy umieszczać delikatnie
bez użycia siły!
Następujące formaty kart pamięci są obsługiwane przez ramkę cyfrową:
Uwaga: Cyfrowa ramka do zdjęć jest przeznaczona wyłącznie do pracy z kompatybilnymi kartami pamięci oraz
nośnikami danych USB 2.0 (100 mA).
3) Obsługa
a) Menu główne
Po włączeniu cyfrowej ramki na zdjęcia automatycznie włącza się pokaz slajdów. Jeśli
zainstalowany jest nośnik danych z zapisanymi zdjęciami, to będą one wyświetlane.
Alternatywnie urządzenie wyświetla pokaz slajdów z 4 zainstalowanymi fabrycznie zdjęciami.
Naciśnij przycisk Home [ ] , aby przejść do Menu głównego.
W Menu głównym do wyboru są różne funkcje cyfrowej ramki na zdjęcia oraz Menu ustawień.
Naciśnij na przyciski ,, aby wybrać punkt menu. Nnaciskając na przyciski ▲, ▼
przechodzisz do odpowiedniego podmenu. Potwierdź wybór przyciskiem Play/Pause [ ].
b) Wyświetlanie zdjęć
W Menu głównym przejdź do funkcji Foto i przyciskiem Play/Pause [ ] potwierdź wybór.
Wyświetlone zostaną podłączone nośniki danych. W zależności od tego jaki nośnik danych
jest podłączony masz tutaj wybór pomiędzy kartą pamięci lub pamięcią USB. Potwierdź wybór
przyciskiem Play/Pause [ ]. Wyświetlone zostanie teraz menu podglądu zdjęć ze wszystkimi
znajdującymi się na nośniku danych zdjęciami w obsługiwanych formatach. Przejdź teraz do
Page 46

PL - 3
zdjęcia i potwierdź wybór przyciskiem Play/Pause [ ], aby rozpocząć od tego miejsca pokaz
Możliwości ustawień
Opis
Język
Wybierz język
Foto
Wybierz:
- efekt przejścia,
- czas wyświetlania zdjęcia,
- proporcje wyświetlania oraz
- kolejność wyświetlania (kolejność zgodnie z
zapisem na nośniku lub przypadkowa) zdjęć.
Czas
Ustaw:
- bieżącą datę,
- tryb wyświetlania czasu (12/24 godziny),
- bieżący czas,
- wyświetlanie zegara (cyfrowy, analogowy,
analogowy z kalendarzem),
- dokładne ustawienie zegara oraz
- godzinę automatycznego włączania i wyłączania.
Ustawienia fabryczne
Zerowanie urządzenia do ustawień fabrycznych.
Jasność
Ustaw jasność wyświetlacza.
slajdów.
Funkcje dostępne podczas pokazu slajdów:
- Naciśnięcie przycisków strzałek w prawo lub lewo pozwala na przejście do następnego
lub poprzedniego zdjęcia.
- Naciśnięcie przycisku Play/Pause [ ] zatrzymuje pokaz slajdów. Powtórne naciśnięcie
wznawia pokaz slajdów.
c) Zegar i kalendarz
W trybie zegara wyświetlany jest zegar cyfrowy, zegar analogowy lub zegar analogowy z
kartą kalendarza. Przyciskiem Play/Pause [ ] zmienia się widok. Naciskając przyciski ▲, ▼
porusza się w podglądzie miesięcznym.
d) Zmienianie ustawień
W Menu głównym wybierz funkcję Ustawienia. Przyciskami ▲, ▼ przejdź do wybranego
punktu menu. Dostępne są opcje Język, Foto, Czas, Ustawienia fabryczne oraz Jasność.
Naciskając przycisk Play/Pause [ ] lub przyciski ▲, ▼, , zmieniasz zależnie od punktu
menu odpowiednie ustawienia lub otwierasz podmenu.
Page 47

PL - 4
4) Bateria potrzymania pamięci
a) Funkcja
Bateria podtrzymania pamięci zapewnia zachowanie ustawień daty i czasu również po
odłączeniu urządzenia od zasilania.
b) Typ
Jest to bateria guzikowa typu CR2032 litowa, o napięciu 3V.
c) Wymiana baterii
Baterię tę można bardzo łatwo wymienić samemu. Należy postępować zgodnie z poniższym
opisem:
- Za nóżką znajduje się komora baterii. Należy rozłożyć nóżkę. Następnie należy nacisną
lekko w dół zabezpieczenie uchwytu baterii i wyciągnąć go delikatnie z urządzenia.
1
- Wyciagnąć do przodu baterię guzikową z uchwytu.
- Włożyć nową baterię podanego wyżej typu.
Należy KONIECZNIE zwrócić uwagę, aby bieguny baterii (+) i (-) zgadzały się z
oznaczeniami na uchwycie. Złe włożenie baterii może prowadzić do spięcia i
uszkodzenia urządzenia.
Na uchwycie baterii znajduje się symbol (+). Baterię należy włożyć w taki sposób, aby
biegun dodatni baterii i symbol (+) na uchwycie znajdowały się po tej samej stronie.
Page 48

PL - 5
- Teraz należy włożyć uchwyt baterii z włożoną nową baterią do obudowy urządzenia.
Wyświetlac z
Cyfrowy TFT LCD
Wielk oś ć wyświetlacza: 6” c al i (15,24cm widoczna pr zekądna o brazu)
Tryb w yś wi et lania: 16:9
Rozdzielcz oś ć: 800* 480 pikseli
Zasilacz
Input: 100~240V AC, 50/60Hz
Output: 5V 1A DC
Port USB
USB Host 2.0
Obsługuje nośniki d an yc h USB
Obsługiwane karty
pam ięci
SD/SDH C™ (Sec ure Digital C ar d), MMC ™ (Multi Media C ar d)
Obsługiwane formaty
obrazu
JPEG, ma ksymalna ro zdzielc zość: 7000*7000 pikseli
Temperatura robocza
0°C ~ +40°C
Wymiary
170*113*22 mm
Waga
~180 gr.
Akcesoria
Stojak, zasilacz sieciowy, wieloję zyczn a inst rukcja obsł ug i
Należy KONIECZNIE zwrócić uwagę, aby wkładać uchwyt we właściwej pozycji. Złe
włożenie baterii może prowadzić do spięcia i uszkodzenia urządzenia.
Jeśli urządzenie leży wyświetlaczem w dół, to w czasie wkładania uchwytu baterii jego
zabezpieczenie znajduje się po prawej stronie, a biegun dodatni baterii wskazuje w dół.
5) Specyfikacje Produktu
Jeżeli chcą Państwo uzyskać więcej informacji, nasza gorąca linia serwisu technicznego z przyjemnością odpowie
na Państwa pytania:
+49 (0) 900 1 50 40 30 Koszt połączenia 0,39 €/min. z telefonu stacjonarnego w Niemczech. Ceny połączeń z
telefonów komórkowych mogą być różne.
Życzymy przyjemnego korzystania z ramki cyfrowej Intenso!
Page 49

PL - 6
UŻYTKOWANIE I KONSERWACJA
UŻYTKOWANIE
Aby uniknąć niebezpiecze ństwa porażenia prądem elektrycznym, nie należy usu wać ani śrub ani
obudowy.
Urządzenia ni e używać w pobliżu wod y. Nie nale ży wys tawiać ramki cyfrowej na działanie deszczu ani
wil goci. W pobliży ur ządzenia ni e ustawiać żadnych p rzedmiotów zawierających wodę lub inne
subst ancje płynne.
Ramk i na zdjęcia nie i ns talować w pobliżu ogrzewania el ektrycznego, pieców oraz innych urządze ń
wydzielających ciepło.
Nie wolno otwierać obudowy. Nie dok on ywa ć samodzielnych napraw. Zadanie to na le ży pozostawić
specjalistom.
Unik ać użytko wania w piaszczyst yc h miejscach.
Należy wcisnąć wtyczkę zasilacza w całości do odpowiedniego otworu urządzenia. Tylko w ten sposób
można uniknąć naładować elektrostatycznyc h.
Wszystkie przyłącza należy połączyć prawidłowo i bezpiecznie.
Nie wolno naciskać na wyświetlacz. Należy go chronić przed działaniem silnych promieni s łonecznych.
Ramk a na zdjęci a odtwarza jedynie kompatybilne formaty plików.
Zdjęci a mogą być chronione prawami os ób trzecich. Ich odtwarzanie bez licencji może spowodować
naruszenie praw autorskich
Podc zas eksploatacji nie dotykać ramki cyfro wej metalowymi przedmiotami.
Nie używać ramki cyfrowej na poduszkach, sofach oraz innych meblach lub przedmiotach domowych
wspom agających wytwarzanie ciepła, gdyż istniej e niebezpieczeństwo przegrzania urządzenia.
Nie wolno wyjmować kart pamięci w trakcie proc es u ich odczytu. W innym przypadku może dojść do
uszkodzeń syst em owych lub u traty dan ych.
Prosim y nie eksponować urządzenia w trak cie pokazu slajdów.
Prosim y nie pakować urządzenia bezpośredni o po dłuższym użytkowaniu. Należy zagwarantować
wystarczaj ąc e ostygnięcie. W innym razie istnieje niebezpieczeństwo przegrzani a urządzenia.
Aby zag wa rantować lepszy poziom u sł ug , do ni ni ejszej instrukcji obsługi m og ą zostać wprowadzone
zmiany.
Konserw acja ur ządz enia
URZĄD ZE NIE MUSI BYĆ WYŁĄCZA NE .
NIE R OZPYLAĆ ANI N IE NAKŁADAĆ BEZPOŚREDN IO NA W YŚWIETLACZ ORAZ OBUDOWĘ Ż ADNYCH
PŁYNÓW.
Czyszczenie wyświetlacza / obudowy / ram y
Obudow ę, ramkę or az wyświetl ac z LCD wycierać delik atni e miękk ą ściereczk ą, k tóra nie jest nasączon a
chemik al iami i nie po zo st awia włos ków na cz ys zczonej p owierzchn i.
Należy używa ć w yłąc zn ie środkó w cz ys zc zących pr ze znaczonych do wyświetlacz y LCD.
Utylizacja starych ur ządz eń elektronicznych
Urządzenia oznaczone tym symbolem podlegają europejskiej wytycznej 2002/96/EC.
Wszystkie urządzenia elektroniczne i elektryczne należy utylizować poprzez przewidziane do tego
celu instytucje państwowe, a nie razem z odpadami z gospodarstwa domowego.
Utylizując odpowiednio stare urządzenia elektroniczne dbają Państwo o środowisko i unikają tym
samym jego zanieczyszczenia.
Page 50

Page 51

RU - 1
Руководство по эксплуатации 6“ Интенсо цифровой
1 Включ./Выкл.
2 Стоп кнопка []
3 Просмотр кнопка [ ]
4 Вверх кнопка []
5 Вниз кнопка [] Taste
6 Вправо кнопка []
7 Влево кнопка []
Для установки устройства откройте
встроенную ножку.
1 Home [ ] - Включ./Выкл.
2 Просмотр кнопка [ ]
3 Стоп кнопка []
a Вверх кнопка []
b Вниз кнопка []
c Влево кнопка []
d Вправо кнопка []
Соедините приложенный блок питания с цифровой
фоторамкой (DC-IN). Вставьте другой конец блока
питания в розетку. цифровой фоторамки включается
автоматически. Держите кнопку включения Power на
протяжении короткого времени нажатой, чтобы
выключить или повторно включить ее.
фоторамки
В данной инструкции Вы узнаете о различных функциях цифровой фоторамки Интенсо.
1) Подключение и включение цифровой фоторамки
Внимани е:
- Розетка должна находится вблизи прибора и должна быть легко доступной.
- Не открывать корпус сетевого адаптера. Открытый корпус составляет опасность для жизни,
связанную с поражением электрическим током. Он не содержит деталей, требующих ухода.
- Использовать сетевой адаптер только с заземленными розетками с 100-240В~, 50/60 Гц переменного
тока. Если Вы не уверены, какой ток подается на месте использоания, необходимо запросить
информацию об этом у поставщика энергии.
- Использовать только приложенный кабель для сетевого адаптера и подключения к сети.
- Чтобы прекратить подачу питания к Вашему прибору, вытяните блок питания из розетки. При
вытягивании держитесь за сам блок питания. Никогда не вытягивайте блок питания за провод.
Page 52

RU - 2
2) Вкладывание карт памяти | подключение носителей памяти USB
Secure Digital Card (SD™)
Secure Digital High Capacit y (SDHC ™)
Multime dia Card (MMC™)
Вставьте карты памяти в гнездо устройства для чтения
карт, направив логотип в сторону дисплея.
Внимание: Не применяйте при вставлении карты силу!
Носитель памяти USB может вставляться
в гнездо USB только одном направлении.
Внимание: Не применяйте силу при вставлении
носителя памяти USB!
Цифровая фоторамка поддерживает следующие форматы карты памяти:
Внимание: Цифровая фоторамка предусмотрена только для использования с совместимыми картами памяти
и носителями памяти USB 2 (100мА).
3) Общее управление
a) Главное меню
При включении цифровой фоторамки автоматически запускается слайд-шоу. При
использовании носителя информации с собственными фотографиями они будут
показаны. В ином случае устройство показывает слайд-шоу из 4 предустановленных
фотографий.
Нажмите на кнопку Home [ ], чтобы попасть в главное меню.
В главном меню имеется выбор между различными функциями цифровой фоторамки и
меню настроек. Нажмите кнопки , для выбора пункта меню. При помощи нажатия на
кнопки ▲, ▼ происходит навигация в соответствующем подменю. Подтвердите выбор
нажатием кнопки Play/Pause [ ].
b) Просмотр фотографий
Выберите в главном меню функцию Foto и подтвердите ее при помощи кнопки
Play/Pause [ ]. Будет отображен подключенный носитель информации. В зависимости
от того, какой носитель информации подключен, имеется выбор между картой памяти и
USB флеш накопителем. Подтвердите выбор нажатием кнопки Play/Pause [ ]. Теперь
Page 53

RU - 3
появится меню предварительного просмотра со всеми, находящимися на носителе
Возможности настроек
Описание
Язык
Выбор желаемого языка.
Фото
Выбор:
- переходного эффекта,
- длительности изображения фотографий,
- желаемого соотношение изображения и
- последовательности воспроизведения (по
порядку записи на носителе или в случайном
порядке) изображений.
Время
Выбор:
- актуальной даты,
- режима отображения часов (12/24 часа),
- текущего времени,
- вида часов (цифровые, аналоговые,
аналоговые с календарем),
- точной настройки часов и
- таймера автоматического
включения/выключения.
Заводские установки
Сброс устройства до заводских установок.
Яркость
Установка яркости дисплея.
фотографиями поддерживаемого формата. Выберите фотографию и подтвердите свой
выбор кнопкой Play/Pause [ ], чтобы запустить слайд-шоу с этого места.
Функции во время работы слайд-шоу:
- При помощи нажатия на кнопки со стрелочками вправо или влево можно перейти
вперед или назад на одно изображение.
- При помощи нажатия на кнопку Play/Pause [ ] слайд-шоу останавливается. При
повторном нажатии слайд-шоу запускается снова.
c) Часы и календарь
В режиме часов можно выбрать между цифровыми часами, аналоговыми часами или
аналоговыми часами с календарем. При помощи кнопки Play/Pause [ ] происходит
переключения вида. При помощи кнопок ▲, ▼ происходит навигация обзора месяца.
d) Изменение настроек
Если в главном меню выбрана функция Setup. При помощи кнопок ▲, ▼ выберите
желаемый пункт меню. Есть выбор между пунктами «язык», «фото», «время», «заводские
установки» и «яркость». При нажатии на кнопку Play/Pause [ ] или кнопки ▲, ▼, ,
меняются соответствующие настройки в зависимости от выбранного пункта меню или
открывается подменю.
Page 54

RU - 4
4) Резервная аккумуляторная батарея
a) Функции
Резервный аккумулятор гарантирует, что настройки даты и времени будут сохранены,
даже если устройство отключено от питания.
b) Тип
Используется литиевый миниатюрный элемент питания типа CR2032 на 3В.
c) Замена аккумуляторной батареи
Вы можете легко заменить батарею самостоятельно. Действуйте следующим образом:
- Батарейный отсек расположен за ножкой. Откиньте ножку. Слегка нажмите на
предохранитель держателя батареи, а затем аккуратно извлеките ее из
устройства.
1
- Затем потяните элемент питания вперед, чтобы вынуть его из крепления.
- Поместите новый элемент питания указанного выше типа.
ОБЯЗАТЕЛЬНО убедитесь, что полюса элемента питания (+) и (-) установлены в
соответствии с маркировкой на батарейном отсеке. Неверная установка может
привести к короткому замыканию и повреждению устройства.
На батарейном отсеке есть знак (+). Вы должны установить элемент питания так,
чтобы его положительный полюс и символ (+) на батарейном отсеке были
расположены на одной стороне.
Page 55

RU - 5
- Теперь задвиньте батарейный отсек с новым элементом питания обратно в корпус
Изображе ние
Цифров ой диспле й TFT L CD
Размер: 6” дюйм ов (15,24 см видимая д иагонал ь фотог ра фии)
Экранный режим: 16:9 - Разде льная спо собност ь: 8 00* 480 п икселей
Блок пит ан ия
Вход: 100~ 240В AC, 50/ 60 Гц
Выход: 5В 1A DC
Порт USB
USB Host 2.0 - Поддержив ает нос ители инф ормац ии USB
Поддер живаемы е карты
памяти
SD/SDH C™ (Sec ure Digital C ar d), MMC ™ (MultiMedia Card )
Поддер живаемы й
формат изображе ния
JPEG, ма кс имальная р аз дельн ая способность: 7000*7000 пи кс елей
Рабоча я те мпература
0°C ~ +40°C
Измере ни я
170*113*22 mm
Вес
~180 rp.
Принадлежност и
ножка, бло к питания, мно гояз ычн ая инструкц ия по обслуживан ию
устройства.
ОБЯЗАТЕЛЬНО убедитесь в том, чтобы батарейный отсек был правильно
вставлен. Неверная установка может привести к короткому замыканию и
повреждению устройства.
Если устройство расположено перед вами дисплеем вниз при вставке аккумулятора,
предохранитель батарейного отсека должен находиться с правой стороны, а
положительный полюс элемента питания – на обратной стороне.
5) ОПИСАНИЕ ПРОДУКТА
Вы не знаете, как решить проблему?
Наша горячая линия по технической поддержке клиентов ответит на Ваши вопросы:
+49 (0) 900 1 50 40 30 für 0,39 €/мин из стационарного телефона в Германии. Цены на звонки из мобильных телефонов могут
быть разными.
Желаем много радости с цифровой рамкой Интенсо!
Page 56

RU - 6
УХОД И ПРОФИЛАКТИЧЕСКИЙ ОСМОТР
Уход
Чтоб ы из бежать импульсов т ока, на удаляйте на винты ни корпус.
Не и спользуйт е да нный прибор вблизи в оды. Не под давайте прибор влиянию дождя или
влажн ости. Не ст авьте вблиз и прибо ра предметы, которые н акапливают воду или другие виды
жидкостей.
Не устанавливайте д ан ную фоторамку вблизи отопления, печей или других приборо в,
излучающих тепло .
Не открывайте к орпус . Не пытайтес ь ремонтировать прибор с ам и. Предоставьте эт о
професс ионалам.
Избегайте использ ования на м естах с песком.
Вста вьте вилку для подключ ен ия блока п итания в отверстие Ц Ф полностью . Только так можно
избеж ать элект ро статического заряда.
Выполняйте все подсоединен ия правильно и надѐжно .
Не н адавливайте н а дисплей. Защищайте д исплей от сильных солнечных л учей.
Фо торамка воспр оизводит только совмес тимые фо рмат ы.
Фо тогр афии могут быть защищены правам и третьих л иц. Воспроизведение фотографий без
лицензии может б ыт ь нарушением авторских прав.
Не п рикасайтесь к ЦФ во вр ем я раб оты металлическими предм етами.
Избегайте использ ования на подушках, диванах или других предметах быта, кот орые
под держ ивают раз витие тепла, так к ак существует опасност ь перегревания прибора.
Не и звлекайте карты памяти во вре мя чтения карт. Это мо жет привест и в сбоям в системе и
пот ер е данных.
Не выключайте при бор во врем я воспроизведения.
Не упаковывайте прибор непосредственн о после д лительного использования. Обеспечьте
доста точное охлажд ение. В и ном случае существует опасность перегревания.
Дл я обеспечения л учшего сервиса воз можны изменения инструкции по обслуживанию.
Профилактический осмотр прибора
ПРИ БОР ДОЛЖЕН БЫТЬ В ЫКЛЮЧЕН.
НИКОГДА НЕ БРЫЗГАЙ ТЕ И НЕ НАН ОСИТЕ ЖИДКОСТ Ь ПРЯМО НА ДИСПЛЕЙ ИЛИ КОР ПУ С.
Чистка дисплея / к орпуса / рамки
Протрите к орп ус, ра мку и дис пл ей LCD осторожно мягкой, неворсистой и св ободной от химик ат ов
тканью. Ис польз уйте очис тительн ые сред ст ва, специ ально п ре дна значенные для дисплея LCD .
Утили зация старых электроприборов
Обозначенные данным символом приборы должны соответствовать европейской директиве
2002/96/EC.
Все электроприборы и старые электроприборы должны утилизироваться отдельно от
домашнего мусора через предусмотренные для этого государством пункты.
Надлежащая утилизация электроприборов и старых электроприборов служит
предотвращению нанесения вреда окружающей среде.
Page 57

 Loading...