

Page 1

Intenso 10“ MEDIACREATOR
V1.0
Page 2
DE - 1
Kurzanleitung 10“ Intenso Digitaler Fotorahmen
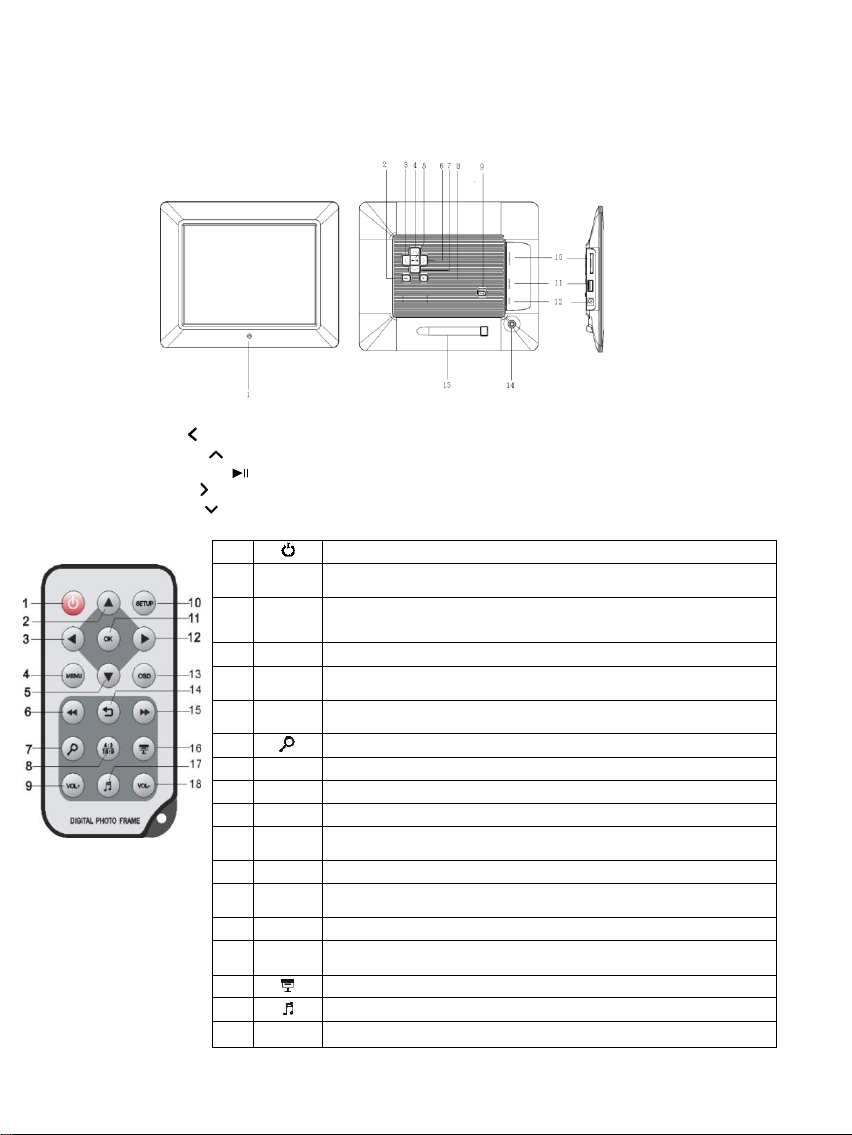
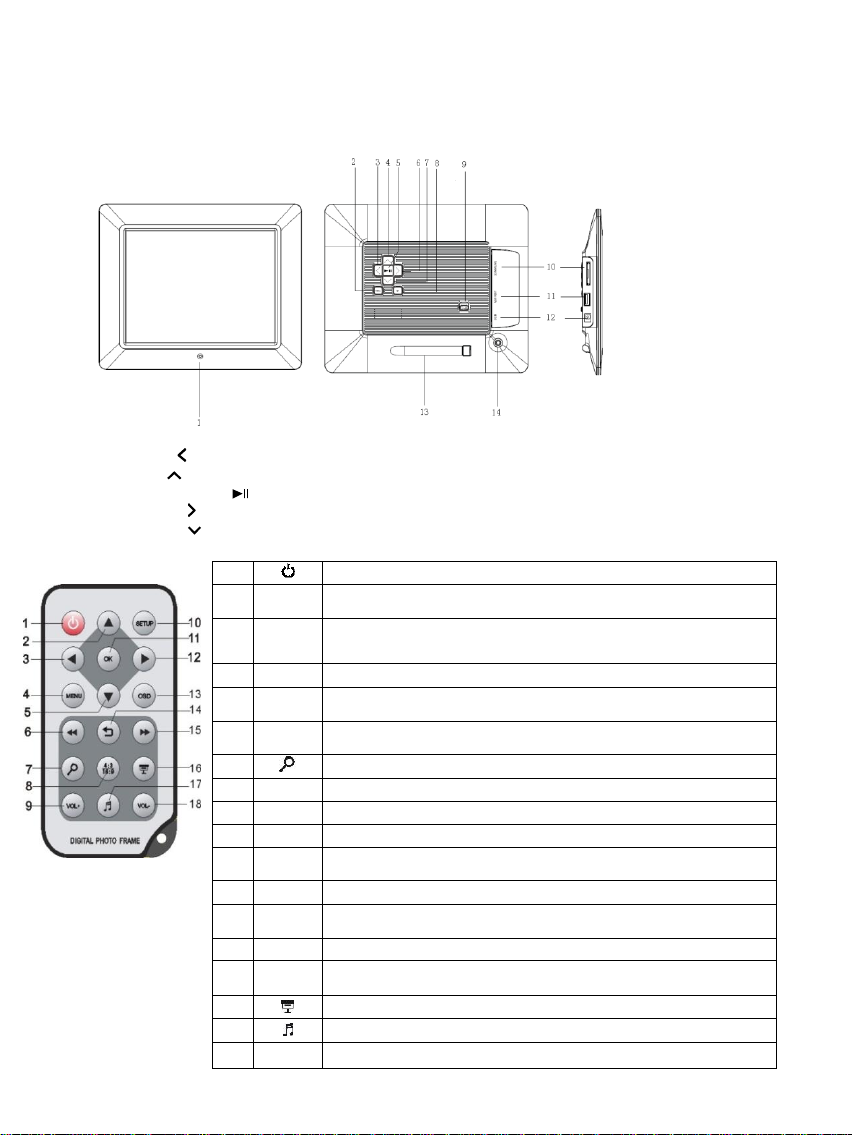
1 Infrarot Sensor
2 Menü Taste, öffnet das OSD Menü
3 Links [ ] Taste
4 Aufwärts [ ] Taste
5 Play/Pause [ ] Taste
6 Rechts [ ] Taste
7 Abwärts [ ] Taste
8 Zurück [] Taste
9 Power An/Aus
10 SD/MMC/MS – Karten Slot
11 USB Host
12 DC 5V 2A Eingang
13 Standfuß
14 Gewindeöffnung für Standfuß
1 Power An/ Aus
2
Bewegt den Cursor Aufwärts im Software Menü
Auswahl des vorherigen Bildes / MP3’s / Videos
3 Bewegt den Cursor nach links im Software Menü..
4
MENU
Aufrufen des Hauptmenüs
5
Bewegt den Cursor Abwärts im Software Menü
Auswahl des nächsten Bildes / MP3’s / Videos
6 Rückwärtssuche während des Abspielens von MP3 oder Video Dateien
7 Zoom In
8
4:3/16:9
Auswahl der Bildanzeige: 4:3 , 16:9
9
VOL+
Lautstärke erhöhen
10
SETUP
Aufrufen des Setup Menüs
11
OK
Bestätigen der Auswahl. Start/Pause der Diashow, MP3 oder Video Wiedergabe
12 Bewegt den Cursor nach rechts im Software Menü..
13
OSD
Anzeige des On-Screen-Display (OSD) während der Diashow
14 Rücksprung zum vorherigen Menü
15 Vorwärtssuche während des Abspielens von MP3 oder Video Dateien
16 Start der Diashow mit Hintergrundmusik
17 Start / Stop der Musikwiedergabe während der Diashow
18
VOL-
Lautstärke verringern
Folgen Sie bitte dieser Kurzanleitung, um über die wichtigsten Funktionen des Digitalen
Fotorahmens von Intenso informiert zu werden. Eine ausführliche Bedienungsanleitung mit der
Beschreibung aller Einstellungsmöglichkeiten des Intenso Digitalen Fotorahmens (DF) finden Sie auf
unserer Homepage: www.intenso.de
Page 3

DE - 2
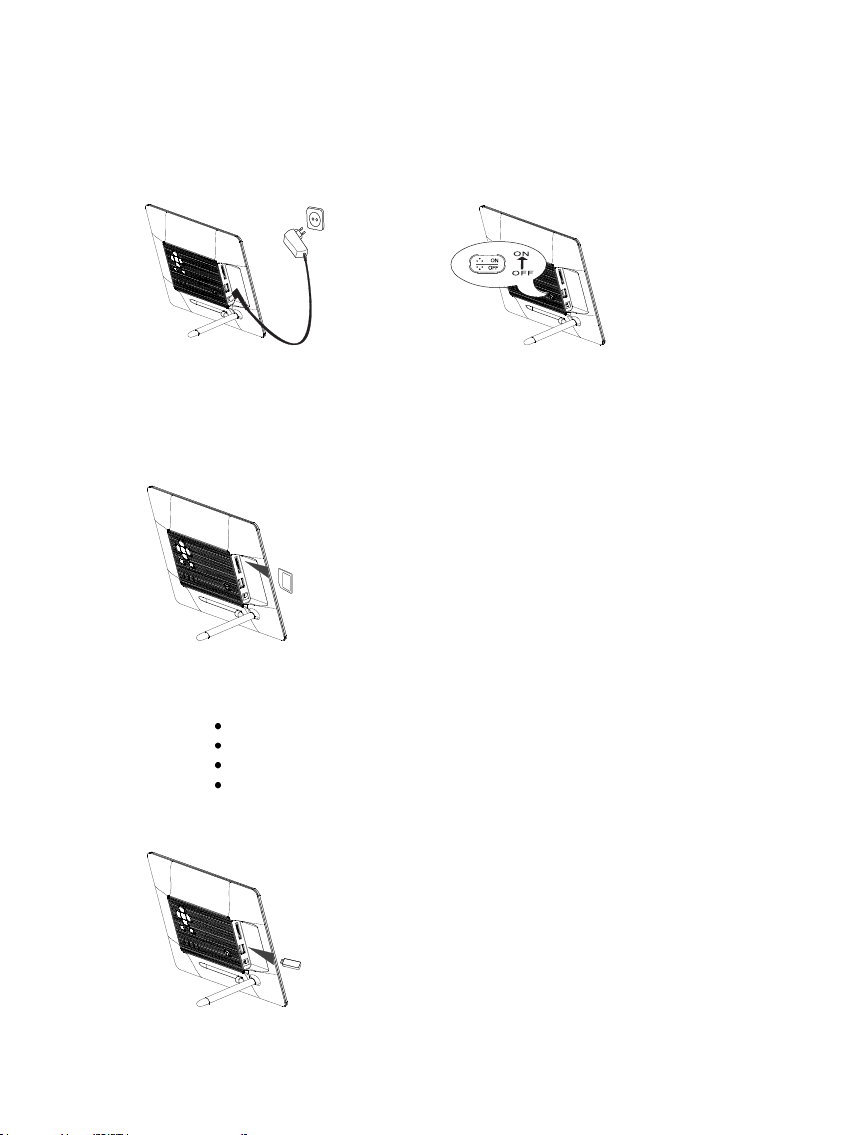
1) Anschließen und Einschalten des Digitalen Fotorahmens
Secure Digital Card (SD™)
Secure Digital High Capacity (SDHC™)
Multimedia Card (MMC™)
Memory Stick (MS™)
Verbinden Sie das mitgelieferte Netzteil mit dem Digitalen Fotorahmen. Stecken Sie das
andere Ende des Netzteils in die Steckdose. Schieben Sie den Regler des Digitalen
Fotorahmens in die „On“ Position, um den Fotorahmen einzuschalten.
2) Einlegen von Speicherkarten | Anschließen von USB Speichermedien
Setzen Sie die Speicherkarten mit den Kontakten in
Richtung des Display schauend in den Slot ein.
Achtung: Die Karte bitte nicht mit Gewalt einsetzen!
Folgende Speicherkarten - Formate werden vom Digitalen Fotorahmen unterstützt:
Das USB Speichermedium kann nur in einer
Richtung in den USB Slot eingesetzt werden.
Achtung: Das USB Speichermedium bitte
nicht mit Gewalt einsetzen!
Page 4

DE - 3
3) Allgemeine Bedienung
a) Hauptmenü
Nach dem Einschalten erscheint das Hauptmenü. Haben Sie bereits ein Speichermedium mit
gespeicherten Fotos eingelegt, so startet die Diashow automatisch.
Bei gestarteter Diashow gelangen Sie durch Drücken der Zurück [] Taste auf der
Fernbedienung oder auf der Rückseite des Fotorahmens aus der Diashow heraus. Es wird das
Bilder-Vorschaumenü angezeigt. Durch nochmaliges Drücken der der Zurück [] Taste
gelangen Sie in das Hauptmenü. Alternativ dazu können Sie auf der Fernbedienung die MenüTaste drücken, um das Hauptmenü aufzurufen.
Im Hauptmenü können Sie die verbundenen Speichermedien, die Uhr oder das Setup-Menü
auswählen. Drücken Sie die [ ], [ ] Tasten auf dem Fotorahmen oder die ▲,▼Tasten auf der
Fernbedienung, um den gewünschten Menüpunkt auszuwählen.
Bestätigen Sie Ihre Wahl mit der OK-Taste auf der Fernbedienung, oder der Play/Pause [ ]
Taste auf dem Fotorahmen.
b) Anzeigen von Fotos
Wählen Sie im Hauptmenü eines der verbundenen Speichermedien und anschließend die
Funktion Fotos aus. Sie gelangen so in das Bilder-Vorschaumenü. Wählen Sie mit den
Pfeiltasten ein Foto aus und bestätigen Sie Ihre Wahl mit der OK-Taste auf der Fernbedienung,
oder der Play/Pause [ ] Taste auf dem Fotorahmen. Das Foto wird nun angezeigt.
- Durch Drücken der Pfeiltasten nach Links oder Rechts können Sie jeweils ein Foto
Zurück oder Vorwärts springen.
- Durch Drücken der OK Taste auf der Fernbedienung oder der Play/Pause [ ] Taste auf
dem Fotorahmen stoppen Sie die Diashow.
- Durch Drücken der OSD Taste auf der Fernbedienung oder der Menü Taste auf dem
Fotorahmen öffnen Sie das OSD Menü.
c) Abspielen von Musikdateien
Wählen Sie im Hauptmenü eines der verbundenen Speichermedien und anschließend die
Funktion Musik aus. Es werden Ihnen nun alle Ordner des verbundenen Speichermediums
angezeigt. Wählen Sie mit den Pfeiltasten einen Ordner aus und bestätigen Sie Ihre Wahl mit
der OK-Taste auf der Fernbedienung oder der Play/Pause [ ] Taste auf dem Fotorahmen. Es
werden Ihnen nun alle Musikdateien des Ordners angezeigt. Wählen Sie mit den Pfeiltasten
einen Titel aus und bestätigen Sie Ihre Wahl mit der OK-Taste auf der Fernbedienung, oder der
Play/Pause [ ] Taste auf dem Fotorahmen. Der Titel wird nun abgespielt.
- Durch Drücken der Pfeiltasten nach Links oder Rechts können Sie im bereits
eingeblendeten OSD Menü navigieren. Bestätigen Sie Ihre Wahl mit der OK-Taste auf der
Fernbedienung, oder der Play/Pause [ ] Taste auf dem Fotorahmen.
- Durch Drücken der Pfeiltasten nach Oben oder Unten können Sie die Lautstärke
verändern.
Page 5

DE - 4
d) Abspielen von Videodateien
Wählen Sie im Hauptmenü eines der verbundenen Speichermedien und anschließend die
Funktion Video aus. Es werden Ihnen nun alle Ordner des verbundenen Speichermediums
angezeigt. Wählen Sie mit den Pfeiltasten einen Ordner aus und bestätigen Sie Ihre Wahl mit
der OK-Taste auf der Fernbedienung, oder der Play/Pause [ ] Taste auf dem Fotorahmen. Es
werden Ihnen nun alle Videodateien des Ordners angezeigt. Wählen Sie mit den Pfeiltasten
eine Videodatei aus und bestätigen Sie Ihre Wahl mit der OK-Taste auf der Fernbedienung,
oder der Play/Pause [ ] Taste auf dem Fotorahmen. Das Video wird nun abgespielt.
- Durch Drücken der Menü Taste auf dem DF oder der Fernbedienung öffnen Sie das OSD
Menü. Durch Drücken der Pfeiltasten nach Links oder Rechts können Sie im OSD Menü
navigieren. Bestätigen Sie Ihre Wahl mit der OK-Taste auf der Fernbedienung, oder der
Play/Pause [ ] Taste auf dem Fotorahmen.
- Durch Drücken der Pfeiltasten nach Oben oder Unten können Sie die Lautstärke
verändern.
e) Datei Menü
Wählen Sie im Hauptmenü eines der verbundenen Speichermedien und anschließend die
Funktion Datei aus. Es werden Ihnen nun alle Ordner des verbundenen Speichermediums
angezeigt. Wählen Sie mit den Pfeiltasten einen Ordner aus und bestätigen Sie Ihre Wahl mit
der OK-Taste auf der Fernbedienung oder der Play/Pause [ ] Taste auf dem Fotorahmen. Es
werden Ihnen nun alle Dateien des Ordners angezeigt. Wählen Sie mit den Pfeiltasten eine
Datei aus und bestätigen Sie Ihre Wahl mit der OK-Taste auf der Fernbedienung, oder der
Play/Pause [ ] Taste auf dem Fotorahmen. Die gewünschte Datei wird nun angezeigt /
abgespielt.
f) Anzeigen der Uhr
Wählen Sie im Hauptmenü den Eintrag Uhr aus, um die eingestellte Uhrzeit, den Wochentag,
das Datum und (bei eingelegtem Speichermedium) eine Diashow anzeigen zu lassen. Für die
Uhranzeige stehen Ihnen 2 verschiedene Modi zur Verfügung. Diese können Sie im
Setupmenü auswählen. Hier können Sie auch die Einstellungen für die Uhr vornehmen.
g) Anzeigen des Kalenders
Wählen Sie im Hauptmenü den Eintrag Kalender aus, um die eingestellte Uhrzeit, das Datum,
eine Monatsübersicht und (bei eingelegtem Speichermedium) eine Diashow anzeigen zu
lassen.
h) Ändern der Einstellungen
Wählen Sie im Hauptmenü den Eintrag Setup aus. Navigieren Sie mit den Pfeiltasten zu dem
gewünschten Menüpunkt. Bestätigen Sie Ihre Auswahl mit der OK-Taste auf der Fernbedienung,
oder der Play/Pause [ ] Taste auf dem Fotorahmen, um Ihr Gerät individuell einzurichten.
Page 6

DE - 5
Einstellmöglich-
keiten
Beschreibung
Foto-
einstellungen
Anzeigedauer
Wählen Sie aus, wie lange ein Bild während einer Diashow angezeigt werden soll.
Einstellmöglichkeiten: 3 Sek., 5 Sek., 15 Sek., 1 Min., 15 Min.
Fotomodus
Wählen Sie aus, ob ein Bild im Vollbild – Modus oder in seinem realen Verhältnissen durch die
Einstellung Standard dargestellt werden soll.
Bildübergänge
Wählen Sie zwischen zufälligen und einem kontinuierlichen Bildübergang
Bildinformationen
Hier werden im Vollbildmodus und in der Diashow die Entstehungsdaten des Bildes
eingeblendet
Zufällig
Wählen Sie hier, ob die Reihenfolge der Bilder zufällig erfolgen soll oder nach der Reihenfolge
Musik-
einstellungen
Musik Wdh. Modus
Wdh. Aus: Gibt alle Musikstücke im ausgewählten Verzeichnis wieder
Wdh. Ein: Wiederholt das ausgewählte Musikstück
Wdh. alle: Gibt alle Musikstücke auf dem ausgewählte n Speichermedium wieder
Video-
einstellungen
Video Wdh. Modus
Wdh. Aus: Gibt alle Videos im ausgewählten Verzeichnis wieder
Wdh. Ein: Wiederholt das ausgewählte Video
Wdh. alle: Gibt alle Videos auf dem ausgewählten Speichermedium wieder
Uhr / Kalender
Setup
Uhr
Wählen Sie zwischen digitaler und analoger Uhr
Foto
Wählen Sie, ob während der Uhrzeiteinblendung auch eine Mini-Diashow laufen soll
Uhr Hintergrund
Wählen Sie die Hintergrundfarbe im Uhrmodus
Zeiteinstellung
Einstellen der Uhrzeit.
Zeitformat
Einstellen des Formates der Uhrzeit 12 Stunden (AM / PM) oder 24 Stunden
Datum
Einstellen des Datums
Datumformat
Wählen Sie die die Anzeigeform für Ihren Kalender aus. Z.B. TT/MM/JJJJ
Alarm Setup
Alarm 1
Einstellen von Alarm, Alarmton und Zeitplan
Alarm 2
Einstellen von Alarm, Alarmton und Zeitplan
Alarm 3
Einstellen von Alarm, Alarmton und Zeitplan
Alarm 4
Einstellen von Alarm, Alarmton und Zeitplan
Alarm
Anzeigemodus
Wählen Sie, welche Funktion bei Beginn des Alarms gestartet werden soll (Digitaluhr,
Analoguhr, Kalender)
Alarmlautstärke
Einstellen von Alarmlautstärke. Einstellmöglichkeiten: 1,2,3,4,5,6
Weiterschlummern
Einstellen des Weiterschlummern-Modus: Aus, 1min, 5min, 10min
Page 7
DE - 6
Anzeige
Digitales TFT LCD
Display Größe: 10” Zoll (25,4 cm sichtbare Bilddiagonale)
Anzeigemodus: 4:3
Auflösung: 1024*768 Pixel
Netzteil
Input: 100~240V AC, 50/60Hz
Output: 5V 2A DC
USB port
USB Host 2.0 (High Speed)
Unterstützt USB Speichermedien
Unterstützte
Speicherkarten
SD/SDHC™ ( Secure Digital Card), MMC™ ( MultiMedia Card), MS™
(Memory Stick)
Unterstütztes Bildformat
JPEG, Maximale Auflösung:8000*8000 Pixel
Betriebstemperatur
0°C ~ +45°C
Abmessungen
265,5*215*23 mm
Gewicht
~ 638.6 gr
Zubehör
Fernbedienung (inkl. Batterie), Standfuß, Netzgerät, mehrsprachige
Kurzanleitung
Allgem. Setup
Sprache
Wählen Sie die gewünschte Sprache aus
Helligkeit
Einstellen der Helligkeit des TFT Displays. Einstellmöglichkeiten: -3, -2, -1, 0, 1, 2, 3.
Kontrast
Einstellen des Kontrastes des TFT Displays. Einstellmöglichkeiten: -3, -2, -1, 0, 1, 2, 3.
Sättigung
Einstellen der Farbsättigung des TFT Displays. Einstellmöglichkeiten: -3, -2, -1, 0, 1, 2, 3.
Auto Run
Stellen Sie hier den Modus ein, in dem Ihr Fotorahmen nach dem Einschalten startet.
( Foto, Hauptmenü, Uhr, Kalender )
Einschalten
Aktivieren des automatischen Einschaltens. Aus / Einmal / Täglich
Ausschalten
Aktivieren des automatischen Ausschaltens. Aus / Einmal / Täglich
Hinweiszeit
Wählen Sie aus, wie lange der Hinweis auf die Funktionen der Tasten im Modus Diashow,
sowie der Status (Pause) bzw. (Play) im Bild eingeblendet werden soll.
Einstellmöglichkeiten: 0 Sek., 5 Sek., 10 Sek., 20Sek.
Werkseinstellung
Gerät wird auf die Werkseinstellungen zurückgesetzt.
4) Produkt Spezifikationen
Wissen Sie einmal nicht weiter?
Unsere Technische Service Hotline beantwortet gerne weitere Fragen:
+49 (0) 900 1 50 40 30 für 0,39 €/Min. aus dem deutschen Festnetz. Mobilfunkpreise können abweichen.
Viel Spaß mit Ihrem Digitalen Fotorahmen von Intenso !
Page 8

DE - 7
Pflege
Um die Gefahr von elektrischen Stromstößen zu vermeiden, entfernen Sie bitte weder die Schrauben
noch das Gehäuse.
Benutzen Sie dieses Gerät nicht in der Nähe von Wasser. Setzen Sie dieses Gerät weder Regen noch
Feuchtigkeit aus. Stellen Sie keine Gegenstände in der Nähe des Gerätes ab, die Wasser oder andere
Flüssigkeiten speichern.
Installieren Sie diesen Bilderrahmen nicht in der Nähe von Heizungen, Öfen oder anderen Wärme
abgebenden Geräten.
Öffnen Sie das Gehäuse nicht. Versuchen Sie bitte keine eigene Reparatur. Überlassen Sie dieses
dem Fachpersonal.
Vermeiden Sie die Benutzung auf sandigen Plätzen.
Bitte stecken Sie den Netzteil-Anschluss-Stecker komplett in die vorhandene Öffnung des DF. Nur so
können Sie elektrostatische Aufladung vermeiden.
Verbinden Sie alle Anschlüsse korrekt und sicher.
Bitte drücken Sie nicht auf das Display. Schützen Sie das Display vor starker Sonneneinstrahlung.
Der Bilderrahmen spielt nur kompatible Dateiformate ab.
Bilder können durch Rechte Dritter geschützt sein. Das Abspielen ohne Lizenz kann Copyright Rechte
verletzen.
Bitte berühren Sie den DF während des Betriebes nicht mit metallischen Gegenständen.
Bitte vermeiden Sie die Benutzung auf Kissen, Sofas oder anderen Wohngegenständen, die eine
Wärmeentwicklung unterstützen, da die Gefahr einer Überhitzung des Gerätes besteht.
Bitte entfernen Sie keine Speicherkarten während des Lesevorganges. Anderenfalls kann es zu
Systemabstürzen oder Datenverlust kommen.
Bitte stellen Sie das Gerät nicht während einer laufenden Diashow aus.
Bitte verpacken Sie das Gerät nicht direkt nach einem längeren Gebrauch. Stellen Sie eine
ausreichende Abkühlung sicher. Es besteht sonst die Gefahr der Überhitzung.
Um einen besseren Service zu gewährleisten, kann es zu Änderungen in der Betriebsanleitung
kommen.
Wartung des Gerätes
Das Gerät muss ausgeschaltet sein.
Sprühen oder Tragen Sie niemals eine Flüssigkeit direkt auf das Display oder
Gehäuse auf.
Säuberung des Displays / Gehäuses / Rahmens
Wischen Sie Gehäuse, Rahmen und LCD Display vorsichtig mit einem
weichen, fussel- und chemikalienfreien Tuch ab. Verwenden Sie nur
Reinigungsmittel, die speziell für LCD-Displays bestimmt sind.
Entsorgung von Elektro-Altgeräten
Die mit diesem Symbol gekennzeichneten Geräte unterliegen der europäischen
Richtlinie 2002/96/EC.
Alle Elektro- und Elektroaltgräte müssen getrennt vom Hausmüll über die dafür
vorgesehenen staatlichen Stellen entsorgt werden.
Mit der ordnungsgemäßen Entsorgung von Elektro-Altgeräten vermeiden Sie
Umweltschäden.
Page 9
GB - 1
Quick Guide 10" Intenso Digital Photo Frame
1 Infrared sensor
2 Menu button, opening the OSD menu
3 Left [ ] button
4 Up [ ] button
5 Play/Pause [ ] button
6 Right [ ] button
7 Down [ ] button
8 Exit [] button
9 Power On/Off
10 SD/MMC/MS – card slot
11 USB host slot
12 DC 5V 2A input
13 Frame base
14 Threaded opening for stand
1 Power On/Off
2
Moves the cursor upwards in the software menu
3 Moves the cursor to the left in the software menu.
4
MENU
Starts the main menu
5
Moves the cursor downwards in the software menu
6 Reverse search while playing MP3 or video files
7 Zoom in
8
4:3/16:9
Selection of display screen: 4:3 , 16:9
9
VOL+
Turn up volume
10
SETUP
Starts the setup menu
11
OK
Confirms the selection. Start/pause of slide show, MP3 or video playback
12 Moves the cursor to the right in the software menu.
13
OSD
Displays the On-Screen-Display (OSD) during slide show
14 Leaps back to the previous menu
15 Forward search while playing MP3 or video files
16 Starts the slide show with background music
17 Start / stop of music during slide show
18
VOL-
Turn down volume
Please follow this quick guide to be informed about the most important functions of the Intenso
Digital Photo Frame. A detailed instruction manual with a description of all settings for the Intenso
Digital Photo Frame can be found on our Homepage:www.intenso.de
Page 10

GB - 2
1) Connect and switch on the digital photo frame
Secure Digital Card (SD™)
Secure Digital High Capacity (SDHC™)
Multimedia Card (MMC™)
Memory Stick (MS™)
Connect the mains adapter provided with the digital photo frame. Plug the other end of the
mains adaptor into the power outlet. Now move the slider of the digital photo frame into
“On” position to switch on the photo frame.
2) Insert memory cards | connect USB data carriers
with the manufacturer logo facing into your direction.
Please note: Never insert cards by use of force!
The following memory card formats can be used with your digital photo frame:
USB data carriers can only be plugged into
Please note: Never insert USB data carriers
Insert memory cards into the slot
the USB slot in one direction.
by use of force!
Page 11

GB - 3
3) General Operation
a) Main Menu
After powering on, the Main Menu appears. If you already have inserted a storage device loaded
with photos, the slideshow will begin automatically.
You can exit the slideshow by pressing the Back [] button on either the remote control or on
the back of the photo frame. That will bring you to the Image Preview Menu. By pressing the
Back [] button again, you will enter the Main Menu. Alternatively, you can press the remote
control Menu button to access the Main Menu.
In the Main Menu you can choose between the Connected Storage Devices, the clock or the
Setup Menu. Press the [ ], [ ] buttons on the photo frame or the ▲,▼ buttons on the remote
control to select your Desired Menu Item. Confirm your selection with the OK button on the
remote control or the Play/Pause [ ] button on the photo frame.
b) Viewing Photos
From the Main Menu select from the Connected Storage Devices and then the function
Photos. This takes you into the Image Preview Menu. Use the Arrow Keys to choose a photo
and confirm your selection with the OK button on the remote control or the Play/Pause [ ]
button on the back of the photo frame. The photo will be displayed.
- By pressing the Arrow Keys either Left or Right you can jump one picture Back or
Forward.
- Press the OK button on the remote control or the Play/Pause [ ] button on the photo frame
to Stop the slideshow.
- Press the OSD button on the remote control or the Menu button on the photo frame to open
the OSD Menu.
c) Playing Music Files
From the Main Menu select the Connected Storage Devices and then the function Music. It
will now display all the Folders in the Connected Storage Devices. Select a Folder with the
Arrow Keys and confirm your selection with the OK button on the remote control or the
Play/Pause [ ] button on the photo frame. All the Music Files in the folder will be displayed.
Use the Arrow Keys to choose a Title and confirm your selection with the OK button on the
remote control or the Play/Pause [ ] button on the photo frame. Your selection will now be
played.
- By pressing the Arrow Keys either Left or Right you can navigate the currently displayed
OSD Menu. Confirm your selection with the OK button on the remote control or the
Play/Pause [ ] button on the photo frame.
- The Volume can be adjusted by pressing the Arrow Keys either Up or Down.
Page 12

GB - 4
d) Playing Video Files
From the Main Menu select the Connected Storage Devices and then the function Video. It will
now display all the Folders in the Connected Storage Devices. Select a Folder with the Arrow
Keys and confirm your selection with the OK button on the remote control or the Play/Pause [ ]
button on the photo frame. All the Video Files in the folder will be displayed. Use the Arrow
Keys to choose a Video and confirm your selection with the OK button on the remote control or
the Play/Pause [ ] button on the photo frame. Your Video will now be Played.
- Pressing the Menu button on the frame or the remote control opens the OSD Menu. By
pressing the Arrow Keys either Left or Right you can navigate the OSD Menu. Confirm
your selection with the OK button on the remote control or the Play/Pause [ ] button on
the photo frame.
- The Volume can be adjusted by pressing the Arrow Keys either Up or Down.
e) File Menu
From the Main Menu select the Connected Storage Devices and then the function Files. It will
now display all the Folders in the Connected Storage Devices. Select a Folder with the Arrow
Keys and confirm your selection with the OK button on the remote control or the Play/Pause [ ]
button on the photo frame. All the Files in the folder will be displayed. Use the Arrow Keys to
choose a File and confirm your selection with the OK button on the remote control or the
Play/Pause [ ] button on the photo frame. Your Desired File will now be Played/Displayed.
f) Clock Display
In the Main Menu select Clock to display the set Time, the Day of the Week, the Date and (with
an inserted storage device) a Slideshow. For the Clock Display there are two different modes
available. These can be chosen in the Setup Menu. You can also Set the time here.
g) Calendar Display
In the Main Menu select Calendar to display the set Time, the Date, a Month View and (with
an inserted storage device) a Slideshow.
h) Changing the Settings
In the Main Menu select Setup to individually set up your device. Navigate with the Arrow Keys
to the desired menu item. Confirm your selection with the OK button on the remote control or the
Play/Pause [ ] button on the photo frame.
Page 13

GB - 5
Settings
Description
Photo setup
Sliding show time
Select how long a picture is displayed during a slide show.
Options: 3 sec., 5 sec., 15 sec., 1 min., 15 min.
Photo mode
Please decide whether the picture is shown as Full Screen Picture or with its original ratio using
the Standart screen function.
Transition effect
Select from random and continuous transition modes
Date stamp
In full screen mode and during a slide show this function shows the picture’s creation date
Music setup
Music repeat
mode
Repeat mode Off: Plays all songs in the selected directory
Repeat mode On: Repeats the selected song
Repeat mode All: Plays all songs on the selected storage medium
Video setup
Movie repeat
mode
Repeat mode Off: Plays all videos in the selected directory
Repeat mode On: Repeats the selected video
Repeat mode All: Plays all videos on the selected storage medium
Clock /
Calendar setup
Time mode
Please select the digital or analogous clock
Show photo
Select Slideshow during clock mode
Clock Wallpaper
Select the colour of clock mode
Set time
Adjusting the time.
Set time format
Adjusts the time format to 12 hours (AM / PM) or 24 hours
Set date
Adjusts the date
Set date format
Please select the display format for your calendar, e.g. DD/MM/YYYY
Alarm setup
Alarm 1
Adjusts alarm, alarm tone and time
Alarm 2
Adjusts alarm, alarm tone and time
Alarm 3
Adjusts alarm, alarm tone and time
Alarm 4
Adjusts alarm, alarm tone and time
Ringtone volume
Adjusts the alarm volume. Options: 1,2,3,4,5,6
General setup
Language
Select your preferred language.
Brightness
Adjusts the brightness of the TFT display. Options: -3, -2, -1, 0, 1, 2, 3.
Contrast
Adjusts the contrast of the TFT display. Options: -3, -2, -1, 0, 1, 2, 3.
Saturation
Adjusts the colour saturation of the TFT display. Options: -3, -2, -1, 0, 1, 2, 3.
Auto-run
Here you can select the mode your photo frame starts in after power on.
( Photo, main menu, clock, calendar )
Power-on
Enables automatic power-on. Off / once / daily
Power-off
Enables automatic power-off. Off / once / daily
Hint time
Specify how long the notification window of the key’s functions is displayed in the slide show mode
and the status (pause) or (play) in the picture. Options: 0 sec., 5 sec., 10 sec., 20 sec.
Default
Device is reset to factory settings.
Page 14

GB - 6
4) Product Specifications
Display
Digital TFT LCD
Display size: 10 inch (25,4 cm diagonal viewable image)
Display modus: 4:3
Resolution: 1024*768 pixels
Mains adapter
Input: 100~240V AC, 50/60Hz
Output: 5V 2A DC
USB port
USB Host 2.0 & USB Device 2.0
Supports USB storage mediums
Memory cards supported
SD/SDHC™ ( Se cu re D igital Card ), M MC ™ (Mul ti Me di a Ca rd ), MS™
(Memory Stick)
Picture size supported
JPEG, max. resolution:8000*8000 pixels
Operating temperature
0°C ~ +45°C
Dimensions
265.5*215*23 mm
Weight (g)
~ 638.6g
Accessory
Remote control (incl. battery), foot, mains adapter, quick guides in more
languages
You need help?
Simply call our Technical Service Hotline at:
+49 (0) 900 1 50 40 30 for 0.39 €/Min. with calls from the German telephone network. Different rates may apply
to calls from mobile phones.
Enjoy Intenso’s digital photo frame!
Page 15
GB - 7
Service
To avoid risks of electric shocks please do not remove screws or the housing.
Do not use the device in the vicinity of water. Do not expose the device to rain or moisture. Do not
place any objects in the vicinity of the device that store water or any other liquids.
Do not install this picture frame in the vicinity of heating systems, ovens or other heat emitting
devices.
Do not open the housing. Do not try to repair the device yourself. Leave any repairs to specialised
personnel only.
Avoid using your device on sandy places.
Please do properly connect the plug of the mains adaptor to the existing opening of the DF. Thus, you
can avoid electro-static charge.
Plug in all connections correctly and safely.
Please do not touch the display. Do not expose the display to direct sunlight.
The picture frame only plays compatible file formats.
Pictures might be protected by copyright law of third parties. Playing such pictures without licences
might represent an infringement of such copyright laws.
Please do not touch the DF with metallic object during operation.
Please avoid operation on pillows, sofas or any other heat emitting home appliances since the device
might overheat in such cases.
Please do not remove memory cards while the device is reading. Otherwise this might result in
abnormal system ends or loss of data.
Please do not switch off the device with the slide show running.
Please do not directly wrap the device after longer operating hours. Please make sure the device has
cooled down properly. Otherwise the device might overheat.
To guarantee better service this operating instruction is subject to alterations.
Device Maintenance
The Device must be switched off.
Never spray or apply liquid substances directly onto the display or the housing.
Cleaning the display / housing / frame
Clean the housing, frame and LCD display carefully with a soft cloth which is free of lint and chemicals.
Only use cleaning agents which are suitable for cleaning LCD displays.
Disposal of WEEE (Waste Electrical and Electronic Equipment)
Devices marked with the WEEE logo are subject to the European Community Directive 2002/96/EC.
Waste Electrical and Electronic Equipment must be separated from household rubbish and disposed at sites that
collect WEEE.
By orderly disposing WEEE you will avoid damage caused to the environment.
Page 16

IT - 1
Istruzioni brevi per la cornice per foto digitale da 10“ di Intenso
1 Sensore infrarosso
2 Tasto menu, apre il menu OSD
3 Tasto sinistra [ ]
4 Tasto su [ ]
5 Tasto Play/Pause [ ]
6 Tasto diritto [ ]
7 Tasto giù [ ]
8 Tasto interruzione []
9 Power Accesso/Spento
10 Schede Slot SD / MMC / MS
11 Host Slot USB
12 Entrata DC 5V 2A
13 Piedino
14 Apertura filettatura per il piedino
di supporto
1 Power Acceso/Spento
2 Muove il cursore verso l’alto nel menu software
3 Muove il cursore a sinistra nel menu software.
4
MENU
Richiamare il menu principale
5 Muove il cursore verso il basso nel menu software
6 Ricerca indietro durante la riproduzione di Mp3 o file video
7 Funzione di zoom
8
4:3/16:9
Selezione della visualizzazione immagine: 4:3 , 16:9
9
VOL+
Aumento del volume
10
SETUP
Richiamare il menu setup
11
OK
Confermare la selezione. Avvio/interruzione del diashow, riproduzione di Mp3
o video
12 Muove il cursore a destra nel menu software
13
OSD
Visualizzazione dello schermo on-screen (OSD) durante il diashow
14 Ritorno al menu precedente
15 Ricerca in avanti durante la riproduzione di Mp3 o file video
16 Avvio del diashow con musica di sottofondo
17 Avvio/interruzione della riproduzione musicale durante il diashow
18
VOL-
Riduzione del volume
La preghiamo di seguire queste brevi istruzioni per essere informata/o riguardo alle funzioni principali
della cornice di foto digitale di Intenso. Le istruzioni dettagliate con la descrizione delle possibilità
d‟impostazione della cornice per foto digitale di Intenso (CF) si trovano sul nostro sito www.intenso.de
Page 17
IT - 2
Secure Digital Card (SD™)
Secure Digital High Capacity (SDHC™)
Multimedia Card (MMC™)
Memory Stick (MS™)
1) Collegare e accendere la Cornice per foto digitali
Colleghi il componente di rete fornito con la Cornice per foto digitali. Inserisca l‟altra
estremità del componente di rete nella presa. Posizioni il regolatore della Cornice per foto
digitali in posizione “on” per accendere la cornice per foto.
2) Inserire le schede di memoria | Collegare le schede di memoria USB
Inserisca le schede di memoria con i contatti in
Attenzione: Non inserire la scheda con forza!
La Cornice per foto digitali supporta le seguenti schede di memoria - i seguenti formati:
La chiave USB può essere inserita esclusivamente
direzione dello schermo nello slot.
in direzione dello slot USB.
Attenzione: Non inserire la chiave USB
con forza!
Page 18

IT - 3
3) Uso generale
a) Menu principale
Dopo l‟accensione appare il menu principale. Se ha gia inserito un mezzo di memorizzazione
con delle foto memorizzate, la visualizzazione delle diapositive si avvia automaticamente.
Durante la visualizzazione delle diapositive avviata, premendo il tasto Indietro [] sul
telecomando o sul retro della cornice delle foto esce dalla visualizzazione delle diapositive.
Viene mostrato il menu anteprima immagini. Premendo nuovamente il tasto Indietro [],
passa al menu principale. In alternativa può premere il tasto menu del telecomando per
richiamare il menu principale.
Nel menu principale si possono selezionare i mezzi di memorizzazione collegati, l‟orologio o
il menu setup. Prema i tasti [ ], [ ] sulla cornice della foto o i tasti ▲,▼sul telecomando per
selezionare il punto del menu desiderato.
Confermi la Sua selezione con il tasto OK del telecomando o con il tasto Play/Pause [ ] sulla
cornice delle foto.
b) Visualizzazione di foto
Selezioni uno dei mezzi di memorizzazione nel menu principale e in seguito la funzione foto.
Passa al menu anteprima immagini. Con i tasti freccia selezioni una foto e confermi la Sua
selezione con il tasto OK sul telecomando o il tasto Play/Pause [ ] sulla cornice delle foto. Ora
la foto viene visualizzata.
- Premendo i tasti freccia verso sinistra o destra può passare alla foto precedente o
successiva.
- Premendo il tasto OK sul telecomando o il tasto Play/Pause [ ] sulla cornice delle foto
interrompe la visualizzazione delle diapositive.
- Premendo il tasto OSD sul telecomando o il tasto menu sulla cornice delle foto, apre il
menu OSD.
c) Riprodurre file musicali
Selezioni nel menu principale uno dei mezzi di memorizzazione collegati e riproduca infine
la funzione musica. Ora vengono visualizzate tutte le cartelle del mezzo di memorizzazione
collegato. Con i tasti a freccia selezioni una cartella e confermi la Sua selezione mediante il
tasto OK sul telecomando o il tasto Play/Pause [ ] sulla cornice delle foto. Vengono visualizzati
tutti i file musicali della cartella. Con i tasti a freccia selezioni un titolo e confermi la Sua
selezione mediante il tasto OK sul telecomando o il tasto Play/Pause [ ] sulla cornice delle
foto. Ora il titolo viene riprodotto.
- Premendo i tasti a freccia verso sinistra o destra, può navigare nel menu OSD gia
visualizzato. Confermi la Sua selezione mediante il tasto OK sul telecomando o il tasto
Play/Pause [ ] sulla cornice delle foto. Premendo i tasti a freccia verso l„alto o verso il
basso può modificare il volume.
Page 19

IT - 4
d) Riprodurre file video
Selezioni nel menu principale uno dei mezzi di memorizzazione collegati e riproduca infine la
funzione video. Ora vengono visualizzate tutte le cartelle del mezzo di memorizzazione
collegato. Con i tasti a freccia selezioni una cartella e confermi la Sua selezione mediante il
tasto OK sul telecomando o il tasto Play/Pause [ ] sulla cornice delle foto. Vengono visualizzati
tutti i file video della cartella. Con i tasti a freccia selezioni un titolo e confermi la Sua
selezione mediante il tasto OK sul telecomando o il tasto Play/Pause [ ] sulla cornice delle
foto. Ora il video viene riprodotto.
- Premendo il tasto menu sulla cornice delle foto o sul telecomando, apre il menu OSD.
Prema i tasti a freccia verso sinistra o destra per poter navigare all‟interno del menu
OSD. Confermi la Sua selezione mediante il tasto OK sul telecomando o il tasto
Play/Pause [ ] sulla cornice delle foto.
- Premendo i tasti a freccia verso l„alto o verso il basso può modificare il volume.
e) File menu
Selezioni nel menu principale uno dei mezzi di memorizzazione collegati e riproduca infine la
funzione file. . Ora vengono visualizzate tutte le cartelle del mezzo di memorizzazione
collegato. Con i tasti a freccia selezioni una cartella e confermi la Sua selezione mediante il
tasto OK sul telecomando o il tasto Play/Pause [ ] sulla cornice delle foto. Vengono visualizzati
tutti i file della cartella. Con i tasti a freccia selezioni un file e confermi la Sua selezione
mediante il tasto OK sul telecomando o il tasto Play/Pause [ ] sulla cornice delle foto. Il file
desiderato ora viene visualizzato / riprodotto.
f) Indicazione dell‘orologio
Selezioni la voce orologio nel menu principale per visualizzare l‟orario, il giorno della
settimana e la data impostati e (nel caso di un mezzo di memorizzazione inserito) una
visualizzazione di diapositive. Per la visualizzazione dell’orologio sono a Sua disposizione 2
diversi modi. Questi può selezionarli nel menu setup. Qui può effettuare le impostazioni
dell‟orologio.
g) Indicazione del calendario
Selezioni la voce calendario nel menu principale per visualizzare l„orario, la data, un riepilogo
mensile e (nel caso di un mezzo di memorizzazione inserito) una visualizzazione di
diapositive.
h) Modificare le impostazioni
Selezioni la voce setup nel menu principale. Navighi con i tasti a freccia per accedere al punto
del menu desiderato. Confermi la Sua selezione con il tasto OK sul telecomando o con il
Play/Pause [ ] sul telecomando per impostare il Suo apparecchio in modo personalizzato.
Page 20

IT - 5
Possibili impostazioni
Descrizione
Setup foto
Durata di visualizzazione
Selezioni per quanto tempo un’immagine deve essere visualizzata durante un diashow.
Possibili impostazioni: 3 sec., 5 sec., 15 sec., 1 min., 15 min.
Modalità foto
Selezioni se una foto deve essere visualizzata in modalità Immagine completa o nelle
proporzioni reali tramite l'impostazione Adatta immagine.
Riproduzione foto
Selezioni tra la riproduzione casuale o continua delle foto
Info sulla foto
Con questa funzione vengono visualizzati i dati di provenienza della foto in modalità immagine
intera e diashow
Impostazione
musica
Modalità ripetiz. musicale
Ripetiz. off.: riproduce tutti i brani musicali della directory selezionata
Ripetiz. on: ripete il brano musicale selezionato
Ripeti tutti: riproduce tutti i pezzi musicali presenti sul supporto di memorizzazione selezionato
Setup video
Modalità ripetiz. video
Ripetiz. off.: riproduce tutti i video nella directory selezionata
Ripetiz. on: ripete il video selezionato
Ripeti tutto: riproduce tutti i video del supporto di memorizzazio ne selezionato
Setup
ora/calendario
Orologio
Selezioni tra orologio analogico e digitale
Impostazione del tempo
Impostazione dell'orario.
Formato ora
Impostazione del formato orario di 12 ore (AM / PM) o 24 ore
Data
Impostazione della data
Formato data
Selezioni il formato di visualizzazione del calendario, ad es. GG/MM/ANNO
Setup allarme
Allarme 1
Impostazione di allarme, tono allarme e orario
Allarme 2
Impostazione di allarme, tono allarme e orario
Allarme 3
Impostazione di allarme, tono allarme e orario
Allarme 4
Impostazione di allarme, tono allarme e orario
Volume allarme
Impostazione del volume di allarme. Possibili impostazioni: 1,2,3,4,5,6
Setup generale
Lingua
Selezioni la lingua desiderata
Luminosità
Impostazione della luminosità del display dello schermo TFT. Possibili impostazioni: -3, -2, -1, 0,
1, 2, 3.
Contrasto
Impostazione del contrasto del display dello schermo TFT. Possibili impostazioni: -3, -2, -1, 0, 1,
2, 3.
Saturazione
Impostazione della saturazione cromatica dello schermo TFT. Possibili impostazioni: -3, -2, -1, 0,
1, 2, 3.
Auto Run
Imposti qui la modalità di visualizazione all'accensione della sua cornice per foto.
( Foto, menu principale, ora, calendario )
Accensione
Attivi l'accensione automatica. Off/ una volta / ogni giorno
Spegnimento
Ativazione dello spegnimento automatico. Off / una volta / ogni giorno
Tempo di avviso
Selezioni la durata dell'avviso delle funzioni dei tasti in modalità diashow, e lo stato (pausa) o
(play) nell'immagine devono essere visualizzti. Possibili impostazioni: 0 sec., 5 sec., 10 sec.,
20 sec.
Impostazioni predefinite
Vengono ripristinate le impostazioni predefinite dell'apparecchio.
Page 21

IT - 6
4) Specificazioni del Prodotto
Visualizzazione
Schermo LCD TFT digitale
Dimensioni schermo: 10" (25,4 cm di diagonale immagine visibile)
Modo di visualizzazione: 4:3
Risoluzione: 1024*768 pixel
Adattatore
Input: 100~240V AC, 50/60Hz
Output: 5V 2A DC
Porta USB
Host USB 2.0 & dispositivo USB 2.0
Supporta le chiavi di memoria USB
Schede di memoria
supportate
SD/SDHC™ ( Secure Digital Card), MMC™ ( MultiMedia Card), MS™
(Memory Stick)
Formato immagine
supportato
JPEG, risoluzione massima:8000*8000 pixel
Temperatura di
funzionamento
-0°C ~ +45°C
Dimensioni
265.5*215*23 mm
Peso
~638.6 g
Accessori
telecomando (inclusa batteria), piedino, adattatore, istruzioni brevi in diversi
lingue
Non sa come procedere?
Il nostro numero verde di supporto tecnico risponde volentieri ad altre domande:
+49 (0) 900 1 50 40 30 al costo di 0,39 €/min. da rete fissa tedesca. I prezzi delle rete dei cellulari possono
variare.
Buon divertimento con la Sua Cornice per foto digitali Intenso !
Page 22

IT - 7
Cura
Per evitare il pericolo di scosse elettriche La preghiamo di non levare viti e/o involucro.
Non usi quest‟apparecchiatura vicino all‟acqua. Non esponga quest‟apparecchiatura a pioggia e/o umidità. Non
depositi oggetti che conservano acqua o altri liquidi vicino a quest‟apparecchiatura.
Non installi questa cornice di foto vicino a termosifoni, fori o altre apparecchiature che producono calore.
Non apra l‟involucro. La preghiamo di non cercare di riparare l'apparecchiatura. Lasci questo lavoro al
personale specializzato.
Eviti l'uso in luoghi sabbiosi.
La preghiamo di inserire tutta la presa di collegamento dell‟adattatore nell‟apertura presente sulla CF. Solo in
questo modo Lei riesce ad evitare il caricamento elettrostatico.
La preghiamo di non esercitare pressione sullo schermo. Protegga lo schermo da forte insolazione.
La cornice delle immagini riproduce esclusivamente formati di file compatibili.
Le immagini possono essere protette da diritti di terzi. La riproduzione priva di licenza potrebbe violare i diritti
d‟autore.
Durante il funzionamento La preghiamo di non toccare la CF con oggetti metallici.
La preghiamo di evitare l‟uso di cuscini, divani o altri oggetti di arredamento che sostengono la formazione di
calore, visto che sussiste il rischio di surriscaldare l‟apparecchiatura.
La preghiamo di non togliere le schede di memoria durante il procedimento di lettura. Altrimenti si possono
avere interruzioni di sistema o perdita di dati.
La preghiamo di non spegnere l‟apparecchiatura durante un diashow in corso.
La preghiamo di non imballare direttamente l‟apparecchiatura dopo un lungo periodo di non uso. Si assicuri che
si sia raffreddata a sufficienza. Altrimenti si ha il rischio che si surriscaldi.
Per garantire un servizio migliore, si possono avere modifiche delle istruzioni d„uso.
Manutenzione dell‘apparecchiatura
L‟app arecc hiatu ra de ve essere spent a.
Non spruzzi o non applichi in nessun caso un liquido direttamente sullo schermo o sull´involucro.
Pulizia di schermo / involucro / cornice
Terga l‟involucro, la cornice e lo schermo LCD con cautela, utilizzando una pezza morbida, senza pelucchi e
sostanze chimiche. Utilizzi esclusivamente detergenti appositamente destinati agli schermi LCD.
Smaltimento di apparecchiature elettroniche usate
Le apparecchiature caratterizzate con questo simbolo sottostanno alla direttiva CEE/2002/96.
Tutte le apparecchiature elettroniche ed elettriche usate devono essere smaltite separatamente dai rifiuti domestici
pressi i punti di smaltimento previsti dallo stato.
Smaltendo correttamente le apparecchiature elettroniche usate evita danni all‟ambiente.
Page 23

FR - 1
Guide de démarrage rapide cadre photo numériques 10"
1 Senseur infrarouge
2 Touche Menu , ouvre le menu OSD
3 Touche Gauche [ ]
4 Touche En amont [ ]
5 Touche Play/Pause [ ]
6 Touche Droite [ ]
7 Touche En aval [ ]
8 Touche Stop/Fin []
9 Power On/Off
10 Fente de cartes SD / MMC / MS
11 Fente USB Host
12 Entrée DC 5V 2A
13 Support
14 Trou fileté pour pied support
1 Power On / Off
2
Bouge le curseur en amont dans le menu de logiciel
3 Bouge le curseur à gauche dans le menu de logiciel
4
MENU
Appeler le menu principal
5
Bouge le curseur en aval dans le menu de logiciel
6 Recherche en arrière pendant la reproduction de fichiers MP3 ou vidéo
7 Zoom In
8
4:3/16:9
Choix de l’affichage d’image : 4:3 , 16:9
9
VOL+
Augmenter le volume
10
SETUP
Appeler le menu setup
11
OK
Validation du choix. Lancement/Pause du diaporama, reproduction de MP3 ou
de vidéo
12 Bouge le curseur à droite dans le menu de logiciel
13
OSD
Affichage de l’écran On-Screen (OSD) pendant le diaporama
14 Affiche le menu précédent
15 Recherche en avant pendant la reproduction de fichiers MP3 ou vidéo
16 Lancement du diaporama avec musique de fond
17 Lancement/Arrêt de la reproduction de musique pendant le diaporama
18
VOL-
Diminuer le volume
Intenso
Veuillez suivre ces instructions de démarrage rapide, afin de vous informer sur les principales
fonctions du cadre photo numérique Intenso. Vous trouverez un manuel d’instructions détaillées
avec la description de toutes les paramètres de réglage du cadre photo numérique Intenso (DF) sur
notre page d'accueil : www.intenso.de
Page 24

FR - 2
Secure Digital Card (SD™)
Secure Digital High Capacity (SDHC™)
Multimedia Card (MMC™)
Memory Stick (MS™)
1) Connecter et mettre le CPN en marche
Connectez le bloc d’alimentation fourni au CPN. Mettez l’autre bout du bloc d’alimentation
dans la prise de courant. Poussez le régulateur vers la position « On » pour allumer le CPN.
2) Mettre la carte de mémoire | Connecter le module de mémoire USB
Attention : Ne mettez pas la carte avec trop de force !
Les formats de carte de mémoire suivants sont supportés par le CPN :
Attention : Ne mettez pas le module de mémoire
Mettez la carte de mémoire dans le slot,
les contacts montrant vers l’écran.
Le module de mémoire USB ne peut être
mis qu’en un seul sens.
avec trop de force !
Page 25

FR - 3
3) Informations de base
a) A propos du menu principal
Le menu principal s’affiche automatiquement lorsque vous allumez l’appareil. Si vous avez déjà
inséré un support d’enregistrement avec des photos stockées, le diaporama démarre
automatiquement.
Vous pouvez quitter la fonction du diaporama en appuyant sur la touche retour [] de la
télécommande ou au recto du cadre photo. Le menu de défilement des photos s’affiche. En
appuyant une nouvelle fois sur la touche retour [], vous retournez au menu principal. En
alternative, vous pouvez appuyer sur la touche menu de la télécommande, pour appeler le
menu principal.
Dans le menu principal, vous pouvez sélectionner les modes d’enregistrement intégrés,
l'horloge ou le menu de réglage setup. Appuyez sur les touches [ ], [ ] sur le cadre photo ou
sur les touches ▲, ▼ de la télécommande, pour sélectionner l’application souhaitée.
Validez votre sélection à l’aide de la touche OK de la télécommande ou de la touche play/pause
[ ] sur le cadre photo.
b) Affichage des photos
Si vous sélectionnez l’un des supports de données insérés dans le menu principal et ensuite
la fonction photo, vous accédez au menu de défilement des photos. Sélectionnez une photo
à l’aide des touches flèches et validez votre sélection à l’aide de la touche OK sur la
télécommande ou la touche play/pause [ ] sur le cadre photos. La photo s’affiche alors.
- En appuyant sur les touches flèches vers la gauche ou vers la droite vous pouvez
retourner sur une photo précédente ou avancer à la photo suivante.
- En appuyant sur la touche OK sur la télécommande ou la touche play/pause [ ] sur le
cadre photo, vous stoppez le diaporama.
- En appuyant sur la touche OSD sur la télécommande ou la touche menus sur le cadre
photo, vous ouvrez la fonction OSD.
c) Lecture de fichiers musicaux
Sélectionnez dans le menu principal l’un des supports d’enregistrement insérés et ensuite la
fonction musique. Tous les fichiers des supports d’enregistrement insérés s’affichent alors.
Sélectionnez un fichier à l’aide des touches flèches et validez votre sélection à l’aide de la
touche OK sur la télécommande ou de la touche play/pause [ ] sur le cadre photo. Tous les
titres musicaux du fichier s’affichent ensuite. Sélectionnez un titre à l’aide des touches
flèches et validez votre sélection à l’aide de la touche OK sur la télécommande ou de la touche
play/pause [ ] du cadre photo. La lecture du titre sélectionné commence.
- La pression sur les touches flèches vers la gauche ou vers la droite vous permet de
naviguer dans le menu OSD en surbrillance. Validez votre sélection à l’aide de la touche
OK sur la télécommande ou la touche play/pause [ ] sur le cadre photo.
- La pression sur les touches flèches vers le haut ou vers le bas vous permet de modifier le
volume.
Page 26

FR - 4
d) Lecture de fichiers vidéo
Sélectionnez dans le menu principal l’un des supports d’enregistrement insérés et ensuite la
fonction vidéo. Tous les fichiers des supports d’enregistrement insérés s’affichent alors.
Sélectionnez un fichier à l’aide des touches flèches et validez votre sélection à l’aide de la
touche OK sur la télécommande ou de la touche play/pause [ ] sur le cadre photo. Tous les
fichiers vidéo s’affichent ensuite. Sélectionnez un fichier à l’aide des touches flèches et
validez votre sélection à l’aide de la touche OK sur la télécommande ou de la touche play/pause
[ ] du cadre photo. La lecture du fichier vidéo sélectionné commence.
- En appuyant sur la touche menu du cadre photo ou de la télécommande, vous ouvrez le
menu OSD. A l’aide des touches flèches vers la gauche ou vers la droite vous pouvez
naviguez dans le menu OSD. Validez votre sélection à l’aide de la touche OK de la
télécommande ou de la touche play/pause [ ] du cadre photo.
- En appuyant sur les touches flèches vers le haut ou vers le bas, vous pouvez modifier le
volume.
e) Fichier menu
Sélectionnez dans le menu principal des supports d’enregistrement insérés et ensuite la
fonction fichier. Tous les fichiers supports d’enregistrement inséré s’affichent alors.
Sélectionnez un fichier à l’aide des touches flèches et validez votre sélection à l’aide de la
touche OK sur la télécommande ou la touche play/pause [ ] sur le cadre photo. Tous les
titres du fichier s’affichent alors. Sélectionnez un titre à l’aide des touches flèches et validez
votre choix à l’aide la touche OK sur la télécommande ou la touche play/pause [ ] sur le cadre
photos. La lecture du titre sélectionné commence.
f) Affichage de l'horloge
Sélectionnez la fonction horloge dans le menu principal, pour afficher l'heure, le jour, la date
configurés (avec le support d’enregistrement inséré) et visionner le diaporama. Vous disposez
de 2 modes d’affichage différents pour l’horloge. Vous pouvez les sélectionner dans le menu
de réglage setup. Ce menu vous permet également de configurer l’horloge.
g) Affichage du calendrier
Sélectionnez la fonction calendrier dans le menu principal, pour afficher l'heure, la date
configurés ainsi que la situation mensuelle et (avec le support d’enregistrement inséré) et le
visionnage d’un diaporama.
h) Modification des paramètres
Sélectionnez la fonction de réglage setup dans le menu principal. Naviguez à l’aide des
touches flèches jusqu’à la fonction souhaitée. Validez votre sélection à l’aide de la touche OK
sur la télécommande ou la touche play/pause [ ] sur le cadre photo, pour configurer votre
appareil individuellement.
Page 27

FR - 5
Paramètres
Description
Setup Photo
Durée d’affichage
Choisissez une durée pour l’affichage d’une image dans le diaporama.
Possibilités de choix : 3 sec., 5 sec., 15 sec., 1 min., 15 min.
Mode de photo
Choisissez si une image doit être affiche en plein écran ou dans ses dimensions originales par le
paramètre Image Fit.
Transition
d’images
Choisissez entre une transition d’images accidentelle et successive.
Informations
d’image
Ici, les informations de l’image affichée en plein écran ou dans le diaporama sont affichées.
Setup Musique
Mode de
répétition de
musique
Off : Reproduit tous les titres de musique dans le dossier choisi
On : Répète le titre de musique choisi
Tous : Reproduit tous les titres de musique du module de mémoire choisi
Setup Vidéo
Mode de
répétition de
vidéo
Off : Reproduit toutes les vidéos dans le dossier choisi
On : Répète la vidéo choisie
Toutes : Reproduit toutes les vidéos du module de mémoire
Setup Heure/
Calendrier
Heure
Choisissez entre une heure numérique ou analogue
Réglage de
l’heure
Réglez l’heure.
Format d’heure
Réglez le format de l’heure 12 heures (AM / PM) ou 24 heures
Date
Réglez la date
Format de date
Choisissez le mode d’affichage de votre calendrier. Par exemple JJ/MM/AAAA
Setup Alarme
Alarme 1
Réglez l’alarme, le ton d’alarme et l’horaire
Alarme 2
Réglez l’alarme, le ton d’alarme et l’horaire
Alarme 3
Réglez l’alarme, le ton d’alarme et l’horaire
Alarme 4
Réglez l’alarme, le ton d’alarme et l’horaire
Volume d’alarme
Réglez le volume d’alarme. Possibilités de choix : 1, 2, 3, 4, 5, 6
Setup géneral
Langue
Choisissez la langue souhaitée
Clarté
Réglez la clarté de l’écran TFT. Possibiltés de choix : -3, -2, -1, 0, 1, 2, 3
Contraste
Réglez le contraste de l’écran TFT. Possibilités de choix : -3, -2, -1, 0, 1, 2, 3
Saturation
Réglez la saturation de l’écran TFT. Possibilités de choix : -3, -2, -1, 0, 1, 2, 3
Auto Run
Réglez le mode dans lequel votre CPN sera lancé après la mise en marche
(Photo, Menu principal, Heure, Calendrier)
Mise en marche
Activez la mise en marche automatique : Off / Une fois / Quotidiennement
Mise hors marche
Activez la mise hors marche automatique : Off / Une fois / Quotidiennement
Affichage de
remarque
Choisissez une durée pour l’affichage de la remarque concernant les fonctions des touches dans
le mode de diaporama et pour l’affichage du statut (Pause) ou bien (Play) en bas.
Possibilités de choix : 0 sec., 5 sec., 10 sec, 20 Sec.
Configuration
d’usine
La configuration d’usine de l’appareil sera rétablie.
Page 28

FR - 6
4) Specifications du Produit
Affichage
Ecran TFT LCD digital
Ecran de 10 pouces (25.5 cm diagonale vis ible de l’écran )
Mode d’ af fichage : 4:3
Résolution : 1024*768 pixels
Bloc d’ alim entation
Input : 100~240V AC, 50/60Hz
Output : 5V 2A DC
Slot USB
USB Host 2.0 & USB Device 2.0
Supporte modules de mémoire USB
Cartes de mémoire
supportées
SD/SDHC™ (Secure Digital Card), MMC™ ( MultiMedia Card), MS™
(Memory Stick)
Format d’ im age su pp orté
JPEG, résolution maximale : 8000*8000 pixels
Température de
fonctionnement
0°C ~ +45°C
Dimensions
265.5*215*23 mm
Poids
~638.6 g
Accessoires
Télécommande (pile comprise), support, adapteur secteur, guide de
démarrage multilingue
Vous avez des questions ?
Notre hot-line de service vous les répond : +49 (0) 90 01 50 40 30 pour 0,39 €/min. du fixe allemand. Les prix
de la téléphonie mobile peuvent en différer.
Nous espérons que le Cadre Photo Numérique d’Intenso vous fait plaisir !
Page 29

FR - 7
Soin
Pour éviter des décharges électri ques n’enl evez ni les vis ni l e boîtier.
N’utilisez pas cet appareil à proximité de l’eau. N’exposez pas l’appareil à l a plu ie ou à l’ humidité. Ne
pos ez pa s des objets contenant de l’ea u ou d’autres liquid es à côté de l’appareil.
N’instal lez pas ce cadre photo numérique à proxi mité de chauffages, de poêles ou d’autres appareils
émettant de la chaleur.
N’ouvrez pas le boîtier. N’essayez pas de rép arer l’apparei l. Il doit être réparé par des spécialistes.
N’utilisez pas l’appareil à des e ndroits sa blonneux.
Mettez le connecteur adapteur du bloc d’alimentation complètement dans l’orifice du CPN. Ainsi, vous
évitez des chargements électrostatiques.
Connecter tous les raccordements correctement et sûrement.
N’appuyez pas sur l’écran. Protégez l’ écran d’une pénétrat ion du sol eil t rop forte.
Le cadre photo numérique ne peut lire que des formats compatibles.
Des images peuvent être soum is es au copyrig ht. L’ affichage sans licence peut désobéir aux droits
copyright.
Ne touchez pas le CPN avec des objets métalliques pendant le fonctionnement.
Evitez l’util isati on sur des coussins, des canap és d’ autres obj ets q ui soutiennent une thermo génie, car
l’appareil risque d’ être surchauffé.
N’enlevez pas d e cartes de mém oire pendant la lect ure. Sinon, i l peut y avoir des bocages de
système ou des pertes de données.
Ne mettez pas l’apparei l hors marche pendant un diaporama.
N’emballez pas l’appareil di rectement après une u tilisation de longue durée. Assurez un
ref roidi ssment suffissant. S inon, l’apparei l ris que d’être surchauffé.
Pour garantir un m eilleur service, il peut y avoir des changements dans le m ode d’emploi .
Entre tien de l’ appar eil
L’appareil doit être mis hors marche.
Ne mettez pas de liquide directement sur l´écran ou sur le boitier.
Netto yag e de l’ écran du b oîtier et du ca dre
Nettoye z le boîtier, le ca dr e et l’ écran LC D prud em ment a ve c un c hi ffon tendre, sa ns pel uches et sans
produit s chim iques. N’utilis ez que d es détergents qui s on t de stinés à l’écran LC D.
Mise en rebut de vieux appareils électro
Les appareils marqués avec ce symbole sont soumis à la directive européenne 2002/96/EC.
Tous les vieux appareils électro doivent être mis en rebut séparément du déchet domestique dans les poubelles
prévues par l’État.
Avec la mise en rebut correcte de vieux appareils électro, vous évitez la pollution de
l’environnment.
Page 30

ES - 1
Guía rápida del marco digital de fotos 10“ Intenso
1 Sensor infrarrojo
2 Tecla menú, abre el Menú OSD
3 Tecla derecha [ ]
4 Tecla arriba [ ]
5 Tecla Play/Pause [ ]
6 Tecla izquierda [ ]
7 Tecla abajo [ ]
8 Tecla Stop []
9 Power encendido/apagado
10 Ranura p. tarjetas SD/MMC/MS
11 Ranura USB Host
12 Entrada DC 5V 2A
13 Soporte
14 Abertura con muesca para el
pie de soporte
1 Power On/Off (encendido/apagado)
2 Mueve el cursor hacia arriba en el menú del software
3 Mueve el cursor hacia la izquierda en el menú del software
4
MENU
Abre el menú principal
5 Mueve el cursor hacia abajo en el menú del software
6 Búsqueda retrospectiva durante la ejecución de archivos de MP3 o video
7 Zoom In
8
4:3/16:9
Selecciona la visualización de la imagen: 4:3 , 16:9
9
VOL+
Aumenta el volumen
10
SETUP
Abre el menú de configuración
11
OK
Confirma la selección. Start/Pause de la presentación de diapositivas, de la
reproducción de MP3 o video
12 Mueve el cursor hacia la derecha en el menú del software.
13
OSD
Visualización de la pantalla On-Screen (OSD) durante la presentación
14 Salto atrás al menú anterior
15 Búsqueda prospectiva durante la ejecución de archivos de MP3 o video
16 Inicia de la presentación de diapositivas con música de fondo
17
Start / Stop de la reproducción de música durante la presentación de
diapositivas
18
VOL-
Reduce el volumen
Lea esta guía rápida, para conocer las funciones más importantes del marco digital de fotos de
Intenso. Encontrará instrucciones de uso más detalladas, con la descripción de todas las
posibilidades de configuración del marco digital de fotos (MD), en nuestra página web:
www.intenso.de
Page 31

ES - 2
1) Conectar y encender el Marco Digital
Secure Digital Card (SD™)
Secure Digital High Capacity (SDHC™)
Multimedia Card (MMC™)
Memory Stick (MS™)
El Marco Digital soporta los siguientes formatos de tarjetas:
Conecte la fuente de alimentación incluida al Marco Digital de Intenso. Conecte el extremo
opuesto de la fuente de alimentación al enchufe. Deslice el regulador del Marco Digital a la
posición "On" para encender el marco de fotos.
2) Introducir tarjetas de memoria | Conectar memorias USB
Introduzca las tarjetas de memoria con los contactos
mirando hacia la pantalla en la ranura para tarjetas.
Atención: ¡No introduzca la tarjeta de memoria por la fuerza!
La memoria USB solo puede introducirse en
la ranura en una dirección.
Atención: ¡No introduzca la memoria USB
por la fuerza!
Page 32

ES - 3
3) Instrucciones generales
a) Menú principal
Cuando se enciende el marco digital de fotos aparece el Menú principal. Si ya ha conectado un
soporte de memoria con fotos, se iniciará de forma automática la presentación de diapositivas.
Puede salir de la presentación de diapositivas iniciada pulsando la tecla Atrás [] en el mando
a distancia o en la parte posterior del marco de fotos. Se mostrará el Menú de previsualización
de fotos. Pulsando de nuevo la tecla Atrás [] puede volver al Menú principal. De forma
alternativa puede pulsar la tecla Menú en el mando a distancia, para acceder al Menú principal.
En el Menú principal puede seleccionar los soportes de memoria conectados, la hora o el
menú de configuración (Setup). Pulse las teclas [ ], [ ] en el marco de fotos o las teclas ▲,▼
en el mando a distancia, para seleccionar el punto del menú deseado.
Confirme su selección con la tecla OK en el mando a distancia o con la tecla Play/Pause [ ] en
el marco de fotos.
b) Visualización de fotos
Seleccione en el Menú principal uno de los soportes de memoria conectados y, a
continuación, la función Fotos. Accederá así al Menú de previsualización de fotos. Seleccione
una foto con las teclas de flechas y confirme su selección con la tecla OK en el mando a
distancia, o con la tecla Play/Pause [ ] en el marco digital de fotos. Se mostrará entonces la
foto.
- Pulsando las teclas de flechas a la izquierda o a la derecha puede avanzar a la siguiente
foto o volver a la anterior.
- Pulsando la tecla OK en el mando a distancia o la tecla Play/Pause [ ] en el marco de
fotos se detiene la presentación de diapositivas.
- Pulsando la tecla OSD en el mando a distancia o la tecla Menú en el marco de fotos se
abre el Menú OSD.
c) Reproducción de archivos de música
Seleccione en el Menú principal uno de los soportes de memoria conectados y, a
continuación, la función Música. Se mostrarán todas las carpetas del soporte de memoria
conectado. Seleccione una carpeta con las teclas de flechas y confirme su selección con la
tecla OK en el mando a distancia o con la tecla Play/Pause [ ] en el marco de fotos. Se
mostrarán todos los archivos de música de la carpeta. Seleccione un título con las teclas de
flechas y confirme su selección con la tecla OK en el mando a distancia, o con la tecla
Play/Pause [ ] en el marco de fotos. Ese título será reproducido.
- Pulsando las teclas de flechas a la izquierda o a la derecha podrá navegar por el Menú
OSD desplegado. Confirme su selección con la tecla OK en el mando a distancia, o la tecla
Play/Pause [ ] en el marco de fotos.
- Pulsando las teclas de flechas hacia arriba o hacia abajo puede regular los altavoces.
Page 33

ES - 4
d) Reproducción de archivos de vídeo
Seleccione en el Menú principal uno de los soportes de memoria conectados y, a
continuación, la función Vídeo. Se mostrarán todas las carpetas del soporte de memoria
conectado. Seleccione una carpeta con las teclas de flechas y confirme su selección con la
tecla OK en el mando a distancia, o con la tecla Play/Pause [ ] en el marco de fotos. Se
mostrarán todos los archivos de vídeo de la carpeta. Seleccione un archivo de vídeo con las
teclas de flechas y confirme su selección con la tecla OK en el mando a distancia o con la tecla
Play/Pause [ ] en el marco de fotos. Este vídeo será reproducido.
- Pulsando la tecla Menú en el marco digital o en el mando a distancia se abre el Menú OSD.
Pulsando las teclas de flechas a la izquierda o a la derecha podrá navegar por el Menú
OSD. Confirme su selección con la tecla OK en el mando a distancia, o la tecla Play/Pause
[ ] en el marco de fotos.
- Pulsando las teclas de flechas hacia arriba o hacia abajo puede regular los altavoces.
e) Menú de archivos
Seleccione en el Menú principal uno de los soportes de memoria conectados y, a
continuación, la función Archivo. Se mostrarán todas las carpetas del soporte de memoria
conectado. Seleccione una carpeta con las teclas de flechas y confirme su selección con la
tecla OK en el mando a distancia, o con la tecla Play/Pause [ ] en el marco de fotos. Se
mostrarán todos los archivos de vídeo de la carpeta. Seleccione un archivo con las teclas de
flechas y confirme su selección con la tecla OK en el mando a distancia o con la tecla
Play/Pause [ ] en el marco de fotos. Este archivo será visualizado o reproducido.
Visualización de la hora
Seleccione Hora en el Menú principal, para mostrar la hora, el día de la semana y la fecha
configurados mientras reproduce una presentación de diapositivas (con un soporte de memoria
conectado). Dispone de dos modos diferentes para la visualización de la hora. Puede
seleccionar el modo deseado en el Menú de configuración (Setup). Aquí puede configurar
también la hora.
f) Visualización del calendario
Seleccione Calendario en el Menú principal, para mostrar la hora, la fecha y la visualización
del mes configurados mientras reproduce una presentación de diapositivas (con un soporte de
memoria conectado).
g) Cambiar la configuración
Seleccione Setup en el Menú principal. Navegue con las teclas de flechas hasta el punto del
menú deseado. Confirme su selección con la tecla OK en el mando a distancia, o con la tecla
Play/Pause [ ] en el marco de fotos, para configurar de forma personalizada su aparato.
Page 34

ES - 5
Opciones de
configuración
Descripción
Configuración
de fotos
Tiempo de
exposición
Seleccione por cuánto tiempo se ha de mostrar una imagen durante la presentación.
Opciones de configuración: 3 seg., 5 seg., 15 seg, 1 min., 15 min.
Modo de fotos
Seleccione, si una imagen debe presentarse en el modo de pantalla completa o en su tamaño
real, con la opción de configuración Foto Fit.
Transición de
imágenes
Elija entre transición de imágenes aleatoria o continuada.
Información de
imágenes
En el modo de pantalla completa y de presentación de diapositivas aparece la fecha en que fue
tomada la foto.
Configuración
de la música
Modo de rep. de
música
Rep. Apagado: Reproduce todas las piezas musicales en el directorio seleccionado
Rep. Encendido: Repite la pieza de música seleccionada
Configuración
del vídeo
Configuración
del reloj /
calendario
Rep. todos: Reproduce todas las piezas de músic a en el soporte de memoria seleccionado
Modo de rep. de
vídeo
Rep. Apagado: Reproduce todos los vídeos en el directorio seleccionado
Zeitformat
Rep. Encendido: Repite el vídeo seleccionado
Datum
Rep. todos: Reproduce todos los vídeos en el soporte de memoria seleccionado
Reloj
Seleccione reloj digital o analógico
Configuración
de la alarma
Configuración de
la hora
Configura la hora.
Formato de la
hora
Configura el formato del reloj 12 horas (AM / PM) o 24 horas
Fecha
Configura de la fecha
Formato de fecha
Seleccione la forma de visualización de su calendario, p. ej.: dd/mm/aaa
Alarma 1
Regula la alarma, tono de alarma y horario
Configuración
Gnral.
Alarma 2
Regula la alarma, tono de alarma y horario
Alarma 3
Regula la alarma, tono de alarma y horario
Alarma 4
Regula la alarma, tono de alarma y horario
Volumen de
alarma
Regula el volumen de alarma. Posibilidades de configuración: 1.2,3.4,5.6
Idioma
Seleccione el idioma deseado
Brillo
Ajusta el brillo del display TFT. Opciones de configuración: -3, -2, -1, 0, 1, 2, 3.
Contraste
Ajusta el contraste del display TFT. Opciones de configuración: -3, -2, -1, 0, 1, 2, 3.
Saturación de
color
Ajusta la saturación de color del display TFT Opciones de configuración: -3, -2, -1, 0, 1, 2, 3.
Auto Run
Seleccione aquí el modo, en el que su marco de fotos debe iniciarse tras el encendido.
( Foto, menú principal, reloj, calendario)
Page 35

ES - 6
4) Especificaciones del Producto
Visualización
LCD TFT digital
Tamaño display: 10 pulgadas (25,4 cm Diagonal de pantalla visible)
Modo de visualización: 4:3
Resolución: 1024*768 Píxel
Fuente de alimentación
Input: 100~240V AC, 50/60Hz
Output: 5V 2A DC
Puerto USB
USB Host 2.0 y dispositivo USB 2.0
Soporta memorias USB
Tarjetas de memoria
aceptadas
SD/SDHC™ (Secure Digital Card), MMC™ (MultiMedia Card), MS™ (Memory
Stick)
Formato de imagen
aceptado
JPEG, resolución máxima:8000*8000 pixels
Temperatura de
funcionamiento
0°C ~ +45°C
Medidas
265,5*215*23 mm
Peso
~ 638.6 gr
Accesorios
Mando a distancia (incl. pila), soporte, fuente de alimentación,guía rápida
multilingüe
¿Tiene alguna duda?
Nuestra línea hotline de servicio técnico le responderá con mucho gusto:
+49 (0) 900 1 50 40 30 a 0,39 €/min. desde la red telefónica fija de Alemania. Los precios pa ra la telefonía
móvil pueden diferir.
¡Que lo pase bien con su Marco Digital de Intenso !
Page 36

ES - 7
Cuidado
Para evitar el riesgo de descarga eléctrica no retire ni los tornillos ni la carcasa.
No utilice este aparato cerca del agua. No ponga en contacto al aparato ni con lluvia ni con humedad. No
coloque cerca del aparato ningún objeto que almacene agua o cualquier otro tipo de líquido.
No instale este marco de fotos cerca de calefacciones, hornos o cualquier otro aparato que desprenda calor.
No abra la carcasa. No intente reparar el aparato usted mismo. Déjelo en manos de personal cualificado.
Evite su uso en lugares arenosos.
Introduzca completamente el enchufe de conexión de la fuente de alimentación en la abertura del MD prevista.
Solo de esta forma se puede evitar la carga electroestática.
Conecte de manera correcta y segura todas las conexiones.
No presione el display. Proteja al display de la radiación solar directa.
El marco de fotos reproduce solo formatos de archivo compatibles.
Las imágenes pueden estar protegidas por derecho a terceros. La reproducción sin licencia puede violar los
derechos de copyright.
No ponga en contacto el MD con objetos metálicos mientras se encuentra operativo
Evite su uso sobre cojines, sofás u otros objetos de salón que favorezcan el desarrollo de calor, puesto que
existe riesgo de sobrecalentamiento.
No retire la tarjeta de memoria mientras se está produciendo su lectura. De otro modo podría producirse la
caída del sistema o la pérdida de datos.
No apague el aparato mientras se está llevando a cabo la presentación.
No empaquete el aparato justo después de un uso prolongado. Asegúrese de que se enfríe lo suficiente. En
caso contrario existe el riesgo de sobrecalentamiento.
Para garantizar un mejor servicio pueden producirse cambios en el manual de instrucciones.
Mantenimiento del aparato
El aparato debe estar desconectado.
Nunca rocie ni ponga en contacto directo con liquidos el display o la carcasa.
Limpieza del display / carcasa / marco
Limpie cuidadosamente la carcasa, el marco y el display LCD con un paño suave, sin pelusas ni químicos. Emplee
solo productos de limpieza especialmente apropiados para displays LCD.
Eliminación de aparatos eléctricos
Los aparatos marcados con este símbolo están sujetos a la directiva europea 2002/96/EC.
Todos los aparatos y viejos aparatos eléctricos deben ser eliminados separadamente de la basura doméstica, en los
lugares previstos para ello.
Eliminando los viejos aparatos eléctricos reglamentariamente estará evitando daños al medio ambiente.
Page 37

PT - 1
Breve instrução 10“ Intenso Moldura digital
1 Sensor Infravermelho
2 Tecla Menu , abre o menu OSD
3 Tecla Esquerda [ ]
4 Teclas para cima [ ]
5 Tecla Play/Pause [ ]
6 Tecla Direita [ ]
7 Tecla Para trás [ ]
8 Tecla Stop []
9 Power On/Off
10 Entrada cartões SD/MMC/MS
11 Conexão USB
12 Entrada DC 5V 2A
13 Pé de apoio
14 Abertura de rosca para o pé de
apoio
1 Power On / Off
2
Move o cursor para cima no Menu Software
3
Move o cursor para a esquerda no Menu Software.
4
MENU
Ir para o Menu Principal
5
Move o cursor para baixo no Menu Software.
6 Busca para trás durante a reprodução de MP3 ou de arquivos de vídeo.
7 Zoom In
8
4:3/16:9
Seleção do modo de visualização: 4:3 , 16:9
9
VOL+
Aumentar volume
10
SETUP
Ir para o Menu Configurações
11
OK
Confirma a seleção. Start/Pause do Slideshow, MP3 ou reprodução de Video
12
Move o cursor para a direita no Menu Software..
13
OSD
Mostra On-Screen-Display (OSD) durante o Slideshow
14 Volta para o Menu anterior
15 Busca para frente durante a reprodução de MP3 ou de arquivos de vídeo.
16 Inicia o Slideshow com música de fundo
17 Start / Stop da reprodução de música durante o slideshow.
18
VOL-
Diminuir volume
Siga as instruçôes desta breve instrução para informações sobre as funções essenciais da Moldura
Digital Intenso. Na nossa página web www.intenso.de encontra-se um manual detalhado com a
descrição de todas as variantes de ajuste da moldura digital Intenso (DF).
Page 38

PT - 2
1) Conectar e Ligar a Moldura de Fotos Digitais
Secure Digital Card (SD™)
Secure Digital High Capacity (SDHC™)
Multimedia Card (MMC™)
Memory Stick (MS™)
Conecte o cabo de alimentação incluído na embalagem com a Moldura de Fotos Digitais
Insira a outra extremidade do cabo na tomada. Coloque o interruptor de força do Moldura
de Fotos Digitais na posição „On“ para ligá-lo.
2) Inserção de cartões de memória | Conexão de mídias de armazenamento USB
compartimento, com os contatos virados para o display.
Atenção: Não utilizar força na inserção do cartão!
A MD suporta os seguintes cartões de memória – formatos:
ser inserida em uma única direção no compartimento
inserção da mídia de armazenamento USB!
Insira o cartão de armazenamento no
A mídia de armazenamento só pode
Atenção: Não utilizar força na
Page 39

PT - 3
3) Utilização Geral
a) Menu principal
A seguir ao ligar o aparelho, aparece o menu principal. Caso o dispositivo de
armazenamento já se encontre inserido com as fotografias gravadas, a apresentação de
diapositivos inicia automaticamente.
Com a sessão de diapositivos iniciada, pode sair da apresentação de diapositivos utilizando a
tecla Voltar [] no telecomando ou no verso da moldura. É apresentado o menu de previsão
de imagem. Utilizando novamente a tecla Voltar [] pode ir para o menu principal. Como
alternativa pode utilizar a tecla do menu no seu telecomando, para ir para o menu principal.
No menu principal pode seleccionar os dispositivos de armazenamento conectados, o
relógio ou o menu de Setup. Utilize as teclas [ ], [ ] na moldura ou as teclas ▲,▼ no
telecomando para seleccionar o ponto no menu pretendido.
Confirme a sua opção com a tecla OK no telecomando ou a tecla Play/Pause [ ] na moldura.
b) Visualizar fotografias
Seleccione no menu principal um dos dispositivos de armazenamento conectados e a
seguir a função Fotos. De essa forma acede ao menu de previsão de imagem. Seleccione
uma imagem com as teclas das setas e confirme a sua opção com a tecla OK no telecomando
ou a tecla Play/Pause [ ] na moldura. A fotografia é visualizada.
- Ao utilizar as teclas das setas para a esquerda ou a direita, pode voltar uma fotografia
atrás ou ir para a frente.
- Ao utilizar a tecla OK no telecomando ou a tecla Play/Pause [ ] na moldura, pode parar a
apresentação de diapositivos.
- Ao utilizar a tecla OSD no telecomando ou a tecla do menu na moldura, abre o menu OSD.
c) Reproduzir ficheiros de música
Seleccione no menu principal um dos dispositivos de armazenamento conectados e a
seguir a função Música. Então consegue visualizar todos os ficheiros do dispositivo de
armazenamento conectado. Seleccione um ficheiro com as teclas das setas e confirme a
sua opção com a tecla OK no telecomando ou a tecla Play/Pause [ ] na moldura. Todos os
arquivos de música do ficheiro podem ser visualizados. Seleccione um dos títulos com as
teclas das setas e confirme a sua opção com a tecla OK no telecomando ou a tecla
Play/Pause [ ] na moldura. Então consegue ouvir a música.
- Ao utilizar as teclas das setas para a esquerda ou a direita, pode navegar pelo menu
OSD presente. Confirme a sua opção com a tecla OK no telecomando ou a tecla
Play/Pause [ ] na moldura. A fotografia é visualizada.
- Ao utilizar as teclas das setas para cima e baixo pode alterar o volume.
Page 40

PT - 4
d) Reproduzir ficheiros de video
Seleccione no menu principal um dos dispositivos de armazenamento conectados e a
seguir a função Video. Então consegue visualizar todos os ficheiros do dispositivo de
armazenamento conectado. Seleccione um ficheiro com as teclas das setas e confirme a
sua opção com a tecla OK no telecomando ou a tecla Play/Pause [ ] na moldura.Todos os
arquivos de video do ficheiro podem ser visualizados. Seleccione um dos ficheiros de video
com as teclas das setas e confirme a sua opção com a tecla OK no telecomando ou a tecla
Play/Pause [ ] na moldura. Então consegue visualizar o video.
- Ao utilizar a tecla do menu na moldura digital, abre o menu OSD. Ao utilizar as teclas das
setas para a esquerda ou a direita, pode navegar pelo menu OSD. Confirme a sua opção
com a tecla OK no telecomando ou a tecla Play/Pause [ ] na moldura.
- Ao utilizar as teclas das setas para Cima e Baixo pode alterar o volume.
e) Ficheiro Menu
Seleccione no menu principal um dos dispositivos de armazenamento conectados e a
seguir a função Ficheiros. Então consegue visualizar todos os ficheiros do dispositivo de
armazenamento conectado. Seleccione um ficheiro com as teclas das setas e confirme a
sua opção com a tecla OK no telecomando ou a tecla Play/Pause [ ] na moldura. Então
consegue visualizar / reproduzir o ficheiro pretendido.
f) Visualizar o relógio
Seleccione no menu principal o relógio para visualizar a hora ajustada, o dia da semana, a
data e (com o dispositivo de armazenamento inserido) ver uma apresentação de diapositivos.
Existem 2 modus diferentes para visualizar o relógio. Esses poderão ser seleccionados no
menu Setup. Aqui também pode alterar os parâmetros do relógio.
g) Visualizar o calendário
Seleccione no menu principal o calendário para visualizar a hora ajustada, a data, uma visão
mensal (com o dispositivo de armazenamento inserido) e ver uma apresentação de
diapositivos.
h) Alterar os parâmetros
Seleccione no menu principal o Setup. Navegue com as teclas das setas para o ponto
pretendido no menu. Confirme a sua opção com a tecla OK no telecomando ou a tecla
Play/Pause [ ] na moldura para ajustar o seu aparelho individualmente.
Page 41

PT - 5
Configuração
Descrição
Configurações
de Foto
Tempo de
visualização
Selecione por quanto tempo uma foto deve ser mostrada durante o Slideshow. Opções: 3 Seg., 5
Seg., 15 Seg., 1 Min., 15 Min.
Modo de Foto
Selecione, se uma foto deve ser mostrada em modo Tela Cheia ou em seu formato original,
através da opção Bild Fit.
Transições
Selecione entre transição aleatória ou contínua.
Informações de
Foto
No modo tela cheia e no Slideshos são mostrados os dados originais da foto.
Configurações
de Música
Modo Rep. de
Música
Rep. Desativada: Reproduz todas as músicas da lista selecionada.
Rep. Ativada: Repete a música selecionada.
Rep. Todas: Reproduz todas as músicas da mídia de armazenamento selecionada.
Configurações
de Vídeo
Modo Rep. de
Vídeo
Rep. Desativada: Reproduz todos os vídeos da lista selecionada.
Rep. Ativada: Repete o vídeo selecionado.
Rep. Todas: Reproduz todos os vídeos da mídia de armazenamento selecionada.
Configurações
de Relógio /
Calendário
Relógio
Selecione entre relógio analógico ou digital.
Configurações de
hora
Ajustar a hora certa.
Formato de hora
Ajustar o formato de hora 12 Horas (AM / PM) ou 24 h oras.
Data
Ajustar a data
Formato de data
Selecione o tipo de visualização para seu calendário. Por exemplo:. DD/MM/AAAA
Configurações
de despertador
Despertador 1
Ajustar despertador, ton da campainha e plano horário
Despertador 2
Ajustar despertador, ton da campainha e plano horário
Despertador 3
Ajustar despertador, ton da campainha e plano horário
Despertador 4
Ajustar despertador, ton da campainha e plano horário
Volume de
despertador
Ajuste o volume da campainha.. Opções: 1,2,3,4,5,6
Configurações
Gerais
Idioma
Selecione o idioma desejado.
Brilho
Ajusta o brilho do visor TFT. Opções: -3, -2, -1, 0, 1, 2, 3.
Contraste
Ajusta o contraste do visor TFT. Opções: -3, -2, -1, 0, 1, 2, 3.
Saturação
Ajusta a saturação do visor TFT. Opções:: -3, -2, -1, 0, 1, 2, 3.
Auto Run
Ajuste o modo em que a moldura deve iniciar.
( Foto, Menu Principal, Hora, Calendário )
Ligar
Ativa Ligar Automático. Ativado / Uma vez / Diariamente
Desligar
Ativa Desligar Automático. Ativado / Uma vez / Diariamente
Tempo de aviso
Selecione por quanto tempo o aviso deve estar ativado na foto, para as funções das teclas em
modo Slideshow, bem como do status (Pause) e (Play). Opções: 0 Sek., 5 Sek., 10 Sek.,
20Sek.
Configurações de
fábrica
O aparelho volta às configurações automáticas.
Page 42

PT - 6
4) Especificaçöes de Produto
Visor
Visor TFT LCD Digital
Tamanho do Visor: 10 Polegadas (25.4 cm tamanho do ecrão visível)
Visualização: 4:3
Definição: 1024*768 Pixels
Alimentação
Input: 100~240V AC, 50/60Hz
Output: 5V 2A DC
USB port
USB Host 2.0 & USB Device 2.0
Suporta mídias de armazenamento USB
Cartões de
armazenamento
compatíveis
SD/SDHC™ ( Secure Digital Card), MMC™ ( MultiMedia Card), MS™
(Memory Stick)
Formatos de fotos
compatíveis
JPEG, Definição máxima:8000*8000 pixels
Temperatura de
operação
0°C ~ +45°C
Medidas
265,5*215*23 mm
Peso
~ 638.6 gr
Acessórios
Controle remoto (incl. 1 pilha), Pé de apoio, Alimentador, breve instrução
multilingual
Não sabe o que fazer?
Nossa Hotline de Assistência Técnica responde com prazer às suas perguntas:
+49 (0) 900 1 50 40 30 por 0,39 €/min. a partir de um telefone fixo na Alemanha. Preços de telefonia móvel
podem variar.
Divirta-se com sua Moldura de Fotos Digitais da Intenso !
Page 43

PT - 7
Cuidado
Para evitar o perigo de choques elétricos, não remova parafusos nem a caixa externa.
Não utilize o aparelho próximo à água. Não submeta o aparelho à chuva ou umidade. Não coloque
outros objetos que armazenem água ou outros líquidos na proximidade deste aparelho.
Não instale esta moldura na proximidade de aquecedores, fornos ou outros aparelhos que gerem
calor.
Não abra o aparelho. Não tente consertá-lo por si próprio. Deixe-o aos cuidados de pessoal
especializado.
Evite utilizá-lo em lugares arenosos.
Introduza o cabo de alimentação completamente na abertura do aparelho. Somente assim pode-se
evitar cargas eletrostáticas.
Conecte todos os cabos de maneira correta e segura.
Não pressione o visor. Proteja o visor dos raios solares.
A moldura só reproduz formatos de dados compatíveis.
As fotos podem estra protegidas contra direitos de terceiros. A reprodução sem licença pode ir contr a
a lei de direitos autorais.
Não encoste na moldura de fotos com instrumentos metálicos enquanto estiver em funcionamento.
Evite a utilização sobre almofadas, sofás ou outros objetos domésticos, que possam produzir calor,
devido ao perigo de superaquecimento do aparelho.
Não remova cartões de memória durante o processo de leitura. Podem ocorrer quedas de sistema ou
perdas de dados.
Não desligue o aparelho durante a reprodução de um Diashow.
Não embale o aparelho diretamente após o longo uso. Confira se há um resfriamento suficiente. De
outra forma, há perigo de superaquecimento.
Para garantir um melhor serviço, podem ocorrer alterações no manual de intruções.
MANUTENÇÃO DO APARELHO
O aparelho deve estar desligado.
Nunca espirre ou derrame liquidos diretamente sobre o visor ou sobre a parte externa do aparelho.
Limpeza do visor / Parte externa / Moldura
Limpe a parte externa, moldura e o visor LCD cuidadosamente com pano macio, sem felpas e sem
aditivos químicos. Utilize somente produtos de limpeza especiais para Visors de LCD.
Eliminação de aparelhos domésticos
Os aparelhos que vêm marcados com este símbolo estão sujeitos às normas européias 2002/96/EC.
Todos os aparelhos elétricos e eletrodomésticos devem ser separados do lixo caseiro e depositados em lugares
próprios, determinados pelo estado.
Com a eliminação correta de aparelhos eletrodomésticos podem ser evitados danos no meio ambiente.
Page 44

PL - 1
Krótkie wprowadzenie 10“ Intenso Cyfrowa ramka
1 Czujnik IR
2 Menu Klawisz, otwiera Menu OSD
3 W prawo Klawisz [ ]
4 Do przodu [ ]
5 Play/Pause Klawisz [ ]
6 W lewo Klawisz [ ]
7 W dół Klawisz [ ]
8 Stop Klawisz []
9 Moc włączona/wyłączona
10 Slot kart SD/MMC/MS
11 USB Host Slot
12 Wejście DC 5V 2A
13 Stojak
14 Gwintowany otwór nóżki
1 Włączenie/ Wyłączenie
2 Porusza kursor w górę w Menu Oprogramowanie
3 Porusza kursor w lewo w Menu Oprogramowanie
4
MENU
Wywołanie Menu Głównego
5 Porusza kursor w dół w Menu Oprogramowanie
6 Przewijanie w tył podczas odtwarzania plików MP3 lub wideo
7 Zoom In
8
4:3/16:9
Wybór trybu wyświetlania zdjęcia : 4:3 , 16:9
9
VOL+
Wzmocnienie siły głosu
10
SETUP
Wywołanie menu USTAWIENIA
11
OK
Potwierdzenie wyboru. Start/Pauza podczas pokazu slajdów, odtwarzania
plików MP3lub wideo.
12 Porusza kursor w prawo w Menu Oprogramow anie.
13
OSD
Wyświetlanie na ekranie (tryb OSD) podczas pokazu slajdów
14 Powrót do poprzedniego menu
15 Przewijanie w przód podczas odtwarzania plików MP3 lub wideo
16
Start pokazu slajdów z odtwarzaniem muzyki w tle
17
Start / Zatrzymanie odtwarzania muzyki podczas pokazu slajdów
18
VOL-
Redukcja siły głosu
fotograficzna
Prosimy o prześledzenie tego krótkiego wprowadzenia do Cyfrowej ramki fotograficznej firmy
Intenso, aby poznać najważniejsze jej funkcje. Szczegółowa instrukcja obsługi wraz z opisem
wszystkich możliwości ustawień Cyfrowej ramki fotograficznej Intenso znajduje się na naszej stronie
internetowej: www.intenso.de
Page 45

PL - 2
Secure Digital Card (SD™)
Secure Digital High Capacity (SDHC™)
Multimedia Card (MMC™)
Memory Stick (MS™)
1) Podłączanie i włączanie ramki cyfrowej
Połączyć dostarczony wraz z urządzeniem zasilacz z ramką cyfrową. Wtyczkę kabla
zasilającego włożyć do gniazdka. Przesunąć regulator ramki cyfrowej do pozycji
„Włączone“ („ON“), aby włączyć ramkę.
2) Wkładanie kart pamięci | Podłączanie nośników pamięci na USB
stykami w kierunku ekranu do gniazda (czytnika).
Następujące formaty kart pamięci są obsługiwane przez ramkę cyfrową:
Nośnik pamięci na USB może zostać włożony
Uwaga: Nie wkładać nośnika pamięci na USB na siłę!
Włożyć kartę pamięci skierowaną
Uwaga: Nie wkładać karty na siłę !
do gniazda USB tylko w jeden sposób.
Page 46

PL - 3
3) Obsługa ogólna
a) Menu główne
Po włączeniu wyświetlane jest Menu główne. Jeśli nośnik danych z zapisanymi zdjęciami
został już włożony, automatycznie zostanie uruchomiony pokaz slajdów.
Aby wyjść z uruchomionego pokazu slajdów należy wcisnąć na pilocie lub z tyłu ramki przycisk
Wstecz []. Wyświetlone zostanie Menu podglądu zdjęć. Po przez ponowne wciśniecie
przycisku Wstecz [] można przejść do Menu głównego. Alternatywnie, aby przejść do Menu
głównego, można wcisnąć na pilocie przycisk Menu.
W Menu głównym można wybrać Podłączone nośniki danych, Zegar lub Menu ustawień.
Aby wybrać odpowiedni punkt menu należy wcisnąć przyciski [ ], [ ] na ramce lub przyciski
▲,▼ na pilocie.
Wybór należy potwierdzić przyciskiem OK na pilocie lub przyciskiem Play/Pause [ ] na ramce.
b) Wyświetlanie zdjęć
Wybierz w Menu głównym jeden z Podłączonych nośników danych, a następnie funkcję
Zdjęcia. W ten sposób przejdziesz do Menu podglądu zdjęć. Wybierz zdjęcie przy pomocy
przycisków strzałek i potwierdź przyciskiem OK na pilocie lub przyciskiem Play/Pause [ ] na
ramce. Zdjęcie zostanie teraz wyświetlone.
- Przy pomocy przycisków strzałek w lewo lub prawo można przejść odpowiednio do
zdjęcia wstecz lub dalej.
- Przy pomocy przycisku OK na pilocie lub przycisku Play/Pause [ ] na ramce można
zatrzymać pokaz slajdów.
- Przy pomocy przycisku OSD na pilocie lub przycisku Menu na ramce można otworzyć
Menu OSD.
c) Odtwarzanie plików muzycznych
Wybierz w Menu głównym jeden z Podłączonych nośników danych, a następnie funkcję
Muzyka. Wyświetlone zostaną wszystkie foldery znajdujące się na Podłączonym nośniku
danych. Wybierz folder przy pomocy przycisków strzałek i potwierdź przyciskiem OK na
pilocie lub przyciskiem Play/Pause [ ] na ramce. Wyświetlone zostaną wszystkie pliki
muzyczne znajdujące się folderze. Wybierz utwór przy pomocy przycisków strzałek i
potwierdź przyciskiem OK na pilocie lub przyciskiem Play/Pause [ ] na ramce. Utwór zostanie
teraz odtworzony.
- Przy pomocy przycisków strzałek w lewo lub prawo można poruszać się w wyświetlonym
Menu OSD. Wybór należy potwierdzić przyciskiem OK na pilocie lub przyciskiem
Play/Pause [ ] na ramce.
- Przy pomocy przycisków strzałek w górę lub w dół można zmieniać głośność.
Page 47

PL - 4
d) Odtwarzanie plików video
Wybierz w Menu głównym jeden z Podłączonych nośników danych, a następnie funkcję
Video. Wyświetlone zostaną wszystkie foldery znajdujące się na Podłączonym nośniku
danych. Wybierz folder przy pomocy przycisków strzałek i potwierdź przyciskiem OK na
pilocie lub przyciskiem Play/Pause [ ] na ramce. Wyświetlone zostaną wszystkie pliki video
znajdujące się folderze. Wybierz plik video przy pomocy przycisków strzałek i potwierdź
przyciskiem OK na pilocie lub przyciskiem Play/Pause [ ] na ramce. Video zostanie teraz
odtworzone.
- Przy pomocy przycisku Menu na ramce lub pilocie można otworzyć Menu OSD. Przy
pomocy przycisków strzałek w lewo lub prawo można poruszać się Menu OSD. Wybór
należy potwierdzić przyciskiem OK na pilocie lub przyciskiem Play/Pause [ ] na ramce.
- Przy pomocy przycisków strzałek w górę lub w dół można zmieniać głośność.
e) Menu plików
Wybierz w Menu głównym jeden z Podłączonych nośników danych, a następnie funkcję Plik.
Wyświetlone zostaną wszystkie foldery znajdujące się na Podłączonym nośniku danych.
Wybierz folder przy pomocy przycisków strzałek i potwierdź przyciskiem OK na pilocie lub
przyciskiem Play/Pause [ ] na ramce. Wyświetlone zostaną wszystkie pliki znajdujące się
folderze. Wybierz plik przy pomocy przycisków strzałek i potwierdź przyciskiem OK na pilocie
lub przyciskiem Play/Pause [ ] na ramce. Wybrany plik będzie teraz pokazany / odtworzony.
f) Wyświetlanie zegara
W Menu głównym należy wybrać funkcję Zegar, aby wyświetlić ustawiony czas, dzień
tygodnia i datę oraz (przy włożonym nośniku danych) pokaz slajdów. Dla wyświetlania
zegara do wyboru są dwa tryby. Można je wybrać w Menu ustawień. Tu również można
ustawić zegar.
g) Wyświetlanie kalendarza
W Menu głównym należy wybrać funkcję Kalendarz, aby wyświetlić ustawiony czas, datę i
przegląd miesiąca oraz (przy włożonym nośniku danych) pokaz slajdów.
h) Zmiana ustawień
W Menu głównym należy wybrać funkcję Ustawienia. Przy pomocy przycisków strzałek
przemieszcza się do wybranego punktu menu. Wybór należy potwierdzić przyciskiem OK na
pilocie lub przyciskiem Play/Pause [ ] na ramce, aby indywidualnie ustawić urządzenie.
Page 48

PL - 5
Opcje ustawień
Opis
Ustawienia zdjęć
Czas wyświetlania
Wybór czasu wyświetlania zdjęcia podczas pokazu slajdów. Opcje ustawień: 3 sek., 5 sek., 15 sek., 1 min., 15
min..
Tryb zdjęć
Wybór trybu wyświetlania zdjęcia: tryb Pełny ekran lub realne proporcje dzięki opcji ustawień Dopasowanie
obrazu.
Efekt przejścia zdjęć
Wybór pomiędzy trybem kolejności wyświetlania zdjęć: losowo lub kolejno
Informacje o zdjęciu
Tu w trybie pełnoekranowym oraz podczas pokazu slajdów wyświetlane są informacje dotyczące obrazu
Ustawienia muzyki
Tryb powtarzania
muzyki
Powtarzanie wyłączone: Odtwarzanie w trybie zwykłym wszystkich utworów w wybranym katalogu.
Powtórz utwór: Powtórzenie wybranego utworu
Powtórz wszystko: Powtórzenie wszystkich utworów na wybranym nośniku pamięci
Ustawienia wideo
Tryb powtarzania
plików filmowych
Powtarzanie wyłączone: Odtwarzanie w trybie zwykłym wszystkich filmów w wybranym katalogu.
Powtórz film: Powtórzenie wybranego filmu
Powtórz wszystko: Powtórzenie wszystkich filmów dostępnych na wybranym nośniku pamięci
Ustawienia
zegara/kalendarza
Zegar
Wybór pomiędzy zegarem elektronicznym a analogowym
Ustawienia godziny
Ustawienie prawidłowej godziny.
Format godziny
Ustawienie formatu wyświetlania czasu: 12 godzin (AM / PM) lub 24 godziny
Data
Ustawienie prawidłowej daty
Format daty
Ustawienie formatu wyświetlania daty w kalendarzu, np. DD/MM/RRRR
Ustawienia alarmu
Alarm 1
Ustawienie alarmu, sygnału alarmu i harmonogramu uruchamiania alarmów
Alarm 2
Ustawienie alarmu, sygnału alarmu i harmonogramu uruchamiania alarmów
Alarm 3
Ustawienie alarmu, sygnału alarmu i harmonogramu uruchamiania alarmów
Alarm 4
Ustawienie alarmu, sygnału alarmu i harmonogramu uruchamiania alarmów
Głośność alarmu
Ustawienia głośności alarmu. Opcje ustawienia: 1,2,3,4,5,6
Ustawienia ogólne
Język
Wybór żądanego języka.
Jasność
Ustawienie jasności ekranu TFT.
Opcje ustawień: -3, -2, -1, 0, 1, 2, 3.
Kontrast
Ustawienie kontrastu ekranu TFT.
Opcje ustawień: -3, -2, -1, 0, 1, 2, 3.
Nasycenie
Ustawienie nasycenia barw ekranu TFT.
Opcje ustawień: -3, -2, -1, 0, 1, 2, 3.
Auto Run
Ustawienia trybu, w jakim nastąpi uruchomienie ramki po jej włączeniu (Foto, Menu główne, Zegar, Kalendarz)
Włączanie
Aktywacja automatycznego włączania. Wyłączone/Raz/Codziennie
Wyłączanie
Aktywacja automatycznego wyłączania. Wyłączone/Raz/Codziennie
Czas wyświetlania
podpowiedzi
Wybór czasu wyświetlania na ekranie podpowiedzi dotyczących działania przycisków w trybie pokazu slajdów, a
także aktualnego statusu (Pauza) lub (odtwarzanie). Opcje ustawień: 0 sek., 5 sek., 10 sek., 20 sek.
Ustawienia
fabryczne
W urządzeniu przywracane są ustawienia fabryczne
Page 49

PL - 6
4) Specyfikacje Produktu
Wyświetla cz
Cyfrowy ekran TFT LCD
Wi elkość ek ranu: 10 cali (25.4 cm przekątnej wid oc znego ek ranu )
Tryb wyświetlania: 4:3
Rozdzie lc zość : 10 24 *768 pikseli
Zasilacz
Moc wejśc io wa : 10 0~ 240V A C, 5 0/ 60 Hz
Moc wyj ścio wa: 5V 2A DC
Port USB
USB Host 2.0
Obsługuje n oś ni ki d anych USB
Obsługiwane karty
pam ięci
SD/SDHC™ (Secure Digital Card), MMC™ (MultiMedia Card), MS™
(Memory Stick)
Obsługiwane for ma ty
obrazu
JPEG, rozdzielc zość m ak symaln a: 8000 * 8000 piksel i
Temperatura robocza
0°C ~ +45°C
Wymiary
265,5*215*23 mm
Waga
~ 638.6 gr
Akcesoria
Pilot (ra zem z baterią), stojak, zasilacz sieciow y, wi elojęz yczne Krótkie
wprowadzenie
Mają Państwo problemy z obsługą urządzenia?
Konsultanci naszej infolinii usługowej chętnie odpowiedzą na wszelkie pytania:
+49 (0) 900 1 50 40 30 – koszt połączenia 0,39 €/min. z sieci stacjonarnej na terenie Niemiec. Ceny połączeń z
sieci komórkowych zależne od cennika danego operatora.
Życzymy przyjemnego korzystania z ramki cyfrowej Intenso !
Page 50

PL - 7
UŻYTKOWANIE
Aby uniknąć niebezpieczeńs twa porażenia elektr ycznego, nie na leży usuwać ani ś rubek ani też
obudowy.
Nie używać urządzenia w pobliżu wody. Nie wystawi ać urządze nia na dzi ałanie deszczu ani wilgoci.
Nie stawiać w pobliżu urządzenia pojem ników ani pr ze dm io tów zawierających wodę lub płyny.
Nie instalo wać tej cyfrowej ramki na zd jęcia w pobliżu o grzewania, pieców ani urządzeń emit ujących
ciepło.
Nie otwierać obudowy urządzenia. Nie próbować napraw na własną rękę, pozostawiając je
personelowi fachowemu.
Unikać używani a w miejscac h zapiaszczonych.
W ciskać wtyczk ę zasil acza w całości do odpowiedniego otworu urządzenia. Tylk o w t en sposób
uniknąć można osadzania się ładunków elektrostatycznych.
W szystkie złącza podł ączyć bezpiecznie i poprawnie.
Nie naciskać ekranu. Chronić ek ran p rzed silnym pro mieniowaniem słonecznym.
Cyfrowa ramka na zdjęcia obsługuje tylk o kompatybilne formaty plik ów.
Zdjęci a m ogą być chronione prawami autorskimi należącymi do osób trzeci ch. W yświetlanie bez
licencji może naruszać te prawa.
Nie dotyk ać cyfrowe j ramki na zdjęcia podczas pracy metalowym i przedmiotami.
Proszę unikać używa nia urządzenia na poduszkach, sofach i innych przedmiotach, kt óre ułatwiają
wzrost temperatury, ponieważ istnieje ryzyko przegrzania urządzenia.
Nie wyjmować kart pam ięci podczas odczytywania. Może doprowadzić to do awari i systemu i utr aty
danych.
Nie wyłąc zać urządzenia podczas trwającego pok azu slajdów.
Nie wk ładać urzą dzeni a bezpośrednio po użytku do opakowania. Zapewnić odp owiedni czas na
ostygnięcie. W innym wypadku istnieje ryzyk o przegrzania urządzenia.
Aby zagwarantować lepszy pozi om usług, do nini ejszej instrukcji obsługi mogą zost ać wprowadzon e
zmiany.
KONSERWACJA URZĄDZENIA
URZĄDZENIE MU SI BYĆ WYŁĄCZONE.
NIE NATRYSKIW AĆ ANI NIE NANOSIĆ W ŻADNYM W YPADKU PŁYNÓW BEZPOŚ REDNIO NA EKRAN
ANI OBUDOW Ę.
Czyszczenie ekranu /obudowy / ramki.
Przet rzeć o stro żnie obudowę, ramkę i ekran L CD m iękką śc iereczką niepozostawiaj ąc ą strzępków ani
nitek i bez żadnych środków chemicznyc h. Używać tylko środk ów c zyszcząc ych przeznaczonych
specjalnie do ekranów LCD.
Utylizacja zużyt ego sprzętu elektronicznego
Oznaczone powyższym symbolem urządzenia podlegają Dyrektywie europejskiej nr 2002/96/EC.
Wszystkie zużyte urządzenia elektryczne i elektroniczne muszą być utylizowane osobno od pozostałych odpadków
domowych, za pośrednictwem specjalnie przeznaczonych do tego celu placówek państwowych.
Utylizując zużyty sprzęt elektroniczny w odpowiedni s posób zapobiegają Państwo zagrożeni u dla
środowiska natural nego!
Page 51

RU - 1
Короткая инструкция пользователя 10“ Интенсо цифровой
1 Инфракрасный сенсор
2 Меню кнопка, открывает Меню OSD
3 Вправо кнопка [ ]
4 Вверх кнопка [ ]
5 Просмотр кнопка [ ]
6 Влево кнопка [ ]
7 Вниз кнопка [ ]
8 Стоп кнопка []
9 Включ./Выкл.
10 Гнездо для карт SD/MMC/MS
11 Гнездо USB Host
12 DC 5В 2A Вход
13 Ножка
14 Резьбовое отверстие для
ножки
1 Включ./Выкл.
2 Передвигает курсор в меню программы вверх
3 Передвигает курсор в меню программы влево.
4
MENU
Вызов главного меню
5
Передвигает курсор в меню программы вниз
6
Поиск в направлении назад во время проигрывания MP3 или
видеофайлов
7 Увеличивает изображение
8
4:3/16:9
Выбор изображения 4:3 , 16:9
9
VOL+
Повышение звука
10
SETUP
Вызов меню настройки
11
OK
Подтверждение выбора. Старт/пауза слайд-шоу, воспроизведение MP3
или видео
12 Передвигает курсор в меню программы вправо.
13
OSD
Индикация на экране (OSD) во время просмотра слайдов
14 Шаг назад к предыдущему меню
15
Поиск в направлении вперѐд во время проигрывания MP3 или
видеофайлов
16 Старт слайд-шоу с музыкальным фоном
17 Старт / стоп в воспроизведении музыки во время слайд-шоу
18
VOL-
Снижение звука
фоторамки
Прочитайте данную короткую инструкцию, чтобы ознакомиться с наиболее важными функциями
цифровой фоторамки Интенсо. Подробную инструкцию по эксплуатации с описанием всех
возможностей настройки цифровой фоторамки Интенсо (ЦФ) Вы найдете на нашей домашней
Интернет-странице: www.intenso.de
Page 52

RU - 2
1) Подключение и включение цифровой фоторамки
Secure Digital Card (SD™)
Secure Digital High Capacity (SDHC™)
Multimedia Card (MMC™)
Memory Stick (MS™)
Соедините приложенный блок питания с цифровой фоторамкой. Вставьте другой
конец блока питания в розетку. Поставьте регулятор цифровой фоторамки в
позицию „On“, чтобы включить фоторамку.
2) Вкладывание карт памяти | подключение носителей памяти USB
Вставьте карту памяти в гнездо, направив
Внимание: Не применяйте при вставлении карты силу!
Цифровая фоторамка поддерживает следующие форматы карт памяти:
Носитель памяти USB может вставляться
в гнездо USB только одном направлении.
Внимание: Не применяйте силу при вставлении
контакты в сторону дисплея.
носителя памяти USB!
Page 53

RU - 3
3) Общее управление
a) Главное меню
После включения прибора появляется главное меню. Если уже вставлен носитель
памяти с записанными фотографиями, слайд-шоу начинается автоматически.
Если слайд-шоу началось, нажатием на кнопку Назад [] на дистанционном управлении
или на обратной стороне фоторамки можно выйти из слайд-шоу. На экране появляется
меню предварительного просмотра фотографий. Нажав еще раз на кнопку Назад [] ,
Вы попадете в Главное меню. Альтернативно Вы можете нажать на кнопку Меню на
дистанционном управлении, чтобы вызвать Главное меню.
В Главном меню можно выбрать подключенные носители памяти, время или Меню
настройки. Нажмите на кнопки [ ], [ ] на фоторамке или ▲,▼ на дистанционном
управлении, чтобы выбрать желаемый пункт меню.
Подтвердите Ваш выбор кнопкой ОК на дистанционном управлении или Play/Pause [ ] на
фоторамке.
b) Просмотр фотографий
Выберите в Главном меню один из подключенных носителей памяти и после этого
функцию Фотографии. Так Вы попадете в Меню просмотра фотографий. Выберите
фотографию с помощью кнопки со стрелкой и подтвердите Ваш выбор с помощью кнопки
ОК на дистанционном управлении или кнопки Play/Pause [ ] на фоторамке. На экране
появляется фотография.
- С помощью кнопки со стрелкой Влево или Вправо Вы можете перемещаться на одну
фотографию Вперед или Назад.
- С помощью кнопки ОК на дистанционном управлении или Play/Pause [ ] на
фоторамке слайд-шоу останавливается.
- С помощью кнопки OSD на дистанционном управлении или кнопки Меню на
фоторамке открывается меню OSD.
c) Проигрывание музыкальных файлов
Выберите в Главном меню один из подключенных носителей памяти и после этого
функцию Музыка. На экране появляются все папки подключенного носителя памяти.
Выберите папку с помощью кнопок со стрелкой и подтвердите Ваш выбор с помощью
кнопки ОК на дистанционном управлении или кнопки Play/Pause [ ] на фоторамке. На
экране появляются все музыкальные файлы папки. Выберите Песню с помощью кнопок
со стрелкой и подтвердите Ваш выбор с помощью кнопки ОК на дистанционном
управлении или кнопки Play/Pause [ ] на фоторамке. Воспроизведение песни
начинается.
- С помощью кнопок со стрелкой Влево или Вправо можно передвигаться по
высвеченному меню OSD Подтвердите Ваш выбор кнопкой ОК на дистанционном
управлении или Play/Pause [ ] на фоторамке.
- С помощью кнопок со стрелкой Вверх или Вниз можно изменять силу звука.
Page 54

RU - 4
d) Проигрывание видеофайлов
Выберите в Главном меню один из подключенных носителей памяти и после этого
функцию Видео. На экране появляются все папки подключенного носителя памяти.
Выберите папку с помощью кнопок со стрелкой и подтвердите Ваш выбор с помощью
кнопки ОК на дистанционном управлении или кнопки Play/Pause [ ] на фоторамке. На
экране появляются все видеофайлы папки. Выберите видеофайл с помощью кнопки со
стрелкой и подтвердите Ваш выбор с помощью кнопки ОК на дистанционном управлении
или кнопки Play/Pause [ ] на фоторамке. Видео проигрывается.
- Нажатием на кнопку Меню на цифровой фоторамке или дистанционном управлении
открывается меню OSD. С помощью кнопок со стрелкой Влево или Вправо можно
передвигаться по меню OSD Подтвердите Ваш выбор кнопкой ОК на дистанционном
управлении или Play/Pause [ ] на фоторамке.
- С помощью кнопок со стрелкой Вверх или Вниз можно изменять силу звука.
e) Меню файлов
Выберите в Главном меню один из подключенных носителей памяти и после этого
функцию Файл. На экране появляются все папки подключенного носителя памяти.
Выберите папку с помощью кнопок со стрелкой и подтвердите Ваш выбор с помощью
кнопки ОК на дистанционном управлении или кнопки Play/Pause [ ] на фоторамке. На
экране появляются все файлы папки. Выберите файл с помощью кнопки со стрелкой и
подтвердите Ваш выбор с помощью кнопки ОК на дистанционном управлении или кнопки
Play/Pause [ ] на фоторамке. На экране появляется /проигрывается нужный файл.
f) Индикация времени
Выберите в Главном меню пункт Время, чтобы на экране показывались время, день
недели, дата и (если вставлен носитель памяти) слайд-шоу. Для индикации времени
имеются 2 разных режима. Их можно выбрать в Меню настройки. Здесь также можно
провести настройку часов.
g) Индикация календаря
Выберите в Главном меню пункт Календарь, чтобы на экране показывались время, дата,
обзор месяца и (если вставлен носитель памяти) слайд-шоу.
h) Изменение настроек
Выберите в главном меню пункт меню НАСТРОЙКА. Перейдите с помощью кнопок со
стрелкой к нужному пункту меню. Подтвердите Ваш выбор кнопкой ОК на дистанционном
управлении или Play/Pause [ ] на фоторамке, чтобы провести индивидуальную настройку
прибора.
Page 55

RU - 5
Возможности
настройки
Описание
Настройка для
фотографий
Длительность просмотра
Выберите, как долго должна показываться фотография во время слайд-шоу.
Возможности настройки: 3 сек., 5 сек., 15 сек., 1 мин., 15 мин.
Режим просмотра
фотографий
Выберите изображение фотографии в режиме полного изображения или в его реальных
размерах, используя меню настройки Установка изображения фотографий.
Переходы между
кадрами
Можно выбирать между случайным и последовательным переходами между кадрами.
Данные о фотографии
На дисплее показываются данные о создании файла в режиме полного изображения или в
виде слайд-шоу.
Настройка
воспроизведе
ния музаки
Режим повторения
музыки
Повт. Выкл.: Воспроизводятся все фонограммы из выбранного регистра
Повт. Вкл.: Повторение выбранной фонограммы
Повт. все.: Воспроизведение всех фонограмм на выбранном носителе данных
Настройка
воспроизведе
ния
видеограмм
Режим повторения видео
Повт. Выкл.: Воспроизводятся все видеограммы из выбранного регистра
Повт. Вкл.: Повторение выбранной видеограммы
Повт. все.: Воспроизведение всех видеограмм на выбранном носителе данных
Настройка
часов /
календаря
Часы
Выберите цифровые или аналоговые часы
Настройка часов
Настройка времени.
Формат времени
Настройка времени: 12 часов (AM / PM) или 24 часа
Дата
Настройка даты
Формат даты
Выберите форму изображения календаря. Напр., ДД/ММ/ГГГГ
Настройка
сигнала
тревоги
Сигнал тревоги 1
Настройка сигнала тревоги, звукового тона и графика
Сигнал тревоги 2
Настройка сигнала тревоги, звукового тона и графика
Сигнал тревоги 3
Настройка сигнала тревоги, звукового тона и графика
Сигнал тревоги 4
Настройка сигнала тревоги, звукового тона и графика
Громкость сигнала
тревоги
Настройка громкости сигнала тревоги. Возможности настройки: 1,2,3,4,5,6
Общая
настройка
Язык
Выберите язык, которым вы желаете пользоваться.
Яркость
Настройка яркости дисплея TFT. Возможности настройки: -3, -2, -1, 0, 1, 2, 3.
Контраст
Настройка контраста дисплея TFT. Возможности настройки: -3, -2, -1, 0, 1, 2, 3.
Насыщенность
Настройка насыщенности цвета дисплея TFT. Возможности настройки: -3, -2, -1, 0, 1, 2, 3.
Автоматическая работа
Выберите здесь режим, в котором фоторамка должна быть запущена после включения.
(Фотография, главное меню, часы, календарь)
Включение
Активирование автоматического включения. Выкл. / Один раз / Ежедневно
Выключение
Активирование автоматического выключения. Выкл. / Один раз / Ежедневно
Длительность указаний
Выберите время, на протяжении которого на изображении должны показываться указания
о функциях кнопок в режиме слайд-шоу и статус (пауза) или (воспроизведение).
Возможности настройки: 0 сек., 5 сек., 10 сек., 20 сек.
Заводская настройка
Прибор возвращается в состояние заводской настройки.
Page 56

RU - 6
4) ОПИСАНИЕ ПРОДУКТА
Изображение
Цифровой дисплей TFT LCD
Размер: 10 дюймов (25,4 см видимая диагон ал ь фотографии)
Экранный режим: 4:3
Раздельная способность: 1024*768 пикселей
Блок питания
Вход: 100~240В AC, 50 /6 0Г ц
Выход: 5В 2A DC
Порт USB
USB Host 2. 0 & устр ойство USB 2 .0
Поддерживает носители информации USB
Поддерживаемые карты
памят и
SD/SDHC™ (Secu re Digital Card), MMC ™ (Multi Me di a Card), MS™
(Memory Stick)
Поддерживаемый
формат изображения
JPEG, максимальная раздельная способность: 8000*8000 пи кс ел ей
Рабочая температура
0°C ~ +45°C
Измерения
265,5*215*23 mm
Вес
~ 638.6 rp
Принадлежности
Дистанционное управление (включ. батарею), ножка, блок
пит ан ия,многоязычная инст рукция пол ьзов ат ел я
Вы не знаете, как решить проблему?
Наша горячая линия по технической поддержке клиентов ответит на Ваши вопросы:
+49 (0) 900 1 50 40 30 за 0,39 €/мин из стационарного телефона в Германии. Цены на звонки из
мобильных телефонов могут быть разными.
Желаем много радости с цифровой рамкой Интенсо!
Page 57

RU - 7
Уход
Чтобы избежат ь импульсов тока, на уд ал яйте на винты ни корпус.
Не используйте данный прибор вблиз и воды. Не поддавайт е прибор влиянию дождя ил и
влажности. Не ставьте в бл изи приб ора предметы , кот орые накапливают воду или другие виды
жидкостей.
Не устан авливайте данную фоторамку вблиз и отоплени я, печей или др угих приборов ,
излучающих тепло.
Не открывайт е корпус. Не пыта йтесь ремонтировать прибор сами. Предост авьте это
профессионалам.
Избегайте использования на местах с песк ом.
Вставьт е вилку дл я под ключения б лока питания в отверст ие ЦФ полн остью . Тол ько т ак можно
избежать электрост атического з аряда .
Выполняйте все подсо едине ния правил ьно и надѐжно.
Не нада вливайте на дисплей. Защ ищайт е дисплей от сильных с олн ечных л уче й.
Фот орамка воспроизводит т олько совм естим ые форматы.
Фотографии могут быть защищ ены правами третьих лиц. Воспроизведение фотографий без
лицензии может быть нарушением авторских прав .
Не прикасайтесь к ЦФ во время раб оты металлич ескими пре дметами .
Избегайте использования на под ушках , диванах или других предметах быт а, которые
под держивают развитие тепла , так как существ ует о пасность перегрев ания прибора.
Не извлекайт е кар ты памяти во время чтения карт . Это может привести в сбоям в с истем е и
пот ере д анных.
Не выключа йте п рибор во время воспроизве дения.
Не упаковыва йте прибор непосредственн о после длительного использ ования . Обеспе чьте
достаточное охл аждение . В ином случае с ущест вует опасность перегревания .
Для обеспечения лучшего с ервиса воз можны изменения инст рукци и по обслуживанию .
Профилактический осмотр прибора
ПРИ БОР ДОЛЖЕН БЫТЬ ВЫКЛЮЧЕН .
НИКОГДА НЕ БРЫЗ ГАЙТЕ И НЕ НАНОСИТЕ ЖИ ДКОСТ Ь ПРЯМО НА ДИСПЛ ЕЙ ИЛИ КОРПУ С.
Чистка д исплея / корпуса / рамки
Протрите корпус , рамку и дисплей LCD ост ор ожно м ягкой, неворсистой и св обод ной от хим ик ат ов
тканью. Используйте очистительные средства , специально предназначенные для дисплея LCD.
Утилизация старых электроприборов
Обозначенные данным символом приборы должны соответствовать европейской директиве 2002/96/EC.
Все электроприборы и старые электроприборы должны утилизироваться отдельно от домашнего мусора
через предусмотренные для этого государством пункты.
Надлежащая утилизация электроприборов и старых электроприборов служит предотвращению нанесения
вреда окружающей среде.
 Loading...