

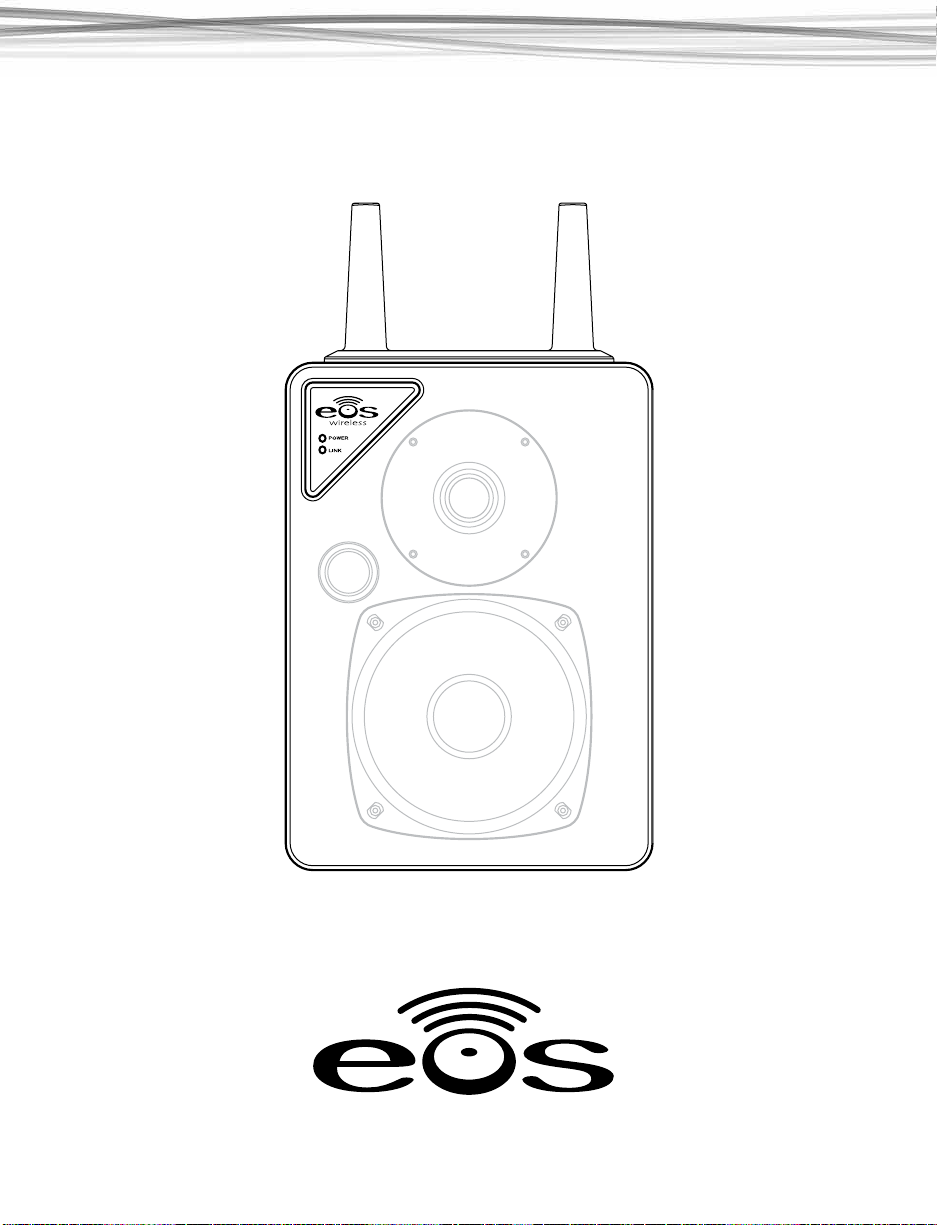
EOSP-622
Dual Zone Wireless Speaker
User Manual
TM
commercial wireless audio

Thank You For Choosing Eos Wireless!
We hope you will get much enjoyment from your wireless audio system.
Please read the entire contents of this manual. It is lled with reference information that will
allow you to get the most from your new Eos system. If you have any questions, please check
our web site at pro.eoswireless.com/support or call us at 877-465-3927.
Your Total Satisfaction – Eos Job #1
Congratulations on your purchase of the Eos Digital Pro Series Audio System. We are committed to making sure your experience is problem free.
If you experience any diculty and/or have any questions regarding the Eos system that are
not addressed in this manual, please feel free to contact the Eos Technical Support Team, tollfree, at 877-465-3927 (between the hours of 8:30 AM and 5 PM pacic time.)
Our Eos Support Team aims to oer quick, comprehensive and thorough technical support to
all our users. Before you call, please make sure you have your Eos unit model number and serial
number on hand.
TM
commercial wireless audio
877-465-3927
www.eoswireless.com/pro
2

Table Of Contents
Contents
Important Safety Instructions 4
FCC Information 5
Limited Warranty 6
Product Support 6
Wireless System Setup 7
Linking Procedure 7
Adding Additional Wireless Speakers/Receivers 7
Controls & Functions 8
Wireless Speaker Operation 9
Channel Switch 9
Volume Control 9
Zone Switch 9
Link Button 9
IR Remote Control 9
Wireless Speaker Sleep Mode 9
Mounting Options 10
Wall Outlet Mounting 10
Wall Outlet Mounting on Inverted Outlets 10
Removing the integrated power supply 10
Mounting Options 11
Wall Mounting 11
Hiding Power Cords 11
3

A Consumer Guide to Product Safety
Important Safety Instructions
Please take the time to follow the instructions in this manual carefully. It will help you set up and operate your system
properly and enjoy all of the advanced features. Please save this manual for future reference.
WARNING: To reduce the risk of re or electrical shock, do not expose the product to rain or moisture. Avoid prolonged
exposure to direct sunlight.
WARNING: Liquids can cause a failure and/or a re hazard. The unit should not be exposed to liquid dripping or
splashing. Avoid placing objects lled with liquids, such as coee cups, soda cans or vases on the unit. As with any
electronic product, use care not to spill liquids into any part of the system.
WARNING: No open ame sources, such as lighted candles, should be placed on the unit.
Note: The product label is located on the bottom of the product. This product is intended to be used only with the power
supply provided. Using another power supply can cause damage to the unit. This product is intended for indoor use. If used
outdoors, care should be exercised in placing the product in an area that is well sheltered from the outdoor environment.
Safety Instructions
1. Read instructions before using this product.
2. Keep these instructions for future reference.
3. Heed all warnings on the product and in the manual.
4. Follow all instructions.
5. Do not use this unit near water or moisture. Do not use this product near a bathtub, washbowl, kitchen sink, laundry tub, in a wet
basement, near a swimming pool, or anywhere else that water or moisture are present.
6. Clean only with a dry cloth and as directed by IntelliTouch. Unplug this product from the power supply before cleaning.
7. Avoid prolonged exposure to direct sunlight or heat.
8. Do not install near any heat sources, such as radiators, heat registers, stoves or other unit (including ampliers) that produce
excess heat.
9. Only use attachments/accessories specied by the manufacturer.
10. Unplug this unit during lightning storms or when unused for long periods of time – to prevent possible damage to this product.
11. Refer all servicing to qualied service personnel. Servicing is required when the unit has been damaged in any way such as: power
supply cord or plug is damaged; liquid has been spilled or objects have fallen into the unit; the unit has been exposed to rain or
moisture, does not operate normally, or has been dropped. Do not attempt to service this product yourself.
12. Opening or removing covers may expose you to dangerous voltages or other hazards.
13. To prevent risk of re or electric shock, avoid overloading wall outlets, extension cords, or integral convenience receptacles.
14. Do not let objects or liquids enter the product as they may touch dangerous voltage points or short-out parts that could result in
a re or electric shock.
15. Use proper power sources - Plug the product into a proper power source, as described in this manual or as marked on the product.
4

A Consumer Guide to Product Safety
FCC Information
Information about products that generate electrical noise if applicable, this equipment has
been tested and found to comply with the limits for a Class B digital device, pursuant to Part
15 of the FCC rules. These limits are designed to provide reasonable protection against harmful
interference in a residential installation.
This equipment generates, uses, and can radiate radio frequency energy and, if not installed
and used in accordance with the instructions, may cause harmful interference to radio communications. However, this is no guarantee that interference will not occur in a particular installation. If this equipment does cause harmful interference to radio or television reception, which
can be determined by turning the equipment o and on, you are encouraged to try to correct
the interference by one or more of the following measures:
• Reorient or relocate the transmitter and/or receiver.
• Increase the separation between the equipment and transmitter and/or receiver.
• Connect the equipment to an outlet on a dierent circuit than the one to which the
transmitter and/or receiver is connected.
• Consult the dealer or an experienced radio/TV technician for help.
FCC Caution: Any changes or modications not expressly approved by the party responsible for
compliance could void the user’s authority to operate this equipment.
This device complies with Part 15 of the FCC Rules. Operation is subject to the following two
conditions: (1) This device may not cause harmful interference, and (2) this device must accept
any interference received, including interference that may cause undesired operation
5

A Consumer Guide to Product Safety
Limited Warranty
IntelliTouch warrants this product to be free from manufacturing defects in material and
workmanship under normal use and conditions for a period of 1-year from date of original purchase in the United States. In order to validate your warranty, you must register your product
by going on-line (pro.eoswireless.com/register), or by calling 877-465-3927 between Monday
through Friday, 8:30AM to 5PM Pacic Time. For Warranty service outside the United States,
contact the reseller that you purchased the Eos product from.
Should service be necessary under this warranty for any reason due to manufacturing defect
during this 1-year period from date of original purchase, IntelliTouch will either repair the unit
or replace it with a reconditioned unit at no charge.
U.S. Warranty Service - You must call (877-465-3927) to obtain a return authorization number
prior to sending your product in for service.
Pack the unit in a well-padded, heavy, corrugated box.
1. Include a note with reason for return along with RMA number and return shipping information.
2. Enclose proof of purchase.
3. Enclose your check or money order payable to IntelliTouch in the amount of $20.00 to
cover shipping and handling costs.
4. Enclose your name, return address and contact number.
5. Ship the unit prepaid via UPS or parcel post (insured).
This warranty is void if the product is:
6. Damaged through negligence, misuse, abuse, moisture or accident.
7. Modied in any way.
8. Damaged because it is improperly connected to the equipment of other manufacturers.
This warranty does not cover:
9. Damage to equipment not properly connected to the product.
10. Costs incurred in the shipping of the product to IntelliTouch.
11. Damage or improper operation of unit caused by customer abuse, misuse, negligence, or
failure to follow instructions in the manual provided with the product.
12. Ordinary adjustments to the product that can be performed by customer as outlined in
the manual.
13. Damage to computer or audio equipment
Eos Wireless Pro Series Products are designed and manufactured by:
IntelliTouch
6370 Nancy Ridge Rd. #105
San Diego, CA 92121
Product Support
Visit pro.eoswireless.com/support
Support Phone - 877-465-3927
6
Set Up
Wireless System Setup
The Eos Pro Series Wireless Speakers can receive wireless audio from either the EOSP-500 Dual
Zone Music Player with the EOSP-510 wireless transmitter card installed or from the EOSP-610
transceiver in the transmit mode. Transmitters are referred as TX in this manual and receivers as
RX.
Linking Wireless Transmitters & Wireless Speakers
Before initial use, you must link the wireless transmitter (TX) with the wireless speakers. Follow
the simple steps below to perform this linking procedure. You can link up to 8 wireless speakers/transceivers (in receive mode) to the transmitter.
To simplify the process, it is recommend that you do the below process with the transmitter
and receivers in close proximity to each other to avoid having to run back and forth between
them.
Note - The receivers will retain their link to the transmitter, even after being powered down and
moved to their nal location.
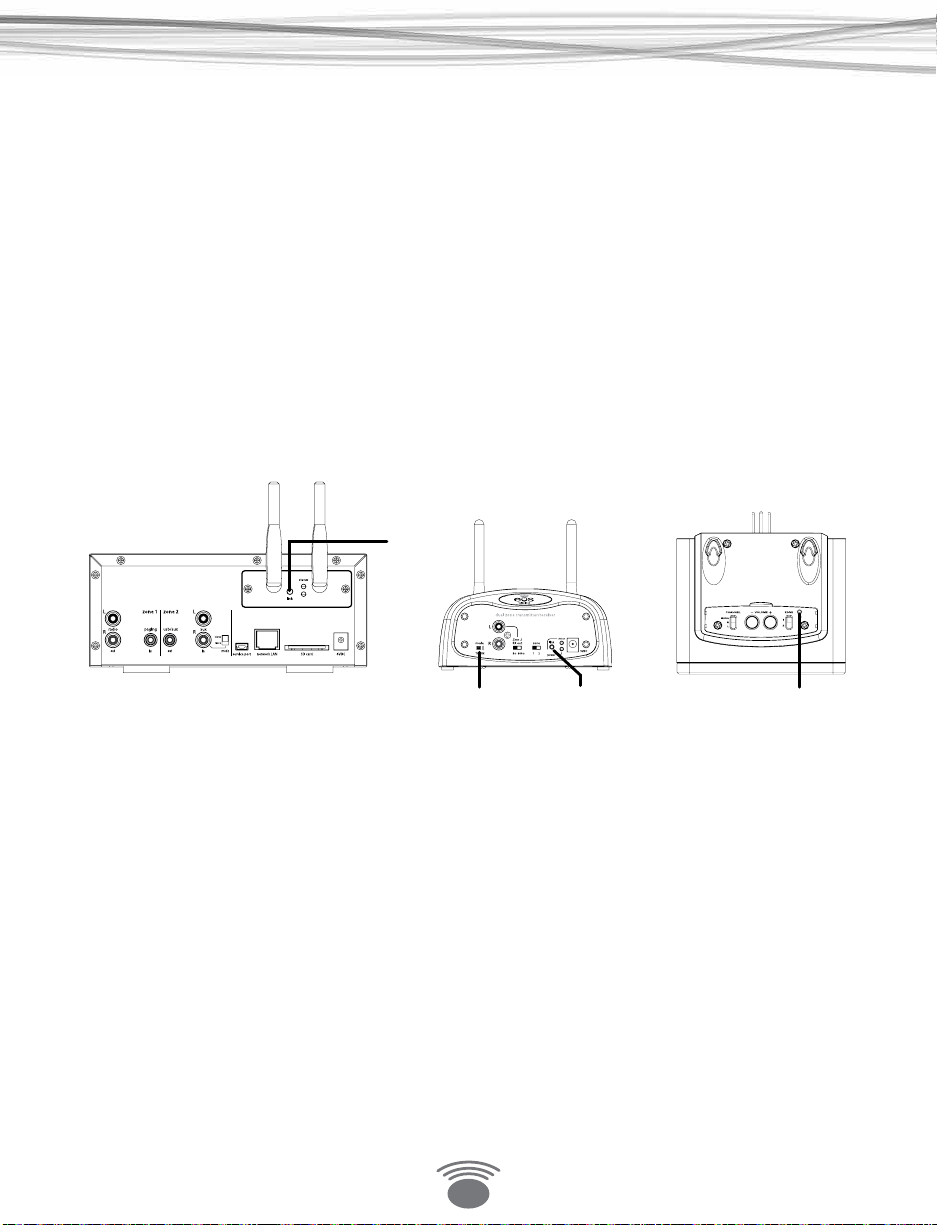
TX Card
Link Button
TM
Set MODE
to TX
Wireless Transceiver
Link Button
Wireless Speaker
Link Button
Linking Procedure
(Note - linking procedure needs to be done on each wireless speaker receiver, one at a time)
1. Power on TX.
2. Using the IR Remote, power on speaker. The Power LED will be ON and the Link LED will
ash slowly.
3. Press the link button on the TX. The Status LED will ash quickly.
4. Press the link button of speaker. The Link LED will ash quickly.
5. If the pairing of TX and speaker is successful, the status LED of both TX and speaker will
be SOLID.
Note - If the pairing is not successful, after one minute, the status LED of the TX will go back to
ON and LED on the RX will return to ashing slowly.
Adding Additional Wireless Speakers/Receivers
After initial setup, you can add additional wireless speakers/transceivers (in RX mode) to the
system at any time by following the same procedure. When adding new wireless speakers/
transceivers to the system, you only need to perform the procedure on the new wireless speakers/receivers.
7

Connections
Controls & Functions
Channel Switch
Allows selection of
Right, Left of Mono
Audio output
Power Status LED
Displays the Power
status of the speaker
Link Status LED
Displays the Link
status of the speaker
Volume Control
Adjusts the local volume
setting of the wireless
speaker
Allows the selection of
Zone 1 or Zone 2
8
Zone Select
output
Link Button
Used to link the
wireless speaker with
the transmitter
Volume Controls
Controls local volume
of the wireless speaker
Tone Controls
Allows you to tune
the speaker acoustics
the type of music and
the room acoustics
Station Presets
Allows you to select from
the stored station presets
on the Streaming Music
Player (EOSP-500). Must be used
line of sight of the player

Connections
Wireless Speaker Operation
Channel Switch
The Wireless Speaker can be set to receive either Right or Left Channel audio or Mono audio
from a stereo signal.
Volume Control
Master volume is set at the transmitter/source end. Local volume for each speaker can be
adjusted either from the speaker or from the IR wireless remote control. The IR wireless remote
control can also set the bass, treble and loudness of the speaker.
Zone Switch
The Wireless Speaker is Dual Zone. Depending on the transmitter source that you want to
receive, you can set the Zone Switch to either Zone 1 or Zone 2.
Link Button
This button is used to pair the Wireless Speaker with the Transmitter.
IR Remote Control
Remote control works on line of sight with the wireless speaker. To use remote, stand close to
the speaker you are adjusting and point the front of the remote at the speaker.
Wireless Speaker Sleep Mode
If the transmitter is turned o, the wireless speaker will go into a low power sleep mode. When
in Sleep mode the POWER staus LED will be o. This sleep mode avoids having turn o all the
speakers individually. When the transmitter is powered back on, the speakers detect this and
power themselves back on automatically, the POWER status LED will return to on.
9

Mounting
Mounting Options
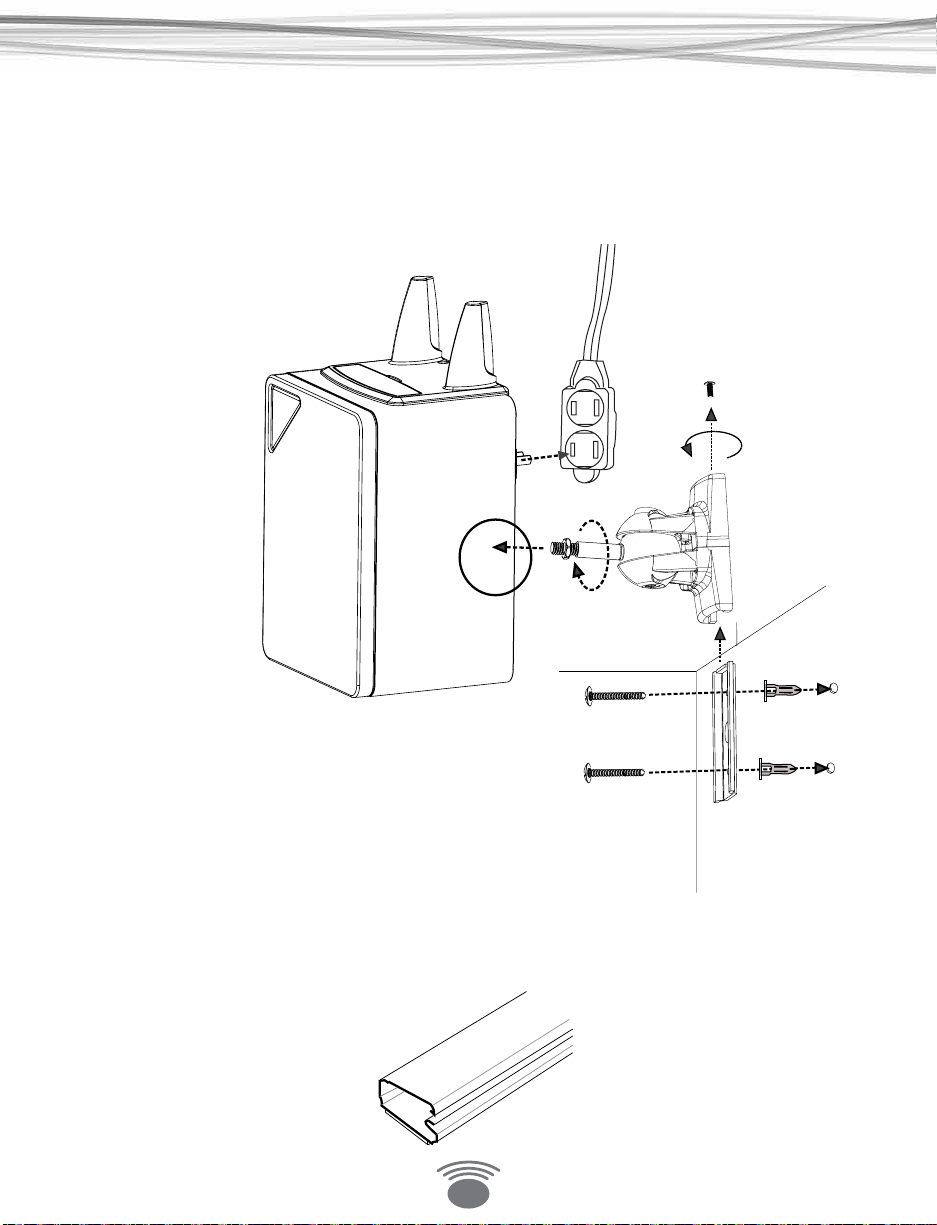
Wall Outlet Mounting
A unique design feature of the wireless speaker is that it can be plugged into a wall outlet for
mounting. For added support a security wall bracket mount is included in the package. To use
this bracket, see the diagram below.
Wall Outlet Mounting on Inverted Outlets
In instances where the wall outlet is upside down (grounding pin at the top of the outlet), the
non-functional grounding pin on the wireless speaker can be removed by unscrewing it. With
the grounding pin removed, it is advised that you use the security wall bracket mount to keep
the speaker from falling out of the wall outlet.
Removing the integrated power supply
A traditional power supply with 6’ feet of cable is integrated into the
cabinet of the wireless speaker. If you wish to remove the power supply
for your installation follow these steps:
1. Remove the 4 Phillips head screws
2. Lift o plastic plate to expose the power supply
3. Remove power supply and cord
4. Unplug the power supply jack at the connector and route the
connector end of the cable though the hole in the plastic plate
5. Reconnect the power cable to the connector in the speaker
6. Replace plastic plate back on the speaker and reinstall the 4
Phillips head screws
10
Remove 4 Phillips
head screws
Mounting
Mounting Options
Wall Mounting
The wireless speaker can be wall mounted using the optional swiveling wall mount speaker kit
(EOSP-5). In wall mounting applications an ordinary extension cord can be used to provide
power to the speaker. To mount using the swiveling wall mounting kit, see the diagram below.
Complete intallation information can be found in the EOSP-5 instruction guide included with
the wall mounting kit (EOSP-5).
Hiding Power Cords
When wall mounting the speaker, you’ll want to hide the power cord with a self adhesive
cord channel raceway available from most home improvement stores in a variety of sizes and
congurations. Route the extension cord though the raceway and attach to the wall with the
self adhive strip on the raceway.
11

TM
commercial wireless audio
877-465-3927
www.eoswireless.com/pro
 Loading...