

Page 1

Support Document
__________________________
IntelliBar Net100 Series Printers
Macintosh OS X Network Setup Guide
IntelliTech International, Inc.
43 Broad Street, Section B404
Hudson, MA 01749-2557
TEL: (978) 212-7200
FAX: (978) 562-5678
www.intellitech-intl.com
support@intellitech-intl.com
Page 2

___________________________
Notice
INTELLITECH INTERNATIONAL, INC. SPECIFICALLY DISCLAIMS THE IMPLIED
WARRANTIES OF MERCHANTABILITY AND FITNESS OF THIS PRODUCT FOR A
PARTICULAR PURPOSE. INTELLITECH INTERNATIONAL shall not be liable for any
errors contained in this manual or for any damages resulting from loss of use, data
profits, or any incidental or consequential damages arising from the use of
INTELLITECH INTERNATIONAL products or services.
Warning
This equipment has been tested and found to comply with the limits for a Class A digital
device pursuant to Part 15 of FCC Rules. These limits are designed to provide
reasonable protection against such interference when operating in a commercial
environment. This equipment generates, uses, and can radiate radio frequency energy,
and if not installed and used in accordance with this guide, may cause harmful
interference to radio communications.
Operation of this equipment in a residential area is likely to cause interference in which
case the user, at his or her own expense, will be required to take whatever measures
will be required to correct the interference.
Trademarks
IntelliBar and IntelliBar Net100 are trademarks of IntelliTech International, Inc.
© Copyright 2007-2011. All rights reserved.
Page 3

Introduction
This guide is specifically intended for the quick network set up of the IntelliBar Net100
(“Net 100”) printers in a Macintosh OS 10.5.2 and later network.
For more detailed instructions about other IntelliBar Net100 printer configurations refer to the
IntelliBar User’s Guide located on the CD-ROM supplied with your Net100 printer or go to the
IntelliTech International, Inc. web site, http://www.intellitech-
intl.com/index.asp?page=techsupp/techdocs/newuserguide.asp.
FCC Compliance
According to 47CFR, Part 2 and 15 for Class B Personal Computers and Peripherals;
and/or CPU Boards and Power Supplies used with Class B Personal Computers:
This device complies with 47CFR Part 2 and 15 of the FCC rules as a Class B digital
device FOR HOME OR OFFICE USE. Each product marketed, is identical to the
representative unit tested and found to be compliant with the standards. Records
maintained continue to reflect the equipment being produced can be expected to be
within the variation accepted, due to quantity production and testing on a statistical
basis as required by 47CFR §2.909. Operation is subject to the following two
conditions: (1) this device may not cause harmful interference, and (2) this device must
accept any interference received, including interference that may cause undesired
operation.
Standards used and met in the assessment:
EN55022: 1998 Class B; CFR Title 47, Part 15, Subpart B, Subpart C, and Subpart E
Information for Canadian Users (IC notice)
The term “IC” before the radio certification number only signifies that Industry of Canada
technical specifications were met. Operation is subject to the following two conditions:
(1) this device may not cause interference, and (2) this device must accept any
interference, including interference that may cause undesired operation of the device.
This Class B digital apparatus meets all requirements of the Canadian InterferenceCausing Equipment Regulations.
To prevent radio interference to the licensed service, this device is intended to be
operated indoors and away from windows to provide maximum shielding. Equipment
that is installed outdoors is subject to licensing.
This device has been designed to operate with an antenna having a maximum gain of 2
dB. Antenna having a higher gain is strictly prohibited per regulations of Industry
Canada. The required antenna impedance is 50 ohms.
Page 4

To reduce potential radio interference to other users, the antenna type and its gain
should be so chosen than the equivalent isotropically radiated power (EIRP) is not more
than the required for successful communication.
Information for European Users
The print server and its optional 802.11a, 802.11b, 802.11g and 802.11n wireless
technology is in compliance with the Class B Information Technology Equipment
requirements and other relevant provisions of European Directive 1999/5/EC. The limits
for Class B equipment were derived for typical residential environments to provide
reasonable protection against interference with licensed communications devices. The
internal function is a radio device using the 2.4 GHz frequency band (2.400GHz -
2.4845 GHz) and 5. GHz frequency band ( 5.150GHz - 5.825GHz). It is intended for
wireless communication with other 802.11a, 802.11b, 802.11g and 802.11n-enabled
devices in an indoor environment.
The use of 802.11a, 802.11b, 802.11g and 802.11n wireless technology in certain
countries may be restricted. Before using 802.11x products, please confirm with the
frequency management authority in the country where you plan to use it. Many
countries allow indoor use only. In Italy, general authorization is required if used
outside. In France, the use of certain channels is restricted outdoors. In some
situations or environments, the use of 802.11x wireless technology might be restricted
by the proprietor of the building or responsible representatives of the organization, for
example, in airplanes, in hospitals or in any other environment where the risk of
interference with other devices or services is perceived or identified as harmful.
If you are uncertain of the policy that applies to the use in a specific organization or
environment, you are encouraged to ask for authorization to use 802.11x wireless
technology prior to switching it on. Consult your physician or the manufacturer of
personal medical devices (pacemakers, hearing aids, etc.) regarding any restrictions on
the use of 802.11x wireless technology.
IntelliTech International, Inc. cannot be responsible for any failure to satisfy the
protection requirements resulting from a non-recommended modification of the product.
Declaration of Conformity (CE)
The above-referenced product, to which this declaration relates, in is conformity with the
provisions of:
Council Directives 1999/5/EC (March 9, 1999), Radio Equipment and
Telecommunications Terminal Equipment.
Standards used and met in the assessment:
EN301 489-1 (V1.5.1, 2004-11)
EN301 489-17 (V1.2.1, 2002-08)
EN300 328 (V1.5.1, 2004-08)
EN60950
Page 5

IntelliBar Net100 Series Printers –Macintosh OS X Setup Guide
Introduction
This document provides instructions for installing IntelliBar Net100 Series printers in a
Macintosh OS X computer system network.
IntelliBar Net100 printers are required for use with Macintosh computer networks.
NOTE: IntelliBar Standard Series printers are not compatible
with Macintosh computer networks.
IntelliBar Net100 Macintosh printer drivers work with Mac OS 10.5.1 and later Mac OS
versions.
Three IntelliBar Net100 Macintosh printer drivers are installed concurrently for the
IntelliBar M48 Net100, M412 Net100 and M88 Net100 printers.
There are four steps for configuring the IntelliBar printers into a Macintosh Leopard
system:
1. Set up the IntelliBar printer.
2. Connect the IntelliBar printer to your network.
3. Install the IntelliBar printer and drivers on your Mac.
4. Configure the IntelliBar Net100 embedded print server.
1. Set up the IntelliBar Net100 Printer
The IntelliBar Net100 should have the necessary supplies (ribbon, labels or other media)
installed and should be configured for your printing requirements. If necessary, refer to
IntelliBar User’s guide located on the CD-ROM supplied with your printer or access the
IntelliBar User’s Guide on the IntelliTech International web site.
2. Connect the IntelliBar printer to your network
A. Connect the printer to your network with an Ethernet CAT5 or CAT6 cable. Connect one
end of the cable to the network device. With the printer powered off, plug the other
end of the cable into the Net100 print server socket, which is located on the lower left
rear panel of the printer.
B. Turn on the printer power. The IntelliBar print server is set to DHCP Boot Mode as the
factory default. In this mode when the printer is powered on, it will automatically be
assigned an IP address by your network OS. NOTE: We recommend that you change
the Boot Mode to STATIC when you configure the print server in Step 4.
Page 6

Test Print Button Location.
.
Ethernet RJ45 Socket
C. After the printer powers up the control panel display will read ONLINE READY. Once this
message is displayed, print a print server status report by pushing the test-print/resetdefault button on the back of the printer.
CAUTION: Pressing the button for five seconds or longer will reset
the print server settings to factory defaults. Any changes
you may have made to the print server settings will be
lost!
Located behind the bottom
Use a straightened paper clip to push the button. The print server status report will
print out. Note the IP address. You will need this address later in order to configure the
print server.
hole beneath the RJ 45
socket. Push the button for
two seconds or less to print
a print server status report
Page 7

3. Install the IntelliBar Mac OS X Printer Drivers
A. Download the IntelliBar printer Macintosh drivers from the IntelliTech web site, or
locate them in the CD-ROM provided with your printer in the IntelliBar Mac Driver
Folder.
B. Double click on the IntelliBar Mac OS X Driver pkg file, which is located in the IntelliBar Mac
Driver Folder. The “Installer” window will appear. Click the “Continue” button.
C. You will be prompted to select a destination for installing the driver package. In this
example, “disk3” is the only available destination. Choose your destination by clicking
on its icon.
Page 8

D. Click on the “Continue” button to install the driver. Your system may prompt you to
enter a password in order to continue the installation. If you are prompted for a
password and do not know what the password is, contact your system administrator for
assistance.
E. Click the “Install” button if needed to proceed. The drivers will installed on the target
drive.
F. After a successful install, click on the “Close” button to finish the driver install to the
Hard Drive.
Page 9

G. To install a new printer, click on “System Preferences”
H. In the “Systems Preferences” window, click Printer & Fax
I. In the “Printer & Fax” window, click on the “+” symbol under the blank box on the left
side of the window above to add a new printer.
Page 10

J. Refer to the print server status report you printed earlier. Type the IP address in the
report into the Address Window as shown below. The IP address “192.168.0.103” is
used only as an example in this illustration.
K. Click the “Add” button.
L. Click on the “Options & Supplies” button in the middle right hand side.
M. In the “Options and Supplies” window, click on the Driver tab.
Page 11
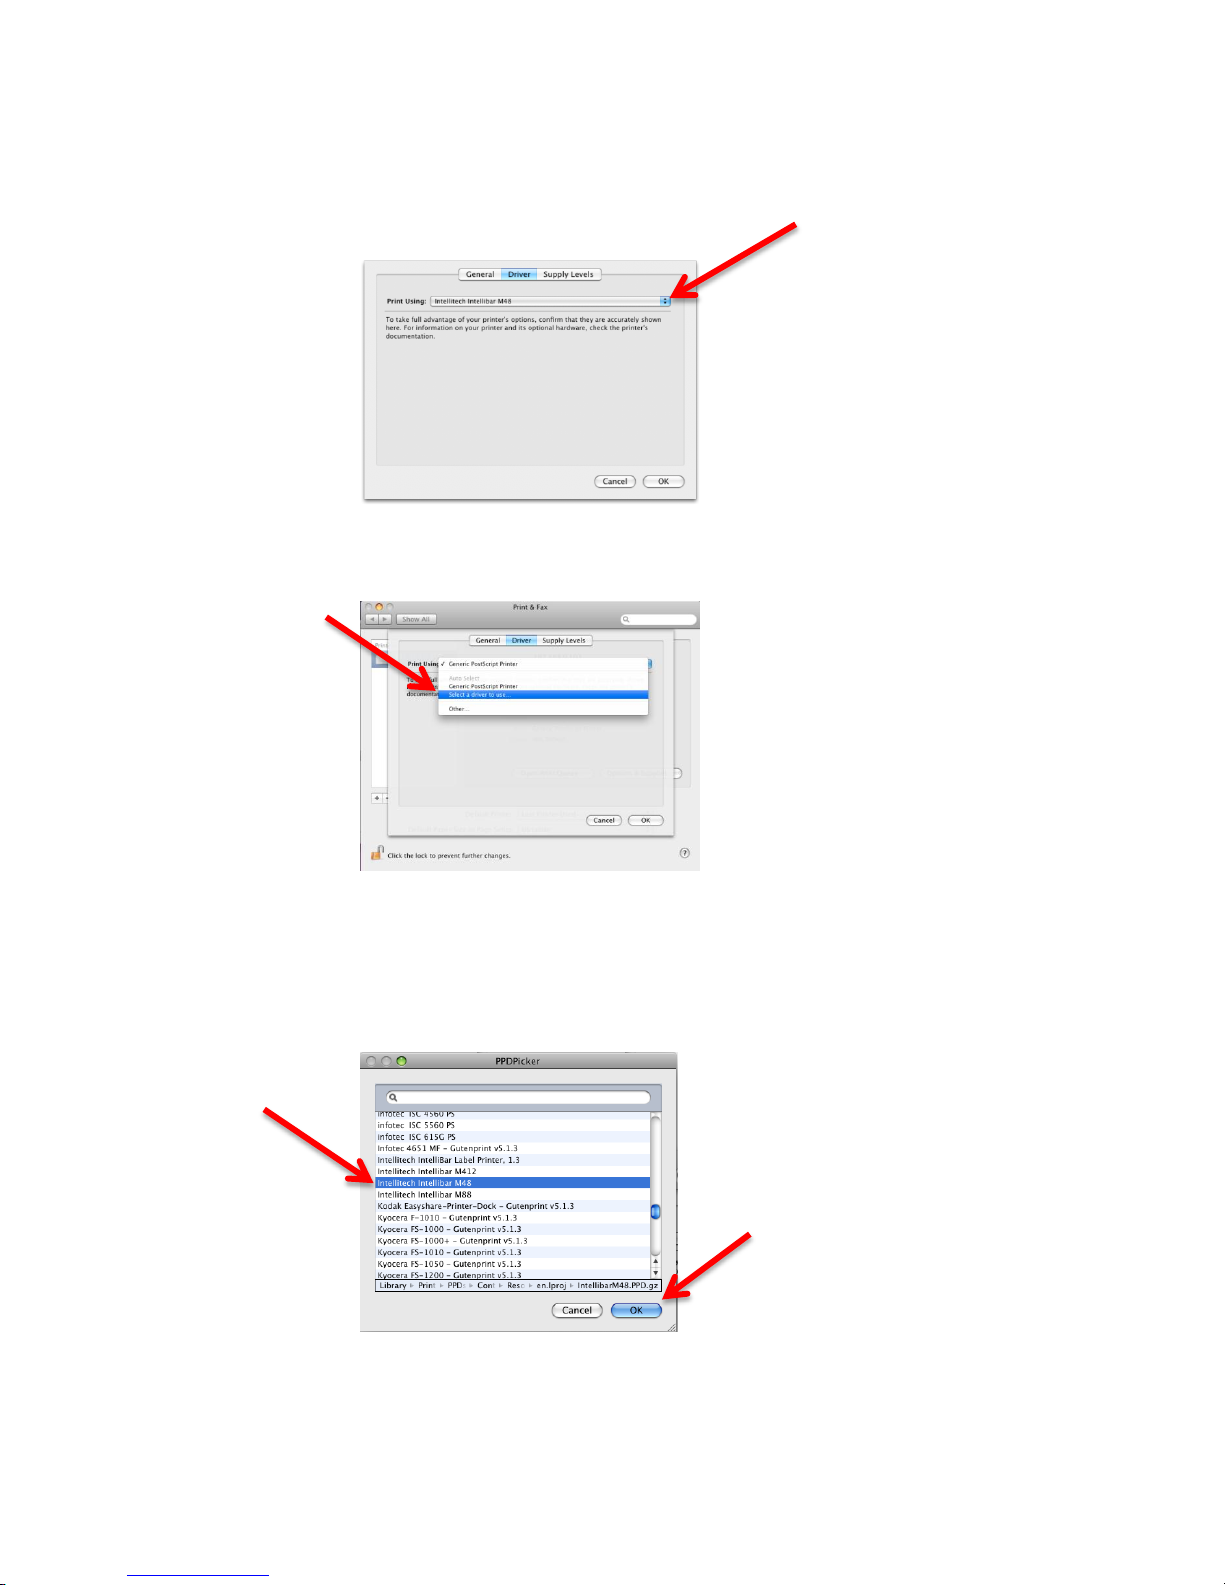
N. The “Print Using:” window will open. Click on the up/down arrows in blue on the right
side of the “Print Using” line.
O. Click on “Select a driver to use …” line as shown below.
P. Scroll down the list and click to highlight your IntelliBar Printer Model, then click the OK
button.
Page 12
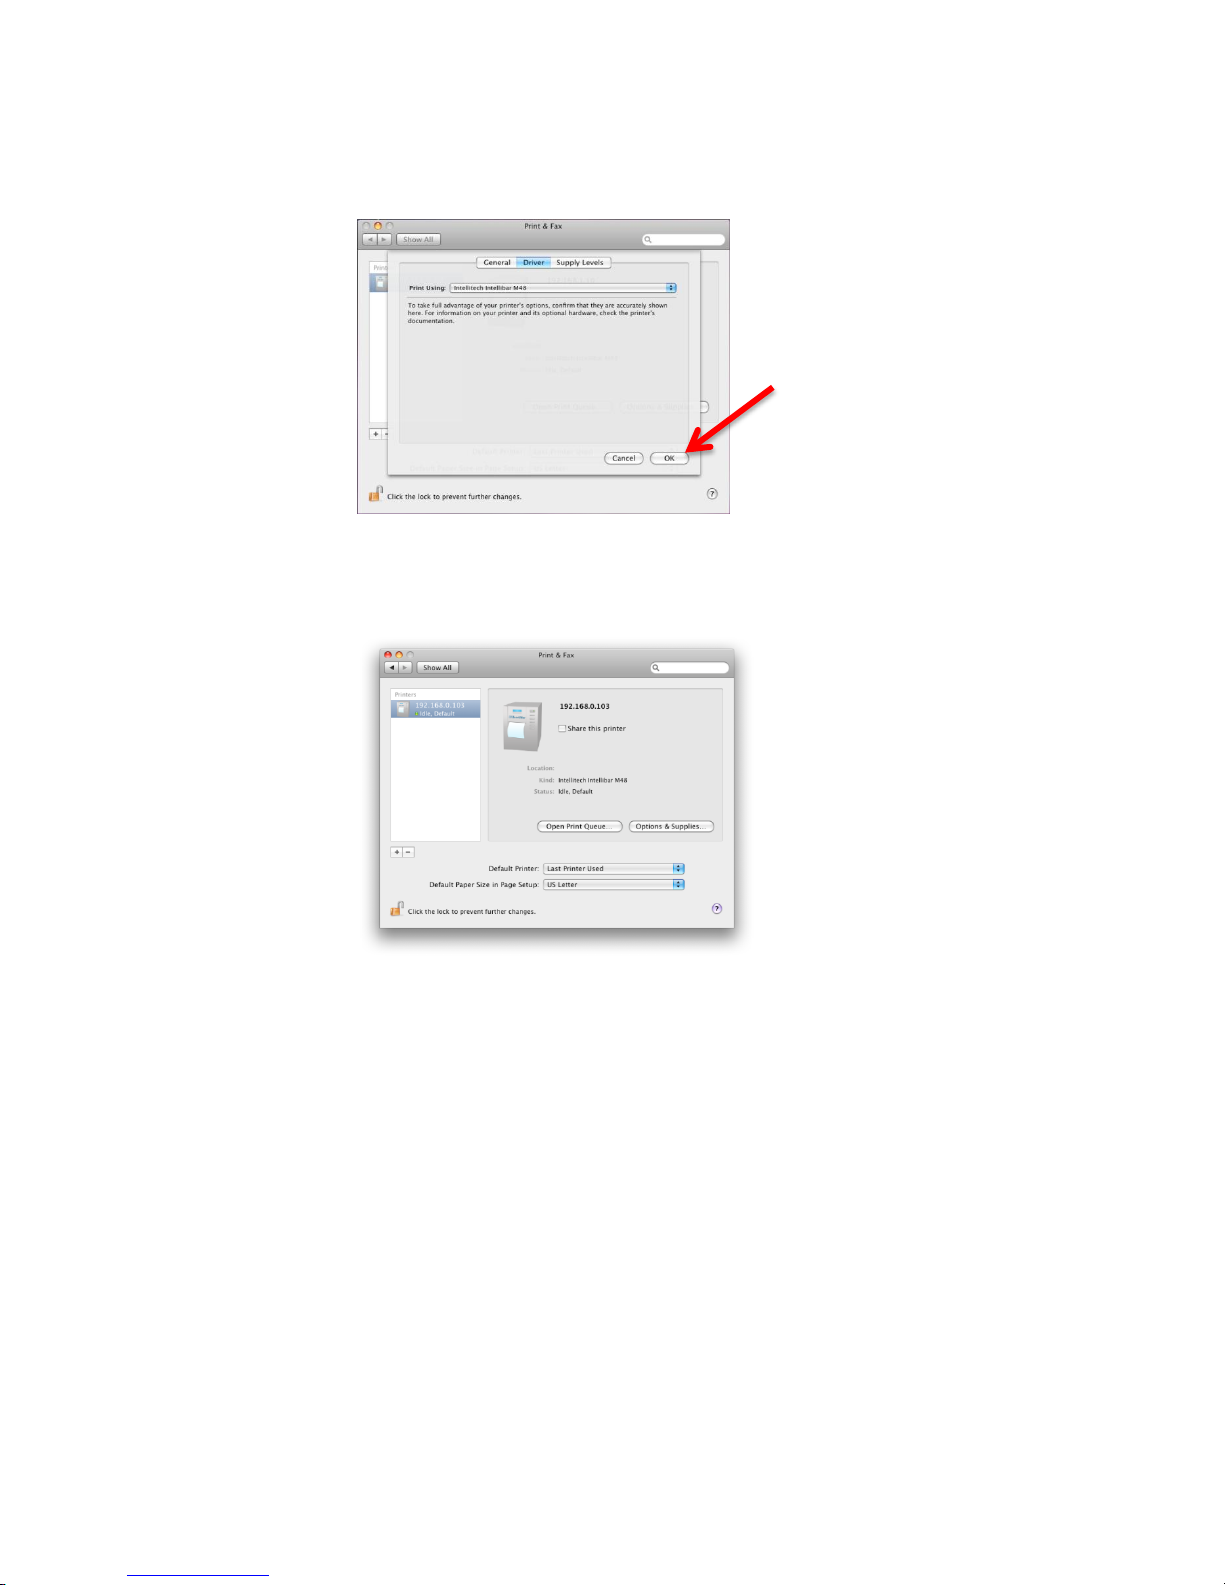
Q. The printer that you selected will appear in the Print Using: window. Click the OK
button.
R. If the IntelliBar driver is correctly installed, the following window will appear under the
Print and Fax icon.
S. The installation of the IntelliBar printer and its driver is now complete
4. Configuring the IntelliBar Net100 Embedded Print Server
A. Link to the Net100 web server.
I. Open a web browser on a computer attached to the same network as the Net100
printer.
II. Enter the Net100 IP address from the print server status page in the browser locater
window and press the enter key.
Page 13

III. The browser will connect to the Net100 embedded web server and the “Printer Status”
page window will open. Click on the “ link. Update Status”
IV. The “Network Configuration Login” page will open. You will be prompted to enter a
password. Enter the password “access” (not case sensitive) and click on the “Submit”
button. You will be granted access to the Printer Status Page.
< CONTINUED ON NEXT PAGE >
Page 14
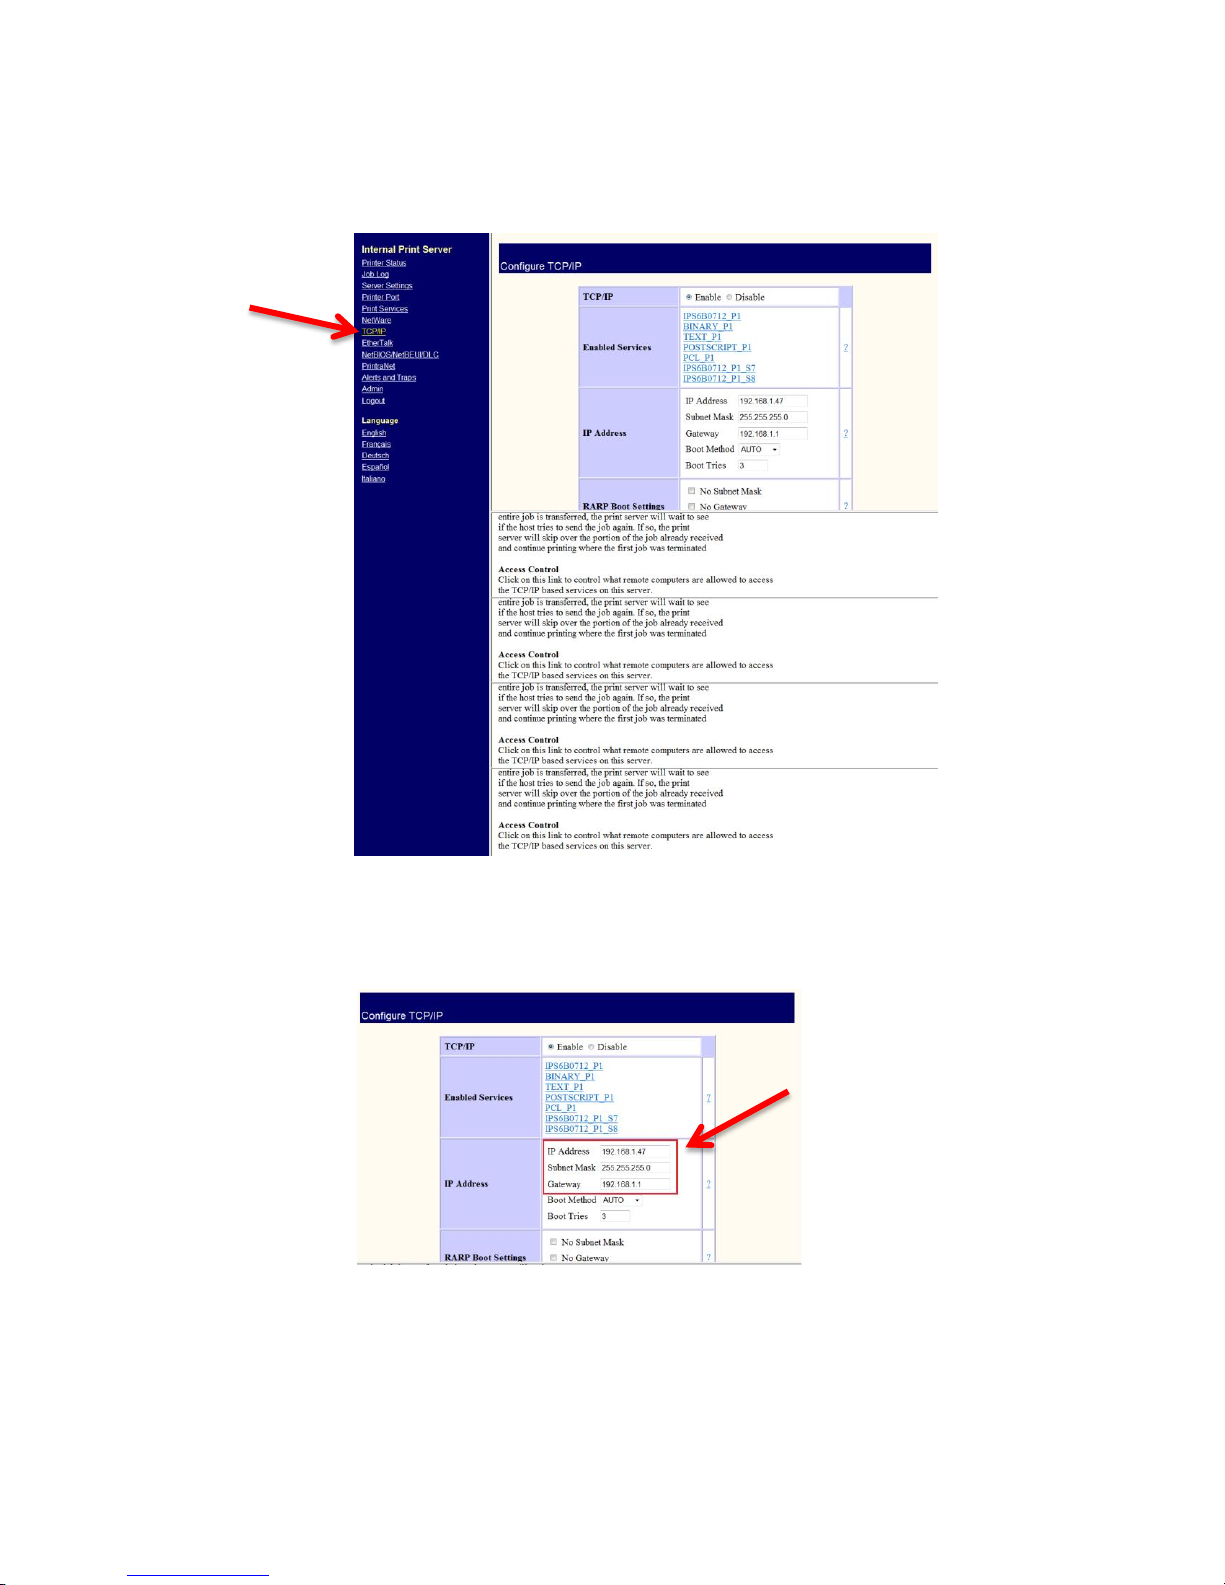
B. Click on the “TCP/IP” link on the left side of the Printer Status page, which will open the
“Configure TCP/IP” page.
C. In the “Configure TCP/IP” window, “IP Address” block enter the desired IP Address, Subnet Mask
and Gateway information.
Note: If the IP address you enter here is different than the IP
address you used in Step 3.M. above to install the
printer on your Mac, you must change the IP address in
the Mac printer setup to the same address as this one.
Otherwise the printer cannot be found on the network
by the Mac.
Page 15

D. Set Boot Method. The default Boot Method is set to “Auto.” From the drop down menu you may
select alternate boot methods: Auto, Bootp, DHCP, Rarp, Static. Choose the method you prefer.
NOTE: If you wish to retain the same IP address, subnet mask
and gateway address, choose “Static.” The Static Boot
Method is preferred and recommended in order to
prevent lost print jobs. Should the IP address be
assigned dynamically (DHCP) the printer may receive a
different IP address. Computers configured with the
printer’s initial IP address will not be able to locate the
printer with the new address and will not be able to
print to the Net100 as a consequence.
E. Set Timeout. Scroll down the “Configure TCP/IP” window to the TCP Timeout setting. The
default setting is set to 1 minute. Change the setting to “0.” Changing the setting to 0 prevents
the printer from ever timing out, keeping it constantly available to receive print jobs.
Page 16

F. Set Keep Alive. Scroll click on the Keepalive Timer setting. The default setting is set to zero (0)
minutes. Change the setting to “1.” Changing the setting to 1 enables the printer to send a
notification of its presence on the network once every minute, which prevents the printer from
becoming “lost” to the network.
G. Submit settings changes. To apply your settings changes, click on the Submit button at the
bottom of the Printer Status Page.
Page 17

H. If you settings have successfully changed the printer configuration you will see the following
message: "Configuration has been modified. The unit must be reset for new values to take
effect. Data updated successfully."
I. Confirm Settings Changes. Click on the Admin button on the left side of the Printer
Status Page. The Admin Configuration page will appear.
J. Click the Print Test Page link. The Net100 will then print a test page.
K. The test page provides (1) a confirmation of network connectivity between the host
computer and the printer and (2) a listing of the printer network setting.
Verify that the settings in the test page are the desired settings. If all settings are
correct, your IntelliBar Net100 printer is now successfully configured for your network.
Page 18

*** END OF DOCUMENT ***
 Loading...