

Page 1
WARRANTY INFORMATION
ENGLISH: For warranty information, go to www.intellinet-network.com/warranty.
DEUTSCH: Garantieinformationen finden Sie unter www.intellinet-network.com/warranty.
ESPAÑOL: Si desea obtener información sobre la garantía, visite www.intellinet-network.com/warranty.
FRANÇAIS: Pour consulter les informations sur la garantie, visitez www.intellinet-network.com/warranty.
PORTUGUÊS:
ITALIANO: Per informazioni sulla garanzia, accedere a www.intellinet-network.com/warranty.
EN MÉXICO: Poliza de Garantia INTELLINET — Datos del importador y responsable ante el consumidor
IC Intracom México, S.A. de C.V. • Av. Interceptor Poniente # 73, Col. Parque Industrial La Joya, Cuautitlan
Izcalli, Estado de México, C.P. 54730, México. • Tel. (55)1500-4500
La presente garantía cubre este producto por 3 años contra cualquier defecto de fabricación en sus
materiales y mano de obra, bajo las siguientes condiciones:
1.
Todos los productos a que se reere esta garantía, ampara su cambio físico, sin ningún cargo para el
consumidor.
2. El comercializador no tiene talleres de servicio, debido a que los productos que se garantizan no cuentan con
reparaciones, ni refacciones, ya que su garantía es de cambio físico.
3. La garantía cubre exclusivamente aquellas partes, equipos o sub-ensambles que hayan sido instaladas
defábrica y no incluye en ningún caso el equipo adicional o cualesquiera que hayan sido adicionados al
mismo por el usuario o distribuidor.
Para hacer efectiva esta garantía bastara con presentar el producto al distribuidor en el domicilio donde fue
adquirido o en el domicilio de IC Intracom México, S.A. de C.V., junto con los accesorios contenidos en su
empaque, acompañado de su póliza debidamente llenada y sellada por la casa vendedora (indispensable
el sello y fecha de compra) donde lo adquirió, o bien, la factura o ticket de compra original donde se mencione
claramente el modelo, numero de serie (cuando aplique) y fecha de adquisición. Esta garantia no es valida en
los siguientes casos: Si el producto se hubiese utilizado en condiciones distintas a las normales; si el producto
no ha sido operado conforme a los instructivos de uso; ó si el producto ha sido alterado o tratado de ser
reparado por el consumidor ó terceras personas.
Para informações sobre garantia, ir para
www.intellinet-network.com/warranty.
REGULATORY STATEMENTS
Federal Communications Commission (FCC) Class B
This equipment has been tested and found to comply with the limits for a Class B digital device, pursuant to Part 15
of Federal Communications Commission (FCC) Rules. These limits are designed to provide reasonable protection
against harmful interference in a residential installation. This equipment generates, uses and can radiate
radio frequency energy, and if not installed and used in accordance with the instructions
may cause harmful interference to radio communications. However, there is no guarantee that
interference will not occur in a particular installation. If this equipment does cause harmful interference
to radio or television reception, which can be determined by turning the equipment o and on, the
user is encouraged to try to correct the interference by one or more of the following measures:
• Reorient or relocate the receiving antenna.
• Increase the separation between the equipment and the receiver.
• Connect the equipment to an outlet on a circuit dierent from the receiver.
• Consult the dealer or an experienced radio/TV technician for help.
European Commission (CE / R&TTE)
ENGLISH:
DEUTSCH: Dieses Gerät enspricht der Direktive R&TTE Direktive 1999/5/EC.
ESPAÑOL: Este dispositivo cumple con los requerimientos de la Directiva R&TTE 1999/5/EC.
FRANÇAIS: Cet appareil satisfait aux exigences de la directive R&TTE 1999/5/CE.
PORTUGUÊS:
ITALIANO: Questo dispositivo è conforme alla Direttiva 1999/5/EC R&TTE.
This device complies with the requirements of the R&TTE Directive 1999/5/EC.
Este dispositivo está em conformidade com a Directiva R&TTE 1999/5/EC.
WASTE ELECTRICAL & ELECTRONIC EQUIPMENT
Disposal of Electric and Electronic Equipment
(applicable in the European Union and other European countries with separate collection systems)
ENGLISH: This symbol on the product or its packaging indicates that this product shall not be treated as
household waste. Instead, it should be taken to an applicable collection point for the recycling of electrical
and electronic equipment. By ensuring this product is disposed of correctly, you will help prevent
potential negative consequences to the environment and human health, which could otherwise be
caused by inappropriate waste handling of this product. If your equipment contains easily removable
batteries or accumulators, dispose of these separately according to your local requirements. The
recycling of materials will help to conserve natural resources. For more detailed information about
recycling of this product, contact your local city oce, your household waste disposal service or the shop
where you purchased this product. In countries outside of the EU: If you wish to discard this product, contact
your local authorities and ask for the correct manner of disposal.
ITALIANO
PORTUGUÊS
FRANÇAIS
ESPAÑOL
DEUTSCH
ENGLISH
GUIDE
QUICK INSTALL
ADAPTER
WIRELESS N
DEUTSCH: Dieses auf dem Produkt oder der Verpackung angebrachte Symbol zeigt an, dass dieses Produkt
nicht mitdem Hausmüll entsorgt werden darf. In Übereinstimmung mit der Richtlinie 2002/96/EG des
Europäischen Parlaments und des Rates über Elektro- und Elektronik-Altgeräte (WEEE) darf dieses Elektrogerät
nicht im normalen Hausmüll oder dem Gelben Sack entsorgt werden. Wenn Sie dieses Produkt entsorgen
möchten, bringen Sie es bitte zur Verkaufsstelle zurück oder zum Recycling-Sammelpunkt Ihrer Gemeinde.
ESPAÑOL: Este símbolo en el producto o su embalaje indica que el producto no debe tratarse como residuo
doméstico. De conformidad con la Directiva 2002/96/CE de la UE sobre residuos de aparatos eléctricos y
electrónicos (RAEE), este producto eléctrico no puede desecha se con el resto de residuos no clasicados.
Deshágase de este producto devolviéndolo al punta de venta o a un punta de recogida municipal para su reciclaje.
FRANÇAIS: Ce symbole sur Ie produit ou son emballage signie que ce produit ne doit pas être traité comme
un déchet ménager. Conformément à la Directive 2002/96/EC sur les déchets d’équipements électriques et
électroniques (DEEE), ce produit électrique ne doit en aucun cas être mis au rebut sous forme de déchet
municipal non trié. Veuillez vous débarrasser de ce produit en Ie renvoyant à son point de vente ou au point
de ramassage local dans votre municipalité, à des ns de recyclage.
PORTUGUÊS:
lixo doméstico. Em vez disso, deve ser levado para um ponto de recolha adequado à reciclagem de equipamento
eléctrico ou electrónico. Ao garantir a eliminação correcta deste produto, ajuda a evitar potenciais consequências
negativas para o ambiente e a saúde humana, que poderiam resultar do manuseamento inadequado de resíduos
deste produto Caso o seu equipamento inclua baterias ou acumuladores facilmente removíveis, elimine-os
separadamente de acordo com os requisitos locais. A reciclagem de materiais ajuda a conservar os recursos
naturais. Para informações mais detalhadas sobre reciclagem deste produto, contacte as autoridades locais, o
serviço de recolha de lixo doméstico ou a loja onde adquiriu o produto. Nos países fora da UE: se quiser eliminar
este produto, contacte as autoridades locais e informe-se sobre o procedimento a adoptar.
ITALIANO: Questo simbolo sui prodotto o sulla relativa confezione indica che il prodotto non va trattato come
un riuto domestico. In ottemperanza alla Direttiva UE 2002/96/EC sui riuti di apparecchiature elettriche
ed elettroniche (RAEE), questa prodotto elettrico non deve essere smaltito come riuto municipale misto.
Si prega di smaltire il prodotto riportandolo al punto vendita o al punto di raccolta municipale locale per un
opportuno riciclaggio.
INTELLINET NETWORK SOLUTIONS™ oers a complete line of active and passive networking products.
Netzwerkkomponenten. Für weitere Informationen wenden Sie sich bitte an Ihren Händler oder nutzen Sie
Alle genannten Produkt- oder Firmennamen sind eingetragene Marken oder Marken der jeweiligen Firmen.
INTELLINET NETWORK SOLUTIONS™ ofrece una línea completa de productos de red activa y pasiva.
Pregunte a su distribuidor para obtener mayor informacion o visite: www.intellinet-network.com.
Todos los productos mencionados son marcas comerciales o marcas registradas de sus respectivos propietarios.
INTELLINET NETWORK SOLUTIONS™ ore un assortiment complet de produits de réseau actifs et passifs. Pour
plus d’informations veuillez contacter votre revendeur ou utiliser la page d’accueil www.intellinet-network.com.
INTELLINET NETWORK SOLUTIONS™ oferece uma linha completa de produtos de rede activos e passivos. Peça
Todos os produtos mencionados são marcas comerciais ou marcas comerciais registadas dos respectivos
Este símbolo no produto ou na embalagem indica que este produto não deve ser tratado como
Ask your local computer dealer for more information or visit www.intellinet-network.com.
All products mentioned are trademarks or registered trademarks of their respective owners.
INTELLINET NETWORK SOLUTIONS™ bietet ein vollständiges Sortiment aktiver und passiver
die Webseite www.intellinet-network.com.
Tous les produits mentionnés sont des marques commerciales ou des marques déposées de leurs
propriétaires respectifs.
mais informações ao fabricante do seu computador ou visite w ww.intellinet-network.com.
proprietários.
INTELLINET NETWORK SOLUTIONS™ ore una linea completa di prodotti di rete attivi e passivi. Chiedi
maggiori informazioni al tuo rivenditore di computer o visita il sito www.intellinet-network.com.
Tutti i prodotti sopracitati sono marchi di fabbrica o marchi registrati depositati dai proprietari.
INT-ADAPTER-BA-QIG-ML-Win7-05
Page 2
STEP
2.2
STEP
2.4
2.5
1
2.1
1.1
1.2
ENGLISH
This guide presents the basic steps to set up and operate this device. For detailed instr uctions and specificat ions, refer to the user manual
on the CD enclose d with this product or at www.intellinet-networ k.com.
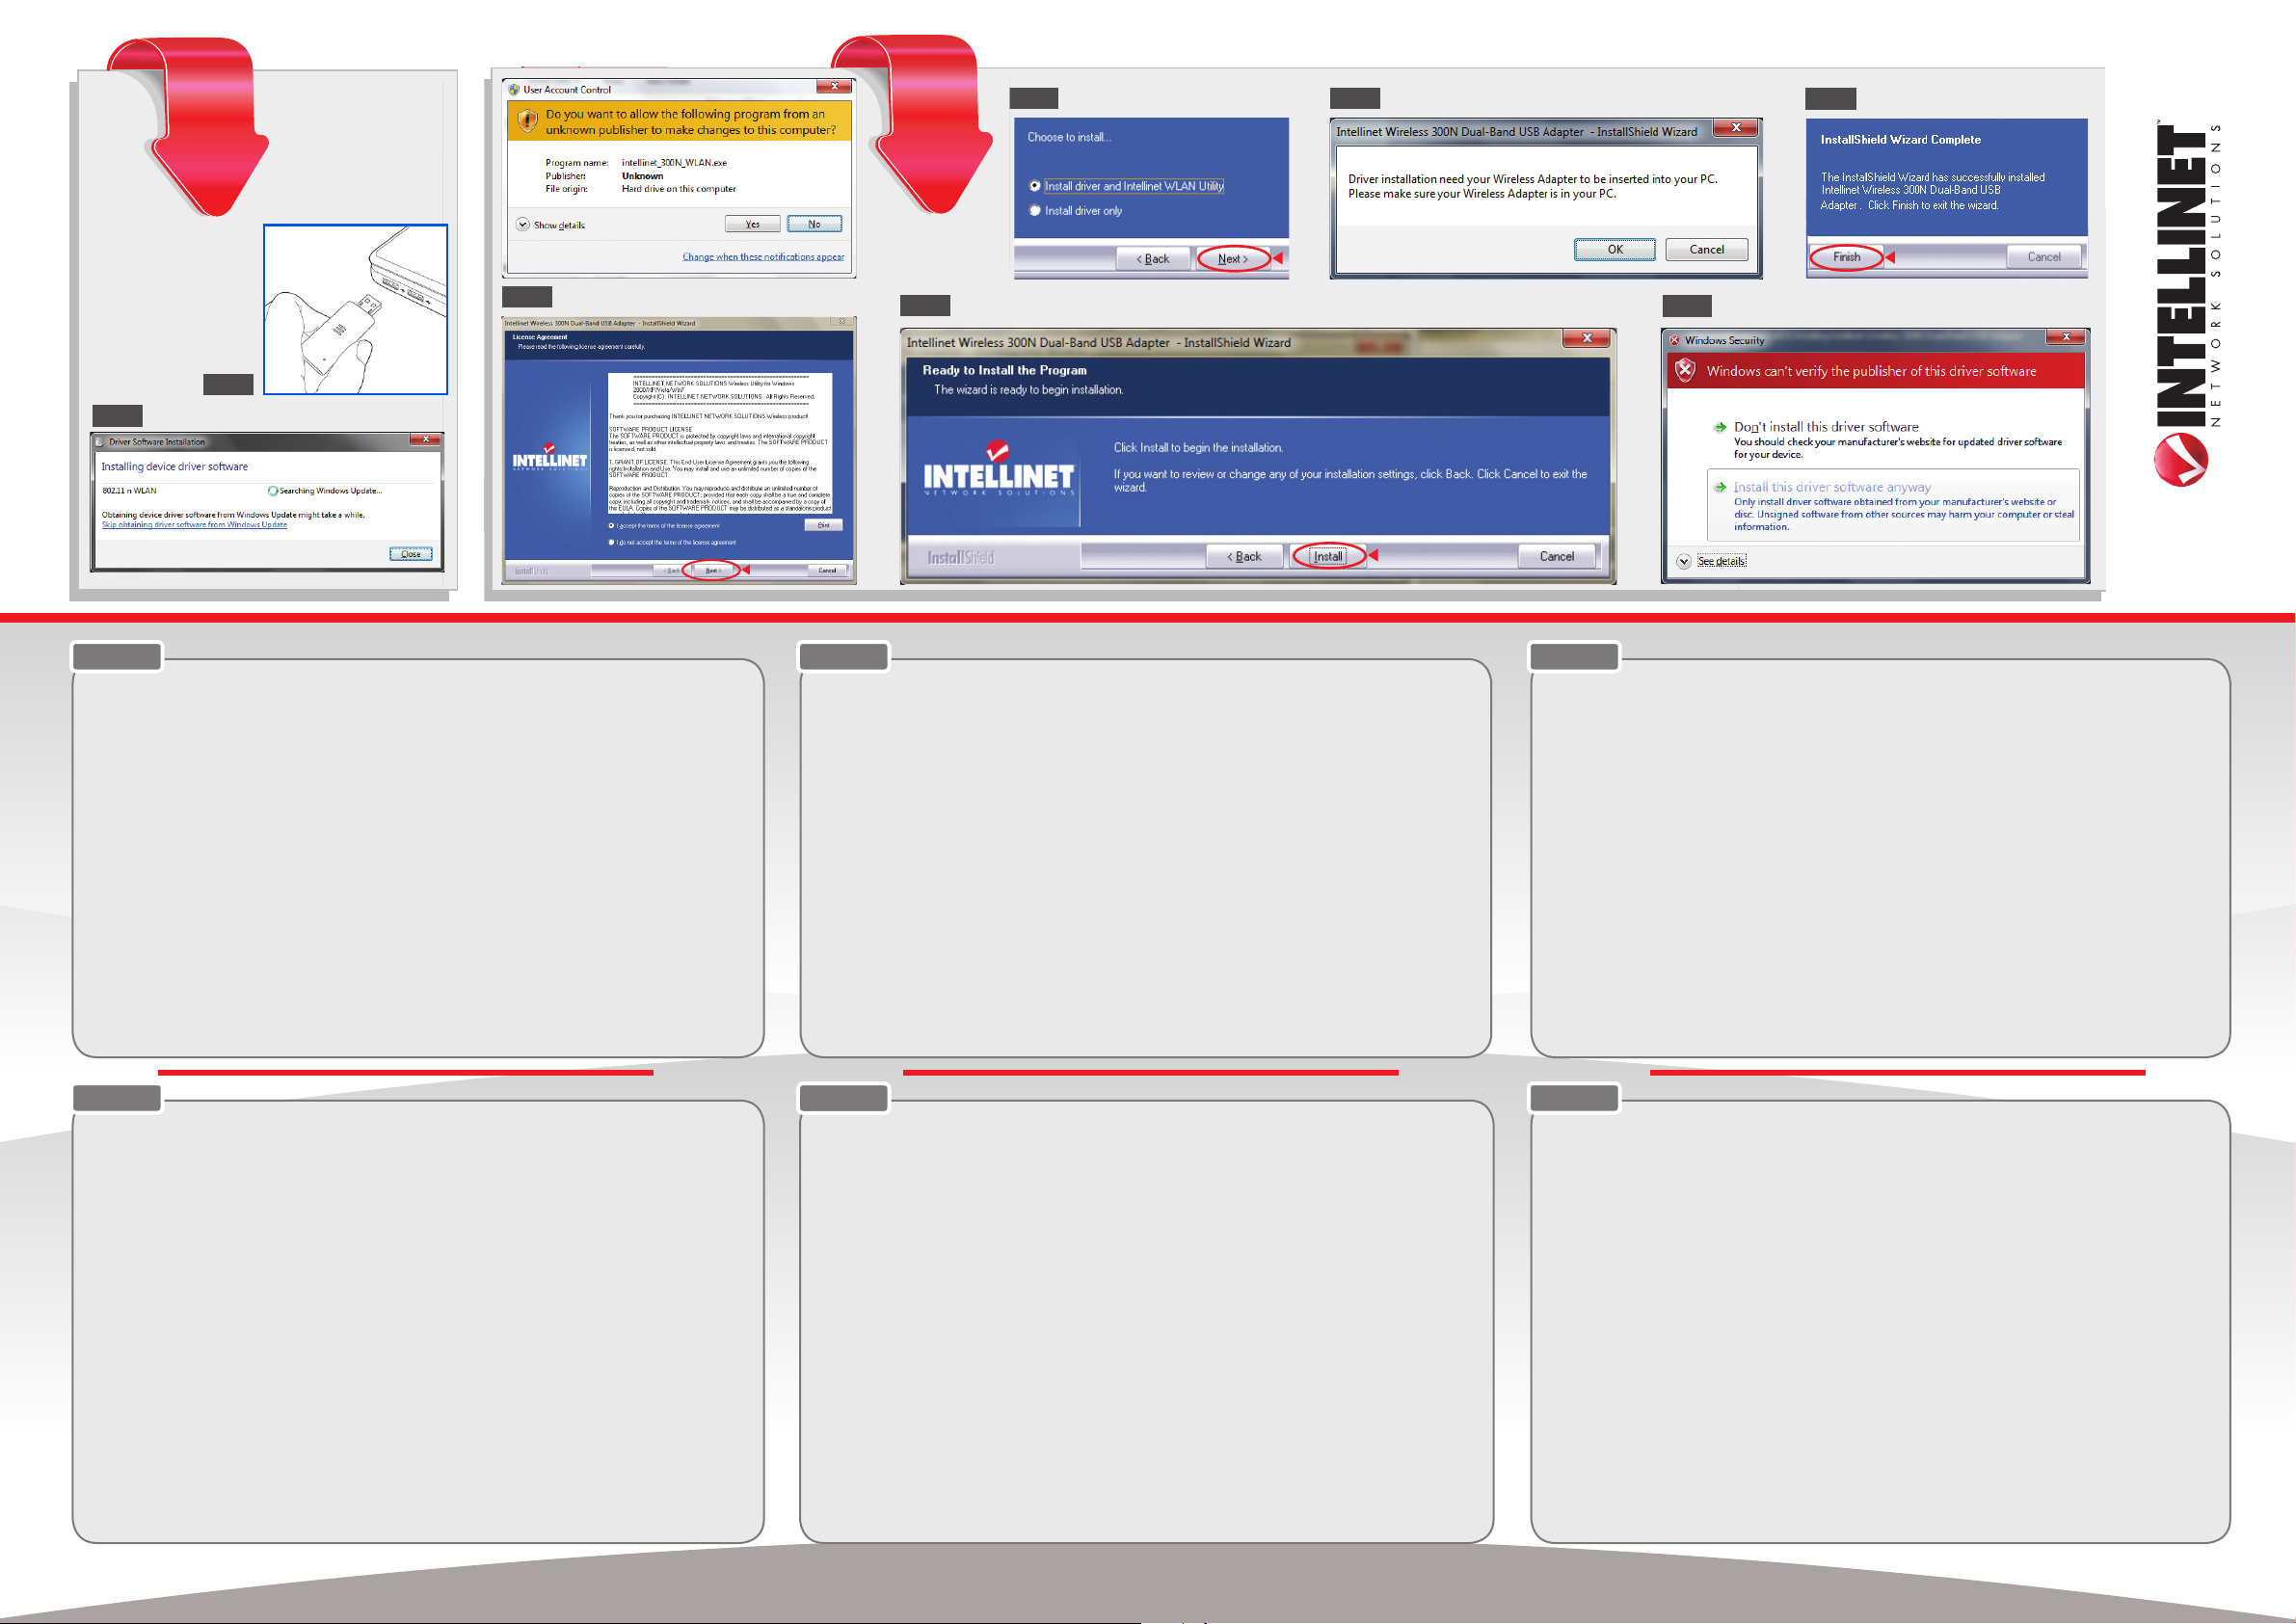
Step 1 - Hardware Installation
1.1 With the computer on, gently insert t he adapter into a USB 2.0 port. If it doesn’t easily slide into the por t, flip the adapter over and
try again.
1.2 Windows 7 will automatically detec t the new hardware. If your system is connected to the Internet, Windows 7 will install the
driver automatic ally: There is no need to perform any additional s teps. You only need to perform the Soft ware Installation steps
below if you want to use the Intellinet WLAN configuration utilit y (not recommen ded).
Step 2 - Software Installation
2.1 Place the include d setup CD in your CD/DVD-ROM drive and r un the “autorun.exe” program. Selec t “Install Driver and Configuration
utility.” When the License Agreement displays, selec t “I accept the terms of the license agreement” and click “Next” to continue.
2.2 With the Setup Type screen displayed, if the adapter is being installed for the first time, it’s recommended that you select “Ins tall
driver and Intellinet WL AN Utility.” To simply update the dr iver, select “Install driver only.” Click “Next” to continue.
2.3 When the Ready to Install the Program screen displays, click “Install.” To change any previous selections/settings, click “Back”; to
exit the wiz ard, click “Cancel.”
2.4 Make sure that the USB WLAN adapter is plugged into the USB port.
2.5 When the Wizard Complete scre en displays, click “Finish.”
2.6 If you encounter a warning about an unverified publisher dur ing the installation, click “Install this driver sof tware anyway.“
2
2.3
DEUTSCH ESPAÑOL
Diese Kurzanleitung zeigt die grundlegenden Schritte zur Einr ichtung und Inbetriebnahme die ses Geräts. Für genauere Anweisungen
nutzen Sie bit te das beiliegende Handbuch auf CD oder auf www.intellinet-ne twork.com.
Schritt 1 - Hardwareinstallation
1.1 Nach dem Einschalten de s Computers, stecken Sie den Adapter in einen USB 2.0 Por t. Sollte er nicht einfach einras ten, drehen Sie
Ihn um und versuchen Sie es erneut.
1.2 Windows 7 erkennt die neue Hardware automatisch. Wenn Ihr System mit dem Internet verbunden is t, installiert Windows 7 den
Treiber auch automatisch: Zusätzliche Schrit te sind nicht notwendig. Die untenstehenden Schritte zur Sof twareinstallation
müssen Sie nur durchführen, wenn Sie das Intellinet-WLAN-Konfigurationstool ver wenden möchten (nicht empfohlen).
Schritt 2 - Softwareinstallation
2.1 Legen Sie die beiliegende Installations-CD in Ihr CD -/DVD-L aufwerk und star ten Sie das Programm “autorun.exe”. Wählen Sie
aus: “Install Dri ver and Configuration utility.” Wenn das Lizenzabkommen er scheint, wählen Sie “I accept the terms of the licens e
agreement” un d klicken Sie auf “Next”.
2.2 Wenn Sie den Adapter das erste Mal auf Ihrem System installieren, empfehlen wir die Optionsaus wahl “Install driver and Intellinet
WLAN Utilit y.” Um lediglich den Treiber zu aktualisieren, wählen Sie “Install dr iver only.” Klicken Sie dann auf “Nex t”.
2.3 Sobald der “Ready to Install” Bildschirm erscheint, klicken Sie auf “Install.” Um Einstellungen zu ändern, klicken Sie auf “B ack”; um
den Assistenten zu verlassen, klicken sie auf “Cancel.”
2.4 Achten Sie darauf, dass der USB-WLAN-Adapter an den USB-Port angeschlossen ist .
2.5 Auf dem “Installation complete”-Bildschirm, klicken Sie auf “Finish.”
2.6 Sollte während der Installation eine Warnung bzgl. eines ungeprü ften Herstellers erscheinen, klicken Sie auf “Diesen Treiber
trotzdem installieren“.
Esta guía presenta los pasos básicos para ins talar y operar este dispositivo. Para obtener instr ucciones detalladas y especificaciones,
consulte el manual de usuario en el CD adjunto ó en ww w.intellinet-net work.com.
Paso 1 - Instalación de Hardware
1.1 Con la computadora encendida, suavemente inser te el adaptador en un puerto USB 2.0. Si no se desliza suavemente en el puer to,
voltee el adaptador e inténtelo de nuevo.
1.2 Windows 7 automáticamente de tectará el nuevo hardware. Si su sis tema está conectado a inter net, Windows 7 instalará
au tomáticamente el controlador, no necesita de instruccione s adicionales. Solo necesita realizar el proceso de la instalación del
soft ware que se menciona abajo, si desea usar la utilidad de configuración “WLAN” de Intellinet (no se recomienda).
Paso 2 - Instalación de Software
2.1 Coloque el CD de configuración incluido en su unidad de CD/DVD-ROM y eje cute el programa “autorun.exe”. Seleccione “Instalar
controlador y Utilidad de Configuración”. Cuando se le pida el acuerd o de licencia, seleccione “Acepto los términos del acuerdo de
licencia” y haga clic en “Siguiente” para continuar.
2.2 Con pantalla de confi guración mostrándose, si el adaptador va a ser instalado por primer a vez, se le recomienda que selección la
opción “Instalar controlador y Utilidad WLAN de Intellinet”. Para simplemente actualizar el controlador, seleccione “Instalar solo el
controlador”. Haga clic en “siguiente para continuar”.
2.3 Cuando se muestre la pantalla de “el programa está lis to para instalarse”, haga clic en “Instalar”. Para cambiar los ajustes y
selecciones previas, haga clic en “regres ar”; para salir del asistente, haga clic en “Cancelar”.
2.4 Asegúrese de que el adaptador USB e stá conectado al puer to USB.
2.5 Cuando el asistente haya terminado, haga clic en “Finalizar”.
2.6 Si aparece una advertencia acerca de que el editor no es tá verificado, haga clic en “Instalar el software controlador de todas formas”.
2.6
FRANÇAIS
Ce guide décrit le s bases pour configurer et opérer cet appareil. Pour des ins tructions et spéci fications détailées, veuillez lire le manuel
de l’utilisation sur le CD inclus ou sur ww w.intellinet-network.com.
Étape 1 - Installation du Matériel
1.1 Après avoir démarré l’ordinateur, connec tez l’adaptateur à un port USB. Si ça ne marche pas facilement tournez-le et essayez à
nouveau.
1.2 Windows 7 détec te le nouveau matériel automatiquement. Si votre système est connecté à l’Inter net, Windows 7 installe le pilote
automatiquement : Il ne faut pas effectu er des étapes additionnelle s. Vous ne deve z qu’effec tuer les étapes d’installat ion ci-dessous
si vous voudriez utiliser l’outil de configurat ion sans fil Intellinet (pas recommandé).
Étape 2 - Logiciel d’Installation
2.1 Insérez le CD d’installation dans votre lecteur CD/DVD-ROM et lancez le pro gramme “autorun.exe”. Sélectionnez “Install Driver
and Configuration utility.” Dés que le contrat de licence app araît, choissisez “I accept the terms of the license agreement” et
cliquez “Nex t” afin de continuer.
2.2 Quand vous installez l’adaptateur la première fois sur votre système, nous recommandons de sélec tionner “Install driver and
Intellinet WLAN Utilit y.” Afin de seulement met tre à jour le pilote, choissisez “Ins tall driver only.” Cliquez “Ne xt” afin de continuer.
2.3 Dès que le programme “Ready to Install” apparaît, cliquez “Install.” Afin de changer de s paramètres préalables, clique z “Back”;
afin de quitter l’assist ant, cliquez “Cancel.”
2.4 Assurez-vous que l’adaptateur sans fil USB est connecté au por t USB.
2.5 Sur l’affichage-écran “Installation complete”, cliquez “Finish.”
2.6 Si un avertissement es t affiché concernant un éditeur non vérifié pendant l’inst allation, cliqu ez sur “Installer ce pilote quand même“.
ITALIANO
Questa guida fornisce i pass aggi basilari per settare e f ar funzionare l’apparecchio. Per istr uzioni dettagliate e ulteriori specifiche, fare
riferimento al manuale d’istruzione contenuto nel CD inclus o al prodot to o su ww w.intellinet-network.com.
Passo 1 - Installazione dell’Hardware
1.1 Con il computer acceso, inserire delicatamente l’adattatore all’interno della porta USB 2.0. Se questo non dovesse s civolare
agevolmente all’interno della porta, ruota l’adattatore e riprova nuovamente.
1.2 Windows 7 automaticamente rileverà il nuovo hardware. Se il vostro sistema è connesso ad Internet, Windows 7 installerà
automaticamente i driver: non è necessario e ffettuare ulteriori passaggi. E’ solo nece ssario eseguire la procedur a di installazione
del Soft ware sotto riportata se desiderate u sare l’ Intellinet WLAN configuration utility (non consigliata).
Passo 2 - Installazione del Software
2.1 Collocare il CD di setup incluso nel lettore CD/DVD e avviare il programma di “autorun.exe”. Selezionare “Installare Driver e utility
Configuration.” Quando appare la Richies ta di accettazione della Licenz a, selezionare “I accept the terms of the license agreement
(accetto i termini del contratto di licenza)” e cliccare “Next (Successivo)” per continuare.
2.2 Con la visualiz zazione del tipo di Setup, se l’adat tatore è stato installato per la prima volta, si consiglia di selezionare “Installare
driver e Intellinet WLAN U tility.” Per semplicemente aggiornare il driver, selezionare “Install driver only (Installa solo il dr iver).”
Cliccare “Next” per continuare.
2.3 Quando compare sullo scher mo che il programma è pronto per l’inst allazione, cliccare “Install (Installa).” Per cambiare qualsiasi
precedente sele zione o settaggio, cliccare “B ack (Indietro)”; per uscire dall’applicazione di installazione guidata, cliccare “Cancel
(Cancella).”
2.4 Assicurar si che l’adattatore USB WLAN sia inserito nella porta USB.
2.5 Quando appare sullo schermo che l ’installazione della procedura guidata è completa, cliccare su “Finish (Finito).”
2.6 Se si incontra un messaggio di errore inaspet tato e non verificato durante l’ins tallazione, cliccare “Installa ques to driver software
di nuovo.“
www.intellinet-network.com
PORTUGUÊS
Este guia apresenta os passos básicos para configuração e operaç ão deste dispositivo. Para instruções e esp ecificações detalhadas,
consulte o manual do utiliz ador no CD fornecido com este produto ou em ww w.intellinet-net work.com.
Passo 1 - Instalação do Hardware
1.1 Com o computador ligado, insir a suavemente o transformador numa porta USB 2.0. Se não conseguir fazê-lo deslizar facilmente
para dentro da porta, volte- o ao contrário e tente novamente.
1.2 O Windows 7 detecta automaticamente o novo hardware. Se o s eu sistema estiver ligado à Internet, o Windows 7 inst ala o
controlador automaticamente: Não é necess ário efectuar quaisquer passos adicionais. Basta efectuar o s passos de Instalação do
Software apresentados abaixo, cas o pretenda utilizar o utilitário de configuração Intelline t WLAN (não recomendado).
Passo 2 - Instalação do Software
2.1 Insira o CD de configuração incluído na unidade de CD/DVD-ROM e execute o programa “autorun.exe”. Seleccione “Ins talar o
Controlador e o Utilitário de Configuraç ão.” Quando o Contrato de L icença aparecer, seleccione “Aceito os termos do contrato de
licença” e clique em “Seguinte” para continuar.
2.2 No e crã Tipo de Configuração, se o adaptador estiver a ser instalado pela primeira vez, é aconselhável seleccionar “Ins talar o
controlador e o Utilit ário Intellinet WLAN.” Para actualizar apenas o controlador, seleccione “Instalar apenas controlador.” Clique em
“Seguinte” para continuar.
2.3 Quando aparecer o ec rã Pronto para Instalar o Programa, clique em “Instalar”. Para alterar as selecções/definições anter iores, clique
em “Anterior”; para sair do assistente, clique em “Cancelar”.
2.4 Certifique-se de que o adaptador WLAN USB est á ligado à porta USB.
2.5 Quando aparecer o ecrã Assistente, clique em “Terminar.”
2.6 Se encontrar um aviso sobre um editor não verificado durante a instalaç ão, clique em “Ins talar este software de controlador mesmo
assim.“
 Loading...