

Page 1
WIRELESS 300N
OUTDOOR POE
ACCESS POINT
QUICK INSTALL
GUIDE
M O D E L 52 4 7 11
INT-524711-QIG-ML1-0214-04-0
Page 2

Wireless 300N Outdoor PoE Access Point • Quick Install Guide English
Thank you for purchasing the Intellinet Network Solutions™ Wireless 300N
Outdoor PoE Access Point, Model 524711.
This guide presents the basic steps to set up and operate this device. For
detailed instructions and specifications, refer to the user manual on the CD
enclosed with this product or at intellinet-network.com.
Installation
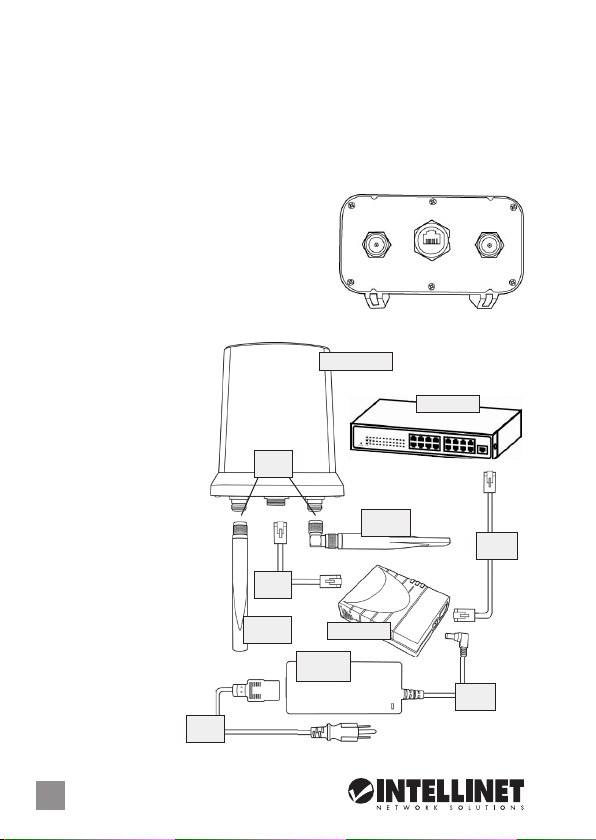
1. Attach the antennas to the access point.
NOTE: Antenna 1 is the primary antenna,
used while transmitting/receiving in
11b/g/n (single antenna) mode.
Antenna 1
RJ45 port
Antenna 2
2. Using the included Ethernet cable,
connect the RJ45 port of the access point to the Power/Data Out port on
the DC injector.
3. Connect the LAN port
access point
on the DC injector to
your network switch
switch/hub
or hub.
4. Connect the power
step
adapter to the DC
injector.
1
5. Using the included
antenna
power cord, connect
the power adapter
to an available AC
outlet. NOTE: Only use
the power adapter
included with this
access point — not
one from any other
device. (See Step 6
for an alternative
configuration.)
step
step
2
antenna
power
adapter
dc injector
1
5
2
step
step
3
4
2
ENGLISH
Page 3
6. As an alternative to using the included injector and power adapter, you can
use any IEEE802.3af-compliant PoE injector.
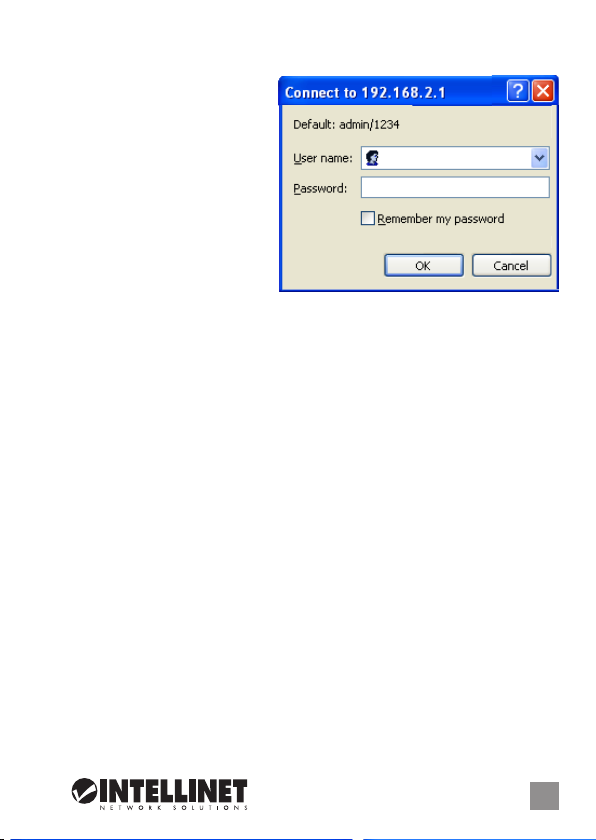
7. Start your Web browser —
MS Internet Explorer, for
example — and open to
http://192.168.2.1 to display
a login window.
8. Enter “admin” for the
username and “1234” for
the password.
Additional installation
instructions — as well as
detailed explanations for all
the setup options — can be found in the user manual on the enclosed CD.
Safety Guidelines
• Do not yank any connected cables; disconnect them gently.
• Do not immerse this device in water.
• If placing this device at heights on a pole or a wall, make sure it’s rmly
secured to prevent damage or possible injury.
• Access point parts (antennas, connectors, etc.) are dangerous should
young children put them in their nose or mouth. Keep this device out of the
reach of children!
• It’s normal for the device to become hot when used for a long time, so
keep it away from paper, cloth and other flammable materials.
• There are no user-serviceable parts inside the device. If you nd that it isn’t
working properly, contact your dealer (place of purchase) and ask for help.
Do not disassemble the device: Doing so will void the warranty.
• If smoke or strange odors emanate from the device or any of its
components, turn the power off immediately.
ENGLISH
3
Page 4
Wireless 300N Outdoor PoE Access Point • Kurzanleitung Deutsch
Vielen Dank für den Kauf des Intellinet Network Solutions™ Wireless 300N
Outdoor PoE Access Point, Modell 524711.
Diese Kurzanleitung zeigt die grundlegenden Schritte zur Einrichtung und
Inbetriebnahme dieses Geräts. Für genauere Anweisungen nutzen Sie bitte
das beiliegende Handbuch auf CD oder auf intellinet-network.com.
Installation
1. Befestigen Sie die Antennen am Access
Point. HINWEIS: Antenne 1 ist die primäre
Antenne, die im 11b/g/n-Modus (einzelne
Antenne) sendet/empfängt.
Antenne 1
RJ45 port
Antenne 2
2. Mit dem mitgelieferten Ethernet-Kabel
verbinden Sie den RJ45-Port des Access Points mit dem “Power”-Anschluss
des DC-Injektors .
3. Verbinden Sie den LAN-
access point
Port am DC-Injektor mit
Ihrem Netzwerk-Switch
switch/hub
oder -Hub.
4. Verbinden Sie das
schritt
Netzteil mit dem DC-
Injektor.
5. Mit dem enthaltenen
Stromkabel verbinden
Sie das Netzteil
mit einer Steckdose.
WICHTIG: Nutzen Sie
nur das mitgelieferte
Netzteil, nicht das
eines anderen Produkts
(siehe Schritt 6).
schritt
5
1
schritt
2
antenne
1
netzteil
antenne
dc-injektor
2
schritt
4
schritt
3
4
DEUTSCH
Page 5

6. Als Alternative zum mitgelieferten Injektor und Netzteil, können Sie jeden
IEEE802.3af-kompatiblen PoE-Injektor.verwenden.
7. Starten Sie Ihren Browser —
z. B. MS Internet Explorer —
und geben Sie die Adresse
http://192.168.2.1 ein, um
ein Login-Fenster zu önen.
8. Geben Sie “admin” als
Benutzernamen und “1234”
als Passwort ein.
Zusätzliche Installations-
anweisungen — sowie
genaue Erklärungen für alle
Einstellungsoptionen — finden Sie im Handbuch auf der beiliegenden CD.
Sicherheitshinweise
• Entfernen Sie Kabel nicht mit Gewalt; trennen Sie sie vorsichtig.
• Bringen Sie dieses Gerät nicht mit Flüssigkeiten in Berührung.
• Sollten Sie das Gerät erhöht oder an einer Wand anbringen, sichern Sie es
ausreichend, um Sach- und Personenschäden zu vermeiden.
• Es besteht die Gefahr, dass Kinder Kleinteile (Antennen etc.) verschlucken.
Halten Sie dieses Gerät außerhalb ihrer Reichweite.
• Bei längerer Nutzung erhitzt sich dieses Gerät geringfügig, wahren Sie
ausreichend Abstand zu brennbarem Material wie Papier etc.
• Dieses Gerät ist nicht zur Eigenreparatur geeignet. Sollte es nicht
ordnungsgemäß funktionieren, wenden Sie sich bitte an den Händler, bei
dem Sie es erworben haben. Öffnen Sie das Gerät nicht, sonst verlieren
Sie ihren Garantieanspruch.
• Sollten Sie Rauch oder befremdliche Gerüche am Gerät feststellen,
schalten Sie es sofort aus.
DEUTSCH
5
Page 6

Access Point 300N PoE para Exteriores • Guía de Instalación Rápida Español
Gracias por comprar el Access Point 300N PoE para Exteriores de Intellinet
Network Solutions™, Modelo 524711.
Esta guía presenta los pasos básicos para instalar y operar este dispositivo.
Para obtener instrucciones detalladas y especificaciones, consulte el manual
de usuario en el CD adjunto ó en intellinet-network.com.
Instalación
1. Conecte las antenas al Access Point.
NOTA: La antena 1 es la antena principal,
utilizada para transmitir/recibiren el modon
11b/g/n (unica antena).
Antena 1
Puerto RJ45
Antena 2
2. Usando el cable Ethernet incluido, conecte
el puerto RJ45 del Access Point a la salida de alimentación/datos del
inyector DC.
3. Conecte el puerto LAN
access point
del inyector DC a su
switch ó hub de su red.
switch/hub
4. Conecte el adaptador
de alimentación al
paso
inyector DC.
5. Use el cable de
1
alimentación incluido,
antena
conecte el adaptador
de corriente a una toma
de alimentación AC
NOTA: Utilice solo el
adaptador incluido
con este Acces Point —
No el de cualquier
otro dispositivo. (vea
el paso 6 para una
conguración
alternativa.)
paso
5
paso
2
antena
1
dc inyector
adaptador
corriente
2
paso
4
paso
3
6
ESPAÑOL
Page 7

6. Como alternativa al uso del inyector y adaptador de corriente incluido,
usted puede utilizar cualquier inyector PoE que cumpla con IEEE802.3af.
7. Abra su navegador —
MS Internet Explorer, por
ejemplo — y abierto escriba
http://192.168.2.1 se mostrara
la ventana de login.
8. Teclee “admin” en usuario y
“1234” en el password.
Para instrucciones adicionales
de instalacion — así como todas
las opciones detalladas de
instalación — las puede
encontrar en el manual del usuario incluido en el CD Adjunto.
Recomendaciones de Seguridad
• No tire los cables conectados; desconectelos con cuidado.
• No sumerja el dispositivo en el agua.
• Si coloca este dispositivo en altura en un poste o una pared, asegúrese de
que esté rmemente asegurados para evitar daños o posibles lesiones.
• Las partes del Access point (antenas, conectores, etc.) son peligrosos los
niños pueden colocarlos en la nariz ó boca. ¡Mantenga este dispositivo
fuera del alcance de los niños!
• Es normal que el dispositivo se caliente cuando se usa durante mucho
tiempo, por lo que manténgalo alejado de papel, tela y otros materiales
inflamables.
• No hay partes que el usuario pueda reparar dentro del dispositivo. Si usted
encuentra que no funciona correctamente, póngase en contacto con su
distribuidor (lugar de compra) y solicite ayuda. No desmonte el dispositivo:
Si lo hace anulara la garantía.
• Si emana humo u olores extraños del dispositivos ó cualquiera de sus
componentes, desconecte la alimentación inmediatamente.
ESPAÑOL
7
Page 8

Point d’accès d’extérieur sans l PoE 300N • Guide d’installation rapide Français
Merci d’avoir acheté l’Intellinet Network Solutions™ Point d’accès d’extérieur
sans fil PoE 300N, modèle 524711.
Ce guide décrit les bases pour configurer et opérer cet appareil. Pour des
instructions et spécications détailées, veuillez lire le manuel de l’utilisateur
sur le CD inclus ou sur intellinet-network.com.
Installation
1. Attachez les antennes au point d’accès.
NOTE: Antenne 1 est l’antenne primaire,
utilisée pendant la transmission/reception
au mode 11b/g/n (seule antenne).
Antenne 1
Port RJ45
Antenne 2
2. Utilisez le câble Ethernet pour connecter le
port RJ45 du point d’accès à l’adaptateur secteur de l’injecteur.
3. Connectez le port LAN
de l’injecteur à votre
point d’accès
switch ou hub.
4. Connectez l’adaptateur
switch/hub
secteur à l’injecteur.
5. Connectez l’adaptateur
étape
secteur par le câble de
courant inclus à une
1
prise de courant.
antenne
NOTE: Utilisez
uniquement l’adaptateur
secteur inclus avec ce
point d’accès pas un d’un
autre appareil. (cf. 6.
pour une configuration
alternative).
étape
5
étape
2
antenne
adaptateur
secteur
injecteur
1
2
étape
4
étape
3
8
FRANÇAIS
Page 9

6. Comme alternative à l’injecteur et l’adaptateur secteur, vous pouvez aussi
utiliser chaque injecteur compatible avec PoE IEEE802.3af.
7. Démarrez votre navigateur
internet — p. ex. Internet
Explorer., — et saisissez
http://192.168.2.1 dans le
champ d’adresse. Une
fenêtre de connexion
s’ache.
8. Saisissez “admin” comme
nom d’utilisateur et “1234”
comme mot de passe.
Des instructions d’installation
complémentaires — ainsi que des descriptions détaillées pour toutes les
options de conguration — se trouvent dans le manuel de l’utilisateur sur le CD
inclus.
Consignes de sécurité
• Déconnectez les câbles avec précaution, pas avec force.
• Protégez l’équipement de l’humidité.
• Si vous placez cet appareil à une position élevée, assurez-le susament
an d’éviter du dommage aux personnes.
• Surveillez vos enfants an d’eviter qu’ils avalent des antennes u touchent
les fiches.
• Il est normal que cet appareil devient chaud quand il est utilisé plus
longtemps, il ne faut pas le mettre près des matériaux inammables.
• N’essayez pas de réparer l’appareil vous-même. S’il marche incorrectement,
veuillez contacter votre vendeur (où vous l’avez acheté). N’ouvrez pas
l’appareil ou vous perdez vos droits de garantie.
• Si vous percevez du dégagement de fumée ou d’odeurs inhabituels à
l’appareil ou un des ses éléments, débranchez-le immédiatement.
FRANÇAIS
9
Page 10

Punto di accesso Wireless 300N per esterno • Guida Rapida all’installazione
Italiano
Grazie per aver acquistato il Punto di Accesso Wireless 300N PoE per esterno
Intellinet Network Solutions™, Modello 524711.
La presente guida fornisce le basi essenziali per il settaggio e il funzionamento
dell’apparecchiatura. Per istruzioni più dettagliate e maggiori speciche, far
riferimento al manuale d’istruzioni contenuto nel CD allegato al prodotto o
visitare il sito intellinet-network.com.
Installazione
1. Collega le antenne al punto di accesso.
NOTA: L’antenna 1 è l’antenna primaria, usata
durante la trasmissione/ricezione in modalità
11b/g/n (single antenna).
Antenna 1
Porta RJ45
Antenna 2
2. Usando il cavo di rete incluso, collegare la
porta RJ45 del punto di accesso alla porta Power/Data Out dell’iniettore DC.
3. Collegare la porta LAN
dell’iniettore DC allo
switch di rete o all’hub.
4. Collegare l’alimentatore
punto di accesso
switch/hub
all’iniettore DC.
5. Usare il cavo di
alimentazione incluso,
passo
1
collegare l’alimentatore
ad una presa di corrente.
NOTA: Utilizzare
solamente l’alimentatore
incluso acon questo
punto di accesso — non
utilizzare altri alimentatori
provenienti da latre
periferiche. (Vedere il
passo 6 per una
congurazione
alternativa.)
passo
passo
2
antenna
1
alimentatore
5
antenna
iniettore dc
2
passo
4
passo
3
10
ITALIANO
Page 11

6. In alternative all’uso dell’iniettore e dell’alimentatori inclusi, si può utilizzare
un iniettore PoE conforme IEEE802.3af.
7. Avviare il Web browser —
MS Internet Explorer, per
esempio — e aprire
http://192.168.2.1 per
visualizzare la nestra di login.
8. Inserire “admin” come nome
utente e “1234” come
password.
Istruzioni aggiuntive per
l’installazione — oltre a
spiegazioni dettagliate per tutte
le opzioni di settaggio — si possono essere trovare nel manuale d’istruzione
all’interno del CD incluso.
Linee guida per la sicurezza
• Non strattonare alcun cavo collegato; scollegare sempre delicatamente.
• Non immergere questa apparecchiatura in acqua.
• Se questa apparecchiatura viene posizionata in alto, assicurarsi che sia
fissata saldamente per prevenire possibili danni o lesioni.
• Il punto di accesso contiene piccole parti (antenne, connettori, etc.) che
possono essere pericolose se manipolati da bambini in quanto possono
essere facilmente ingoiate o introdotte nel naso. Tenere questa
apparecchiatura fuori dalla portata dei bambini!
• E’ normale per questa apparecchiatura diventare calda quando usata per
un lungo periodo, si raccomanda di tenerla lontano da carta, abiti o altro
material infiammabile.
• Non ci sono parti utili all’utente all’interno di questa apparecchiatura. Se
riscontrate un’anomalia di funzionamento, contattare il rivenditore e
chiedere supporto. Non smontare l’apparecchiatura, questa operazione
renderà nulla la copertura della garanzia.
• Se fumo o strani odori vengono emessi dalla periferica o dai suoi
componenti, spegnere immediatamente.
ITALIANO
11
Page 12

Access Point bezprzewodowy 300N zewnętrzny PoE • Instrukcja Instalacji Polski
Dziękujemy za zakup zewnętrznego Access Pointa 300N PoE Intellinet Net-
work Solutions™, Model 524711.
Ta instrukcja prezentuje podstawowe kroki podłączenia i instalacji urządzenia.
Aby uzyskać szczegółowe informacje techniczne oraz instrukcję użytkownika
zapoznaj się zawartością płyty CD dołączonej do opakowania lub odwiedź
stronę intellinet-network.com.
Instalacja
1. Podłącz anteny do Access Pointa. UWAGA:
Antena 1 jest anteną główną, używaną
podczas transmisji/odbierania pakietów w
Antena 1
Port RJ45
Antena 2
trybie 11 b/g/n (antena sygnałowa).
2. Używając dołączonego kabla Ethernet połącz port RJ45 access point’a z
portem Power/Data Out
splittera PoE.
3. Podłącz port LAN splittera
PoE do portu przełącznika
access point
przeŁĄcznik/hub
w Twojej sieci.
4. Podłącz adapter zasilania
do splittera PoE.
krok
1
5. Używając dołączonego
kabla zasilającego,
podłącz adapter zasilania
do gniazda sieciowego.
UWAGA: Możesz użyć
tylko adaptera zasilania
dostarczonego razem z
produktem — nie
można używać zasilaczy
od innych urządzeń.
(Zapoznaj się z krokiem
nr 6, aby uzyskać
informacje na temat
krok
krok
2
antena
1
zasilacz
5
splitter poe
antena
2
krok
3
krok
4
alternatywnej konfiguracji).
12
POLSKI
Page 13

6. Jako alternatywę dołączonego do zestawu splittera PoE i zasilacza możesz
użyć dowolnego adaptera zasilania PoE zgodnego ze standardem IEEE802.3af.
7. Otwórz przeglądarkę
internetową (np. MS Internet
Explorer), a następnie w
pasek adresu wpisz
http://192.168.2.1, aby
wyświetlić okno logowania.
8. Wpisz w pole username
„admin” oraz „1234” w pole
password.
Dodatkową instrukcję instalacji,
jak również szczegółowe
objaśnienie wszystkich opcji konguracyjnych można znaleźć w instrukcji
użytkownika na dołączonej płycie CD.
Zasady bezpieczeństwa
• Nie szarp za żaden z podłączonych kabli, odłączaj je delikatnie.
• Nie zanurzaj urządzenia w wodzie.
• Jeśli urządzenie zamocowane jest na wysokim słupie lub ścianie, upewnij
się, że jest dobrze zabezpieczone, aby zapobiec ewentualnemu wypadkowi
oraz uszkodzeniu sprzętu.
• Elementy składowe urządzenia (anteny, złącza, itp.) mogą być niebezpieczne
dla małych dzieci. Urządzenie należy trzymać z dala od dzieci!
• Naturalne jest, że po dłuższym czasie użytkowania urządzenie nagrzewa
się, należy więc trzymać z dala od niego papier, tkaniny oraz inne materiały
łatwopalne.
• Wewnątrz urządzenia nie ma żadnych elementów nadających się do
samodzielnej naprawy. Jeśli zauważysz, że coś nie działa prawidłowo,
skontaktuj się ze sprzedawcą i poproś o pomoc. Nie rozkręcaj urządzenia:
prowadzi to do utraty gwarancji.
• Jeśli dym lub dziwne zapachy wydobywają się z urządzenia lub z jego
komponentów, należy urządzenie bezzwłocznie wyłączyć.
POLSKI
13
Page 14

Disposal of Electric and Electronic Equipment (applicable in the European Union and other European countries with separate collection systems)
ENGLISH
This symbol on the product or its packaging indicates that this product shall not be treated as household
detailed information about recycling of this product, contact your local city oce, your household waste
disposal service or the shop where you purchased this product. In countries outside of the EU: If you wish to
discard this product, contact your local authorities and ask for the correct manner of disposal.
DEUTSCH
Dieses auf dem Produkt oder der Verpackung angebrachte Symbol zeigt an, dass dieses Produkt nicht mit
dem Hausmüll entsorgt werden darf. In Übereinstimmung mit der Richtlinie 2002/96/EG des Europäischen
Parlaments und des Rates über Elektro- und Elektronik-Altgeräte (WEEE) darf dieses Elektrogerät nicht
im normalen Hausmüll oder dem Gelben Sack entsorgt werden. Wenn Sie dieses Produkt entsorgen
möchten, bringen Sie es bitte zur Verkaufsstelle zurück oder zum Recycling-Sammelpunkt Ihrer Gemeinde.
ESPAÑOL
Este símbolo en el producto o su embalaje indica que el producto no debe tratarse como residuo doméstico.
De conformidad con la Directiva 2002/96/CE de la UE sobre residuos de aparatos eléctricos y electrónicos
(RAEE), este producto eléctrico no puede desecharse con el resto de residuos no clasicados. Deshágase
de este producto devolviéndolo a su punto de venta o a un punto de recolección municipal para su
reciclaje.
FRANÇAIS
Ce symbole sur Ie produit ou son emballage signifie que ce produit ne doit pas être traité comme un
déchet ménager. Conformément à la Directive 2002/96/EC sur les déchets d’équipements électriques
et électroniques (DEEE), ce produit électrique ne doit en aucun cas être mis au rebut sous forme de
déchet municipal non trié. Veuillez vous débarrasser de ce produit en Ie renvoyant à son point de vente
ou au point de ramassage local dans votre municipalité, à des ns de recyclage.
ITALIANO
Questo simbolo sui prodotto o sulla relativa confezione indica che il prodotto non va trattato come un riuto
domestico. In ottemperanza alla Direttiva UE 2002/96/EC sui riuti di apparecchiature elettriche ed
elettroniche (RAEE), questa prodotto elettrico non deve essere smaltito come rifiuto municipale misto.
Si prega di smaltire il prodotto riportandolo al punto vendita o al punto di raccolta municipale locale per
un opportuno riciclaggio.
POLSKI
Jeśli na produkcie lub jego opakowaniu umieszczono ten symbol, wówczas w czasie utylizacji nie wolno
wyrzucać tego produktu wraz z odpadami komunalnymi. Zgodnie z D yrektywą Nr 2002/96/WE w sprawie
zużytego sprzętu elektrycznego i elektronicznego (WEEE), niniejszego produktu elektrycznego nie wolno
usuwać jako nie posor towanego odpadu komunalnego. Prosimy o usuniecie niniejszego produktu
poprzez jego zwrot do punktu zakupu lub oddanie do miejscowego komunalnego punktu zbiórk i
odpadów przeznaczonych do recyklingu.
WASTE ELECTRICAL & ELECTRONIC EQUIPMENT
waste. Instead, it should be taken to an applicable collection point for the recycling of electrical
and electronic equipment. By ensuring this product is disposed of correctly, you will help
prevent potential negative consequences to the environment and human health, which could
otherwise be caused by inappropriate waste handling of this product. If your equipment contains easily removable batteries or accumulators, dispose of these separately according to your
local requirements. The recycling of materials will help to conserve natural resources. For more
North & S outh Ameri ca
IC Intracom Americas
550 Commerce Blv d.
Oldsmar, FL 34 677
USA
All trade marks and tra de names are the p roperty o f their respe ctive owner s.
Alle Marken und Markennamen sind Eigentum Ihrer jeweiligen Inhaber.
Todas las marcas y nombres comerciales son propiedad de sus respectivos dueños.
Toutes les mar ques et noms comm erciaux sont l a propriété de l eurs propri étaires resp ectifs.
Tutti i marchi registrati e le dominazioni commerciali sono di proprietà dei loro rispettivi proprietari.
Wszys tkie znaki tow arowe i nazw y handlowe nale żą do ich właśc icieli.
Asia & Afr ica
IC Intracom Asia
Far Eastern Techn ology Center
7-F No. 125, Secti on 2, Da Tong Rd.
Shij r, Taipe i • Taiwa n, ROC
Europe
IC Intracom Europe
Löhbache r Str. 7
D-58553 Halver
Germany
14
Page 15

English: For warranty information, go to intellinet-net work.com/ warranty.
Deutsch: Garantieinformationen finden Sie hier unter intellinet-n etwork.com /warranty.
Español: Si desea obtener información sobre la garantía, visite intellinet-net work.com/wa rranty.
Français: Pour consulter les informations sur la garantie, rendezvous à l’adresse
intellinet-network.com/warranty.
Polski: Informacje dotyczące gwarancji znajdują się na stronie intellinet-n etwork.com /warranty.
Italiano: Per informazioni sulla garanzia, accedere a intellinet-ne twork.com/ warranty.
En México: Póliza de Garantía Intellinet — Datos del importador y responsable ante el consumidor
IC Intracom México, S.A.P.I. de C.V. • Av. Interceptor Poniente # 73, Col. Parque Industrial La Joya, Cuautitlán
Izcalli, Estado de México, C.P. 54730, México. • Tel. (55)1500-4500
La presente garantía cubre este producto por 3 años contra cualquier defecto de fabricación en sus ma-
teriales y mano de obra, bajo las siguientes condiciones:
1. Todos los productos a que se reere esta garantía, ampara su cambio físico, sin ningún cargo para
el consumidor.
2. El comercializador no tiene talleres de servicio, debido a que los productos que se garantizan no
cuentan con reparaciones, ni refacciones, ya que su garantía es de cambio físico.
3. La garantía cubre exclusivamente aquellas partes, equipos o sub-ensambles que hayan sido instaladas
de fábrica y no incluye en ningún caso el equipo adicional o cualesquiera que hayan sido adicionados
al mismo por el usuario o distribuidor.
Para hacer efectiva esta garantía bastará con presentar el producto al distribuidor en el domicilio donde
fue adquirido o en el domicilio de IC Intracom México, S.A.P.I. de C.V., junto con los accesorios conteni-
dos en su empaque, acompañado de su póliza debidamente llenada y sellada por la casa vendedora
(indispensable el sello y fecha de compra) donde lo adquirió, o bien, la fac tura o ticket de com
donde se mencione claramente el modelo, número de serie (cuando aplique) y fecha de adquisición. Esta
garantía no es válida en los siguientes casos: Si el producto se hubiese utilizado en condiciones distintas
a las normales; si el producto no ha sido operado conforme a los instructivos de uso; o si el producto ha
sido alterado o tratado de ser reparado por el consumidor o terceras personas.
This equipment has been tested and found to comply with the limits for a Class A digital device, pursuant to Part 15 of the Federal Communications Commission (FCC) Rules. These limits are designed to
provide reasonable protection against harmful interference when the equipment is operated in a commercial environment. This equipment generates, uses and can radiate radio frequency energy, and if not
installed and used in accordance with the instruction manual may cause harmful interference to radio
communications. Operation of this equipment in a residential area is likely to cause harmful interference,
in which case the user will be required to correct the interference at his own expense. Any changes or
modifications made to this equipment without the approval of the manuafacturer could result in the
product not meeting the Class A limits, in which case the FCC could void the user’s authority to operate
the equipment.
English: This device complies with the requirements of R&TTE Directive 1999/5/EC.
The Declaration of Conformity for this product is available at:
Deutsch: Dieses Gerät enspricht der Direktive R&TTE Direktive 1999/5/EC.
Die Konformitätserklärung für dieses Produkt nden Sie unter::
Español: Este dispositivo cumple con los requerimientos de la Directiva R&TTE 1999/5/EC.
La declaración de conformidad para este producto esta disponible en:
Français: Cet appareil satisfait aux exigences de la directive R&TTE 1999/5/CE.
La Déclaration de Conformité pour ce produit est disponible à l’adresse :
Polski: Urządzenie spełnia wymagania dyrektywy R&TTE 1999/5/EC.
Deklaracja zgodności dostępna jest na stronie internetowej producenta:
Italiano: Questo dispositivo è conforme alla Direttiva 1999/5/EC R&TTE.
La dichiarazione di conformità per questo prodotto è disponibile al:
WARRANTY INFORMATION
REGULATORY STATEMENTS
FCC Class A
CE / R&TTE
intellinet-network.com
pra original
15
Page 16

Intellin et is a trademark o f IC Intracom, re gistered in the U. S. and other count ries.
© IC Intraco m. All rights res erved.
 Loading...