

Page 1
Wireless
300N 3G
router
quick
iNstall
Guide
Model
524 6 81
INT-524681-QIG-0809-03
Page 2

iNtroductioN
Thank you for purchasing the INTELLINET NETWORK SOLUTIONS™
Wireless 300N 3G Router, Model 524681.
This quick install guide presents the basic steps required for setting up
and operating this device. For detailed instructions and specications,
refer to the user manual on the CD enclosed with this product at
www.intellinet-network.com.
System Requirements
• For a complete list of compatible 3G USB modems, visit
www.intellinet-network.com
Package Contents
• Wireless 300N 3G Router
• Power adapter
• Ethernet Cat5 RJ45 cable: 1.0 m (3 ft.)
• USB extension cable: 1.0 m (3 ft.)
• User manual on CD; quick install guide
NOTE: Some screen images have been modied to t the format of this
guide. Screen images on all compatible operating systems are similar.
2
Page 3
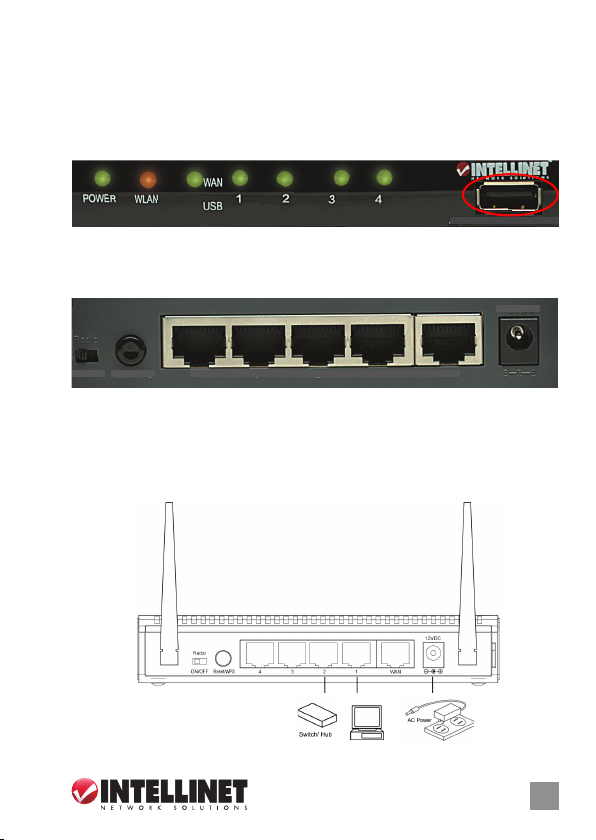
coNNectioNs
1. With the router properly positioned on a at, stable surface, connect
your 3G / 3.5G USB modem by inserting it in the USB port on the
right side of the router’s front panel (below).
Wireles s 300N 3G Route r
2. Connect all your computers, network devices (such as game consoles
or switches/hubs) to the LAN port(s) of the router (back panel, below).
12VDC
ON/OFF Reset/WPS
4 3 2 1 WAN
3. Plug the power adapter into an AC electrical outlet, then connect it to
the 12VDC jack on the router. The Power LED on the front panel
should be on, and the other LEDs should light if the devices they
correspond to are also powered on and properly connected to the
router. (If they don’t, check the connections.)
3
3
Page 4
NetWork setup
The following procedure is for conguring the Wireless 300N 3G Router
using your Web browser. NOTE: For the initial conguration, a computer
with a wired Ethernet connection is required.
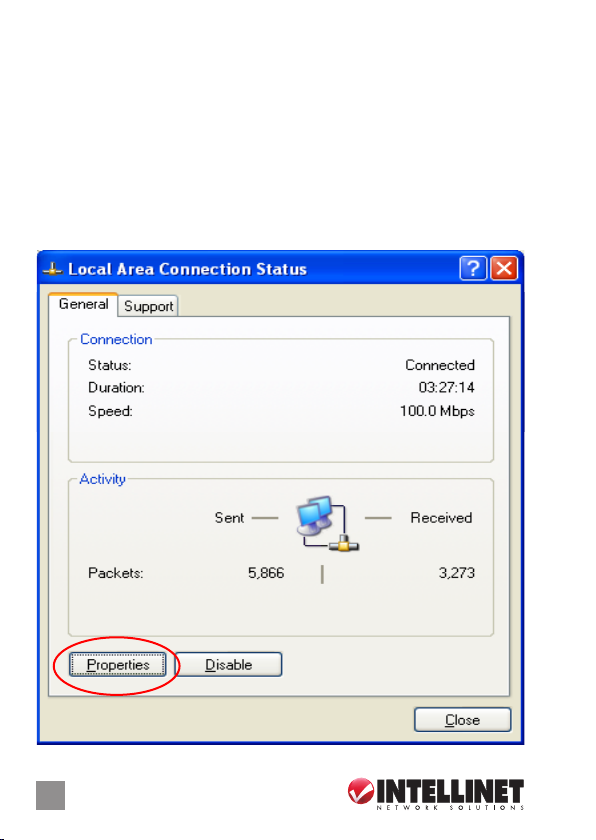
1. Set your computer to obtain an IP address from the wireless router:
Go to Start (in the lower-left corner of your desktop), then go to
Control Panel. Double-click Network Connections, then double-click
Local Area Connection. When the Local Area Connection Status
screen displays, click “Properties.”
4 4
Page 5
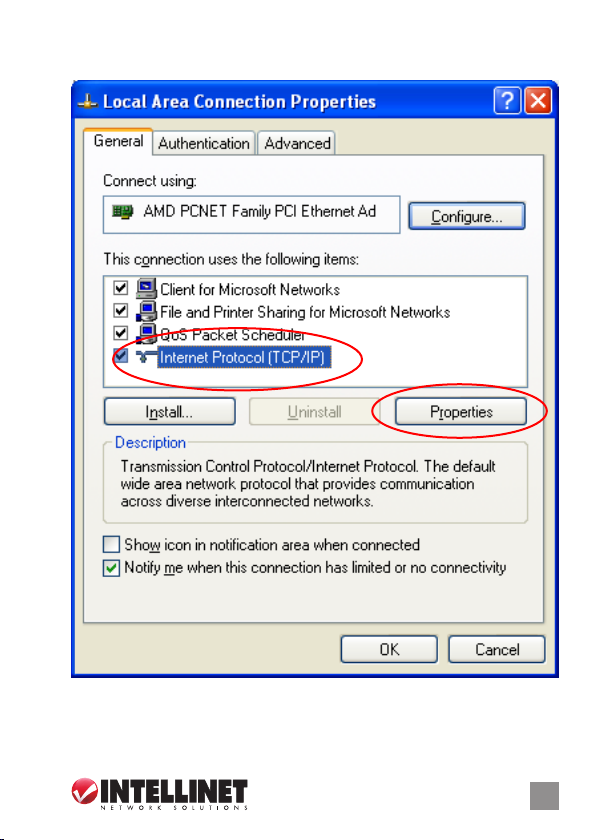
2. When the Local Area Connection Properties screen displays, select
“Internet Protocol (TCP/IP),” then click “Properties.”
5
Page 6

3. When the Internet Protocol (TCP/IP) screen displays, select “Obtain
an IP address automatically” and “Obtain DNS server address
automatically,” then click “OK.” The IP address setup is now complete.
6
Page 7

4. Go to Start again, then
Run. Enter “cmd,” then
click “OK.”
5. Enter “ipcong,” then press <Enter>. Check the “IP Address” and
“Default Gateway” settings. (In the example below, the IP address of
router — the default gateway — is 192.168.2.1.)
C:\Documents and Settings\home user>ipconfig
Windows IP Configuration
Ethernet adapter Local Area Connection:
Connection-specific DNS Suffix . :
IP Address . . . . . . . . . . . . . . . . . . : 192.168.2.3
Subnet Mask . . . . . . . . . . . . . . . . .: 255.255.255.0
Default Gateway . . . . . . . . . . . . . : 192.168.2.1
C:\Documents and Settings\home user>_
7
Page 8

6. Activate your Web browser and
enter the IP address of the
router in the browser’s address
bar. When the subsequent
Login window displays (right),
ll in the “User name” and
“Password” elds (username
default is “admin”; password
default is “1234”), then click
“OK” to present the Web
management interface of the
rout er.
7. When the Home screen of the Web management interface displays,
click the Quick Setup button on the left.
8
Page 9

8. When the subsequent Time Zone screen displays, select your local
time zone from the drop-down menu and click “Next.”
9. When the subsequent Broadband Type screen displays, select “3/3.5G”
for the Internet connection, then click “Next.”
10. When the next screen displays the settings options (below), enter the
Internet connection values if/as required by your 3G / 3.5G service
provider. Click “OK.”
9
Page 10

11. With the Basic Settings screen displayed, make the selections/entries
you prefer, then click “Next.”
12. To protect your wireless network, it’s recommended that the security
be enabled. Select a security type from the drop-down menu, enter the
encryption key, then click “OK.”
10
Page 11

13. When the prompt appears to restart the system, click “Apply.” A status
message will display, indicating that the router will be ready for
operation in approximately 30 seconds. Once the router is ready for
use, connect to any Internet site or open any Internet application to
check that they’re working properly.
11
Page 12

WASTE ELECTRICAL & ELECTRONIC EQUIPMENT
(applicable in the European Union and other European countries with separate collection systems)
ENGLISH
This symbol on the product or its packaging indicates that this product shall not be treated as household waste.
detailed information about recycling of this product, contact your local city oce, your household waste
disposal service or the shop where you purchased this product. In countries outside of the EU: If you wish
to discard this product, contact your local authorities and ask for the correct manner of disposal.
dEutScH
Dieses auf dem Produkt oder der Verpackung angebrachte Symbol zeigt an, dass dieses Produkt nicht mi
dem Hausmüll entsorgt werden dar f. In Übereinstimmung mit der Richtlinie 2002/96/EG des Europäischen
Parlaments und des Rates über Elektro- und Elektronik-Altgeräte (WEEE) darf dieses Elektrogerät nicht
im normalen Hausmüll oder dem G elben Sack entsorgt werden. Wenn Sie dieses Produkt entsorgen
möchten, bringen Sie es bitte zur Verkaufsstelle zurück oder zum Recycling-Sammelpunkt Ihrer Gemeinde.
ESPAñOL
Este símbolo en el producto o su embalaje indica que el producto no debe tratarse como residuo doméstico.
De conformidad con la Directiva 2002/96/CE de la UE sobre residuos de aparatos eléctricos y electrónicos
(RAEE), este producto eléc trico no puede desecha se con el resto de residuos no clasicados. Deshágase
de este producto devolviéndolo al punta de venta o a un punta de recogida municipal para su reciclaje.
FRANçAIS
Ce symbole sur Ie produit ou son emballage signie que ce produit ne doit pas être traité comme un
déchet ménager. Conformément à la Directive 2002/96/EC sur les déchets d’équipements électriques et
électroniques (DEEE), ce produit électrique ne doit en aucun cas être mis au rebut sous forme de déchet
municipal non trié. Veuillez vous débarrasser de ce produit en Ie renvoyant à son point de vente ou au point de
ramassage local dans votre municipalité, à des ns de recyclage.
ItALIANO
Questo simbolo sui prodotto o sulla relativa confezione indica che il prodotto non va trattato come un riuto
domestico. In ottemperanza alla Direttiva UE 2002/96/EC sui riuti di apparecchiature elettriche ed
elettroniche (RAEE), questa prodotto elettrico non deve essere smaltito come riuto municipale misto. Si prega
di smaltire il prodotto riportandolo al punto vendita o al punto di raccolta municipale locale per un opportuno
riciclaggio.
POLSkI
Jeśli na produkcie lub jego opakowaniu umieszczono ten symbol, wówczas w czasie utylizacji nie wolno
wyrzucać tego produktu wraz z odpadami komunalnymi. Zgodnie z Dyrekty wą N r 2002/96/WE w sprawie
zużytego sprzętu elektrycznego i elektronicznego (WEEE), niniejszego produktu elektrycznego nie wolno
usuwać jako nie posortowanego odpadu komunalnego. Prosimy o usuniecie niniejszego produktu
poprzez jego zwrot do punktu zakupu lub oddanie do miejscowego komunalnego punktu zbiórki
odpadów przeznaczonych do recyklingu.
Disposal of Electric and Electronic Equipment
Instead, it should be taken to an applicable collection point for the recycling of electrical and
electronic equipment. By ensuring this product is disposed of correctly, you will help prevent
potential negative consequences to the environment and human health, which could other wise
be caused by inappropriate waste handling of this product. If your equipment contains easily
removable batteries or accumulators, dispose of these separately according to your local
requirements. The recycling of materials will help to conserve natural resources. For more
t
12
Page 13

WARRANTY INFORMATION
ENGLISH:
For warranty information, go to www.intellinet-network.com/warrant y.
dEutScH:
Garantieinformationen nden Sie unter www.intellinet-net work.com/warranty.
ESPAñOL:
Si desea obtener información sobre la garantía, visite www.intell inet-network .com/warranty.
FRANçAIS:
Pour consulter les informations sur la garantie, visitez www.intelline t-network.com /warranty.
POLSkI:
Informacje dotyczące gwarancji znajdują się na stronie www.intel linet-network .com/warranty.
ItALIANO:
Per informazioni sulla garanzia, accedere a www.intellinet-network.com/warrant y.
EN MéXIcO: Poliza de Garantia INTELLINET — Datos del impor tador y responsable ante el consumidor
IC Intracom México, S.A. de C.V. • Av. Interceptor Poniente # 73, Col. Parque Industrial La Joya, Cuautitlan
Izcalli, Estado de México, C.P. 54730, M éxico. • Tel. (55)1500-4500
La presente garantía cubre este producto por 3 años contra cualquier defecto de fabricación en sus
materiales y mano de obra, bajo las siguientes condiciones:
1. Todos los productos a que se reere esta garantía, ampara su cambio físico, sin ningún cargo para
el consumidor.
2. El comercializador no tiene talleres de servicio, debido a que los productos que se garantizan no
cuentan con reparaciones, ni refacciones, ya que su garantía es de cambio físico.
3. La garantía cubre exclusivamente aquellas partes, equipos o sub- ensambles que hayan sido instaladas
defábrica y no incluye en ningún caso el equipo adicional o cualesquiera que hayan sido adicionados
al mismo por el usuario o distribuidor.
Para hacer efectiva esta garantía bastara con presentar el producto al distribuidor en el domicilio donde
fue adquirido o en el domicilio de IC Intracom México, S.A. de C.V., junto con los accesorios contenidos
en su empaque, acompañado de su póliza debidamente llenada y sellada por la casa vendedora
(indispensable el sello y fecha de compra) donde lo adquirió, o bien, la factura o ticket de
compra original donde se mencione claramente el modelo, numero de serie (cuando aplique) y
fecha de adquisición. Esta garantia no es valida en los siguientes casos: Si el producto se hubiese
utilizado en condiciones distintas a las normales; si el producto no ha sido operado conforme a los
instructivos de uso; ó si el producto ha sido alterado o tratado de ser reparado por el consumidor ó
terceras personas.
13
Page 14

FEDERAL COMMUNICATIONS COMMISSION
REGULATORY STATEMENT
Fcc class A
This equipment has been tested and found to comply with the limits for a Class A digital device,
pursuant to Part 15 of the Federal Communications Commission (FCC) Rules. These limits are
designed to provide reasonable protection against harmful interference when the equipment
is operated in a commercial environment. This equipment generates, uses and can radiate radio
frequency energy, and if not installed and used in accordance with the instruction manual may
cause harmful interference to radio communications. Operation of this equipment in a residential
area is likely to cause harmful interference, in which case the user will be required to correct
the interference at his own expense. Any changes or modications made to this equipment without
the approval of the manuafacturer could result in the product not meeting the Class A limits, in
which case the FCC could void the user’s authority to operate the equipment.
R&TTE
ENGLISH
This device complies with the requirements of the R&TTE Directive 1999/5/EC.
dEutScH
Dieses Gerät enspricht der Direktive R&TTE Direktive 1999/5/EC.
ESPAñOL
Este dispositivo cumple con los requerimientos de la Directiva R&TTE 1999/5/EC.
FRANçAIS
Cet appareil satisfait aux exigences de la directive R&TTE 1999/5/CE.
POLSkI
Urządzenie spełnia wymagania dyrektywy R&TTE 1999/5/EC.
ItALIANO
Questo dispositivo è conforme alla Direttiva 1999/5/EC R&TTE.
14
Page 15

INTELLINET NETWORK SOLUTIONS™ oe rs a com plete l ine of a ctive and pas sive ne twork ing pr oduc ts.
Ask your local computer dealer for more information or visit www.intellinet-network.com.
All p roduc ts men tione d are tr adema rks or regis tered t radem arks o f thei r respe ctive owner s.
INTELLINET NETWORK SOLUTIONS™ bie tet ein vollst ändig es Sor timen t akti ver und passiv er
Netzwerkkomponenten. Für weitere Informationen wenden Sie sich bitte an Ihren Händler oder
Alle erwähnten Produkte sind registrierte Marken und Eigentum Ihrer jeweiligen Besitzer.
INTELLINET NETWORK SOLUTIONS™ ofr ece una línea c omple ta de pr oduct os de re d acti va y pas iva.
Todos los productos mencionados son marcas comerciales o marcas registradas de sus respectivos propietarios.
INTELLINET NETWORK SOLUTIONS™ or e un ass ortim ent com plet d e produ its de r éseau actif s et
pas sifs. P our plu s d’in format ions ve uille z conta cter v otre re vendeu r ou uti liser l a page d ’accue il
Tous les produits mentionnés sont des marques commerciales ou des marques déposées de leurs
INTELLINET NETWORK SOLUTIONS™ to ko mplet na lini a akty wnych oraz p asyw nych kom ponen tów
INTELLINET NETWORK SOLUTIONS™ or e una lin ea com pleta d i prod otti d i rete at tivi e passi vi.
Tutti i prod otti s opraci tati s ono mar chi di f abbri ca o mar chi reg istra ti depo sitat i dai pr oprie tari.
nutzen Sie die Webseite www.intellinet-network.com.
Pregunte a su distrib uidor para obtener mayor informacion o visite:
sie ciowy ch. Pop roś lok alneg o deal era o wi ęcej in forma cji lub odwie dź str onę
Wsz ystki e nazw y han dlowe i t owarów są naz wami i z nakam i towar owymi
zastrzeżonymi odpowiednich rm odnośnych właścicieli.
Chie di mag giori i nform azion i al tuo rivend itore d i comp uter o vi sita i l sito
www.intellinet-network.com.
www.intellinet-network.com.
propriétaires respectifs.
www.intellinet-network.com.
www.intellinet-network.com.
15
Page 16

Copyright © INTELLINET NETWORK SOLUTIONS
 Loading...