

Page 1
PowerLine
HD
etHernet
ADAPter
user
mAnuAL
MODEL 503839*
INT-503839-UM-0608-01
* This manual can also be used for the
PowerLine HD Ether net Adapter Starter Kit,
Model 503808
Page 2

introDuction
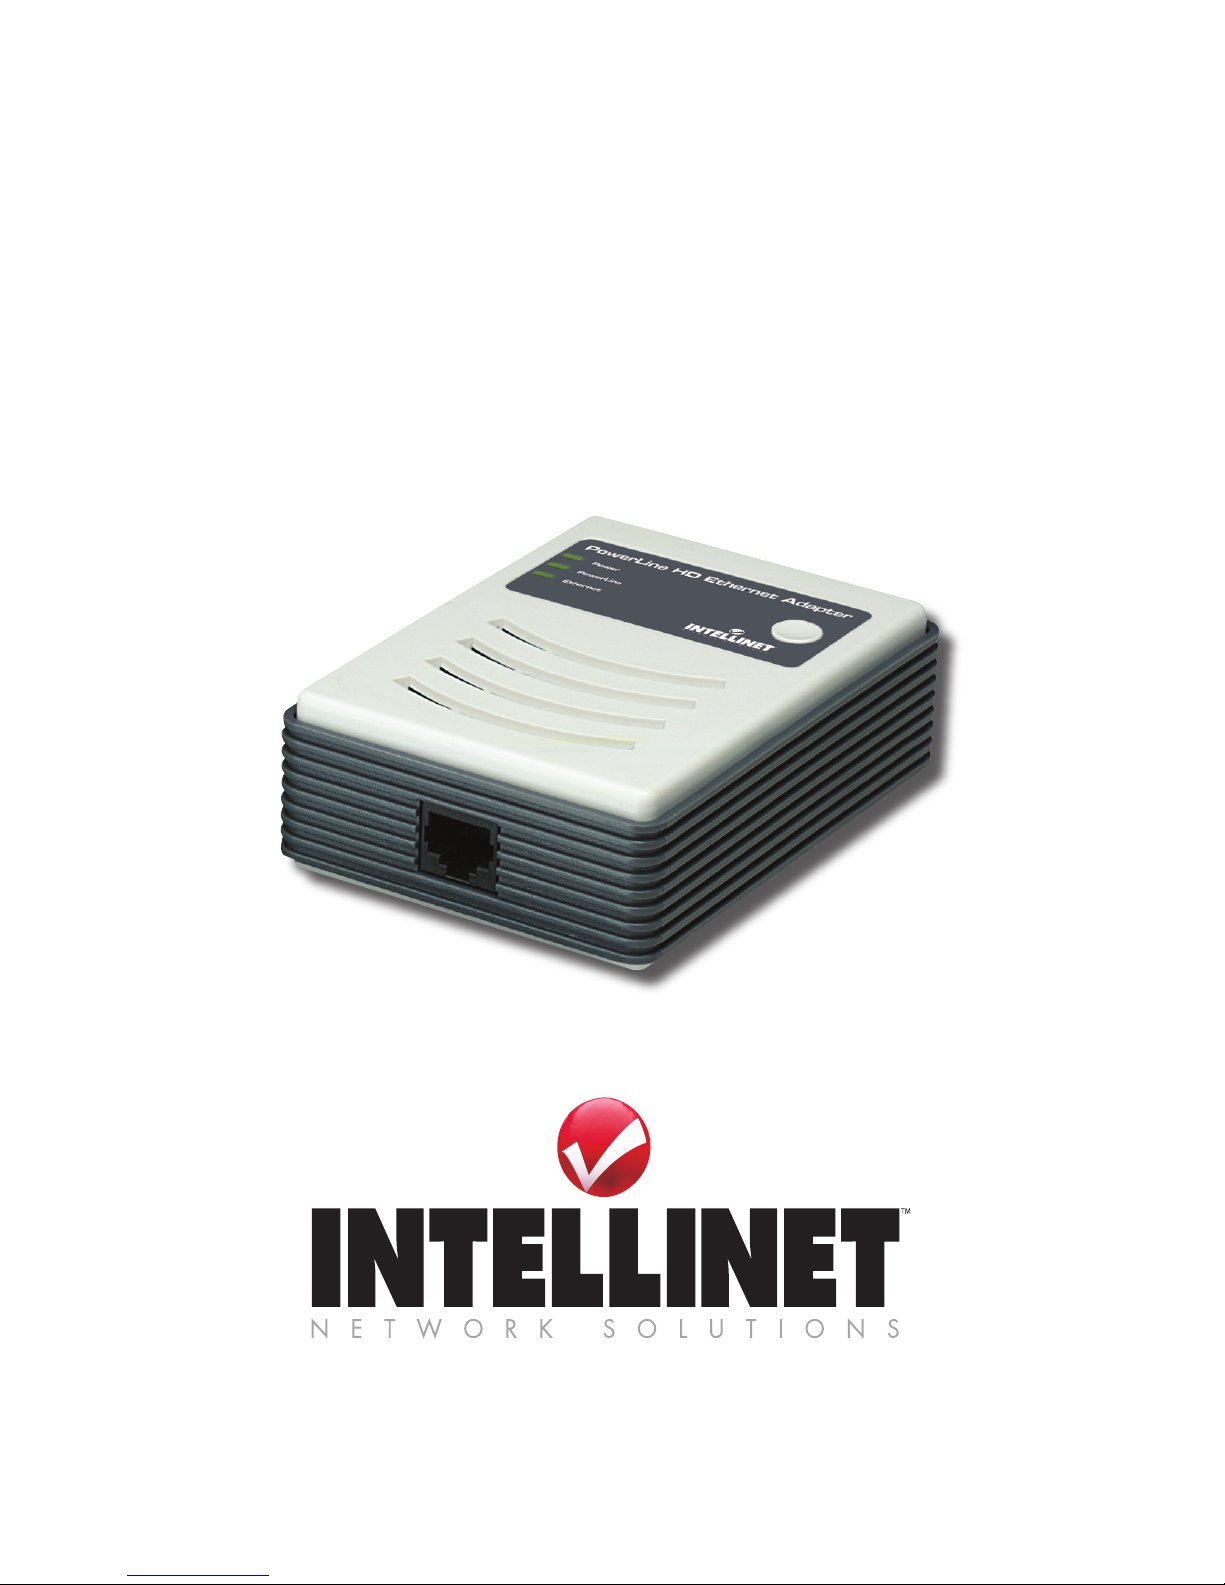
Thank you for purchasing the INTELLINET NETWORK SOLUTIONS™
PowerLine HD Ethernet Adapter, Model 503839.*
This easy-to-install device allows you to create a high-speed network for
the computers in your home or ofce by simply plugging the adapter(s)
into any electrical outlet. You immediately create a network using the
existing AC power lines and can extend your home network into areas a
wireless signal cannot reach. Attach multiple computers to the network
by simply plugging them into additional adapters.
The PowerLine Turbo Ethernet Adapter provides a network connection
speed of up to 200 Mbps and automatically senses the speed of a
router or computer device, adjusting to accommodate 10 Mbps or 100
Mbps Ethernet devices. Quality of Service (QoS) further improves
performance by prioritizing your important trafc through the use of up
to eight priority levels.
An effective data throughput of up to 90 Mbps streams crystal-clear,
1080p high-denition (HD) video to the media streamer connected to
your home entertainment center, making it the perfect choice for the
connection of network-enabled gaming consoles and digital media
devices such as Slingbox, Tivo, Xbox 360, Nintento Wii or PlayStation 3.
It’s also Plug and Play (no drivers are required), and comes with the
INTELLINET NETWORK SOLUTIONS Lifetime Warranty.
* This manual can also be used with the PowerLine HD Ethernet
Adapter Starter Kit, Model 503808.
NOTE: Some screen images have been modied to t the format of this
manual.
FCC Warning
This device has been tested and found to comply with limits for a Class B
digital device, pursuant to Parts 2 and 15 of FCC Rules. These limits are
designed to provide reasonable protection against harmful interference
when the equipment is operated in a commercial environment. This
equipment generates and radiates radio frequency energy and, if not
installed and used in accordance with the user’s manual, may cause
interference, in which case the user will be required to correct such
interference at his own expense.
CE Warning
This is a Class B product. In a domestic environment, this product may
cause radio interference, in which case the user may be required to
take adequate measures.
2
Page 3
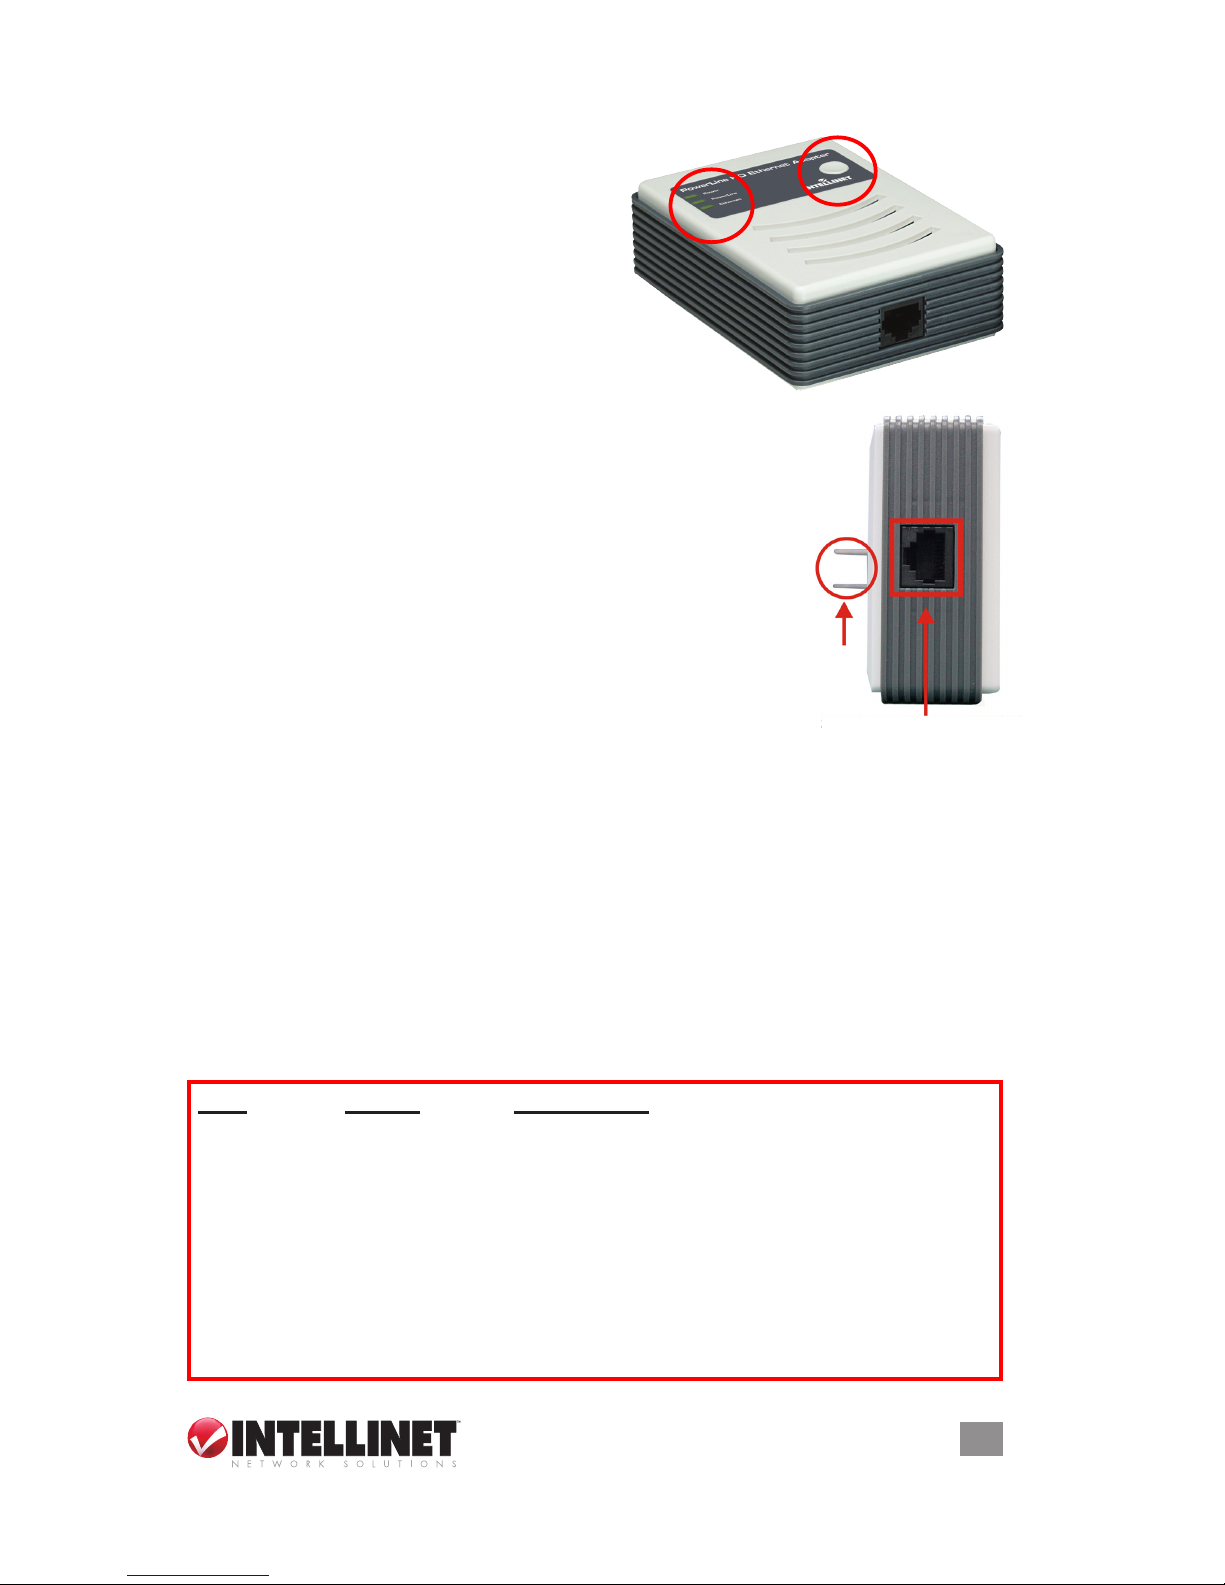
HArDwAre instALLAtion
The PowerLine HD Ethernet Adapter is
designed for quick, easy installation.
10/100M Fast Ethernet Port
Using the included Ethernet cable,
connect the adapter to a network router,
switch or other Ethernet-enabled device.
NOTE: The Ethernet port on the adapter
supports 10/100M Auto-MDI/MDIX, so you can
use a straight-through or a crossover Ethernet
cable when connecting to another Ethernet-enabled device.
AC Power Plug
Plug the device directly into an AC power outlet. Do
not connect the PowerLine adapter to a power strip,
extension cord or surge protector, as this may prevent
it from working properly or degrade the network
performance.
Quick Setup Button
This front-panel button provides a quick option for
joining an adapter to an established PowerLine network.
1. Press and hold the Quick Setup button until all LEDs are off (this may
take more than 10 seconds). The adapter will reset the network ID
setting and generate a random network ID. NOTE: Always reset the
network ID before pairing the adapter with other PowerLine devices.
2. To join a new unit to the network, press the Quick Setup button on any
adapter currently in the network and — within 3 seconds — press the
Quick Setup button on the new adapter. A blinking Power LED indicates
the pairing is in progress; a lighted Power LED means the unit is paired.
LED Indicators
Power, PowerLine and Ethernet (as detailed below).
LED Status Description
Power Solid blue Power is on.
Blinking Device is paired or upgrading rmware.
Off Power is off.
PowerLine Solid blue A proper PowerLine link has been made.
Blinking blue There is activity on the link.
Off No PowerLine link has been made.
Ethernet Solid blue A proper Ethernet link has been made.
Blinking blue There is activity on the link.
Off No Ethernet link has been made.
3
LED Indicators
Quick Setup
Button
AC Power Plug
(U.S. version)
10/100M Fast
Ethernet Port
Page 4
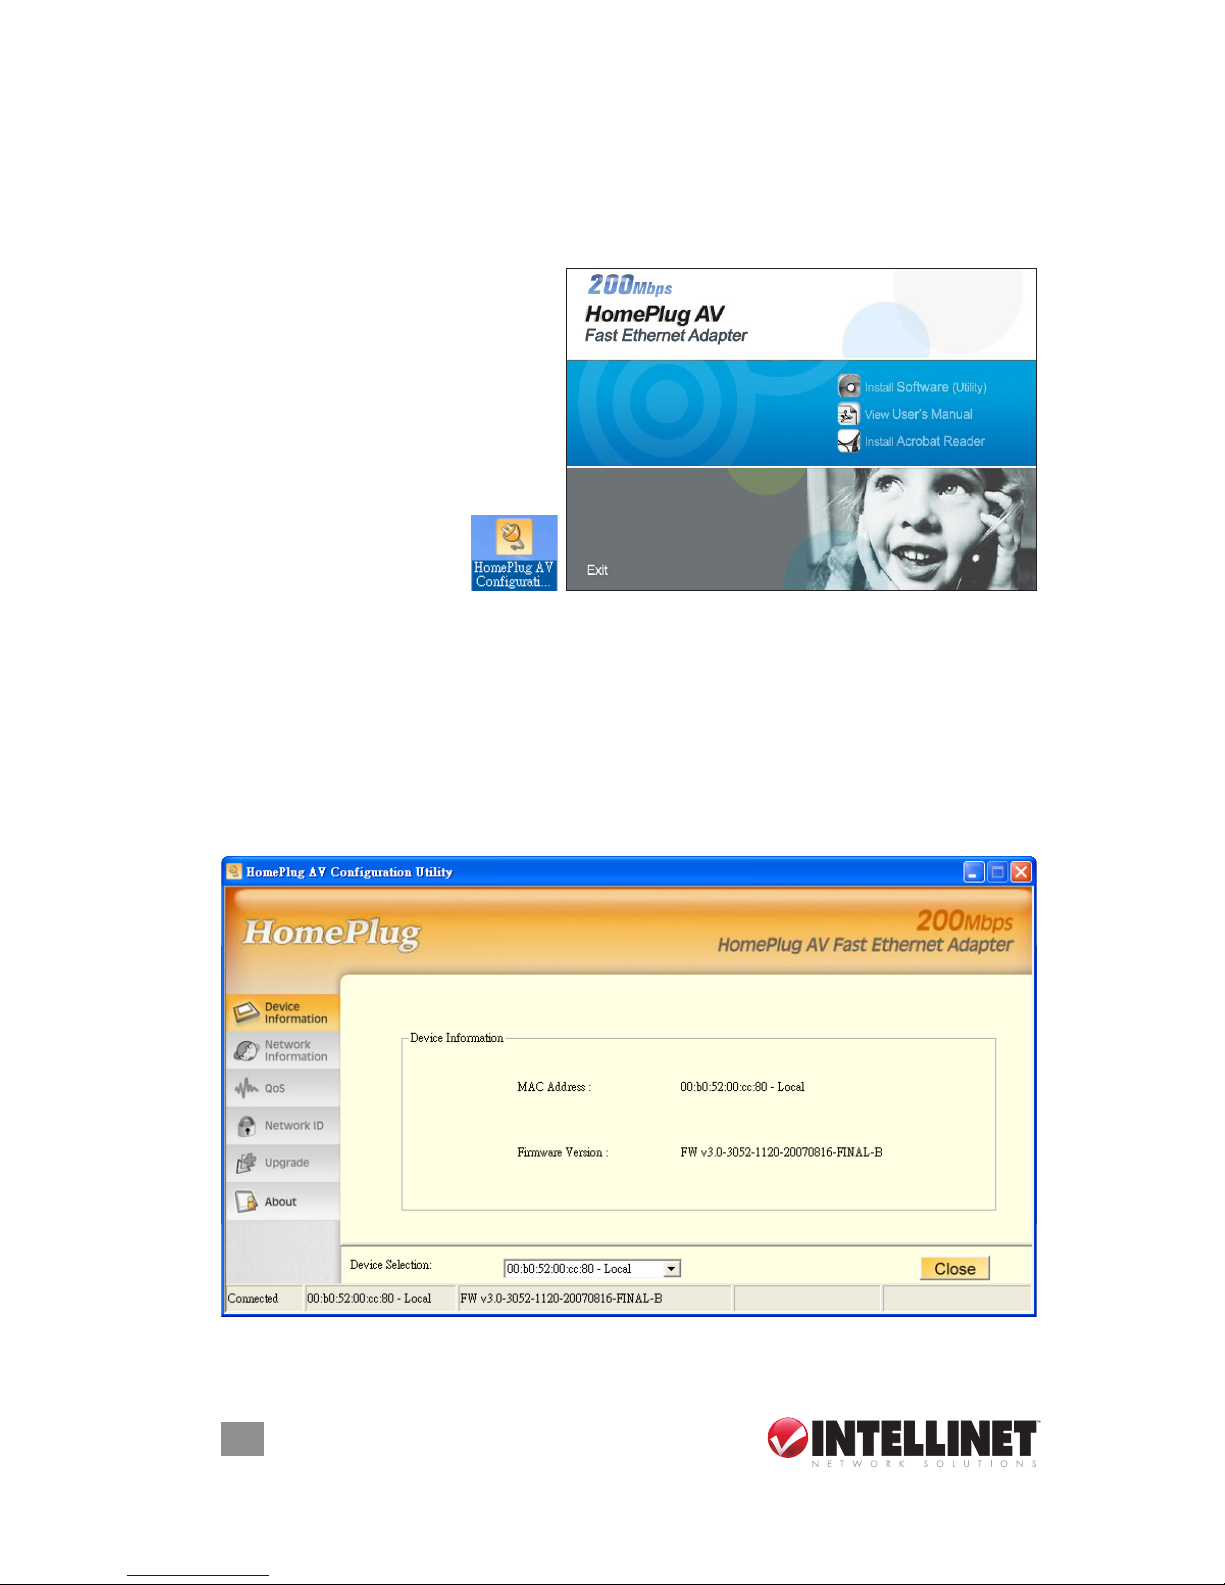
conFiGurAtion utiLitY instALLAtion
The HomePlug AV Utility (for Windows 2000, XP or Vista) enables
users to identify PowerLine devices on the PowerLine network. It also
measures data rate performance, ensures privacy and performs
diagnostics by setting user-dened, secure PowerLine networks.
To begin installation, insert
the included setup CD into
your CD-ROM drive to
display the Autorun program.
Click/select “Install Software
(Utility)” on the menu screen;
the install wizard will begin
the software installation.
When the HomePlug
AV Conguration
Utility icon (right)
displays on the desktop, double-click on it to start the utility and access
the various option screens.
The left-hand menu (shown on the screen image below) presents six
sub-menus — Device Information, Network Information, QoS, Network
ID (Security), Upgrade and About — each of which is explained in the
following sections.
Device Information
This screen presents the MAC address, rmware version and the
connected PowerLine device.
4
Page 5

Network Information
This screen presents a list of all devices on the PowerLine network.
Devices that are active on the current logical network will show a
transfer rate and receiver rate.
QoS
Quality of Service (QoS) requirements are different for various data
types, such as streaming video or music, voice and raw data. To provide
higher QoS for streaming data, priority levels can be set using tags at
the beginning of data frames. Virtual Local Area Network (VLAN) 802.1p
priority tags on Ethernet frames are used to specify eight levels (0 – 7)
of user priority.
The PowerLine HD Ethernet Adapter allows four levels (0 – 3) of
Channel Access Priority (CAP). Therefore, the eight levels of VLAN
Ethernet tags must be mapped to the four levels of CAP priority, where
CAP 3 is the highest priority and CAP 0 is the lowest. CAP 3 priority
might be used for voice and network management frames; CAP 2 is
used for streaming video and music; while CAP 1 and CAP 0 are used
for data. Mapping VLAN tags or ToS bits to CAP levels is easily done
using the VLAN Priority Mapping function on the QoS tab window.
5
Page 6

Device Selection
From the drop-down list, select the device you want to congure.
List View
The QoS tab includes two list views to provide simple channel access
priority (CAP) classication for individual MAC addresses and IP ports.
There is a collective limit of eight across both lists. NOTE: No delimiters,
colons or dashes are allowed in the MAC address format.
Priority Mapping
The Priority Mapping group contains both VLAN and ToS bit-mapping
capability. When selected, packets matching the VLAN or ToS Bit
priority will be assigned the PowerLine contention priority (Channel
Access Priority, CAP) as set in the corresponding drop-down box. If a
packet has both VLAN and ToS in it, VLAN will override ToS.
Default CAP
The Default CAP group allows for default priority mapping of packets
that do not have a VLAN or ToS bit. Settings are available for Unicast
(directed to a host).
• IGMP (default CAP 3): sets the channel access priority for IGMP
frames (the group management frames, not the stream data).
• IGMP Managed Multicast Stream (default CAP 2): sets the default
channel access priority for stream data belonging to a snooped IGMP
multicast group.
6
Page 7

• Multicast/Broadcast: sets the default CAP 1 for multicast frames not
in a snooped group and for broadcast frames.
• Unicast (default CAP 1): sets the default channel access priority for
unicast frames not matching any other classication or mapping.
Reset to default
Press “Reset to default” to restore the factory default QoS settings.
Save changes
Press “Save changes” to save and execute the modied QoS settings.
Network ID
This screen is used to set or change the network group ID.
Device Selection
From the drop-down list, select the device you want to congure.
Network ID
If “Device Selection” is set to the local device, enter the network ID in
the “Network ID” eld; then click “Save changes” to set the entered
network ID.
If “Device Selection” is set to a remote device, enter the network ID in
the “Network ID” eld and enter the remote device access key in the
“DAK Password” eld; then click “Save changes” to set the entered
network ID. (A DAK password is on each PowerLine device label.)
Reset to default
Press “Reset to default” to restore the factory default settings of the
adapter.
7
Page 8

Upgrade
Device Selection
From drop-down list, select the device you want to congure.
Reboot Device
Press “Reboot Device” to reset the node, which will restore the initial
factory conguration.
Firmware Upgrade
Click “Firmware Upgrade,” then locate the
two rmware les (PIB le *.pib and rmware
le *.nvm). When the conrmation windows
display, click “Yes” to start the upgrade or “No” to abort it.
About
This screen displays important reference information.
8
Page 9

troubLesHootinG
When you initially plug in and turn on the power to a PowerLine adapter,
the Power LED should light. After approximately 10 seconds, the
PowerLine LED should also light, and the Ethernet LED should blink.
If the Power LED fails to light:
• If the AC power outlet is controlled by a wall switch, make sure the
switch is in the On position.
• Verify that the wall socket is live. To do this, disconnect the PowerLine
adapter and plug in another electrical product. If the Power LED still
doesn’t light and you’ve conrmed the power outlet is live, you have a
hardware problem and should contact technical support.
If the PowerLine LED fails to light (but the Power LED is lit):
• Make sure that power is being provided to more than one PowerLine
device. Another PowerLine device must be installed for successful
communication across the PowerLine.
• Verify that the network password is the same on all devices.
If the Ethernet LED fails to light and blink:
• Make sure that the Ethernet cable is plugged in properly at both ends.
• Be sure you’re using the correct cable on the router the rst PowerLine
adapter is connected to. When connecting the router’s Internet port to
a cable or DSL modem, use the cable (straight-through or crossover)
supplied with the modem.
• On the attached Ethernet device or network adapter card, check that
the Link LED is lit.
9
Page 10

sPeciFicAtions
Standards
• IEEE 802.3 10Base-T; IEEE 802.3u 100Base-TX; HomePlug AV
General
• One 10/100 RJ-45 port
• One AC power line port
• Chipset: Intellon INT6300
• Link speed: up to 200 Mbps
• 128-bit AES Link Encryption with key management for secure power
line communications
• Enhanced Quality of Service (QoS) with eight levels of prioritized random
access, contention-free access, and segment and packet bursting
• Supports IGMP managed multicast IP transmissions
LEDs
• Power; PowerLine Link/Activity; Ethernet Link/Activity
Power
• Internal 90 – 260 V AC, 50 – 60 Hz
• Power consumption: 4.3 Watts (maximum)
Environmental
• Dimensions: 75 (W) x 102 (L) x 34 (H) mm (2.9 x 4.0 x 1.4 in.)
• Weight: 0.35 kg (0.8 lbs.)
• Operating temperature: 0 – 40°C (32 – 104°F)
• Operating relative humidity: 10 – 90%, non-condensing
• Storage temperature: -25 – 70°C (-13 – 158°F)
• Storage relative humidity: 0 – 95%, non-condensing
• Power: AC 100 – 240 V / 50 – 60 Hz / 0.1 A
Certications
• FCC Part 15, Part B, Class B; CE Class B; RoHS
Minimum System Requirements
• Existing PowerLine HD Ethernet Adapter
• TCP/IP protocol
• CD-ROM drive
• Conguration utility requires Windows 2000, XP, Vista
Package Contents
• PowerLine HD Ethernet Adapter (2 devices in the Starter Kit, Model
503808)
• Setup CD-ROM with user manual
• One Ethernet network cable
• Quick start guide
10
Page 11

Page 12

INTELLINET NETWORK SOLUTIONS™ offers a complete line
of active and passive networking products.
Ask your local computer dealer for more information or visit
www.intellinet-network.com.
Copyright © INTELLINET NETWORK
SOLUTIONS
All products mentioned are trademarks or registered trademarks of their respective owners.
 Loading...