

Page 1
Quick Install Guide
Guía de instalación
rápida ESPAÑOL
Guide d'installation
rapide FRANÇAIS
ENGLISH
Kurzanleitung
DEUTSCH
instalaciju HRVATSKI
guida all’installazione
inštaláciou SLOVENSKY
upute za brzu
rapida ITALIANO
Instrukcja szybkiej
instalacji POLSKI
Sprievodca rýchlou
Page 2
ENGLISH: Safety and Regulatory Notices
This equipment has been tested and found to comply with the
limits for a Class B computing device pursuant to Subpart B of
protection against such interference when operated in a commercial
environment. Operation of this equipment in a residential area is likely to cause
interference, in which case the user, at his own expense, will be required to
take whatever measures may be required to correct the interference.
R&TTE Compliance Statement
Earth Station Equipment) as of April 8, 2000.
Waste Electrical & Electronic Equipment
Disposal of Electric and Electronic Equipment
(Applicable in the European Union and other European countries with
separate collection systems)
batteries or accumulators, dispose of these separately according to your local
requirements. The recycling of materials will help to conserve natural
resources. For more detailed information about recycling of this product,
contact your local city office, your household waste disposal service or the shop
where you purchased this product. In countries outside of the EU: If you wish
to discard this product, contact your local authorities and ask for the correct
manner of disposal.
Part 15 of FCC rules, which are designed to provide reasonable
This digital equipment fulfills the requirements for radiated
emission according to limit B of EN55022/1998, and the
requirements for immunity according to EN55024/1998
residential, commercial and light industry.
This equipment complies with all the requirements of DIRECTIVE
1999/5/EC OF THE EUROPEAN PARLIAMENT AND THE COUNCIL of
March 9, 1999, on radio equipment and telecommunication
terminal equipment and the mutual recognition of their conformity
(R&TTE). The R&TTE Directive repeals and replaces Directive
98/13/EEC (Telecommunications Terminal Equipment and Satellite
This symbol on the product or its packaging indicates that this
product shall not be treated as household waste.
Instead, it should be taken to an applicable collection point for the
recycling of electrical and electronic equipment. By ensuring this
product is disposed of correctly, you will help prevent potential
negative consequences to the environment and human health,
which could otherwise be caused by inappropriate waste handling
of this product. If your equipment contains easily removable
- 2 -
Page 3

Introduction
Congratulations on your purchase of the INTELLINET NETWORK SOLUTIONS™
GuestGate MK II Hotspot Gateway. The GuestGate connects guests to your
network, allowing them to access only the Internet (Web, Email, Chat and
other applications). GuestGate protects your existing network from
unauthorized access by the connected guest computers and, if required, even
shields the guest computers among themselves. Furthermore GuestGate
features enhanced IP PnP (Plug and Play) technology: It automatically adjusts
to the guest computer’s TCP/IP settings, eliminating time-consuming client IP
reconfigurations. GuestGate seamlessly integrates into your existing network
and in many applications a configuration of GuestGate is not necessary.
GuestGate provides the core functionality right out of the box.
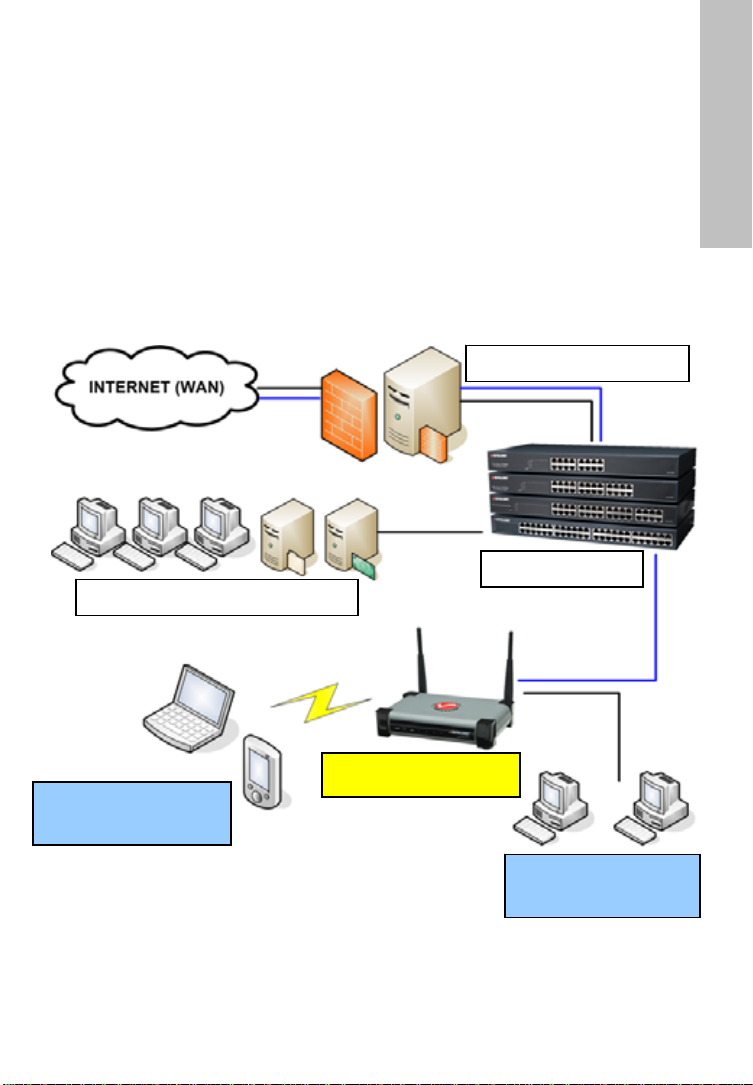
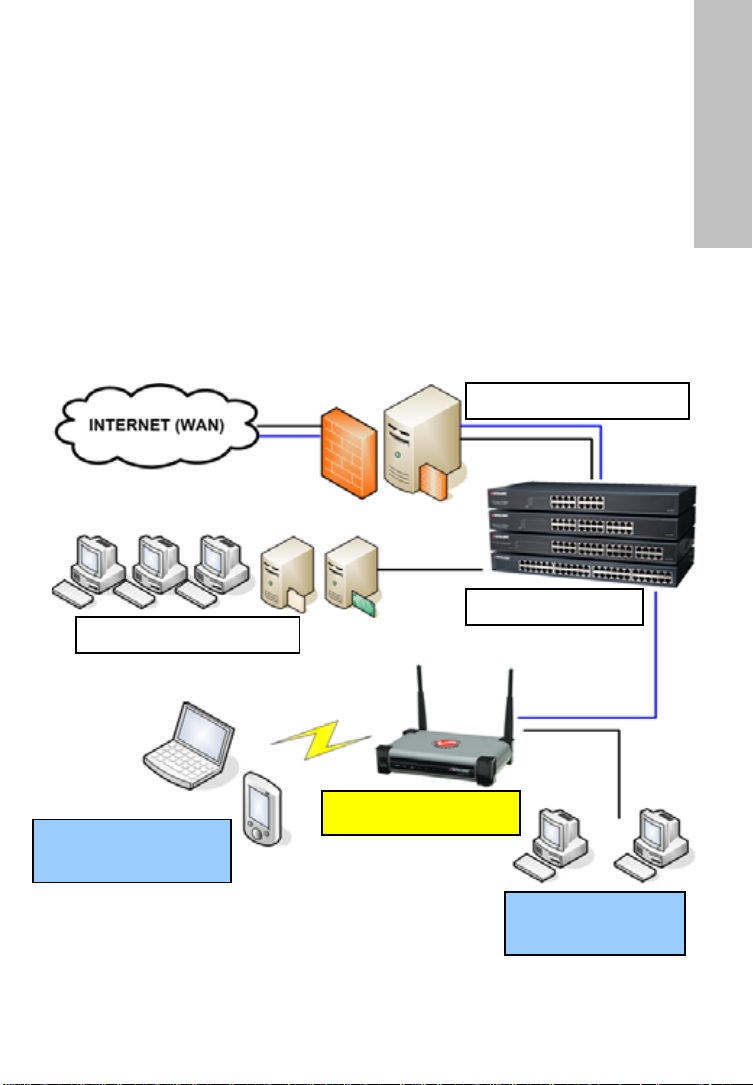
Installation Example
Firewall / Gateway
LAN Switches
LAN / Host Network
ENGLISH
Wireless Guest
Network
GuestGate MK II
Wired Guest
Network
- 3 -
Page 4
Installation
This setup method assumes that a DHCP Server, such as a router, is present in
your network.
1. Connection to the Host Network
Connect standard RJ45 Network Cable to GuestGate’s HOST Port and to an
RJ45 port on your existing network (Ethernet switch port, Router switch port,
etc.).
Turn on GuestGate and verify that the network connection is active (HOST LED
must be lit on GuestGate).
NOTE: The startup process takes up to 60 seconds.
2. Connection of Guests
Using standard RJ45 Network Cable you can connect PCs, Notebooks, Ethernet
Switches, Hubs or Wireless Access Points to the Guest Ports of GuestGate. Each
Port has its own Status LED. Verify that the network connection is active on
each port you connect.
Alternatively you can connect to GuestGate wirelessly by connecting to the
Wireless network with the name of “GuestGate.”
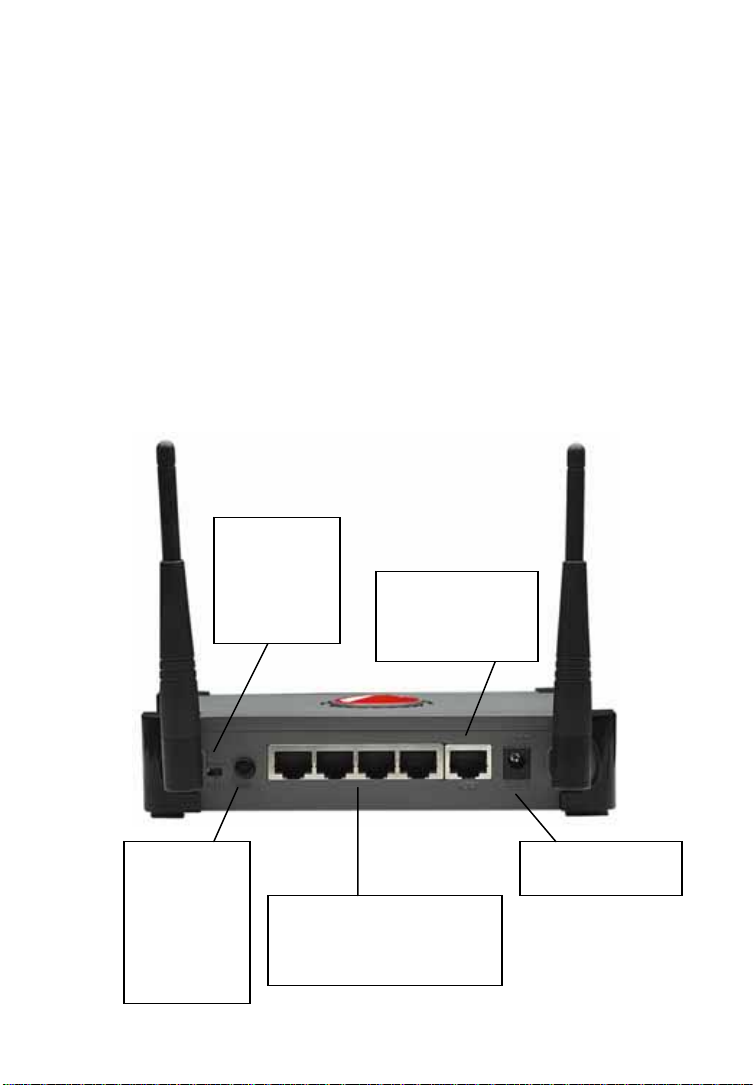
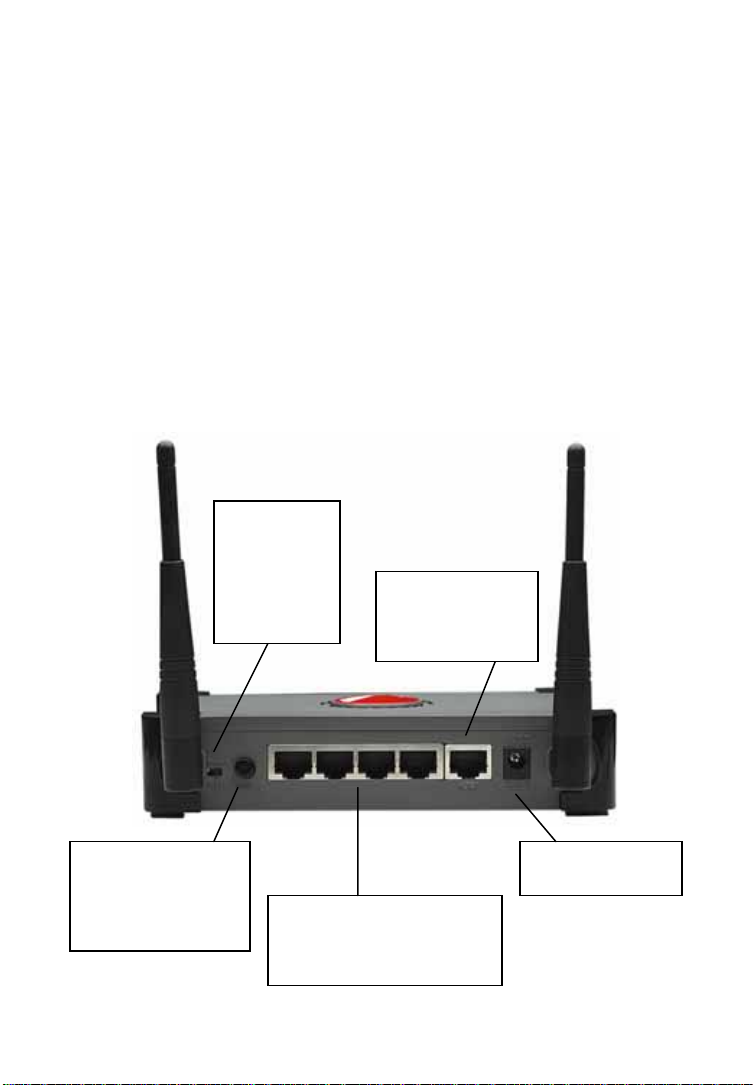
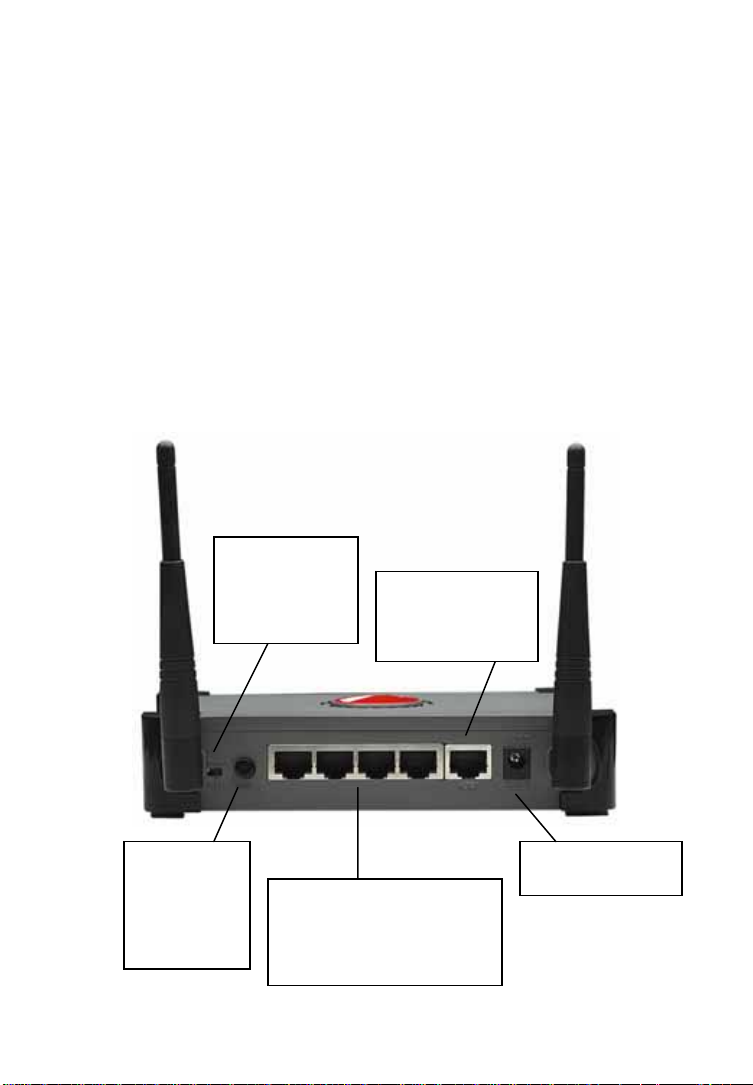
Radio on/off
switch
enables or
disables the
wireless
function
Host port -
Connect this to
your network,
e.g., the router
Reset button.
Hold down
for 10
seconds to
restore the
factory
default
settings
12V DC power
input connector
Guest ports 1 – 4 for the
connection of LAN switches,
Access Points, Desktop PCs
and Notebook computers
- 4 -
Page 5

Testing Internet Access
Start a PC or Notebook, which is connected to one of the guest ports, and
launch a Web browser. Then open a Web site such as
http://www.intellinet-network.com.
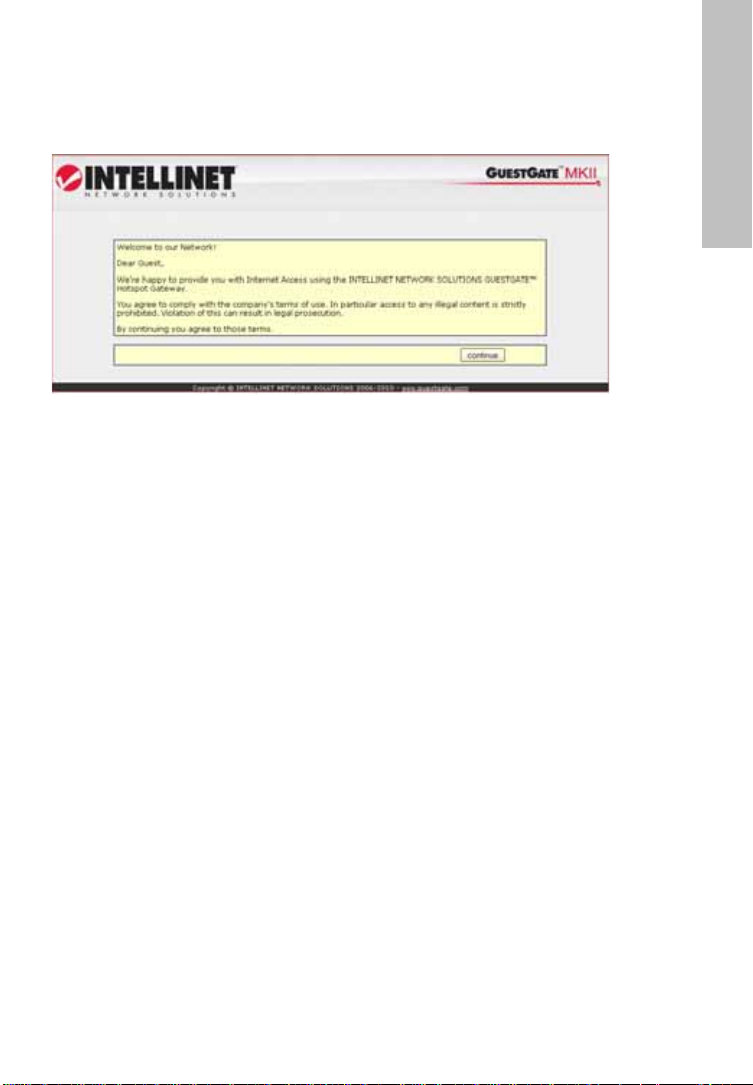
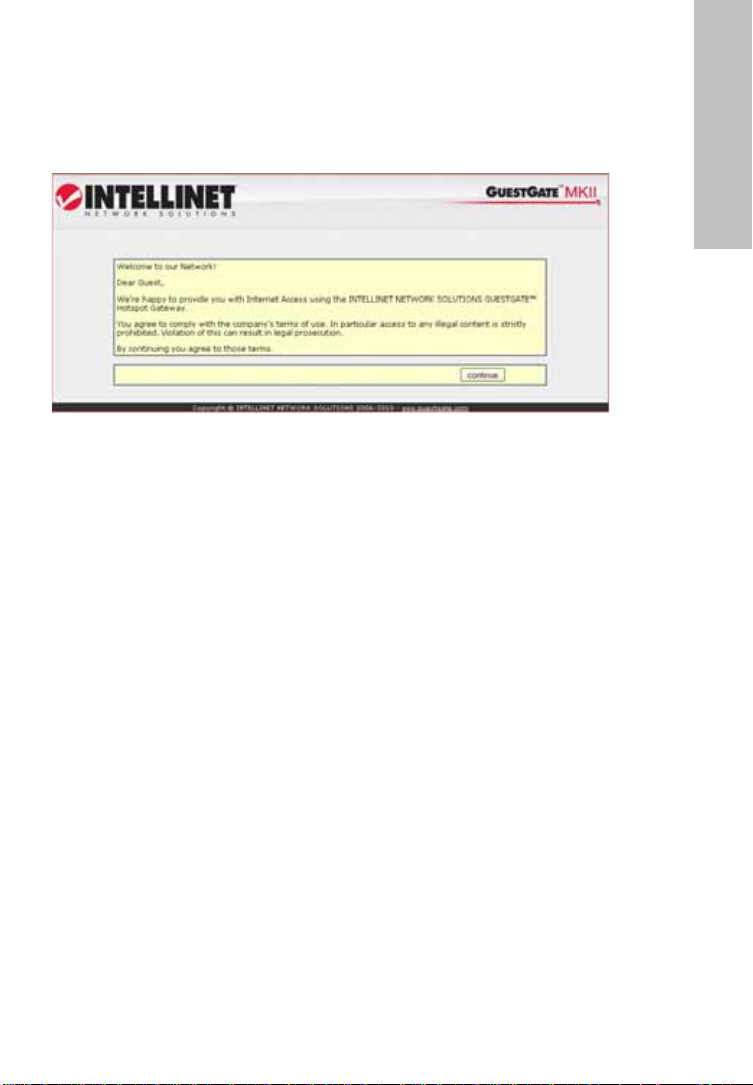
If GuestGate has Internet access, you will see GuestGate’s welcome page.
ENGLISH
Click “continue” and you will then be forwarded to the Web page you originally
entered in the Web browser’s address bar.
Accessing the Administrator Web Interface from the Host
Network
Access to the Web administrator interface is only possible when connecting to
GuestGate via the Host port.
Connect to the router (DHCP Server) in your network and open the DHCP client
log of the router. Connect GuestGate’s Host port to one of the router’s LAN
ports and power-on GuestGate. Wait about 30 seconds, and then refresh the
DHCP client log in the router. The last entry (the newest) belongs to GuestGate.
Launch your Web browser and open the IP address shown in the DHCP client
log. You will then see the Administrator Web interface.
The default password is 1234.
If this procedure does not work you can configure your PC with a static IP
address of 192.168.2.xxx, disconnect GuestGate from the router and connect
your computer directly to the host port. Power-on GuestGate and wait about
one minute, then open GuestGate’s default IP address http://192.168.2.1 with
the Web browser.
Additional Information
For additional information about the installation process, the configuration and
functions of GuestGate, please refer to the user manual on the INTELLINET
installation CD.
- 5 -
Page 6
DEUTSCH: Sicherheits- und Rechtshinweise
Dieses Gerät wurde geprüft und entspricht den Bestimmungen für
ein digitales Gerät der Klasse B gemäß Teil 15 der FCC-
vor schädlichen Störungen beim Betrieb des Geräts in Gewerbegebieten.
Beim Betrieb dieses Geräts in Wohngebieten sind Interferenzen wahrscheinlich.
In diesem Fall muss der Nutzer die Interferenzen auf eigene Kosten beseitigen.
R&TTE-Konformitätserklärung
Die R&TTE-Richtlinie ersetzt seit dem 08. April 2000 die Richtlinie 98/13/EEC
und hebt diese auf.
Elektro- & Elektronik-Altgeräte
Entsorgung von Elektro- und Elektronik-Geräten
(Anwendbar in der Europäischen Union und anderen europäischen
Ländern mit getrennten Sammelsystemen)
lokalen Bestimmungen Ihres Wohnorts. Das Materialrecycling trägt zur
Bewahrung natürlicher Rohstoffe bei. Für weitere Informationen über das
Recycling dieses Produkts wenden Sie sich an das zuständige Amt Ihrer Stadt,
Ihren lokalen Abfallbeseitigungsdienst oder den Händler, bei dem Sie dieses
Produkt erworben haben. Für Länder außerhalb der EU: Möchten Sie dieses
Produkt entsorgen, wenden Sie sich an Ihre lokalen Behörden und erkundigen
Sie sich über die ordnungsgemäße Art der Entsorgung.
Bestimmungen. Diese Grenzwerte bieten angemessenen Schutz
Dieses digitale Gerät erfüllt die Anforderungen zu Strahlenausstoß
gemäß Grenzwert B EN55022/1998 und die Anforderungen zu
Störfestigkeitseigenschaften gemäß EN55024/1998 in Wohn-,
Gewerbe, und Leichtindustriegebieten.
Diese Anlage entspricht allen Anforderungen der Richtlinie
1999/5/EG des Europäischen Parlaments und des Rates vom 09.
März 1999 über Funkanlagen und
Telekommunikationsendeinrichtungen und die gegenseitige
Anerkennung ihrer Konformität (R&TTE).
Dieses Symbol auf dem Produkt oder der Verpackung bedeutet,
dass das Produkt nicht als Hausmüll zu behandeln ist.
Stattdessen sollte es zu einer geeigneten Rücknahmestelle zum
Recycling von Elektro- und Elektronik-Geräten gebracht werden.
Durch die Sicherstellung der ordnungsgemäßen Entsorgung, tragen
Sie dazu bei, negative Einflüsse auf Umwelt und Gesundheit zu
vermeiden. Wenn Ihr Gerät einfach zu entfernende Batterien oder
Akkus enthält, entsorgen Sie diese separat entsprechend der
- 6 -
Page 7
Einleitung
Herzlichen Glückwunsch zum Kauf eines INTELLINET NETWORK SOLUTIONS™
GuestGate MK II HotSpot Gateways. GuestGate verbindet Gäste mit Ihrem
Netzwerk und beschränkt den Zugriff dabei auf das Internet (z. B. Web, E-Mail,
Chat und ähnliche Anwendungen). So schützt GuestGate Ihr vorhandenes
Netzwerk vor unbefugtem Zugriff durch angeschlossene Gastcomputer und
schirmt diese, falls gewünscht, sogar untereinander ab. Außerdem unterstützt
GuestGate erweiterte IP PnP (Plug and Play)- Technologie: Es passt sich
automatisch an die TCP/IP-Einstellungen des Gastcomputers an und macht
zeitaufwändiges Neukonfigurieren der Gastcomputer überflüssig. GuestGate
integriert sich nahtlos in Ihr vorhandenes Netzwerk, eine weitere Konfiguration
des GuestGates ist nur in den seltensten Fällen notwendig.
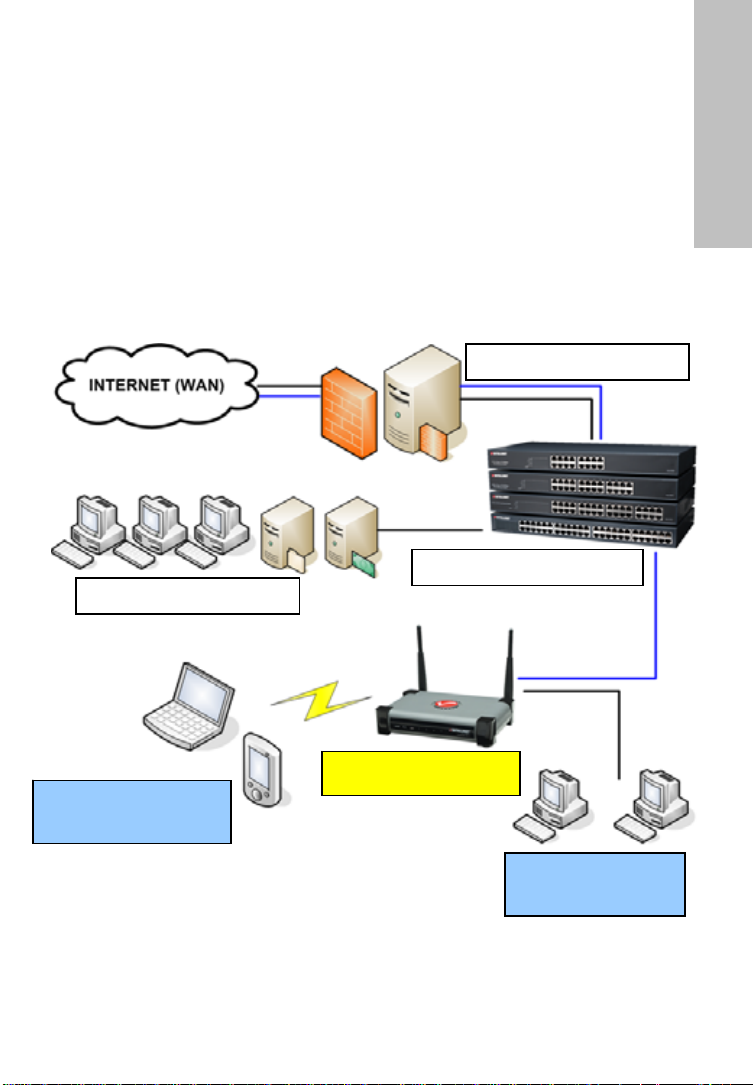
Installationsbeispiel
Firewall / Gateway
LAN-Switche
LAN / Gastgebernetzwerk
DEUTSCH
Kabelloses
Gastnetzwerk
GuestGate MK II
Kabelgebundenes
Gastnetzwerk
- 7 -
Page 8
Installation
Diese Installationsart setzt einen DHCP-Server in Ihrem Netzwerk voraus, z. B.
einen Router.
1. Verbindung mit dem Gastgebernetzwerk
Schließen Sie ein Standard-RJ45-Netzwerkkabel an den „Host“-Port des
GuestGates sowie an den RJ45-Port Ihres Netzwerkgerätes an (Ethernet
Switch, Router, etc.).
Schalten das GuestGate ein und stellen Sie sicher, dass die Verbindung aktiv ist
(die „Host“-LED des GuestGates muss leuchten).
HINWEIS: Der Startvorgang kann bis zu 60 Sekunden in Anspruch nehmen.
2. Verbindung von Gastcomputern
Über ein Standard-RJ45-Netzwerkkabel können Sie PCs, Notebooks, EthernetSwitche, Hubs oder Wireless Access Points an die „Guest“-Ports des GuestGates
anschließen. Jeder Port hat seine eigenen Status-LEDs. Stellen Sie sicher, dass
die Netzwerkverbindung an jedem Port mit dem Sie verbinden, aktiv ist.
Alternativ können Sie eine kabellose Verbindung herstellen, indem Sie eine
Verbindung mit dem Wireless Netzwerk „GuestGate” herstellen.
„Radio“an/ausSchalter
aktiviert/
deaktiviert
die Wireless-
Funktion
„Host“-Port -
Anschluss für Ihr
Netzwerk, z. B.
den Router
Reset-Schalter -
10 Sekunden
gedrückt halten, um
Werkseinstellungen
wiederherzustellen
12V DC
Stromanschluss
Gast-Ports 1 – 4 für den
Anschluss von LAN-
Switchen, Access Points,
PCs und Notebooks
- 8 -
Page 9

Internetzugang testen
Starten Sie einen PC/Laptop, der mit einem der Gast-Ports verbunden ist
und öffnen Sie den Webbrowser. Öffnen Sie eine beliebige Webseite, z. B.
http://www.intellinet-network.com.
Hat GuestGate Internetzugang, wird die GuestGate-Willkommensseite
eingeblendet.
DEUTSCH
Klicken Sie auf „Weiter“, woraufhin Sie zu der Webseite weitergeleitet werden,
die Sie in der Adresszeile des Webbrowsers eingegeben haben.
Zugriff auf das Administrator-Webinterface des
Gastgebernetzwerks
Zugriff auf das Administrator-Webinterface ist nur möglich, wenn Sie über den
Host-Port an das GuestGate angeschlossen sind.
Stellen Sie eine Verbindung mit dem Router (DHCP-Server) Ihres Netzwerks
her und öffnen Sie das DHCP-Client-Ereignisprotokoll des Routers. Verbinden
Sie den Host-Port des GuestGates mit einem der LAN-Ports des Routers und
starten Sie dann das GuestGate. Warten Sie ca. 30 Sekunden und aktualisieren
Sie dann das Ereignisprotokoll des Routers. Der letzte Eintrag (der neueste)
gehört zu GuestGate und zeigt seine IP-Adresse.
Öffnen Sie Ihren Webbrowser und geben Sie diese IP-Adresse ein. Sie sehen
nun das Administrator-Webinterface.
Das Standardpasswort lautet: 1234.
Sollte dieses Vorgehen nicht funktionieren, können Sie dem PC eine feste
(„statische“) IP-Adresse aus dem Bereich 192.168.2.xxx zuweisen. Trennen Sie
das GuestGate vom Router und schließen Sie Ihren Computer direkt an den
Host-Port an. Starten Sie das GuestGate und warten Sie ca. eine Minute, dann
öffnen Sie die Standard-IP-Adresse des Routers http://192.168.2.1 mit dem
Webbrowser.
Weitere Informationen
Weitere Informationen über den Installationsvorgang, die Einstellungen und
Funktionen von GuestGate finden Sie im Handbuch auf der INTELLINET
Installations-CD.
- 9 -
Page 10
ESPAÑOL: Avisos de Seguridad y Regulatorios
Este equipo ha sido probado y se encontró que cumple con los
límites establecidos para los dispositivos de cómputo Clase B
de la FCC, la cual está diseñada para proporcionar una protección razonable
contra todas aquellas interferencias operadas en un ambiente comercial.
La operación de este equipo en un área residencial es probable que cause
cierta interferencia, en tal caso el usuario, según su experiencia, tendrá que
inmunidades residenciales, comerciales y de industria ligera de acuerdo con
EN55024/1998.
Declaración de Conformidad R&TTE
(Equipo Terminal de Telecomunicaciones y Equipo de Estación Terrestre
Satelital) a partir del 8 de Abril del 2000.
Desperdicios de Equipo Eléctrico y Electrónico
Eliminación de Equipo Eléctrico y Electrónico
(Válido en la unión europea y en otros países europeos con sistemas de
recolección por separado)
contiene baterías o acumuladores fáciles de remover, deséchelos por separado
de acuerdo a las leyes de su localidad. El reciclado de los materiales ayudará a
conservar los recursos naturales. Para mayor información acerca del reciclado
de los materiales de este producto, póngase en contacto con su oficina local en
su ciudad, el servicio de limpia o en donde ha comprador este equipo. En países
fuera de los EE. UU.: Si desea desechar este producto, póngase en contacto con
según lo acordado en la Sub-parte B de la Parte 15 de las reglas
realizar las mediciones requeridas para corregir la mencionada
interferencia. Este equipo digital cumple en su totalidad con los
requerimientos en materia de emisiones radiadas de acuerdo con
el límite B de EN55022/1998, y los requerimientos de
Este equipo cumple con todos los requerimientos de la DIRECTIVA
1999/5/EC DEL PARLAMENTO EUROPEO Y EL CONSEJO de marzo
9 de 1999, en material de equipos de radio y terminales de
telecomunicaciones y el reconocimiento mutuo de su conformidad
(R&TTE).
La Directiva R&TTE revoca y reemplaza la Directiva 98/13/EEC
Este símbolo en el producto en su empaque indica que éste no
deberá ser tratado como un desperdicio del hogar.
En vez de ello, deberá ser llevado a un punto de recolección para
reciclaje de equipo eléctrico y electrónico. Para asegurar que este
producto ha sido correctamente desechado, usted ayudará a
prevenir las consecuencias potenciales negativas hacia el ambiente
y la salud humana, que de otra forma se puede causar al manejar
inapropiadamente los desechos de este producto. Si su equipo
- 10 -
Page 11

sus autoridades locales y pregunte por la forma correcta de manejar éstos
residuos.
ESPAÑOL
Introducción
Felicidades por su compra del Gateway Hotspot GuestGate MK II de
INTELLINET NETWORK SOLUTIONS™. El GuestGate conecta a los invitados
con su red, dándoles acceso sólo a Internet (Web, correo electrónico, Chat y
otras aplicaciones). GuestGate protege su red existente de acceso no
autorizado por parte de computadoras invitadas conectadas y, si se requiere,
incluso blinda las computadoras invitadas entre ellas. Además, GuestGate
tiene como función una tecnología PnP de IP mejorado (Plug and Play): Se
adapta automáticamente a los ajustes de TCP/IP de la computadora invitada,
eliminando así reconfiguraciones IP de cliente que consumen tiempo.
GuestGate se integra de manera uniforme a su red existente y en muchas
aplicaciones, no es necesario hacer la configuración del GuestGate. GuestGate
proporciona la funcionalidad central sólo al sacarlo de la caja y conectarlo
Ejemplo de instalación
Firewall / Gateway
LAN Switches
LAN / Host Network
Red inalámbrica de
invitados
GuestGate MK II
Red cableada de
invitados
- 11 -
Page 12

Instalación
Este método de configuración supone que hay un Servidor DHCP, así como un
ruteador, presentes en su red.
1. Conexión con la red Host
Cable de red estándar RJ45 conectado al Puerto del HOST de GuestGate y a un
puerto RJ45 en su red existente (Puerto de switch Ethernet, puerto de switch
de ruteador, etc.).
Encienda el GuestGate y verifique que la conexión de red esté activa (el LED
indicador HOST debe estar encendido en el GuestGate).
NOTA: El proceso de arranque toma hasta 60 segundos.
2. Conexiones de invitados
Usando el Cable de red estándar RJ45 usted puede conectar PCs, computadoras
portátiles, Switches Ethernet, Hubs o Access Points a los Puertos de Invitados
de GuestGate. Cada Puerto tiene su propio LED indicador de Estado. Verifique
que la conexión de red esté activa en cada puerto que conecte.
De manera alternativa, puede conectarse a GuestGate vía inalámbrica
conectándose a la red Inalámbrica con el nombre de “GuestGate.”
Encendido/
apagado del
Radio habilita
o deshabilita
la función
inalámbrica.
Puerto de Host -
Conecte éste a su
red, por ej., al
ruteador
Botón Reset
(Restablecer)
Oprimir durante
10 segundos
para restaurar
ajustes
predeterminados
de fábrica.
Puertos de invitados 1 – 4
para la conexión de switches
LAN, Access Points,
computadoras de escritorio
o portátiles
- 12 -
Conector de entrada
de energía de 12V
Page 13

Prueba de acceso a Internet
Encienda una computadora de escritorio o una portátil, que está conectada a
uno de los puertos de invitado, e inicie el navegador Web. Después, abra
una página Web, por ejemplo
http://www.intellinet-network.com.
Si GuestGate tiene acceso a Internet, verá la página de bienvenida de
GuestGate.
ESPAÑOL
Haga clic en “continue” (continuar) y se le reenviará a la página web a la que
ingresó originalmente en la barra de dirección del navegador Web.
Acceso a la Interfaz web del administrador de la Red
Host (Huésped)
El acceso a la interfaz del administrador Web sólo es posible cuando se conecta
al GuestGate mediante el puerto de Host.
Conéctese al ruteador (Servidor DHCP) en su red y abra la bitácora del cliente
DHCP del ruteador. Conecte el puerto del Host GuestGate a uno de los puertos
LAN del ruteador y encienda el GuestGate. Espere aproximadamente 30
segundos y después actualice la bitácora de cliente DHCP en el ruteador. La
última entrada (la más nueva) pertenece a GuestGate.
Abra su navegador Web y abra la dirección IP mostrada en la bitácora de
cliente DHCP. Después verá la interfaz Web del Administrador.
La contraseña predeterminada es 1234.
Si este procedimiento no funciona, puede configurar su computadora con una
dirección IP estática de 192.168.2.xxx, desconecte el GuestGate del ruteador y
conecte su computadora directamente al puerto del host. Encienda el
GuestGate y espere aproximadamente un minuto, y después abra la dirección
IP predeterminada de GuestGate http://192.168.2.1 con el navegador web.
Información adicional
Para información adicional sobre el proceso de instalación, la configuración y las
funciones de GuestGate, favor de referirse al manual del usuario en el CD de
instalación de INTELLINET.
- 13 -
Page 14

FRANÇAIS: Informations de sécurité et
mentions légales
Cet appareil a été testé et déclaré conforme aux exigences de la
classe B pour appareils numériques, selon l’article 15 de la norme
contre les interférences dangereuses en milieu commercial. Si cet équipement
cause des interférences à la réception de vos ondes radio ou TV, ce qui peut
être vérifié en allumant et éteignant l’appareil successivement, l’utilisateur est
invité à prendre les mesures nécessaires. Cet appareil satisfait aux exigences
Déclaration de conformité R&TTE
depuis le 8 avril 2000.
WASTE ELECTRICAL & ELECTRONIC EQUIPMENT
Déchets des équipements électriques et électroniques
(Applicable dans l’Union européenne et d’autres pays européens avec
du tri des déchets)
européenne. Conçu pour apporter une protection raisonnable
d’émission rayonnée accordées à la limite B de EN55022/1998 et
les exigences d’immunités accordées à EN55024/1998 pour des
zones résidentielles, commerciales et industrielles.
Cet appareil satisfait aux exigences de la DIRECTIVE 1999/5/CE
de la Commission au Conseil et au Parlement européen du 9 mars 1999
concernant les équipements hertziens et les équipements terminaux de
télécommunications et la reconnaissance mutuelle de leur conformité
(R&TTE). La Directive R&TTE remplace la Directive 98/13/EEC
Ce symbole sur le produit ou son emballage signifie que ce produit
ne doit pas être traité comme un déchet ménager. Conformément
à la Directive 2002/96/EC sur les déchets d’équipements
électriques et électroniques (DEEE), ce produit électrique ne doit
en aucun cas être mis au rebut sous forme de déchet
municipal non trié. Veuillez vous débarrasser de ce produit en le
renvoyant à son point de vente ou au point de ramassage local
dans votre municipalité, à des fins de recyclage.
- 14 -
Page 15
Introduction
Merci d’avoir acheté l’INTELLINET NETWORK SOLUTIONS™ GuestGate MK II
Hotspot Gateway. Le GuestGate connecte des clients à votre réseau, ne
permettant que l’accès sur l’Internet (Web, e-mail, chat et d’autres
applications). GuestGate protège votre réseau contre l’accès des ordinateurs
clients connectés et, si nécessaire, même isole les ordinateurs clients
respectivement. En plus, GuestGate utilise la technologie avancée IP PnP
(Plug & Play): Elle ajuste automatiquement aux paramètres TCP/IP des
ordinateurs clients, éliminant les reconfigurations de longue haleine.
GuestGate s’intègre sans problèmes dans votre réseau existant et en la
plupart des cas il ne faut le configurer.
Exemple d’une installation
Pare-feu / Passerelle
Commutateur réseau
LAN / Réseau hôte
FRANÇAIS
Réseau sans fil du
client
GuestGate MK II
Réseau filaire du
client
- 15 -
Page 16
Installation
Cette méthode d’installation suppose qu’un serveur DHCP se trouve sur votre
réseau.
1. Connexion au réseau hôte
Connectez un câble réseau standard RJ45 au port hôte de GuestGate et à un
port RJ45 sur votre réseau existant (port commutateur Ethernet, port
commutateur du routeur, etc.).
Démarrez GuestGate et vérifiez que la connexion réseau est active (Le DEL
« Host » au GuestGate doit être allumé).
NOTE: La procédure de démarrage dure environ 60 secondes.
2. Connexion des clients
En utilisant un câble réseau standard RJ45, vous pouvez connecter des
ordinateurs, portables, commutateurs Ethernet, hubs Ethernet ou points
d’accès aux ports clients de GuestGate. Chaque port a son propre DEL d’état.
Vérifiez que la connexion réseau est active sur chaque port que vous connectez.
Alternativement que vous pouvez connecter au GuestGate en connectant au
réseau sans fil « GuestGate ».
Commutateur
« Radio
on/off » active
ou désactive la
fonction sans fil
Port hôte -
connectez celui à
votre réseau,
p.ex. au routeur
Bouton reset.
Pressez-le 10
secondes afin
de
réinitialiser
l’appareil
12V DC jack
d’alimentation
Ports clients 1 – 4 pour la
connexion des
commutateurs Ethernet,
points d’accès, ordinateurs
et portables
- 16 -
Page 17

Tester l’accès à l’Internet
Démarrez un ordinateur ou portable qui est connecté à un des ports clients
et démarrez un navigateur Web. Accédez un site Web comme p.ex.
http://www.intellinet-network.com.
Si GuestGate a l’accès à l’Internet, vous voyez l’écran de bienvenue de
GuestGate.
FRANÇAIS
Cliquez sur « continue » et vous serez redirigé vers la page que vous avez
entré dans la barre d’adresse du navigateur Web.
Accéder l’interface Web administrateur du réseau hôte
Accès à l’interface Web administrateur n’est que possible si vous êtes connecté
au GuestGate via le port hôte.
Connectez au routeur (serveur DHCP) sur votre réseau et accédez le fichier
journal DHCP du client du routeur. Connectez le port hôte de GuestGate à un
des ports Ethernet du routeur et démarrez GuestGate. Attendez environ 30
secondes, puis actualisez le fichier journal du routeur. La dernière entrée (la
plus nouvelle) fait partie de GuestGate et affiche son adresse IP.
Démarrez votre navigateur Web et accédez cette adresse. Vous verrez
l’interface Web administrateur.
Le mot de passe par défaut est 1234.
Si cette procédure ne marche pas, vous pouvez configurer votre ordinateur
avec une adresse IP fixe (« statique ») de la portée 192.168.2.xxx.
Déconnectez GuestGate du routeur et connectez votre ordinateur directement
au port hôte. Démarrez GuestGate et attendez environ une minute, puis
accédez l’adresse IP par défaut de GuestGate http://192.168.2.1 avec votre
navigateur Web.
Informations complémentaires
Pour des informations complémentaires sur l’installation, la configuration et les
fonctions de GuestGate, veuillez lire le manuel de l’utilisateur sur le CD fourni
avec cet appareil.
- 17 -
Page 18
HRVATSKI : Sigurnosne i regulatorne obavijesti
kućnu, komercijalnu i laku industrijsku uporabu.
R&TTE suglasnost
Otpad elektroničke opreme
Odlaganje elektroničke i električne opreme
(Prisutno u Europskoj uniji i drugim europskim zemljama s odvojenim
sistemom odlaganja otpada)
resursa. Za više informacija o reciklaži ovog proizvoda, konaktirajte lokalne
vlasti, komunalana poduzeća ili trgovinu gdje ste kupili proizvod. U zemljama
izvan EU: Ako želite odložiti ovaj proizvod, kontaktirajte lokalne vlasti i pitajte
za ispavne mjere odlaganja.
Ova oprema je testirana i testiranjem je utvrđeno da odgovara
limitima klase B digitalnih uređaja te odgovara odjeklju B iz dijela
15 FCC pravilnika, oprema je dizajnirana da osigura zaštitu od
smetnji kada se koristi u komercijalne svrhe.
Uporaba ove opreme u kućnom instalacijama može izazvati
smetnje, u tom slučaju korisnik će, na vlasititi trošak, morati
poduzeti mjere potrebne za popravak nastale štete. Ova digitalna
oprema ispunjava uvjete za emisiju zračenja prema limitima B od
EN55022/1998, i zahtjeve imunosti prema EN55024/1998 za
Ova oprema odgovara svim zahtjevima odredbe 1999/5/EC
europskog parlamenta 9. ožujaka, 1999. radijske i
telekomunikacijske opreme i zajedničko priznanje usklađenosti s
pravilima i standardima (R&TTE).
R&TTE odredba mijenja odredbu 98/13/EEC (telekomunikacijka i
satelitska oprema) 8. travnja, 2000.
Ovaj simbol na proizvodu ili pakiranju označava da se taj proizvod
ne tretira kao kućni otpad. Nego bi trebao biti odnešen na posebno
odlagalište za reciklažu električne i elektroničke opreme.
Osiguravanjem da je oprema odložena ispravno, spriječiti ćete
potencijalne posljedice na okolinu i ljudsko zdravlje, koje bi inače
bilo ugroženo neadekvatnim odlaganjem otpada. Ako oprema
sadrži odvojive baterije ili akumulatore, odvojite ih od uređaja prije
odlaganja. Recikliranje materijala će pomoći pri zaštiti prirodnih
- 18 -
Page 19

Uvod
Hvala što ste odabrali INTELLINET NETWORK SOLUTIONS™ GuestGate MK II
Hotspot Gateway. GuestGate spaja goste na vašu mrežu, omogućujući im
samo pristup Internetu (Web, Email, Chat i drugim aplikacijama). GuestGate
štiti vašu mrežu od neovlaštenog pristupa spojenih gost računala i, ako je
potrebno, štiti gost računala jedna od drugih. Nadalje GuestGate posjeduje
naprednu IP PnP (Plug and Play) tehnologiju: Automatski podešava gostove
računalne TCP/IP postavke, eliminirajući dugotrajne IP klijent
rekonfiguracije. GuestGate se neprimjetno integrira u vašu postojeću mrežu i
u mnogim aplikacijama konfiguracija GuestGate-a nije potrebna. GuestGate
osigurava visoku funkcionalnost vašeg sustava.
Primjer instalacije
Firewall / Gateway
LAN Switcheri
LAN / Host mreža
HRVATSKI
Bežična gost mreža
GuestGate MK II
Žična gost mreža
- 19 -
Page 20

Instalacija
Ova metoga predpostavlja da DHCP server, kao što je ruter, postoji na vašoj
mreži.
1. Spajanje na Host mrežu
Spojite standardni RJ45 mrežni kabel na GuestGate-ov HOST Port i na RJ45
port vaše postojeće mreže (Ethernet switch port, ruter switch port, itd.).
Upalite GuestGate i provjerite da je mrežna konekcija aktivna (HOST LED dioda
mora svijetliti na GuestGate-u).
NAPOMENA: Početni process može trajati do 60 sekundi.
2. Spajanje gostiju
Koristeći standardni RJ45 mrežni kabel možete spojiti PC-e, laptope, ethernet
switchere, hubove ili wireless pristupne točke na Guest portove GuestGate-a.
Svaki port ima svoj vlastiti LED status. Provjerite da li je mrežna konekcija
akitvna na svakom portu koji koristite.
Alternativno na GuestGate se možete spojiti bežično, spajanjem na bežičnu
mrežu naziva “GuestGate.”
Radio on/off
prkidač
omogućuje ili
onemogućuje
bežičnu
funkciju
Host port -
Spojite na vašu
mrežu,
npr., ruter
Reset tipka.
Držite 10
sekundi za
vraćanje na
početne
tvorničke
postavke
12V DC utičnica
za punjač
Gost portovi 1 – 4 za
konekciju LAN switchera,
pristupnih točaka, stolnih i
prijenosnih računala
- 20 -
Page 21
Testranje Internet pristupa
Upalite PC ili Notebook, koji je spojen na jedan od gost portova, i pokrenite
Web preglednik. Otvorite web stranicu kao što je
http://www.intellinet-network.com.
Ako GuestGate ima Internet pristup, vidjet ćete GuestGate početni ekran.
HRVATSKI
Kliknite “continue” i bit ćete preusmjereni na web stranicu koju ste upistali u
adresar web preglednika.
Pristupanje administratorskom web sučelju iz host
mreže
Pristup web administratorskom sučelju moguć je samo preko GuestGate host
porta.
Spojite se na ruter (DHCP server) vaše mreže i otvorite DHCP klijent log rutera.
Spojite GuestGate host port na jedan od ruterskih LAN portova i upalite
GuestGate. Pričekajte 30 sekundi, i osvježite DHCP klijent log rutera. Zadnji
ulaz (najnoviji) pripada GuestGate-u.
Pokrenite web preglednik i otvorite IP adresu prikazanu u DHCP klijent logu.
Tako ćete pristupiti web administratorskom sučelju.
Zadana lozinka je 1234.
Ako ova procedura ne uspije, možete konfigurirati vaš PC preko statične IP
adrese 192.168.2.xxx. Odspojite GuestGate iz rutera i spojite vaše računalo
direktno na host port. Upalite GuestGate i pričekajte jednu minutu, nakon toga
otvorite GuestGate zadanu IP adresu http://192.168.2.1 u web pregledniku.
Dodatne informacije
Za dodatne infomacije o instalacijskom procesu, konfiguraciji i funkcijama
GuestGate-a, molimo pogledajte korisnički priručnik na INTELLINET
instalacijskom CD-u.
- 21 -
Page 22

ITALIANO: Sicurezza e Informazioni Normative
Questa apparecchiatura è stata testata e risulta conforme ai limiti
indicati per periferiche di classe B conformemente al Sottosezione
B della Parte 15 dell’ordinamento FCC, che sono destinate a
si opera in ambienti commerciali. L’impiego si questa apparecchiatura in
un’area residenziale potrebbe causare interferenza, nel qual caso l’utente, a
proprie spese, dovrà approntare le misure necessarie che potrebbero essere
richieste per correggere tali interferenze.
Dichiarazione di conformità R&TTE
ha abrogato e sostituito la Direttiva 98/13/EEC (Apparecchiature Terminali di
Telecomunicazione e Apparecchiature di stazioni terrestri di comunicazione via
satellite) a partire dall’ 8 Aprile 2000.
Smaltimento delle apparecchiature elettriche ed
elettroniche
europei con sistemi di smaltimento differenziato della spazzatura)
Questo simbolo sul prodotto o sul relativo imballo indica che il prodotto, al termine
o accumulatori che possono essere facilmente rimossi, preoccupati di smaltirli
separatamente, in conformità alle norme locali. Il riciclaggio dei materiali aiuterà a
tutelare l’ambiente preservando le risorse naturali. Per ulteriori dettagli in merito allo
smaltimento di questo prodotto, contatta l’ente responsabile o il servizio disposto al
ritiro dei rifiuti domestici della tua città o il rivenditore dove hai acquistato il
prodotto. Nei paesi non appartenenti all’Unione Europea: se desideri buttare questo
prodotto, contatta le autorità locali e chiedi informazione per il corretto smaltimento.
fornire una protezione ragionevole contro tali interferenze quando
Questa apparecchiatura soddisfa i requisiti relativi ai disturbi radio
in accordo alle limitazioni previste per le apparecchiatura di
classe B previsti della Normativa EN55022/1998, e le condizioni di
immunità ai disturbi in conformità alla norma EN55024/1998.
Questa apparecchiatura è conforme a i requisiti richiesti dalla
DIRETTIVA 1999/5/EC del Parlamento Europeo e del Consiglio
emanata il 9 Marzo, 1999, riguardante le apparecchiature radio, le
apparecchiature terminali di telecomunicazione ed il reciproco
riconoscimento della loro conformità (R&TTE). La Direttiva R&TTE
(Applicabile nell’Unione Europea e negli altri paesi
della sua vita, non potrà essere conferito nella spazzatura domestica.
Esso deve essere, invece, conferito presso i punti di raccolta
differenziati per il riciclaggio delle apparecchiature elettriche ed
elettroniche. Assicurandoti che questo prodotto venga smaltito
correttamente, contribuirai a prevenire le possibili conseguenze
negative sull’ambiente e sulla salute umana conseguenti ad un’
inappropriata gestione del rifiuto. Se l’apparecchiatura contiene batterie
- 22 -
Page 23

Introduzione
Complimenti per aver acquistato il GuestGate MK II Hotspot Gateway
INTELLINET NETWORK SOLUTIONS™. Con questa apparecchiatura potete
collegare i vostri ospiti alla rete, permettendo loro l’accesso solamente ad
Internet (Web, E-mail, Chat e altre applicazioni). GuestGate protegge la rete
esistente dagli accessi non autorizzati dei computer degli ospiti collegati e,
se richiesto, permette di proteggere i computer degli ospiti tra loro.
Oltre a ciò le caratteristiche del GuestGate incrementano la tecnologia IP PnP
(Plug and Play): l’apparecchio automaticamente regola il settaggio TCP/IP
del computer dell’ospite, eliminando le perdite di tempo causate dalle reconfigurazioni dei client IP. GuestGate si integra velocemente nella vostra
rete esistente e per molte applicazioni non è necessaria una configurazione del
GuestGate. GuestGate fornisce il massimo delle funzionalità e delle prestazioni
non appena estratto dalla sua confezione.
Esempio di installazione
Firewall / Gateway
ITALIANO
LAN / Host Network
Wireless Guest
Network
LAN Switches
GuestGate MK II
Wired Guest
Network
- 23 -
Page 24

Installazione
Questo metodo di settaggio presume che sia presente nella vostra rete un
Server DHCP, come un router.
1. Collegamento alla rete locale tramite porta Host
Collegate la porta HOST del GuestGate ad una porta RJ45 della vostra rete
esistente (Porta dello switch Ethernet, porta del Router switch, etc.) tramite il
cavo di rete standard RJ45.
Accendete il GuestGate e verificate che la connessione di rete sia attiva (il LED
dell’HOST sul GuestGate deve essere illuminato).
NOTA: Il processo di avvio potrebbe richiedere fino a 60 secondi.
2. Collegamento degli ospiti
Usando un cavo di rete standard RJ45 potete collegare PC, Notebook, Ethernet
Switch, Hub o Punti di accesso Wireless alle Porte Guest del GuestGate.
Ciascuna porta ha il suo LED di stato. Verificare che la connessione di rete sia
attiva su ciascuna porta che viene collegata. Alternativamente vi potete
connettere al GuestGate in modalità senza fili tramite la connessione alla rete
Wireless con il nome di “GuestGate.”
Interruttore
per abilitare
o disabilitare
la funzione
wireless
Porta Host –
Collegare questa alla
vostra rete, per
esempio al router
Tasto reset.
Tenere
premuto per
Porte Ospiti 1-4 per la
connessione di LAN switch,
punti di accesso, desktop PC
e notebook
Connettore per
alimentazione 12 V DC
- 24 -
Page 25

Accesso di prova ad Internet
Avviate un PC o un Notebook, che è stato connesso a una delle porte guest,
lanciate un browser Internet. Quindi aprite un sito Web come
http://www.intellinet-network.com.
Se il GuestGate riesce ad accedere ad Internet, comparirà la pagina di
benvenuto del GuestGate. Cliccate su “continua” e sarete quindi indirizzati
alla pagina Web che originariamente avete richiamato dalla barra degli
indirizzi del Web browser.
ITALIANO
Accesso all’interfaccia web di gestione del GuestGate
L’accesso all’interfaccia di gestione Web è possibile solo quando ci si collega al
GuestGate tramite la porta Host.
Collegate il router (DHCP Server) alla vostra rete e aprite il DHCP client log del
router. Connettete la porta Host del GuestGate a una delle porte LAN del router
e accendere il GuestGate. Attendete circa 30 secondi, e quindi aggiornate il
DHCP client log nel router. L’ultimo inserimento (il più recente) appartiene al
GuestGate.
Lanciate il vostro Web browser e aprite l’indirizzo IP che compare nel DHCP
client log. Ora vedrete l’interfaccia web di gestione.
La password predefinita è 1234.
Se questa procedura non funziona potete configurare il vostro PC con un
indirizzo IP 192.168.2.xxx statico, disconnettere il GuestGate dal router e
collegare il computer direttamente alla porta host. Accendete il GuestGate e
attendete circa un minuto, quindi aprite l’indirizzo IP predefinito
http://192.168.2.1 del GuestGate con il Web browser.
Informazioni aggiuntive
Per ulteriori Informazioni circa la procedura di installazione, la configurazione e
le funzioni del GuestGate, fate riferimento al manuale d’istruzione disponibile
sul CD INTELLINET di installazione.
- 25 -
Page 26

POLSKI: Bezpieczeństwo i normy
Kamery sieciowe IP przeznaczone są do użytku w środowiskach
klasy B. Jednak wyposażenie w pewne funkcje opcjonalne może
spowodować zmianę kategorii urządzenia na klasę A. Aby ustalić
informacji w punktach dotyczących poszczególnych instytucji normalizacyjnych.
Każdy z punktów zawiera informacje dotyczące standardów bezpieczeństwa,
zgodności elektromagnetycznej i zakłóceń elektromagnetycznych,
obowiązujących w poszczególnych krajach.
Niniejsze urządzenie zostało zakwalifikowane do klasy B, zawartej w normie
EN55022/1998, dotyczącej zakłóceń w odbiorze fal radiowych oraz spełnia
normy EN5024/1998, dotyczące charakterystyki odporności sprzętu
komputerowego.
Deklaracja zgodności R&TTE
Pozbycie się zużytego sprzętu
Zagadnienia ochrony środowiska są dla naszej firmy bardzo ważne.
Unia Europejska (UE) opracowała dyrektywę WEEE (on Waste Electrical
and Electronic Equipment – o zużytym sprzęcie elektronicznym), aby
zapewnić wdrożenie jednolitych systemów zbiórki, przeróbki i
recyklingu odpadów elektronicznych w całej Unii Europejskiej.
Intellinet Network Solutions przestrzega postanowień dyrektywy WEEE
ze sprzętu elektrycznego i elektronicznego. Osobna zbiórka oraz recykling
zużytego sprzętu pomogą w ochronie zasobów naturalnych i zapewnią ponowne
wprowadzenie go do obiegu w sposób chroniący zdrowie człowieka i
środowisko. Aby uzyskać więcej informacji o tym, gdzie można przekazać
zużyty sprzęt do recyklingu, należy się skontaktować z urzędem miasta,
zakładem gospodarki odpadami lub sklepem, w którym zakupiono produkt.
Intellinet Network Solutions finansuje przetwarzanie i recykling odpadów
zwracanych w wyznaczonych punktach zbiórki.
klasyfikację elektromagnetyczną urządzenia, należy szukać
Urządzenie pracuje zgodnie z wymaganiami zawartymi w
dyrektywie europejskiej opisującej urządzenia radiowe, terminale
telekomunikacyjne oraz ich wzajemne rozpoznawanie i zgodność
(Dyrektywa 1999/5/CE wydana przez Parlament Eurepjski oraz
Radę Europy).
oraz ustawodawstwa obowiązującego w Polsce.
Ten symbol na produkcie lub jego opakowaniu oznacza, że produktu
nie wolno wyrzucać do zwykłych pojemników na odpady.
Obowiązkiem użytkownika jest przekazanie zużytego sprzętu do
wyznaczonego punktu zbiórki w celu recyklingu odpadów powstałych
- 26 -
Page 27

Wprowadzenie
Gratulujemy zakupu bramki Hotspot GuestGate MK II INTELLINET NETWORK
SOLUTIONS™. Bramka GuestGate umożliwia podłączenie użytkowników-
gości do istniejącej sieci, zapewniając im dostęp jedynie do Internetu (www,
Email, czat itp.), chroniąc jednocześnie zasoby lokalne przed niepowołanym
dostępem, a w razie konieczności izolując również komputery
użytkowników-gości od siebie. Ponadto GuestGate korzystając z techologii IP
PnP (Plug and Play) automatycznie przydziela ustawienia TCP/IP
podłączonym komputerom eliminując konieczność konfiguracji od strony
klienta. GuestGate nie wymaga praktycznie żadnej konfiguracji, dzięki
czemu jest gotowy do użycia od razu po wyjęciu z pudełka.
Przykład instalacji
Firewall / Router
Przełączniki LAN
Sieć LAN / Host
POLSKI
Użytkownicy
bezprzewodowi
GuestGate MK II
Użytkownicy
przewodowi
- 27 -
Page 28

Instalacja
Opisana poniżej metoda instalacji wymaga, aby w sieci lokalnej działał aktywny
serwer DHCP, np. w routerze.
1. Podłączenie do sieci Hosta
Standardowym kablem Ethernet RJ45 podłącz GuestGate’a przez port HOST do
wolnego portu RJ45 w Twojej sieci (w switchu, routerze itp.).
Włącz GuestGate’a i sprawdź czy połączenie jest aktywne (dioda HOST
urządzenia powinna się zaświecić).
UWAGA: Proces uruchamiania urządzenia może zająć około 60 sekund.
2. Podłączanie użytkowników
Używając standardowych kabli Ethernet RJ45 możemy podłączyć do portów
użytkowników GuestGata’a komputery PC, notebooki, przełączniki Ethernet lub
bezprzewodowe punkty dostępowe. Każdy port posiada własną diodę statusu,
która informuje czy na danym porcie jest aktywne połączenie.
Do GuestGate’a możemy również podłączyć się bezprzewodowo – domyślne
SSID sieci bezprzewodowej urządzenia to „GuestGate”.
Radio on/off.
Wyłącznik
mudułu
radiowego.
Port Hosta -
do podłączenia
Twojej sieci
Przycisk
“Reset”.
Wciśnij i
przytrzymaj
przez około 10
sekund aby
przywrócić
ustawienia
domyślne
Złącze zasilania
12V DC
Porty użytkowników 1 – 4
do podłączenia komputerów,
notebooków, przełączników
LAN, access pointów itp
- 28 -
Page 29

Sprawdzanie połączenia Internetowego
Uruchom przegladarkę internetową na komputerze podłączonym do portu
użytkownika GuestGate’a. Następnie wpisz adres dowolnej strony www, np.
http://www.intellinet-network.com.
Jeśli GuestGate ma połączenie z Internetem, powinna pojawić się strona
powitalna.
POLSKI
Klinkij „continue” aby przejść do wybranej strony www.
Dostęp do interfejsu administratora z sieci Hosta
Dostęp do interfejsu administratora urządzenia możliwy jest jedynie z
komputerów podłączonych przez port HOST.
Zaloguj się na router (z aktywnym serwerem DHCP) w Twojej sieci lokalnej i
otwórz tablicę logów klientów DHCP. Podłącz GuestGate’a poprze port Host do
jednego z portów LAN routera i włącz zasilanie urządzenia. Po około 30
sekundach odśwież tablicę logów DHCP routera. Najnowszy wpis będzie
odpowiadał adresowi IP GuestGate’a.
Uruchom przeglądarkę i wpisz adres IP GuesGate’a. Pojawi się ekran logowania
do interfejsu administratora.
Domyślne hasło to 1234.
Jeśli powyższa procedura się nie powiedzie, skonfiguruj kartę sieciową
komputera wpisując statyczny adres IP z podklasy 192.168.2.xxx. Odłącz
GuestGate’a od routera i podłącz bezpośrednio do karty sieciowej komputera.
Włącz zasilanie GuestGate’a i odczekaj około 60 sekund. Następnie uruchom
przeglądarkę i wpisz domyślny adres IP GuestGate’a http://192.168.2.1.
Dodatkowe informacje
Aby uzyskać dodatkowe informacje na temat procesu instalacji, konfiguracji
oraz funkcji GuestGate’a, proszę zapoznać się z pełną instrukcją użytkownika
zamieszczoną na płycie CD.
- 29 -
Page 30

SLOVENSKY: Bezpečnostné a regulačné
upozornenia
Toto zariadenie bolo testované a uznané za vyhovujúce limitmi
pre Triedu B výpočtových zariadení v súvislosti s Podčasťou B
primeranú ochranu proti rušeniu, keď je zariadenie prevádzkované
v komerčnom prostredí. Prevádzka zariadenia v obytnej zóne môže spôsobovať
rušenie a v takomto prípade je užívateľ povinný na svoje vlastné náklady prijať
všetky opatrenia, ktoré by rušenie napravili.
R&TTE Vyhlásenie o zhode
staníc) s platnosťou od 8. apríla 2000.
Odpad elektrických & elektronických zariadení
Likvidácia elektrických a elektronických zariadení
(Platné v Európskej únii a v ďalších európskych krajinách so
zavedeným separovaným zberom)
akumulátory, likvidujte ich oddelene podľa miestnych požiadaviek. Recykláciou
materiálov pomôžete zachovávať prírodné zdroje. Pre podrobnejšie informácie
o recyklácii tohto výrobku, kontaktujte príslušný miestny obecný úrad, podniky
komunálnych služieb alebo obchod, v ktorom ste si zakúpili tento produkt.
V krajinách mimo EÚ: Ak chcete odstrániť tento produkt, obráťte sa na
príslušné miestne úrady a informujte sa o správnom spôsobe likvidácie.
Časti 15 FCC pravidiel, ktoré sú navrhnuté tak, aby poskytovali
Toto digitálne zariadenie spĺňa požiadavky pre radiačné žiarenie
v súvislosti s limitom B z EN55022/1998 a požiadavky pre
odolnosť v súvislosti s EN55024/1998 obytného, obchodného
a ľahkého priemyslu.
Toto zariadenie vyhovuje všetkým požiadavkám SMERNICE
1999/5/EC EURÓPSKEJ RADY A PARLAMENTU z 9. marca 1999
o rádiových zariadeniach a koncových telekomunikačných
zariadeniach a vzájomnom uznávaní ich zhody (R&TTE). R&TTE
smernica ruší a nahrádza Smernicu 98/13/EEC (Koncové
telekomunikačné zariadenia a zariadenia družicových pozemských
Tento symbol na produkte alebo jeho balení naznačuje, že sa
s produktom nesmie zaobchádzať ako s domácim odpadom.
Namiesto toho by malo byť zariadenie vzaté do zberného miesta
pre recykláciu elektrických a elektronických zariadení.
Zabezpečením správnej likvidácie napomáhate odstraňovať
negatívne vplyvy na prostredie a ľudské zdravie, ktoré by mohli byť
spôsobené nevhodnou likvidáciou tohto výrobku. Pokiaľ vaše
zariadenie obsahuje jednoducho odnímateľné batérie alebo
- 30 -
Page 31
Úvod
Gratulujeme vám k zakúpeniu INTELLINET NETWORK SOLUTIONS
GuestGate™ MK II Hotspot brány. GuestGate pripája klientské zariadenia k
vašej sieti a umožňuje im pristupovať iba k Internetu (Web, Email, Chat
a ďalšie aplikácie). GuestGate chráni vašu existujúcu sieť pred
neoprávneným prístupom pripojených klientských počítačov a ak je to
potrebné, dokonca chráni klientské počítače medzi nimi samými. GuestGate
ďalej disponuje vylepšenou IP PnP (Plug and Play) technológiou:
Automaticky upraví TCP/IP nastavenia počítačov a tým skráti dobu potrebnú
pre rekonfigurovanie IP klientov. GuestGate sa hladko integruje do vašej
existujúcej siete a v mnohých aplikáciách (riešeniach) nie je konfigurácia
GuestGate vôbec nutná. GuestGate poskytuje základnú funkcionalitu ihneď po
vybalení z obalu.
Príklad inštalácie
Firewall / Brána
SLOVENSKY
Sieť LAN / “HOST”
Bezdrôtová sieť
„HOST“
LAN prepínače
GuestGate MK II
Káblová sieť
„HOST“
- 31 -
Page 32

Inštalácia
Pri tomto spôsobe inštalácie sa predpokladá, že je vo vašej sieti prítomný DHCP
server, napríklad router.
1. Pripojenie k sieti hosta
Pripojte štandardný RJ45 sieťový kábel ku HOST portu zariadenia GuestGate
a ku RJ45 portu vo vašej existujúcej sieti (port prepínača Ethernetu, port
prepínača routera, atď.).
Zapnite GuestGate a presvedčte sa, že je sieťové pripojenie aktívne (na
GuestGate musí svietiť HOST LED).
POZNÁMKA: Proces spustenia môže trvať až do 60 sekúnd.
2. Pripojenie hostí
Použitím štandardného RJ45 sieťového kábla môžete ku portom 1 až 4 na
GuestGate pripojiť počítače, notebooky, ethernetové switche, rozbočovače
alebo bezdrôtové prístupové body. Každý z portov má svoju vlastnú LED,
zobrazujúcu aktuálny stav. Presvedčte sa, že je sieťové spojenie aktívne na
každom pripojenom porte.
Alternatívou je pripojenie sa ku GuestGate bezdrôtovo, pripojením sa
k bezdrôtovej sieti s názvom “GuestGate”.
Prepínač
zapnutia/vypnutia
vysielania
povoľuje alebo
zakazuje funkciu
bezdrôtového
vysielania
„HOST“ port -
Tento pripojte ku
vašej sieti, napr.
ku routeru
Tlačidlo Reset.
Pre obnovenie
predvolených
nastavení
výrobcu podržte
tlačidlo po dobu
10 sekúnd.
Vstupný 12V DC
konektor
napájania
Klientské porty 1 – 4
pre pripojenie LAN
prepínačov,
prístupových bodov,
stolových počítačov
a notebookov
- 32 -
Page 33
Testovanie prístupu k Internetu
Zapnite PC alebo notebook, ktorý je pripojený ku jednému z klientských
portov a spustite webový prehliadač. Potom otvorte web stránku, napríklad
http://www.intellinet-network.com.
Ak má GuestGate prístup k Internetu, zobrazí sa vám uvítacia stránka
GuestGate.
SLOVENSKY
Stlačte “Continue” (“Pokračovať”) a následne budete presmerovaní na webovú
stránku, ktorú ste pôvodne zadali do riadku adresy webového prehliadača.
Prístup ku webovému rozhraniu administrátora zo siete
hosta
Prístup ku webovému rozhraniu administrátora je možný iba v prípade, že sa
pripájate ku GuestGate cez port s označením „HOST“.
Pripojte sa ku routeru (DHCP serveru) vo vašej sieti a otvorte log DHCP klienta
routra. Pripojte GuestGate cez „HOST“ port ku jednému z LAN portov routera
a zapnite GuestGate. Počkajte približne 30 sekúnd a potom obnovte log DHCP
klienta. Posledný údaj (najnovší) patrí ku GuestGate.
Spustite váš webový prehliadač a otvorte IP adresu zobrazenú v logu DHCP
klienta. Následne sa vám zobrazí webové rozhranie administrátora.
Prednastavené heslo je 1234.
Ak tento postup nefunguje, môžete nastaviť PC so statickou adresou
192.168.2.xxx, odpojte GuestGate od routera a pripojte váš počítač priamo do
„HOST“ portu. Zapnite GuestGate a počkajte približne jednu minútu, následne
otvorte vo webovom prehliadači predvolenú IP adresu GuestGate
http://192.168.2.1.
Ďalšie informácie
Pre ďalšie informácie týkajúce sa inštalačného procesu, konfigurácie a funkcií
GuestGate, sa prosíme obráťte na užívateľský manuál na INTELLINET
inštalačnom CD.
- 33 -
Page 34

WARRANTY INFORMATION
Deutsch Garantieinformationen finden Sie hier unter
English For warranty information, go to
Español Si desea obtener información sobre la garantía, visite
Français Pour consulter les informations sur la garantie, rendezvous à
Italiano Per informazioni sulla garanzia, accedere a
Polski Informacje dotyczące gwarancji znajdują się na stronie
www.intellinet-network.com/warranty.
México Poliza de Garantia INTELLINET — Datos del importador y
responsable ante el consumidor IC Intracom México, S.A. de C.V. • Av.
Interceptor Poniente # 73, Col. Parque Industrial La Joya, Cuautitlan Izcalli,
Estado de México, C.P. 54730, México. • Tel. (55)1500-4500
La presente garantía cubre los siguientes productos contra cualquier defecto de
fabricación en sus materiales y mano de obra.
A. Garantizamos cámaras IP y productos con partes moviles por 3 años.
B. Garantizamos los demas productos por 5 años (productos sin partes
moviles), bajo las siguientes condiciones:
1. Todos los productos a que se refiere esta garantía, ampara su cambio físico,
sin ningún cargo para el consumidor.
2. El comercializador no tiene talleres de servicio, debido a que los productos
que se garantizan no cuentan con reparaciones, ni refacciones, ya que su
garantía es de cambio físico.
3. La garantía cubre exclusivamente aquellas partes, equipos o sub-ensambles
que hayan sido instaladas efábrica y no incluye en ningún caso el equipo
adicional o cualesquiera que hayan sido adicionados al mismo por el usuario o
distribuidor.
Para hacer efectiva esta garantía bastara con presentar el producto al
distribuidor en el domicilio donde ue adquirido o en el domicilio de IC Intracom
México, S.A. de C.V., junto con los accesorios contenidos n su empaque,
acompañado de su póliza debidamente llenada y sellada por la casa vendedora
indispensable el sello y fecha de compra) donde lo adquirió, o bien, la factura o
ticket de ompra original donde se mencione claramente el modelo, numero de
serie (cuando aplique) yfecha de adquisición. Esta garantia no es valida en los
siguientes casos: Si el producto se hubiese tilizado en condiciones distintas a
las normales; si el producto no ha sido operado conforme a los nstructivos de
uso; ó si el producto ha sido alterado o tratado de ser reparado por el
consumidor ó erceras personas.
www.intellinet-network.com/warranty.
www.intellinet-network.com/warranty.
www.intellinet-network.com/warranty.
l’adresse www.intellinet-network.com/warranty.
www.intellinet-network.com/warranty.
- 34 -
Page 35

- 35 -
Page 36

INTELLINET NETWORK SOLUTIONS™ offers a complete line
of active and passive networking products.
Ask your local computer dealer for more information or visit
www.intellinet-network.com
Copyright © INTELLINET NETWORK
All products mentioned are trademarks or registered trademarks of their
respective owners.
SOLUTIONS
 Loading...