

Intellinet 550987 QUICK INSTALL GUIDE [ml]
Kurzanleitung
DEUTSCH
Quick Install Guide
Guía de instalación
rápida ESPAÑOL
Guide de demarrage
rapide FRANÇAIS
instalaciju HRVATSKI
guida all’installazione
rapida ITALIANO
Instrukcja szybkiej
instalacji POLSKI
Sprievodca rýchlou
inštaláciou SLOVENSKY
ENGLISH
upute za brzu
DEUTSCH
Sicherheits- und Rechtshinweise
Dieses Gerät wurde geprüft und entspricht den Bestimmungen
für ein digitales Gerät der Klasse B gemäß Teil 15 der FCCSchutz vor schädlichen Störungen beim Betrieb des Geräts in
Beim Betrieb dieses Geräts in Wohngebieten sind Interferenzen wahrscheinlich.
In diesem Fall muss der Nutzer die Interferenzen auf eigene Kosten beseitigen.
R&TTE-Konformitätserklärung
Die R&TTE-Richtlinie ersetzt seit dem 08. April 2000 die Richtlinie 98/13/EEC
und hebt diese auf.
Elektro- & Elektronik-Altgeräte
Entsorgung von Elektro- und Elektronik-Geräten
(Anwendbar in der Europäischen Union und anderen europäischen
Ländern mit getrennten Sammelsystemen)
lokalen Bestimmungen Ihres Wohnorts. Das Materialrecycling trägt zur
Bewahrung natürlicher Rohstoffe bei. Für weitere Informationen über das
Recycling dieses Produkts wenden Sie sich an das zuständige Amt Ihrer Stadt,
Ihren lokalen Abfallbeseitigungsdienst oder den Händler, bei dem Sie dieses
Produkt erworben haben. Für Länder außerhalb der EU: Möchten Sie dieses
Produkt entsorgen, wenden Sie sich an Ihre lokalen Behörden und erkundigen
Sie sich über die ordnungsgemäße Art der Entsorgung.
Gewerbegebieten.
Dieses digitale Gerät erfüllt die Anforderungen zu
Strahlenausstoß gemäß Grenzwert B EN55022/1998 und die
Anforderungen zu Störfestigkeitseigenschaften gemäß
EN55024/1998 in Wohn-, Gewerbe, und
Leichtindustriegebieten.
Diese Anlage entspricht allen Anforderungen der Richtlinie
1999/5/EG des Europäischen Parlaments und des Rates vom 09.
März 1999 über Funkanlagen und
Telekommunikationsendeinrichtungen und die gegenseitige
Anerkennung ihrer Konformität (R&TTE).
Dieses Symbol auf dem Produkt oder der Verpackung bedeutet,
dass das Produkt nicht als Hausmüll zu behandeln ist.
Stattdessen sollte es zu einer geeigneten Rücknahmestelle zum
Recycling von Elektro- und Elektronik-Geräten gebracht werden.
Durch die Sicherstellung der ordnungsgemäßen Entsorgung, tragen
Sie dazu bei, negative Einflüsse auf Umwelt und Gesundheit zu
vermeiden. Wenn Ihr Gerät einfach zu entfernende Batterien oder
Akkus enthält, entsorgen Sie diese separat entsprechend der
- 2 -
Mit der Kamera verbinden
Verbinden Sie den LAN-Anschluss über das RJ45-Netzwerkkabel mit Ihrem
Netzwerk; z. B. dem Router oder einem LAN-Switch, und schalten Sie dann
die Kamera ein. Der Startvorgang dauert ca. eine Minute. Zur
Stromversorgung müssen Sie das mitgelieferte Netzteil verwenden, es sei
denn, Ihr Kameramodell unterstützt PoE. In diesem Fall können Sie das
RJ45-Kabel einfach mit einem PoE-fähigen Switch oder Injektor verbinden,
um die Kamera mit Strom zu versorgen.
Standardmäßig sucht die Netzwerkkamera (oder der Videoserver) im
Netzwerk nach einem DHCP-Server und bekommt automatisch eine IP
Adresse zugewiesen. In den meisten Netzwerken dient ein Router als DHCPServer.
Ein DHCP-Server in Ihrem Netzwerk vereinfacht die Installation enorm. Selbst
Nutzer mit geringen TCP/IP-Netzwerkkenntnissen können eine Netzwerkkamera
in wenigen Minuten installieren. Sollte kein DHCP-Server gefunden werden,
wird die Kamera auf ihre Standard-IP-Adresse gesetzt: 192.168.1.221.
Auf Windows-Systemen empfiehlt sich die Nutzung der IP-Installer-Software
zur Identifikation der Kamera im Netzwerk und ihrer Konfiguration.
Ist die Kamera einmal korrekt eingerichtet, kann einfach mit dem
Internetbrowser des Computers auf sie zugegriffen werden. Der folgende
Abschnitt beschreibt diesen Vorgang auf Windows, MacOS und Linux.
Windows XP, Vista und Windows 7
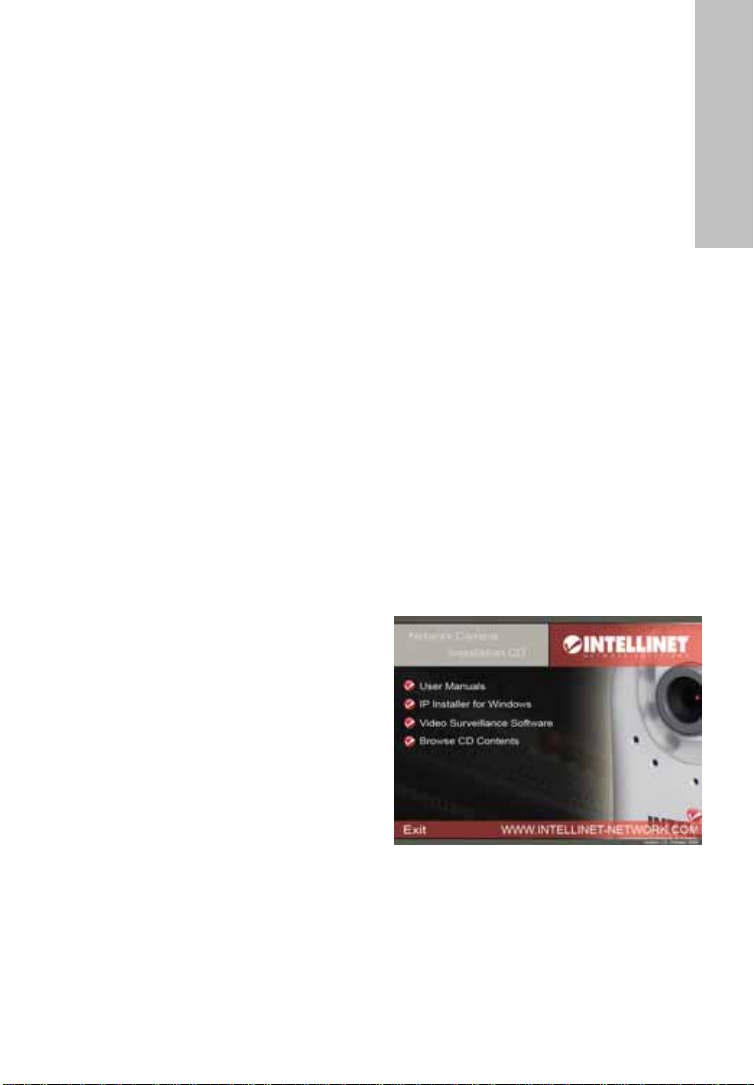
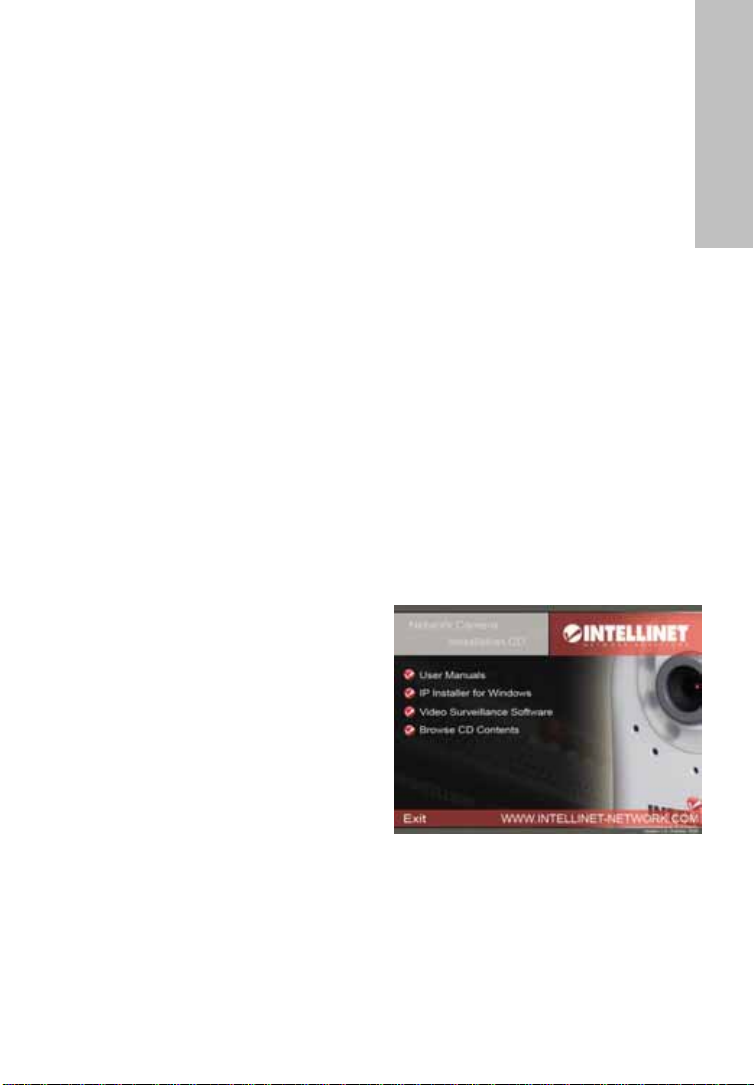
Legen Sie die Installations-CD in Ihr
CD/DVD-Laufwerk ein. Nach einigen
Augenblicken startet die CD
automatisch und zeigt das rechts
abgebildete Fenster an. Sollte dies
nicht der Fall sein, durchsuchen Sie mit
Ihrem Windows Explorer die CD nach
der Datei autorun.exe, und starten Sie
diese.
User Manuals [Handbücher]
1.
Das Handbuch der INTELLINET NETWORK SOLUTIONS Netzwerkkamera
befindet sich in mehreren Sprachen auf der Installations-CD.
Falls die Abbildungen im Handbuch nicht mit denen auf Ihrem Bildschirm
übereinstimmen, empfehlen wir Ihnen das Handbuch der CD zu nutzen, da
es möglicherweise aktueller ist, als die gedruckte Version.
DEUTSCH
- 3 -
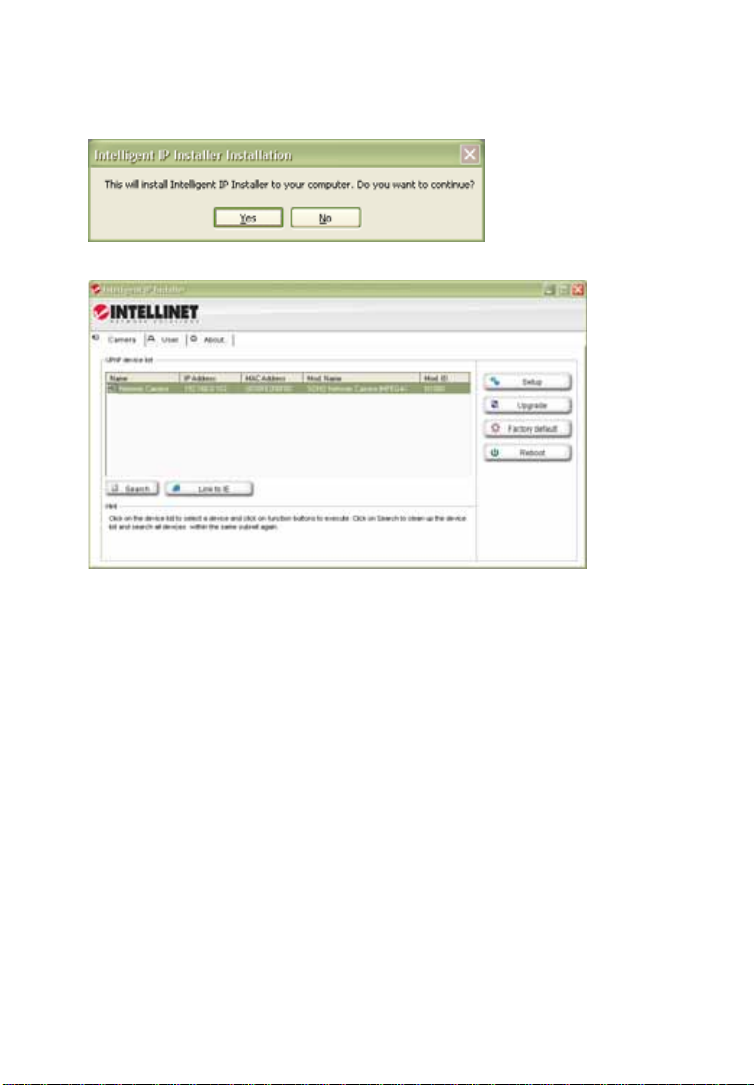
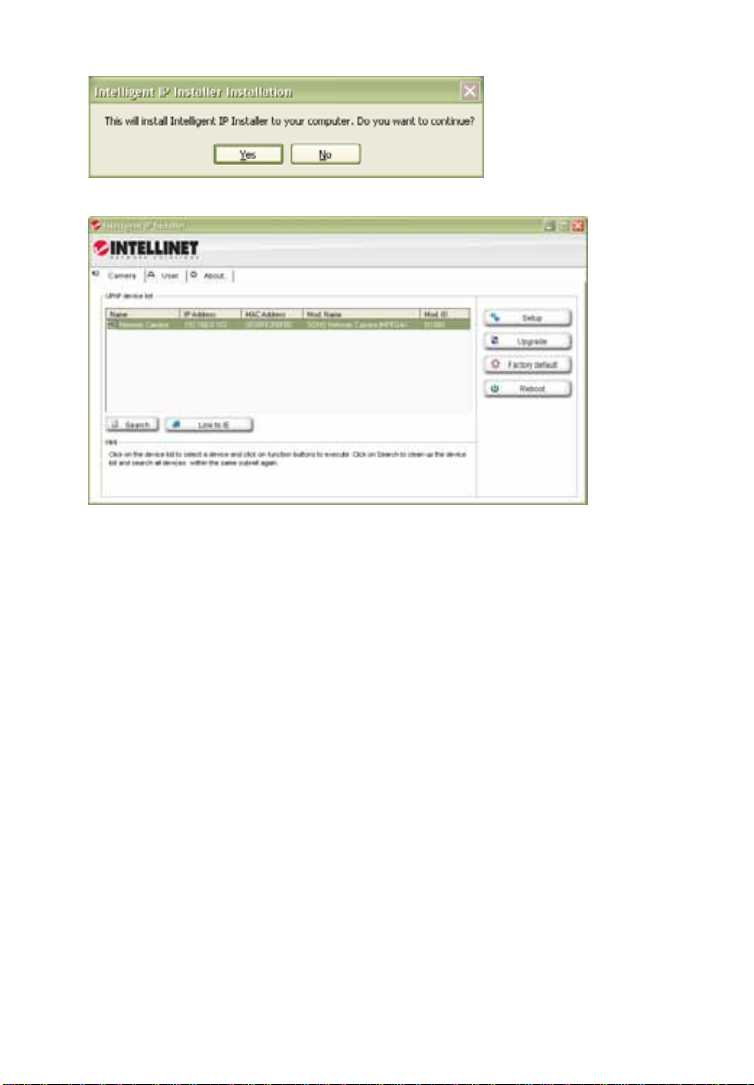
2. IP Installer for Windows
Diese Software dient der Identifikation der Kamera im Netzwerk und ihrer
Identifikation.
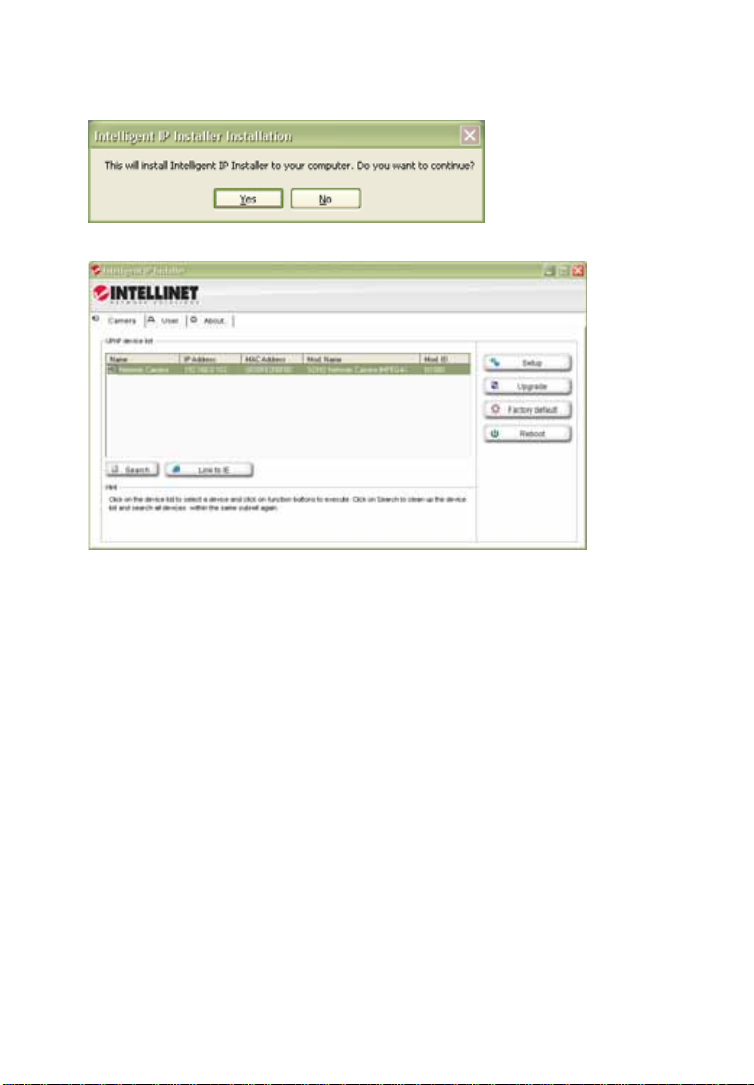
Klicken Sie auf “Yes”, um die Installation zu starten.
Bei Programmstart wird obiges Fenster eingeblendet. Die IP-InstallerSoftware listet alle Kameras auf, die in Ihrem Netzwerk gefunden werden
konnten. Mit dieser Software können Sie Einstellungen ändern, die
Firmware aktualisieren, auf die Werkseinstellungen der Kamera
zurücksetzen und die Kamera neu starten. Hinweis: Es kann bis zu drei
Minuten dauern, bis der IP Installer eine Kamera anzeigt, die gerade
(neu)gestartet wurde.
Für genauere Hinweise zur Einrichtung der Kamera, lesen Sie bitte das
Handbuch auf der Installations-CD.
3. Video Surveillance Software [Videoüberwachungssoftware]
Um den 16-Kanal-NVR (Netzwerk-Videorekorder) zu nutzen, lesen Sie bitte
das Handbuch auf der Installations-CD.
MacOS
Für die Installation auf Apple-Systemen mit MacOS X wird die Installations-CD
nicht benötigt. Die INTELLINET NETWORK SOLUTIONS Netzwerkkamera
unterstützt Apples „Bonjour“-Dienst.
Öffnen Sie den Safari-Browser und dort die Favoritenleiste, wo Sie die BonjourVerknüpfung finden.
- 4 -

Die Netzwerkkamera wird in der
Kategorie Webseiten angezeigt. Zur
Verbindung mit der Kamera,
doppelklicken Sie einfach auf den
eingekreisten Link. Safari verbindet
sich dann mit der Kamera und Sie
erhalten evtl. folgende Meldung:
„Applet von „xxxxx“ fordert
uneingeschränkten Zugriff auf Ihren
Computer“.
Klicken Sie auf „Zulassen“ worauf
Ihnen das Live-Bild der Kamera wenige
Augenblicke später angezeigt wird.
Für genauere Hinweise zur Einrichtung
Handbuch auf der Installations-CD.
Linux
Für die Installation auf Linux-Systemen wird keine spezielle Software benötigt.
Die Netzwerkkamera ist kompatibel zu Internetbrowsern wie Firefox und
Konqueror.
Für die erste Installation müssen Sie die IP-Adresse der Kamera einrichten.
Standardmäßig erhält die Kamera ihre IP-Adresse von einem DHCP-Server im
Netzwerk (z. B. einem Router). Sie können auf die Kamera zugreifen, nachdem
Sie die IP-Adresse der Kamera aus dem „DHCP Client Log“ des DHCP- Servers
erhalten haben. Alternativ können Sie auch Bonjour (mDNSResponder)
benutzen, das ebenfalls für Linux verfügbar ist.
Sollte sich in Ihrem Netzwerk kein DHCP-Server befinden, erhält die Kamera
standardmäßig die IP-Adresse 192.168.1.221. Um auf die Kamera zugreifen zu
können, müssen Sie die IP -Einstellungen Ihres Systems manuell anpassen.
Stellen Sie die IP-Adresse so ein, dass Sie sich im Adressbereich von
192.168.1.xxx (wobei xxx nicht 221 sein darf) befinden. Öffnen Sie danach
Ihren Browser und verbinden Sie sich mit der Adresse http://192.168.1.221.
Melden Sie sich auf der Kamera an und klicken Sie auf “Settings“
[Einstellungen], um das Administratormenü zu öffnen. Weitere Informationen
zu den Einstellungen finden Sie im Kapitel 5.2. des Handbuchs.
Hardware-Installation und weitere Informationen
Für weitere Informationen zu Installation, Konfigurierung und Funktionen der
Kamera oder dem Netzwerk-Videoserver, lesen Sie bitte das Handbuch auf der
INTELLINET Installations-CD.
der Kamera, lesen Sie bitte das
DEUTSCH
- 5 -
ENGLISH
Safety and Regulatory Notices
commercial environment.
EN55022/1998, and the requirements for immunity according to EN55024/1998
residential, commercial and
R&TTE Compliance Statement
Earth Station Equipment) as of April 8, 2000.
Waste Electrical & Electronic Equipment
Disposal of Electric and Electronic Equipment
(Applicable in the European Union and other European countries with
separate collection systems)
batteries or accumulators, dispose of these separately according to your local
requirements. The recycling of materials will help to conserve natural
resources. For more detailed information about recycling of this product,
contact your local city office, your household waste disposal service or the shop
where you purchased this product. In countries outside of the EU: If you wish
to discard this product, contact your local authorities and ask for the correct
manner of disposal.
This equipment has been tested and found to comply with the
limits for a Class B computing device pursuant to Subpart B of
Part 15 of FCC rules, which are designed to provide reasonable
protection against such interference when operated in a
Operation of this equipment in a residential area is likely to
cause interference, in which case the user, at his own expense,
will be required to take whatever measures may be required to
correct the interference. This digital equipment fulfills the
requirements for radiated emission according to limit B of
light industry.
This equipment complies with all the requirements of DIRECTIVE
1999/5/EC OF THE EUROPEAN PARLIAMENT AND THE COUNCIL of
March 9, 1999, on radio equipment and telecommunication
terminal equipment and the mutual recognition of their conformity
(R&TTE). The R&TTE Directive repeals and replaces Directive
98/13/EEC (Telecommunications Terminal Equipment and Satellite
This symbol on the product or its packaging indicates that this
product shall not be treated as household waste.
Instead, it should be taken to an applicable collection point for the
recycling of electrical and electronic equipment. By ensuring this
product is disposed of correctly, you will help prevent potential
negative consequences to the environment and human health,
which could otherwise be caused by inappropriate waste handling
of this product. If your equipment contains easily removable
- 6 -

Connecting to the Camera
Connect the RJ45 network cable from the camera’s LAN port to your
network; e.g., the router or a LAN switch, then power on the camera. The
boot sequence will take about one minute. You will need to use the camera’s
power adapter, unless your camera supports PoE. In that case you can
connect the RJ45 cable to a PoE-enabled switch or injector to power the
camera.
By default, the network camera (or video server) searches for a DHCP server
on the network and obtains an IP address automatically. A very common
DHCP server is a router, a device that is found on most networks.
The presence of a DHCP server on your network simplifies the installation and
users with limited knowledge of TCP/IP networks can install the network
camera in minutes. If no DHCP server is found, the network camera will revert
to its default IP address: 192.168.1.221.
On Windows systems, you want to use the IP Installer utility that finds the
camera on the network and lets you make changes to the configuration.
Once the camera is set up properly, it can be accessed with the computer’s
Web browser. The following sections describe the procedure for Windows,
MacOS and Linux users.
Windows XP, Vista and Windows 7
Insert the Installation CD into the CD
or DVD drive. After a few moments, the
CD will automatically start and display
the screen to the right. If that does not
happen, you need to browse the CD
with Windows Explorer and double-click
the autorun.exe file.
1. User Manuals
The user manual for the
INTELLINET NETWORK SOLUTIONS Network Camera is available in
electronic form on the installation CD, along with user manuals in different
languages.
If you encounter differences between the screen shots shown in the user
manual and the actual screen contents, it is recommended that you open
the manual from the CD, as it may be a newer edition than the printed
version.
ENGLISH
- 7 -
2. IP Installer for Windows
This utility is designed to find the network camera on your network and lets
you make changes to the configuration.
Click on “Yes” to begin the installation.
When the program starts, you are presented with the screen shown above.
The IP Installer utility lists all cameras that can be found on your network.
With this utility you can make changes to the configuration, perform a
firmware upgrade, restore the camera to factory default values, and reboot
the camera. Note: It may take up to three minutes for IP Installer to show
a camera that has been recently (re-)started.
Refer to the user manual for more detailed instructions on the camera
setup.
3. Video Surveillance Software
Refer to user manual on the CD for the 16-channel NVR (network video
recorder).
MacOS
The installation on Apple systems running MacOS X does not involve the
INTELLINET installation CD. The INTELLINET NETWORK SOLUTIONS network
camera supports Apple’s Bonjour service.
Open the Safari Web browser and open the Bookmarks toolbar, where you will
find the Bonjour link.
- 8 -

The Network Camera is shown in
the category Webpages. In order to
connect to the camera, double-click
the circled link.
Safari then connects to the camera
and a message may appear: “An
applet from “xxxxx” is requesting
unrestricted access to your
computer.”
Click on “Allow” and you will see the
camera live image a few moments
later.
Refer to the user manual for more
detailed instructions on the camera
setup.
Linux
The installation on Linux systems does not require any special software. The
network camera is compatible to Web browsers such as Firefox and Konqueror.
The initial installation requires the setup of the camera’s IP address. As the
camera by default obtains an IP address from a DHCP server in the network
(e.g., a router), you can access the camera as soon as you have obtained the
IP address from the router’s DHCP client log. Alternatively, you may use
Bonjour (mDNSResponder), which is also available for Linux.
If no DHCP server is connected to your network, the camera reverts to its
default IP address: 192.168.1.221. In order to gain access to the camera, you
need to change the IP settings of your system manually. Set up the IP address
to be in range of 192.168.1.xxx (where xxx is not 221). Then open your Web
browser and connect to address http://192.168.1.221. Log in to the camera
and click on the Settings link to open the administrator menu. Refer to section
5.2 Settings Page in the user manual for more details.
Hardware Installation and Additional Information
For additional information about the installation process, the configuration and
functions of the camera or network video server, please refer to the user
manual on the INTELLINET installation CD.
ENGLISH
- 9 -
ESPAÑOL
Avisos de Seguridad y Regulatorios
Este equipo ha sido probado y se encontró que cumple con los límites
establecidos para los dispositivos de cómputo Clase B según lo acordado en la
Sub-parte B de la Parte 15 de las reglas de la FCC, la cual está diseñada para
operadas en un ambiente comercial. La operación de este equipo en un área residencial es
probable que cause cierta interferencia, en tal caso el usuario, según su experiencia,
Declaración de Conformidad R&TTE
Desperdicios de Equipo Eléctrico y Electrónico
Eliminación de Equipo Eléctrico y Electrónico
(Válido en la unión europea y en otros países europeos con sistemas de
recolección por separado)
Este símbolo en el producto en su empaque indica que éste no deberá ser tratado como un
producto. Si su equipo contiene baterías o acumuladores fáciles de remover, deséchelos
por separado de acuerdo a las leyes de su localidad. El reciclado de los materiales ayudará
a conservar los recursos naturales. Para mayor información acerca del reciclado de los
materials de este producto, póngase en contacto con su oficina local en su ciudad, el
servicio de limpia o en donde ha comprador este equipo. En países fuera de los EE. UU.: Si
desea desechar este producto, póngase en contacto con sus autoridades locales y pregunte
por la forma correcta de manejar éstos residuos.
Advertencias
No exponga el producto a:
a)Instalaciones inadecuadas, servicios o alteraciones, uso de suministros o partes que no
cumplan nuestras especificaciones, modificaciones no autorizadas.
b)Uso inapropiado, desastres y accidentes, incluyendo fuego, agua, truenos, rayos,
descargas eléctricas, variaciones en el voltaje, golpes accidentales o intencionales y otros
factores naturales similares o análogos.
No se cubren afectaciones que ocurran durante el traslado al domicilio donde va hacer
efectiva la garantía, perdida de datos, pérdida de tiempo, afectaciones en software,
perdida de ventas o utilidades, perdidas cubiertas por su aseguradora, costos y gastos
operativos, averías incidentales o de consecuencia que no hayan sido listados previamente.
proporcionar una protección razonable contra todas aquellas interferencias
tendrá que realizar las mediciones requeridas para corregir la mencionada
interferencia. Este equipo digital cumple en su totalidad con los
requerimientos en materia de emisiones radiadas de acuerdo con el límite B
de EN55022/1998, y los requerimientos de inmunidad residenciales,
comerciales y de industria ligera de acuerdo con EN55024/1998.
Este equipo cumple con todos los requerimientos de la DIRECTIVA 1999/5/EC
DEL PARLAMENTO EUROPEO Y EL CONSEJO de marzo 9 de 1999, en material
de equipos de radio y terminales de telecomunicaciones y el reconocimiento
mutuo de su conformidad (R&TTE). La Directiva R&TTE revoca y reemplaza la
Directiva 98/13/EEC (Equipo Terminal de Telecomunicaciones y Equipo de
Estación Terrestre Satelital) a partir del 8 de Abril del 2000.
desperdicio del hogar. En vez de ello, deberá ser llevado a un punto de
recolección para reciclaje de equipo eléctrico y electrónico. Para asegurar que
este producto ha sido correctamente desechado, usted ayudará a prevenir las
consecuencias potenciales negativas hacia el ambiente y la salud humana, que de
otra forma se puede causar al manejar inapropiadamente los desechos de este
- 10 -
Conectando la cámara
Conecte el cable de red RJ45 al Puerto LAN de la cámara a su red; por
ejemplo, al ruteador o al switch, después encienda la cámara. La secuencia
de arranque puede tomar más de un minuto. Necesitará también el
adaptador de corriente de la cámara, a menos que ésta soporte PoE. En tal
caso conecte el cable RJ45 a un switch o inyector de corriente PoE y a la
cámara.
De fábrica, la cámara de red (o servidor de video) buscan que un servidor
DHCP les asignen una dirección IP de manera automática. Un ejemplo de
servidor DHCP puede ser el ruteador, dispositivo que se encuentra en la
mayoría de las redes.
La presencia de un servidor DHCP en su red simplifica la instalación y los
usuarios con conocimiento limitado en redes TCP/IP podrán instalar la cámara
de red en minutos. Si no cuenta con servidor DHCP, la cámara de red tomará
su dirección IP de fábrica: 192.168.1.221.
En sistemas con Windows, podrá usar la aplicación IP Installer que viene
incluida en el disco y podrá buscar y cambiar los parámetros de red de la
cámara para su configuración.
Una vez que la cámara ha sido instalada correctamente, puede ser direccionada
a través del Navegador de Internet de su computadora. Las siguientes
secciones describen el procedimiento de instalación para los usuarios de
Windows, MacOS y Linux.
Windows XP, Vista y Windows 7
Inserte el CD de instalación en la
unidad de lectura. Después de un rato,
el CD arrancará de forma automática la
pantalla de la derecha. Si esto no
ocurriese, revise el contenido del CD en
el explorador de Windows y de doble
clic sobre el archivo autorun.exe.
1. Manuales del usuario
El manual del usuario para la
Cámara de Red INTELLINET
NETWORK SOLUTIONS se encuentra disponible en forma electrónica en el
CD de instalación, además de incluirlo en diferentes idiomas.
Si usted encuentra diferencias entre las pantallas mostradas en el presente
manual y las que ve en la cámara, le recomendamos abrir el manual del
CD, que puede tener una versión más actual que la impresa.
2. IP Installer para Windows
Esta utilería está diseñada para encontrar la cámara un su red y permitirle
- 11 -
ESPAÑOL
realizar cambios en su configuración.
De clic en “Si” para iniciar la instalación.
Cuando el programa arranca, se presenta la pantalla arriba mostrada. La
utilería IP Installer lista todas las cámaras que se encuentren conectadas a
su red. Con esta utilería podrá realizar cambios a la configuración,
actualizar el firmware, reestablecer los valores de fábrica y reiniciar la
cámara. Nota: Podrá tomar hasta tres minutos el mostrar la cámara que ha
sido recientemente reiniciada.
Refiérase al manual del usuario para obtener más instrucciones detalladas
de la puesta en marcha de la cámara.
3. Software de Vídeovigilancia
Refiérase al manual del usuario en el CD para instalar y configurar el
Grabador de Vídeo en Red de 16 canales (NVR).
MacOS
La instalación en sistemas MacOS X no necesita del disco de instalación
INTELLINET. La cámara de red INTELLINET NETWORK SOLUTIONS soporta el
servicio Bonjour de Apple.
Ejecute el Navegador de Internet Safari y abra la barra de herramientas,
encontrará el enlace hacia el servicio Bonjour.
- 12 -
 Loading...