

Intellinet 524681, 524940 User guide
WIRELESS N
3G ROUTER
USER MANUAL
MODELS 524681 & 524940
INT-524681/524940-UM-0809-02.5

Federal Communications Commission
Interference Statement
FCC Part 15
This equipment has been tested and found to comply with the limits
for a Class B digital device, pursuant to Part 15 of FCC Rules.
These limits are designed to provide reasonable protection against
harmful interference in a residential installation. This equipment
generates, uses and can radiate radio frequency energy and, if not
installed and used in accordance with the instructions, may cause
harmful interference to radio communications. However, there is no
guarantee that interference will not occur in a particular installation.
If this equipment does cause harmful interference to radio or
television reception, which can be determined by turning the
equipment off and on, the user is encouraged to try to correct the
interference by one or more of the following measures:
1. Reorient or relocate the receiving antenna.
2. Increase the separation between the equipment and
receiver.
3. Connect the equipment into an outlet on a circuit different
from that to which the receiver is connected.
4. Consult the dealer or an experienced radio technician for
help.
FCC Caution
This equipment must be installed and operated in accordance with
provided instructions, and a minimum of 20 cm of space (approx. 8
inches) must be provided between any computer-mounted antenna
and a person’s body (excluding hands, wrists and feet) during
wireless modes of operation.
This device complies with Part 15 of the FCC Rules. Operation is
subject to the following two conditions: (1) This device may not

cause harmful interference; and (2) This device must accept any
interference received, including interference that may cause
undesired operation.
Any changes or modifications not expressly approved by the party
responsible for compliance could void the authority to operate the
equipment.
Federal Communications Commission (FCC) Radiation
Exposure Statement
This equipment complies with FCC radiation exposure set forth for
an uncontrolled environment. In order to avoid the possibility of
exceeding the FCC radio frequency exposure limits, human
proximity to the antenna shall not be less than 20 cm (8 inches)
during normal operation.
The antenna(s) used for this transmitter must not be co-located or
operating in conjunction with any other antenna or transmitter.
The equipment version marketed in the U.S. is restricted to usage
of channels 1-11 only.

R&TTE Compliance Statement
This equipment complies with all the requirements of Directive
1999/5/EC of the European Parliament and the Council of March 9,
1999, on radio equipment and telecommunication terminal
equipment and the mutual recognition of their conformity (R&TTE).
The R&TTE Directive repeals and replaces in the directive
98/13/EEC (Telecommunications Terminal Equipment and Satellite
Earth Station Equipment) as of April 8, 2000.
Safety
This equipment is designed with the utmost care for the safety of
those who install and use it. However, special attention must be
paid to the dangers of electric shock and static electricity when
working with electrical equipment. All guidelines of this and of the
computer manufacturer must therefore be allowed at all times to
ensure the safe use of the equipment.
EU Countries Intended for Use
The ETSI version of this device is intended for home and office use
in Austria, Belgium, Denmark, Finland, France, Germany, Greece,
Ireland, Italy, Luxembourg, the Netherlands, Portugal, Spain,
Sweden and the United Kingdom.
The ETSI version of this device is also authorized for use in EFTA
member states Iceland, Liechtenstein, Norway and Switzerland.
EU Countries Not Intended for Use
None.

Table of Contents
CHAPTER I: PRODUCT INFORMATION
1-1 Introduction .......................................................................... 1
1-2 Safety Information ................................................................. 2
1-3 System Requirements........................................................... 3
1-4 Package Contents................................................................. 3
1-5 Connections and Indicators................................................... 4
CHAPTER II: SYSTEM AND NETWORK SETUP
2-1 Network Connections ............................................................ 6
2-2 Connecting to the Router via Web Browser .......................... 9
2-2-1 Windows 95/98/Me IP Address Setup ............................... 9
2-2-2 Windows 2000 IP Address Setup .................................... 11
2-2-3 Windows XP IP Address Setup........................................ 13
2-2-4 Windows Vista IP Address Setup .................................... 15
2-2-5 Router IP Address Lookup............................................... 18
2-3 Using Quick Setup .............................................................. 21
2-3-1 Setup Procedure for 3G/3.5G .......................................... 26
2-3-2 Setup Procedure for Cable Modem ................................. 28
2-3-3 Setup Procedure for Fixed-IP xDSL................................. 29
2-3-4 Setup Procedure for PPPoE xDSL .................................. 30
2-3-5 Setup Procedure for PPTP xDSL..................................... 31
2-3-6 Setup Procedure for L2TP xDSL ..................................... 33
2-3-7 Setup Procedure for Telstra BigPond .............................. 35
2-4 Basic Setup ......................................................................... 37
2-4-1 Time Zone and Time Auto-Synchronization..................... 37
2-4-2 Changing the Management Password............................. 38
2-4-3 Remote Management ...................................................... 41
2-5 Set Up the Internet Connection (WAN Setup)..................... 43
2-5-1 Setup Procedure for 3G/3.5G .......................................... 44
2-5-2 Setup Procedure for Dynamic IP ..................................... 46
2-5-3 Setup Procedure for Static IP .......................................... 47
2-5-4 Setup Procedure for PPPoE ............................................ 48
2-5-5 Setup Procedure for PPTP .............................................. 50
2-5-6 Setup Procedure for L2TP ............................................... 52

2-5-7 Setup Procedure for Telstra Big Pond ............................. 54
2-5-8 Setup Procedure for DNS ................................................ 55
2-5-9 Setup Procedure for DDNS.............................................. 57
2-6 Wired LAN Configurations................................................... 59
2-6-1 LAN IP.............................................................................. 61
2-6-2 DHCP Server ................................................................... 62
2-6-3 Static DHCP Leases Table .............................................. 63
2-7 Wireless LAN Configurations .............................................. 65
2-7-1 Basic Wireless Settings ................................................... 66
2-7-2 Advanced Wireless Settings ............................................ 69
2-7-3 Wireless Security ............................................................. 72
2-7-3-1 Disable Wireless Security ............................................. 72
2-7-3-2 WEP - Wired Equivalent Privacy .................................. 72
2-7-3-3 Wi-Fi Protected Access (WPA)..................................... 75
2-7-3-4 WPA RADIUS ............................................................... 76
2-7-4 Wireless Access Control .................................................. 78
2-7-5 Wi-Fi Protected Setup (WPS) .......................................... 80
2-7-6 Security Tips for Wireless Network .................................. 82
CHAPTER III: ADVANCED FUNCTIONS
3-1 Quality of Service (QoS) ..................................................... 83
3-1-1 Basic QoS Settings .......................................................... 83
3-1-2 Add a New QoS Rule....................................................... 85
3-2 Network Address Translation (NAT) ................................... 88
3-2-1 Basic NAT Settings .......................................................... 88
3-2-2 Port Forwarding ............................................................... 89
3-2-3 Virtual Server ................................................................... 91
3-2-4 Port Mapping for Special Applications ............................. 94
3-2-5 UPnP Setting ................................................................... 96
3-2-6 ALG Settings.................................................................... 97
3-3 Firewall................................................................................ 99
3-3-1 Access Control............................................................... 100
3-3-1-1 Add PC ....................................................................... 103
3-3-2 URL Blocking ................................................................. 104
3-3-3 DoS Attack Prevention................................................... 106
3-3-3-1 DoS - Advanced Settings............................................ 108
3-3-4 Demilitarized Zone (DMZ).............................................. 110

3-4 Fail Over............................................................................ 113
3-5 System Status ................................................................... 115
3-5-1 System Information and Firmware Version.................... 115
3-5-2 Internet Connection Status ............................................ 115
3-5-3 Device Status................................................................. 116
3-5-4 System Log .................................................................... 117
3-5-5 Security Log ................................................................... 117
3-5-6 Active DHCP Client List ................................................. 118
3-5-7 Statistics......................................................................... 119
3-5-8 Modem Info .................................................................... 119
3-6 Configuration Backup and Restore ................................... 120
3-7 Firmware Upgrade ............................................................ 121
3-8 System Reset .................................................................... 122
CHAPTER IV: APPENDIX
4-1 Specifications .................................................................... 124
4-2 Troubleshooting ................................................................ 128
4-3 Glossary ............................................................................ 131

1
Chapter I: Product Information
1- 1 Introduction and Safety Information
Thank you for purchasing this INTELLINET NETWORK
SOLUTIONSTM Wireless 300N 3G Router, Model 524681, or
Wireless 150N 3G Router, Model 524940.
This high-speed wireless 3G broadband router supports both
UMTS/ HSDPA and EVDO networks. When connecting a 3G / 3.5G
USB modem* to the router, all network (wired/wireless) users can
share the 3G / 3.5G Internet connection. The router can support 3G
/ 3.5G speed up to 7.2 Mbps.
Other features of this access point include:
• Supports UMTS/HSDPA and EVDO 3G networks
• Up to 300 Mbps network link speed (150 Mbps for Model 524940)
• Complies with 2.4 GHz Draft IEEE 802.11n standard and is
backward compatible with IEEE 802.11g/b standards
• 2T2R MIMO technology for enhanced throughput and coverage
(Model 524681 only)
• Supports WMM function to meet the multimedia data bandwidth
requirement
• Supports Wi-Fi Protected Setup (WPS)
• Supports WAN connection auto fail-over
• Supports WEP and WPA/WPA2 (TKIP and AES) data encryption
• DHCP server supports static lease management
• Supports virtual server, port forwarding and DMZ
• Supports DDNS (dynamic DNS)
• Supports UPnP (Universal Plug and Play)
• Integrated anti-DOS firewall
• QoS (Quality of Service) bandwidth management
• VPN Passthrough (PPTP/IPSec)
• Integrated USB 2.0 port for UMTS/HSDPA and EVDO 3G
modems
• Easy installation through Web-based user interface
* For a complete list of compatible 3G USB modems, visit www.intellinet-network.com.

2
1- 2 Safety Information
To maintain the safety of users and property, follow these safety
instructions:
1. This device is designed for indoor use only; DO NOT place this
device outdoors.
2. DO NOT put this device in or near hot or humid places, like a
kitchen or bathroom. Also, do not leave this device in your car
in hot weather.
3. DO NOT pull any connected cable with force; disconnect it from
the device first.
4. If you want to place this device at any significant height or hang
it on a wall, make sure it’s firmly secured. Falling from any
height would damage the device and its accessories.
5. Accessories of this device, like the antennas and power supply,
are dangers to small children under 3 years of age. They may
put the small parts in their nose or mouth, possibly causing
injury. KEEP THIS DEVICE OUT THE REACH OF CHILDREN!
6. The device will become hot when in use for long time. This is
normal and is not a malfunction. DO NOT put this device on
paper, cloth or other flammable materials.
7. There’s no user-serviceable part inside the device. If the
device is not working properly, contact your dealer and ask for
help. DO NOT disassemble the device.
8. If the device falls into water when it’s powered, DO NOT use
your hands to pick it up. Switch the electrical power off before
you do anything, or contact an experienced electrical technician
for help.
9. If you smell something strange or even see some smoke
coming from the device or power supply, remove the power
supply or switch the electrical power off immediately and call
the dealer for help.

3
1- 3 System Requirements
• Internet connection, provided by xDSL or cable modem or 3G
modem.
• Computer or network devices with wired or wireless network
interface card.
• Web browser (Firefox, Microsoft Internet Explorer 4.0 or above,
Netscape Navigator 4.7 or above, Opera Web browser or Safari
Web browser)
• Available AC power socket (100 – 240 V, 50/60 Hz)
1- 4 Package Contents
Before you start to use this router, check to see if there’s anything
missing in the package. If so, contact your dealer of purchase.
• Wireless 300N or 150N 3G Router
• Quick installation guide
• User manual on CD
• A/C power adapter

4
1- 5 Connections and Indicators
Front Panel
LED Name
Light
Status
Description
POWER
On
Router is switched on and correctly
powered.
On
Wireless WPS function is enabled.
Off
Wireless network is switched off.
WLAN
Flashing
Wireless LAN activity (transferring or
receiving data).
On
WAN port is connected.
Off
WAN port is not connected.
WAN
LNK/ACT
Flashing
WAN activity (transferring or receiving
data).
On
USB modem is connected.
Off
USB modem is not connected.
USB
LNK/ACT
Flashing
USB modem activity (transferring or
receiving data).
On
LAN port is connected.
Off
LAN port is not connected.
LAN 1-4
LNK/ACT
Flashing
LAN activity (transferring or receiving
data).
5
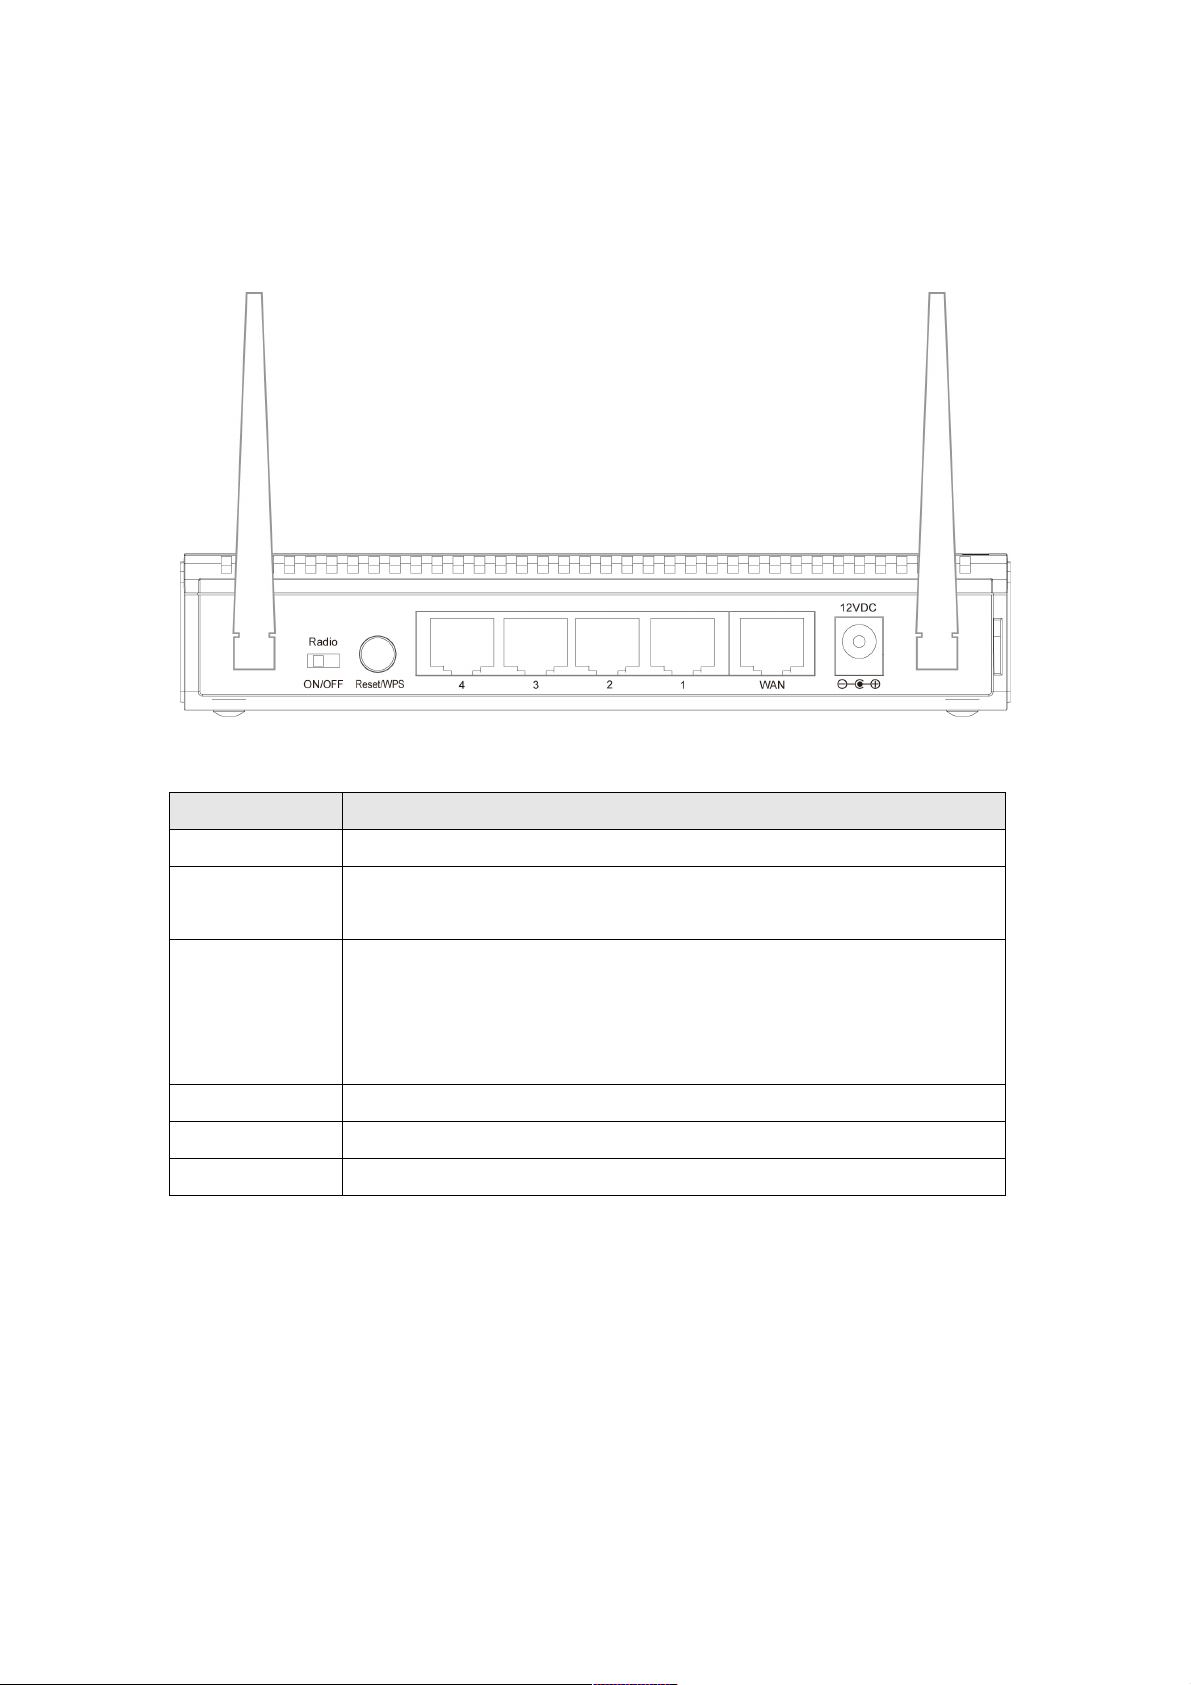
Back Panel
Item Name
Description
Antenna A/B*
These antennas are 3dBi dipole antennas.
Radio
ON/OFF
Switch the button to activate or deactivate the wireless
functions.
Reset / WPS
Reset the router to factory default settings (clear all settings)
or start WPS function. Press this button and hold for 10
seconds to restore all settings to factory defaults, and press
this button for less than 5 seconds to start WPS function.
1 – 4
Local Area Network (LAN) ports 1 to 4.
WAN
Wide Area Network (WAN / Internet) port.
Power
Power connector, connects to A/C power adapter.
* Only one antenna for Model 524940
Antenna A
Antenna B
6
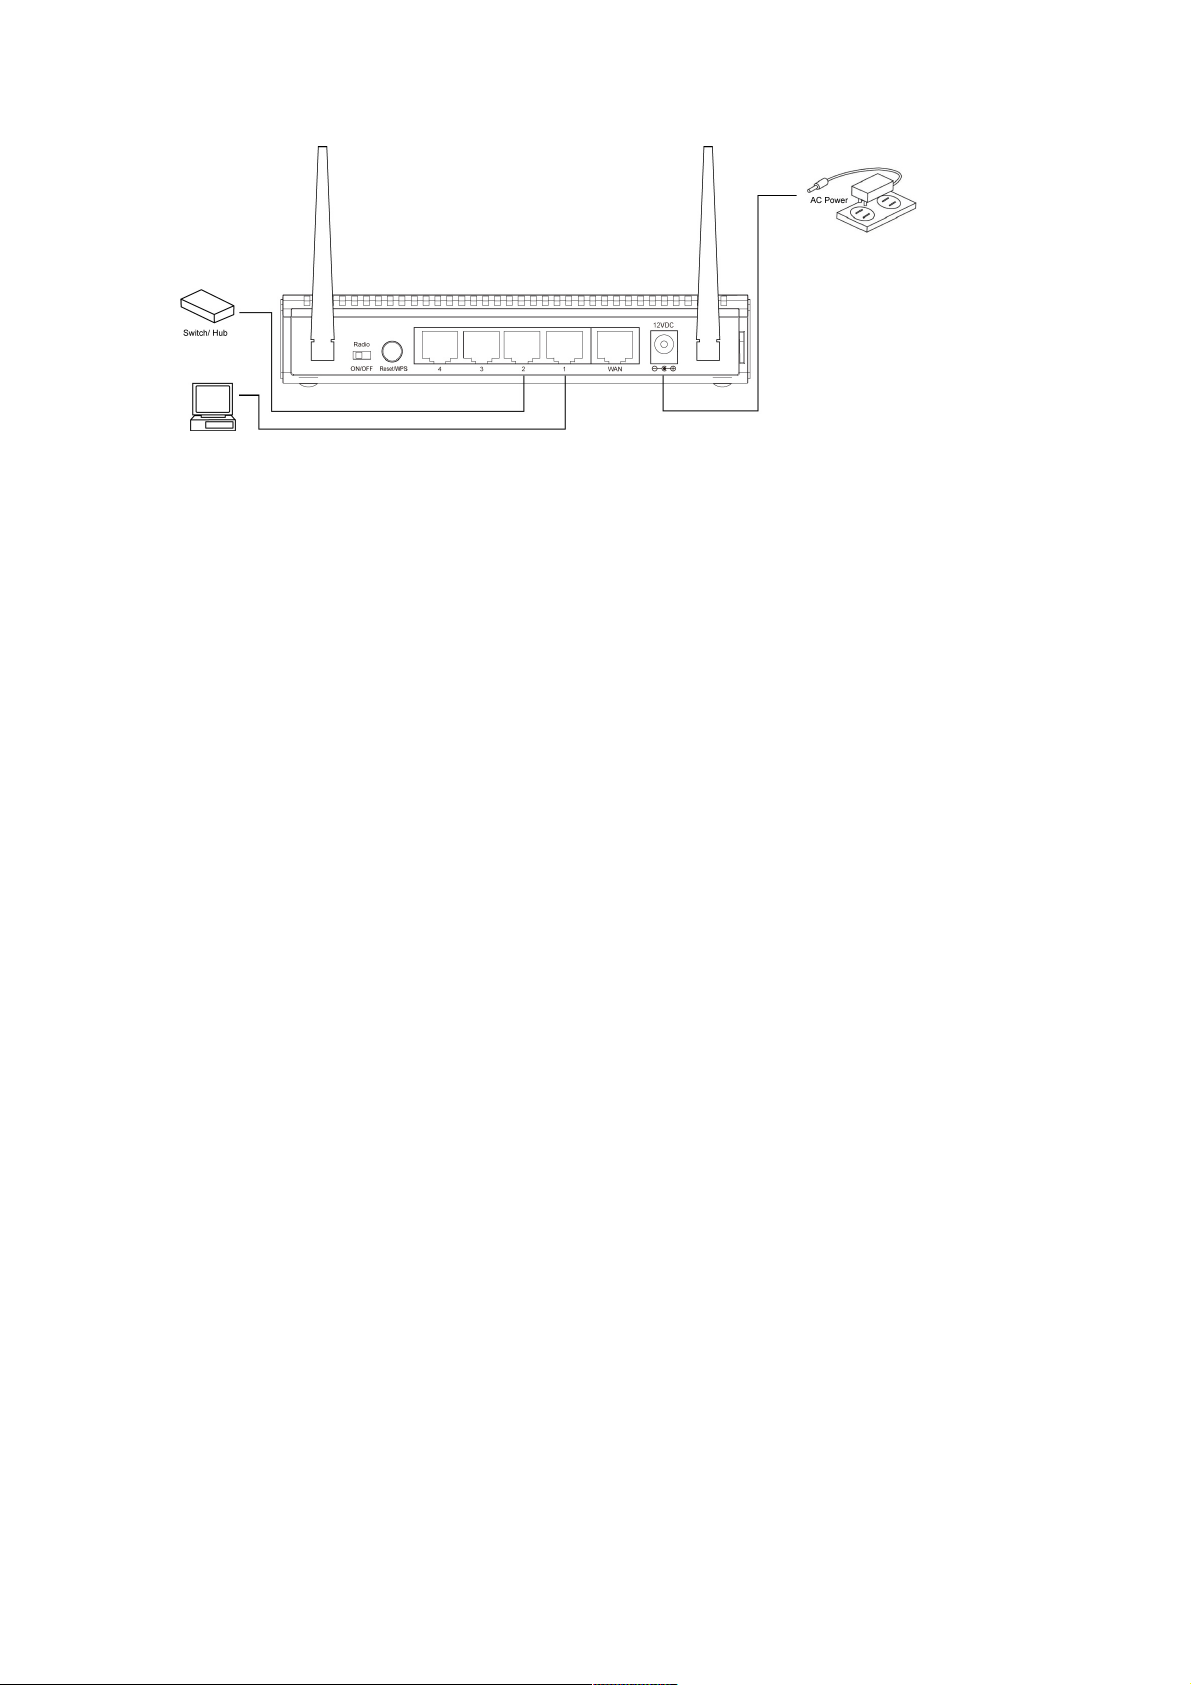
Chapter II: System and Network Setup
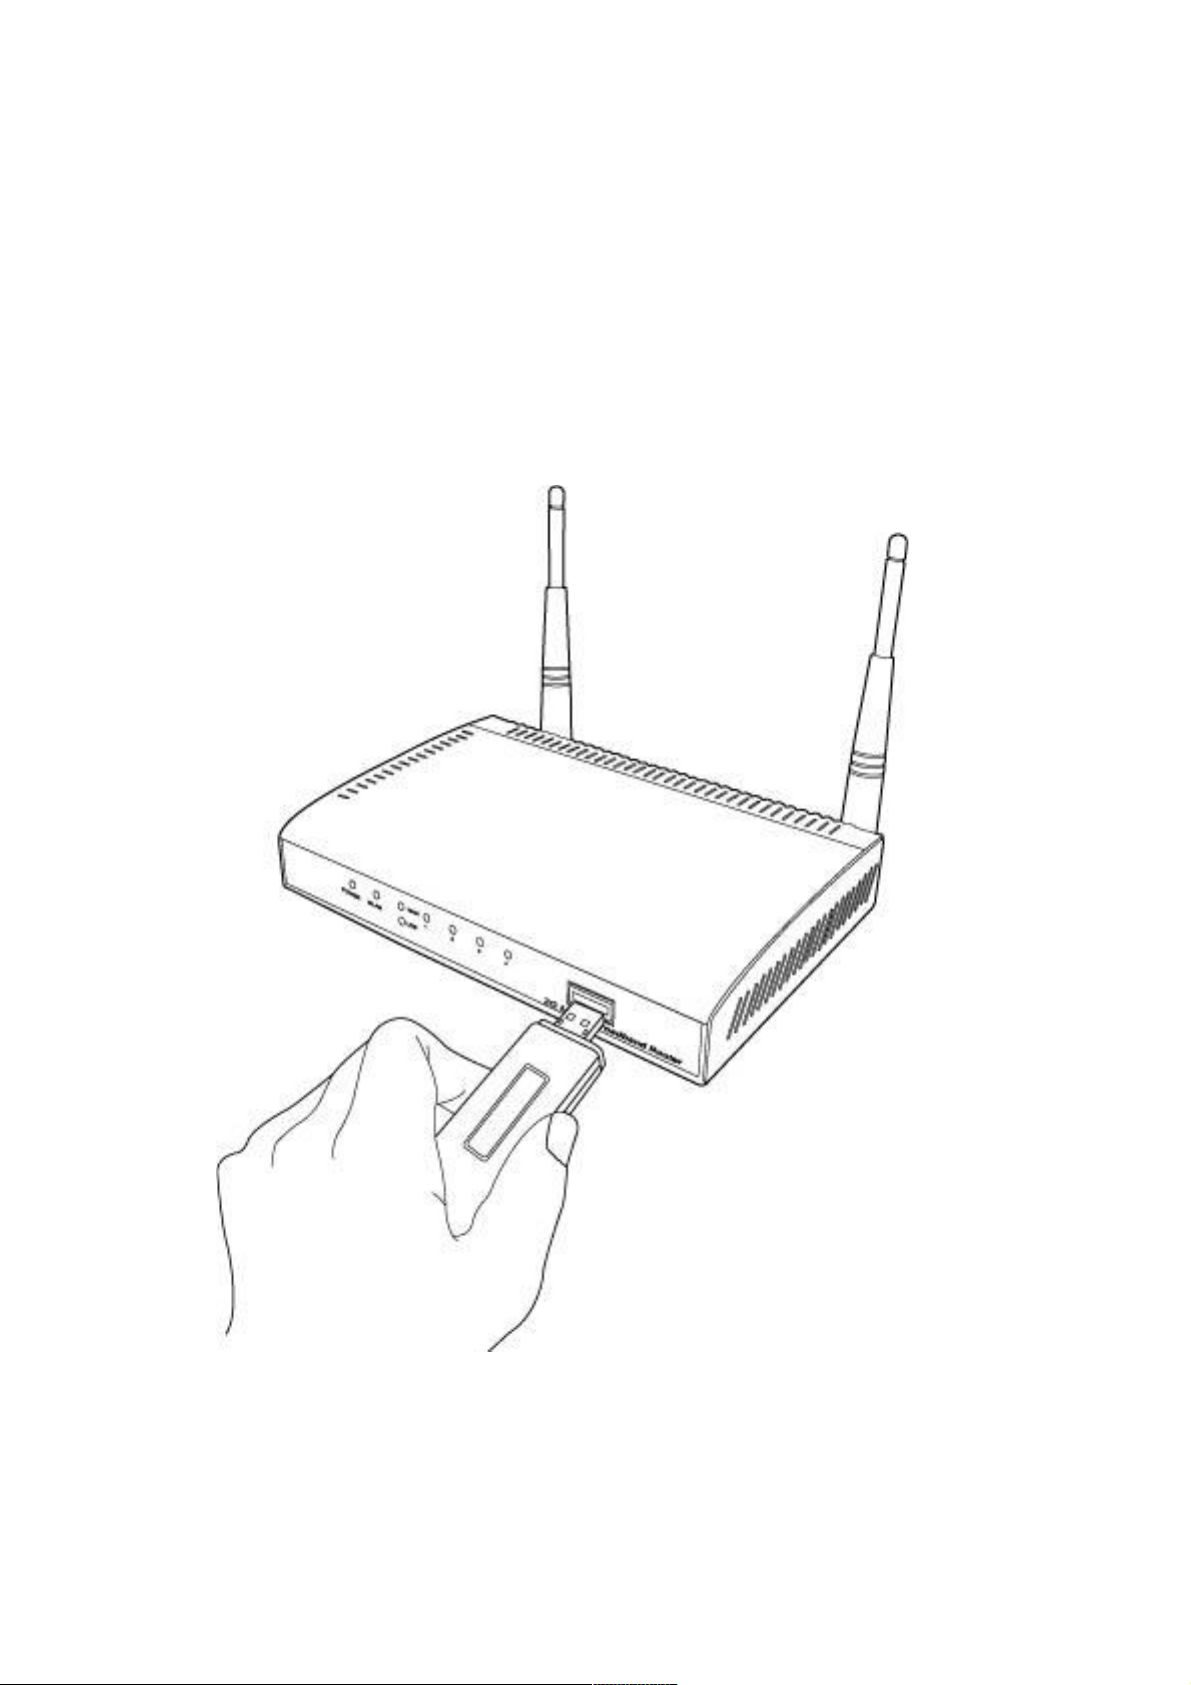
2-1 Network C onnections
1. Connect your USB modem to the USB port located on the front
panel of the router.
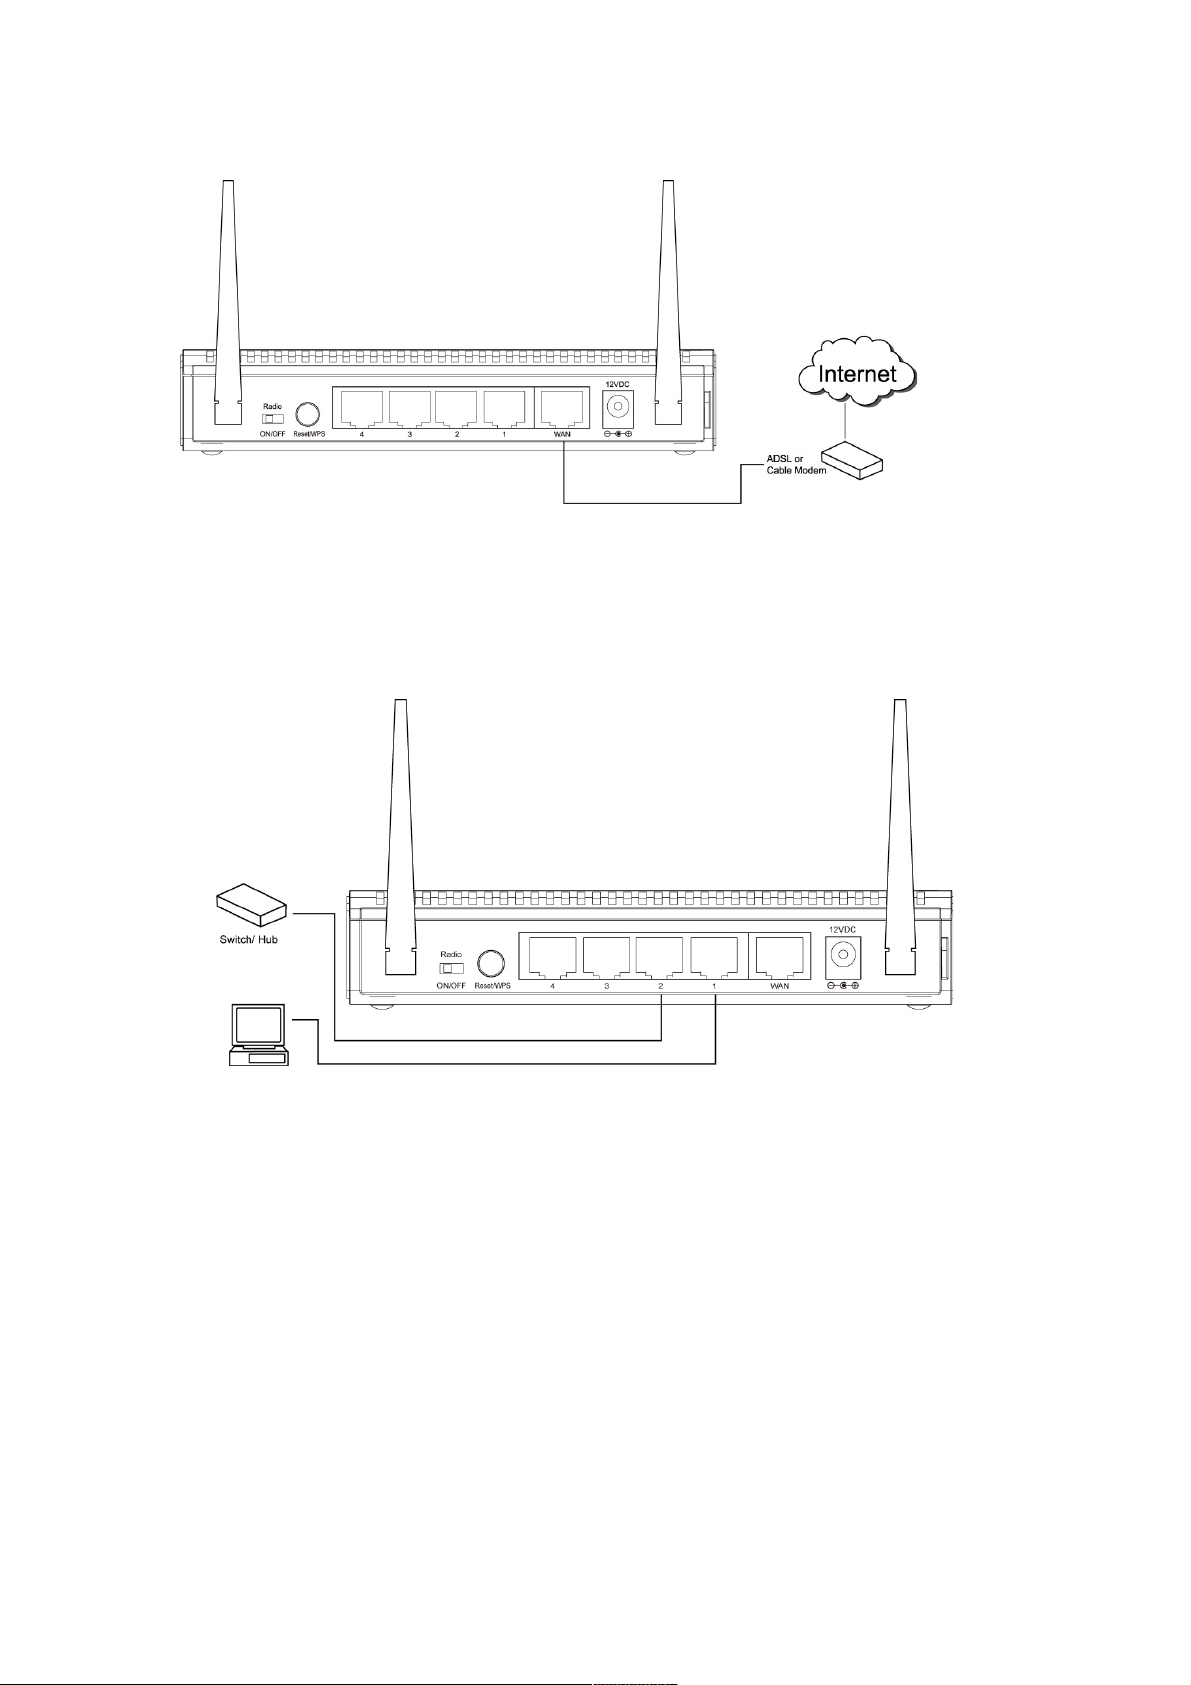
2. Connect your xDSL / cable modem to the WAN port of router by
Ethernet cable. NOTE: Go to Section 3-4 Fail Over to assign
the WAN connection priority if you have subscribed to both 3G
and xDSL/Cable Modem services.
7
3. Connect all your computers, network devices (network-enabled
consumer devices other than computers, like game consoles or
switches/hubs) to the LAN port of the router.
4. Connect the AC power adapter to the wall socket, then connect
it to the Power socket of the router.
8
5. Check all LEDs on the front panel. The Power LED should be on;
the WAN, LAN and USB LEDs should be on if the computer /
network device connected to the respective ports of the router
are powered on and correctly connected. If the Power LED is not
on, or if any LED you expected to be on isn’t, re-check the
cabling or refer to 4-2 Troubleshooting for possible causes and
solutions.

9
2-2 Connecting to the Router via W eb B rowser
After the network connection is established, the next step is to set
up the router with proper network parameters so it can work
properly in your network environment.
Before you can connect to the router and start the configuration
procedures, your computer must be able to obtain an IP address
automatically (use dynamic IP address). If it’s set to use a static IP
address, or if you’re unsure, follow the instructions below to
configure your computer to use a dynamic IP address:
If the operating system of your computer is
Windows 95/98/Me - go to section 2-2-1
Windows 2000 - go to section 2-2-2
Windows XP - go to section 2-2-3
Windows Vista/7 - go to section 2-2-4
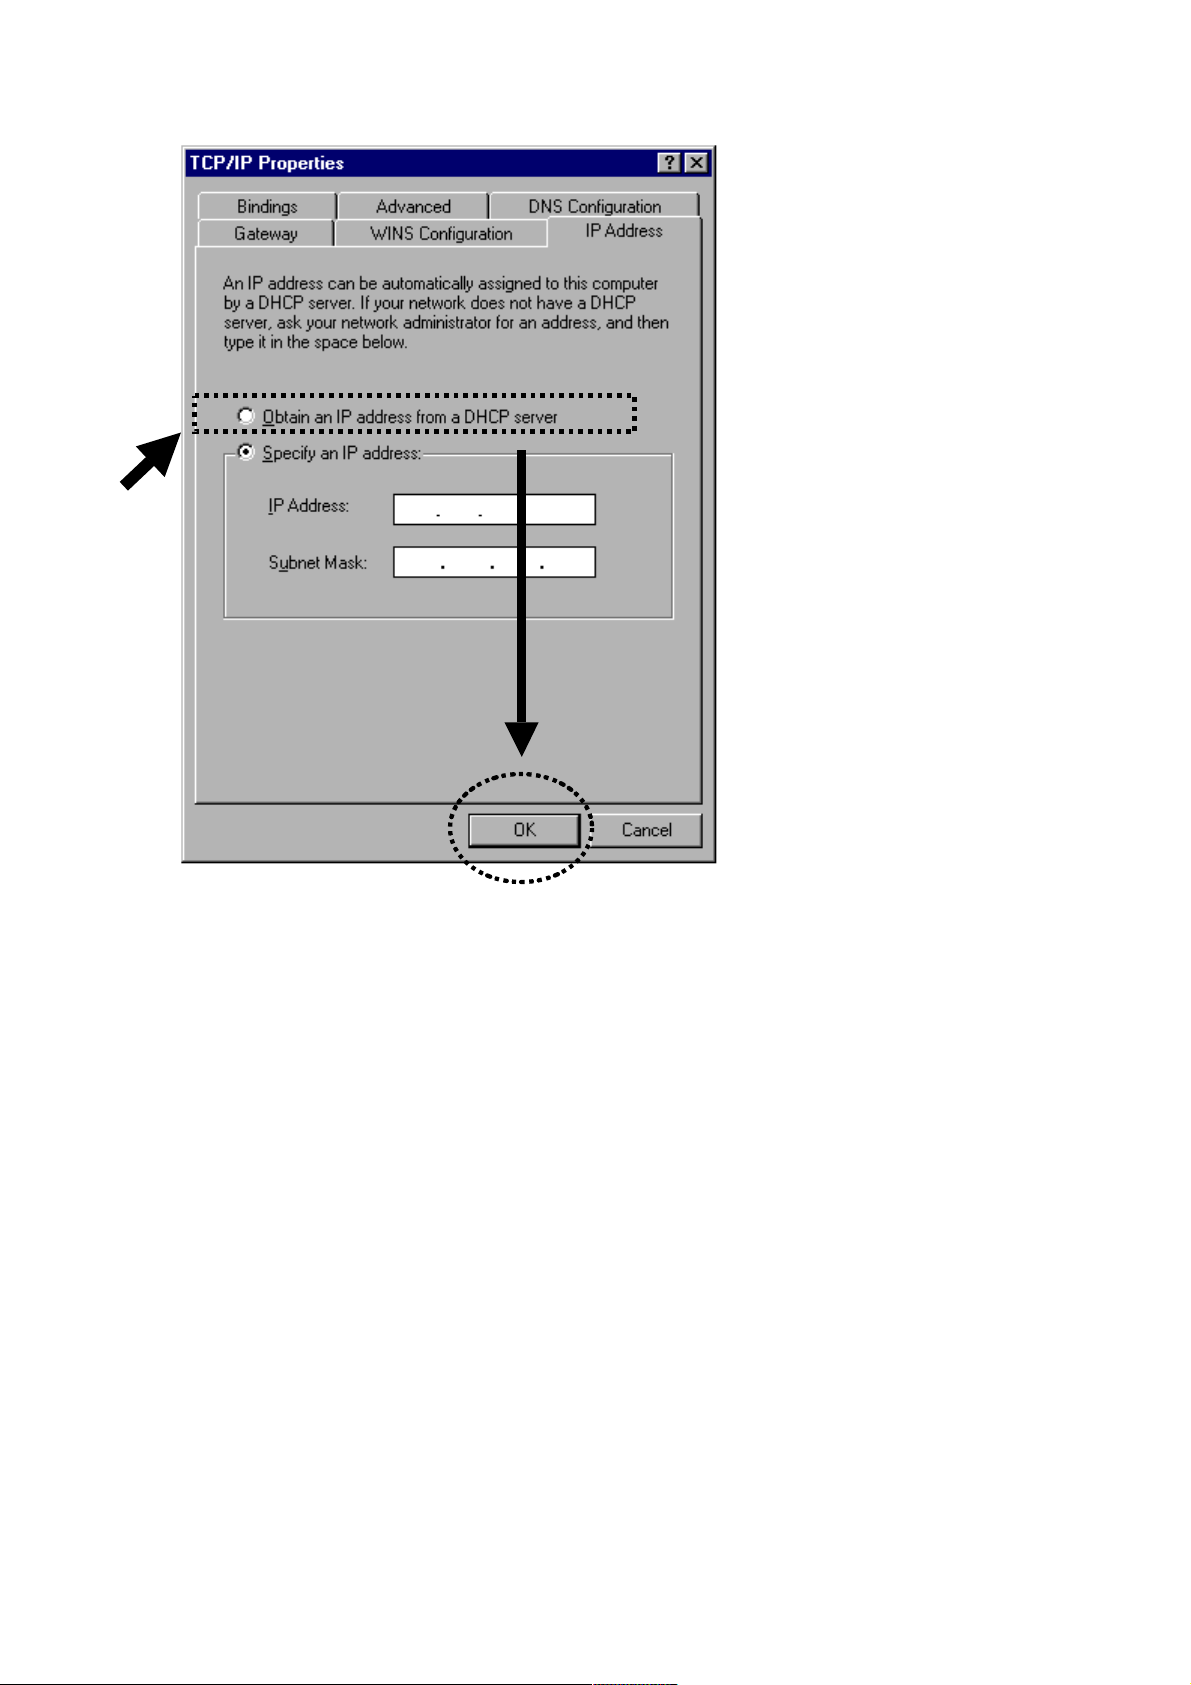
2- 2- 1 Windows 95/98/Me IP Address S etup
1. Click Start (at the lower-left corner of your desktop), then click
Control Panel. Double-click the Network icon and the Network
window will appear. Select “TCP/IP,” then click “Properties.”

10
2. Select “Obtain an IP address from a DHCP server” and then click
“OK.”
11
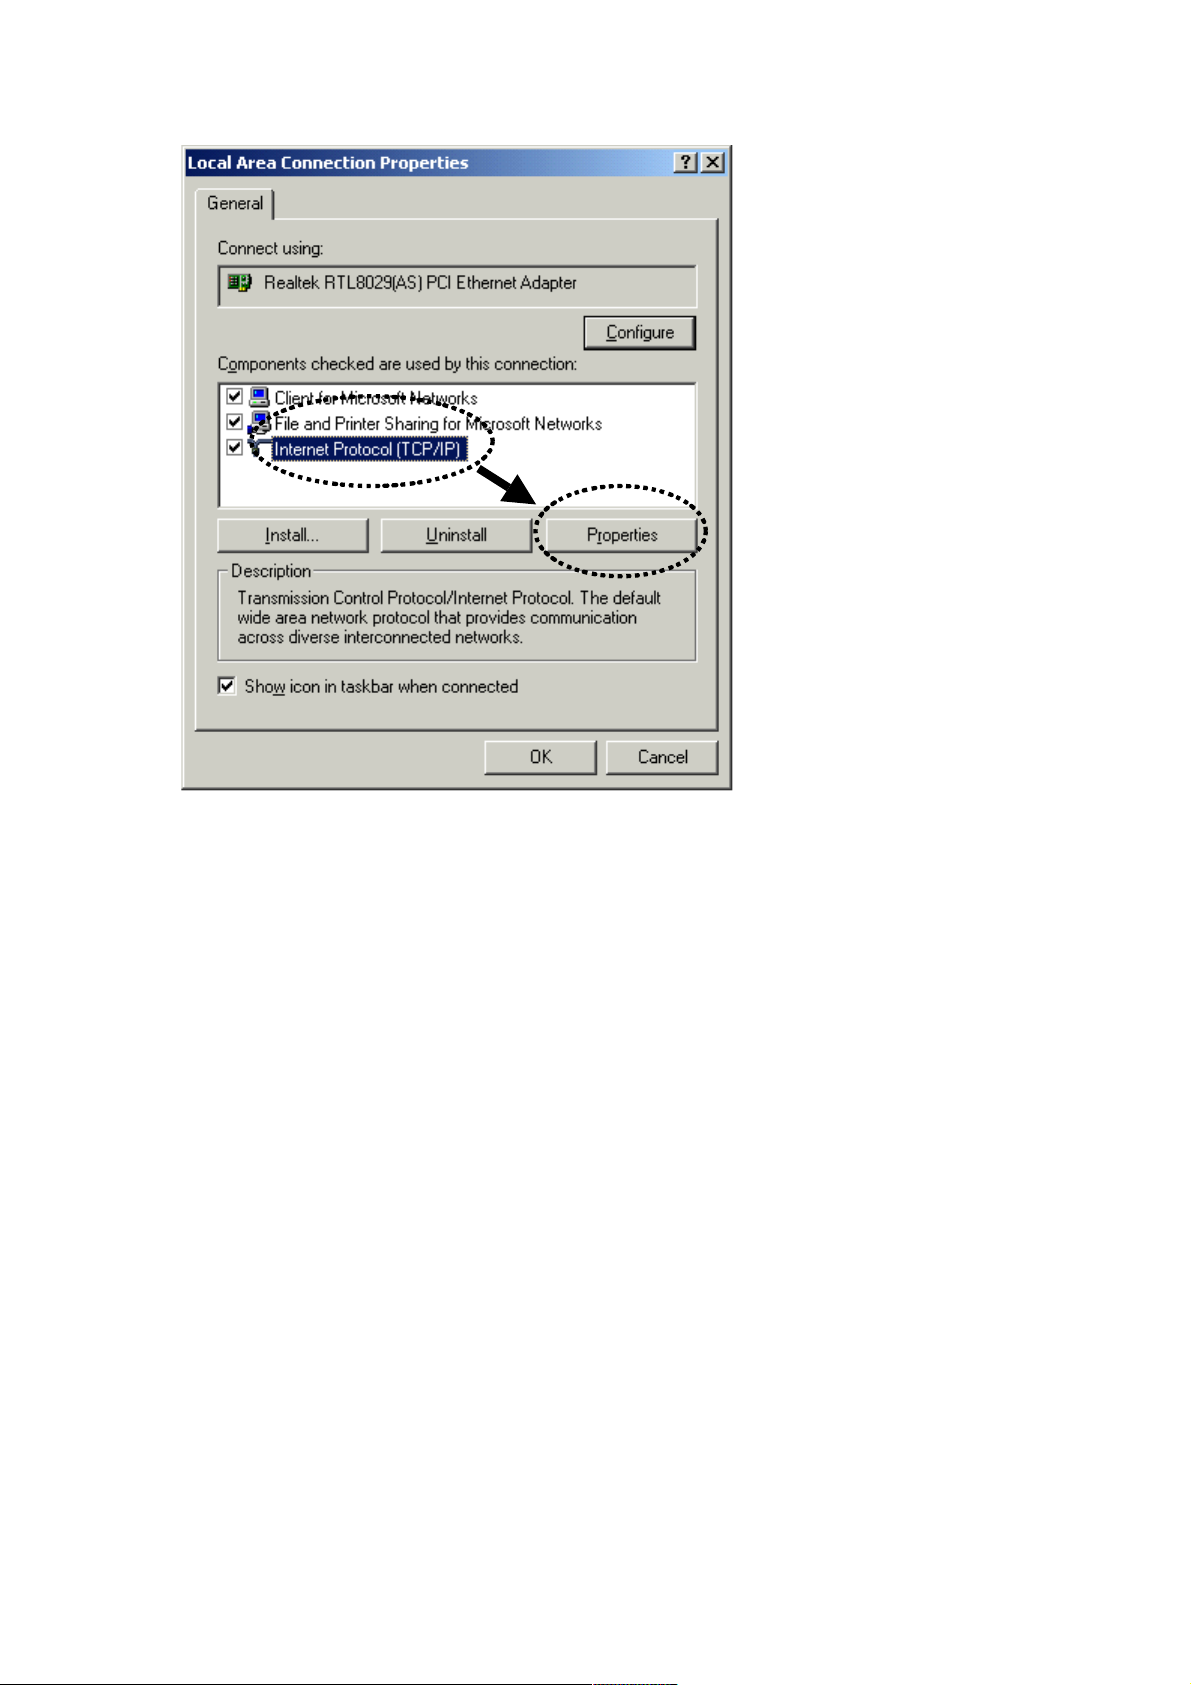
2- 2- 2 Windows 2000 IP Address Setup
1. Click Start (at the lower-left corner of your desktop), then click
Control Panel. Double-click the Network and Dial-up
Connections icon; click Local Area Connection; the Local
Area Connection Properties window will appear. Select
“Internet Protocol (TCP/IP)” and then click “Properties.”
12
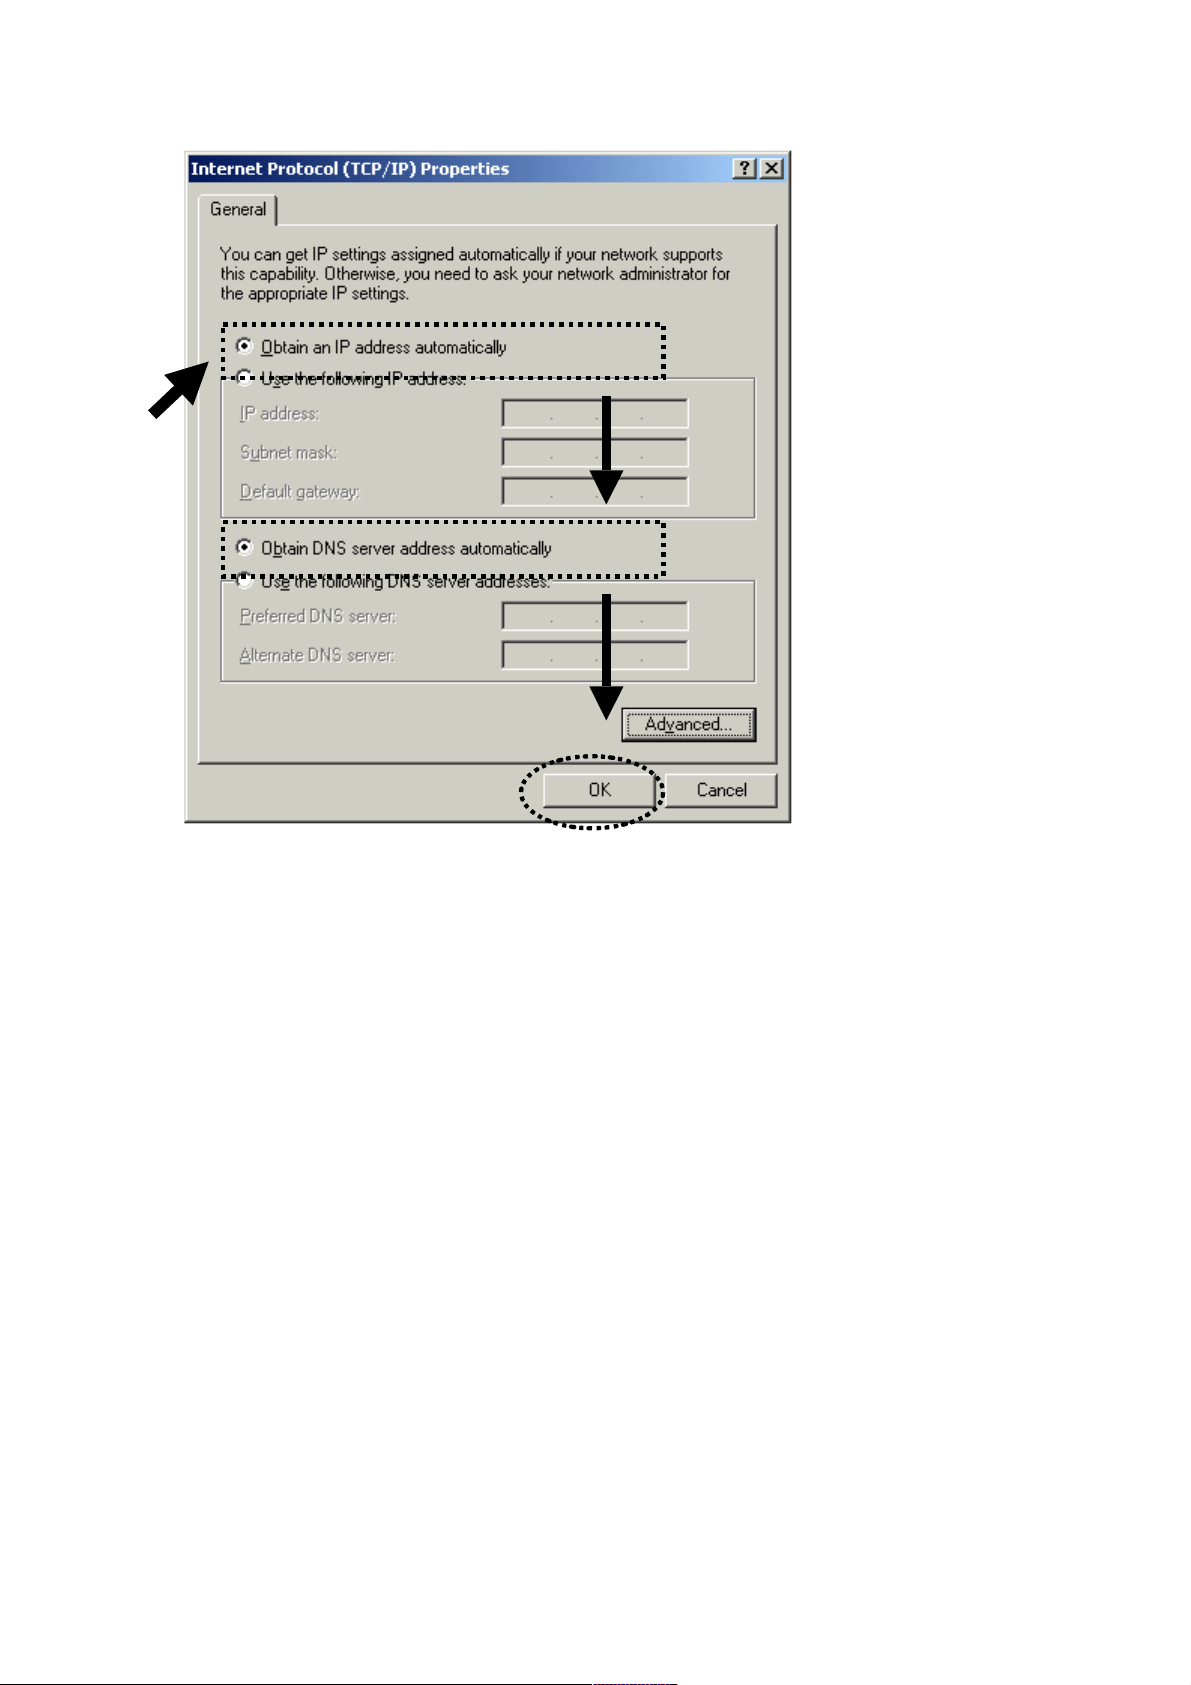
2. Select “Obtain an IP address automatically” and “Obtain DNS
server address automatically,” then click “OK.”
13
2- 2- 3 Windows XP IP Address S etup
1. Click Start (at the lower-left corner of your desktop), then click
Control Panel. Double-click the Network and Internet
Connections icon, click Network Connections, then
double-click Local Area Connection; the Local Area
Connection Status window will appear. Click “Properties.”

14
2. Select “Obtain an IP address automatically” and “Obtain DNS
server address automatically,” then click “OK.”
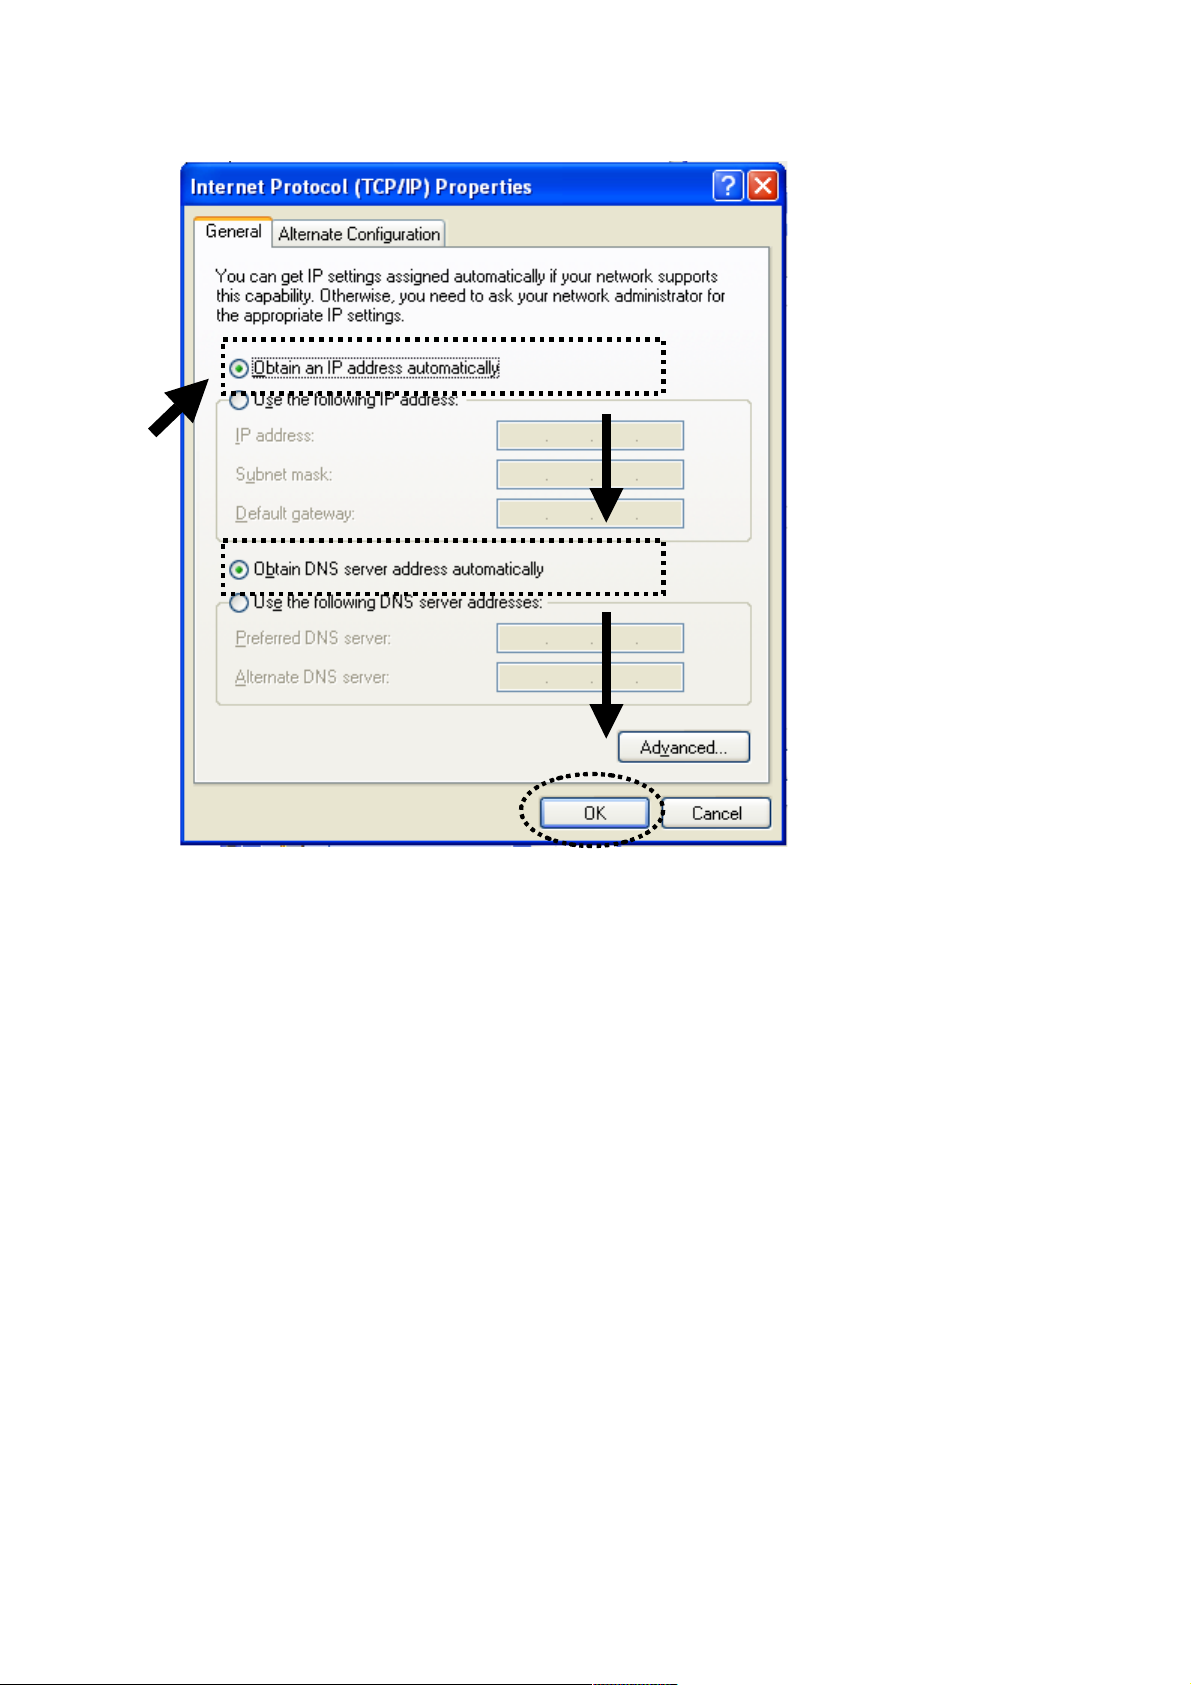
15
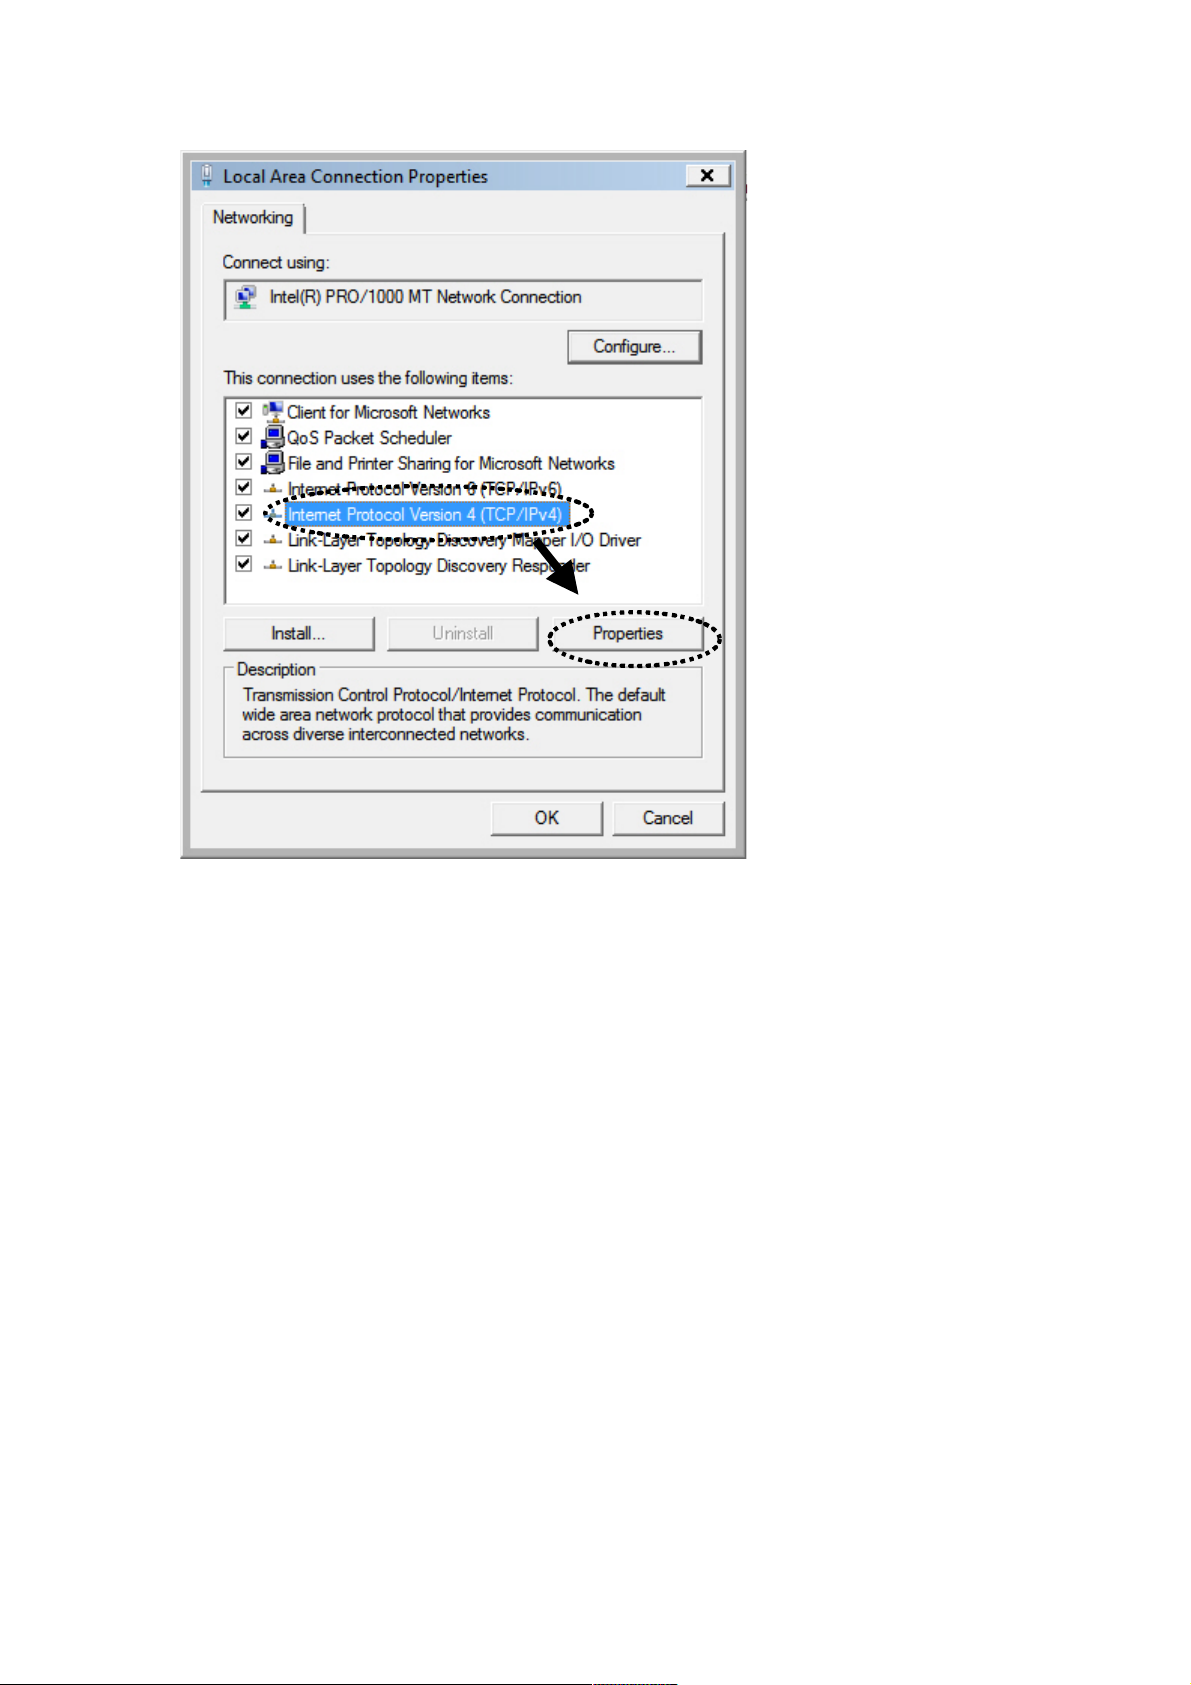
2- 2- 4 Windows Vista/7 IP Address S etup
1. Click Start (at the lower-left corner of your desktop), then click
Control Panel. Click View Network Status and Tasks, and then
click Manage Network Connections. Right-click Local Area
Network, then select “Properties.” The Local Area
Connection Properties window will appear. Select “Internet
Protocol Version 4 (TCP / IPv4),” and then click “Properties.”
16
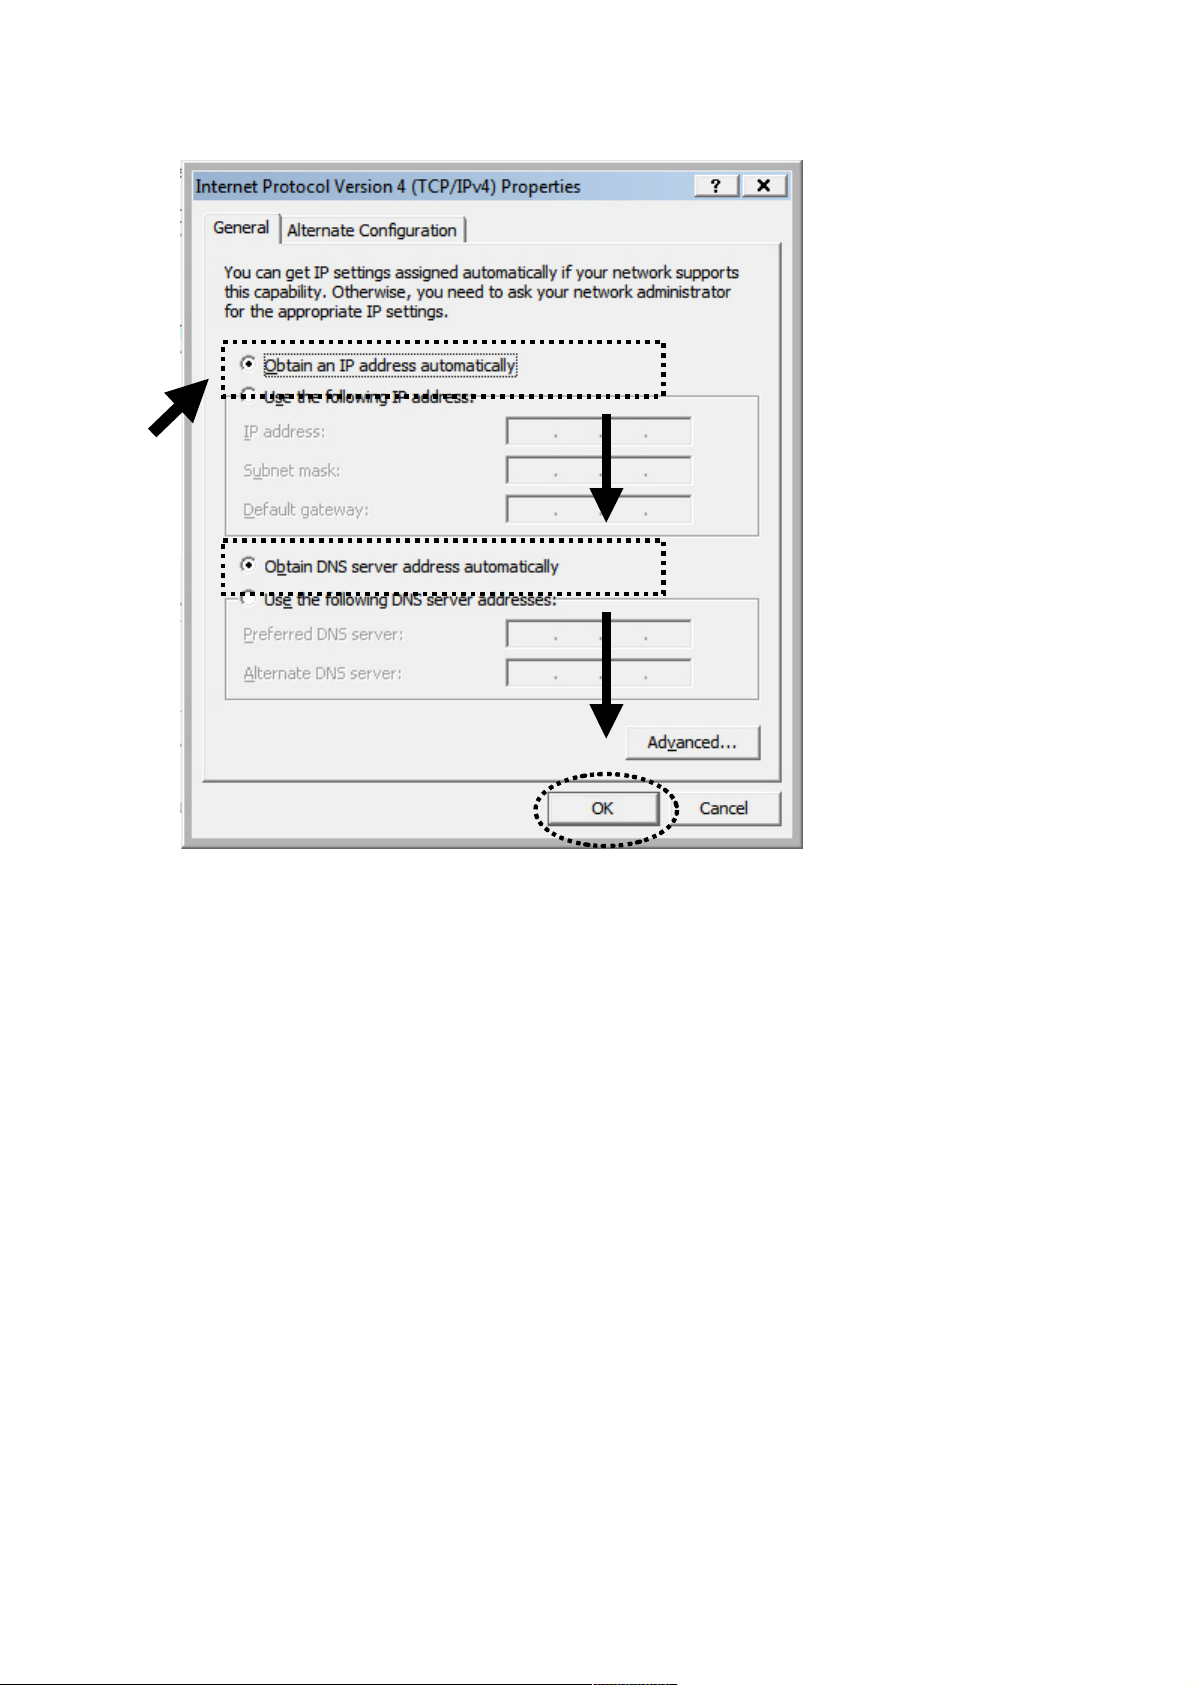
2. Select “Obtain an IP address automatically” and “Obtain DNS
server address automatically,” then click “OK.”
17 18
2- 2- 5 Router IP Address L ookup
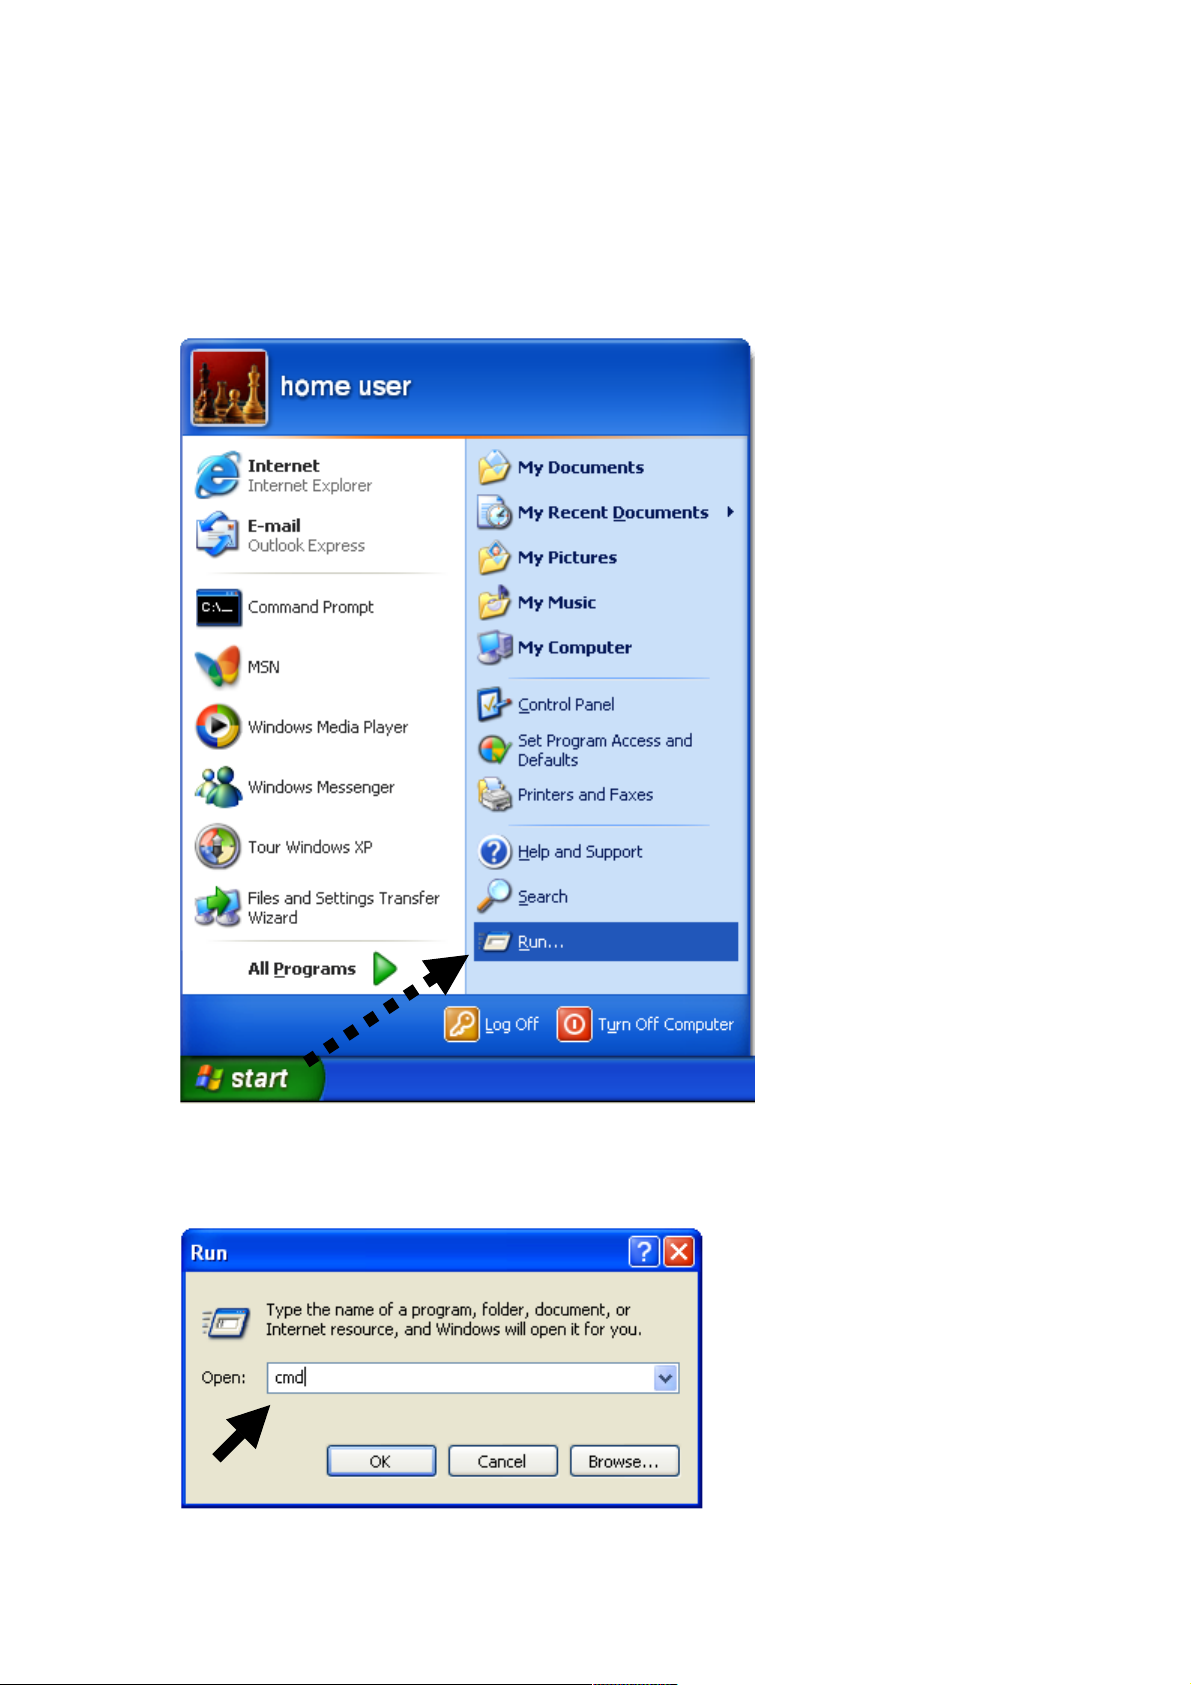
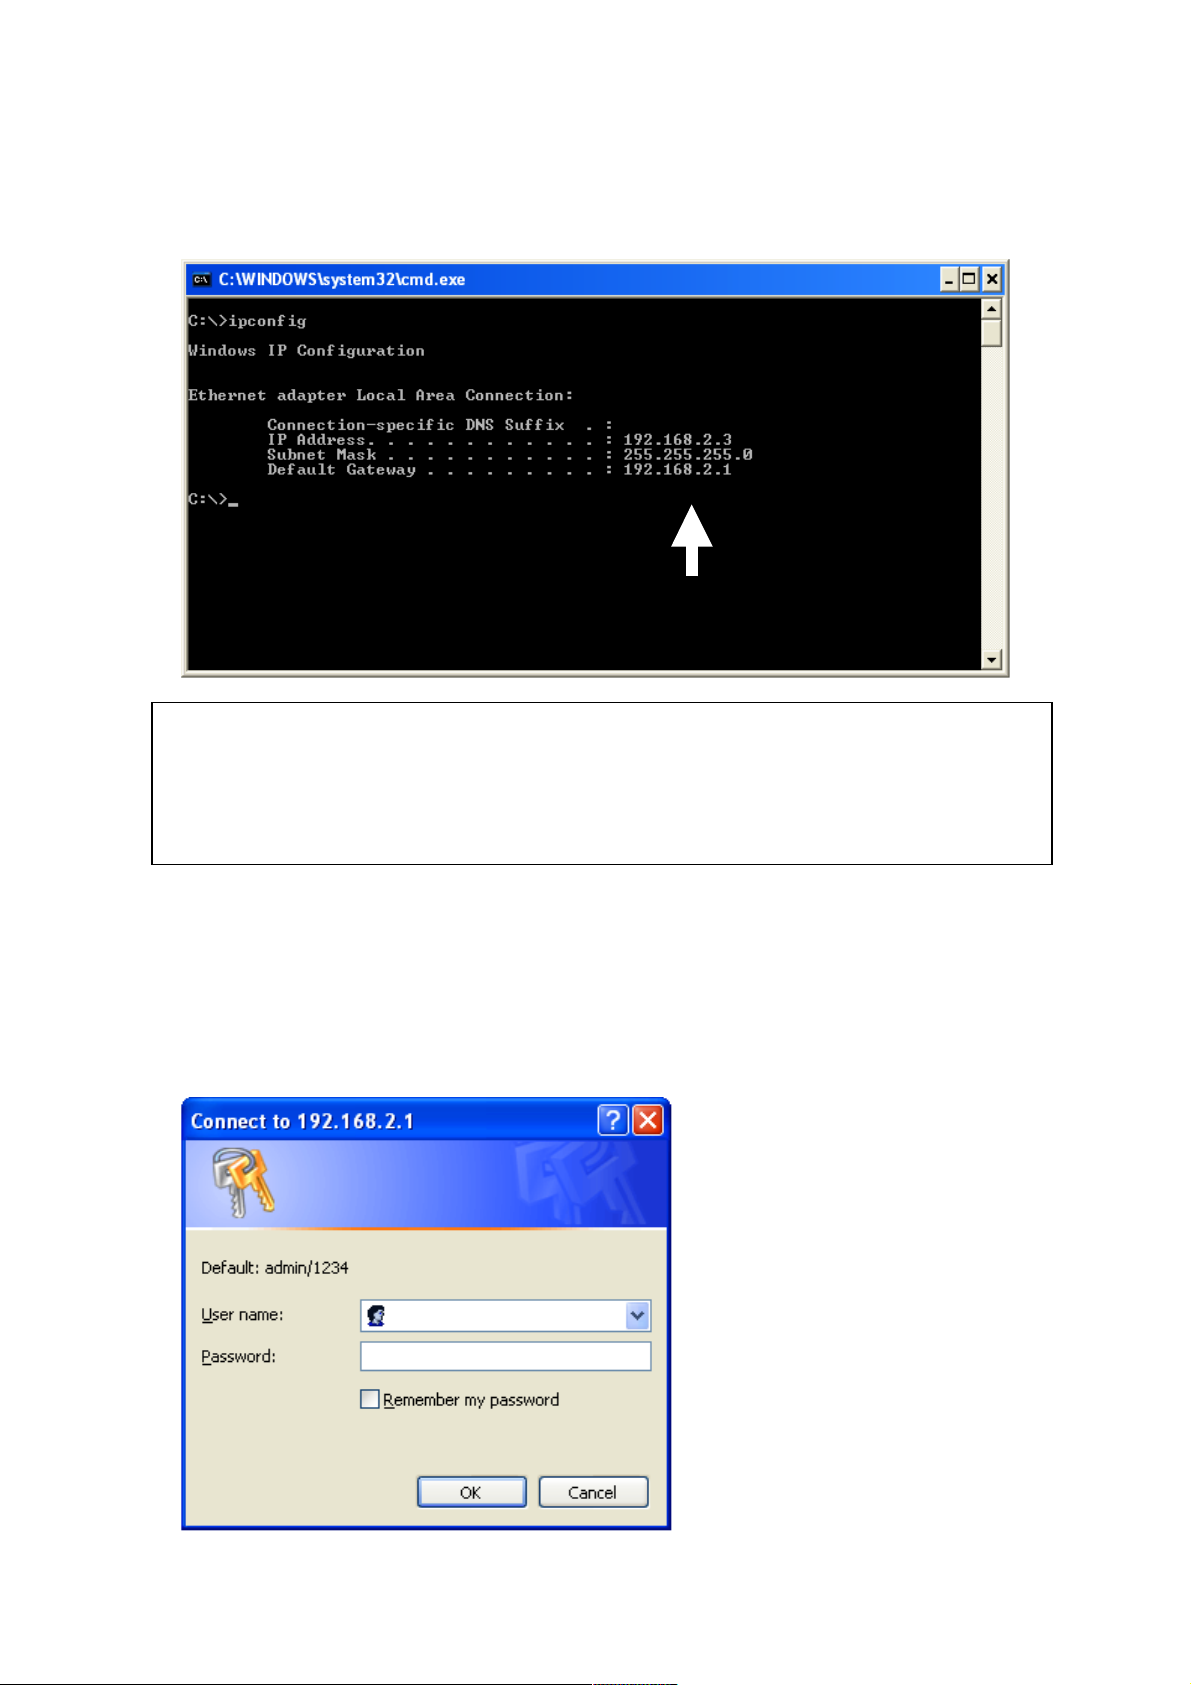
After the IP address setup is complete, go to Start, then Run at the
bottom-lower corner of your desktop:
Input “cmd,” then click “OK.”
19
Input “ipconfig,” then press <Enter>. Check the IP address followed
by the default gateway (in this example, the IP address of the router
is 192.168.2.1).
3. Connect the router’s management interface by Web browser
After your computer obtains an IP address from the router, start
your Web browser and input the IP address of the router in the
address bar. The following window should display.
NOTE: If the IP address of the default gateway is not displayed, or if the
address following “IP Address” begins with “169,” re-check the network
connection between your computer and router, and/or go to the beginning
of this chapter to re-check each step of the network setup procedure.
20
Enter a user name and password in their respective fields (default
user name is “admin”; default password is “1234”). Click “OK” band
you can see the Web management interface of the router.
NOTE: If you can’t see the Web management interface and you’re
being prompted to input the user name and password again, it means
you didn’t input the user name and password correctly: Re-enter the
user name and password. If you’re certain the user name and
password you entered are correct, refer to 4-2 Troubleshooting to
perform a factory reset to set the password back to its default value.
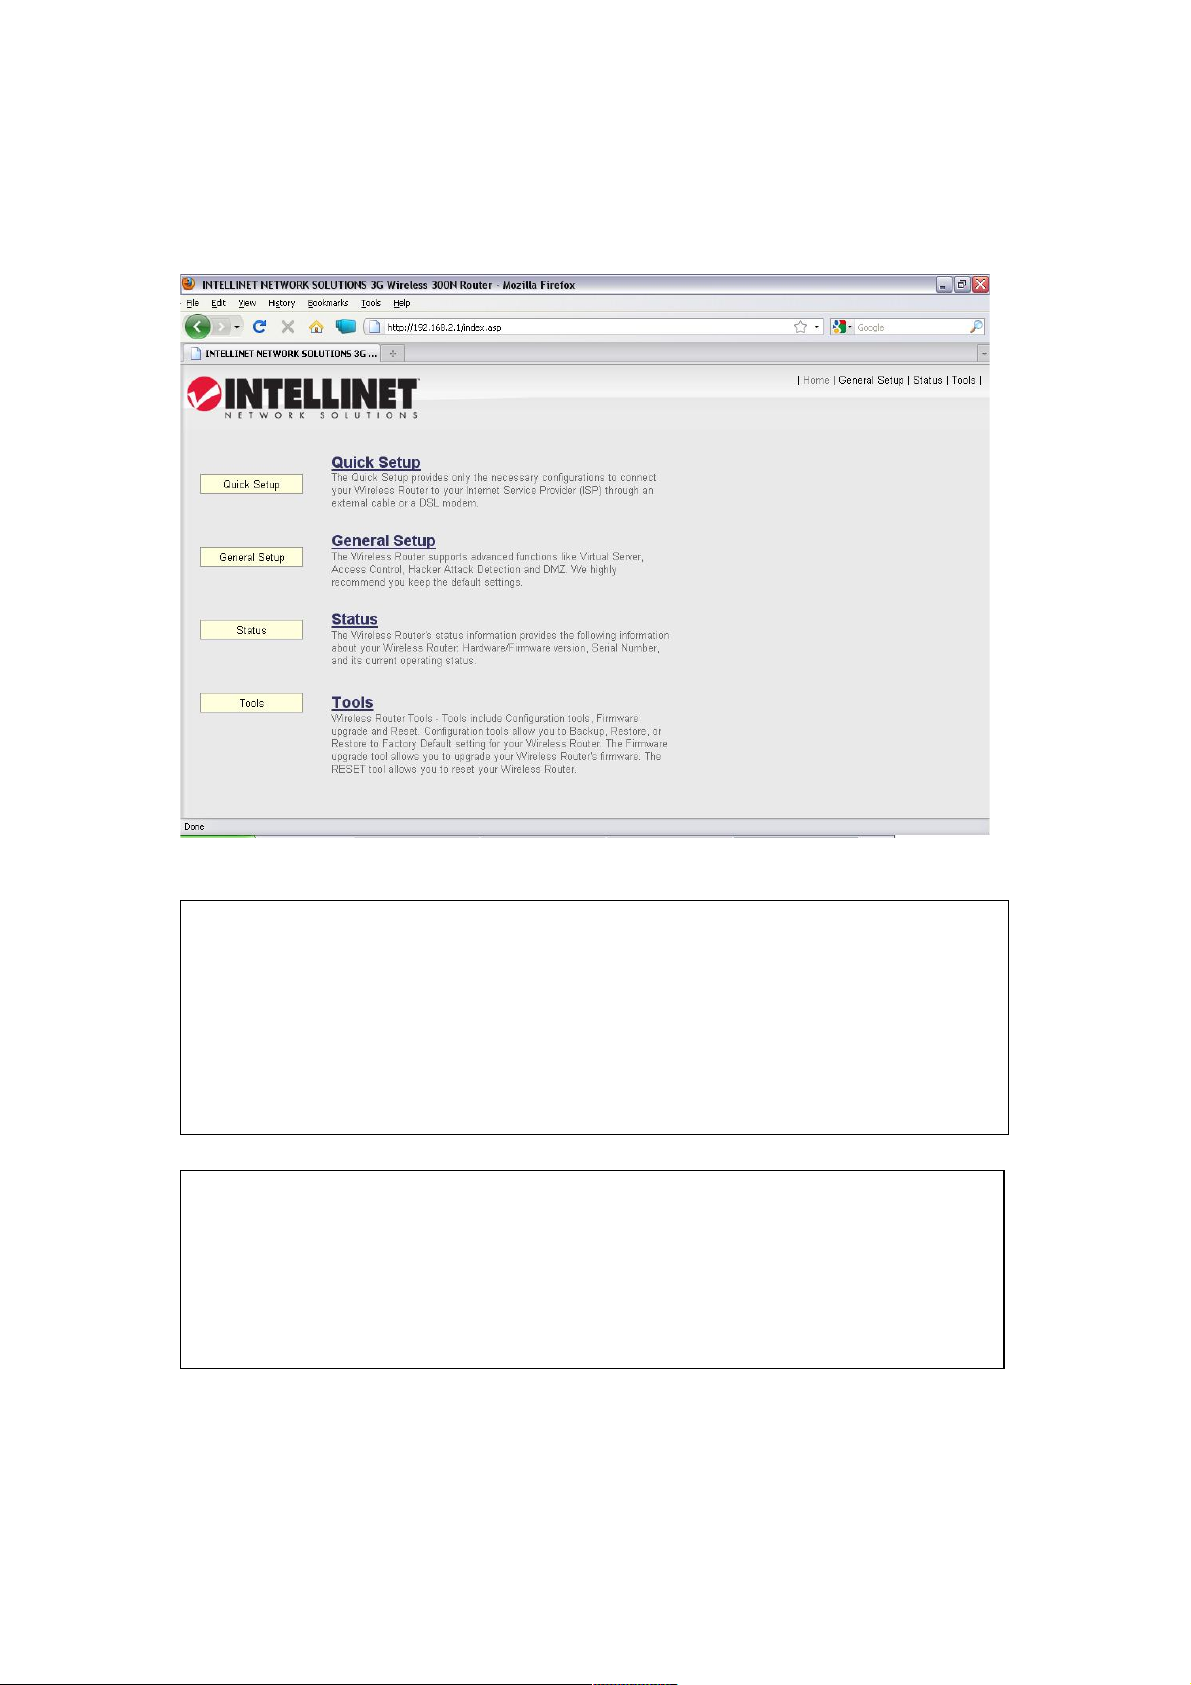
TIP: This page shows the four major menus: Quick Setup, General
Setup, Status and Tools. The shortcuts to these menus are at the
upper-right corner of every page so you don’t have to go back to the
first page.

21
2-3 Using Quick Setup
Quick Setup lets you complete all the required settings you need in
order to access the Internet very quickly.
Click “Quick Setup” on the left-hand navigation panel.
The following message will be displayed:
1. Set Time Zone
Below are descriptions of each option:
Set Time Click and a drop-down list will be shown
Zone (1): Choose the time zone for your location.
1
2
3
4

22
Time Server Input the IP address / host name of time server
Address (2): here.
Daylight If the country you live in uses Daylight Saving,
Savings (3): check “Enable Function” and choose the
duration of Daylight Saving.
After you finish the settings, click “Next” (4).
NOTE: There are several time servers available on the Internet:
129.6.15.28 (time-a.nist.gov)
132.163.4.101 (time-a.timefreq.bldrdoc.gov)
131.107.1.10 (time-nw.nist.gov)
If you find the time on the router is incorrect, try another time server.
23
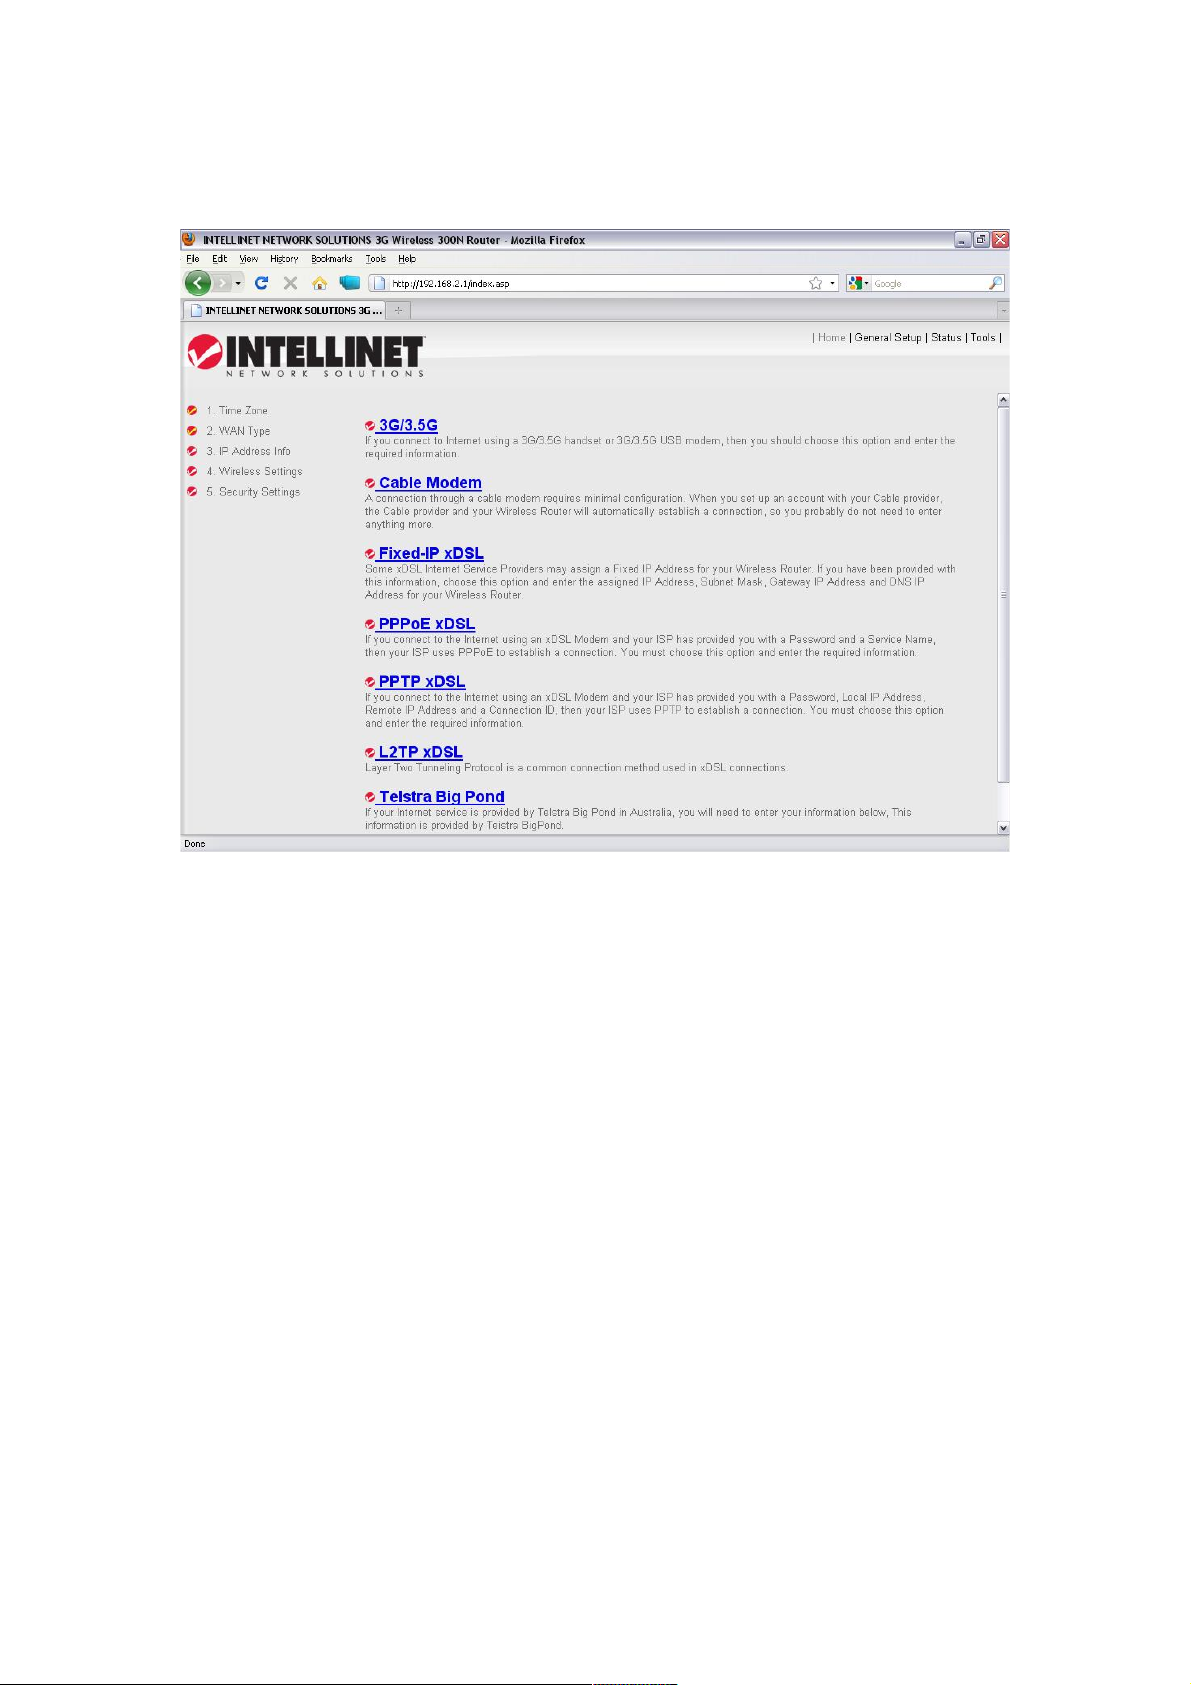
2. Broadband Type
Choose the broadband (Internet connection) type you’re using.
There are seven types of Internet connections:
3G/3.5G - go to section 2-3-1
Cable Modem - go to section 2-3-2
Fixed-IP xDSL - go to section 2-3-3
PPPoE xDSL - go to section 2-3-4
PPTP xDSL - go to section 2-3-5
L2TP xDSL - go to section 2-3-6
Telstra BigPond - go to section 2-3-7
If you’re not sure which to use, contact your Internet service
provider. A wrong Internet connection type will cause connection
problems, and you will not be able to connect to the Internet.
To go back to a previous step, click “Back” at the bottom of the
page.
 Loading...