

Page 1
TRI-BAND CEILING MOUNT ANTENNA
INSTALLATION GUIDE
MODEL 524025
INT-524025-QIG-ML1-0810-01-0
FRANÇAIS
Antenne tri-bande pour montage au plafond
Pour la xa tion au plafond:
1 Placez un des q uatre clips inclus à l’arriè re de l’antenne d’une façon que le b out pointu se trouv e dans la fente et le bout ent aillé dépasse à la
bordure du pa nneau.
2 Fixez le clip av ec une des quatre vis in cluses d’une façon que la tê te de la vis dépasse. Rép étez ce processus ave c les clips et vis res tant, puis
mette z l’antenne sur des rails au plafo nd, des tôles ou d’autre s fixations. NOTE: Pour la fixati on supplémentaire, une s uspension peut êt re
attach ée à l’arrière de l’antenne.
Pour la xa tion au mur:
3 Marquez la po sition des deux tr ous de montage sur un mur ou d ’autres su rfaces horizo ntales, puis placez le s vis incluses (et goujon s, si
nécessa ire), laissant un p etit écart ent re les têtes des vis e t le mur. Alignez les deux tro us de montage et placez l ’antenne au mur.
4 Utilisez l e câble inclus afin de conne cter l’antenne au routeur o u point d’accès de votre rése au. NOTE: Évitez l ’installation derr ière une
armoire ou d ’autre équi pement.
Pour la feuille de d onnées avec une list e de fonctions et sp écifications com plète, visitez ww w.intellinet-networ k.com.
ESPAÑOL
Antena para Montaje en Techo de Banda Triplicada
Para mont aje en techo:
1 Coloque uno d e los 4 clips incluidos en la pa rte posterior d e la antena por lo que la punta s e inserta en la ranur a y el
extre mo con las muescas crea u n labio en el borde del pane l.
2 Fije el clip con u no de los 4 tornilos inclui dos. Repita con el res to de los clips y tornillos , a continuacion deslice lo sobre
los rieles d el techo, chapa u otro so porte. NOTA : Para t ener soporte adic ional, puede usar un pa nel o soporte par a
techo que pu ede ser conecta do a la antena.
Para mont aje en pared:
3 Sobre una par ed o superficie ho rizontal, marcar la posi ción de los dos agujeros d el panel posterio r, fije los torni llos
incluidos (y an clas, si es necesari o), dejando un pe queño espacio entre la s cabezas de torni llos y la pared. Alinee los
agujeros de m onataje con la cabeza d e los tornillos y ajuste la an tena.
4 Utilice el cab le incluido para conec tar la antena al router o acce ss point. NOTA: Evi te colocarla detr as de gabinetes y
otro equip o.
Para ver una fich a tecnica con una lista c ompleta de carac teristicas y esp ecificaciones , visite www.intelline t-network.com.
POLSKI
Antena dookólna sutowa trzyzakresowa
Mocowanie sutowe:
1 Jeśli posi adasz na suficie sz yny, do montażu anteny uż yj dołączonych k lipsów. Przyczep j e z tyłu anteny, a następn ie przykręć do łączonymi
śrubkami.
2 Antenę można r ównież przym ocować bezpośre dnio do sufitu za pomo cą śruby. Należy wc ześniej wywierc ić otwór na kołek roz porowy.
Mocowanie ścienne:
3 Na ścianie lub in nej płaskiej powi erzchni, należy za znaczyć miejs ca, a następnie wy wiercić dwa otwo ry. Śruby należy wkr ęcić tak, aby ich
główki d elikatnie odstawa ły od ściany. Na wys tających główk ach śrub należy z amontować antenę.
4 Użyj do łączonego kabla , aby podłącz yć antenę do bezprze wodowego routera lu b Access Pointa. UWAGA : Nie należ y umiejscawiać spr zętu
za szafa mi rackowymi oraz i nnymi urządzeniami.
Aby uzys kać pełną spec yfikację tech niczną, zapoznaj si ę z kartą produk tu dostępną na st ronie www.intellinet-n etwork.com.
ITA LI ANO
Antenna Tri-band per montaggio
a sotto
Per monta ggio a sotto:
1 Posizionar e sul retro dell’antenna una dell e quattro
clip incluse co sicché la punta della clip tr ovi
collocaz ione nell’alloggiamento com e indicato dalla
freccia r ossa e che la parte de ntellata crei un bordo ada tto per permet tere il supporto d ell’antenna.
2 Assicur are la clip con una delle quat tro viti incluse cosi cché la testa della vite s compaia. Ripetere
l’operazion e con le rimanenti clip e vit i, quindi far scivolar e l’antenna su delle staffe per l ’attacco a
soffitto, s u una sottile last ra di metallo o altro supp orto. NOTA : Per un sup porto aggiuntivo, u n gancio
sul pannello a s offitto può esser e agganciato al pannello po steriore dell’antenna.
Per monta ggio a muro:
3 Su un muro o su un’altra su perficie oriz zontale, segnare la po sizione dei due for i del pannello
posteri ore di montaggio, quindi fi ssare le viti inclus e (e anche i tas selli, se necessari o), lasciando un
piccolo spaz io tra le teste della vi te e il muro. Allineare i due fori d i fissaggio con le test e delle viti e
posizionare l’antenna.
4 Usare il cavo in cluso per collegare l’antenn a al router o al punto di access o. NOTA: Ev itare di
posizion are l’antenna dietro ad armad i o altre attrez zature.
Per prendere v isione di una scheda te cnica con una lista com pleta delle carat teristiche e delle
specific he, visitate il sito w ww.intellinet-netwo rk.com.
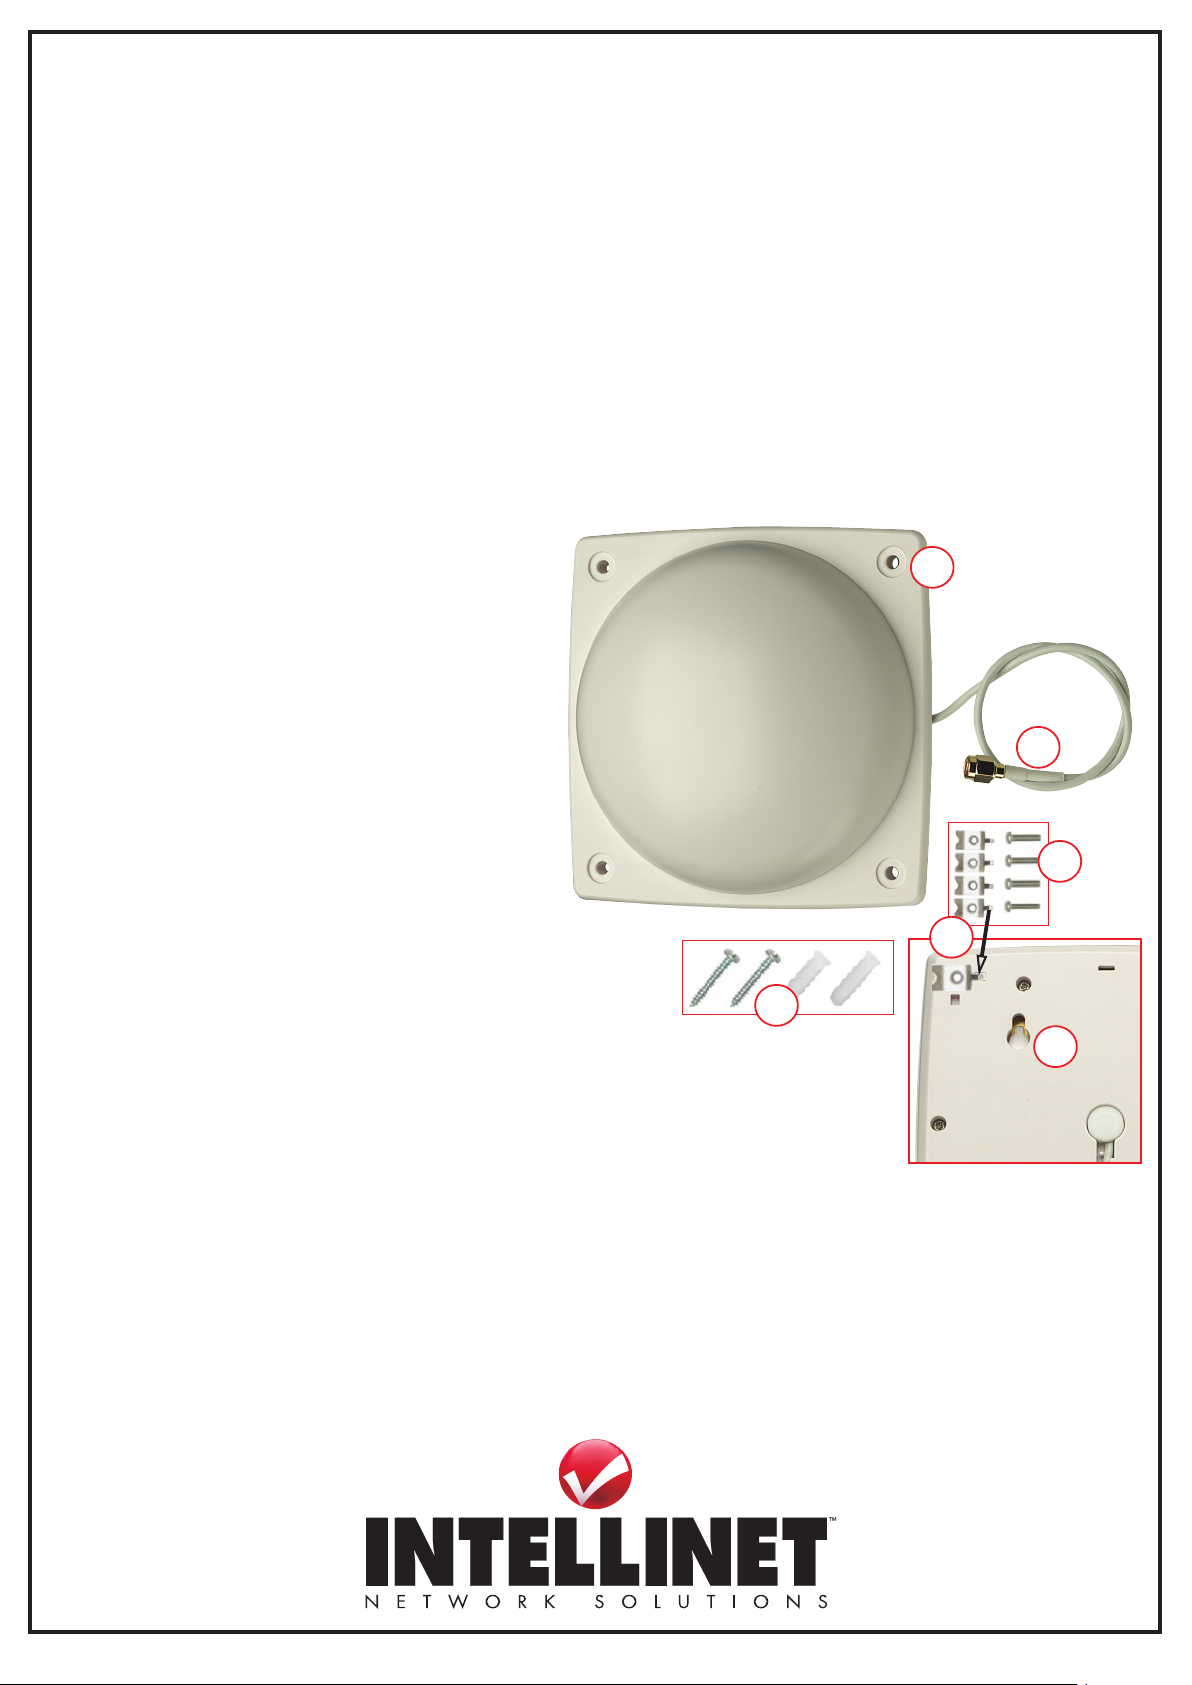
For overhe ad mounting:
1 Position on e of the four included c lips on the back of the ante nna so the extende d tip sits in the slot an d
the notche d end creates a lip at the edg e of the panel.
2 Secure th e clip with one of the fou r included machine sc rews so the screw head i s recessed. Repea t using
the remaining c lips and screws, the n slide onto overhead ceiling r ails, sheet metal or ot her support.
NOTE: Fo r added support , a ceiling-panel hanger c an be hooked to the bac k panel of the antenna.
For wall mo unting:
3 On a wall or other h orizontal surf ace, mark the positi on of the two back-pan el mounting holes, th en set
the include d screws (and anchors , if needed), leaving a slight g ap between the sc rew heads and the wall.
Align the t wo mounting holes on th e screw heads and set t he antenna in place.
4 Use the inclu ded cable to connec t the antenna to your net work’s router or acces s point. NOTE: Avoid
placement beh ind cabinets or oth er equipment.
To view a datashe et with a complete list o f features and spec ifications, go to ww w.intellinet-networ k.com.
2
2
3
3
4
#
1
DEUTSCH
Omni-Direktionale Tri-Band-Antenne zur Deckenmontage
Zur Deckenmontage:
1 Platzier en Sie eine der vier beilie genden Klammern so auf d er Rückseite der An tenne, dass das spitze E nde in der Öffnung si tzt und das
halbrunde E nde am Rand der Platte he rvorsteht.
2 Sichern Sie di e Klammer mit einer der vie r beiliegenden Schr auben, so dass der Schr aubenkopf hervor steht. Verfahren Si e ebenso mit den
übrigen Kla mmern und Schrauben, d ann führen Sie die Antenne au f an der Decke montier te Schienen, Profilb leche oder andere
Halterungen. HINWEIS: Für zusät zliche Stütz funktion, kann ein B ügel an der Rückse ite der Antenne befes tigt werden.
Zur Wandmontage:
3 Markieren S ie die Positionen der be iden rückseit igen Montagelöche r an einer Wand oder einer ande ren horizontalen Fläc he, dann platzieren
Sie die beilie genden Schrauben (und Dü bel, falls notwendig) i n den Löchern, wobei Sie e ine kleine Fläche zw ischen Schraubenko pf und
Wand freilas sen. Richten Sie die beid en Montagelöcher au f die Schraubenköpfe a us und bringen Sie die Anten ne an.
4 Verwenden Si e das beiliegende Kab el, um die Antenne an einen Rout er oder Access Point Ihres Ne tzwerks
anzuschließen. HINW EIS: Vermeiden Si e die Installation hinte r Schränken oder andere r Ausstattung.
Das Datenblat t mit einer vollstän digen Liste aller Eigen schaften und Sp ezifikationen find en Sie unter
www.intellinet-network.com.
Page 2
Copyright ©
INTELLINET NETWORK SOLUTIONS
ENGLISH
This symbol on the product or its packaging indicates that this product
shall not be treated as household waste. Instead, it shou ld
be taken to an applicable collection point for the recycling
of electrical and electronic equipment. By ensuring this
product is disposed of correctly, you will help prevent
potential negative consequences to the environment and
human health, which could otherwise be caused by
inappropriate waste handling of this product. If your equipment
contains easily removable batteries or accumulators, dispose of
these separately according to your local requirements. The
recycling of materials will help to conserve natural resources. For
more detailed information about recycling of this product, contact
your local city oce, your household waste disposal service or
the shop where you purchased this product. In countries outside
of the EU: If you wish to discard this product, contact your local
authorities and ask for the correct manner of disposal.
dEutScH
Dieses auf dem Produkt oder der Verpackung angebrachte Symbol
zeigt an, dass dieses Produkt nicht mit dem Hausmüll entsorgtwerden
darf. In Übereinstimmung mit der Richtlinie 2002/96/EG des
Europäischen Parlaments und des Rates über Elektro- und
Elektronik-Altgeräte (WEEE) darf dieses Elektrogerät nicht
im normalen Hausmüll oder dem Gelben Sack entsorgt werden.
Wenn Sie dieses Produkt entsorgen möchten, bringen Sie es bitte zur
Verkaufsstelle zurück oder zum Recycling-Sammelpunkt Ihrer Gemeinde.
ESPAñOL
Este símbolo en el producto o su embalaje indica que el producto
no debe tratarse como residuo doméstico. De conformidad con la
Directiva 2002/96/CE de la UE sobre residuos de aparatos
eléctricos y electrónicos (RAEE), este producto eléctrico no puede
desecha se con el resto de residuos no clasicados. Deshágase
de este producto devolviéndolo al punta de venta o a un punta de
recogida municipal para su reciclaje.
FRANçAIS
Ce symbole sur Ie produit ou son emballage signie que ce
produit ne doit pas être traité comme un déchet ménager.
Conformément à la Directive 2002/96/EC sur les déchets
d’équipements électriques et électroniques (DEEE), ce produit
électrique ne doit en aucun cas être mis au rebut sous forme de
déchet municipal non trié. Veuillez vous débarrasser de ce
produit en Ie renvoyant à son point de vente ou au point de
ramassage local dans votre municipalité, à des ns de recyclage.
ItALIANO
Questo simbolo sui prodotto o sulla relativa confezione indica che il
prodotto non va trattato come un riuto domestico. In ottemperanza
alla Direttiva UE 2002/96/EC sui riuti di apparecchiature elettriche
ed elettroniche (RAEE), questa prodotto elettrico non deve essere
smaltito come riuto municipale misto. Si prega di smaltire il prodotto
riportandolo al punto vendita o al punto di raccolta municipale locale
per un opportuno riciclaggio.
POLSkI
Jeśli na produkcie lub jego opakowaniu umieszczono ten symbol,
wówczas w czasie utylizacji nie wolno wyrzucać tego produktu wraz
z odpadami komunalnymi. Zgodnie z Dyrektywą Nr 2002/96/WE
w sprawie zużytego sprzętu elektrycznego i elektronicznego (WEEE),
niniejszego produktu elektrycznego nie wolno usuwać jako nie
posortowanego odpadu komunalnego. Prosimy o usuniecie
niniejszego produktu poprzez jego zwrot do punktu zakupu
lub oddanie do miejscowego komunalnego punktu zbiórki
odpadów przeznaczonych do recyklingu.
WASTE ELECTRICAL & ELECTRONIC EQUIPMENT
Disposal of Electric and Electronic Equipment
(applicable in the European Union and other European countries with separate collection systems)
ENGLISH —
For warranty information, go to www.intellinet-network.com/warranty.
dEutScH —
Garantieinformationen nden Sie unter www.intellinet-network.com/warranty.
ESPAñOL —
Si desea obtener información sobre la garantía, visite
www.intellinet-network.com/warranty.
FRANçAIS —
Pour consulter les informations sur la garantie, visitez
www.intellinet-network.com/warranty.
POLSkI —
Informacje dotyczące gwarancji znajdują się na stronie
www.intellinet-network.com/warranty.
ItALIANO —
Per informazioni sulla garanzia, accedere a www.intellinet-network.com/warranty.
EN MéXIcO: Poliza de Garantia INTELLINET — Datos del importador y responsable ante el consumidor
IC Intracom México, S.A. de C.V. • Av. Interceptor Poniente # 73, Col. Parque Industrial La Joya, Cuautitlan
Izcalli, Estado de México, C.P. 54730, México. • Tel. (55)1500-4500
La presente garantía cubre este producto por 3 años contra cualquier defecto de fabricación en sus
materiales y mano de obra, bajo las siguientes condiciones:
1. Todos los productos a que se reere esta garantía, ampara su cambio físico, sin ningún cargo para
el consumidor.
2. El comercializador no tiene talleres de servicio, debido a que los productos que se garantizan
no cuentan con reparaciones, ni refacciones, ya que su garantía es de cambio físico.
3. La garantía cubre exclusivamente aquellas partes, equipos o sub-ensambles que hayan sido
instaladas defábrica y no incluye en ningún caso el equipo adicional o cualesquiera que hayan sido
adicionados al mismo por el usuario o distribuidor.
Para hacer efectiva esta garantía bastara con presentar el producto al distribuidor en el domicilio donde
fue adquirido o en el domicilio de IC Intracom México, S.A. de C.V., junto con los accesorios contenidos
en su empaque, acompañado de su póliza debidamente llenada y sellada por la casa vendedora
(indispensable el sello y fecha de compra) donde lo adquirió, o bien, la factura o ticket de
compra original donde se mencione claramente el modelo, numero de serie (cuando aplique) y
fecha de adquisición. Esta garantia no es valida en los siguientes casos: Si el producto se hubiese
utilizado en condiciones distintas a las normales; si el producto no ha sido operado conforme a los
instructivos de uso; ó si el producto ha sido alterado o tratado de ser reparado por el consumidor ó
terceras personas.
WARRANTY INFORMATION
INTELLINET NETWORK SOLUTIONS™ oers a complete line of active and passive networking products. Ask your local computer dealer for more information or visit www.intellinet-network.com.
All products mentioned are trademarks or registered trademarks of their respective owners.
INTELLINET NETWORK SOLUTIONS™ bietet ein vollständiges Sortiment aktiver und passiver Netz werkkomponenten. Für weitere Informationen wenden Sie sich bitte an Ihren Händler oder nutzen Sie
die Webseite www.intellinet-network.com.
Alle genannten Produkt- oder Firmennamen sind eingetragene Marken oder Marken der jeweiligen Firmen.
INTELLINET NETWORK SOLUTIONS™ ofrece una línea completa de productos de red activa y pasiva. Pregunte a su distribuidor para obtener mayor informacion o visite: www.intellinet-network.com.
Todos los productos mencionados son marcas comerciales o marcas registradas de sus respectivos propietarios.
INTELLINET NETWORK SOLUTIONS™ ore un assortiment complet de produits de réseau actifs et passifs. Pour plus d’informations veuillez contacter votre revendeur ou utiliser la page d’accueil
www.intellinet-network.com.
Tous le s produ its me ntionn és sont des mar ques com mercia les ou d es marq ues dép osées de leur s prop riétai res res pect ifs.
INTELLINET NET WORK SOLUTIONS™ to kompletna linia akty wnych oraz pasywnych komponentów sieciowych. Poproś lok alnego dealera o więcej informacji lub odwiedź stronę www.intellinet-network.com.
Wszystkie nazwy handlowe i towarów są nazwami i znakami towarowymi zastrzeżonymi odpowiednich rm odnośnych właścicieli.
INTELLINET NETWORK SOLUTIONS™ ore una linea completa di prodotti di rete attivi e passivi. Chiedi maggiori informazioni al tuo rivenditore di computer o visita il sito www.intellinet-network .com.
Tutti i prodotti sopracitati sono marchi di fabbrica o marchi registrati depositati dai proprietari.
 Loading...