

Page 1

Appliance Manual
1. Introduction ……………………..……………………………………… 3
1.1 Product Specifications ………………………....…..……………… 3
1.2 Benefits and Key Features ……………………………..…………… 4
1.3 Physical Parts and Panel of the SA……..……………….…………..…… 7
1.4 Packing List ………………………………………..…………………….… 9
2. Quick Installation ..…………………………………………...……………... 10
2.1 Hardware Installation …………………………….……………………... 10
2.2 Check your PC First …………………………….………….……………. 11
2.3 Connect to the Web-Based Manager……………………………………... 13
2.4 Web-Based Manager-Basic Settings………………………………..……14
3. Configuration Hierarchy .……………………………….……….….…. 21
3.1 Overview of Configuration Menu …………………………..…….. 22
4. Network Settings.…………………………………………………......23
4.1 DHCP Server ……………………………..……….…………………… 23
4.2 IP Alias ……………………………………..………….…………………... 25
4.3 Multiple NAT…………………………………………..…......……………...26
4.4 Route Settings………………………………………..……………... 27
4.5 DDNS ……………………………………………….………………. 28
5. FireWall Settings …………………………………………………….....30
5.1 Virtual Server Settings………………………………….………... 31
5.2 URL Filter Setup………………………………………….…….………….…32
5.3 IP Filter Setup ………………………………………………………………. 33
5.4 Denial of Service ……………………………..………………….. 34
6. VPN Settings………………………………………………..………34
6.1 IP Sec Settings…………..…………………………..………………...35
6.2 PPTP Settings………………………..……………………….………….…..38
1
Page 2

7. System Management ………………………….………….. 40
7.1 Administrator Settings …………………….….…………. . 40
7.2 Event Report Settings .………………………….……………... 41
7.3 Firmware Update ………………………………….……………. 42
7.4 Time Settings ……………………………………..…………….. 44
7.5 SNMP………………………………………………………………..……….. 45
8. System Report ………………………………..…………………. 46
8.1 System Information …………………………………….……………. 47
8.2 System Log……………………………………………..…………… 48
8.3 URL Log ……………………………………………..………………… 49
8.4 DHCP Lease Report …………………………………….…………………50
9. User Management ……………………………..……………………50
9.1 Users ……………………………………………….………………………. 51
9.2 Groups ……………………………………………………….……………. 54
10. NAS Management…………………………………………..………………57
10.1 HD Initialization Wizard…………………………………..………………. 57
10.2 Advanced ……………………………………………..…………………….62
10.3 File Sharing ………………………………………………………………. 66
11. Personal Web server (some models)……….………………..…..71
12. Personal E-mail server (some models)…………………………..…...72
12. Appendix A - USB Printer Server (some models)…………….……...74
12. Appendix B - PPTP VPN Setup...………………….……….…….…...79
2
Page 3

1 Introduction
Thank you for purchasing our innovative all-in-one solution for your
networking needs.
The SA (Server Appliance) integrates server services such as a Network
Address Translator (NAT), Virtual Private Network (VPN), SPI firewall, and
networked storage into one easy to manage device. The Server Appliance
allows a group of trusted computers and networks to connect quickly and
safely. With the Server Appliance, network managers and users can save
time in establishing some of the most common services done on servers
costing thousands of dollars.
1.1 Product Specifications
Connection Sharing
Flexible Address Space for NAT service
IP Alias
Multiple NAT
Virtual Private Network
20 IPSec Tunnels Available
PPTP Server / Client
Firewall
Prevent Denial of Service (DoS) Attacks
Packet/URL Filtering
Access Control, Virtual Server
System Management
Web-based Management for Configuring System
Firmware Update via HTTP
Reset To Factory Settings
Event Alert and Logs
System Information
3
Page 4

Services
DHCP Client/Server
Proxy DNS
RIP
DDNS Client
FTP Server
Network
Programmable Static Route
Network Protocols Supported: PPPoE, TCP, UDP, ICMP, ARP
PPP Authentication
PAP, CHAP, MS CHAPv2
Real Time Clock
File Sharing
Supports CIFS,SMB, Appletalk(AFP), NFS
User Management
Local User Account Management
Power Management
Support Mechanical Off/Soft Off/Sleeping/Working System States
Other Features (Some Models Only)
Personal Web Server
USB Printer Server
Personal POP E-Mail Server
1.2 Benefits and Key Features
Virtual Private Network
With Virtual Private Networking, an enterprise can establish a dedicated
tunnel among branch offices and/or mobile employees. All data is encrypted
and decrypted via the pre-defined dedicated tunnel. This prevents any
hackers from stealing private information in the public network. With this
functionality, any sub-network can be grouped as though they are in the same
network.
4
Page 5

Firewall
The Server Appliance provides a powerful firewall capable of preventing
hackers from attacking the gateway or internal network. Many famous DoS
attacks can be detected and prevented. Whenever an attack is detected, the
system will alert the network manager that an attack has occurred. The
network manager can then inspect the log information to find the IP address
that sent the packets.
Easy Installation
In order to facilitate the use of the Server Appliance, the product comes with
default settings that most network managers can install it without any
modification. If the network manager needs to modify any of the settings, the
Server Appliance provides an intuitive Web-based user interface.
Network Attached Storage
Network-attached storage (NAS) is the concept of shared storage on a
network. NAS transfers data using industry standard file sharing protocols
such as CIFS, AFP, NFS and FTP. Files can be shared simultaneously by
clients regardless of the operating system they are using or the network
server they are attached to. This solution provides convenient common
storage resources.
Dynamic DNS
Dynamic DNS allows anyone wishing to reach your host by the name only.
Dynamic DNS will map that name to your current IP address, which changes
each time you dial your Internet service provider. With a URL that stays the
same all the time regardless of IP address your options become almost as
unlimited as a normal content provider like www.indiatimes.com or
www.yahoo.com.
Print Server (Some Models Only)
Print Server allows any computer in the network to share an USB printer. It
complies with USB 2.0 specifications. And the users can print from any
computer over a LAN.
5
Page 6

Personal Web Server (Some Models Only)
The Personal Web Server enables users to host an information type website
from their appliance. Create your website and place it on the appliance for the
world to see. Use it in combination with our built-in DDNS client and anyone
with a broadband connection can have their very own website.
Personal POP E-mail Server (Some Models Only)
The Personal POP E-mail Server provides users the ability to run a personal
private e-mail server. Send e-mail you’re your registered domain name or just
create a DDNS account and have your personalized e-mail address.
FTP Server
FTP is the most secure, fastest, reliable method of transferring files. The FTP
server allows you full control over who can login to the server appliance,
which files the user can access or they could upload data.
Power Management
We divide the power management function into three parts. These are Power
Down, Wake On LAN and Hard Disk Standby.
We’ll describe each part in detail below.
- Power Down
We turn the power down in several ways:
Power Down by Web
Please select System Management -> Administrator Settings. In
Power Down field, to select the enable radio button and then click
the apply button.
Power Down by press the power button
Prompt Power Down
Please press and hold the power button at least 4 seconds.
-Wake On LAN
The WOL function allows the remote users on the network to turn on the
Server Appliance. Please note that the power adapter must be connected to
6
Page 7

the Server Appliance and plugged into the power outlet.
-Hard Disk Standby
If the hard disk is idle for a while, we would like the hard disk to enter standby
mode to reduce the consumption of power. In the left menu, select NAS
Management -> HD Initialization Wizard, in HD Power Management Setting,
please select the time in the ‘Turn Off hard disk’ field (Figure 3.2a). If you
select ‘none’, the hard disk will not enter the standby mode even if it is always
idle. If you select ’5 mins’, the hard disk will enter standby mode once it is idle
for more than five minutes.
Figure 3.2a
1.3 Physical Parts and Panel of the SA
1 WAN port : 10/100 Mbps
WAN port MDI/MDIX switch
4 LAN ports : 10/100 Mbps
USB 2.0 port (Some Models Only)
Reset Button
Power Button
Power Jack
7
Page 8

LEDs : Link/Activity LEDs for Each Ethernet Port, Power LED, Packet
Transmit/Receive LEDs
Power 12VDC/3A
WAN Port
The WAN port is used to connect to an ADSL/Cable modem for linking to the
Internet.
WAN MDI/MDIX Switch
The WAN MDI/MDIX switch is used to adjust the cable connection of the
WAN port. If the port is connected to hub, you should move the switch to the
“hub” side; if the port is connected to PC like machine, you should move the
switch to the “PC” side. As for the four LAN ports, there is no need to add
additional switches for each cable connection. This is because the LAN ports
support auto MDI/MDIX.
LAN Ports
The LAN ports are used to connect to a PC, server, hub, switch or other
network devices on the intranet.
Reset Button
If you forget your password and/or IP settings, you will not be able to access
the SA. You can use the Reset Button to restore the factory settings. To
initiate a reset, you must hold the button for at least 5 seconds.
The primary default settings are listed in the following table.
Configuration Item Default Settings
Administrator Username <empty>
Administrator Password admin
Internal IP address 172.16.1.1
8
Page 9

Power Button
Description
of LEDsLED
Power
Heart-Beat
WAN/LAN
Link/Activity
10/100 Mbps
Throughput
Status Meaning
On Power On
Off Power Off
Solid/Off System is not working
Flashing System is working
On Link up
Off Link down
Flash The interface is
transmitting/receiving packets
On The network link is 100 Mbps WAN/LAN
Off The network link is 10 Mbps
No LED on Current transfer rate is < 10KB/s
1 LED on Current transfer rate is > 10KB/s
2 LEDs on Current transfer rate is >50KB/s
3 LEDs on Current transfer rate is >100KB/s
4 LEDs on Current transfer rate is >500KB/s
1.4 Packing List
z Server Appliance
z Power Adaptor and Cable
z UTP cable (CAT5)
z User Manual CD
z Quick Start Guide
9
Page 10

2 Quick Installation
This chapter will give you brief instructions on how to install the product. In
section 2.1, we will configure the hardware part of SA step by step. In section
2.2, we will check whether the IP address of your PC is assigned by DHCP.
Once we complete the installation of the SA hardware and checked your PC
settings, we will use the web-based management to configure the SA to suit
your network environment. In section 2.3, and 2.4, we will review all the
software settings. We will configure it to gain access to the Internet. If you
need additional help or advanced setting details, please refer to the
remaining chapters.
2.1 Hardware Installation
Please follow the steps below to install hardware:
1. Get the included Ethernet cable.
Connect one end of it to the ADSL/Cable modem and the other end
to the WAN port on the SA.
2. Get another Ethernet cable.
Connect one end of it to the PC or hub and the other end to one of
the LAN ports on the SA.
3. Turn the ADSL/Cable modem on. Note: Cable modem users MUST
disconnect the cable modem from the wall outlet for at least 2
minutes before turning it on again.
If there are more PCs or hubs to be connected, please repeat step
2.
4. Connect the included power adapter to the power socket on the SA
and then plug the power adapter into a wall outlet.
5. Turn on the SA.
If the link LED of the WAN port is not ON, switch the WAN
MDI/MDIX switch to the alternate setting.
The hardware installation is now complete.
10
Page 11
2.2 Check Your PC First
Please check the following settings on your PC:
Do not assign an IP address to your PC.
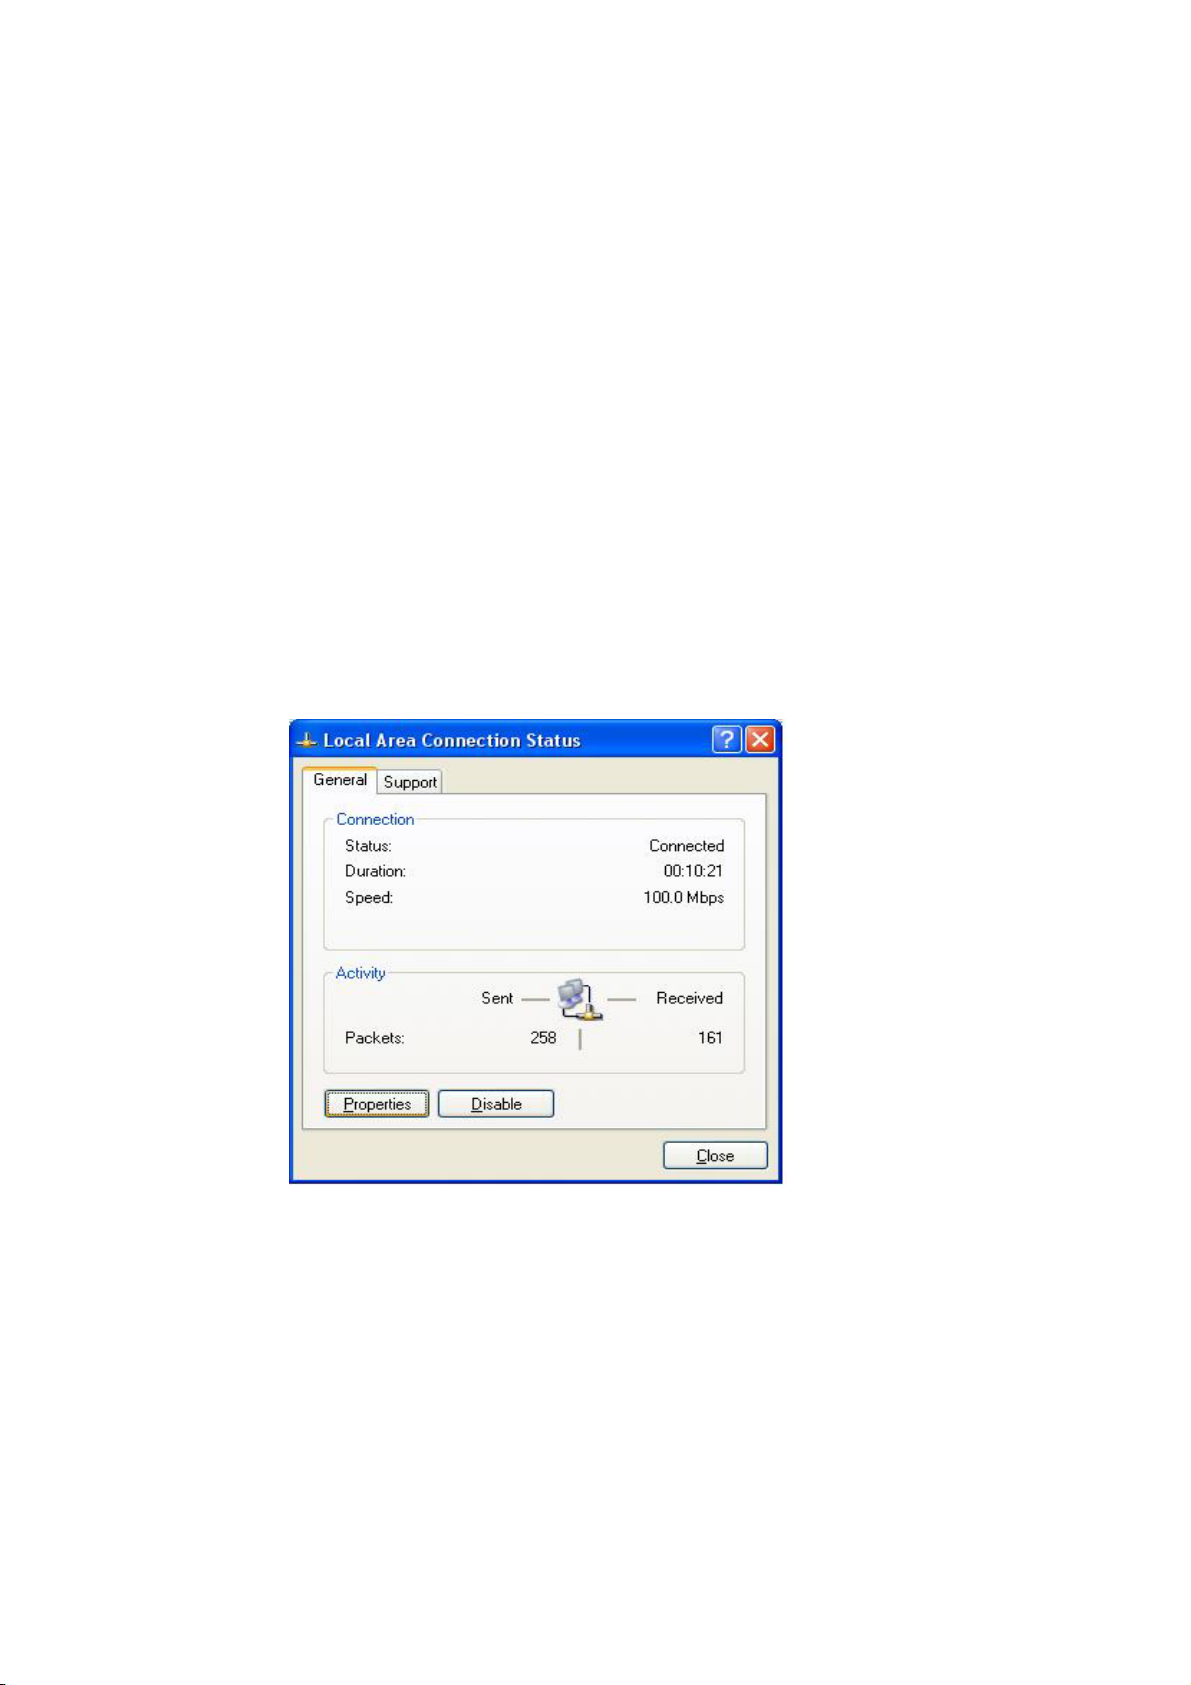
1. Please select sequentially: In Start menu -> Settings -> Control
panel -> Network connections -> Local Area Connection. Then a
“Local Area Connection Status” window shows up. (Figure 2.2a)
2. Click the Properties button in Local Area Connection Status. Then
the “Local Area Connection Properties” window shows up as Figure
2.2b.
3. Select Internet protocol (TCP/IP) item and then click the Properties
button. The “Internet Protocol (TCP/IP) Properties” window shows
up (Figure 2.2c).
4. Select the “Obtain an IP address automatically” radio button then
click the OK button.
Figure 2.2a
11
Page 12
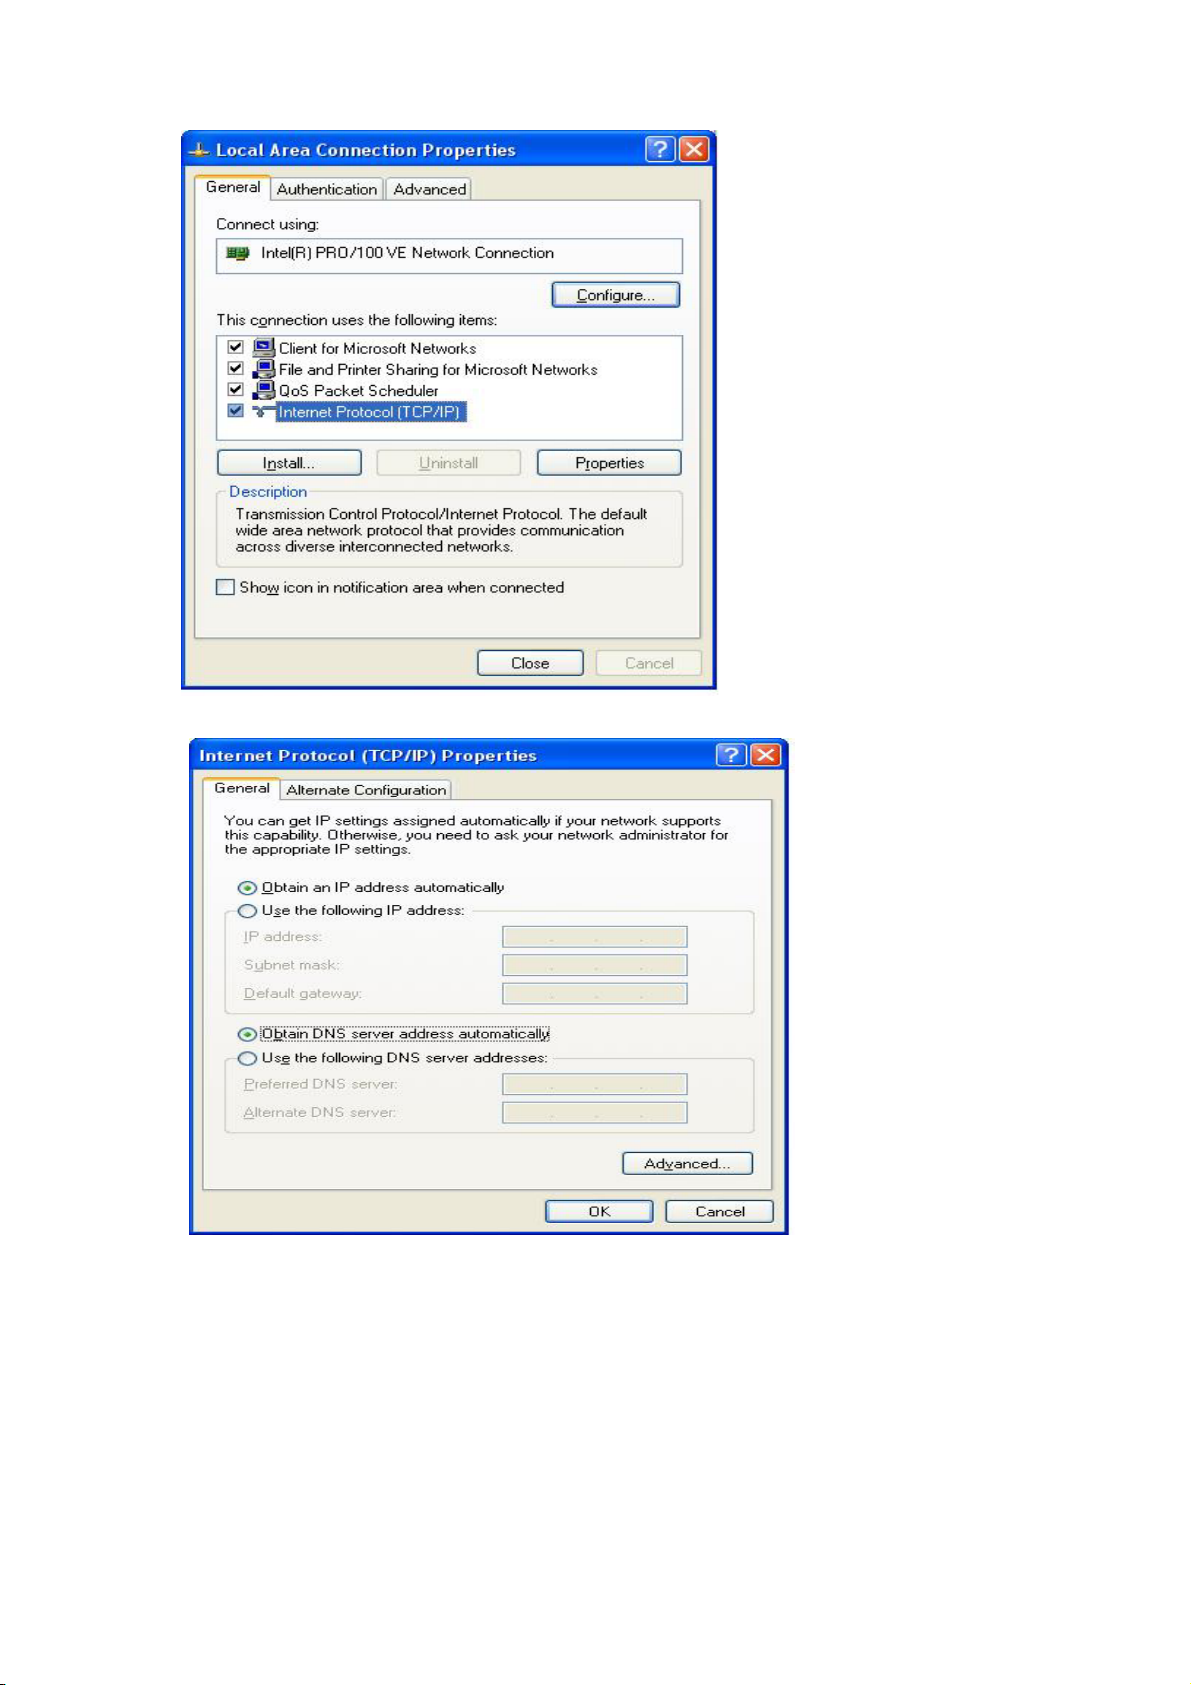
Figure 2.2b
`
Figure 2.2c
12
Page 13
2.3 Connect to the Web-Based Manager
Please follow the steps to connect to the web-based manager:
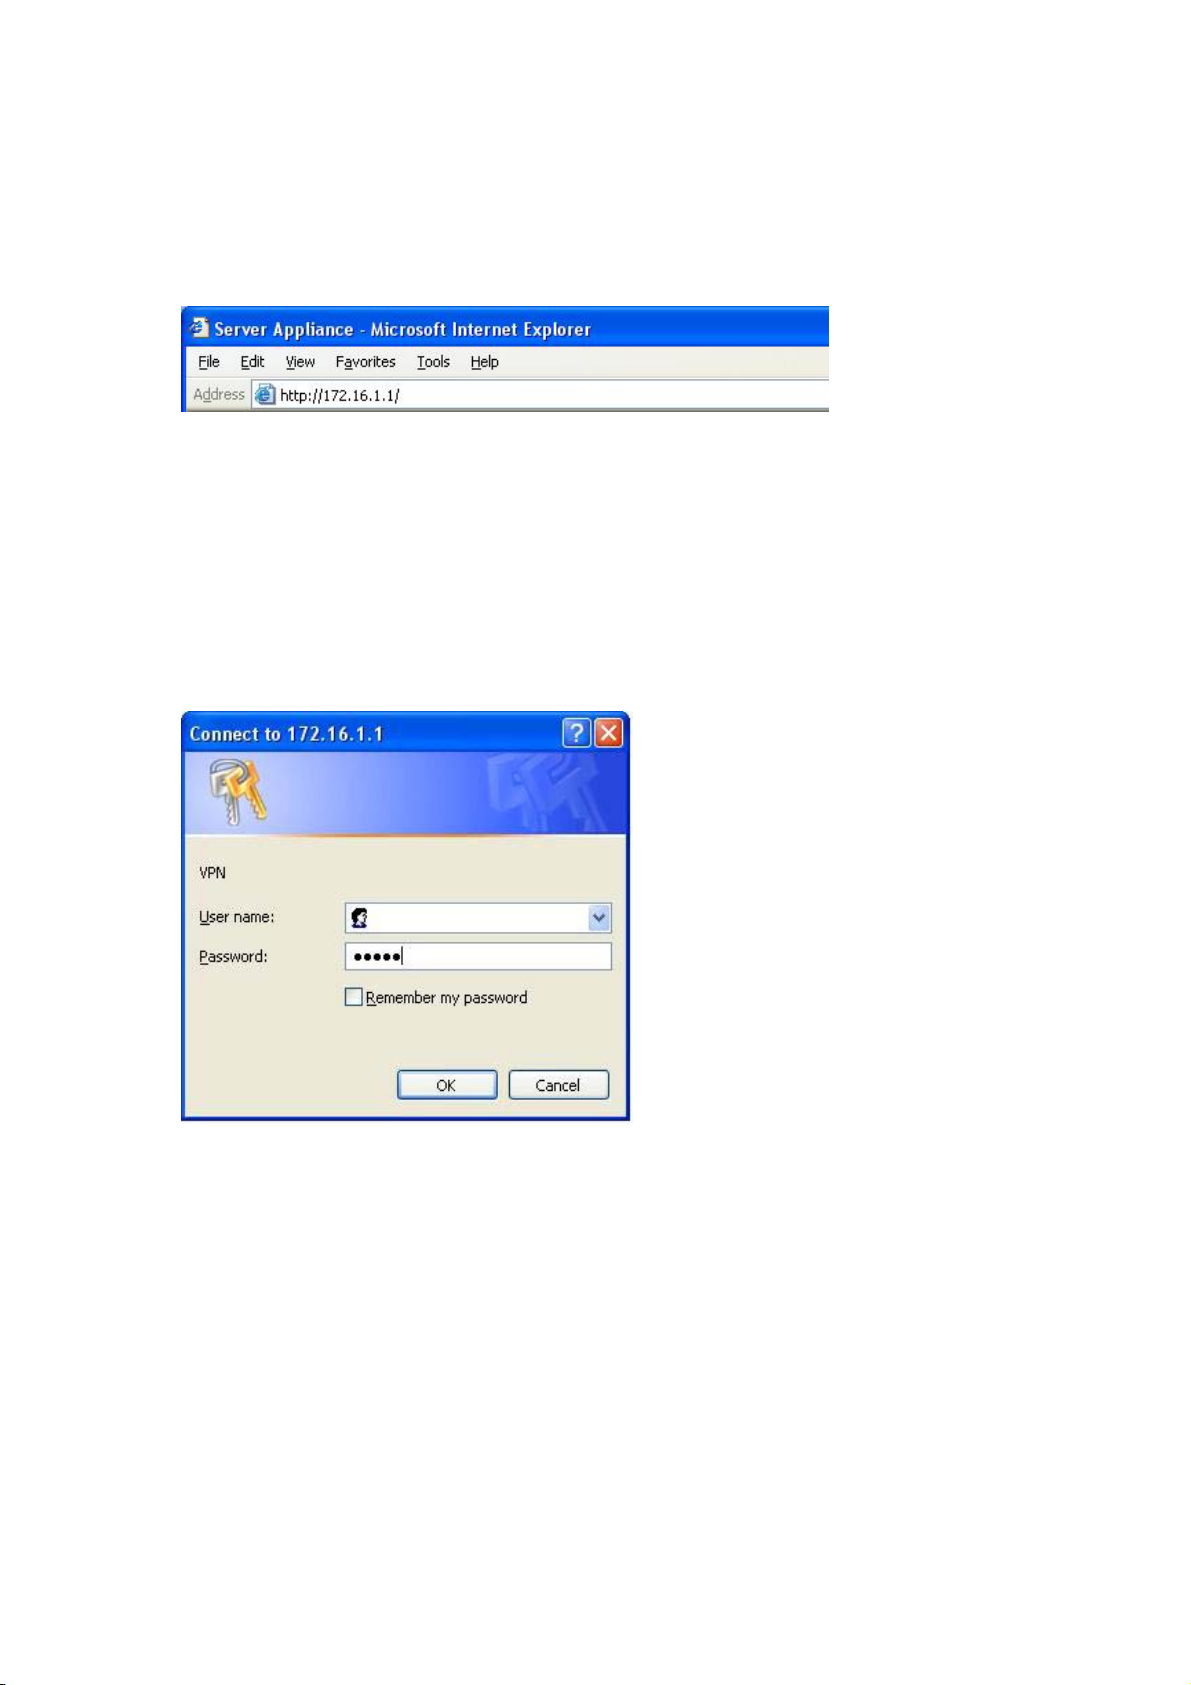
1. Open a browser on the PC that is DIRECTLY connected to the SA.
Type “http://172.16.1.1” in address field. And then press Enter key.
2. An authentication window shows up to prompt you to type the
username and the password.
3. Leave the username blank and type “admin” as a password.
(Figure 2.3a.)
4. Then press OK button. The default web page will appear like Figure
2.3b.
Figure 2.3a
13
Page 14
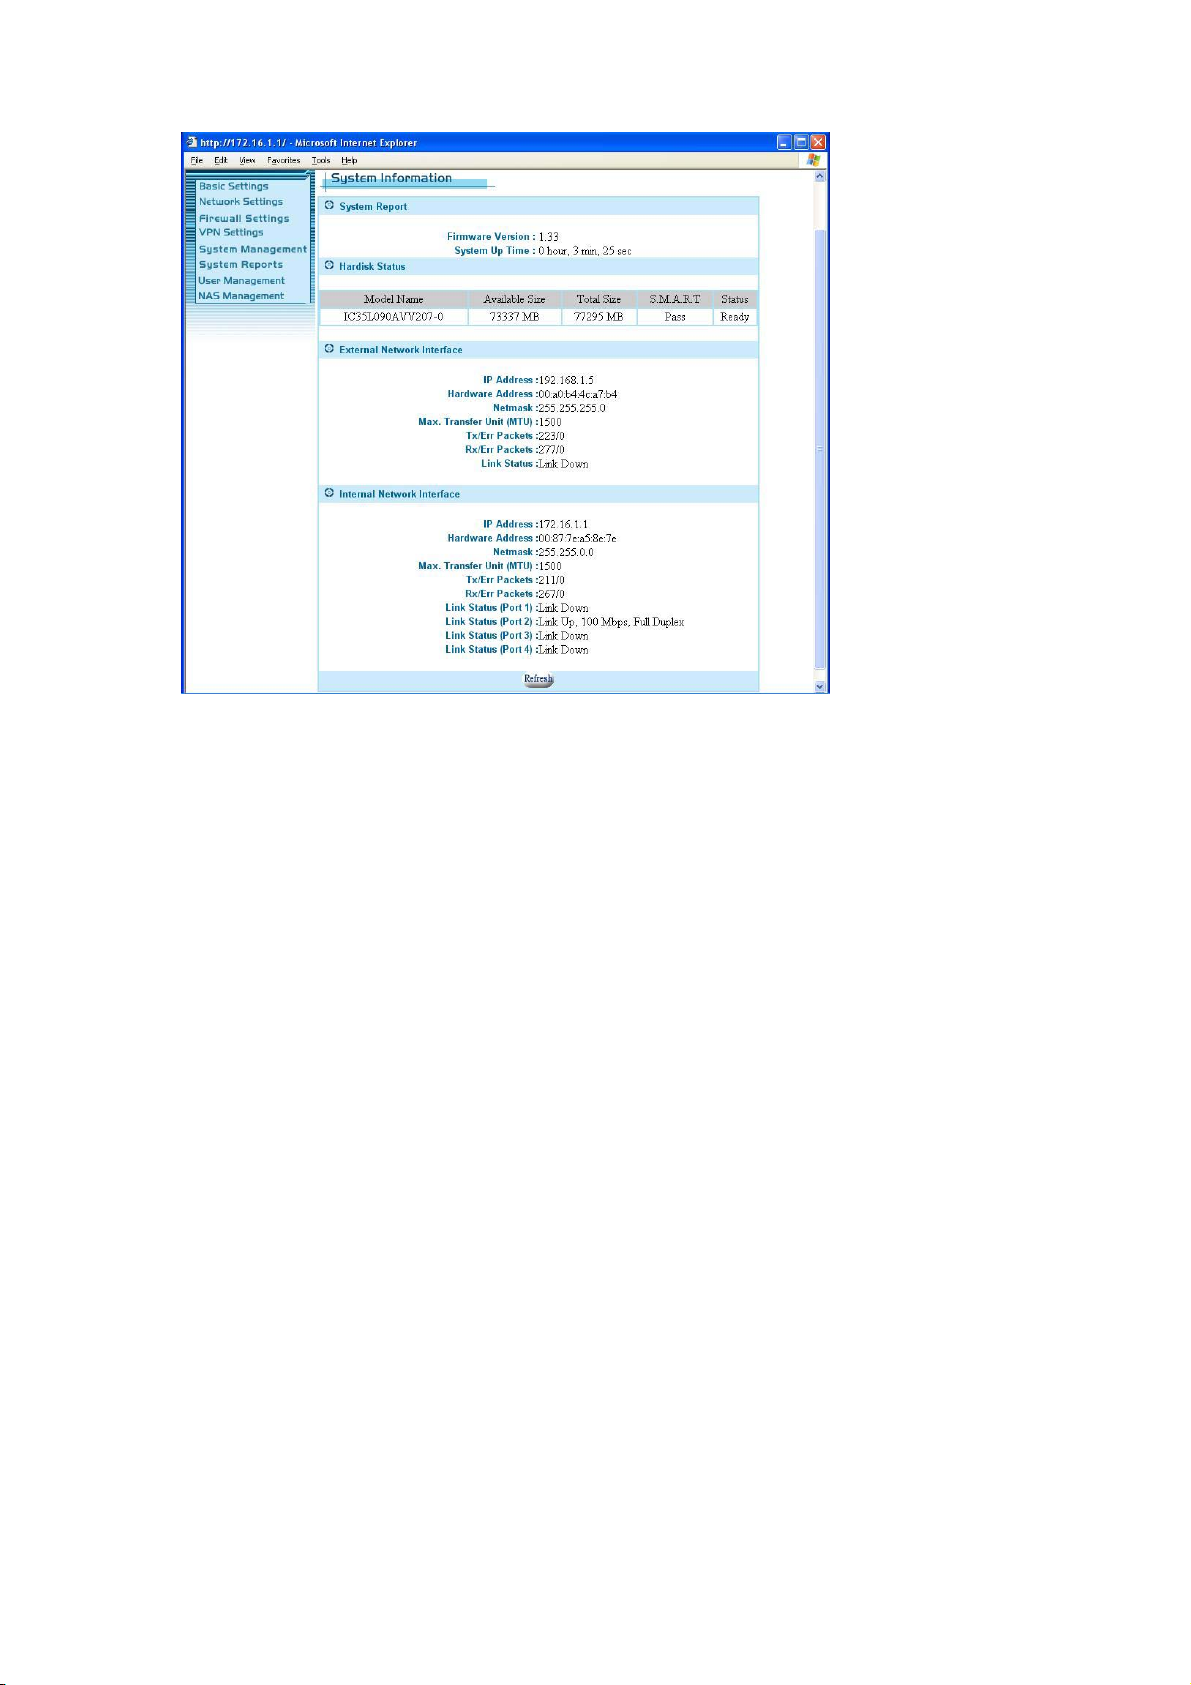
Figure 2.3b
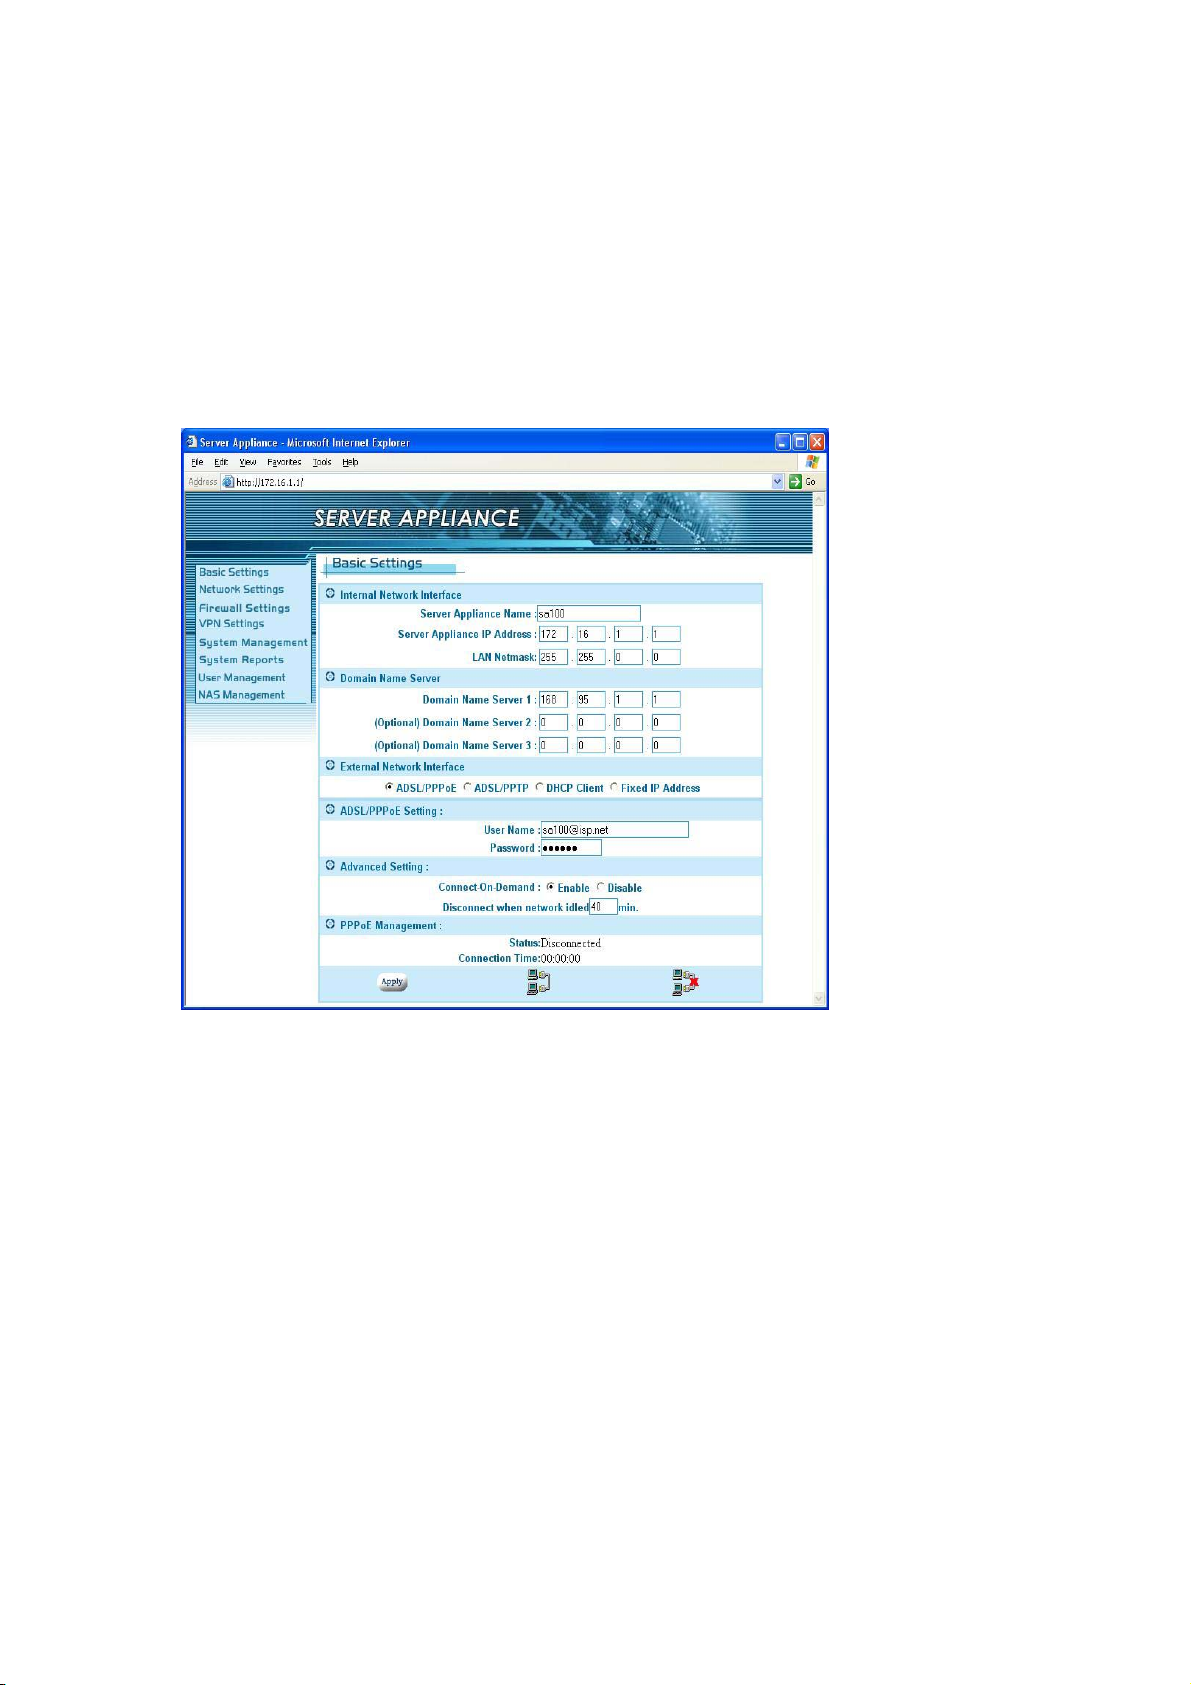
2.4 Web-Based Manager – Basic Settings
Start to configure your network environment by clicking the Basic Settings in
left menu. The Basic Settings page is shown as Figure 2.4a.
14
Page 15
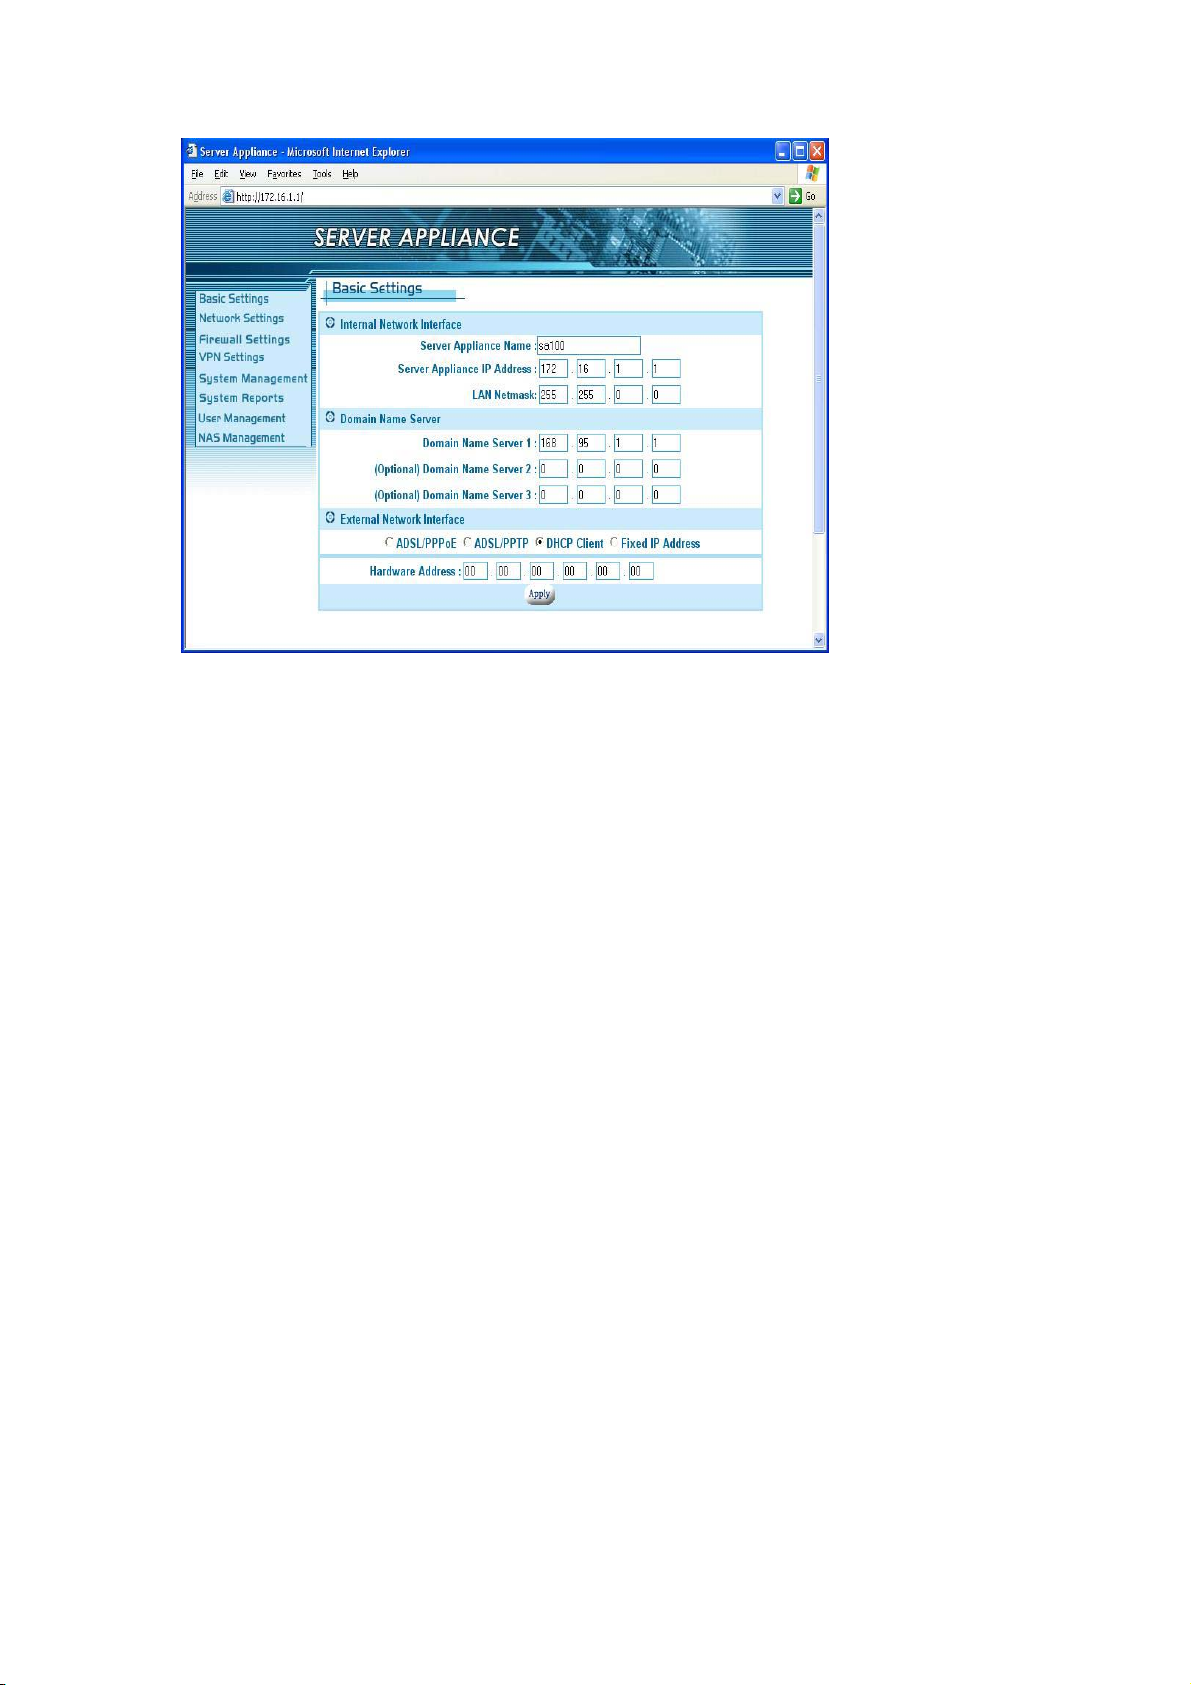
Figure 2.4a
The Basic Settings page contains Network Policy, Internal Network
Interface, Domain Name Server, and External Network Interface. We
describe these settings below in detail. You must click the apply button after
you finish inputting the settings. You will see a rebooting window as Figure
2.4b. During the rebooting phase, do not turn off or unplug the Server
Appliance.
15
Page 16
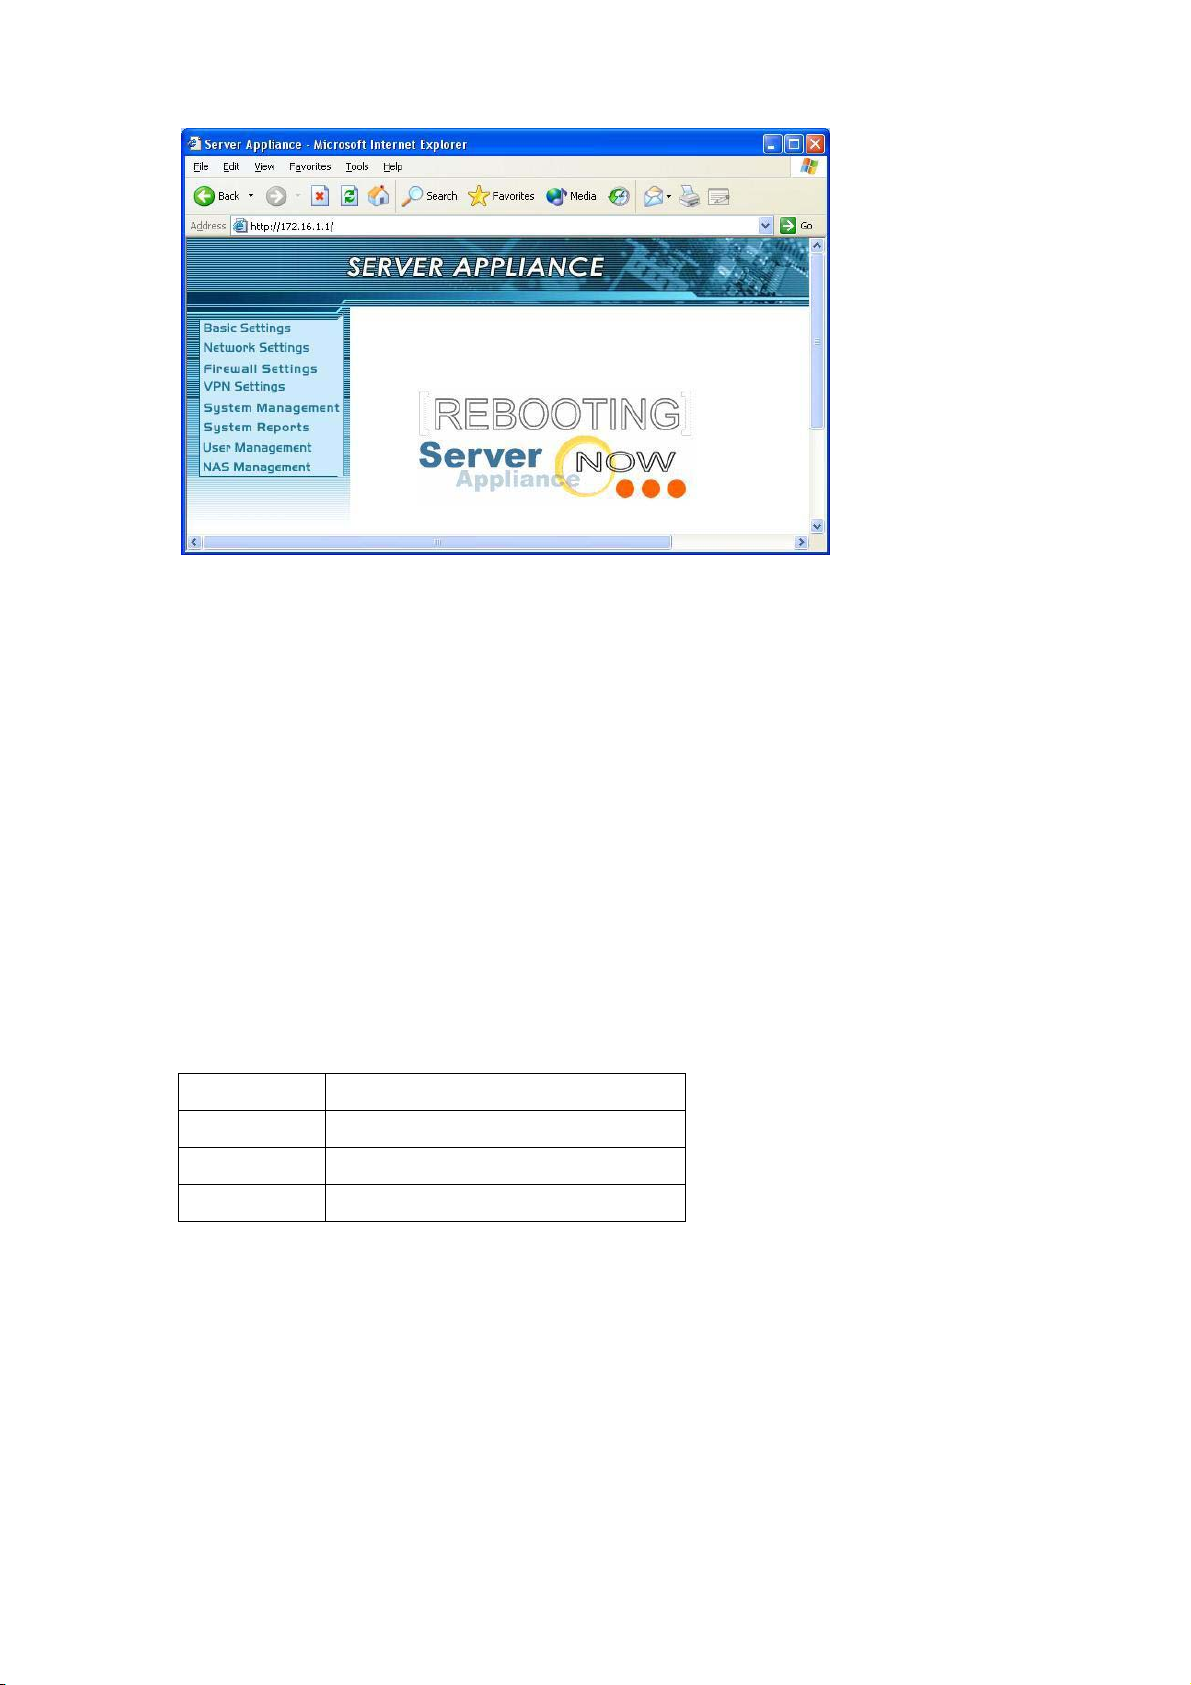
Figure 2.4b
Internal Network Interface
The default settings are:
Host Name: “SA”
Private IP: “172.16.1.1”
Private IP Netmask: “255.255.0.0”
According to the default settings, we will assign the LAN to network
“172.16.1.x” You can add more detailed configurations later in section 4.1
DHCP Server settings.
For the Network Address Translation (NAT) application, the private network
address should be set in the following address range reserved by the Internet
Assigned Numbers Authority (IANA).
Class Address Range
A Class 10.0.0.0/10.255.255.255
B Class 172.16.0.0/172.31.255.255
C Class 192.168.0.0/192.168.255.255
16
Page 17
Domain Name Server
Most of the time this information is not needed, as your ISP will
automatically provide the information.
Please ask the DNS IP address from your ISP if one is required.
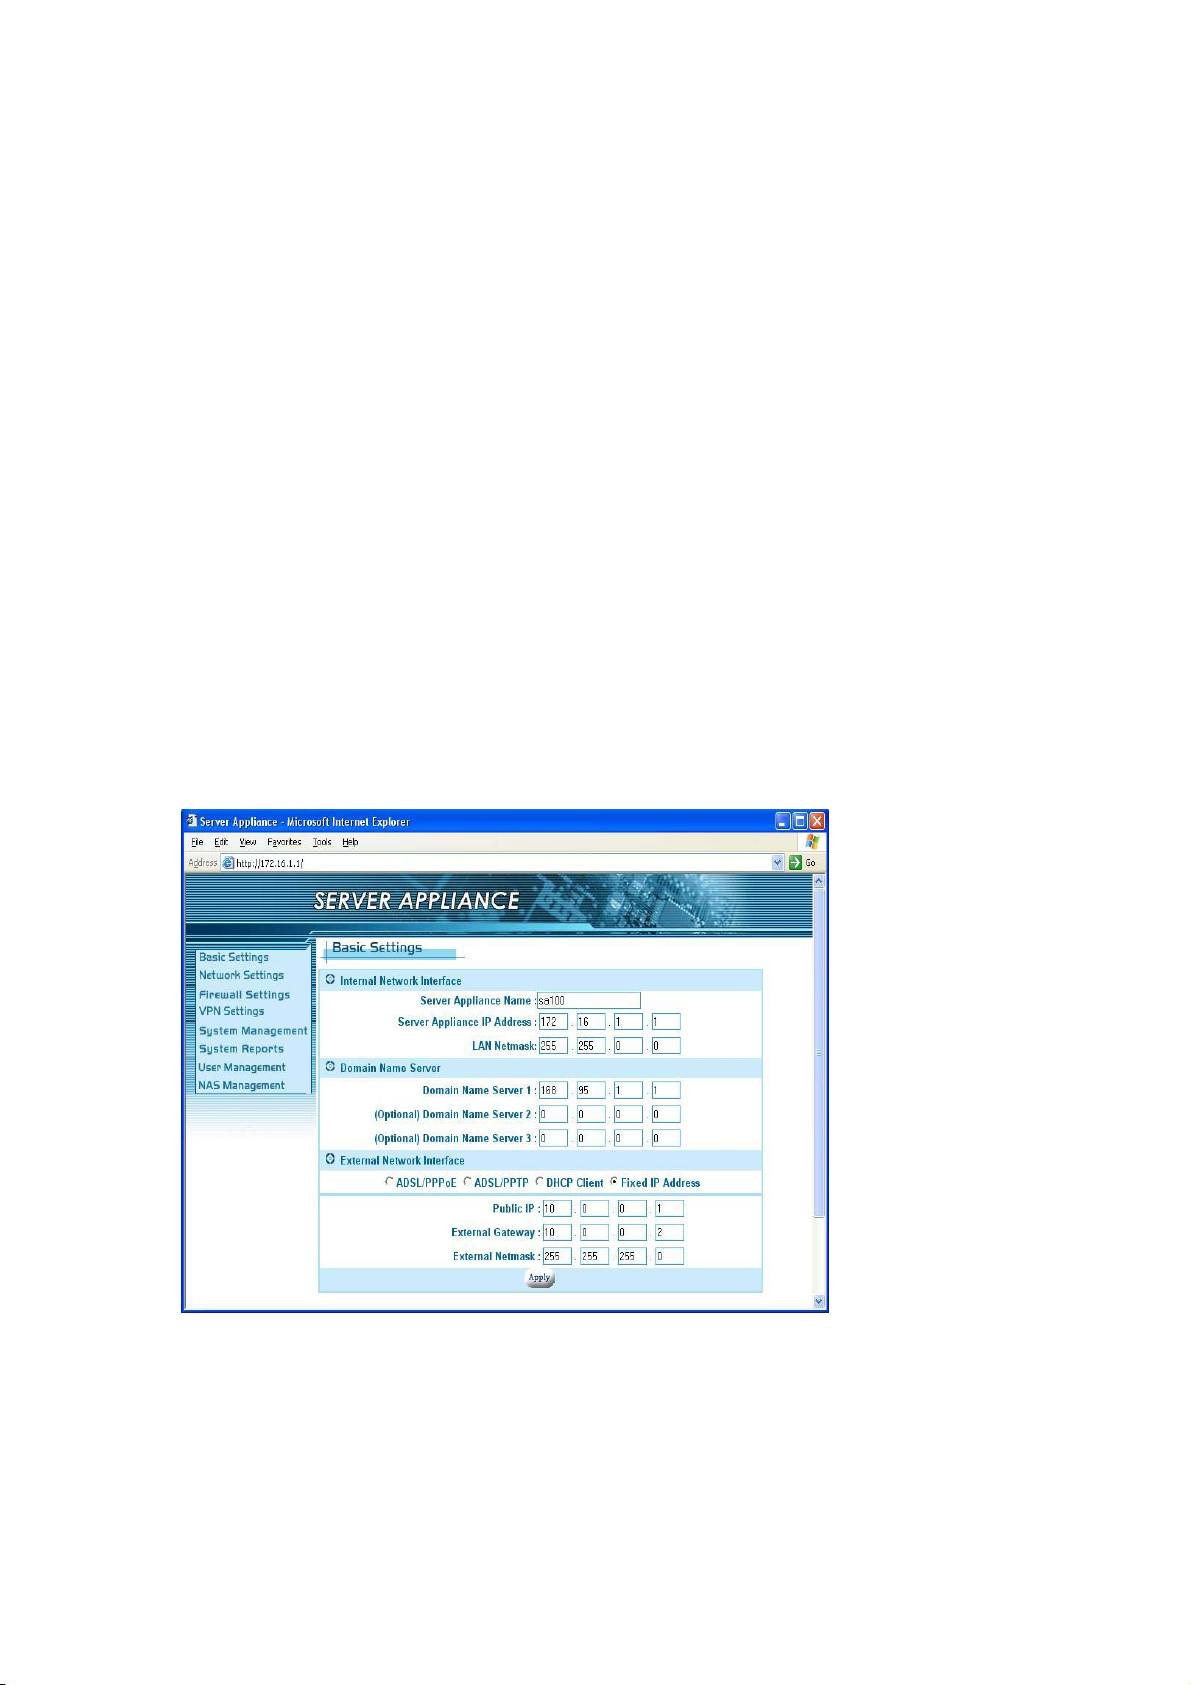
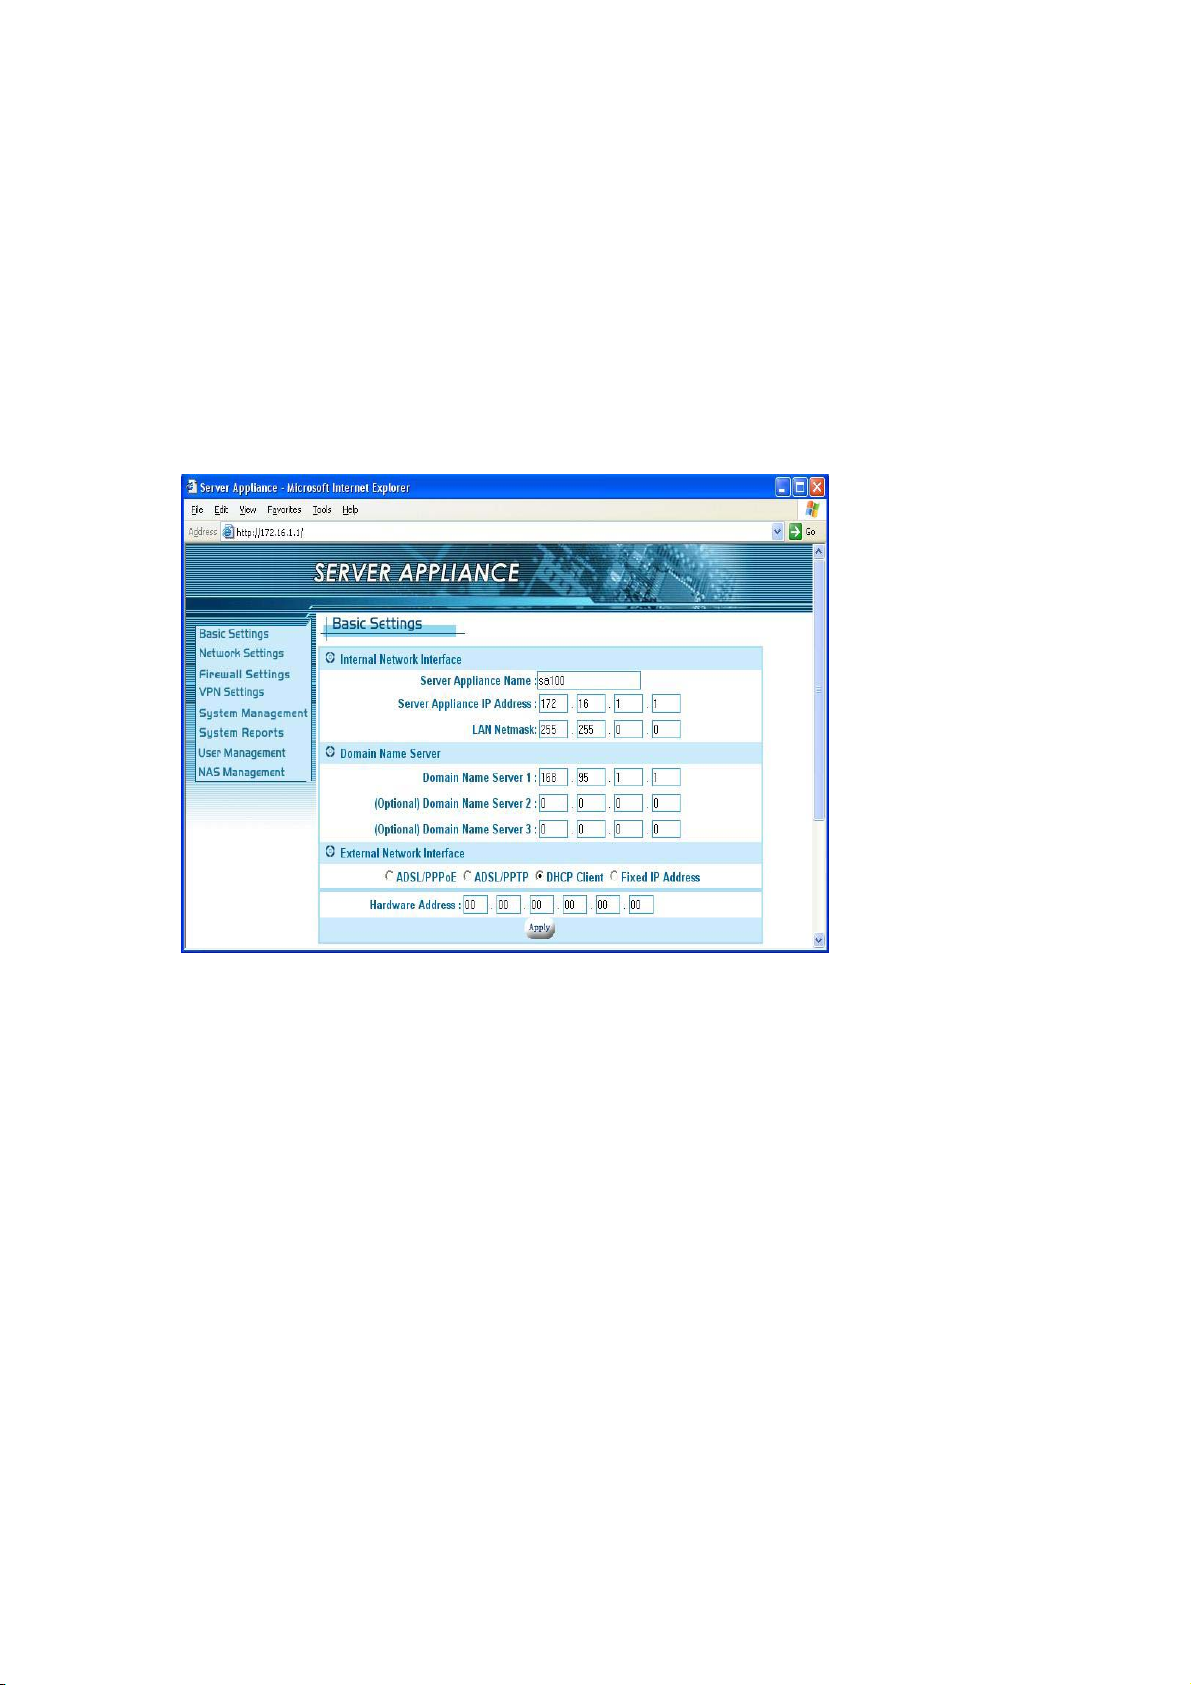
External Network Interface
External network interface includes ADSL/PPPoE , DHCP Client and Fixed
IP Address settings. Make sure that the system information webpage shows
that your Link status is ‘Link Up’. If not, please check your connection and/or
switch the MDX switch located next to your WAN port. We have to choose
one of the three ways to configure the external network interface. They are
illustrated as follows:
Example 1: If you are connecting through a fixed IP address from the ISP.
Example 2: If you are connecting through a dynamic IP address from ISP.
Example 3: If you usually enter a username and password to access the
Internet.
Example 1: Fixed IP Address Settings
17
Page 18
If you have a fixed IP address from your ISP to access the Internet, please
follow the steps below:
1. Select the Fixed IP Address radio button.
2. Enter the Public IP address.
3. Enter the External Gateway.
4. Enter the External Netmask.
5. Click the apply button.
Example 2: DHCP Client / Cable Modem
If you have a dynamic IP address from your ISP to access the Internet,
please select the DHCP Client radio button. Once the external IP address is
obtained via the DHCP protocol, there is no need to give an external IP
address, external gateway address or netmask. The DHCP server will
dynamically assign these fields. In general, you should choose this option if
you are connecting the Server Appliance to a cable modem. Note: Cable
modem users MUST disconnect the cable modem from the wall outlet for at
least 2 minutes before turning it on again. Some cable modem connections
need you to provide specific hardware address. For the case, you should fill
18
Page 19
your hardware address that you get from your ISP provider in Hardware
Address field to override the original hardware address. However, it does not
update the original hardware address stored in EEPROM. If you would not
like to override the hardware address, you should set each field of the
Hardware Address to zero “00”.
Example 3: ADSL Connection
Most ADSL connections do not give you a fixed IP address. In this case, you
must enter the user name and password provided by your ISP for
authentication. Please follow the steps below.
1. Please select the ADSL/PPPoE radio button.
2. In ADSL/PPPoE Setting: Enter the User Name and Password.
3. Click the apply button to save your settings.
After completing your configuration, each time the SA boots, it will try to
19
Page 20
connect with your ISP and the ISP will assign the Server Appliance an
external IP address. Once successfully connected, the Status field should
reflect this. If the Status is still the same, check to make sure that the
username, password, cables, etc. are all correct.
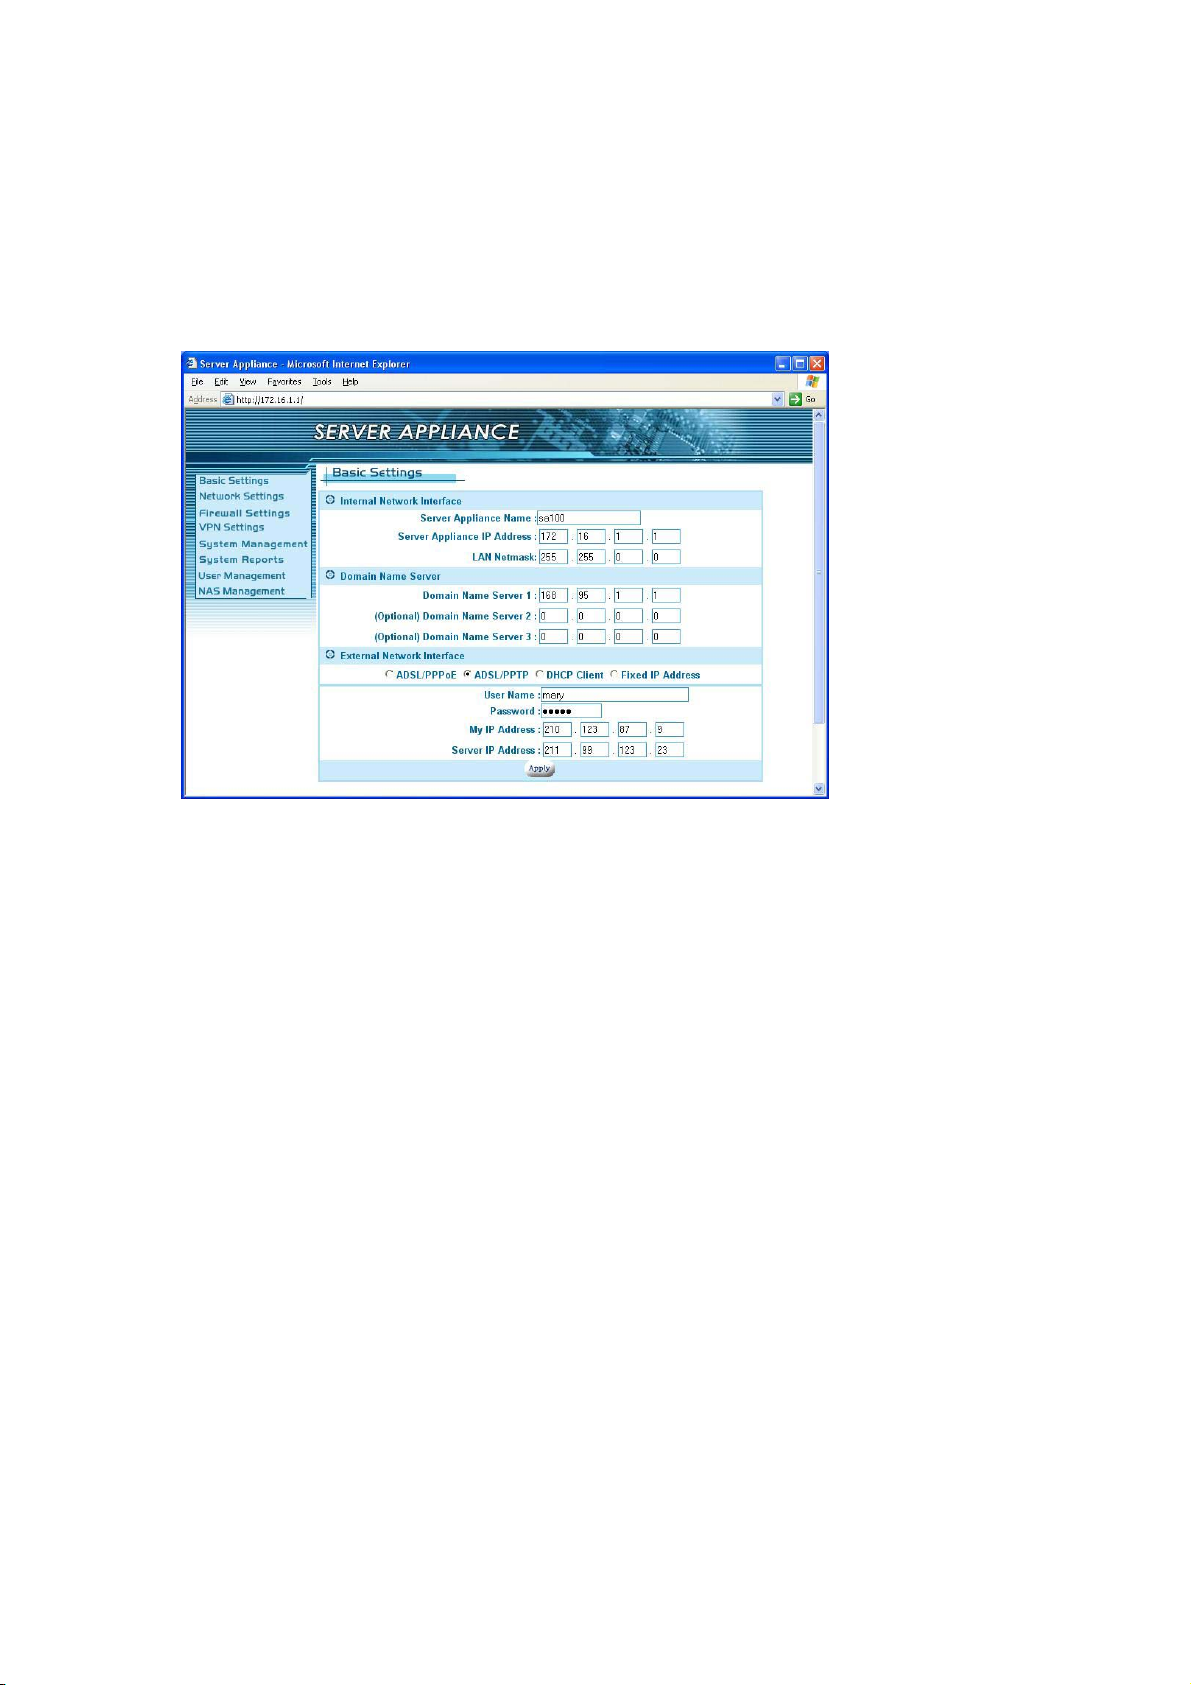
Example 4: ADSL/PPTP Client Setting
If your ISP provides a PPTP server, you could set up the PPTP client here.
Please follow the steps:
1. Select ADSL/PPTP radio button.
2. Enter the user name. (You get this from your ISP)
3. Enter the password. (You get this from your ISP)
4. Enter the IP address of your host in My IP Address.
5. Enter the IP address of the server in Server IP Address.
In the following chapters, we will cover more details of configuring the SA.
20
Page 21

3 Configuration Hierarchy
This chapter gives you an overview of all the configuration options available.
The Server Appliance is a multifunction product. The section3.1 explains the
corresponding settings for each function. And in section3.2, we describe the
power management in detail.
There are eight main categories in configuration menu, Basic settings,
Network settings, Firewall settings, VPN settings, System management,
System reports, User management and NAS management. Each item
has advanced configurations. See Figure 3.1..
21
Page 22
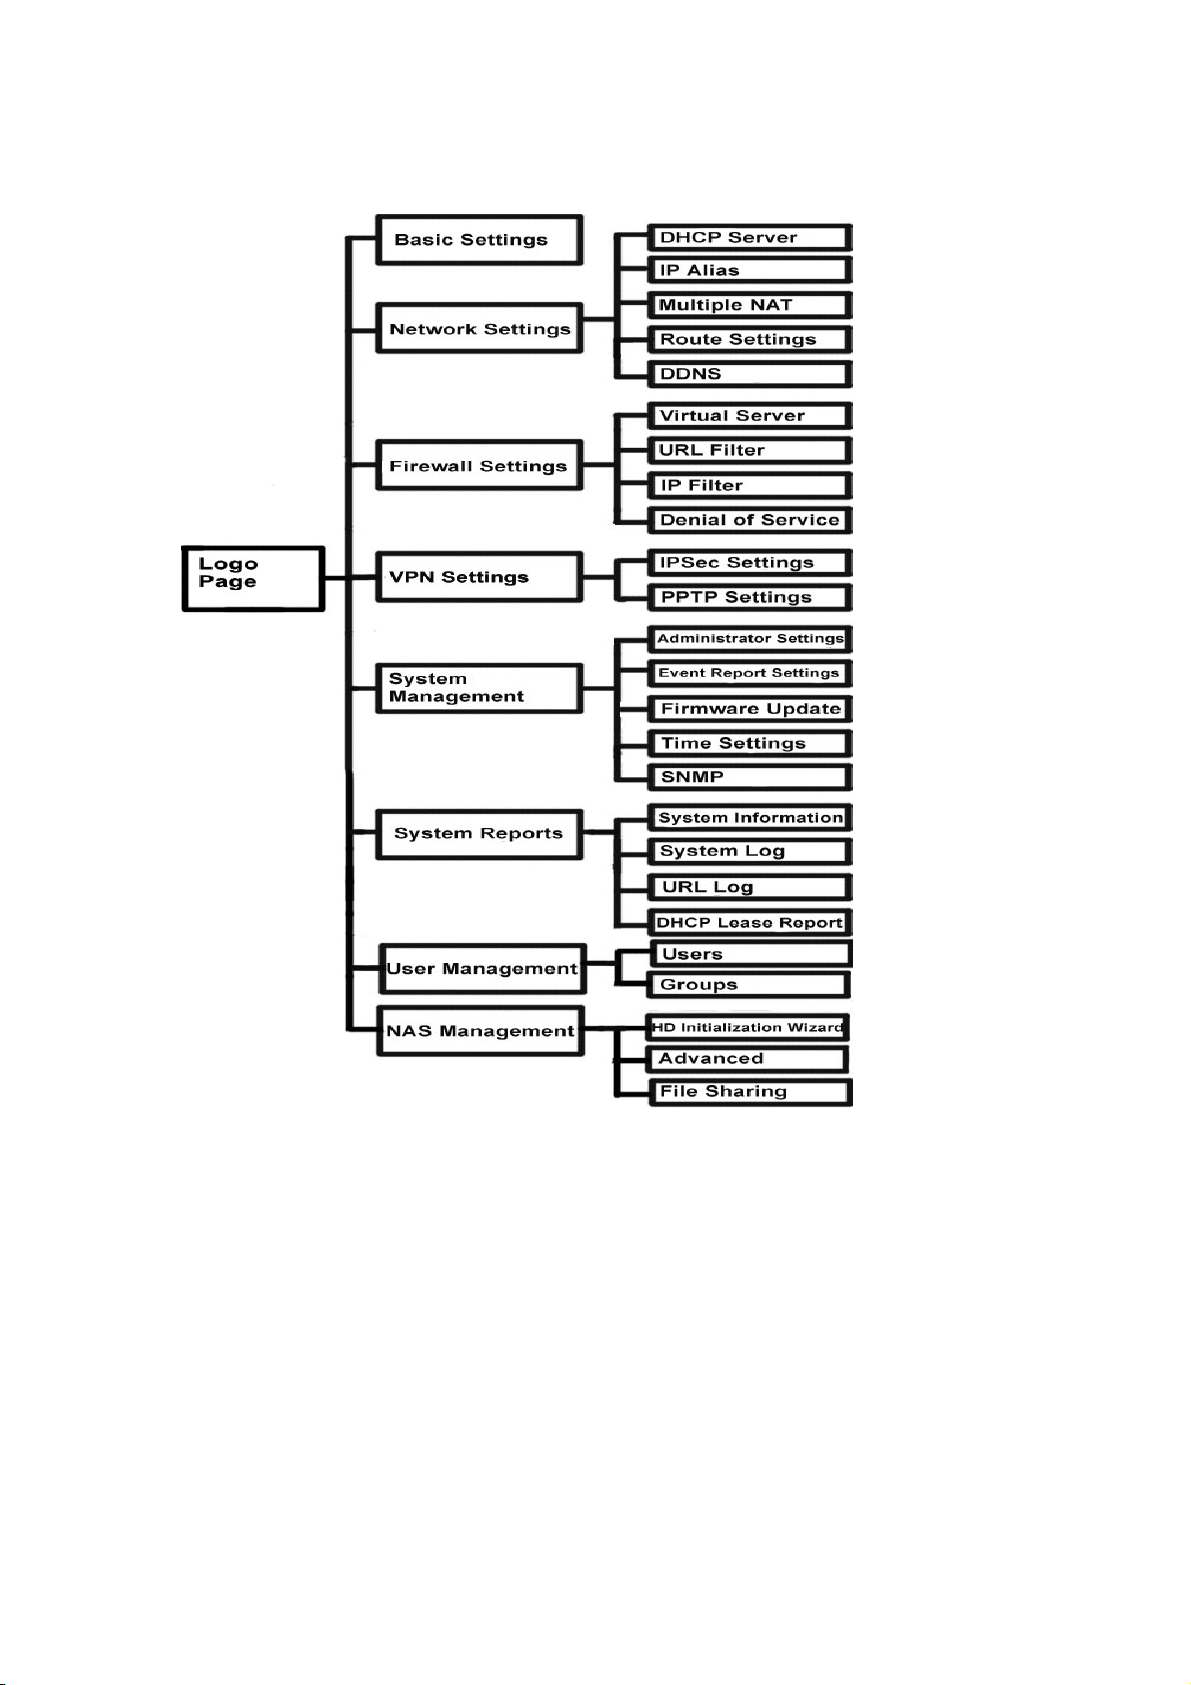
3.1 Overview of Configuration Menu
Figure 3.1
22
Page 23
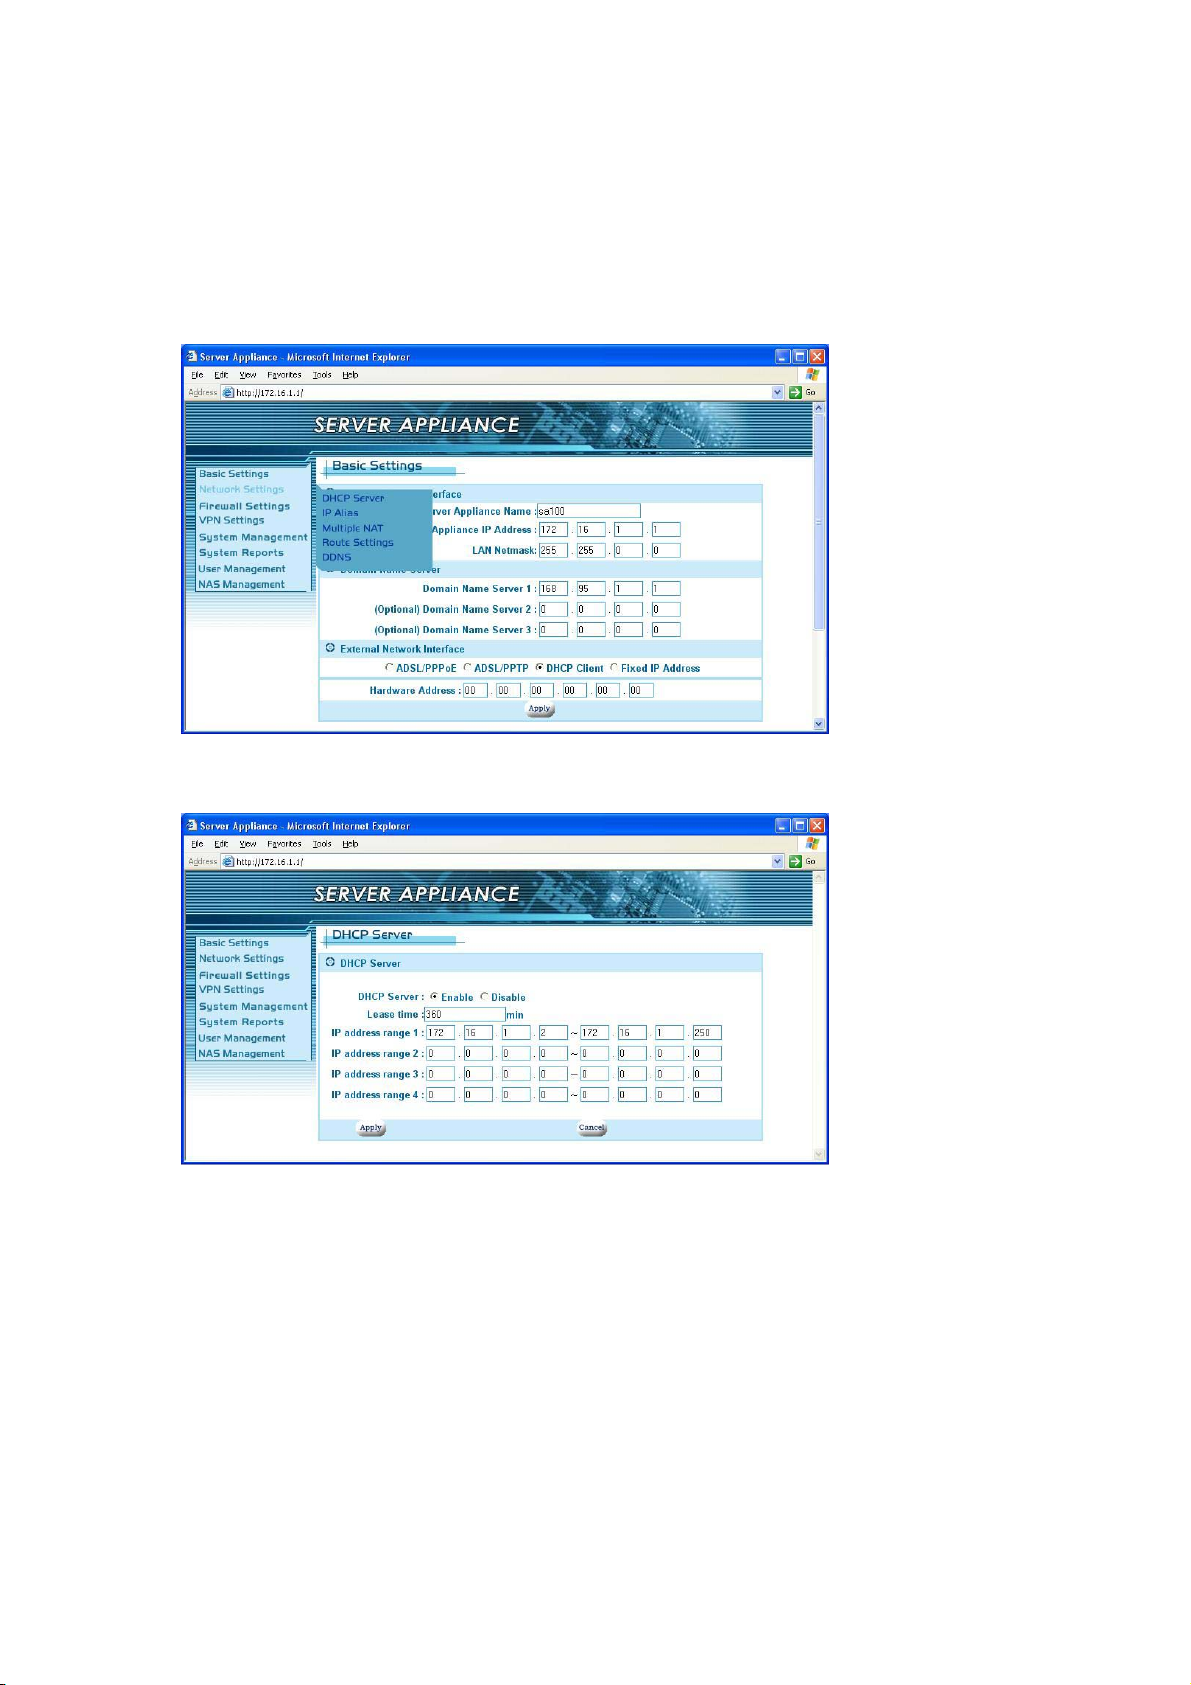
4 Network Settings
When you select Network Settings in the left menu of the web page, five
configuration options appear: DHCP Server, IP Alias, Multiple NAT, Route
Settings and DDNS. Please refer to the corresponding section for these
configurations.
4.1 DHCP Server
In DHCP Server settings, we assign the rage of the virtual IP addresses for
the four LAN ports of SA. All devices connect to the LAN ports of SA will be
dynamically assigned the IP addresses within the range. If you wish to mix
dynamic and static IP clients on your network:
23
Page 24

Under DHCP server settings, the SA defaults to assigning IPs 172.16.1.2
through 172.16.1.250...So depending on how many fixed IP devices they
have, they can assign their device to an IP of 172.16.1.251 (through 254) as
these IPs will not be handed out by the SA. If they have more devices or want
a different IP range, then all they need to do is modify the range that the SA
hands out so it does not hand out an IP in that range. Typical offices set their
DHCP server to assign IPs from 30 through 200. IPs 1 through 29 are usually
assigned to servers and 201 and above are reserved for special uses.
You can either enable the DHCP server or disable it in this screen also.
To Enable the DHCP Server
If you do not have a DHCP server on your network,
1. Select the Enable radio button.(already enabled by default).
2. Enter a number in Lease time field.
3. Enter the IP address range1 as “192.168.0.2” and “192.168.0.250”
(default).
4. Enter the IP address range2, otherwise enter “0” in each field.
5. Enter the IP address range3, otherwise enter “0” in each field.
6. Enter the IP address range4, otherwise enter “0” in each field.
7. Click the apply button.
When DHCP server is enabled, it will allow DHCP clients to obtain their
network configuration from the unit. In the figure above, the IP address range
of 192.168.0.2 to 192.168.0.250 is dynamically assigned to individual DHCP
clients. The DHCP client may be assigned an IP address like “192.168.0.10”.
The IP address “192.168.0.1” cannot be assigned as it is not in the range and
is also assigned to SA under Basic Settings. If you assign another network
(e.g. 192.168.1.x) to IP address ranges 2, 3, 4, please refer to section 4.2 for
further IP Alias setting. When no other IP address ranges are assigned, a
zero value should be filled in to indicate that no other IP addresses are
available for assignment.
24
Page 25

To Disable the DHCP Server
If you already have a DHCP server on your network,
1. Select Disable radio button
2. Click the apply button.
Or you do not have DHCP server on your network, but you would like
to assign a static IP address to each device connected to the LAN
port of SA.
1. Select Disable radio button.
2. Assign a static IP address to each device connected to the LAN port.
For example, you have four PCs, PC1, PC2, PC3 and PC4 connected to
the LAN port. You have to assign a UNIQUE static IP address i.e.
“192.168.0.34”, “192.168.0.25”, “192.168.0.18”, “192.168.0.108” to PC1,
PC2, PC3 and PC4 respectively. Note: The static IP addresses
assigned are all in the same subnet with SA. In Basic Settings, we set
“192.168.0.1” as private IP address of SA with a 255.255.255.0 subnet.
Therefore, the networked PCs need to belong to “192.168.0.x”.
4.2 IP Alias
In Basic Settings, we’ve set the private IP address of SA as “192.168.0.1”.
We will assign the LAN ports of SA to the network of “192.168.0.x”. In DHCP
server settings, we’ve set the IP addresses of the LAN as “192.168.0.x”.
“192.168.0.x” includes “192.168.0.x”, and therefore is considered to be in the
same network. There is no problem if the network interface contains only one
IP address range, but if you want to assign another IP addresses like
“192.168.1.x” to the LAN, then there is an issue. “192.168.1.x” and
“192.168.0.x” are not in the same network. We need IP Aliasing to resolve
this issue. IP alias allows one network interface to contain more than one
network. It allows the additional network “192.168.1.x” to be recognized by
the SA.
25
Page 26

Please follow the steps to add another network:
1. Enter “192.168.1.1” in IP Alias 1.
2. Enter “255.255.255.0” in Netmask of IP Alias 1.
3. Click the apply button.
Note that the IP Alias 1, 192.168.1.1 is assigned to SA and the network is
“192.168.1.x”.
For additional IP addresses of the internal network interface to be accepted,
enter the other IP address in IP Alias 2 and IP Alias 3. Enter “0” in each field if
none.
4.3 Multiple NAT
If you get several fixed IP addresses from your ISP and the ISP restricts the
bandwidth for each fixed IP address, you have to prevent the network
26
Page 27

packets from always sending on the same IP address and the other IP
address to sit idle. Multiple NAT solves this and allows you to increase the
bandwidth. Multiple NAT allows you to dispatch your network packets evenly
to these IP addresses provided by ISP.
1. Enter the Internal IP range1, e.g. “172.16.1.1/24”. It means the
network is “172.16.1.x”
2. Enter the External IP range1, the IP address range you get from
your ISP.
3. Enter the Internal IP range2, e.g. “192.168.1.1/24”. It means the
network is “192.168.1.x”.
4. Enter the External IP range2, the IP address range you get from
your ISP.
5. Or enter “0” in each field for non-setting multiple NAT.
6. Click the apply button.
After you configure the Multiple NAT on the group of fixed IP addresses, it
can increase the bandwidth. The Internal IP range you entered will be routed
to the corresponding External IP range.
4.4 Route Settings
The Route Settings page gives you a way to set the static route. You have to
set the static route if you would like to route your packets to the specific
network and the router of the destination network does not support RIP
27
Page 28

(Routing Information Protocol). If the router supports RIP, it will automatically
exchange routing information with SA and it is not necessary to set a static
route. Please refer the steps and figures to set a static route.
1. Select Enable radio button in Routing Setup.
2. Enter the network in Destination network column. (e.g.
“192.168.6.0/24”)
3. Enter IP address of the gateway in Gateway column. (e.g.
“172.16.1.249”)
4. Enter the number in Hop count column. The number means how
many gateways you have to pass through.
5. Click the apply button.
In the figures, the destination network is “192.168.6.x”. And the packets will
be route in or out of the destination network through the gateway
“172.16.1.249”.
4.5 DDNS
Your Internet Service Provider (ISP) provides you at least one IP address to
use when connecting to the Internet. The address you as assigned may be
static, meaning it never changes, or more than likely dynamic, meaning it’s
likely to change periodically. How often it changes depends on your ISP. A
dynamic IP address complicates remote access since you may not know your
current WAN IP address when you want to access your network over the
28
Page 29

Internet. DDNS provides a simple, and in most cases free, solution.
The Internet uses DNS servers to lookup domain names and translates then
into IP addresses. Domain names, such as www.yahoo.com, are just easy to
remember aliases for IP addresses. A dynamic DNS service provides a
means of updating your IP address so that you listing will be current when
your IP address changes. There are several services on the Internet that are
available for free. We will only cover one, www.dyndns.org. You will need to
register with the service and setup a domain of your choice from the list they
provide for you.
The DDNS service in our device works by uploading your new WAN IP
address to the servers when it changes. You would only need to enter the
account information in the DDNS setup page of your unit.
How to setup a DynDNS DDNS account:
1. Access the DynDNS homepage ( www.dyndns.org ).
2. If you have not registered, click ‘Sign Up Now’ to create a new
account.
3. Follow the instructions to create a free DDNS account. Requires only
e-mail address.
4. Log into your account by providing a username and password.
5. Select ‘Services’ from the top menu.
6. Select ‘Dynamic DNS’ from the choice of services.
7. Select ‘Add A Host’ from the ‘Your Hosts’ section. Follow the
instructions.
8. Note your hostname so you can input it in the DDNS configuration for
your device.
You can setup additional host names for additional devices.
Please follow the steps below to setup DDNS on your SA.
1. Select Enable radio button in DDNS Client Service field.
2. Select the DDNS service provider.
29
Page 30

3. Enter the User name. The user name you log in DDNS service.
4. Enter the password. The password you log in DDNS service.
5. Enter the Host name. The host name you register in DDNS
service.
6. Click the apply button.
Every time your public IP changes, the SA will tell the DDNS server what your
new IP address is. Other users, through the magic of DDNS, will be sent to
the right place.
5 Firewall Settings
When you select the Firewall Settings item in left menu of the web page, four
configuration items appear including: Virtual Server settings, URL Filter, IP
Filter setup and Denial of Service. Please refer the corresponding section for
each of these items.
30
Page 31

5.1 Virtual Server Settings
The virtual server service is a way to simulate multiple servers on the intranet.
You have several IP addresses within your LAN. These IPs are not visible to
the users from the Internet. When servers are installed in the office that need
to be seen from the Internet, we establish some forwarding rules to deal with
the packet from the Internet users and direct the SA to forward the specific
packets to the specific IP address. Users from the Internet could be allowed
to access the specific server on your LAN. You can configure different IPs to
act as different virtual servers. For example, the users accessing port 21 will
be directed to “172.16.2.1”. “172.16.2.1” could be a FTP server. Users
accessing port 80 will be directed to “172.16.2.2”, an HTTP server on the
LAN. For users outside the LAN, they will feel like many services are running
on a single host. Please follow the steps below.
1. Select Enable radio button in Virtual Server.
2. Enter the IP address , in LAN will be set as a virtual server.
3. Select the Protocol.
4. Enter the number in Ports, the users accessing the port will be
directed to the virtual server in step 2.
5. Please repeat the steps above to establish more virtual servers
31
Page 32

or enter “0” in each field for none.
6. Click the apply button.
5.2 URL Filter Setup
The URL Filter function is used to restrict internal hosts from accessing
specific URL locations. You deny any access to the URL location specified in
the Site1, Site2 …Site10 fields.
Please follow the steps:
1. Select Enable radio button in URL Filter.
2. In Site 1, please enter the URL address.
3. Please repeat the step 2 to build more URL addresses not
allowed.
4. Click the apply button.
If the Site1 is given as www.yahoo.com, any hosts in the intranet will not be
allowed to connect to www.yahoo.com. If you do not restrict any access from
intranet to Internet, please select the Disable radio button in the URL Filter.
32
Page 33

5.3 IP Filter Setup
The IP filter function is similar to URL Filter. It provides further restrictions in
access permission. URL Filtering only blocks port number 80 (HTTP). In IP
filtering, you can assign a group of IP to be restricted. You can block four
individual ports or a range of ports in the same time. So the specific group of
intranet hosts cannot connect to these ports. Please follow the steps:
1. Select Enable radio button in IP Filter.
2. Enter the IP address range in the format “x. x. x. x / x”(e.g.
“192.168.1.0/24”, you would like to restrict the IP group)
3. Select the Protocol.
4. Enter the port number in Blocked Ports No. There are four
fields you can enter in any order or combination. You can enter
one, two, etc.
5. Enter the range of port numbers (if any) in Blocked Port Range.
In the example, if any hosts that requests information from 192.168.1.1 to
192.168.1.254 in the intranet with port number 21, 23 or from 100 to 1024
with TCP protocol, will be blocked.
33
Page 34

5.4 Denial of Service
It is highly recommended that the DoS Protection feature be enabled to
prevent attacks on the network. However, if you allow someone to manage
the router from outside or are running a web server, e-mail server, or FTP
server, you should either disable Detect SYN Flood Attack or increase the
TCP flow. Otherwise, the configuration web pages will not be sent smoothly.
6 VPN Settings
VPNs (Virtual Private Networking) provide secure communication between
two separate networks without using a dedicated leased line. In order to
achieve this functionality, a secure tunnel must be built between the two sites
for secure communication over the Internet. The SA supports the two most
popular protocols, IPSec and PPTP. IPSec provides encryption and
authentication services at the IP layer. Working at this level, IPSec can
protect any traffic carried over IP unlike other encryption methods that only
protect a particular higher-level protocol. PPTP (Point-to-Point Tunneling
Protocol), described in RFC 2637 is a PPP-specific protocol proposed by
Microsoft. The SA implements a PPTP server. The remote user can connect
34
Page 35

to the PPTP server and access a local host behind the PPTP server. When
you select the VPN item in left menu of the web page, IPsec and PPTP
configuration options will appear. Please refer to the corresponding section
for these configurations.
6.1 IPSec Settings
Sometimes there is a need to transfer commercial information from a branch
office through the Internet. The information being transferred cannot be sent
over the Internet without encryption. The best solution for most customers is
to establish a secure tunnel between the company and branch office. IPsec
implements this function through the use of a “pre-share key”. The pre-share
key is known both in main office and branch location. Please follow the steps
below to build the tunnel:
In the main company side:
1. Select the Enable radio button in IP Security. (Figure 6.1a )
2. Enter the Local ID. For identifying this host.
3. Click the apply button.
4. The IPSec Tunnel List is empty by default. Please click the
“NEW” button to establish a new tunnel. You will be taken to the
IPSec Settings page. It includes the IPsec tunnel settings and
Remote Host Settings. (Figure 6.1b )
5. In IPsec tunnel setting: Enter the Connection Name. (e.g. vpn1).
35
Page 36

The branch side has to enter the same connection name to
identify the connection.
6. Select the Enable radio button in Start on Boot field. It means
the connection will be established during system startup. Select
the Disable radio button for none.
7. Enter the Preshare key. The branch has to use the same
Preshare key.
8. Enter the number of hours in IPsec key Lifetime.
9. In Remote Host Setting: If the branch has a fixed IP address
“10.0.0.9”. Please select the Fixed IP radio button.
10. Enter the Remote IP. The fixed IP address of the branch
“10.0.0.9”.
11. Enter the Remote Subnet. (e.g. 172.17.0.0)
12. Enter the Remote Netmask. (e.g. 255.255.0.0)
13. Click the apply button. Then you would go back to the previous
IPSec Setting. (Figure 6.1c )
14. Please check the IPsec Tunnel List. In Action column, click the
link up button to connect immediately, or click the remove
button to remove the tunnel.
At the branch side:
Please repeat the steps above to create the tunnel. Note in step 9,
the Remote IP field, enter the fixed IP address of the main company
and the corresponding Subnet and Netmask.
The Preshare Key field is a secret key that is used to identify communicating
host during the phase 1 IKE negotiation. The IPSec Key Lifetime specifies
how long the secret key will be exchanged. If zero value is given, it will pick
up the default setting. For the Remote Host Setting, you can choose the
remote type of the communication as fixed IP gateway or dynamic IP gateway.
The IPSec Tunnel List displays information for each tunnel that you build.
The Name field is the connection name; the Gateway field is the IP address
with which we communicate; the Destination Subnet field specifies the
36
Page 37

sub-network address with which we communicate; the Status field shows
you whether the current link is established or not. If the current link is not
established, you can click the Link Up button in the Action field to request
the tunnel to be established. If you need to re-configure the setting, the
Modify button will help you adjust your settings. When you no longer require
the tunnel, click the Remove button and the corresponding entry will be
removed from the table.
Figure 6.1a
Figure 6.1b
37
Page 38

Figure 6.1c
6.2 PPTP Settings
For most companies, the PPTP server creates a secure connection that a
remote user can access a host within the company. The remote user has to
run a PPTP client and connect to the PPTP server. The PPTP server has to
validate the remote user as being in the User List in section 9.1. The server
certifies the PPTP client with a username and password. After passing the
certification, the server will assign a private IP address to the client. The
remote user will be treated like a member of the LAN and can access the
local hosts inside the company. Please refer to Appendix A for more details
about configuring a PPTP VPN connection. To run the PPTP server on the
company side, please follow the steps below:
1. In PPTP Settings page: Select the Enable button in PPTP Server field.
(Figure 6.2a)
2. Enter the private IP address of the server in Server IP Address field.
3. Enter the Client IP Range. The server will assign the IP to each client
within the range.
4. Click the apply button.
38
Page 39

Figure 6.2a
7 System Management
When you select the System Management item in the left menu, four
configuration items appear including; Administrator Settings, Event Report
Settings, Firmware Update, Time Settings and SNMP. Please refer the
corresponding section for these configuration details.
39
Page 40

7.1 Administrator Settings
In Administrator settings you will find the basic administrator functions. The
settings are easily modified and managed by the administrator. They are
described as below:
1. New Password: the administrator could change the administrator
password here. Please enter the new password you would like to
change to. Note that you must fill the new password in both
Password change and Password confirmation fields. If both fields are
not the same, the page will not be
submitted.
2. FTP Server: please select the enable radio button to establish the
FTP server. Or select the disable radio button for none.
3. Confirm New Password: please enter the new password again.
4. External Admin.: This feature allows administrators to access the
web based configuration menu from the Internet. The default setting
for this feature is
disabled for security reasons.
5. External Admin. Port: defines a port for the remote
40
Page 41

administrator to connect to.
6. Restart device: This function reboots the Server Appliance. Select
the enable radio button to restart SA. The default setting of the
function is disabled.
7. Clear event log: This function is used to clean the system history
that is listed in Event Report (section 8.2). If you choose the “No”
radio button, the event record never clears even when you reboot the
system.
8. Clear DHCP lease: This function is used to clean the DHCP Lease
record listed in section 8.4. Please choose the “Yes” radio button to
clean DHCP lease
report.
9. Restore Factory default: To recover the factory settings, please
choose the “Yes” radio button and
the factory defaults will be loaded.
10. Click the apply button.
7.2 Event Report Settings
The Event Report Setting is used to send the administrator an e-mail alert
once an event occurs on the system. If you select the Disable radio button in
Alarm Mail, the system will not send an alarm to anyone. To enable the
function, please follow these steps:
41
Page 42

1. Select Enable radio button in Alarm Mail.
2. Enter the IP address or domain name of the Mail Server. (e.g.
111.22.33.4 or mail.your.net)
3. Enter the e-mail account (e.g. admin@mail.your.net) that you
want the system to send e-mail to if an event occurs.
4. Select “Normal” or “Warning” in Alert Level to indicate when to
send the e-mail. If you select “normal”, events with a normal level
will induce the system to send e-mail to the administrator’s
e-mail.
5. Click the apply button.
7.3 Firmware Update
In Firmware Update, the current firmware version is shown. You can select a
new firmware image to update the unit. If you would like to upgrade your
firmware, you should download an image for the current model and save the
image on your local drive. If the image is already on your drive, please follow
these steps:
1. The current Firmware version is shown as 1.06.
2. In Firmware Update, click the Browse button. A window (see
Figure 7.3a) should pop-up. Please select the image file you
have downloaded. After you confirm your selection, click the
open button.
42
Page 43

3. An update percentage is shown as in Figure 7.3b. The image
will be uploaded to the Server Appliance it performs some
checks on whether the image is valid. If the image is wrong, it will
not be updated.
Note: Do NOT shutdown the unit or remove the power source
during a firmware update.
Figure 7.3a
Figure 7.3b
43
Page 44

7.4 Time Settings
In Time Settings, you can adjust the system time. The fields
in Time settings are described below:
1. YY/MM/DD format. Please enter the year in the first field then
select the month and date.
2. HH:MM:SS format. Please enter the hour, minutes and seconds
respectively.
3. Click the apply button.
Once the system time is set, the system will record the proper
time for system events in the log.
44
Page 45

7.5 SNMP
The SNMP agent allows users with SNMP client applications to conveniently
inspect the network status of SA. Please
follow the steps below to setup the SNMP agent.
1. Select the Enable radio button in the SNMP Agent field.
2. Enter the Community Name. Note that the agent side and the
client side must use the same community name.
3. Enter the contact information in System Contact field. For
example, the phone number or the email account of the
administrator.
4. Enter the location of the unit the System Location field.
5. Click the apply button.
45
Page 46

8 System Reports
When you select System Reports in the left menu of the web page, four
configuration items appear including; System Information, System Log, URL
Log, and DHCP Lease Report. Please refer to the corresponding section for
these configuration items.
46
Page 47

8.1 System Information
The System Information displays some useful information about the system.
It shows the firmware version, the system up time and the internal and
external network connections. On SA, We have one WAN port and four LAN
ports. The WAN port belongs to the external network interface and the LAN
port belongs to the internal network interface. They are described as below:
Firmware Version: 1.33
The system up time
IP Address: the IP address is shown as your current setting.
In Chapter 2, section 2.4, the Basic setting, we already configure the
external interface in one of the three ways, ADSL/PPPoE, DHCP
client and Fixed IP address. In Chapter4, section 4.1, DHCP
Server, we assigned the IP address range to the internal network
interface.
Hardware Address: Ethernet hardware address
Netmask: corresponding to the network.
47
Page 48

Max. Transfer Unit: maximum bytes of a packet.
Tx/Err Packets: e.g. 309/0, means you sent 309 packets and there
are “0” packets with errors.
Rx/Err Packets: e.g. 3573/2, it means you received 3573 packets
and there are 2 error packets.
Link Status: Shows the current transfer speed. e.g. 100Mbps, full
duplex.
The refresh button: Click the refresh button to see if anything has
been updated.
If your external connection is not set to a fixed IP address, you can check
whether the Server Appliance has obtained an IP address after booting.
If there is no external IP address, you should check your network
connection or environment settings.
8.2 System Log
The System Log function reports the system history. It shows the time that
the event occurred, the event level and a description of the event in the
48
Page 49

Message column. If there is an error, the event report will help determine
where and/or what the error is. You can clear the records under the
administrator settings. Please refer to section 7.1, Clean Event Log.
8.3 URL Log
The URL Log function records the recent connections for each client. If you
would like to view what the user is browsing, you can click the corresponding
Destination URL in the rightmost column.
49
Page 50

8.4 DHCP Lease Report
The DHCP Lease Report function reports all leased IP provided by DHCP
server. From this page, you can find out which host was assigned to which IP
address. You can clear all the records through administrator settings. Please
refer to the section 7.1, Clear DHCP Lease.
9 User Management
NAS provides a client/server environment for users to share files over
network. File sharing works by authorizing the users or groups to access
folders by their username and password. When we create a new shared
folder, we must create a new user/group list from the current users/groups.
When a user/group tries to access the folder, the system will check the list of
valid users for the folder. If the user/group is included in the list, the
user/group then has permission to access the folder. The SA provides a
concise interface to manage all users and groups for folder access. When
50
Page 51

you select User Management from the left menu of the web page, two
configuration items appear including; User and Group settings. Please refer
to the corresponding section for these configurations.
9.1 Users
For file sharing to work, we have to allow users and/or groups. We create the
user accounts here. The “admin” and “guest” accounts are in the system by
default. Please follow these steps to create new users:
1. Click the “NEW” button in User Management . ( Figure 9.1a)
2. Then the Add/Modify Users page shows up. ( Figure 9.1b)
3. Enter the Username. (e.g. peter)
4. Enter the Password.
5. Click the apply button. Then you will be taken back to the User
Management page where the user you just created will appear
on the Users List. ( Figure 9.1c)
6. Modify or to delete users in the same way. Please click the
corresponding buttons.
7. Please follow the steps above to add more users. (e.g. mary,
sophia and tom. Figure 9.1d )
51
Page 52

Figure 9.1a
Figure 9.1b
52
Page 53

Figure 9.1c
Figure 9.1d
53
Page 54

9.2 Groups
After creating the users, we can categorize the users into different groups.
For example, we have users: mary, peter, sophia and tom. In the following
example, we will assign mary to the teacher group and tom and sophia to the
student group. The group management interface is similar to user
management. The “everyone” group is there by default. To create new groups,
please follow these steps:
1. Click the “NEW” button in Groups Management. (Figure 9.2a)
2. Then the Add/Modify Groups page shows up. Enter the group name.
(e.g. teacher. Figure 9.2b)
3. To include more users in this group (e.g. teacher), please select the
user in System Users List (e.g. mary, Figure 9.2b)
4. Then click the “left arrow“ button to add the user to Group Members
List and vice versa. (e.g. “mary” in System Users List will be moved to
Group members List. Now mary belongs to the teacher group. Figure
9.2c)
5. Click the apply button. You will be taken back to the Group page.
6. To create another group, please repeat the steps above. (e.g. We
created a “student” group and choose “tom” and “sophia” to be the
members of the group. Figure 9.2d)
7. The group you created is now in the Groups List.
54
Page 55

Figure 9.2a
Figure 9.2b
55
Page 56

Figure 9.2c
Figure 9.2d
56
Page 57

Figure 9.2e
10 NAS Management
When you select the NAS Management item from the left menu of the web
page, three configuration items appear including; HD Initialization Wizard,
Advanced and File Sharing. Please refer to the corresponding section for the
configuration details.
10.1 HD Initialization Wizard
The first time you use the NAS feature, you must initialize the hard disk. The
SA provides an easy way to initialize the hard disk via the wizard. Follow the
wizard in order to properly setup the drive. Select the HD Initialization option
and refer to the steps below:
1. Select the Enable radio button and click the apply button in S.M.A.R.T.
field.
2. In HD Power Management Setting, select the time in Turn off HD field.
It specifies the idled time length of the HD to enter the standby
mode.(Figure 10.1a)
57
Page 58

3. In hard disk Status, click the Initialize button in the Action column
following the hard drive description.
4. A warning will show up. Please click the “OK” button (Figure 10.1b).
5. The Step 1 page should now appear. To set the information for file
sharing. Please enter the workgroup name (make sure this matches
the workgroup on your network), the computer description and share
folder name (Figure 10.1c). You can create more share folders after
the initialization process.
6. Click the Next button to continue HD initialization. (Click the Cancel
button to leave the HD initialization process.
7. The Step 2 page should now appear. In this page we set which user(s)
or group(s) can access the shared folder. Please refer Chapter 9 to
establish the users and groups.
8. In the Selection field, select the Users radio button to share the folder
by users (Figure 10.1d) or select the Groups radio button to share by
groups (Figure 10.1e).
9. Click the Next button. At this point, the system starts to initialize the
hard disk. A percentage bar shows the progress. ( Figure 10.1f)
Note:Users without Java may get an error message. You can ignore
and return to the main wizard screen to see the current percentage. It
will not update unless you refresh your browser.
10. When the formatting is finished, it shows “ Initialization – Complete “.
( Figure 10.1g)
11. In NAS Management -> File Sharing, the shared folder you created
above should now appear on the Share Name List (Figure 10.1h).
The HD status should display the HD information. It includes the model
name, serial number, size, S.M.A.R.T, status of the HD and the Initialize
button. The S.M.A.R.T. field is disabled by default and the message in
the S.M.A.R.T. column is “Disable”. You can enable the S.M.A.R.T
function if your drive supports this. It will report to the system when the
HD is broken. The status of the S.M.A.R.T column will change to “Pass”
( Figure 10.1a)
58
Page 59

To modify and/or create more share folders, please refer section 10.3.
Figure 10.1a
Figure 10.1b
Figure 10.1c
59
Page 60

Figure 10.1d
Figure 10.1e
60
Page 61

Figure 10.1f
Figure 10.1g
61
Page 62

Figure 10.1h
10.2 Advanced
In NAS Management -> Advanced settings, there are three protocols for
different OS platforms. By default, all protocols are enabled, but for security
reasons users may want to disable specific protocols.
For MS-Windows Users
Please follow the steps below:
1. In MS-Windows File Sharing field: please select the Enable
radio button.
2. Enter the Workgroup Name and Computer Description.
3. Click the apply button (Figure 10.2a).
62
Page 63

Figure 10.2a
For Mac Users
Please follow the steps below:
1. In Apple File Sharing field, please select the Enable radio
button.
2. Enter the name in Apple Zone field.
3. Click the apply button.
For Unix-like Platform Users
Please follow the steps below:
1. In Network File System field, please select the Enable radio
button.
2. Click the apply button (Figure 10.2a).
3. Click the NEW button in NFS Mapping List.
4. A NFS Mapping page shows up. (Figure 10.2b)
5. Enter the Remote UID.
6. Enter the Remote IP.
7. Select the Mapping User.
63
Page 64

8. Click the apply button. ( Or click the Cancel button for none)
You will go back to the Advanced Setting page. Please check the NFS
Mapping List in NFS Setting section. The mapping rule you created is in
the list. (Figure 10.2c)
Figure 10.2b
Figure 10.2c
64
Page 65

FTP Setting
Please select the enable radio button in FTP Server field and click the
apply button.
FTP Server
If you want to access files stored on your SA from a remote location, FTP is the
easiest way. Here is a typical setup:
Connection Diagram:
Work CPU<-->Internet<-->DSL/Modem<-->SA<-->Home CPU
To access files from the SA from work, all you need to do is setup a DDNS
account as more than likely, your DSL IP changes all the time. Refer to the
DDNS chapter for details. Enable the FTP server on the SA (Nas
Management->Advanced). Make sure to have users and passwords assigned
to all your shared folders. If you want to allow anyone access, just assign the
'guest' account to that folder. FTP users can then log on with and anonymous
account to that folder. Note: Users will be able see the names of all the other
shared folders, but will not be able to access them without a username and
password. To completely disable anonymous access (must have user account
on NAS to see folders), make sure you do not have the ‘guest’ account
assigned to any shared folder.
Now from work you would type into a browser (or FTP application) ftp://<DDNS
Name> and it will take you to your SA unit. If you cannot see anything on your
browser, make sure you have the 'View FTP Folders' option turned on in your
browser settings. You may also have to go into 'File->Login As'. Use a valid
user name and password for the SA.
65
Page 66

10.3 File Sharing
For file sharing, you must create users and groups first. We can now create
the share folder and assign users/groups. To assign the users/groups to a
folder, please follow the steps below:
1. The folder created after the HD initialization should be on the Share
Name List. (Figure 10.3a)
2. Click the “NEW” button.
The Files Access Control page shows up. (Figure 10.3b)
3. Enter the folder name in Sharing Name field. (e.g. party)
The sharing name is the name of the folder you would share over the
network.
4. Select one of the radio buttons in the Selection field. (e.g. select the
Users radio button)
To select the Users radio button if you are allowing access to the
folder based on users. Select the Groups radio button if you are
allowing access to the folder based on groups.
5. In the Method field, to select the Write method if you are allowing the
user/group to read and write to the folder. Select the Read method if
you only allow the user/group to read the folder.
6. Select the user in Denying Users List, then click the “left
arrow“ button to add the user to Allowing Users List and vice versa.
(e.g. select mary. See Figure 10.3c, we selected tom and sophia and
selected the Read method in step 5.)
7. Click the apply button. You will be taken back to the File Sharing
page.(Figure10.3d)
8. Check to see that the folder you created appears on the Share
Names List.
9. There are “Add”, “Remove”, and “Modify” buttons. They are used to
create, to delete or to modify the shared folders in the Share Names
List.
66
Page 67

Figure 10.3e and Figure 10.3f Example of sharing the folder by groups.
We already created the teacher and student groups. We allow the groups
we created to share the folder “exam”. The teacher group can read/write
to the folder while the student group can only read the folder. We enter the
folder name “exam” in step 3, select the Groups radio button in step 4,
select the Read method in step 5. and select student group in step 6. After
we finish, we now have the “party” and “exam” folders in the Share Names
List.
Figure 10.3a
Figure 10.3b
67
Page 68
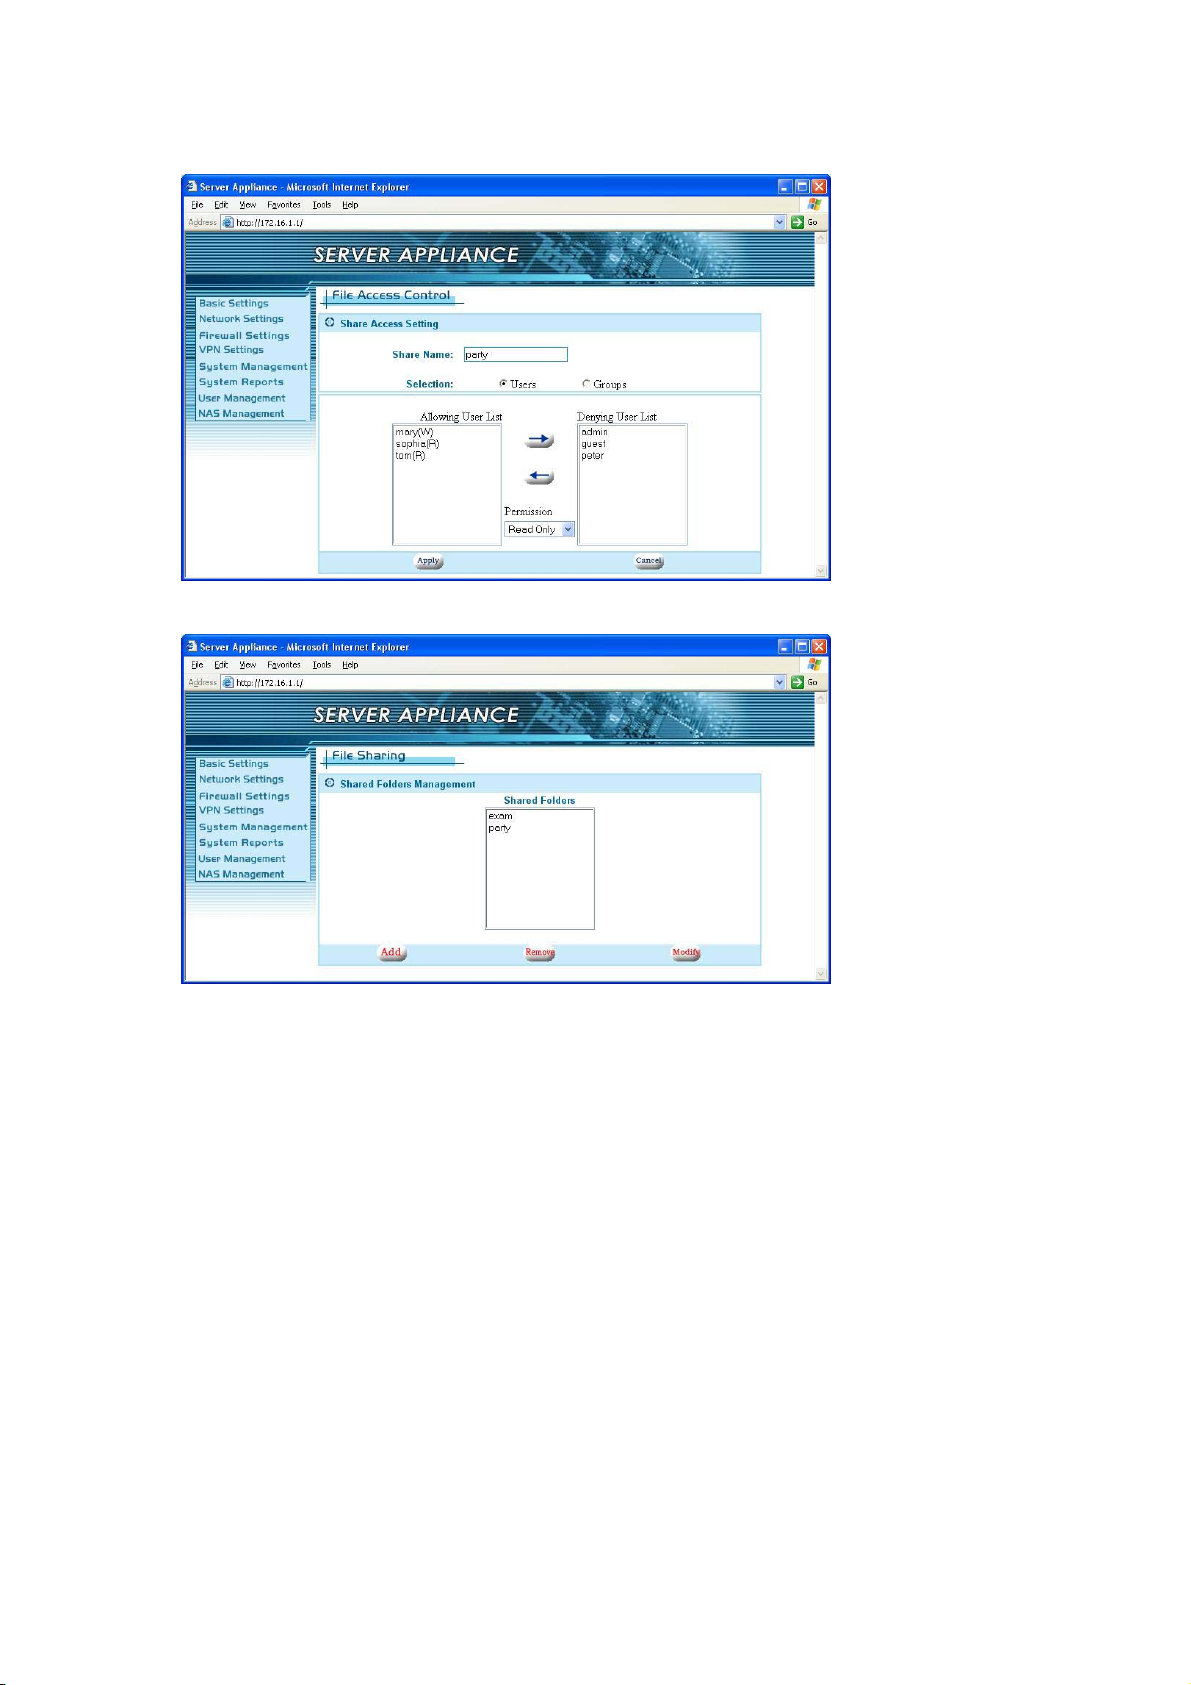
Figure 10.3c
Figure 10.3d
68
Page 69

Figure 10.3e
Figure 10.3f
After setting up file sharing, we can access the files and folders in the NAS
through network neighborhood. You also can search for the NAS in the
network by the hostname that is set under Basic settings (e.g. SA100). Once
you select the name in the network neighborhood, an authentication window
shows up as Figure 10.3g.
69
Page 70

Figure 10.3g
Please enter the user name and password that was created in section 9.1.
Then the validated user can access to NAS based on their rights level
(Figure 10.3h).
Figure 10.3h
70
Page 71

11. Personal Web Server (some models)
The Web Server settings are currently under 'Nas Management->Web Server'.
Getting started
Enable the web server by selecting the ‘Enable’ radio button. It will then create
a shared folder called 'www'. Set the server port number to '80' if you want all
default HTTP calls to go to your website. When you type in a URL address in a
browser, the Internet automatically directs your browser to port 80 at that
address. This is the industry standard and should be used 99% of the time. If
you want to hide or make your site available only to people who know your port
number, then you can assign it a different port. For example, if you were to
assign port 77 instead of 80, users would have to type in their browser
www.mywebsite.com:77 to see the website. You do not normally use ‘:80’
because that’s the assumed default in the industry.
Uploading your web page(s)
All web pages for your website will be stored in the ‘www’ shared folder. You
can copy the folders and files of your website into that directory via the
network neighborhood, mapped drive, or FTP if you have enabled that
function. Make sure that you have allowed the user uploading the files to
have read/write access under ‘File Sharing’. By default, anyone (anonymous)
can have access to the ‘www’ shared folder as the guest account is assigned
to that share.
Web page design
You must have an 'index.html' file as that is what the web server will look for
as the first page of your website. You are free to make folders under the ‘www’
directory to help organize your website. All references to those directories can
be called on from any page. You can use many popular web page design
71
Page 72

programs to make your website and then copy the finished product (all
associated images, files and folders also) to the ‘www’ shared folder.
Accessing the website
Users with a static WAN IP address can access the website simply by typing
in the IP address on any browser. If you are on the inside of the network, you
must use the WAN IP address to access the website, not the internal
appliance IP address. If you have a domain name, then you can have the
domain name company forward the domain to this static IP address. With a
domain name, you do not have to remember the IP address, just the domain
name.
If you have a dynamic IP, you can setup a DDNS account and enable the
DDNS feature of your appliance to make your website accessible without
having to find out the current IP address. Refer to the DDNS Chapter for
more information.
Important Note:
The ‘www’ share defaults to allow ‘guest’ users to have access. Please go
into NAS Management -> File Sharing, add a valid user and remove ‘guest’ if
you do not wish everyone to be able to modify you web pages.
12 E-mail Server (some models)
The E-mail Server settings are located under 'Nas Management->E-mail
Server'.
Getting started
In order to use the e-mail server, you must have a domain name or have
registered with a DDNS service provider. E-mail requires a domain name and
72
Page 73

will not work with just an IP address. Enable the e-mail server by selecting the
‘Enable’ radio button. Enter your domain name in ‘Mail Domain Name’. For
example, myhomedomain.com is a valid name. Do not enter the ‘www’
usually associated with domain names. If you have a DDNS name, for
example, myname.dyndns.org, you can enter it here in as shown also. You
should limit the maximum size a mailbox under the quota field and the size of
each e-mail in the following field. Default settings are ‘0’ for unlimited.
E-mail names
After applying the settings, your e-mail accounts are now active. They are
based on your user names that are created under user management. For
example, if ‘teacher’ is a user on the appliance, and ‘school.com’ is the
domain name, the e-mail address for ‘teacher’ is now ‘teacher@school.com’.
DDNS e-mail addresses work in a similar manner. For example, if ‘teacher’ is
the user on the appliance and the domain name (DDNS) is
‘school.dyndns.org’, then the e-mail address would then be
‘teacher@school.dyndns.org’.
Sending and receiving e-mail
You can use any POP e-mail type program to retrieve and send your e-mails.
Windows includes MS Outlook Express as a standard application. Start
Outlook. Under Tools->Mail, you want to ADD a mail account. Enter a display
name, the formal name you want your e-mails to appear to come from
(Usually your full name). In the e-mail address field, enter your new e-mail
address. From the above example, we would enter ‘teacher@school.com’ or
‘teacher@school.dyndns.org’. Under ‘Incoming mail server’ and ‘Outgoing
mail server’, enter your domain name. In the above examples, it would either
be ‘school.com’ or ‘school.dyndns.org’. Both fields should be the same. Lastly,
enter the Account name and password. This name is the same one as on
your appliance. In this case, user name is ‘teacher’ and password is: ****.
Click on the ‘Finish’ and you are ready to send and receive e-mail!
73
Page 74

NOTE:
Passwords are highly suggested for all e-mail account users to protect your
e-mails and to prevent people from unauthorized use of your e-mail server.
13 USB Printer Server (Some Models)
Step 1: Installing a shared network printer (Windows only)
(a) Please make sure the hard disk is initialized (the status is READY)
(b) Plug in a USB PRINTER to the USB port on the
Unit.
Step 2: Check for the printer in “My Network Places”
74
Page 75

(a) Search for the device name in “My Network Places” and select it by
double clicking on the icon.
(b) Enter a valid user name and
password
(c) You will now see the printer
port next to the shares for the
device.
75
Page 76

Step 3: Install the printer driver on the user’s system
(a) Click “Add a printer” from the “Printers and Faxes”
(b) Click Next
76
Page 77

(c) Select “A network printer, or a printer attached to another computer” and
click Next
(d) Select “Browse for a printer” and click Next
77
Page 78

(e) Search the name of the device (for example: NAS), you should see the
printer port under it.
(f) Continue with NEXT and follow instructions. You may need to provide the
printer drivers as instructed by Windows.
78
Page 79

APPENDIX A
PPTP VPN
Important:
Make sure that the subnet of your Appliance is different the network you are
trying to connect from. For example: User’s office IP addresses are
192.168.1.x, set your Appliance to 192.168.2.1 Netmask 255.255.255.0.
Make sure that you have created a user account and password on the
Appliance for the users that you want to allow VPN access.
Proceed to your appliance’s PPTP Settings under VPN Settings.
1. Enable the Server
2. Enter a server IP, a number from 2-254 that is not being used by any
computer on the Appliance network. Usually 200 is a safe number.
3. Enter a range of IP addresses that users logging into the Appliance will
(W2K and XP only)
be assigned. Usually 201-210 is ok. Again make sure that there are no
computers on the Appliance network using the IP addresses in this
range.
4. Select Apply.
From the remote computer:
1. From the start menu: Select Settings -> Network and Dial-up
Connections -> Make a new connection.
2. Click Next on the wizard and select Connect to a private network
through the internet. Click on Next.
79
Page 80

3. Select Do not dial…..Click Next
4. Enter the host name. This should be a static IP if you have one. If not,
then set up a DDNS account before continuing. This is where the
Appliance can be found on the Internet. Click Next.
5. Select if you want to create this connection for all users on your
remote network or just for the one computer. Click Next.
6. Name your connection and select if you want to have an icon on your
desktop. Click Finish when done.
7. Use the user name and password on your Appliance to log in. You
should be able to see the Appliance in your network neighborhood
now. You must initiate the VPN connection each time unless you
selected otherwise.
TIPS: If all you need is file transfer, we suggest using the FTP server feature,
as it is faster and simpler. If you must use the PPTP VPN feature, then you
can also disable the encryption under Properties -> Security to increase the
performance.
80
 Loading...