

Intellinet 521796, 521871, 523561, 523578 User Manual
RACKMOUNT
CONSOLE
KVM SWITCH
USER
MANUAL
MODELS 521796, 521871,
523561 & 523578
INT-521796/521871/523561/523578-UM-0307-01

CONTENTS
1. Introduction .......................................................................3
Overview............................................................................. ..................4
Configurations................................................................ ......................6
2. Installation ........................................................................7
Device Connection............................................................................. ......7
Initial Power-Up................................................................ .....................9
3. Operation ..........................................................................9
Push Buttons ...........................................................................9
On-Screen Display (OSD) Operation .........................................10
Hotkey Commands ................................................................13
4. Cascade Configuration ...................................................14
Connection .......................................................................... 14
Changing the Configuration while Running ................................ 15
5. Multi-Access Model .........................................................16
Connection .......................................................................... 16
Operation ............................................................................ 16
6. Sun/Mac Keyboard Mapping ........................................17
7. Troubleshooting .............................................................. 18
8. Specifications ..................................................................21
2
CONTENTS
section page

1. INTRODUCTION
Thank you for purchasing the INTELLINET NETWORK SOLUTIONS™ Rackmount
Console KVM Switch, Model 521796 (15” LCD, 8-port); Model 521871 (15” LCD,
16-port); Model 523561 (17” LCD, 8-port); or Model 523578 (19” LCD, 8-port).
With a keyboard mouse, LCD panel and KVM switch module housed in an industrystandard 19” 1U- or 2U-height rack drawer, the console saves you as much as a
third of the space needed for a rack cabinet. And when the console is cascaded
with other INTELLINET NETWORK SOLUTIONS KVM switch modules to increase
server management capacity, you save even more space.
Flip-open 15,” 17” or 19” LCD panels support VGA resolution up to 1280 x 1024
without any degradation. The advanced VGA circuit design guarantees smooth and
flicker-free switching from one computer to another with cable lengths up to 100 ft.
/ 30 m (tested with high-quality UL2919-rated, low-loss and shielded cables).
With the on-screen display (OSD) menu, you can name your computers, switch
to a computer from a list, easily configure settings and view the name of the
selected computer on-screen with a programmable time interval. Plus, the OSD
menu shows the system status throughout operation.
All KVM switch modules come with a universal CEN36 connector for connection
between the console drawer and a KVM switch module. This modularized design
offers maximum flexibility, as you can choose and swap the modules to fit your
needs. A KVM switch module can also be used as an independent KVM switch.
This user manual shows you how to set up and operate the KVM switch. (For
instructions on assembling and positioning the console drawer and the switch
in a rack, refer to the separate Rackmount Console KVM Switch quick installation
guide.) Follow the instructions in this user manual and you’ll soon be enjoying
these additional popular features:
• Integrated LCD console, keyboard, mouse and KVM switch module for sturdy
rack-mount installation with tilt-free, two-piece rear bracket and extension kit
• Manage/control 8 or 16 computers from one keyboard, monitor and mouse
• Standard 19” 1U or 2U rack drawer
• Fits rack cabinets with depth from 67.5 to 80.5 cm (26 5/8 to 31 5/8 in.)
• Locking mechanism locks the drawer when pulled out, pushed in or folded down
• Full 105-key, low-profile, sturdy keyboard
• Ergonomic handrest design
• • Auto-scan automatically selects computers sequentially
• Supports Microsoft IntelliMouse (Pro)
• Supports both PS/2 and serial mice
• 3-in-1 space-saving cables
• Programmable scan filters unused computers
• Store system settings and name entries to non-volatile memory
3
INTRODUCTION
• Password security protects computers from unauthorized use
• Hotkey functions allow easy computer access
• Keyboard states automatically saved and restored when switching computers
• Operating system independent, transparent to all applications
• Plug and Play system configuration
• Keyboard and mouse can be hot plugged at any time
• DDC2B compatible
• Includes 6 ft. (1.8 m) PS/2 connection cable (plus 6 ft. [1.8 m] USB connection
cable for Models 523561 and 523578)
• Lifetime Warranty
Use the chart below for cross-referencing the different INTELLINET NETWORK
SOLUTIONS Rackmount Console KVM Switch models with their various
manufacturer part/reference numbers and specifications.
Overview
The combination of console and KVM switch module offers the latest and the
most efficient way of controlling server rooms and multiple computers. With
models of KVM switch modules available to control from eight to 136 servers
at the console — or at another set of consoles up to 100 ft. away — it’s the
ultimate tool for server management.
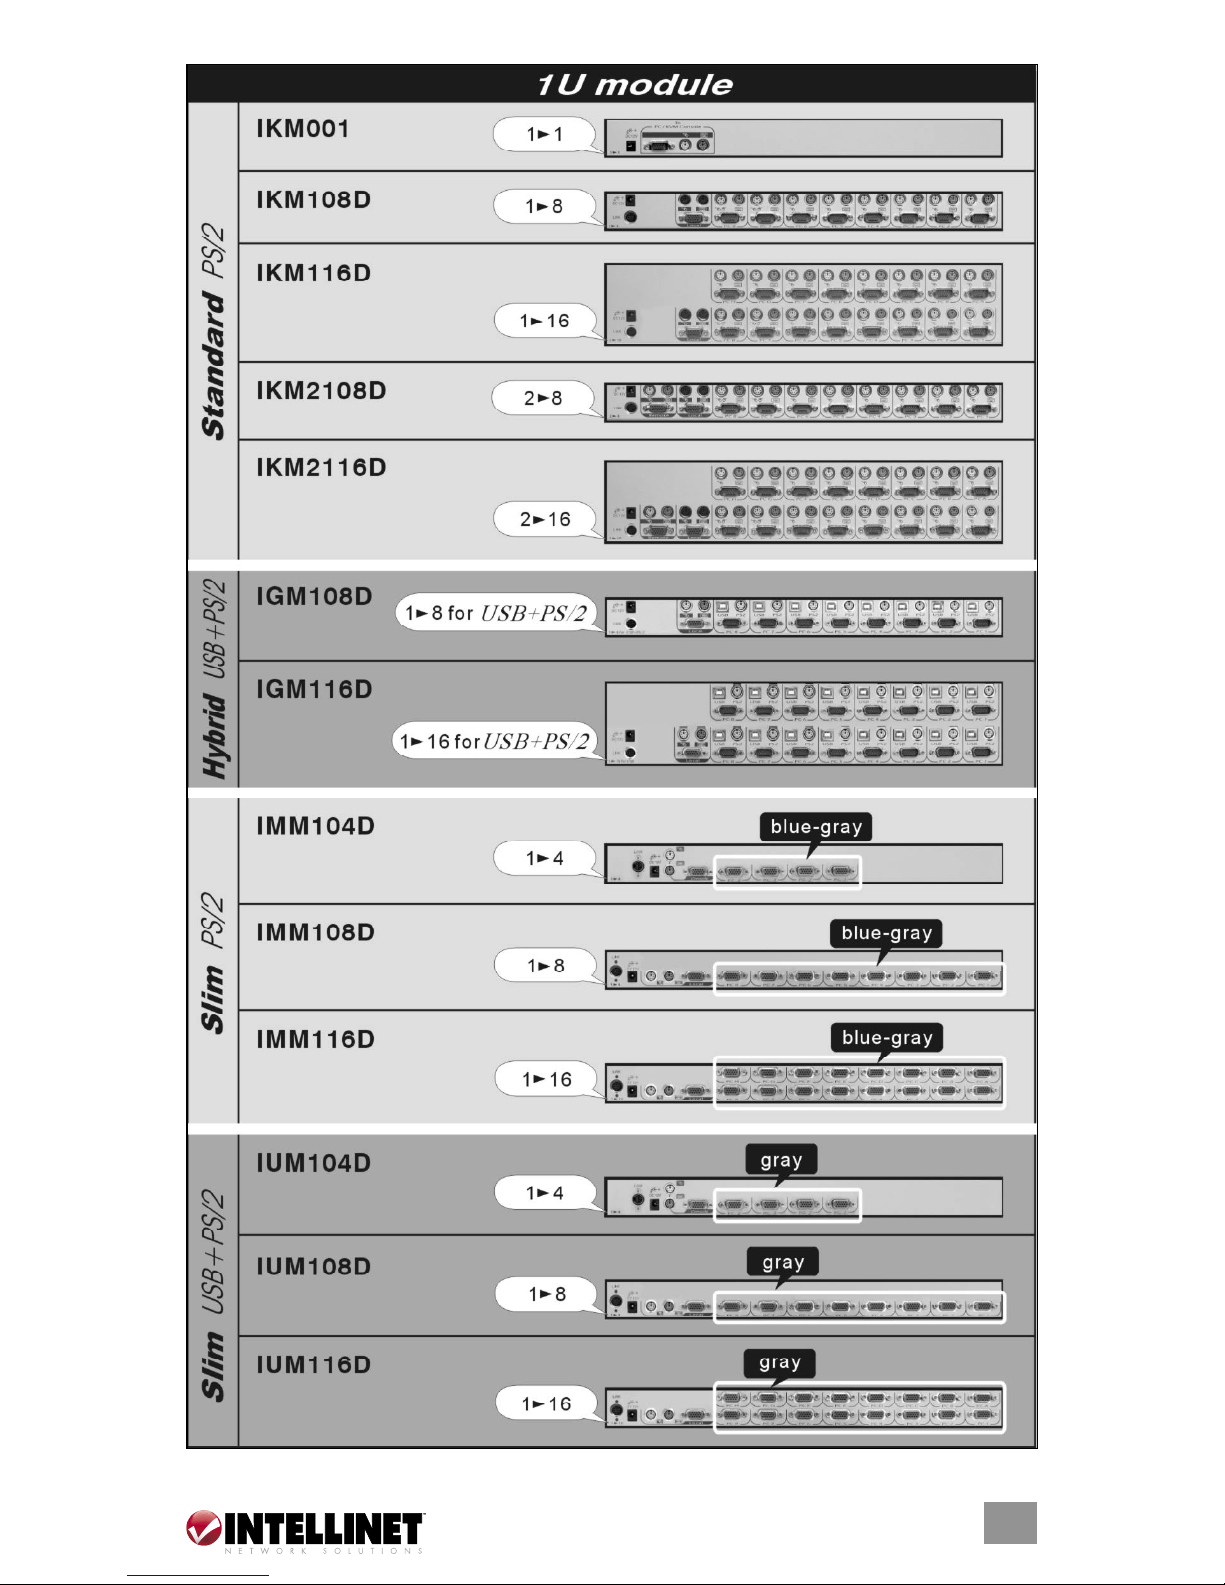
The variety of models of KVM switch modules available — including the four
INTELLINET NETWORK SOLUTIONS models addressed in this user manual —
present different computer interface options, which are listed below and shown
in the images that follow.
• Standard models feature three connectors: for PS/2 keyboard, PS/2 mouse
and monitor (HDB15).
• Hybrid (PS/2 + USB) models feature connectors for PS/2 keyboard, PS/2
mouse, USB (keyboard + mouse) and monitor (HDB15).
• Slim PS/2 models feature special 3-in-1 connectors for PS/2 keyboard,
mouse and monitor (HDB15).
4
INTRODUCTION
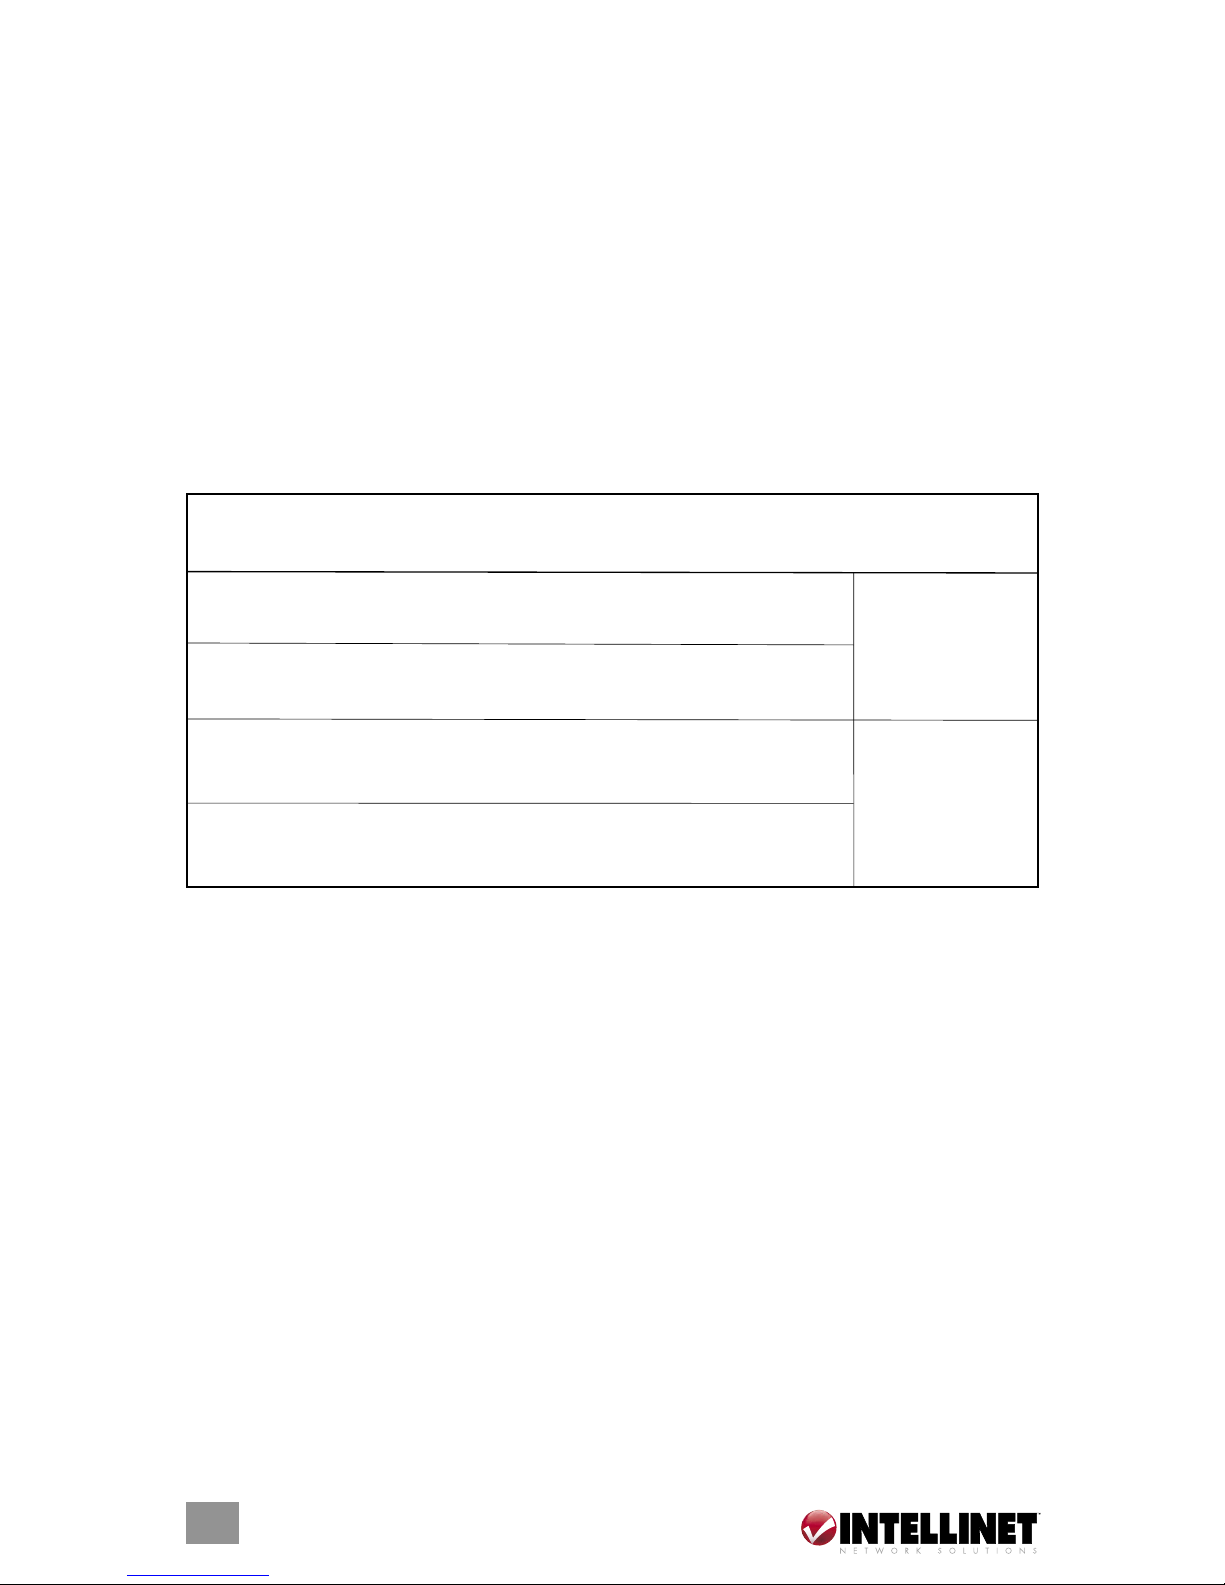
Console/ KVM Rear Brkt. KVM
Model Drawer Module & Ext. Kit Console Port KVM Package
No. Part No. Part No. Part No. Size Type Ports Ht. Contents
• Console
• Rear brkt. & ext. kit
• KVM Switch Module
• Power supply
• 6’ PS/2 cable
Combo • Console
(USB and/ • Rear brkt. & ext. kit
or PS/2) • KVM Switch Module
Combo • Power supply
(USB and/ • 6’ PS/2 cable
or PS/2) • 6’ USB cable
521871 Transa PRO 15 IKM116D REK7 15” PS/2 16 2U
521796 Transa PRO 15 IMM108D REK7 15” PS/2 8 1U
523561 Transa PRO 17 IUM108D REK7 17”
523578 Transa PRO 19 IUM108D REK7 19”
8 1U
8 1U
5
INTRODUCTION
Configurations
KVM switch modules are available with four, eight (Models 521796, 523561 and
523578) and 16 ports (Model 521871) with various interfaces. In applications
that require a larger number of computers, the KVM switch modules can be
cascaded in a master/slave configuration. NOTE: Throughout this user manual,
“master” refers to the KVM switch module that connects directly to the console
drawer; “slave” refers to a KVM switch module that has its console port connected
to a master’s “PC-x” port. Slaves only exist in cascade configuration.
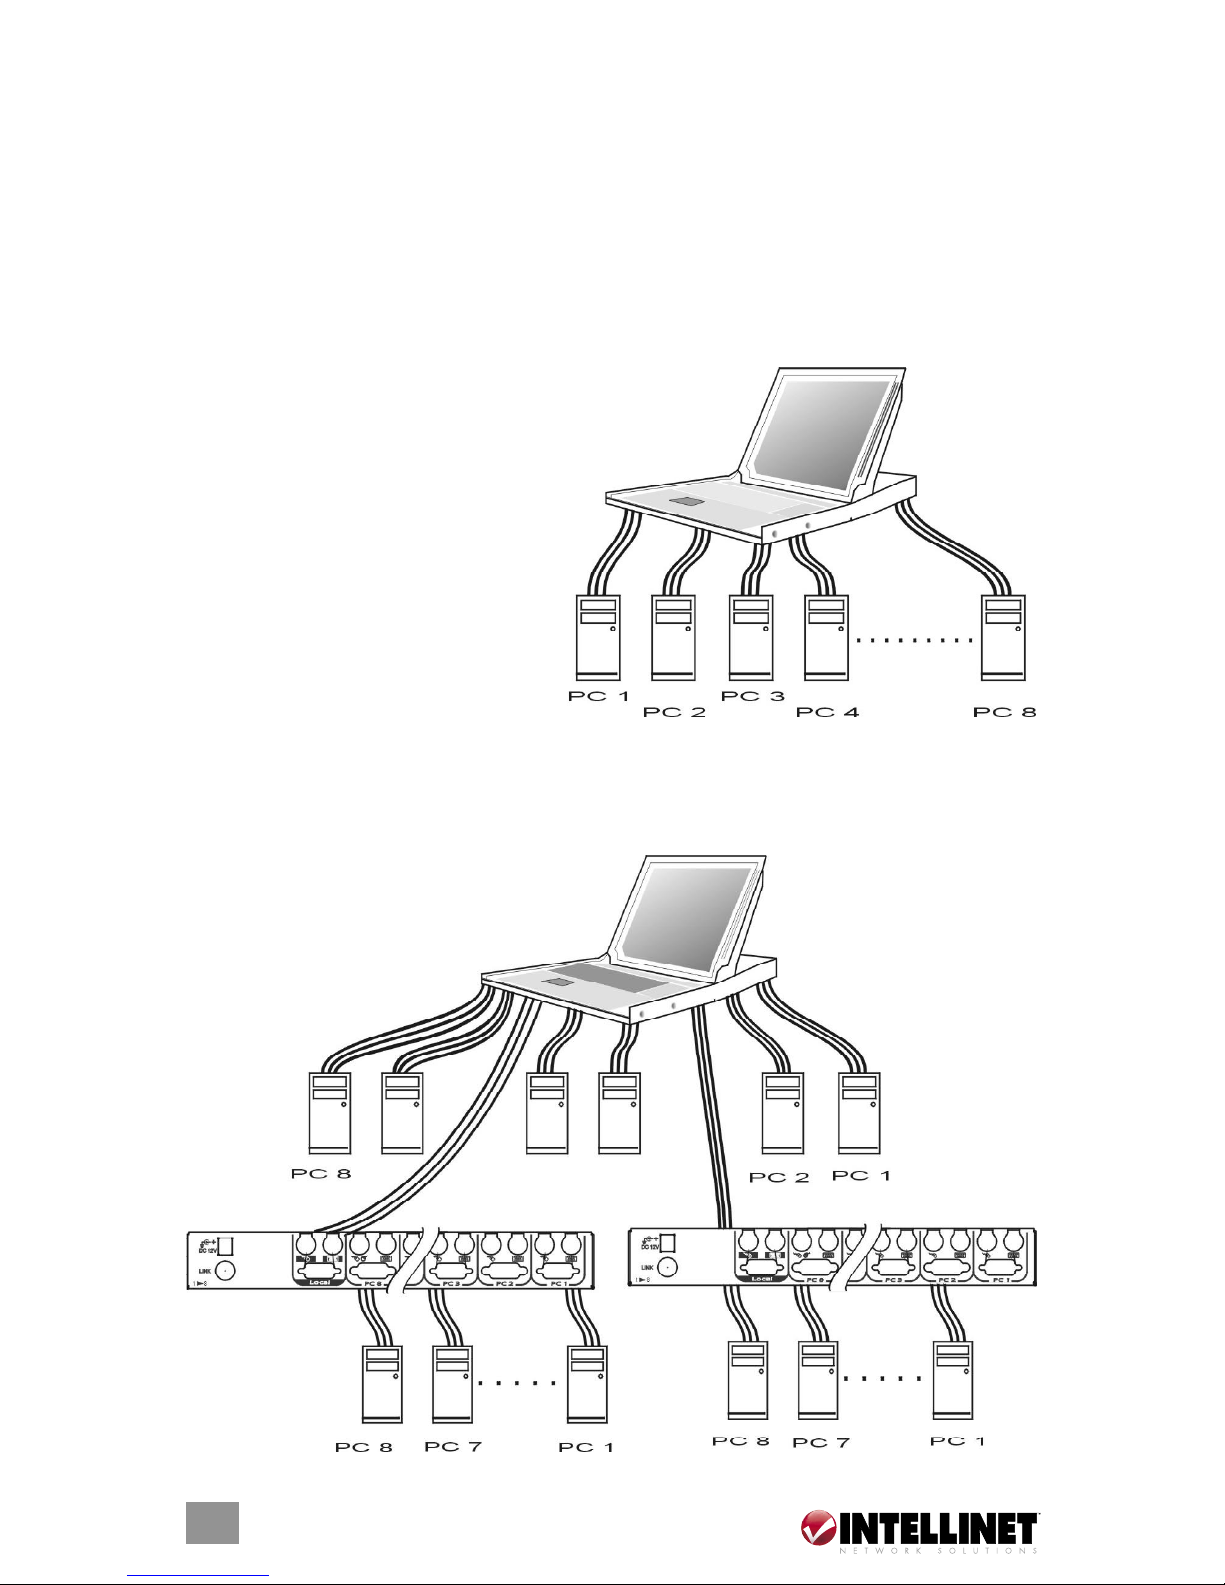
Single KVM Switch Module Configuration:
Combined with a console, the KVM switch module
can be connected to multiple computers with
keyboard, mouse and monitor cables
as shown at right.
KVM Switch Module in Cascade
(Master/Slave) Configuration:
You can connect a second level
of one or more KVM switches
modules to a master unit.
Cascade configuration expands
system ability, allowing you to select computers connected to the master or
slaves. There is only one master that connects to the console directly operated
by a user. Once connected, the KVM switch modules automatically configure
themselves to either master or slave.
Slaves of different KVM switch
modules can be mixed in cascade
configuration as shown
here.
6
INTRODUCTION
2. INSTALLATION
Device Connection
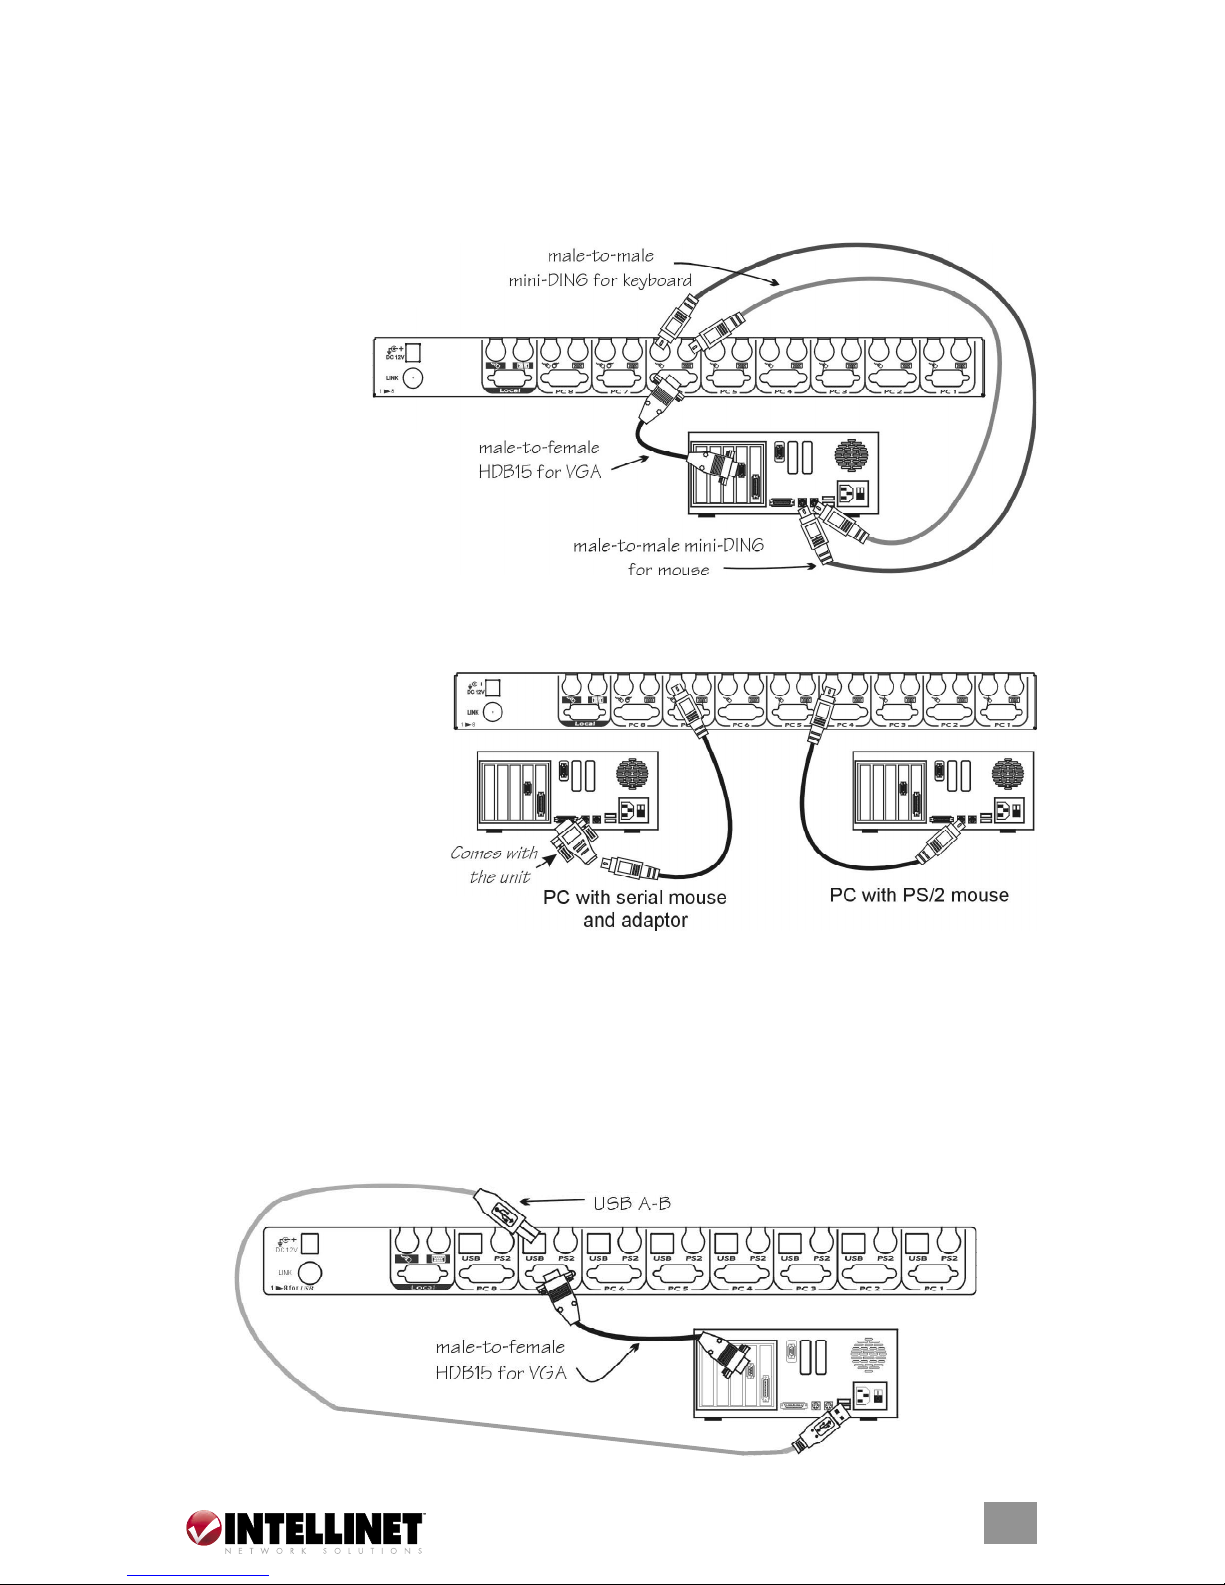
Standard Models (Model 521871):
Determine the port
number of each
computer. For
computers using
a PS/2 mouse,
connect the
computer’s mouse
and keyboard
cables to the
connectors marked
with a mouse and
keyboard, respectively, as shown. Repeat this step for PC-1 through PC-8.
For computers using a serial mouse, connect the DB9-to-mini-DIN6 adapter
(included with the
switch) to the computer
mouse port, then use
PS/2 cables to connect
the mouse to the KVM
switch module.
Connect the computer’s
monitor cable to the
HD-DB-15 VGA connector.
NOTE: This function is only available for PC-7 and PC-8 marked with two mice.
Hybrid (PS/2 + USB) Models:
With a hybrid, you can connect to a computer using either a PS/2 or USB port.
To a USB computer: Use a USB A-B cable to connect from one of the PC ports
to the USB port of a computer (A connector, flat connector), as shown below.
The computer can be a USB-ready PC, Sun, HP server or Mac.
7
INSTALLATION
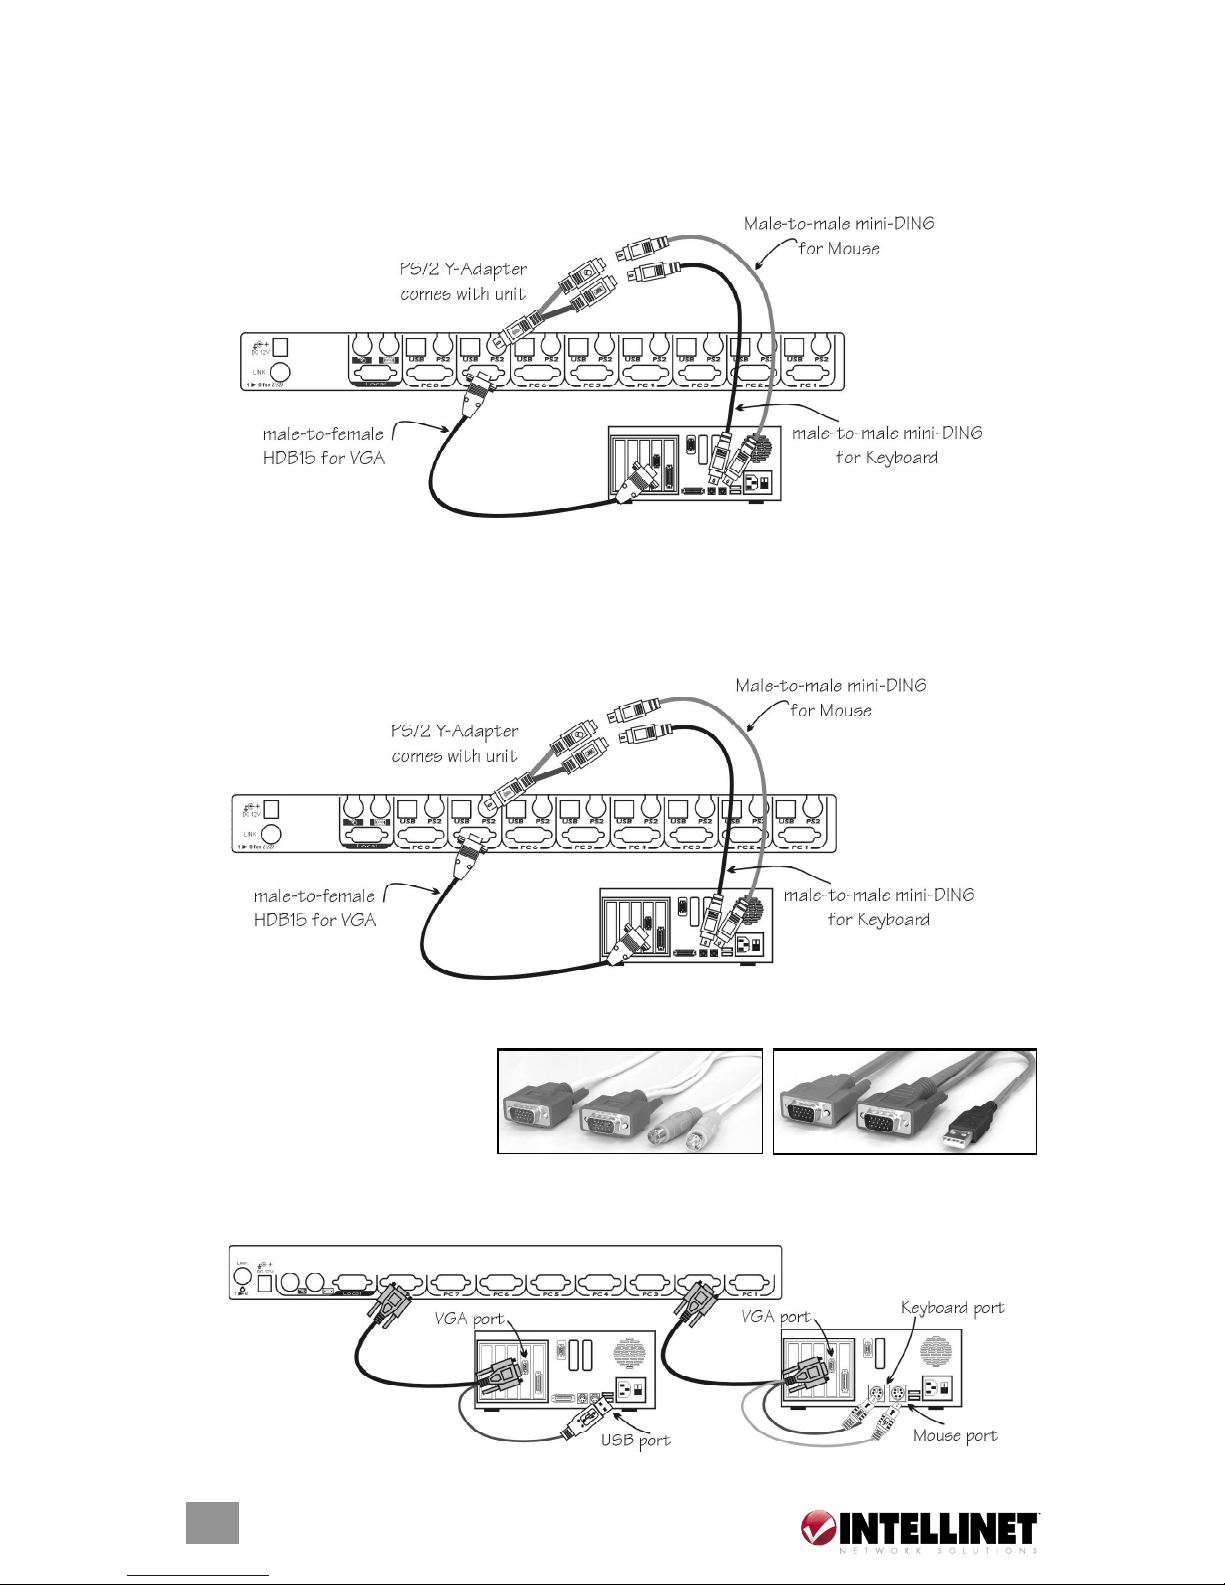
To a PS/2 computer: Connect a PS/2 “Y” adapter, which comes with the unit,
to the PS/2 port on the PC side, then use two mini-DIN6 male-to-male cables
for the keyboard and mouse, as shown below. There are two mini-DIN6 female
connectors on the PS/2 “Y” adapter marked for the keyboard and mouse.
NOTE: Be sure not to swap the connections.
To a laptop computer: In most cases, all you need is one PS/2 male-to-male
cable connecting the KVM switch module and your laptop, as shown below;
the “Y” adapter is not necessary. However, as some laptop computers do not
follow the industry standard, check your laptop’s user manual for details.
Slim Models (Models 521796, 523561 and 523578):
Use only the cables shown
at right. Connection from a
slim KVM module to a PS/2
computer or a USB computer
is shown below.
8
INSTALLATION
For PS/2 computers connected to
IMM and IUM models (Models
521796, 523561, 523578).
For USB computers connected to IUM
models (Models 523561, 523578).
 Loading...