

Intellinet 505888, 505895 Quick Install Manual
GiGabit
Sata NaS
quick
iNStall
Guide
MODELS 505888
& 505895
Model 505888: 1.5 TB
Model 505895: 3 TB
INT-505888/505895-QIG-0110-01


Thank you for purchasing the INTELLINET NETWORK SOLUTIONS™
Gigabit SATA NAS, Model 505888 (1.5 TB) or Model 505895 (3 TB).
This quick install guide presents the rudimentary steps required to set
up and operate this network-attached storage (NAS) device. For more
detailed instructions, specications and regulatory statements, refer to
the user manual on the CD enclosed with this product or on the Web site
listed below. Contact your INTELLINET NETWORK SOLUTIONS dealer
with comments or questions, or visit www.intellinet-network.com for
information on related products and additional contact information.
In order to facilitate the use of the NAS, the device comes with default
settings that most users can use without any modication. If a network
manager needs to modify any of the settings, the NAS provides an
intuitive Web-based user interface. NOTE: Make sure that the TCP/IP
protocol is installed on the networked computers that will be accessing
the NAS.
NOTE: Some screen images have been modied to t the format of this
guide.
System Requirements: Model 505888 / 1.5 TB
• Computer with Internet browser and network access for setup
• Switch or router with one free Ethernet port for the NAS
• One 3.5” SATA-I or SATA-II hard drive with 20 GB – 1 TB (1.5 Gbps)
System Requirements: Model 5058958 / 3 TB
• Computer with Internet browser and network access for setup
• Switch or router with one free Ethernet port for the NAS
• One or two 3.5” SATA-I or SATA-II hard drives (1.5 Gbps) with 20 GB –
1 TB per drive (2 TB total)
• For RAID 0 and 1, two hard drives of identical capacity are recommended
Package Contents
• Gigabit SATA NAS
• Power adapter
• Quick install guide
• CD with user manual
3
hardware iNStallatioN
Model 505888 / 1.5 TB
Front Panel
Two LEDs are positioned behind the frontpanel grille: Blue indicates power is on;
red indicates data access. NOT E: This
unit doesn’t feature an On/Off switch. To
turn it off, simply remove the power supply; or when using the network
drive, go to the Turn Off Server screen in the System section and click
“Turn off.” To turn it back on, re-connect the power supply or allow about
two minutes for the system to re-boot when using the network drive.
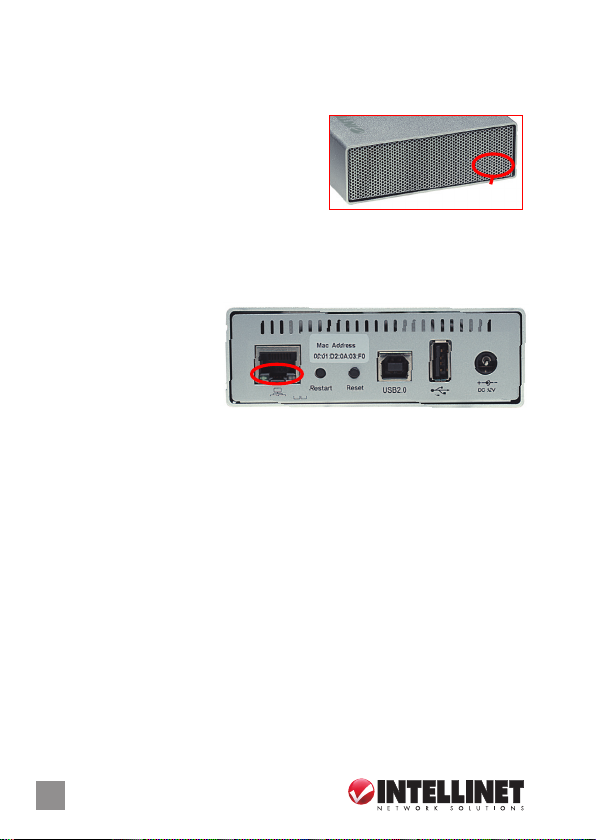
Rear Panel
The buttons and jacks on
the rear panel are detailed
below from left to right.
Gigabit Ethernet port —
When ashing green, the left LED indicates activity. The right LED is
unlit when linked at 10 Mbps; green at 100 Mbps; orange at 1000 Mbps.
NOTE: The NAS can be used as a network drive or an external USB
drive, but not at the same time. It acts as a USB hard drive when both
USB and Ethernet cables are connected.
Restart button — Press and release for a hardware reset of the network
drive. The device will restart after you release the button.
Reset button — When the network drive is powered up and ready, press
and release for a software reset, or press and hold it for 5 seconds
before releasing to reset all the network drive settings to factory
defaults (which will erase all user accounts and groups).
USB host por t — This USB type-B port is the host connection to the
computer when using the device as an external USB HDD.
USB device port — This USB type-A port is for connection to an external
USB hard drive, USB ash drive or USB printer.
Power adapter jack — For external USB devices, it’s recommended
that the USB drives have their own power supply.
LEDs
(behind grille)
4
 Loading...