


INTELLINET 500012 NAS Quick Installation
1. Packing Contents
• One Network attached system with the Main Board and FAN.
• One RJ45 Cable.
• One Parallel ATA IDE Cable for Hard Disk Only
• One Power Code for Hard Disk Only
• One Power Adapter 12VDC, output 1.7A.
• One Power Cord.
• One Installation CD (Manual on CD).
• One Quick Installed Guide (QIG).
Note: Using a power supply with a different voltage rating than the one included with the
Network Attached Storage will cause damage and void the warranty for this product. If any
of the above items is missing, please contact your reseller.
2.Default Setting
Name Default Setting
User name admin
Password admin
Profile 1
Profile Name Conference
Wired Mode Use The IP Below
IP Address 192.168.0.1
Subnet Mask 255.255.255.0
DHCP Server Yes
Start client IP Address 192.168.0.2
End client IP Address 192.168.0.254
Share Password rw
Before you start
Everything you need to boot this system is included in this Quick Installation Guide. For
more information, a complete Online User’s Manual can be found in the Bonus Pack CD
Disc.
3.System Installation.
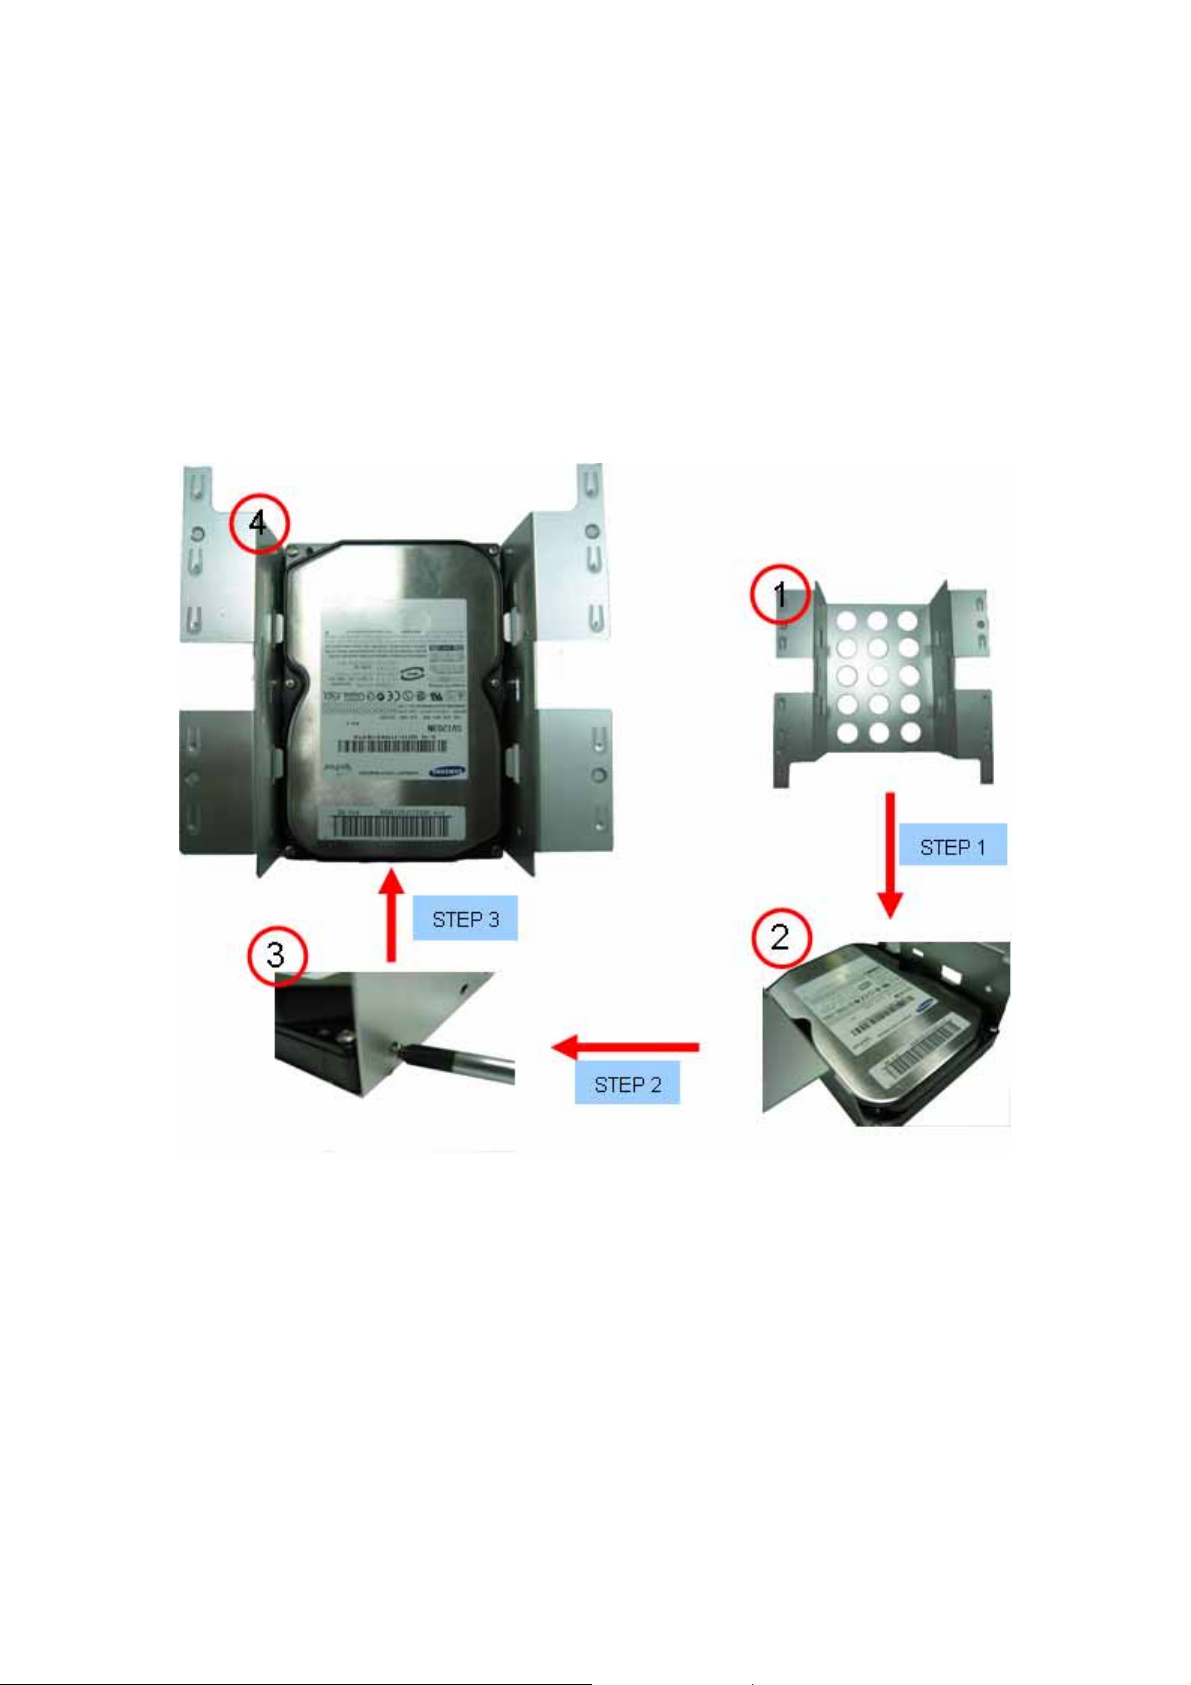
3.1. HD tray installation guide
Step 1: Draw out the HDD tray from the system. Install HDD in the tray.
Step 2: Screw the HDD on the tray.
Step 3: HDD assembled in the tray.
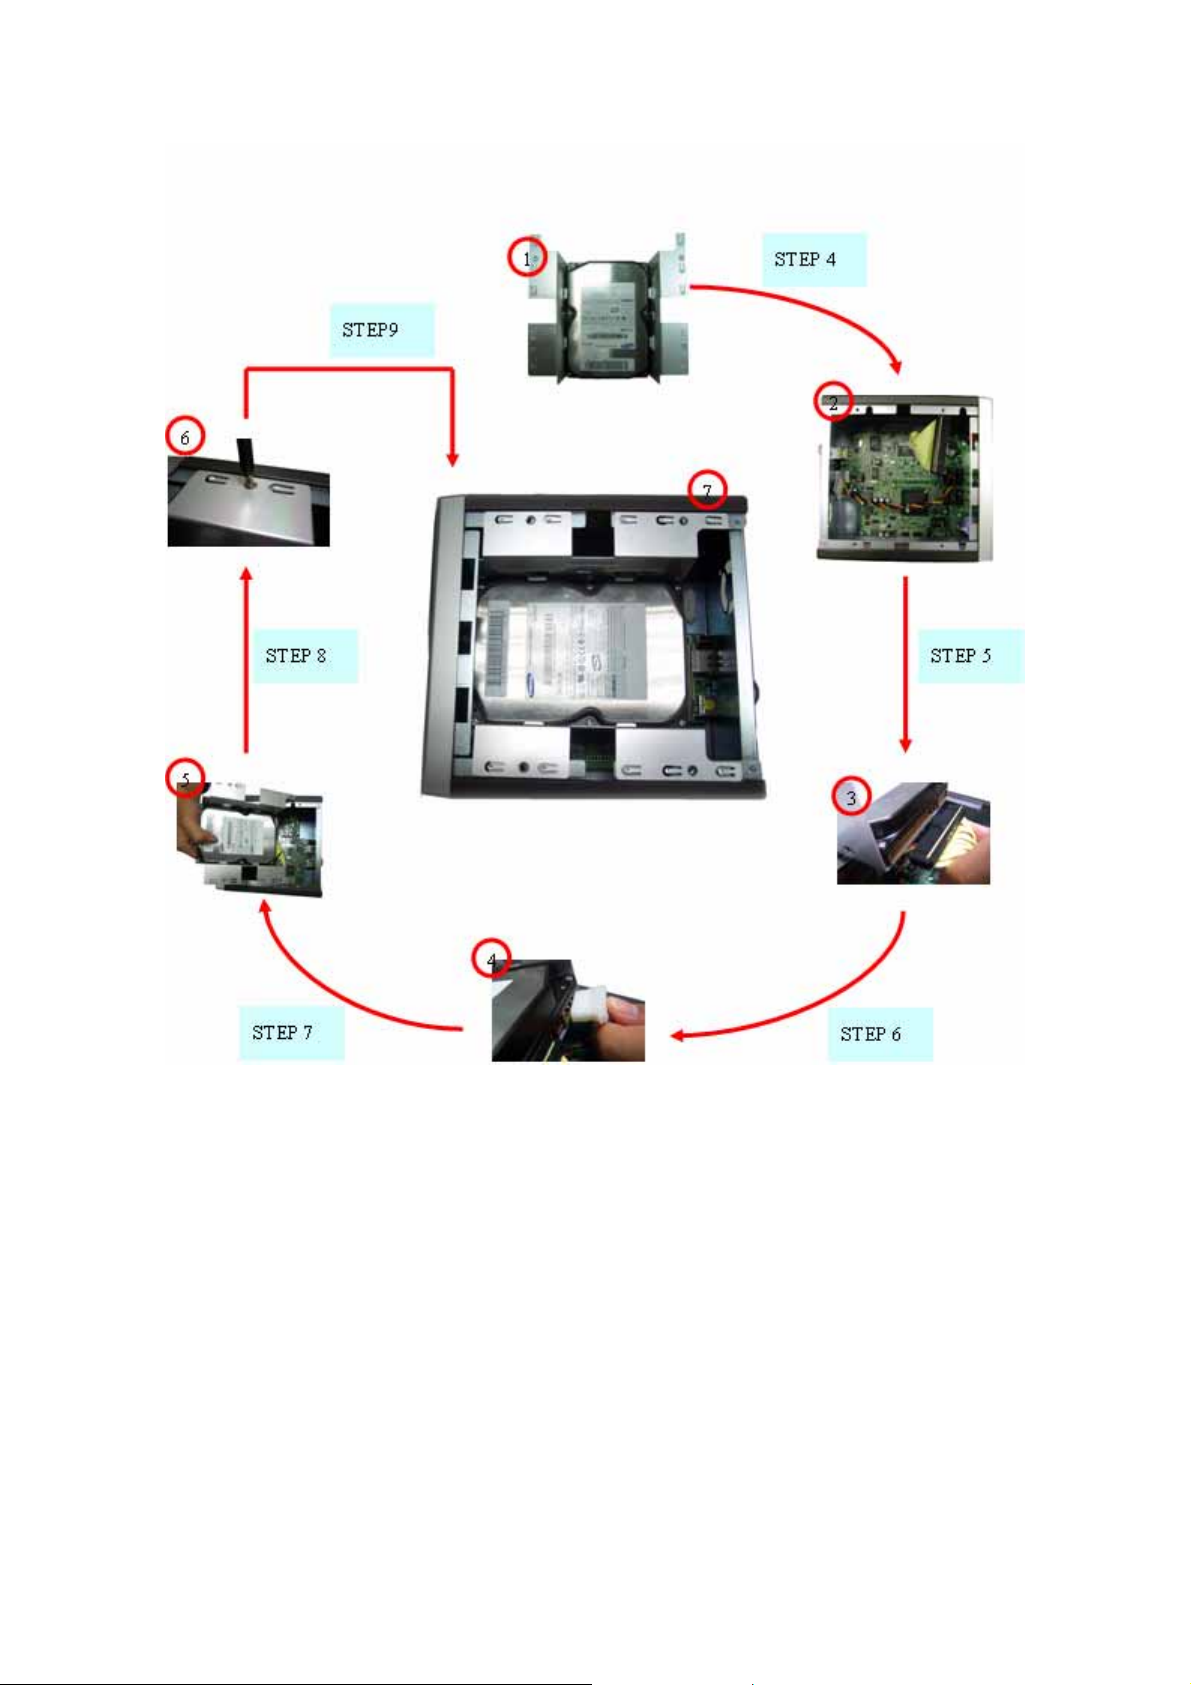
Step 4: Assembled HDD tray
Step 5: Insert IDE cable into HDD.
Step 6: Insert power cable into HDD.
Step 7: Install assembled HDD tray into system.
Step 8: Screw HDD tray on the system.
Step 9: Cover the system with top chassis.

3.2. System outlook and LED
LED Color Status LED Activity
On Power On Power Blue
Off Power Off
LAN Green Flashing Transfer/Receive Data
HDD Green Flashing Read/Write Data
On HDD FullHDD/F Green
Off HDD have free space

2.3. I/O port on the back side
Notice: The left USB port only supports HDD or flash drive, and the right USB port only
supports printer.

4 Software installation
Step 01: Power on the system.
Step 02: Insert Utility CD into CD-ROM
Step 03: Open your Internet browser and key in the address http://192.168.0.1. You will
see the below picture. (Notice: Set the IP of client system as the same
domain)
Step 04: Press button “Browser” and search “PKG” file in the CD. (Default path is
“x:\Firmware”) then push the “Setup” button.
Step 05: Before you push the “OK Button” for next step.
Step 06: Please do not power off either your computer or the NAS during this
process. This could take a few minutes depending on your hard drive
capacity.
Step 07: When the system upgrade process is completed, you will see the message
below in your web browser.

Step 08: Please choose the suitable profile. (Default is Conference Profile)
Step 09: Please install the client engine software from the CD. (Path is x:\application)
Step 10: Click “Administration Console” to operate
Step 11: Click the “Server Web Management” and key in the default username and
password”, then you can access the system setup.
(Notice: The System Default Username and Password is “admin”)

The enclosed Hardware Installation Guide gives you a step-by-step explanation of how to
install your Network Attached System (NAS). Further technical assistance and all updated
drivers can be accessed at
www.intellinet-network.com
Here you have access to 24hour support and can contact our support team to answer any
questions you may have.
In order to provide the requested support we need the following details from you:
• A clear description of the problem;
• Version number of the drivers you are using (always check the website to see whether
you are using the latest version);
• Type of PC you are using;
• Operating system you are using
For more information about INTELLINET products, please visit the INTELLINET Web Site:
www.intellinet-network.com
ATTENTION!!
The Software installation as described below, may be slightly different from the installation
on your computer. This depends on the Windows version you are using. Contents are
subject to change without prior notice.
If you are shipping this product after installing a hard drive, please ensure that you take
adequate measures to protect the system from shock levels that can be damaging to the
installed hard drive.
Limitation of Liability: TO THE MAXIMUM EXTENT PERMITTED BY LAW,
ICINTRACOM IS NOT LIABLE UNDER ANY CONTRACT, NEGLIGENCE, STRICT
LIABILITY OR OTHER LEGAL OR EQUITABLE THEORY. FOR ANY LOSS OF USE OF
THE PRODUCT, INCONVENIENCE OR DAMAGES OF ANY CHARACTER, WHETHER
DIRECT, SPECIAL, INCIDENTAL OR CONSEQUENTIAL (INCLUDING, BUT NOT
LIMITED TO, DAMAGES FOR LOSS OF GOODWILL, LOSS OF REVENUE OR PROFIT,
WORK STOPPAGE, COMPUTER FAILURE OR MALFUNCTION, FAILURE OF OTHER
EQUIPMENT OR COMPUTER PROGRAMS TO WHICH ICINTRACOM’S PRODUCT IS
CONNECTED WITH, LOSS OF INFORMATION OR DATA CONTAINED IN, STORED ON,
OR INTEGRATED WITH ANY PRODUCT RETURNED TO ICINTRACOM FOR
WARRANTY SERVICE) RESULTING FROM THE USE OF THE PRODUCT, RELATING
TO WARRANTY SERVICE, OR ARISING OUT OF ANY BREACH OF THIS LIMITED
WARRANTY, EVEN IF ICINTRACOM HAS BEEN ADVISED OF THE POSSIBILITY OF
SUCH DAMAGES. THE SOLE REMEDY FOR A BREACH OF THE FOREGOING
LIMITED WARRANTY IS REPAIR, REPLACEMENT OR REFUND OF THE DEFECTIVE
OR NON-CONFORMING PRODUCT. THE MAXIMUM LIABILITY OF ICINTRACOM
UNDER THIS WARRANTY IS LIMITED TO THE PURCHASE PRICE OF THE PRODUCT
COVERED BY THE WARRANTY. THE FOREGOING EXPRESS WRITTEN
WARRANTIES AND REMEDIES ARE EXCLUSIVE AND ARE IN LIEU OF ANY OTHER
WARRANTIES OR REMEDIES, EXPRESS, IMPLIED OR STATUTORY.
 Loading...