


Intellinav SE User Manual

Copyright © 2006-2008 Netropa Corp. http://www.intellinav.com
All rights reserved.
Part number#IN-MIGSE
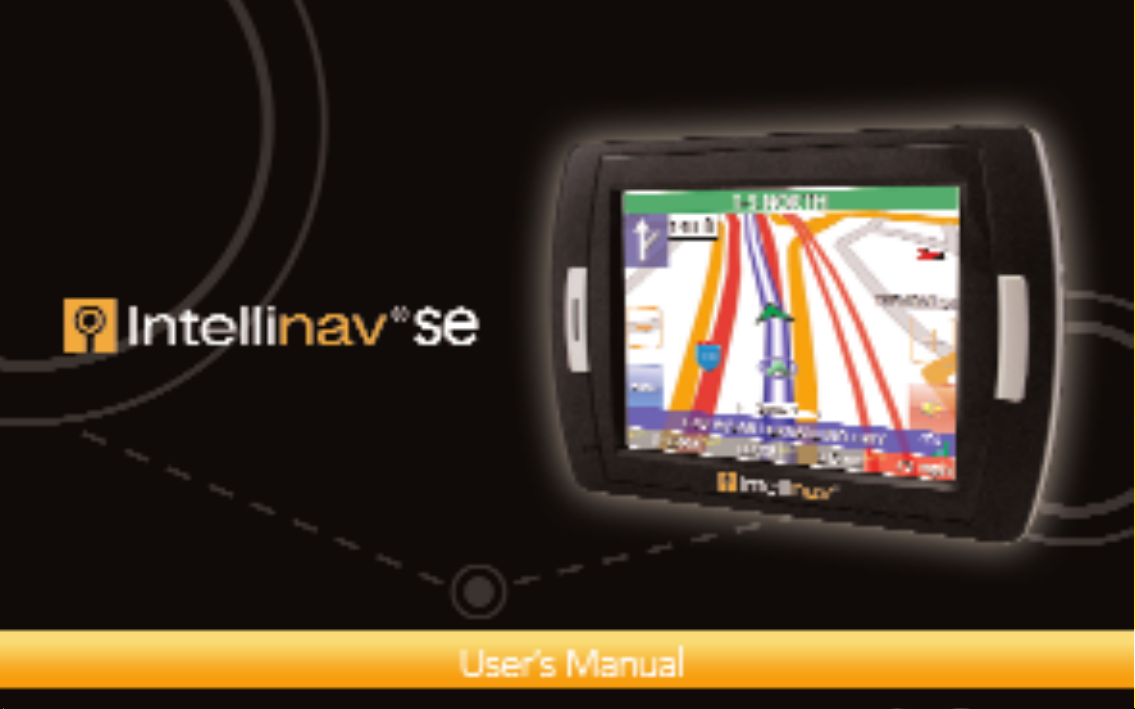

Table of Contents
Getting Started . . . . . . . . . . . . . . . . . . . . . . . . . . . . . . . .3
Basic Operation . . . . . . . . . . . . . . . . . . . . . . . . . . . . .4
Mounting the Intellinav System . . . . . . . . . . . . . . . .5
Charging the Battery . . . . . . . . . . . . . . . . . . . . . . . . .5
Starting Intellinav . . . . . . . . . . . . . . . . . . . . . . . . . . . . . .6
Getting GPS Signal . . . . . . . . . . . . . . . . . . . . . . . . . .6
GPS Information . . . . . . . . . . . . . . . . . . . . . . . . . . . .7
Entering Data on the Intellinav System . . . . . . . . . .7
Moving Through the Screens . . . . . . . . . . . . . . . . . .7
Resetting the Intellinav System . . . . . . . . . . . . . . . . .7
Working with the Map . . . . . . . . . . . . . . . . . . . . . . . . . .8
Map View . . . . . . . . . . . . . . . . . . . . . . . . . . . . . . . . . .8
Maneuver Detail . . . . . . . . . . . . . . . . . . . . . . . . . . . .8
Panning the Map . . . . . . . . . . . . . . . . . . . . . . . . . . . .8
3D Map View . . . . . . . . . . . . . . . . . . . . . . . . . . . . . . .9
Route List . . . . . . . . . . . . . . . . . . . . . . . . . . . . . . . . . .9
Current Location . . . . . . . . . . . . . . . . . . . . . . . . . . . .9
POI Information . . . . . . . . . . . . . . . . . . . . . . . . . . . .10
Screen Tap Area . . . . . . . . . . . . . . . . . . . . . . . . . . . .10
Entering Your Route . . . . . . . . . . . . . . . . . . . . . . . . . . .11
Setting a Single Destination . . . . . . . . . . . . . . . . . .11
Using an Address as a Destination . . . . . . . . . . .11
Using an Intersection as a Destination . . . . . . . .14
Using a Point of Interest (POI) as a Destination .16
1
Intellinav se
Using a Favorite Destination as a Destination . .19
Using a Recent Destination as a Destination . . .19
Using a City Center as a Destination . . . . . . . . .20
Detours . . . . . . . . . . . . . . . . . . . . . . . . . . . . . . . .22
Avoid Roads . . . . . . . . . . . . . . . . . . . . . . . . . . . .22
Stopovers . . . . . . . . . . . . . . . . . . . . . . . . . . . . . .23
Setting an Itinerary . . . . . . . . . . . . . . . . . . . . . . . . .24
Using Shortcuts . . . . . . . . . . . . . . . . . . . . . . . . . . . .25
Managing Your Favorites List . . . . . . . . . . . . . . . . . . . .26
Getting Information . . . . . . . . . . . . . . . . . . . . . . . . . . .27
Route List . . . . . . . . . . . . . . . . . . . . . . . . . . . . . . . . .27
Current Location . . . . . . . . . . . . . . . . . . . . . . . . . . .27
Trip Information . . . . . . . . . . . . . . . . . . . . . . . . . . . .28
Almanac . . . . . . . . . . . . . . . . . . . . . . . . . . . . . . . . . .28
System Information . . . . . . . . . . . . . . . . . . . . . . . . .28
GPS Information . . . . . . . . . . . . . . . . . . . . . . . . . . .28
Parked-car Locator . . . . . . . . . . . . . . . . . . . . . . . . . . . .29
Setting Your Options . . . . . . . . . . . . . . . . . . . . . . . . . .30
Display Options . . . . . . . . . . . . . . . . . . . . . . . . . . . .30
Route Options . . . . . . . . . . . . . . . . . . . . . . . . . . . . .33
Safety Options . . . . . . . . . . . . . . . . . . . . . . . . . . . . .34
Language Options . . . . . . . . . . . . . . . . . . . . . . . . . .37
Localization Options . . . . . . . . . . . . . . . . . . . . . . . .38
System Options . . . . . . . . . . . . . . . . . . . . . . . . . . . . . .39

Volume . . . . . . . . . . . . . . . . . . . . . . . . . . . . . . . . . .39
Display . . . . . . . . . . . . . . . . . . . . . . . . . . . . . . . . . . .39
Language . . . . . . . . . . . . . . . . . . . . . . . . . . . . . . . . .40
Power Status . . . . . . . . . . . . . . . . . . . . . . . . . . . . . .40
Restore . . . . . . . . . . . . . . . . . . . . . . . . . . . . . . . . . . .41
System Information . . . . . . . . . . . . . . . . . . . . . . . . .41
Photo Viewer . . . . . . . . . . . . . . . . . . . . . . . . . . . . . . . .42
Full Screen Mode . . . . . . . . . . . . . . . . . . . . . . . . . .43
Magnification . . . . . . . . . . . . . . . . . . . . . . . . . . . . . .44
Orientation . . . . . . . . . . . . . . . . . . . . . . . . . . . . . . . .44
Slide Show . . . . . . . . . . . . . . . . . . . . . . . . . . . . . . . .44
Safety and Regulation . . . . . . . . . . . . . . . . . . . . . . . . .45
Software License Agreement . . . . . . . . . . . . . . . . . . . .46
Nuance End User License Agreement . . . . . . . . . . . .47
Terms And Conditions . . . . . . . . . . . . . . . . . . . . . . . . .48
Limited Warranty . . . . . . . . . . . . . . . . . . . . . . . . . . . . .52
Caring for your device . . . . . . . . . . . . . . . . . . . . . . . . .54
Important Information . . . . . . . . . . . . . . . . . . . . . . . . .55
System Specifications . . . . . . . . . . . . . . . . . . . . . . . . . .57
Intellinav se User’s Manual
2

Getting Started
Congratulations on your purchase of the Intellinav se
system. Your Intellinav system can guide you to the
destination of your choice using signals from Global
Positioning Satellites (GPS) orbiting the earth.
There are 24 GPS satellites orbiting the earth. A GPS
device can calculate your position on the earth if it can
receive signals from at least three of these satellites.
When it receives at least four signals, a GPS device can
also calculate your altitude (height above sea level).
You can start using your Intellinav system by simply
mounting the holder on your car's windshield or dash,
plugging in the charger, and turning it on. Make sure the
Battery On/Off switch on the bottom of the unit is in the
On position, then press the Standby button on the top.
FFoorr yyoouurr ssaaffeettyy aanndd tthhee ssaaffeettyy ooff ootthheerrss,, pplleeaassee ddoo nnoot
ooppeerraattee tthhee ssyysstteemm wwhhiillee ddrriivviinngg.. IItt iiss ddaannggeerroouuss ttoo ddo
ssoo.. WWhheenn yyoouu wwaanntt ttoo eenntteerr aann aaddddrreessss oorr cchhaannggee a
sseettttiinngg,, pplleeaassee ppuullll oovveerr aanndd ppaarrkk tthhee ccaarr iinn aa ssaaffee aarreea
ffiirrsstt.. YYoouu sshhoouulldd aallwwaayyss ppaayy ffuullll aatttteennttiioonn ttoo tthhee rrooaad
aanndd uussee tthhee ssyysstteemm oonnllyy aass aann aaiidd,, bbyy ttaakkiinngg oonnlly
ggllaanncceess aatt aa ttiimmee,, aanndd lliisstteenniinngg ttoo tthhee vvooiiccee pprroommppttss.
3
Intellinav se
a
d
y
WWAARRNNIINNGG:: AAnn iinneexxppeerriieenncceedd ddrriivveerr sshhoouulldd NNOOTT uusse
tthhee ssyysstteemm..
UUVV--pprrootteecctteedd WWiinnddsshhiieelld
UV-protected windshield in certain vehicles reflects UVrays as well as satellite signals. Although the Intellinav se
is equipped with SiRF’s high sensitivity GPS receiver, the
acquisition time is drastically affected. It is not
recommended to use Intellinav se in vehicles with UVprotected windshield.
t
TThheefft
As it is dangerous to leave any valuable item visible in a
parked car, portable navigation systems have been
targets in many theft crimes. Please store the Intellinav se
t
in a non-visible area or carry it with you, after parking the
o
car.
a
.
d
e

Basic Operation
SD Card Slot
Stylus Pen
LED
Battery On/Off
** YYoouu mmuusstt ffiirrsstt sseett tthhee BBaatttteerryy sswwiittcchh ttoo tthhee OOnn ppoossiittiioonn uussiinngg tthhee ssttyylluuss ppeenn,, iinn oorrddeerr ttoo ooppeerraattee tthhee ddeevviiccee.
Standby
Speaker
Headphone Jack
Menu
DC In
Intellinav se User’s Manual
.
4
Mounting the Intellinav System
Mounting on the Windshield
1. Clean the surface of the
windshield using rubbing
alcohol.
2. Press the suction cup
firmly against the
windshield.
3. Rotate the lever to fix the suction cup in place.
NOTICE TO DRIVERS IN CALIFORNIA AND
MINNESOTA: State law prohibits drivers in California
(CVC 26708(a)) and Minnesota (169.71, Minnesota
Statutes 2006) from using suction mounts on their
windshields while operating motor vehicles
Mounting on the Dashboard
1. Remove the adhesive cover on the disc,
and stick the disc on the dashboard.
2. Press the suction cup firmly against the
disc.
5
Intellinav se
Mounting the Cradle and GPS
1. Insert the GPS unit bottom in first, and then lock it
using the lever on the top.
2. Adjust the angles of the arms to achieve the best
viewing position.
Charging the Battery
1. Prior to first use, please use the AC adapter to fully
charge the unit for 4-6 hours, until battery LED turns
green.
2. In the vehicle, you may plug in the car charger to
provide continuous power. On a full charge, the unit
can operate up to 5 hours.
3. To charge the battery, the Battery On/Off switch at
the bottom of the unit must in the On position.
4. To preserve battery power when the unit will not be
used for an extended period, set the Battery On/Off
switch to the Off position.

Starting Intellinav
Press the Standby button.
oonn tthhee bboottttoomm ooff tthhee uunniitt iiss iinn tthhee OOffff ppoossiittiioonn,, sseett iitt tto
OOnn ffiirrsstt uussiinngg tthhee aattttaacchheedd ssttyylluuss ppeenn.
NNaavviiggaattiioon
Tap
IIAAggrreee
Tap
warning. The map view appears and you are ready to set
your first destination!
n
. A warning screen appears.
e
after you have read and agreed to the
IIff tthhee BBaatttteerryy OOnn//OOffff sswwiittcch
.
h
o
Getting GPS Signal
To use the Intellinav system to guide you to a destination,
the system's GPS antenna must receive GPS signals. GPS
signals can be obstructed by ceilings, trees, and nearby
tall buildings. Signals can also be obstructed by the roof
of your vehicle. For best results, position your Intellinav
system where it has a clear view of the sky.
The very first time turning on the system may take as
long as 15 minutes to obtain a valid GPS fix. Once the
first GPS fix is obtained, thereafter, it should normally
take no more than 30 seconds to 1 minute to obtain a
valid GPS fix.
There are 3 ways to view the state of the signal:
1) Car Cursor
The status of the GPS signal is
represented in the car cursor color:
Red: Acquiring GPS signal
Yellow: Weak GPS signal
Green: GPS signal locked and ready to navigate
GREY: Connectivity to GPS lost
2) GPS signal strength meter
White: Acquiring GPS signal
Yellow: Weak GPS signal
Green: GPS signal locked and ready to navigate
3) For detailed information about the GPS operational
state, please see the GPS Information screen.
Intellinav se User’s Manual
6
GPS Information
TToo vviieeww tthhee GGPPSS iinnffoorrmmaattiioonn:
u
MMeennu
1. Tap
the next item that matches the letters you've tapped.
If you need to enter numbers, tap the 1-2-3 button, and
:
the numeric keyboard appears:
IInnffoorrmmaattiioon
2. Tap
GGPPSS IInnffoorrmmaattiioon
3. Tap
appears.
n
.
n
. The GPS Information screen
Moving Through the Screens
Entering Data on the Intellinav System
The Intellinav system doesn't have a physical keyboard.
Instead, you tap the screen to enter data. When you are
entering data, a screen containing the letters of the
alphabet appears:
The Intellinav system shows you one screen at a time.
Each time you tap a button, a new screen appears. If
you want to return to go to the previous screen, tap
the in the upper right corner of the screen. If you
want to go back to the map view directly, tap the
button on the upper left corner of the screen.
Resetting the Intellinav System
You should never have to reset the Intellinav System
under normal circumstances. However, in the event that
a problem cannot be corrected, you may reset the
As you tap the buttons on the virtual on-screen
keyboard, the list at the top of the screen scrolls to show
7
Intellinav se
Intellinav System using the Battery On/Off switch on the
bottom of the system, using a pen or paper clip.
Working with the Map
The Intellinav system gives you many ways of looking at
the map. You can see your current position, view any of
the turns on a route, or pan the map to view other areas.
You can zoom in and out, and find information about
specific locations.
Map View
The map view on the Intellinav system shows your
current location.
At the bottom of the map is a scale indicating your
current zoom level. On the upper right is the compass.
On the center right and left are zoom in and out
buttons, respectively.
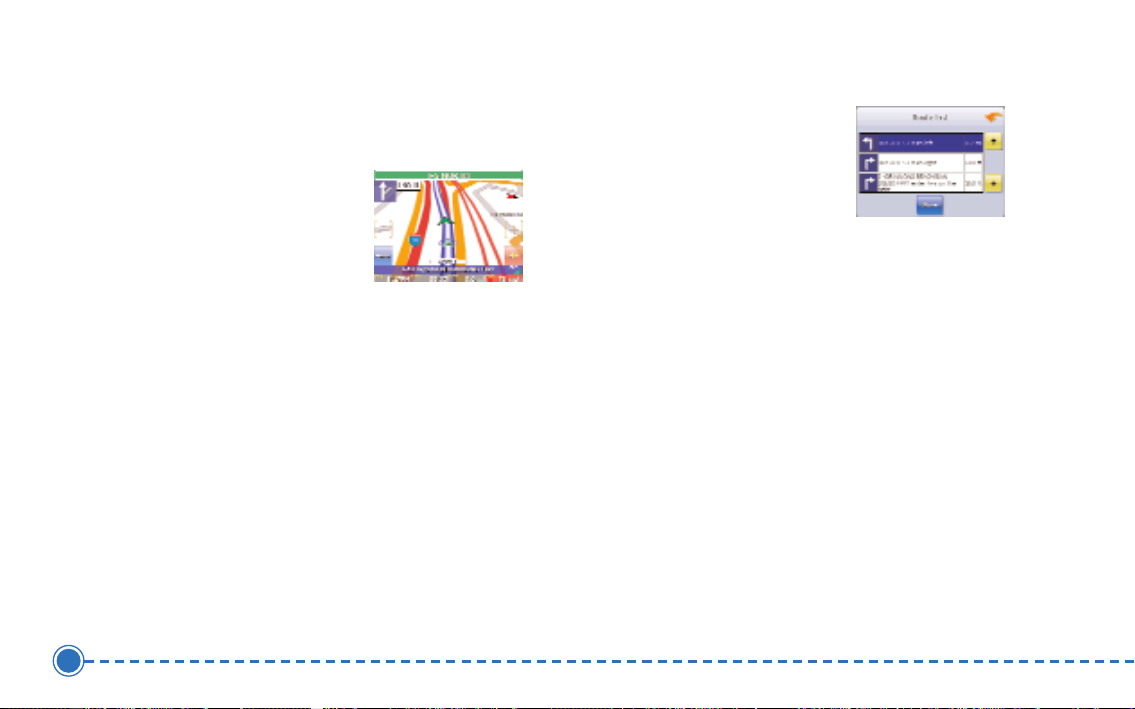
Maneuver Detail
If you have set a destination, the map displays additional
information. As you navigate to a destination, the top of
the map displays the name of the next street, the
direction of your next turn and the distance to the turn.
At the bottom of the map you see the estimate of how
much time remains before arriving at your destination,
the remaining distance to your destination, and your
current speed.
On the upper left is an arrow indicating the direction and
the type of maneuver ahead, as well as the remaining
distance to the next maneuver. A smaller arrow
represents the following maneuver.
.
Panning the Map
You can pan the map by tapping and dragging the map.
X
X
To return to the regular map view, tap the
button.
Intellinav se User’s Manual
8
3D Map View
You can change the perspective of the map display to
3D or bird’s eye view.
TToo cchhaannggee ttoo 33DD vviieeww:
u
MMeennu
1. Tap
Menu appears.
SSeettttiinnggs
2. Tap
DDiissppllaayy OOppttiioonns
3. Tap
appears.
:
. The Main
s
. The Settings screen appears.
s
. The Display Option screen
IInnffoorrmmaattiioon
2. Tap
Information screen
appears.
RRoouuttee LLiisst
3. Tap
4. Tapping an item on the list and then tapping
will display the the maneuver on the map.
5. Alternatively, you may call up the route list by
simply tapping on the next street bar on the top of
the map screen.
n
t
.
. The
SShhoow
w
4. Select from 2D, High, Medium and Low, which
represents the inclination of the 3D map display.
Route List
If you have set a destination, you can view a list of the
maneuvers that make up your route.
TToo vviieeww tthhee rroouuttee lliisstt:
MMeennu
1. Tap
9
Intellinav se
:
u
. The Main Menu appears.
Current Location
You can find location information about any point on the
map by pressing firmly on the map for one second. A
screen appears giving you the opportunity to set the
location as the Start or the Destination, and save the
location to your Favorites list, or view information.
From the Information screen you have several options:
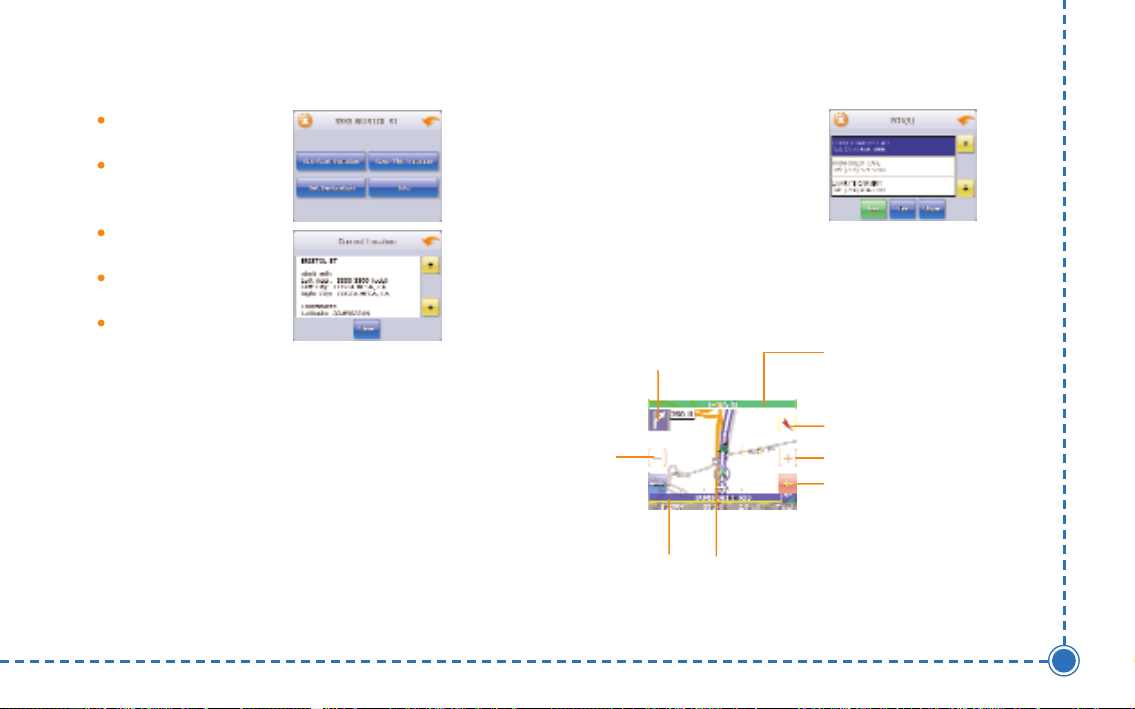
Set Start Location
Set Stopover (with an
existing route)
POI Information
To view information about a POI on
the map, tap on the icon on the
map. The POI(S) screen will appear.
Intellinav se User’s Manual
Set Destination
Save This Location
Information
Setting the location as a starting point is useful if you are
trying to find the distance between two locations.
Setting the location as your destination is a quick way to
set a destination.
Saving the location adds the location to your Favorites
list (you'll learn more about Favorites later in this
manual).
You can also get additional information about the
current location, including latitude and longitude.
Screen Tap Areas
Tap in designated areas on the map display for shortcuts
to handy functions.
Repeat voice
guidance
Zoom
out
Show details of
current location
Tap and hold to show details of the street,
set as the start location, or set as the
destination (2D mode only)
Show route list
Change map
orientation to Heading
Up or North Up
Zoom in
Mute
10
Entering Your Route
11
You can set a destination with the Intellinav system many
different ways. Once you have set a destination, you can
add a detour or a stopover.
The Intellinav system also offers an Itinerary feature,
where you can enter up to 100 destinations and use the
Itinerary screen to re-order destinations as you like.
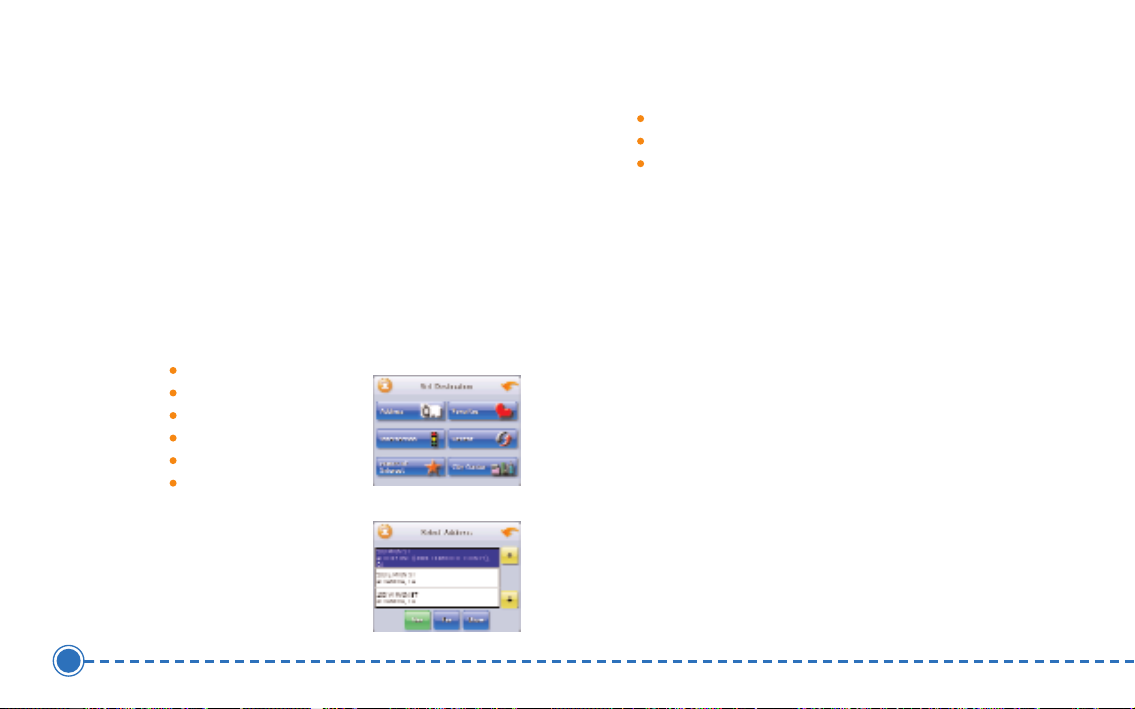
Setting a Single Destination
You can set your destination the following ways:
Address
Intersection
Point of Interest (POI)
Favorites
Recent
City Center
When you have found your
destination, you have
several options:
Intellinav se
Nav
Fav
Show
v
NNaav
calculates the route from your current location (or
the location you set as a starting point) to the
destination.
v
FFaav
adds the destination to your Favorites list. Your
Favorites list is a list of locations that you can add
destinations to. You can also enter a name for a
destination and delete destinations from the list.
w
SShhoow
displays the location on the panning map without
calculating a route. You can also use it to manually set a
starting point for a route.
Using an Address as a Destination
There are two ways to enter the address: by selecting
the street first, or by selecting the city first. If you use
Street First and too many records match, you will be
asked to use City First.

:
NNOOTTEE:
then the house number.
TToo EEnntteerr aann AAddddrreessss aass aa DDeessttiinnaattiioonn UUssiinngg SSttrreeeet
FFiirrsstt:
You will be prompted for the street name first,
:
u
MMeennu
1. Tap
. The main menu appears.
SSttrreeeett FFiirrsst
5. Tap
appears.
t
6. Tap the
OK when you have selected the street. The Enter
House Number screen appears.
t
. The Enter Street Name screen
s
LLeetttteerrs
to enter the name of the street. Tap
Intellinav se User’s Manual
DDeessttiinnaattiioon
2. Tap
appears.
AAddddrreesss
3. Tap
4. If you need to change the region:
a. Tap
screen appears.
b. Tap the
region or State, or tap the name in the list.
c. Tap
or State. You will return to the Input Method
screen.
n
. The Set Destination screen
s
. The Input Method screen appears.
CChhaannggee SSttaatte
LLeetttteerrs
K
OOK
when you have selected the region
e
. The Enter State Name
s
to enter the name of the
7. Tap the
house number. Tap
appears.
8. Select the address that matches the location you
want to go to and tap
the guidance directions begin.
TToo EEnntteerr aann AAddddrreessss aass aa DDeessttiinnaattiioonn UUssiinngg CCiittyy FFiirrsstt:
1. Tap
2. Tap
appears.
3. Tap
NNuummbbeerrs
u
MMeennu
DDeessttiinnaattiioon
AAddddrreesss
s
or Letters
K
OOK
NNaav
. The main menu appears.
n
. The Set Destination screen
s
. The Input Method screen appears.
D
AA--D
to enter the
. The Select Address screen
v
. The map appears, and
:
12

4. If you need to change the region or State:
a. Tap
CChhaannggee SSttaatte
e
. The Enter State Name
screen appears.
s
b. Tap the
LLeetttteerrs
to enter the name of the
region or State, or tap the name in the list.
c. Tap
when you have selected the region.
K
OOK
You will return to the Input Method screen.
8. Tap the
NNuummbbeerrs
house number. Tap
s
or Letters
K
OOK
D
AA--D
to enter the
. The Select Address screen
appears.
9. Select the address that matches the location you
v
want to go to and tap
NNaav
. The map appears, and
the guidance directions begin.
13
5. Tap
CCiittyy FFiirrsst
t
. The Enter City Name screen
appears.
s
6. Tap the
OOK
LLeetttteerrs
K
when you have selected the City. The Enter
to enter the name of the City. Tap
Street Name screen appears.
s
OOK
LLeetttteerrs
K
to enter the name of the street.
when you have selected the street. The
7. Tap the
Tap
Enter House Number screen appears.
Intellinav se

Using an Intersection as a Destination
There are two ways to enter the intersection: by
selecting the street first, or by selecting the city first. If
you use Street First and too many records match, you
will be asked to use City First.
TToo eenntteerr aann iinntteerrsseeccttiioonn aass aa ddeessttiinnaattiioonn uussiinngg SSttrreeeet
:
FFiirrsstt:
u
MMeennu
1. Tap
2. Tap
appears.
3. Tap
appears.
4. If you need to change the region or State:
. The main menu appears.
DDeessttiinnaattiioon
IInntteerrsseeccttiioon
a. Tap
screen appears.
b. Tap the
n
. The Set Destination screen
n
. The Input Method screen
CChhaannggee SSttaatte
s
LLeetttteerrs
e
. The Enter State Name
to enter the name of the
region, or tap the name of the region.
K
OOK
c. Tap
You return to the Input Method screen.
SSttrreeeett FFiirrsst
5. Tap
t
appears.
6. Tap the
K
OOK
when you have selected the street. The Enter
2nd Street Name screen appears.
7. Tap the
street. Tap
The Select Address screen appears.
8. Select the intersection that matches the location
you want to go to and tap
and the guidance directions begin.
when you have selected the region.
t
. The Enter Street Name screen
s
LLeetttteerrs
to enter the name of the street. Tap
s
LLeetttteerrs
to enter the name of the second
K
OOK
when you have selected the street.
v
NNaav
. The map appears,
Intellinav se User’s Manual
14

TToo eenntteerr aann iinntteerrsseeccttiioonn aass aa ddeessttiinnaattiioonn uussiinngg CCiitty
:
FFiirrsstt:
y
5. Tap
CCiittyy FFiirrsst
t
. The Enter City Name screen
appears.
15
1. Tap
2. Tap
. The main menu appears.
DDeessttiinnaattiioon
n
. The Set Destination screen
u
MMeennu
appears.
3. Tap
IInntteerrsseeccttiioon
n
. The Input Method screen
appears.
4. If you need to change the region:
a. Tap
CChhaannggee SSttaatte
e
. The Enter State Name
screen appears.
s
b. Tap the
LLeetttteerrs
to enter the name of the
region, or tap the name of the region.
c. Tap
when you have selected the region.
K
OOK
You return to the Input Method screen.
Intellinav se
s
6. Tap the
OOK
LLeetttteerrs
to enter the name of the city. Tap
K
when you have selected the city. The Enter
Street screen appears.
s
7. Tap the
Tap
LLeetttteerrs
to enter the name of the street.
K
OOK
when you have selected the street. The
Enter 2nd Street Name screen appears.
s
8. Tap the
street. Tap
LLeetttteerrs
to enter the name of the second
K
OOK
when you have selected the street.
The Select Address screen appears.
9. Select the intersection that matches the location
v
NNaav
you want to go to and tap
. The map appears,
and the guidance directions begin.
Using a Point of Interest (POI) as a
Destination
There are over 6 million points of interest that you can
select as a destination. Generally, you choose a category
and then choose one of four methods of selecting the
specific point of interest. Sometimes you must first select
a subcategory before you can choose a selection
method.
The four methods of selecting a specific point of
interest include two for nearby POIs and two for all
POIs in a region.
I
PPOOI
3. Tap
Interest screen appears.
4. Tap a
appears.
. The Points of
CCaatteeggoorry
y
. Usually a subcategory screen
Intellinav se User’s Manual
TToo sseelleecctt aa nneeaarrbbyy PPOOII aass aa ddeessttiinnaattiioonn:
u
MMeennu
1. Tap
appears.
2. Tap
Destination screen appears.
. The main menu
DDeessttiinnaattiioon
n
. The Set
:
16