

Page 1

PM SERIES
ELECTRONIC BENCH SCALE
OPERATION MANUAL
PLEASE READ THIS MANUAL VERY CAREFULLY BEFORE
ATTEMPT TO OPERATE THE SCALE
APRIL 2003 REV 3
Specifications subject to change without prior notice
CONTENTS
1 INSTALLATION
2 SPECIFICATIONS
3 KEYBOARD LAYOUT AND DESCRIPTION
4 INSTRUCTIONS FOR USE
5 TROUBLE SHOOTING
6 DAILY CARE AND MAINTENANCE
7 INSTALLATION DIAGRAM
Page 2

1. INSTALLATION
Check and make sure that the following
accessories are included:
This Operation Manual
Indicator x 1
Mains adapter x 1
Assembled platform x 1
Stainless steel platform cover x 1
L shape indicator platform mount support x 1
U shape indicator wall mount support x 1
Pillar, pillar mounting set + screws and tool
set x 1 (Option)
Contact your dealer if any items missed.
2. Insert stainless platform cover into the
platform in the same direction as the
platform. Always insert the platform cover
to the platform gently, no excessive force
is needed.
3. Fixing the Indicator
3.1 Platform Mount
3.1.1 Connect the cable plug from the
platform to the indicator receiving
plug.
3.1.2 Secure the connection firmly by
turning the plug screw in clockwise
direction.
3.1.3 Insert the indicator to the L shape
support, with the back of the indicator
against the platform.
NOTE:
The indicator could be mounted to the platform
in either longitude or latitude direction.
Default mounting is in longitude direction.
To change mounting direction, remove the
screws of the platform mount support
underneath the platform, then move the
support to the alternate mounting area and
fix it with the screw.
3.2 Wall Mount
3.2.1 Install the supplied U shape support
to a strong wall surface. Secure the
support to the wall with screws
supplied. In no circumstance the
extended cable length should excess
100cm.
3.2.2 Connect the cable plug from the
platform to the indicator receiving
Page 3

plug.
3.2.3 Secure the connection firmly by
turning the plug screw in clockwise
direction.
3.2.4 Insert the indicator to the U shape
support.
3.3 Pillar (option) Mount
3.3.1 Insert the pillar support to the
platform and locked it by the screws
provided.
3.3.2 Insert the pillar to the support
attached to the platform base. Fix the
pillar to the support with Philip head
screw supplied.
3.3.3 Insert the pillar mount indicator
support to the top of the pillar. Fix
this support to the pillar with the
Philip head screw supplied.
3.3.4 Thread the platform cable through the
pillar very carefully.
3.3.5 Connect the cable plug to the indicator
receiving plug.
3.3.6 After plugs are connected, lock the
plugs by turn the plug screw in
clockwise direction.
3.3.7 Insert the indicator into the
backplate of the support.
4 Always operate this scale on a level
surface and strong enough surface and free
from vibration, excessive moisture and RF
interference.
5 Unpack the power adapter package. Check
the voltage of the main adapter matches
with the voltage of electricity outlet.
Contact your local dealer if not.
6 Plug the main adapter to the wall outlet
and connect the output plug into the
platform DC inlet.
7 Charge the scale at least 8 hours before
operation.
8 Retain the package for future
transportation of scale.
Page 4
2. SPECIFICATIONS
GENERAL SPECIFICATIONS
Model No.
PM-3
0
PM-60
PM-15
0
Capacity
30kg/
661b
60kg/13
01b
150kg/
3301b
Division
0.01kg
/0.021
b
0.02kg/
0.051b
0.05kg
/0.11b
Platform
Size
280 X
330mm
280 X
330mm
280 X
330mm
Power
Source
By built-i
n rechargeable battery
and/or mains adapter.
The rechargeable battery is
automatically charged by built-
in
charging
Circuit while the mains adapter is
used.
Operatin
g Temp.
0~400C (32~1040F)
TO COMPLY WITH THE LAW, THE POUND UNIT WOULD
BE DISABLE. IN CERTAIN COUNTRIES. PLEASE
CONTACT YOUR LOCAL FOR MORE INFORMATION.
SPECIFICATIONS SUBJECT TO CHANGE WITHOUT PRIOR
NOTICE, CONTACT YOUR DEALER FOR DETAILS.
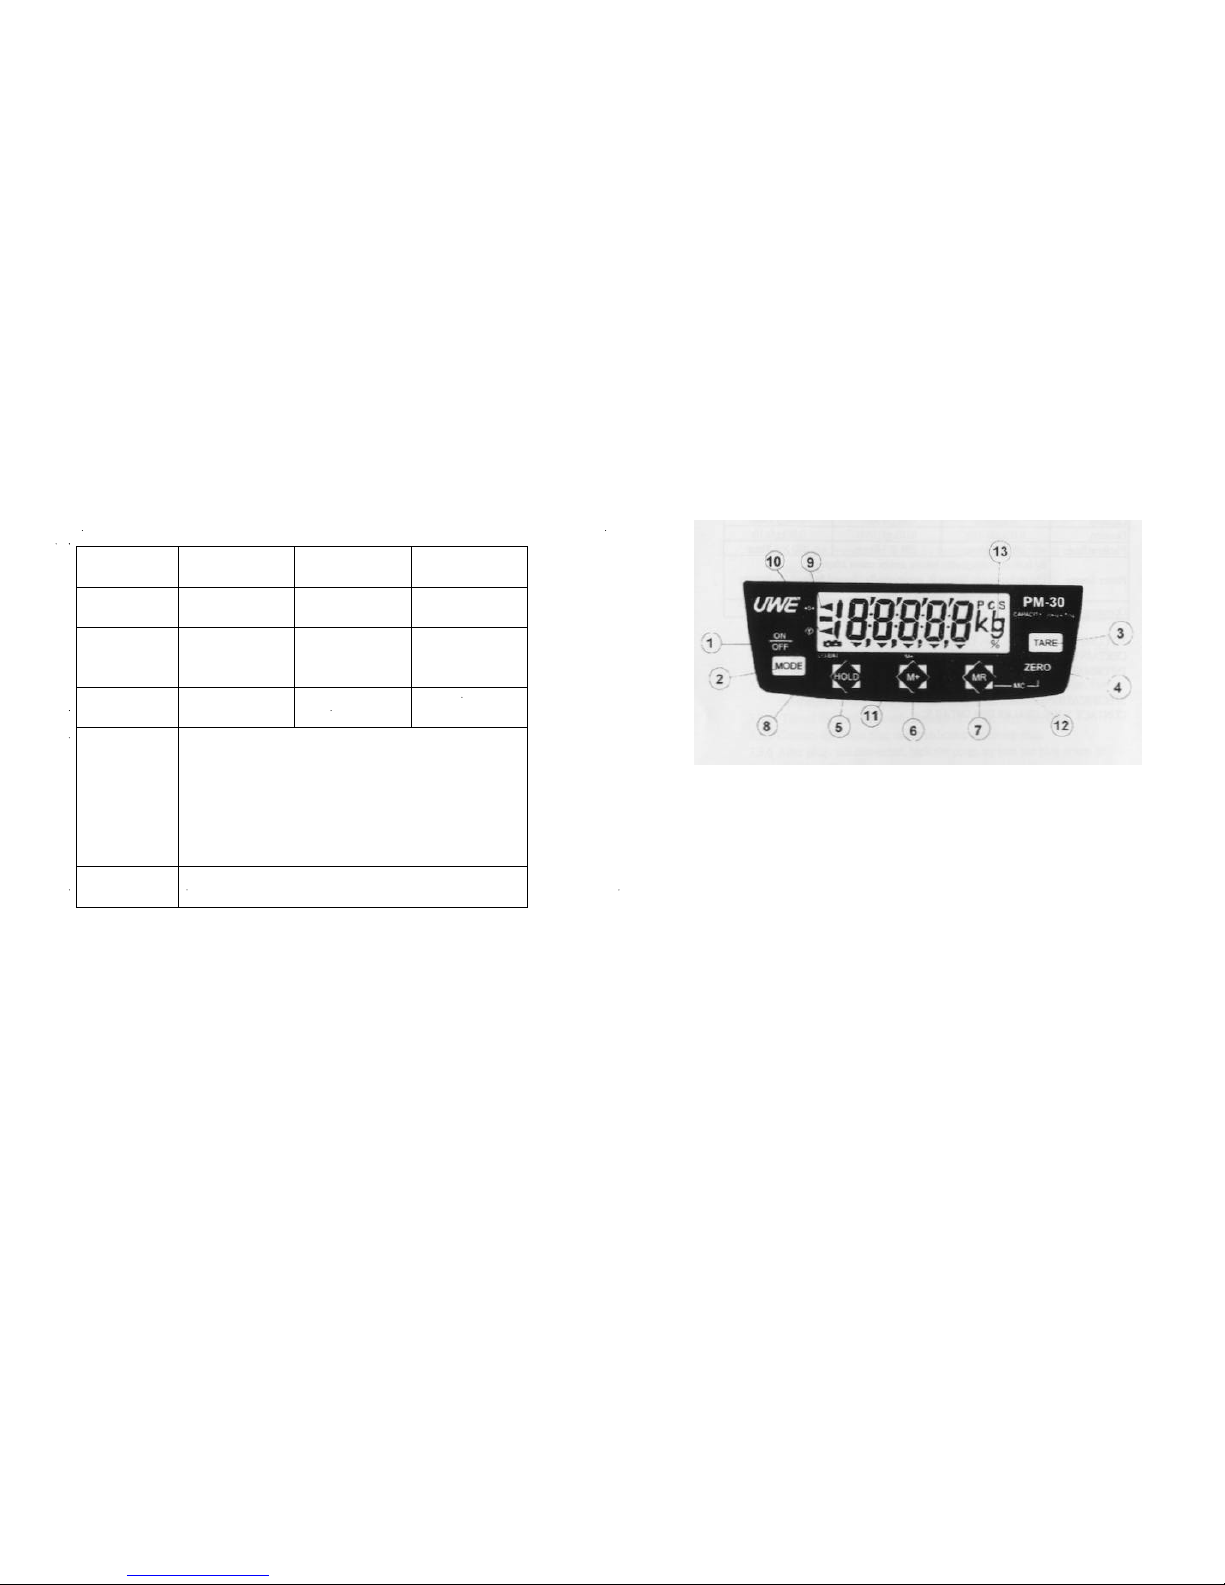
3. KEYBOARD LAYOUT AND DESCRIPTION
1. ON/OFF KEY
Press this key to turn scale on/off.
2. MODE KEY
Press this key to switch between kg, Lb & Lb/oz
with or without backlight (option).
NOTE: TO COMPLY WITH THE LAW OF CERTAIN
COUNTRIES, THIS KEY WILL BE WITHOUT ANY
FUNCTION EXCEPT SELECTING BACKLIGHT (OPTION)
STATUS.
Page 5

3. TARE KEY
Press this key to tare off the weight of
container.
4. ZERO KEY
Press this key to return weight displayed to
zero when scale is unloaded.
5. HOLD KEY
Press this key to switch between auto/manual
hold or to hold the weight displayed manually.
6. M+ KEY
Press this key to memory and add present weight
to memorized weight.
7. MR KEY
Press this key to recall accumulated weight
in memory.
SIGNS
8. LO-BAT SIGN
When this sign is on, recharge the scale
immediately.
9. ZERO SIGN
An arrow will appear and point at this sign
to indicate a zero weight status.
10. TARE SIGN
An arrow will appear and point at this sign
to indicate the tare function is being
employed.
11. M+ SIGN
An arrow will appear and point at this sign
to indicate the memory contains data.
12. MC SIGN
Press MR and ZERO simultaneously to clear
memory.
13 WEIGHT UNIT SIGN
"kg" indicates the metric weight unit is being
employed.
"lb" indicates the pound weight unit is being
employed.
Page 6

4. INSTRUCTIONS FOR USE
4.1 PLACING SCALE
Use this unit only on a hard and strong surface,
where is free from RF interference, vibration,
fire, direct sunlight and excessive moisture.
4.2 POWER THE SCALE
Press ON/OFF to turn scale on.
4.3 INTERNAL SETTINGS
4.3.1 Select Weight Unit
This unit is equipped with 3 weight unit modes,
i.e. kg, 1b and 1b/oz.
Default weight unit = kg (without pound unit)
Follow the below step to employ (disable) the
pound weigh unit.
a. Turn scale off
b. Press and hold TARE, then press ON/OFF.
Scale displays F.1
c. Press TARE twice. Scale displays F.3
d. Press and hold MODE
e. Press MODE unit the “1b” signs appear (or
select “KG” TO DISABLE THE POUND UNIT)
f. Press ZERO to confirm and return to normal
operation status.
(If the pound weight is selected) Press
MODE to shift among kg, 1b and 1b/oz during
operation.
4.3.2 Select Auto Hold Status
The default Hold setting is manual hold status.
Follow the below steps to employ the Auto Hold
Function.
a. turn scale on
b. press and hold HOLD until PXXXX and 5 arrows
beneath appears
c. release HOLD and scale will return to normal
operation status
Follow the below steps to disable the Auto Hold
Status
a. turn scale on
b. press and hold HOLD until PXXXX (without
the above mentioned 5 arrows) appears
c. release HOLD and scale will return to normal
operation status
4.3.3 Select Auto Power Off Setting
This unit is equipped with Auto Power Off
Function. The scale will turn off automatically
if the value remains unchanged for 4 minutes.
Follow the below steps to enable/disable Auto
Power Off Function
Page 7

a. Turn scale off
b. Press and hold TARE, then press ON/OFF
c. Scale displays F.1
d. Press TARE three times
e. Scale displays F.4
f. Press MODE to shift between 0._OFF and
4._OFF.
-To enable Auto Power Off Function, press
TARE when 4._OFF appears.
-To disable Auto Power Off Function, press
TARE when 0._OFF appears.
g. Press ZERO to confirm and return to normal
operation.
4.4 TO TARE OFF THE WEIGHT OF A CONTAINER
4.4.1 Place a container onto the platform, and
then press TARE to tare off the weight of this
container. After TARE is pressed, the tare sign
appears.
4.4.2 To Clear Container Weight from Memory
To clear the weight of the container, remove
the container and all loads from the platform
and press TARE. Then the tare sign disappears.
4.5 Zero the Weight Displayed When Unloaded
If zero weight value is not displayed when the
scale is unloaded, press ZERO to reset weight
to zero.
4.6 PLACING A LOAD
Always place a load to the platform gently.
Sudden shock/excessive force may cause damage
to the weight sensor inside.
It is a good practice to remove all loads from
platform immediately after weighed. This would
prolong the lifetime of the weight sensor.
4.7 HOLDING A WEIGHT DISPLAYED
4.7.1 When Auto Hold Function is not employed
Press HOLD to retain the weight displayed. 5
flashing arrows beneath the weight would appear
indicating the weight displayed is being held.
Press HOLD again to release.
4.7.2 When Auto Hold Function is employed
After the load is stable, the scale would
automatically retain the weight displayed. 5
flashing arrows beneath the weight would appear
indicating the weight displayed is being held.
Weight retained would
Page 8

be released automatically 3 seconds after load
is removed.
4.8 SELECT BACKLIGHT (option) STATUS
To enable/disable backlight function, press
MODE unit the desired status is attained.
Backlight would automatically go off 5 second
after zero weight is detected and automatically
turned on immediately
after a load is detected.
4.9 WEIGHT MEMORY FUNCTION
4.9.1 Save a Weight to Memory and Auto Weight
Accumulation
When weight display is stable, press M+
to save. Scale Displays “P. 1” and the
M+ arrow sign appears indication total
number of total entries and
the memory function is being employed.
4.9.2 Recall Weight Accumulated
Press MR, scale displays total number
of entries and total accumulated weight
of these translations. Scale return to
normal operation status 2 seconds after
accumulated weight displayed.
4.9.3 Memory Clear
Press and hold MR, then press ZERO after
accumulated weight display. Scale
displays “P.0” and all data is cleared.
Cautions
All data stored will be erased if:
a. the scale is turned off
b. weight unit is changed
Page 9

5. TROUBLING SHOOTING
SYNDROME SCALE CANNOT BE TURNED ON
CHECK Is rechargeable battery function
properly.
ACTION Recharge the battery.
CHECK Is the main adapter inserted
properly both to the wall outlet?
CHECK Is the output plug of the main adapter
inserted properly into the DC inlet
of the scale.
ACTION Secure both ends of the main adapter
to the wall outlet and DC inlet of
scale.
SYNDROME SCALE TURNED ON BUT ZERO WEIGHT
CANNOT BE ATTAINED
CHECK Is the platform cable connected to
the indicator firmly?
ACTION Check and secure the platform cable
plug to the indicator receiving
plug.
CHECK Is the platform cover placed
correctly?
ACTION Check and insert the platform again.
CHECK Is anything load applied to
platform.
ACTION Remove all loads applied to
platform.
CHECK Is the platform cable connected to
indicator?
ACTION Check and lock plugs connections
firmly.
SYNDROME RATED CAPACITY CANNOT BE REACHED
CHECK Is the TARE sign go on?
ACTION Turn scale off, remove all loads from
platform and turn on again.
CHECK Anything obstructing the platform?
ACTION Remove all obstacles between
platform cover and platform.
SYNDROME SCALE DOES NOT FUNCTION CORRECTLY
CHECK Is the right weight unit employed?
ACTION Select the right weight unit.
CHECK Is the scale calibrated correctly?
ACTION Contact your local dealer.
Page 10

SYNDROME SCALE TURNED OFF AUTOMATICALLY
CHECK Is the Auto Off Function employed?
ACTION Reset the Auto Off Function.
SYNDROME WEIGHT DISPLAYED UNCHANGED
CHECK Is the hold function in used?
ACTION Press HOLD again.
SYNDROME SCALE DISPLAYS
OOOO0
CHECK Is the weight of load excesses the
maximum capacity of the scale?
ACTION Removed loads on platform and check
again.
6. DAILY CARE AND MAINTENANCE
6.1 Clean the scale with a soft and damp cloth,
if necessary with a mild detergent.
6.2 Do not sue any harsh, abrasive material,
acetone, volatile solvent, thinner or
alcohol for cleaning.
6.3 Verify the accuracy of the scale
periodically. Re-calibrate the scale
when needed. Note: in some countries,
calibration is restricted to be done by
qualified/authorized agent only.
Contact our local dealer for more
information.
Page 11
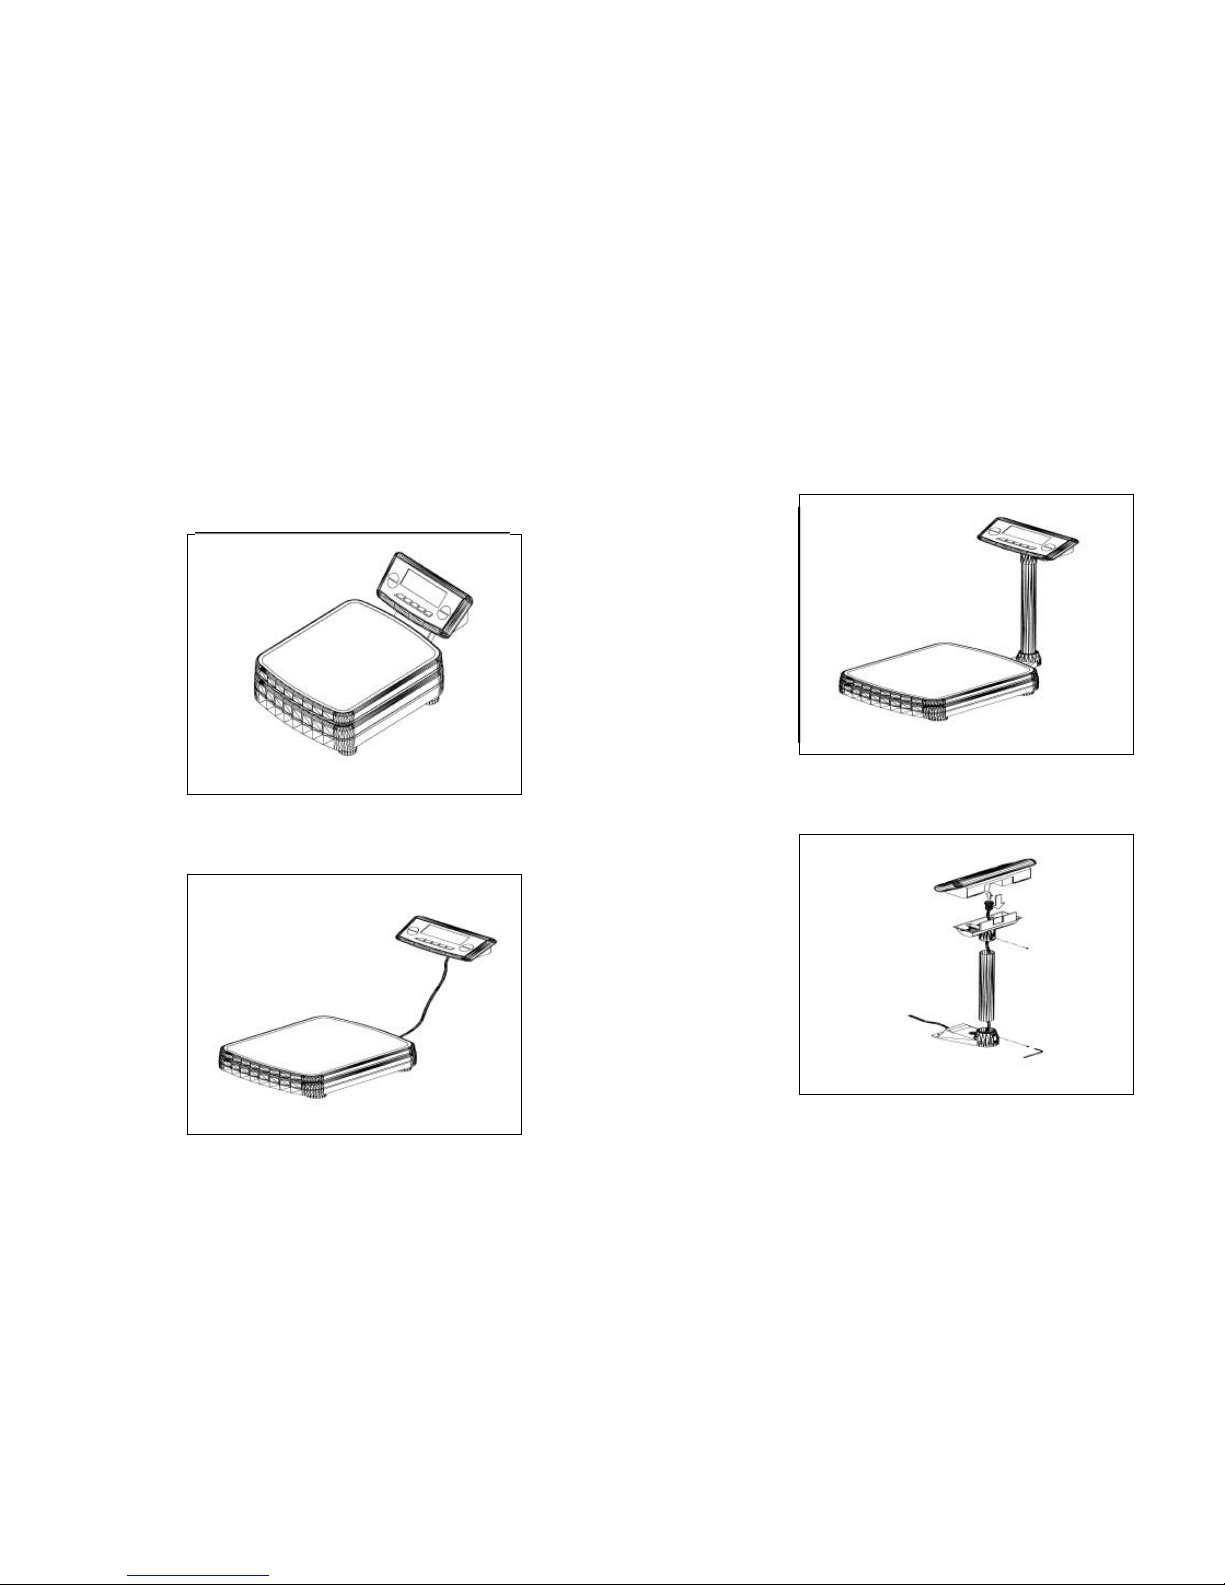
7. INSTALLATION DIAGRAM
Diagram 1: W shape mounting
Diagram 2: U shape wall mounting
Diagram 3: Pillar mounting
Diagram 4: Pillar mounting accessories
 Loading...